

KitchenAid KEMS377GBT0, KEMS377GBL0, KEMS377GAL0 Owner’s Manual
and Care Guide
A Note to You ...........................................2
Electric Oven Safety ................................3
Getting to Know Your
Electric Convection Oven .......................5
Using Your Electric Convection Oven,..6
Using the electronic oven control ..........6
Oven settings.........................................9
Setting the clock ..................................10
Using the timer.....................................10
Baking or convection baking ...............11
Convection baking tips........................12
Convection roasting .............................12
Convection roasting tips ......................13
Positioning racks and pans .................13
Bakeware choices ...............................14
Using aluminum foil .............................15
Adjusting oven temperature ................15
Using the temperature probe ..............16
Using CONVECT FULL MEAL ...........18
Using EASY CONVECT TM
Conversion ...........................................20
Broiling .................................................21
Convection broiling ..............................22
Timed cooking ......................................24
Dehydrating ..........................................26
Proofing (raising) bread .......................27
The oven vent ......................................27
Using the Self-Cleaning Cycle .............28
Before you start ...................................28
Before setting the controls ..................29
Setting the controls ..............................29
For best cleaning results .....................30
How the cycle works............................30
Caring for Your
Electric Convection Oven .....................31
Cleaning Chart.....................................3!
Removing the oven door .....................32
Using and replacing oven lights..........33
Troubleshooting .....................................34
Requesting Assistance or Service.,....36
Warranty ..................................................40
IntheU.S.A.forassistanceorservice,
calltheConsumer AssistanceCenter:
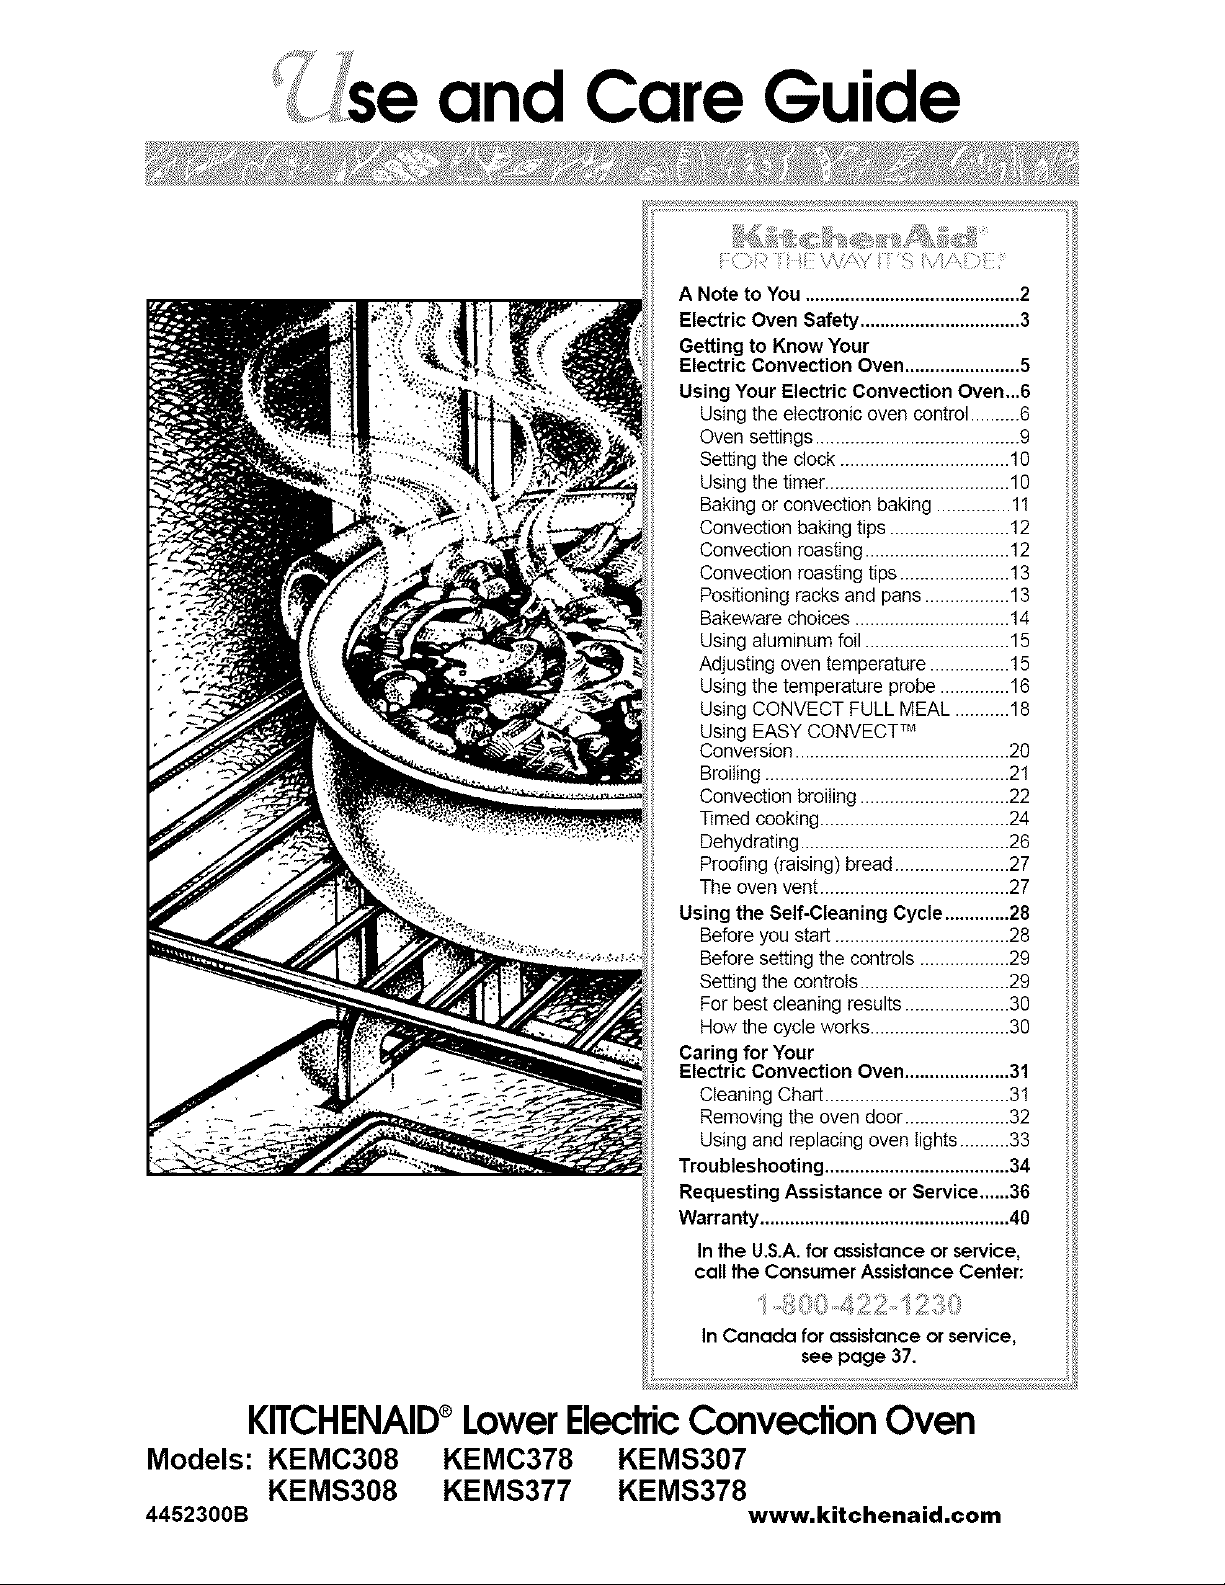
KITCHENAID®LowerEleclricConveclion Oven
Models: KEMC308 KEMC378 KEMS307
KEMS308 KEMS377 KEMS378
4452300B www, kitchenaid,corn
Note to You
_!_7_¸ ._,_iii _, ,,_ f_%ii_ _' _ A_ ' _ '_, _,_>,., i_,._. ......
KitchenAid designs the best tools for the most important room in your house. To
ensure that you enjoy many years of trouble-free operation, we developed this Use
and Care Guide.
It contains valuable information concerning how to operate and maintain your new
appliance properly. Please read it carefully. Also, please complete and mail the
enclosed Product Registration Card.
o ,, ,, •
Whenever you call our Consumer
Assistance Center at 1-800-422-1230
(in Canada, 1-800-807-6777) or request
service for your appliance, you need to
know your complete model number and
serial number. You can find this information
on the model and serial number plate (see
diagram in the Parts and Features section
for plate location on the lower oven).
Please also record the purchase
information.
Model Number
Serial Number
Purchase/
Installation Date
Builder/Dealer
Name
Address
Phone
NOTE: You must provide proof of purchase
or installation date for in-warranty service.
Keep this book and the sales slip together in o safe place for future reference.
2
lectricOven Safety
Your safety and the safety of others are very important.
We have provided many important safety messages
Always read and obey all safety messages.
This is the safety alert symbol.
This symbol alerts you to potential hazards that can kill or hurt you and
others.
All safety messages will follow the safety alert symbol and either the word
"DANGER" or "WARNING." These words mean:
You can be killed or seriously injured if you
don't immediatelv follow instructions.
You can be killed or seriously injured if you
don't follow instructions.
All safety messages will tell you what the potential hazard is, tell you how to reduce the
chance of injury, and tell you what can happen if the instructions are not followed.
in this manual and on your appliance.
IMPORTANT SAFETY INSTRUCTIONS
WARNING: To reduce the risk of fire,
electrical shock, injury to persons, or
damage when using the oven, follow basic
precautions, including the following:
• Proper Installation - Be sure the oven is
properly installed and grounded by a
qualified technician.
• Never Use the Oven for Warming or
Heating the Room.
• Do Not Leave Children Alone - Children
should not be left alone or unattended
in area where oven is in use. They
should never be allowed to sit or stand
on any part of the oven.
• Wear Proper Apparel- Loose-fitting or
hanging garments should never be worn
while using the oven.
• User Servicing - Do not repair or
replace any part of the oven unless
specifically recommended in the manu-
al. All other servicing should be referred
to a qualified technician.
*Storage in Oven - Flammable materials
should not be stored in an oven.
• Do Not Use Water on Grease Fires -
Smother fire or flame or use dry chemical
or foam-type extinguisher.
• Use Only Dry Potholders- Moist or damp
potholders on hot surfaces may result in
burns from steam. Do not let potholder
touch hot heating elements. Do not use a
towel or other bulky cloth.
• Use Care When Opening Door - Let hot
air or steam escape before removing or
replacing food.
• Do Not Heat Unopened Food Containers
- Build-up of pressure may cause
container to burst and result in injury.
• Keep Oven Vent Ducts Unobstructed.
SAVE THESE INSTRUCTIONS
3
. lectnc Oven Safety
IMPORTANT SAFETY INSTRUCTIONS
• Placement of Oven Racks - Always
place oven racks in desired location
while oven is cool. If rack must be
moved while oven is hot, do not let
potholder contact hot heating element
in oven.
*DO NOT TOUCH HEATING ELE-
MENTS OR INTERIOR SURFACES
OF OVEN - Heating elements may be
hot even though they are dark in
color. Interior surfaces of an oven
become hot enough to cause burns.
During and after use, do not touch, or
let clothing or other flammable
materials contact heating elements or
interior surfaces of oven until they
have had sufficient time to cool. Other
surfaces of the oven may become hot
enough to cause burns - among
these surfaces are oven vent
openings and surfaces near these
openings, oven doors, and windows of
oven doors.
• Do Not Clean Door Gasket - The door
gasket is essential for a good seal. Care
should be taken not to rub, damage, or
move the gasket.
• Do Not Use Oven Cleaners- No
commercial oven cleaner or oven liner
protective coating of any kind should be
used in or around any part of the oven.
*Clean Only Parts Listed in Manual.
• Before Self-Cleaning the Oven -
Remove broiler pan and other utensils.
SAVE THESE INSTRUCTIONS
The California Safe Drinking Water and Toxic Enforcement Act requires the Governor
of California to publish a list of substances known to the State of California to cause
cancer, birth defects, or other reproductive harm, and requires businesses to warn of
potential exposure to such substances.
WARNING: This product contains a chemical known to the State of California to cause
cancer, birth defects, or other reproductive harm.
This appliance can cause low-level exposure to some of the substances listed,
including benzene, formaldehyde, carbon monoxide, and toluene.
4
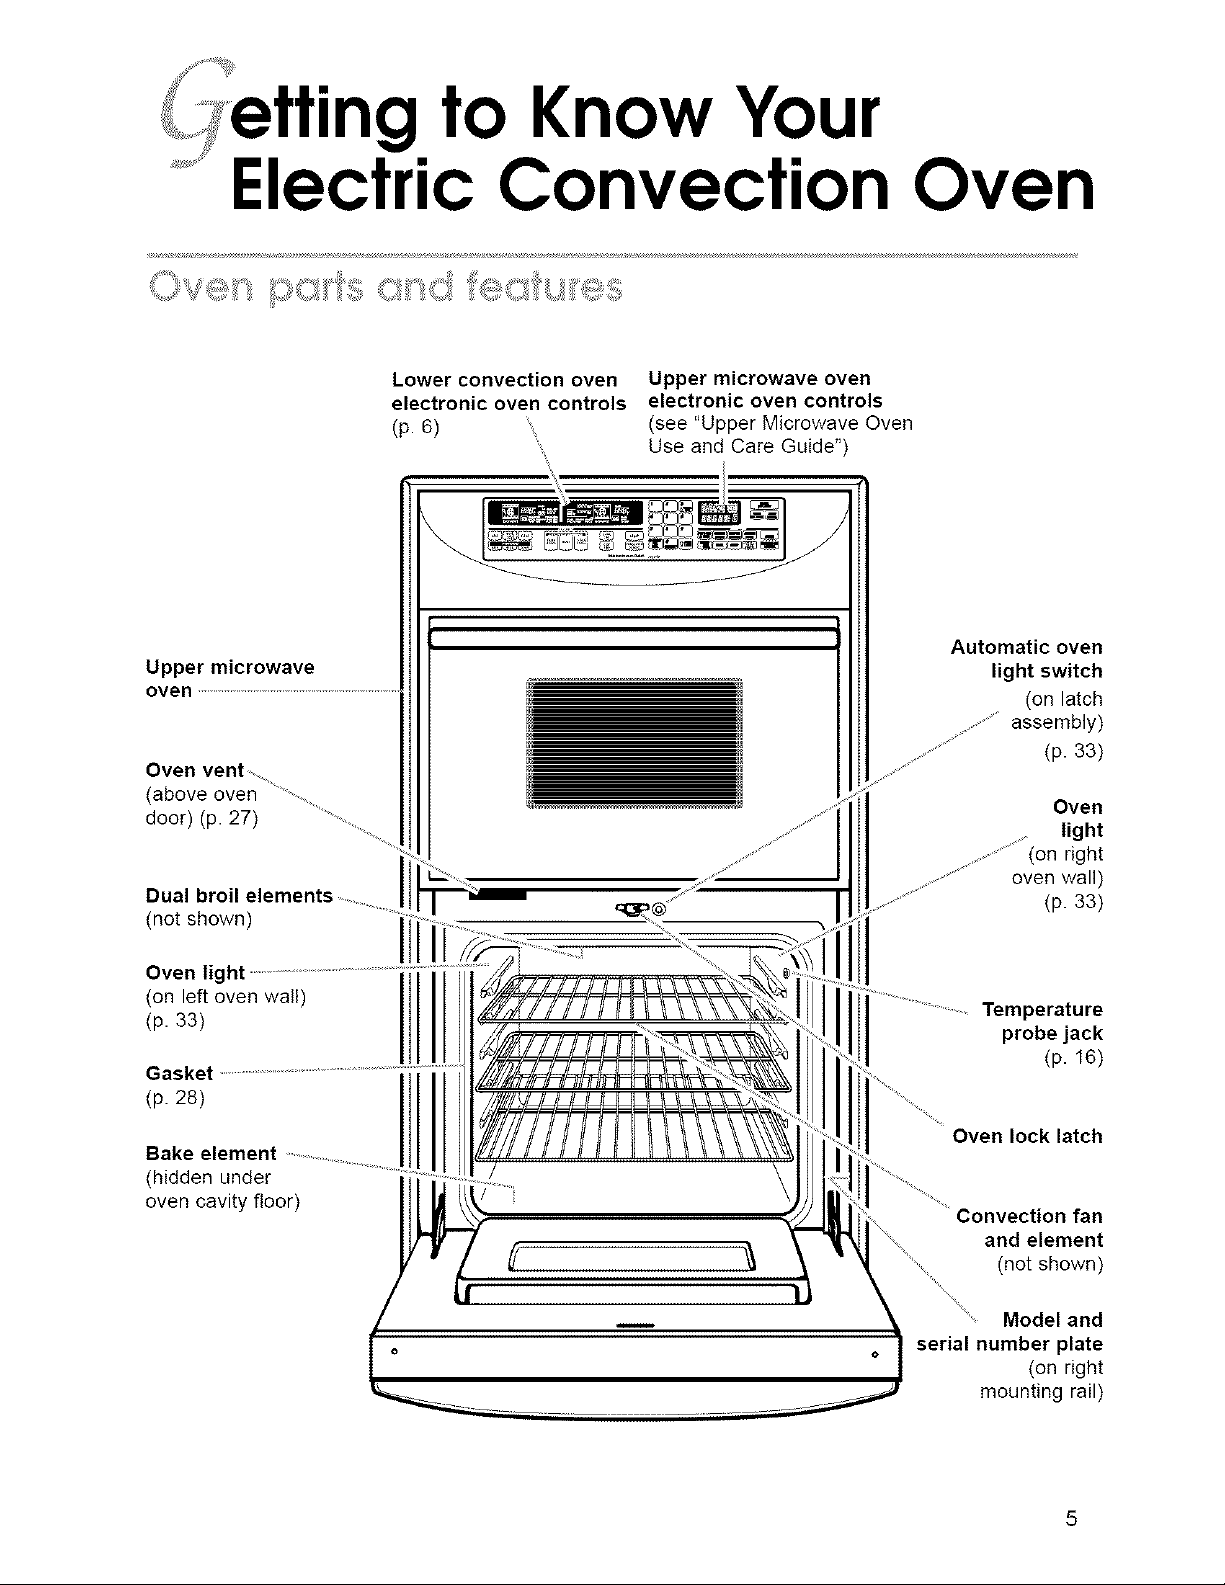
"ngto Know Your
Electric Convection Oven
Lower convection oven
electronic oven controls
(p. 6)
Upper microwave
oven .....................................................................
Oven vent,,
(above oven
door) (p. 27) ...............
Dual
(not shown)
Upper microwave oven
electronic oven controls
(see "Upper Microwave Oven
Use and Care Guide")
Automatic oven
light switch
(on latch
assembly)
(p. 33)
Oven
light
oven wall)
(p. 33)
Oven light
(on left oven wall)
(p. 33)
Gasket
(p. 28)
Bake element
(hidden under
oven cavity floor)
Temperature
probe jack
(p. 16)
Oven lock latch
Convection fan
and element
(not shown)
Model and
serial number plate
(on right
mounting rail)
5
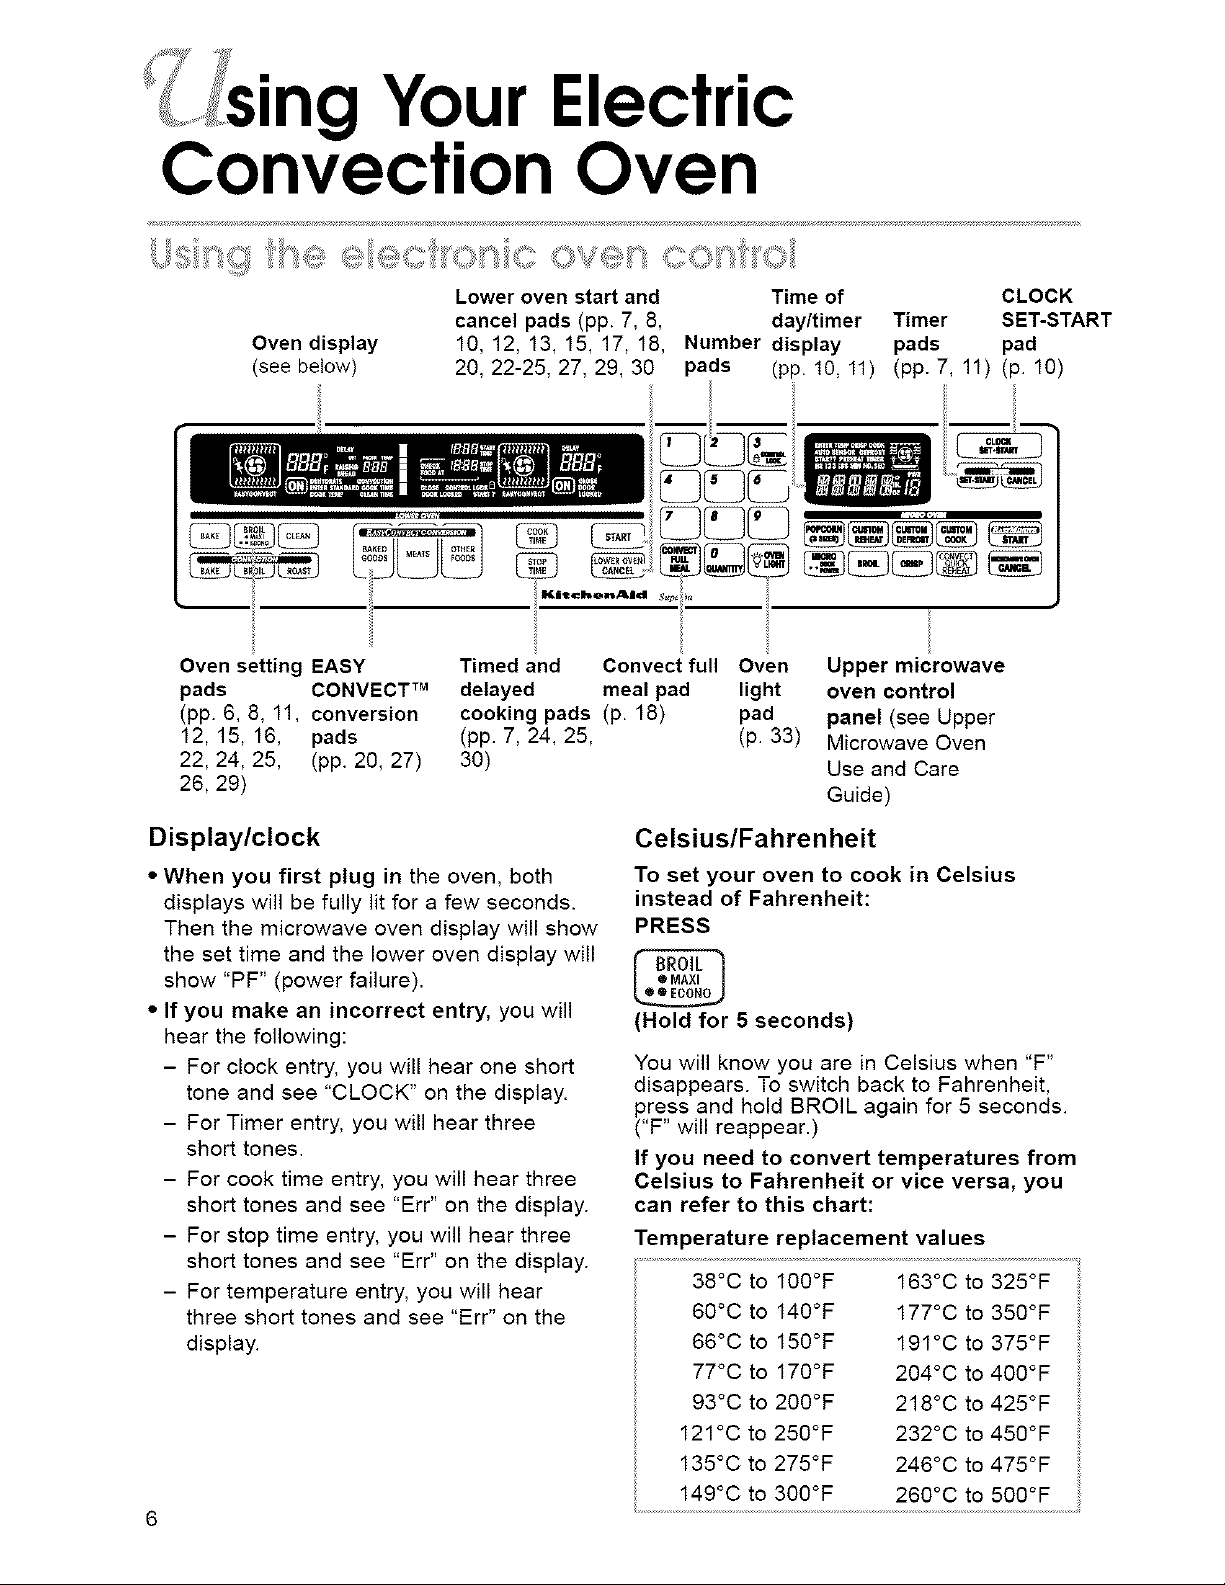
• Your Electric
Convection Oven
Lower oven start and Time of CLOCK
cancel pads (pp. 7, 8, day/timer Timer SET-START
Oven display 10, 12, 13, 15, 17, 18, Number display pads pad
(see below) 20, 22-25, 27, 29, 30 pads (pp. 10, 11) (pp. 7, 11) (p. 10)
Oven setting EASY Timed and Convect full Oven
pads CONVECT TM delayed meal pad light
(pp. 6, 8, 11, conversion cooking pads (p. 18) pad
12, 15, 16, pads (pp. 7, 24, 25, (p. 33)
22, 24, 25, (pp. 20, 27) 30)
26, 29)
Display/clock
• When you first plug in the oven, both
displays will be fully lit for a few seconds.
Then the microwave oven display will show
the set time and the lower oven display will
show "PF" (power failure).
• If you make an incorrect entry, you will
hear the following:
- For clock entry, you will hear one short
tone and see "CLOCK" on the display.
- For Timer entry, you will hear three
short tones.
- For cook time entry, you will hear three
short tones and see "Err" on the display.
- For stop time entry, you will hear three
short tones and see "Err" on the display.
- For temperature entry, you will hear
three short tones and see "Err" on the
display.
6
Celsius/Fahrenheit
To set your oven to cook in Celsius
instead of Fahrenheit:
PRESS
(Hold for 5 seconds)
You will know you are in Celsius when "F"
disappears. To switch back to Fahrenheit,
press and hold BROIL again for 5 seconds.
("F" will reappear.)
If you need to convert temperatures from
Celsius to Fahrenheit or vice versa, you
can refer to this chart:
Temperature replacement values
38°C to 100°F
60°C to 140°F
66°C to 150°F
77°C to 170°F
93°C to 200°F
121°C to 250°F
135°C to 275°F
149°C to 300°F
Upper microwave
oven control
panel (see Upper
Microwave Oven
Use and Care
Guide)
163°C to 325°F
177°C to 350°F
191°C to 375°F
204°C to 400°F
218°C to 425°F
232°C to 450°F
246°C to 475°F
260°C to 500°F
LgYour Electric Convection Oven
Starting an operation
After programming a function, you must
____ ress START to start thefunction. If you do not press
START within 5 seconds of
programming, "START?" will show on the
display as a reminder.
Canceling an operation
LOWER OVEN CANCEL will cancel any
lower oven function. When you
press LOWER OVEN
CANCEL, the large display will
not show anything, unless the oven is too
hot after canceling a Self-Cleaning cycle.
NOTE: You may hear a fan blowing in the
oven after you press LOWER OVEN
CANCEL. This is the cooling fan. It will turn
off when the oven has cooled down.
Changing audible signals
Audible signals tell you if a function is
entered correctly or not. They also tell you
when a cycle is completed.
To change pitch and loudness of key tone:
PRESS
To turn on and off key pad entry and
end-of-cycle tones:
PRESS
(Hold for 5 seconds)
A short tone will sound and "Snd" and "ON"
or "OFF" will appear on the display to tell
you the signals have been changed. Repeat
the step above to turn the signals back on.
Using the control lock
The control lock prevents unwanted use of
the oven by disabling the control panel
command pads.
NOTES:
• Control lock is available only when both
the lower oven and the microwave oven
are not in use. It is not available during the
Self-Cleaning cycle or the Sabbath mode.
• Control lock does not disable the Timer
or Clock.
• Set control lock when cleaning the control
panel to prevent oven from accidentally
turning on.
To lock or deactivate the control panel:
PRESS
(Hold for 5 seconds)
A short tone will sound and "Snd" and "Hi" or
"Lo" will appear on the display. Repeat the
step above to change to the other setting.
To turn on and off oven reminder tones:
PRESS
(Hold for 5 seconds)
To turn on and off timer reminder tones:
PRESS
(Hold for 5 seconds)
(Hold for 5 seconds)
A single tone will sound and "CONTROL
LOCK I_1"will appear on the display.
To unlock the control panel:
PRESS
(Hold for 5 seconds)
A single tone will sound after 5 seconds and
"CONTROL LOCK _1" will disappear from
the display.
Prompt for start
If "START?" is lit, this means that START
has not been pressed. If you do not press
START, the programmed function will
automatically be canceled in 5 minutes.
7
g Your Electric Convection Oven
Setting your oven for the
Sabbath
The Sabbath mode is an oven operation
designed for the special needs of Orthodox
Jews on the Sabbath or holy days. It is only
available to provide a continuous untimed
bake function or, if desired, a timed bake
function. (See below)
NOTE: The Sabbath mode must be set
before it can be activated and remains set
until canceled.
To SET the Sabbath mode:
1. PRESS
2. Press Number Pads to set the
temperature you want.
Example for 325°F (163°C):
NOTE: If you open the oven door when the
elements are off, the elements will not turn on.
Elements will not turn on immediately after the
door is closed. If you open the oven door
when the elements are on, the elements will
turn off after a delay. Again, elements will not
turn on immediately after the door is closed.
To change the temperature during
the Sabbath mode:
1. Press a Number Pad for the
desired temperature. Each
Number Padis programmed for
a specific set temperature:
3. PRESS
4. To go into the Sabbath mode,
PRESS
(Hold for 5 seconds)
What your oven will/will not do
while in the Sabbath mode:
• The oven will not shut off automatically.
• The temperature display of the lower
oven will show "Sab."
• To prevent accidental key pad presses,
only the O to 9 and START keypads will work.
• No tones will sound.
• No error messages or temperature changes
will be displayed.
• The ON indicator remains lit.
• Heating element icons flash before oven
heating elements turn on or turn off.
• With the oven door closed, heating ele-
ment icons light when the oven is heating
and go off when the oven stops heating.
8
9
2. PRESS
(Hold for 1 second)
NOTES:
• It may take the oven up to one half hour
to reach the desired temperature.
• Changing the temperature will not turn
the heating elements on or off immediately.
Also, the display will not show the tempera-
ture change immediately.
To end the Sabbath mode and turn
off oven:
PRESS
(Hold for 5 seconds)
If a power failure occurs during
the Sabbath mode:
The oven will automatically return to the
Sabbath mode at the desired temperature
when power returns.
ig Your Electric Convection Oven
!=,_. ! !.. ;#iiI.....
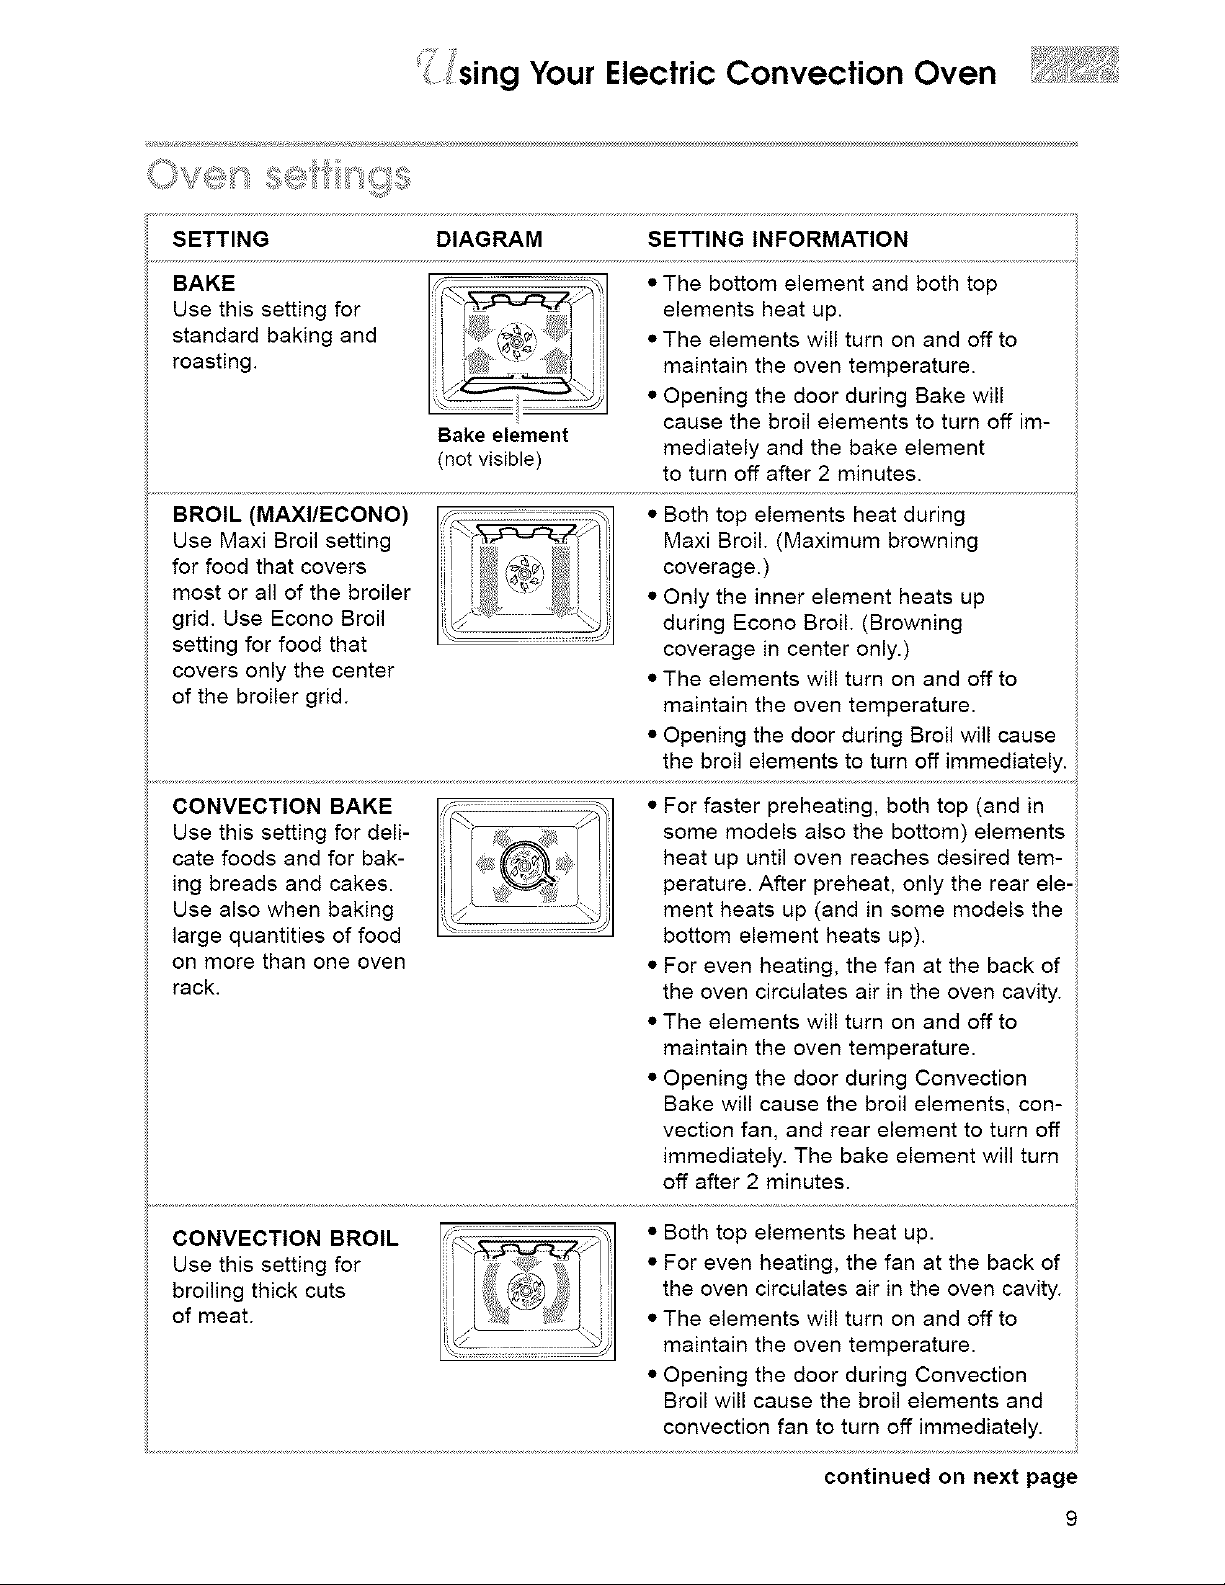
SETTING DIAGRAM SETTING INFORMATION
BAKE
Use this setting for
standard baking and
roasting.
BROIL (MAXI/ECONO)
Use Maxi Broil setting
for food that covers
most or all of the broiler
grid. Use Econo Broil
setting for food that
covers only the center
of the broiler grid.
CONVECTION BAKE
Use this setting for deli-
cate foods and for bak-
ing breads and cakes.
Use also when baking
large quantities of food
on more than one oven
rack.
Bake element
(not visible)
• The bottom element and both top
elements heat up.
• The elements will turn on and off to
maintain the oven temperature.
• Opening the door during Bake will
cause the broil elements to turn off im-
mediately and the bake element
to turn off after 2 minutes.
• Both top elements heat during
Maxi Broil. (Maximum browning
coverage.)
• Only the inner element heats up
during Econo Broil. (Browning
coverage in center only.)
• The elements will turn on and off to
maintain the oven temperature.
• Opening the door during Broil will cause
the broil elements to turn off immediately.
• For faster preheating, both top (and in
some models also the bottom) elements
heat up until oven reaches desired tem-
perature. After preheat, only the rear ele-
ment heats up (and in some models the
bottom element heats up).
• For even heating, the fan at the back of
the oven circulates air in the oven cavity.
• The elements will turn on and off to
maintain the oven temperature.
• Opening the door during Convection
Bake will cause the broil elements, con-
vection fan, and rear element to turn off
immediately. The bake element will turn
off after 2 minutes.
CONVECTION BROIL
Use this setting for
broiling thick cuts
of meat.
• Both top elements heat up.
• For even heating, the fan at the back of
the oven circulates air in the oven cavity.
• The elements will turn on and off to
maintain the oven temperature.
• Opening the door during Convection
Broil will cause the broil elements and
convection fan to turn off immediately.
continued on next page
9
g Your Electric Convection Oven
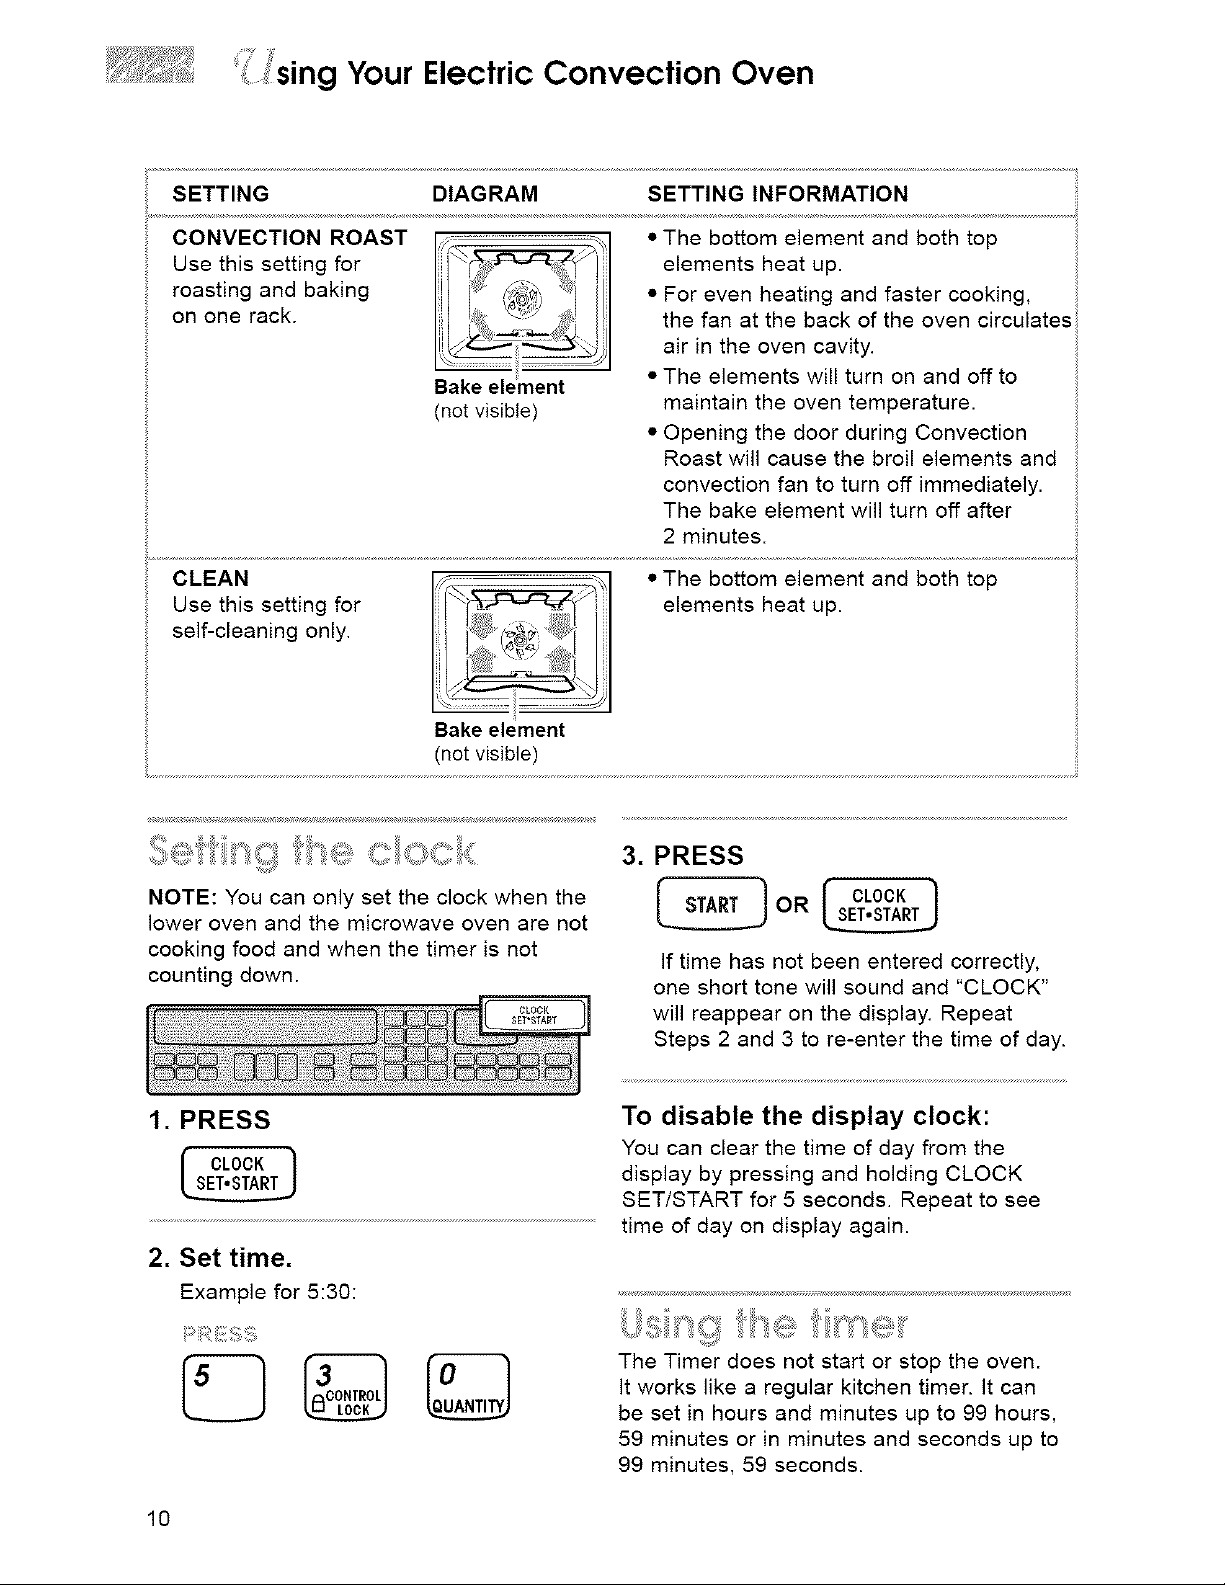
SETTING DIAGRAM SETTING INFORMATION
CONVECTION ROAST
Use this setting for
roasting and baking
on one rack.
CLEAN
Use this setting for
self-cleaning only.
Bake element
(not visible)
Bake element
(not visible)
• The bottom element and both top
elements heat up.
• For even heating and faster cooking,
the fan at the back of the oven circulates
air in the oven cavity.
• The elements will turn on and off to
maintain the oven temperature.
• Opening the door during Convection
Roast will cause the broil elements and
convection fan to turn off immediately.
The bake element will turn off after
2 minutes.
• The bottom element and both top
elements heat up.
NOTE: You can only set the clock when the
lower oven and the microwave oven are not
cooking food and when the timer is not
counting down.
1. PRESS
r CLOCK '_
2. Set time.
Example for 5:30:
3. PRESS
I START10R 1
If time has not been entered correctly,
one short tone will sound and "CLOCK"
will reappear on the display. Repeat
Steps 2 and 3 to re-enter the time of day.
To disable the display clock:
You can clear the time of day from the
display by pressing and holding CLOCK
SET/START for 5 seconds. Repeat to see
time of day on display again.
<-
The Timer does not start or stop the oven.
It works like a regular kitchen timer. It can
be set in hours and minutes up to 99 hours,
59 minutes or in minutes and seconds up to
99 minutes, 59 seconds.
10
LgYour Electric Convection Oven
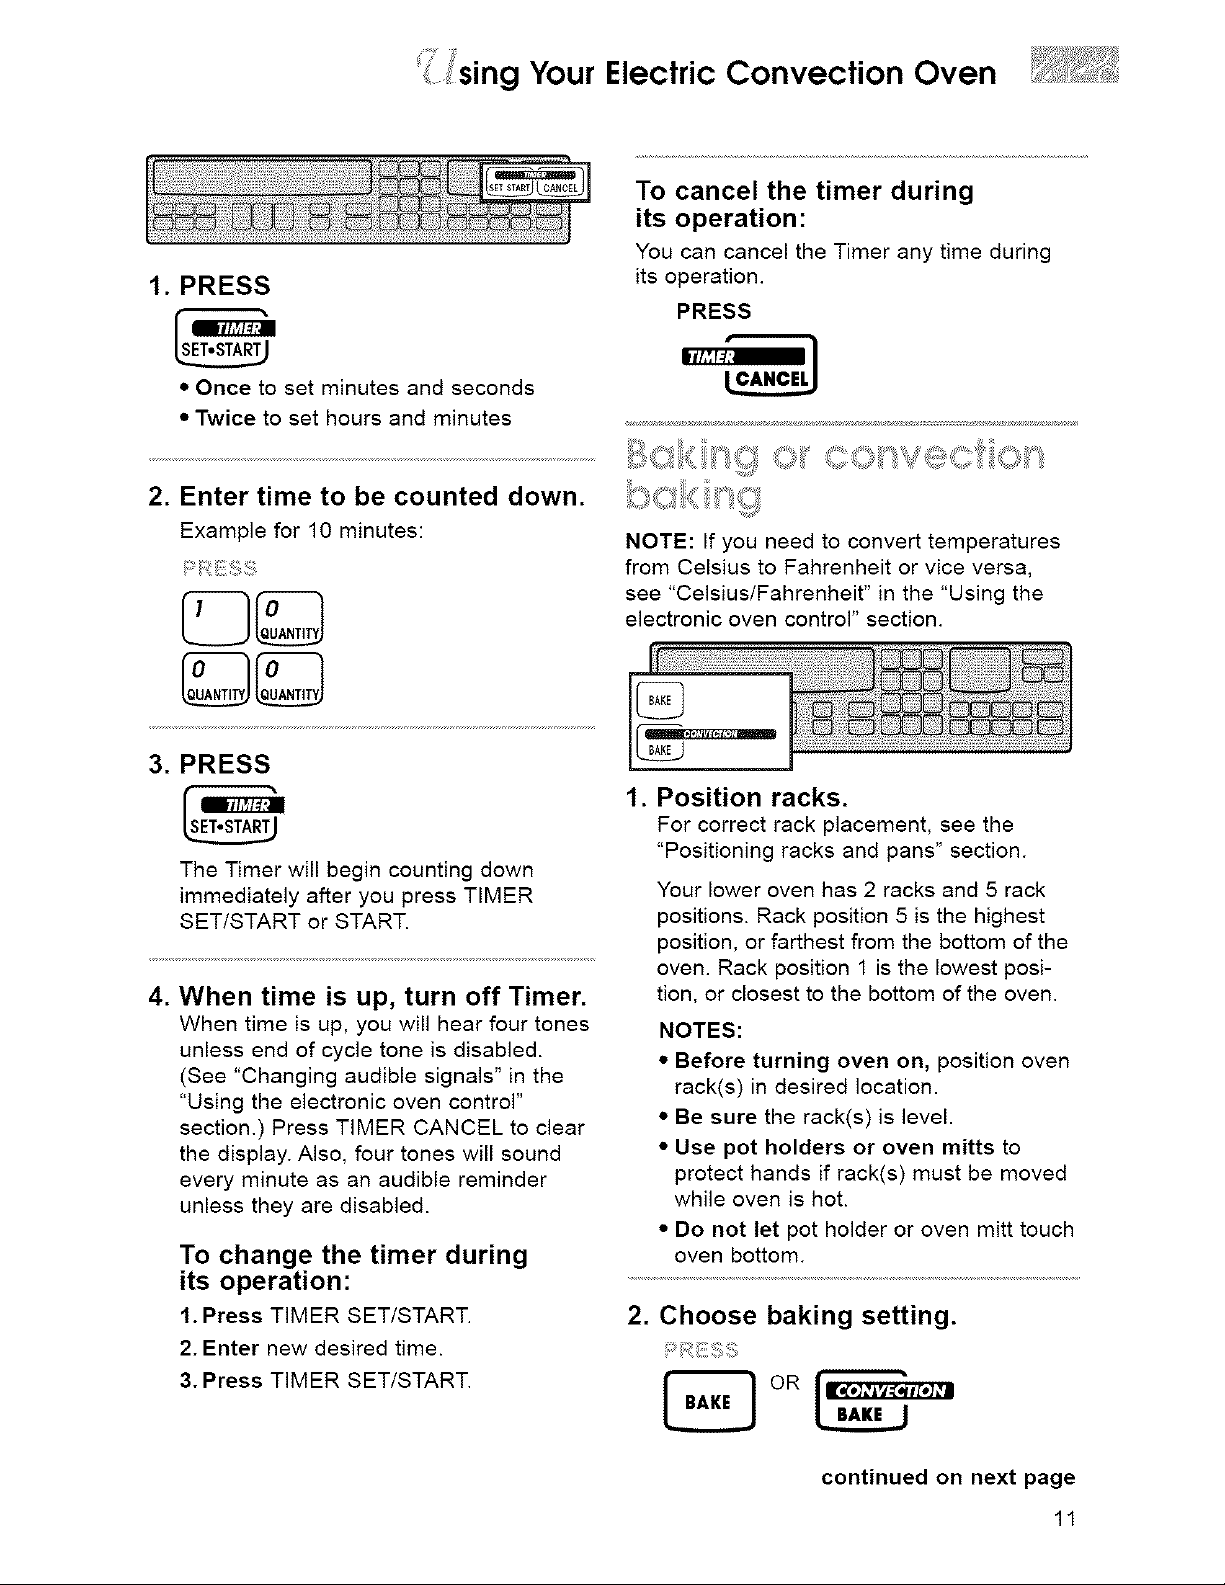
1. PRESS
• Once to set minutes and seconds
• Twice to set hours and minutes
2. Enter time to be counted down.
To cancel the timer during
its operation:
You can cancel the Timer any time during
its operation.
PRESS
Example for 10 minutes:
3. PRESS
The Timer will begin counting down
immediately after you press TIMER
SETISTART or START.
4. When time is up, turn off Timer.
When time is up, you will hear four tones
unless end of cycle tone is disabled.
(See "Changing audible signals" in the
"Using the electronic oven control"
section.) Press TIMER CANCEL to clear
the display. Also, four tones will sound
every minute as an audible reminder
unless they are disabled.
To change the timer during
its operation:
1. Press TIMER SET/START.
2. Enter new desired time.
3. Press TIMER SET/START.
NOTE: If you need to convert temperatures
from Celsius to Fahrenheit or vice versa,
see "Celsius/Fahrenheit" in the "Using the
electronic oven control" section.
1. Position racks.
For correct rack placement, see the
"Positioning racks and pans" section.
Your lower oven has 2 racks and 5 rack
positions. Rack position 5 is the highest
position, or farthest from the bottom of the
oven. Rack position 1 is the lowest posi-
tion, or closest to the bottom of the oven.
NOTES:
• Before turning oven on, position oven
rack(s) in desired location.
• Be sure the rack(s) is level.
• Use pot holders or oven mitts to
protect hands if rack(s) must be moved
while oven is hot.
• Do not let pot holder or oven mitt touch
oven bottom.
2. Choose baking setting.
continued on next page
11
g Your Electric Convection Oven
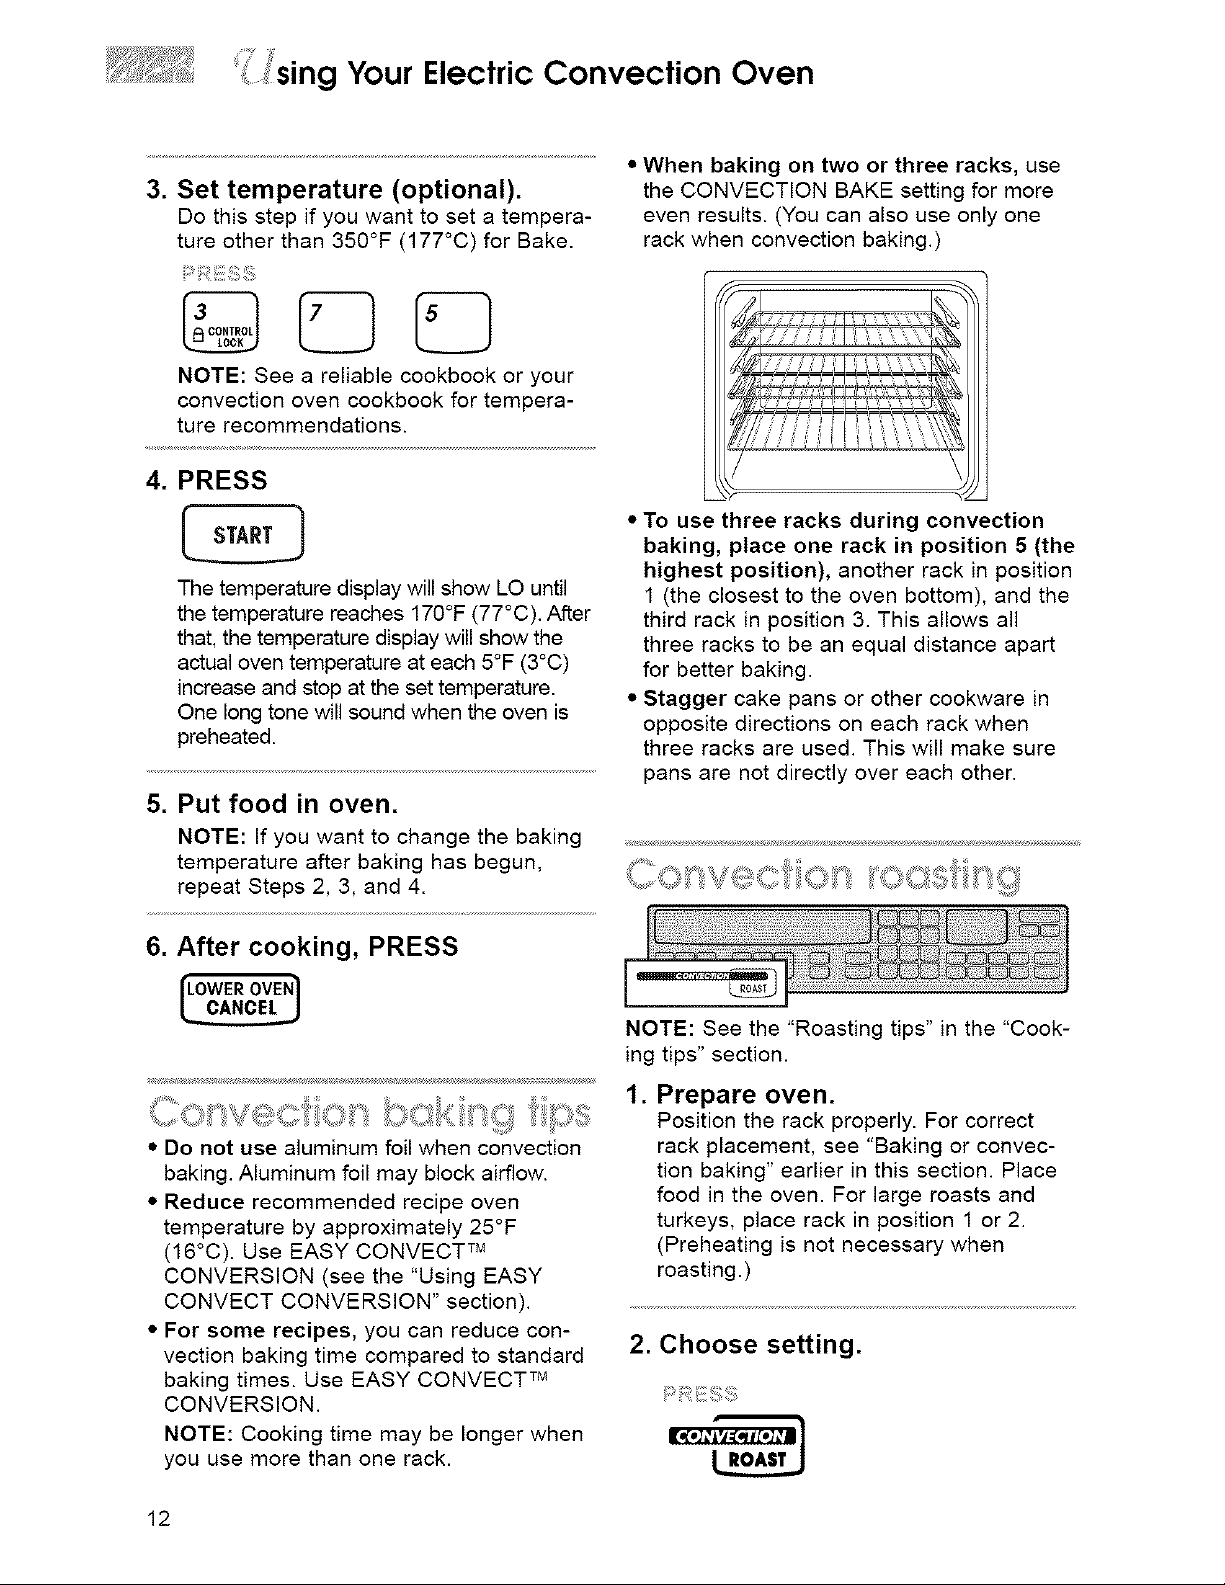
3. Set temperature (optional).
Do this step if you want to set a tempera-
ture other than 350°F (177°C) for Bake.
NOTE: See a reliable cookbook or your
convection oven cookbook for tempera-
ture recommendations.
4. PRESS
The temperature display will show LO until
the temperature reaches 170°F (77°C). After
that, the temperature display will show the
actual oven temperature at each 5°F (3°C)
increase and stop at the set temperature.
One long tone will sound when the oven is
preheated.
5. Put food in oven.
• When baking on two or three racks, use
the CONVECTION BAKE setting for more
even results. (You can also use only one
rack when convection baking.)
• To use three racks during convection
baking, place one rack in position 5 (the
highest position), another rack in position
1 (the closest to the oven bottom), and the
third rack in position 3. This allows all
three racks to be an equal distance apart
for better baking.
• Stagger cake pans or other cookware in
opposite directions on each rack when
three racks are used. This will make sure
pans are not directly over each other.
NOTE: If you want to change the baking
temperature after baking has begun,
repeat Steps 2, 3, and 4.
6. After cooking, PRESS
r \
• Do not use aluminum foil when convection
baking. Aluminum foil may block airflow.
• Reduce recommended recipe oven
temperature by approximately 25°F
(16°C). Use EASY CONVECT TM
CONVERSION (see the "Using EASY
CONVECT CONVERSION" section).
• For some recipes, you can reduce con-
vection baking time compared to standard
baking times. Use EASY CONVECT TM
CONVERSION.
NOTE: Cooking time may be longer when
you use more than one rack.
NOTE: See the "Roasting tips" in the "Cook-
ing tips" section.
1. Prepare oven.
Position the rack properly. For correct
rack placement, see "Baking or convec-
tion baking" earlier in this section. Place
food in the oven. For large roasts and
turkeys, place rack in position 1 or 2.
(Preheating is not necessary when
roasting.)
2. Choose setting.
12
 Loading...