

KitchenAid KEHC379JBT05, KEHC379JBL05, KEHC379JBL06, KEHC379JBL07, KEHC379JWH07 Owner’s Manual
...
Kitchen_kid ®
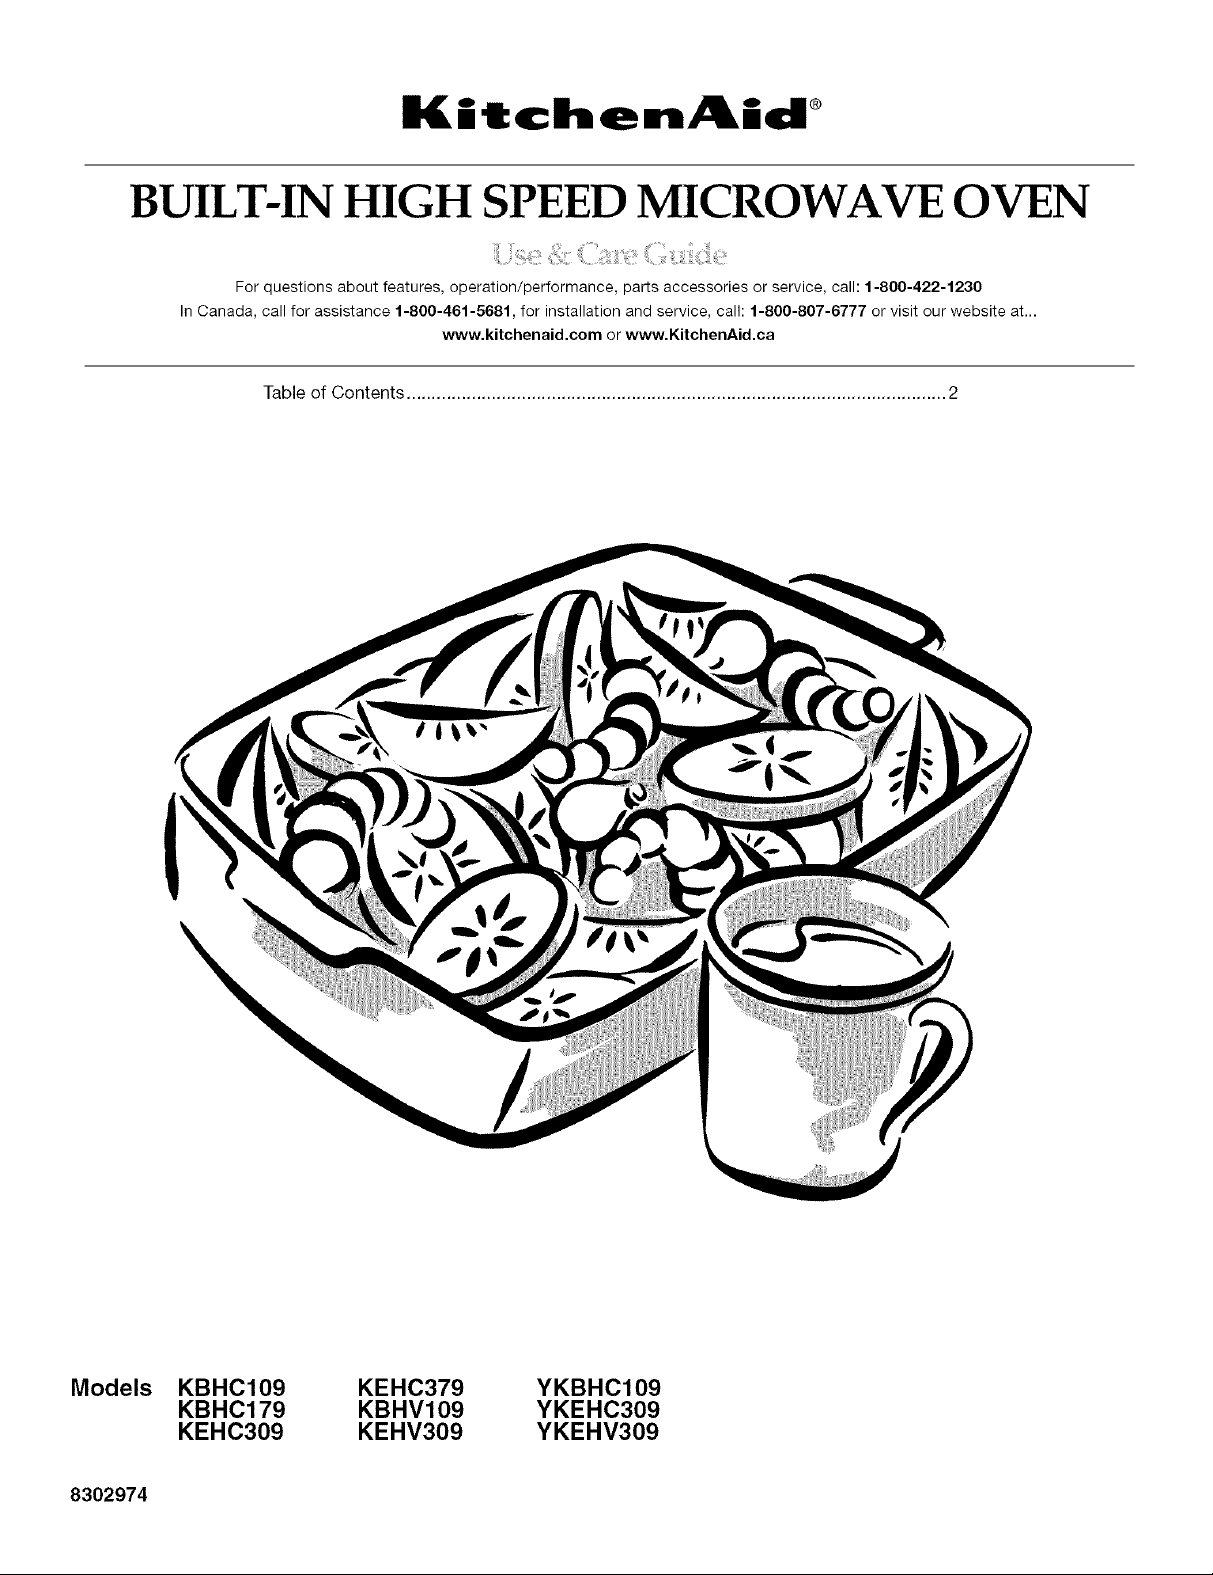
BUILT-IN HIGH SPEED MICROWAVE OVEN
For questions about features, operation/performance, par_s accessories or service, call: 1-800-422-1230
In Canada, call for assistance 1-800-461-5681, for installation and service, call: 1-800-807-6777 or visit our website at...
www.kitchenaid.com or www.KitchenAid.ca
Table of Contents ............................................................................................................ 2
Models KBHC109
KBHC179
KEHC309
8302974
KEHC379
KBHV109
KEHV309
YKBHC109
YKEHC309
YKEHV309
TABLE OF CONTENTS
MICROWAVE OVEN SAFETY ........................................................ 3
Electrical Requirements ............................................................... 5
PARTS AND FEATURES ................................................................ 5
Turntable ...................................................................................... 6
Grids ............................................................................................. 6
Crisper Pan and Handle ............................................................... 6
ELECTRONIC OVEN CONTROL ................................................... 7
Display(s) ...................................................................................... 8
Number Codes ............................................................................. 8
Start, Easy Minute ........................................................................ 8
Upper Oven Cancel and Cancel Off ............................................ 8
Clock ............................................................................................ 8
Tones ............................................................................................ 9
Fahrenheit and Celsius ................................................................. 9
Timer ............................................................................................. 9
Control Lock ................................................................................. 9
Help Prompts ............................................................................... 9
HIGH SPEED COOKING .............................................................. 10
High Speed Cooking Chart ........................................................ 10
MICROWAVE OVEN USE ............................................................ 14
Food Characteristics .................................................................. 14
Cooking Guidelines .................................................................... 14
Cookware and Dinnerware ........................................................ 15
Aluminum Foil and Metal ........................................................... 15
Cooking Power ........................................................................... 16
Cooking ...................................................................................... 16
Cooking in Stages ...................................................................... 16
Crisper Pan Frying ...................................................................... 17
Custom Reheat .......................................................................... 17
Custom Defrost .......................................................................... 18
Popcorn ...................................................................................... 19
Keeping Food Warm .................................................................. 19
Crisp ........................................................................................... 20
Broil ............................................................................................ 20
Convection Cooking ................................................................... 21
OVEN CARE .................................................................................. 24
General Cleaning ........................................................................ 24
TROUBLESHOOTING .................................................................. 25
ASSISTANCE OR SERVICE ......................................................... 26
In the U.S.A ................................................................................ 26
In Canada ................................................................................... 26
Replacement Parts & Accessories ............................................. 26
WARRANTY .................................................................................. 28
MICROWAVE OVEN SAFETY
Your safety and the safety of others are very important.
We have provided many important safety messages in this manual and on your appliance. Always read and obey all
safety messages.
This symbol alerts you to potential hazards that can kill or hurt you and others.
All safety messages will follow the safety alert symbol and either the word "DANGER" or
This is the safety alert symbol.
"WARNING." These words mean:
You can be killed or seriously injured if you don't
immediately follow instructions.
You can be killed or seriously injured if you don't
follow instructions.
All safety messages will tell you what the potential hazard is, tell you how to reduce the chance of injury, and tell you
what can happen if the instructions are not followed.
iMPORTANT SAFETY iNSTRUCTiONS
When using electricai appliances basic safety precautions shouid be followed, incDding the following:
WARNmNG: To reduce the risk of burns, electric
shock, fire, injury to persons, or exposure to excessive
microwave energy:
_, Read aHinstructions before using the microwave
oven,
_, Read and follow the specific "PRECAUTIONS TO
AVOID POSSIBLE EXPOSURE TO EXCESSIVE
MICROWAVE ENERGY" found in this section,
The microwave oven must be grounded, Connect
only to properly grounded outlet, See "GROUNDING
INSTRUCTIONS" found in this section,
_, Install or locate the microwave oven only in
accordance with the provided Installation Instructions.
_, Some products such as whole eggs in the shell and
sealed containers - for example, closed glass jars -
may explode and should not be heated in the
microwave oven.
_, Use the microwave oven only for its intended use as
described in this manual. Do not use corrosive
chemicals or vapors in the microwave oven. This
type of oven is specifically designed to heat, cook,
or dry food. It is not designed for industrial or
laboratory use.
" Oversized foods or oversized metal utensils should
not be inserted in the microwave oven as they may
create a fire or risk of electric shock.
,. Do not clean with metal scouring pads. Pieces can
burn off the pad and touch electrical parts involving
a risk of electric shock.
,. Do not store any materials, other than manufacturer's
recommended accessories, in this oven when not in
use.
,. Do not operate the microwave oven if it has a
damaged cord or plug, if it is not working properly, or
if it has been damaged or dropped.
Do not deep fry in oven. Microwavable utensils are
not suitable and it is difficult to maintain appropriate
deep frying temperatures.
m Do not use paper products when appliance is
operated in the "PAN BROWN" mode.
Do not cover racks or any other part of the oven with
metal foil. This wiii cause overheating of the oven.
mAs with any appliance, close supervision is necessary
when used by children.
,. The microwave oven should be sewiced only by
qualified service personnel. Contact nearest
authorized service company for examination, repair,
or adjustment.
mDo not cover or block any openings on the
microwave oven.
SAVE THESE iNSTRUCTiONS
mMPORTANT SAFETY mNSTRUCTmONS
" Liquids, such as water, coffee, or tea are abb to be
overheated beyond the boiling point without appearing
to be boiling, VisibUe bubbling or boiling when the
container is removed from the microwave oven is not
aUwayspresent, THUSCOULD RESULT iN VERY HOT
UQUUDS SUDDENLY BOUUNG OVER WHEN THE
CONTAINER USDISTURBED OR A SPOON OR
OTHER UTENSIL USiNSERTED UNTOTHE UQUUD,
To reduce the risk of injury to persons:
- Do not overheat the Hquid,
- Stir the fiquid both before and haffway through
heating it,
- Do not use straight-sided containers with narrow
necks,
- After heating, aflow the container to stand in the
microwave oven for a short time before removing
the container,
- Use extreme care when inserting a spoon or other
utensil into the container,
SAVE THESE iNSTRUCTiONS
• Do not store the microwave oven outdoors, Do not
use this product near water - for example, near a
kitchen sink, in a wet basement, or near a
swimming pool,and the like.
• See door surface cleaning instructions in the "Oven
Care" section,
• To reduce the risk of fire in the oven cavity:
- Do not overcook food, Carefully attend the
microwave oven if paper, plastic, or other
combustible materials are placed inside the oven
to facilitate cooking,
- Remove wire twist-ties from paper or plastic bags
before placing bags in oven,
- if materials inside the oven should ignite, keep
oven door closed, turn oven off, and disconnect the
power cord, or shut off power at the fuse or circuit
- Do not use the cavity for storage purposes, Do not
leave paper products, cooking utensils, or food in
the cavity when not in use,
PRECAUTIONS TO AVOID POSSIBLE EXPOSURE TO
EXCESSIVE MICROWAVE ENERGY
(a) Do not attempt to operate this oven with the door
open since open-door operation can result in
harmful exposure to microwave energy. It is
important not to defeat or tamper with the
safety interlocks.
(b) Do not place any object between the oven front
face and the door or allow soil or cleaner residue
to accumulate on sealing surfaces.
(c) Do not operate the oven if it is damaged. It is
particularly important that the oven door close
properly and that there is no damage to the:
(1) Door (bent),
(2) Hinges and latches (broken or loosened),
(3) Door seals and sealing surfaces.
(d) The oven should not be adjusted or repaired by
anyone except properly qualified service personnel.
The microwave oven is connected to a 110-volt side of the
240-volt circuit required for the lower oven. If the incoming
voltage to the microwave oven is less than 110 volts cooking
times may be longer. Have a qualified electrician check your
electrical system.
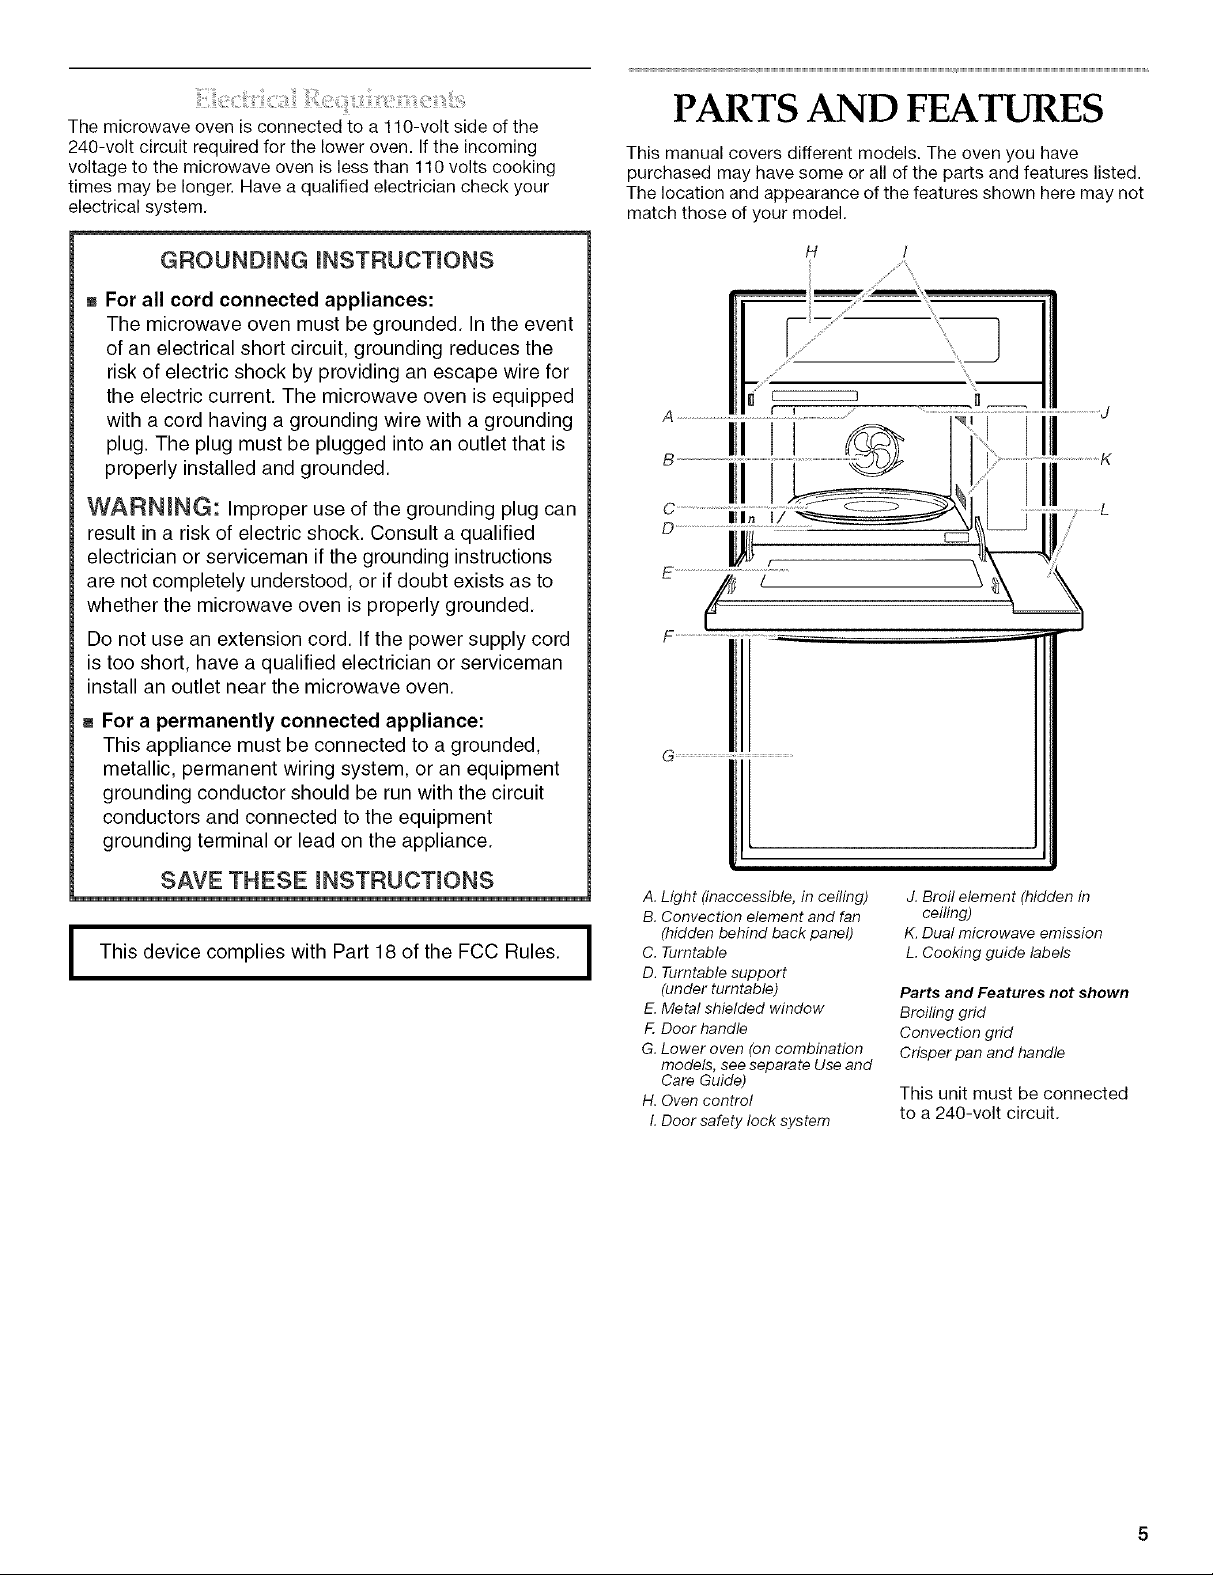
PARTS AND FEATURES
This manual covers different models. The oven you have
purchased may have some or all of the parts and features listed.
The location and appearance of the features shown here may not
match those of your model.
GROUNDING mNSTRUCTmONS
-, For all cord connected appliances:
The microwave oven must be grounded. In the event
of an electrical short circuit, grounding reduces the
risk of electric shock by providing an escape wire for
the electric current. The microwave oven is equipped
with a cord having a grounding wire with a grounding
plug. The plug must be plugged into an outlet that is
properly installed and grounded.
WARNmNG: Improper use of the grounding plug can
result in a risk of electric shock. Consult a qualified
electrician or serviceman if the grounding instructions
are not completely understood, or if doubt exists as to
whether the microwave oven is properly grounded.
Do not use an extension cord. If the power supply cord
is too short, have a qualified electrician or serviceman
install an outlet near the microwave oven.
m For a permanently connected appliance:
This appliance must be connected to a grounded,
metallic, permanent wiring system, or an equipment
grounding conductor should be run with the circuit
conductors and connected to the equipment
grounding terminal or lead on the appliance.
H /
SAVE THESE mNSTRUCTmONS
i This device complies with Part 18 of the FCC Rules. i
A. Light (inaccessible, in ceiling)
B. Convection element and fan
(hidden behind back panel)
C. Turntable
D. Turntable support
(under turntable)
E. Metal shielded window
F. Door handle
G. Lower oven (on combination
models, see separate Use and
Care Guide)
H. Oven control
I. Door safety lock system
J. Broil element (hidden in
ceiling)
K. Dual microwave emission
L. Cooking guide labels
Parts and Features not shown
Broiling grid
Convection grid
Crisper pan and handle
This unit must be connected
to a 240-volt circuit.
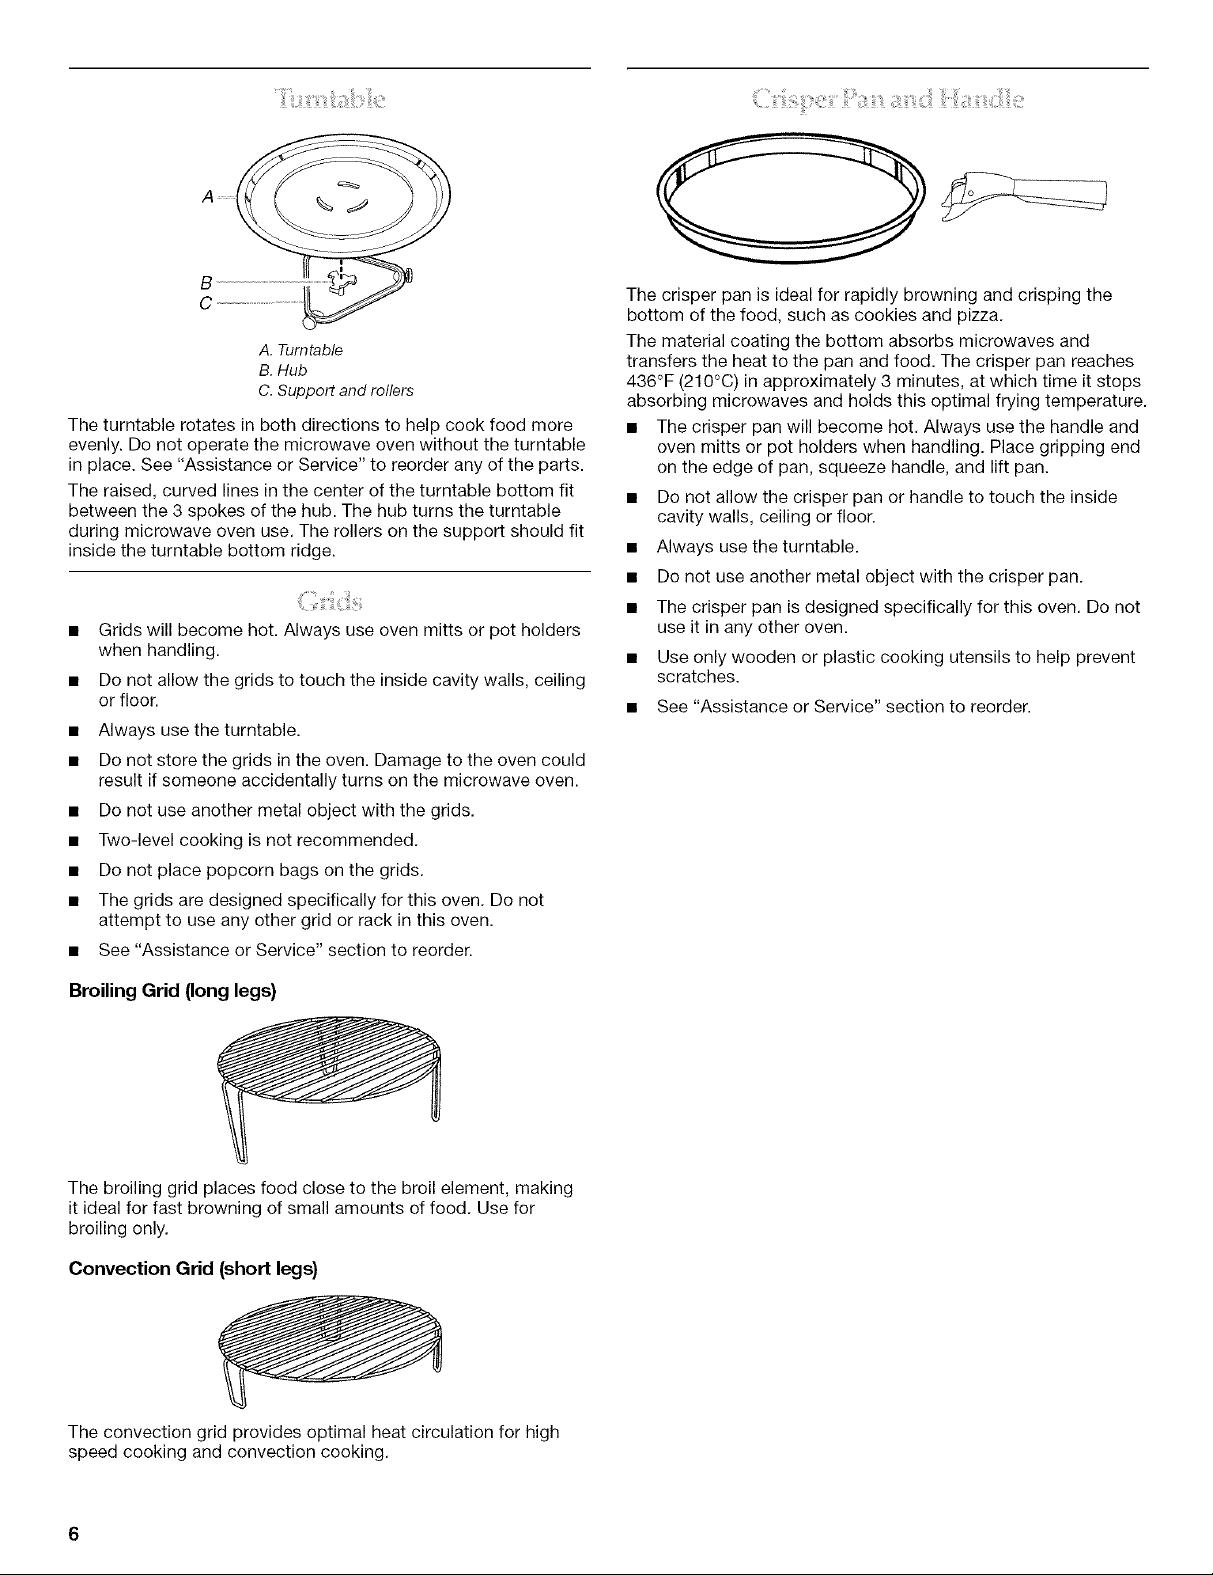
A. Turntable
B.Hub
C.Support and rollers
The turntable rotates in both directions to help cook food more
evenly. Do not operate the microwave oven without the turntable
in place. See "Assistance or Service" to reorder any of the parts.
The raised, curved lines in the center of the turntable bottom fit
between the 3 spokes of the hub. The hub turns the turntable
during microwave oven use. The rollers on the support should fit
inside the turntable bottom ridge.
• Grids will become hot. Always use oven mitts or pot holders
when handling.
• Do not allow the grids to touch the inside cavity walls, ceiling
or floor.
• Always use the turntable.
• Do not store the grids in the oven. Damage to the oven could
result if someone accidentally turns on the microwave oven.
• Do not use another metal object with the grids.
• Two-level cooking is not recommended.
• Do not place popcorn bags on the grids.
• The grids are designed specifically for this oven. Do not
attempt to use any other grid or rack in this oven.
• See "Assistance or Service" section to reorder.
The crisper pan is ideal for rapidly browning and crisping the
bottom of the food, such as cookies and pizza.
The material coating the bottom absorbs microwaves and
transfers the heat to the pan and food. The crisper pan reaches
436°F (210°C) in approximately 3 minutes, at which time it stops
absorbing microwaves and holds this optimal frying temperature.
• The crisper pan will become hot. Always use the handle and
oven mitts or pot holders when handling. Place gripping end
on the edge of pan, squeeze handle, and lift pan.
• Do not allow the crisper pan or handle to touch the inside
cavity walls, ceiling or floor.
• Always use the turntable.
• Do not use another metal object with the crisper pan.
• The crisper pan is designed specifically for this oven. Do not
use it in any other oven.
• Use only wooden or plastic cooking utensils to help prevent
scratches.
• See "Assistance or Service" section to reorder.
Broiling Grid (long legs}
The broiling grid places food close to the broil element, making
it ideal for fast browning of small amounts of food. Use for
broiling only.
Convection Grid (short legs)
The convection grid provides optimal heat circulation for high
speed cooking and convection cooking.
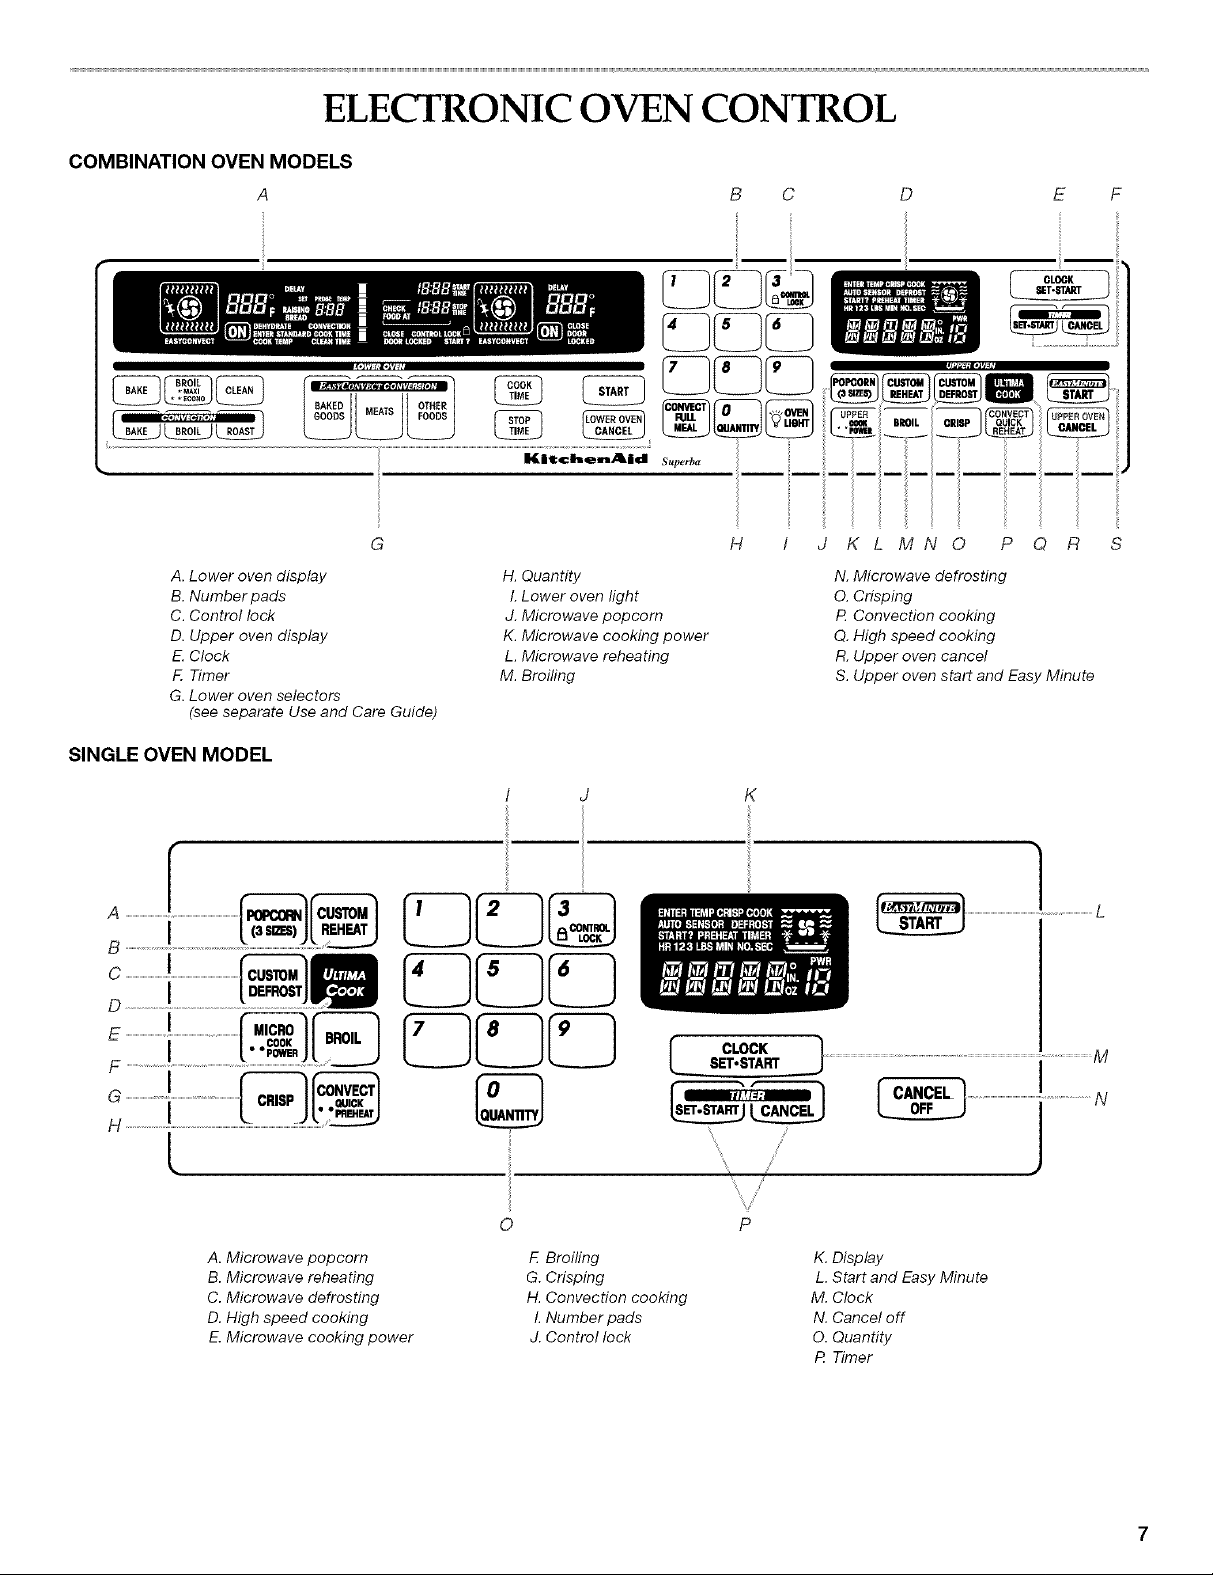
ELECTRONIC OVEN CONTROL
COMBINATION OVEN MODELS
A B C D E F
CLOCK_ET.START
A. Lower oven display
B. Number pads
C. Control lock
D. Upper oven display
E.Clock
F. Timer
G. Lower oven selectors
(see separate Use and Care Guide)
SINGLE OVEN MODEL
D
H. Quantity
L Lower oven light
J. Microwave popcorn
K. Microwave cooking power
L. Microwave reheating
M. Broiling
/ J
©
H f J
K
L CLOCKSET.START
KLMNO P O R S
N. Microwave defrosting
O. Crisping
tq Convection cooking
Q. High speed cooking
R. Upper oven cancel
S. Upper oven start and Easy Minute
_ L
A. Microwave popcorn
B. Microwave reheating
C. Microwave defrosting
D. High speed cooking
E. Microwave cooking power
0
E Broiling
G. Crisping
H. Convection cooking
L Number pads
J. Control lock
K. Display
L. Start and Easy Minute
M. Clock
N. Cancel off
O. Quantity
R Timer
When power is first supplied to the appliance, everything on the
display(s) will light up for 5 seconds. Then, "PF id = 27" or
"PF id = 30" will appear. Touch LOWER OVEN CANCEL, UPPER
OVEN CANCEL or CANCEL OFF (on some models) to clear
display(s).
Any other time "PF id = 27" or "PF id = 30" appears, a power
failure occurred. Touch LOWER OVEN CANCEL, UPPER OVEN
CANCEL or CANCEL OFF (on some models) and reset the clock
if needed.
Lower Oven Display (combination oven models)
When the lower oven is in use, this display shows the lower oven
temperature, heat source(s) and start time.
During lower oven Timed Cooking, this display also shows a
vertical bar and minute time countdown and the stop time (if
entered).
If "Err" appears on the display, an invalid pad was touched.
Touch LOWER OVEN CANCEL, UPPER OVEN CANCEL or
CANCEL OFF (on some models) and retry the entry.
When the lower oven is not in use, this display is blank.
Upper Oven Display (combination oven models),
Display (single oven models)
When the upper oven or single oven is in use, this display shows
the upper oven or single oven heat source(s), cooking power,
quantities, weights and/or help prompts.
If "RETRY" flashes on the display for 1 second, an invalid pad
was touched. Retry the entry.
When the upper oven or single oven is not in use, this display
shows the time of day or Timer countdown.
The START pad controls 2 separate functions: Start and Easy
Minute.
Starting
The START pad begins any upper or single oven function except
the Timer. If not touched within 5 seconds after pressing a pad,
"START?" will appear on the display as a reminder. If not touched
within 5 minutes after pressing a pad, the display will return to the
time of day mode and the programmed function will be canceled.
If cooking is interrupted, touching START will resume the preset
cycle.
Adding Minutes
During High Speed Cooking, Crisping and Broiling, touching
EASY MINUTE (START) while the oven is operating will add cook
time in 1-minute increments.
During Microwave Cooking, touching EASY MINUTE while the
oven is operating, or at the end of a cycle, will add cook time in
1-minute increments.
During Convection Cooking, touching EASY MINUTE will not add
minutes.
The UPPER OVEN CANCEL or CANCEL OFF pad stops any
upper or single oven function except for the Clock, Timer and
Control Lock.
The oven will also turn off when the door is opened. When the
door is opened, the element(s) and fan will turn off, but the oven
light will remain on. Close the door and touch START to resume
the cycle.
The oven is preset with shortcut number codes for High Speed
and Microwave Cooking. A number code includes one or more of
the following; cooking power, cook time and food quantity or
weight. See the code charts in the "High Speed Cooking,"
"Custom Reheat," "Custom Defrost" and "Popcorn" sections for
additional information.
This is a 12-hour clock and does not show a.m. or p.m.
To Set:
Before setting, make sure the ovens, Timer and Timed Cooking
are off.
1. Touch CLOCK SET • START.
2. Touch the number pads to set the time of day.
3. Touch CLOCK SET • START or START.
To remove the time of day from the display: Touch and hold
CLOCK SET • START for 5 seconds.
To return the time of day to the display: Touch CLOCK
SET ° START. The time should not have to be reset.
Tonesareaudiblesignals,indicatingthefollowing:
Onetone
• Validpadtouch
• Ovenispreheated
• Functionhasbeenentered
Three tones
• Invalid pad touch
Four tones
• End of cycle
• Reminder, repeating each minute afterthe end-of-cycle tones
All Tones (combination oven models only)
All of the above tones are preset on, but can be turned off.
To Turn Off/On: Touch and hold TIMER CANCEL for 5 seconds.
A tone will sound, and "Snd oFF" will appear on the lower oven
display for 3 seconds. Repeat to change back to "Snd on."
Tone Volume
The volume is preset at high, but can be changed to low.
To Change: Touch and hold the number pad "7" for 5 seconds.
A tone will sound, and "Snd Lo" will appear on the lower oven
display for 3 seconds. Repeat to change back to "Snd HI."
The Timer can be set in minutes and seconds or hours and
minutes, and counts down the set time. The Timer does not start
or stop the oven.
To Set:
1. Touch TIMER SET * STAR£
Touch again to switch between MIN/SEC and HR/MIN.
If no action is taken after 1 minute, the display will return to
the time of day mode.
2=
Touch the number pads to set length of time.
3.
Touch TIMER SET * START or START.
If not touched within 5 seconds, the display will return to the
time of day mode and the programmed function will be
canceled.
When the set time ends, if enabled, end-of-cycle tones will
sound, then reminder tones will sound every minute.
Touch TIMER CANCEL anytime to cancel the Timer and/or
stop reminder tones.
Remember, touching the UPPER OVEN CANCEL or CANCEL
OFF pad(s) will turn the respective oven(s) off.
The time can be reset during the countdown by repeating the
above steps.
Reminder tones
The Timer and Timed Cooking reminder tones are preset on,
but can be turned off. Reminder tones do not include end-of-
cycle tones. On combination oven models, if "All Tones" have
been turned off, the reminder tones cannot be independently
turned on.
Timer
To Turn Tones Off/On: Touch and hold TIMER SET * START until
a tone sounds. Repeat to turn back on.
Timed Cooking (combination oven models only)
To Turn Tones Off/On: Touch and hold COOK TIME until a tone
sounds and the lower oven display returns to inactive mode
(blank). Repeat to turn back on.
_o_•_i_o_ o_,__ ¸_,_
The temperature is preset in Fahrenheit, however it can be
changed to Celsius.
To Change: Touch and hold BROIL • MAXl °o ECONO for
5 seconds. A tone will sound, and "C °'' will appear on the display
for 3 seconds. Repeat to change back to Fahrenheit.
When in Fahrenheit, "°F" follows the oven temperature.
When in Celsius, only ..... follows the oven temperature.
The Control Lock shuts down the control panel pads to prevent
unintended use of the oven(s).
When the control is locked, only the CLOCK SET ° START,TIMER
SET • START and TIMER CANCEL pads will function.
The Control Lock is preset unlocked, but can be locked.
To Lock/Unlock Control: Before locking, make sure the oven(s),
Timer and Timed Cooking are off. Touch and hold the number
pad 3 CONTROL LOCK until "CONTROL LOCK" and a picture of
a lock appear on the display, about 3 seconds. Repeat to unlock
and remove "CONTROL LOCK" from the display.
Help prompts are visible messages that appear on the upper
oven display on combination oven models or the display on
single oven models. Only Crisping and Broiling help prompts can
be turned off.
Before turning help prompts on/off, the oven(s), Timer and, on
combination oven models, the lower oven Timed Cooking must
be off.
To Turn Off/On: Touch and hold the number pad "2" for
5 seconds. A tone will sound, and either "HELP OFF" or
"HELP ON" will flash on the upper oven display on combination
oven models or the display on single oven models for 3 seconds.
Repeat for desired option.
 Loading...