

KitchenAid KEHC379JWH0, KEHC309JWH0, KEHC309JSS0, KEHC309JSS, KEHC309JBT0 Owner’s Manual
...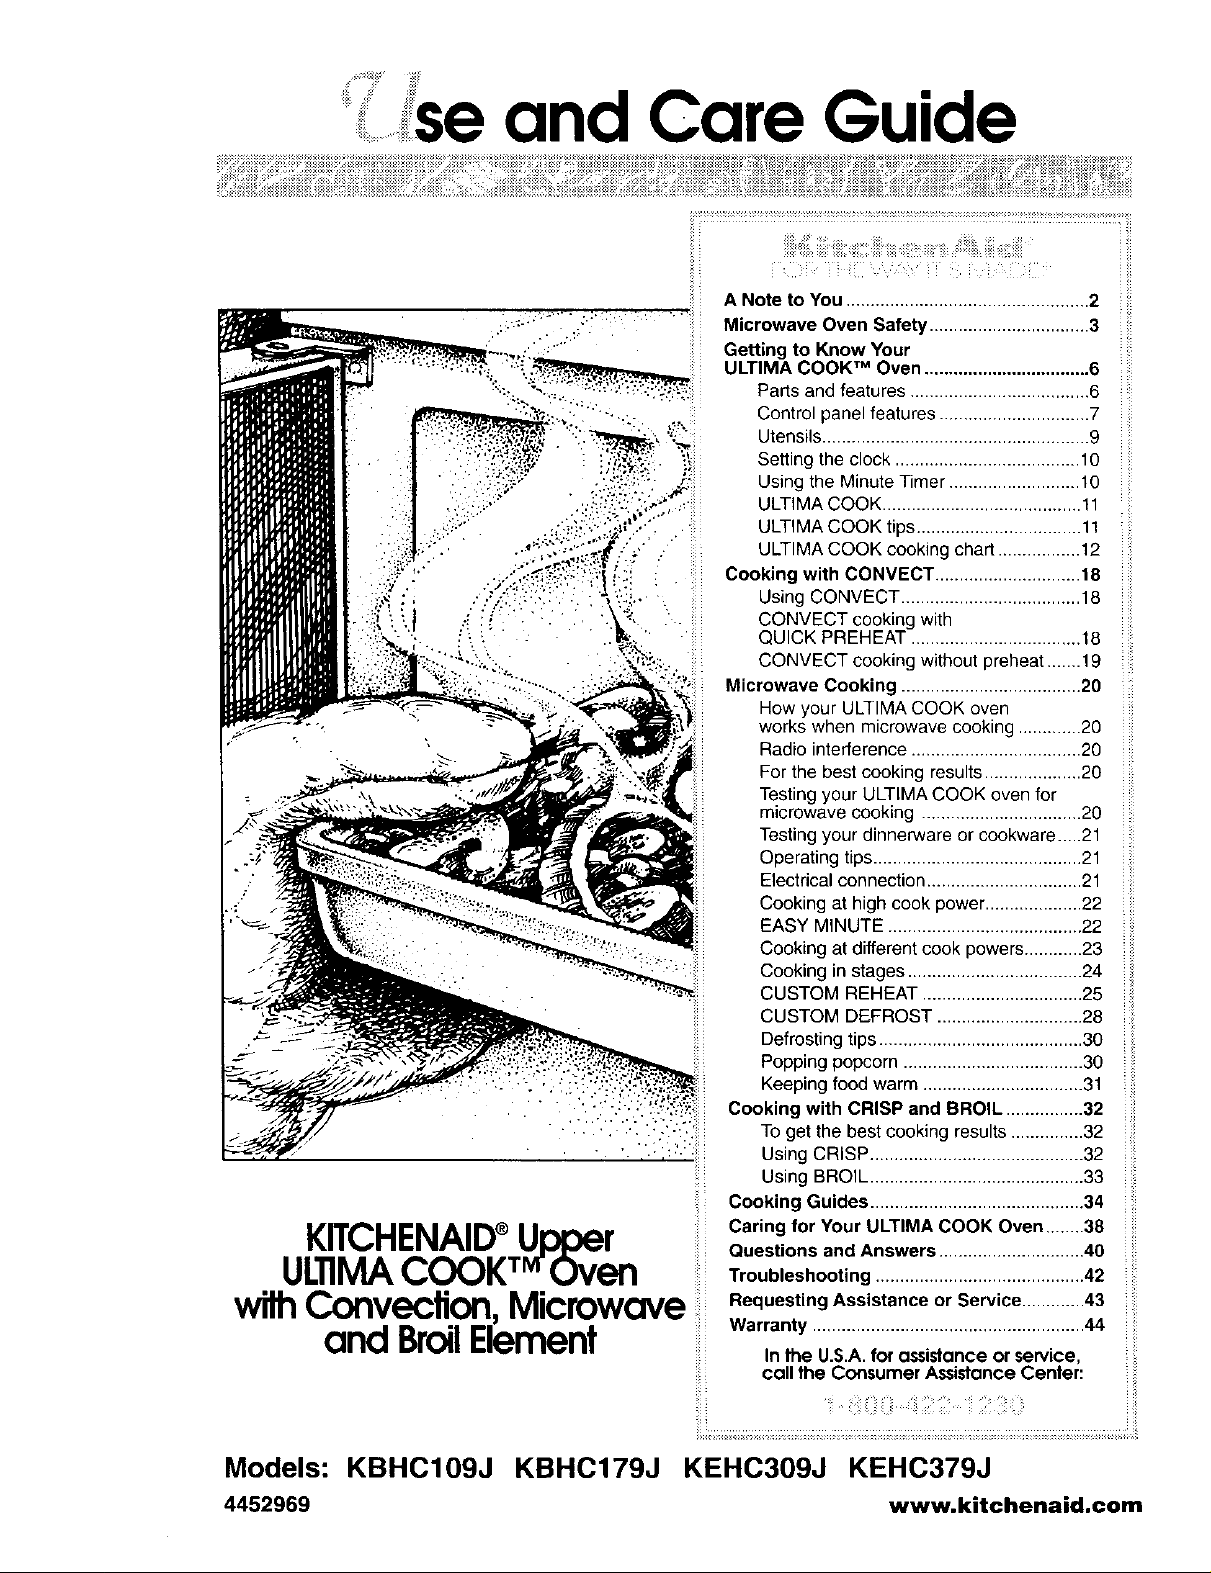
'se and Care Guide
KITCHENAID®Upper
ULIIMACOOKT_rOven
wilhConvection,Microwave
and BroilElement
A Note to You .................................................. 2
Microwave Oven Safety ................................. 3
Getting to Know Your
ULTIMA COOK TM Oven .................................. 6
Parts and features ..................................... 6
Control panel features ............................... 7
Utensils ....................................................... 9
Setting the clock ...................................... 10
Using the Minute Timer ........................... 10
ULTIMA COOK ......................................... 11
ULTIMA COOK tips .................................. 11
ULTIMA COOK cooking chart ................. 12
Cooking with CONVECT .............................. 18
Using CONVECT ..................................... 18
CONVECT cooking with
QUICK PREHEAT ................................... 18
CONVECT cooking without preheat ....... 19
Microwave Cooking ..................................... 20
How your ULTIMA COOK oven
works when microwave cooking ............. 20
Radio interference ................................... 20
For the best cooking results .................... 20
Testing your ULTIMA COOK oven for
microwave cooking ................................. 20
Testing your dinnerware or cookware.._.21
Operating tips ........................................... 21
Electrical connection ................................ 21
Cooking at high cook power .................... 22
EASYM_NUTE........................................22
Cooking at different cook powers ............23
Cooking in stages .................................... 24
CUSTOM REHEAT ................................. 25
CUSTOM DE,FROST .............................. 28
Defrosting tips .......................................... 30
Popping popcorn ..................................... 30
Keeping food warm ................................. 31
Cooking with CRISP and BROIL ................ 32
To get the best cooking results............... 32
Using CRISP ............................................ 32
Using BROIL ............................................ 33
Cooking Guides ............................................ 34
Caring for Your ULTIMA COOK Oven ........38
Questions and Answers .............................. 40
ii !
Troubleshooting ........................................... 42
Requesting Assistance or Service ............. 43
Warranty ........................................................ 44
In the U.S.A. for assistance or service,
call the Consumer Assistonce Center:
i i:i
i ii
Models: KBHC109J KBHC179J KEHC309J KEHC379J
4452969 www.kitchenaid,com
Note toYou
_!_,J_i!_i?ii'i!_k U'i5_!__ ii_iii::_i!_I_::Yhi_ii i_!ii:iiC:i!i(i ii_!:iiii:i_ii!ii_ilYi,_'i_iiiii{_ _::_iiii:3_iii3!!ii_::ii_!__i_::i:_,_ii?_i
Because your life is getting busier and more complicated, KitchenAid ® appliances are
easy to use, save time, and help you manage your home better. To ensure that you
enjoy many years of trouble-free operation, we developed this Use and Care Guide.
It contains valuable information concerning how to operate and maintain your new
appliance properly. Please read it carefully. Also, please complete and
mail the enclosed Product Registration Card.
Whenever you call our Consumer Model Number
Assistance Center at 1-800-422-1230 or
request service for your appliance, you
need to know your complete model number
and serial number. You can find this infor-
mation on the model and serial number
plate (located on the lower oven ).
Please also record the purchase
information.
Serial Number
Purchase/
Installation Date
Builder/Dealer
Name
Address
NOTE: You must provide proof of purchase Phone
or installation date for in-warranty service.
Keep this book and the sales slip together in a safe place for future reference.

................_ _ii!¸
., _iiiiii
iiii;, i 'iiiiii iiiiii •
icrowave Oven Safety
Your safety and the safety of others are very important.
We have provided many important safety messages in this manual and on your appliance.
Always read and obey all safety messages.
This is the safety alert symbol.
This symbol alerts you to potential hazards that can kill or hurt you and
others.
All safety messages will follow the safety alert symbol and either the word
"DANGER" or "WARNING." These words mean:
You can be killed or seriously injured if you
don't immediately follow instructions.
You can be killed or seriously injured if you
don't follow instructions.
All safety messages will tell you what the potential hazard is, tell you how to reduce the
chance of injury, and tell you what can happen if the instructions are not followed.
IMPORTANT SAFETY INSTRUCTIONS
When using electrical appliances basic safety precautions should be followed, including
the following:
WARNING: To reduce the risk of burns,
electric shock, fire, injury to persons, or
exposure to excessive microwave energy:
• Read all instructions before using the
microwave oven.
• Read and follow the specific "PRE-
CAUTIONS TO AVOID POSSIBLE
EXPOSURE TO EXCESSIVE
MICROWAVE ENERGY" found in
this section.
• The microwave oven must be
grounded. Connect only to properly
grounded outlet. See "GROUNDING
INSTRUCTIONS" found in the
"Installation Instructions" section and on
page 5 of this manual.
• Install or locate the microwave oven
only in accordance with the provided
Installation Instructions.
• Some products such as whole eggs in
the shell and sealed containers - for
example, closed glass jars - may
explode and should not be heated in
the microwave oven.
• Use the microwave oven only for its
intended use as described in this manual.
Do not use corrosive chemicals or vapors
in the microwave oven. This type of oven
is specifically designed to heat, cook, or
dry food. It is not designed for industrial
or laboratory use.
• As with any appliance, close supervision
is necessary when used by children.
• Do not operate the microwave oven if it
has a damaged cord or plug, if it is not
working properly, or if it has been
damaged or dropped.
SAVE THESE INSTRUCTIONS
continued on next page
3
_::''_°......... _icrowave Oven Safety
IMPORTANT SAFETY INSTRUCTIONS
,,The microwave oven should be serviced
only by qualified service personnel.
Call an authorized service company for
examination, repair, or adjustment.
• See door surface cleaning instructions
in the "Caring for Your Microwave
Oven" section.
• To reduce the risk of fire in the
oven cavity:
- Do not overcook food. Carefully
attend the microwave oven if paper,
plastic, or other combustible materials
are placed inside the oven to facilitate
cooking.
SAVE THESE INSTRUCTIONS
- Remove wire twist-ties from paper
or plastic bags before placing bags
in oven.
- If materials inside the oven should
ignite, keep oven door closed, turn oven
off, and disconnect the power cord, or
shut off power at the fuse or circuit
breaker panel.
- Do not use the cavity for storage
purposes. Do not leave paper products,
cooking utensils, or food in the cavity
when not in use.
PRECAUTIONS TO AVOID POSSIBLE
EXPOSURE TO EXCESSIVE MICROWAVE
ENERGY..,
(a) Do not attempt to operate this oven (c)
with the door open since open-door
operation can result in harmful
exposure to microwave energy. It is
important not to defeat or tamper with
the safety interlocks.
(b) Do not place any object between the
oven front face and the door or allow
soil or cleaner residue to accumulate
on sealing surfaces. (d)
Do not operate the oven if it is
damaged. It is particularly important
that the oven door close properly and
that there is no damage to the:
(1) Door (bent),
(2) Hinges and latches (broken
or loosened),
(3) Door seals and sealing surfaces.
The oven should not be adjusted or
repaired by anyone except properly
qualified service personnel.
4
icrowave Oven Safely
GROUNDING
• For all cord connected appliances:
The microwave oven must be grounded.
In the event of an electrical short circuit,
grounding reduces the risk of electric
shock by providing an escape wire for
the electric current. The microwave
oven is equipped with a cord having a
grounding wire with a grounding plug.
The plug must be plugged into an outlet
that is properly installed and grounded.
WARNING: Improper use of the
grounding plug can result in a risk of
electric shock.
Consult a qualified electrician or
serviceman if the grounding instructions
are not completely understood, or if
doubt exists as to whether the
microwave oven is properly grounded.
SAVE THESE INSTRUCTIONS
INSTRUCTIONS
Do not use an extension cord. If the power
supply cord is too short, have a qualified
electrician or serviceman install an outlet
near the microwave oven.
• For a permanently connected
appliance:
The microwave oven must be
connected to a grounded, metallic,
permanent wiring system, or an
equipment grounding conductor should
be run with the circuit conductors and
connected to the equipment grounding
terminal or lead on the microwave oven.
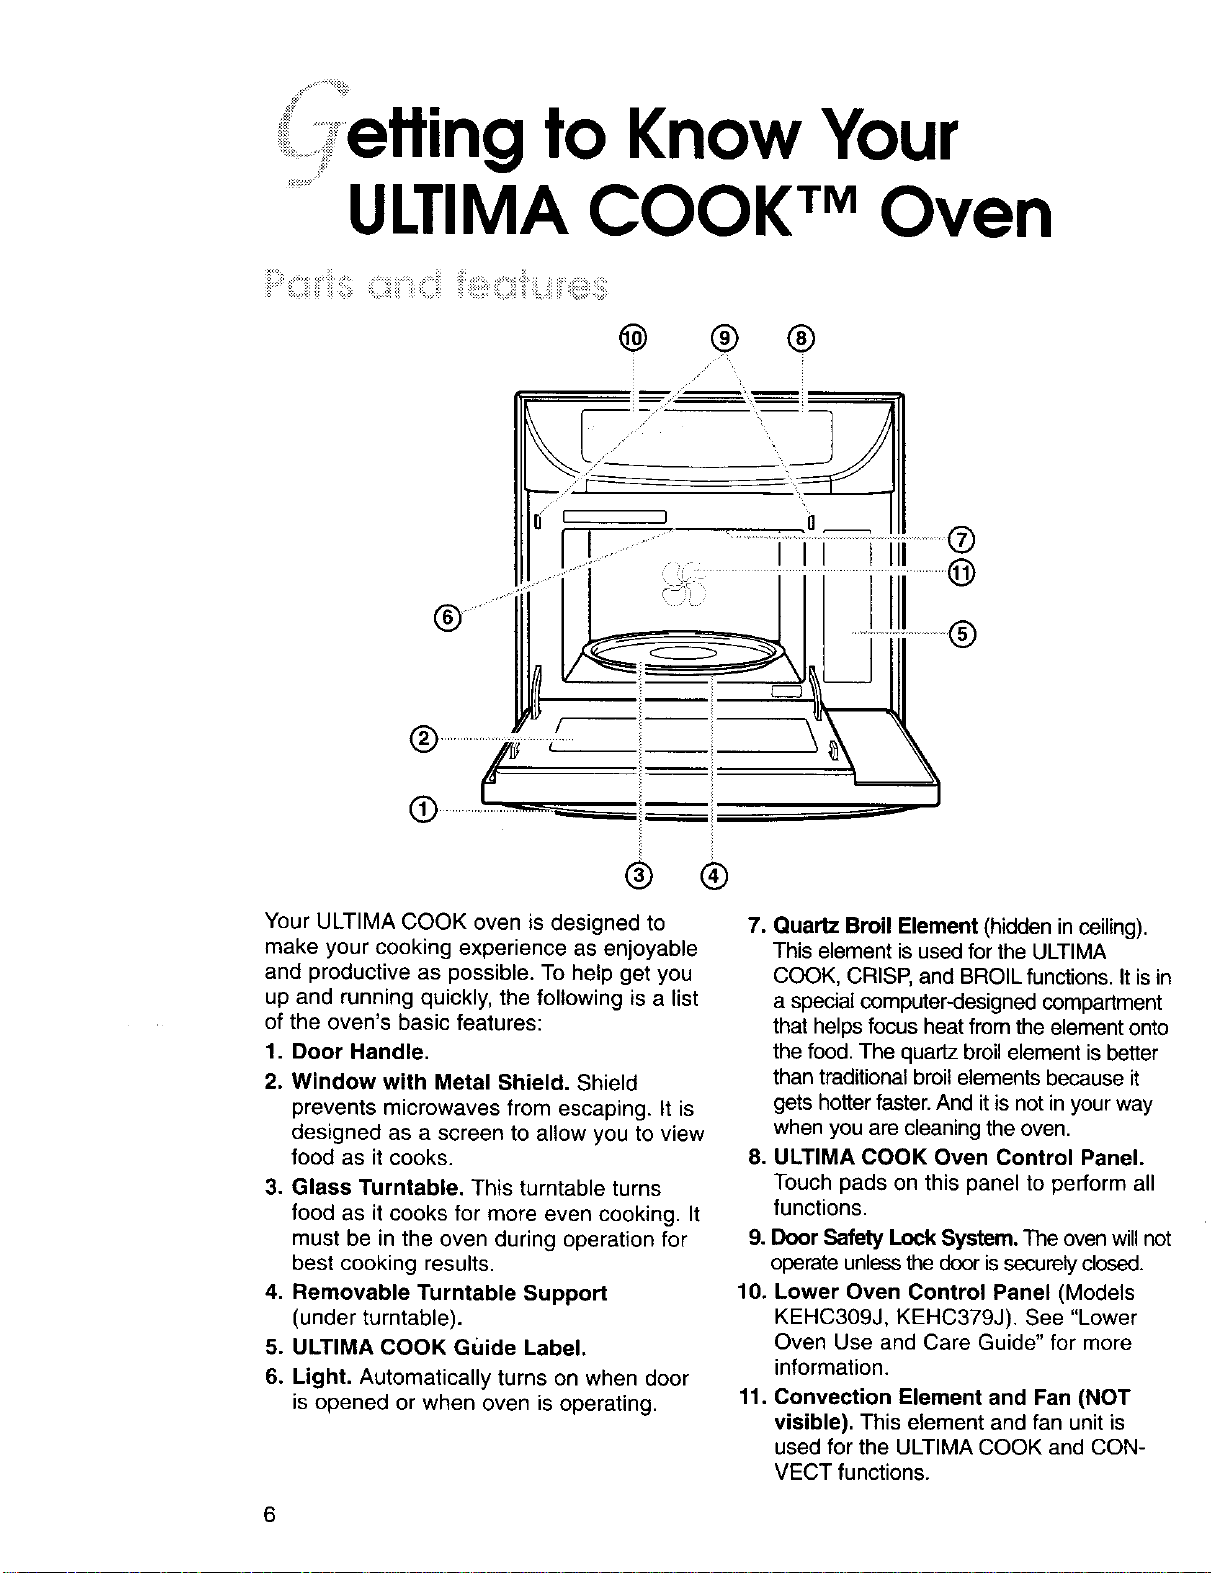
efling to Know Your
........ULTIMACOOK TMOven
@ ® ®
® ®
Your ULTIMA COOK oven is designed to
make your cooking experience as enjoyable
and productive as possible. To help get you
up and running quickly, the following is a list
of the oven's basic features:
1. Door Handle.
2. Window with Metal Shield. Shield
prevents microwaves from escaping. It is
designed as a screen to allow you to view
food as it cooks.
3. Glass Turntable. This turntable turns
food as it cooks for more even cooking. It
must be in the oven during operation for
best cooking results.
4. Removable Turntable Support
(under turntable).
5. ULTIMA COOK Guide Label.
6. Light. Automatically turns on when door
is opened or when oven is operating.
7. Quartz Broil Element (hidden in coiling).
This element is used for the ULTIMA
COOK, CRISP, and BROIL functions. It is in
a special computer-designed compartment
that helps focus heat from the element onto
the food. The quartz broil element is better
than traditional broil elements because it
gets hotter faster. And it is not in your way
when you are cleaning the oven.
8. ULTIMA COOK Oven Control Panel.
Touch pads on this panel to perform all
functions.
9. Door Safety Lock System. The oven will not
operate unless the door is securely closed.
10. Lower Oven Control Panel (Models
KEHC309J, KEHC379J). See "Lower
Oven Use and Care Guide" for more
information.
11. Convection Element and Fan (NOT
visible). This element and fan unit is
used for the ULTIMA COOK and CON-
VECT functions.
6
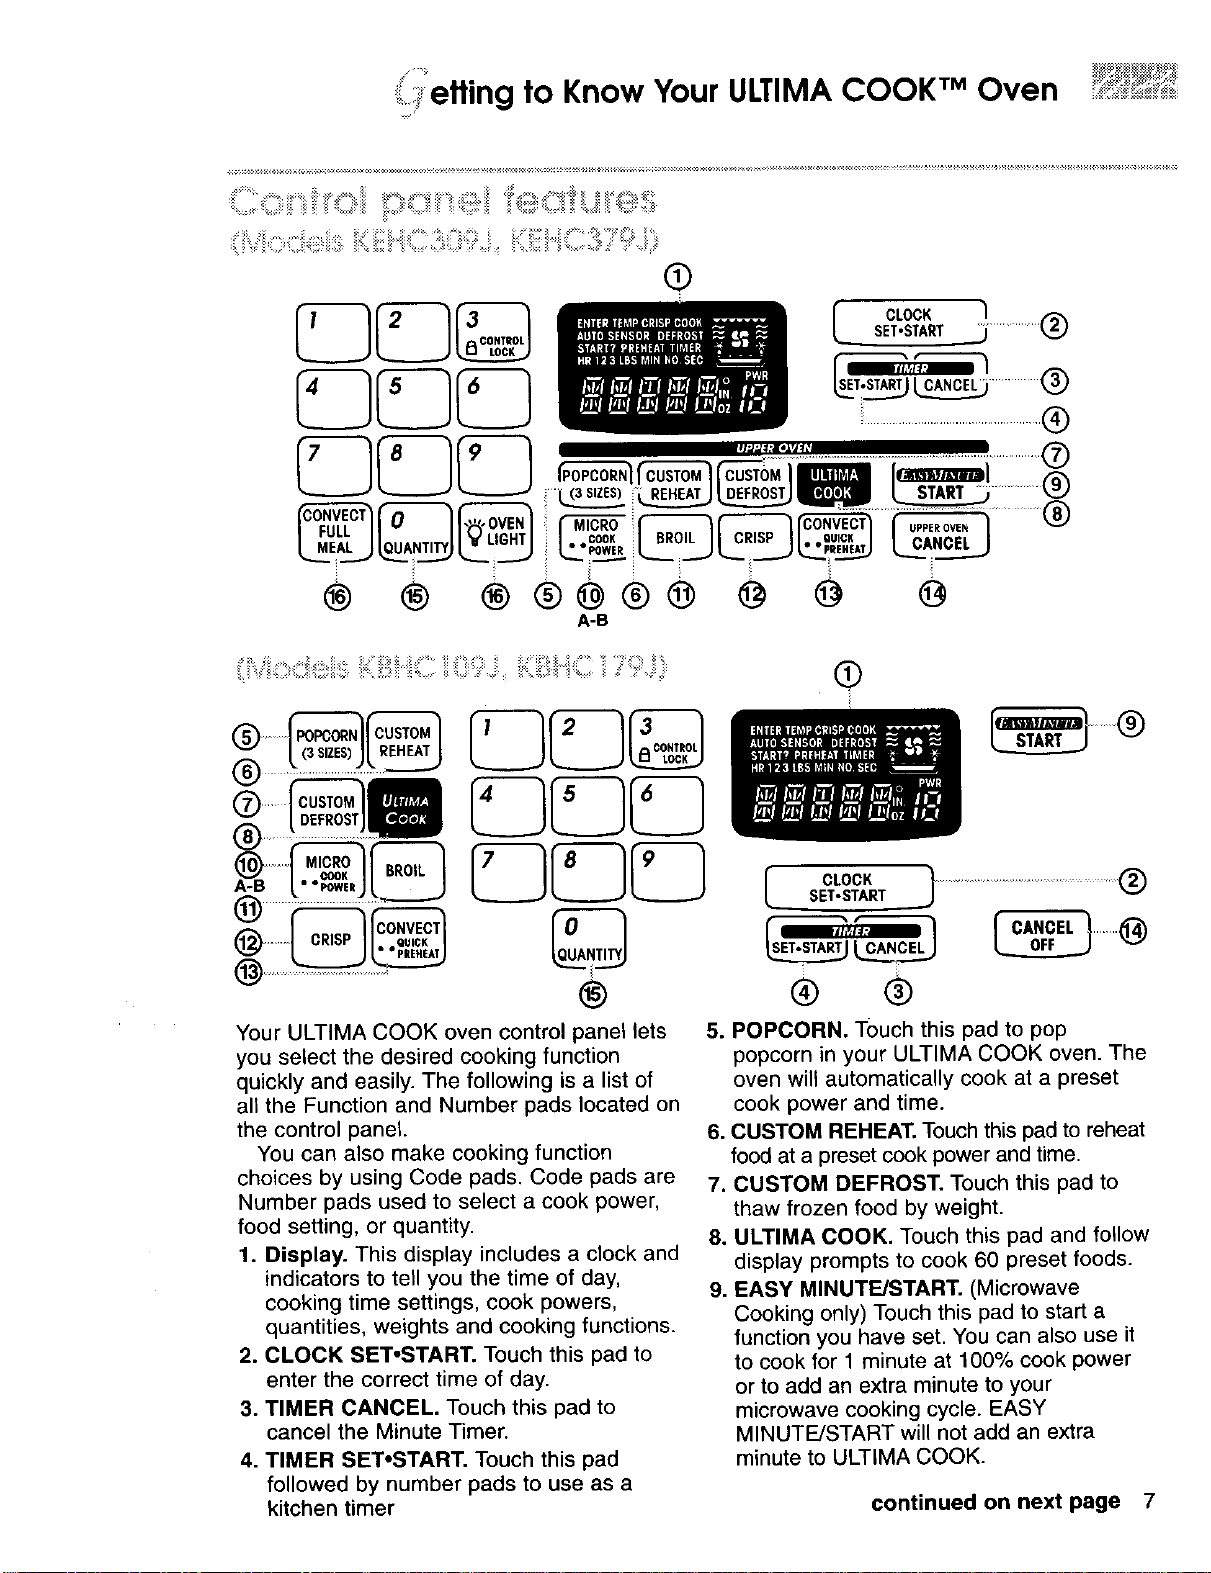
_ fling to Know Your ULTIMA COOK TM Oven ....°_*"*"_;""_
•,(_s,zEs__ _ _ _
® ® ® ®@®® @ @ @
A-B
: :: _ ,._ . : ;: i i;¸ _: _i::,_
:F : _r_!<i_i_,i i _ !i!,': i::i:iii ¸__ • _ii :,," _ !_!'I__:!:! _: :: "_ ;_ ;: ¸¸
I CLOCKSET.START _ ................(_
.,.__ ....
®
Your ULTIMA COOK oven control panel lets
you select the desired cooking function
quickly and easily. The following is a list of
all the Function and Number pads located on
the control panel.
You can also make cooking function
choices by using Code pads. Code pads are
Number pads used to select a cook power,
food setting, or quantity.
1. Display. This display includes a clock and
indicators to tell you the time of day,
cooking time settings, cook powers,
quantities, weights and cooking functions.
2. CLOCK SET*START. Touch this pad to
enter the correct time of day.
3. TIMER CANCEL. Touch this pad to
cancel the Minute Timer.
4. TIMER SET*START. Touch this pad
followed by number pads to use as a
kitchen timer
®
SET.S .,cl°cK............................................®
r CANCEL7" "_i_
v
® ®
5. POPCORN. Touch this pad to pop
popcorn in your ULTIMA COOK oven. The
oven will automatically cook at a preset
cook power and time.
6. CUSTOM REHEAT. Touch this pad to reheat
food at a preset cook power and time.
7. CUSTOM DEFROST. Touch this pad to
thaw frozen food by weight.
8. ULTIMA COOK. Touch this pad and follow
display prompts to cook 60 preset foods.
9. EASY MINUTE/START. (Microwave
Cooking only) Touch this pad to start a
function you have set. You can also use it
to cook for 1 minute at 100% cook power
or to add an extra minute to your
microwave cooking cycle. EASY
MINUTE/START will not add an extra
minute to ULTIMA COOK.
continued on next page 7
retting to Know Your ULTIMA COOK TM Oven
10A. MICRO. Touch this pad before entering
a cooking time when setting a second
or third cycle in multi-cycle cooking.
10B. COOK POWER. Touch this pad after
the cook time has been set, followed
by a Number pad to set the amount of
microwave energy released to cook the
food. The higher the number, the high-
er the power wattage and the faster
the "cooking speed."
11. BROIL. Touch this pad to broil with the
broil element.
12. CRISP. Touch this pad to crisp
precooked foods. Use it also for baking
and for frying bacon and eggs,
sausages, etc.
13. CONVECT/QUICK PREHEAT. Touch
this pad to put oven into the CONVECT
cooking mode.
14. UPPER OVEN CANCEL/CANCEL
OFF. Touch this pad to cancel a
function. See "Interrupting Cooking"
later in this section for more
information.
15. Number Pads. Touch Number pads to
enter cooking times, cook powers,
selection, quantities, or weights.
16. See "Lower Electric Convection Oven
Use and Care Guide" (Models
KEHC309J, KEHC379J).
Choosing cooking function
settings
The cooking functions discussed in the
"Getting to Know Your ULTIMA COOK Oven"
and "Microwave Cooking" sections use
Function pads to choose cooking function set-
tings. Another way to choose cooking function
settings is by using Code pads. Code pads
are Number pads used to select a cook power,
food settings, or quantities. Food setting charts
found in the "CUSTOM REHEAT," "CUSTOM
DEFROST," and "ULTIMA COOK cooking
chart" sections list only Code pads for food
settings. The charts in "Using code pads" in
the "Microwave Cooking" section list all the
available Code pads.
Interrupting cooking
You can stop the oven during a cycle by
opening the door. The oven stops heating
and the fan stops, but the light stays on.
To restart cooking for all cycles, close
the door and
If you do not want to continue cooking:
• Close the door and the light goes off
AND
NOTES:
• If you touch one Function pad and then
want to choose another Function pad in the
same cycle, you must press CANCEL first.
• If you attempt to enter unacceptable
instructions, three tones will sound. Touch
CANCEL and re-enter the instructions.
Audible signals
Audible signals are available to guide you
when setting and using your oven:
• A programming tone will sound each
time you touch a pad.
• Four tones signal the end of a cooking
cycle or the Minute Timer countdown.
8
_" CANCEL "i UPPEROVE,
Using the control lock
The control lock prevents unwanted use of
the oven by disabling the control panel
function pads.
NOTES:
• On combo ovens, control lock is available
only when both ovens are not in use. It is also
not available during the Self-Cleaning cycle.
• On single ovens, control lock is only avail-
able when the oven is not in use.
• Control lock does not disable the Timer
or Clock.
• Set control lock when cleaning the control
panel to prevent oven from accidentally
turning on.
etting to Know Your ULTIMA COOK TM Oven
To lock or deactivate the control panel:
Press and hold CONTROL LOCK (Number
tone will sound and "CONTROL
Pad 3) for 5 seconds. A single
LOCK /_" will appear on the dis-
play.
To unlock the control panel:
Press and hold CONTROL LOCK (Number
tone will sound after 5 seconds
Pad 3) for 5 seconds. A single
and "CONTROL LOCK P_"will
disappear from the display.
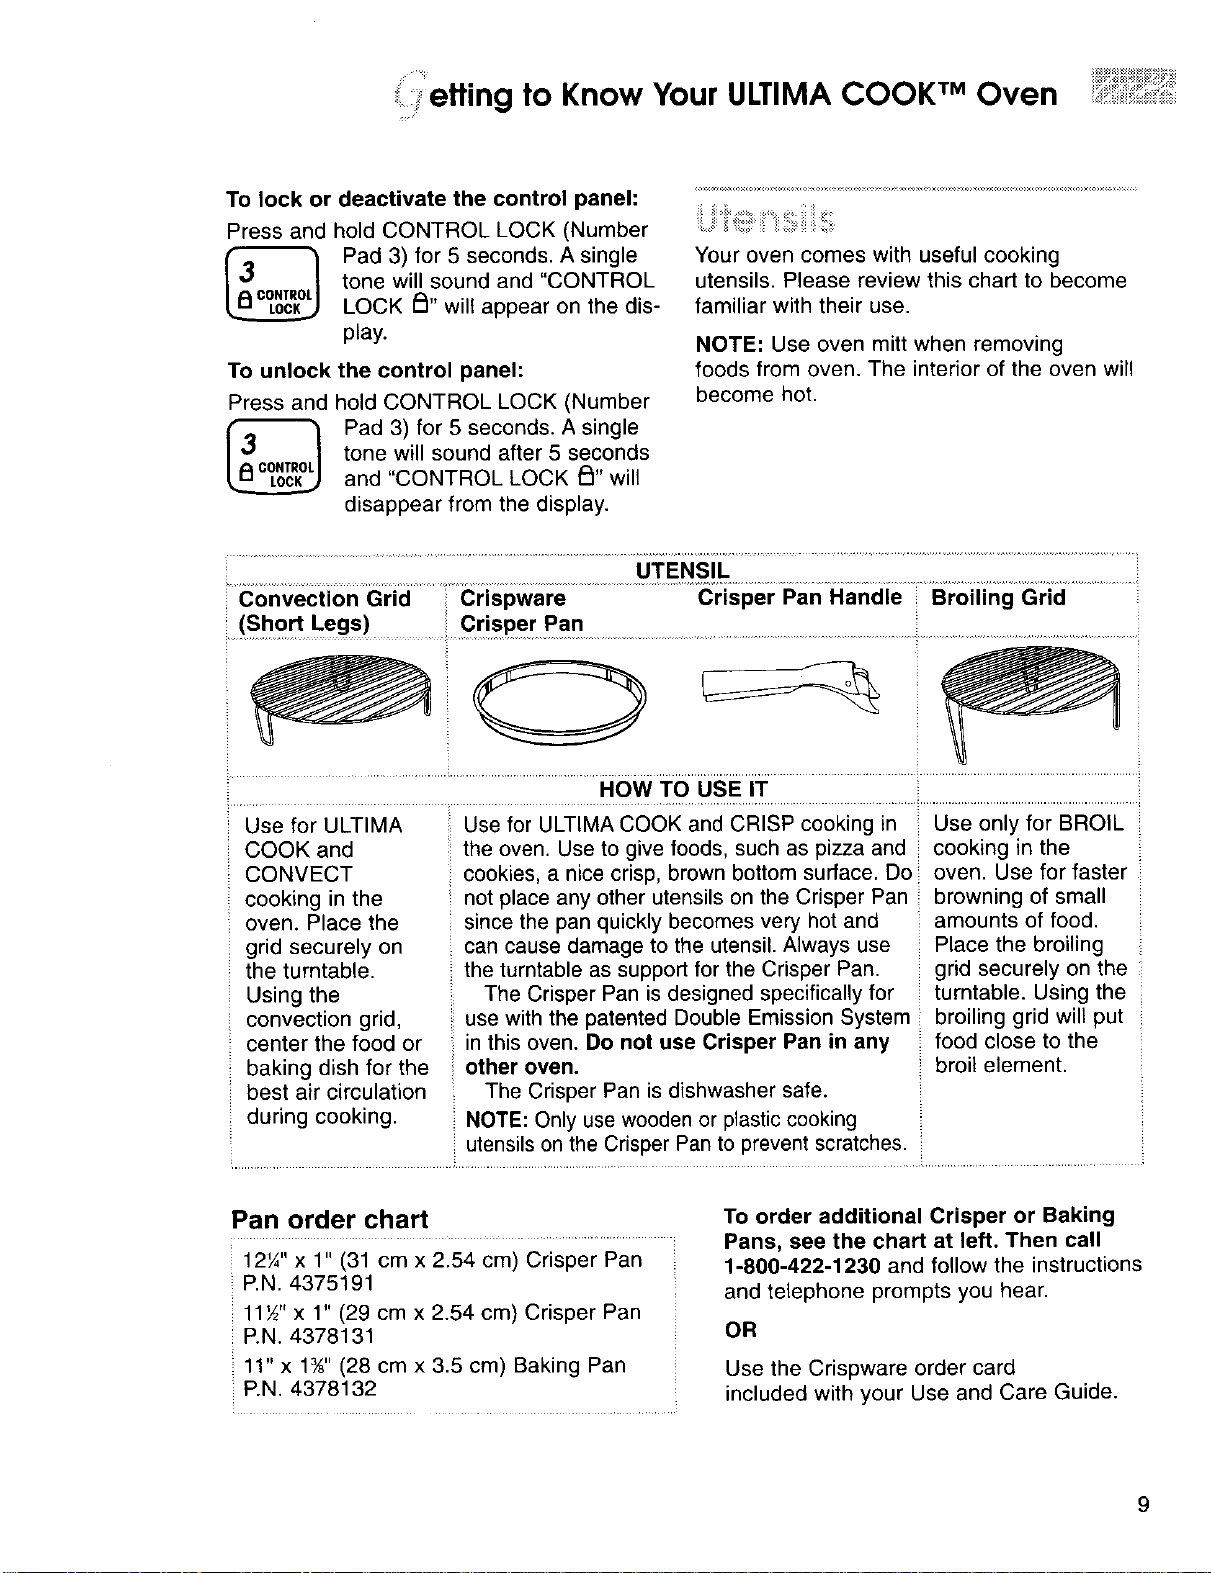
UTENSIL
Convection Grid Crispware Crisper Pan Handle Broiling Grid
(Short Legs) Crisper Pan
.......,, _=_=_=_iiii_iiii_¸iiiiii:_i;iiz¸
Your oven comes with useful cooking
utensils. Please review this chart to become
familiar with their use.
NOTE: Use oven mitt when removing
foods from oven. The interior of the oven will
become hot.
..............................................................................,owT00sEiT ..... .......................................
Use for ULTIMA Use for ULTIMA COOK and CRISP cooking in Use only for BROIL
COOK and the oven. Use to give foods, such as pizza and cooking in the
CONVECT cookies, a nice crisp, brown bottom surface. Do oven. Use for faster
cooking in the not place any other utensils on the Crisper Pan browning of small
oven. Place the since the pan quickly becomes very hot and amounts of food.
grid securely on can cause damage to the utensil. Always use Place the broiling
the turntable, the turntable as support for the Crisper Pan. grid securely on the
Using the The Crisper Pan is designed specifically for turntable. Using the
convection grid, use with the patented Double Emission System broiling grid will put
center the food or in this oven. Do not use Crisper Pan in any food close to the
baking dish for the : other oven. _:broil element.
best air circulation The Crisper Pan is dishwasher safe.
during cooking. NOTE: Only use wooden or plastic cooking
utensils on the Crisper Pan to prevent scratches.
Pan order chart
12'/," x 1" (31 cm x 2.54 cm) Crisper Pan
P.N. 4375191
11Y2'x 1" (29 cm x 2.54 cm) Crisper Pan
P.N. 4378131
11" x 1¾" (28 cm x 3.5 cm) Baking Pan
P.N. 4378132
To order additional Crisper or Baking
Pans, see the chart at left. Then call
1-800-422-1230 and follow the instructions
and telephone prompts you hear.
OR
Use the Crispware order card
included with your Use and Care Guide.
9
:: :::::::::::::::::::::
.........,,,.........,_ _ fling to Know Your ULTIMA COOK TM Oven
iiiiii e
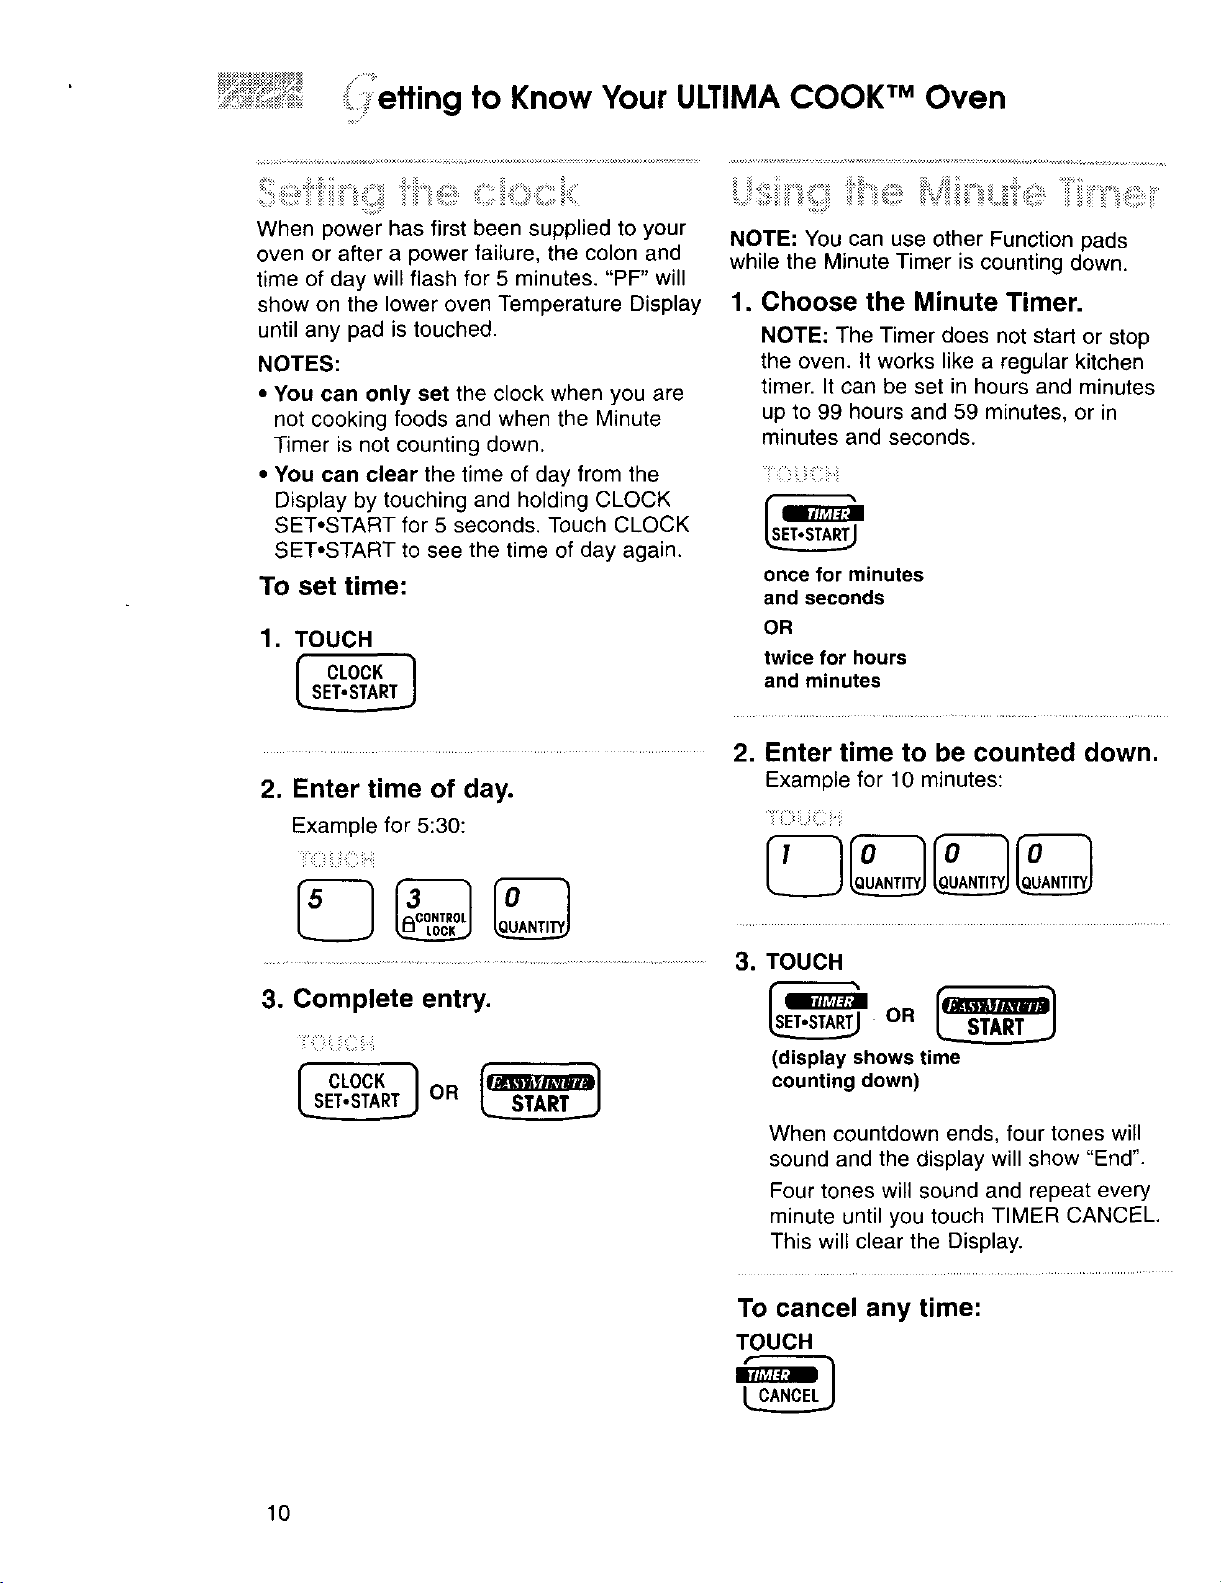
When power has first been supplied to your
oven or after a power failure, the colon and
time of day will flash for 5 minutes. "PF" will
show on the lower oven Temperature Display
until any pad is touched.
NOTES:
• You can only set the clock when you are
not cooking foods and when the Minute
Timer is not counting down.
• You can clear the time of day from the
Display by touching and holding CLOCK
SET*START for 5 seconds. Touch CLOCK
SET*START to see the time of day again.
To set time:
1. TOUCH
f CLOCK 1
NOTE: You can use other Function pads
while the Minute Timer is counting down.
1. Choose the Minute Timer.
NOTE: The Timer does not start or stop
the oven. It works like a regular kitchen
timer. It can be set in hours and minutes
up to 99 hours and 59 minutes, or in
minutes and seconds.
.....
once for minutes
and seconds
OR
twice for hours
and minutes
........................................ 2. Enter time to be counted down.
2. Enter time of day.
Example for 5:30:
Example for 10 minutes:
=;
...... .... ................. ............ 3o
3. Complete entry.
:
I CLOOK1
10
TOUCH
(display shows time
counting down)
When countdown ends, four tones will
sound and the display will show "End".
Four tones will sound and repeat every
minute until you touch TIMER CANCEL.
This will clear the Display.
To cancel any time:
TOUCH
/
etting to Know Your ULTIMA COOK TM Oven
i:! Z:i_:i:i_i::i;_ _i: ::i_ i_i :i: i:i _:i _i: i:i_::__
1. Put food in oven and close door.
2. TOUCH
3. Enter code.
When "Code" appears on the display, use
the number pads to enter a valid code.
Example for Casserole, Freshly Made
(Code 27):
NOTES:
• To choose the desired food setting, see
the Cooking Guide Label on the front
frame of the oven, the "ULTIMA COOK
cooking chart" later in this section or the
ULTIMA COOK brochure.
• If an invalid number is entered, a tone
will sound and "START", then "OVER"
will alternately appear on the display.
Enter a valid code number from the
"ULTIMA COOK cooking chart" to clear.
4. Enter food size or weight.
(If required, some categories do not have
amounts or weights.)
When "WGF' or "QTY" appear on the dis-
play, use the number pads to enter correct
amounts. Pressing the "0" pad increases
weight in .25 Ib (.113 kg) increments.
Example for 4 cups (1L):
-][, _! :! !i !i i ¸ _iEi
The cooking time will count down.
When cooking time ends, four tones will
sound, and the display will show "End".
e
After cooking, open the door
OR
rc,.c,,EL x m]
Four tones will repeat every minute until
you open the oven door or touch
CANCEL. This will clear the display.
::: ::: : ::: ::::::: :: i:;
• Use non-metallic cookware for ULTIMA
COOK. Ovenproof glass, ceramic and
plastic bakeware are suitable for use
during ULTIMA COOK.
• Do not use coverings or containers made
of foil, plastic not recommended for use in
a conventional oven, waxed paper or other
paper when using ULTIMA COOK.
• Covering of foods while cooking with
ULTIMA COOK is generally not necessary.
If your recipe requires covering use a
casserole dish with a lid for best results.
• For most cooking with ULTIMA COOK, use
the convection grid on the turntable. The
convection grid allows hot air to circulate
around the bakeware. Refer to the
ULTIMA COOK chart to know when to use
the convection grid.
• To aid in cooking, the crisper pan is some-
times used during ULTIMA COOK. Refer to
the ULTIMA COOK chart to know when to
use the crisper pan. When using the crisper
pan, place the pan directly on the turntable.
• When roasting with ULTIMA COOK, meats
and poultry will spatter more heavily than
when roasting in a conventional oven. To
make cleanup easier you may use plastic
oven bags designed for use in a conven-
tional oven. When using oven bags, follow
the manufacturer's instructions about
preparation of the bag for cooking.
:. :: : ; :,: .....
Touch START or wait 5 seconds for oven
to start automatically.
continued on next page 11
etting to Know Your ULTIMA COOK TMOven
• Select tender cuts of meat when cooking
with ULTIMA COOK. Less tender cuts of
meat that require long, slow cooking
cycles to become tender are not well suit-
ed for ULTIMA COOK.
• No preheating is required when using
ULTIMA COOK.
• Cooking times preset for ULTIMA COOK
were carefully set for you, but if the done-
ness is not what you desire keep these
two tips in mind. If foods are typically more
done than you desire, always check the
doneness of the food a few minutes before
the end of the cycle. For meats, always
rely on an instant read meat thermometer
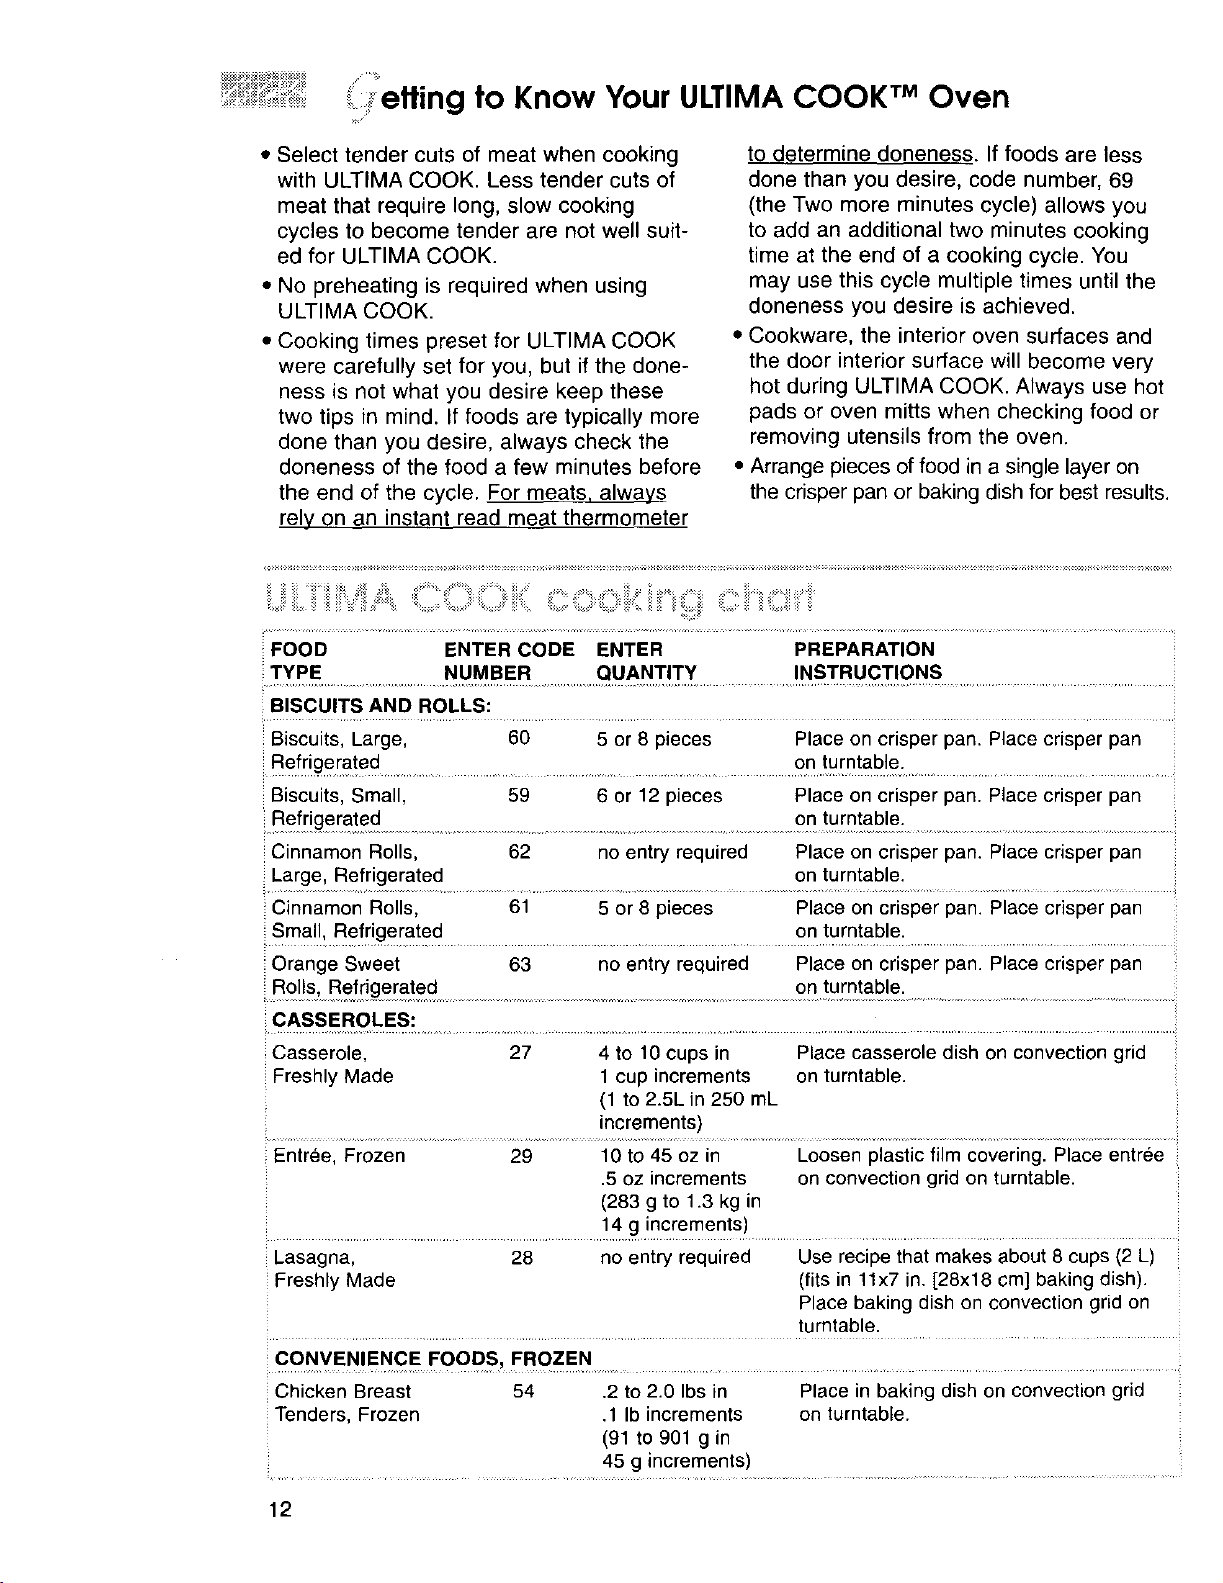
:z _ii_ _:_ii_:i_ii:! :ii!_:_::i ! iii i :ii : : _ : : :_-_ : : ; :: !:
:FOOD ENTER CODE ENTER PREPARATION
TYPE NUMBER QUANTITY INSTRUCTIONS
BISCUITS AND ROLLS:
...... .....
to determine doneness. If foods are less
done than you desire, code number, 69
(the Two more minutes cycle) allows you
to add an additional two minutes cooking
time at the end of a cooking cycle. You
may use this cycle multiple times until the
doneness you desire is achieved.
• Cookware, the interior oven surfaces and
the door interior surface will become very
hot during ULTIMA COOK. Always use hot
pads or oven mitts when checking food or
removing utensils from the oven.
• Arrange pieces of food in a single layer on
the crisper pan or baking dish for best results.
Biscuits, Large, 60 5 or 8 pieces Place on crisper pan. Place crisper pan
Refr!ger_a!ed ............................................................................ on .!umtab.le.:..................................................
Biscuits, Small, 59 6 or 12 pieces Place on crisper pan. Place crisper pan
....Refrigera!ed ..........................................................................................on !urotable........................................................
Cinnamon Rolls, 62 no entry required Place on crisper pan. Place crisper pan
Large, Refrigerated on turntable.
Cinnamon Rolls, 61 5 or 8 pieces Place on crisper pan. Place crisper pan
. Small_.Refriger_ated....................................................................................en.tum_able:..........................................................
Orange Sweet 63 no entry required Place on crisper pan. Place crisper pan
Rolls, Refrigerated .....
:=CASSEROLES:
Casserole, 27 4 to 10 cups in Place casserole dish on convection grid
Freshly Made 1 cup increments on turntable.
Entree, Frozen 29 10 to 45 oz in Loosen plastic film covering. Place entree
.............................................. !4 g increments)................................................................
Lasagna, 28 no entry required Use recipe that makes about 8 cups (2 L)
Freshly Made (fits in 11x7 in. [28x18 cm] baking dish).
......... on turntable.
(1 to 2.5L in 250 mL
increments)
.5 oz increments on convection grid on turntable.
(283 g to 1.3 kg in
Place baking dish on convection grid on
turntable.
Chicken Breast 54 .2 to 2.0 Ibs in Place in baking dish on convection grid
Tenders, Frozen .1 Ib increments on turntable.
(91 to 901 g in
45 g increments)
12
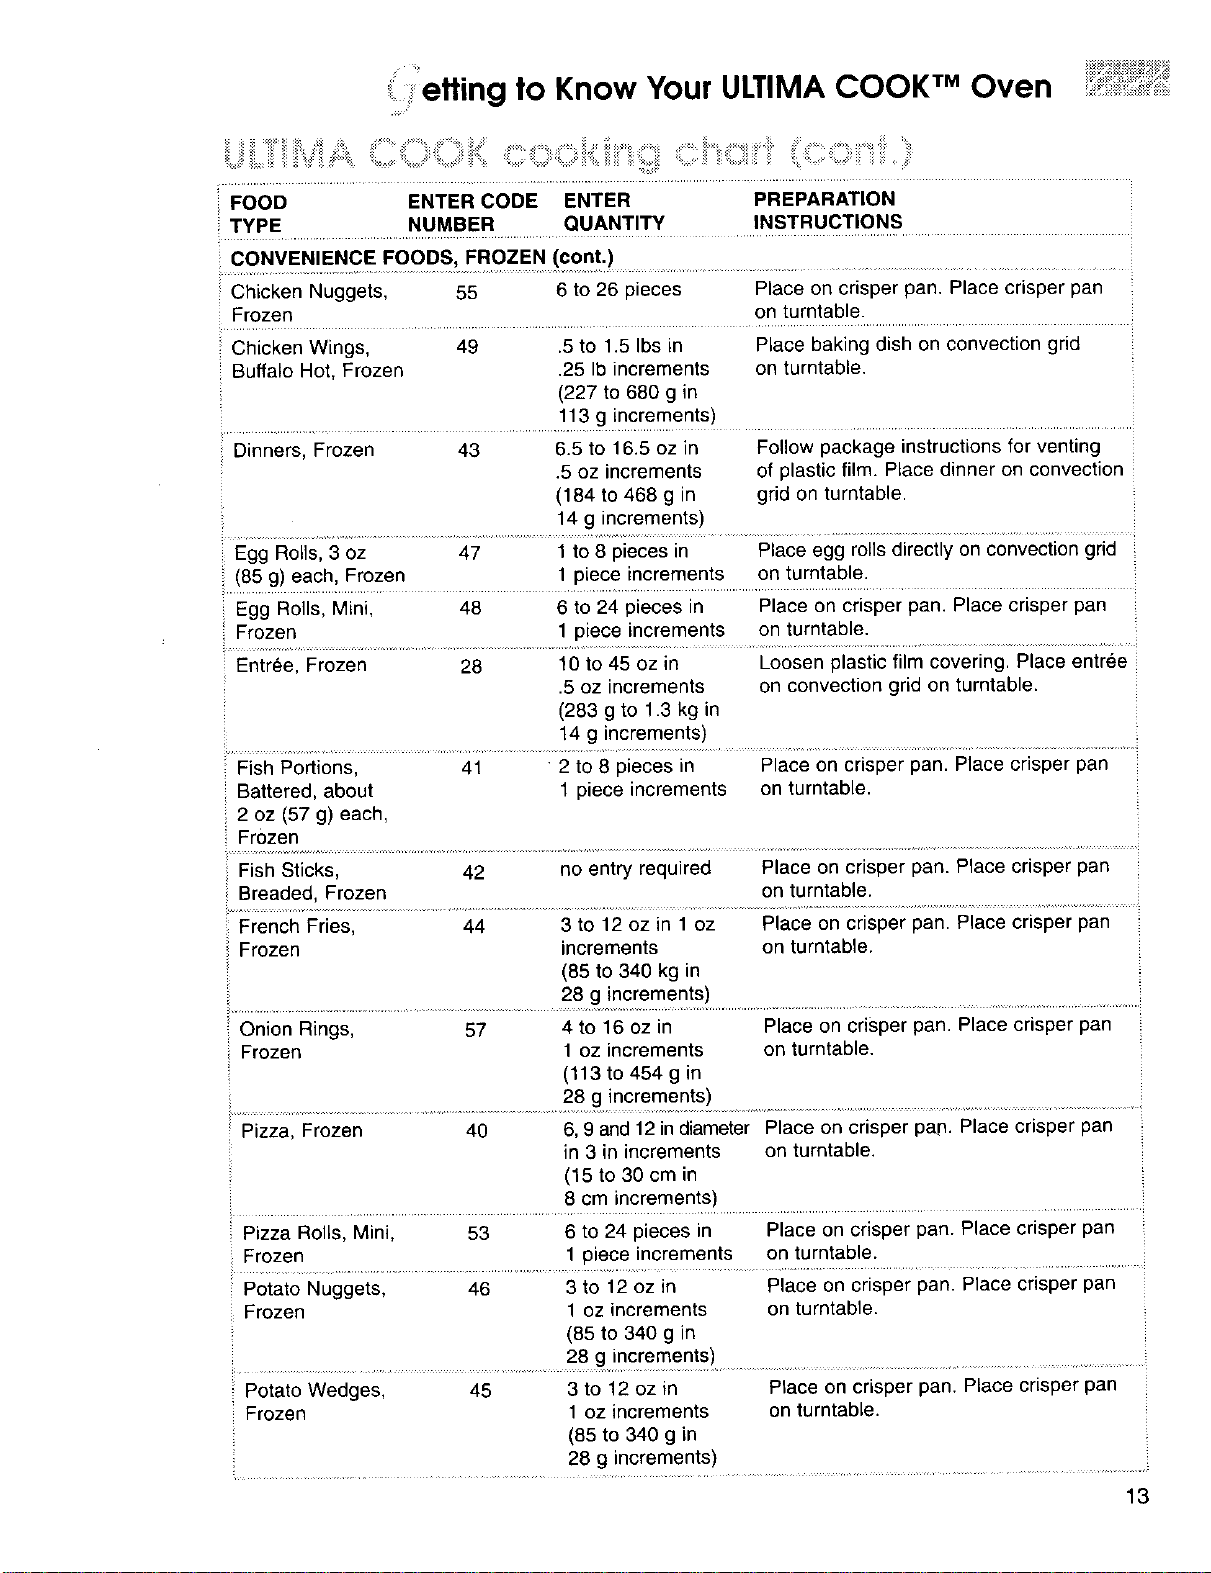
etting to Know Your ULTIMA COOK TM Oven
.............................. ii ....iiiTM!,•_ _,, ,i,.,_,,_ ,,,_,,.,_,,,,_,_,,_,,_,,,,_, ,,,_
FOOD ENTER CODE ENTER PREPARATION
TYPE NUMBER QUANTITY INSTRUCTIONS
Chicken Nuggets, 55 6 to 26 pieces Place on crisper pan. Place crisper pan
Frozen on turntable.
Chicken Wings, 49 .5to 1.5 Ibs in PLace baking dish on convection grid
Buffalo Hot, Frozen .25 Ib increments on turntable.
(227 to 680 g in
113 g increments)
Dinners, Frozen 43 6.5 to 16.5 oz in Follow package instructions for venting
.5 oz increments of plastic film. Place dinner on convection
(184 to 468 g in grid on turntable.
14 g increments)
Egg Rolls, 3 oz 47 1 to 8 pieces in Place egg rolls directly on convection grid
(85 g) each, Frozen 1piece increments on turntable.
Egg Rolls, Mini, 48 6 to 24 pieces in Place on crisper pan. Place crisper pan
Frozen 1 piece increments on turntable.
Entree, Frozen 28 t0 to 45 oz in Loosen plastic film covering. Place entree
.5 oz increments on convection grid on turntable.
(283 g to 1.3 kg in
14 g increments)
Fish Portions, 41 2 to 8 pieces in Place on crisper pan. Place crisper pan
Battered, about 1 piece increments on turntable.
2 oz (57 g) each,
Frozen
Fish Sticks, 42 no entry required Place on crisper pan. Place crisper pan
Breaded, Frozen on turntable.
French Fries, 44 3 to 12 oz in 1 oz Place on crisper pan. Place crisper pan
Frozen increments on turntable.
(85 to 340 kg in
28 g increments)
Onion Rings, 57 4 to 16 oz in Place on crisper pan. Place crisper pan
Frozen 1 oz increments on turntable.
(113 to 454 g in
28 g increments)
Pizza, Frozen 40 6, 9 and 12 in diameter Place on crisper pan. Place crisper pan
in 3 in increments on turntable.
(15 to 30 cm in
8 cm increments)
Pizza Rolls, Minil ........ 53 ...............6 tO 24 pieces in.......... Piaceon crispe; pan. Place crisper pan
Frozen 1 piece increments on turntable.
Potato Nuggets, 46 3 to 12 oz in Place on crisper pan. Place crisper pan
Frozen 1 ez increments on turntable.
(85 to 340 g in
Potato Wedges, 45 3 to 12 oz in Place on crisper pan. Place crisper pan
Frozen 1 oz increments on turntable.
(85 to 340 g Ln
28 g increments)
13
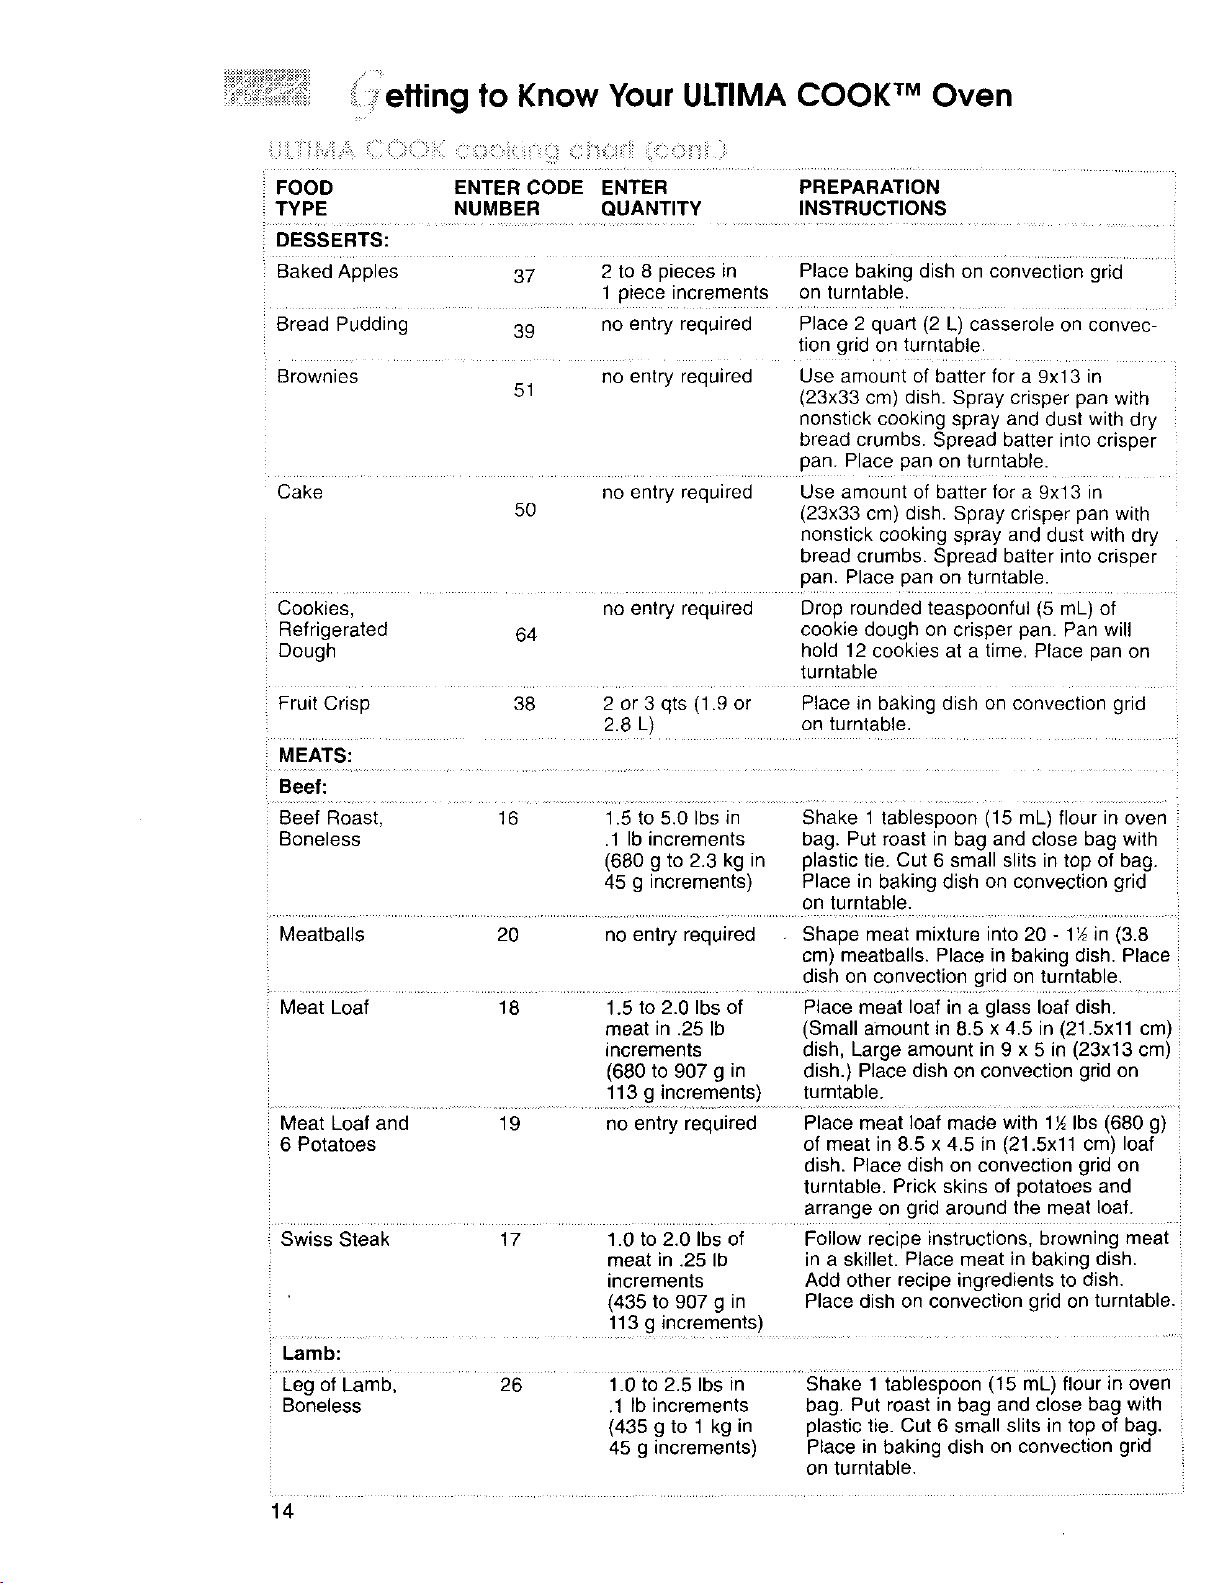
: etting to Know Your ULTIMA COOK TM Oven
FOOD ENTER CODE ENTER PREPARATION
TYPE NUMBER QUANTITY INSTRUCTIONS
DESSERTS:
Baked Appies 37 2 to 8 pieces in Place baking dish on convection grid
1 piece increments on turntable.
Bread Pudding 39 no entry required Place 2 quart (2 L) casserole on convec-
Brownies no entry required Use amount of batter for a 9x13 in
51 (23x33 cm) dish. Spray crisper pan with
Cake no entry required Use amount of batter for a 9x13 in
50 (23x33 cm) dish. Spray crisper pan with
Cookies, no entry required Drop rounded teaspoonful (5 mL) of
Refrigerated 64 cookie dough on crisper pan. Pan will
Dough hold 12 cookies at a time. Place pan on
Fruit Crisp 38 2 or 3 qts (1.9 or Place in baking dish on convection grid
2.8 L) on turntable.
MEATS:
Beef:
Beef Roast, i6 .... i.5 to 5.0 Ibs in Shake i teblespoen (15 mE)flour in even
Boneless .1 Ib increments bag. Put roast in bag and close bag with
(660 g to 2.3 kg in plastic tie. Cut 6 small slits in top of bag.
45 g increments) Place in baking dish on convection grid
Meatballs 20 no entry required Shape meat mixture into 20 - 1½in (3.8
Meat Loaf 18 1.5 to 2.0 Ibs of Place meat loaf in a glass loaf dish.
meat in .25 Ib (Small amount in 8.5 x 4.5 in (21.5xll cm)
increments dish, Large amount in 9 x 5 in (23x13 cm)
(680 to 907 g in dish.) Place dish on convection grid on
113 g increments) turntable.
Meat Loaf and 19 no entry required Place meat loaf made with 1½ Ibs (680 g)
6 Potatoes of meat in 8.5 x 4.5 in (21.5xll cm) loaf
Swiss Steak 17 1.0 to 2.0 Ibs of Follow recipe instructions,browning meat
meat in .25 Ib in a skillet. Place meat in baking dish.
increments Add other recipe ingredients to dish.
(435 to 907 g in Place dish on convection grid on turntable.
...... 113 g increments ) ..........
Lamb:
Leg of Lamb, 26 1.0 to 2.5 Ibs in Shake 1 tablespoon (15 mL) flour in oven
Boneless .1 Ib increments bag. Put roast in bag and close bag with
(435 g to 1 kg in plastic tie. Cut 6 small slits in top of bag.
45 g increments) Place in baking dish on convection grid
tion grid on turntable•
nonstick cooking spray and dust with dry
bread crumbs. Spread batter into crisper
pan. Place pan on turntable.
nonstick cooking spray and dust with dry
bread crumbs. Spread batter into crisper
pan. Place pan on turntable.
turntable
on turntable.
cm) meatballs. Place in baking dish. Place
dish on convection grid on turntable.
dish. Place dish on convection grid on
turntable. Prick skins of potatoes and
arrange on grid around the meat loaf.
on turntable.
14
 Loading...