

KitchenAid KECC567H Owner's Manual
Use and Care Guide
®
®
A Note to You ...............................2
Cooktop Safety ...........................3
Getting to Know
Your Cooktop...............................5
Using Your Cooktop....................9
Using the surface units ................9
Using the cooktop ......................12
Cookware tips.............................13
Characteristics of
cookware materials....................14
Caring for Your Cooktop ..........15
Cleaning the cooktop
and control panel........................15
Cleaning the control knobs........15
How to keep your cooktop
looking like new..........................16
Troubleshooting........................18
Requesting Assistance
or Service...................................19
Warranty.....................................22
For assistance or service in the U.S.A.,
call the Customer Interaction Center.
1-800-422-1230
For assistance or service
in Canada, see page 20.
KITCHENAID®Electric Built-In Ceramic Cooktop
Models: KECC501G KECC502G YKECC502G KECC507G
YKECC507G KECC508G YKECC508G KECC562G
KECC567G YKECC567G KECC568G YKECC568G
KECC051H KECC507H KECC563H KECC567H
3192800A
www.kitchenaid.com

A Note to You
Thank you for buying a KITCHENAID
Because your life is getting busier and more complicated, KitchenAid appliances are
easy to use, save time, and help you manage your home better. To ensure that you
enjoy many years of trouble-free operation, we developed this Use and Care Guide.
It contains valuable information concerning how to operate and maintain your new
appliance properly. Please read it carefully. Also, please complete and mail the
enclosed Product Registration Card.
®
appliance!
Please record your model’s information.
Whenever you call our Customer Interaction
Center at 1-800-422-1230 (in Canada,
1-800-461-5681) or request service for your
appliance, you need to know your complete
model number and serial number. You can
find this information on the model and serial
number plate (see diagrams for location of
plate).
Please also record the purchase
information.
NOTE: You must provide proof of purchase
or installation date for in-warranty service.
Keep this book and the sales slip together for future reference.
Model Number __________________________
Serial Number __________________________
Purchase/
Installation Date ________________________
Builder/Dealer
Name __________________________________
Address ________________________________
Phone__________________________________
2
Cooktop Safety
IMPORTANT SAFETY INSTRUCTIONS
WARNING: To reduce the risk of
fire, electrical shock, injury to persons, or
damage when using the cooktop, follow
basic precautions, including the following:
• CAUTION: Do not store items of
interest to children in cabinets above
a cooktop – Children climbing on
the cooktop to reach items could be
seriously injured.
• Proper Installation – Be sure your cooktop is properly installed and grounded
by a qualified technician.
• Never Use Your Cooktop for Warming
or Heating the Room.
• Do Not Leave Children Alone – Children
should not be left alone or unattended
in area where cooktop is in use. They
should never be allowed to sit or stand
on any part of the cooktop.
• Wear Proper Apparel – Loose-fitting
or hanging garments should never
be worn while using the cooktop.
• User Servicing – Do not repair or
replace any part of the cooktop
unless specifically recommended in
the manual. All other servicing should
be referred to a qualified technician.
• Storage on Cooktop – Flammable
materials should not be stored near
surface units.
• Do Not Use Water on Grease Fires –
Smother fire or flame or use dry
chemical or foam-type extinguisher.
• Use Only Dry Potholders – Moist or
damp potholders on hot surfaces may
result in burns from steam. Do not let
potholder touch hot heating elements.
Do not use a towel or other bulky cloth.
SAVE THESE INSTRUCTIONS
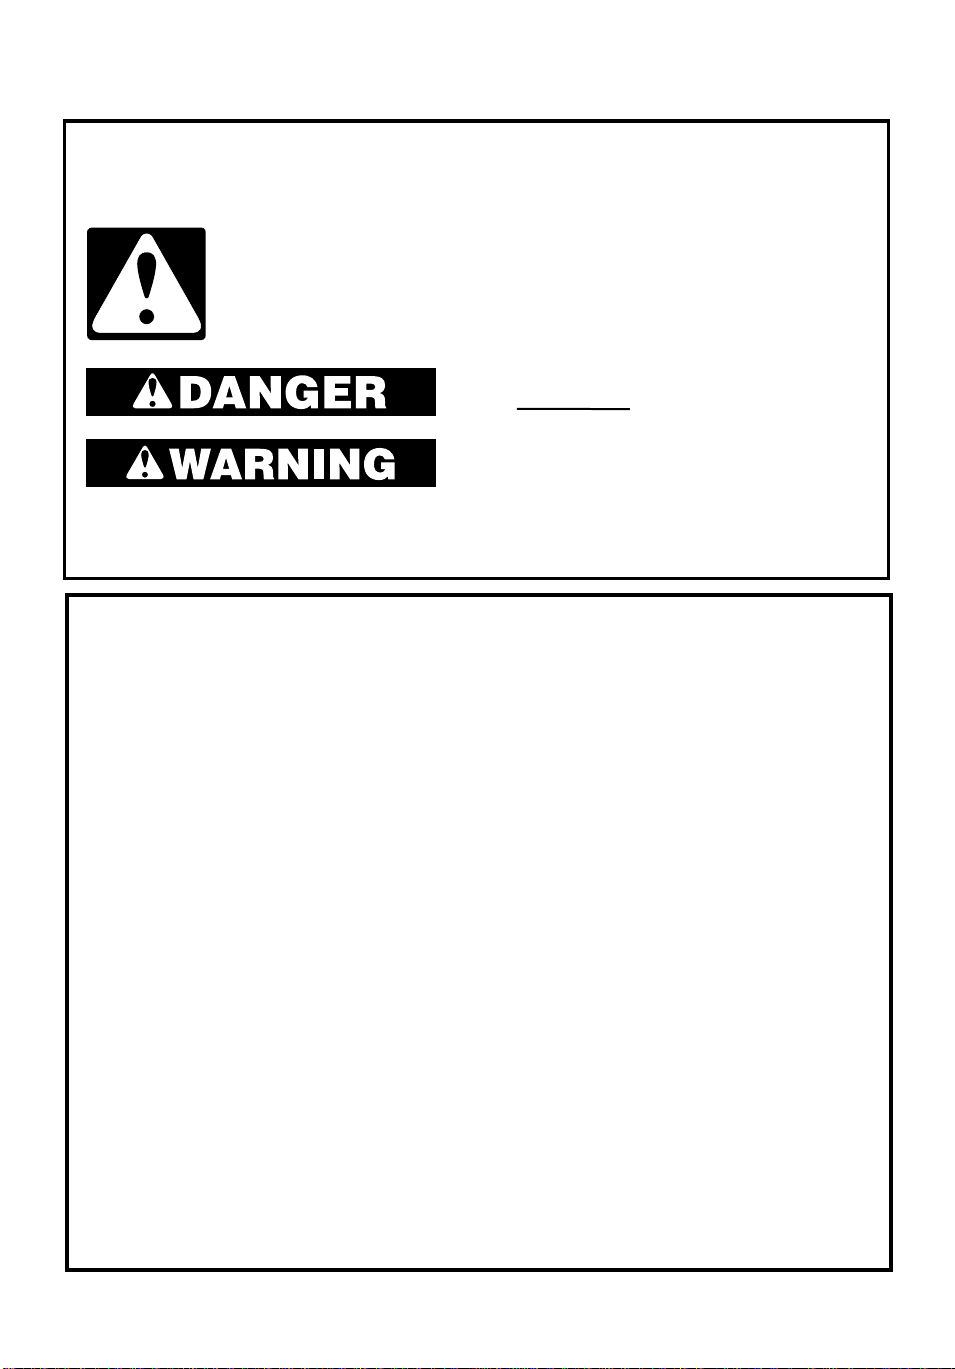
You can be killed or seriously injured if you
don't immediately follow instructions.
You can be killed or seriously injured if you
don't follow instructions.
All safety messages will tell you what the potential hazard is, tell you how to reduce the
chance of injury, and tell you what can happen if the instructions are not followed.
Your safety and the safety of others are very important.
We have provided many important safety messages in this manual and on your appliance.
Always read and obey all safety messages.
This is the safety alert symbol.
This symbol alerts you to potential hazards that can kill or hurt you and
others.
All safety messages will follow the safety alert symbol and either the word
“DANGER” or “WARNING.” These words mean:
continued on next page
3
C ooktop Safety
IMPORTANT SAFETY INSTRUCTIONS
• DO NOT TOUCH SURFACE UNITS
OR AREAS NEAR UNITS – Surface
units may be hot even though they are
dark in color. Areas near surface units
may become hot enough to cause
burns. During and after use, do not
touch, or let clothing or other flammable
materials contact surface units or areas
near units until they have had sufficient
time to cool. Among those areas are
the cooktop and surfaces facing the
cooktop.
• Use Proper Pan Size – This cooktop is
equipped with one or more surface units
of different size. Select utensils having
flat bottoms large enough to cover the
surface unit heating element. The use
of undersized utensils will expose a
portion of the heating element to direct
contact and may result in ignition of
clothing. Proper relationship of utensil
to burner will also improve efficiency.
• Never Leave Surface Units Unattended
at High Heat Settings – Boilover causes
smoking and greasy spillovers that
may ignite.
• Glazed Cooking Utensils – Only certain
types of glass, glass/ceramic, ceramic,
earthenware, or other glazed utensils
are suitable for cooktop service without
breaking due to the sudden change in
temperature.
• Utensil Handles Should Be Turned
Inward and Not Extend Over Adjacent
Surface Units – To reduce the risk of
burns, ignition of flammable materials,
and spillage due to unintentional
contact with the utensil, the handle of
a utensil should be positioned so that it
is turned inward, and does not extend
over adjacent surface units.
• Do Not Cook on Broken Cooktop –
If cooktop should break, cleaning
solutions and spillovers may penetrate
the broken cooktop and create a risk
of electric shock. Contact a qualified
technician immediately.
• Clean Cooktop With Caution – If a
wet sponge or cloth is used to wipe
spills on a hot cooking area, be careful
to avoid steam burn. Some cleaners
can produce noxious fumes if applied
to a hot surface.
For units with ventilating hood –
• Clean Ventilating Hoods Frequently –
Grease should not be allowed to
accumulate on hood or filter.
• When flaming foods under the hood,
turn the fan on.
SAVE THESE INSTRUCTIONS
The California Safe Drinking Water and Toxic Enforcement Act requires the Governor
of California to publish a list of substances known to the State of California to cause
cancer, birth defects, or other reproductive harm, and requires businesses to warn of
potential exposure to such substances.
WARNING: This product contains a chemical known to the State of California to cause
cancer, birth defects, or other reproductive harm.
This appliance can cause low-level exposure to some of the substances listed,
including benzene, formaldehyde, carbon monoxide, and toluene.
4
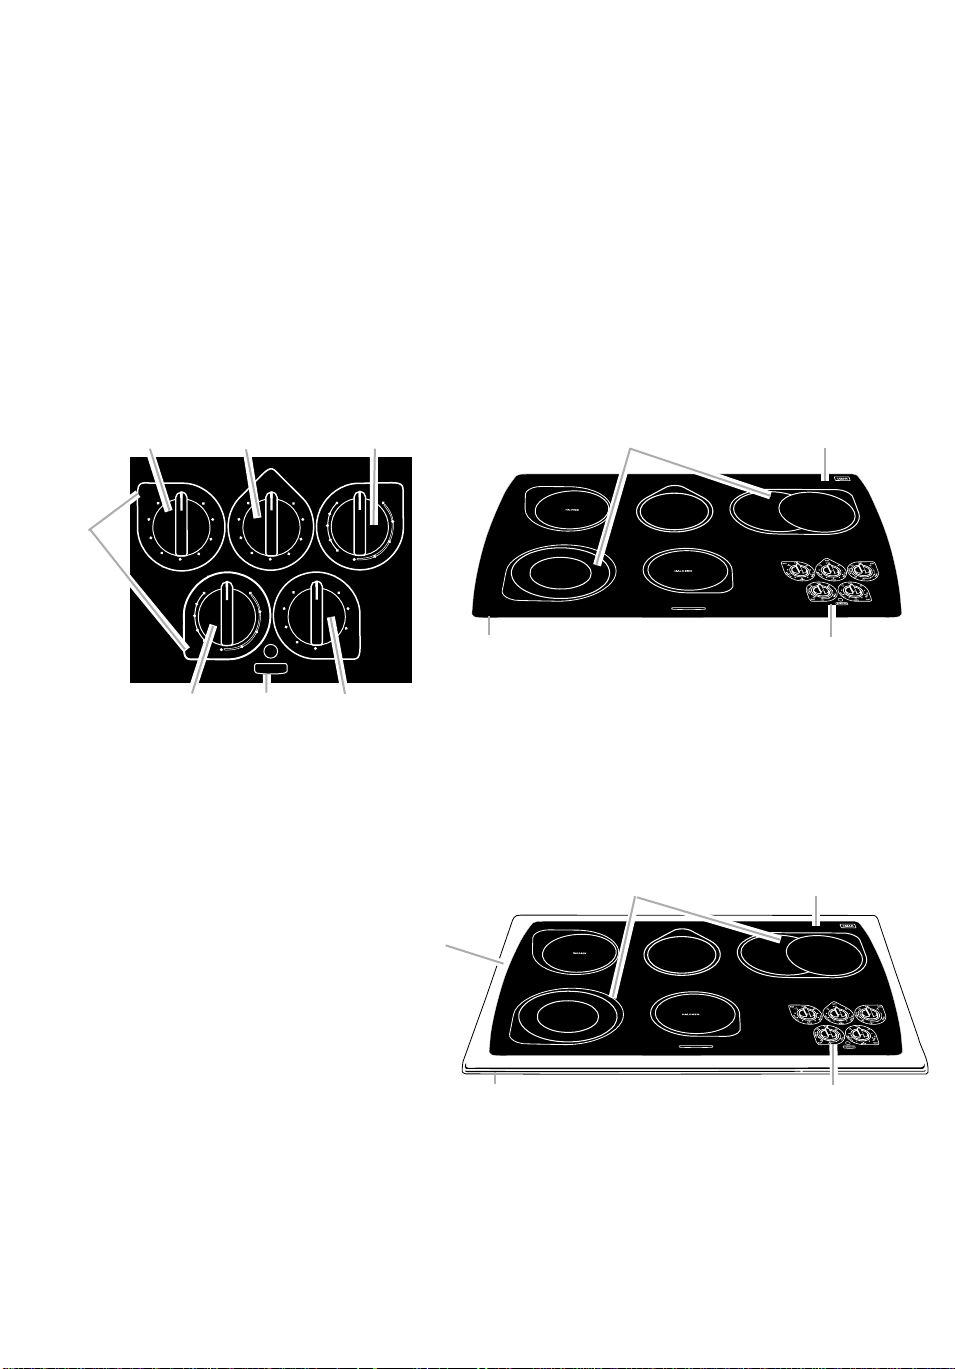
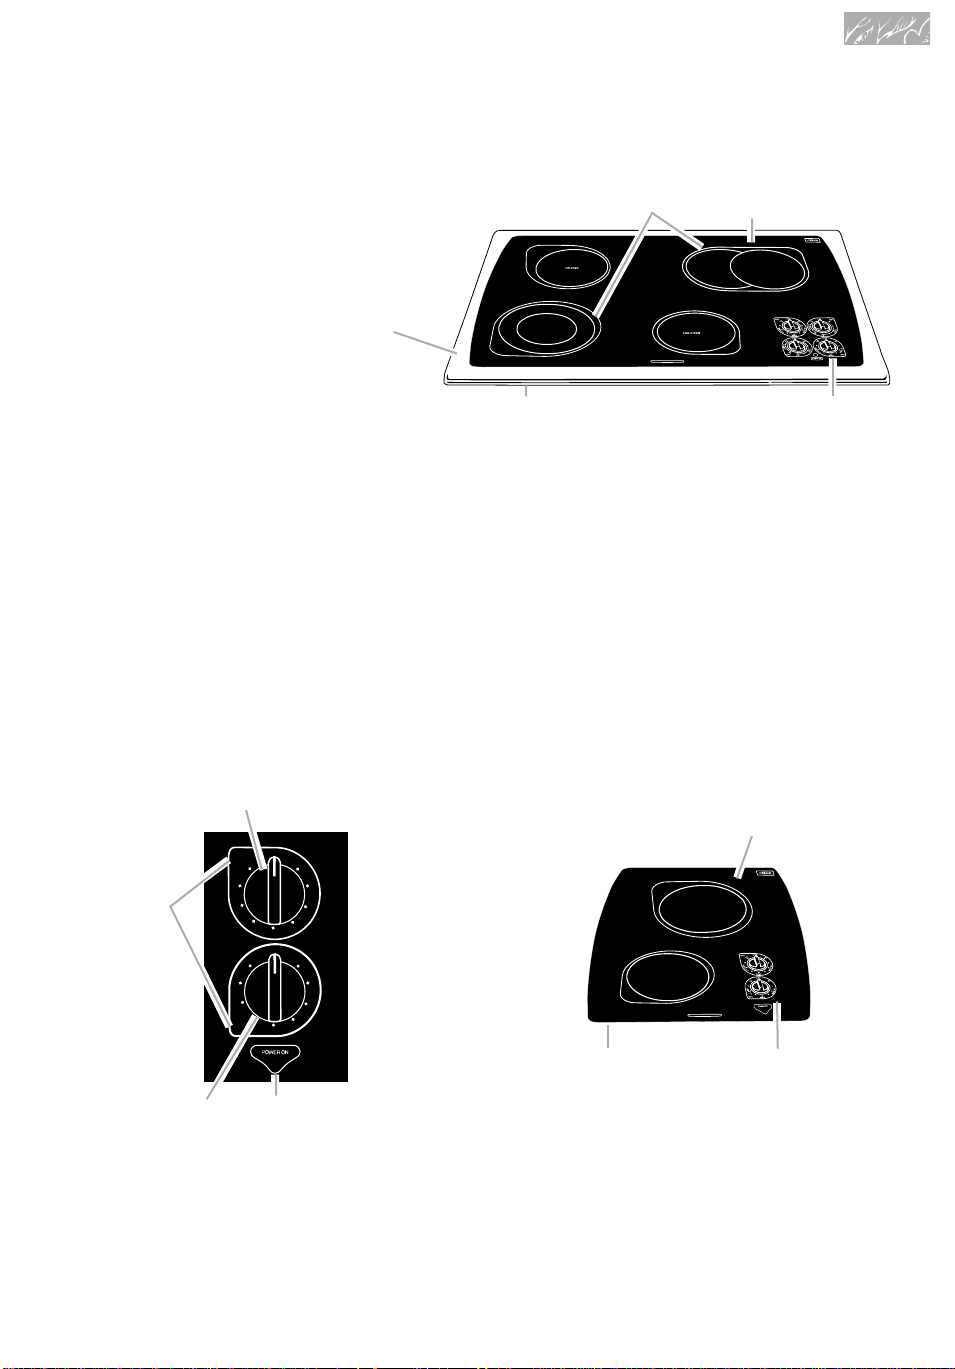
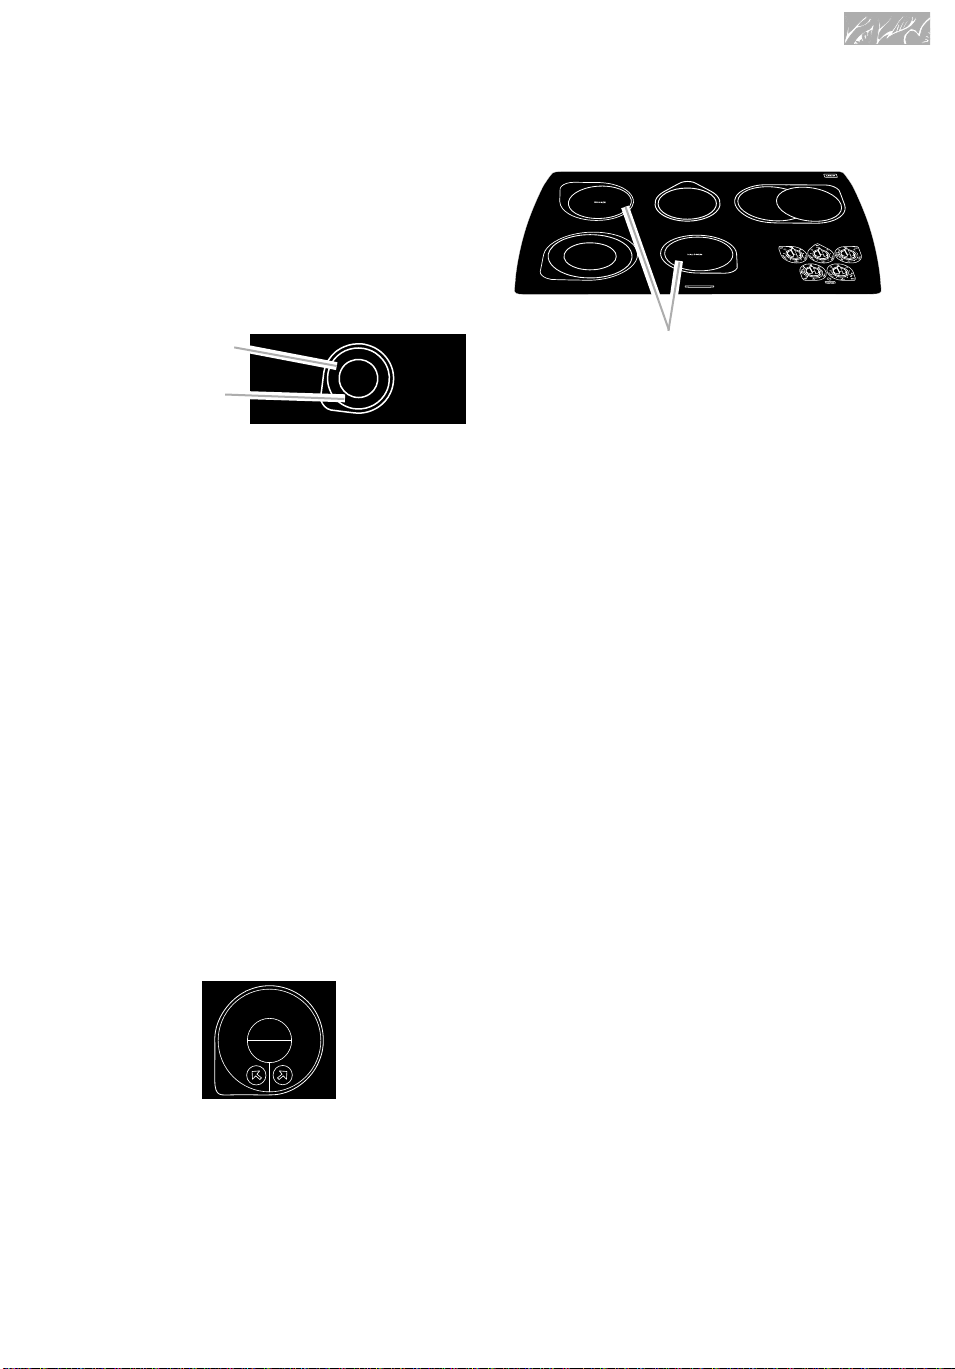
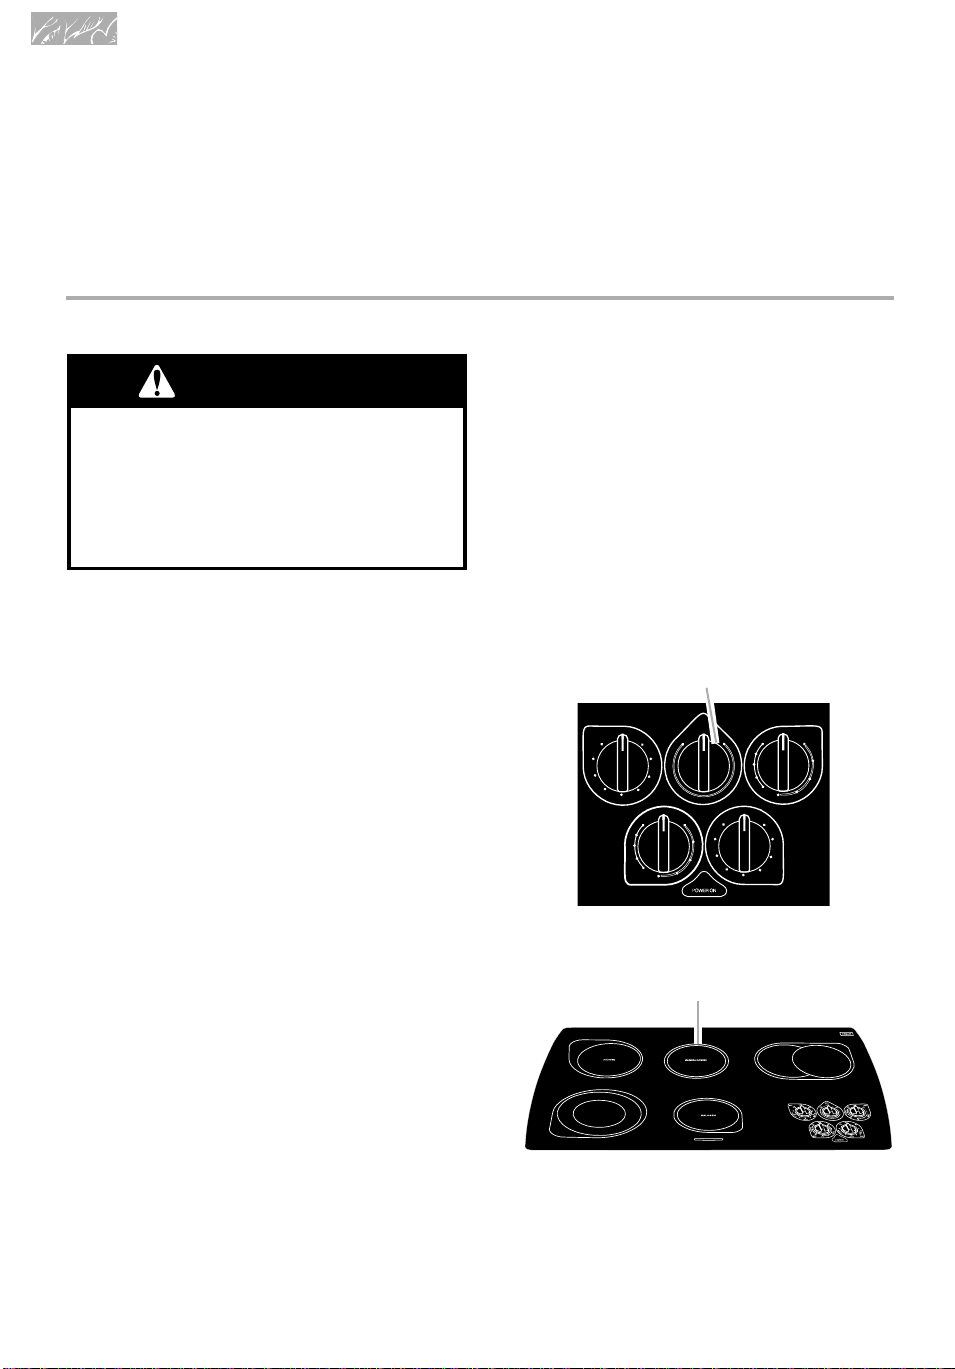
Getting to Know Your
Cooktop
This section contains captioned illustrations of your cooktop. Use it to become familiar with
the location and appearance of all parts and features. Following are models with control
knobs and dual-size and halogen surface units.
36" Models
(KECC562G, KECC567G, YKECC567G, and KECC567H)
Control panel
Hot
surface
indicator
lights
located in
the lobe
of each
surface
unit marker
Left rear
control
knob
F
F
O
HOT
O
L
M
E
D
L
O
M
E
D
Left front
control
knob
H
I
M
O
L
E
L
G
N
I
S
H
I
HOT
Center rear
control
knob
HOT
F
F
O
O
L
M
I
H
E
D
D
L
E
O
M
E
D
F
F
O
H
I
L
A
U
D
L
O
POWER ON
Power on
light
Right rear
control
knob
F
F
O
HOT
H
I
I
H
D
E
M
F
F
O
O
L
M
E
D
L
O
M
E
D
H
I
O
L
E
L
G
N
I
S
H
I
H
L
A
U
D
L
O
I
I
H
D
E
M
HOT
Model and serial
number plate
Dual-size
surface units
(p. 10)
(on bottom of
Right
burner box)
Ceramic
cooktop
(pp. 9-12)
Control
panel
(pp. 5, 9-12)
front
control
knob
(Model KECC567H shown below)
Dual-size
surface units
(p. 10)
Ceramic
cooktop
(pp. 9-12, 14-16)
Stainless steel
frame
(pp. 15, 17)
Model and serial
number plate
(on bottom of
burner box)
Control
panel
(pp. 5, 9-11)
Note for Models KECC567G, YKECC567G, and
KECC567H:
Right front and left rear surface units are halogen.
5

HOT
H
I
L
O
O
F
F
M
E
D
M
E
D
H
I
M
E
D
L
O
HOT
H
I
S
I
N
G
L
E
L
O
O
F
F
L
O
D
U
A
L
H
I
HOT
H
I
S
I
N
G
L
E
L
O
O
F
F
L
O
D
U
A
L
H
I
H
I
L
O
O
F
F
M
E
D
M
E
D
H
I
M
E
D
L
O
HOT
POWER ON
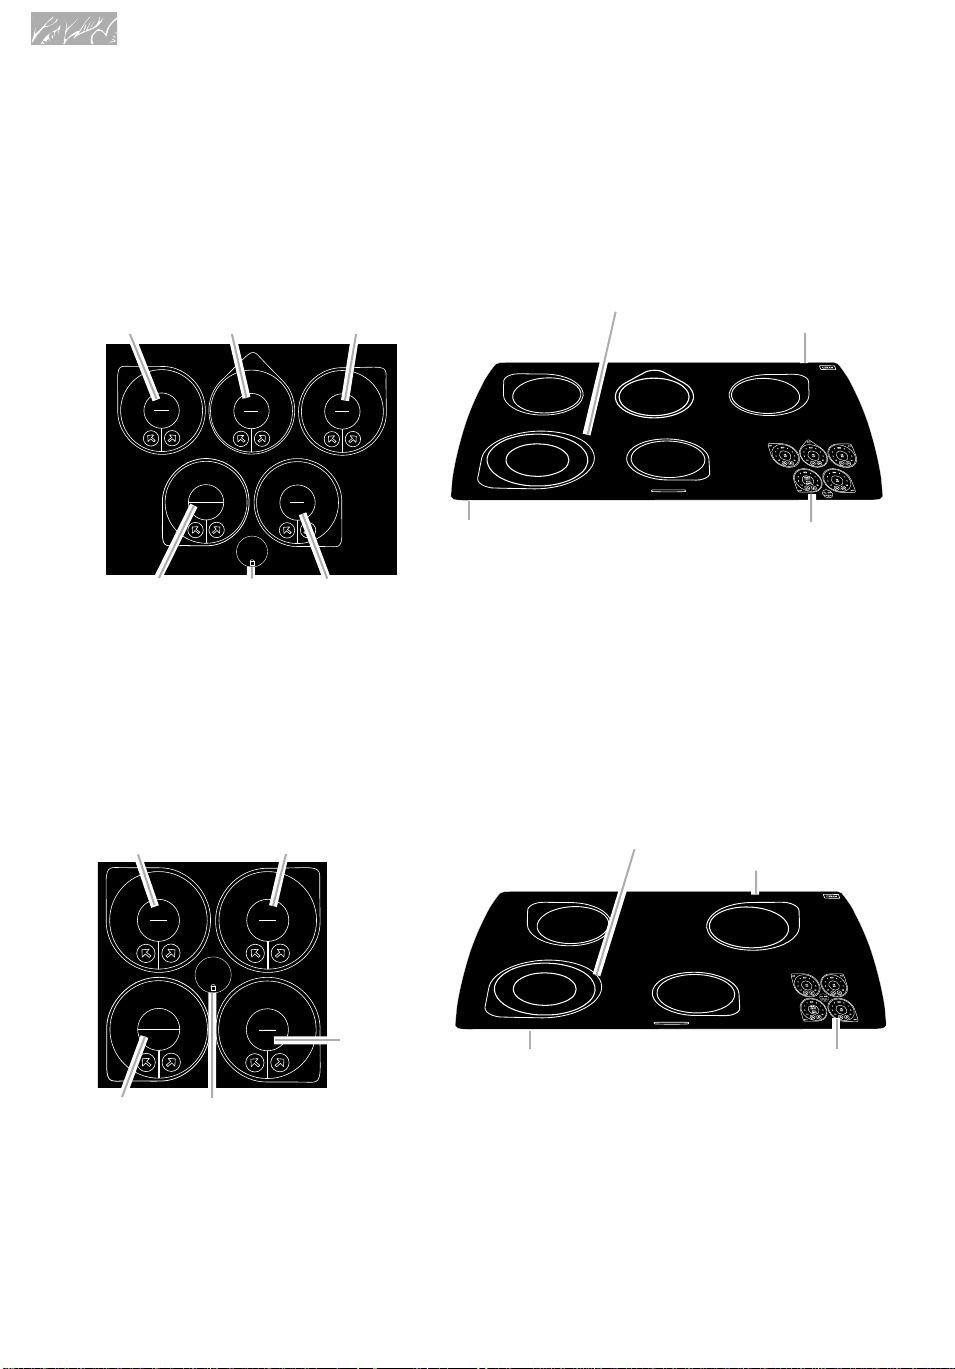
Getting to Know Your Cooktop
(KECC563H)
Control panel
Left rear
control
knob
Center rear
control knob
(Warming
element)
Right rear
control
knob
Dual-size
surface units
(p. 10)
Ceramic
cooktop
(pp. 9-12)
HOT
Hot
surface
indicator
lights
located in
the lobe
of each
surface
unit marker
F
F
O
HOT
M
E
D
H
O
L
L
O
M
E
D
O
L
E
L
G
N
I
S
H
I
HOT
Left front
control knob
I
O
L
I
H
D
E
M
F
F
O
H
I
L
O
Power on
light
F
F
O
H
I
O
L
E
L
G
N
I
S
H
I
F
F
O
H
I
O
L
M
E
L
D
A
L
U
O
D
HOT
M
E
D
Right front
control knob
30" Models
(KECC501G, KECC502G, YKECC502G,
KECC507G, YKECC507G, and KECC507H)
Control panel
Left rear
control
knob
Hot
surface
indicator
lights
located in
the lobe
of each
surface
unit marker
Right rear
control
knob
F
F
O
L
O
I
H
D
E
M
HOT
H
I
L
A
U
D
Right
front
control
knob
Model and serial
number plate
(on bottom of
Warming
element
(p. 12)
burner box)
Dual-size
surface units
(p. 10)
Model and serial number
plate (on bottom of
burner box)
Control
panel
(pp. 6, 9-10, 12)
Ceramic
cooktop
(pp. 9-12)
Control panel
(pp. 6, 9-10)
Left front
control
Power on
light
knob
6
Getting to Know Your Cooktop
HOT
H
I
L
O
O
F
F
M
E
D
M
E
D
H
I
M
E
D
L
O
HOT
H
I
L
O
O
F
F
M
E
D
M
E
D
H
I
M
E
D
L
O
15" Model
(KECC051H)
Stainless steel
frame
(pp. 15, 17)
(Model
Model and serial number
plate (on bottom of
burner box)
KECC507H shown below
Dual-size
surface units
(p. 10)
)
Ceramic
cooktop
(pp. 9-12)
Control
panel
(pp. 6, 9-10)
Note for Models KECC507G and YKECC507G:
Right front and left rear surface units are halogen.
Note for Model KECC501G:
This model does not have dual-size surface units.
Control panel
Hot
surface
indicator
lights
located in
the lobe
of each
surface
unit marker
Front
control
knob
Rear control
knob
Power on
light
Model and serial
number plate
(on bottom of burner
box)
Ceramic
cooktop
(pp. 9-12)
Control
panel
(pp. 7, 9)
7
HOT
LO
HI
2
3
4
6
7
8
MED
ON
OFF
LO
HI
2
3
4
6
7
8
MED
ON
OFF
LO
HI
2
3
4
6
7
8
MED
ON
OFF
LO
HI
2
3
4
6
7
8
MED
ON
/
OFF
ON/OFF
DUAL
SINGLE
HOT
HOT
HOT
ALL
OFF
CONTROL LOCK
Getting to Know Your Cooktop
Shown below are models with electronic touch controls and dual-size surface units.
36" Models
(KECC568G, YKECC568G)
Touch Control panel
Left rear
touch
control
Center rear
touch
control
Right rear
touch
control
Dual-size
surface unit
(p. 10)
Ceramic
cooktop
(pp. 9-12)
HOT
MED
4
3
ON
2
OFF
LO
HOT
Left front
touch
6
HI
3
2
LO
HOT
MED
4
3
7
ON
8
2
OFF
LO
MED
4
6
7
SINGLE
/
OFF
ON
8
DUAL
ON/OFF
HI
OFF
ALL
CONTROL LOCK
ALL OFF/
Control Lock
6
7
8
HI
4
3
2
LO
control
30" Models
(KECC508G, YKECC508G)
Touch Control panel
Left rear
touch
control
Right rear
touch
control
MED
ON
OFF
MED
4
3
ON
2
OFF
LO
6
7
8
HI
HOT
Right
front
touch
control
HOT
6
7
8
HI
Model and serial
number plate
(on bottom of
burner box)
Dual-size
surface unit
(p. 10)
Control
panel
(pp. 8, 9)
Ceramic
cooktop
(pp. 9-12)
Right
front
touch
control
ALL OFF/
Control Lock
Left front
touch
control
8
Model and serial
number plate
(on bottom of burner
box)
Control
panel
(pp. 8, 9)
Using Your Cooktop
This section tells you how to operate the controls on the cooktop. It also discusses how the
ceramic glass cooktop works, and includes tips on how to cook with and maintain the cooktop.
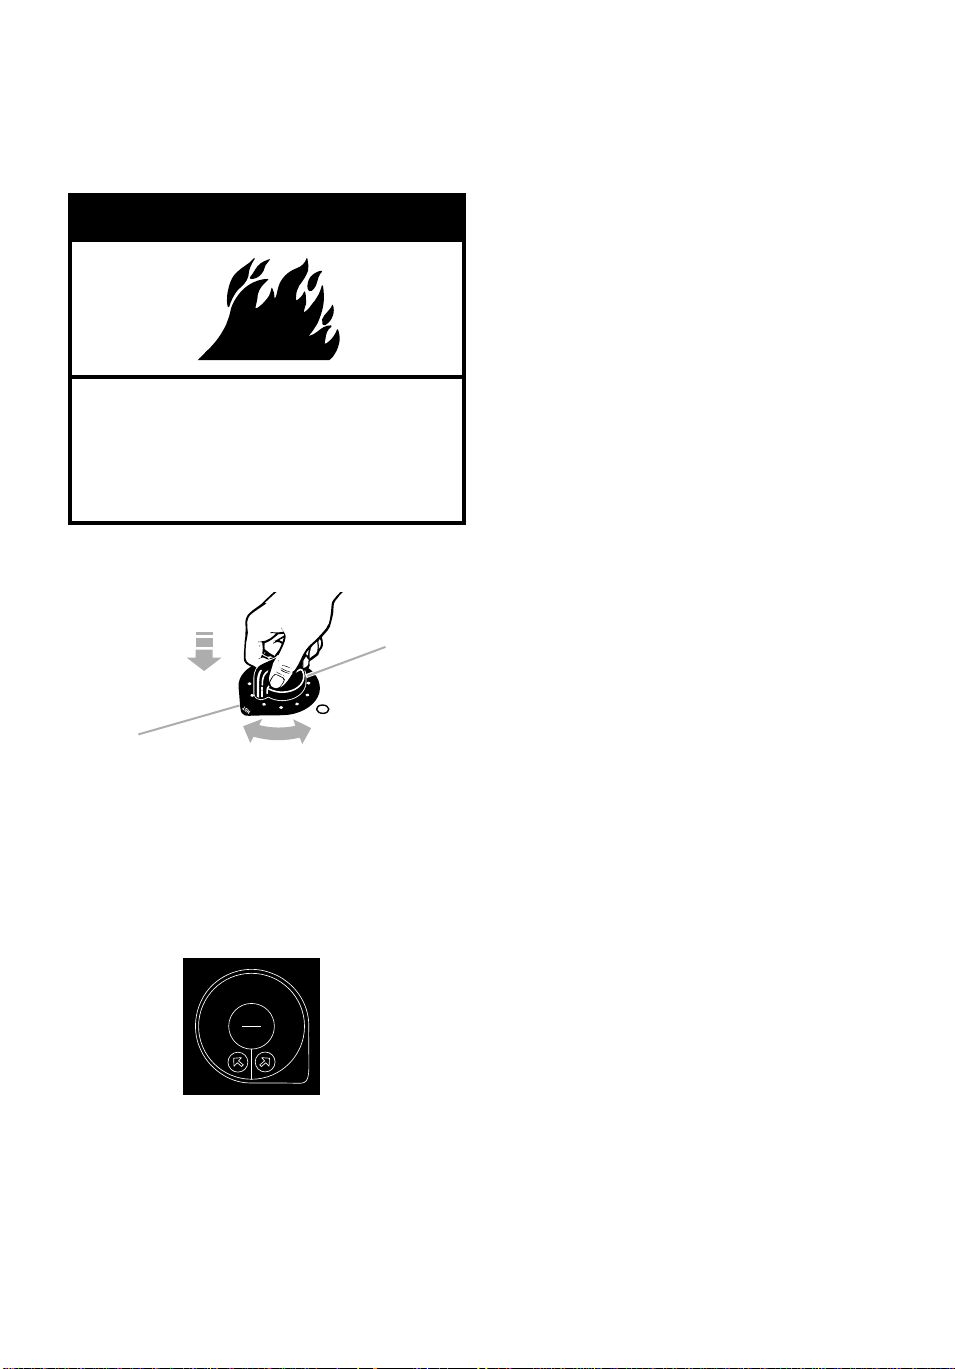
To choose a power level other than HI, from
wWARNING
Fire Hazard
Turn off all controls when done
cooking.
Failure to do so can result in death
or fire.
Using the surface units
F
F
O
H
O
I
L
Surface unit
M
E
D
L
O
I
H
D
E
M
M
D
E
marker
Control knobs (Models KECC501G,
KECC502G, YKECC502G, KECC507G,
YKECC507G, KECC562G, KECC567G,
YKECC567G, KECC051H, KECC507H,
KECC563H, KECC567H)
Push in control knobs before turning them to
a setting. Set them anywhere between HI and
OFF.
MED
4
6
3
2
LO
7
ON
8
OFF
HI
HOT
Electronic touch controls (Models
KECC508G, YKECC508G, KECC568G,
YKECC568G)
Touch ON/OFF to turn heating elements on.
The LO and HI lights will blink on and off,
indicating a choice of high or low power. To
choose high power, touch the arrow pointing to
HI. To choose low power, touch the arrow
pointing to LO.
Control
knob
the HI setting, touch and hold, or tap, the
arrow pointing to HI and the power level will
decrease. Stop when you reach the desired
level. Follow the same procedure from LO to
increase the power level.
To turn heating elements off individually,
touch ON/OFF. To turn all elements off at
once, touch ALLOFF.
NOTE: Heating elements will be visible (glow)
only at or above power levels 7 or 8.
To lock controls, touch CONTROL LOCK
and hold for 5 seconds. Atone will sound and
the lock light will go on. To unlock, repeat
above and lock light will go off.
Models KECC508G, YKECC508G,
KECC568G and YKECC568G are equipped
with a control cooling fan. The fan operates
when the cooktop is in use. The fan may
continue to run for a short period of time after
the cooktop is turned off.
Surface unit markers (All Models)
The shape and location of the Surface Unit
Markers match the shape and location of
the surface units that the control knob or
the touch control operates.
Power on light
Models KECC501G, KECC502G,
YKECC502G, KECC507G, YKECC507G,
KECC562G, KECC567G, YKECC567G,
KECC051H, KECC507H, KECC563H,
KECC567H :These models have a separate
Power On Light.
Models KECC508G, YKECC508G,
KECC568G, YKECC568G: These
electronic touch control models have a
common Power On Light. Power levels
LO through HI also act as Power On
Indicator Lights.
9
O
F
F
H
I
S
I
N
G
L
E
L
O
L
O
D
U
A
L
H
I
REAR
O
F
F
H
I
S
I
N
G
L
E
L
O
L
O
D
U
A
L
H
I
REAR
HOT
Using Your Cooktop
Hot surface indicator lights
The Hot Surface Indicator Lights in the lobe
at each control will glow when the surface
units get hot. The Indicator Lights will
continue to glow as long as the surface
units are too hot to touch, even after they
are turned off.
Until you get used to the settings, use the
following as a guide. For best results, start
cooking at the high setting; then turn the
control knob down to continue cooking.
SETTING
HI
MED-HI or 6-8
MED or 5
MED-LO or 2-4
RECOMMENDED USE
• To start food cooking.
• To bring liquid to a boil.
• To hold a rapid boil.
• To quickly brown or
sear meat.
• To maintain a slow boil.
• To fry poultry or meat.
• To make pudding,
sauce, or gravy.
• To stew or steam food.
• To simmer food.
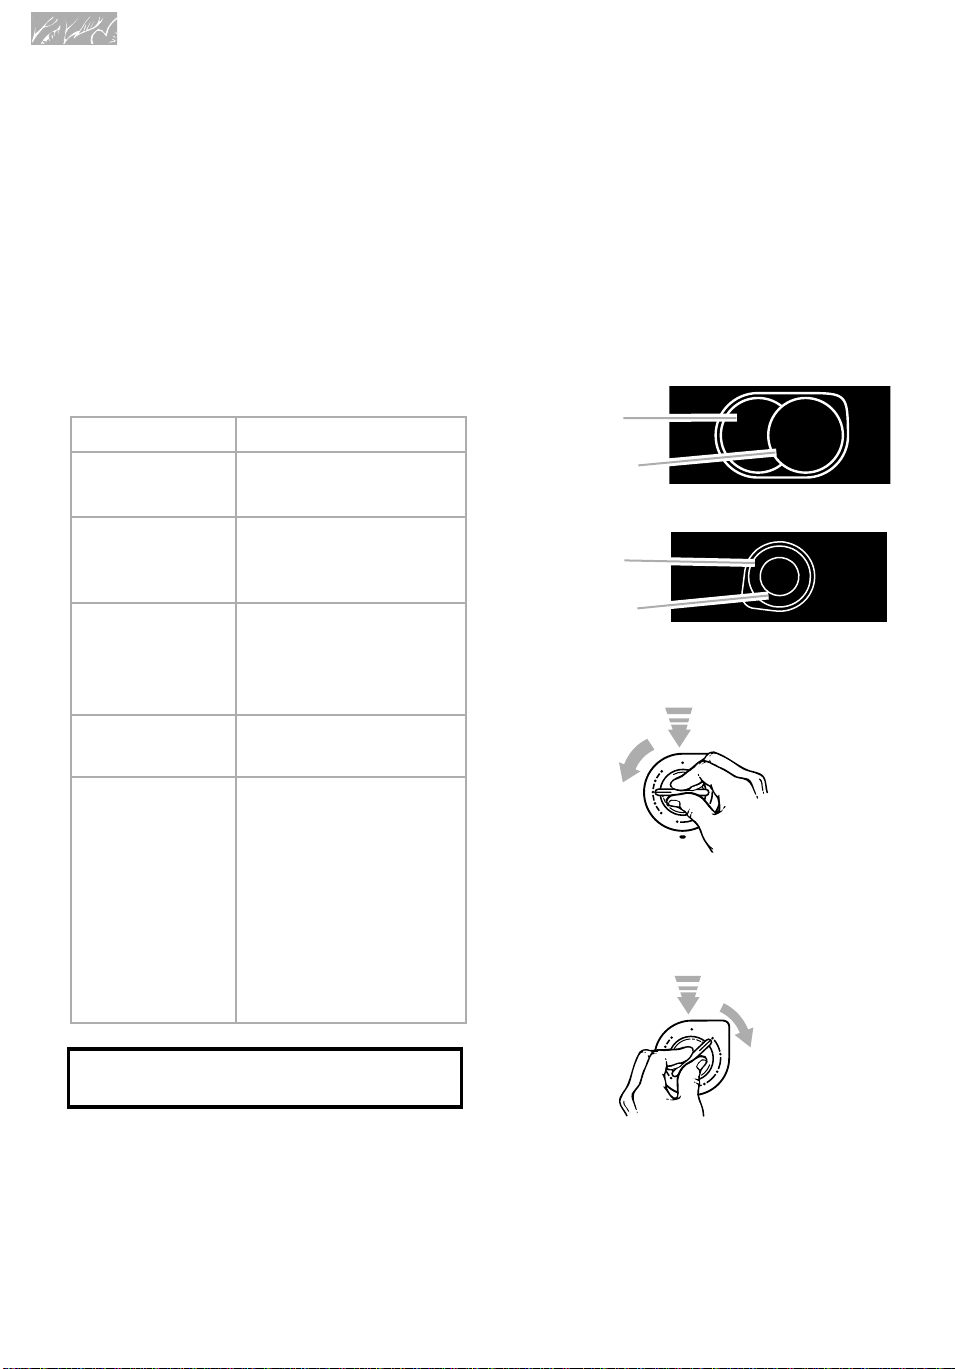
Using the dual-size surface unit
KECC568G, YKECC568G, KECC508G,
YKECC508G, KECC502G, YKECC502G,
KECC507G, YKECC507G, KECC562G,
KECC567G, YKECC567G, KECC507H,
KECC563H and KECC567H
You can use the right rear and left front
surface units as either small diameter, lower
wattage elements or large diameter, full
wattage elements.
Right rear surface unit:
Use both elements
for larger pans
Use small element
for smaller pans
Left front surface unit:
Use both elements
for larger pans
Use inner element
for smaller pans
To use the small or inner element
(for smaller pans):
LO
• To keep food warm.
Set the heat higher or
lower within the LO
(or 1) band to keep
food at the
temperature you want.
• To maintain liquid just
below simmer.
• To melt chocolate or
butter.
REMEMBER: When cooktop is in use, the entire cooktop area may become hot.
10
• Push in and turn the control knob to the
left (counterclockwise) to the desired
setting in the area marked “SINGLE”.
To use both elements (for larger pans):
• Push in and turn the control knob to the
right (clockwise) to the desired setting in
the area marked “DUAL”.
NOTE: You can turn the control knob in
either direction to reach “OFF”.
Using Your Cooktop
LO
HI
2
3
4
6
7
8
MED
ON
/
OFF
ON/OFF
DUAL
SINGLE
HOT
Using the dual size surface unit
(Models KECC508G, YKECC508G,
KECC568G, YKECC568G)
You can use the left front surface unit as
either a small diameter, lower wattage
element (center inner ring) for smaller pans
or as a large diameter, full wattage element
(entire element to outer ring) for larger pans.
Use both elements
for larger pans
Use inner element
for small pans
To use the small or inner element:
Touch SINGLE ON/OFF. The HI and LO
•
lights will blink on and off indicating a
choice of either HI or LO power selection.
Touch the arrow pointing to HI for high
•
power.
Touch the arrow pointing to LO for low
•
power.
To use both elements:
Touch DUAL ON/OFF and proceed the
•
same as for SINGLE ON/OFF.
To turn the entire element on, touch
•
DUAL ON/OFF. The HI and LO lights will
blink on and off indicating a choice of
either HI or LO power selection.
Touch the arrow pointing to HI for high
•
power.
Touch the arrow pointing to LO for low
•
power.
NOTE: You may switch between SINGLE
and DUAL element operation at any time an
element is in operation simply by touching
SINGLE or DUAL.
Using the ceramic glass cooktop
Halogen element (Models KECC507G,
YKECC507G, KECC567G, YKECC567G and
KECC567H)
The right front and left rear surface units
feature halogen elements. These elements
light up as soon as you turn them on and are
brighter than regular coil elements.
Cooking on the ceramic glass cooktop is
similar to cooking on coil elements. There are,
however, a few differences:
The surface cooking area will glow red
•
when the element is turned on. You will see
the element cycling on and off – even on the
HI setting – to help the area stay at the
temperature setting you chose.
Do not cook foods directly on the cooktop.
•
Do not cook popcorn that comes in
•
prepackaged aluminum containers on the
cooktop. The container could leave
aluminum marks on the cooktop that
cannot be removed completely.
Make sure the bottoms of pots and pans
•
are clean and dry before using them. Food
and water particles left on the bottoms can
leave deposits on the cooktop when it is
heated.
Lift pots and pans onto and off of the
•
cooktop. Sliding pots and pans on the cooktop could leave marks that are difficult to
remove or could leave permanent marks.
Dropping a heavy or hard object on the
•
cooktop could crack it. Be careful when using
heavy skillets and large pots. Do not store
jars or cans above the cooktop.
Do not use the cooktop as a cutting board.
•
Do not allow anything that could melt, such
•
as plastic, to come in contact with the cooktop while it is hot.
11
Using Your Cooktop
WARNING
Food Poisoning Hazard
Do not let food sit for more than
one hour before or after cooking.
Doing so can result in food poisoning
or sickness.
Sugary spills and soils can cause pitting.
•
See “Cleaning the cooktop and control
panel” in the “Caring for Your Cooktop”
section for more information.
Using the cooktop
Using the Warming element
(Model KECC563H)
Use the Warming element to keep cooked
foods warm. It is not recommended for
heating cold foods. Choose the LO
setting for heat-sensitive and smaller
quantities of food. Choose the HI setting for
liquids and larger quantities of food. Adjust
as needed.
To set the Warming element:
1. Push in and turn the control knob to the
desired setting from LO to HI for different
levels of heating.
2. Turn the knob to OFF when finished. The
Keep Warm element will remain warm
until the surface indicator light on the
cooktop goes off.
Cover all foods with a lid. Do not use plas-
•
tic wrap to cover food because it may melt
onto the cooktop surface. When warming
baked goods, allow a small opening in the
cover for moisture to escape.
Use only cookware and dishes
•
recommended for oven and cooktop use.
Use potholders or oven mitts to remove
•
food.
Wiping off the cooktop before and after
•
each use will help keep the surface free from
stains and give you the most even heating.
See “Cleaning the cooktop and control
panel” in the “Caring for Your Cooktop”
section for care and cleaning suggestions.
The Warming element will not glow red
•
when it is on, unlike the surface elements.
However, the surface indicator light on the
cooktop will glow.
The Warming element may be used
•
whether the other elements are in use or
not.
The quality of the food may deteriorate if it
•
is kept on the Warming element for an
extended period of time.
Warming element
control knob
HOT
F
F
O
HOT
H
O
L
M
E
D
L
O
M
E
D
O
L
E
L
G
N
I
S
H
I
HOT
F
F
O
I
O
L
I
H
D
E
M
F
F
O
H
O
I
L
M
E
L
D
A
L
U
O
D
L
O
F
F
O
HOT
H
I
F
O
M
E
H
I
O
L
E
L
G
N
I
S
H
I
F
D
L
A
U
D
L
O
H
I
I
H
D
E
M
HOT
Warming element
12

Home canning information
Using Your Cooktop
Center over
surface unit
• Use the entire surface (“DUAL” setting)
of the left front surface cooking area for
best results. (Models KECC502G,
YKECC502G, KECC507G, YKECC507G,
KECC508G, YKECC508G, KECC562G,
KECC567G, YKECC567G, KECC568G,
YKECC568G, KECC507H, KECC563H,
and KECC567H)
• Use flat-bottomed canners on all types
of cooktops, especially ceramic glass.
Canners with rippled or ridged bottoms do
not allow good contact with the surface.
• Center the canner over the largest
surface cooking area. Do not extend more
than one inch outside the surface cooking
area. Large diameter canners/pans, if not
centered correctly, trap heat and can
cause damage to the cooktop.
Do not place your canner on two surface
•
cooking areas at the same time.
Pan
Surface
unit
• The type of material the canner is made
of determines the length of heating time.
Refer to the “Characteristics of cookware
materials” chart later in this section for
more information.
• When canning for long periods of time,
allow elements and the surrounding
surfaces to cool down.
• Alternate use of the surface cooking
areas between batches or prepare small
batches at a time.
• Start with hot water, cover with a lid,
and bring to a boil; then reduce heat to
maintain a boil or required pressure levels
in a pressure canner.
• For up-to-date information on canning,
contact your local U.S. Government
Agricultural Department Extension Office
or companies who manufacture home
canning products. In Canada, contact
Agriculture Canada.
Cookware tips
•
Select a pan that is about the same size
as the surface cooking area. Cookware
should not extend more than 1 inch
(2.5 cm) outside the area.
•
For best results and greater energy
efficiency, use only flat-bottomed
cookware that makes good contact with
the surface cooking area. Cookware with
rounded, warped, ribbed (such as some
porcelain enamelware), or dented bottoms
could cause uneven heating and poor
cooking results.
Cookware designed with slightly indented
•
bottoms or small expansion channels can
be used.
• Cookware with non-stick finish has
heating characteristics of the base material.
•
Check for rough spots on the bottom of
metal or glass cookware which will scratch
the ceramic glass surface.
Use flat bottom cookware for best heat
•
conduction from the surface cooking area
to the cookware. Determine flatness with
the ruler test. Place the edge of a ruler
across the bottom of the cookware. Hold it
up to the light. No light should be visible
under the ruler. Rotate the ruler in all
directions and look for any light.
Do not leave empty cookware, or
•
cookware that has boiled dry, on a hot
surface cooking area. The cookware
could overheat, causing damage to the
cookware or the surface cooking area.
13

Using Your Cooktop
The pan material affects how fast heat transfers from the surface cooking area through the pan
material and how eve nly heat spreads over the pan bottom. Choo se pans that provide the
best cooking results.
Aluminum
• Heats quickly and evenly.
• Use for all types of cooking.
• Medium or heavy thickness is best for most cooking.
• Used as a core or base in cookware to provide even heating.
Cast iron
• Heats slowly and evenly.
• Good for browning and frying.
• Maintains heat for slow cooking.
• Can be coated with porcelain enamel.
Ceramic or
ceramic glass
• Heats s low ly a nd uneve nly.
• Use on low to medium settings.
• Follow manufacturer’s instructions.
Copper
• Heats very quickly and evenly.
• Used as a core or base in cookware to provide even heating.
Earthenware
• Can be used for cooktop cooking if recommended by the
manufacturer.
• Use on low settings.
Porcelain enamel-on-steel
or enamel-on-cast iron
• See cast iron and stainless steel.
Stainless steel
• Heats q uick ly but une ve nly.
• A core or base of aluminum or copper on the cookware
provides even heating.
• Can be coated with porcelain enamel.
Characteristics of cookware materials
14
 Loading...