

KitchenAid KEC97A, 5KSM7586P, 7KSM7586P Owner's Manual
KEC97A
5KSM7586P
7KSM7586P

STAND MIXER INSTRUCTIONS
TABLE OF CONTENTS
STAND MIXER SAFETY
Important safeguards ������������������������������������������������������������������������������������������� 3
Electrical requirements �������������������������������������������������������������������������������������� 5
Electrical requirements for Brazil only ���������������������������������������������������������������� 6
PARTS AND FEATURES �����������������������������������������������������������������������������������������7
ASSEMBLING THE STAND MIXER
Attaching the bowl and beaters ��������������������������������������������������������������������������� 8
Adjusting the beater to bowl clearance ��������������������������������������������������������������� 9
OPERATING THE STAND MIXER
Speed control guide – 10-speed Stand Mixers �������������������������������������������������� 10
Removing the bowl and beaters ������������������������������������������������������������������������ 11
TIPS FOR GREAT RESULTS
Stand Mixer use ������������������������������������������������������������������������������������������������� 11
Mixing time �������������������������������������������������������������������������������������������������������� 12
Mixing tips ��������������������������������������������������������������������������������������������������������� 12
ATTACHMENTS ����������������������������������������������������������������������������������������������������12
CARE AND CLEANING ���������������������������������������������������������������������������������������� 13
TROUBLESHOOTING ������������������������������������������������������������������������������������������ 14
TECHNICAL INFORMATION ������������������������������������������������������������������������������14
ENVIRONMENTAL ISSUES ���������������������������������������������������������������������������������15
TECHNICAL ASSISTANCE OR SERVICE ���������������������������������������������������������15
2
English
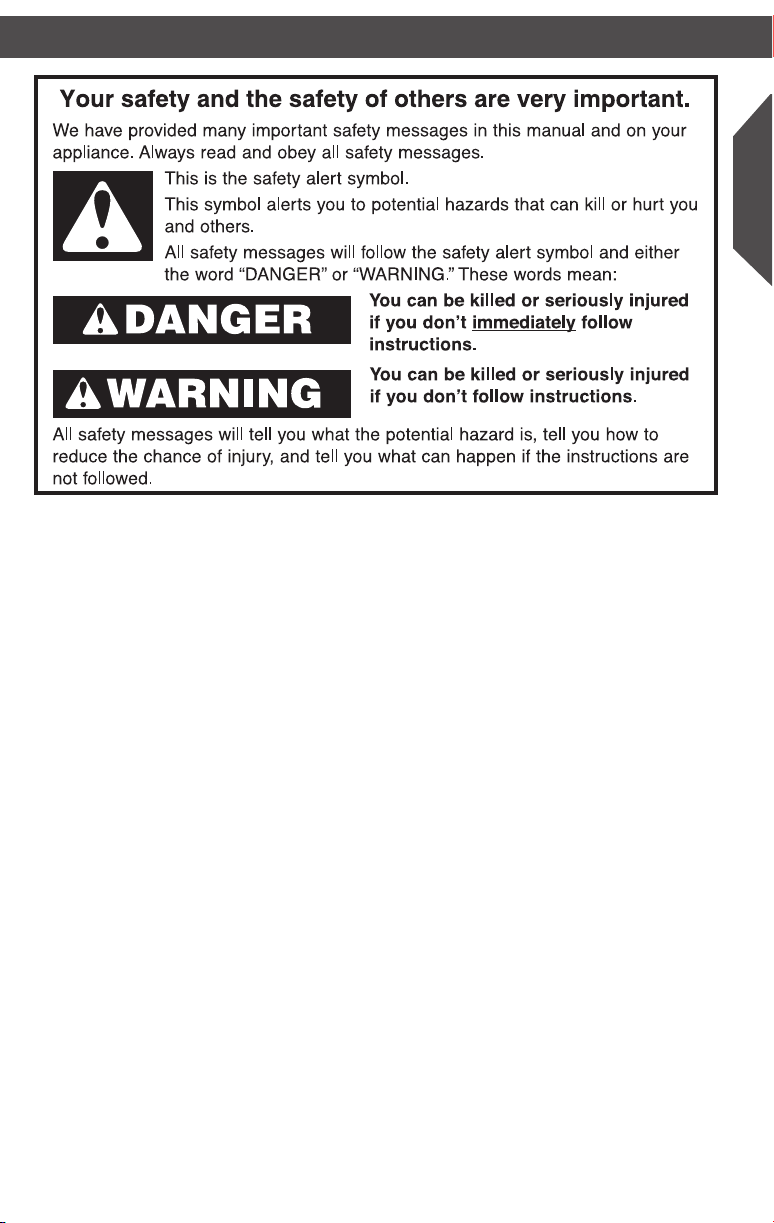
STAND MIXER SAFETY
IMPORTANT SAFEGUARDS
When using electrical appliances, basic safety precautions
should always be followed, including the following:
1. Read all instructions� Misuse of appliance may result in
personal injury�
2. To avoid risk of electrical shock, do not put Stand Mixer in
water or other liquid�
3. This appliance is not intended for use by persons (including
children) with reduced physical, sensory or mental
capabilities, or lack of experience and knowledge, unless
they have been given supervision or instruction concerning
use of the appliance by a person responsible for their safety�
4. Children should be supervised to ensure that they do not
play with the appliance�
5. Unplug Stand Mixer from outlet when not in use, before
putting on or taking off parts, and before cleaning�
6. Avoid contacting moving parts� Keep hands, hair, and
clothing, as well as spatulas and other utensils away from
beater during operation to reduce the risk of injury to
persons and/or damage to the Stand Mixer�
3

STAND MIXER SAFETY
7. Do not operate Stand Mixer with a damaged cord or plug
or after the Stand Mixer malfunctions, or is dropped or
damaged in any manner� Return appliance to the nearest
Authorized Service Center for examination, repair or
electrical or mechanical adjustment�
8. The use of attachments not recommended or sold by
KitchenAid may cause re, electrical shock, or injury.
9. Do not use the Stand Mixer outdoors�
10. Do not let the cord hang over edge of table or counter�
11. Remove Flat Beater, Stainless Steel Whip, or Spiral Dough
Hook from Stand Mixer before washing�
12. To avoid product damage, do not use the mixer bowls in
areas of high heat such as an oven, microwave, or on a
stovetop�
13. Do not use the Stand Mixer on or next to an electric or gas
oven, or put it inside of a warm oven�
14. Do not use the Stand Mixer for anything other than its
intended function as specied in this manual.
15. Do not use toxic products (alcohol, ammonia, stain
removers, etc�) or steel sponges to clean the Stand Mixer�
These products may damage the Stand Mixer or leave
undesirable odors�
16. This product is designed for household use only.
SAVE THESE INSTRUCTIONS
4
English
STAND MIXER SAFETY
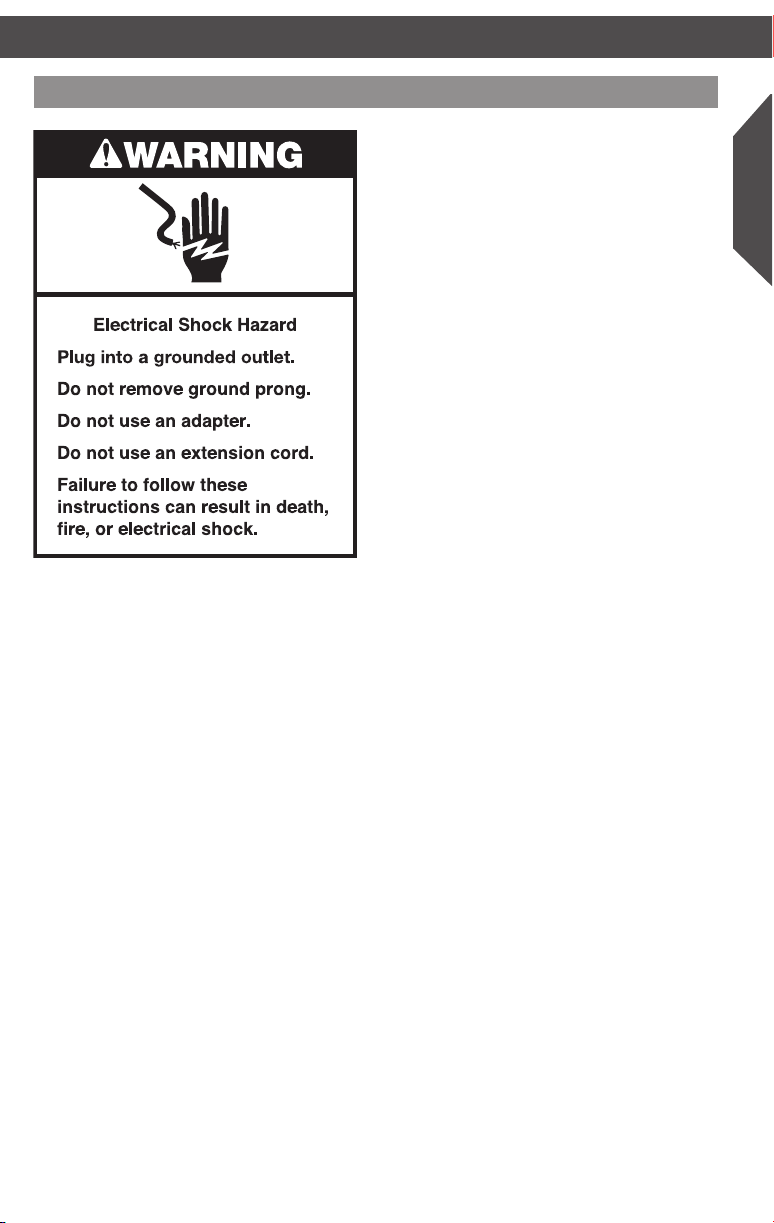
Electrical requirements
Volts: 127-220 A�C�
Hertz: 60 Hz
Wattage: 500 Watts
NOTE: Use an appropriate outlet to plug in
your Stand Mixer� If the plug does not fit in
the outlet, contact a qualified electrician� Do
not modify the plug in any way� Do not use
adapters or T’s�
Do not use an extension cord� If the power
supply cord is too short, have a qualified
electrician or serviceman install an outlet
near the appliance�
5
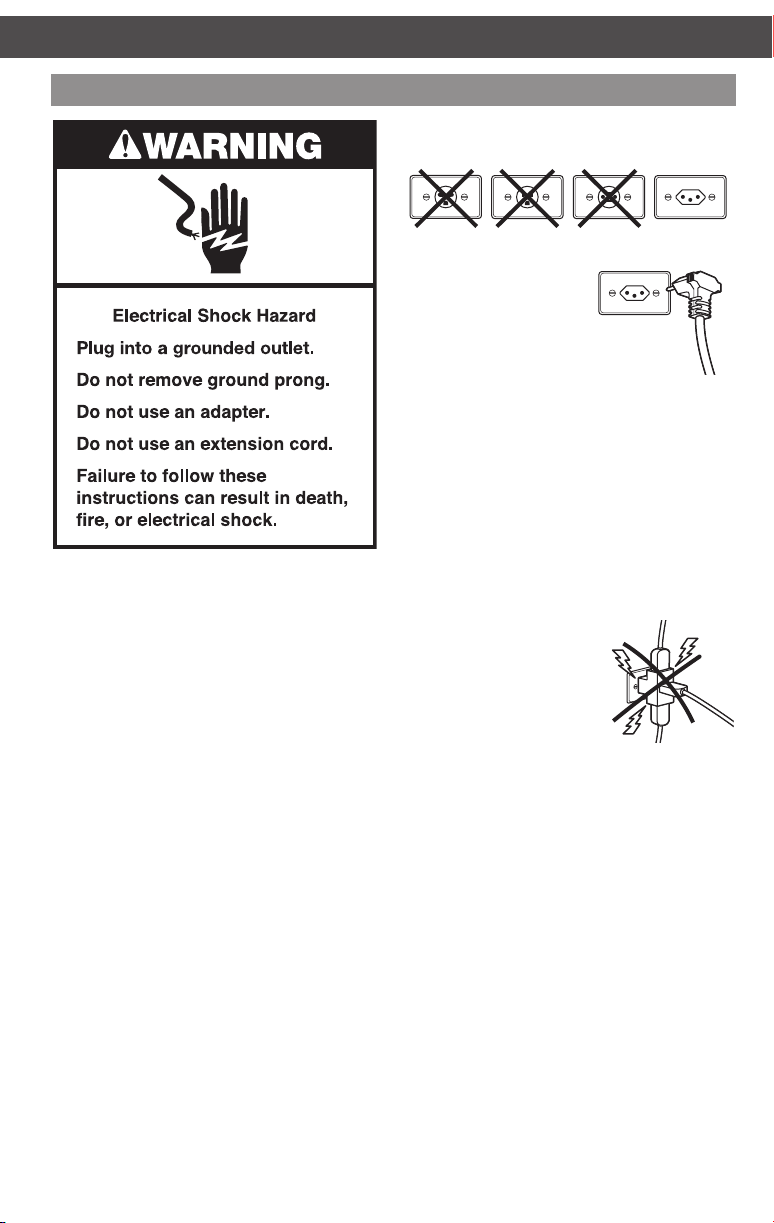
STAND MIXER SAFETY
Electrical requirements (for Brazil only)
Use appropriate outlet type for your
appliance plug, as shown below:
Before operating
this appliance, make
sure the main voltage
at the installation site
is the same as indicated
on product technical
data label�
This information is also included on the
label attached to your appliance’s cord
near the plug�
IMPORTANT:
• If it is necessary to convert your
Residence mains:
The mains wires must be of copper
with a minimum cross-section per ABNT
(NBR-5410�)
To protect this appliance and the mains
against over loading, this appliance must
be connected to a circuit that is protected
with a thermo-magnetic circuit breaker�
If the household circuit does not include
a circuit breaker, contact an electrician
to have one installed�
Electric outlet:
For your safety and to avoid damage
to your product, it is very important
that your product is earthed correctly�
Your appliance power cord features a
3-pin-shaped hexagon-shaped plug,
10A, per ABNT (NBR 14136)�
Your residence electrical installation
must have a suitable electric outlet
for this type of plug� If not, it is your
responsibility to have one installed
by a qualified electrician�
• If it is necessary to convert your
• Never plug your
• In case of oscillation in mains voltage,
• If the cord of this appliance is damaged, it
127V appliance to 220V, use a
1�0 KVA stabiliser�
220V appliance to 127V, use a
1�0 KVA stabiliser�
appliance into
multi-plug adapters
with another
appliance in the same
socket� Do
not use an extension
cord� This type of connection may cause
electrical overload in the mains, and can
damage the appliance and could cause a
fire� The appliance should be plugged into
its own outlet�
install an automatic voltage stabiliser with
minimum rating of 1000 Watts between
the appliance and the socket�
must be replaced� Contact your nearest
authorized KitchenAid Customer Care
Center�
6
English
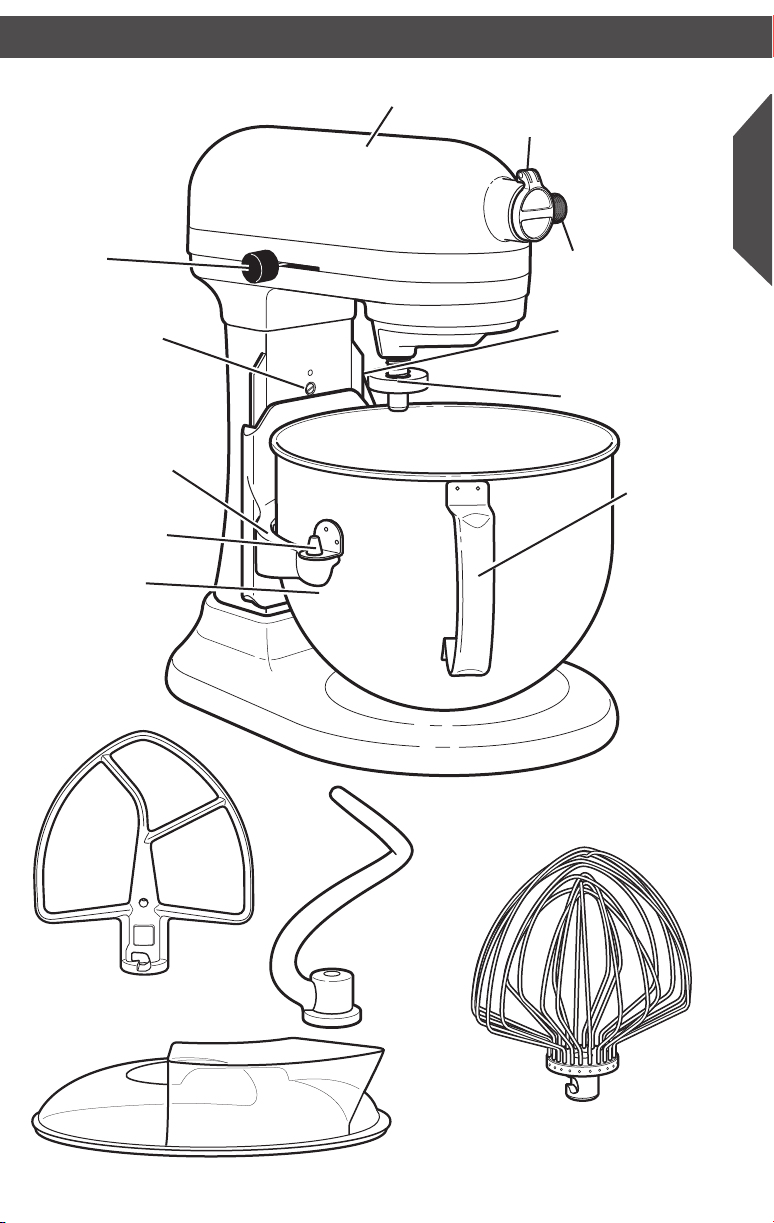
PARTS AND FEATURES
Speed control
lever
Beater height
adjustment
screw
Bowl support
Locating pins
Bowl
Motor head
Attachment hub
(see the “Attachments”
section)
Attachment
knob
Bowl lift lever
(not shown)
Beater Shaft
Bowl
handle
Flat beater
Pouring shield
Dough hook
Wire whip
7
MONTANDO A BATEDEIRA PROLINE
,
5
:
²
6
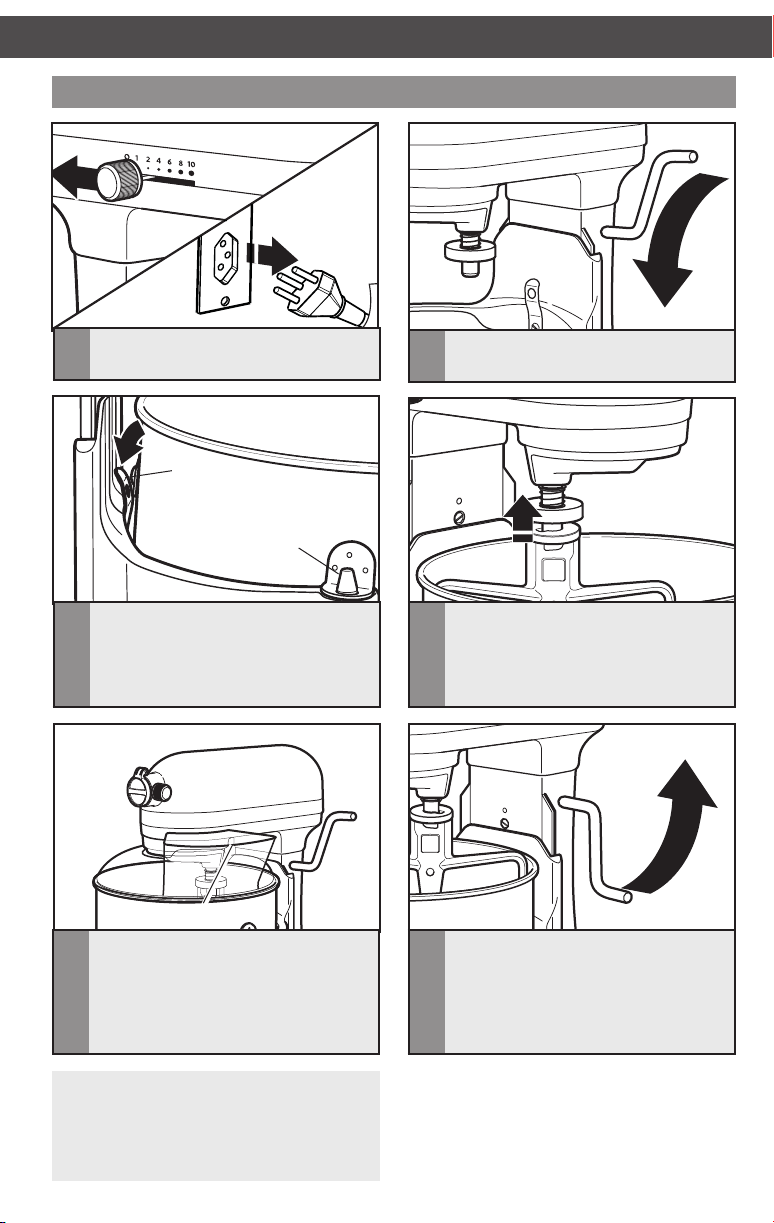
ASSEMBLING THE STAND MIXER
Attaching the bowl and beaters
Turn speed control to “0” (OFF), and
1
unplug Stand Mixer�
Spring Latch
Locating Pin
Fit bowl supports over locating pins;
3
press down on back of the bowl until
bowl pin snaps into the spring latch� If
not securely snapped into place, bowl
will be unstable and wobble during use�
Pouring Chute
If using the pouring shield, from the
5
front of the Stand Mixer, slide the
pouring shield over the bowl until it
is centered� The bottom rim of the
pouring shield should fit within the
bowl�
Place bowl lift lever into down position�
2
Slip a beater (flat, wire whip, or dough
4
hook) onto the beater shaft and press
upward as far as possible� Turn beater
to the right, hooking it over the pin on
the beater shaft�
Raise the bowl into mixing position
6
by rotating the bowl lift lever
counterclockwise to the straight up
position� The bowl must always be
in the raised position when mixing�
NOTE: Rotate the pouring shield so the
motor head covers the U-shaped gap in
the shield� The pouring chute will be just
to the right of the attachment hub as you
face the Stand Mixer�
8
English
MONTANDO A BATEDEIRA PROLINE
,
5
:
²
6
ASSEMBLING THE STAND MIXER
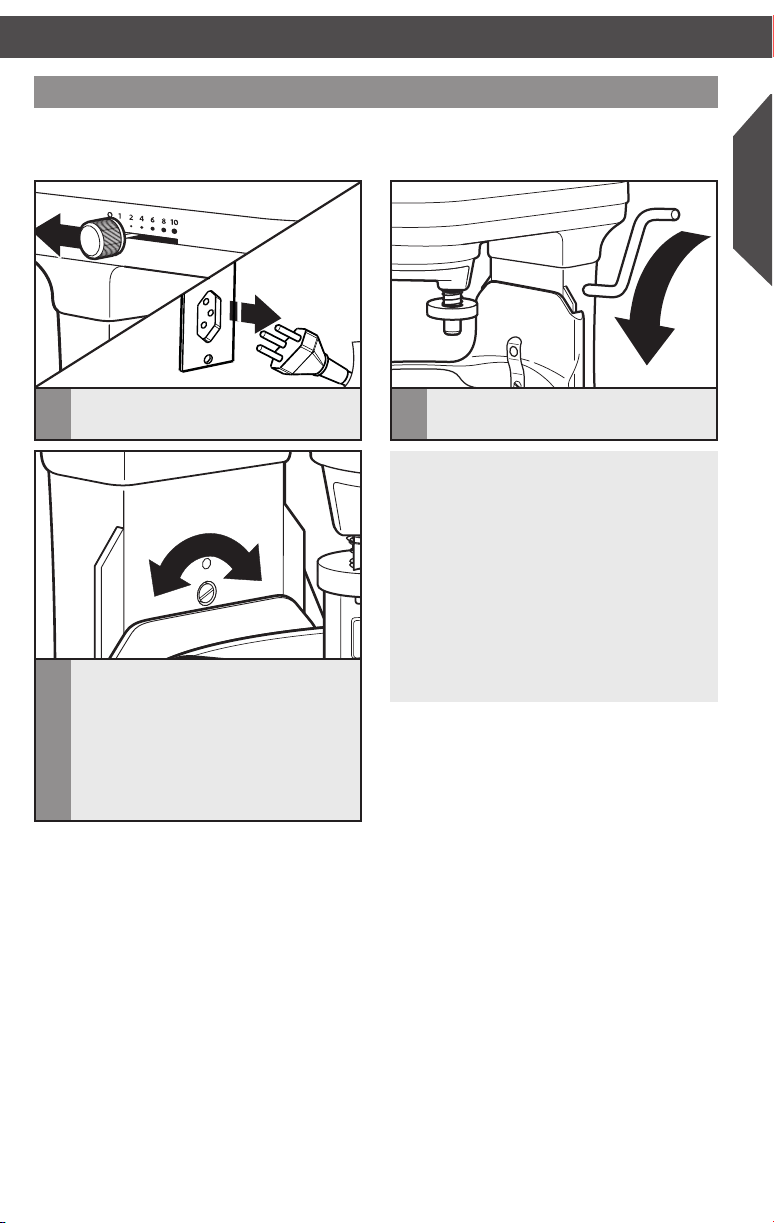
Adjusting beater to bowl clearance
Your Stand Mixer is adjusted at the factory so the at beater just clears the bottom of the
bowl. If, for any reason, the at beater hits the bottom of the bowl or is too far away from
the bowl, you can correct the clearance easily�
Turn speed control to “0” (OFF), and
1
unplug Stand Mixer�
Turn beater height adjustment screw
3
(A) slightly counterclockwise (left) to
raise the flat beater; or turn clockwise
(right) to lower the flat beater� Adjust
so that the flat beater just clears the
surface of the bowl� If you over adjust
the screw, the bowl lift lever may not
lock in place�
Lower the bowl to the down position�
2
NOTE: When properly adjusted, the at
beater will not strike on the bottom or
side of the bowl. If the at beater or the
wire whip is so close that it strikes the
bottom of the bowl, the coating may wear
off the at beater (for coated beaters) or
wires on the wire whip may wear�
Scraping sides of bowl may be necessary
under certain conditions regardless of
beater adjustment� The Stand Mixer must
be stopped to scrape bowl or damage to
Stand Mixer may occur�
9
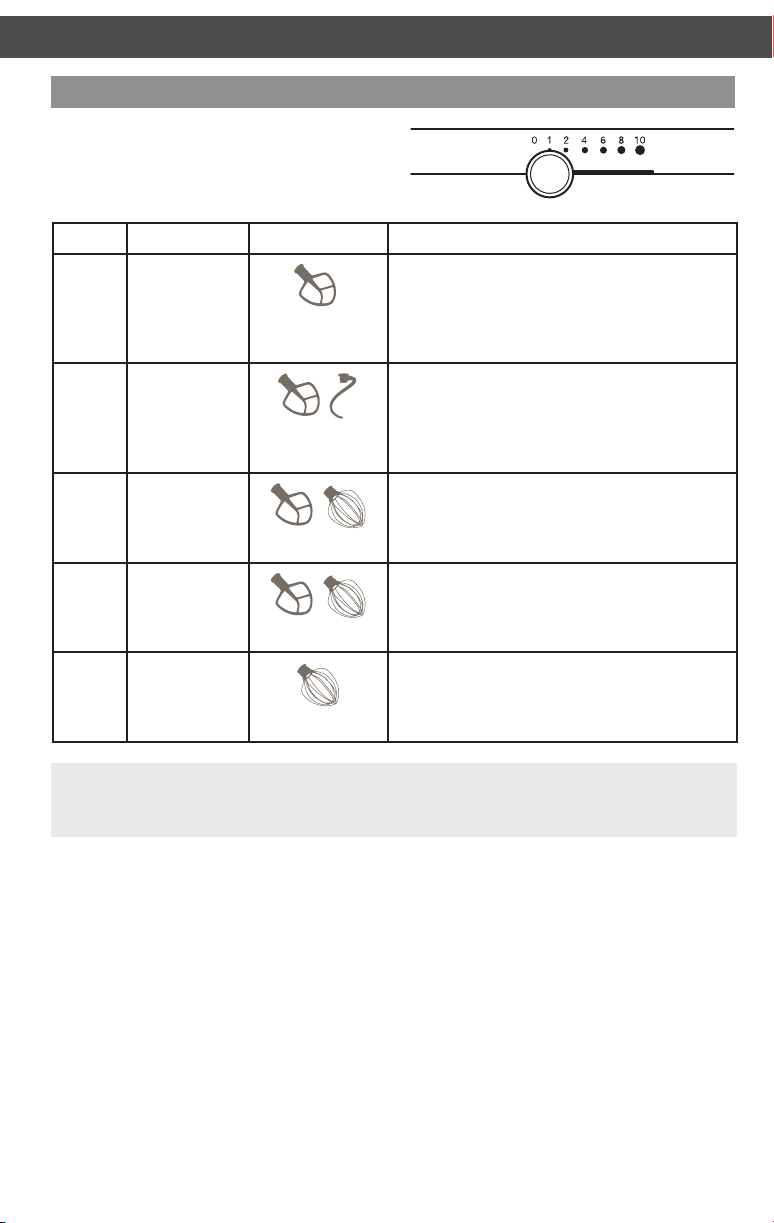
OPERATING THE STAND MIXER
Speed control guide – 10-speed Stand Mixers
Speed Used For Accessories Description
1 Stirring For slow stirring, combining, mashing,
starting all mixing procedures� Use to add
flour and dry ingredients to batter, and add
liquids to dry ingredients� Do not use Speed
1 to mix or knead yeast doughs�
2 Slow mixing,
Kneading
4 Mixing,
Beating
6 Beating,
Creaming
8-10 Fast beating,
Whipping,
Fast Whipping
For slow mixing, mashing, faster stirring�
Use to mix and knead yeast doughs, heavy
batters, and candies; start mashing potatoes
or other vegetable; cut shortening into flour;
mix thin or splashy batters�
For mixing semi-heavy batters, such
as cookies� Use to combine sugar and
shortening and to add sugar to egg whites for
meringues� Medium speed for cake mixes�
For medium-fast beating (creaming) or
whipping� Use to finish mixing cake,
doughnut, and other batters� High speed for
cake mixes�
For whipping cream, egg whites, and boiled
frostings� For whipping small amounts of
cream, egg whites or for final whipping of
mashed potatoes�
NOTE: Use Speed 2 to mix or knead yeast doughs� Use of any other speed creates high
potential for Stand Mixer failure. The dough hook efciently kneads most yeast dough
within 4 minutes�
10
 Loading...