

KitchenAid KEBI276DWH7, KEBI101DWH7, KEBI101DBL8, KEBI276DWH9, KEBI276DWH8 Owner’s Manual
...
Use and Care Guide
KitchenAid _
FOR' THE-WAY IT'S MADE t
A Note to You.......................................2
Oven Safety..........................................3
Parts and Features..............................5
Using Your Oven .................................6
Usingtheelectronicoven control....6
Oven settings...................................11
Settingtheclock..............................12
Usingthe timer................................12
Baking/Roasting..............................13
Positioningracksand pans.............14
Bakewarechoices...........................15
Usingaluminumfoil.........................16
Adjustingoven temperature............16
Broiling.............................................17
13medcooking.................................20
The ovenvent(s).............................22
Using the Serf-Cleaning Cycle ........2.3
Beforeyou start...............................23
Before settingcontrols....................24
Settingthe controls.........................24
Forbest cleaningresults.................26
Howthe cycleworks.......................26
Cadng for Your Oven ........................27
CleaningChart................................27
Removingtheoven door.................28
Usingand replacingovenlights.....29
Troubleshooting ................................30
Requesting Assistance
or Service ...........................................32
Warranty .............................................36
In lhe U.S.A.f(x assistanceor sendce,
call the Consumer AssistanceCenter:
Models:
4451951
1-800-422-1230
In Canada forasddance or service,
see page 33.
KITCHENAIDEleckicBum-lnOvens
KEBI101D KEBI206D
KEBI141D KEBI276D
KEBI171D
www.kitchenaid.com
Note to You
T_atl_z_Jou for buying a KITCHENAID ® appliance!
KitchenAid designs the best tools for the most important room in your house. To
ensure that you enjoy many years of trouble-free operation, we developed this Use
and Care Guide.
It contains valuable information concerning how to operate and maintain your new
appliance properly and safely. Please read it carefully. Also, please complete and
mail the enclosed Product Registration, Card.
Please record your model's information.
Whenever you call our Consumer Model Number
Assistance Center at 1-800-422-1230
(in Canada, 1-800-461-5681) or request
service for your appliance, you need to
know your complete model number and
serial number. You can find this information
on the model and serial number plate (see
diagram in the Parts and Features section
for plate location on the lower oven).
Please also record the purchase
information.
Serial Number
Purchase/
Installation Date
Builder/Dealer
Name
Address
Phone
NOTE: You must provide proof of purchase
or installation date for in-warranty service.
Keep this book and the sales slip together in a safe place for future reference.
Oven Safety
Your safety and the safety of others is very important.
We have provided many importantsafety messages in this manual and on your
appliance. Always read and obey all safety messages.
This is the safety alert symbol.
This symbol alerts you to hazards that can kill or hurt you and others.
All safety messages will be preceded by the safety alert symbol and the
word "DANGER" or "WARNING." These words mean:
You will be killed or seriously injured
if you don't follow instructions.
You can be killed or seriously injured
if you don't follow instructions.
All safety messages will identify the hazard, tell you how to reduce the chance of injury,
and tell you what can happen if the instructions are not followed.
IMPORTANT SAFETY INSTRUCTIONS
WARNING: To reduce the risk of fire,
electrical shock, injury to persons, or
damage when using the oven, follow basic
precautions, including the following:
• Proper Installation - Be sure the oven is
properly installed and grounded by a
qualified technician.
• Never Use the Oven for Warming or
Heating the Room.
• Do Not Leave Children Alone - Children
should not be left alone or unattended
in area where oven is in use. They
should never be allowed to sit or stand
on any part of the oven.
• Wear Proper Apparel - Loose-fitting or
hanging garments should never be worn
while using the oven.
• User Servicing - Do not repair or
replace any part of the oven unless
specifically recommended in the
manual. All other servicing should be
referred to a qualified technician.
• Storage in Oven - Flammable materials
should not be stored in an oven.
• Do Not Use Water on Grease Fires -
Smother fire or flame or use dry chemical
or foam-type extinguisher.
• Use Only Dry Potholders - Moist or damp
potholders on hot surfaces may result in
burns from steam. Do not let pothoider
touch hot heating elements. Do not use a
towel or other bulky cloth.
• Use Care When Opening Door - Let hot
air or steam escape before removing or
replacing food.
• Do Not Heat Unopened Food Containers
- Build-up of pressure may cause
container to burst and result in injury.
• Keep Oven Vent Ducts Unobstructed.
SAVE THESE INSTRUCTIONS
continued on next page
3
Oven Safety
IMPORTANT SAFETY INSTRUCTIONS
• Placement of Oven Racks -Atways
place oven racks in desired location
while oven is cool. If rack must be
moved while oven is hot, do not let
potholder contact hot heating element
in oven.
• DO NOT TOUCH HEATING ELE-
MENTS OR INTERIOR SURFACES
OF OVEN - Heating elements may be
hot even though they are dark in
color. Interior surfaces of an oven
become hot enough to cause bums.
During and after use, do not touch, or
let clothingor other flammable
materials contact heating elements or
interior surfaces of oven until they
have had sufficient time to cool. Other
surfaces of the oven may become hot
enough to cause burns _-among
these surfaces are oven vent open-
ings and surfaces near these open-
ings, oven doors, and windows of
oven doors.
For self.cleaning ovens:
• Do Not Clean Door Gasket - The door
gasket is essential for a good seal. Care
should be taken not to rub, damage, or
move the gasket.
• Do Not Use Oven Cleaners - No
commercial oven cleaner or oven liner
protective coating of any kind should be
used in or around any part of the oven.
• Clean Only Parts Listed in Manual.
• Before Self-Cleaning the Oven -
Remove broiler pan and other utensils.
SAVE THESE INSTRUCTIONS
4
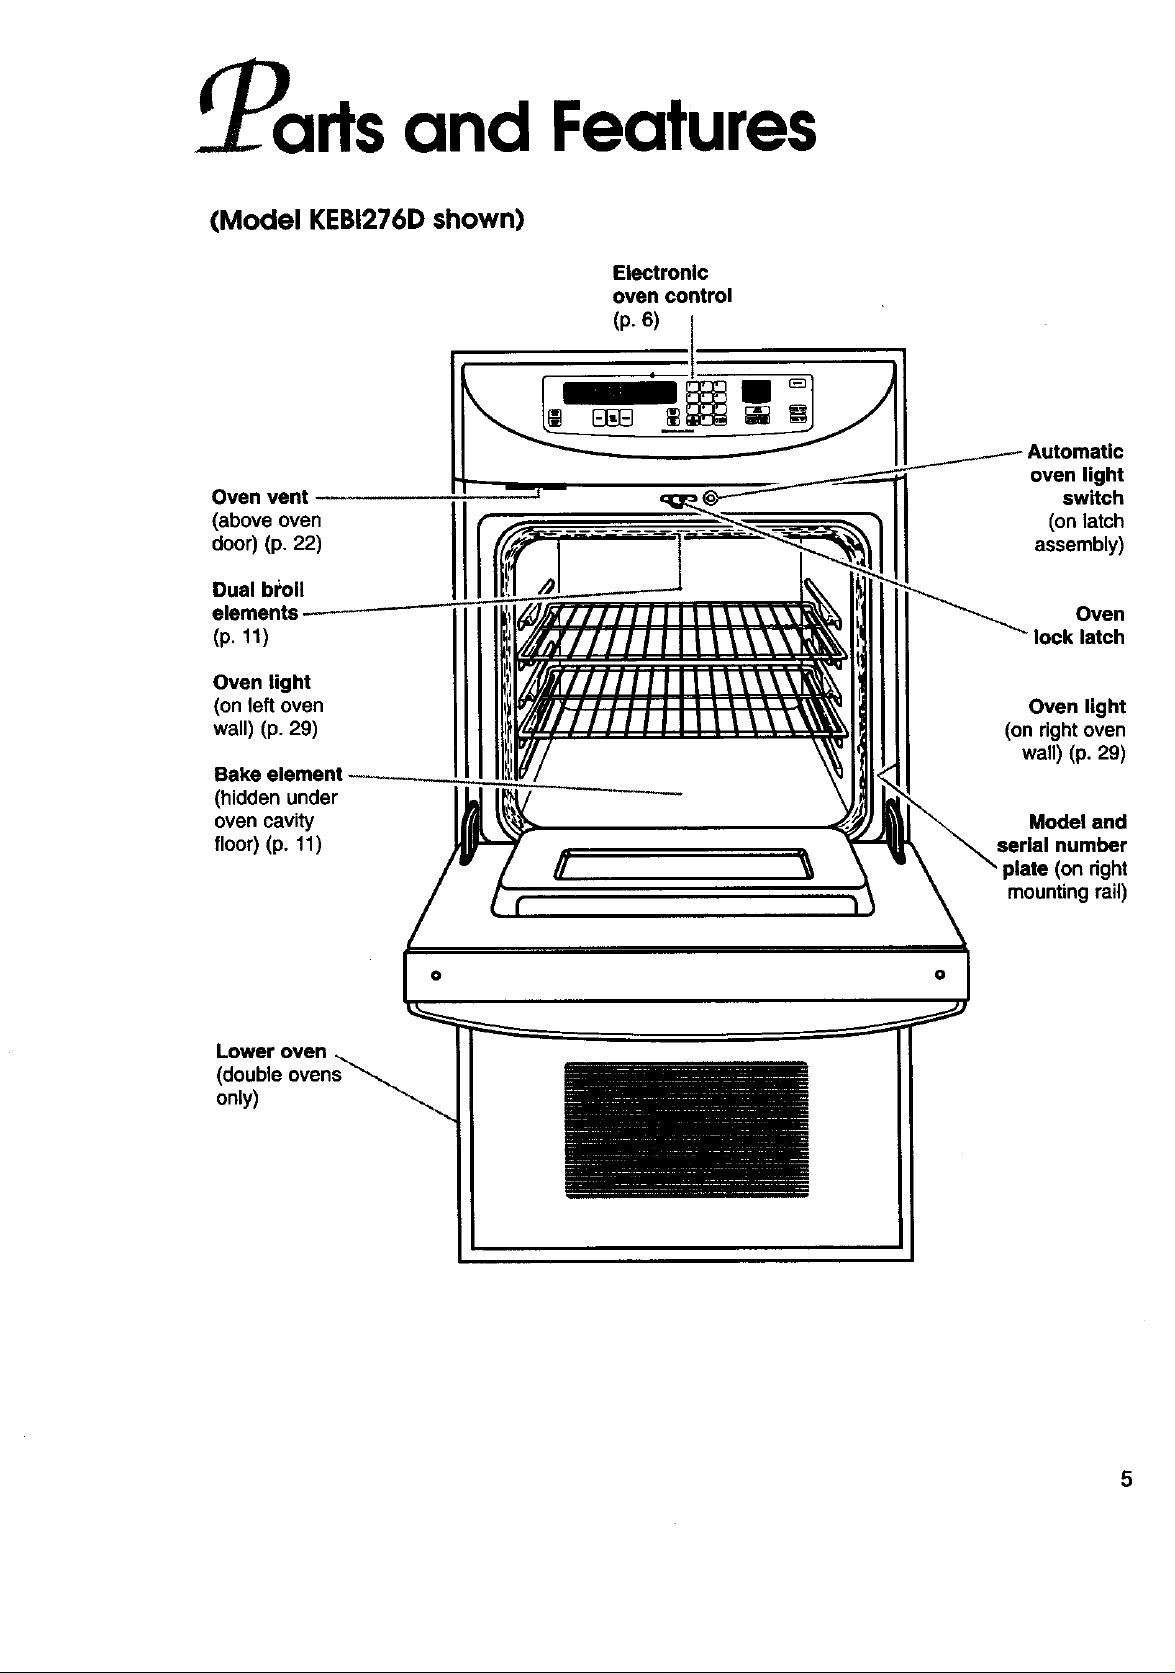
Parts and Features
(Model KEBI276D shown)
Electronic
oven control
(p.6) I
I
Oven vent
door) (p. 22)
oveoven
Dual broil
(p.11)
Oven light
(on left oven
wall) (p. 29)
(hidden under
oven cavity
floor) (p. 11)
0 0
Lower oven _.
(double ovens _.
only)
oven light
switch
(on latch
assembly)
Oven
lock latch
Oven light
(on right oven
wall) (p. 29)
Model end
serial number
(on right
mounting rail)
5

sing YourOven
Usingthe electronicoven control
(double oven shown)
NOTE: Displays and command pads shown are for double upper ovens. In some cases,
lower oven and single oven displays and command pads may Iookdifferent than those
shown.
Oven
selector pads
(double ovens
only) (p. 7)
Oven display Time of Start
(see below) day/timer pad
Oven setting Control Oven Clock Timer Cancel/off
pads lock pad light set/start pads pads
(pp. 13, 18, 24) (p. 8) pad pad (pp. 12, (p. 7)
Timed and delayed Number
Display/clock
• When you first plug in the oven, a tone
will sound, the display will be fully lit for a
few seconds, and the display will show the
last time set and "PF" (power failure). If,
after you set the clock, the display again
shows "PF", your electricity was off for
awhile. Reset the clock. (See "Setting the
clock" section.)
• The display will show "Err" and three
short tones will sound if a time or
temperature is incorrectly entered.
To set your oven to cook in Celsius
instead of Fahrenheit:
PRESS and hold for 5 seconds
pads
display (p. 7)
DD©
K;O
(p. 29) (p. 12) 13)
If you need to convert temperatures from
Celsius to Fahrenheit or vice versa, you
can refer to this chart:
Temperature replacement values
38°C-100°F
60°C-140°F
66°C-150°F
77°C-170°F
93°C-200°F
121°C-250°F
135°C-275°F
149°C-300°F
163°C-325°F
177°C-350°F
191°C-375°F
204°C-400°F
218°C-425°F
232°C-450°F
246°C-475°F
260°C-500°F
You will know you are in Celsius when "F"
disappears. To switch back to Fahrenheit,
press and hold BROIL again for 5 seconds.
("F" will reappear.)
6
Using Your Oven
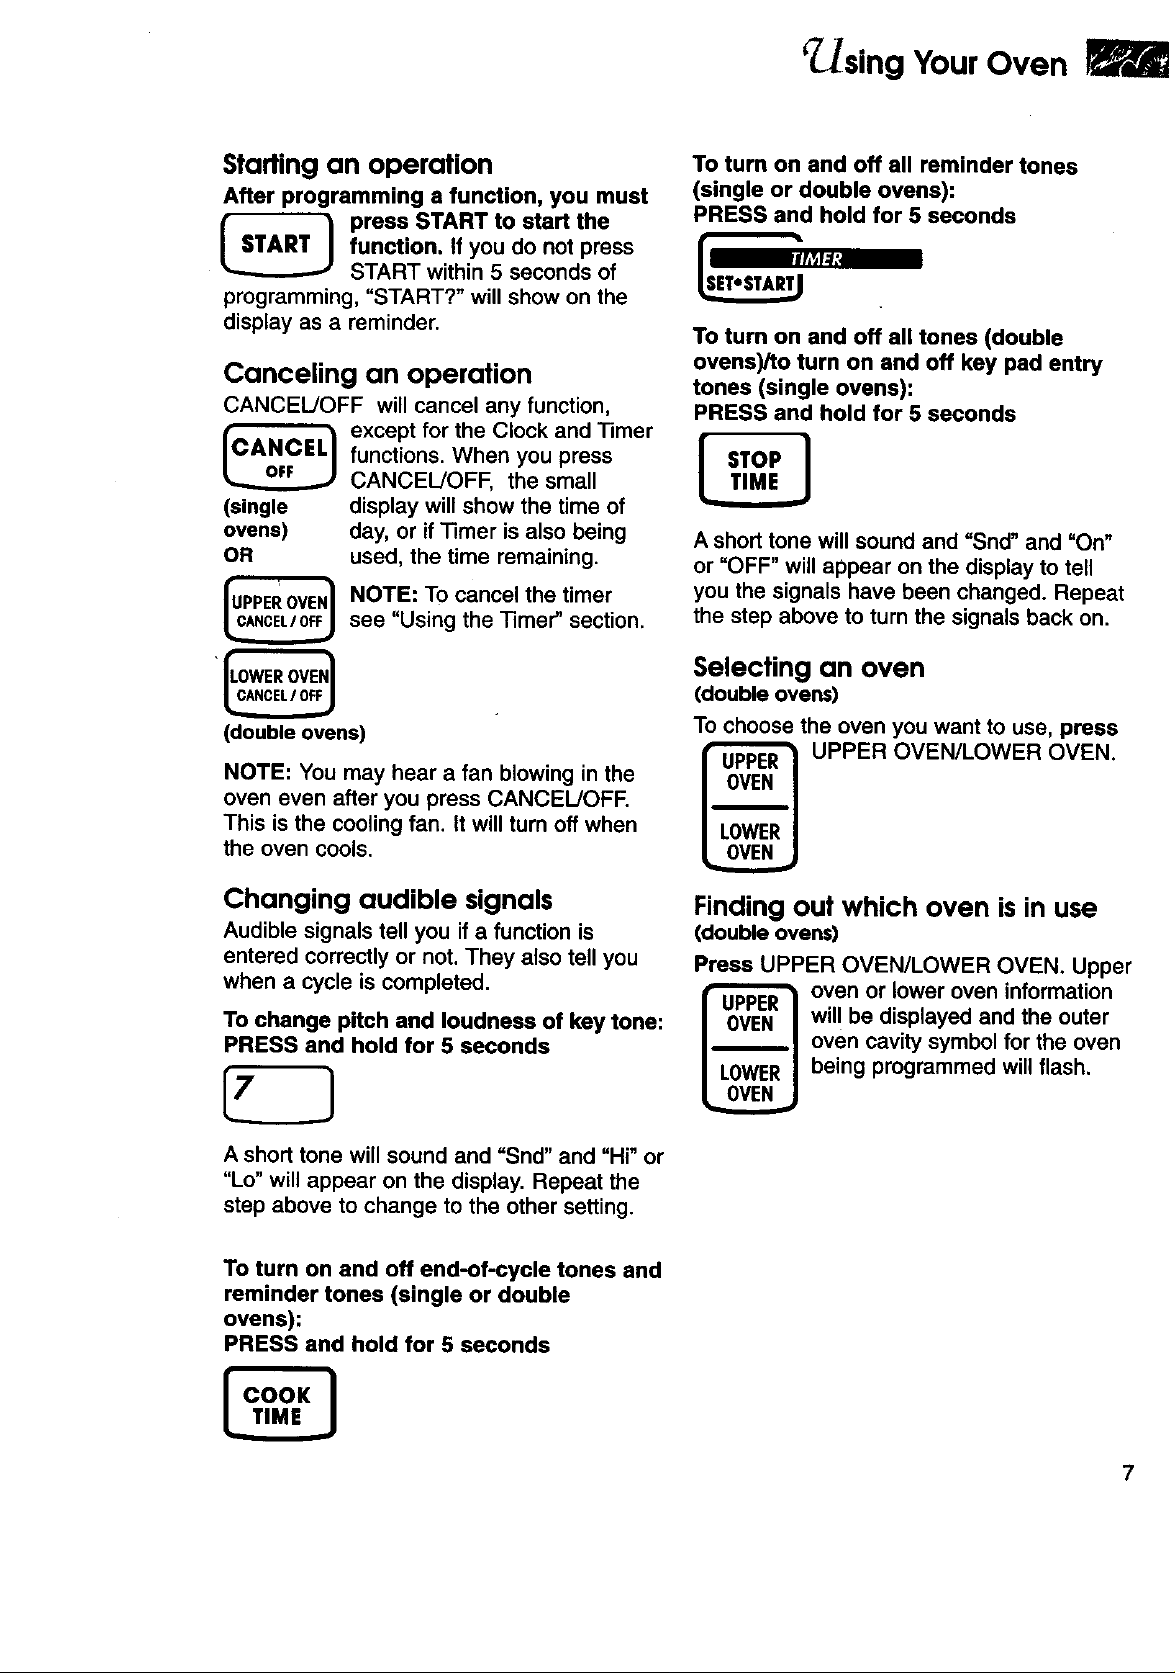
Starting an operation
After programming a function, you must
function. If you do not press
press START to start the
START within 5 seconds of
programming, "START?" will show on the
display as a reminder.
Canceling an operation
CANCEL/OFF will cancel any function,
except for the Clock and Timer
functions. When you press
CANCEL!OFF, the small
(single
ovens)
OR
(double ovens)
display will show the time of
day, or if Timer is also being
used, the time remaining.
NOTE: To cancel the timer
see "Using the Timer" section.
To turn on and off all reminder tones
(single or double ovens):
PRESS and hold for 5 seconds
To turn on and off all tones (double
ovens)/to turn on and off key pad entry
tones (single ovens):
PRESS and hold for 5 seconds
STOP I
A short tone will sound and "Snd" and "On"
or "OFF" will appear on the display to tell
you the signals have been changed. Repeat
the step above to turn the signals back on.
Selecting an oven
(double ovens)
To choose the oven you want to use, press
NOTE: You may hear a fan blowing in the
oven even after you press CANCEL!OFF.
This is the cooling fan. It will turn off when
the oven cools.
Changing audible signals
Audible signals tell you if a function is
entered correctly or not. They also tell you
when a cycle is completed.
To change pitch and loudness of key tone:
PRESS and hold for 5 seconds
A short tone will sound and "Snd" and "Hi" or
"Lo" will appear on the display. Repeat the
step above to change to the other setting.
To turn on and off end-of-cycle tones and
reminder tones (single or double
ovens):
PRESS and hold for 5 seconds
_ UPPER OVEN/LOWER OVEN.
Finding out which oven is in use
(double ovens)
Press UPPER OVEN/LOWER OVEN. Upper
will be displayed and the outer
oven cavity symbol for the oven
being programmed will flash.
oven or lower oven information
l COOK I
fusing YourOven
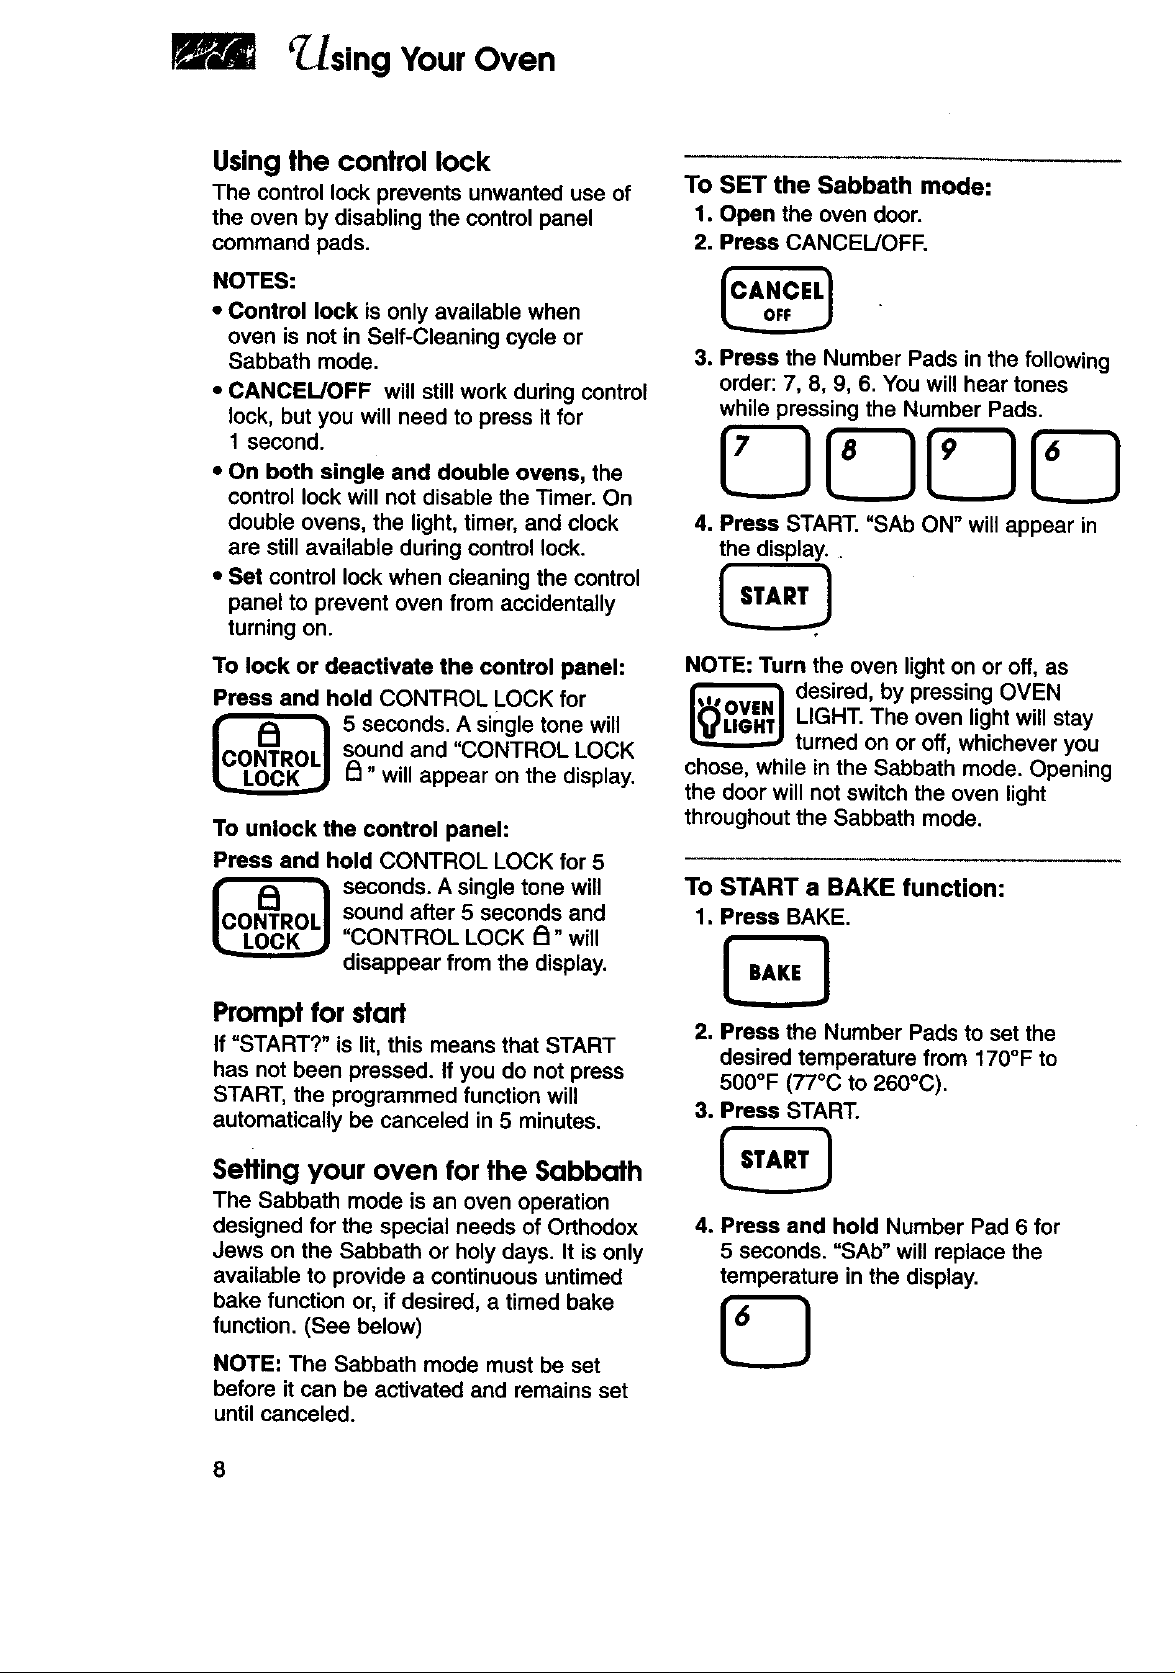
Using the control lock
The control lock prevents unwanted use of
the oven by disabling the control panel
command pads.
NOTES:
• Control lock is only available when
oven is not in Self-Cleaning cycle or
Sabbath mode.
• CANCEL/OFF will still work during control
lock, but you will need to press it for
1 second.
• On both single and double ovens, the
control lock will not disable the Timer. On
double ovens, the light, timer, and clock
are still available dudng control lock.
• Set control lock when cleaning the control
panel to prevent oven from accidentally
turning on.
To lock or deactivate the control panel:
Press and hold CONTROL LOCK for
sound and "CONTROL LOCK
5 seconds. A single tone will
/_" will appear on the display.
To unlock the control panel:
Press and hold CONTROL LOCK for 5
sound after 5 seconds and
_ seconds. A single tone will
"CONTROL LOCK F_- will
disappear from the display.
To SET the Sabbath mode:
1. Open the oven door.
2. Press CANCEL/OFF.
e Press the Number Pads in the following
order: 7, 8, 9, 6. You will hear tones
while pressing the Number Pads.
JG
4. Press START. "SAb ON" will appear in
the display.
NOTE: Turn the oven light on or off, as
_ esired, by pressing OVEN
chose, while in the Sabbath mode. Opening
the door will not switch the oven light
throughout the Sabbath mode.
To START a BAKE function:
1. Press BAKE.
LIGHT. The oven light will stay
turned on or off, whichever you
Prompt for start
If "START?" is lit, this means that START
has not been pressed. If you do not press
START, the programmed function will
automatically be canceled in 5 minutes.
Setting your oven for the Sabbath
The Sabbath mode is an oven operation
designed for the special needs of Orthodox
Jews on the Sabbath or holy days. It is only
available to provide a continuous untimed
bake function or, if desired, a timed bake
function. (See below)
NOTE: The Sabbath mode must be set
before it can be activated and remains set
until canceled.
8
2, Press the Number Pads to set the
desired temperature from 170°F to
500°F (77°C to 260°C).
3. Press START.
Press and hold Number Pad 6 for
de
5 seconds. "SAb" will replace the
temperature in the display.
..Jsing Your Oven
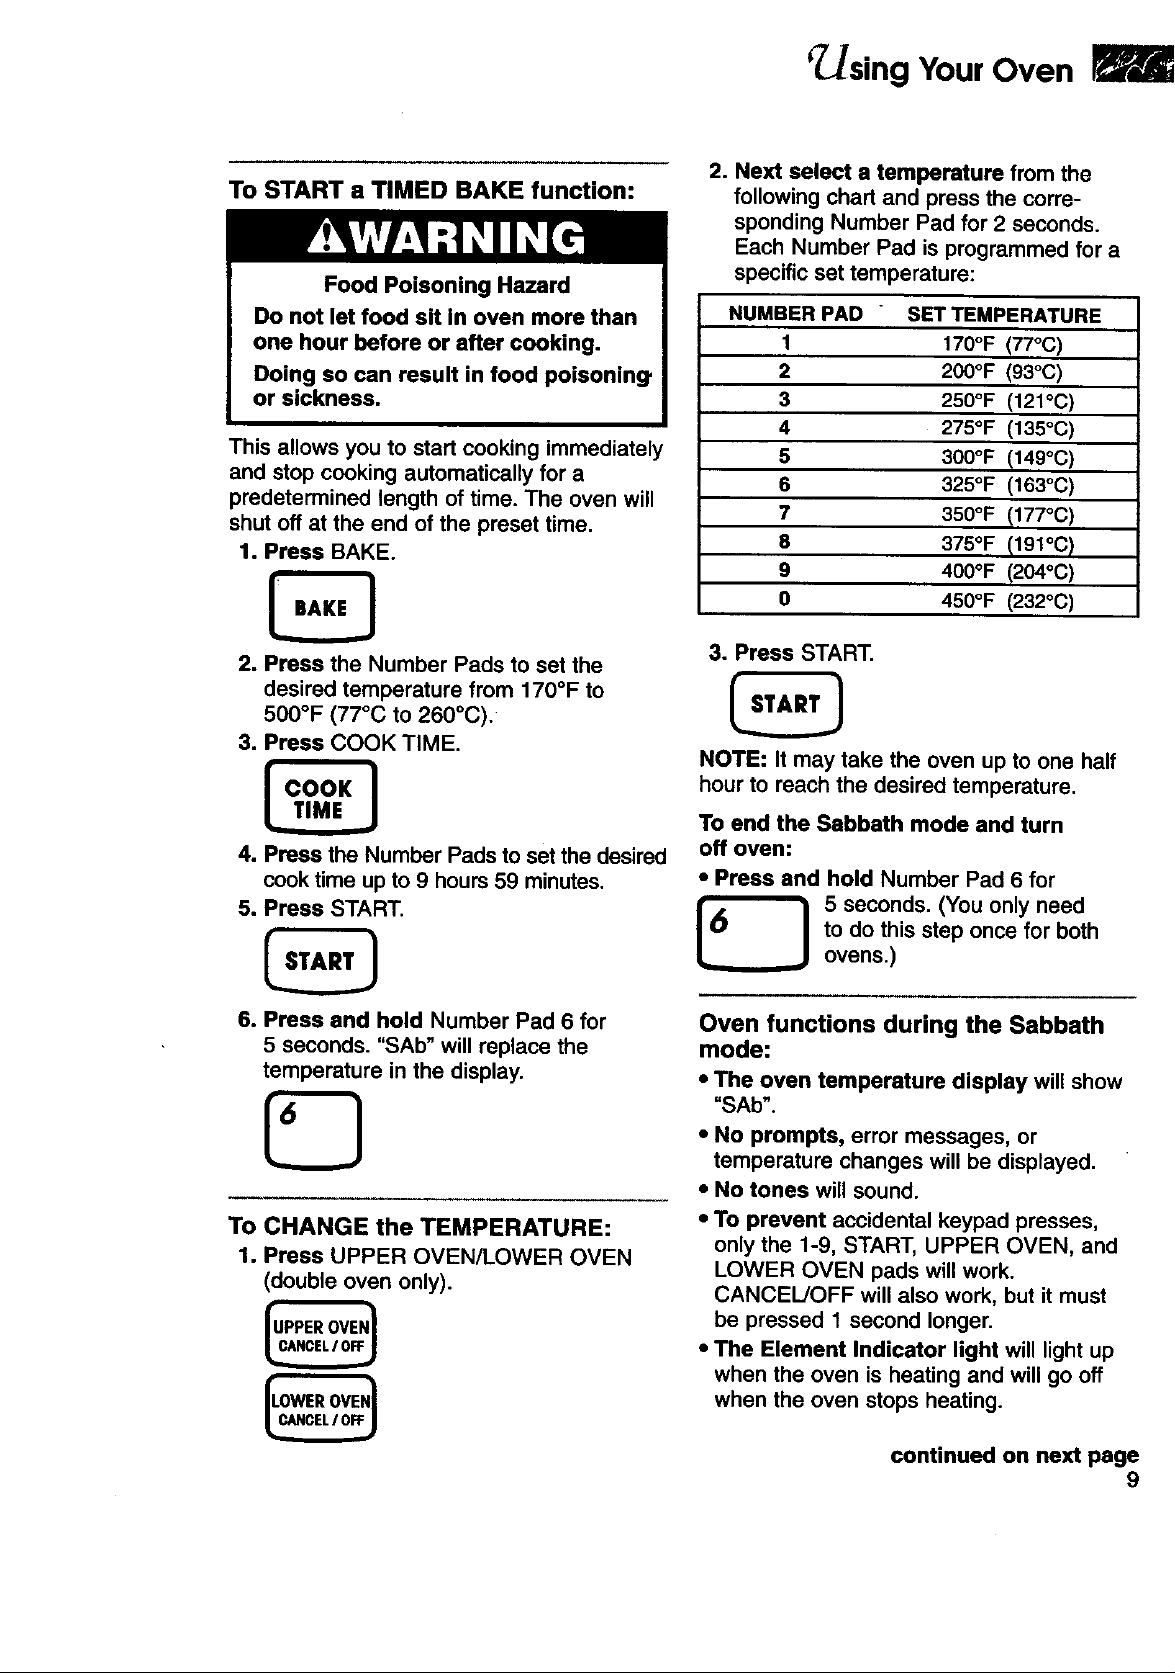
To START a TIMED BAKE function:
Food Poisoning Hazard
Do not let food sit in oven more than
one hour before or after cooking.
Doing so can result in food poisoning"
or sickness.
This allows you to start cooking immediately
and stop cooking automatically for a
predetermined length of time. The oven will
shut off at the end of the preset time.
t. Press BAKE.
2. Press the Number Pads to set the
desired temperature from 170°F to
500°F (77°C to 260°C).
3. Press COOK TIME.
2. Next select a temperature from the
following chart and press the corre-
sponding Number Pad for 2 seconds.
Each Number Pad is programmed for a
specific set temperature:
NUMBER PAD SET TEMPERATURE
1 170°F (77°C)
2 200°F (93°C)
3
4
5
6
7
8
9
0
3. Press START.
NOTE: It may take the oven up to one half
hour to reach the desired temperature.
250°F (121oC)
275°F (135oc)
300°F (149°C)
325°F (163°C)
350°F (177oc)
375°F (191°C)
400°F (204oc)
450°F (232oC)
4. Press the Number Pads to set the desired
cook time up to 9 hours 59 minutes.
5. Press START.
6. Press and hold Number Pad 6 for
5 seconds. "SAb" will replace the
temperature in the display.
To CHANGE the TEMPERATURE:
1. Press UPPER OVEN/LOWER OVEN
(double oven only).
To end the Sabbath mode and turn
off oven:
• Press and hold Number Pad 6 for
to do this step once for both
5 seconds. (You only need
ovens.)
Oven functions during the Sabbath
mode:
• The oven temperature display will show
"SAb".
• No prompts, error messages, or
temperature changes will be displayed.
• No tones will sound.
• To prevent accidental keypad presses,
only the 1-9, START, UPPER OVEN, and
LOWER OVEN pads will work.
CANCEL/OFF will also work, but it must
be pressed 1 second longer.
• The Element Indicator light will light up
when the oven is heating and will go off
when the oven stops heating.
continued on next page
9
r'L/sing YourOven
• If you open the oven door when the
elements are off, the elements will not turn
on. Elements will not turn on immediately
after the door is closed. If you open the
oven door when the elements are on, the
elements will turn off after a delay. Again,
elements will not turn on immediately after
the door is closed.
• The preset temperature will remain the
same prior to entering the Sabbath mode
unless the preset temperature is changed.
The preset temperature takes 15 to 20
seconds to change after the keypad has
been pressed.
• After a new preset temperature is
entered, the oven setting will not change
until the previous preset temperature has
been reached.
• The cooling fan will remain on for the
duration of the Sabbath mode.
• If power failure occurs in bake or timed
bake during the Sabbath mode, the oven
will return to a default temperature setting
of 350°F (177°C) and reset to the bake
mode only.
To use both ovens in the Sabbath
mode:
• Both ovens must be in BAKE mode be-
fore going into the Sabbath mode. If only
one oven is on before entering the
Sabbath mode, then the other oven cannot
be turned on while in the Sabbath mode.
• The temperature displays of the active
ovens will show "Sab".
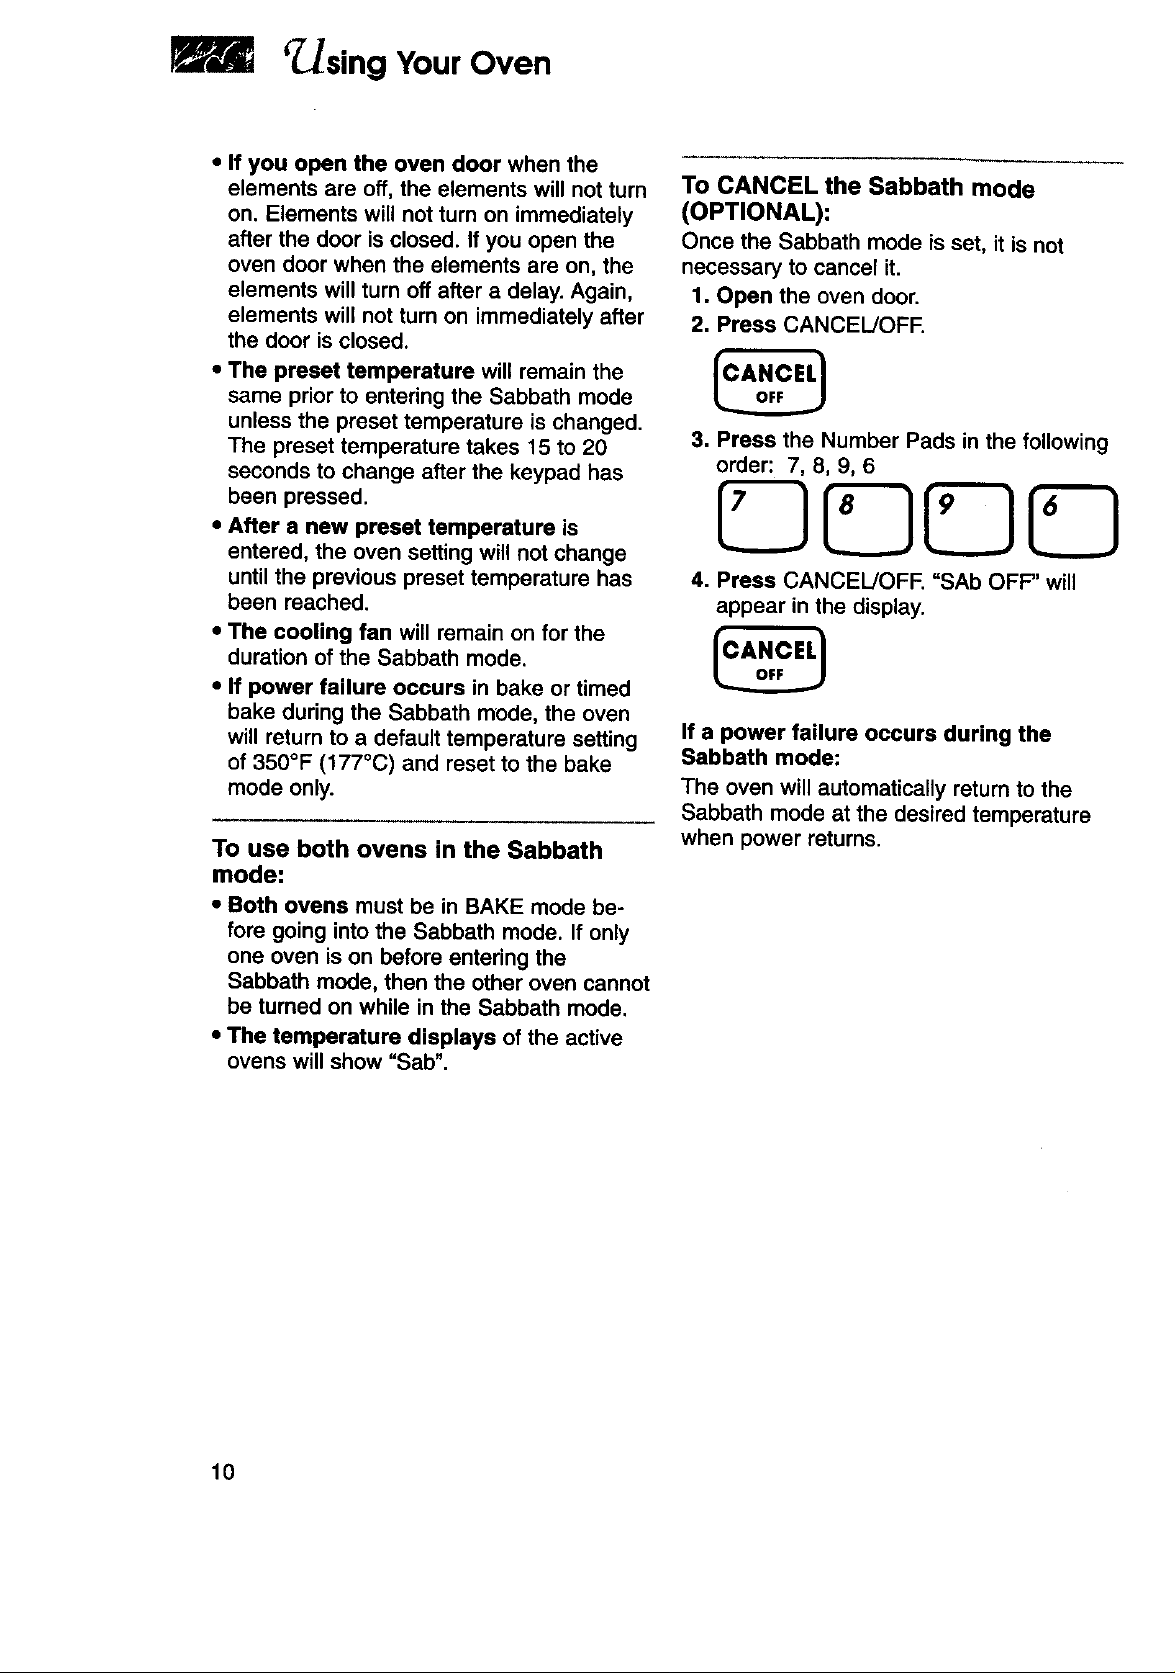
To CANCEL the Sabbath mode
(OPTIONAL):
Once the Sabbath mode isset, it is not
necessary to cancel it.
1. Open the oven door.
2. Press CANCEL/OFF.
3. Press the Number Pads in the following
order: 7, 8, 9, 6
OUUO
4. Press CANCEL!OFF. =SAb OFF" will
appear in the display.
If a power failure occurs during the
Sabbath mode:
The oven will automatically return to the
Sabbath mode at the desired temperature
when power returns.
10
' sing YourOven
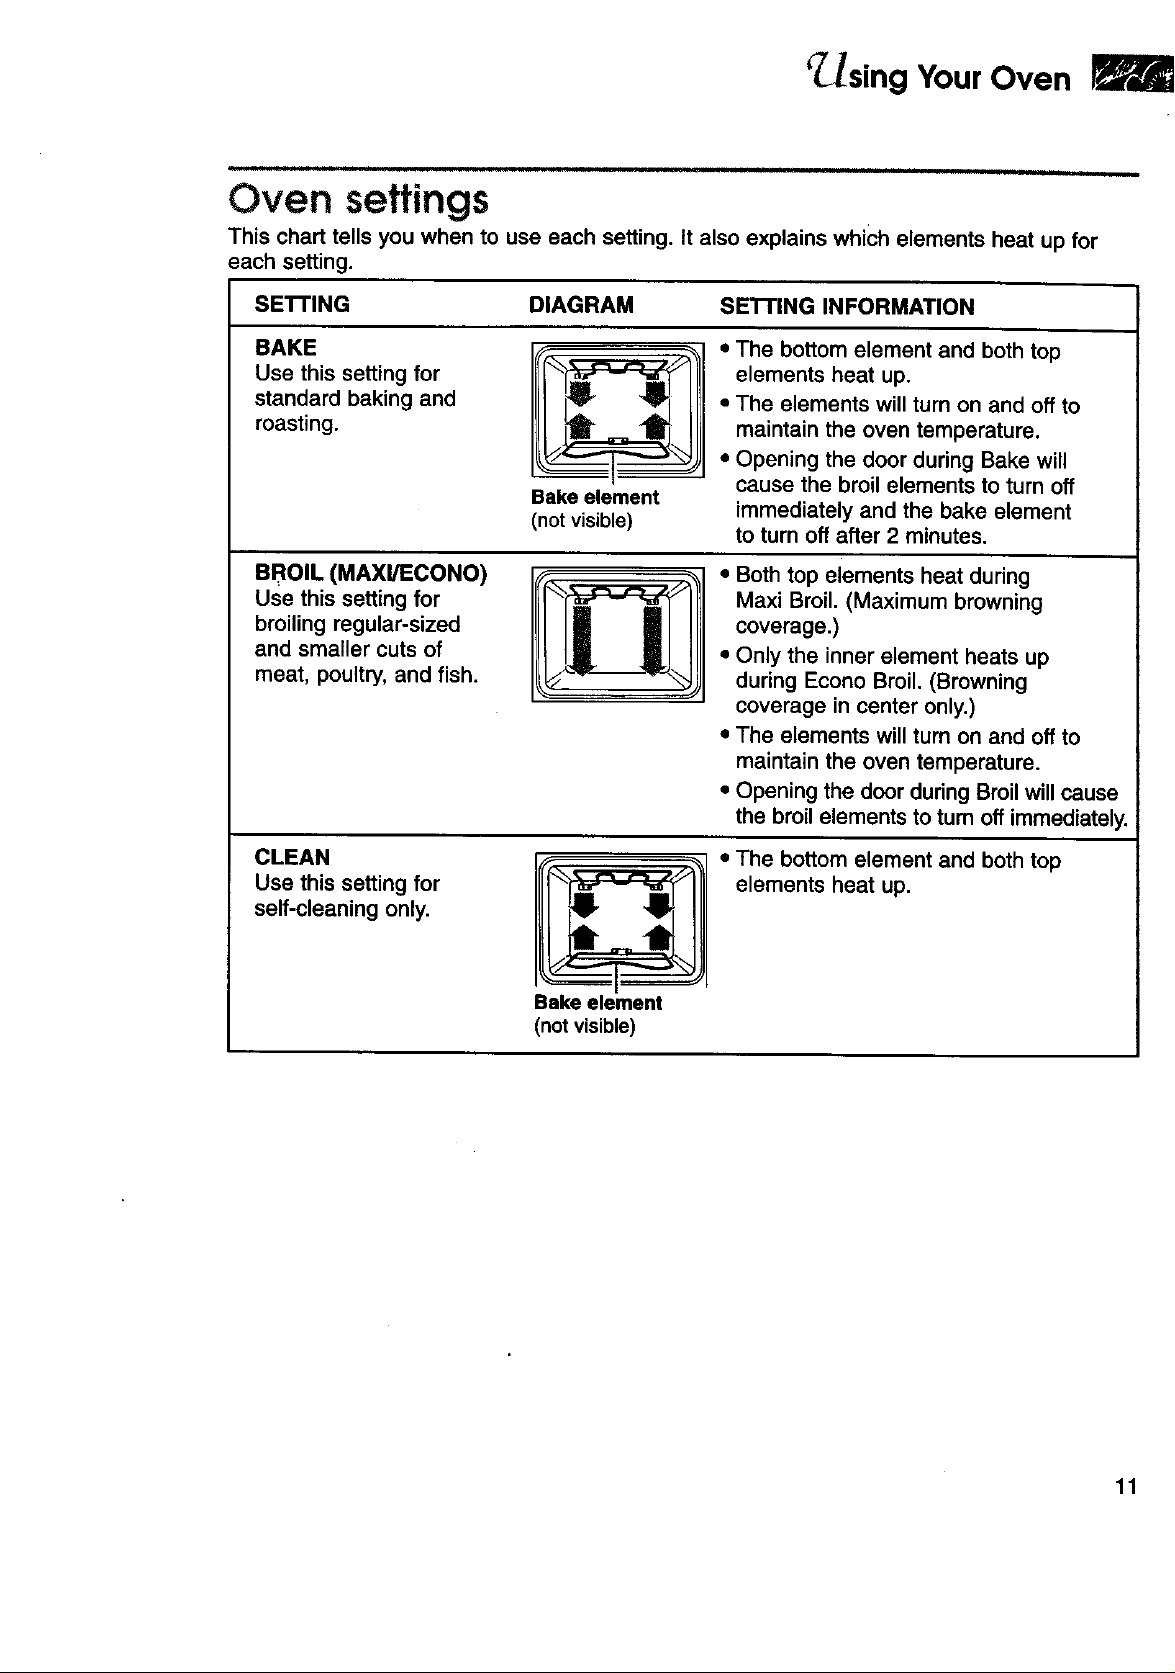
Oven settings
This chart tells you when to use each setting. It also explains which elements heat up for
each setting.
SETTING DIAGRAM SE'I-rlNG INFORMATION
BAKE
Use this setting for
standard baking and
roasting.
BROIL (MAXl/ECONO)
Use this setting for
broiling regular-sized
and smaller cuts of
meat, poultry, and fish.
CLEAN
Use this setting for
self-cleaning only.
Bake element
(not visible)
• The bottom element and both top
elements heat up.
• The elements will turn on and off to
maintain the oven temperature.
• Opening the door during Bake will
cause the broil elements to turn off
immediately and the bake element
to turn off after 2 minutes.
• Both top elements heat during
Maxi Broil. (Maximum browning
coverage.)
• Only the inner element heats up
during Econo Broil. (Browning
coverage in center only.)
• The elements will turn on and off to
maintain the oven temperature.
• Opening the door during Broil will cause
the broil elements to turn off immediately.
• The bottom element and both top
elements heat up.
Bake element
(not visible)
11
 Loading...