

Page 1
DOUBLE REFRIGERATOR DRAWERS
Installation Guide
IMPORTANT: READ AND
SAVE
THESE INSTRUCTIONS. INSTALLATION REQUIRES 2 OR MORE PEOPLE.
CAJÓN REFRIGERADO DOBLE
Manual de instalación
IMPORTANTE: LEA Y GUARDE ESTAS INSTRUCCIONES. LA INSTALACIÓN REQUIERE DE 2 O MÁS PERSONAS.
DOUBLE TIROIR RÉFRIGÉRÉ
Guide d’installation
IMPORTANT : LIRE ET CONSERVER CES INSTRUCTIONS. L’INSTALLATION NÉCESSITE L’INTERVENTION DE 2 PERSONNES OU PLUS.
Table of Contents/Índice/Table des matières..................................................................2
2258066A
Page 2

TABLE OF CONTENTS
REFRIGERATOR DRAWERS SAFETY..........................................3
Proper Disposal of Your Old Refrigerator Drawers .....................3
DESIGN SPECIFICATIONS............................................................3
Models..........................................................................................3
INSTALLATION REQUIREMENTS................................................4
Tools and Parts ............................................................................4
Style 2: Custom Overlay Drawer Panels......................................4
Product Dimensions.....................................................................5
Location Requirements................................................................5
Electrical Requirements ...............................................................6
ÍNDICE
SEGURIDAD DE LOS CAJONES REFRIGERADOS..................13
Cómo deshacerse adecuadamente
de sus cajones refrigerados viejos ............................................13
ESPECIFICACIONES DE DISEÑO ..............................................13
Modelos......................................................................................13
REQUISITOS DE INSTALACIÓN.................................................14
Piezas y herramientas................................................................14
Estilo 2: Paneles de los cajones recubiertos a la medida.........14
Medidas del producto................................................................15
Requisitos de ubicación.............................................................15
Requisitos eléctricos..................................................................16
INSTALLATION INSTRUCTIONS ..................................................6
Unpack the Refrigerator Drawers ................................................6
Remove the Base Grille................................................................6
Style 2: Install Custom Overlay Drawer Panels ...........................7
Install the Mounting Brackets ......................................................9
Move the Refrigerator Drawers to Final Location........................9
Lower the Leveling Legs ..............................................................9
Level the Refrigerator Drawers ..................................................10
Attach the Mounting Brackets to Adjacent Cabinets................10
Reinstall the Base Grille .............................................................11
Complete Installation..................................................................11
INSTRUCCIONES DE INSTALACIÓN.........................................16
Cómo desempacar los cajones refrigerados.............................16
Cómo quitar la rejilla de la base.................................................16
Estilo 2: Instalación de los paneles
de los cajones recubiertos a la medida.....................................17
Cómo instalar los soportes de montaje.....................................19
Mueva los cajones refrigerados a su posición final...................19
Cómo bajar las patas niveladoras..............................................20
Nivelación de los cajones refrigerados......................................20
Cómo fijar los soportes de
montaje a los gabinetes adyacentes .........................................21
Cómo reinstalar la rejilla de la base ...........................................21
Complete la instalación..............................................................21
TABLE DES MATIÈRES
SÉCURITÉ DES TIROIRS RÉFRIGÉRÉS....................................23
Mise au rebut correcte de vos vieux tiroirs réfrigérés ...............23
SPÉCIFICATIONS DU DESIGN ...................................................23
Modèles......................................................................................23
EXIGENCES D’INSTALLATION...................................................24
Outillage et pièces......................................................................24
Style 2 : Panneaux de tiroir personnalisés - série Overlay........24
Dimensions du produit...............................................................25
Exigences d’emplacement.........................................................25
Spécifications électriques..........................................................26
INSTRUCTIONS D’INSTALLATION............................................26
Déballage des tiroirs réfrigérés ..................................................26
Dépose de la grille de la base....................................................26
Style 2 : Installation des panneaux
de tiroir personnalisés - série Overlay........................................27
Installation des brides de montage............................................29
Déplacement des tiroirs réfrigérés à leur emplacement final ....29
Déploiement des pieds de nivellement......................................29
Réglage de l'aplomb des tiroirs réfrigérés.................................30
Fixation des brides de montage aux placards adjacents..........30
Réinstallation de la grille de la base...........................................31
Achever l'installation ..................................................................31
2
Page 3

REFRIGERATOR DRAWERS SAFETY
Your safety and the safety of others are very important.
We have provided many important safety messages in this manual and on your appliance. Always read and obey all safety
messages.
This is the safety alert symbol.
This symbol alerts you to potential hazards that can kill or hurt you and others.
All safety messages will follow the safety alert symbol and either the word “DANGER” or “WARNING.”
These words mean:
You can be killed or seriously injured if you don't immediately
DANGER
WARNING
All safety messages will tell you what the potential hazard is, tell you how to reduce the chance of injury, and tell you what can
happen if the instructions are not followed.
follow instructions.
can be killed or seriously injured if you don't
You
instructions.
follow
Proper Disposal of Your Old
Refrigerator Drawers
WARNING
Suffocation Hazard
Remove drawers from your old refrigerator drawers.
Failure to do so can result in death or brain damage.
IMPORTANT: Child entrapment and suffocation are not problems
of the past. Junked or abandoned refrigerator drawers are still
dangerous – even if they will sit for “just a few days.” If you are
getting rid of your old refrigerator drawers, please follow these
instructions to help prevent accidents.
DESIGN SPECIFICATIONS
Models - Refrigerator Drawers
Before you throw away your old refrigerator drawers:
Remove the drawers.
Style 1: Standard
Features wrap-around styling that complements the contoured
door handles. This style provides warm, commercial-looking
refrigerator drawers.
KDDA27TRS
Style 2: Overlay
Features factory-installed, overlay style trim to provide a
“frameless” look. This style requires the installation of custom
panels and handles.
KDDO27TRX
3
Page 4
INSTALLATION REQUIREMENTS
A
B
C
Tools and Parts
TOOLS NEEDED:
Gather the required tools and parts before starting installation.
Read and follow the instructions provided with any tools listed
here.
■ Hand drill or electric drill
(properly grounded)
■ ¹⁄₈" Drill bit
■ ⁵⁄₁₆" Socket wrench
Additional Tools Needed for Style 2: Overlay (only):
■ Scissors
■ Pencil
PARTS NEEDED Style 2: Overlay (only):
■ Custom Overlay Drawer Panels —
See “Style 2: Custom Overlay Drawer Panels.”
■ Hardware
■ #8 x ¹⁄₂" Pan-head screws (12) optional
PARTS SUPPLIED:
■ #8 x ¹⁄₂" Pan-head
screws (16)
■ Tape measure
■ Level
■ Phillips screwdriver
■ T30 TORX
■ Masking tape
■ Mounting Brackets (4)
®†
screwdriver
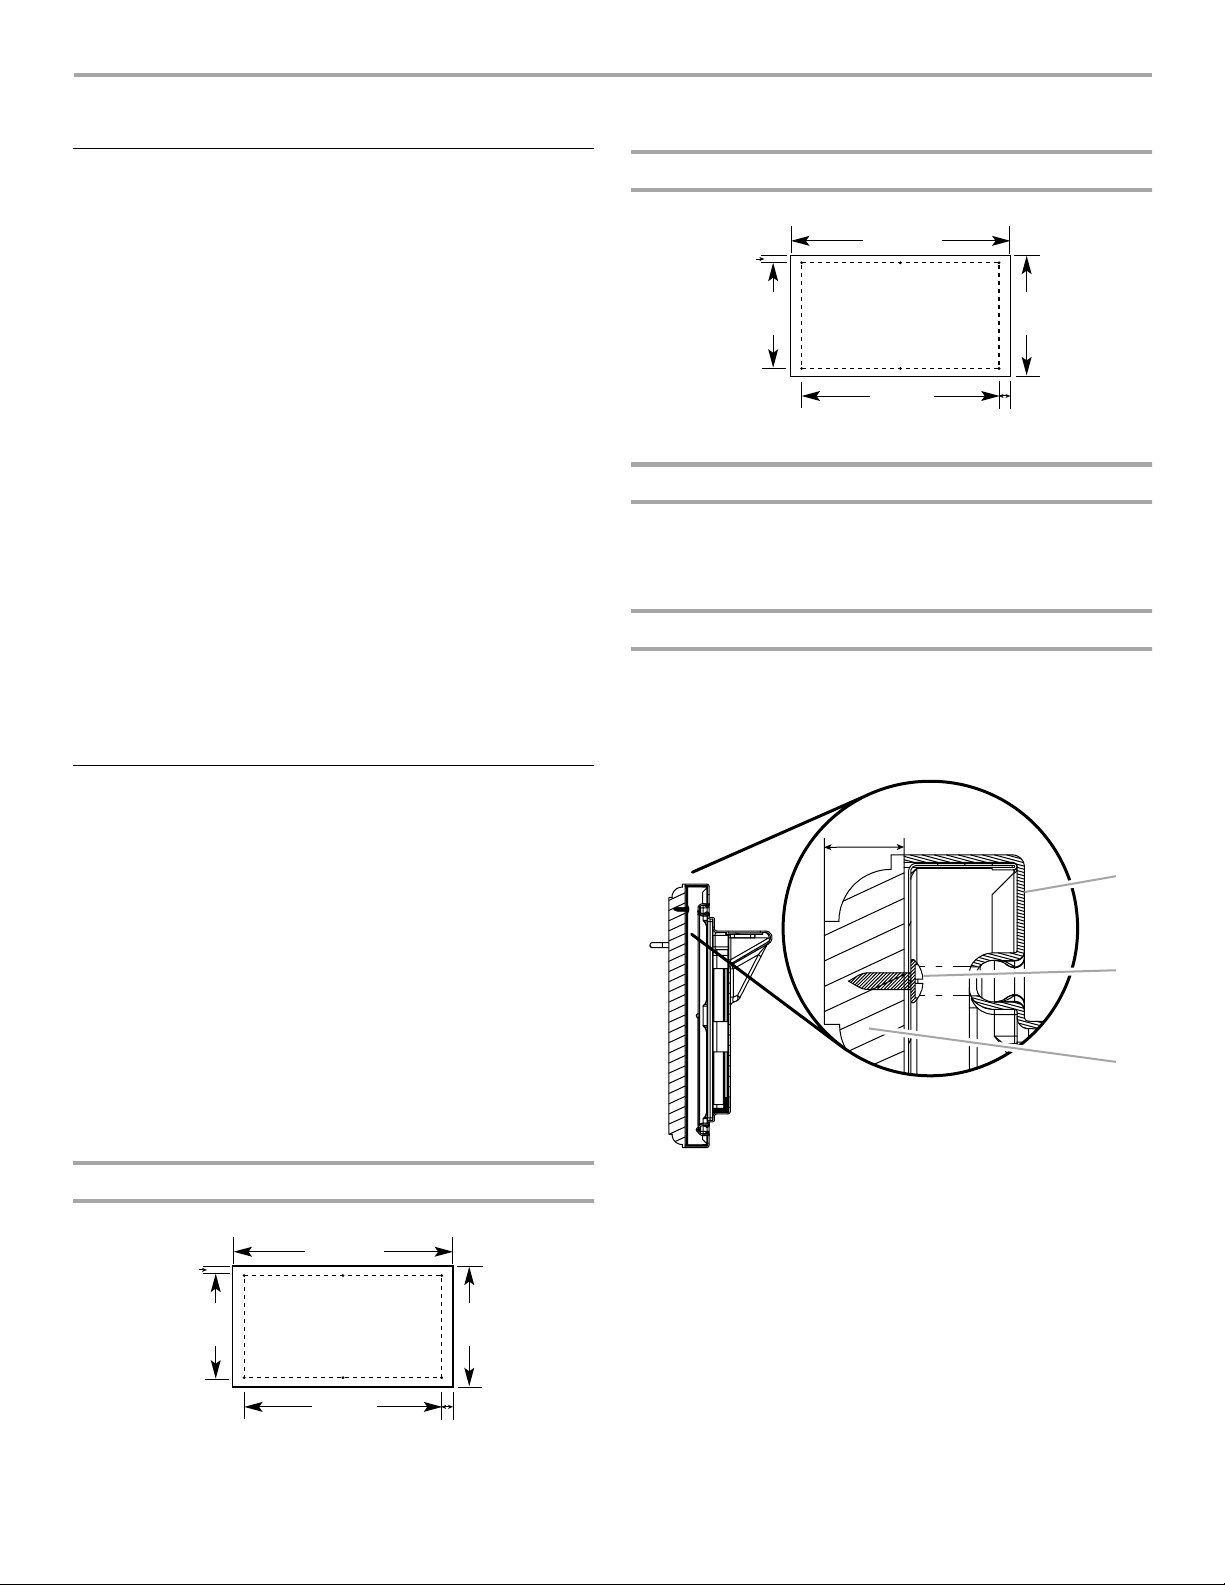
Bottom Overlay Drawer Panel Dimensions
26.5"
⁷⁄₈"
(2.2 cm)
14.5"
(36.8 cm)
(67.4 cm)
23.5"
(59.7 cm)
16.5"
(42.0 cm)
1.5"
(3.8 cm)
Flat Panels
You can create a custom flat panel using material less than ³⁄₄"
(19.05 mm) thick. The material must be laminated to either
plywood or medium density fiberboard that is ³⁄₄" (19.05 mm)
thick.
Raised Panels
You can create a raised panel design. Be sure to maintain a ³⁄₄"
(19.05 mm) minimum thickness where the overlay panel attaches
to the drawer front.
Raised Panel Attachment
Style 2: Custom Overlay Drawer Panels
If you plan to install custom wood panels, you will need to create
the panels yourself or consult a qualified cabinetmaker or
carpenter. See dimension drawings for panel specifications.
IMPORTANT:
■ The thickness of the overlay panels must be ³⁄₄"
(19.05 mm).
■ Each overlay panel must not weigh more than 10 lbs
(4.5 kg).
■ Overlay panels weighing more than recommended may
damage the refrigerator drawers.
■ Do not exceed the height dimension for the overlay
panels. Panels that exceed the height dimension may
damage the refrigerator drawers, cabinets or countertop.
■ The width of the overlay panels may vary according to the
width of the cabinet opening.
Top Overlay Drawer Panel Dimensions
26.5"
1.25"
(3.2 cm)
10.5"
(26.7 cm)
(67.4 cm)
12.7"
(32.2 cm)
³⁄₄"
(19.05 mm)
A. Drawer front
¹⁄₂
B. #8 x
C. Overlay panel
" pan-head screw
23.5"
(59.7 cm)
†®TORX is a registered trademark of Textron Innovations Inc.
1.5"
(3.8 cm)
4
Page 5
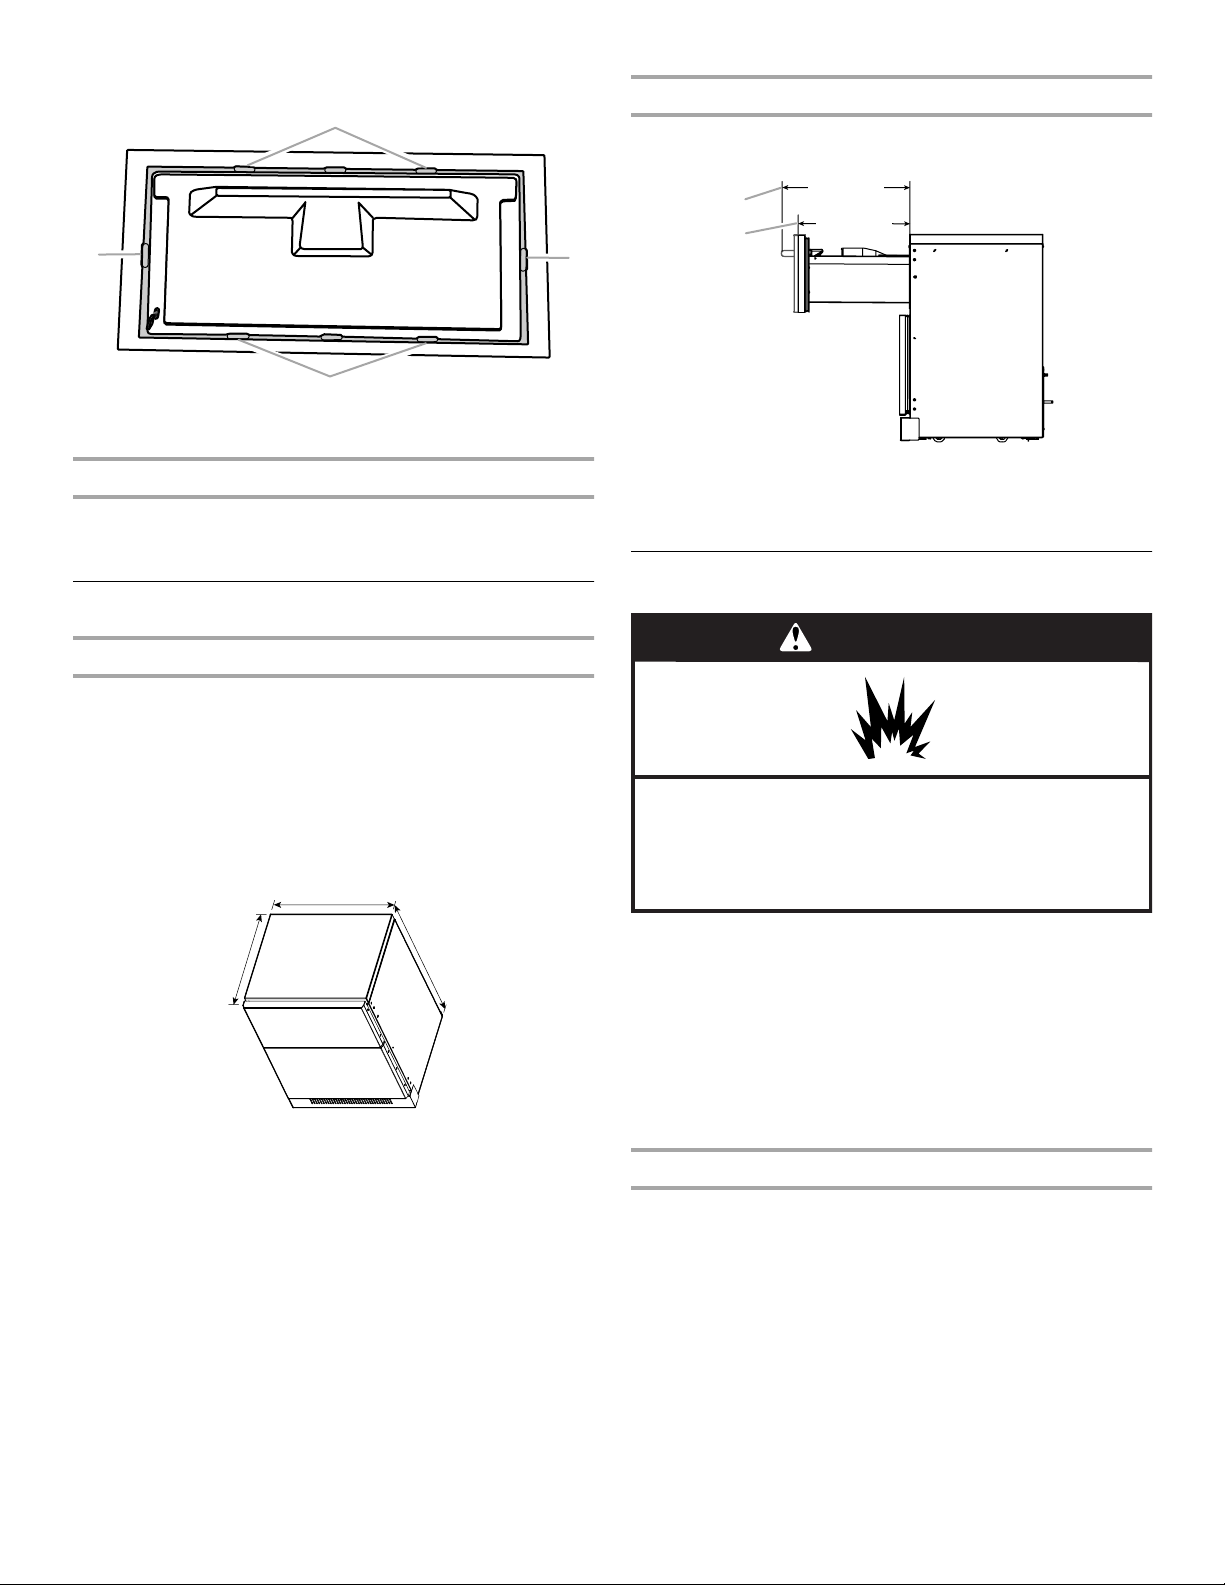
Drawer Front #8 x ¹⁄₂" Pan-head Screw Locations
A
A
A
A. Pre-drilled screw locations
Drawer Opening Dimensions
Dimensions vary based on model, as shown.
20.9"
A
B
A
(53.1 cm)
18.2"
(46.2 cm)
Hardware (optional)
Customer supplied handles may be installed at this time. Be sure
when installing custom hardware that the mounting screws are
flush with the back of the panels.
Product Dimensions
Styles 1 and 2: Standard and Overlay
■ Height dimensions are shown with the leveling legs extended
to the minimum height of ¹⁄₄" (6.35 mm) below the refrigerator
drawers.
■ When leveling legs are fully extended to 1" (25 mm) below the
refrigerator drawers, add ³⁄₄" (19.05 mm) to the height
dimensions.
■ The power cord is 60" (152.4 cm) long.
26.7"
(67.9 cm)
23.5"
(59.6 cm)
34.0"
(86.3 cm)
A. Style 1: Standard
B. Style 2: Overlay—Measurement does
not include
panel or optional hardware
³⁄₄
" (19.05 mm) overlay
Location Requirements
WARNING
Explosion Hazard
Keep flammable materials and vapors, such as
gasoline, away from refrigerator drawers.
Failure to do so can result in death, explosion, or fire.
NOTES:
■ For the refrigerator drawers to be flush with the front of the
base cabinets remove any baseboards or moldings from the
rear of the opening. See “Product Dimensions” and later in
this section “Opening Dimensions (both styles).”
■ It is recommended that you do not install the refrigerator
drawers near an oven, radiator, or other heat source.
■ Do not install in a location where the temperature will fall
below 55°F (13°C).
Opening Dimensions (both styles)
■ Height dimensions are shown with the leveling legs extended
to the minimum height of ¹⁄₄" (6.35 mm) below the refrigerator
drawers.
NOTE: When leveling legs are fully extended to 1" (25 mm)
below the refrigerator drawers, add ³⁄₄" (19.05 mm) to the
height dimensions. See “Product Dimensions.”
5
Page 6
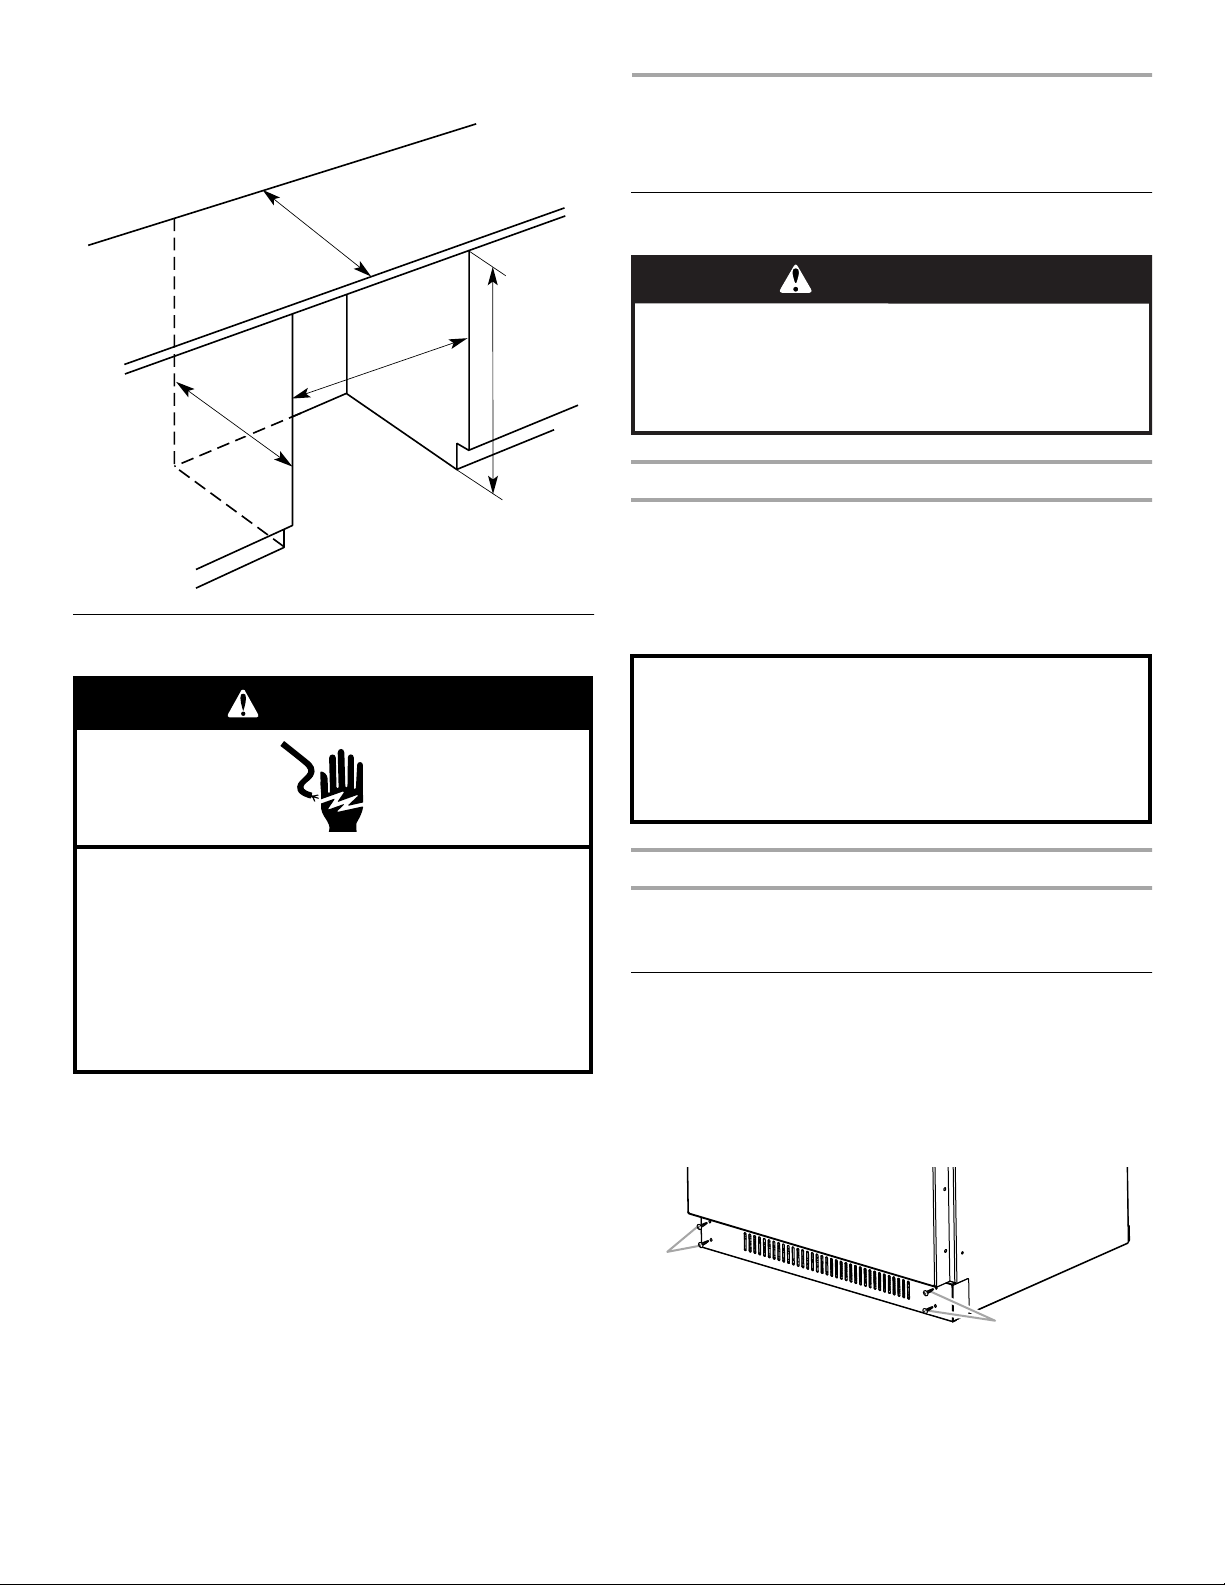
■ If the floor of the opening is not level with the kitchen floor,
shim the opening to make it level with the kitchen floor.
25"
(63.5 cm)
35"
24"
(60.96 cm)
27¹⁄₄"
(69.2 cm)
(88.9 cm)
Electrical Requirements
INSTALLATION INSTRUCTIONS
Unpack the Refrigerator Drawers
WARNING
Excessive Weight Hazard
Use two or more people to move and install refrigerator
drawers.
Failure to do so can result in back or other injury.
Remove the Packaging
Properly dispose of packaging. Do not use sharp instruments,
rubbing alcohol, flammable fluids, or abrasive cleaners to remove
tape or glue. These products can damage the surface of your
refrigerator drawers.
IMPORTANT: Use a T30 TORX
skids.
®†
screwdriver to remove the
WARNING
Electrical Shock Hazard
Plug into a grounded 3 prong outlet.
Do not remove ground prong.
Do not use an adapter.
Do not use an extension cord.
Failure to follow these instructions can result in death,
fire, or electrical shock.
Before you move your refrigerator drawers into the final location,
it is important to make sure you have the proper electrical
connection.
Recommended grounding method
A 115 Volt, 60 Hz., AC only 15- or 20-amp fused, grounded
electrical supply is required. It is recommended that a separate
circuit serving only your refrigerator drawers be provided. Use an
outlet that cannot be turned off by a switch. Do not use an
extension cord.
IMPORTANT: If this product is connected to a GFCI
(Ground Fault Circuit Interrupter) protected outlet, nuisance
tripping of the power supply may occur, resulting in loss of
cooling. Food quality and flavor may be affected. If nuisance
tripping has occurred, and if the condition of the food appears
poor, dispose of it.
When Moving Your Refrigerator Drawers:
Your refrigerator drawers are heavy. When moving the
appliance for service, be sure to protect the floor. Always
pull the appliance straight out when moving it. Do not
wiggle or “walk” the appliance when trying to move it, as
floor damage could occur.
Clean Before Using
After you remove all of the package materials, clean the inside of
your refrigerator drawers before using them. See the cleaning
instructions in the Use & Care Guide.
Remove the Base Grille
IMPORTANT: You must remove the base grille in order to lower
the leveling legs. Be sure to reinstall the base grille when the
installation is complete.
1. Using a Phillips screwdriver, remove the four screws from the
base grille as shown.
NOTE: Do not discard the screws.
A
A
A. Screws
2. Place the base grille on a clean, soft working surface for
later use.
†®TORX is a registered trademark of Textron Innovations Inc.
6
Page 7
Style 2: Install Custom Overlay Drawer Panels
B
If you have Style 1: Standard refrigerator drawers, skip this step.
Go to “Install the Mounting Brackets” to continue the installation.
IMPORTANT:
■ Create custom overlay drawer panels according to the
specifications in the “Style 2: Custom Overlay Drawer
Panels” section.
■ KitchenAid is not responsible for the removal or addition of
decorative panels that would prevent the refrigerator drawers
from being serviced.
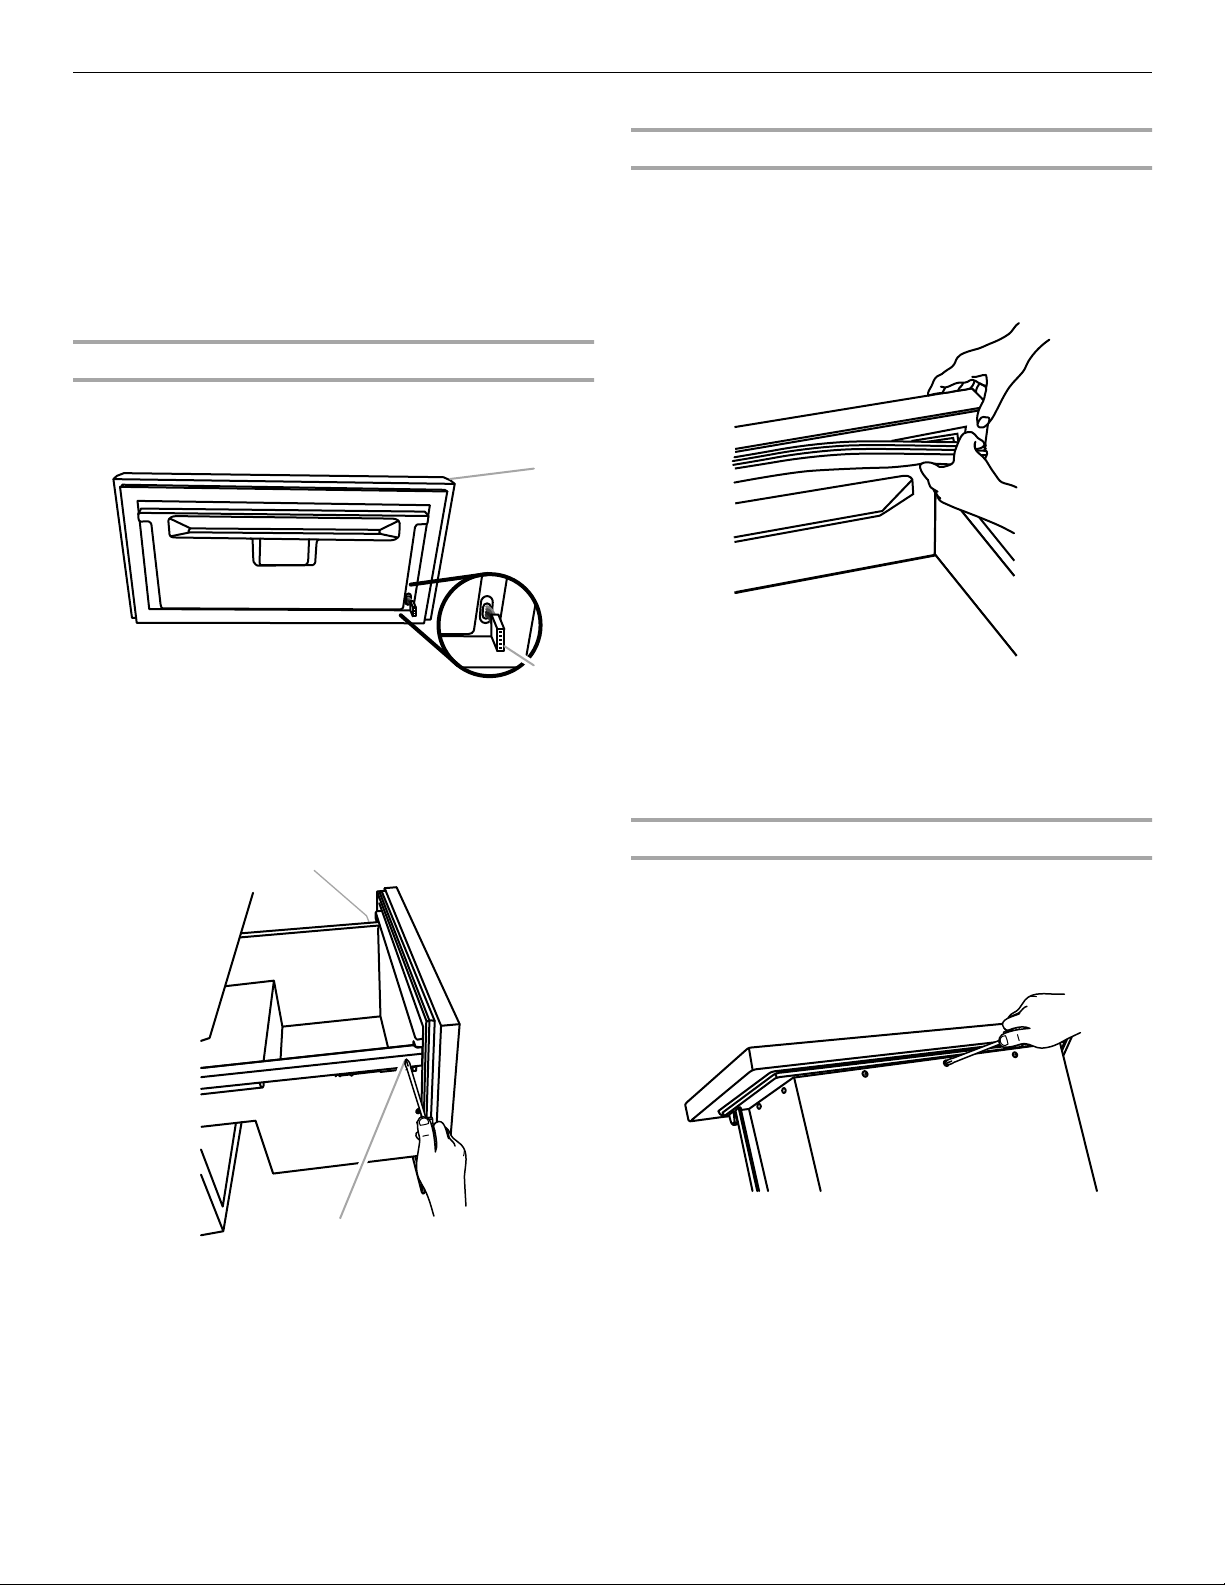
Remove the Drawers
1. Disconnect the wiring plug located on the left side of the
drawer (top drawer only) as shown.
A
Remove the Gaskets
IMPORTANT: The gaskets contain strong magnetic strips. Follow
these instructions and keep screws and other loose metal parts
away from the gaskets to prevent damaging them.
1. Begin at the top right corner. Slowly pull the gasket out of the
corner and continue working slowly toward the opposite side
as shown.
A. Drawer front
B. Wiring plug
2. Using a Phillips screwdriver, remove the two screws located
on each side of the drawer to release it.
NOTE: Do not discard the screws. Set them aside for later
use.
A
A
2. Proceed slowly from corner to corner until the gasket is
completely free from the groove.
3. Gently remove the gasket and lay it aside on a clean, soft
working surface. Be sure to keep all screws and loose metal
parts away from the magnetic gasket.
4. Repeat the process for the other gasket.
Remove the Drawer Fronts
1. Remove the drawer front by removing the three screws
located across the bottom and the two screws located on
each side of the drawer as shown.
NOTE: Do not discard the screws. Set them aside for later
use.
A. Screws
3. Remove the drawer by lifting it up and sliding it forward.
4. Push the empty drawer slides back into place.
5. Repeat the process for the other drawer.
7
Page 8
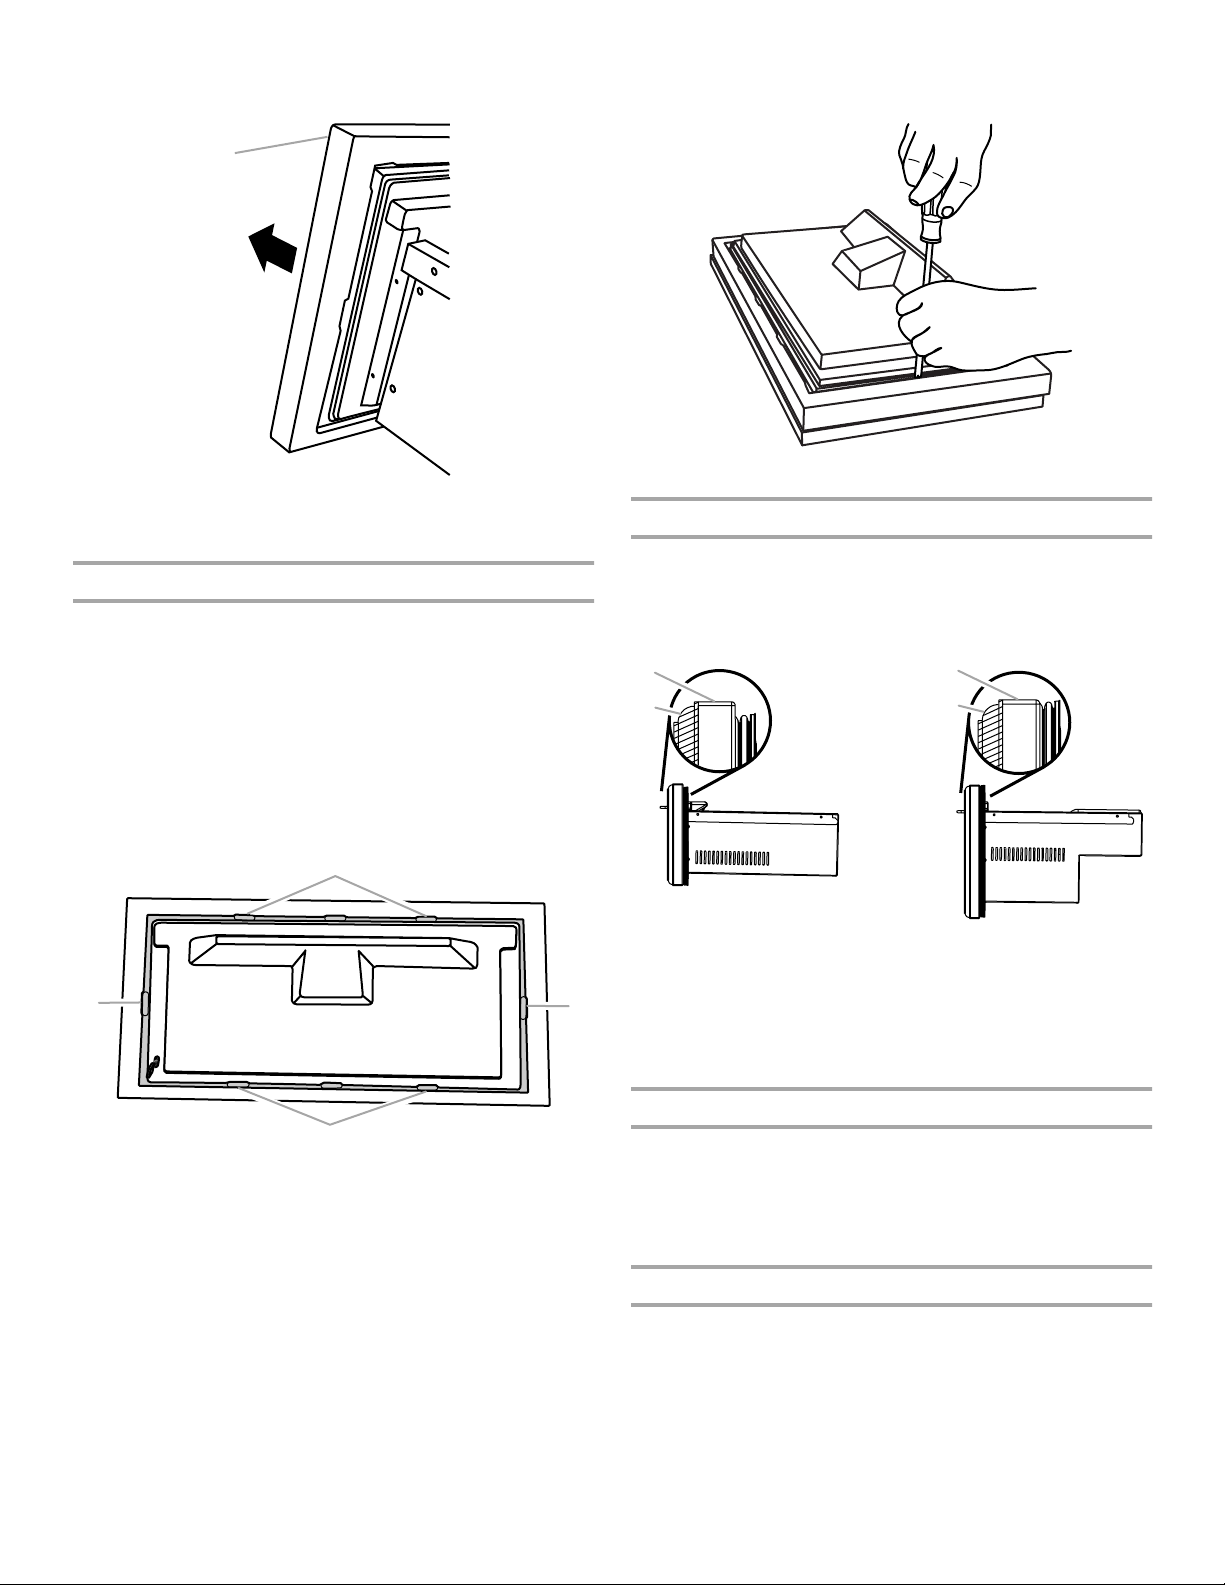
2. To remove the drawer front, pull the drawer front forward and
away from the drawer.
A
A. Drawer front
3. Repeat the process for the other drawer.
Install the Custom Overlay Panels
1. Place the custom overlay panel face down on a clean, flat
working surface.
2. Place the drawer front face down on the overlay panel. Align
all edges of the drawer front to the overlay panel.
3. Using masking tape, secure the drawer front to the overlay
panel.
4. Using the pre-drilled holes in the drawer front as a guide, drill
six ¹⁄₈" x ¹⁄₂" (3.18 mm x 12.7 mm) deep holes into the overlay
panel.
NOTE: Be sure not to drill deeper than ¹⁄₂" (12.7 mm).
5. Drive six #8 x ¹⁄₂" pan-head screws through the drawer front
into the overlay panel.
6. Repeat the process for the other drawer front.
Reinstall the Drawer Fronts
1. Be sure that the overlay panel is flush with the drawer front as
shown.
Top Drawer Bottom Drawer
A
B
A
B
A
A. Drawer front
B. Overlay panel
A
2. Reinstall the drawer front using three screws across the
A
bottom and two screws on each side of the drawer. See
“Remove the Drawer Fronts.”
3. Repeat the process for the other drawer.
Reinstall the Gaskets
A
A. Pre-drilled screw locations
1. To reinstall the gasket, place the gasket over the drawer.
2. Start at the corners, and working toward the opposite corner,
press the gasket back into the groove. Be sure to seat the
gasket on all four sides.
3. Repeat the process for the other drawer.
Reinstall the Drawers
1. Install the drawer by fully extending the drawer slides.
2. Place the drawer onto the top of the slides. Push the drawer
all the way back until it locks into place. Then pull the drawer
forward and adjust the slides until the screw holes align with
the drawer.
8
Page 9
3. Using a Phillips screwdriver and two screws, secure the
drawer to the slides.
4. Reconnect the wiring plug located on the left side of the
drawer (top drawer only). See “Remove the Drawers” earlier
in this section.
IMPORTANT: If you do not reconnect the wiring plug, you
cannot adjust the temperature settings. See “Adjusting
Controls” in the Use & Care Guide.
5. Repeat the process for the other drawer.
Install the Mounting Brackets
IMPORTANT:
■ Install two mounting brackets (upper and lower) on both sides
of the refrigerator drawers cabinet. The mounting brackets
secure the appliance to the adjacent cabinets.
■ Failure to secure the mounting brackets to the adjacent
cabinets may result in the appliance pulling out of the
opening when the upper or lower drawer is opened.
■ The mounting bracket has an offset. Be sure when installing
the mounting brackets to position the offset to the adjacent
cabinets.
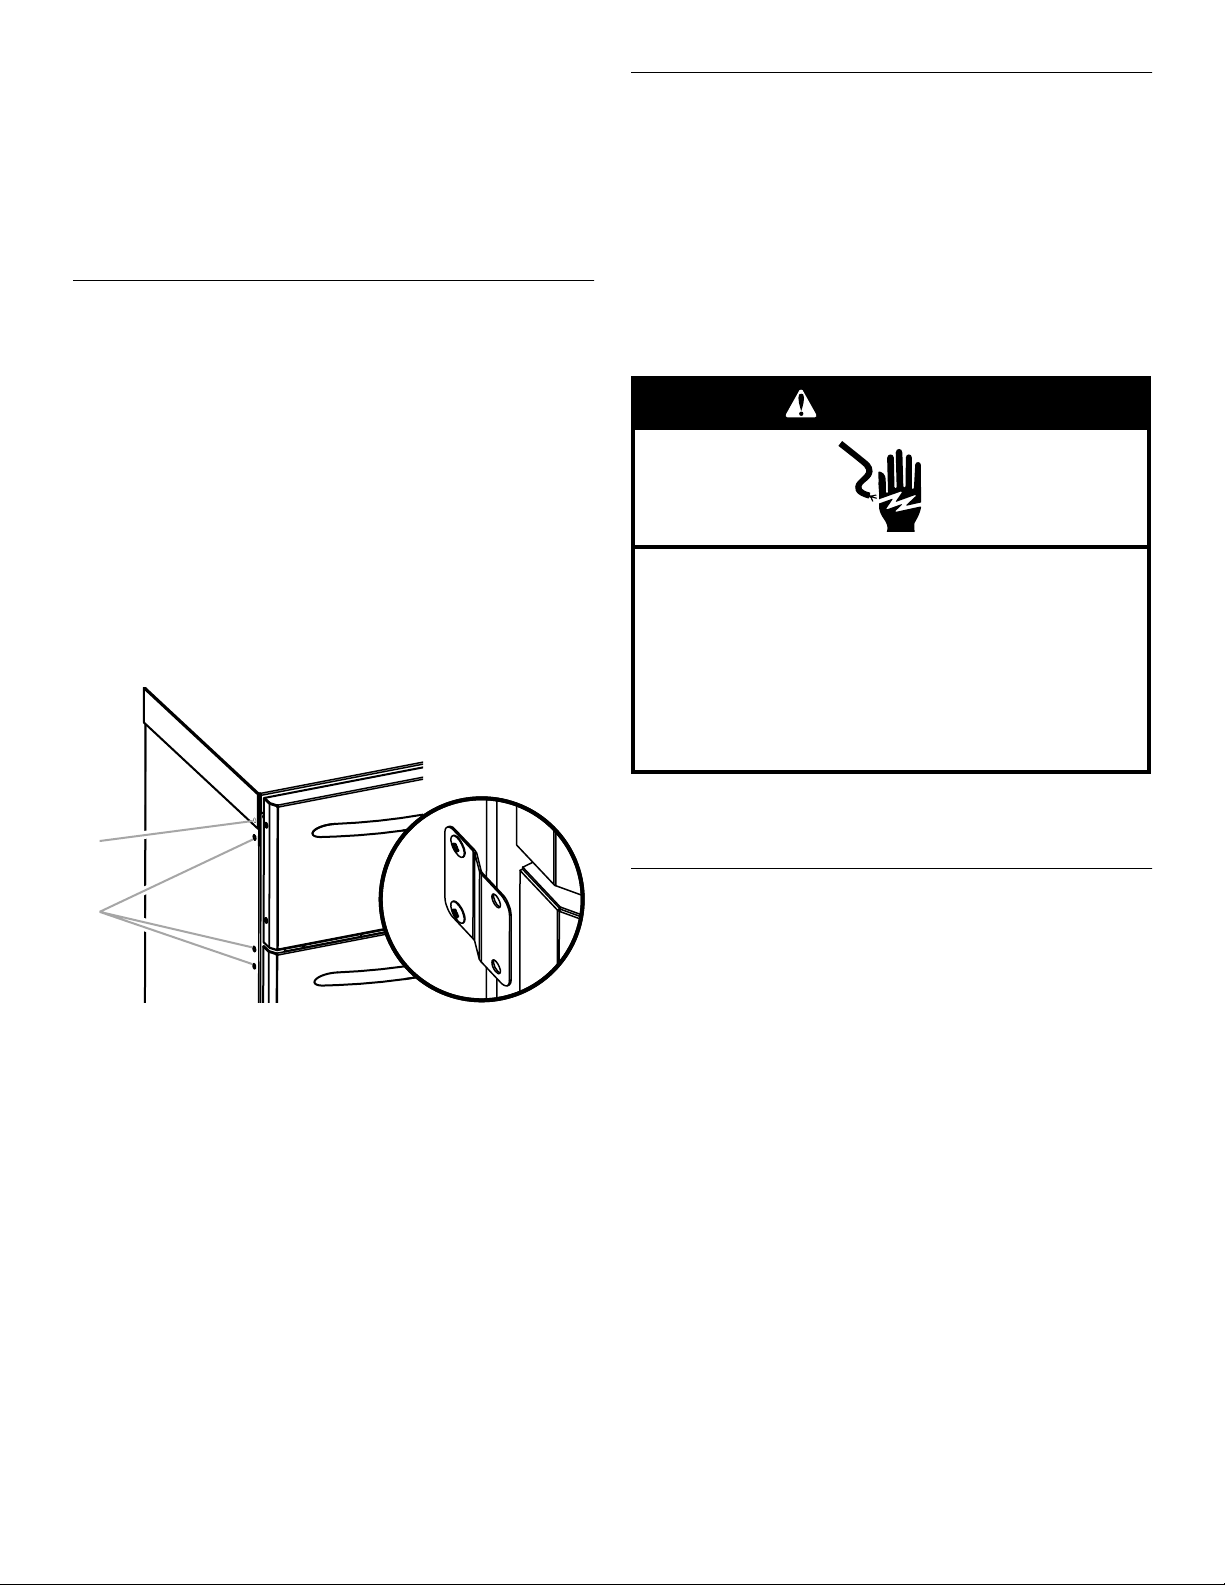
1. Begin installation (on each side) at the pre-drilled holes for the
upper mounting brackets.
NOTE: Insulation tape covers the top pre-drilled holes for the
upper mounting brackets. Do not remove the insulation tape
when installing the upper mounting brackets.
Move the Refrigerator Drawers to
Final Location
IMPORTANT:
■ To prevent floor damage, make sure levelers are raised (not
touching floor) and the weight of the appliance is on the
rollers before moving.
■ Rollers are for moving the refrigerator drawers and not for
permanent support.
1. Place top of cardboard carton or plywood under the
appliance. Remove dolly.
2. Do not remove protective film or cover.
WARNING
Electrical Shock Hazard
Plug into a grounded 3 prong outlet.
Do not remove ground prong.
Do not use an adapter.
Do not use an extension cord.
Failure to follow these instructions can result in death,
fire, or electrical shock.
A
B
A. Pre-drilled top hole is underneath
the insulation tape
B. Pre-drilled holes
2. Using a Phillips screwdriver and one #8 x ¹⁄₂" pan-head
screw, drive the screw through the bottom hole of upper
mounting bracket and into the pre-drilled hole. Tighten the
screw.
3. Push a pan-head screw through the insulation tape and into
the pre-drilled hole. Tighten the screw.
4. Using a Phillips screwdriver and two #8 x ¹⁄₂" pan-head
screws, drive the screws through the holes in the lower
mounting bracket into the pre-drilled holes. Tighten the
screws.
5. Repeat the process for the other side.
6. Set aside the remaining eight #8 x ¹⁄₂" pan-head screws for
later use. See “Attach the Mounting Brackets to Adjacent
Cabinets.”
3. Plug into a grounded 3 prong outlet.
4. Move the refrigerator drawers straight back and evenly into
the opening.
Lower the Leveling Legs
IMPORTANT:
■ All four leveling legs must contact the floor to support and
stabilize the full weight of the refrigerator drawers.
■ Rollers are for moving the refrigerator drawers and not for
permanent support.
■ To avoid cabinet/countertop damage, do not apply more than
50 inch–pounds (58 cm - kg) of torque to the leveling legs.
■ When leveling, be sure that the gap between the upper
drawer and the bottom edge of the countertop is a minimum
of ³⁄₈" (9.5 mm).
■ Style 2: Overlay—Be sure to install the custom overlay drawer
panels before leveling the refrigerator drawers. See “Style 2:
Install Custom Overlay Drawer Panels.”
1. Using a ⁵⁄₁₆" socket wrench, turn the leveling bolts on both
sides of the refrigerator drawers to the right (clockwise) until
the leveling legs support the refrigerator drawers’ weight.
9
Page 10
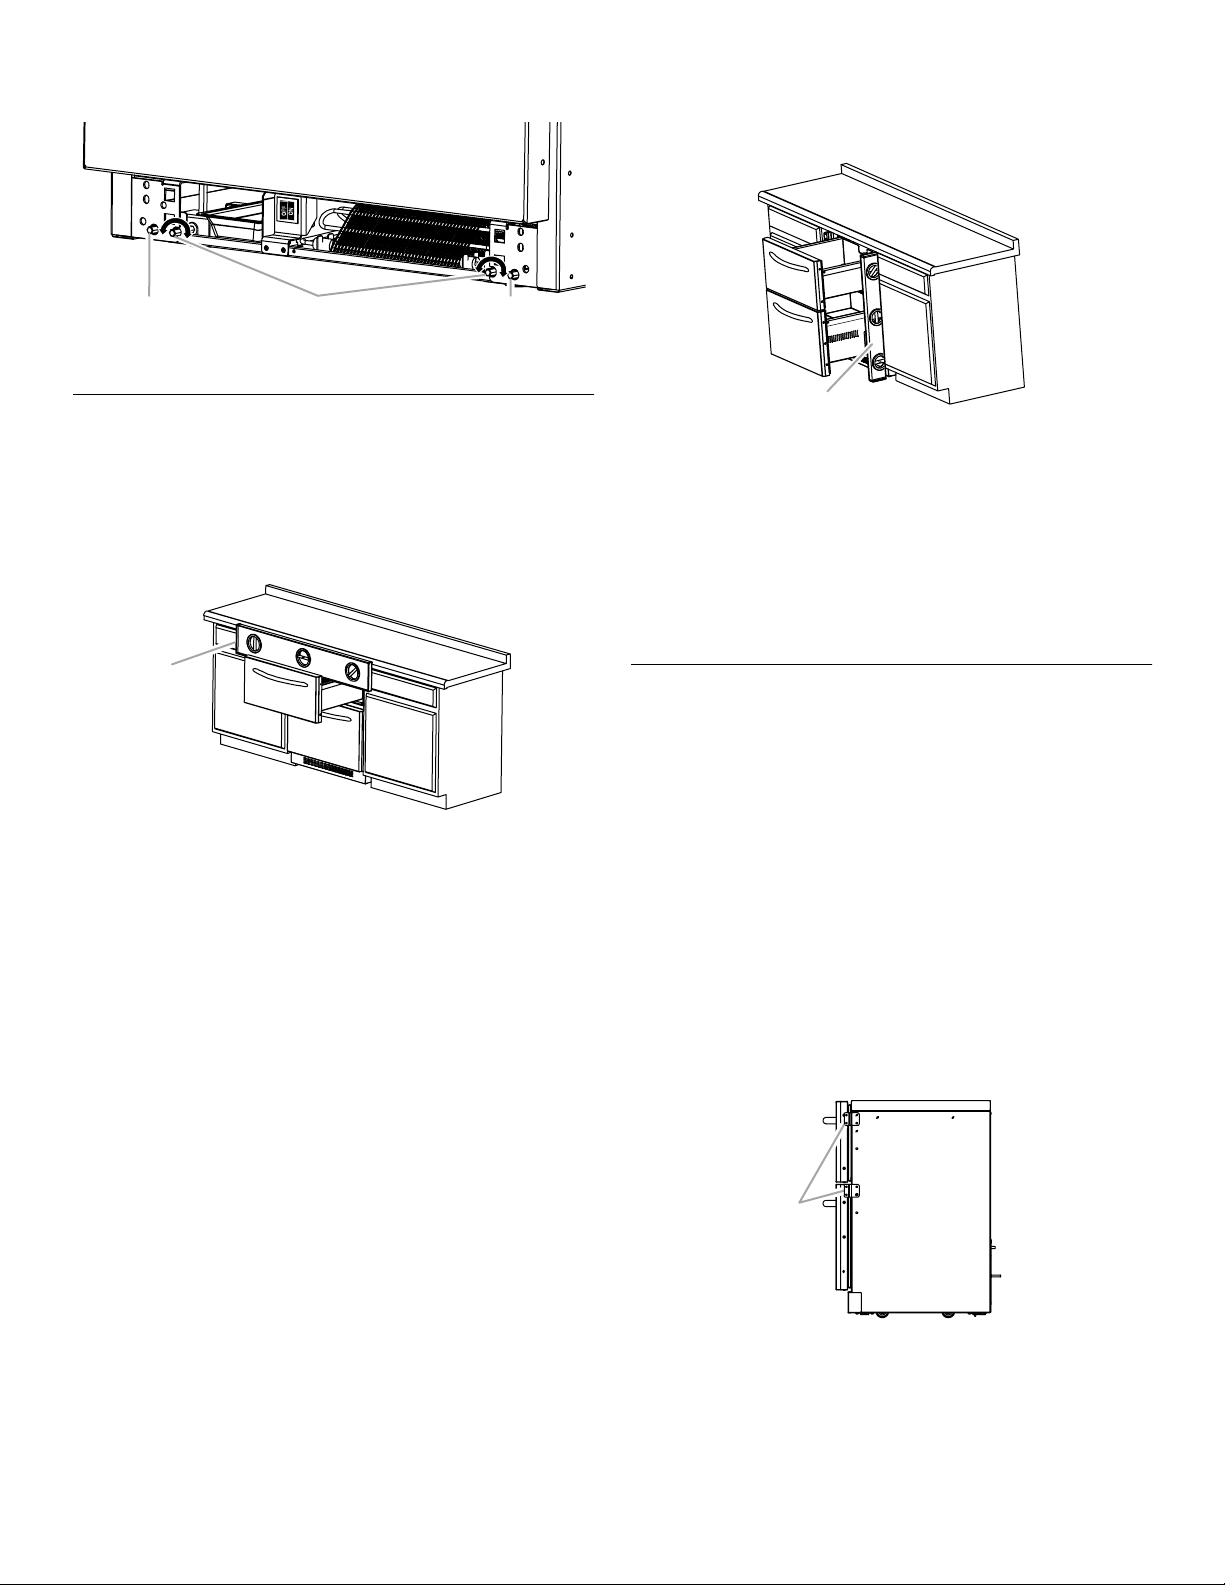
2. Lower all four leveling legs until the refrigerator drawers are
the proper height.
BA A
A. Rear leveling bolt
B. Front leveling bolt
Level the Refrigerator Drawers
IMPORTANT: Style 2–Overlay: Be sure to install the custom
overlay drawer panels before leveling the refrigerator drawers for
the Overlay Model. See “Style 2: Install Custom Overlay Drawer
Panels.”
1. Open the top drawer and place the level across the top
drawer as shown. Check the level from left to right.
A
A. Check the level from left to right.
2. Using the front and rear leveling bolts, adjust the refrigerator
drawers cabinet until the top drawer measures level from left
to right. See “Lower Leveling Legs.”
NOTE: Adjusting the front and rear leveling bolts together will
either raise or lower the side of the refrigerator drawers
cabinet.
3. Remove the level and close the top drawer. Check the gap
between the top of the drawer and the countertop. If the gap
measures less than ³⁄₈" (9.5 mm) minimum, turn all four
leveling bolts equally to raise the leveling legs. Recheck the
level.
4. Open both drawers less than midway. Place the level on the
side flange beside the drawers as shown. Raise or lower the
front leveling bolts of the refrigerator drawers together until
the sides of the refrigerator drawers are plumb.
A
A. Check the level from
front to back.
5. Remove the level and close the drawers. Recheck the gap
between the top of the drawer and the countertop. If the gap
measures less than ³⁄₈" (9.5 mm), turn all four leveling bolts
equally to raise the leveling legs. Recheck the level.
NOTE: Be sure to recheck the horizontal level of the top
drawer.
6. Be sure all four levelers are on the floor and supporting the
full weight of the refrigerator drawers.
Attach the Mounting Brackets to
Adjacent Cabinets
IMPORTANT: To avoid damage to your cabinets or countertop,
be sure to secure the mounting brackets to the adjacent
cabinets.
1. Center the refrigerator drawers cabinet in the opening.
2. Pull out the upper drawer far enough to reach the mounting
brackets.
NOTE: Do not pull the drawer out more than midway.
3. Using the upper mounting brackets as a guide, predrill two
¹⁄₈" (3.18 mm) holes through the mounting brackets (for each
side) into the adjacent cabinets. Be sure to drill at least two
holes per mounting bracket.
NOTE: Be sure the refrigerator drawers are level before
securing the upper mounting brackets.
4. Using four #8 x ¹⁄₂" pan-head screws, attach the upper
mounting brackets to the adjacent cabinets.
10
A
A. Mounting brackets
5. Repeat the process for the lower drawer.
Page 11

Reinstall the Base Grille
1. Be sure the Power On/Off Switch is on.
A
A. Power On/Off Switch (ON)
2. Reinstall the base grille.
NOTE: The bottom of the base grille has a notch and a wider
flange than the top.
A
A. Bottom flange
Complete Installation
1. Remove all boxes, parts packages and packing materials
from the interior of the refrigerator drawers.
2. Remove the protective film.
3. Clean the refrigerator drawers before use. See “Cleaning”
section in the Use & Care Guide for instructions.
4. The controls are preset at the factory to the default setting
37°F (3°C) for the upper and lower drawers. Be sure that the
compressor is operating properly and that all the lights are
working.
5. If construction will continue after the refrigerator drawers
have been installed, turn the power Off for both Drawers. See
“Using the Controls” in the Use & Care Guide for instructions.
To get the most efficient use from your new refrigerator drawers,
read your Use & Care Guide. Keep these Installation Instructions
and Use & Care Guide near the refrigerator drawers for easy
reference.
3. Using a Phillips screwdriver, drive the four screws into the
base grille as shown. Tighten all screws.
A
A
A. Screws
11
Page 12

Notes
12
Page 13

SEGURIDAD DE LOS CAJONES REFRIGERADOS
Su seguridad y la seguridad de los demás es muy importante.
Hemos incluido muchos mensajes importantes de seguridad en este manual y en su electrodoméstico. Lea y obedezca siempre
todos los mensajes de seguridad.
Este es el símbolo de advertencia de seguridad.
Este símbolo le llama la atención sobre peligros potenciales que pueden ocasionar la muerte o una lesión a
usted y a los demás.
Todos los mensajes de seguridad irán a continuación del símbolo de advertencia de seguridad y de la palabra
“PELIGRO” o “ADVERTENCIA”. Estas palabras significan:
PELIGRO
ADVERTENCIA
Todos los mensajes de seguridad le dirán el peligro potencial, le dirán cómo reducir las posibilidades de sufrir una lesión y lo que
puede suceder si no se siguen las instrucciones.
Cómo deshacerse adecuadamente de sus
cajones refrigerados viejos
Si no sigue las instrucciones de inmediato, usted puede
morir o sufrir una lesión grave.
Si no sigue las instrucciones, usted puede morir o sufrir
una lesión grave.
Antes de descartar sus viejos cajones refrigerados:
Saque los cajones.
ADVERTENCIA
Peligro de Asfixia
Remueva los cajones de sus cajones refrigerados
viejos.
No seguir esta instrucción puede ocasionar la muerte
o daño al cerebro.
IMPORTANTE: El atrapamiento y asfixia de niños no es un
problema del pasado. Los cajones refrigerados tirados y
abandonados son un peligro, aún si van a quedar ahí “por unos
pocos días”. Si Ud. está por deshacerse de sus cajones
refrigerados viejos, por favor siga las instrucciones que se dan a
continuación para prevenir accidentes.
ESPECIFICACIONES DE DISEÑO
Modelos - Cajones refrigerados
Estilo 1: Estándar
Presenta un estilo envolvente que complementa los contornos de
las agarraderas de la puerta. Esta serie ofrece un estilo comercial
cálido para cajones refrigerados.
KDDA27TRS
Estilo 2: Recubierto
Presenta un adorno recubierto instalado de fábrica que ofrece un
estilo “sin marco”. Esta serie requiere la instalación de paneles y
agarraderas a la medida.
KDDO27TRX
13
Page 14

REQUISITOS DE INSTALACIÓN
A
B
C
Piezas y herramientas
HERRAMIENTAS NECESARIAS:
Reúna las herramientas y piezas necesarias antes de comenzar
la instalación.
Lea y siga las instrucciones provistas con cualquiera de las
herramientas enlistadas aquí.
■ Taladro manual o eléctrico
(debidamente conectado a
tierra)
■ Broca de ¹⁄₈"
■ Llave de cubo de ⁵⁄₁₆"
■ Cinta para medir
■ Nivel
■ Destornillador Phillips
■ Destornillador T30 TORX
®†
Herramientas adicionales necesarias para el Estilo 2:
Recubierto (únicamente):
■ Tijeras
■ Lápiz
■ Cinta adhesiva protectora
PIEZAS NECESARIAS para el Estilo 2: Overlay (únicamente):
■ Paneles de los cajones recubiertos a la medida - Vea
“Estilo 2: Paneles de los cajones recubiertos a la medida”.
■ Herrajes
■ Tornillos de cabeza de cono achatado # 8 x ½" (12) opcional
PIEZAS SUMINISTRADAS:
■ Tornillos de cabeza de cono
■ Soportes de montaje (4)
achatado
# 8 x ½" (16)
Estilo 2: Paneles de los cajones
recubiertos a la medida
Si va a instalar paneles de madera a la medida, deberá hacerlos
usted mismo o consultar un carpintero o fabricante de gabinetes
calificado. Para obtener información acerca de las
especificaciones de los paneles, vea los gráficos de
dimensiones.
IMPORTANTE:
■ El grosor de los paneles recubiertos debe ser de ³⁄₄"
(19,05 mm).
■ El panel recubierto no debe pesar más de 10 lbs (4,5 kg).
■ Los paneles recubiertos que pesan más de lo
recomendado pueden dañar sus cajones refrigerados.
■ No sobrepase la medida de altura establecida para los
paneles recubiertos. Los paneles que sobrepasan la
medida de altura pueden dañar los cajones refrigerados,
los gabinetes o el mostrador.
■ El ancho de los paneles recubiertos puede variar de
acuerdo con el ancho de la abertura del gabinete.
Medidas del panel superior de los cajones recubiertos
26,5"
1,25"
(3,2 cm)
10,5"
(26,7 cm)
(67,4 cm)
23,5"
(59,7 cm)
12,7"
(32,2 cm)
1,5"
(3,8 cm)
Medidas del panel inferior de los cajones recubiertos
26,5"
⁷⁄₈"
(2,2 cm)
14,5"
(36,8 cm)
(67,4 cm)
23,5"
(59,7 cm)
16,5"
(42,0 cm)
1,5"
(3,8 cm)
Paneles planos
Se pueden crear paneles planos a la medida de un grosor menor
de ³⁄₄" (19,05 mm). El material debe estar laminado en madera
terciada o tablas de fibra de densidad media de ³⁄₄" (19,05 mm)
de grosor.
Paneles con relieve
Se puede crear un diseño de panel con relieve. Asegúrese de
mantener un espesor mínimo de ³⁄₄" (19,05 mm) donde el panel
recubierto se une con el frente del cajón.
Accesorio para el panel con relieve
³⁄₄"
(19,05 mm)
†®TORX es una marca registrada de Textron Innovations Inc.
14
A. Frente del cajón
B. Tornillo de cabeza de cono
achatado #8 x
C. Panel recubierto
¹⁄₂
"
Page 15

Ubicaciones de los tornillo de cabeza de cono achatado
#8 x ¹⁄₂" del frente del cajón
Medidas de abertura de los cajones
A
A
A
A. Ubicaciones de los tornillos de
montaje perforados previamente
Herrajes (opcionales)
En este paso se pueden instalar las manijas provistas por el
cliente. Asegúrese al instalar los herrajes a la medida que los
tornillos de montaje estén al ras con la parte trasera de los
paneles.
Medidas del producto
Estilo 1 y 2: Estándar y Recubierto
Las medidas varían según el modelo, como se muestra.
20,9"
A
B
(53,1 cm)
18,2"
(46,2 cm)
A
A. Estilo 1: Estándar
B. Estilo 2: Recubierto - Las medidas
no incluyen el panel recubierto de
¾" (19,05 mm) o los herrajes
opcionales
Requisitos de ubicación
ADVERTENCIA
■ Las medidas de altura indicadas consideran las patas
niveladoras extendidas a la altura mínima de ¹⁄₄" (6,35 mm)
por debajo de los cajones refrigerados.
■ Si las patas niveladoras están totalmente extendidas 1"
(25 mm) por debajo de los cajones refrigerados, agregue ¾"
(19,05 mm) a las medidas de altura.
■ El cable de suministro de energía es de 60" (152,4 cm) de
largo.
26,7"
(67,9 cm)
23,5"
(59,6 cm)
34,0"
(86,3 cm)
Peligro de Explosión
Mantenga los materiales y vapores inflamables,
tales como gasolina, alejados de los cajones
refrigerados.
No seguir esta instrucción puede ocasionar la muerte,
explosión, o incendio.
NOTAS:
■ Para que los cajones refrigerados estén alineados con el
frente de los gabinetes de la base, quite los zócalos o
molduras de la parte posterior de la abertura. Vea “Medidas
del producto” y “Medidas de la abertura (ambos estilos)” más
adelante en esta sección.
■ No se recomienda instalar los cajones refrigerados cerca de
un horno, radiador u otra fuente de calor.
■ No instale en un lugar donde la temperatura puede ser menor
de 55°F (13°C).
Medidas de la abertura (ambos estilos)
■ Las medidas de altura indicadas consideran las patas
niveladoras extendidas a una altura mínima de ¹⁄₄" (6,35 mm)
por debajo de los cajones refrigerados.
NOTA: Si las patas niveladoras están totalmente extendidas
1" (25 mm) por debajo de los cajones refrigerados, agregue
¾" (19,05 mm) a las medidas de altura. Vea “Medidas del
producto”.
15
Page 16

■ Si el piso de la abertura no está nivelado con el piso de la
cocina, ponga calzas en la abertura para que quede nivelado
con el piso de la cocina.
INSTRUCCIONES DE
INSTALACIÓN
25"
(63,5 cm)
35"
24"
(60,96 cm)
27¹⁄₄"
(69,2 cm)
(88,9 cm)
Requisitos eléctricos
ADVERTENCIA
Peligro de Choque Eléctrico
Conecte a un contacto de pared de conexión a tierra de
3 terminales.
No quite la terminal de conexión a tierra.
No use un adaptador.
No use un cable eléctrico de extensión.
No seguir estas instrucciones puede ocasionar
la muerte, incendio o choque eléctrico.
Antes de mover los cajones refrigerados a su ubicación final, es
importante asegurarse que tiene la conexión eléctrica adecuada.
Método de conexión a tierra recomendado
Se requiere una fuente de energía eléctrica de 115 Voltios,
60 Hz., CA solamente y con fusibles de 15 ó 20 amperios,
debidamente conectados a tierra. Se recomienda que use un
circuito separado sólo para sus cajones refrigerados. Use un
tomacorriente que no se pueda apagar con un interruptor. No use
un cable eléctrico de extensión.
IMPORTANTE: Si este producto está conectado a un
tomacorriente protegido por GFCI (Ground Fault Circuit
Interrupter- Interruptor de circuito de falla eléctrica de puesta a
tierra), puede ocurrir un disparo molesto del suministro de
energía, lo que resultará en la pérdida de refrigeración. Esto
puede afectar la calidad y el sabor de los alimentos. Si ha
ocurrido un disparo molesto, y el alimento aparenta estar en
malas condiciones, deshágase del mismo.
Cómo desempacar los cajones refrigerados
ADVERTENCIA
Peligro de Peso Excesivo
Use dos o más personas para mover e instalar los
cajones refrigerados.
No seguir esta instrucción puede ocasionar una
lesión en la espalda u otro tipo de lesiones.
Cómo quitar los materiales de empaque
Descarte apropiadamente los materiales de empaque. No use
instrumentos filosos, alcohol para fricciones, líquidos inflamables
o productos de limpieza abrasivos para eliminar los restos de
cinta o goma. Estos productos pueden dañar la superficie de sus
cajones refrigerados.
IMPORTANTE: Utilice un destornillador T30 TORX
las correderas.
Cuando mueva sus cajones refrigerados:
Sus cajones refrigerados son muy pesados. Cuando mueva
el electrodoméstico para darle servicio, proteja el piso. Al
mover el electrodoméstico, siempre tire directamente hacia
afuera. No menee el electrodoméstico de lado a lado ni lo
haga “caminar” cuando lo trate de mover ya que podría
dañar el piso.
Limpieza antes del uso
Una vez que usted haya quitado todos los materiales de
empaque, limpie el interior de sus cajones refrigerados antes de
usarlos. Vea las instrucciones de limpieza en el Manual de uso y
cuidado.
Cómo quitar la rejilla de la base
IMPORTANTE: Se recomienda quitar la rejilla de la base antes de
bajar las patas niveladoras. Asegúrese de reinstalar la rejilla de la
base cuando se haya terminado la instalación.
1. Quite los cuatro tornillos ubicados en la rejilla de la base
utilizando un destornillador Phillips, como se muestra.
NOTA: No descarte los tornillos.
A
A. Tornillos
†®TORX es una marca registrada de Textron Innovations Inc.
A
®†
para quitar
16
Page 17

2. Coloque la rejilla de la base sobre una superficie de trabajo
B
blanda y limpia para utilizarla más adelante.
Cómo quitar las empaquetaduras
Estilo 2: Instalación de los paneles de los
cajones recubiertos a la medida
Si tiene el Estilo 1: Cajones refrigerados estándar, saltee este
paso. Siga a “Cómo instalar los soportes de montaje” para
continuar la instalación.
IMPORTANTE:
■ Cree paneles recubiertos a la medida de acuerdo con las
especificaciones en la sección “Estilo 2 - Paneles de los
cajones recubiertos a la medida”.
■ KitchenAid no es responsable de la remoción o adición de
paneles decorativos que pudieran impedir darle servicio a los
cajones refrigerados.
Cómo quitar los cajones
1. Desconecte el enchufe de cableado ubicado en la parte
izquierda del cajón (solamente el cajón superior) como se
muestra.
A
IMPORTANTE: Las empaquetaduras tienen fuertes bandas
magnéticas. Siga estas instrucciones y mantenga los tornillos y
otras partes sueltas de metal alejados de las empaquetaduras
para evitar dañarlas.
1. Comience en el extremo superior derecho. Lentamente jale la
empaquetadura desde la esquina hacia el extremo opuesto
como se muestra.
2. Siga lentamente desde la esquina hacia la esquina opuesta
hasta que la empaquetadura se despegue completamente de
la ranura.
3. Suavemente quite la empaquetadura y colóquela a un lado
sobre una superficie de trabajo blanda y limpia. Asegúrese de
mantener todos los tornillos y las partes sueltas de metal
alejados de la empaquetadura magnética.
4. Repita el procedimiento con la otra empaquetadura.
A. Frente del cajón
B. Enchufe de cableado
2. Con un destornillador Phillips quite los dos tornillos ubicados
a cada lado del cajón para sacarlo.
NOTA: No descarte los tornillos. Apártelos para usarlos más
adelante.
A
A
Cómo quitar el frente de los cajones
1. Quite el frente de los cajones sacando los tres tornillos
ubicados a lo largo del fondo y los dos tornillos ubicados a
cada lado del cajón, como se muestra.
NOTA: No descarte los tornillos. Apártelos para usarlos más
adelante.
A. Tornillos
3. Quite el cajón levantándolo y jalándolo hacia afuera.
4. Empuje las guías del cajón vacías a su lugar.
5. Repita el procedimiento con el otro cajón.
17
Page 18

2. Para quitar el frente del cajón, jale el frente del cajón hacia
fuera para sacarlo del cajón.
A
A. Frente del cajón
3. Repita el procedimiento con el otro cajón.
Instalación de los paneles recubiertos a la medida
1. Coloque el panel recubierto a la medida boca abajo sobre
una superficie de trabajo plana y limpia.
2. Coloque el frente del cajón sobre el panel recubierto. Alinee
todos los bordes del frente del cajón y el panel recubierto.
3. Con cinta adhesiva protectora asegure el frente del cajón al
panel recubierto.
4. Utilizando como guía los orificios perforados previamente en
el frente del cajón, taladre seis orificios de ¹⁄₈" x ½" (3,18 mm
x 12,7 mm) de profundidad en el panel recubierto.
NOTA: Asegúrese de no taladrar más de ½" (12,7 mm) de
profunidad.
5. Atornille seis tornillos de cabeza de cono achatado #8 x ½" a
través del frente del cajón dentro del panel recubierto.
6. Repita el procedimiento con el otro frente del cajón.
Volver a instalar el frente de los cajones
1. Asegúrese de que el panel recubierto esté alineado con el
frente de los cajones, como se muestra.
Cajón superior Cajón inferior
A
B
A
B
A
A. Frente del cajón
B. Panel recubierto
A
2. Vuelva a instalar el frente del cajón usando los tres tornillos
A
ubicados a lo largo del fondo y los dos tornillos ubicados a
cada lado del cajón. Vea “Cómo quitar el frente de los
cajones”.
3. Repita el procedimiento con el otro cajón.
Volver a instalar las empaquetaduras
A
A. Ubicaciones de los tornillos
perforados previamente
1. Para volver a instalar la empaquetadura, colóquela sobre el
cajón.
2. Ejerza presión sobre la empaquetadura para ubicarla
nuevamente en la ranura comenzando en las esquinas para
seguir hacia la esquina opuesta. Asegúrese de que la
empaquetadura quede ubicada en los cuatro lados.
3. Repita el procedimiento con el otro cajón.
18
Page 19

Volver a instalar los cajones
1. Instale el cajón extendiendo por completo las guías del
mismo.
2. Coloque el cajón sobre la parte superior de las guías. Empuje
el cajón hasta el fondo hasta que encaje en su lugar. Luego
jale el cajón hacia adelante y ajuste las guías hasta que los
orificios de los tornillos se alineen con el cajón.
3. Usando un destornillador Phillips y dos tornillos, asegure el
cajón a las guías.
4. Reconecte el enchufe del cableado ubicado en la parte
izquierda del cajón (solamente en el cajón superior). Vea
“Cómo quitar los cajones” anteriormente en esta sección.
IMPORTANTE: Si no enchufa el enchufe de cableado, no
podrá regular los ajustes de temperatura. Vea “Cómo regular
los controles” en el Manual de uso y cuidado.
5. Repita el procedimiento con el otro cajón.
Cómo instalar los soportes de montaje
IMPORTANTE:
■ Instale dos soportes de montaje (superior e inferior) a
amboslados del gabinete de los cajones refrigerados. Los
soportes de montaje fijan el electrodoméstico a los gabinetes
adyacentes.
■ Si no se fijan los soportes de montaje a los gabinetes
adyacentes, el electrodoméstico puede salirse de la abertura
al abrir el cajón superior o inferior.
■ El soporte de montaje tiene un rebajo. Asegúrese cuando
instale los soportes de montaje de ubicar el rebajo contra los
gabinetes adyacentes.
1. Comience la instalación (a cada lado) en los orificios
perforados previamente para los soportes de montaje
superiores.
NOTA: La cinta aisladora cubre los orificios superiores
taladrados previamente para los soportes de montaje
superior. No quite la cinta aisladora cuando instale los
soportes de montaje superiores.
A
B
A. El orificio superior perforado previamente se
encuentra debajo de la cinta aisladora
B. Orificios perforados previamente
2. Con un destornillador Phillips y un tornillo de cabeza de cono
achatado #8 x ¹⁄₂", enrosque el tornillo a través del orificio
inferior del soporte de montaje superior dentro del orificio
taladrado previamente. Apriete el tornillo.
3. Empuje un tornillo de cabeza de cono achatado a través de la
cinta aisladora y dentro del orificio taladrado previamente.
Apriete el tornillo.
4. Con un destornillador Phillips y dos tornillos de cabeza de
cono achatado #8 x ¹⁄₂", enrosque los tornillos a través de los
orificios en el soporte de montaje inferior en los orificios
taladrados previamente. Apriete los tornillos.
5. Repita el procedimiento para el otro lado.
6. Aparte los ocho tornillos de cabeza de cono achatado #8 x
¹⁄₂" que restan para usarlos más adelante. Vea “Cómo fijar los
soportes de montaje a los gabinetes adyacentes”.
Mueva los cajones refrigerados a su
posición final
IMPORTANTE:
■ Antes de mover el refrigerador y para evitar daños al piso,
asegúrese que las patas niveladoras están levantadas (no
están tocando el piso) y que el peso del electrodoméstico se
encuentra sobre los rodillos.
■ Los rodillos se usan para mover los cajones refrigerados y
nunca para un soporte permanente.
1. Coloque la parte superior del empaque de cartón o madera
contrachapada debajo del electrodoméstico. Quite la
plataforma rodante.
2. No quite la película o cubierta de protección.
ADVERTENCIA
Peligro de Choque Eléctrico
Conecte a un contacto de pared de conexión a tierra de
3 terminales.
No quite la terminal de conexión a tierra.
No use un adaptador.
No use un cable eléctrico de extensión.
No seguir estas instrucciones puede ocasionar
la muerte, incendio o choque eléctrico.
3. Conecte a un contacto de pared de conexión a tierra de
3 terminales.
4. Empuje los cajones refrigerados directamente hacia atrás y
en forma pareja hacia el interior de la abertura.
19
Page 20

Cómo bajar las patas niveladoras
IMPORTANTE:
■ Las cuatro patas niveladoras deberán hacer contacto con el
piso para soportar y estabilizar el peso total de los cajones
refrigerados.
■ Los rodillos se usan para mover los cajones refrigerados y
nunca para un soporte permanente.
■ Para evitar daños al gabinete/mostrador, limite el torque
aplicado a las patas niveladoras a no más de 50 pulg/lbs.
(58 cm/kg).
■ Asegúrese al nivelar las patas de que el espacio entre el
cajón superior y el borde inferior del mostrador tenga un
mínimo de ³⁄₈" (9,5 mm).
■ Estilo 2: Recubierto - Asegúrese de instalar los paneles para
los cajones recubiertos a la medida antes de nivelar los
cajones refrigerados. Vea “Estilo 2 - Instalación de los
paneles de los cajones recubiertos a la medida”.
1. Utilizando una llave de cubo de ⁵⁄₁₆", gire a la derecha
(sentido de las manecillas del reloj) los pernos niveladores en
ambos lados de los cajones refrigerados, hasta que las patas
niveladoras soporten el peso de los cajones refrigerados.
2. Baje las cuatro patas niveladoras juntas hasta que los
cajones refrigerados tengan la altura adecuada.
2. Utilizando los pernos niveladores frontales y traseros, ajuste
el gabinete de los cajones refrigerados hasta que el cajón
superior esté nivelado de izquierda a derecha. Vea “Cómo
bajar las patas niveladoras”.
NOTA: Al ajustar juntos los pernos niveladores frontales y
traseros, el lado del cabinete de los cajones refrigerados va a
subir o bajar.
3. Quite el nivel y cierre el cajón superior. Verifique el espacio
entre la parte superior del cajón y el mostrador. Si el espacio
mide menos de ³⁄₈" (9,5 mm), gire los cuatro pernos
niveladores en forma pareja para subir las patas niveladoras.
Controle el nivel nuevamente.
4. Abra ambos cajones menos de la mitad. Coloque el nivel en
el reborde lateral al lado de los cajones, como se muestra.
Suba o baje juntos los pernos niveladores frontales de los
cajones refrigerados hasta que los lados de los cajones
refrigerados estén a plomo.
BA A
A. Perno nivelador trasero
B. Perno nivelador frontal
Nivelación de los cajones refrigerados
IMPORTANTE: Estilo 2 - Recubierto: Asegúrese de instalar los
paneles para cajón recubierto a la medida antes de nivelar los
cajones refrigerados para el modelo recubierto. Vea “Estilo 2 Instalación de los paneles de los cajones recubiertos a la
medida”.
1. Abra el cajón superior y ubique el nivel a lo ancho del cajón
como se muestra. Verifique que esté nivelado de izquierda a
derecha.
A
A
A. Verifique que esté
nivelado de adelante
hacia atrás
5. Quite el nivel y cierre los cajones. Vuelva a controlar el
espacio entre la parte superior del cajón y el mostrador. Si el
espacio mide menos de ³⁄₈" (9,5 mm), gire los cuatro pernos
niveladores en forma pareja para subir las patas niveladoras.
Controle el nivel nuevamente.
NOTA: Asegúrese de volver a revisar la nivelación horizontal
del cajón superior.
6. Verifique que los cuatro pernos niveladores están sobre el
piso y que sostienen todo el peso de los cajones
refrigerados.
20
A. Verifique que esté nivelado de
izquierda a derecha
Page 21

Cómo fijar los soportes de montaje a los
gabinetes adyacentes
IMPORTANTE: Para evitar dañar los gabinetes o el mostrador,
asegúrese de fijar los soportes de montaje a los gabinetes
adyacentes.
1. Centre el gabinete de los cajones refrigerados en la abertura.
2. Jale el cajón superior hacia afuera lo suficiente para poder
alcanzar los soportes de montaje.
NOTA: No jale el cajón hacia afuera a más de la mitad de su
recorrido.
3. Usando los soportes superiores de montaje como guía,
perfore previamente cuatro orificios de ¹⁄₈" (3,18 mm) a través
de los soportes de montaje (para cada lado) en los gabinetes
adyacentes. Asegúrese de taladrar por lo menos dos orificios
por soporte.
NOTA: Asegúrese que los cajones refrigerados estén
nivelados antes de fijar los soportes de montaje superiores.
4. Usando cuatro tornillos de cabeza de cono achatado
#8x½", ajuste los soportes de montajesuperior a los
gabinetes adyacentes.
NOTE: El lado inferior de la rejilla de la base tiene una muesca y
un reborde más ancho que la parte superior.
A
A. Tornillo de montaje superior
(hacia la parte trasera)
B. Reborde inferior
3. Atornille los cuatro tornillos a la rejilla de la base utilizando un
destornillador Phillips, como se muestra. Apriete todos los
tornillos.
A
A
A.
Tornillos
A
A. Soportes de montaje
5. Repita el procedimiento con el cajón inferior.
Cómo reinstalar la rejilla de la base
1. Asegúrese que el interruptor On/Off esté encendido.
A
A. Interruptor de encendido On/Off
(ENCENDIDO)
2. Vuelva a instalar la rejilla de la base.
Complete la instalación
1. Quite todas las cajas, paquetes de piezas y materiales de
empaque del interior de los cajones refrigerados.
2. Quite la película de protección.
3. Limpie los cajones refrigerados antes de usar. Vea la sección
“Limpieza” en el Manual de uso y cuidado, para las
instrucciones.
4. Los controles están programados de fábrica en el ajuste
prefijado de 37°F (3°C) para los cajones superior e inferior.
Verifique que el compresor está funcionando correctamente y
que todas las luces funcionan.
5. Si se sigue construyendo después de haber instalado los
cajones refrigerados, apague ambos cajones. Vea “Uso de
los controles” en el Manual de uso y cuidado, para las
instrucciones.
Para obtener el uso más eficiente de sus nuevos cajones
refrigerados, lea el Manual de uso y cuidado. Conserve a la mano
las Instrucciones de instalación y el Manual de uso y cuidado de
los cajones refrigerados para una consulta fácil.
21
Page 22

Notas
22
Page 23

SÉCURITÉ DES TIROIRS RÉFRIGÉRÉS
Votre sécurité et celle des autres est très importante.
Nous donnons de nombreux messages de sécurité importants dans ce manuel et sur votre appareil ménager. Assurez-vous de
toujours lire tous les messages de sécurité et de vous y conformer.
Voici le symbole d’alerte de sécurité.
Ce symbole d’alerte de sécurité vous signale les dangers potentiels de décès et de blessures graves à vous
et à d’autres.
Tous les messages de sécurité suivront le symbole d’alerte de sécurité et le mot “DANGER” ou
“AVERTISSEMENT”. Ces mots signifient :
Risque possible de décès ou de blessure grave si vous ne
DANGER
AVERTISSEMENT
Tous les messages de sécurité vous diront quel est le danger potentiel et vous disent comment réduire le risque de blessure et
ce qui peut se produire en cas de non-respect des instructions.
suivez pas immédiatement les instructions.
Risque possible de décès ou de blessure grave si vous
ne suivez pas les instructions.
Mise au rebut correcte de vos vieux
tiroirs réfrigérés
AVERTISSEMENT
Risque de suffoquer
Enlever les tiroirs de vos vieux tiroirs réfrigérés.
Le non-respect de cette instruction peut causer
un décès ou des lésions cérébrales.
IMPORTANT : L'emprisonnement et l'étouffement des enfants ne
sont pas un problème du passé. Les tiroirs réfrigérés jetés ou
abandonnés sont encore dangereux, même s'ils sont laissés
abandonnés pendant “quelques jours seulement”. Si vous vous
débarrassez de vos vieux tiroirs réfrigérés, veuillez suivre les
instructions suivantes pour aider à éviter les accidents.
SPÉCIFICATIONS DU DESIGN
Modèles - Tiroirs réfrigérés
Avant de jeter vos vieux tiroirs réfrigérés :
Enlever les tiroirs.
Style 1 : Standard
Se caractérise par un style enveloppant qui complète les poignées
de porte galbées. Cette série procure des tiroirs réfrigérés
encastrés d'apparence commerciale.
KDDA27TRS
Style 2 : Overlay
Se caractérise par des garnitures d'origine de style décoratif
procurant un aspect “sans cadre”. Cette série nécessite
l'installation de panneaux et poignées personnalisés.
KDDO27TRX
23
Page 24

EXIGENCES D’INSTALLATION
A
B
C
Outillage et pièces
OUTILLAGE NÉCESSAIRE :
Rassembler les outils et pièces nécessaires avant de commencer
l'installation.
Lire et suivre les instructions fournies avec les outils
mentionnésici.
■ Perceuse manuelle ou
électrique (convenablement
reliée à la terre)
■ Foret de ¹⁄₈"
■ Clé à douille de ⁵⁄₁₆"
Outils additionnels nécessaires pour Style 2 : Overlay
(seulement) :
■ Ciseaux
■ Crayon
PIÈCES NÉCESSAIRES Style 2 : Overlay (seulement) :
■ Panneaux de tiroir décoratifs personnalisés — Voir “Style 2 :
Panneaux de tiroir personnalisés - série Overlay”.
■ Quincaillerie
■ Vis à tête bombée n° 8 x ¹⁄₂" (12) - option
PIÈCES FOURNIES :
■ Vis à tête bombée
n° 8 x ¹⁄₂" (16)
■ Mètre-ruban
■ Niveau
■ Tournevis Phillips
■ Tournevis T30 TORX
■ Ruban adhésif de masquage
■ Brides de montage (4)
®†
Dimensions du panneau décoratif du tiroir supérieur
26,5"
1,25"
(3,2 cm)
10,5"
(26,7 cm)
(67,4 cm)
23,5"
(59,7 cm)
12,7"
(32,2 cm)
1,5"
(3,8 cm)
Dimensions du panneau décoratif du tiroir inférieur
26,5"
⁷⁄₈"
(2,2 cm)
14,5"
(36,8 cm)
(67,4 cm)
23,5"
(59,7 cm)
16,5"
(42,0 cm)
1,5"
(3,8 cm)
Panneaux plats
Style 2 : Panneaux de tiroir personnalisés -
série Overlay
Si vous prévoyez installer des panneaux personnalisés en bois,
vous devrez les créer vous-même ou consulter un ébéniste ou
menuisier qualifié. Voir le dessin des dimensions pour les
spécifications des panneaux.
IMPORTANT :
■ L'épaisseur du panneau décoratif doit être de ³⁄₄"
(19,05 mm).
■ Le poids de chaque panneau décoratif ne doit pas
dépasser 10 lb (4,5 kg).
■ Un panneau décoratif de poids supérieur au poids
recommandé risque de faire subir des dommages aux
tiroirs réfrigérés.
■ Respecter les dimensions indiquées pour la hauteur des
panneaux décoratifs. Si la dimension de la hauteur est
supérieure à la valeur recommandée, les tiroirs réfrigérés,
les placards et/ou le plan de travail pourraient subir des
dommages.
■ La largeur du panneau décoratif peut varier en fonction
de la largeur de l’espace d’installation de la caisse.
On peut réaliser un panneau plat personnalisé d'épaisseur
inférieure à ³⁄₄" (19,05 mm); dans ce cas, on doit lamifier le
panneau sur une plaque de ³⁄₄" (19,05 mm) de contreplaqué ou
aggloméré MDF.
Panneaux à relief
On peut réaliser un panneau personnalisé à relief. Veiller à
maintenir l'épaisseur de ³⁄₄" (19,05 mm) dans les zones de la
façade de tiroir recevant les vis de montage.
Fixation du panneau en relief
³⁄₄"
(19,05 mm)
†®TORX est une marque déposée de Textron Innovations Inc.
24
A. Façade du tiroir
B. Vis à tête bombée nº 8 x
C. Panneau décoratif
¹⁄₂
"
Page 25

Emplacements des vis à tête bombée nº 8 x ¹⁄₂" de la
façade de tiroir
Dimensions avec tiroir ouvert
A
A
A
A. Emplacements prépercés des vis de montage
Quincaillerie (facultatif)
On peut installer à ce point les poignées fournies par le client.
Lors de l'installation des pièces de quincaillerie, veiller à ce que
les vis de fixation soient encastrées dans la face arrière des
panneaux.
Dimensions du produit
Styles 1 et 2 : Standard et Overlay
Les dimensions varient en fonction du modèle - voir l’illustration.
20,9"
A
B
(53,1 cm)
18,2"
(46,2 cm)
A
A. Style 1 : Standard
B. Style 2 : Overlay - Les mesures n'incluent pas la
dimension du panneau personnalisé de ¾"
(19,05 mm)
ou la quincaillerie facultative
Exigences d’emplacement
AVERTISSEMENT
■ Les dimensions de hauteur sont illustrées avec les pieds de
nivellement déployés à la hauteur minimum de ¼" (6,35 mm)
sous les tiroirs réfrigérés.
■ Lorsque les pieds de nivellement sont totalement déployés
de 1" (25 mm) sous les tiroirs réfrigérés, ajouter ¾"
(19,05 mm) à la hauteur totale.
■ La longueur du cordon d'alimentation est de 60" (152,4 cm).
26,7"
(67,9 cm)
23,5"
(59,6 cm)
34,0"
(86,3 cm)
Risque d'explosion
Garder les matières et les vapeurs inflammables, telle
que l'essence, loin des tiroirs réfrigérés.
Le non-respect de cette instruction peut causer
un décès, une explosion ou un incendie.
REMARQUES :
■ Lorsqu'on souhaite placer les tiroirs réfrigérés en
affleurement avec la façade des placards inférieurs, enlever
toutes les moulures et plinthes à l'arrière de l'ouverture. Voir
“Dimensions du produit” et “Dimensions de l'ouverture (pour
les deux styles)” plus loin dans cette section.
■ On recommande de ne pas installer les tiroirs réfrigérés près
d'un four, d'un radiateur ou de toute autre source de chaleur.
■ Ne pas installer les tiroirs réfrigérés en un endroit où la
température pourrait descendre en-dessous de 55°F (13°C).
Dimensions de l'ouverture (pour les deux styles)
■ Les dimensions de hauteur sont illustrées avec les pieds de
nivellement déployés à la hauteur minimum de ¼" (6,35 mm)
sous les tiroirs réfrigérés.
REMARQUE : Lorsque les pieds de nivellement sont
totalement déployés de 1" (25 mm) au-dessous des tiroirs
réfrigérés, ajouter ¾" (19,05 mm) à la hauteur totale. Voir
“Dimensions du produit”.
25
Page 26

■ Si le plancher de l'ouverture n'est pas au même niveau que le
plancher de la cuisine, placer une cale dans l'ouverture pour
qu'elle soit au même niveau que le plancher de la cuisine.
INSTRUCTIONS
D’INSTALLATION
25"
(63,5 cm)
35"
24"
(60,96 cm)
27¹⁄₄"
(69,2 cm)
(88,9 cm)
Spécifications électriques
AVERTISSEMENT
Risque de choc électrique
Brancher sur une prise à 3 alvéoles reliée à la terre.
Ne pas enlever la broche de liaison à la terre.
Ne pas utiliser un adaptateur.
Ne pas utiliser un câble de rallonge.
Le non-respect de ces instructions peut causer
un décès, un incendie ou un choc électrique.
Avant de placer les tiroirs réfrigérés à leur emplacement final, il
est important de vous assurer d'avoir la connexion électrique
appropriée.
Méthode recommandée de mise à la terre
Une source d'alimentation de 115 volts, 60 Hz, type 15 ou
20 ampères CA seulement, protégée par fusible et adéquatement
mise à la terre est nécessaire. On recommande que les tiroirs
réfrigérés soient alimentés par un circuit indépendant. Utiliser
une prise murale qui ne peut pas être mise hors circuit à l'aide
d'un commutateur. Ne pas utiliser de rallonge.
IMPORTANT : Si ce produit est connecté à une prise protégée
par un disjoncteur de fuite à la terre, un déclenchement
intempestif peut se produire et causer une perte de
refroidissement. La qualité et la saveur des aliments risquent
d'être affectées. Si un déclenchement intempestif se produit et si
les aliments semblent de piètre qualité, jeter le tout.
Déballage des tiroirs réfrigérés
AVERTISSEMENT
Risque du poids excessif
Utiliser deux ou plus de personnes pour déplacer et
installer les tiroirs réfrigérés.
Le non-respect de cette instruction peut causer
une blessure au dos ou d'autre blessure.
Enlèvement des matériaux d'emballage
Jeter le matériel d'emballage de manière appropriée. Ne pas
utiliser d'instruments coupants, d'alcool à friction, de liquides
inflammables ou de nettoyants abrasifs pour enlever le ruban
adhésif ou la colle. Ces produits peuvent endommager la surface
de vos tiroirs réfrigérés.
IMPORTANT : Utiliser un tournevis T30 TORX
patins de support.
Déplacement des tiroirs réfrigérés :
Vos tiroirs réfrigérés sont lourds. Lors du déplacement de
l’appareil pour le service, veiller à protéger le plancher.
Toujours tirer l’appareil tout droit lors du déplacement. Ne
pas incliner l’appareil d’un côté ou de l’autre ni le “faire
marcher” en essayant de le déplacer car le plancher pourrait
être endommagé.
Nettoyage avant utilisation
Après avoir enlevé tous les matériaux d'emballage, nettoyer
l'intérieur des tiroirs réfrigérés avant de les utiliser. Voir les
instructions de nettoyage dans le Guide d'utilisation et
d'entretien.
Dépose de la grille de la base
IMPORTANT : On recommande que la grille de la base soit
retirée avant le déploiement des pieds de nivellement. Veiller à
réinstaller la grille de la base une fois l'installation terminée.
1. Avec un tournevis Phillips, ôter les quatre vis de la grille de la
base - voir l'illustration.
REMARQUE : Ne pas jeter les vis.
A
A. Vis
®†
pour ôter les
A
26
†®TORX est une marque déposée de Textron Innovations Inc.
Page 27

2. Placer la grille de la base sur une surface protégée propre,
B
pour réutilisation.
Dépose des joints
Style 2 : Installation des panneaux de tiroir
personnalisés - série Overlay
Pour les tiroirs réfrigérés standard (Style 1), poursuivre avec la
section “Installation des brides de montage” pour la suite des
instructions d'installation.
IMPORTANT :
■ Réaliser les panneaux personnalisés conformément aux
spécifications de la section “Style 2 : Panneaux de tiroir
personnalisés - série Overlay”.
■ KitchenAid n'assume aucune responsabilité en ce qui
concerne la dépose ou l'addition de panneaux décoratifs qui
entraveraient les interventions de réparation ou d'entretien
sur les tiroirs réfrigérés.
Dépose des tiroirs
1. Débrancher le câblage des tiroirs réfrigérés, sur le côté
gauche du tiroir (tiroir supérieur seulement) - voir l'illustration.
A
A. Façade du tiroir
B. Câblage des tiroirs réfrigérés
2. Avec un tournevis Phillips, ôter les deux vis situées de part et
d'autre du tiroir, pour pouvoir libérer le tiroir.
REMARQUE : Ne pas jeter les vis. Conserver les vis pour
réutilisation.
A
IMPORTANT : Les joints contiennent des bandes magnétiques
résistantes. Suivre ces instructions et maintenir les vis et autres
pièces métalliques éloignées des joints afin d'empêcher des
dommages sur les joints magnétiques.
1. Commencer par le coin supérieur droit. Tirer lentement sur le
joint pour le sortir du coin en progressant vers le côté opposé
- voir l’illustration.
2. Poursuivre lentement la dépose du joint. Procéder d'un coin
au coin opposé jusqu'à ce que le joint soit complètement
libéré de la rainure.
3. Retirer le joint avec précaution et le faire reposer à part sur
une surface protégée et propre. Veiller à conserver toutes les
vis et autres pièces métalliques à distance du joint
magnétique.
4. Répéter le processus pour l’autre joint.
Dépose des façades de tiroir
1. Retirer la façade du tiroir en ôtant les trois vis situées en
travers du fond et les deux vis situées de part et d'autre du
tiroir - voir l’illustration.
REMARQUE : Ne pas jeter les vis. Conserver les vis pour
réutilisation.
A
A. Vis
3. Retirer le tiroir : soulever et faire glisser vers l'avant.
4. Réinsérer les glissières de tiroir vides en place.
5. Répéter le processus pour l’autre tiroir.
27
Page 28

2. Pour retirer la façade de tiroir, la tirer vers l’avant et la séparer
du tiroir.
A
5. Utiliser les six vis à tête bombée n° 8 x ½"; visser ces vis de
montage à travers la façade de tiroir dans le panneau
décoratif.
A. Façade du tiroir
3. Répéter le processus pour l’autre tiroir.
Installation des panneaux personnalisés - série Overlay
1. Placer le panneau personnalisé sur une surface de travail
plane et propre, face vers le bas.
2. Placer la façade de tiroir sur le panneau personnalisé, face
vers le bas. Aligner les bords de la façade du tiroir et du
panneau.
3. Fixer la façade du tiroir et le panneau ensemble avec du
ruban adhésif de masquage.
4. Utiliser les trous prépercés de la façade de tiroir comme
guides, et percer six trous de ¹⁄₈" x ¹⁄₂" de profondeur
(3,18 mm x 12,7 mm) dans le panneau décoratif.
REMARQUE : Veiller à ne pas percer à une profondeur
supérieure à ½" (12,7 mm).
A
A
6. Répéter le processus pour l’autre façade de tiroir.
Réinstallation des façades de tiroir
1. S'assurer que le panneau décoratif est en affleurement avec
la façade du tiroir - voir l'illustration.
Tiroir supérieur Tiroir inférieur
A
B
A. Façade de tiroir
B. Panneau décoratif
2. Réinstaller la façade de tiroir à l’aide des trois vis à travers le
A
fond, et des deux vis sur les côtés du tiroir. Voir “Dépose des
façades de tiroir”.
3. Répéter le processus pour l’autre tiroir.
A
B
28
A
A. Emplacements
prépercés des vis
Réinstallation des joints
1. Pour réinstaller le joint, placer le joint sur le tiroir.
2. Commencer dans un angle, et progresser vers le coin
opposé; insérer le joint dans la rainure. Veiller à ce que le joint
soit parfaitement emboîté sur les quatre côtés.
3. Répéter le processus pour l’autre tiroir.
Réinstallation des tiroirs
1. Déployer complètement les glissières du tiroir.
2. Placer le tiroir par-dessus les glissières. Pousser le tiroir
jusqu’au fond pour le bloquer en place. Puis tirer le tiroir vers
l’avant et ajuster les glissières pour obtenir l’alignement des
trous de vis avec le tiroir.
Page 29

3. Avec un tournevis Phillips et deux vis, fixer le tiroir sur les
glissières.
4. Rebrancher le câblage du côté gauche du tiroir (tiroir
supérieur seulement). Voir “Dépose des tiroirs” plus tôt dans
cette section.
IMPORTANT : Si on ne rebranche pas le câblage, il ne sera
pas possible d'ajuster les réglages de température. Voir la
section “Ajustement des commandes” dans le Guide
d'utilisation et d'entretien.
5. Répéter le processus pour l’autre tiroir.
Installation des brides de montage
IMPORTANT :
■ Installer deux brides de montage (supérieure et inférieure) sur
les deux côtés de la caisse des tiroirs réfrigérés. Les brides
de montage assujettissent l'appareil placards adjacents.
■ Si les brides de montage ne sont pas assujetties aux placards
adjacents, l'appareil pourrait sortir de l'espace d'installation
lors de l'ouverture du tiroir supérieur ou inférieur.
■ La bride de montage comporte un décalage. Lors de
l'installation des brides de montage, s'assurer de placer le
décalage contre les placards adjacents.
1. Commencer l'installation (de chaque côté) aux trous
prépercés pour les brides de montage supérieures.
REMARQUE : Le ruban adhésif isolant recouvre les trous
prépercés supérieurs pour les brides de montage
supérieures. Ne pas retirer le ruban adhésif isolant lors de
l'installation des brides de montage supérieures.
Déplacement des tiroirs réfrigérés à leur
emplacement final
IMPORTANT :
■ Avant de déplacer l'appareil, pour éviter de détériorer le
plancher, vérifier que les pieds de nivellement sont soulevés
(pas de contact avec le sol) le poids de l'appareil repose sur
les roulettes.
■ Les roulettes ne sont utilisées que pour le déplacement des
tiroirs réfrigérés et non pas comme support permanent.
1. Placer le sommet de l'emballage (carton) ou une feuille de
contreplaqué sous l'appareil. Enlever le chariot.
2. Ne pas ôter le film de protection ou l’emballage.
AVERTISSEMENT
Risque de choc électrique
Brancher sur une prise à 3 alvéoles reliée à la terre.
Ne pas enlever la broche de liaison à la terre.
Ne pas utiliser un adaptateur.
Ne pas utiliser un câble de rallonge.
Le non-respect de ces instructions peut causer
un décès, un incendie ou un choc électrique.
A
B
A. Le trou prépercé supérieur se
trouve sous le ruban adhésif
isolant
B. Trous prépercés
2. À l'aide d'un tournevis Phillips et d'une vis à tête bombée n° 8
x ½", visser la vis à travers le trou inférieur de la bride de
montage supérieure et dans le trou prépercé. Serrer la vis.
3. Enfoncer une vis à tête bombée à travers le ruban adhésif
isolant et dans le trou prépercé. Serrer la vis.
4. À l'aide d'un tournevis Phillips et de deux vis à tête bombée
n° 8 x ½", visser les vis à travers les trous dans la bride de
montage inférieure et dans les trous prépercés. Serrer les vis.
5. Répéter le procédé pour l'autre côté.
6. Laisser de côté les huit vis à tête bombée n° 8 x ½" restantes
pour utilisation ultérieure. Voir “Fixation des brides de
montage aux placards adjacents”.
3. Brancher l'appareil sur une prise à 3alvéoles reliée à la terre.
4. Pousser les tiroirs réfrigérés en ligne droite et uniformément
dans l’espace d’installation.
Déploiement des pieds de nivellement
IMPORTANT :
■ Les quatre pieds de nivellement doivent être en contact avec
le plancher pour supporter et stabiliser le poids total des
tiroirs réfrigérés.
■ Les roulettes ne sont utilisées que pour le déplacement des
tiroirs réfrigérés et non pas comme support permanent.
■ Pour éviter d'endommager la caisse ou le plan de travail de
l'appareil, ne pas exercer un couple de plus de 50" - lb
(58 cm - kg) sur les pieds de nivellement.
■ Lors du réglage des pieds, veiller à ce que l'espace entre le
tiroir supérieur et le bord inférieur du plan de travail soit de
³⁄₈" (9,5 mm) minimum.
■ Style 2 : Overlay—S'assurer d'installer les panneaux
décoratifs personnalisés sur les tiroirs avant d'ajuster
l'aplomb des tiroirs réfrigérés. Voir “Style 2 : Installation des
panneaux de tiroir personnalisés - série Overlay”.
1. Avec une clé à douille de ⁵⁄₁₆", faire tourner les boulons de
réglage de l’aplomb de part et d'autre des tiroirs réfrigérés
vers la droite (sens horaire) jusqu'à ce que les pieds de
nivellement supportent le poids des tiroirs réfrigérés.
29
Page 30

2. Abaisser les quatre pieds de nivellement ensemble, pour
établir l'aplomb de l'appareil à la hauteur adéquate.
BA A
A. Boulon de réglage de l’aplomb - arrière
B. Boulon de réglage de l’aplomb - avant
Réglage de l'aplomb des tiroirs réfrigérés
IMPORTANT : Style 2–Overlay : S'assurer d'installer les
panneaux décoratifs de tiroir personnalisés avant de régler
l'aplomb des tiroirs réfrigérés. Voir “Installation des panneaux de
tiroir personnalisés - série Overlay”.
1. Ouvrir le tiroir supérieur; placer un niveau en travers du tiroir
supérieur - voir l'illustration. Déterminer s'il y a une inclinaison
vers la droite ou vers la gauche.
A
A. Contrôle de l'aplomb de
l'appareil (gauche-droite)
2. À l'aide des boulons de réglage de l'aplomb arrière et avant,
ajuster la caisse des tiroirs réfrigérés jusqu'à l'obtention de
l'aplomb de l'appareil (gauche-droite). Voir “Déploiement des
pieds de nivellement”.
REMARQUE : L'ajustement des boulons de réglage de
l'aplomb avant et arrière abaissera ou soulèvera le côté de la
caisse des tiroirs réfrigérés.
3. Enlever le niveau et fermer le tiroir supérieur. Contrôler
l'espace entre le sommet du tiroir et le plan de travail. Si
l'espace est inférieur à ³⁄₈" (9,5 mm), rétracter uniformément
les quatre pieds de nivellement, et contrôler l'aplomb de
nouveau.
4. Ouvrir les deux tiroirs, de moins de 50 pour cent. Placer le
niveau contre le bord latéral des tiroirs - voir l'illustration.
Déployer ou rétracter les pieds de nivellement jusqu'à ce que
les côtés des tiroirs réfrigérés soient d'aplomb.
A
A. Contrôle de l'aplomb
(avant-arrière)
5. Enlever le niveau et fermer les tiroirs. Contrôler de nouveau
l'espace entre le sommet du tiroir et le plan de travail. Si
l'espace est inférieur à ³⁄₈" (9,5 mm), rétracter uniformément
les quatre pieds de nivellement, et contrôler l'aplomb de
nouveau.
REMARQUE : Ne pas oublier de contrôler de nouveau
l'horizontalité du tiroir supérieur.
6. Vérifier que les quatre pieds de nivellement reposent sur le
sol et soutiennent tout le poids des tiroirs réfrigérés.
Fixation des brides de montage aux
placards adjacents
IMPORTANT : Pour éviter d'endommager les placards ou le plan
de travail, s'assurer d'assujettir les brides de montage aux
placards adjacents.
1. Centrer la caisse des tiroirs réfrigérés dans l'espace
d'installation.
2. Sortir le tiroir supérieur suffisamment pour atteindre les brides
de montage.
REMARQUE : Ne pas tirer le tiroir de plus de 50 pour cent.
3. Utiliser les brides de montage supérieures comme guides;
prépercer deux trous de ¹⁄₈" (3,18 mm) à travers les brides de
montage (pour chaque côté) et dans les placards adjacents.
Veiller à percer au moins deux trous par bride.
REMARQUE : Vérifier le bon aplomb des tiroirs réfrigérés
avant d'assujettir les brides de montage supérieures.
30
Page 31

4. Utiliser les quatre vis à tête bombée n° 8 x ½" pour assujettir
les brides de montage supérieures aux placards adjacents.
3. À l'aide d'un tournevis Phillips, visser les quatre vis dans la
grille de la base - voir l'illustration. Serrer les vis.
A
A. Brides de montage
5. Répéter le processus pour le tiroir inférieur.
Réinstallation de la grille de la base
1. S'assurer que l'interrupteur d'alimentation On/Off (marche/
arrêt) est allumé.
A
A. Interrupteur d'alimentation On/
Off (en position ON/marche)
2. Réinstaller la grille de la base.
REMARQUE : La partie inférieure de la grille de la base a une
encoche et un plus grand rebord que la partie supérieure.
A
A
A. Vis
Achever l'installation
1. Retirer boîtes, composants et matériaux d'emballage de
l'intérieur des tiroirs réfrigérés.
2. Retirer le film de protection.
3. Nettoyer les tiroirs réfrigérés avant utilisation. Voir la section
"Nettoyage" dans le Guide d'utilisation et d'entretien pour
des instructions.
4. Les commandes ont été préréglées à l'usine aux valeurs
sélectionnées par défaut (37°F/3°C) pour les tiroirs supérieur
et inférieur. S'assurer que le compresseur fonctionne bien et
que toutes les lampes s'allument.
5. Si les travaux doivent se poursuivre après l'installation des
tiroirs réfrigérés, régler les commandes à OFF (arrêt) pour les
deux tiroirs. Voir "Utilisation des commandes" dans le Guide
d'utilisation et d'entretien pour des instructions.
Pour pouvoir tirer le plus grand parti de vos nouveaux tiroirs
réfrigérés, lire le Guide d'utilisation et d'entretien. Conserver les
instructions d'installation et le Guide d'utilisation et d'entretien à
proximité des tiroirs réfrigérés pour pouvoir les consulter à tout
moment.
A. Vis de montage supérieure
(à l'arrière)
B. Rebord inférieur
A
31
Page 32

2258066A
© 2005. All rights reserved.
Todos los derechos reservados.
Tous droits réservés.
® Registered Trademark/TM Trademark of KitchenAid, U.S.A., KitchenAid Canada licensee in Canada
® Marca Registrada/TM Marca de comercio de KitchenAid, U.S.A., usada en Canadá bajo licencia de KitchenAid Canada
® Marque déposée/TM Marque de commerce de KitchenAid, U.S.A., Emploi licencié par KitchenAid Canada au Canada
Printed in U.S.A.
Impreso en EE. UU.
Imprimé aux É.-U.
4/05
 Loading...