

Page 1
Models KAWS700G, KAWS750G, KAWS800G, KAWS850G
3950451C
Page 2

TABLE OF
CONTENTS
WASHER SAFETY............................................................ 3
PARTS AND FEATURES .................................................... 4
USING YOUR WASHER...................................................... 5
Understanding Washer Cycles......................................... 5
Loading.............................................................................. 5
Normal Washer Sounds.................................................... 5
Starting Your Washer........................................................ 6
Selecting a Cycle and Time .............................................. 7
SENSORSURE
Rinse and Spin.................................................................. 9
Drain and Spin................................................................... 9
Self-Cleaning Lint Filter..................................................... 9
CARING FOR YOUR WASHER ........................................ 10
Cleaning Your Washer.................................................... 10
Water Inlet Hoses............................................................ 10
Vacation, Storage, and Moving Care.............................. 10
TROUBLESHOOTING....................................................... 11
ASSISTANCE OR SERVICE ............................................. 14
In the U.S.A. .................................................................... 14
In Canada........................................................................ 14
WARRANTY....................................................................... 15
™
Temperature Control ............................. 9
2
Page 3
WASHER SAFETY
Your safety and the safety of others are very important.
We have provided many important safety messages in this manual and on your appliance. Always read and obey all
safety messages.
This is the safety alert symbol.
This symbol alerts you to potential hazards that can kill or hurt you and others.
All safety messages will follow the safety alert symbol and either the word “DANGER” or
“WARNING.” These words mean:
You can be killed or seriously injured if you don't
immediately follow instructions.
You can be killed or seriously injured if you don't
follow instructions.
All safety messages will tell you what the potential hazard is, tell you how to reduce the chance of injury, and tell you
what can
happen if the instructions are not followed.
IMPORTANT SAFETY INSTRUCTIONS
WARNING:
precautions, including the following:
■
Read all instructions before using the washer.
■
Do not wash articles that have been previously
cleaned in, washed in, soaked in, or spotted with
gasoline, dry-cleaning solvents, other flammable,
or explosive substances as they give off vapors
that could ignite or explode.
■
Do not add gasoline, dry-cleaning solvents, or
other flammable, or explosive substances to the
wash water. These substances give off vapors
that could ignite or explode.
■
Under certain conditions, hydrogen gas may be
produced in a hot water system that has not been
used for 2 weeks or more. HYDROGEN GAS IS
EXPLOSIVE. If the hot water system has not
been used for such a period, before using the
washing machine, turn on all hot water faucets
and let the water flow from each for several
minutes. This will release any accumulated
hydrogen gas. As the gas is flammable, do not
smoke or use an open flame during this time.
To reduce the risk of fire, electric shock, or injury to persons when using the washer, follow basic
■
Do not allow children to play on or in the washer. Close
supervision of children is necessary when the washer
is used near children.
■
Before the washer is removed from service or
remove the lid.
■
Do not reach into the washer if the tub or agitator is
moving.
■
Do not install or store the washer where it will be
exposed to the weather.
■
Do not tamper with controls.
■
Do not repair or replace any part of the washer or
attempt any servicing unless specifically recommended
in this Use and Care Guide or in published user-repair
instructions that you understand and have the skills to
carry out.
■
See Installation Instructions for grounding
requirements.
discarded,
SAVE THESE INSTRUCTIONS
3
Page 4
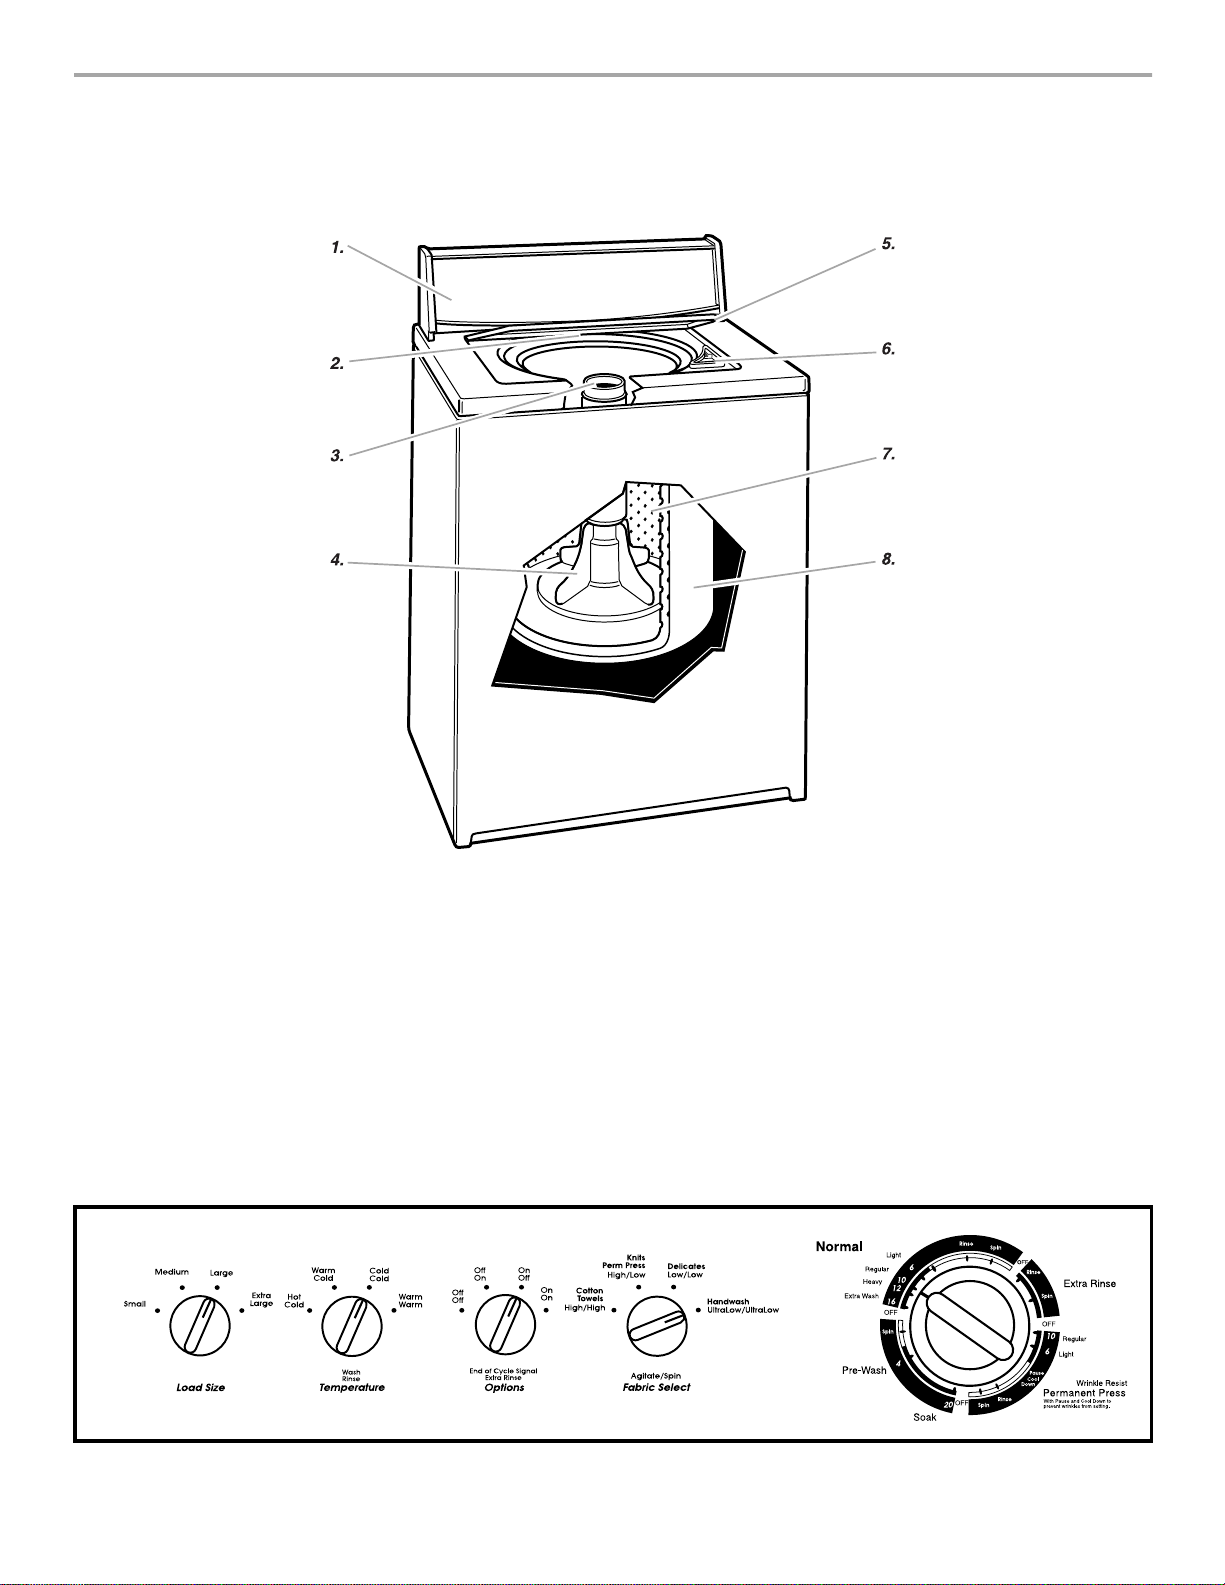
PARTS AND FEATURES
This manual covers several different models. The washer you have purchased may have some or all of the parts and
features listed below.
1. Control panel
2. Model and serial number label
3. Liquid fabric softener dispenser
4. SURE CARE
5. Lid
6. Liquid chlorine bleach dispenser
®
agitator
Control panel
7. Basket
8. Tub
9. Self-cleaning
10.White porcelain basket
lint filter
Other feature your washer may have
SENSORSURE™ temperature control
4
Page 5
USING YOUR
WASHER
Loading
Loading suggestions
For these suggested full-sized loads, set the LOAD SIZE
selector to the highest load size setting.
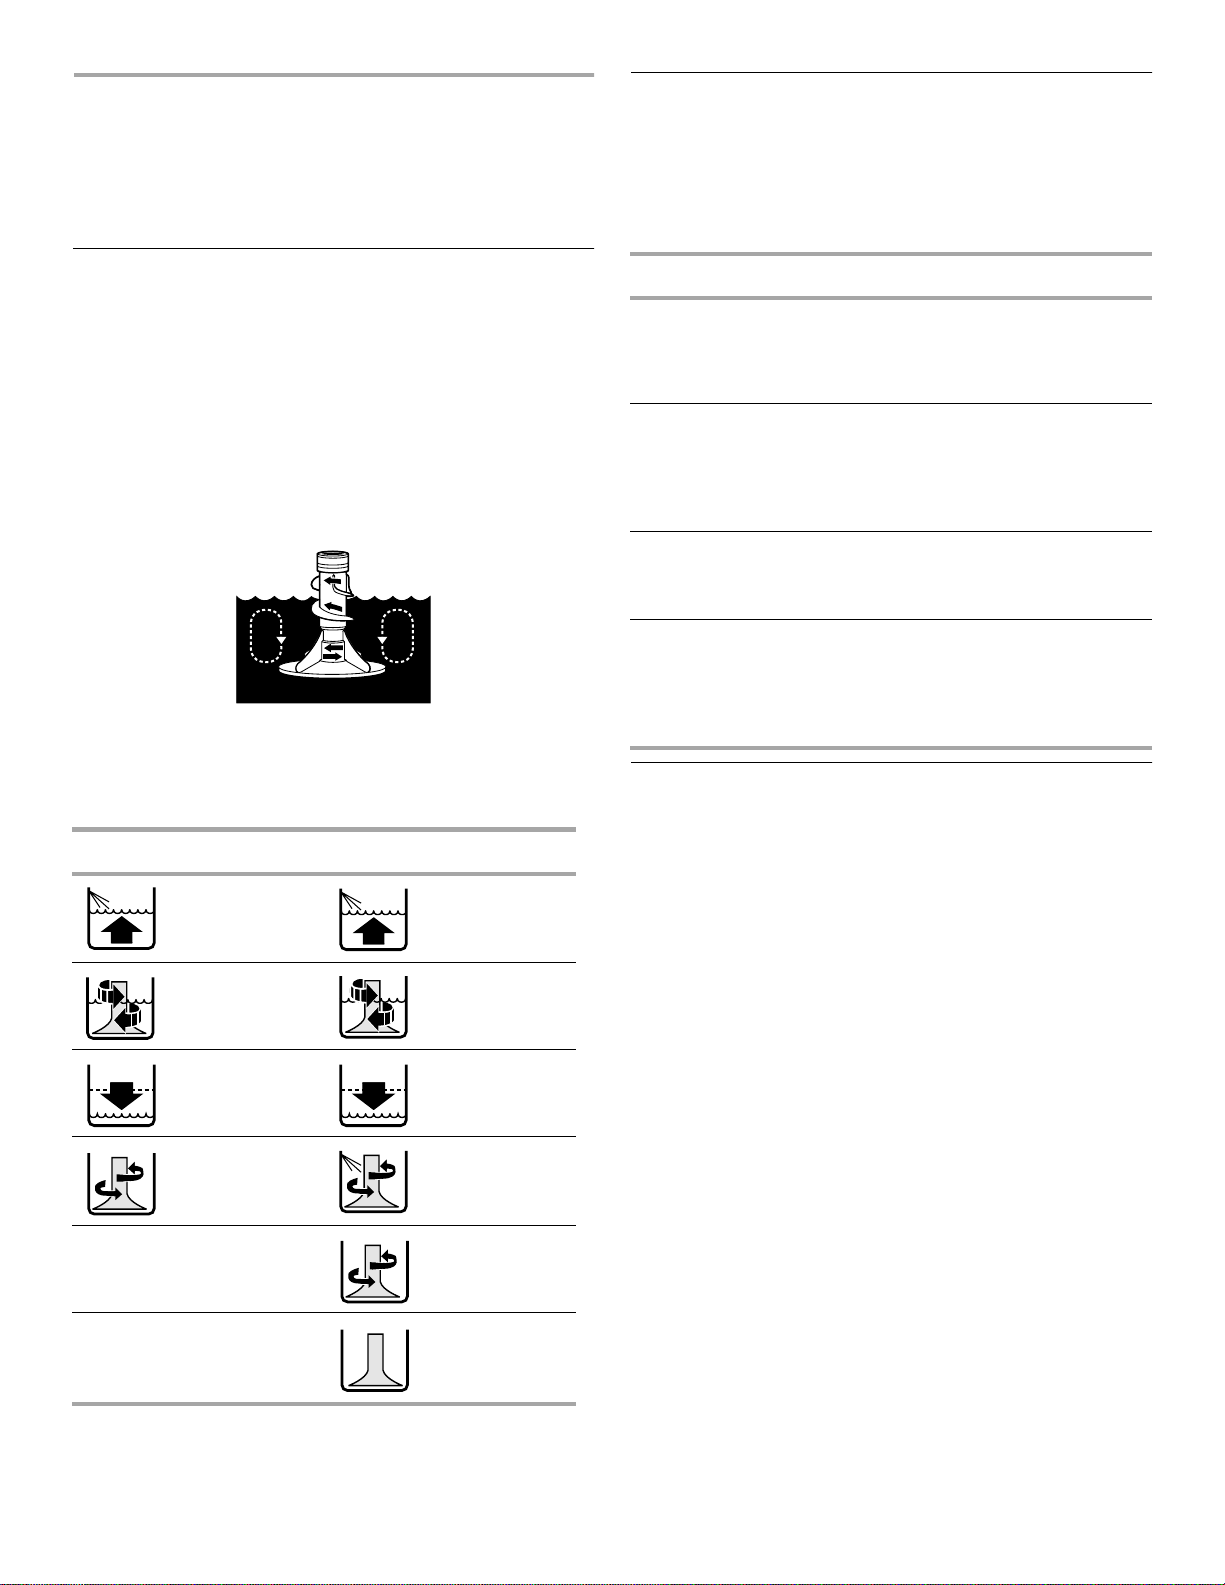
Understanding W asher
Cycles
When the Cycle Control knob is set to a number and pulled
out, the washer fills (to the selected load size) before
agitation and timing start. The washer begins agitating
immediately after fi lling; agitation occurs with the washer
lid up or down.
During agitation, the agitator creates a continuous rollover
action that provides a thorough cleaning of the wash load.
After agitation starts, the Cycle Control knob turns
clockwise until i t poi nts t o a n O FF area and the cycle ends.
NOTE: The washer pauses briefly throughout each cycle.
These pauses are normal for washer operation.
W ASH RINSE
1. Fill 1. Fill
SUPER CAPACITY PLUS WASHERS
Heavy Work Clothes
3 pair pants
3 shirts
4 pair jeans
Delicates
3 camisoles
1 quilted robe
4 slips
4 panties
Towels
10 bath towels
10 hand towels
Mixed Load
3 double sheets
4 pillowcases
8 T-shirts
6 pair shorts
1 coverall
1 overall
2 bras
2 nighties
1 baby’s dress
14 wash cloths
1 bath mat
2 shirts
2 blouses
8 handkerchiefs
Normal W asher Sounds
Your new washer may make sounds your old one didn’t.
Because the sounds might be unfamiliar, you may be
concerned about them. These sounds are normal.
2. Wash
selected
time
3. Drain
No agitation
4. Spin 4. Spin-Spray
†
The Permanent Press
cycle partially drains,
fills, agitates briefly, and
drains.
†
2. Rinse
3. Drain
No agitation
rinse
5. Spin
6. Off
During washing
When you select a small lo ad size sett ing, your washe r has
a lower water level. This can cause a clicking sound from
the upper part of the agitator.
During drain
If water is drained quickly from your washer (depending on
your installation), you may hear air being pulled through
the pump during the end of draining.
After drain and before spin
When the cycle changes from draining to spinning, you
may hear gears engaging.
5
Page 6

Starting Y our W asher
Fire Hazard
Never place items in the washer that are
dampened with gasoline or other flammable
fluids.
No washer can completely remove oil.
Do not dry anything that has ever had any type of
oil on it (including cooking oils).
Doing so can result in death, explosion, or fire.
WARNING
■ To reduce wrinkling of permanent press clothes and
some synthetic knits, use a large load size to provide
more space (see step 5).
2. (OPTIONAL STEP) Pour measured liquid chlorine
bleach into the li quid chlori ne bleach dispenser. Bleach
will be dilut ed automa tica lly duri ng the w ash par t of the
cycle.
■ Never use more than 1 cup (250 mL) for a full load.
Use less with a smaller load size.
■ Follow the manufacturer’s directions for safe use.
■ To avoid spilli ng, us e a cup with a pou ring sp out. Do
not let bleach splash, drip, or run down into the
washer basket.
■ Use only liquid chlorine bleach in this dispenser.
3. (OPTIONAL STEP) Pour measured liquid fabric
softener into the liquid fabric softener dispenser.
Softener is added automatically during the rinse
portion of the cycle.
Electrical Shock Hazard
Plug into a grounded 3 prong outlet.
Do not remove ground prong.
Do not use an adapter.
Do not use an extension cord.
Failure to follow these instructions can result in
death, fire, or electrical shock.
1. Measure detergent and pour it into the washer. If
desired, add powder e d or liq uid col or safe bl each. Add
extra detergent for the Extra Wash cycle.
Drop a sorted load of clothes loosely into your washer.
■ Load evenly to maintain washer balance. Mix large
and small items.
■ Items should move easily through the wash water.
Overloading can cause poor cleaning.
Dilute liquid fabric softener by filling the dispenser with
warm water until liquid reaches the crossbar in the
opening.
■ Do not spill or drip any fabric softener on the
clothes.
■ Use only liquid fabric softener in this dispenser.
4. Close the washer lid.
5. Turn the LOAD SIZE selector to the correct setting for
your wash load and th e type of fabric being washed.
■ Choose a load size that allows the load to move
freely for best fabric care. See “Load ing.”
■ To change the lo ad size selection after the washer
has started filling, turn the selector to the desired
setting. On models with a Reset option, first move
the selector to RESET, then to the new load size.
6. Turn the TEMPERATURE selector to the correct setting
for the type of fabric and soils being washed. Use the
warmest water safe for fabric. Follow garment label
instructions.
6
Page 7

Water Temp Use For
Hot
111°F (44°C)
or above
Warm
90°-110°F
(32°-43°C)
Cold
70°-90°F
(21°-32°C)
Whites and pastels
Heavy and greasy soils
Bright colors
Moderate to light soils
Colors that bleed or fade
Light soils
NOTE: In wash water temperatures colder than 70ºF
(21ºC), detergents do not dissolve well. Soils can be
difficult to remove. Some fabrics can retain wear
wrinkles and have increased pilling (the formation of
small lint-like balls on the surface of garments).
■ Some models have an electronic sensor control that
maintains a uniform water temperature. See
“SENSORSURE
™
Temperature Control.”
7. (OPTIONAL STEP) Some models have an EXTRA
RINSE selector. For an additional rinse and spin at the
end of the Normal wash cycle, set the selector to On.
To stop or start your washer
■ To stop the washer at any time, push in the Cycle
Control knob.
■ To restart the washer , clo se the lid (if open) an d pull out
the Cycle Control knob.
Selecting a Cycle and T ime
This section describes the available wash cycles and will
help you make the best cycle selections for your wash
loads. Each cycle is designed for different types of fabric
and soil levels.
■ The washer pauses br iefly throughout each cycle.
These pauses are normal. Refer to “Normal Washer
Sounds” to learn more about the sounds you may hear
during a wash cycle.
■ Refer to “Understanding Washer Cycles” to learn what
happens during a wash cy cle .
NOTE: This manual covers several different models. The
Cycle Control knob for ea ch model is shown below. Once
you find your model numb er, use the cycl e descrip tions for
that particular washer.
Model KA WS700G
8. (OPTIONAL STEP) Some models have an OPTIONS
selector. This allows you to select an End of Cycle
Signal at the end of any cycle and/or add an Extra
Rinse to your Normal wash cycle only.
■ The End of Cycle Signal is helpful when you are
washing items that should be removed from the
washer as soon as the cycle ends.
■ An Extra Rinse removes additional detergent
residue from heavily soiled or special care items.
Using the OPTION S se lector
■ Set the selector at On/On f or an End o f Cycle Signal
and an Extra Rinse .
■ Set the selector at On/Of f for an End of Cycle Signal
only .
■ Set the selector at Off/On for an Extra Rinse only.
■ Set the selector at Off/Off if you do not desire an
End of Cycle Signal or an Extra Rinse.
9. Push in the Cycle Contr ol knob and turn it cl ockwise to
the wash cycle you want. Reduce wash time when
using a small load size setting. See “Selecting a Cycle
and Time.”
Pull out the Cycle Control knob to start the washer.
Normal cycle
The Normal cycle features extended agitation time for
cleaning cottons and linens, and longer spin times to
shorten drying time. Select 6, 10, or 12 minutes of wash
time, depending on whether your load is light ly , moderately
or heavily soiled.
Extra Wash - Select the 16-minute Extra Wash feature to
wash heavily soiled loads that need maximum soil
removal. Use two times the amount of recommended
detergent for this cycle.
Wrinkle Resist/Permanent Press cycle
The Wrinkle Resist/P ermanent Press cycle starts with high
agitation and then steps to lo w for cleaning permanent press
blends and synthetic f a brics. To maximize water r emoval but
minimize wrinkling, this cycle f eatures a cool-do wn rinse and a
final spin that steps through e xtr a low, low and high spin. Select
6 or 10 minutes of wash time for lightly to moder ately soiled
loads.
7
Page 8

Delicate cyc le
The 6-minute Delicate cycle can be used to gently clean
delicate items and washable knits. This cycle offers low
agitation and spin speeds.
To use this cycle
1. Turn the Cycle Control knob to Delicate/
Handwashables.
2. Set the HANDWASH selector to Off.
Handwashables c yc le
The 6-minute Handwashables cycle features brief periods
of low speed agitation and soak time. Low spin speed
reduces wrinkl ing. Use this cy cle for cl eanin g li ght ly so iled
hand washables.
To use this cycle
1. Turn the Cycle Control knob to Delicate/
Handwashables.
2. Set the HANDWASH selector to On.
Soak cyc le
The Soak cycle feat ure s brief p eriods o f agitatio n and s oak
time to help remove heavy soils and stains that need pretreatment.
■ Use warm water when soaking laundry. Hot water can
set some stains.
■ Use the amount of detergent or presoak additive
recommended by the manufacturer.
■ The Soak cycle automatically advances into the Pre-
Wash cycle.
Pre-W ash c yc le
The Pre-Wash cycle feature s 4 minute s of agi tation to help
remove heavy soils and stains that need pre-treatment.
When the Pre-Wash period ends, add detergent and star t
a new wash cycle.
Normal cycle
The Normal cycle is used with the Fabric Select option to
provide the best wash and spin action for a given load.
Select 6, 10 or 12 minutes of wash time depending on
whether your load is lightly , moderately or heavily soiled.
Extra Wash – Select the 16-minute Extra Wash feature to
wash heavily soiled loads that need maximum soil
removal. Use two times the amount of recommended
detergent for this cycle.
Wrinkle Resist/Permanent Press cycle
The Wrinkle Resis t/Permane nt Pr ess cycle is used with the
Fabric Select option to provide the best wash and spin
action for a given load. The Wrinkle Resist/Permanent
Press cycle features a pause and cool down rinse to
reduce wrinkling. Use 6 or 10 minutes of wash time for
lightly to moderately soiled loads.
Soak cycle
The Soak cycle feat ure s brief p eriods o f agitatio n and s oak
time to help remove heavy soils and stains that need
pretreatment.
■ Use warm water when soaking laundry. Hot water can
set stains.
■ Use the amount of detergent or presoak additive
recommended by the manufacturer.
■ The Soak cycle automatically advances into the Pre-
Wash cycle.
Models KAWS750G, KA WS800G,
KAWS850G
20
8
Pre-W ash c yc le
The Pre-W ash cycle fe atur es 4 mi nutes of agitati on to hel p
remove heavy soils and stains that need pre-treatment.
When the Pre-Wash period ends, add detergent and start
a new wash cycle.
Additional Fabric Select options
available on the KAWS850G model
Sweaters option
Use this option to gently clean non-wool sweaters.
To use this option
1. Turn the FABRIC SELECT option to Sweaters.
2. Set the TEMPERATURE selector to the
SENSORSURE™ Cold/Cold setting.
3. Set the Cycle Control knob to a 6-minute Normal wash
cycle.
Page 9

Handwash/Wool option
Use this option to gently clean washable wool garments
(refer to your garment’s care label).
To use this option
1. Turn the FABRIC SELECT option to Handwash/Wool.
2. Set the TEMPERATURE selector to the
SENSORSURE™ Cold/Cold setting.
3. Set the Cycle Control knob to a 6-minute Normal wash
cycle.
SENSORSURE™
Rinse and Spin
When using extra detergent for heavily soiled clothes, or
washing special-care items, you may find an extra rinse
and spin is needed.
1. Push in the Cycle Contr ol knob and turn it cl ockwis e to
any of the Rinse settings.
2. Pull out the Cycle Control knob. The washer fills to the
selected load si ze, agitates, drains, and spins.
NOTE: An EXTRA RINSE option is available (on some
models). See “Starting Your Washer.”
Temperature Control
SENSORSURE temperature control electronically senses
and maintains a uniform water temperature by regulating
incoming hot and cold water.
SENSORSURE keeps warm and cold water temperatures
within recommended ranges for best detergent
performance and fabric care.
■ Cold wash is regulated at approximately 75°F (24ºC).
■ Warm wash is regulated at approximately 100°F (38°C).
To select SENSORSURE
Turn the TEMPERATURE selector to a SENSORSURE
setting.
Drain and Spin
A drain and spin may help shorten drying times for some
heavy fabrics or special-care items by removing excess
water.
1. Push in the Cycle Contr ol knob and turn it cl ockwis e to
any of the Spin sett ings.
2. Pull out the Cycle Control knob. The washer drains,
then spins.
Self-Cleaning Lint Filter
Your washer has a self-cleaning lint filter at the bottom of
the basket. W ash and ri nse water flow ove r the filter during
agitation, separating the lint from the water. The lint spins
out of the system during the spin part of the cycle.
If your washer drains into a tub, remove any lint collected
in the tub or strainer.
9
Page 10

CARING FOR
Vacation, Storage,
and Moving Care
YOUR WASHER
Cleaning Y our Washer
Cleaning the exterior
Use a soft, damp cloth or sponge to wipe up any spi lls
such as detergent or bleach. Occasionally wipe the
outside of your washer to keep it looking new.
Cleaning the interior
Clean your washer interior by mixing 1 cup (250 mL) of
chlorine bleach and 2 cups (500 mL) of detergent. Pour
this into your washer and run it through a complete cycle
using hot water. Repeat this process if necessary.
NOTE: Remove any hard water dep osits using only
cleaners labeled as washer safe.
Cleaning the liquid fabric softener dispenser
Flush dispenser periodically with warm water, as shown.
Remove the dispenser by grasping the top of the
dispenser with both hands and squeezing and pushing
upwards with thumbs. Clean the dispenser by rinsing it
under a water faucet. Replace it after cleaning.
NOTE: Do not wash clothes with this dispenser removed.
Do not add detergent or bleach to this dispenser; it is for
liquid fabric softener use only.
Install and store your washer where it will not freeze.
Because some water may stay in the hoses, freezing can
damage your washer. If storing or moving your washer
during freezing weather, winterize it.
Non-use or vacation care
Operate your washer onl y when you ar e at home. If you wil l
be on vacation or not using your washer for an extended
period of time, you should:
■ Unplug washer or disconnect power.
■ Turn off the water supply to the washer . This helps avoid
accidental flooding (due to a water pressure surge)
while you are away.
To winterize washer
1. Shut off both water faucets.
2. Disconnect and drain water inlet hoses.
3. Put 1 quart (1 L) of R.V.-type antifreeze in the basket.
4. Run washer on a drain and spin setting (see “Drain and
spin”) for about 30 seconds to mix the antifreeze and
water.
5. Unplug washer or disconnect power.
To use washer again
1. Flush water pipes and hoses.
2. Reconnect water inlet hoses.
W ater Inlet Hoses
Replace inlet hoses after five years of use to reduce the
risk of hose failure. Periodically inspect and replace inlet
hoses if bulges, kinks, cuts, wear or leaks are found.
When replacing your inlet hoses, mark the date of
replacement on the label with a permanent marker.
3. Turn on both water faucets.
4. Plug in washer or reconnect power.
5. Run the washer through a complete cycle with 1 cup
(250 mL) of detergent to clean out antifreeze.
10
Page 11

Washer w on’t drain or spin
TROUBLE-
SHOOTING
First try the solutions suggested here and
possibly a v oid the cost of a service call...
Was her won’t fill, rinse or a gitate
■ Check the following:
Is the power cord plugge d in?
Is the indicator on the Cycle Control knob properly
lined up with a cycle? Turn the Cycle Control knob to
the right slightly and pull to start.
Are the water inlet valve screens clogged?
Are both the hot and cold water faucets turned on?
Is the water inlet hose kinked?
■ Does the water level seem too low, or the washer
appears to not fill completely?
The top of the agitator is much higher than the highest
water level. This creates a perception that the washer is
not filling completely. This is normal.
Washer stops
■ Is the drain hose clogged, or the end of the drain
hose more than 72 inches (183 cm) above the floor?
See the Installation Instructions for proper installation
of drain hose.
■ Is the lid open?
The lid must be closed during operation.
■ Is there excessive sudsing?
Always measure detergent. Follow manufacturer’s
directions. If you have very soft water, you might need
to use less detergent.
■ Is your voltage low?
Check your electrical source or call an electrician. Do
not use an extension cord.
Washer continues to fill or drain, or the cyc le
seems stuck
■ Is the top of drain hose lower than the water level in
washer?
The top of the hose must be higher than the water level
in the washer for proper operation. See the Installation
Instructions.
■ Does the drain hose fit too tightly in the standpipe,
or is it taped to the standpipe?
The drain hose should be loose yet fit securely. Do not
seal the drain hose with tape. The hose needs an air
gap. See the Installation Instructions.
■ Check the following:
Is the power cord plugge d in?
Is the indicator on the Cycle Control knob properly
lined up with a cycle? Turn the Cycle Control knob to
the right slightly and pull to start.
Are the water inlet valve screens clogged?
Are both the hot and cold water faucets turned on?
Is the water inlet hose kinked?
■ Is there power at the plug?
Check your electrical source or call an elec trician.
■ Has a fuse blown or is the circuit breaker open?
If problem continues, call an electrician.
■ Are you using an extension cord?
Do not use an extension cord.
■ Is the washer in a normal pause in the Permanent
Press (or Hand Washables) cycle?
The washer pauses for about 2 minutes in the
Permanent Press cycle. Allow the cycle to continue.
The Hand Washables cycle (on some models) features
periods of agitation and soak.
■ Is the washer overloaded?
Wash smaller loads.
W asher makes nois e
■ Is the load balanced and the washer level?
The wash load should be balan ced and not over loaded.
The washer must be level. The front feet should be
properly installed and the nuts tightened. Reset the rear
leveling legs (i f nee d ed). See the Installa ti on
Instructio ns .
■ Did you completely remove the yellow shipping
strap with cotter pins?
See the Installation Instructions.
■ Are the gears engaging after the drain and before
spin, or is the upper part of agitator clicking during
wash?
These are normal washer noises.
11
Page 12

Washer leaks
Load too wet
■ Check the following:
Are the fill hoses tight? Are the fill hose washers
properly seated? Is the drain hose clamp properly
installed? See the Installation Instructions.
■ Is the sink or drain clogged?
Sink and standpipe must be able to handle 17 gallons
(64 L) of water per minute.
■ Is water deflecting off the tub ring or the load?
Center the tub before starting the washer.
The wash load shoul d be balanced and not o verloaded.
The fill or spray rinses can deflect off the load.
The washer must be level. The front feet should be
properly installed and the nuts tightened. Reset the rear
leveling legs (if needed). See the Installation
Instructions.
■ Check household plumbing for l eaks.
Washer basket is crooked
■ Was the washer basket pulled forward during
loading?
The wash load shoul d be balanced and not o verloaded.
Push the basket to the center before starting wash.
■ Is the load balanced and the washer level?
The wash load should be balanced and not overloaded.
The washer must be level. The front feet should be
properly installed and the nuts tightened. Reset the rear
leveling legs (if needed). See the Installation
Instructions.
■ The washer basket moves while was hing.
This is normal.
Agitator operation
■ The top of the agitator is loose, or moves in only
one direction.
This is normal.
■ Did you use the right cycle for the load being
washed?
Select a cycle with a higher spin speed (if available).
■ Did you use a cold rinse?
Cold rinses leave loads wetter t han warm rinses. This is
normal.
Residue or lint on load
■ Did you sort properly?
Sort lint givers (towels, chenille) from lint takers
(corduroy, synthetics). Also sort by color.
■ Did you overload the washer?
The wash load must be balanced and not overloaded.
Lint can be trapped in the load if overloaded. Wash
smaller loads.
■ Check the following:
Was pap er or tissue left in the pockets?
Did you use enough detergent? Follow manufacturer’s
directions. Use enough detergent to hold the lint in the
water.
Is your water colder than 70°F (21°C)? Wash water
colder than 70°F (21°C) may not completely dissolve
the detergent.
Stains on load
■ Did you follow the manufacturer’s directions when
adding detergent and fabric s o ftener?
Measure detergent and fabric softener. Use enough
detergent to remove soil and hold it in suspension.
Dilute fabric so ftener and add to the rinse portion of a
cycle only. Do not drip fabric softener on clothes.
■ Is there above average iron (rust) in water?
You may need to install an iron filter.
■ Did you properly sort the load?
Sort dark clothes from whites and lights.
Dispensers c logged or ble ach leak ing
■ Did you follow the manufacturer’s directions when
adding detergent and fabric softener to the
dispensers?
Measure detergent and fabric softener. Carefully pour
into the dispensers. Wipe up all spills.
Dilute fabric softener in the fabric softener dispenser.
■ Did you put powdered or color-safe bleach in the
liquid chlorine bleach dispenser?
Add powdered or li quid color -safe bl each directl y to the
basket. Do not use the chlorine bleach dispenser for
color-safe bleach.
12
■ Did you unload the washer promptly?
To avoid dye transfer, unload the washer as soon as it
stops.
Page 13

Load is wrinkled
Garment damage
■ Did you unload the washer promptly?
Unload the washer as soon as it stops.
■ Did you use the right cycle for the load being
washed?
Use the Permanent Press cycle or another cycle with
low spin speeds (if available) to reduce wrinkling.
■ Did you overload the washer?
The wash load must be balanced and not overloaded.
Loads should move freely during washing.
■ Was the w ash water warm e nough to rel ax wrinkles,
or are you using warm rinses?
If safe for the load, use warm or hot wash water. Use
cold rinse water.
■ Are the hot and cold water hoses reversed?
Check to be sure the hot and cold water hoses are
connected to the right faucets. See the Installation
Instructions.
Load is tangled or twisted
■ Did you overload the washer?
The wash load must be balanced and not overloaded.
Loads should move freely during washing.
■ Did you wrap items around the agitator?
Drop items loosely into the washer. Do not wrap items
around the agitator.
■ Check the following:
Were sharp items removed from pockets before
washing? Empty pockets, zip zippers, snap or hook
fasteners before washing.
Were strings and sashes tied to prevent tangling?
Were items damaged before was hing? Mend rips and
broken threads in seams before washing.
■ Did you overload the washer?
The wash load must be balanced and not overloaded.
Loads should move freely during washing.
■ Did you properly add chlorine bleach?
Do not pour chlorine bleach directly on load. Wipe up
bleach spills. Undiluted bleach will damage fabrics.
■
■ Did you follow the manufacturer’s care label
■■
instructions?
Gray whites, ding y color s
■ Did you properly sort the load?
Dye transfer can occu r when mixing whites and colors
in a load. Sort dark clothes from whites and lights.
■ Was the wash temperature too low?
Use hot or warm washes if safe for the loa d. Hot water
should be at least 111°F (44°C) to clean heavy or
greasy soils.
■ Did you use enough detergent, or do you have hard
water?
Use more detergent for washing heavy soils in cold or
hard water.
■ Are the hot and cold water hoses reversed?
Check to be sure the hot and cold water hoses are
connected to the right faucets. See the Installation
Instructions.
13
Page 14

ASSISTANCE
OR SERVICE
In Canada
Call the KitchenAid Canada Consumer Assistance Center
toll free: 1-800-461-5681 8:30 a.m. - 6:00 p.m. (EST)
Our consultants provide assistance with:
Before callin g for assistance or service, please check
“Troubleshooting.” It may save you the cost of a service
call. If you still need help, follow the instructions below.
When calling, please know the purchase date and the
complete model and serial number of your appliance. This
information will help us to better respond to your request.
If you need replacement parts
If you need to order replacement parts, we r ecommend
that you only use factory specified parts. These parts will
fit right and work right, because they are made with the
same precisio n used to build every new KITCHENAID
appliance. To locate factory specifi ed r epl acement p arts in
your area, call ou r Con sumer As sis t ance Ce nter t el ep hone
number or your nearest designated service center.
®
In the U.S.A.
Call the KitchenAid Consumer Assistance Center
toll free: 1-800-422-1230.
Our consultants provide assistance with:
■ Features and specifications on our full line of
appliances.
■ Installation information.
■ Features and specifications on our full line of
appliances.
■ Referrals to local dealers.
For service in Canada
Call 1-800-807-6777. KitchenAid designated service
technicians are trained to fulfill the product warranty and
provide after-warranty service, anywhere in Canada.
For further assistance
If you need further assistance, you can write to KitchenAid
Canada with any questions or concerns at:
Consumer Relations Center
KitchenAid Canada
1901 Minnesota Court
Mississauga, Ontario L5N 3A7
Please include a daytime phone number in your
correspondence.
■ Use and maintenance procedures.
■ Accessory and repair parts sales.
■ Specialized customer assistance (Spanish speaking,
hearing impaired, limited vision, etc.).
■ Referrals to local dealers, repair parts distributors, and
service companies. KitchenAid designated service
technicians are trained to fulfill the product warranty
and provide after-warranty service, anywher e in the
United States.
To locate the KitchenAid designated service company
in your area, you can also look in your telephone
directory Yellow Pages.
For further assistance
If you need fur the r as sist an ce, y ou can wr it e to Kit ch enA id
with any questions or concerns at:
KitchenAid Brand Home Appliances
Consumer Assistance Center
c/o Correspondence Dept.
2000 North M-63
Benton Harbor, MI 49022-2692
Please include a daytime phone number in your
correspondence.
14
Page 15

KITCHENAID® WASHER WARRANTY
TWO-YEAR FULL WARRANTY
For two years from the date of purchase, when this washer is operated and ma intained according to instructions attached to or
furnished with the product, KITCHENAID will pay for replacement parts and repair labor to correct defects in materials or workmanship.
Service must be provided by a KITCHENAID designated service company.
THIRD THROUGH FIFTH YEAR LIMITED WARRANTY
For the third through fifth year from the date of purchase, when this washer is operated and maintained according to i nstructio ns
attached to or furnished with the product, KITCHENAID will pay for
if defective in materials or workmanship.
THIRD THROUGH TENTH YEAR LIMITED WARRANTY
For the third through tenth year from the date of purchase, when this washer is operated and maintai ned according to instructions
attached to or furnished with the product, KITCHENAID will pay for replacement parts for the following components if defective in
materials or workmanship: the top/lid and cabinet assembly due to rust; any part of the gearcase assembly; the outer tub should it
crack, or fail to contain water.
replacement parts for the motor and center post assembly bearings
LIFETIME LIMITED WARRANTY
For the lifetime of the washer, when this washer is operated and maintained according to instructions attached to or furnished with the
product, KITCHENAID will pay for replacement parts for the white porcelain basket should it chip or rust due to defects in materials or
workmanship.
KitchenAid will not pay for:
Service calls to correct the installation of your washe r, to instruct you how to use your washer, or to replace house fuses or correct
1.
house wiring or plumbing.
Repairs when your washer is used in other than normal, single-family household use.
2.
Damage resulting from accident, alteration, misuse, abuse, fire, flood, acts of God, improper installation, or installation not in
3.
accordance with local electrical and plumbing codes.
Any labor costs during the limited warranties.
4.
Replacement parts or repair labor costs for unit s operated outside the United States and Canada.
5.
Pickup and delivery. This product is designed to be repaired in the home.
6.
Repairs to parts or systems resulting from unauthorized modifications made to the appliance.
7.
In Canada, travel or transporta tion expenses for customers who reside in remote areas.
8.
KITCHENAID AND KITCHENAID CAN A DA DO NOT ASSUME
ANY RESPONSIBILITY FOR I NCIDENTAL OR
CONSEQUENTIAL DAMAGES.
Some states and provinces do not allow the exclusion or
limitation of incidental or consequential damages, so this
exclusion or limitation may not apply to you. This warranty gives
you specific leg al rights and you may also have other rig hts which
vary from state to state or province to province.
Keep this book and your sales slip together for future
reference. You must provide proof of purchase or i nstallat ion
date for in-warranty service.
Write down t he foll owin g informa tion a bout your washer to b etter
help you obtain assistance or service if you ever need it. You will
need to know your complete model number and serial number.
You can find this information on the model and serial number
label/plate, located on your appliance as shown in “Parts and
Features.”
Outside the 50 United States and Canada, this warranty does
not apply. Contact your local KITCHENAID dealer to
determine if another warranty applies.
If you need service, first see “Troublesho oting.” Additional help
can be found by checking “Assi stance or Service,” or by calling
our Consumer Assistance Center at
anywhere in the U.S.A. or write: KitchenAid Brand Home
Appliances, Consu mer Assistance Center, c/o Correspondence
Dept., 2000 North M-63, Benton Harbor, MI 49022-2692. In
Canada, call Kitc henA id C a nada a t
Dealer name_________________________________________
Address ____________________________________________
Phone number_______________________________________
Model number _______________________________________
Serial number _______________________________________
Purchase date _______________________________________
1-800-422-1230
1-800-807-6777
, from
.
11/99
15
 Loading...