

Page 1

Page 2

Please Indicate Product Purchased:
Food preparer ( )
4C
( )
K-45
( ) 1<5-A
1. Where did you purchase?
1.
)
Department Store
(
2.
)
Appliance Store
(
Hardware Store
3.
( )
4.
Premium
( )
5.
)
Utility
(
6.
Don't Know
( )
7.
Other, Please Specify
)
(
2. What prompted your purchase of
KitchenAid?
)
Magazine Ad
1. (
)
Newspaper Ad
2. (
Radio or TV
3. (
)
Recommended by dealer
4. (
)
Recommended by friend
5. (
)
Used KitchenAid before
6. (
)
Features
7. (
)
)
Styling
8. (
Price
9. (
)
Saw it demonstrated
10. (
)
Other, please specify
11. (
)
3.
Was this appliance:
1.
Selected by
(
)
2.
Purchased for own use?
( )
3.(
Received as a gift?
)
Your first of this type?
4. (
)
A replacement of what brand?
5. (
)
How many years of use
Used in farm home?
6. (
)
Used in city home?
7. (
)
Commercial or industrial use?
8. (
)
(
) woman
Name:
Address:
City:
Date of Purchase
man
(
)
both?
Phone:
State:
Month
4.
Do you own other KitchenAid appliances:
1.
Yes, please specify
( )
2.
No, and want literature on
( )
Electric Coffee Mill
Food Waste. Disposers
Built-In Dishwashers
Portable Dishwashers
Trash Compactors
Hot-water Dispensers
Food Preparer Attachments
5.
Do you:
Rent apartment?
1. (
)
Rent home?
2. (
)
Own home?
3. (
)
Day
Zip
Code:
Year
Le
0)
2
0)CDO
o-0
F o
U)CD
CD
Cl)
•
Ut
)
9.
0CD
_1(D
Cl)
0-'0
I
Q
.
CDCD 0
0
.
- -
0
to
k
-
CD
-
<
0
-.
-
0)
CD
0)
0
•
0.
Page 3

WARRANTY
Hobart Corporation warrants this
United States in normal home use, against defective material or workmanship for one (1) year
from date of purchase.
purposes, this warranty shall be for a period of (90) ninety days from date of purchase. All
other models have
through one of its authorized servicing outlets, repair or replace, free of charge, including
service and labor, all parts found to be defective and subject to such warranty. Take the unit,
or ship, prepaid and insured, to the nearest authorized servicing outlet. Repaired unit will be
returned, prepaid and insured.
This warranty does not apply to damage resulting from accident, alteration, misuse or abuse,
nor does it cover breakage of Whips, Beaters or Bowls.
Hobart neither assumes nor authorizes anyone else to assume for it any other obligation or lia-
bility in connection with this KitchenAid product.
KitchenAid Division,
Please keep receip* or purchase verification if service should be required. Thank You.
IMPORTANT
ON THE INSIDE FRONT COVER, TEAR OFF ON PERFORATED LINES AND MAIL.
RETURN OF THIS CARD WILL ENABLE US TO CONTACT YOU IN THE UNLIKELY
EVENT OF A PRODUCT SAFETY NOTIFICATION. THIS IS IN COMPLIANCE WITH THE
PRODUCT SAFETY COMMISSION ACT. WE APPRECIATE YOUR COOPERATION.
If you have any questions not covered in this booklet, or need additional Food Preparer infor-
mation write to: Manager of Home Economics, KitchenAid Division, Hobart Corporation,
Troy, Ohio 45374.
PLEASE FILL OUT YOUR OWNERSHIP REGISTRATION CARD LOCATED
If the Model K5-A Food Preparer is used for industrial or commercial
no
warranty when used for industrial or commercial purposes. Hobart will,
KitchenAid®
Food Preparer, when operated within the
Troy, Ohio 45374
SHOULD YOU EVER NEED SERVICE
PLEASE READ THIS BEFORE CALLING YOUR SERVICING OUTLET:
1.
In normal mixing, the temperature of the motor will rise. When overloaded, however, the
motor can become so hot that hands cannot be laid momentarily on it. If this occurs, imme-
diately stop the Food Preparer and reduce amount of material being mixed.
2.
If Beater strikes Bowl, stop unit. See page 5 for instructions for adjusting Beater to the Bowl.
IF YOUR FOOD PREPARER SHOULD MALFUNCTION OR FAIL TO OPERATE, PLEASE
CHECK THE FOLLOWING:
1.
Is the Food Preparer plugged in?
2.
Is the fuse in the circuit to the Food Preparer in working order? If you have a circuit
breaker box, be sure the circuit
IF SERVICE IS NECESSARY:
to the closest KitchenAid authorized servicing outlet. Please refer to the list of authorized
servicing outlets enclosed with your Food Preparer.
proof of date of purchase.
If service is not satisfactory write: National Service Manager, KitchenAid Division, Hobart
Corporation, Troy, Ohio 45374. Phone 513/335-7171
closed.
is
Take your Food Preparer or ship, packed, prepaid and insured
For in-warranty service, please supply
Page 4
1k
and Welcome to your new world of
food preparation by KitchenAid.
We urge you to become thoroughly familiar with the following information before using your
Food Preparer.
INDEX
Warranty
Should You Ever Need Service
Important Safeguards
Understanding Your Food Preparer—
Model 4-C
Understanding Your Food Preparer—
Model K-45
Understanding Your Food Preparer—
Model K5-A
Speed Control Guide
Use and Care Tips
Care and Cleaning
Helpful Hints
Planetary Mixing Action
Mixing Tips
Recipes
Baked Treats
Cakes
Cookies and Brownies
Frostings and Candies
KitchenAid Specialties
Inside Front Cover
Inside Front Cover
6
8-10
11-13
14-15
16-17
18-19
Pies and Pastry
Yeast Breads—Models K-45
K5-A only
1
2
3
4
5
5
6
6
7
7
Bread Making Tips
General Instructions—Kneading Bread
Dough
KitchenAid Attachments
General Information
Pouring Chute
Splash Guard
Can Opener
Knife Sharpener
Silver Buffer
Food Grinder
Slicer and Shredder—Rotor Type
Slicer and Shredder—Disc Type
Juice Extractor
Ice Cream Freezer
Colander and Sieve
KitchenAid Attachments—Model
Number Listing..
&
. .
Inside Back Cover
20-21
22-32
22
22-23
33
34
34
35
35
35
36-37
38-39
40
41
42-43
44
IMPORTANT SAFEGUARDS
When using electrical appliances, basic
safety precautions should always be fol-
lowed including the following:
1.
Read all instructions.
2.
To protect against electrical hazards
do not immerse Food Preparer in water
or other liquid.
3.
Close supervision is necessary when
any appliance is used by or near chil-
dren.
4.
Unplug Food Preparer from outlet
when not in use, before putting on or
taking off parts, and before cleaning.
Avoid contacting moving parts. Keep
5.
hands, hair, clothing, as well as spat-
ulas and other utensils away from
beater during operation to prevent in-
SAVE THESE INSTRUCTIONS.
jury, and/or damage to the Food Pre-
parer.
Remove Beater, Wire Whip or Dough
6.
Hook from Food Preparer before wash-
ing.
Do not operate any appliance with a
7.
damaged cord set or after the appli-
ance has been dropped or damaged in
any manner. Return appliance to the
nearest authorized servicing outlet for
examination, repair or adjustment.
The use of attachments not recom-
8.
mended by KitchenAid may cause haz-
ards.
9.
Do not use outdoors.
10.
Do not let cord hang over edge of table
or counter, or touch hot surfaces.
1
Page 5
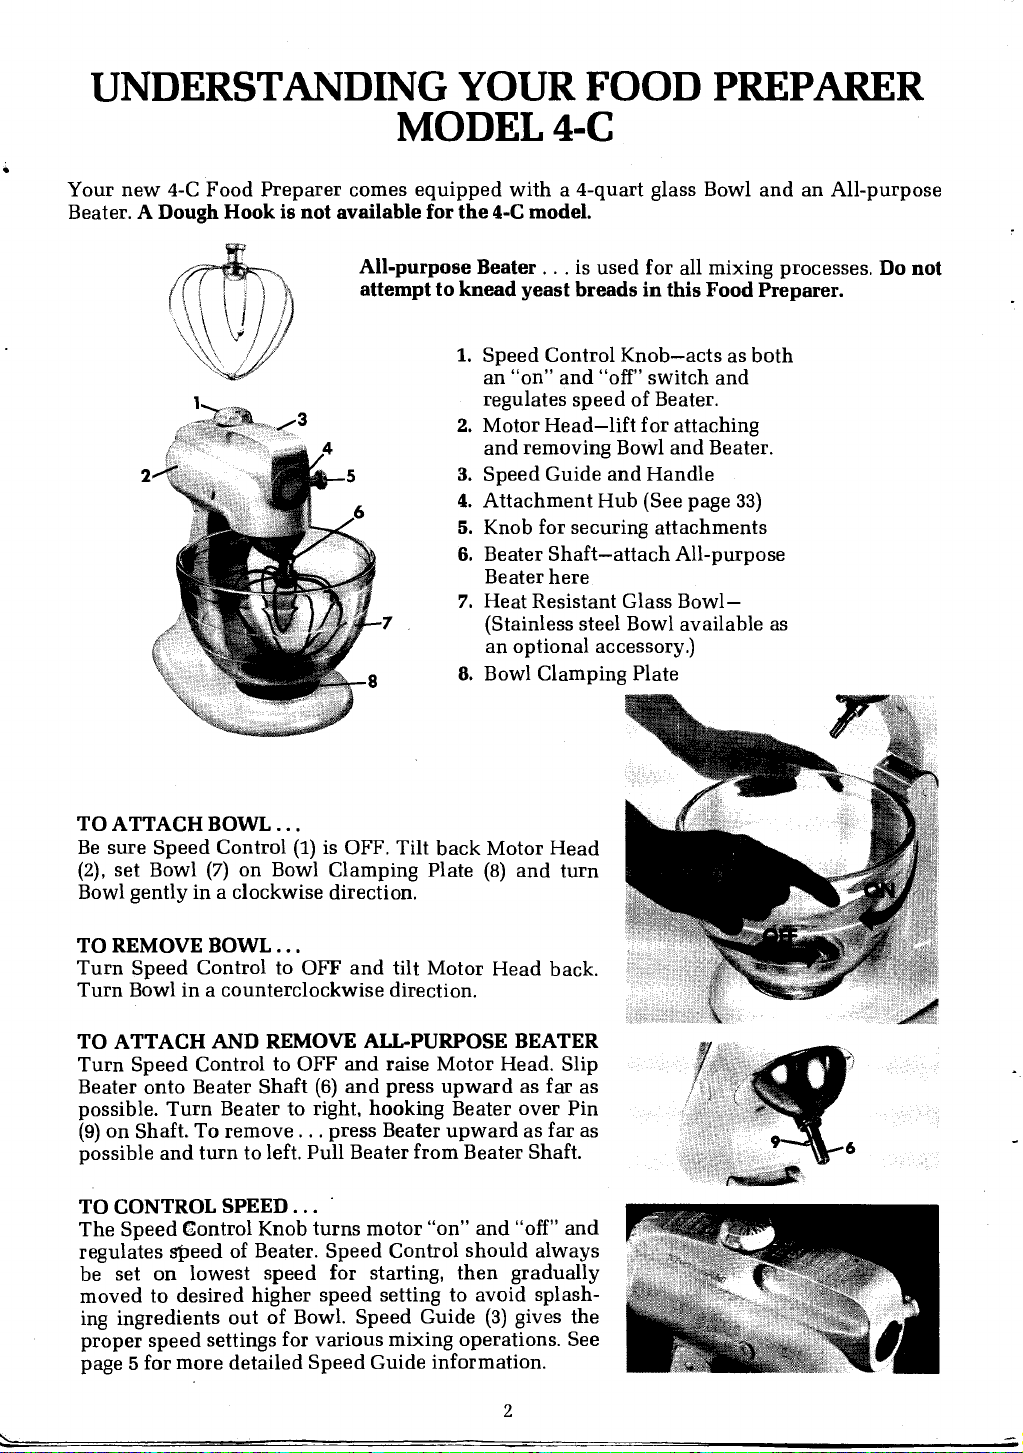
UNDERSTANDING YOUR FOOD PREPARER
MODEL 4-C
Your new 4-C Food Preparer comes equipped with a 4-quart glass Bowl and an All-purpose
Beater.
A Dough Hook is not available for the 4-C model.
All-purpose Beater. .
attempt to knead yeast breads in this Food Preparer.
1.
Speed Control Knob—acts as both
an "on" and "off" switch and
regulates speed of Beater.
2.
Motor Head—lift for attaching
and removing Bowl and Beater.
3.
Speed Guide and Handle
4.
Attachment Hub (See page 33)
5.
Knob for securing attachments
6.
Beater Shaft—attach All-purpose
Beater here
7.
Heat Resistant Glass Bowl—
(Stainless steel Bowl available as
an optional accessory.)
8.
Bowl Clamping Plate
TO ATTACH BOWL...
Be sure Speed Control (1) is OFF. Tilt back Motor Head
(2), set Bowl (7) on Bowl Clamping Plate (8) and turn
Bowl gently in a clockwise direction.
. is used for all mixing processes.
Do not
TO REMOVE BOWL...
Turn Speed Control to OFF and tilt Motor Head back.
Turn Bowl in a counterclockwise direction.
TO ATTACH AND REMOVE ALL-PURPOSE BEATER
Turn Speed Control to OFF and raise Motor Head. Slip
Beater onto Beater Shaft (6) and press upward as far as
possible. Turn Beater to right, hooking Beater over Pin
(9) on Shaft. To remove. . . press Beater upward as far as
possible and turn to left. Pull Beater from Beater Shaft.
TO CONTROL SPEED...
The Speed Control Knob turns motor "on" and "off" and
regulates steed of Beater. Speed Control should always
be set on lowest speed for starting, then gradually
moved to desired higher speed setting to avoid splash-
ing ingredients out of Bowl. Speed Guide (3) gives the
proper speed settings for various mixing operations. See
page 5 for more detailed Speed Guide information.
2
Page 6
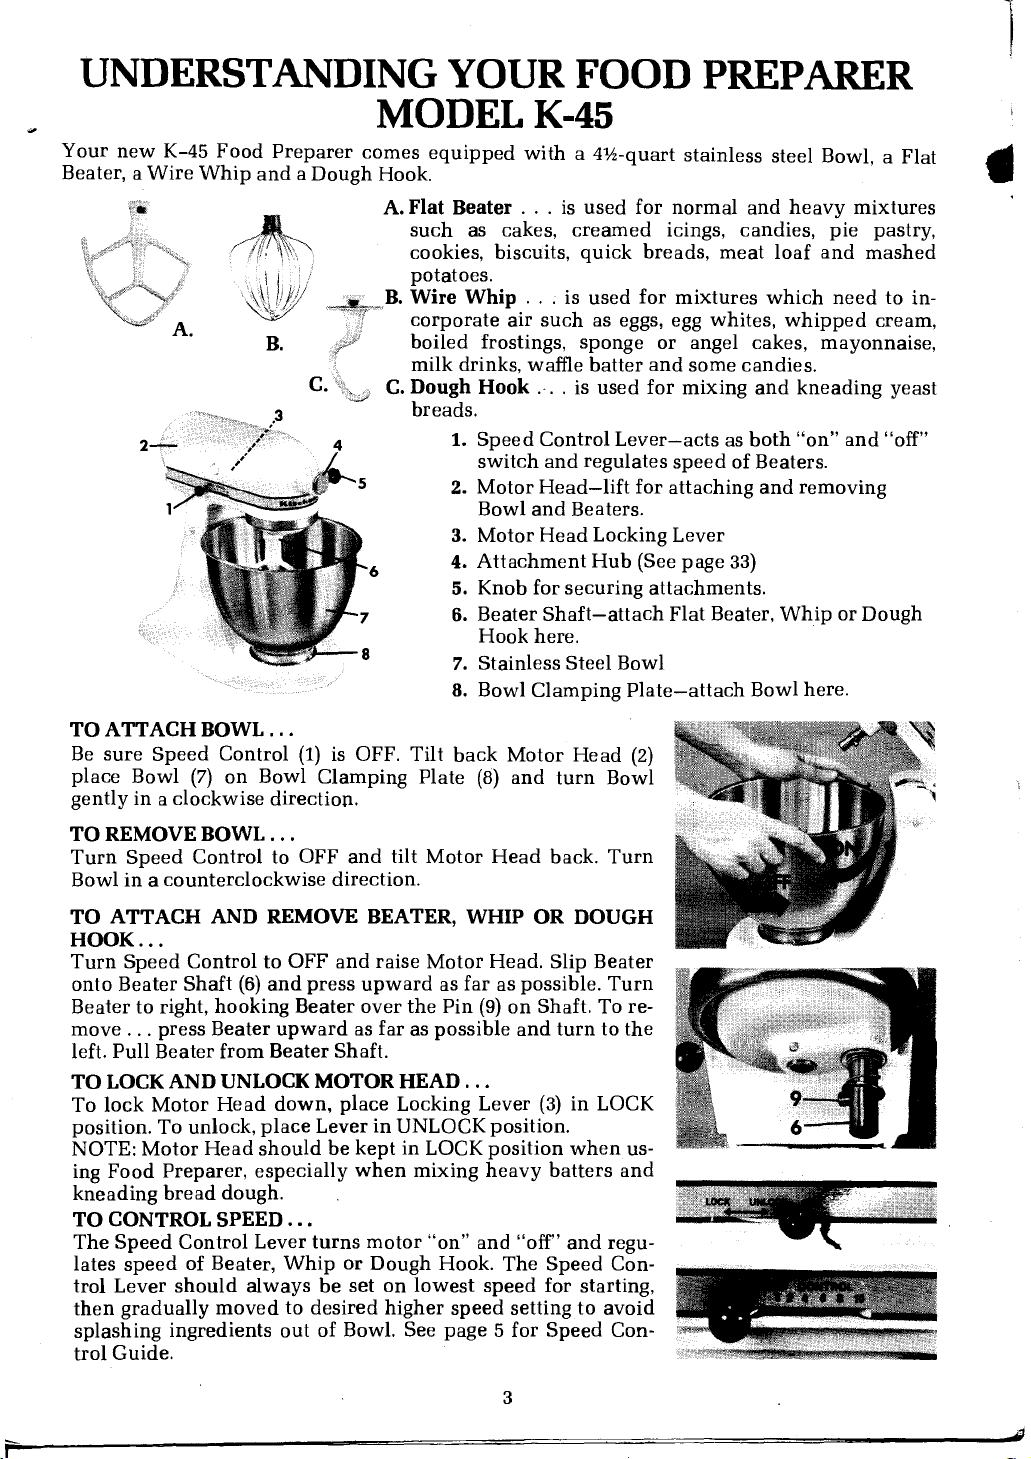
UNDERSTANDING YOUR FOOD PREPARER
MODEL K-45
Your new K-45 Food Preparer comes equipped with a
Beater, a Wire Whip and a Dough Hook.
Flat Beater . .
A.
such as cakes, creamed icings, candies, pie pastry,
cookies, biscuits, quick breads, meat loaf and mashed
potatoes.
Wire Whip . .
B.
corporate air such as eggs, egg whites, whipped cream,
boiled frostings, sponge or angel cakes, mayonnaise,
milk drinks, waffle batter and some candies.
Dough Hook- . . is used for mixing and kneading yeast
C.
breads.
1.
Speed Control Lever—acts as both "on" and "off"
switch and regulates speed of Beaters.
Motor Head—lift for attaching and removing
2.
Bowl and Beaters.
Motor Head Locking Lever
3.
Attachment Hub (See page 33)
4.
Knob for securing attachments.
5.
Beater Shaft—attach Flat Beater, Whip or Dough
6.
Hook here.
Stainless Steel Bowl
7.
8.
Bowl Clamping Plate—attach Bowl here.
1
/
2
4
-quart stainless steel Bowl, a Flat
. is used for normal and heavy mixtures
. is used for mixtures which need to in-
I
TO ATTACH BOWL
Be sure Speed Control (1) is OFF. Tilt back Motor Head (2)
place Bowl (7) on Bowl Clamping Plate (8) and turn Bowl
gently in a clockwise direction.
TO REMOVE BOWL
Turn Speed Control to OFF and tilt Motor Head back. Turn
Bowl in a counterclockwise direction.
TO ATTACH AND REMOVE BEATER, WHIP OR DOUGH
HOOK...
Turn Speed Control to OFF and raise Motor Head. Slip Beater
onto Beater Shaft (6) and press upward as far as possible. Turn
Beater to right, hooking Beater over the Pin (9) on Shaft. To
move. . . press Beater upward as far as possible and turn to the
left. Pull Beater from Beater Shaft.
TO LOCK AND UNLOCK MOTOR HEAD...
To lock Motor Head down, place Locking Lever (3) in LOCK
position. To unlock, place Lever in UNLOCK position.
NOTE: Motor Head should
ing Food Preparer, especially when mixing heavy batters and
kneading bread dough.
TO CONTROL SPEED
The Speed Control Lever turns motor "on" and "off" and regu-
lates speed of Beater, Whip
trol Lever should always be set on lowest speed for starting,
then gradually moved to desired higher speed setting to avoid
splashing ingredients out of Bowl. See page 5 for Speed Con-
trol Guide.
be kept
in LOCK position when us-
or
Dough Hook. The Speed Con-
re-
3
Page 7

UNDERSTANDING YOUR FOOD PREPARER
MODEL K5-A
Your new K5-A Food Preparer comes equipped with a 5-quart stainless steel Bowl, a Flat
Beater, a Wire Whip and a Dough Hook.
A.
Flat Beater. .
such as cakes, creamed icings, candies, pie pastry,
cookies, biscuits, quick breads, meat loaf and mashed
potatoes.
B.
A.
It
9
/
4
Wire Whip. .
corporate air such as eggs, egg whites, whipped
cream, boiled frostings, sponge or angel cakes, may-
onnaise, milk drinks, waffle batter and some candies.
C.
Dough Hook. .
breads.
. is used for normal and heavy mixtures
. is used for mixtures which need to in-
. is used for mixing and kneading yeast
1. Speed Control Lever— 5. Knob for securing attach-
acts as both "on" and
"off" switch and regu-
lates speed of Beaters.
2.
Motor Head—stationary
3.
Spring latch—secures
Bowl.
4.
Attachment hub (See
page 33)
TO RAISE AND LOWER BOWL
To Raise Bowl . . . Rotate Handle (9) back and up until it
snaps into the locked vertical position. Bowl must always
be in this raised, locked position when mixing. To Lower
Bowl. . . rotate Handle back and down.
TO ATTACH BOWL...
Be sure Speed Control (1) is OFF. Bowl Lift Handle
should be in the down position. Fit Bowl Supports (10)
over Locating Pins (8) and press down on back of Bowl
until Bowl Pin (11) snaps into Spring Latch (3). Raise
Bowl before beginning mixing process.
TO REMOVE BOWL...
Bowl Lift Handle should be in the down position. Lift
back of Bowl to remove Bowl Pin from Spring Latch. Lift
Bowl from Locating Pins.
TO ATTACH AND REMOVE BEATER, WHIP OR
DOUGH HOOK...
Turn Speed Control to OFF and lower Bowl. Slip Beater
on Beater Shaft (6) and press upward as far as possible.
Turn Beater to right, hooking Beater over the Pin (12) in
Shaft.
To remove. . . press Beater upward as far as possible and
turn to the left. Pull Beater from Beater Shaft.
TO CONTROL SPEED
Speed Control Lever turns motor "on" and "off" and
regulates the speed of the Beater, Whip or Dough Hook.
Speed Control should always be set on lowest speed for
starting, then gradually moved to desired higher speed
setting to avoid splashing ingredients out of Bowl. See
page 5 for Speed Control Guide.
ments
6.
Beater Shaft—attach Flat
Beater, Whip or Dough
Hook here.
7.
Stainless Steel Bowl
8.
Locating Pins
9.
Bowl Lift Handle
10.
Bowl Supports
11.
Bowl Pin
SPEED CONTROL
1 2 4
6 8
10 -
4
Page 8

SPEED
NUMBER
1
2
6
8
10
SPEED CONTROL GUIDE
ALL MODELS
STIRRING, FOLDING—Slow
mixing procedures. Use to add flour or other dry ingredients to a batter.. . to add
liquids to dry batter. . . to stir fruits and nuts into heavy batters. . . to crush fruit
or combine heavy mixtures. Use also as a "starting speed" after adding in-
gredients which may splash or spray. When ingredients are combined, a higher
speed may be used.
SLOW MIXING—Slow
heavy batters and candies. . . to start mashing of potatoes or other vegetables...
to cut shortening into flour . . . to beat thin or splashy batters. Use to mix and
knead yeast dough - Models K-45 and K5-A only. Attachments: Can Opener, Co-
lander and Sieve.
MIXING, BEATING—Medium fast beating or creaming, slow whipping. Use to
mix semi-heavy batters such as cookies. .. cream sugar and shortening.. . to add
eggs to cake mixtures . . . to whip frozen mixtures . . . to start whipping large
amounts of cream . . . to add sugar to egg whites for meringues. Attachments:
Food Grinder, Slicer/Shredder, Ice Cream Freezer.
BEATING, CREAMING—Fast
finish cake mixing, doughnuts and other batters. . . to whip large amounts of egg
whites, angel food cakes, whipped cream, egg yolks, sponge cakes, gelatine des-
serts, salad dressings. . . and as a final whipping speed for potatoes or other vege-
tables. Attachments: Juicer, Silver Buffer.
FAST BEATING, WHIPPING—Use
ing. Advance Speed Control
reached.
FAST WHIPPING—Use
especially when small quantities are used, such as
Advance Speed Control
reached. Attachments: Knife Sharpener, Silver Buffer.
NOTE: The Speed Control Lever can be set between the above speeds if a finer
adjustment is desired. The intermediate settings correspond to Speeds 3,
5,7,9.
beating or creaming, faster stirring, mashing. Use to beat
stirring, folding, combining, mashing, starting all
beating or creaming, medium fast whipping. Use to
to whip egg whites. . . to whip boiled frost-
gradually
for very fast whipping of foods mentioned for Speed 8,
gradually
through other speeds until Speed 8 is
1
egg white or
through other speeds until Speed 10 is
Y4
cup cream.
USE AND CARE TIPS
Adjusting Beater to Bowl:
tory so that the Beater just clears the bottom of the Bowl. Dough
Hook on the K-45 and K5-A is shorter than the Flat Beater. If for any
reason the Beater strikes the bottom of the Bowl or is too far away
from the Bowl, clearance can be corrected as follows:
Model 4-C—To
(arrow) to right. To lower the Beater, turn screw to left. Adjust
Beater level so it will just clear lower inner surface of Bowl.
Model
left to raise, and to the right to lower the Beater. Adjustment should
be made with Flat Beater so it will just clear lower inner surface of
Bowl.
Model
should be done by an authorized KitchenAid servicing outlet.
K-45—Lift Motor Head—Turn the screw (arrow) slightly to the
K5-A—Adjustment seldom required but when necessary
raise Beater, turn top screw at rear of mixer pedestal
The Food Preparer is adjusted at the fac-
5
Model 4-C
Model K-45
Page 9

CARE AND CLEANING
BE SURE TO UNPLUG FOOD PREPARER BEFORE CLEANING
Wipe Food Preparer with a damp cloth. DO NOT IMMERSE IN WATER. Wipe off Beater
Shaft frequently, removing any residue that may accumulate.
Bowls, Beaters, Wire Whips and Dough Hooks may be washed in an automatic dishwasher. Or
clean them thoroughly in hot sudsy water and rinse completely before drying.
Attachments should be washed in hot sudsy water, rinsed and dried thoroughly before storing.
Heat resistant glass Bowl may be used in the oven but should
units or gas burners.
Lubrication:
normal use as a household appliance.
Electrical Requirements:
A.C., 25 to 60 hertz house current.
Motor bearings are self-lubricating and should require no further attention under
Your KitchenAid Food Preparer operates on regular 110 to 120 volt
not
be placed on electric surface
HELPFUL HINTS
Your KitchenAid Food Preparer, with its Planetary Action (see page 7), accom-
plishes the desired mixing results in less time than other mixers.
be avoided.
KitchenAid Beaters are regulated to controlled speeds. Due to the shorter mixing
time required, and since eggs, flour and other ingredients differ, your own observa-
tions and experience will be needed. Watch the batter and beat only until it has the
desired appearance as described in the recipe—such as, "smooth and creamy." Once
you have adjusted your favorite recipes to the shorter KitchenAid mixing time, you
may want to note the new times on your recipes.
IMPORTANT:
Always start mixing on Speed 1. Use Speed 1 until ingredients have
been blended. Then
gradually
increase to desired speed setting.
Overheating must
The Bowl and Beaters are designed to provide thorough mixing
scraping. Usually, scraping the Bowl once, midway through the mixing process, is
sufficient.
The Food Preparer should
back (4-C and K-45) or lowering the Bowl (K5-A).
WARNING: Do not attempt to scrape Bowl while Food Preparer is running as this
could damage Beaters.
Should scraper or other object drop into Bowl, turn motor OFF before
removing.
While Food Preparer is operating, keep out of reach of children.
always
be turned OFF before tilting the Motor Head
6
without
frequent
Page 10

EXCLUSIVE
ROUND-THE-BOWL
MIXING...
Adding Ingredients
The standard procedure to follow when mixing most batters, especially cake and
cookie batters, is to add:
Cold Ingredients
It is a good idea to take cold ingredients out of the refrigerator approximately one hour
before mixing time.
Creaming..
Cream butter, margarine, shortening or cream cheese first, then add sugar, eggs, dry
ingredients and liquid, individually.
PLANETARY ACTION
ing, the Beater or Whip moves around the
is Exclusive with KitchenAid ... During mix-
stationary Bowl,
same time turning in the opposite direction on its own axis. Diagram
shows the complete mixing and coverage of Bowl made by path of
the Beater.
Your KitchenAid Food Preparer will mix faster and more thor-
oughly than other electric mixers and, therefore, the mixing time
specified in most recipes must be reduced to avoid overheating.
MIXING TIPS
1/3
dry ingredients
½ liquid ingredients
1/3
dry ingredients
1/2
liquid ingredients
1/3
dry ingredients
. Ingredients should be at room temperature for best results in creaming.
at the
Eggs . .
. When eggs are to be separated, you may find them easier to separate cold.
Then allow them to warm to room temperature. If cold eggs from the refrigerator are
added to creamed butter and sugar, the mixture may curdle. When whole eggs are
specified, each egg should be completely beaten into the mixture, separately, to avoid
breaking down the emulsion. Fresh eggs require more beating than storage eggs.
Adding Nuts, Raisins or Candied Fruits...
Solid materials are folded in last with a few seconds of mixing on Speed 1. The batter
should be thick enough to prevent the fruit or nuts from sinking to the bottom of the
pan while baking. Sticky fruits should be dusted with flour to prevent them from stick-
ing together.
Liquid mixtures...
Mixtures containing large amounts of liquid ingredients should be mixed at lower
speeds to avoid splashing. Increase speed only after mixture has thickened.
Whipping egg whites
An accumulation of oil or detergent on Bowl will prevent proper whipping of egg
whites. Bowls should either be dishwasher washed or thoroughly washed by hand in
hot sudsy water, rinsed completely with hot water and thoroughly dried.
7
Page 11

•
Banana Nut Bread
•
Cream Puffs
&
Vanilla Custard Filling
•
Bran Muffins
Eclairs
BAKED
TREATS
•
Basic Noodle Dough
•
Baking Powder Biscuits
•
Apple Crumb Coffee Cake
Banana Nut Bread, Cream Puffs & Eclairs
BANANA NUT BREAD
1/3
cup shortening
cup sugar
½
2 eggs
cup sifted flour
1
3
/
4
1 teaspoon baking
powder
Place shortening and sugar in Bowl; attach
Bowl and Beater. Beat at Speed 6 for
ute. Stop and scrape Bowl. Beat 1 minute
more at Speed 6, then turn to Speed 4 and
add eggs. Beat 30 seconds. Stop and scrape
teaspoon soda
½
1
/
2
teaspoon salt
1 cup mashed ripe
bananas
½ cup chopped
walnuts
1
min-
Bowl. Turn to Speed 6 for 1½ minutes. Stop.
Sift together flour, baking powder, soda and
salt. Turn to Speed 1 and add half of ba-
nanas, half of flour mixture, remaining ba-
nanas, then remaining flour mixture; mixing
30 seconds after each addition. Stop and
scrape Bowl. Blend walnuts in on Speed 1,
about 15 seconds.
1
/
2
Pour in greased and floured 9
loaf pan. Bake at 350°F. for 40 to 45 minutes.
Remove from pan and cool on rack.
Yield:
1
loaf
8
X5X3-inch
Page 12

CREAM PUFFS
1 cup water
1/2 cup butter or
margarine
1/4 teaspoon salt
1 cup sifted flour
*VANILLA CUSTARD
FILLING
1/3
cup sugar
1 tablespoon flour
1 tablespoon corn
starch
1/4 teaspoon salt
1½
4 large eggs
* Vanilla Custard
Filling
Confectioners'
sugar
cups milk
In a saucepan, combine sugar, flour, corn-
starch and salt. Gradually stir in milk. Cook
and stir until mixture thickens and boils;
cook and stir 2 to 3 minutes longer.
1 egg yolk, slightly
beaten
1 teaspoon vanilla
½ cup whipping
cream, whipped
In a sauce pan, heat water, butter and salt to
full rolling boil. Reduce heat and quickly
stir in flour, mixing vigorously with a
wooden spoon until mixture leaves the sides
of the pan in a ball. Remove from heat.
Attach Bowl and Beater and add flour mix-
ture to Bowl. Turn to Speed 2 and add eggs,
one at a time, beating approximately 30 sec-
onds after each addition. Scrape Bowl and
Beater. Mix at Speed 4 for 15 seconds.
**D
rop
dough from metal mixing spoon
onto greased cookie sheet, or squeeze
through pastry tube into any desired shape,
forming mounds 3 inches apart.
Bake at 400°F. for 10 minutes. Lower heat to
350°F. and bake for 25 minutes. Puffs are
ready when doubled in size, golden brown,
and firm to touch. Remove puffs from oven
and cut the side of each with a sharp knife.
Put them back into the turned-off oven.
Keep oven door ajar and let stand for 10
minutes. Cool puffs on racks. Slit top; fill
with Vanilla Custard Filling. Sprinkle with
confectioners' sugar.
Yield: 12 large or 16 medium cream puffs
**F
or
Eclairs
Force mixture through pastry tube or shape
with spatula into 16 fingers, 1 x 4 inches.
Bake on greased cookie sheets at 400°F. for
40 to 45 minutes. Remove at once to racks
and cool away from drafts. Split, fill with
Vanilla Custard Filling. Top with Chocolate
Icing (see page 16). Store in refrigerator.
Stir a little hot mixture into egg yolk; return
to hot mixture. Cook and stir until mixture
just boils. Add vanilla; cool. Beat smooth;
fold in whipped cream.
BRAN MUFFINS
1 cup boiling
water
1 cup bran
Rakes
1/2
cup shortening
1 cup brown sugar
1/2
cup sugar
2 eggs
2 cups buttermilk
Pour boiling water over bran flakes. Let
stand. Place shortening, brown sugar and
sugar in Bowl. Attach Bowl and Beater.
Turn to Speed 4 and cream for 2 minutes.
Add eggs and continue mixing on Speed 4
for 30 seconds. Add buttermilk and continue
on Speed 4 for 1 minute. Stop and scrape
Bowl.
Sift together flour, soda, baking powder and
salt. Gradually add to sugar mixture on
Speed 1, about 30 seconds. Turn to Speed 4
for 1 minute. Stop. Add vanilla, All-Bran or
Bran Buds and bran flakes which have been
soaking in the boiling water. Turn to Speed
1 and mix 30 seconds or until all ingredients
are mixed. Stop.
Store in tightly covered jars or plastic con-
tainers in the refrigerator. Bake in greased
muffin tins at 400°F. for 20 minutes. Add
dates, raisins or nuts as desired.
2½
cups flour
2/2 teaspoons soda
1 teaspoon baking
powder
teaspoon salt
½
1 teaspoon vanilla
2 cups All-Bran or
Bran Buds
Cereal
Yield: 12 large or 16 medium eclairs
This makes about
for 6 weeks in the refrigerator.
Yield: 2
9
dozen muffins
1
/
2
21/4
quarts and will keep
Page 13

BASIC NOODLE DOUGH
2 eggs
1/2
teaspoon salt
1/4
inch thick. Sepa-
1½ cups sifted flour
Sift flour and salt into Bowl. Drop in eggs.
Attach Bowl and Beater. Mix on Speed 2 un-
til mixture becomes a very stiff paste, about
45 seconds. If it is too moist, more flour must
be added. (You may want to scrape Bowl
and Beater half way through the mixing
time.) Divide dough into halves and roll into
two balls.
Put floured tablecloth or pastry cloth on
wooden board or marble, wooden or enamel
kitchen table. Place dough on cloth and with
floured rolling pin, roll very thin. Turn
dough often, rolling it first on one side, then
on the other, flouring cloth and rolling pin
occasionally. Roll up dough tightly into a
long roll and, with a sharp knife, cut into
crosswise slices about
rate and unroll slices. Place in 200°F. oven
for 30 minutes to 1 hour to dry out. Store in
ajar.
To Cook: Cook in boiling, salted water for 20
to 25 minutes or until tender.
Yield: About 8 ounces
BAKING POWDER BISCUITS
2 cups sifted
flour
1 teaspoon salt
Sift flour, salt and baking powder into Bowl.
Cut shortening into 4 to 5 pieces and drop in
Bowl; attach Bowl and Beater. Turn to
Speed 1 and cut shortening in, about
ute. Stop and scrape Bowl.
h cup milk
2
4 teaspoons bak-
ing powder
1/3
cup shortening
1
min-
APPLE CRUMB COFFEE
CAKE
*
Crumb Topping
½ cup butter or
margarine,
softened
½ cup sugar
½ teaspoon salt
1/4
cup warm water
(105°F. to 115
0
F.)
1 package active
dry yeast
Prepare Crumb Topping and set aside. Place
butter in Bowl; attach Bowl and Beater. Beat
at Speed 6 until butter is consistency of
mayonnaise, about 2 minutes. Stop and
scrape Bowl.
Turn to Speed 1 and add sugar and salt
gradually, about 30 seconds. Increase to
Speed 6 and beat until light and creamy,
about 21/
2
minutes. Stop and scrape Bowl.
Dissolve yeast in warm water. Add yeast
mixture, eggs and milk to butter mixture.
Gradually turn to Speed 6 and beat until
well blended, about 1 minute. Turn to Speed
2 and gradually add flour, about 1 minute.
Turn to Speed 6 for 1 minute. Stop.
Spread batter in greased and floured 9-inch
square cake pan. Arrange apples over dough
and sprinkle with Crumb Topping. Cover;
let rise in a warm place, free from draft, un-
til doubled in bulk, about 1 hour.
Bake at 375°F. for 35 to 40 minutes. Remove
from pan and serve warm or allow to cool
on rack.
Yield: One 9-inch coffee cake
3 eggs at room
temperature
1/4
cup milk at
room
temperature
21/
3
cups flour
3 medium
apples, sliced
Add milk and mix on Speed
1
about 45 sec-
onds or until dough starts to cling to Beater.
Avoid overheating. Stop. Turn dough onto
lightly floured board. Knead dough lightly
until smooth, about 20 seconds. Pat or roll to
1/2
inch thickness. Cut with 2-inch biscuit
cutter.
Place biscuits on greased baking sheets and
brush with melted butter or margarine. Bake
at 450°F. for 12 to 15 minutes. Remove and
serve immediately.
Yield: 1 dozen biscuits
*
CRUMB TOPPING
~ cup sugar
½ cup flour
2 teaspoons
cinnamon
6 tablespoons butter or margarine
Combine all ingredients in Bowl; attach
Bowl and Beater. Mix on Speed 2 about 2
minutes or until mixture is crumbly.
10
Page 14

•
Quick Plain Cake
•
Standard Plain Cake
•
Easy White Cake
•
Walnut Cake
CAKES
•
Chocolate Cake
•
Old Fashioned Pound Cake
•
Chocolate Pound Cake
•
Angel Food Cake
QUICK PLAIN CAKE
11/
cups sifted
2'/4
cake flour
3 teaspoons bak-
ing powder
1
teaspoon salt
Sift dry ingredients into Bowl. Add shorten-
ing, % cup milk and vanilla. Attach Bowl
and Beater. Turn to Speed 2 and beat 1 min-
ute. Stop.
Add remaining milk and eggs. Turn to
Speed 2 and beat 30 seconds. Stop and
scrape Bowl. Turn to Speed 6 and beat 1
minute.
Pour batter into 2 greased and floured 8 or
9-inch cake pans. Bake at 375°F. for 25 min-
utes or until done. Allow to cool before
frosting.
Yield: One 2-layer cake
STANDARD PLAIN CAKE
3
cups sifted cake
flour
2½ teaspoons bak-
ing powder
1
teaspoon salt
½ cup plus
tablespoons
shortening
Sift together dry ingredients. Place shorten-
ing and sugar in Bowl and attach Bowl and
Beater. Gradually turn to Speed 4 and beat
for 1 minute. Stop and scrape Bowl. Return
to Speed 4 and beat for 1 minute more. Add
eggs, one at a time, beating 30 seconds after
each addition. Stop and scrape Bowl. Return
to Speed 4 and beat until mixture is light
and fluffy, about 1 minute.
Turn to Speed 1 and add a third of the dry
ingredients, half of milk and vanilla, a third
of the dry ingredients, remaining milk and
vanilla and remaining dry ingredients, beat-
ing 15 seconds after each addition. Stop and
scrape Bowl. Turn to Speed 4 and beat 15
seconds. Stop.
Pour batter into 2 greased and floured 9-inch
cake pans. Bake at 350°F. for 35 to 40 min-
utes. Allow to cool before frosting.
Yield: One 2-layer cake
2
3
cups sugar
½ cup shortening
1
cup milk
1
teaspoon vanilla
2
eggs
13/
4
cups plus
tablespoons
sugar
2
eggs
11/4 cups milk
11/
2
teaspoons
vanilla
2
EASY WHITE CAKE
cups sifted cake
3
Hour
cups sugar
3
/
1
4
3 teaspoons bak-
ing powder
Sift dry ingredients into Bowl. Add shorten-
ing and 1 cup milk. Attach Bowl and Beater.
Gradually turn to Speed 6 and beat for 1
minute or until smooth. Stop and scrape
Bowl. Add egg whites, remaining milk and
vanilla. Beat on Speed 6 for 1 minute or un-
til smooth and fluffy. Pour into 2 greased
and floured 8 or 9-inch cake pans. Bake at
350°F. for 35 minutes or until done. Allow to
cool before frosting.
Yield: One 2-layer cake
WALNUT
9 eggs, separated
1½ cups sugar
2 teaspoons
vanilla
~
cup sifted cake
flour
Place egg whites in Bowl. Attach Bowl and
Whip. Gradually turn to Speed 8 and whip
until Soft Peaks form (see page 18), about 1
minute, 45 seconds. Gradually add
sugar and continue whipping until very stiff
peaks form, about 1 minute, 15 seconds.
Stop. Transfer egg whites to another large
bowl.
Combine egg yolks, remaining sugar and va-
nilla in Bowl. Attach Bowl and Whip. Beat
on Speed 6 until thick and lemon colored,
about 1 minute. Stop and scrape Bowl. Add
flour, cinnamon and salt and whip on Speed
2 about 30 seconds or until mixed. Stop and
scrape Bowl. Beat on Speed 2 for 15 seconds
longer.
Fold batter gently into egg whites with a
spatula. Then fold in walnuts. Pour into an
ungreased 10-inch tube pan. Bake at 350°F.
for 55 to 65 minutes or until done. Invert pan
and cool completely before removing cake.
Yield: One 10-inch cake
teaspoon
½
1 cup shortening
1½ cups milk
3 egg whites
teaspoon vanilla
1
CAKE
2 teaspoons
cinnamon
1 teaspoon salt
2 cups finely
chopped
walnuts
salt
3
/
4
cup
11
Page 15

CHOCOLATE CAKE
2 cups sifted cake
flour
1 teaspoon baking
powder
½ teaspoon soda
1 teaspoon salt
1
1
/
3
cups sugar
1
/
2
cup shortening
Sift dry ingredients into Bowl. Add shorten-
ing, % cup milk and vanilla. Attach Bowl utes or until done. Allow to cool before
and Beater. Turn to Speed 2 and beat 1 min-
ute. Stop and scrape Bowl. Beat on Speed 2
for 1 minute more. Stop.
1 cup milk
1 teaspoon vanilla
2 eggs
2 ounces (2
squares)
unsweetened
chocolate,
melted
Add remaining milk, eggs and chocolate.
Turn to Speed 2 and beat for 30 seconds.
Stop and scrape Bowl. Turn to Speed 6 and
continue beating 1 minute. Stop.
Pour batter into 2 greased and floured 8 or
9-inch cake pans. Bake at 375°F. for 25 min-
frosting.
Yield: One 2-layer cake
12
Page 16

OLD FASHIONED POUND
CAKE
10 eggs, separated
1 pound sweet
butter
1 teaspoon vanilla
Place egg whites in Bowl. Attach Bowl and
Whip. Gradually turn to Speed 8 and whip
until egg whites are Stiff But Not Dry (see
page 18). Stop. Remove whites from Bowl.
Place butter and flour in Bowl. Attach Bowl
and Whip. Gradually turn to Speed 2 and
beat 2
minutes. Stop and scrape Bowl. Re-
1
/
2
turn to Speed 2 and continue beating 2
minutes. Stop. Remove butter and flour mix-
ture from Bowl, keeping separate from egg
whites.
Place egg yolks, sugar and vanilla in Bowl.
Attach Bowl and Whip. Beat on Speed 4 for
2 minutes. Stop and scrape Bowl. Turn to
Speed 6 and beat 1 minute. Stop.
41/4
cups sifted, self-
rising flour
2 cups sugar
Turn to Speed 1 and add eggs, one at a time,
beating 15 seconds after each addition. Add
light cream and beat 15 seconds. Turn to
Speed 4 and beat 15 seconds more. Stop.
Pour batter into a well-oiled 10-inch tube
pan and bake at 325°F. for 1 hour, 40 min-
utes or until done. Cool cake completely be-
fore removing from pan. Do not invert pan.
Yield: One 10-inch cake
ANGEL FOOD CAKE
1½ cups sifted cake
1
/2
flour
1% cups sugar
1½ cups egg whites
(12 to 15 eggs)
Sift flour once and measure; sift again three
times with
1/3
cup of the sugar. Sift remain-
ing sugar; keep separate from flour-sugar
mixture.
1/4
11/
z
teaspoons cream
1
1
/
2
teaspoons
teaspoon salt
of tartar
flavoring
Add butter and flour mixture to egg yolk
mixture. Gradually turn to Speed 4 and beat
5 minutes. Stop and scrape Bowl. Add
beaten egg whites. Mix on Speed 2 until
mixed in, about 1 minute. Turn to Speed 4
and beat 10 minutes. If necessary, stop and
scrape Bowl half way through this mixing
process.
Pour batter into a greased and floured 10-
inch tube pan. Drop pan to remove air bub-
bles. Bake at 325°F. for 1 hour, 20 minutes or
until done. Cool cake completely before re-
moving from pan. Do not invert pan.
Yield: One 10-inch cake
CHOCOLATE POUND CAKE
3 cups sifted cake
Hour
3 cups sugar
1 cup cocoa
3 teaspoons bak-
ing powder
1 teaspoon salt
Sift dry ingredients into Bowl. Make a well
in the center and add softened butter, milk
and vanilla. Attach Bowl and Beater. Turn
to Speed 1 for 1 minute or until mixed. Stop
and scrape Bowl. Turn to Speed 6 and beat 5
minutes. Stop and scrape Bowl.
1 cup butter,
softened
1½
cups milk
3 teaspoons
vanilla
3 eggs
1/4
cup
light cream
Place egg whites in Bowl. Attach Bowl and
Whip. Turn gradually to Speed 6 and whip
until whites are Frothy (see page 18), about
20 to 30 seconds. Stop.
Add salt, cream of tartar and flavoring. Turn
to Speed 6 and continue whipping until
whites are almost Stiff But Not Dry, about 2
to 2
1
/
2
minutes.
Turn to Speed 2, and add sifted sugar gradu-
ally, about 1 minute. Stop and scrape Bowl.
Turn to Speed 6 and whip 5 seconds. Stop.
Remove Bowl. Sift about a quarter of the
flour-sugar mixture over the batter. Very
gently fold in with a spatula, making 10 to 12
strokes. Repeat until all flour is gently
folded in.
Pour into ungreased 10-inch tube pan. Bake
at 375°F. for 35 minutes. Let cool in inverted
pan for 1 hour.
Yield: One 10-inch cake
13
Page 17

COOKIES AND BROWNIES
•
Spiced Oatmeal Cookies
•
Butterscotch Refrigerator Cookies
•
Sugar Cookies
•
Brownies
SPICED OATMEAL COOKIES
1
1
/
2
cups flour
2 teaspoons bak-
ing powder
teaspoon salt
½
2 teaspoons
cinnamon
1 teaspoon ground
cloves
In a separate bowl, sift together flour, bak-
ing powder, salt and spices. Add oatmeal.
Place shortening in Bowl. Attach Bowl and
Beater. Turn to Speed 6 and beat until
shortening is consistency of mayonnaise,
about 2 minutes. Gradually add sugar, about
1
minute, and continue beating until light
and creamy, about 2 minutes. Add egg and
beat about 30 seconds. Stop and scrape
Bowl.
Turn to Speed
ternately with milk in this way: add half of
dry ingredients, all liquid, and remaining
dry ingredients, mixing 10 to
ter each addition. Stop and scrape Bowl.
Turn to Speed
seconds.
Drop by teaspoonfuls on greased baking
sheet. Bake at 350°F. for 20 minutes. Remove
from sheet immediately.
Yield: 3 dozen cookies
REFRIGERATOR COOKIES
cups sifted flour
2/4
2 teaspoons bak-
jug powder
½ teaspoon salt
½ cup shortening
Sift flour, baking powder and salt into Bowl.
Cut shortening into
Bowl. Add sugar, eggs and vanilla. Attach
Bowl and Beater. Turn to Speed
until ingredients are combined, about 30
seconds. Stop and scrape Bowl.
½ teaspoon ground
ginger
i% cups oatmeal
cup shortening
½
1 cup brown sugar
1 egg
cup milk
½
1
cup seeded
raisins
1
and add dry ingredients al-
15
seconds af-
1
and add raisins, about 15
BUTTERSCOTCH
2 cups brown
- sugar
2 eggs
teaspoon vanilla
1
½ cup chopped
walnuts
5
pieces and drop in
4
or
and stir
1
Turn to Speed 2 and beat until ingredients
are thoroughly combined, about 2 minutes.
Add nuts. Turn to Speed
seconds. Stop.
Form into 2 rolls about 2
ter. Wrap in waxed paper, and chill. When
ready to bake, slice off as many cookies as
desired, ½ to
apart on ungreased baking sheet. Bake at
400°F.
sheet immediately.
Yield:
for 8 to
4
dozen cookies
11
/
4
inch thick. Place
10
1
and stir about 30
1
/
2
inches in diame-
1/2
minutes. Remove from
SUGAR COOKIES
1
cup butter or
margarine
1
teaspoon
vanilla
3/4
cup sugar
2 eggs, well beaten
Put butter and vanilla in Bowl. Attach Bowl
and Beater. Turn to Speed 6, creaming to
make smooth mixture, about 2 minutes.
Gradually add sugar, about 30 seconds. Con-
tinue beating 1 minute. Add eggs and con-
tinue beating for 30 seconds. Stop and
scrape Bowl.
Sift dry ingredients together. Turn to Speed.
1 and gradually add dry ingredients until
thoroughly mixed, about
Drop, by teaspoonfuls, on greased baking
sheet (3 inches apart). Bake at
8 minutes. Sprinkle with sugar while still
hot.
Yield:
4
dozen cookies
2
cups flour
I
teaspoon cream
of tartar
½
teaspoon soda
1/4
teaspoon nutmeg
1/
4
teaspoon salt
Sugar
1
minute. Stop.
400°F.
for 6 to
inch
14
Page 18

Sugar Cookies and Brownies
BROWNIES
1 cup butter or
margarine, soft-
ened
4 ounces (4
squares)
unsweetened
chocolate
1/2
Melt
cup of butter with chocolate; cool.
Add remaining butter and sugar to Bowl. At-
tach Bowl and Beater. Turn to Speed
30
seconds, then increase to Speed 6 and
cream for 2 minutes. Stop and scrape Bowl.
Turn to Speed
4
beating 15 seconds after each addition. Add
2 cups sugar
3 eggs
1 teaspoon vanilla
1 cup sifted flour
teaspoon salt
½
1 cup chopped
nuts
and add eggs, one at a time,
2
for
vanilla and continue on Speed
4 for 15
onds longer. Stop and scrape Bowl.
Add melted and cooled butter and choco-
late. Turn to Speed
2
for
30
seconds. Stop.
Add flour, salt and nuts and mix on Speed I
until well blended, about
30
seconds.
Pour into a greased and floured
inch pan. Bake at
350°F.
for
Cool in pan and cut into small squares.
Yield: 5 dozen brownies
S
15
13X9X2-
45
minutes.
sec-
Page 19

Fudge and Penuche
Speedy KitchenAid Frosting
PENUCHE
Butter
1½
cups granulated
sugar
1 cup brown sugar
1/3
cup light cream
1/3
cup milk
Butter sides of a heavy 2-quart saucepan. In
it, combine sugars, cream, milk and butter.
Heat over medium heat, stirring constantly,
until sugars dissolve and mixture comes to a
boil. Cook to soft ball stage (238°F.), stirring
2
tablespoons but-
ter or margarine
1
teaspoon vanilla
cup chopped
½
walnuts or
pecans
only if necessary. Immediately remove from
heat and cool to lukewarm (110°F.).
stir.
Pour into Bowl and add vanilla. Attach
Bowl and Beater. Gradually turn to Speed 2
and beat about 5 minutes or until candy be-
comes very thick and starts to lose its gloss.
Quickly stir in nuts on Speed 1 and spread
in buttered shallow pan. Score while warm;
cut when firm.
17
Do not
Page 20

KITCHENAID SPECIALTIES
•
Whipped Cream
Egg Whites
•
•
Mayonnaise
Mashed Potatoes
•
white is whipped on Speed 10, while a
WHIPPED CREAM
It is advisable to use whipping cream at
least one day old. If cream is too fresh, it
will not whip well. Chill both cream and
Bowl.
Pour cream into Bowl. Attach Bowl and
Whip.
for amount to be whipped, and whip to de-
sired stage (see chart below). Note: for 1 pint
of cream, start the whipping on Speed 4 un-
til cream starts to thicken, then increase to
Speed 6 and whip to desired stage.
Gradually
Amount
1 pint
1 cup
½ cup
¼ cup
turn to Speed designated
SPEED CHART
4, then
Speed
gradually
gradually
grauallf'tb
gradually
to 6
to 6
to 10
larger quantity of egg whites, such as for
Angel Food Cake, is whipped on Speed 6.
Until you are familiar with the machine, it is
advisable to use slightly slower Speeds.
Whip on Speed 6 until whited Begin To
Hold their Shape, then turn to Speed 4, and
continue whipping to the desired stage; Soft
Peak, Stiff, etc.
Add salt, cream of tartar or flavoring, as in
Meringue or Angel Food Cake, immediately
after the whites have been whipped to the
Frothy stage. Or put in the Bowl with the
whites in the beginning. When sugar is to be
added, as in Meringue, it may be added on
Speed 4 when Soft Peaks begin to form.
WHIPPING STAGES
Frothy:
apparent.
Large air bubbles of uneven size are
WHIPPING STAGES
Cream Begins To Thicken:
custard-like consistency. At this stage, it is
used in making refrigerator iccream.
Holds Its Shape:
removed from the cream; cream forrps sçft
peaks. At this stage, its used to foN,Jo
other ingredients in making of desserts and
sauces.
Cream stands in sharp. stiff peaks and
Stiff:
holds its shape. At this stage. it is used as a
topping on cake or desserts, or as a filling for
cream puffs or eclairs.
Cream varies in whipping time. Since it is
just a matter of secondThpt minutes be-
tween whipping stages, "tch the cream
while it is whipping. DO NOT OVERWHIP.
Whip leaves marksvhen
Cream i a thick,
EGGWH
Place egg whites in freshl7c1eaned and
dried Bowl. Attach Bowl and Whip.
ally
turn to Speed 8, and whip to the desired
point (see Whipping Stages). A single egg
Gradu-
Begin To Hold Shape:
and close together, and whole product
seems whiter. The Whip leaves marks when
. removed from the whites.
Soft Peak:
are so soft the tips will bend over.
Almost Stiff: This stage may be rather diffi-
cult to identify at first but it is readily des-
cernable with a little practice. After whites
have passed Soft Peak, they will begin to
stanaLin sharply pointed peaks, but will still
be clWte soft. This is the stage cook books
,usually des%ribe as "stiff but whites will
flow from bowl when bowl is tipped."
Stiff BuøNot Dry:
sIp1y pointed peaks, but are still a uni-
form white color and glisten.
tiff And Dry:
peaks; product will be speckled with white
spots and have a dull appearance.
Stop machine and lift Whip, or dip out a
small spoonful of whites, to observe stages.
Whites will stand in peks, but
Whites stand in stiff, sharp
Air bubbles are fine
Whites stand in stiff,
18
Page 21

Adding oil to Mayonnaise
MAYONNAISE
2 egg yolks
1
teaspoon
sugar
1 teaspoon dry
mustard
1/4 teaspoon
paprika
Place egg yolks, sugar, mustard, paprika and
salt in chilled Bowl. Attach Bowl and Whip.
Turn to Speed 6 and whip until thoroughly
blended, about 30 seconds. Add vinegar
very slowly, continuing on Speed 6 about 30
seconds longer. Stop
Return to Speed 6 and add '/ cup oil,
at a time, about 3
maining oil, 1 tablespoon at a time, whip-
ping 10 to 15 seconds after each addition or
until oil is completely incorporated. Contin-
uing on Speed 6, gradually add lemon juice,
about 30 seconds, and whip 30 seconds
longer.
Yield: 2 cups
1 teaspoon
2 tablespoons
vinegar
2 cups olive oil or
vegetable oil
tablespoons
2
lemon juice
scrape Bowl.
and
minutes. Then add re-
1
/
2
salt
1
drop
NOTE: If mayonnaise curdles, beat 1 egg
yolk with 1 tablespoon combined
water and vinegar and slowly add
the curdled mixture, beating on
Speed 4.
MASHED POTATOES
5
large, hot,
boiled
potatoes
cup milk, heated
%
Warm Bowl and Beater by rinsing in hot
water and then dry both. Put boiled potatoes
in Bowl. Break up potatoes using fork. At-
tach Bowl and Beater. Turn to Speed 2. Very
gradually turn to Speed 4 and beat until
smooth, about
milk, butter and seasonings. Turn gradually
to Speed 4 and beat until milk is absorbed,
about 15 seconds Turn gradually to Speed 6
and continue beating until fluffy, about 1
minute. Stop.
1
2 tablespoons but-
ter or margarine
1 teaspoon salt
Pepper
minute. Stop. Add heated
19
Page 22

PIES & PASTRY
•
Pie Crust Pastry
•
Apple Pie
•
Vanilla Cream Pie
(variations for Chocolate, Coconut,
Banana)
•
Pumpkin Pie
•
Lemon Chiffon Pie
PIE CRUST PASTRY
One 10-inch Pastry
Shell
1
11/2
cups flour
½ teaspoon salt
½ cup shortening
3 to 4 tablespoons
cold water
Sift flour and salt into Bowl. Cut shortening
into 4 or 5 pieces and drop in Bowl. Attach
Bowl and Beater. Turn to Speed 1 and stir
until lumps of flour-covered fat are the size
of small peas, about 1 minute. Add water, 1
tablespoon at a time, until all particles are
moistened, about 10 to 15 seconds. Use only
enough water to make pastry form a ball.
Stop.
Chilling in refrigerator at least 10 minutes
before rolling out adds to ease of handling.
Roll to
board, and proceed as usual in making pie
crust.
1/
inch thickness on a lightly floured
Two 8 or 9-inch
Pastry Shells
OR
One 8 or 9-inch
Double Crust
21/4
cups flour
3
/4 teaspoon salt
3/4
cup shortening
5 to 6 tablespoons
cold water
APPLE PIE
6 to 8 tart apples,
pared, cored and
thinly sliced (6
cups
)*
1 tablespoon
lemon juice
(optional)
1 cup sugar
2 tablespoon flour
1 teaspoon
cinnamon
If apples are bland, sprinkle with 1 table-
spoon lemon juice to add tartness. Combine
sugar, flour, spices and salt; mix with apples.
Line 9-inch pie plate with half of pastry. Fill
with apple mixture; dot with butter. Roll out
remaining crust and place on top of pie, cut-
ting slits for steam to escape; seal edges.
Sprinkle with sugar. Bake at 400°F. for 50
minutes or until done.
1/f
teaspoon
nutmeg
1/
teaspoon salt
Pastry for
Double Crust
9-inch pie
2 tablespoons
butter or margarine
Sugar
To bake for unfilled pastry shell: prick sides
and bottom with a fork to allow steam to es-
cape. Bake at 450°F. for 8 to 10 minutes.
Yield: One 9-inch pie
*O
r
use two 1-pound, 4-ounce cans (about 5
cups) pie-sliced apples, drained.
20
Page 23

VANILLA CREAM PIE
1 cup sugar
6 tablespoons
flour
Salt
2
1
/
2
cups milk
3 eggs, separated
Mix ½ cup sugar, flour and
in heavy 2-quart saucepan. Add milk and
cook on medium heat until thickened, stir-
ring constantly. Lower heat, cover and cook
for 10 minutes longer, stirring occasionally.
Beat egg yolks until frothy. Slowly add a
small amount of milk mixture to yolks; re-
turn to pan and cook at medium heat for 3 to
4 minutes, stirring constantly. Remove from
heat; add butter and vanilla. Cool and pour
into baked pie shell.
11
/
4
teaspoon cream of tartar
1 tablespoon but-
ter or margarine
i teaspoon vanilla
9-inch baked
pie shell
1/4
teaspoon salt
PUMPKIN PIE
2 eggs
1
/
2
cup brown sugar 1 cup milk
1
1
/
2
teaspoons
cinnamon
1/4
teaspoon ginger
1/4
teaspoon
nutmeg
1/4
1
3
/
4
teaspoon salt
cups cooked,
mashed
pumpkin
9-inch unbaked
pie shell
Place eggs in Bowl. Attach Bowl and Whip.
Gradually turn to Speed 6 and whip until
eggs are frothy, about 1 minute. Add sugar
gradually, then spices and salt; continue
whipping 45 seconds. Stop and scrape Bowl.
Turn to Speed 2 and gradually add milk,
about 30 seconds. Add pumpkin and whip
until combined, about 1 minute. Stop.
Pour mixture into unbaked pie shell. Bake at
450°F. for 10 minutes, then reduce to 350°F.
and bake 30 to 35 minutes.
Combine
1/8
teaspoon salt, cream of tartar
and egg whites in Bowl. Attach Bowl and
Whip. Gradually turn to Speed 8 and whip
until Soft Peaks form (see page 18), about 1
minute. Turn to Speed 4 and gradually add
remaining sugar; whip until Stiff Peaks
form, about 1 minute.
Pile meringue lightly on pie and spread to
edges. Bake at 325°F. for about 18 minutes.
Yield: One 9-inch pie
Chocolate Cream Pie
Follow recipe for Vanilla Cream Pie. Add 2
ounces ( squares) unsweetened chocolate,
melted, to filling with the butter and Vanilla.
P'roceed as directed.
Banana Cream Pie
Follow recipe for Vanilla Cream Pie. Slice 2
or 3 ripe bananas into pie shell before pour-
ing in filling. Proceed as directed.
Coconut Cream Pie
Follow recipe for Vanilla Cream Pie Add ½
cup flaked coconut to filling before pouring
into shell. Before baking. sprinkle meringue
1/4
with
cup flaked coconut. Proceed as
directed.
Yield: One 9-inch pie
LEMON CHIFFON PIE
1 tablespoon plain
gelatine
11
/
4
cup cold water
4 eggs, separated
1
/
8
teaspoon salt
1/3
cup lemon juice
Soften gelatine in cld water. Place egg
yolks in Bowl. Attach Bowl and Whip.
Gradually turn to Speed 6 and whip until
thick and lemon-colored, about 1 minute.
Add salt, lemon juice and rind; gradually
add half of the sugar and continue whipping
about 30 seconds. Stop.
Pour mixture into saucepan and cook on
low heat until thickened, stirring constantly.
Remove from heat; add softened gelatine,
and stir until dissolved. Cool.
Wash and dry Bowl and Whip thoroughly.
Place egg whites in Bowl. Attach Bowl and
Whip. Turn gradually to Speed 8 and whip
to Soft Peak stage (see page 18), about ½ to 1
minute. Turn to Speed 4 and gradually add
remaining sugar; whip 15 seconds longer.
Stop.
Add cooled custard mixture. Turn to Speed
4 and whip about 30 seconds. Stop and
scrape Bowl, turning mixture over 3 or 4
times.
Pour into baked pie shell; place in refrig-
e?tor and chill until firm. Serve topped
with whipped cream, if desired.
Yield: One 9-inch pie
1 teaspoon grated
lemon rind
1 cup sugar
9-inch baked pie
shell
-
21
Page 24

•
Bread Making Tips
•
General Kneading Steps
•
Shaping A Loaf
•
Recipes
YEAST BREADS
Models K-45 and K5-A only
BREAD MAKING TIPS
Never use recipe calling for more than 8
•
cups of flour.
•
You may need to add more flour than rec-
ipe calls for, if humidity is high (up to
cup). Adding flour, ½ cup at a time,
slowly around sides of Bowl, allows you
to add correct amount of flour to remove
stickiness. Allow Dough Hook to knead
each addition of flour until flour is
worked into dough. If more flour is neces-
sary, dough will then become sticky,
clinging to sides and/or bottom of Bowl.
When all dough clings to Hook and cleans
sides of Bowl—enough flour has been
added. Then knead 7 to 10 minutes longer
or until dough is soft, smooth and elastic.
Use a candy or other kitchen thermometer
•
to assure that liquids are at temperature
specified in the recipe. Liquids at higher
temperatures can kill yeast, while liquids
at lower temperatures will retard yeast
growth.
GENERAL INSTRUCTIONS
KNEADING BREAD DOUGH
1
1.
Combine all dry ingredients in Bowl ex-
cept last
1
to 2 cups
fl
our
.*
•
Since cooler temperatures slow down
yeast growth,
warmed or at room temperature for
proper rising of dough. If yeast is to be
dissolved in Bowl, always warm Bowl
first to prevent cooling of recipe liquids.
Bread should be allowed to rise in a warm
•
place, 80°F. to 85°F., free from draft, un-
less otherwise specified in recipe.
Recipe rising times may vary due to tem-
•
perature and humidity in your kitchen.
Dough has doubled in bulk when dent re-
mains after tips of fingers are pressed
lightly and quickly into dough.
all
ingredients should be
2.
Attach Bowl and Dough Hook. Lock
head, or raise K5-A Bowl. Turn to Speed
for approximately 30 seconds or until in-
gredients are mixed.
* When recipe calls for yeast to be dissolved
in warm liquids, add dry ingredients (ex-
cept last 1 to 2 cups flour) to liquid in Bowl
and proceed with Steps 2 through 6.
22
K-45
2
Page 25

3. Continuing on Speed 2, gradually add liq-
uid ingredients to flour mixture, approx-
imately 30 seconds to 1 minute. Mix 1 min-
ute longer.
5. When dough clings to Hook and cleans
sides of Bowl, knead on Speed 2 for 7 to 10
minutes longer or until dough is smooth and
elastic. Stop.
4. Continue on Speed 2, adding remaining
1/2
flour,
flour gently around sides of Bowl. Mix until
dough clings to Hook, about 5
*If dough starts to climb Hook, this in-
dicates more flour should be added be-
cause dough is too sticky. Turn to Speed 4
for about 1 minute, then return to Speed 2.
cup at a time, as needed. Shake
minutes
.*
6. Unlock and raise head on K-45, or lower
Bowl on K5-A, and remove dough from
Hook. Follow directions in recipe for rising,
shaping and baking.
23
Page 26

SHAPING A LOAF
Divide dough in half and roll each half into
a rectangle, approximately 9 X 14 inches. A
rolling pin will smooth dough and remove
gas bubbles.
RAPIDMIX COOL RISE
WHITE BREAD
7 to 8 cups flour
3 tablespoons sugar
41/2
teaspoons salt
3 packages active
dry
yeast
Place 6
solved yeast and margarine in Bowl. Attach
Bowl and Dough Hook. Turn to Speed 2 and
mix for about 1 minute. At Speed 2, gradu-
ally add warm water, about 1 minute. Mix 1
minute longer. Continue on Speed 2, adding
remaining flour, ½ cup at a time, as needed.
Mix until dough clings to Hook, about 5
minutes.
11
/
2
cups flour, sugar, salt and undis-
¼ cup butter or
margarine, soft-
ened
2% cups very
tap water
(120°F. to 130
Vegetable Oil
;a:'n
°
.)
Starting at short end, roll dough tightly.
Pinch dough to seal end.
When dough clings to Hook and cleans sides
of Bowl, knead on Speed 2 for 7 to 10 min-
utes longer or until dough is smooth and
elastic. Stop.
Remove Bowl. Cover Bowl with plastic
wrap, then a towel. Let rest 20 minutes.
Divide dough in half. Roll each half to a
14 X 9-inch rectangle. Shape into loaves.
Place in 2 greased 9X5X3-inch loaf pans.
Brush with vegetable oil. Cover loosely with
plastic wrap. Refrigerate 2 to 12 hours.
When ready to bake, remove from refrig-
erator. Uncover dough carefully. Let stand
at room temperature 10 minutes. Puncture
any gas bubbles which may have formed
with a greased toothpick or metal skewer.
Bake at 400°F. for 35 to 40 minutes, or until
done. Remove from baking pans and cool on
wire racks.
Yield: 2 loaves
Pinch ends and turn under. Place, seam side
down, in loaf pan. Follow directions in rec-
ipe for rising and baking.
24
Page 27

CINNAMON BREAD
1 cup milk
3/
cup water
1/3
cup butter or
margarine
6
1
/
2
to 71
/
2
cups
fLu
6 tailcspoons
sugar
1
/
2
teaspoons salt
1
packages active
2
dry yeast
*C
rum
Combine milk, water and
in a saucepan. Heat over low heat until liq-
uids are very warm (120°F. to 130°F.). Mar-
garine does not need to melt.
Place 6 ci ps flour, sugar, salt and yeast in
Bowl. Attach Bowl and Dough Hook. Turn
to Speed 2 and mix about 1 minute. At
Speed 2, gradually add eggs, then warm liq-
uid mixture, about 30 seco4 Mix 1 minute
longer.
Continuing on Speed 2, add remaining flour,
½ cup at a time, until dough loses stickiness
and clings to Hook, about 5 minutes. Knead
on Speed 2 for 7 to 10 minutes longer or un-
til dough is smooth and elastic. Stop.
Place in greased bowl, turning to grease top.
Cover; let rise in warm place, free from
draft, until doubled i%bulk about 35
minutes.
Meanwhile, combine ½ cup sugar and
cinnamon.
Punch dough down and divide in half. Roll
each half to a 14X9-inch rectangle. Brush
lightly with melted margarine. Sprinkle
each with half of cinnamon-sugar mixture.
Beginning at the 9-inch end, tightly roll
dough and shape into loaves. Place in 2
greased 9X5X3-inch loaf pans. Cover; let
rise in warm place, free from draft, until
doubled in bulk, about 35 minutes.
3
eggs at room
temperature
1
/
2
cup sugar
2
teaspoons
cinnamon
Melted butter or
margarine
1 egg white,
slightly beaten
b Topping
1/3
cup margarine
*
CRUMB TOPPING:
Combine
1/3
cup flour,
cup light brown sugar and 1 teaspoon
ground cinnamon. Add 3 tablespoons soft-
ened butter or margarine. Rub through fin-
gers until mixture is crumbly.
Yield: 2 loaves
FREEZER WHITE BREAD
6 to 7 cups flour
¼ cup sugar
1 tablespoon salt
1,/3
cup instant
nonfat dry
milk solids
2
packages active
dry yeast
Combine 5 cups flour, sugar, salt, dry milk
solids, undissolved yeast and margarine in
Bowl. Attach BO*l and Dough Hook. Turn
to Speed 2and gradually add water, about I
minute. Mix 1 minute longer. Continue on
Speed 2, adding remaining flour, ½ cup at a
time, as needed. Mix until dough clings to
Hook, about 5 minutes.
When dough clings to Hook and cleans sides
of Bowl, knead on Speed 2 for 7 to 10 min-
utes longer or until dough is smooth and
elastic. Stop.
Turn dough out on lightly floured board.
Cover with a towel; let rest for 15 vinutes.
Divide doughnto 2 equal pieces. Form each
piece into a smnoth round ball. Flatten each
ball into a mound, 6 inches in diameter.
Place on greased baking sheets and cover
with plastic wrap. Freeze until firm. Trans-
fer to plastic bags. Hold in freezer up to 4
weeks.
Remove from freezer; place on ungreased
baking sheets.Cover; let stand at rpom tem-
perature until fully thawed, about 4 hdurs.
*R
o
ll each ball to 12>8-inch rectangle.
Shape into loaves. Place in 2 greased 8½X
4½X2½-inch loaf pans. Let rise in warm
place, free from draft, until doubled in bulk,
11/2
about
hours.
2
tablespoons
butter or
margarine
2
cups very
warm water
(120°F. to
130°F.)
1/3
Brush with egg white; sprinkle each with
half of Crumb Topping. Loosely top each
with an aluminum foil "tent." Bake on low-
est rack position at 375°F. for 45 minutes.
Remove foil; bake 5 minutes longer, or just
until golden brown. Remove from pans and
cool on wire racks.
Bake at 350°F. for 35 minutes, or until done.
Remove from pans and cool on wire racks.
Yield: 2 loaves
*T
o
make round loaves: let thawed dough
rise on ungreased baking sheets until
doubled in bulk, about 1 hour. Bake as for
loaves.
25
Page 28

WHOLEGRAIN WHEAT
BREAD
2
1
/
4
cups warm
water
(105°F. to 1150F.)
1 tablespoon
brown sugar
2 packages active 2 teaspoons salt
dry yeast
7
6
to
cups
wholegrain
wheat flour
Dissolve 1 tablespoon brown sugar in water
and add yeast. Let mixture stand while you
prepare flour mixture.
Combine 5 cups flour, powdered milk, re-
maining brown sugar and salt in Bowl. At-
tach Bowl and Dough Hook. Turn to Speed 2
and mix 30 seconds. Stir yeast and water
mixture to dissolve yeast. While on Speed 2,
gradually add yeast and water to flour mix-
ture, about 30 seconds. Add liquid shorten-
ing and continue to mix 30 seconds longer.
Continuing on Speed 2, add remaining flour,
1/2
cup at a time, as needed. Mix until dough
clings to Hook, about 5 minutes.
When dough clings to Hook and cleanssides
of Bowl, knead on Speed 2 for 7 to 10 min-
utes longer or until dough is smooth and
elastic. Stop.
3/4
cup powdered
milk
1/4
cup plus 2
tablespoons
brown sugar
1%
cup plus 2
tablespoons
liquid shortening
I
CHEDDAR CROWN LOAF
•
1/4 cups milk
1/2
cup water
3 tablespoons but-
ter or margarine
61/2
71/2
to
cups flour
2 tablespoons
sugar
1 tablespoon salt
2 packages active
1 cup shredded
sharp Cheddar
cheese (1/4
pound)
Melted butter or
margarine
1/4 teaspoon cara-
way seed
(optional)
dry yeast
Combine milk, water and 3 tablespoons
margarine in a saucepan. Heat over low heat
until liquids are very warm (120°F. to
130°F.). Margarine does not need to melt.
Place 6 cups flour, sugar, salt and yeast in
Bowl. Attach Bowl and Dough Hook. Turn
to Speed 2 and mix about 1 minute. At
Speed 2, gradually add cheese, then warm
liquid mixturbout 30 seconds. Continue
to mix at Speed 2 until dough clings to
Hook, and starts to clean Bowl, about 3 to 5
minutes.
Continuing on Speed 2, add remaining flour,
¼ cup at a time, until dough loses stickiness,
clings to Hook and cleans sides of Bowl,
about 5 minutes. Knead on Speed 2 for 7
10 minutes longer or until dough is smooth
and elastic. Stop.
Place in greased bowl, turning to grease top.
Cover bowl and let rise in a slightly warm
oven (about 90°F.) for one hour, or until
doubled in bulk.
Punch dough down and divide in half.
Shape each section into a loaf and place in
butt
ere
d* 8½X4%X2
1/4
-inch pans. Each
loaf may also be shaped into a round loaf.
Cover and place in a slightly warm oven
(about 90°F.) for 30 minutes, or until
doubled in bulk. Remove from oven. Bring
the temperature to 400°F. and bake bread
for 15 minutes. Reduce to 350°F. and bake 30
minutes longer. Remove bread from pans
immediately. Place on wire racks and butter
top of loaves.
Yield: 2 loaves
* Pans should be greased with butter, lard or
margarine; bread will stick to pans greased
with vegetable oil.
Place in greased 1w1, turning to grease top.
Cover; let rise in warm place, free from
draft, until doubled in bulk, about 40 min-
utes.
Punch dough down. Divide dough into 32
equal pieces. Shape each piece into a
smooth ball. Arrange 16 balls in a well-
greased 10-inch tube pan. Brush with melted
margarine and sprinkle with half of the
caraway seed. Arrange remaining balls of
dough on top. Brush with melted margarine
and sprinkle with remaining caraway seed.
Cover; let rise in warm place, free from
draft, until doubled in bulk, about 45 min-
utes.
Bake at 375°F. for 40 minutes, or until done.
Remove from pan and cool on wire rack.
Best served warm.
Yield: 1 large loaf
26
Page 29

Wholegrain Wheat Bread and Cheddar Crown Loaf
27
Page 30

RYE BREAD
3 cups rye flour
3 cups white
flour
1 tablespoon
sugar
1 tablespoon
salt
1 tablespoon
caraway seed
(optional)
1 package active
dry yeast
Combine flours; in Bowl thoroughly mix 4
1 cup milk
3/4
cup water
2
tablespoons
honey
1 tablespoon
butter or
margarine
1/4
cup cornmeal
1 egg white
tablespoons
2
water
2
/2
cups flour mixture, sugar, salt, caraway seed
and yeast.
Combine milk, water, honey and margarine
in a saucepan. Heat over low heat until liq-
uids are just warm (105°F. to 115°F.). Marga-
rine does not need to melt.
Attach Bowl and Dough Hook. Turn to
Speed
on Speed
and mix for
2,
gradually add warm liquid to
30
seconds. Continuing
2
flour mixture, approximately 1 minute. Mix
1 minute longer. Continue on Speed
2,
add-
ing remaining flour mixture, ½ cup at a
time, as needed. Mix until dough clings to
Hook, about 4 minutes.
When dough clings to Hook and cleans sides
2
of Bowl, knead on Speed
for 7 to 10 min-
utes longer or until dough is smooth and
elastic. Stop.
Place in greased bowl, turning to grease top.
Cover; let rise in warm place, free from
draft, until doubled in bulk, about 1 hour.
Punch dough down. Divide in half; form
each piece into a smooth ball. Cover; let rest
10 minutes. Flatten each piece slightly. Roll
lightly on board to form tapered ends. Place
2
loaves on
greased baking sheets which
have been sprinkled with cornmeal. Brush
with slightly beaten egg white and water.
Let rise, uncovered, in warm place, free
from draft,
Bake at 400°F. for
minutes.
35
minutes, or until done.
25
Remove from baking sheets and cool on
wire racks.
ENGLISH MUFFINS
1 cup milk
2
tablespoons sugar
1 teaspoon salt
3
tablespoons butter
or margarine
Scald milk. Stir in sugar, salt and margarine;
cool to lukewarm (115
warm water; stir to dissolve yeast.
Place 5 cups flour in Bowl. Attach Bowl and
Dough Hook. Turn to Speed
add lukewarm milk mixture, about
onds; then add dissolved yeast mixture,
about
30
seconds. Continue on Speed 2 until
dough clings to Hook, about
Dough will be sticky.
At Speed
2,
add remaining flour,
time. Knead on Speed
longer. Stop. This dough will be very soft.
Place in greased bowl, turning to grease top.
Cover; let rise in warm place, free from
draft, until doubled in bulk, about 1 hour.
Punch dough down; divide in half. On a
board heavily sprinkled with corn meal, pat
each half of dough into a ½-inch thickness.
Cut into circles with a floured,
cutter. Place on ungreased baking sheets
about 2 inches apart. Cover; let rise in warm
place, free from draft, until doubled in bulk,
about
30
minutes.
Place on a lightly-greased, medium-hot
griddle or skillet, corn meal side down. Bake
until well browned, about 10 minutes on
each side. Cool on wire racks.
To serve, split muffins in half and toast.
Yield: 15 to
18
muffins
1
cup warm water
(105°F. to
1
dry yeast
6
cups
Cornmeal
0
F.). Sprinkle yeast in
2
0
115
package active
flour
2
and gradually
30
2
minutes.
1/2
cup at a
for
3
to 5 minutes
3
-inch cookie
F.)
sec-
Yield:
2
loaves
28
Page 31

FRENCH BREAD
2
1
/
2
cups warm
water
(105°F.
packages active
2
to
115°F.)
dry yeast
tablespoon salt
1
1
tablespoon cold water
Dissolve yeast in warm water in warmed
Bowl. Add salt, margarine and flour. Attach
Bowl and Dough Hook. Turn to Speed 2 and
mix until well blended, about 2 minutes.
Continue on Speed 2 for 2 minutes longer.
Stop. Dough will be sticky.
Place in greased bowl, turning to grease top.
Let rise in a warm place, free from draft, un-
til doubled in bulk, about
Punch dough down and divide dough into 2
equal parts; roll each into a 12
long. Roll up tightly beginning at long side,
sealing as you roll. Taper ends if desired.
Place loaves on 2 greased baking sheets,
which have been sprinkled with cornmeal.
Cover; let rise in a warm place, free from
draft, until doubled in bulk, about
With sharp knife, make 4 diagonal cuts on
top of each loaf. Bake at 450°F. for 25 min-
utes. Remove from oven and brush with
slightly beaten egg white and water. Return
to oven and bake 5 minutes longer. Remove
from baking sheets and cool on wire racks.
Yield: 2 loaves
*
SOUR DOUGH STARTER
31/2
cups strong,
bread-type flour
1 tablespoon sugar
Combine flour, sugar and undissolved yeast
in a large bowl. Gradually add warm water
to dry ingredients and beat until smooth.
Cover with transparent wrap; let stand in
warm place for 2 days.
To use in recipe: measure out amount called
for in recipe and use as directed.
1
tablespoon but-
ter or margarine,
melted
cups flour
7
1/4
cup corn meal
1
egg white
1
hour.
1 package active
dry yeast
2
cups warm
water
x
15-inch ob-
1
hour.
SOUR DOUGH BREAD
*11/2
cups Sour
Dough Starter
3/4
cup milk
tablespoons
2
sugar
1
teaspoon salt
2
tablespoons but-
ter or margarine
Sour Dough Starter must be prepared two
days before bread is made.
Scald milk. Stir in sugar, salt and margarine;
cool to lukewarm. Dissolve yeast in warm
water, in warmed Bowl. Add lukewarm milk
mixture, Starter and
Attach Bowl and Dough Hook. Turn to
Speed 2 and mix until dough begins to cling
to Hook, about 3 minutes. At Speed 2, add
remaining flour, ½ cup at a time, as needed.
Mix until dough clings to Hook and cleans
sides of Bowl, about 5 minutes. Knead on
Speed 2 for
7
to 10 minutes longer or until
dough is smooth and elastic. Stop.
Place in greased bowl, turning to grease top.
Cover; let rise in a warm place, free from
draft, until doubled in bulk, about
Punch dough down; divide into 3 equal
pieces. Form each piece into a smooth round
ball or a 14-inch tapered roll. Place on
greased baking sheets. With a sharp knife,
make several cuts in crosscross fashion on
tops of round loaves, or make several diago-
nal cifls on tops of long loaves. Cover; let
rise in warm place, free from draft, until
doubled in bulk, about
Bake at 400°F. for 25 minutes, or until done.
Remove from baking sheets and cool on
wire racks.
5
cups flour.
1/4
cup warm water
(105°F. to 115°F.)
1 package active
dry yeast
5 to 6 cups flour
1
1
hour.
hour.
1
/
To replenish starter: Add 1
bread-type flour and
1
2
cups strong,
cup warm water to
remaining Starter. Beat until smooth. Store
covered in warm place. Stir before using. If
not used in one week, remove 1½ cups starter
and follow directions for replenishing.
Yield: 3 loaves
29
Page 32

SIXTY-MINUTE ROLLS
4 to 5 cups flour
3 tablespoons
sugar
1
teaspoon salt
2 packages active
dry yeast
1 cup milk
1/2
cup water
1/4 cup butter or margarine
cups flour, sugar, salt and un-
1
/
Combine 3
2
dissolved yeast in Bowl. Attach Bowl and
Dough Hook. Turn to Speed 2 and mix for
minute.
Combine milk, water and margarine in a
saucepan. Heat over low heat, until liquids
are very warm (120°F. to 130°F.). Margarine
does not need to melt. Turn to Speed 2 and
gradually add liquid to flour mixture, about
30 seconds. Mix 1 minute longer. Continue
on Speed 2, adding remaining flour, ½ cup
at a time, as needed. Mix until dough clings
5
to Hook, about
Speed 2 for
minutes. Knead dough on
to 10 minutes longer, or until
7
dough is smooth and elastic. Stop.
Place in greased bowl, turning to grease top.
Cover; place bowl in pan of water at about
15
98°F. Let rise
minutes.
Turn dough out onto floured board. Divide
in half and shape as Curlicues or Lucky Clo-
vers (below). Cover; let rise in slightly warm
oven (about 90°F.) for
15
minutes, or until
doubled in bulk. Bake at 425°F. for 12 min-
utes, or until done. Remove from baking
1
sheets and cool on wire racks.
Curlicues:
Roll out each half to a 12 X 9-inch
rectangle. Cut into 12 equal strips (about i
inch wide). Hold one end of strip firmly and
wind closely to form coil. Tuck end firmly
underneath. Place on greased baking sheets
about 2 inches apart.
Lucky Clovers:
Form each half into a 12-
inch roll. Cut into 12 equal pieces. Form into
balls; place in greased muffin pans,
inches. With scissors, cut each ball in half,
then into quarters, cutting through almost to
bottom of rolls.
Yield: 2 dozen rolls
2/4
X 11%-
Shaping Sixty-Minute Rolls
Curlicues and Lucky Clovers
30
Page 33

Sixty—Minute Rolls
31
Page 34

MAPLE PECAN ROLLS
*1 Recipe Basic
Sweet Dough
11/2 cups light brown
sugar
3/4
cup maple
flavored
syru
-
p**
6 tablespoons but-
ter or margarine,
softened
11/2
Combine
cups brown sugar, syrup and 6
tablespoons butter in a sauce pan. Bring to a
boil. Cook 3 minutes, stirring constantly.
Sprinkle pecans in 3 ungreased 8-inch
square pans. Pour syrup mixture over
pecans.
Divide dough into 3 equal pieces. Roll each
piece into a 9X7-inch rectangle. Spread
each with 2 tablespoons butter and sprinkle
with a third of remaining brown sugar. Roll
each up from long side and seal edges
firmly. Cut into 1-inch slices. Place, cut side
up, in prepared pans. Cover; let rise in a
warm place, free from draft, until doubled
in bulk, about 45 minutes.
Bake at 400°F. for 25 minutes, or until done.
Invert rolls on plates to cool.
Yield: 3 coffee cakes
**p
ancake
syrup plus 1 teaspoon maple
flavoring
cup coarsely
chopped pecans
tablespoons but-
6
ter or margarine,
softened
1
/2
cup dark brown
sugar
BALLOON BUNS
*1 Recipe Basic
Sweet Dough
30 large marshmal-
lows
cup butter or
½
margarine,
melted
Divide dough in half. Roll out into
thickness. Cut fifteen 3
each half. Dip marshmallows in melted but-
ter; then wrap a dough circle around each
marshmallow, pinching together tightly at
the bottom. Dip in melted butter, then cin-
namon-sugar mixture. Place in greased muf-
fin cups. Let rise 15 to 20 minutes, until light.
Bake 25 to 30 minutes at 375°F. Remove im-
mediately and serve warm.
1 tablespoon
cinnamon
1 cup sugar
1
L/2 inch circles from
1/4
inch
*BASIC SWEET DOUGH
3
/4 cup milk
l/z cup sugar
1
1
/
4
teaspoons salt
½
cup butter or
margarine
1/3
cup warm
water (105°F.
to 115°F.)
Scald milk; stir in sugar, salt and margarine.
Cool to lukewarm (115°F.).
Pour warm water into warmed Bowl.
Sprinkle in yeast and stir until dissolved.
Add lukewarm milk mixture, eggs and 5
cups flour. Attach Bowl and Dough Hook.
Turn to Speed 2 and mix until dough is well
mixed and begins to cling to Hook, about 3
minutes. At Speed 2, add remaining flour,
cup at a time, as needed. Mix until dough
clings to Hook and cleans sides of Bowl,
about 5 minutes. Knead on Speed 2 for 7 to
10 minutes longer or until dough is smooth
and, elastic. Stop.
Place in greased bowl, turning to grease top.
Cover and let rise in warm place, free from
draft, until doubled in bulk, about 1 hour.
Punch dough down and divide dough for
rolls or coffee cakes, as desired.
2 packages
active dry
yeast
3 eggs, at room
temperature
5
to
1
/
-2
flour
61/2
cups
1/2
Yield: 2/2 dozen buns
32
Page 35

KITCHENAID ATTACHMENTS
GENERAL INFORMATION
KitchenAid Attachments are designed to assure long life. The Attachment
Power Shaft and Hub Socket are of a square design, to eliminate any possi-
bility of slipping during the transmission of power to the Attachment. The
Hub and Shaft Housing are tapered to assure a snug fit, even after prolonged
use and wear. KitchenAid Attachments require no extra power unit to operate
them; the power unit is built in.
ATTACHMENT HUB
Attachment Knob
(1)
(2)
Hub
Attachment Hub
(3)
Socket
(4)
Attachment
Power Shaft
Attachment Shaft
(5)
Housing
(6)
Pin
(7)
Notch
GENERAL INSTRUCTIONS
TO USE:
Attachments are inserted directly into Attachment Hub (2), in this way:
Remove Attachment Hub Cover. (Metal Disc)
1.
by turning it counterclockwise.
Loosen Attachment Knob
2.
Insert Attachment Shaft Housing (5) into Attachment Hub (2), making cer-
3.
tain that Attachment Power Shaft (4) fits into square Attachment Hub
Socket (3). It may be necessary to "rock" Attachment back and forth until
square shaft fits into square socket. When the Attachment is in the proper,
upright position, the Pin (6) on the Shaft Housing will fit into the Notch (7)
on the Hub rim.
Tighten Attachment Knob by turning clockwise.
4.
Some of the Attachments are placed on the Beater Shaft or the Bowl
than in the Attachment Hub. These include the Colander and Sieve, Dough
Hook, Pouring Chute and Splash Guard.
(1)
rather
'
33
Page 36

TO ATTACH:
Place lip of Chute
over side of Bowl.
POURING CHUTE
TO USE:
Preparer is mixing. ALWAYS USE SPEED 1 WHEN ADDING INGREDIENTS.
Place dry ingredients in the Chute to introduce them into the Bowl, while the Food
SPLASH GUARD
TO ATTACH:
Place on rim of Bowl.
TO USE:
CONTAINING LARGE AMOUNTS OF LIQUID INGREDIENTS SHOULD BE MIXED ON
LOW SPEEDS. Increase speed SLOWLY, and only after mixture has thickened.
The Splash Guard will help to minimize the splash-out of ingredients. MIXTURES
34
Page 37

—3
CAN OPENER
TO ATTACH:
Loosen Attachment Knob. Insert Shaft
Housing (1) into the Attachment Hub (2) and
tighten Knob. Please read general instruc-
tions, page 33.
TO USE:
Lift Handle (3) and rotate to right side. Hold
the can in a vertical position with the lid
edge under and back of the round knife. Ro-
tate Handle to extreme left. Turn to Speed 2.
The top of the can will be cut and held from
the contents of the can by the magnet. Turn
Speed Control to OFF. Hold can and rotate
Handle to the right to release the can.
IMPORTANT SAFEGUARD
Do not open pressurized (aerosol-type) cans.
Do not open cans of
as lighter fluids.
flammable
liquids such
KNIFE SHARPENER
TO ATTACH:
Loosen Attachment Knob. Insert Shaft
Housing into the Attachment Hub and
tighten Knob. Please read general instruc-
tions, page 33.
TO USE:
Turn to Speed 10. Place cutlery edge to be
sharpened in Groove between the two
Wheels and draw blade from left to right.
DO NOT TRY TO FORCE BLADE DOWN
INTO THE GROOVE. Should the two
Wheels tend to remain apart, it is probably
due to emery dust that collects on the Shaft.
Turn Speed Control to OFF. Pull the Wheels
apart by hand and let them snap together
several times.
SILVER BUFFER
TO ATTACH:
Loosen Attachment Knob. Insert Shaft
Housing into the Attachment Hub and
tighten Knob. Please read general instruc-
tions, page 33.
TO USE:
Apply polish lightly on silver and allow to
dry. If applied too heavily, the polish will
roll up during the polishing process. Turn to
Speed 6, for preliminary polishing; increase
to Speed 10, for final polishing. Turn Speed
Control to OFF. After polishing, wash silver
thoroughly; rinse and dry completely.
35
Page 38

FOOD GRINDER
•
Sausage
•
Meat Loaf
•
Chopped Chicken Livers
•
Holiday Fruit Cake
SAUSAGE
Requires Sausage Stuffer Attachment.
TO ASSEMBLE:
Insert the Grind Worm (1) into Grinder
Body (2). Place the four-bladed Knife (3)
over the square shank at exposed end of
Grind Worm with flat cutting edges
ward. Place Grinder Plate (4) in position
with the notch in the edge mating with small
pin in the Grinder Body. Turn Ring (5) into
place, drawing up firmly but not too tightly.
TO ATTACH:
Loosen Attachment Knob.
Insert Attachment Shaft Housing (6) into At-
tachment Hub (7) making certain that At-
tachment Power Shaft fits into square Hub
Socket. Tighten Knob. Please read general
instructions, page 33.
TO USE:
Cut food into small strips and feed them
into Hopper (8). Meat especially, should be
cut into long narrow strips. Use Stomper (9)
to press food into Hopper—do not use fin-
gers. For better mix and more tender results,
grind meat twice. Operate on Speed 4.
The two Plates provided give you a choice
of a coarse or fine grind.
out-
1/2
Casing must be soaked
lukewarm water. Run water through casing
to remove salt. Assemble Food Grinder, us-
ing Coarse Plate. Chill Food Grinder.
Season meat as desired or in following pro-
portions:
10 pounds pork
trimmings
1 tablespoon
pepper
Keep meat COLD, as close to freezing as
possible. Cut cold pork trimmings into long
strips for grinding; sprinkle with seasonings.
Add one crushed ice cube per pound of
meat and mix with trimmings before grind-
ing. This will provide a clean cut and thor-
ough mixing of seasonings with trimmings.
Attach Food Grinder. Grind once on Speed
4. Mix ground meat to assure seasonings are
well blended.
Remove Knife and Coarse Plate and put
Sausage Stuffer Horn through Ring. Screw
into place. Grease Stuffing Horn well. Slide
about 3 feet of casing onto the Horn leaving
1/2
inch overlap.
Feed ground meat into Hopper using Stom-
per to press meat into Hopper—do not use
fingers. Operate on Speed 4. Hold casing end
lightly with left hand as meat is forced into
casing. Continue to hold casing very near
end of Stuffer throughout entire operation,
to get more uniform stuffing. For greatest ef-
ficiency, place pan underneath Stuffer to
catch sausage. Place stuffed sausage in re-
frigerator immediately.
Yield: 10 pounds
hour or longer in
7 tablespoons salt
½
teaspoon sage
Ice Cubes
36
Page 39

MEAT LOAF
HOLIDAY FRUIT CAKE
2 pounds beef,
chuck or round
2 slices dry bread
1 small onion
1 clove garlic
(optional)
2 eggs
2 teaspoons salt
1/4
teaspoon pepper
1/2
teaspoon dried
basil or
marjoram
3 or 4 slices bacon
*T
omato
Sauce
Assemble and attach Food Grinder, using
Fine Plate. Cut beef, bread, onion and garlic
into suitable size for grinding. Turn to
Speed 4 and grind these ingredients twice.
Let fall into Bowl. Add eggs, salt, pepper
and basil or marjoram.
Attach Bowl and Beater. Turn to Speed 1
and mix until well blended, about 30 sec-
onds.
1
/
4
Shape into loaf and place in 9
X5¼X2
inch loaf pan. Place bacon on top of loaf and
cover with Tomato Sauce. Bake at 350'F. for
1 hour.
*T
omato
Sauce
1 cup catsup
1 cup brown sugar
Combine ingredients and stir until smooth.
Yield: 6 to 8 servings
1
4-ounce package
lemon peel
1 4-ounce package
orange peel
1/2
pound candied
cherries
1/z
pound pitted
dates
1%
pound candied
pineapple
1/4
pound citron
1/2
pound seedless
raisins
1%
pound walnuts,
halved
1/4
pound pecans,
1%
cup flour
I
cup shortening
cup sugar
½
1/2
cup honey
5 eggs, well beaten
1
11
/
2
cups flour
1 teaspoon salt
1
teaspoon baking
powder
1
teaspoon all-
spice
teaspoon nutmeg
½
teaspoon ground
½
cloves
1/4
cup orange juice
halved
Assemble and attach Food Grinder using
Coarse Plate. Turn to Speed 4 and grind
3
/4
fruit once. Dredge fruit and nuts in
flour.
Attach Bowl and Beater. Cream shortening
and sugar on Speed 6 until light and fluffy,
about 3 minutes. Reduce to Speed 1 and add
honey and eggs. Gradually increase to
Speed 6 and beat about 2
and scrape Bowl.
Sift together flour, salt, baking powder and
spices.
1
/
2
minutes. Stop
1%
cup
CHOPPED CHICKEN LIVERS
1 pound chicken
livers
3
hard-cooked
eggs
1 small onion
Broil livers until done. Do not overcook. As-
semble and attach Food Grinder, using Fine
Plate. Turn to Speed 4 and grind livers, eggs
and onion.
Add mayonnaise, oil, and salt and pepper to
taste. Put mixture into Bowl. Attach Bowl
and Beater. Turn to Speed 1 for 30 seconds
and increase to Speed 4. Mix until smooth
and fluffy, about 1 minute. Chill. Serve with
assorted crackers.
Yield: 6 servings
2 tablespoons
mayonnaise
1/4
cup cooking oil
or chicken fat
Salt and Pepper
Turn to Speed 1 and add half the flour mix-
ture, orange juice and remaining flour mix-
ture, mixing about one minute after each ad-
dition. Gradually increase to Speed 4 and
continue beating until well blended, about 1
minute. Stop and scrape Bowl.
Turn to Speed 1 and gradually add fruit and
nuts. Mix until well blended, about 30 sec-
onds. Line 2 greased 3½X 7½-inch loaf pans
with waxed paper, allowing an extra edge to
extend above pans on all sides. Pour batter
into pans; do not flatten. Bake at 250°F. for 3
to 4 hours or until done.
Yield: 2 loaves
37
Page 40

SLICER AND SHREDDER
ROTOR TYPE
TO ATTACH AND ASSEMBLE:
Loosen Attachment Knob. Insert Shaft
Housing (1) into the Attachment Hub
(2) and tighten Knob. Please read
general instructions, page 33.
Attach Shaft (3) to desired Cone.
Insert Cone unit into Housing so that
Shaft fits into square Hub Socket. The
Cone unit is automatically locked into
position with Latch (6).
TO USE:
To use Slicer/Shredder, lift the Handle of
the Hopper Plate (7) and drop food in the
Hopper. Turn to Speed 4 and push down
lightly on Handle. Catch the food in the
Bowl or any other deep bowl.
Never use fingers or a spoon to depress the
food. Always
it by the Handle (8).
use the Hopper Plate, holding
Insert square end of Shaft
opening of Housing (5) and tighten by turn-
ing Cone clockwise.
GUARD: blades are sharp; handle carefully.
Illustration A
IMPORTANT SAFE-
(4)
in square
38
Page 41

TO CHANGE CONES:
See Illustration A—page 38.
The Latch (6) must be raised to remove Cone
unit. Cones may be easily changed by
inserting square end of Shaft
opening (5) and turning counterclockwise.
CONES AND THEIR USES:
All cones are numbered on the
closed end.
Replacement cones should be
ordered by number.
4
(4)
in square
•
Hot Cheese-Potato Salad
•
Combination Cole Slaw
HOT CHEESE-POTATO
SALAD
6 medium
potatoes,
peeled and
cooked
1 small onion
2 hard-cooked
eggs
4 to 5 stalks celery
1/3
cup vinegar
Assemble and attach Slicer/Shredder, using
Coarse Shredder Cone (No. 2). Turn to
Speed 4 and shred potatoes, onion and eggs.
Replace Shredder Cone with Thin Slicer
Cone (No. 4). Turn to Speed 4 and slice
enough celery to make 1 cup. Mix all in-
gredients except cheese and place in a shal-
low 2-quart broiler-proof baking dish.
2 teaspoons salt
1/4
teaspoon pepper
1 teaspoon dry
mustard
1/3
cup liquid bacon
fat
1/2
pound sharp
Cheddar cheese
NO.1 FINE SHREDDER:
Finely shreds hard and crisp vegetables,
such as carrots, beets, turnips and celery, or
grates nuts, onions, potatoes, hard cheese,
dry bread and fruit rinds.
NO.2 COARSE SHREDDER AND SHOE
STRINGER:
Coarsely shreds carrots, celery, fruit, nuts,
or chocolate. Potatoes can be shredded for
shoestrings, juliennes or hash browns.
NO.3 THICK SLICER:
Gives a uniformly thick slice for all firm
foods ordinarily sliced with a knife. Perfect
for steamed, fried, scalloped or creamed
vegetables.
NO.4 THIN SLICER:
Thinly slices vegetables for cole slaw,
potato chips, sauerkraut, bread and butter
pickles, sliced cucumbers, radishes, celery
and nuts.
Grate cheese with Coarse Shredder Cone
(No. 2) on Speed 4 and sprinkle on top of po-
tato mixture. Broil until golden brown and
bubbly. Serve hot.
Yield: 6 servings
COMBINATION COLE SLAW
1 medium-sized
head cabbage
1 cucumber
1 bunch radishes
Assemble and attach Slicer/Shredder using
Thin Slicer Cone (No. 4). Turn to Speed 8
and slice cabbage and cucumber. Replace
Thin Slicer with Coarse Shredder (No. 2)
and shred radishes, green pepper, carrot and
enough celery to make 1 cup. Mix vege-
tables thoroughly and serve with favorite
dressing.
Yield: 8 servings
39
1 medium green
pepper
1 carrot
4 to 5 stalks celery
Page 42

SLICER AND SHREDDER
DISC TYPE
TO ATTACH AND ASSEMBLE:
Loosen Attachment Knob. Insert Shaft
Housing (1) into the Attachment Hub (2) and
tighten Knob. Please read general instruc-
tions, page 33.
TO ADJUST:
The Slicer knives can be adjusted. To ad-
just, hold the Shaft of the Slicer Plate point-
ing towards you. Turn the round nut on the
Shaft clockwise for fine slicing and counter-
clockwise for coarse slicing.
Lift latch (3) and swing front portion (4) of
Attachment to open position. Insert Slicer
Plate so that Power Shaft (5) fits into square
Hub Socket. Swing front portion into closed
position and latch.
Note: Slicer Plate only is furnished as stand-
ard equipment
Shredder Plates or an
be purchased.
with this
Ice
attachment—two
Chipper may also
TO USE:
Lift Hopper Plate Handle (7) and drop food
in Hopper. The Bowl or any other deep
bowl may be used to catch food which
drops out at the bottom (6).
Never use fingers or a spoon to press the
food: always
Speed 4 or 6, for soft or cooked foods and
cheese or coconut; Speed 6 or 8 for raw
crisp vegetables such as cabbage or po-
tatoes. Lower Handle and turn to desired
Speed. Press down lightly on Handle as food
goes through. If slicing long thin food such
as celery, place it in the Tube (8), with the
small end first and use the Stomper (9) to
press food into Tube.
40
use the Hopper Plate (7). Use
Page 43

JUICE EXTRACTOR
TO ATTACH:
Insert round end of metal Shaft (1) into Reamer (2) so that pins fit in slot. Insert square end of
Shaft (3) through Shaft Housing portion of Shield (4). Place Strainer (5), narrow end first, into
slots in Shield.
Loosen Attachment Knob. Insert Shaft Housing (4) into Attachment Hub (6) making certain
that the square end of the Shaft fits into the square Hub Socket. Please read general instruc-
tions, page 33.
TO USE:
Place glass or pitcher under Juice Extractor
to catch juice. Turn to Speed 6. Holding
fruit firmly cupped in hand, bring fruit in
contact with spinning Reamer. Move fruit in
all directions, exerting an inward and down-
ward pressure to extract the juice.
41
Page 44

ICE CREAM FREEZER
Models
4-C and K-45,
Model K5
2—quart capacity
-A,
4—quart capacity
40
3
TO ASSEMBLE AND ATTACH:
Fill Freezer Can (1) about
mixture; set in Dasher (2) and place Cover (3)
on Can. Fit Freezer Can on Knob in bottom of
Bucket (4). Slip Freezer Shaft (5) through Shaft
Housing (6) on side of Bucket, fitting Freezer
Assembly (7) over Dasher (2) and locking with
Key (8) on other side of Bucket. Turn Freezer
Shaft with fingers to be certain gears will
mesh. Loosen Attachment Knob. Insert Shaft
Housing into Attachment Hub making certain
that Freezer Shaft fits into square Hub Socket.
Tighten Knob. Please read general instructions,
page 33.
3/4
full with ice cream
6
TO FREEZE:
Pack with 1 cup rock salt to each 6 cups crushed ice in alternate layers. Place bowl or deep
pan under Spout (9) to catch salt water during freezing. Turn to Speed 1, and gradually in-
crease to Speed 4, freezing 8 to 10 minutes.
When mixture begins to stiffen, the motor will slow down slightly.
TO REMOVE:
Loosen Knob and remove Shaft and Housing from Hub. Unlock Key (8) and remove Freezer
Assembly from top of Bucket. Drain off excess salt water into sink by carefully tilting Bucket.
Remove at least two inches of ice and salt mixture from around top and sides of Freezer Can.
Wipe top and upper sides of Can with a clean, damp cloth or sponge. TAKE CARE NOT TO
ALLOW ANY OF THE SALT WATER SOLUTION TO ENTER THE FREEZER CAN.
Remove Can Cover and draw out Freezer Dasher carefully. Press ice cream into Can. Put
Cover in place and close opening with either a cork or a plug made from wax paper. Drain off
excess salt water, and repack with ice and salt. Or remove Can from Bucket and place in
freezer.
42
Page 45

•
Vanilla Ice Cream
•
Chocolate Ice Cream
•
Milk Fruit Sherbet
CHOCOLATE ICE CREAM
VANILLA ICE CREAM
3 cups milk
3 eggs
1
/
8
teaspoon salt
1 cup sugar
Scald 1 cup of milk. Place eggs in Bowl. At-
tach Bowl and Whip. Turn to Speed 6 and
whip until light, about 30 seconds. Turn to
Speed 4 and add salt and sugar gradually.
Stop and scrape Bowl. Pour into a saucepan;
slowly add scalded milk, mixing well. Cook
over low heat or in a double boiler 3 min-
utes or until mixture coats spoon. Chill.
1 cup heavy cream
or sweetened
condensed milk
1 teaspoon vanilla
2 ounces (2 squares)
unsweetened
chocolate
2 cups milk
1 cup sugar
1
/
8
teaspoon salt
Place chocolate and milk in a sauce pan and
heat over hot water or low heat until choco-
late is melted. Combine sugar, salt and egg
yolks, and add to milk, stirring until com-
bined. Cook 3 minutes. Add vanilla. Chill.
Place cream in Bowl. Attach Bowl and
Whip. Gradually turn to speed 6 and whip
until cream Holds Its Shape (see page 18),
about 2 minutes. Turn to Speed 1 and fold in
chocolate mixture, about 30 seconds. Stop.
Pour into Freezer Can and freeze.
Yield: 2 quarts ice cream
For 4-quart Freezer, double recipe.
3 egg yolks,
slightly beaten
1 teaspoon vanilla
1½ cups heavy
cream
Add remaining milk, cream or condensed
milk, and vanilla. Pour into Freezer Can and
freeze.
Yield: 2 quarts ice cream
For 4-quart Freezer, double recipe.
MILK FRUIT SHERBET
2 egg whites
1 cup sugar
3 cups milk
1 tablespoon lemon
juice
Place egg whites in Bowl. Attach Bowl and
Whip. Turn to Speed 8 and whip until Soft
Peaks (see page 18) have formed, about 45
seconds. Stop. Combine with remaining in-
gredients, pour into Freezer Can and freeze.
Yield: 2 quarts sherbet
For 4-Quart Freezer, double recipe.
43
2/3
cup crushed
pineapple or
other fruit
1/4
teaspoon vanilla
Page 46

COLANDER AND SIEVE
TO ATTACH AND ASSEMBLE:
Place Colander Rim in Bowl and set Per-
forated Disk in Rim. Attach Paddle to Beater
Shaft. Place food in Colander and attach
Bowl.
TO USE:
Turn to Speed 1, for a few seconds, then
turn to Speed 2. If food adheres to sides,
stop and scrape down.
•
Tomato Puree
•
Applesauce
TOMATO PUREE
Cook 8 to 10 tomatoes in boiling water about
8 minutes. Attach Colander, Sieve and
Paddle. Drain tomatoes and place in Colan-
der and Sieve. Turn to Speed 1 and sieve to-
matoes. 11 tomatoes adhere to sides, stop and
scrape down occasionally.
APPLESAUCE
8 medium apples
1 cup water
Core and quarter apples; combine with wa-
ter, sugar and cinnamon in a saucepan.
Cover and simmer until very tender, about
10 to 15 minutes. Remove cinnamon and
drain apples.
Attach Colander, Sieve and Paddle. Place
about half of the apples in Sieve and turn to
Speed 2. Sieve apples for about 1 minute.
Stop. Place remainder of apples in Colander
and Sieve as above.
NOTE: Use wooden spoon cautiously to
Yield: approximately
44
push contents down into Sieve. Stop
and scrape Paddle and Rim of Col-
ander after first half of sieving.
3/4
cup sugar
2 sticks cinnamon
11/2
cups
Page 47

KITCHENAID ATTACHMENTS
Every KitchenAid Food Preparer has a built-in power unit to make it more than just a mixer.
You may want to add to the utility of your Food Preparer by purchasing some of these time-
saving Attachments. Order these from your dealer or authorized servicing outlet. Always
specify the model number of your Food Preparer and the name and letter designation of the
Attachment when placing an order.
Directions for using the Attachments are found on the precee ding pages.
ALL MODELS
G—Splash Guard
CO—Can Opener JE—Juice Extractor
BU—Silver Buffer
I
Model 4-C only
PC—Pouring Chute
KS—Knife Sharpener
SSB—Stainless
Steel Bowl
FG—Food Grinder
SS—Sausage Stuffer
DVS—Disc Vegetable Slicer
Model K-45 only
RVS—Rotor Vegetable Slicer-Shredder
VF and VC—
Fine and Coarse Grater Plate
VI—Ice Chipping Plate
Model K5-A only
WI—Ice or
Hot Water Jacket
CS—Colander
and Sieve
CF—Ice Cream
Freezer
2—quart capacity
CS—Colander and Sieve
CF—Ice Cream Freezer
2—quart.capacity
CS—Colander and Sieve
CF—Ice Cream Freezer
4—quart capacity
Page 48

Look for these other
fine KitcheiiAid Products
KitchenAid
DISHWASHERS
Whichever KitchenAid dishwasher you buy, you'll
get outstanding performance and reliability.
That's what built our reputation ever since
KitchenAid dishwashers were introduced over 25
years ago. We make even our lowest priced models
to be as reliable as the highest priced models of
other brands. And to make sure-your KitchenAid
will work properly from the first day you get it,
every one is hooked up and tested before it leaves
our factory. A wide variety of models to choose
from: Built-ins, Dishwasher-Sink Combinations,
Front-loading portables, Convertible-portables
and Top-loading portables.
KitchenAid
TRASH COMPACTOR
It puts a 3,000 lb. squeeze on
all the boxes, cans, bottles and
paper that previously would
fill three or four trash cans so
they fit neatly into just one.
And with KitchenAid, you
can choose to use the
Compactor with or without
trash bags.
KitchenAid
HOT-WATER
DISPENSER
You'll find many uses for it
every day. Instant, steaming
hot water up to 190°F.. . just
by turning a knob. It's hot
enough to make instant foods
or drinks and help with
special clean-up chores.
KitchenAid
FOOD WASTE
DISPOSERS
A KitchenAid Disposer grinds
finer, faster, quieter. .. and
lasts longer. It gets rid of food
waste, even beef bones and
stringy vegetables. In every
way, it's built to last. Choose
from either the batch feed or
continuous feed models.
KitchenAid
ELECTRIC
COFFEE
MILL
With a KitchenAid Coffee
Mill, all the flavor and aroma
of freshly ground coffee goes
in every cup. Simply dial your
favorite grind and flip the
switch. Then brew. .. and
enjoy the incomparable taste
of fresh-ground coffee.
F-11189-B
KitchenAid Division,
HOBARTA
To
..
5374
(Y.-374) Litho in USA
Page 49

Allentown
Altoona
Erie
Greensburg
Harrisburg
Philadelphia
Pittsburgh
Scranton
Wilkes Barre
RHODE ISLAND:
Central Falls 02853
SOUTH CAROLINA:
Columbia
Greenville
SOUTH DAKOTA:
Rapid City
Sioux
Falls
TENNESSEE:
Bristol
Chattanooga
Knoxville
Memphis
Nashville
TEXAS:
Abilene
Amarillo
Austin
Beaumont
Corpus Christi
Dallas
El Paso
Fort Worth
Harlingen
Houston
Lubbock
San Antonio
Texarkana
Waco
Wichita Falls
UTAH:
Salt Lake City
Rutland
Hobart Sales and Service
18103
1015 Union Blvd.
16602
Hobart Sales and Service
400 S. Greenwood Rd.
16503
Hobart Sales and Service
306 E. 11th St.
15601
Hobart Sales and Service
512 Euclid St.
17111
Hobart Sales and Service
2917 Wayne St.
19136
Hobart Corporation
9135 Torresdale Ave.
15210
Hobart Corporation
1224 Brownsville Rd.
18503
Hobart Sales and Service
302 Penn Avenue
18701
Hobart Sales and Service
55 S. Washington St.
Hobart Sales and Service
444 Broad St.
29205
Jim Fleshman Equipment Co.
749 Saluda Ave.
29609
Hobart Sales and Service
400 McAlister Road
57701
Hobart Sales and Service
2223 S. Hwy. 79
57106
Hobart Sales and Service
5007 West 12th St.
37620
Hobart Sales and Service
56 Pennsylvania Ave.
37404
Hobart Sates and Service
1216-tsOrQalti-*ve. -
37917
Hobart Sales and Service
210 Magnolia Ave.
38126
Hobart Sales and Service
591 Linden Ave.
Hobart Sales and Service
37203
1715 Church St.
79602
Hobart Sales and Service
999 Oak St.
79109
Hobart Sales and Service
2212 Canyon Dr.
Hobart Sales and Service
78701
404 East 2nd
Hobart Sales and Service
77701
2690 South 4th St.
78401
Hobart Sales and Service
1327 Loredo St.
75240
Hobart Corporation
4407 Alpha Road
79902
Hobart Sales and Service
1430 Wyoming Ave.
76104
Hobart Corporation
809 W. Vickery Blvd.
Hobart Sales and Service
78550
521 W. Harrison St.
77002
Hobart Sales and Service
5120 Ashbrook
79416
Hobart Sales and Service
Levelland Highway Rt #5
78212
Hobart Sales and Service
1919 N. St. Marys
75501
Hobart Sales and Service
1102 Bowie St.
76702
Hobart Sales and Service
500 N. 9th St.
76301
Hobart Sales and Service
1206 14th St.
84115
Hobart Sales and Service
3410 South 300 West
439-1504
944-8363
452.4979
834-2015
564-6202
331-8400
881-7600
342-7900
696-1476
728-1150
252-7762
239-3588
348-2680
332-6531
764-3942
6311 4479
523-8410
523-8093
329-3096
677-6962
374-0357
226-2792
833-6022
883-4622
233-7781
532-2122
335-4639
423-8066
666-8031
792-4351
226-2792
794-8021
752-4631
766-0471
487-9955
VIRGINIA:
Charlottesville 22901
Norfolk
Richmond
Roanoke
WASHINGTON:
Seattle
Spokane
Tacoma
WEST VIRGINIA:
Charleston
Clarksburg
Huntington
Parkersburg
WISCONSIN:
Appleton
La Crosse
Madison
Marathon
New Berlin
Oshkosh
WYOMING:
05701 Hobart Sales and Service
23513
23220
24012
98121
99204
98408
25302
26301
25704
26101
54911
54601
53714
54448
53151
54901
Route 4 East
Hobart Sales and Service
1724 Allied St.
Hobart Sales and Service
3300 Azalea Garden Road
Hobart Sales and Service
1739 Kelleys Road
Hobart Sales and Service
3135 Williamson Rd. NW
Hobart Sales and Service
2208 2nd Ave.
Hobart Sales and Service
218 S. Howard St.
Hobart Sales and Service
3424 S. Tacoma Way
Hobart Sales and Service
741 Virginia St., W.
Hobart Sales and Service
132W. Pike St.
Hobart Sales and Service
1601 Washington Ave.
Hobart Sales and Service
550 Fifth St.
Hobart Sales and Service
634 W. Wisconsin
Hobart Sales and Service
912 Caledonia St.
Hobart Sales and Service
3212 Commercial Ave.
Hobart Sales and Service
301 M.,)a St-
Hobart Corporation
2331 S. 170th Se.
Hobart Sales and Service
1209 N. Main St.
773-7183
295-2168
853-0921
353-1275
362-1638
622-1022
747-3893
474-0746
346-9643
624-5962
429-3050
428-0731
739-9141
782-1019
249-7646
782-0100
231-3640
I
HO
LJ
69L
H
OB
ART
CORP
OR
ATI
ON
, TROY
, OHIO
45374
N
II
H3
VN3
OI
a
AI
SI
OI
N
C
.
C
ID
:3
-
ID
.0
D 0
cr5
0
'—F
C
0
Ci
-
Ci
ID
<
o
ID
00
0
C)
-
ID
-
4
0
:3
-:-
—
ID
CD
Cn
ID
-
s
:3
00
-4
-.5
C
ID
-4
0
Si,
CD
-'
(Ci
--CD
-
•
.-t
CD
•
-.)
CD C5 ZD
ID
C
-,
CD
ID
D
-
cn
C:
-+1
Qj
CD
Ct
-,
.
-
t
CD
--t
—NJ
5,
(r
CL (CD
-
0
U)
5/•
CD')
CD
C)
-ç
-
o
0)
cn
0
-
Cp
C
CD
CD
—d
CD
rs
-f
:3
(I)
CD
Cs
-
C
CD
D
T
r+
0
0
9AP
'qZ
3
14
rr
AI
L6
t7
OHinv
ZIH
03
S
UJ
IA
3
NJ
O
fl
U
U
S
Page 50

ALABAMA:
Birmingham
Dothan
Florence
Mobile
Montgomery
35203
36301
35630
36601
36104
ALASKA:
Anchorage
Juneau
99503 Hobart Sales and Service
99801
ARIZONA:
85281
85719
Tempe
Tucson
ARKANSAS:
72902
72204
93305
94010
95926
95549
93721
92645
90017
94609
98515
93901
92110
95150
95401
95204
Ft. Smith
Little Rock
CALIFORNIA:
Bakersfield
Burlingame
Chico
Eureka
Fresno
Garden Grove
Los Angeles
North Hollywood 91605
Oakland
Sacramento
Salinas
San Bernardino 92410
San Diego
San Jose
Santa Barbara 93103
Santa Rosa
Stockton
COLORADO:
Colorado Springs 80903
Denver
Grand Junction
CONNECTICUT:
Bridgeport
Hartford
West Haven
80216
81501
06605
06114
06516
DELAWARE:
DISTRICT OF COLUMBIA:
Washington
20018 Hobart Sales and Service
Jacksonville
Miami
Orlando
Pensacola
Sarasota
Tallahassee
Tampa
West Palm Bench
32206
33150
32806
32506
33581
32304
33614
33401
GEORGIA:
Albany
Athens
Augusta
Chamblee
Columbus
Macon
Savannah
HAWAII:
Honolulu
IDAHO:
Boise
31701
30601
30904
30341
31904
31204
31404
96814 Hobart Corporation
83706 Hobart Sales and Service
Hobart Sales and Service
621 N. 9th St.
Hobart Sales and Service
302-A S. Lena St.
Hobart Sales and Service
3705 Florence Blvd.
Hobart Sales and Service
507 St. Louis St.
Hobart Sales and Service
124 Covington Rd.
3217 Arctic Boulevard
Hobart Sates and Service
292 S. Franklin St.
Hobart Corporation
929A South Hohokam
Hobart Sales and Service
2766 N. Country Club Rd. 795-3550
Hobart Sales and Service
2917 Midland Blvd.
Hobart Sales and Service
4706 W. 12th St.
Hobart Corporation
505 E. 19th St.
Hobart Corporation
1801 Bayshore Hwy.
Hobart Sales and Service
173 E. 13th St.
Hobart Sales and Service
Greenwood Heights Dr.
Hobart Sales and Service
175 Fulton
Hobart Corporation
Hobart Corporation
1501 W. 8th St.
Hobart Corporation
13360 Sherman Way
Hobart Corporation
4315 Telegraph Ave.
Hobart Corporation
1584 Silica Ave.
Hobart Corporation
611 E. Atisat St.
Hobart Corporation
1184 W. Baseline St.
Hobart Corporation
5390 Napa
Hobart Corporation
325 Phelan Ave.
Hobart Corporation
236 E. Montecita St.
Hobart Sales and Service
905 W. College Ave.
Hobart Corporation
2511 W. Lane Boulevard
Hobart Corporation
525 South Weber
Hobart Corporation
1325 E 58th Ave.
Hobart Sales and Service
2924 North Ave.
Hobart Sales and Service
3406 Fairfield Ave.
Hobart Corporation
300 Murphy Rd.
Hobart Corporation
636 First Ave.
2830 Bladensburg Rd. N.E.
Hobart Sales and Service
452 E. 8th St.
Hobart Corporation
9100 N.W. 7th Ave.
Hobart Corporation
2605 S. Taylor Ave.
Hobart Sales and Service
5604-5606 N. Davis Hwy.
Hobart Sales and Service
3210 Clark Rd.
Hobart Sales and Service
1366 Btountstown Hwy.
Hobart Corporation
5424 W. Water St.
Hobart Corporation
901 N. Dixie Highway
Hobart Sales and Service
622 Flint
Hobart Corporation
1383 Prince Ave.
Hobart Sales and Service
423 Crawford Ave.
Hobart Corporation
3904 N. Peachtree
Hobart Sales and Service
3802 Glenn Road Expy.
Hobart Sales and Service
3186 Columbus Road
Hobart Sales and Service
2601 Waters Ave
317 Kamakce SE
1517 Main St.
324-4639
794.5277
764.0536
433-3851
262-3255
277-0541
586-3125
968-9401
783-1167
666-2816
322-7171
697-9122
342-9092
443.4981
237-2118
.89,3-3558
483-131
483-1310
983-1107
654-6366
922-9681
422-2754
889-2785
299-9500
293-6333
966.6147
545-1822
463-6101
471-2222
572-3194
243-1548
333-0053
523-8222
934-1108
529-4100
356-1376
759-5702
843-8864
477-9700
924-0414
5764780
884-3466
833-3316
436-7105
93-3558
543-7887
733-0950
458-2361
561-0401
746-5365
236-0004
5364361
343-4521
ILLIONIS:
Aurora
Broadview
Mount Prospect
Peoria
Quincy
Rockford
Springfield
60538
60155
60056
61614
62301
61103
62703
INDIANA:
Evansville
Ft. Wayne
Highland
Indianapolis
Lafayette
South Bend
Terre Haute
47711
46819
46322
46241
47905
46618
47807
IOWA:
Davenport
Des Moines
Dubuque
Sioux City
Waterloo
52803
50313
52001
51103
50701
KANSAS:
Hays
Topeka
Wichita
67601
66604
67214
KENTUCKY:
Lexington
Louisville
40505
40104 Hobart Sales and Service
LOUISIANA:
Baton Rouge
Carencro
Metairie
Shreveport
West Monroe
70816
70520
70002
71103
71291
MAINE:
Westbrook
MARYLAND:
Baltimore
Hagerstown
Salisbury
04102 Hobart Sales and Service
21204
21740
21801
MASSACHUSETTS:
Dedham
N. Dartmouth 02747
Springfield
Worcester
02026
01104
01609
MICHIGAN:
Flint
Grand Rapids
Kalamazoo
Lansing
Marquette
Oak Park
Saginaw
Traverse City
MINNESOTA:
Duluth
Minneapolis
St. Cloud
St. Paul
48507 Hobart Sales and Service
49508 Hobart Sales and Service
49003 Hobart Sales and Service
48906 Hobart Sales and Service
49855
48237
48603 Hobart Sales and Service
49684 Hobart Sales and Service
55806
55405
56301
55117
MISSISSIPPI:
Jackson
Tupelo
39202 Hobart Corporation
38801
MISSOURI:
Cape Girardeau
63701 Hobart Corporation
Hobart Corporation
835 W. Lake St.
Hobart Corporation
2747 S. 25th Ave.
Hobart Corporation
415 S. Williams St.
Hobart Sales and Service
1504 W. Crestwood
Hobart Corporation
640 N. 12th St.
Hobart Corporation
3515 Auburn St.
Hobart Sales and Service
1500 E. Jefferson St.
Hobart Sales and Service
2115 N. Bedford Ave.
Hobart Sales and Service
4227 Bluffton Rd.
Hobart Corporation
9801 Spring Drive
Hobart Corporation
2222 Profit Drive
Hobart Sates and Service
302 Farabee Drive
Hobart Corporation
224 Garst
Hobart Corporation
1662 Locust St.
Hobart Sales and Service
618 E. 4th St.
Hobart Sales and Service
5701 N. Second Ave.
Hobart Sales and Service
53 Locust St.
Hobart Corporation
512W. 7th St.
Hobart Sales and Service
1133 Franklin St.
Hobart Sales and Service
131 W. 8th St.
Hobart Sales and Service
2041 Western St.
Hobart Sales and Service
1140 N. Mostly St.
Hobart Sales and Service
1057 Goodwin Dr.
1010 East Broadway
Hobart Sales and Service
4324 Rhoda Drive
Hobart Sales and Service
Route 1
Hobart Corporation
3209 Ridge Lake Dr.
Hobart Corporation
2037 Texas Ave.
Hobart Sales and Service
504 Louisville Ave.
4 Warren Ave.
Hobart Corporation
1030 Cromwell Bridge Rd.
Hobart Sales and Service
654 Frederick St.
Hobart Sales and Service
Alexander Ave.
Hobart Corporation
Rear 892 Providence Hwy.
Hobart Sales and Service
166 Chase Rd.
Hobart Corporation
467 Cottage St.
Hobart Salts and Service
55 Chandler St.
G-4175 S. Saginaw
4064 S. Division St.
3816 Miller Rd. (at Sprinkle) 349-6767
4631 N. East St.
Hobart Sales and Service
1732 Elm Ave.
Hobart Corporation
12750 North End Ave.
2345 Midland Rd.
10240 A Cherry Bend Road 946-7311
Hobart Sates and Service
2132 W. Third St.
Hobart Corporation
1221 Glenwood Ave. N.
Hobart Sales and Service
R.R. #5 Cheryl Park
Hobart Corporation
345 Atwater
1118 S. Gallatin St.
Hobart Sales and Service
Highway 45 North
South panish
--
897-0586
626-3787
259-8010
688-8533
223-0900
962-8074
866.2394
477-0886
744-5328
838-7797
243-8506
742-6959
288-7722
232-1493
326-3557
283-2119
582-7834
255-8401
233-9632
625-9028
354-1494
2654279
252-6689
585-4389
343-1563
896-8266
835-2518
221-5221
325-1773
772-6478
828-6100
733-6560
546-1334
329-3340
992-5125
734-7191
756-7101
742-7590
534-5131
489-6349
225-1654
542-5938
793-7441
727-3103
377-9622
251-0606
488-0538
948-3772
8424248
334-5094
Joplin
Kansas City
Springfield
St. Louis
MONTANA:
Billings
Helena
NEBRASKA:
Omaha
NEVADA:
Lass Vegas
Reno
NEW HAMPSHIRE:
Manchester
NEW JERSEY:
Fairfield
Manasquan
Morris Plains
Trenton
NEW MEXICO:
Albuquerque
NEW YORK:
Bronx
Buffalo
Elmira
Guitderland
Hauppauge
Johnson City
Long Island City
Newburgh
Olean
Rochester
Syracuse
Utica
Watertown
White Plains
NORTH CAROLINA:
Asheville
Charlotte
Fayetteville
Greensboro
Kinston
Raleigh
Wilmington
Winston Salem
NORTH DAKOTA:
Fargo
Minot
OHIO:
Akron
Bridgeport
Cincinnati
Cleveland
Columbus
Dayton
Lima
Mansfield
Toledo
Youngstown
OKLAHOMA:
Oklahoma City
Tulsa
OREGON:
Eugene
Portland
64801
Hobart Sales and Service
930 Main St.
64111
Hobart Corporation
4130 Penniylvania
62703
Hobart Sales and -Service
1906 E. Meadowmere St.
63110
Hobart Corporation
4044 Clayton Ave.
59102
Hobart Sales and Service
216 Moore Lane
59601
Hobart Sales and Service
140 E. 61h Ave.
68127
Hobart Sates and Service
8939 L St.
89102 Hobart Sales and Service
2407 S. Highland Ave.
89502 Hobart Corporation
145 A. Hubbard Way
03105
Hobart Sales and Service
Route 28 Bypass
07006
Hobart Corporation
4 Gloria Lane
08736
Hobart Corporation
1917 Atlantic Ave.
07950
Hobart Sates and Service
3000 Route #10
08610
Hobart Corporation
40 W. Taylor Ave.
87107-
3115 Claremont St. N.E.
10461 Hobart Sales and Service
1509 Jarrett Place
14206 Hobart Sales and Service
111 Dingens St.
14901 Hobart Sales and Service
402 S. Main St.
12084
Hobart Sates and Service
Charles Park, New Karner Rd.456-0100
11767 Hobart Corporation
1330 Motor Parkway
13790
Hobart Sales and Service
130 Main St.
11101 Hobart Corporation
48-48 Fifth
12550
Hobart Sales and Service
137 Walsh Ave.
14206
Hobart Sales and Service
111 Dingens St.
14623
Hobart Corporation
3000 Winton Rd. South 275-9000
13201 Hobart Sales and Service
100 Tully St.
13502 Hobart Sales and Service
169 Campbell Ave.
13601 Hobart Sales and Service
424 Court St.
Hobart Corporation
10603
606 N. Broadway
28803
Hobart Sales and Service
563 Fairview Road
28203
Hobart Sales and Service
3108 Griffith St.
28306
Hobart Sales and Service
5005 Raeford Road
27403
Hobart Sales and Service
3109 Battleground Ave.
28501
Hobart Sales and Service
1906 West Vernon
Hobart Sales and Service
27606
5706 New Chapel Hill Rd.
28401
Hobart Sales and Service
1220 Dock St.
27105
Hobart Sales and Service
2607 N. Liberty St.
58102
Hobart Sales and Service
18 South 14th St.
58702
Hobart Sales and Service
Highway 2 and 52 W
44310
Hobart Sales and Service
1022 Main St., N.
43912
Hobart Sales and Service
117 County Road
45246
Hobart Sales and Service
217 Northern Blvd.
44135
Hobart Corporation
15416 Industrial Pkwy.
43215
Hobart Corporation
1063 Dublin Rd.
45404
Hobart Corporation
2548 E. Stanley Ave.
45805
Hobart Sales and Service
217 So. Pine St.
44905
Hobart Sales and Service
1222 Park Ave., East
43608
Hobart Corporation -
1156 Expressway Dc., S.
44507
Hobart Sales and Service
3330 Market St.
73106
Hobart Sales and Service
1740 N.W. 5th St.
74104
Hobart Sales and Service
2244 E. 6th St.
97401
Hobart Sales and Service
340 W. 5th St.
97209 Hobart Sates and Service
624-1100
531-1113
866-2394
534-2604
259-7935
442-8750
339-0550 -
385-350-3
323-2155
723-6054
227-9265
223-1100
267-9111
223-1100
345-2470
892-8933
826-8760
732-9070
2344200
797-2366
361-1010
565-8955
826-8761)
472-7779
732-3839,
782-1510
949-7460
274-3239
372-3155
425-7954
288-6370
527-0040
851-0956
763-8576
723-6054
237-5240
839-3820
923-0777
635-0523
771-8833
433-4800
486-7106
223-41t4
222-5976
5894852
729-5418
788-6092
236-5961
939-2254
342-1875
Page 51

ROTOR SLICER and SHREDDER
IMPORTANT SAFEGUARDS
When using electrical appliances, basic safety precautions
should be followed. Please refer to the basic Important
Safeguards as outlined on page 1 of the KitchenAid Food
Preparer Instruction Manual. In addition, these instructions
should be followed:
•
ALWAYS use a completely assembled slicer.
•
NEVER use fingers or a spoon to depress
the food. ALWAYS use the Hopper Plate,
holding it by the handle.
•
Blades on Cones are sharp. Handle carefully.
SAVE THESE INSTRUCTIONS
Page 52

TO ATTACH AND ASSEMBLE:
Looen Attachment Knob. Insert Shaft
Housing (1) into the Attachment Hub
(2) and tighten Knob.
and Care Guide, pages 33, 38-39.
Please see Use
Insert Cone unit into Housing so that
Shaft fits into square Hub Socket. The
Cone unit is automatically locked into
position with Latch (6).
Attach Shaft (3) to desired Cone.
Insert square end of Shaft (4) in square
opening of Housing (5) and tighten by
turning Cone clockwise.
TO CHANGE CONES:
The Latch (6) must be raised to
remove Cone unit. Cones may be easily
changed by inserting square end of
Shaft (4) in square opening (5) and
turning counterclockwise.
TO USE:
To use Slicer/Shredder, lift the Handle
of the Hopper Plate (7) and drop food
in the Hopper. Turn to Speed 4 and
push down lightly on Handle. Catch
the food in the Bowl or any other-deep
bowl.
Never
depress the food. Always use the
Hopper Plate, holding it by the Handle
(8).
use fingers or a spoon to
SEE REVERSE SIDE
Page 53

CONES AND THEIR USES: All Cones
are numbered on the closed end.
NO.1 FINE SHREDDER:
Finely shreds hard and crisp vegetables,
such as carrots, beets, turnips and
celery, or grates nuts, onions, potatoes,
hard cheese, dry bread and fruit rinds.
Forr F-3267-C
NO. 2 COARSE SHREDDER AND
SHOE STRINGER:
Coarsely shreds carrots, celery, fruit,
nuts, or chocolate. Potatoes can be
shredded for shoestrings, juliennes or
hash browns.
NO.3 THICK SLICER:
Gives a uniformly thick slice for all
firm foods ordinarily sliced aith a
knife. Perfect for steamed, fried,
scalloped or creamed vegetables.
NO.4 THIN SLICER:
Thinly slices vegetables for cole slaw,
potato chips, sauerkraut, bread and
butter pickles, sliced cucumbers,
radishes, celery and nuts.
KITCHENAID DIVISION
Troy, Ohio 45374
(G-175)
Page 54

FULL ONE YEAR WARRANTY
ON COMPLETE ATTACHMENT
Hobart Corporation warrants this Attachment to your KitchenAid Food
Preparer, when operated within the United States in normal home use, to
be free of defects in workmanship or material for one year from date of
purchase. Hobart will, through one of its authorized KitchenAid service
outlets, repair or replace, free of charge, including service and labor, all
parts found to be defective and subject to such warranty.
HOW TO ARRANGE FOR SERVICE
•
First consult the list of KitchenAid Authorized Servicing Outlets listed
in the Recipe Instructions Book provided with your Food Preparer and
select the authorized outlet that is most convenient for you.
Take the Attachment, or ship, prepaid and insured, to the authorized
•
servicing outlet. Repaired Attachment will be returned, prepaid and
insured.
•
All service should be handled locally by a KitchenAid Authorized
Service Outlet. If you are unable to obtain satisfactory service in this
manner, contact the Customer Relations Department, KitchenAid
Division, Hobart Corporation, Troy, Ohio 45374. Phone Area Code
513- 335-7171.
WHAT IS NOT COVERED
The above warranties do not apply to damage resulting from accident,
alteration, misuse or abuse. Hobart does not assume any responsibility for
consequential damages. Some states do not allow the exclusion or
limitation of incidental or consequential damages, so the above limitations
may not apply to you.
This warranty gives you specific legal rights and you may also have other
rights which vary from state to state.
6Tb KITCHENAID DIVISION
F-12358
TROY, OHIO 45374
(H-1276)
Page 55

POURING SHIELD
TO ATTACH:
Place Pouring Shield on rim
Bowl to Food Preparer. Then attach Flat Beater,
Wire Whip or Dough Hook.
K45: Attach Beater, Whip or Dough Hook
with Motor Head tilted up. Lower
Beater attachment through chute
portion
of
Shield.
of
Bowl. Attach
Chute is lined up by turning Shield
until Beater attachment can be
lowered through.
K5A: Attach Beater with Bowl in low
position. Then raise Bowl to Motor
TO USE:
Place or pour ingredients into chute portion
Pouring Shield to introduce them into the Bowl
while Food Preparer is mixing.
TO SCRAPE BOWL . .
Motor Head. Lift Motor Head (K45) or lowir
Bowl (K5A) and scrape as needed.
Head.
. Lift Pouring Shield over
of
Page 56

POURING SHIELD
IMPORTANT SAFEGUARDS
When using electrical appliances, basic safety precautions
should be followed. Please refer to the basic Important
Safeguards as outlined on page 1 of the KitchenAid Food
Preparer Instruction Manual.
SAVE THESE INSTRUCTIONS
KITCHENAID DIVISION
HOBART
52
Troy, Ohio 45374
Page 57

_9 k 9 Q 9 9 0
0 1 k
QJ&L9
0
Q..LLQ
9
U
U
U10
U
U Q.9J 2JJ._9.9 QLLLO.J.j
9,.
FULL ONE YEAR WARRANTY
ON COMPLETE ATTACHMENT
Hobart Corporation warrants this Attachment to your KitchenAid Food
Preparer, when operated within the United States in normal home use, to
be free of defects in workmanship or material for one year from date of
purchase. Hobart will, through one of its authorized KitchenAid service
outlets, repair or replace, free of charge, including service and labor, all
parts found to be defective and subject to such warranty.
HOW TO ARRANGE FOR SERVICE
First consult the list of KitchenAid Authorized Servicing Outlets listed
•
in the Recipe Instructions Book provided with your Food Preparer and
select the authorized outlet that is most convenient for you.
•
Take the Attachment, or ship, prepaid and
servicing outlet. Repaired Attachment will
insured, to the authorized
be returned, prepaid and
insured.
•
All service should be handled locally by
Service Outlet. If you are unable to obtain
manner, contact the Customer Relations
Division, Hobart Corporation, Troy, Ohio
a KitchenAid Authorized
satisfactory service in this
Department, KitchenAid
45374. Phone Area Code
513- 335-7171.
WHAT IS NOT COVERED
The above warranties do not apply to damage resulting from accident,
alteration, misuse or abuse. Hobart does not assume any responsibility for
consequential damages. Some states do not allow the exclusion or
limitation of incidental or consequential damages, so the above limitations
may not apply to you.
*
This warranty gives you specific legal rights and you may also have other
rights which vary from state to state.
0
F-12358
KITCHENAID DIVISION
TROY, OHIO 45374
(H-1276)
E
0
Page 58

Itit€hiiAid®
GRAIN MILL ATTACHMENT
For Models K-45 and K5-A only
Get
Back to Basics
with a
KitchenAid Food Preparer
and Grain Mill Attachment.
Go from
Grain to Bread,
right in your own kitchen.
Grinds Wheat, Corn, Rye, Oats, Rice, Buckwheat and Barley to a fine flour or coarse meal
for bread, cookies, muffins, cereal, casseroles and many other tasty foods.
FLAVOR
Enjoy the whole flavor of natural
grain when you grind your own
flour for cooking and baking.
Wholegrain flours provide sub-
stantially more nutrients than
white flour, even when the white
flour is enriched.
NUTRITION
MONEY SAVINGS
Added to all the benefits of grind-
ing your own flour is the cost sav-
ings you can enjoy as compared
to buying commercially prepared
flour.
Page 59

Grain Mill Hopper
Funnel also provided
for easy loading of
Hopper.
Grain Mill
Shaft Housing
Fits Attachment
Hub of K45 and
K5-A Food Pre-
parers.
Glass Jar
2-cup capacity
Jar holds
ground flour.
Grain Mill Housing
Made of polished cast
aluminum. Contains the
stationary grinding Burr.
Grind Worm
Moves grain automatically
from Hopper into Burrs for
grinding.
Movable Burr
Turns against stationary
grinding Burr to grind
grain. Made of hardened
metal for long life.
Adjustment Knob
Adjusts from fine to
coarse grind.
Thumb Screws & Lock Washers
Provide a fight fit for
Grain Mill parts during
grinding. Remove easily
for disassembly and
cleaning.
The easy-to-use Grain Mill Attachment gives you freshly ground flour without the time consuming,
hard work of a hand-cranked mill. And your KitchenAid mixer is right there to mix up those
wholegrain foods that add wholesome variety to your menu.
The booklet provided with the Grain Mill gives simple instructions for use and care, information
on grains, and basic wholegrain recipes which can be varied according to your own personal taste.
We hope this delicious corn bread recipe will tingle your tastebuds and tempt you to get
to basics
with KitchenAid.
I
back
BUTTERMILK CORN BREAD
2 cups whole corn meal
leaspoon salt
Vi
1 teaspoon cream of tartar
/i
teaspoon soda
3 tablespoons brown sugar
1 cup buttermilk
2 eggs
1/4
cup liquid shortening
Instructions written for use with KitchenAid mixer.
Mix corn meal, salt, cream of tartar, soda and brown sugar together thoroughly. Set aside.
Place eggs in Bowl. Attach Bowl and Flat Beater. Turn to Speed 6 and beat for about 30 seconds.
Reduce to Speed 4 and add buttermilk. Beat 15 seconds longer. Stop and scrape Bowl.
Add dry ingredients and liquid shortening to egg mixture. Turn to Speed 2 and mix only until
ingredients are combined, about 30 seconds.
Pour into a greased 8 x 8-inch pan and bake at 425° F. for 20 minutes or until done.
Yield: 16 2-inch squares
VARIATION:
Substitute 1 cup wholegrain wheat flour for 1 cup of the corn meal. Proceed as directed.
Additional attachments that can make your KitchenAid mixer a complete food preparation center:
Food Grinder
Vegetable Slicer
Can Opener
Juice Extractor
Colander and Sieve
Ice Cream Freezer
Knife Sharpener
Silver Buffer
Splash Cover
Pouring Chute
Sausage Stuffer
F-11639
KitchenAid Division
Troy, Ohio
45374
(K-674)
Page 60

PLEASE FILL OUT COMPLETELY & CLEARLY
H
YOUR
N
ADDRESSr
CITY &
STATE
YOUR
COMPANY
NAME
TELEPHONE NO.
LOC.
CATALOG NO/ST
31
::
(97,
(
-
L
1
.
ALL RETURNS MUST BE ACCOMPANIED BY SALES RECEIPT, ORIGINAL CARTON & PACKING
-
NO
j
LT2
.
BUYER'S CODE
/
7 7
R'_•
- -
PICKED BY
DESCRIPTION (INCLUDE SIZE AND COLOR)
'/
0
BEST
PRODUCTS
®
\
'YTE,r/
()IA
60
TEL
RE
8
0
TV
ENG
//?
Page 61

R
fl7EE6
54
14872
t.675Q
6//77
17,67 M
9.97 MCS
27.6L
¶TL
1.80 TX
29.1414
29./4
n
•
U fiU
14 TTL
L.
CTC
P
CU
 Loading...