

Page 1

Food Processor
KFP1317
KFP1318
KFP1319
W11462548A.indb 1W11462548A.indb 1 10/14/2020 12:23:13 PM10/14/2020 12:23:13 PM
Page 2
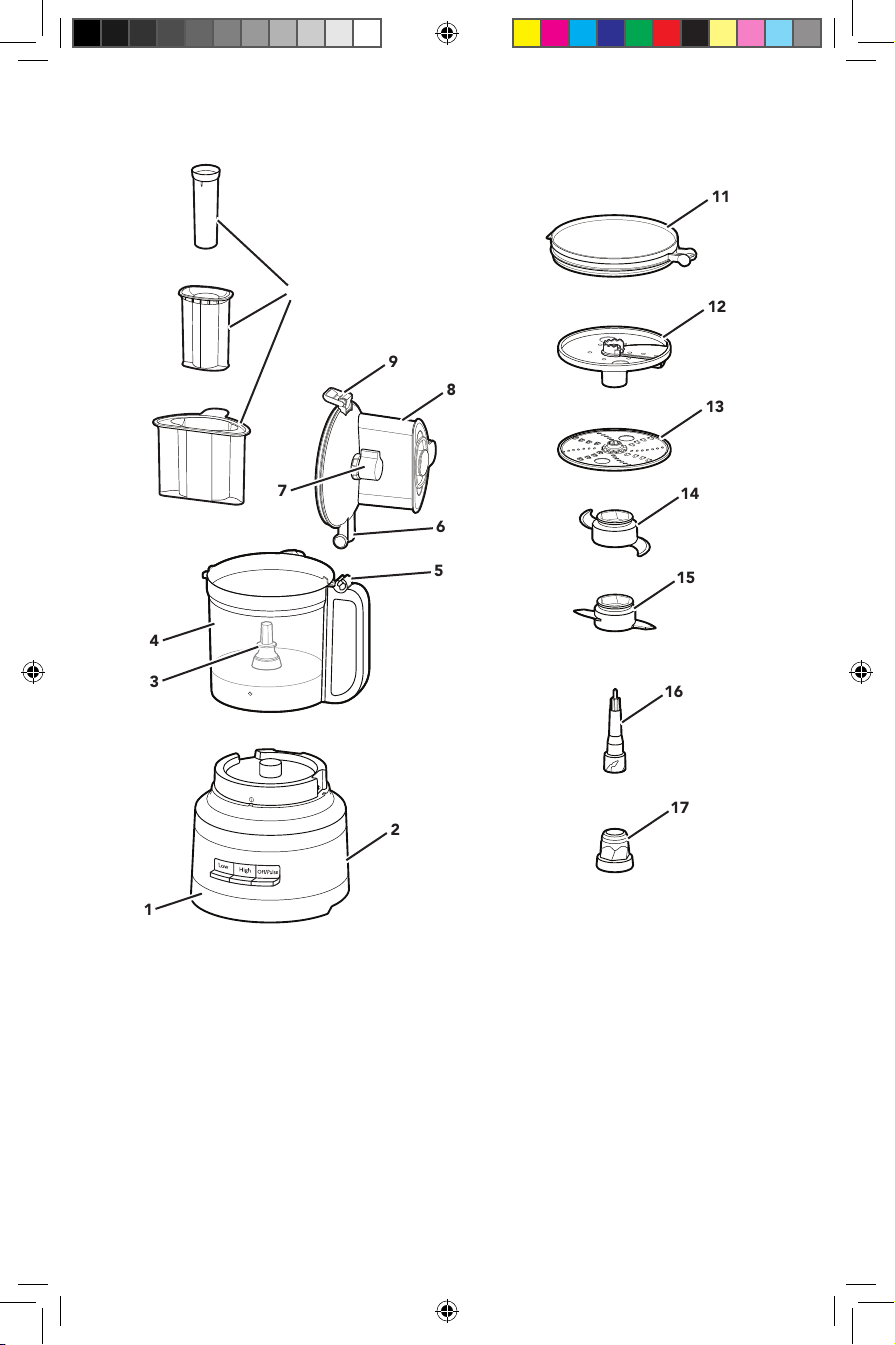
PARTS AND FEATURES
11
10
9
8
7
6
5
4
3
2
12
13
14
15
16
17
1
1 Heavy-Duty Base
2 Power Cord and Cord Storage
(not shown)
3 Drive Pin
4 13-Cup (3.1 L) Work Bowl
5 Handle Hinge
6 Lid Hinge
7 Slicing Knob
8 Work Bowl Cover with 3-in-1 Feed
Tube
9 Lid Latch
2
W11462548A.indb 2W11462548A.indb 2 10/14/2020 12:23:14 PM10/14/2020 12:23:14 PM
10 3-in-1 Food Pusher
11 Refrigerator Lid
12 Externally Adjustable Slicing Disc
(thin to thick)
13 Reversible Fine/Medium Shredding
Disc
14 Multipurpose Stainless Steel Blade
15 Dough Blade
16 Drive Adapter (Upper)
17 Drive Adapter (Lower)
Page 3

ENGLISH
PARTS AND FEATURES
18
19
20
13
12
15
17
21
18 Dicing Kit Cover
19 Dicing Blade
20 Dicing Kit Base
ACCESSORY GUIDE
Accessory
External Adjustable Slice
Storage Caddy
Wide Mouth Opening
3-in-1 Feed Tube
Multipurpose Blade
Dough Blade
Thin and Medium Shred
Thin Shred
Storage Lid
Dicing Kit
22
16
14
21 Dicing Kit Clean Out Tool
22 Storage Caddy
Included with Model
KFP1319 KFP1318 KFP1317
• • •
• • •
• • •
• • •
• • •
• •
• •
•
•
•
3
W11462548A.indb 3W11462548A.indb 3 10/14/2020 12:23:14 PM10/14/2020 12:23:14 PM
Page 4

PRODUCT SAFETY
IMPORTANT SAFEGUARDS
When using electrical appliances, basic safety precautions should always
be followed, including the following:
1. Read all instructions.
2. To protect against risk of electrical shock, do not put Food Processor in water
or other liquid.
3. This appliance is not intended for use by persons (including children) with
reduced physical, sensory or mental capabilities, or lack of experience and
knowledge, unless they are closely supervised and instructed concerning use
of the appliance by a person responsible for their safety. Close supervision is
necessary when any appliance is used by or near children. Children should be
supervised to ensure that they do not play with appliance.
4. Turn the appliance OFF, then unplug from the outlet when not in use, before
assembling, disassembling parts and before cleaning. To unplug, grasp the
plug and pull from the outlet. Never pull from the Power Cord.
5. Avoid contacting moving parts.
6. Do not operate any appliance with a damaged cord or plug or after the
appliance malfunctions, or is dropped or damaged in any manner. Contact the
manufacturer at their customer service telephone number for information on
examination, repair, or adjustment.
7. The use of attachments not recommended or sold by KitchenAid may cause
re, electric shock, or injury.
8. Do not use outdoors.
9. Do not let cord hang over edge of table or counter.
10. Keep hands and utensils away from moving Blades or discs while processing
food to reduce the risk of severe injury to persons or damage to the Food
Processor. A scraper may be used but must be used only when the Food
Processor is not running.
4
W11462548A.indb 4W11462548A.indb 4 10/14/2020 12:23:15 PM10/14/2020 12:23:15 PM
Page 5

ENGLISH
PRODUCT SAFETY
11. Blades are sharp. Handle carefully.
12. To reduce the risk of injury, never place cutting Blade or discs on Base without
rst putting bowl properly in place.
13. Be certain Cover is securely locked in place before operating appliance.
14. Never feed food by hand. Always use the Food Pusher.
15. Do not attempt to defeat the Cover interlock mechanism.
16. Do not ll the bowl above the marked maximum ll line (or rated capacity) to
avoid risk of injury due to damage to the Cover or bowl.
SAVE THESE INSTRUCTIONS
This product is designed for household use only.
ELECTRICAL REQUIREMENTS
Voltage: 120 VAC
Frequency: 60 Hz
NOTE: This Food Processor is equipped with a polarized plug (one Blade is wider than
the other). To reduce the risk of electrical shock, this plug will fit in a polarized outlet only
one way. If the plug does not fit fully in the outlet, reverse the plug. If it still does not fit,
contact a qualified electrician. Do not modify the plug in any way.
5
W11462548A.indb 5W11462548A.indb 5 10/14/2020 12:23:15 PM10/14/2020 12:23:15 PM
Page 6

ACCESSORIES SELECTION GUIDE
Action Setting Food Accessory
Cheese
Chop
Mince or Purée
Mix
Slice
(thin to thick)
Shred
(fine to medium)
Dice
Knead
Low or Pulse
High or Pulse
Low
Low
High
Low
High
Low
Low
Chocolate
Fruits
Fresh herbs
Nuts
Tofu
Vegetables
Pasta Sauce
Pesto
Salsa
Sauces
Batters
Fruit (soft)
Potatoes
Tomatoes
Vegetables (soft)
Cheese
Chocolate
Fruit (hard)
Vegetables (hard)
Potatoes
Vegetables (soft)
Cabbage
Cheese
Chocolate
Fruits (hard)
Vegetables (hard)
Potatoes
Vegetables
Fruit
Cheese
Yeast
Dough
Multipurpose Stainless
Steel Blade
Externally Adjustable
Slicing Disc
Reversible Fine/Medium
Shredding Disc
Dicing Kit
Dough Blade
FOR DETAILED INFORMATION ON USING THE FOOD PROCESSOR
Visit www.kitchenaid.com/quickstart for additional instructions with videos, inspiring
recipes, and tips on how to use your Food Processor.
6
W11462548A.indb 6W11462548A.indb 6 10/14/2020 12:23:15 PM10/14/2020 12:23:15 PM
Page 7

ENGLISH
PRODUCT ASSEMBLY
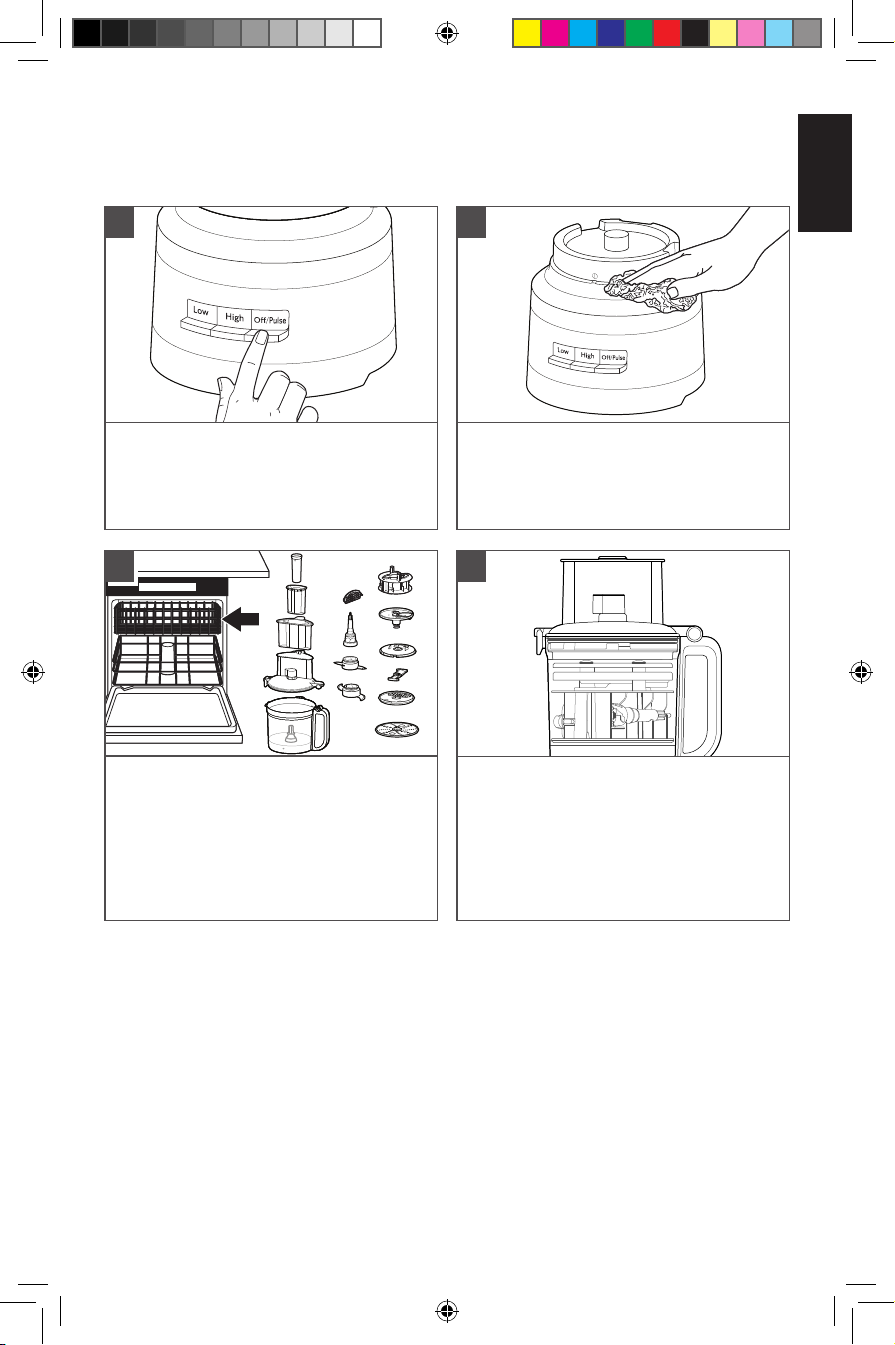
Before first use
Before using your Food Processor for the first time, wash all parts and accessories either
by hand or in the dishwasher (see “Care and Cleaning” section).
NOTE: Your Food Processor is designed so that all accessories may be stored inside the
Work Bowl.
1
Lift up the Lid Latch to unlock the Cover.
Tilt the Work Bowl Cover back and lift it
straight up so that the Lid Hinge pulls out
of the Handle Hinge.
IMPORTANT: Place the Food Processor on a dry, level countertop with the controls
facing forward. Do not plug in the Food Processor until it is completely assembled.
3
2
Remove all parts and accessories from
the Work Bowl, and lift the Food Pusher
out of the Feed Tube.
4
Place the Work Bowl on the Base, aligning
the Handle with the raised button on the
right side of the Base. The bowl will click
into place and should be flush against the
Base when properly aligned.
W11462548A.indb 7W11462548A.indb 7 10/14/2020 12:23:16 PM10/14/2020 12:23:16 PM
Place the Drive Adapter in the Work
Bowl, lowering it onto the Drive Pin.
7
Page 8

PRODUCT ASSEMBLY
NOTE: For ease of assembly, install the desired Blade or Disc before attaching the Work
Bowl Cover.
5 6
To attach the Work Bowl Cover, hook the
Lid Hinge into the Handle Hinge on the
Work Bowl and close the Cover.
NOTE: Your Food Processor will not operate unless the Work Bowl Cover is fully closed,
the large Food Pusher is in place,
and the Work Bowl is properly seated on the Base.
Once the Work Bowl Cover is closed, the
Lid Latch will lock in position.
INSTALLING THE MULTIPURPOSE BLADE OR DOUGH BLADE
1
Install the Lower Drive Adapter onto the
Upper Drive Adapter. Place the Blade on
the Drive Adapter. Rotate the Blade so it
falls down to the Base of the Adapter.
2
Install the Work Bowl Cover, and be sure
the Lid Latch is pushed down to the
locked position.
8
W11462548A.indb 8W11462548A.indb 8 10/14/2020 12:23:16 PM10/14/2020 12:23:16 PM
Page 9

ENGLISH
PRODUCT ASSEMBLY
INSTALLING THE EXTERNALLY ADJUSTABLE SLICING DISC
1 2
Hold the Slicing Disc by the finger grips
and lower it onto the Drive Adapter.
To attach the Work Bowl Cover, hook the
Lid Hinge into the Handle Hinge on the
Work Bowl and close the Cover.
TIP: You may need to adjust the Drive Adapter with a slight turn on the power shaft until
it drops into place. For easiest installation, make sure the Adjustment Knob is in the “0”
position.
3
Once the Work Bowl Cover is closed, the
Lid Latch will lock in position.
NOTE: Your Food Processor will not
operate unless the Work Bowl Cover is
fully closed and the Work Bowl is properly
seated on the Base.
ADJUSTING THE SLICING THICKNESS
1
Thinner
Thicker
NOTE: The Knob only works with
the Externally Adjustable Slicing Disc.
Changing thickness settings with other
discs or Blades installed will have no effect
on operation.
Set the desired thickness by moving the
Knob to the left for thinner slices and to
the right for thicker slices.
9
W11462548A.indb 9W11462548A.indb 9 10/14/2020 12:23:17 PM10/14/2020 12:23:17 PM
Page 10

PRODUCT ASSEMBLY
INSTALLING THE DICING KIT
1 2
With the Work Bowl removed from the
Base, place Dicing
Cover in the Work Bowl.
Kit Base, Blade, and
3 4
Place the Work Bowl Cover on the Work
Bowl. Take small and/or medium Feed
Tube. Insert food to dice.
PRODUCT USAGE
Align Dicing Kit Cover with wide mouth
feed shoot.
1
2
After dicing, remove the Work Bowl
Cover, Dicing Kit Cover and Dicing Blade,
then insert the Dicing Kit Clean Out Tool
into the Dicing Kit Base and push any
extra food through the grid.
Before operating the Food Processor, be
sure the Work Bowl, Blades/Disc, and Work
Bowl Cover are properly assembled on the
Base (see the “Product Assembly” section).
10
W11462548A.indb 10W11462548A.indb 10 10/14/2020 12:23:19 PM10/14/2020 12:23:19 PM
Page 11

ENGLISH
PRODUCT USAGE
1
To turn on, press Low or High. The Food
Processor will run continuously and the
indicator light will glow.
To turn off, press Low or High again, or
press Off/Pulse.
3
When finished, press the Off/Pulse
button. The indicator light will go out
and the Blade or Disc will slow to a stop.
2
To use the Pulse function:
Press Off/Pulse for short bursts, or press
and hold for longer bursts. The Pulse
function runs at high speed only. The
Food Processor will turn off when the
Off/Pulse button is released.
4
Wait until the Blade or disc comes to a
complete stop before removing the Work
Bowl Cover. Be sure to turn off the Food
Processor before removing the Work
Bowl Cover, or before unplugging the
Food Processor.
USING THE 3-IN-1 FEED TUBE
The 3-in-1 Feed Tube features a 3-piece
Food Pusher.
Use the entire Feed Tube and the large
Food Pusher to process large items.
NOTE: The unit will not start if food is
loaded in the large Feed Tube above the
max fill line.
Use the medium Food Pusher in the Feed
Tube to process smaller items.
Use the small Food Pusher to slice or shred
the smallest, thinnest items.
Use the drizzle hole in the small Food
Pusher to slowly drizzle oil or other liquid
ingredients into the Work Bowl.
W11462548A.indb 11W11462548A.indb 11 10/14/2020 12:23:19 PM10/14/2020 12:23:19 PM
3-Piece
Food
Pusher
11
Page 12

PRODUCT DISASSEMBLY
REMOVING PROCESSED FOODS
1 2
Turn the Food Processor off: Press the
Off/Pulse button and unplug the Food
Processor before disassembling.
3 4
If using the disc, remove it before
removing the bowl. Holding the disc by
the finger holes, lift it straight up.
5
Lift the Lid Latch to unlock the Work
Bowl Cover, then lift the Cover to
remove.
Remove the Drive Adapter and
Multipurpose Blade, if using. The Blade
will stay in place on the Drive Adapter
when you remove the Adapter.
Lift the Work Bowl off of the Base to
remove food from the bowl with a
spatula.
12
W11462548A.indb 12W11462548A.indb 12 10/14/2020 12:23:20 PM10/14/2020 12:23:20 PM
Page 13
ENGLISH
CARE AND CLEANING
IMPORTANT: The BPA-free bowl requires special handling. If you choose to use a
dishwasher instead of hand washing, please follow these guidelines.
1 2
Press the Off/Pulse button, then unplug
the Food Processor before cleaning.
3 4
All parts are top rack dishwasher safe.
Avoid laying the bowl on its side.
Thoroughly dry all parts after washing.
Use gentle dishwashing cycles such as
normal. Avoid high-temperature cycles.
Wipe the Base and cord with a warm,
damp cloth. Thoroughly dry with a soft
cloth. Do not use abrasive cleaners or
scouring pads. Do not immerse Base in
water or other liquid.
You can store up to two Blades and three
discs as well as the Drive Adapter inside
the Work Bowl by using the in bowl
Storage Caddy when the Food Processor
is not in use. Wrap the Power Cord
around the Cord Storage on the bottom
of the Base, then secure the plug by
clipping it to the housing.
NOTE: If washing the Food Processor parts by hand, avoid the use of abrasive cleansers
or scouring pads. They may scratch or cloud the Work Bowl and Cover.
13
W11462548A.indb 13W11462548A.indb 13 10/14/2020 12:23:21 PM10/14/2020 12:23:21 PM
Page 14

TROUBLESHOOTING GUIDE
Problem Solution
Check to see if the Food Processor is securely plugged
into a grounded electrical outlet.
If your Food Processor should
malfunction or fail to operate,
check the following:
Is the fuse in the circuit to the
Food Processor in working
order?
The Food Processor may need
to cool to room temperature:
The motor may be locked:
Food Processor not shredding
or slicing properly:
If the Work Bowl Cover won’t
close when using the disc:
If the problem cannot be
corrected:
Make sure that the Bowl and Lid are properly aligned
and locked in place.
Have you pressed more than one button at the same
time?
Unplug the Food Processor, then plug it back into the
outlet.
If you have a circuit breaker box, be sure the circuit is
closed.
If the speed light turns off and the Off/Pulse light flashes,
wait until the Off/Pulse light turns off and retry.
The Food Processor may take from 5-15 minutes to cool
completely.
If the speed light stays on while the Off/Pulse light
flashes, press the Off/Pulse button to reset the motor.
Make sure the raised-Blade side of the disc is positioned
face up on the Drive Adapter.
Make sure ingredients are suitable for slicing or
shredding.
Make sure the disc is positioned in the process position
(near the top of the bowl), and not the storage position
(low and inside of the bowl).
Make sure the disc is installed correctly, and is positioned
properly on the Drive Adapter.
See the “Warranty and Service” sections.
Do not return the Food Processor to the retailer.
Retailers do not provide service.
14
W11462548A.indb 14W11462548A.indb 14 10/14/2020 12:23:21 PM10/14/2020 12:23:21 PM
Page 15

ENGLISH
WARRANTY AND SERVICE
KITCHENAID® FOOD PROCESSOR WARRANTY FOR THE 50 UNITED
STATES, THE DISTRICT OF COLUMBIA, PUERTO RICO, AND
CANADA
This warranty extends to the purchaser and any succeeding owner for Food Processors
operated in the 50 United States, the District of Columbia, Puerto Rico, and Canada.
Length of Warranty:
KitchenAid Will Pay
for Your Choice of:
One Year Full Warranty from date of purchase.
Hassle-Free Replacement of your Food Processor.
See the next page for details on how to arrange for
service, or call the Customer eXperience Center
toll-free at 1-800-541-6390.
OR
The replacement parts and repair labor costs to
correct defects in materials and workmanship. Service
must be provided by an Authorized KitchenAid
Service Center.
KitchenAid Will
Not Pay for:
A. Repairs when your Food Processor is used in other
than normal single family home use.
B. Damage resulting from accident, alteration, misuse or
abuse.
C. Any shipping or handling costs to deliver your Food
Processor to an Authorized Service Center.
D. Replacement parts or repair labor costs for Food Pro-
cessor operated outside the 50 United States, District
of Columbia, Puerto Rico, and Canada.
DISCLAIMER OF IMPLIED WARRANTIES; LIMITATION OF REMEDIES
IMPLIED WARRANTIES, INCLUDING TO THE EXTENT APPLICABLE WARRANTIES
OF MERCHANTABILITY OR FITNESS FOR A PARTICULAR PURPOSE, ARE
EXCLUDED TO THE EXTENT LEGALLY PERMISSIBLE. ANY IMPLIED WARRANTIES
THAT MAY BE IMPOSED BY LAW ARE LIMITED TO ONE YEAR, OR THE
SHORTEST PERIOD ALLOWED BY LAW. SOME STATES AND PROVINCES DO
NOT ALLOW LIMITATIONS OR EXCLUSIONS ON HOW LONG AN IMPLIED
WARRANTY OF MERCHANTABILITY OR FITNESS LASTS, SO THE ABOVE
LIMITATIONS OR EXCLUSIONS MAY NOT APPLY TO YOU.
IF THIS PRODUCT FAILS TO WORK AS WARRANTED, CUSTOMER’S SOLE AND
EXCLUSIVE REMEDY SHALL BE REPAIR OR REPLACEMENT ACCORDING TO
THE TERMS OF THIS LIMITED WARRANTY. KITCHENAID AND KITCHENAID
CANADA DO NOT ASSUME ANY RESPONSIBILITY FOR INCIDENTAL OR
CONSEQUENTIAL DAMAGES. This warranty gives you specific legal rights and
you may also have other rights which vary from state to state or province to
province.
15
W11462548A.indb 15W11462548A.indb 15 10/14/2020 12:23:22 PM10/14/2020 12:23:22 PM
Page 16

WARRANTY AND SERVICE
HASSLE-FREE REPLACEMENT WARRANTY – 50 UNITED STATES,
DISTRICT OF COLUMBIA, AND PUERTO RICO
We’re so confident the quality of our
products meets the exacting standards
of KitchenAid that, if your Food
Processor should fail within the first year
of ownership, KitchenAid will arrange
to deliver an identical or comparable
replacement to your door free of charge
and arrange to have your original
Food Processor returned to us. Your
replacement unit will also be Covered by
our one year limited warranty.
If your Food Processor should fail within
the first year of ownership, simply call
our toll-free Customer eXperience
Center at 1-800-541-6390 Monday
through Friday. Please have your original
sales receipt available when you call.
Proof of purchase will be required to
initiate the claim. Give the consultant
your complete shipping address (no P.O.
Box numbers, please).
When you receive your replacement
Food Processor, use the carton, packing
materials, and prepaid shipping label to
pack up your original Food Processor
and send it back to KitchenAid.
HASSLE-FREE REPLACEMENT WARRANTY – CANADA
We’re so confident the quality of our
products meets the exacting standards
of the KitchenAid brand that, if your
Food Processor should fail within the
first year of ownership, we will replace
your Food Processor with an identical
or comparable replacement. Your
replacement unit will also be Covered by
our one year limited warranty.
If your Food Processor should fail within
the first year of ownership, simply call
our toll-free Customer eXperience
Center at 1-800-807-6777 Monday
through Friday. Please have your original
sales receipt available when you call.
Proof of purchase will be required to
initiate the claim. Give the consultant
your complete shipping address.
When you receive your replacement
Food Processor, use the carton, packing
materials, and prepaid shipping label to
pack up your original Food Processor
and send it back to KitchenAid.
ARRANGING FOR SERVICE AFTER THE WARRANTY EXPIRES, OR
ORDERING ACCESSORIES AND REPLACEMENT PARTS
In the United States and Puerto Rico:
For service information, or to order
accessories or replacement parts, call
toll-free at 1-800-541-6390 or write to:
Customer eXperience Center,
KitchenAid Small Appliances,
P.O. Box 218, St. Joseph, MI 49085-0218
®/™ ©2020 KitchenAid. All rights reserved. Used under license in Canada.
16
W11462548A.indb 16W11462548A.indb 16 10/14/2020 12:23:22 PM10/14/2020 12:23:22 PM
Outside the United States and
Puerto Rico:
Consult your local KitchenAid dealer or
the store where you purchased the Food
Processor for information on how to
obtain service.
For service information in Canada:
Call toll-free 1-800-807-6777.
For service information in Mexico:
Call toll-free 01-800-0022-767.
Page 17

FRANÇAIS
PIÈCES ET CARACTÉRISTIQUES
11
10
9
8
7
6
5
4
3
2
16
17
15
14
12
13
1
1 Base robuste
2 Cordon d’alimentation et range-cordon
(non illustré)
3 Axe d’entraînement
4 Bol de préparation de 13tasses (3,1L)
5 Charnière de la poignée
6 Charnière du couvercle
7 Bouton de tranchage
8 Couvercle du bol d’alimentation avec
goulotte d’alimentation3 en 1
9 Loquet du couvercle
W11462548A.indb 17W11462548A.indb 17 10/14/2020 12:23:22 PM10/14/2020 12:23:22 PM
10 Poussoir alimentaire3 en 1
11 Couvercle pour réfrigération
12 Disque à trancher avec système de
réglage externe (tranchage fin à épais)
13 Disque déchiqueteur réversible pour
couper moyennement ou finement
14 Lame polyvalente en acier inoxydable
15 Lame à pétrissage
16 Tige d’entraînement
17 Axe d’entraînement
17
Page 18

PIÈCES ET CARACTÉRISTIQUES
18
19
20
13
12
15
17
21
18 Couvercle de l’ensemble de
tranchage en dés
19 Lame de tranchage en dés
20 Socle de l’ensemble de tranchage
en dés
GUIDE D’ACCESSOIRES
Accessoire
Ajustement externe de l’épaisseur des tranches
Boîtier de rangement
Ouverture à large embout
Goulotte d’alimentation 3 en 1
Lame polyvalente
Lame à pétrissage
Râper fin et moyen
Râper fin
Couvercle de rangement
Ensemble de tranchage en dés
18
22
16
14
21 Outil de nettoyage de l’ensemble de
tranchage en dés
22 Boîtier de rangement
Inclus avec le modèle
KFP1319 KFP1318 KFP1317
• • •
• • •
• • •
• • •
• • •
• •
• •
•
•
•
W11462548A.indb 18W11462548A.indb 18 10/14/2020 12:23:23 PM10/14/2020 12:23:23 PM
Page 19

FRANÇAIS
SÉCURITÉ DU PRODUIT
IMPORTANTES MESURES
DEPROTECTION
Lors de l’utilisation d’appareils électriques, certaines précautions élémentaires
de sécurité doivent toujours être observées, incluant les suivantes:
1. Lire toutes les instructions.
2. Pour éviter tout risque de choc électrique, ne pas immerger le robot culinaire
dans de l’eau ou tout autre liquide.
3. Cet appareil ne convient pas à une utilisation par des personnes (y compris
des enfants) à capacités physiques, sensorielles ou mentales réduites, ou
possédant un manque d’expérience et de connaissances, à moins qu’elles
ne soient placées sous supervision ou qu’elles aient reçu des instructions
concernant l’utilisation de l’appareil par une personne responsable de leur
sécurité. Une surveillance attentive s’impose lorsqu’un appareil ménager est
utilisé par ou à proximité d’enfants. Les enfants doivent être surveillés an de
s’assurer qu’ils ne jouent pas avec l’appareil.
4. S’assurer que l’appareil est éteint et débranché de la prise murale lorsqu’il n’est
pas utilisé, avant d’y ajouter des pièces ou d’en enlever et avant de la nettoyer.
Pour débrancher, saisir la che et la retirer de la prise. Ne pas tirer sur le cordon
d’alimentation.
5. Éviter tout contact avec les pièces mobiles.
6. Ne pas faire fonctionner un appareil si la prise ou le cordon est endommagé,
si l’appareil ne fonctionne pas correctement, s’il tombe ou s’il est endommagé
d’une quelconque façon. Communiquer par téléphone avec le service à la
clientèle du fabricant pour obtenir des renseignements sur la vérication,
laréparation et le réglage de l’appareil.
7. L’utilisation d’accessoires non recommandés ou non vendus par KitchenAid
peut causer un incendie, une décharge électrique ou des blessures.
8. Ne pas utiliser à l’extérieur.
19
W11462548A.indb 19W11462548A.indb 19 10/14/2020 12:23:23 PM10/14/2020 12:23:23 PM
Page 20

SÉCURITÉ DU PRODUIT
9. Ne pas laisser le cordon pendre par-dessus le bord d’une table ou d’un comptoir.
10. Garder les mains et les ustensiles à l’écart des lames ou disques lors de
la préparation des aliments pour éviter tout blessure corporelle grave ou
dommage au robot culinaire. On peut utiliser un grattoir, mais il doit être
employé uniquement lorsque le robot culinaire ne fonctionne pas.
11. Les lames sont tranchantes. Manipuler avec précaution.
12. Pour réduire le risque de blessure, ne jamais placer la lame ou les disques sur
la base sans installer correctement le bol au préalable.
13. S’assurer que le couvercle est bien verrouillé avant de faire fonctionner l’appareil.
14. Ne jamais introduire les aliments à la main. Toujours utiliser le poussoir pour
introduire les aliments.
15. Ne pas tenter d’outrepasser le dispositif de verrouillage du couvercle.
16. Ne pas remplir le bol au-dessus de la ligne de remplissage maximale marquée
(ou de la capacité nominale) an d’éviter tout risque de blessure en cas
d’endommagement du couvercle ou du bol.
CONSERVER CES INSTRUCTIONS
Ce produit est conçu uniquement pour un usage domestique.
SPÉCIFICATIONS ÉLECTRIQUES
Tension: 120 VCA
Fréquence: 60Hz
REMARQUE: Ce robot culinaire comporte une fiche polarisée (avec une lame
plus large que l’autre). Pour réduire le risque de décharge électrique, cette fiche ne
peut être insérée dans une prise que dans un seul sens. Si la fiche ne s’enfonce pas
complètement dans la prise, inverser la fiche. Si la fiche ne s’introduit toujours pas,
appeler un électricien qualifié. Ne pas modifier la fiche de quelque manière que ce soit.
20
W11462548A.indb 20W11462548A.indb 20 10/14/2020 12:23:23 PM10/14/2020 12:23:23 PM
Page 21

FRANÇAIS
GUIDE DE SÉLECTION DES ACCESSOIRES
Mesures Réglage Aliment Accessoire
Hacher
Hacher ou réduire
en purée
Mélanger
Trancher
(mince ou épais)
Couper en lanières
(fines ou moyennes)
Trancher en dés
Pétrir
Low (basse) ou
Pulse (impulsion)
High (élevée) ou
Pulse (impulsion)
Low (basse)
Low (basse)
High (élevée)
Low (basse)
High (élevée)
Low (basse)
Low (basse)
Fromage
Chocolat
Fruits
Fines herbes
Noix
Tofu
Légumes
Sauce bolognaise
Pesto
Salsa
Sauces
Pâtes
Fruits (mous)
Pommes de terre
Tomates
Légumes (mous)
Fromage
Chocolat
Fruits (durs)
Légumes (durs)
Pommes de terre
Légumes (mous)
Choux
Fromage
Chocolat
Fruits (durs)
Légumes (durs)
Pommes de terre
Légumes
Fruit
Fromage
Levure
Pâte
Lame polyvalente en acier
inoxydable
Commande externe du
disque à trancher réglable
Disque déchiqueteur
réversible pour couper
moyennement ou finement
Ensemble de tranchage
en dés
Lame à pétrissage
POUR OBTENIR DES INFORMATIONS DÉTAILLÉES SUR L’UTILISATION DU
ROBOTCULINAIRE:
Visiter le site www.kitchenaid.com/quickstart pour des instructions supplémentaires avec
vidéos, des recettes qui inspirent et des conseils sur la façon d’utiliser le robot culinaire.
21
W11462548A.indb 21W11462548A.indb 21 10/14/2020 12:23:23 PM10/14/2020 12:23:23 PM
Page 22

ASSEMBLAGE DU PRODUIT
Avant la première utilisation
Avant d’utiliser le robot culinaire pour la première fois, laver toutes les pièces et
accessoires à la main ou au lave-vaisselle (voir « Nettoyage du robot culinaire »).
REMARQUE: Ce robot culinaire est conçu pour que tous les accessoires puissent être
rangés à l’intérieur du bol.
1
Soulever le loquet du couvercle pour
déverrouiller le couvercle. Incliner
le couvercle du bol vers l’arrière et
le soulever vers le haut pour que la
charnière du couvercle sorte de la
charnière de la poignée.
IMPORTANT: Placer le robot culinaire sur un comptoir sec et de niveau avec
les commandes face à soi. Ne pas brancher le robot culinaire avant qu’il ne soit
entièrement assemblé.
3
2
Retirer tous les pièces et accessoires du
bol et sortir le poussoir de la goulotte
d’alimentation.
4
Placer le bol sur la base en alignant
lapoignée avec le bouton surélevé du
côté droit de la base. Le bol s’enclenche
et doit être en affleurement avec la base
lorsqu’il est correctement aligné.
22
W11462548A.indb 22W11462548A.indb 22 10/14/2020 12:23:24 PM10/14/2020 12:23:24 PM
Placer la tige d’entraînement dans le bol
en l’abaissant sur l’axe d’entraînement.
Page 23

FRANÇAIS
ASSEMBLAGE DU PRODUIT
REMARQUE: Pour faciliter l’assemblage, installer la lame ou le disque désiré avant de
fixer le couvercle du bol.
5 6
Pour fixer le couvercle du bol, accrocher
la charnière du couvercle dans la
charnière de la poignée sur le bol,
puisfermer le couvercle.
REMARQUE: Le robot culinaire ne fonctionnera pas à moins que le couvercle du bol
soit complètement fermé, que le grand poussoir est en place et que le bol est bien en
place sur la base.
MONTAGE DE LA LAME POLYVALENTE OU DE LA LAME DE PÉTRISSAGE
Une fois le couvercle du bol fermé, la
charnière du couvercle se verrouillera en
position.
1
Installer la tige d’entraînement inférieure
sur la tige d’entraînement supérieure.
Placer la lame sur la tige d’entraînement.
Faire tourner la lame pour qu’elle repose
bien au bas de la tige.
2
Installer le couvercle du bol et s’assurer
que le loquet du couvercle est poussé
vers le bas en position verrouillée.
23
W11462548A.indb 23W11462548A.indb 23 10/14/2020 12:23:24 PM10/14/2020 12:23:24 PM
Page 24

ASSEMBLAGE DU PRODUIT
ASSEMBLAGE DU DISQUE À TRANCHER RÉGLABLE DE L’EXTÉRIEUR
1 2
Tenir le disque à découper par les prises
pour doigts et l’abaisser sur la tige
d’entraînement.
Pour fixer le couvercle du bol, accrocher
la charnière du couvercle dans la
charnière de la poignée sur le bol,
puisfermer le couvercle.
ASTUCE: Il faudra peut-être régler la tige d’entraînement en faisant légèrement
tourner l’axe du socle jusqu’à ce qu’elle soit bien positionnée. Pour faciliter
l’installation, s’assurer que le bouton de réglage est à la position « 0 ».
3
Une fois le couvercle du bol fermé, la
charnière du couvercle se verrouillera en
position.
REMARQUE: Le robot culinaire ne
fonctionnera pas à moins que le couvercle
du bol soit complètement fermé et que le
bol est bien en place sur la base.
RÉGLAGE DE L’ÉPAISSEUR DE TRANCHAGE
1
Plus
fines
Plus
épaisses
REMARQUE: Le bouton ne fonctionne
qu’avec le disque de tranchage réglable
de l’extérieur. Le fait de modifier
les réglages d’épaisseur des autres
disques/râpes ou lames installées sur
l’appareil n’aura pas d’impact sur le
fonctionnement.
Régler l’épaisseur souhaitée des tranches
en déplaçant le bouton vers la gauche
pour des tranches plus fines et vers la
droite pour des tranches plus épaisses.
24
W11462548A.indb 24W11462548A.indb 24 10/14/2020 12:23:24 PM10/14/2020 12:23:24 PM
Page 25

FRANÇAIS
ASSEMBLAGE DU PRODUIT
INSTALLATION DE L’ENSEMBLE DE TRANCHAGE EN DÉS
1 2
Une fois le bol enlevé de la base, placez
le socle de l’ensemble de tranchage,
lame et le couvercle dans le bol.
la
3 4
Placer le couvercle de bol sur le bol de
préparation. Utiliser la grande ou petite
ouverture de la goulotte d’alimentation.
Insérer les aliments pour les faire
trancher en dés.
Aligner le couvercle de l’ensemble
de tranchage en dés avec la goulotte
d’alimentation.
1
2
Une fois le tranchage en dés effectué,
retirer le couvercle du bol de préparation,
le couvercle de l’ensemble de tranchage
en dés et la lame de tranchage en dés, et
placer l’outil de nettoyage de l’ensemble
de tranchage en dés dans le socle de
l’ensemble et pousser tout aliment
supplémentaire à travers la grille.
25
W11462548A.indb 25W11462548A.indb 25 10/14/2020 12:23:25 PM10/14/2020 12:23:25 PM
Page 26

UTILISATION DU PRODUIT
Avant d’utiliser le robot culinaire, s’assurer
que le bol du robot, les lames/disques
et le couvercle du bol sont correctement
assemblés sur la base (voir la section
«Assemblage du produit»).
1 2
Utilisation de la fonction d’impulsion :
Pour mettre en marche, appuyer sur
LOW (base) ou HIGH (élevée). Le robot
culinaire fonctionnera sans s’arrêter et le
témoin lumineux s’allume.
Pour l’éteindre, appuyer de nouveau sur
Low (basse) ou High (élevée) ou appuyer
sur Off/Pulse (arrêt/impulsion).
26
W11462548A.indb 26W11462548A.indb 26 10/14/2020 12:23:25 PM10/14/2020 12:23:25 PM
Appuyer sur le bouton Off/Pulse (arrêt/
impulsion) pour mixer par courtes
impulsions ou l’appuyer et le maintenir
enfoncé pour mixer par impulsions plus
longues. La fonction Pulse (impulsion)
fonctionne uniquement à grande vitesse.
Le robot culinaire s’éteint lorsque le
bouton Off/Pulse (arrêt/impulsion)
estrelâché.
Page 27

FRANÇAIS
UTILISATION DU PRODUIT
3 4
Après avoir terminé, appuyer sur le
bouton Off/Pulse (arrêt/impulsion).
Letémoin lumineux s’éteindra et la lame
ou le disque ralentira jusqu’à l’arrêt.
Attendre que le disque ou la lame soit
complètement arrêté(e) avant d’ôter
le couvercle du bol de préparation.
Veiller à éteindre le robot culinaire
avant de retirer le couvercle du bol
depréparation ou de le débrancher.
UTILISATION DE LA GOULOTTE D’ALIMENTATION3 EN 1
La goulotte d’alimentation3 en 1
comprend un poussoir à 3 pièces.
Utiliser toute la goulotte d’alimentation ainsi
que le poussoir alimentaire de grande taille
pour mélanger les aliments de grande taille.
REMARQUE: L’appareil ne démarrera
pas si les aliments sont chargés dans le
grand tube d’alimentation au-dessus de
laligne de remplissage maximum.
Utiliser le poussoir alimentaire de taille
moyenne dans la goulotte d’alimentation
pour traiter des aliments plus petits.
Utiliser le poussoir alimentaire de petite
taille pour trancher ou broyer les articles
lesplus petits/fins.
Pour arroser lentement la préparation
d’huile ou d’autres ingrédients liquides dans
le bol de travail, utiliser l’orifice d’arrosage
du poussoir alimentaire de petite taille.
Poussoir
à3pièces
27
W11462548A.indb 27W11462548A.indb 27 10/14/2020 12:23:26 PM10/14/2020 12:23:26 PM
Page 28

DÉMONTAGE DU PRODUIT
RETRAIT DE LA PRÉPARATION OBTENUE
1 2
Éteindre robot culinaire: Appuyer sur
le bouton Off/Pulse (arrêt/impulsion) et
débrancher le robot culinaire avant de le
démonter.
3 4
Si le disque est utilisé, l’ôter avant de
retirer le bol. Tenir le disque par les
trous pour doigts et le soulever et le
tirant tout droit vers le haut.
5
Lever le loquet du couvercle pour
déverrouiller le couvercle du bol, puis
soulever le couvercle pour le retirer.
Retirer la tige d’entraînement et la lame
multifonction, le cas échéant. La lame
reste en place sur la tige d’entraînement
lorsque cette dernière est retirée.
Soulever le bol de la base pour retirer
les aliments du bol à l’aide d’une
spatule.
28
W11462548A.indb 28W11462548A.indb 28 10/14/2020 12:23:26 PM10/14/2020 12:23:26 PM
Page 29

FRANÇAIS
ENTRETIEN ET NETTOYAGE
IMPORTANT: Le bol sans BPA nécessite un soin particulier. Si l’on préfère utiliser un
lave-vaisselle au lieu d’un nettoyage manuel, suivre les instructions ci-après.
1 2
Essuyer la base et le cordon avec
Appuyer sur le bouton Off/Pulse (arrêt/
impulsion) et débrancher le robot
culinaire avant de le nettoyer.
3 4
un chiffon mouillé à l’eau tiède et
savonneuse. Bien sécher avec un linge
doux. Ne pas utiliser de nettoyants
abrasifs ou de tampons à récurer. Nepas
immerger la base dans de l’eauou tout
autre liquide.
Toutes les pièces sont lavables au lavevaisselle. Éviter de coucher le bol sur
le côté. Bien sécher toutes les pièces
après les avoir nettoyées. Utiliser des
programmes de lavage au lave-vaisselle
comme « Normal ». Éviter d’utiliser des
programmes à température élevée.
REMARQUE: Lorsqu’on lave les pièces du robot culinaire à la main, éviter d’utiliser
des détergents abrasifs ou des tampons à récurer. Ils pourraient rayer ou ternir le bol
depréparation et son couvercle.
W11462548A.indb 29W11462548A.indb 29 10/14/2020 12:23:27 PM10/14/2020 12:23:27 PM
Deux lames et trois disques ainsi que la
tige d’entraînement peuvent être rangés
à l’intérieur du bol en utilisant le boîtier
de rangement lorsque le robot culinaire
n’est pas utilisé. Enrouler le cordon
d’alimentation autour du range-cordon
au bas de la base, puis attacher la fiche
en la fixant au boîtier.
29
Page 30

GUIDE DE DÉPANNAGE
Problème Solution
Vérifier pour voir si le robot culinaire est branché sur une
prise électrique reliée à la terre.
En cas de dysfonctionnement
ou de non fonctionnement
du robot culinaire, vérifier
lespoints suivants:
Le fusible dans le circuit du
robot culinaire est-il en état
demarche?
Le robot culinaire nécessite
peut-être de refroidir à
température ambiante.
Le moteur peut être verrouillé.
Le robot culinaire ne râpe
pas ou ne tranche pas
correctement:
Si le couvercle du robot
culinaire ne se ferme pas
lorsde l’utilisation du disque:
Si le problème ne peut être
résolu:
S’assurer que le bol et le couvercle sont correctement
alignés et bien verrouillés.
L’utilisateur a-t-il appuyé sur plus d’un bouton en même
temps?
Débrancher le robot culinaire et le rebrancher dans la
prise.
Si l’on possède un disjoncteur, s’assurer que le circuit est
fermé.
Si le témoin de vitesse s’éteint et que le témoin Off/
Pulse clignote, attendre que le témoin Off/Pulse
s’éteigne et réessayer.
Le robot culinaire peut prendre entre 5 à 15 minutes
pour se refroidir complètement.
Si le témoin de vitesse reste allumé alors que le témoin
Off/Pulse clignote, appuyer sur le bouton Off/Pulse pour
réinitialiser le moteur.
S’assurer que le côté du disque sur lequel la lame dépasse
est orienté vers le haut sur la tige d’entraînement.
S’assurer que les aliments peuvent être tranchés ou râpés.
S’assurer que le disque est positionné dans la position
de transformation des aliments (près du haut du bol) et
non dans la position de rangement (niveau inférieur et
àl’intérieur du bol).
S’assurer que le disque est correctement installé et
positionné sur la tige d’entraînement.
Voir les sections «Garantie et service».
Ne pas renvoyer le robot culinaire chez le détaillant.
Les détaillants n’assurent aucun service après-vente.
30
W11462548A.indb 30W11462548A.indb 30 10/14/2020 12:23:27 PM10/14/2020 12:23:27 PM
Page 31

FRANÇAIS
GARANTIE ET SERVICE
GARANTIE DU ROBOT CULINAIRE KITCHENAID® POUR LES 50 ÉTATS
DESÉTATS-UNIS, LE DISTRICT FÉDÉRAL DE COLUMBIA, PORTO RICO
ETLE CANADA
La présente garantie couvre l’acheteur et les propriétaires suivants du robot culinaire
lorsqu’il est utilisé dans les 50 États des États-Unis, le district fédéral de Columbia,
PortoRico et le Canada.
Durée de la garantie:
KitchenAid prendra
encharge les éléments
suivants à votre choix:
Garantie complète d’un an à compter de la date d’achat.
Le remplacement satisfaction totale du robot culinaire.
Voir la page suivante pour plus de détails concernant
la procédure à suivre pour un dépannage, ou appeler
le numéro sans frais 1-800-541-6390 du Centre
eXpérience à la clientèle.
OU
Le coût des pièces de rechange et de la main-d’œuvre
pour corriger les vices de matériaux et de fabrication.
L’intervention de dépannage doit être effectuée par
uncentre de dépannage KitchenAid agréé.
KitchenAid ne paiera
paspour:
A. Les réparations lorsque le robot culinaire est utilisé à des
fins autres que l’usage domestique unifamilial normal.
B. Les dommages causés par: accident, altération,
mauvaise utilisation ou abus.
C. Tout frais d’expédition ou de manutention pour livrer
lerobot culinaire à un centre de réparation agréé.
D. Les frais des pièces de rechange ou de main d’œuvre
pour le robot culinaire lorsqu’il est utilisé à l’extérieur
des 50 États des États-Unis, du district fédéral de
Columbia, de Porto Rico et du Canada.
CLAUSE D’EXONÉRATION DE RESPONSABILITÉ AU TITRE DES GARANTIES
IMPLICITES; LIMITATION DES RECOURS
LES GARANTIES IMPLICITES, Y COMPRIS DANS LA MESURE APPLICABLE
LES GARANTIES DE QUALITÉ MARCHANDE OU D’APTITUDE À UN USAGE
PARTICULIER, SONT EXCLUES DANS LA MESURE AUTORISÉE PAR LA LOI.
TOUTEGARANTIE IMPLICITE POUVANT ÊTRE IMPOSÉE PAR LA LOI EST LIMITÉE
À UN AN OU À LA PLUS COURTE PÉRIODE AUTORISÉE PAR LA LOI. CERTAINES
JURIDICTIONS NE PERMETTENT PAS LA LIMITATION DE LA DURÉE DE VALIDITÉ
DES GARANTIES IMPLICITES DE QUALITÉ MARCHANDE OU D’APTITUDE À UN
USAGE PARTICULIER; PAR CONSÉQUENT, LES LIMITATIONS OU EXCLUSIONS
STIPULÉES DANS LES PRÉSENTES PEUVENT NE PAS ÊTRE APPLICABLES.
SI CE PRODUIT NE FONCTIONNE PAS TEL QUE GARANTI, LE SEUL ET
UNIQUE RECOURS DU CLIENT CONSISTE À EN OBTENIR LA RÉPARATION
OU LE REMPLACEMENT CONFORMÉMENT AUX TERMES DE LA PRÉSENTE
GARANTIE LIMITÉE. KITCHENAID ET KITCHENAID CANADA DÉCLINENT TOUTE
RESPONSABILITÉ AU TITRE DES DOMMAGES FORTUITS OU INDIRECTS. Cette
garantie vous confère des droits juridiques spécifiques et vous pouvez également
jouir d’autres droits qui peuvent varier d’un État à l’autre ou d’une province à l’autre.
31
W11462548A.indb 31W11462548A.indb 31 10/14/2020 12:23:27 PM10/14/2020 12:23:27 PM
Page 32

GARANTIE ET SERVICE
GARANTIE DE REMPLACEMENT SANS DIFFICULTÉ POUR LES 50 ÉTATS
DES ÉTATS-UNIS, LE DISTRICT FÉDÉRAL DE COLUMBIA ET PORTO RICO
Nous sommes tellement certains que
la qualité de nos produits satisfait aux
normes exigeantes de KitchenAid que, si
le robot culinaire cesse de fonctionner au
cours de la première année suivant son
achat, KitchenAid livrera gratuitement à
votre porte un appareil de remplacement
identique ou comparable et prendra
les dispositions nécessaires pour que
le robot culinaire d’origine nous soit
retourné. L’appareil de remplacement
sera également couvert par notre
garantie limitée d’un an.
Si le robot culinaire cesse de fonctionner
durant la première année suivant son
acquisition, il suffit d’appeler notre Centre
eXpérience clientèle au 1-800-541-6390,
du lundi au vendredi. Veuillez avoir l’original
de votre reçu de vente à portée de main
au moment de votre appel. Une preuve
d’achat est indispensable pour que votre
réclamation puisse être traitée. Fournissez
votre adresse de livraison complète au
représentant (aucune boîte postale).
Après avoir reçu le robot culinaire de
rechange, utilisez le carton, les matériaux
d’emballage et l’étiquette d’expédition
prépayée pour emballer le robot culinaire
d’origine et le renvoyer à KitchenAid.
GARANTIE DE REMPLACEMENT SANS DIFFICULTÉ POUR LE CANADA
Nous sommes tellement certains que
la qualité de nos produits satisfait
aux normes exigeantes de la marque
KitchenAid que si le robot culinaire
cesse de fonctionner au cours de la
première année suivant son acquisition,
nous remplacerons le robot culinaire
par un appareil de remplacement
identique oucomparable. L’appareil de
remplacement sera également couvert
par notre garantie limitée d’un an.
Si le robot culinaire cesse de fonctionner
durant la première année suivant
son acquisition, il suffit d’appeler
notre Centre eXpérience clientèle
au1-800-807-6777, du lundi au
vendredi. Veuillez avoir l’original de
votre reçu de vente à portée de main
au moment de votre appel. Une preuve
d’achat est indispensable pour que votre
réclamation puisse être traitée. Il vous
faudra fournir votre adresse de livraison
complète au représentant.
Après avoir reçu le robot culinaire de
rechange, utilisez le carton, les matériaux
d’emballage et l’étiquette d’expédition
prépayée pour emballer le robot culinaire
d’origine et le renvoyer à KitchenAid.
OBTENIR UN DÉPANNAGE UNE FOIS LA GARANTIE EXPIRÉE OU
COMMANDER DES ACCESSOIRES ET DES PIÈCES DE RECHANGE
Aux États-Unis et à Porto Rico:
Pour des informations sur le service
de dépannage ou pour commander
des accessoires ou des pièces de
rechange, composer le numéro sans
frais1800541-6390 ou écrire à:
Customer eXperience Center,
KitchenAid Small Appliances,
P.O. Box218, St. Joseph, MI 49085-0218
®/™ ©2020 KitchenAid. Tous droits réservés. Utilisé sous licence au Canada.
32
W11462548A.indb 32W11462548A.indb 32 10/14/2020 12:23:27 PM10/14/2020 12:23:27 PM
En dehors des États-Unis et de Porto Rico:
Consulter le revendeur KitchenAid local
ou le détaillant auprès duquel le robot
culinaire a été acheté pour obtenir la
marche à suivre pour un dépannage.
Pour des informations concernant toute
intervention de dépannage au Canada:
Composer sans frais le 1800807-6777.
Pour des informations concernant toute
intervention de dépannage au Mexique:
Composer sans frais le 01-800-0022-767.
Page 33

ESPAÑOL
PIEZAS Y CARACTERÍSTICAS
11
10
9
8
7
6
5
4
3
2
16
17
15
14
12
13
1
1 Base resistente
2 Cable eléctrico y lugar de
almacenamiento del cable
(no se muestran)
3 Eje de accionamiento
4 Tazón de trabajo de 13 tazas (3,1 l)
5 Bisagra de la manija
6 Bisagra de la tapa
7 Perilla de rebanado
8 Cubierta para tazón de trabajo con
tubo de alimentación 3 en 1
9 Seguro de la tapa
W11462548A.indb 33W11462548A.indb 33 10/14/2020 12:23:28 PM10/14/2020 12:23:28 PM
10 Empujador de alimentos 3 en 1
11 Tapa para almacenamiento en
refrigerador
12 Disco rebanador regulable desde
elexterior (de fino a grueso)
13 Disco reversible para rallado fino/medio
14 Cuchilla de acero inoxidable multiuso
15 Cuchilla para masa
16 Adaptador de accionamiento (superior)
17 Adaptador de accionamiento (inferior)
33
Page 34

PIEZAS Y CARACTERÍSTICAS
15
18
19
20
13
12
17
21
18 Cubierta del juego para cortar en cubos
19 Cuchilla para cortar en cubos
20 Base del juego para cortar en cubos
22
14
21 Herramienta de limpieza del juego
para cortar en cubos
22 Contenedor de almacenamiento
GUÍA PARA LOS ACCESORIOS
Accesorio
Rebanada ajustable externa
Contenedor de almacenamiento
Apertura de boca ancha
Tubo de alimentación 3 en 1
Cuchilla multiuso
Cuchilla para masa
Rallado fino y medio
Rallado fino
Tapa de almacenamiento
Juego para cortar en cubos
34
Artículos incluidos con el modelo
KFP1319 KFP1318 KFP1317
• • •
• • •
• • •
• • •
• • •
• •
• •
•
•
16
•
W11462548A.indb 34W11462548A.indb 34 10/14/2020 12:23:28 PM10/14/2020 12:23:28 PM
Page 35

ESPAÑOL
SEGURIDAD DEL PRODUCTO
SALVAGUARDIAS IMPORTANTES
Al utilizar aparatos eléctricos, se deben seguir las precauciones básicas de
seguridad, entre las que se incluyen las siguientes:
1. Lea todas las instrucciones.
2. Para protegerse contra el riesgo de choque eléctrico, no ponga el procesador
de alimentos en agua ni en ningún otro líquido.
3. Este aparato no ha sido diseñado para que lo usen personas (incluidos niños)
con capacidad física, sensorial o mental reducida, o con falta de experiencia
y conocimiento, a menos que el uso se haga con supervisión o siguiendo las
instrucciones sobre el uso del aparato junto a una persona responsable por su
seguridad. Se debe supervisar atentamente a los niños cuando usen cualquier
electrodoméstico o cuando estos se usen cerca de ellos. Los niños deben ser
supervisados para garantizar que no jueguen con el aparato.
4. Apague el aparato, luego desenchúfelo del tomacorriente cuando no esté en uso,
antes de armar o desarmar las piezas y antes de limpiarlo. Para desenchufarlo,
tome el enchufe y retírelo del tomacorriente. Nunca tire del cable eléctrico.
5. Evite tocar las piezas que estén en movimiento.
6. No utilice ningún electrodoméstico cuyo cable o enchufe esté dañado, si el
aparato no ha funcionado correctamente, o si se ha caído o dañado de alguna
forma. Llame al número de teléfono de atención al cliente del fabricante para
obtener información sobre revisión, reparación o ajuste del producto.
7. El uso de accesorios no recomendados ni vendidos por KitchenAid puede
provocar un incendio, un choque eléctrico o lesiones.
8. No lo use al aire libre.
9. No deje que el cable cuelgue del borde de la mesa o del mostrador.
35
W11462548A.indb 35W11462548A.indb 35 10/14/2020 12:23:29 PM10/14/2020 12:23:29 PM
Page 36

SEGURIDAD DEL PRODUCTO
10. Mantenga las manos y los utensilios lejos de las cuchillas o los discos
mientras estos se mueven al picar los alimentos; esto reducirá el riesgo de
provocar lesiones graves a las personas o daños al procesador de alimentos.
Puedeusarse un raspador, pero se debe utilizar solamente cuando el
procesador de alimentos no esté funcionando.
11. Las cuchillas son losas. Manipúlelas con cuidado.
12. Para reducir el riesgo de lesiones, nunca coloque la cuchilla de corte ni los discos
en la base sin primero haber colocado el tazón en su lugar adecuadamente.
13. Asegúrese que la cubierta esté asegurada apropiadamente en su lugar antes
de operar el aparato.
14. Nunca introduzca los alimentos con las manos. Siempre utilice el empujador
dealimentos.
15. No intente anular el mecanismo de bloqueo de la cubierta.
16. No llene el tazón por encima de la línea de llenado máximo (o la capacidad
nominal) para evitar que se provoquen lesiones por daños en la cubierta o
eneltazón.
GUARDE ESTAS INSTRUCCIONES
Este producto está diseñado únicamente para uso doméstico.
REQUISITOS ELÉCTRICOS
Tensión: 120V CA
Frecuencia: 60 Hz
NOTA: Este procesador de alimentos tiene un enchufe polarizado (una hoja es más
ancha que la otra). Para reducir el riesgo de choque eléctrico, este enchufe encajará
en un contacto polarizado solamente de una manera. Si el enchufe no encaja por
completo en el tomacorriente, dé vuelta el enchufe. Si aun así no encaja, póngase en
contacto con un electricista competente. No modifique el enchufe de ninguna manera.
36
W11462548A.indb 36W11462548A.indb 36 10/14/2020 12:23:29 PM10/14/2020 12:23:29 PM
Page 37

ESPAÑOL
GUÍA DE SELECCIÓN DE ACCESORIOS
Acción Ajuste Alimentos Accesorio
Picar
Picar o hacer puré
Mezclar
Rebanar
(delgado a grueso)
Rallar
(fino a medio)
Cortar en cubos
Amasar
Low (Bajo) o
Pulse (Pulsador)
High (Alto) o
Pulse (Pulsador)
Low (Bajo)
Low (Bajo)
High (Alto)
Low (Bajo)
High (Alto)
Low (Bajo)
Low (Bajo)
Queso
Chocolate
Frutas
Hierbas frescas
Frutos secos
Tofu
Verduras
Salsa para pasta
Pesto
Salsa
Salsas
Masas
Frutas (blandas)
Papas
Tomates
Verduras (blandas)
Queso
Chocolate
Frutas (duras)
Verduras (duras)
Papas
Verduras (blandas)
Repollo
Queso
Chocolate
Frutas (duras)
Verduras (duras)
Papas
Verduras
Frutas
Queso
Levadura
Masa
Cuchilla de acero
inoxidable multiuso
Disco rebanador regulable
externamente
Disco reversible para
rallado fino/medio
Juego para cortar en
cubos
Cuchilla para masa
PARA OBTENER INFORMACIÓN DETALLADA SOBRE EL USO DEL PROCESADOR
DEALIMENTOS:
Visite www.kitchenaid.com/quickstart para obtener instrucciones adicionales, que
incluyen videos, recetas inspiradoras y consejos para usar su procesador de alimentos.
37
W11462548A.indb 37W11462548A.indb 37 10/14/2020 12:23:29 PM10/14/2020 12:23:29 PM
Page 38

MONTAJE DEL PRODUCTO
Antes del primer uso
Antes de usar el procesador de alimentos por primera vez, lave todas las piezas y los
accesorios a mano o en la lavavajillas (vea la sección “Cuidado y limpieza”).
NOTA: Gracias a su diseño, todos los accesorios del procesador de alimentos se
pueden guardar dentro del tazón de trabajo.
1
Levante el seguro de la tapa para
destrabar la cubierta. Incline la cubierta
del tazón de trabajo hacia atrás y
levántela en línea recta para que la
bisagra de la tapa salga de la bisagra
dela manija.
IMPORTANTE: Coloque el procesador de alimentos en un mostrador seco y nivelado,
con los controles mirando hacia delante. No enchufe el procesador de alimentos hasta
que se haya montado por completo.
3
2
Retire todas las piezas y accesorios del
tazón de trabajo y quite el empujador
de alimentos del tubo de alimentación.
4
Coloque el tazón de trabajo en la base;
asegúrese de alinear la manija con el
botón levantado en el lado derecho de
la base. El tazón hará un clic cuando
se trabe en su lugar y debe quedar
apoyado en la base cuando esté
alineado correctamente.
38
W11462548A.indb 38W11462548A.indb 38 10/14/2020 12:23:29 PM10/14/2020 12:23:29 PM
Coloque el adaptador de accionamiento
en el tazón de trabajo bajándolo hasta
el eje de accionamiento.
Page 39

ESPAÑOL
MONTAJE DEL PRODUCTO
NOTA: Para facilitar el montaje, instale la cuchilla o el disco deseado antes de colocar
la cubierta del tazón de trabajo.
5 6
Para fijar la cubierta del tazón de
trabajo, enganche la bisagra de la tapa
en la bisagra de la manija del tazón y
cierre la cubierta.
NOTA: El procesador de alimentos no funcionará a menos que la cubierta del tazón
de trabajo esté completamente cerrada, el empujador de alimentos grande esté en su
lugar y el tazón esté asentado correctamente en la base.
Una vez que la cubierta del tazón de
trabajo esté cerrada, el seguro de la
tapa se colocará en la posición de
bloqueo.
INSTALACIÓN DE LA CUCHILLA MULTIUSO O DE LA CUCHILLA PARA MASA
1
Instale el adaptador de accionamiento
bajo en el adaptador de accionamiento
Coloque la cuchilla en el adaptador
alto.
de accionamiento. Rote la cuchilla hasta
que se ajuste a la base del adaptador.
2
Instale la cubierta del tazón de trabajo;
asegúrese de que el seguro de la tapa
se encuentre en la posición de bloqueo.
39
W11462548A.indb 39W11462548A.indb 39 10/14/2020 12:23:30 PM10/14/2020 12:23:30 PM
Page 40

MONTAJE DEL PRODUCTO
INSTALACIÓN DEL DISCO REBANADOR REGULABLE DESDE EL EXTERIOR
1 2
Sostenga el disco rebanador por los
orificios para los dedos y bájelo hasta el
adaptador de accionamiento.
Para fijar la cubierta del tazón de
trabajo, enganche la bisagra de la tapa
en la bisagra de la manija del tazón y
cierre la cubierta.
CONSEJO: Quizás necesite ajustar el adaptador de accionamiento con un leve giro
del eje eléctrico hasta que se coloque en su lugar. Para una instalación más sencilla,
asegúrese de que la perilla de ajuste esté en la posición “0”.
3
Una vez que la cubierta del tazón de
trabajo esté cerrada, el seguro de la
tapa se colocará en la posición de
bloqueo.
NOTA: El procesador de alimentos no
funcionará a menos que la cubierta del
tazón de trabajo esté completamente
cerrada y que el tazón esté asentado
correctamente en la base.
CÓMO REGULAR EL GROSOR DE LAS REBANADAS
1
Más
delgadas
Más gruesas
NOTA: La perilla funciona solamente con
el disco rebanador regulable desde el
exterior. El cambiar los ajustes de grosor
con otros discos o cuchillas instalados no
afectará el funcionamiento.
Fije el grosor deseado moviendo la
perilla hacia la izquierda para rebanadas
más delgadas, o hacia la derecha para
rebanadas más gruesas.
40
W11462548A.indb 40W11462548A.indb 40 10/14/2020 12:23:30 PM10/14/2020 12:23:30 PM
Page 41

ESPAÑOL
MONTAJE DEL PRODUCTO
INSTALACIÓN DEL JUEGO PARA CORTAR EN CUBOS
1 2
Saque el tazón de trabajo de la base y
coloque la base del juego para cortar
en cubos, la cuchilla y la cubierta en el
tazón de trabajo.
Alinee la cubierta con la toma de
alimentación de boca ancha.
3 4
Coloque la cubierta en el tazón de
trabajo. Tome un tubo de alimentación
pequeño y/o mediano. Inserte la comida
que desee cortar.
1
2
Luego de cortar en cubos, quite la
cubierta del tazón de trabajo, la cubierta
del juego para cortar en cubos y la
cuchilla para cortar en cubos. Luego,
inserte la herramienta de limpieza del
juego para cortar en cubos dentro de la
base del juego e empujar cualquier resto
de comida a través de la rejilla.
41
W11462548A.indb 41W11462548A.indb 41 10/14/2020 12:23:31 PM10/14/2020 12:23:31 PM
Page 42

USO DEL PRODUCTO
1 2
Antes de usar el procesador de alimentos,
asegúrese de que el tazón de trabajo,
las cuchillas/disco y la cubierta del tazón
estén correctamente ensamblados sobre
la base (consulte la sección “Montaje del
producto”).
Para encenderlo, presione Low (Bajo) o
High (Alto). El procesador de alimentos
funcionará continuamente y la luz
indicadora se iluminará.
Para apagarlo, presione Low (Bajo) o
High (Alto) nuevamente o presione Off/
Pulse (Apagar/Pulsador).
42
W11462548A.indb 42W11462548A.indb 42 10/14/2020 12:23:31 PM10/14/2020 12:23:31 PM
Si desea usar la función de pulsación:
Presione Off/Pulse (Apagar/Pulsador) para
ráfagas cortas o mantenga presionado
el botón para ráfagas más largas.
Estafunción solo se ejecuta a velocidad
alta. El procesador de alimentos se
apagará cuando se deje de presionar
elbotón Off/Pulse (Apagar/Pulsador).
Page 43

ESPAÑOL
USO DEL PRODUCTO
3 4
Cuando termine, presione el botón
Off/Pulse (Apagar/Pulsador). La luz
indicadora se apagará y la cuchilla o
el disco reducirá la velocidad hasta
detenerse.
Espere hasta que la cuchilla o el disco se
detenga por completo antes de retirar la
cubierta del tazón de trabajo. Asegúrese
de apagar el procesador de alimentos
antes de retirar la cubierta del tazón de
trabajo o de desenchufarlo.
CÓMO USAR EL TUBO DE ALIMENTACIÓN 3 EN 1
El tubo de alimentación 3 en 1 incluye un
empujador de alimentos de 3 piezas.
Use el tubo de alimentación completo y
el empujador de alimentos grande para
procesar alimentos grandes.
NOTA: La unidad no empezará a funcionar si
la comida cargada en el tubo de alimentación
grande sobrepasa la línea máxima.
Use el empujador de alimentos mediano
en el tubo de alimentación para procesar
alimentos más pequeños.
Use el empujador de alimentos pequeño
para rebanar o rallar alimentos más
pequeños y más finos.
Use el orificio para verter ingredientes en
el empujador de alimentos pequeño para
rociar lentamente aceite u otros ingredientes
líquidos dentro del tazón de trabajo.
Empujador de
alimentos de
3 piezas
43
W11462548A.indb 43W11462548A.indb 43 10/14/2020 12:23:31 PM10/14/2020 12:23:31 PM
Page 44

DESMONTAR EL PRODUCTO
EXTRACCIÓN DE LOS ALIMENTOS PROCESADOS
1 2
Debe apagar el procesador de
alimentos en los siguientes casos:
Presione el botón Off/Pulse (Apagar/
Pulsador) y, a continuación, desenchufe
el procesador de alimentos antes de
desmontarlo.
3 4
Levante el seguro de la tapa para
destrabar la cubierta del tazón, luego
levante la cubierta para quitarla.
Si usó un disco, retírelo antes de retirar
el tazón. Sostenga el disco por los
2orificios para los dedos; levántelo
ensentido recto.
Retire el adaptador de accionamiento y
la cuchilla multiuso, si se usó. La cuchilla
se mantendrá ajustada al adaptador de
accionamiento cuando retire el adaptador.
5
Retire el tazón de trabajo de la base
para quitar los alimentos con una
espátula.
44
W11462548A.indb 44W11462548A.indb 44 10/14/2020 12:23:32 PM10/14/2020 12:23:32 PM
Page 45

ESPAÑOL
CUIDADO Y LIMPIEZA
IMPORTANTE: El tazón sin BPA necesita un cuidado especial. Si prefiere lavarlo en
lavavajillas en vez de lavarlo a mano, siga estas instrucciones.
1 2
Presione el botón Off/Pulse (Apagar/
Pulsador) y, a continuación, desenchufe
el procesador de alimentos antes de
limpiarlo.
3 4
Todas las piezas pueden lavarse en
la bandeja superior del lavavajillas.
Evitecolocar el tazón de costado.
Seque minuciosamente todas las piezas
después de lavarlas. Use ciclos suaves
del lavavajillas, como el normal.
Evite los ciclos a alta temperatura.
Limpie la base y el cable con un paño
humedecido con agua tibia. Sequetodo
completamente con un paño suave.
Nouse esponjas ni limpiadores
abrasivos. No sumerja la base
enelaguani en otros líquidos.
Puede almacenar hasta dos cuchillas,
tres discos y el adaptador de
accionamiento dentro del tazón
detrabajo usando el contenedor
de almacenamiento cuando el
procesador de alimentos no esté en
uso. Enrolleel cable eléctrico en el
lugar de almacenamiento del cable
quese encuentra en la parte inferior
dela base. Luego, enganche el enchufe
enlacarcasa para fijarlo.
NOTA: Si va a lavar las piezas del procesador de alimentos a mano, evite usar esponjas
para fregar o productos de limpieza abrasivos. Pueden rayar u opacar el tazón de
trabajo y la cubierta.
45
W11462548A.indb 45W11462548A.indb 45 10/14/2020 12:23:32 PM10/14/2020 12:23:32 PM
Page 46

GUÍA DE SOLUCIÓN DE PROBLEMAS
Problema Solución
Verifique que el procesador de alimentos esté
enchufado correctamente en un tomacorriente
conconexión a tierra.
Si el procesador de alimentos
falla o no funciona, revise lo
siguiente:
¿Está funcionando adecuadamente
el fusible en el circuito que va a al
procesador de alimentos?
Puede que se necesite dejar
enfriar el procesador de
alimentos a temperatura
ambiente en los siguientes casos:
El motor puede estar bloqueado
en los siguientes casos:
El procesador de alimentos no
ralla o rebana adecuadamente:
Si la cubierta del tazón de
trabajo no cierra cuando se
usael disco:
Si no se puede corregir el
problema:
Cerciórese de que el tazón y la tapa estén
debidamente alineados y trabados en su lugar.
¿Presionó más de un botón al mismo tiempo?
Desenchufe el procesador de alimentos y después
vuelva a enchufarlo en el tomacorriente.
Si tiene una caja de disyuntores, asegúrese de que el
circuito esté cerrado.
Si la luz de velocidad se apaga y la luz de Off/Pulse
(Apagar/Pulsador) destella, espere hasta que esta se
apague e intente nuevamente.
El procesador de alimentos puede tardar de 5 a
15minutos en enfriarse completamente.
Si la luz de velocidad permanece encendida mientras
la luz de Off/Pulse (Apagar/Pulsador) destella, presione
el botón Off/Pulse (Apagar/Pulsador) para reiniciar el
motor.
Asegúrese de que el lado del disco con el filo en
relieve esté mirando hacia arriba sobre el adaptador
deaccionamiento.
Asegúrese de que los ingredientes sean apropiados
para rebanar o rallar.
Asegúrese de que el disco esté colocado en la posición
de procesado (en la parte superior del tazón) y no en
la posición de almacenamiento (en la parte inferior
deltazón).
Asegúrese de que el disco se haya instalado y colocado
correctamente en el adaptador de accionamiento.
Consulte las secciones de “Garantía y servicio”.
No devuelva el procesador de alimentos a la tienda
minorista. Los minoristas no proveen servicio técnico.
46
W11462548A.indb 46W11462548A.indb 46 10/14/2020 12:23:32 PM10/14/2020 12:23:32 PM
Page 47

ESPAÑOL
GARANTÍA Y SERVICIO
GARANTÍA DEL PROCESADOR DE ALIMENTOS KITCHENAID® PARA LOS
50 ESTADOS DE LOS ESTADOS UNIDOS, EL DISTRITO DE COLUMBIA,
PUERTO RICO Y CANADÁ
Esta garantía se extiende al comprador y a cualquier propietario subsiguiente para
el procesador de alimentos que se utilice en los 50 estados de los Estados Unidos,
elDistrito de Columbia, Puerto Rico y Canadá.
Duración de la garantía:
Un año de garantía completa a partir de la fecha
decompra.
KitchenAid pagará por lo
siguiente, a su elección:
Reemplazo sin dificultades de su procesador de
alimentos. Consulte la página siguiente para obtener
detalles acerca de cómo obtener servicio técnico
o llame sin cargo al Centro para la experiencia del
cliente al 1-800-541-6390.
O BIEN
El costo de las piezas de repuesto y de la mano de
obra de reparación para corregir los defectos de los
materiales y de la mano de obra. El servicio deberá
ser brindado por un centro de servicio autorizado
porKitchenAid.
KitchenAid no pagará por: A. Reparaciones cuando su procesador de alimentos
haya sido utilizado para fines ajenos al uso doméstico
normal de una sola familia.
B. Daños causados por accidente, alteración, uso
indebido o abuso.
C. Cualquier gasto de envío o manipulación para llevar
el procesador de alimentos a un centro de servicio
autorizado.
D. Piezas de repuesto o costos de mano de obra para
procesadores de alimentos operados fuera de los
50 estados de los Estados Unidos, el Distrito de
Columbia, Puerto Rico y Canadá.
EXCLUSIÓN DE GARANTÍAS IMPLÍCITAS; LIMITACIÓN DE RECURSOS
LAS GARANTÍAS IMPLÍCITAS, INCLUIDAS EN LA MEDIDA QUE CORRESPONDA
LAS GARANTÍAS DE COMERCIABILIDAD O DE IDONEIDAD PARA UN
PROPÓSITO PARTICULAR, QUEDAN EXCLUIDAS EN LA MEDIDA EN QUE ESTÉ
PERMITIDO POR LEY. TODA GARANTÍA IMPLÍCITA QUE SEA IMPUESTA POR
LEY SERÁ LIMITADA A UN AÑO O AL PERÍODO MÁS CORTO PERMITIDO POR
LEY. ALGUNOS ESTADOS Y PROVINCIAS NO PERMITEN LAS LIMITACIONES O
EXCLUSIONES ACERCA DE CUÁNTO DEBE DURAR UNA GARANTÍA IMPLÍCITA
DE COMERCIABILIDAD O DE IDONEIDAD, DE MODO QUE LAS LIMITACIONES
OEXCLUSIONES ARRIBA MENCIONADAS PUEDEN NO APLICARSE EN SU CASO.
SI ESTE PRODUCTO NO FUNCIONA COMO SE HA GARANTIZADO,
ELÚNICO Y EXCLUSIVO RECURSO DEL CLIENTE SERÁ EL DE REPARARLO
O REEMPLAZARLO SEGÚN LOS TÉRMINOS DE ESTA GARANTÍA LIMITADA.
KITCHENAID Y KITCHENAID CANADA NO SE RESPONSABILIZARÁN POR
DAÑOS INCIDENTALES O CONSECUENTES. Esta garantía le otorga derechos
legales específicos y puede que también tenga otros derechos que varíen de un
estado a otro o de una provincia a otra.
47
W11462548A.indb 47W11462548A.indb 47 10/14/2020 12:23:33 PM10/14/2020 12:23:33 PM
Page 48

GARANTÍA Y SERVICIO
GARANTÍA DE REEMPLAZO SIN DIFICULTADES: EN LOS 50 ESTADOS
DEESTADOS UNIDOS, EL DISTRITO DE COLUMBIA Y PUERTO RICO
Confiamos tanto en que la calidad de
nuestros productos cumple con las
exigentes normas de KitchenAid que,
siel procesador de alimentos presentara
alguna falla durante el primer año
de compra, KitchenAid se encargará
de entregar un reemplazo idéntico o
comparable a su domicilio sin cargo y
arreglará la devolución de su procesador
de alimentos original a nosotros. La unidad
de reemplazo también estará cubierta por
nuestra garantía limitada de un año.
Si su procesador de alimentos fallara
durante el primer año de compra,
simplemente llame a nuestro Centro
parala experiencia del cliente al
1-800-541-6390, de lunes a viernes.
Tenga a mano el recibo de compra
original cuando llame. Se requerirá el
comprobante de compra para iniciar
un proceso de reclamo. Proporcione al
consultor su dirección de envío completa
(no números de casillas de correo).
Cuando reciba el procesador de
alimentos de reemplazo, use la caja,
el material de embalaje y la etiqueta
de envío prepago para embalar el
procesador de alimentos original y
devolverlo a KitchenAid.
GARANTÍA DE REEMPLAZO SIN DIFICULTADES: CANADÁ
Confiamos tanto en que la calidad de
nuestros productos cumple con las
exigentes normas de la marca KitchenAid
que, si el procesador de alimentos
presentara alguna falla durante el primer
año de propiedad, reemplazaremos
el procesador de alimentos por una
idéntica o una parecida. La unidad de
reemplazo también estará cubierta por
nuestra garantía limitada de un año.
Si su procesador de alimentos fallara
durante el primer año de compra,
simplemente llame a nuestro Centro
para la experiencia del cliente al
1-800-807-6777, de lunes a viernes.
Tenga a mano el recibo de compra
original cuando llame. Se requerirá el
comprobante de compra para iniciar
un proceso de reclamo. Proporcione al
asesor su dirección de envío completa.
Cuando reciba el procesador de
alimentos de reemplazo, use la caja,
el material de embalaje y la etiqueta
de envío prepago para embalar el
procesador de alimentos original y
devolverlo a KitchenAid.
CÓMO OBTENER SERVICIO TÉCNICO DESPUÉS DE QUE EXPIRE LA
GARANTÍA O CÓMO PEDIR ACCESORIOS Y PIEZAS DE REPUESTO
En los Estados Unidos y Puerto Rico:
Para obtener información acerca del
servicio técnico o para pedir accesorios
o piezas de repuesto, llame sin costo al
1-800-541-6390 o escriba a:
Customer eXperience Center,
KitchenAid Small Appliances,
P.O. Box 218, St. Joseph, MI 49085-0218
®/™ ©2020 KitchenAid. Todos los derechos reservados. Usado bajo licencia en Canadá.
48
W11462548A.indb 48W11462548A.indb 48 10/14/2020 12:23:33 PM10/14/2020 12:23:33 PM
Fuera de los Estados Unidos y
PuertoRico:
Consulte a su distribuidor local de
KitchenAid o a la tienda donde compró
el procesador de alimentos para obtener
información sobre el servicio técnico.
Para obtener información acerca
delservicio en Canadá:
Llame sin cargo al 1-800-807-6777.
Para obtener información acerca
delservicio en México:
Llame sin cargo al 01-800-0022-767.
Page 49

W11462548A.indb 49W11462548A.indb 49 10/14/2020 12:23:33 PM10/14/2020 12:23:33 PM
Page 50

W11462548A.indb 50W11462548A.indb 50 10/14/2020 12:23:33 PM10/14/2020 12:23:33 PM
Page 51

W11462548A.indb 51W11462548A.indb 51 10/14/2020 12:23:33 PM10/14/2020 12:23:33 PM
Page 52

DISCOVER MORE. DÉCOUVREZ PLUS. DESCUBRA MÁS.
KITCHENAID.COM/QUICKSTART
PRODUCT QUESTIONS OR RETURNS
QUESTIONS SUR LE PRODUIT OU LES RETOURS
PREGUNTAS SOBRE EL PRODUCTO O DEVOLUCIÓNES
USA: 1.800.541.6390 | KitchenAid.com
CANADA: 1.800.807.6777 | KitchenAid.ca
MEXICO: KitchenAid.com.mx
LATIN AMERICA: KitchenAid-Latam.com
®/™ ©2020 KitchenAid. All rights reserved. Used under license in Canada.
Tous droits réservés. Utilisé sous licence au Canada.
Todos los derechos reservados. Usada en Canadá bajo licencia.
W11462548A
W11462548A.indb 52W11462548A.indb 52 10/14/2020 12:23:33 PM10/14/2020 12:23:33 PM
10/20
 Loading...