

KitchenAid COOK SPEED OVEN User Manual
ULTIMA COOK™ SPEED OVEN
Use & Care Guide
For questions about features, operation/performance, parts accessories or service, call: 1-800-422-1230
www.kitchenaid.com
Table of Contents............................................................................................................2
Model KHHS179L
8205975/4619-652-61654

TABLE OF CONTENTS
MICROWAVE OVEN SAFETY........................................................3
Electrical Requirements ...............................................................5
PARTS AND FEATURES................................................................5
Oven Cavity Coating ....................................................................5
Microwave System – OPTIMAWAVE™ Plus Technology...........5
Grill Element .................................................................................6
Turntable ......................................................................................6
Cooking Rack...............................................................................6
Browning Pan and Handle...........................................................7
Grill Rack ......................................................................................7
OVEN CONTROL............................................................................7
Display/Touch Screen..................................................................7
Progress Bar.................................................................................9
Start..............................................................................................9
Off/Cancel ....................................................................................9
Clock ............................................................................................9
Tones............................................................................................9
Timer.............................................................................................9
Vent Fan .....................................................................................10
Cooktop/Countertop Light.........................................................10
Hints & Settings..........................................................................10
Child Lock ..................................................................................10
Night Light..................................................................................11
Display Brightness and Contrast ...............................................11
Demo Mode................................................................................11
Learning Mode ...........................................................................11
OVEN USE.....................................................................................12
Food Characteristics..................................................................12
Cooking Guidelines....................................................................12
Cookware and Dinnerware ........................................................12
Aluminum Foil and Metal ...........................................................13
Cooking Power...........................................................................13
Cooking ......................................................................................14
Doneness ...................................................................................14
Prepare.......................................................................................14
Preset Cooking...........................................................................14
Popcorn......................................................................................15
Cooking in Stages......................................................................15
Reheating ...................................................................................15
Defrosting...................................................................................16
Baked Goods .............................................................................16
Grill .............................................................................................17
Boil & Simmer.............................................................................18
Browning Pan Feature ...............................................................18
Soften and Melt..........................................................................19
Keep Warm.................................................................................19
OVEN CARE..................................................................................20
General Cleaning........................................................................20
Replacing Filters.........................................................................21
Replacing Cooktop Light ...........................................................21
Replacing Oven Light.................................................................21
TROUBLESHOOTING ..................................................................22
ASSISTANCE OR SERVICE.........................................................23
Replacement Parts.....................................................................23
WARRANTY ..................................................................................24
2
MICROWAVE OVEN SAFETY
Your safety and the safety of others are very important.
We have provided many important safety messages in this manual and on your appliance. Always read and obey all
safety messages.
This is the safety alert symbol.
This symbol alerts you to potential hazards that can kill or hurt you and others.
All safety messages will follow the safety alert symbol and either the word “DANGER” or
“WARNING.” These words mean:
You can be killed or seriously injured if you don't
immediately follow instructions.
can be killed or seriously injured if you don't
You
follow instructions.
All safety messages will tell you what the potential hazard is, tell you how to reduce the chance of injury, and tell you
what can
When using electrical appliances basic safety precautions should be followed, including the following:
WARNING: To reduce the risk of burns, electric
shock, fire, injury to persons, or exposure to excessive
microwave energy:
■
Read all instructions before using the microwave
oven.
■
Read and follow the specific “PRECAUTIONS TO
AVOID POSSIBLE EXPOSURE TO EXCESSIVE
MICROWAVE ENERGY” found in this section.
■
The microwave oven must be grounded. Connect
only to properly grounded outlet. See “GROUNDING
INSTRUCTIONS” found in this section and in the
provided Installation Instructions.
■
Install or locate the microwave oven only in
accordance with the provided Installation Instructions.
■
Some products such as whole eggs in the shell and
sealed containers – for example, closed glass jars –
are able to explode and should not be heated in the
microwave oven.
■
Use the microwave oven only for its intended use as
described in this manual. Do not use corrosive
chemicals or vapors in the microwave oven. This type
of oven is specifically designed to heat, cook, or dry
food. It is not designed for industrial or laboratory use.
■
As with any appliance, close supervision is necessary
when used by children.
happen if the instructions are not followed.
IMPORTANT SAFETY INSTRUCTIONS
■
Do not operate the microwave oven if it has a
damaged cord or plug, if it is not working properly, or
if it has been damaged or dropped.
■
The microwave oven should be serviced only by
qualified service personnel. Call an authorized
service company for examination, repair, or
adjustment.
■
See door surface cleaning instructions in the
“Microwave Oven Care” section.
■
To reduce the risk of fire in the oven cavity:
– Do not overcook food. Carefully attend the
microwave oven when paper, plastic, or other
combustible materials are placed inside the oven
to facilitate cooking.
– Remove wire twist-ties from paper or plastic bags
before placing bags in oven.
– If materials inside the oven ignite, keep oven door
closed, turn oven off, and disconnect the power cord,
or shut off power at the fuse or circuit breaker panel.
– Do not use the cavity for storage purposes. Do not
leave paper products, cooking utensils, or food in
the cavity when not in use.
SAVE THESE INSTRUCTIONS
3

IMPORTANT SAFETY INSTRUCTIONS
■
Liquids, such as water, coffee, or tea are able to be
overheated beyond the boiling point without appearing
to be boiling. Visible bubbling or boiling when the
container is removed from the microwave oven is not
always present. THIS COULD RESULT IN VERY HOT
LIQUIDS SUDDENLY BOILING OVER WHEN THE
CONTAINER IS DISTURBED OR A SPOON OR
OTHER UTENSIL IS INSERTED INTO THE LIQUID.
To reduce the risk of injury to persons:
– Do not overheat the liquid.
– Stir the liquid both before and halfway through
heating it.
– Do not use straight-sided containers with narrow
necks.
– After heating, allow the container to stand in the
microwave oven for a short time before removing
the container.
– Use extreme care when inserting a spoon or other
utensil into the container.
■
Suitable for use above both gas and electric cooking
equipment.
■
Intended to be used above ranges with maximum
width of 36 inches.
■
Clean Ventilating Hoods Frequently - Grease should
not be allowed to accumulate on hood or filter.
■
Oversized foods or oversized metal utensils should not
be inserted in the microwave oven as they may create
a fire or risk of electric shock.
■
Do not clean with metal scouring pads. Pieces can
burn off the pad and touch electrical parts involving a
risk of electric shock.
■
Do not use paper products when appliance is
operated in the “PAN BROWN” mode (on models
with this feature).
■
Do not store any materials, other than manufacturer’s
recommended accessories, in this oven when not in
use.
■
Do not store anything directly on top of the microwave
oven when the microwave oven is in operation.
■
When flaming foods under the hood, turn the fan on.
■
Use care when cleaning the vent-hood filter.
Corrosive cleaning agents, such as lye-based oven
cleaners, may damage the filter.
■
Do not cover or block any openings on the
microwave oven.
■
Do not store this microwave oven outdoors. Do not
use the microwave oven near water - for example,
near a kitchen sink, in a wet basement, or near a
swimming pool, or similar locations.
■
Do not immerse cord or plug in water.
■
Keep cord away from heated surfaces.
■
Do not let cord hang over edge of table or counter.
■
Do not mount over a sink.
■
Do not cover racks or any other part of the oven with
metal foil. This will cause overheating of the oven.
SAVE THESE INSTRUCTIONS
PRECAUTIONS TO AVOID POSSIBLE EXPOSURE TO
EXCESSIVE MICROWAVE ENERGY
(a) Do not attempt to operate this oven with the door
open since open-door operation can result in
harmful exposure to microwave energy. It is
important not to defeat or tamper with the
safety interlocks.
(b) Do not place any object between the oven front
face and the door or allow soil or cleaner residue
to accumulate on sealing surfaces.
(c) Do not operate the oven if it is damaged. It is
particularly important that the oven door close
properly and that there is no damage to the:
(1) Door (bent),
(2) Hinges and latches (broken or loosened),
(3) Door seals and sealing surfaces.
(d) The oven should not be adjusted or repaired by
anyone except properly qualified service personnel.
4
Electrical Requirements
9
0
3
PARTS AND FEATURES
WARNING
Electrical Shock Hazard
Plug into a grounded 3 prong outlet.
Do not remove ground prong.
Do not use an adapter.
Do not use an extension cord.
Failure to follow these instructions can result in
death, fire, or electrical shock.
Observe all governing codes and ordinances. A 120 Volt, 60 Hz,
AC only, 15- or 20-amp fused electrical supply is required. (A
time-delay fuse or circuit breaker is recommended.) It is
recommended that a separate circuit serving only this appliance
be provided.
GROUNDING INSTRUCTIONS
■ For all cord connected appliances:
The microwave oven must be grounded. In the event
of an electrical short circuit, grounding reduces the
risk of electric shock by providing an escape wire for
the electric current. The microwave oven is equipped
with a cord having a grounding wire with a grounding
plug. The plug must be plugged into an outlet that is
properly installed and grounded.
WARNING:
result in a risk of electric shock. Consult a qualified
electrician or serviceman if the
are not completely understood
whether the microwave oven is properly grounded.
Do not use an extension cord. If the power supply cord
is too short, have a qualified electrician or serviceman
install an outlet near the microwave oven.
■ For a permanently connected appliance:
This appliance must be connected to a grounded,
metallic, permanent wiring system, or an equipment
grounding conductor should be run with the circuit
conductors and connected to the equipment
grounding terminal or lead on the appliance.
Improper use of the grounding plug can
grounding instructions
, or if doubt exists as to
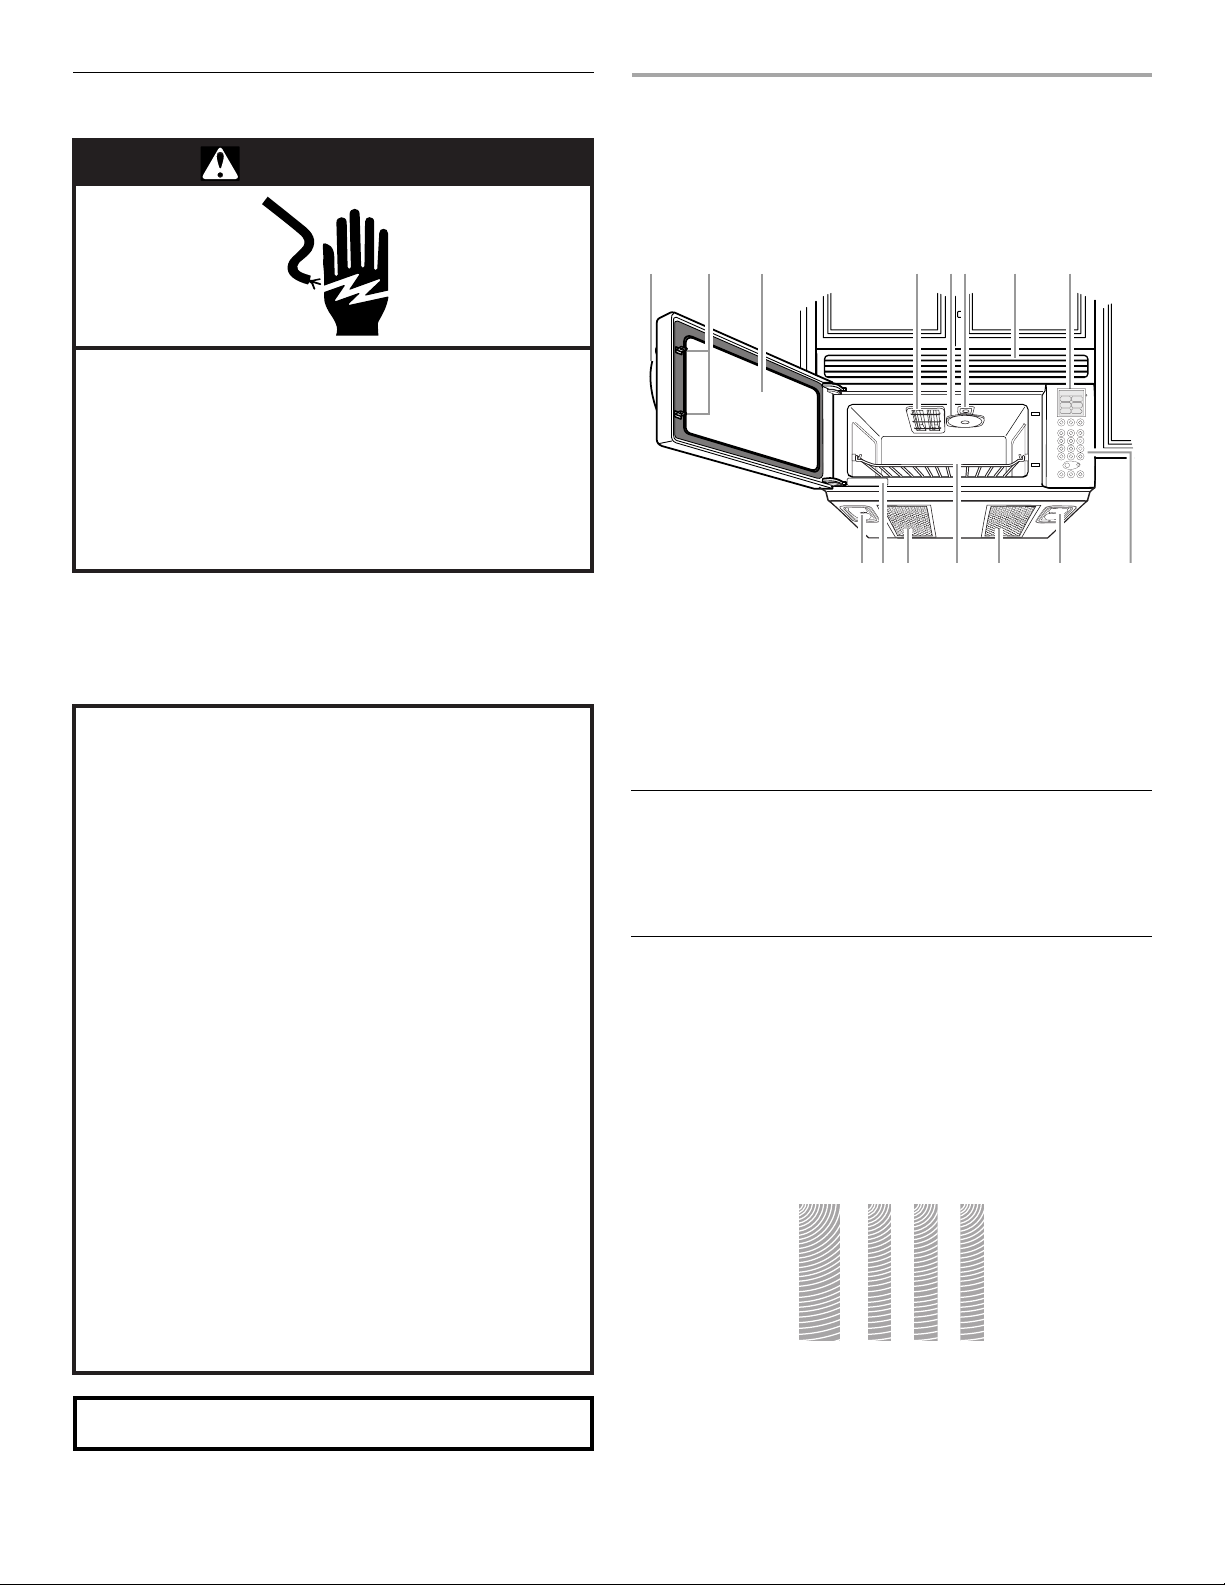
This manual may cover several different models. The model you
have purchased may have some or all of the features shown here.
The appearance of your particular model may differ slightly from
the illustrations in this manual.
2
31
1. Door Handle
2. Door Safety Lock System
3. Metal-Shielded Window
4. Grill Element
5. Microwave Inlet Cover
6. Oven Light
7. Vent Grille
8. Touch Screen Display
9. Control Buttons
101
456 7 8
Home
Reheat
Defrost
Cook
Grill
MORE
Melt
CHOICES
Add A
Popcorn
Cook Time
Minute
123
4
56
89
7
Timer
Clock
0
Set/Off
Off /
Start
Cancel
Turntabl e
Fan
Light
On/Off
On/Off Adjust
On/Off Adjust
1211 11
10. Cooktop Lights
11. Grease and Charcoal Filters
12. Cooking Rack
13. Model and Serial Number Plate
Parts and Features Not Shown
Turn ta bl e
Grill Rack
Browning Pan and Handle
1
Oven Cavity Coating
The oven has a durable, nonstick coating which resists soil
buildup by making cleaning easier than in conventional
microwave ovens. For cleaning information, see “General
Cleaning” in the “Oven Care” section.
Microwave System – OPTIMAWAVE™
Plus Technology
The microwave system featuring OPTIMAWAVE™ Plus
Technology delivers a constant stream of microwave power – true
high, medium and low power – to provide consistent, even
results.
Typically, microwave ovens operate on HIGH power only. For
example, to achieve a 50% power level (“medium”) in a typical
microwave oven, the oven operates 50% of the time at HIGH
power and 50% of the time OFF.
SAVE THESE INSTRUCTIONS
This device complies with Part 18 of the FCC Rules.
5

In contrast, microwave ovens utilizing this microwave system
deliver the selected power level continuously. This constant
stream of microwave power helps to minimize overcooking of
foods and messy food spatters.
Sensor Cooking
The microwave system features sensor cooking functions. A
humidity sensor in the oven cavity detects moisture and humidity
emitted from food as it heats. The sensor adjusts cooking times
to various types and amounts of food. Sensor cooking takes the
guesswork out of microwave cooking.
Grill Element
To Install:
1. Remove tape from the hub.
2. Place the support on the oven cavity bottom.
3. Place the turntable on the support.
Fit the raised, curved lines in the center of the turntable
bottom between the three spokes of the hub. The rollers on
the support should fit inside the turntable bottom ridge.
To Tur n O ff :
The turntable can be turned off (except during an auto function).
This is helpful when cooking with plates that are larger than the
turntable or when cooking with two 10¼ in. (26 cm) plates that
are side by side.
To Tur n O ff : Press TURNTABLE ON/OFF button.
“TURNTABLE OFF” will appear in the display. The turntable will
turn back on automatically when cooking is over or when OFF/
CANCEL is pressed.
Cooking Rack
The rectangular cooking rack is ideal for two-level cooking. It
provides extra cavity space for cooking 2 or more containers at
the same time. Insert the rack securely into the rack supports on
the side walls of the oven. See “Assistance or Service” to order
replacement parts.
1
2
1. Halogen bulb
2. Quartz bulb
The oven uses a 1,000-watt halogen bulb with a 500-watt bulb to
serve as the grill element for various cooking functions.
When the element is in use, the halogen bulb glows very brightly,
while the glow of the quartz bulb is barely – if at all – visible. (See
“Troubleshooting” for quartz bulb testing.) The oven cavity and
door will become hot. The use of oven mitts is recommended.
Turntable
1
2
3
4
1. Turntable
2. Hub
3. Support
4. Shaft
The turntable can rotate in either direction to help cook food
more evenly. Do not operate the oven without the turntable in
place. See “Assistance or Service” to reorder any of the parts.
■ Rack will become hot. Always use oven mitts or pot holders
when handling.
■ Do not allow the rack to touch the inside cavity walls, ceiling
or floor.
■ Do not store the rack in the oven. Damage to the oven could
result if someone accidentally turns on the oven.
■ Use the rack only when cooking on 2 levels.
■ Do not use metal cookware, utensils, or a browning dish with
the rack.
■ Do not let food container on rack touch the top or sides of the
oven.
■ Do not use Browning Pan on rack.
■ Remove rack before using Grill function.
■ Remove rack before using Popcorn function.
■ Do not cook food directly on the rack. Always use a
microwave-safe container.
■ The rack is designed specifically for this oven. Do not attempt
to use any other rack (besides those supplied with the oven)
in this oven.
■ Clean rack supports often (see “General Cleaning” section).
Damage to the oven could result due to soil buildup.
6
Browning Pan and Handle
Grill Rack
The Browning Pan, with a nonstick surface and detachable
handle, has been specially designed for microwave use, and is
ideal for pan-frying (pan-browning) foods in the microwave oven.
The Browning Pan is also used as a drip pan for grilling.
Use the handle to grasp the pan. Place gripping end on the edge
of pan, squeeze handle and lift pan.
See “Assistance or Service” to order replacement parts.
OVEN CONTROL
Home
Reheat
Cook
Melt
Popcorn
1
4
Defrost
Grill
MORE
CHOICES
Cook Time
2
Add A
Minute
3
56
The circular grill rack is for grilling in the microwave oven. Place
the grill rack securely on Browning Pan, the Browning Pan on the
turntable, and position food on grill rack. See “Assistance or
Service” to order replacement parts.
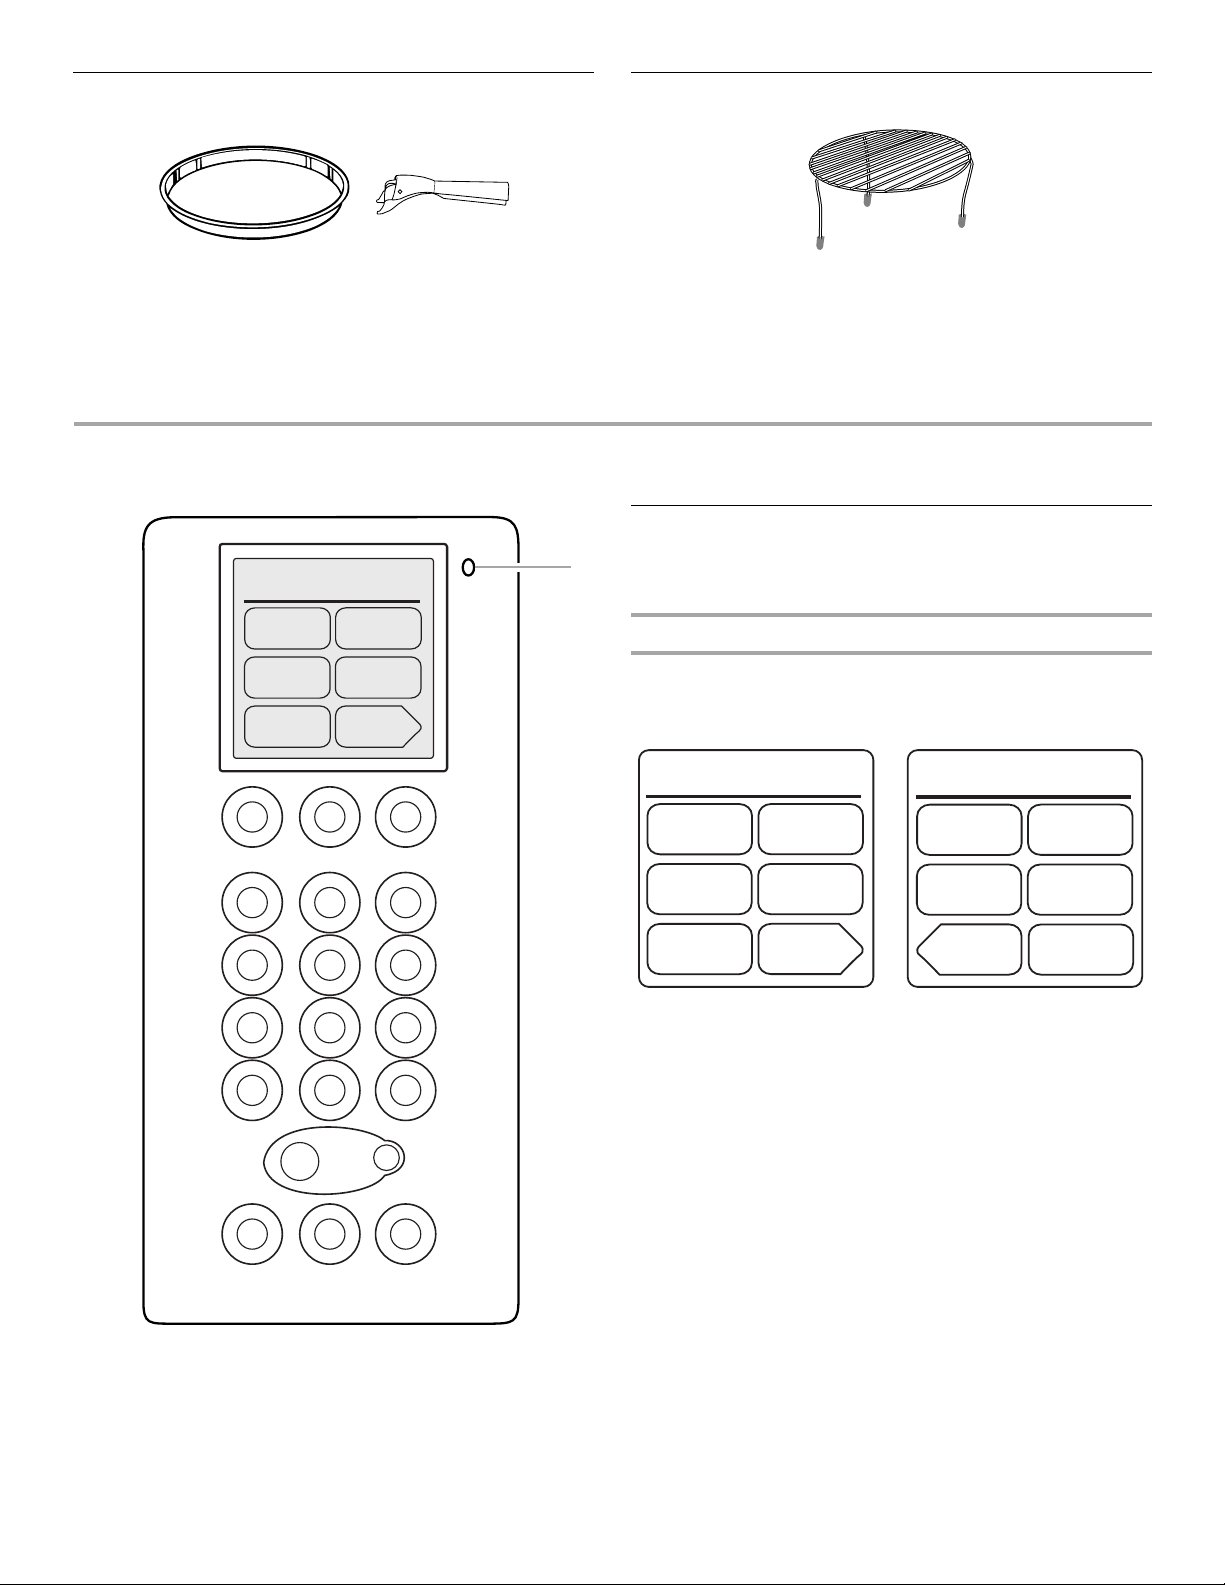
Display/Touch Screen
1
The display/touch screen functions as both a display and a
menu-driven touch screen control.
Display
The display screen shows the time of day and Home screen
when the microwave oven is not in use. If the time of day is
hidden (see “Clock” section), “Home” will appear in its place.
12:44
Reheat
Cook
Melt
PM
Defrost
Grill
MORE
CHOICES
12:44
Soften
Boil &
Simmer
BACK
Browning
PM
Pan
Baked
Goods
Hints &
Settings
Clock
7
Start
Light
On/Off Adjust
89
0
Fan
On/Off Adjust
1. Light Sensor
Off /
Cancel
Turntable
On/Off
Timer
Set/Off
During programming, the display screen displays function
menus, servings and weights, preparation instructions, and
cooking time/power settings. During a cooking cycle, it counts
down the remaining time, and gives prompts to stir or turn food.
7
Touch Scre e n
The LCD touch screen is used to input commands. A light- to
medium-pressure touch of the fingertip will activate the menu
choice. However, sensitivity of the touch screen may vary, and
using the tips or backs of fingernails may provide more accuracy
when inputting commands.
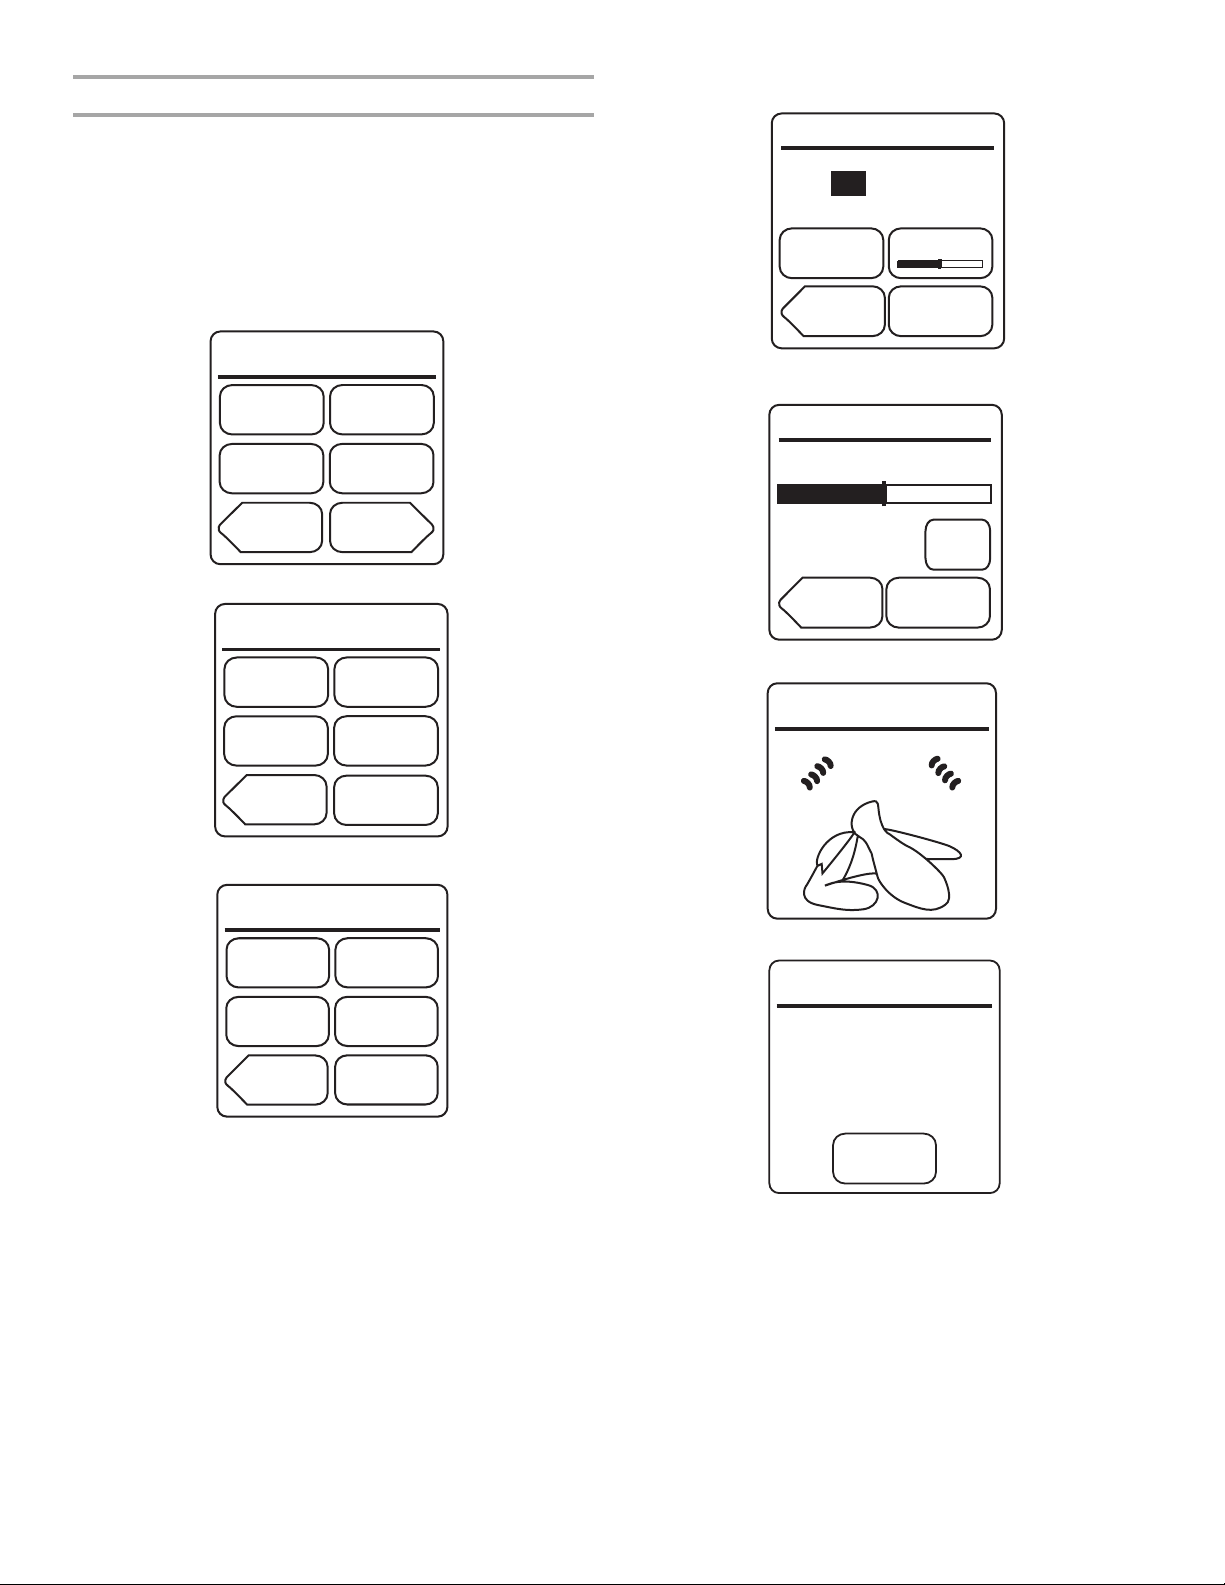
The following illustrates how the Touch Screen display screens
help the navigation through menus. This example shows the
display screens and selections when cooking chicken pieces.
1. From Home screen, touch “Cook.” Display shows:
4. Touch “Pieces, Bone-In.” Use number pads to enter weight.
Display shows:
Pieces
Cooks 0.5-2.0 Pounds.
BONE-IN
1.5 pounds
ENTER AMOUNT. PRESS
PREPARE, DONENESS, OR START.
Prepare
BACK
Doneness
_
+
Start
Cook
Cereal
Frozen
Food
BACK
2. Touch “More Choices.” Display shows:
Eggs
Vegetable
MORE
CHOICES
Cook
Grains
Rice/Pasta
Poultry
BACK
3. Touch “Poultry.” Display shows:
Poultr
Breast
Bonelss
Poached
Pieces
Bone-In
BACK
Meat
Fish
Manual
y
Breast
Bonelss
Pan Brown
Chicken
Tenders
Ground
5. Touch “Doneness” if desired. (See “Doneness” in the “Oven
Use” section.) Display shows:
Doneness
Press + button to
change doneness level.
LESS
Normal is lowest
level allowed for
6. Touch “Start.” While cooking, display shows:
NORMAL
this food.
BACK
MORE
+
Start
01:37
Cooking
When cooking is over, display shows:
End
Let stand 3 minutes
covered.
Remove food or
press Keep Warm.
Keep
Warm
See “Learning Mode” section to see how to practice navigating
through the menus without turning on the microwave generator.
See “Display Brightness and Contrast” section to see how to
adjust display settings.
8
 Loading...