

Page 1
A
A
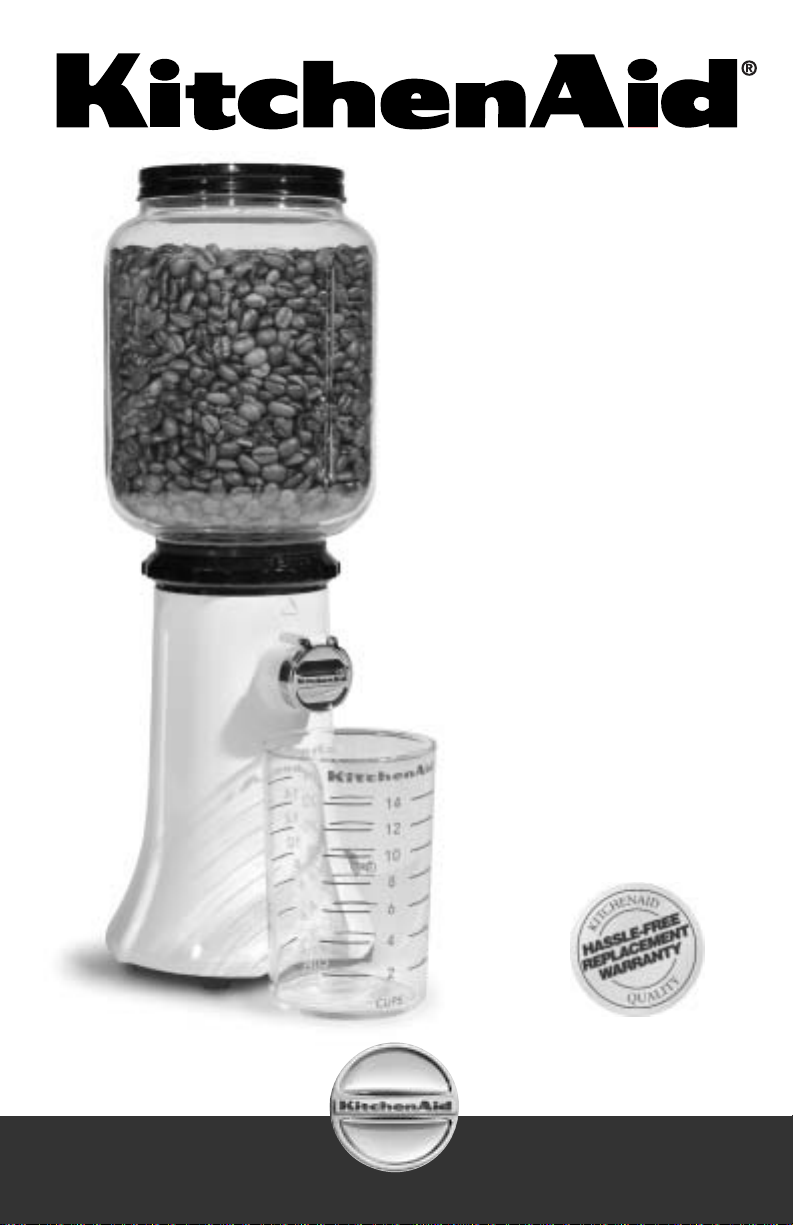
MODEL A-9
COFFEE MILL
INSTRUCTIONS
FOR THE WAY IT’S MADE.
™
®
®
1-800-541-6390
Details Inside
Page 2

We’re so confident
the quality of our
products meets the
exacting standards of
KitchenAid that, if your
Coffee Mill should fail
within the first year of ownership,
KitchenAid will arrange to deliver an
identical or comparable replacement
to your door free of charge and
arrange to have your “failed” Coffee
Mill returned to us. Your replacement
unit will also be covered by our one
year full warranty. Please follow
these instructions to receive this
quality service.
If you reside in the 50 United
States or the District of Columbia
and your KitchenAid
®
Model A-9
®
Coffee Mill should fail within the first
year of ownership, simply call our tollfree Customer Satisfaction Center at
1-800-541-6390, 8 a.m. to 8 p.m.,
Monday through Friday, 10 a.m. to 5
p.m., Saturday, Eastern Time. Give the
consultant your complete shipping
address. (No P.O. Box numbers, please.)
When you receive your replacement
Coffee Mill, use the carton and
packing materials to pack your
“failed” Coffee Mill. In the carton,
include your name and address on a
sheet of paper along with a copy of
the proof of purchase (register receipt,
credit card charge slip, etc.).
For a detailed explanation of warranty
terms and conditions, including how
to arrange for service outside the
United States, see pages 3 and 4.
Hassle-Free Replacement Warranty
Proof of Purchase & Product Registration
Always keep a copy of the sales
receipt showing the date of purchase
of your Coffee Mill. Proof of purchase
will assure you of in-warranty service.
Before you use your Coffee Mill,
please fill out and mail your product
registration card packed with the
unit. This card will enable us to
contact you in the unlikely event of a
product safety notification and assist
us in complying with the provisions
of the Consumer Product Safety Act.
This card does not verify your
warranty.
Please complete the following for
your personal records:
Model Number _______________________________________________________
Serial Number ________________________________________________________
Date Purchased _______________________________________________________
Store Name __________________________________________________________
Page 3
1
Inspired Designs are Timeless
In 1937, celebrated industrial
designer Egmont Arens perfected the
KitchenAid®Model “K” Stand Mixer, a
matchless design which remains
virtually unchanged to this day. The
following year, Arens put the finishing
touches on the world’s first electric
coffee grinder for the home, the
KitchenAid®Model A-9®Coffee Mill.
The flowing curves of metal and glass
embodied a new age of performance,
and delighted homemakers everywhere
with style and convenience.
The honest style, rugged durability,
and essential convenience of the
Model A-9®Coffee Mill reflect the
simple virtues of quality that have
guided KitchenAid since 1919.
Table of Contents
Hassle-Free Replacement Warranty...........................................Inside Front Cover
Product Registration Card ........................................................Inside Front Cover
Coffee Mill Safety ..............................................................................................2
Warranty ...........................................................................................................3
For the 50 United States and District of Columbia.......................................3
For Puerto Rico ...........................................................................................4
Arranging for Service after the Warranty Expires .........................................4
Arranging for Service Outside the 50 United States and Puerto Rico ...........4
Ordering Accessories and Replacement Parts .....................................................4
Electrical Requirements......................................................................................5
Troubleshooting Problems .................................................................................5
Model A-9®Coffee Mill Features........................................................................6
Model A-9®Coffee Mill Operation .....................................................................7
Coffee Grinding Tips..........................................................................................8
How the Grind Affects Flavor.............................................................................9
Care and Maintenance ....................................................................................10
Page 4
2
IMPORTANT SAFEGUARDS
When using electrical appliances, basic safety precautions should always be
followed including the following:
1. Read all instructions.
2. To protect against risk of electric shock do not put Coffee Mill in water or
other liquid.
3. Close supervision is necessary when any appliance is used by or near children.
4. Unplug Coffee Mill from outlet when not in use, before putting on or
taking off parts, and before cleaning.
5. Avoid contacting moving parts.
6. Do not operate any appliance with a damaged cord or plug or after the
appliance malfunctions, or is dropped or damaged in any manner. Return
appliance to the nearest Authorized Service Facility for examination, repair
or electrical or mechanical adjustment.
7. The use of attachments not recommended or sold by KitchenAid may cause
fire, electric shock, or injury.
8. Do not use outdoors.
9. Do not let cord hang over edge of table or counter, or touch hot surfaces.
10. Check bean hopper for presence of foreign objects before using.
11. This product is designed for household use only.
SAVE THESE INSTRUCTIONS
Your safety and the safety of others are very important.
We have provided many important safety messages in this manual and on your
appliance. Always read and obey all safety messages.
This is the safety alert symbol.
This symbol alerts you to potential hazards that can kill or hurt you
and others.
All safety messages will follow the safety alert symbol and either
the word “DANGER” or “WARNING.”These words mean:
You can be killed or seriously injured
if you don’t immediatel
y follow
instructions.
You can be killed or seriously injured
if you don’t follow instructions.
All safety messages will tell you what the potential hazard is, tell you how to
reduce the chance of injury, and tell you what can happen if the instructions are
not followed.
Coffee Mill Safety
DANGER
WARNING
Page 5

3
Length of
Warranty:
One Year Full Warranty
from date of purchase.
KitchenAid Will Pay
For Your Choice of:
Hassle-Free
Replacement of your
Coffee Mill. See inside
front cover for details
on how to arrange for
service, or call the
Customer Satisfaction
Center toll-free at
1-800-541-6390.
OR
The replacement parts
and repair labor costs
to correct defects in
materials and
workmanship. Service
must be provided by an
Authorized KitchenAid
Service Center. See the
KitchenAid®Coffee Mill
Warranty for Puerto
Rico on page 4 for
details on how to
arrange for service.
KitchenAid Will Not
Pay For:
A. Repairs when Coffee
Mill is used in other
than normal single
family home use.
B. Damage resulting
from accident,
alteration, misuse
or abuse.
C. Any shipping or
handling costs to
deliver your Coffee
Mill to an
Authorized Service
Center.
D. Replacement parts
or repair labor costs
for Coffee Mills
operated outside the
50 United States
and District of
Columbia.
KITCHENAID DOES NOT ASSUME ANY RESPONSIBILITY FOR INCIDENTAL
OR CONSEQUENTIAL DAMAGES. Some states do not allow the exclusion or
limitation of incidental or consequential damages, so this exclusion may not
apply to you. This warranty gives you specific legal rights and you may also
have other rights which vary from state to state.
This warranty extends to the purchaser and any succeeding owner for Coffee
Mills operated in the 50 United States and District of Columbia.
KitchenAid®Coffee Mill Warranty for
the 50 United States and District of Columbia
Page 6

4
KitchenAid®Coffee Mill Warranty
for Puerto Rico
A one year full warranty extends to
the purchaser and any succeeding
owner for Coffee Mills operated in
Puerto Rico. During the warranty
period, all service must be handled by
an Authorized KitchenAid Service
Center. Please bring the Coffee Mill, or
ship it prepaid and insured, to the
nearest Authorized Service Center. Call
toll-free 1-800-541-6390 to learn the
location of a Service Center near you.
Your repaired Coffee Mill will be
returned to you prepaid and insured.
Consult your local KitchenAid dealer
or the store where you purchased the
Coffee Mill for information on how to
obtain service.
Arranging for Service Outside
the 50 United States, the District of Columbia
and Puerto Rico
To order accessories or replacement
parts for your Coffee Mill, call toll-free
1-800-541-6390 or write to:
Customer Satisfaction Center,
KitchenAid Portable Appliances, P.O.
Box 218, St. Joseph, MI 49085-0218.
Ordering Accessories and Replacement Parts
For service information, call toll-free
1-800-541-6390 or write to:
Customer Satisfaction Center,
KitchenAid Portable Appliances, P.O.
Box 218, St. Joseph, MI 49085-0218.
Arranging for Service
after the Warranty Expires
Page 7
5
Troubleshooting Problems
If your Coffee Mill should fail to
operate properly, check the
following:
1. Is the Coffee Mill plugged in?
2. Is the fuse in the circuit to the
Coffee Mill in working order? If
you have a circuit breaker box,
make sure the circuit is closed.
3. Try unplugging the Coffee Mill,
then plug it back in.
If the problem cannot be corrected
with the above steps, see the
KitchenAid Warranty on page 3.
Do not return the Coffee Mill to the
retailer – they do not provide service.
Electrical Requirements
Volts: 120V A.C. only.
Hertz: 60 Hz
Grounding, 3-prong system.
15-amp branch circuit.
NOTE: Your Coffee Mill has a
3-prong grounded plug. To reduce
the risk of electrical shock, this plug
will fit in an outlet only one way. If
the plug does not fit in the outlet,
contact a qualified electrician. Do not
modify the plug in any way.
WARNING
Electrical Shock Hazard
Plug into a grounded 3-prong
outlet.
Do not remove ground prong.
Do not use an adapter.
Failure to follow these
instructions can result in
death, fire, or electrical shock.
Page 8
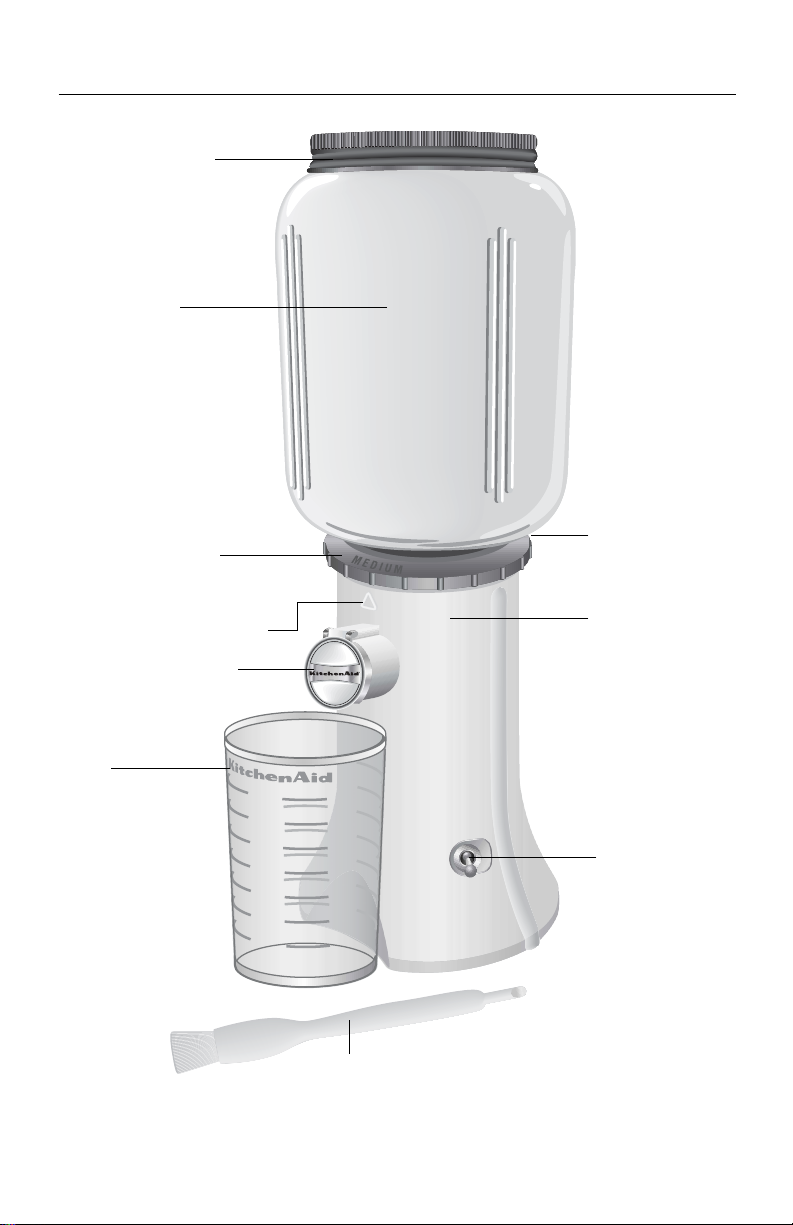
6
Model A-9®Coffee Mill Features
Bean Hopper
Bean hopper
holds 1 lb. of
coffee beans and
unscrews from
motor housing for
simple cleaning.
Motor Housing
Precision
Stainless Steel
Grinding Burrs
(not shown)
On/Off Switch
Power Cord
Round cord wipes
clean easily.
Bean Hopper Lid
Stainless steel lid
twists off for filling.
GrindAdjustment Ring
Rotate ring to select
one of 16 grinds.
Grind Indicator Arrow
Grind Spout Cover
Measuring
Glass
Lines show
approximate
amount of
coffee needed
to brew a given
number of cups.
Cleaning Tool
Specially designed tool features a pick on one
end to facilitate removal of grinds from the
grinding spout and the burrs. Stiff bristles on
the other end of the cleaning tool quickly
sweep excess grinds from the cutting burrs.
Removable
Burr Set Screw
(not shown)
14
12
10
8
6
4
2
Page 9
7
Model A-9®Coffee Mill Operation
Before First Use
Wash the bean hopper, bean hopper
lid, and measuring glass in hot, soapy
water. Rinse and dry.
Model A-9®Coffee Mill Use
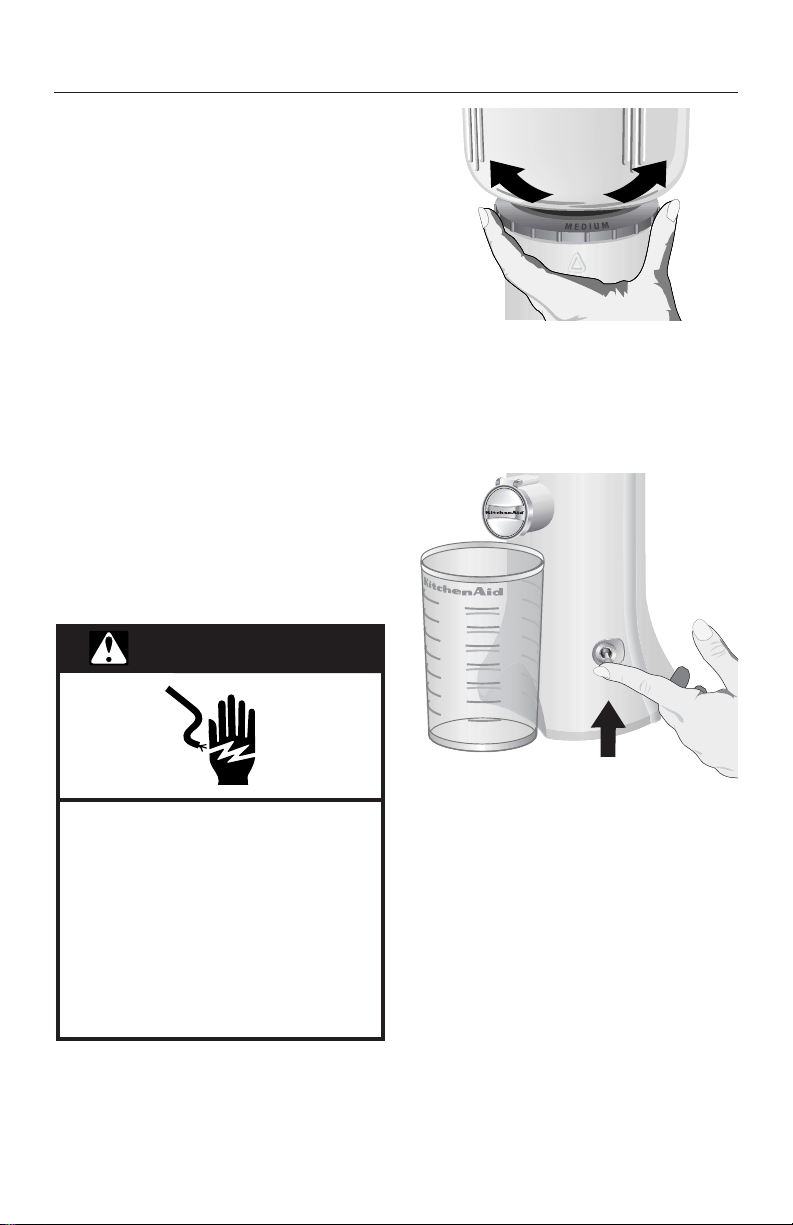
1. Unplug Coffee Mill.
2. Attach bean hopper to motor
housing by turning bean hopper
clockwise until snug.
3. Fill bean hopper with whole coffee
beans. Attach lid to bean hopper
by turning clockwise.
NOTE: Grinding flavored coffee beans
is not recommended. Flavored beans
will impart an off-taste to any other
coffee that is ground in the mill.
Additionally, many flavored coffee
beans have sugars or syrups added in
the roasting process. These sugared
beans may cause the mill to clog,
damaging the unit.
4. Plug into a grounded 3-prong outlet.
5. Select grind by rotating grindadjustment ring, aligning markings
with the grind indicator arrow on
the motor housing. See “Coffee
Grinding Tips” on page 8 to select
the appropriate grind adjustment.
6. Position measuring glass under
spout. The glass shows the
approximate amount of coffee
needed to brew a given number of
cups. Individual tastes may require
slightly more or less coffee.
7. To grind coffee, flip “On/Off”
switch to “On” position. When
measuring glass is filled with desired
amount of ground coffee, flip
“On/Off” switch to “Off” position.
NOTE: To avoid grounds spraying
beyond glass, do not lift grind spout
cover while the coffee mill is operating.
WARNING
14
12
10
8
6
4
2
Electrical Shock Hazard
Plug into a grounded 3-prong
outlet.
Do not remove ground prong.
Do not use an adapter.
Failure to follow these
instructions can result in
death, fire, or electrical shock.
Page 10

8
Coffee Grinding Tips
• Use the correct grind for the brew
process you are using. 16 grinds are
available from “Fine” to “Coarse.”
“Fine” can be used for espresso,
“Medium” is appropriate for
automatic drip coffee makers, and
“Coarse” is suited to French Press
brewing. Experiment – your tastes
may be better served by using a
slightly finer or coarser grind.
• When adjusting to a finer grind, it
may be easier to turn the grindadjustment ring while the grinder is
running.
•For drip coffee makers, a good
starting point is to grind 1 ounce of
coffee for every 4 cups of brew
water as measured with the carafe
(a carafe “cup” is about 41⁄4 ounces).
Finer grinds require less coffee, but
too fine a grind could cause an
overflow in the brew basket of the
coffee maker.
• Ground coffee loses flavor and
aroma quickly. For best results, grind
only as much coffee as you intend
to use immediately.
•To preserve the freshness of coffee
beans, keep beans in an opaque,
airtight container and store them in
a cool, dry place. Refrigeration is not
recommended, as condensation
tends to form on the beans
whenever the container is opened.
Freezing can help preserve beans
stored for an extended period, but it
will also impair the flavor.
NOTE: Grind frozen beans
immediately upon removal from the
freezer. If beans begin to thaw from a
frozen state, condensation will form
on the beans and the moisture may
clog both the grinds and the mill.
• Grinding flavored coffee beans is
not recommended – they will impart
an off-taste to any other coffee that
is ground in the mill, and may cause
the burrs to clog.
• Do not grind spices. The Coffee Mill
is intended for grinding whole
coffee beans only.
Page 11

9
How the Grind Affects Flavor
The flavor of coffee depends on a
variety of factors, including the
quality, freshness, and roast of the
beans, the purity of the brew water,
the cleanliness of the brewing
equipment, and the brewing
temperature. The fineness and
consistency of the grind is also critical.
Coffee that is ground too fine for a
particular brewing process – using too
fine of a grind in a drip coffee maker,
for example – will result in the brew
water over-extracting the oils and
aromatic compounds in the coffee,
yielding a brew that is extremely
pungent and bitter.
Conversely, coffee that is too
coarsely ground for a particular
process will result in the underextraction of the oils and essences,
resulting in a very thin and weak
flavor.
The consistency of the grind is also
an important factor in the flavor of
coffee. If the grounds are uniform,
equal amounts of soluble compounds
will be extracted from each. If the
grounds vary in size, some will be
over-extracted and some will be
under-extracted, leading to extremely
poor quality.
The Model A-9
®
Coffee Mill uses a
pair of stainless steel cutting burrs to
grind coffee with precision. This helps
ensure that your coffee is the best it
can be.
Page 12
10
Care and Maintenance
IMPORTANT:
• Make sure the Coffee Mill is switched
“Off” and unplugged before cleaning.
• Do not immerse motor housing
in water.
• Do not use abrasive cleaners or
scouring pads.
•Never immerse the cutting burrs,
burr-shaft assembly, or face-plate
assembly in water. Keep them dry
at all times.
Cleaning the Coffee Mill
1. Loosen and scrape leftover grinds
from the grinding spout with the
cleaning tool after each use.
2. Wipe the motor housing and cord
with a clean damp cloth.
3. Dry with a soft cloth.
4. Wash the bean hopper, lid, and
glass in hot soapy water.
5. Dry all parts thoroughly before
attaching them to the Coffee Mill.
NOTE: The bean hopper, bean hopper
lid, and measuring glass are dishwasher
safe, but repeated dishwasher cleaning
may cause the graduated markings on
the measuring glass to fade.
Cleaning the Cutting Burrs
If the mill is used frequently, the
cutting burrs need to be cleaned every
few weeks for best performance.
Cleaning enables the burrs to achieve
the most consistent grinds possible.
Without regular cleaning, the mill may
clog, which could cause damage to
the Coffee Mill.
Foreign objects – like pebbles or
twigs – sometimes find their way into
whole bean coffee. These objects may
cause the mill to jam. If this happens,
follow the burr-cleaning procedure to
remove the foreign material.
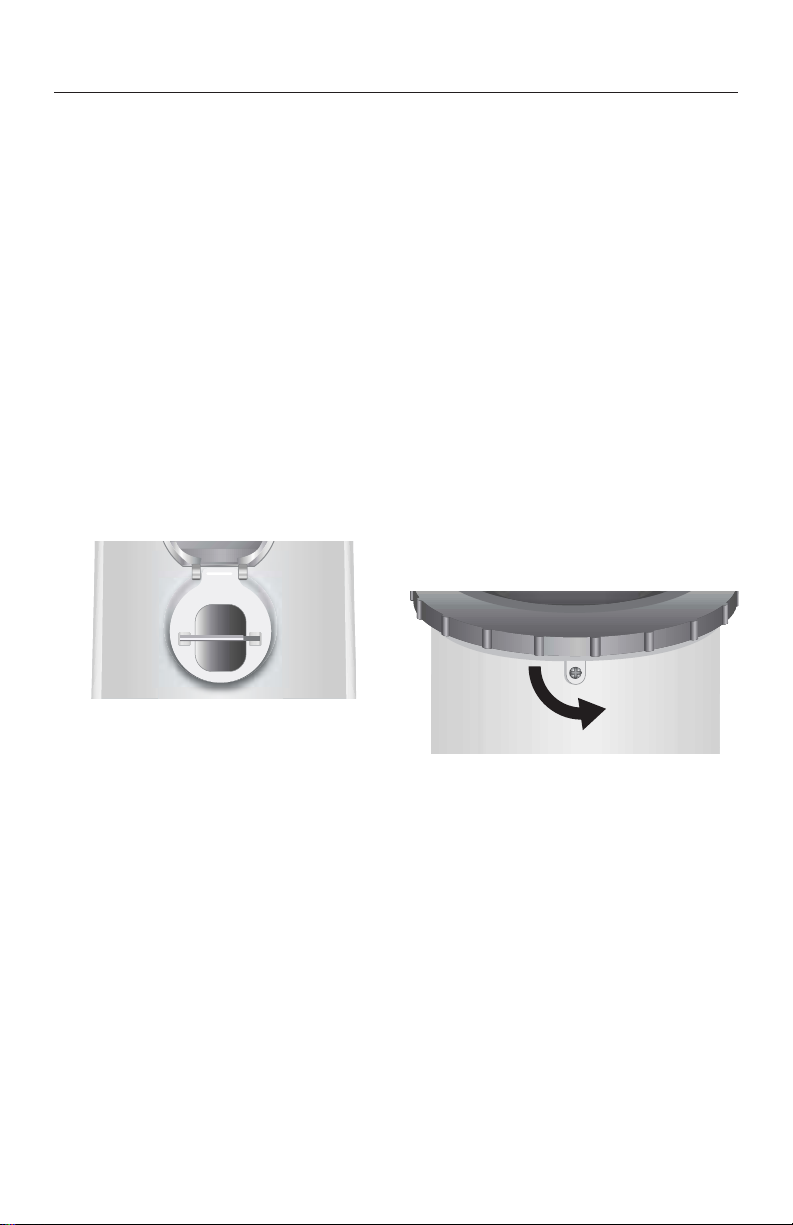
To clean the removable burrs:
1. Empty the bean hopper and
remove from the base.
2. Locate the removable-burr set screw
on the back of the Coffee Mill.
3. Using a Phillips-head screwdriver,
turn the set screw counterclockwise to loosen, and remove.
Page 13
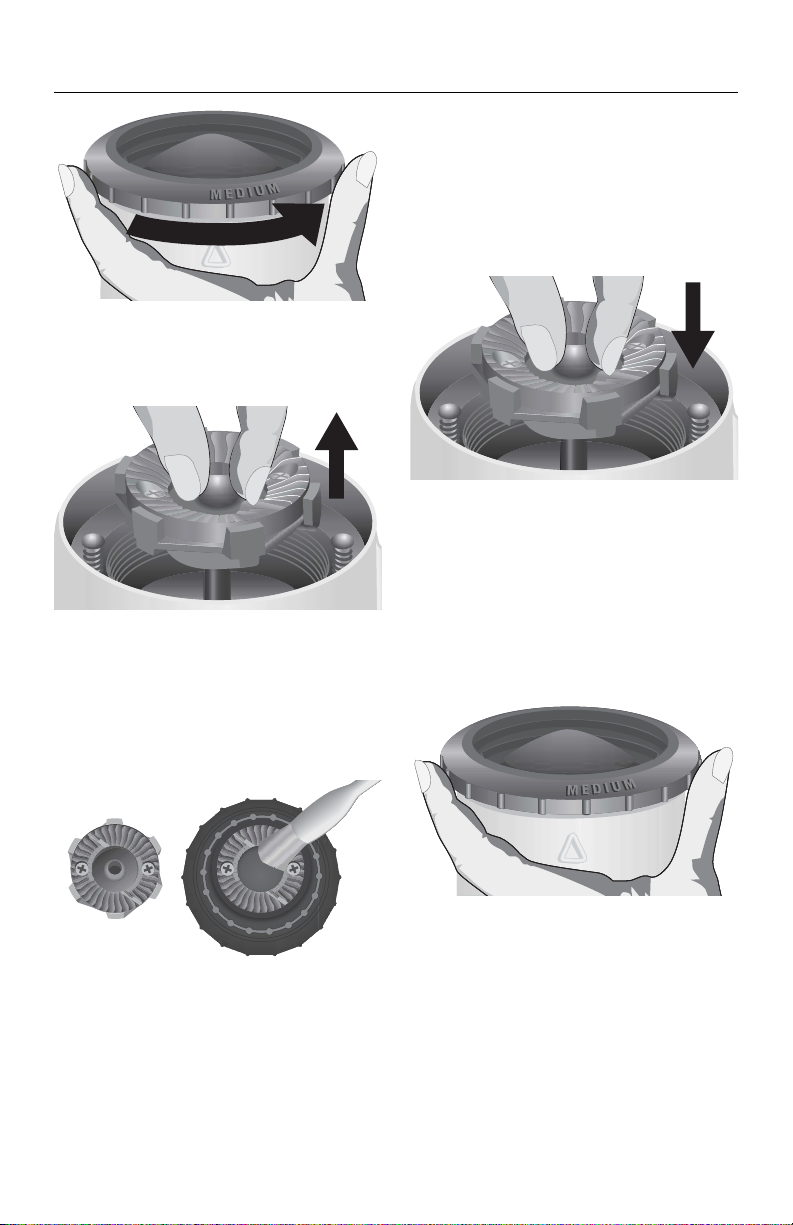
To reassemble:
1. After cleaning, align the keyed
burr-shaft assembly with the motor
shaft. Lower the burr-shaft assembly
onto the motor shaft and rotate
until the burr-shaft assembly falls
into place inside the motor housing.
2. Place the grind-adjustment ring
onto the motor housing. Press and
turn the grind-adjustment ring
clockwise several rotations until the
gear offers complete resistance,
then rotate it counterclockwise
until the selection arrow aligns
with the initial “M” for the
Medium grind selection.
3. Replace the set screw and tighten
with the Phillips-head screwdriver.
Your Coffee Mill is now ready
for use.
11
4. Turn the grind-adjustment ring
counterclockwise several complete
rotations, and remove it from the
base.
5. Lift the burr-shaft assembly out of
the motor housing.
6. Using the cleaning tool, clean the
burr mounted on the burr-shaft
assembly and the burr mounted
underneath the grind-adjustment
ring.
NOTE: Never wash the burrs or burrshaft assembly in water. Keep them
dry at all times.
Care and Maintenance
Page 14
12
4. Attach the replacement burrs to
the burr-shaft assembly and the
grind-adjustment ring with the
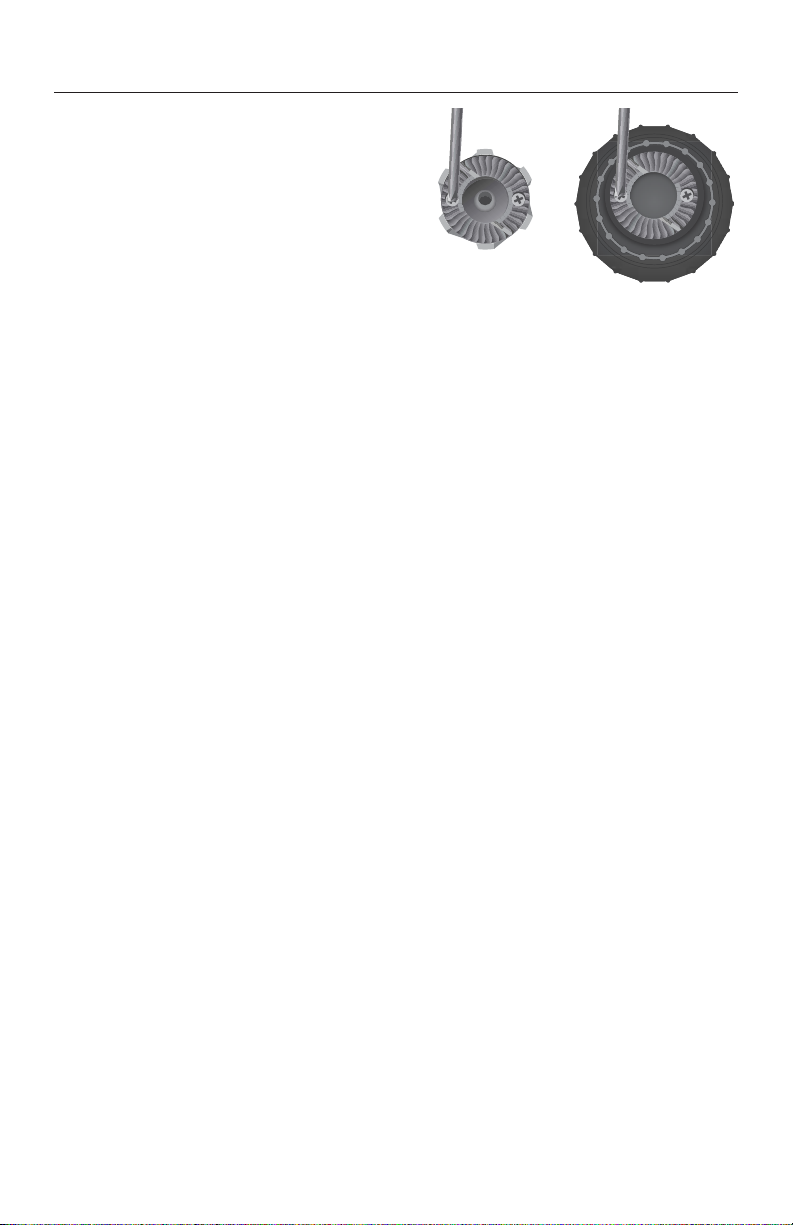
burr-mounting screws. Make
certain the cutting surfaces of the
burrs face outward (see the
illustration above), and the burrmounting screws are tight.
5. Insert the burr-shaft assembly into
the motor housing and attach the
grind-adjustment ring. For
instructions, see “To reassemble”,
page 11, steps 1-3.
Replacing the Cutting Burrs
If the cutting burrs are damaged, or
have reached the end of their life
(usually after grinding 600-800 lbs. of
coffee), they can be easily replaced.
Contact KitchenAid at
1-800-541-6390 to order a set of
replacement burrs.
To replace the burrs:
1. Unplug Coffee Mill.
2. Remove the grind-adjustment ring
and burr-shaft assembly. For
instructions, see “Cleaning the
Cutting Burrs”, pages 10-11,
steps 1-5.
3. With a Phillips-head screwdriver,
remove the burr from the burrshaft assembly by turning the two
burr-mounting screws counterclockwise until free.
4. Remove the burr from the grindadjustment ring by turning the
two burr mounting screws counterclockwise until free.
Care and Maintenance
Page 15

Page 16

® Registered Trademark/™Trademark of KitchenAid, U.S.A.
© 2005. All rights reserved. (4380dZw205)
FOR THE WAY IT’S MADE.
™
®
9707030 Rev. C
 Loading...