

Page 1
3
SPEED
VITESSES
VELOCIDADES
BLENDER
INSTRUCTIONS
MÉLANGEUR
INSTRUCTIONS
LICUADORA
INSTRUCCIONES
KSB540
9709948A
U.S.A./É.-U./EE.UU.:
1-800-541-6390
Canada/Canadá:
1-800-807-6777
®
FOR THE WAY IT’S MADE.
KitchenAid.com
KitchenAid.ca
®
Page 2

Proof of Purchase and Product Registration
Always keep a copy of the sales receipt
showing the date of purchase of your
blender. Proof of purchase will assure you
of in-warranty service.
Before you use your blender, please fill out
and mail your product registration card
packed with the unit. This card will enable
Model Number ______________________________________________________________
Serial Number _______________________________________________________________
Date Purchased ______________________________________________________________
Store Name and Location ______________________________________________________
us to contact you in the unlikely event of
a product safety notification and assist us
in complying with the provisions of the
Consumer Product Safety Act. This card
does not verify your warranty.
Please complete the following for your
personal records:
Preuve d’achat et enregistrement du produit
Veuillez conserver une copie du coupon de
caisse indiquant la date d’achat de votre
mélangeur. La preuve d’achat vous assure
du service après-vente sous garantie.
Avant d’utiliser le mélangeur, veuillez
remplir et poster la carte d’enregistrement
du produit accompagnant l’appareil.
Grâce à cette carte, nous pourrons vous
Numéro de modèle __________________________________________________________
appeler dans l’éventualité improbable
d’un avis de sécurité et nous pouvons
aussi nous conformer plus facilement aux
dispositions de la loi sur la sécurité des
produits de consommation. Cette carte ne
confirme pas la garantie.
Veuillez remplir ce qui suit pour votre
dossier personnel.
Numéro d’identification _______________________________________________________
Date d’achat ________________________________________________________________
Nom du magasin et emplacement ______________________________________________
Comprobante de compra y registro del producto
Siempre conserve una copia del recibo
de ventas que especifique la fecha de
compra de su licuadora. El comprobante
de compra le asegurará el servicio técnico
bajo garantía.
Antes de utilizar la licuadora, complete y
envíe por correo su tarjeta de registro del
producto que viene junto con la unidad.
Esta tarjeta nos permitirá contactarnos
Número del modelo __________________________________________________________
Número de serie _____________________________________________________________
Fecha de compra ____________________________________________________________
Nombre de la tienda y dirección ________________________________________________
con usted en el improbable caso de
notificación de algún problema de
seguridad con el producto y nos ayudará a
cumplir con las cláusulas de la Consumer
Product Safety Act (Ley sobre la seguridad
de los productos para el consumidor). Esta
tarjeta no asegura su garantía.
Complete lo siguiente para su
registro personal:
Page 3

Page 4

Table of Contents
INTRODUCTION
Proof of Purchase and Product Registration Card ................................. Inside Front Cover
Blender Safety ................................................................................................................2
Important Safeguards ....................................................................................................2
Electrical Requirements .................................................................................................. 3
FEATURES AND OPERATION
Blender Features ............................................................................................................4
Preparing the Blender for Use ........................................................................................ 6
Before First Use ......................................................................................................6
Blender Assembly ...................................................................................................6
Using the Blender .......................................................................................................... 7
Before Use ..............................................................................................................7
Operating the Blender ............................................................................................ 7
Pulse Feature ..........................................................................................................7
Ingredient Cap .......................................................................................................7
Speed Control Guide .....................................................................................................8
CARE AND CLEANING
Cleaning the Blender .....................................................................................................9
Troubleshooting .............................................................................................................9
BLENDER TIPS
Quick Tips .............................................................................................................10
How To ................................................................................................................10
ENGLISH
WARRANTY AND SERVICE INFORMATION
KitchenAid
®
blender Warranty ......................................................................................12
Hassle-Free Replacement Warranty – 50 United States and District of Columbia .......... 13
Hassle-Free Replacement Warranty – Canada ...............................................................13
How to Arrange for Warranty Service in Puerto Rico ....................................................13
How to Arrange for Service after the Warranty Expires – All Locations .........................14
How to Arrange for Service Outside these Locations ....................................................14
How to Order Accessories and Replacement Parts ........................................................14
NOTE: Due to the unique container and blade design, read these instructions before
using your new KitchenAid
®
blender to achieve maximum peformance results.
1
Page 5

Blender Safety
Your safety and the safety of others are very important.
We have provided many important safety messages in this manual and on your
appliance. Always read and obey all safety messages.
ENGLISH
All safety messages will tell you what the potential hazard is, tell you how to
reduce the chance of injury, and tell you what can happen if the instructions are
not followed.
This is the safety alert symbol.
This symbol alerts you to potential hazards that can kill or hurt you
and others.
All safety messages will follow the safety alert symbol and either
the word “DANGER” or “WARNING.” These words mean:
You can be killed or seriously
DANGER
WARNING
injured if you don’t immediately
follow instructions.
You can be killed or seriously injured
if you don’t follow instructions.
IMPORTANT SAFEGUARDS
When you are using electrical appliances, basic safety precautions should always be
followed to reduce the risk of fire, electric shock, and/or injury to persons including the
following:
1. Read all instructions.
2. To avoid the risk of electrical shock, do not put blender in water or other liquid.
3. Close supervision is necessary when any appliance is used by or near children.
4. Unplug from outlet when not in use, before putting on or taking off parts, and
before cleaning.
5. Avoid contact with moving parts.
6. Do not operate the blender with a damaged cord or plug or after appliance
malfunctions, or is dropped or damaged in any manner. Return appliance to the
nearest Authorized Service Center for examination, repair or electrical or mechanical
adjustment.
7. Do not use outdoors.
8. Do not let cord hang over edge of table or counter.
9. Keep hands and utensils out of container while blending to reduce the risk of
severe injury to persons or damage to the blender. A scraper may be used but must
be used only when the blender is not running.
10. Blades are sharp. Handle carefully.
11. Always operate blender with cover in place.
12. The use of attachments, including canning jars, not recommended by KitchenAid
may cause a risk of injury to persons.
13. When blending hot liquids, remove center piece of two-piece cover.
14. This product is designed for household use only.
SAVE THESE INSTRUCTIONS
2
Page 6

Electrical Requirements
Electrical features: 120 VAC, 60 hz, 6 amp
NOTE: Your blender has a 3 prong
grounded plug. To reduce the risk of
electrical shock, this plug will fit in an
outlet only one way. If the plug does
not fit in the outlet, contact a qualified
electrician. Do not modify the plug in
any way.
Do not use an extension cord. If the
power supply cord is too short, have a
qualified electrician or serviceman install
an outlet near the appliance.
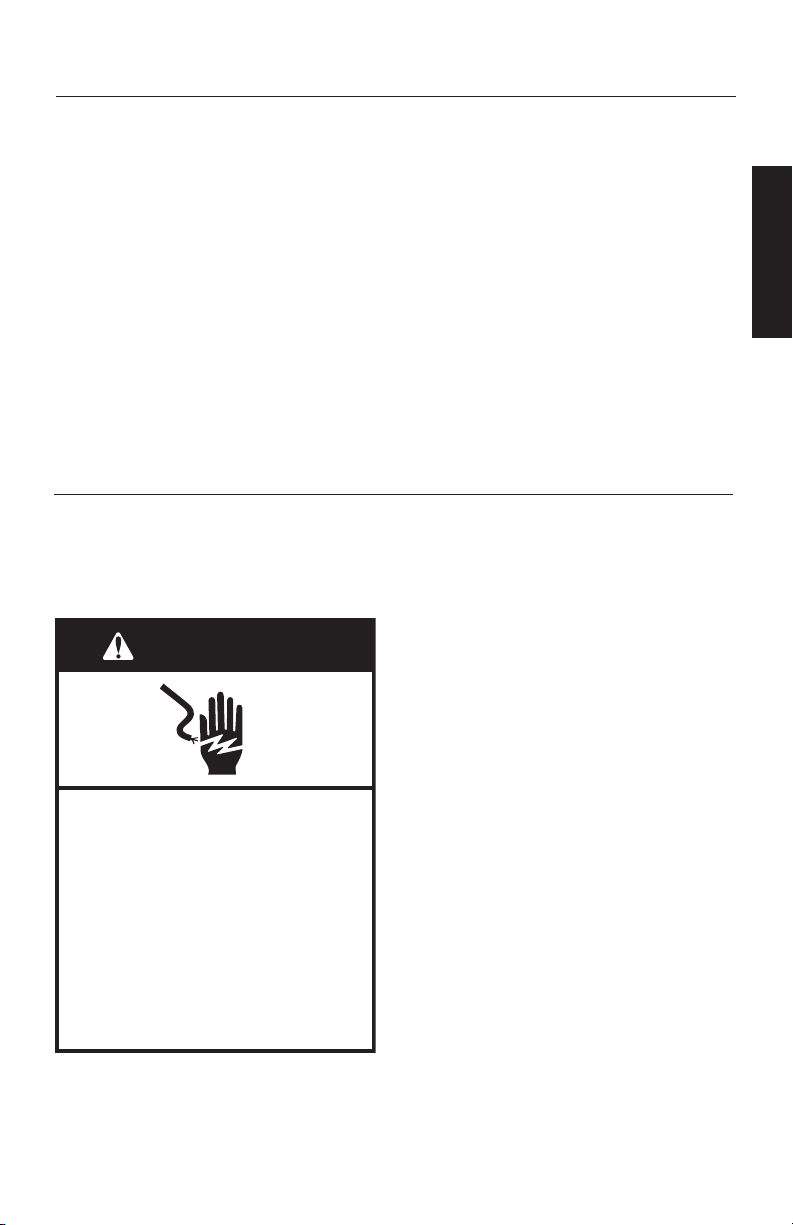
WARNING
ENGLISH
Electrical Shock Hazard
Plug into a grounded 3 prong
outlet.
Do not remove ground prong.
Do not use an adapter.
Do not use an extension cord.
Failure to follow these
instructions can result in death,
fire, or electrical shock.
3
Page 7
ENGLISH
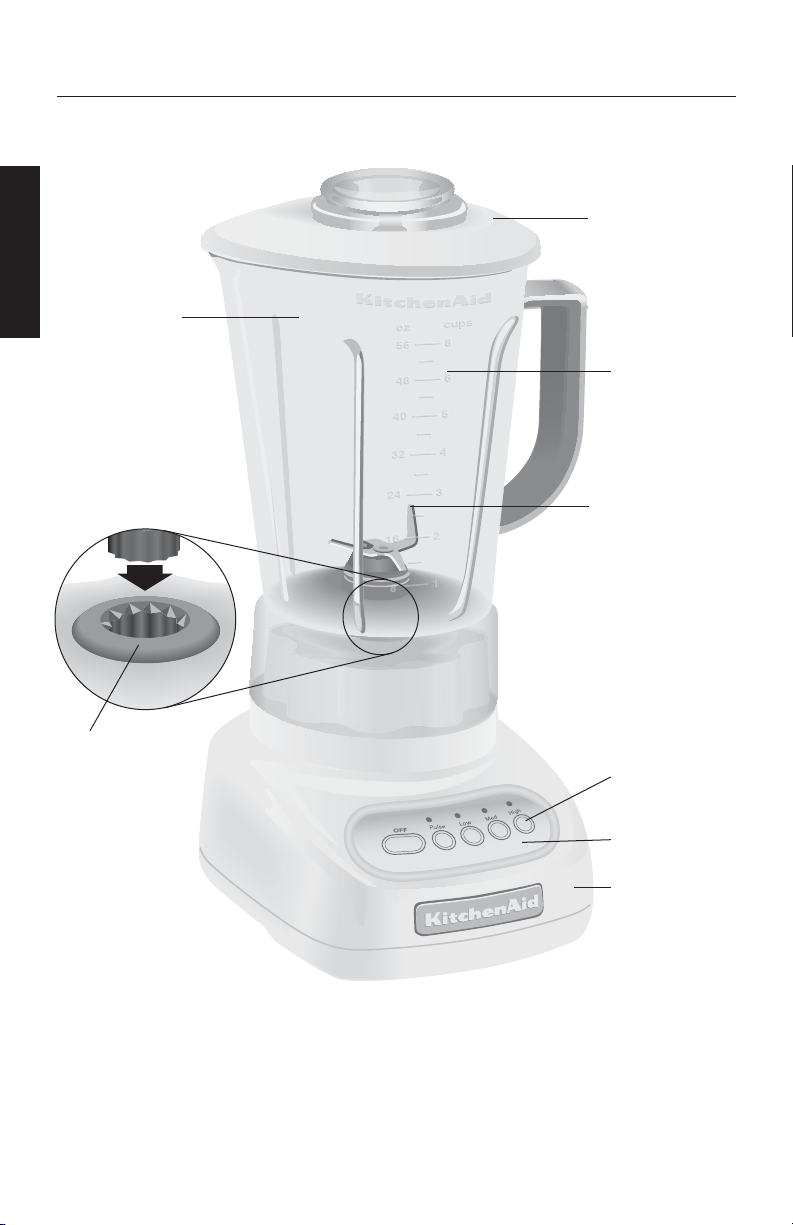
Blender Features
Stay-Put Lid
with Clear,
2 oz (60 mL)
Ingredient Cap
56 oz (1.75 L)
Polycarbonate
Pitcher
Durable
Steel-Reinforced
Coupler
Easy clean,
One-Piece
Pitcher
Design
Patented
Stainless Steel
Blade
Speed
Selection
Buttons
Clean Touch™
Control Pad
Die-Cast
Metal Base
4
Page 8

Blender Features
This blender was built and tested to
KitchenAid quality standards for optimum
performance and long, trouble-free life.
Robust Motor
Rugged 0.9-horsepower motor supplies
the power for superb performance with
all blending tasks – from pureeing sauces
to making chunky salsas, or uniformly
crushing a pitcher of ice or frozen fruit
within seconds for silky smoothies.
Easy clean, One-Piece Pitcher Design
One-piece design integrates a functional
pitcher with dynamic interior contours
that continually direct food into the
blade for fast, thorough blending. The
one-piece design also means cleaning is
achieved without removing the blade and
other parts. Pitcher stands up to extreme
temperatures – from boiling soups to
frozen margaritas and has a wide pour
spout to ensure smooth pouring. Pitcher is
dishwasher safe.
Polycarbonate Pitcher
One-piece 56 oz (1.75 L)
capacity, clear, polycarbonate
pitcher is shatter resistant,
scratch resistant, and stain
resistant. Pitcher’s handle
features soft inner grip for firm,
comfortable, no-slip control.
Patented Stainless Steel Blade
Sharp oversized blade tines are positioned
on four different planes for fast, thorough,
and consistent blending. Our durable
blade design is built into the pitcher for
easy handling and cleaning.
Speed Selection Buttons
Create frozen drinks and puree sauces or
soups in seconds. Blend with confidence,
control, and consistency at all settings:
LOW, MEDIUM, and HIGH. The PULSE
button gives added control for jobs that
require short, quick bursts or longer bursts
of power.
Clean Touch™ Control Pad
Wipes clean in an instant. Smooth control
pad has no crevices or cracks to trap
ingredients.
Durable Steel-Reinforced Couplers
Commercial-quality couplers with
12 interlocking teeth provide direct
transfer of motor power to the blade.
Pitcher coupler is coated for quiet
operation.
Stay-Put Lid with Clear,
2 oz (60 mL) Ingredient Cap
Provides a strong seal. The flexible lid
will maintain its tight seal throughout
the life of the blender. The lid includes
a removable 2 oz (60 mL) cap for
convenience in measuring and adding
ingredients.
Die-Cast Metal Base
Heavy, die-cast metal base ensures stable,
quiet operation when blending a full
pitcher of ingredients. Four rubber feet
on wide, solid base provide a no-slip,
non-marring grip. Smooth and rounded,
the base is easy to clean and features
convenient cord storage underneath.
ENGLISH
5
Page 9

Preparing the Blender for Use
Before First Use
Before using your blender for the first time,
wipe blender base with a warm sudsy cloth,
then wipe clean with a damp cloth. Dry
ENGLISH
with a soft cloth. Wash 1-piece pitcher, lid,
and ingredient cap in warm, sudsy water
or just add soap and warm water to the
pitcher, place it on the blender base, and
blend to clean. See “Care and Cleaning”
section. Rinse parts and wipe dry.
Blender Assembly
1. Adjust the length of the power cord to
suit your needs.
A. If you will be using
the blender within
2 ft (61 cm) of an
outlet, you can
shorten the power
cord by coiling it into
the storage area on
the bottom of the
base in the pattern
at right (indicated by
arrows):
B. If you will be using the
blender within
16" (41 cm) of an
outlet, you can
shorten the power
cord by coiling it into
the storage area on
the bottom of the
base in this pattern:
2. Place the 1-piece pitcher on the
blender base.
3. Before plugging in the blender, be sure
to press OFF to ensure the blender is in
the Off mode.
WARNING
Electrical Shock Hazard
Plug into a grounded 3 prong
outlet.
Do not remove ground prong.
Do not use an adapter.
Do not use an extension cord.
Failure to follow these
instructions can result in death,
fire, or electrical shock.
C. To store the majority
of the power cord
under the base of
your blender, follow
cord wrap pattern “B”
above. Then, starting
at point “A” in the
drawing at right, coil
a second layer of cord
into the base in the
pattern indicated by
the arrows:
4. Plug into a grounded 3 prong outlet.
Blender is now ready for operation.
5. Before removing the pitcher from the
base after use, always press OFF and
A
unplug the power cord. Lift the pitcher
in a straight, upward motion off of the
blender base.
6
Page 10
Using the Blender
Before Use
NOTE: While the blender is on:
- Do not interfere with blade movement.
- Do not remove pitcher lid.
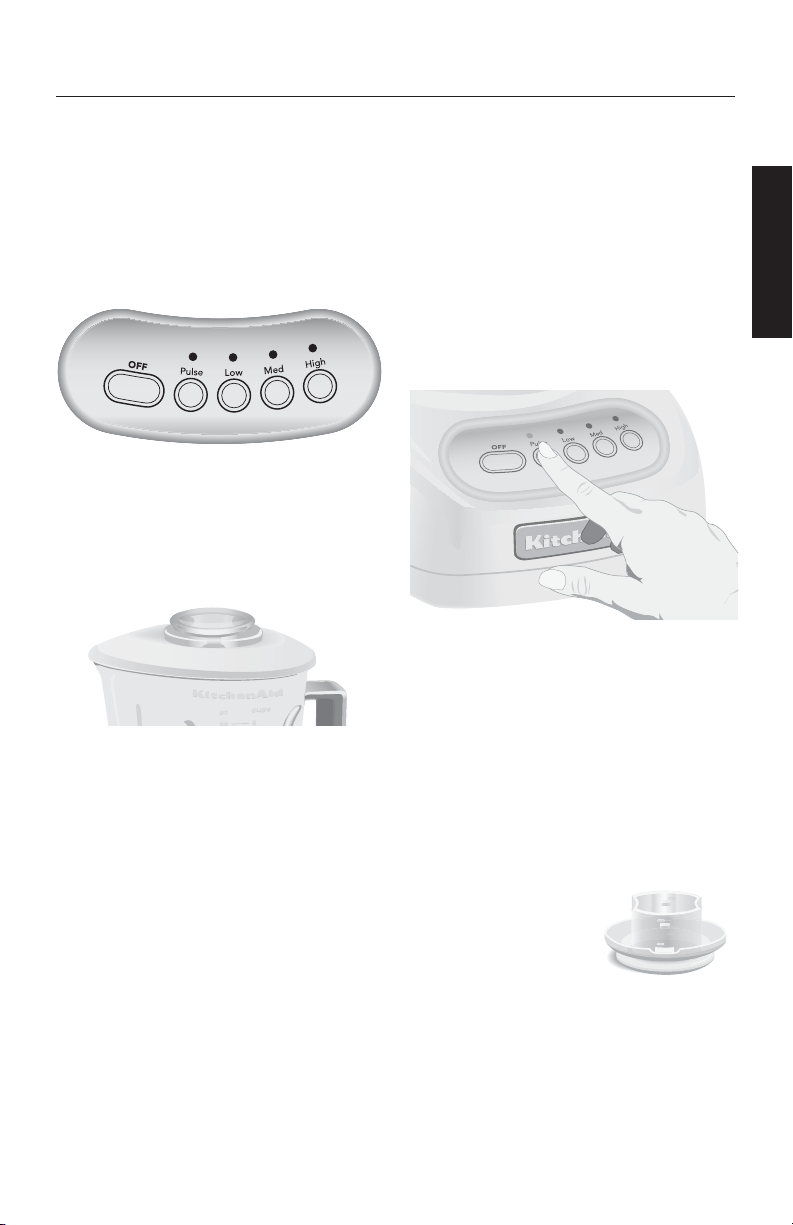
Operating the Blender
The KitchenAid
®
blender has 3 speeds:
LOW, MEDIUM, and HIGH. It also features
a PULSE button.
1. With convenient 1-step operation, this
unit will operate only when a speed
selection button is pressed.
2. Before operating the blender, make
sure the pitcher is properly in place on
the blender base. Put ingredients in
pitcher and firmly attach lid.
3. Press the desired speed button for
continuous operation at that speed.
The red indicator above the selected
speed will appear. You may change
speeds without stopping the unit by
pressing a new speed button.
IMPORTANT: If blending hot foods or
liquids, remove the center ingredient cap.
Operate only on LOW speed.
4. To turn off the blender, press OFF. The
Off button will stop any speed and
deactivate the blender at the same
time. Before removing the pitcher,
press OFF to deactivate the blender,
and unplug the power cord.
Pulse Feature
Your KitchenAid
®
blender offers a Pulse
feature.
1. Before operating the blender, make
sure the pitcher is properly in place on
the blender base.
2. Put ingredients into pitcher, and firmly
attach lid.
3. Press PULSE and hold for the desired
length of time. The red indicator will
appear. The Pulse feature allows user
easy control for short, quick bursts or
longer bursts of power.
4. To turn off the Pulse feature, simply
release the PULSE button. The blender
is now ready for continuous operation.
5. Before removing the pitcher, press OFF
to deactivate the blender, and unplug
the power cord.
Ingredient Cap
The 2 oz (60 mL) ingredient cap can be
used to measure and add ingredients.
Remove cap and add ingredients at LOW
speed. When operating at higher speeds,
with a full pitcher or with
hot contents, stop the
blender and then add
ingredients.
60 ml
2 oz
30 ml
1 oz
ENGLISH
7
Page 11

Speed Control Guide
Item Speed
Cheesecake . . . . . . . . . . . . . . . . . . . . High
Chopped fruit . . . . . . . . . . . . . . . . . . Pulse
Chopped ice . . . . . . . . . . . . . . . . . . . Pulse
ENGLISH
Chopped vegetables . . . . . . . . . . . . . Pulse
Crushed ice . . . . . . . . . . . . . . . . . Medium,
High or Pulse
Frozen yogurt-based drink . . . . . . . . High
Fruit-based drink . . . . . . . . . . . . . . . . High
Fruit juice from
frozen concentrate . . . . . . . . . . . . .Low
Grated hard cheese . . . . . . . . . . . . . . High
TIP: Process up to one standard ice cube tray or 12 to 14 standard ice cubes at a time.
No liquid needs to be added for processing; occasional stirring with a spatula will be
helpful, but should only be done when blender is OFF.
Item Speed
Gravy . . . . . . . . . . . . . . . . . . . . . Medium
Ice Cream-based drink . . . . . . . . . . . High
Mousse . . . . . . . . . . . . . . . . . . . . . . . High
Pancake batter . . . . . . . . . . . . . . . . . .Low
Sherbet-based drink . . . . . . . . . . . . . High
Smooth ricotta or
cottage cheese . . . . . . . . . . . . Medium
Streusel topping . . . . . . . . . . . . . . . . .Low
Sweet crumb topping . . . . . . . . . . . . .Low
Waffle batter . . . . . . . . . . . . . . . . . . .Low
White sauce . . . . . . . . . . . . . . . . . . . .Low
8
Page 12
Care and Cleaning
The blender pitcher and blade can be
easily cleaned without disassembly.
• Clean the blender thoroughly after every
use.
• Do not immerse the blender base or
cord in water.
• Do not use abrasive cleansers or
scouring pads.
1. To clean the blade, place the pitcher on
the blender base, fill one-half full with
warm (not hot) water, and add 1 or 2
drops of dishwashing liquid. Place the
lid on the pitcher, press the LOW speed
setting, and run the blender for 5 to
10 seconds. Remove the pitcher and
Troubleshooting
• If the blender does not operate
when a setting is selected:
– Check to see if the blender is plugged
into a grounded 3 prong outlet. If it
is, press OFF, then unplug the blender.
WARNING
Electrical Shock Hazard
Plug into a grounded 3 prong
outlet.
Do not remove ground prong.
Do not use an adapter.
Do not use an extension cord.
Failure to follow these
instructions can result in death,
fire, or electrical shock.
Plug it back in to the same outlet. If the
blender still does not work, check the
fuse or circuit breaker on the electrical
circuit the blender is connected to and
make sure the circuit is closed.
empty contents. Rinse the pitcher with
warm water until clean. The pitcher can
also be washed in the bottom rack of
an automatic dishwasher.
2. To clean the lid and ingredient cap,
wash in warm soapy water, then rinse
and dry thoroughly. These parts can
also be washed in the top rack of an
automatic dishwasher. For best results,
hand washing is recommended.
3. Wipe the blender base and cord with
a warm, sudsy cloth; wipe clean with a
damp cloth, and dry with a soft cloth.
For storage, the cord can be coiled
into the cord-wrap on the bottom of
the base.
• If the blender slows excessively
when blending heavy ingredients:
– The blender may be overloaded. Press
OFF to stop the blender. Remove the
pitcher from the base and divide the
pitcher contents into smaller batches.
Adding liquid to the pitcher may also
reduce the load on the blender.
• If the blade stops spinning:
– Blender ingredients or a foreign object
may have jammed the blender. Press OFF
to stop the blender. Remove the pitcher
from the base and free the blade by
breaking-up or removing the contents
at the bottom of the pitcher.
If the problem cannot be fixed with the
steps provided in this section, then contact
KitchenAid or an Authorized Service Center.
U.S.A./Puerto Rico: 1-800-541-6390,
Canada: 1-800-807-6777,
Mexico: 01-800-024-17-17
(JV Distribuciones)
or
01-800-902-31-00
(Industrias Birtman)
See the KitchenAid Warranty and Service
section for additional details. Do not
return the blender to the retailer – they do
not provide service.
ENGLISH
9
Page 13

Blender Tips
Quick Tips
• Blend at HIGH if you’re making a large
amount of beverage using lots of ice. For
smaller quantities, use MEDIUM.
ENGLISH
• Smaller ice cubes can be chopped or
crushed faster than large ones.
• Add food to this blender pitcher in
larger quantities than you would with
other blenders – you can add 2 to
3 cups (475 to 710 mL) at a time versus
1 cup (235 mL) portions.
• For many ingredient mixtures, start the
blending process at LOW to thoroughly
combine the ingredients. Then increase to
a higher speed, if necessary.
• Be sure to keep lid on pitcher while
blending.
• If desired, remove center cap of pitcher
lid to add liquids or ice cubes while the
blender is operating at LOW speed.
• When operating at higher speeds with a
full pitcher or with hot contents, stop the
blender and then add ingredients.
• Stop the blender before using utensils
in the pitcher. Use a rubber spatula to
mix ingredients only when the blender
is OFF. Do not use any utensil, including
spatulas, in the pitcher while the motor
is running.
• Cool hot foods, if possible, before
blending. Begin blending warm foods
at LOW. Increase to higher speed,
if necessary.
• Remove center ingredient cap when
blending hot liquids and operate only on
LOW. Do not place bare hand on pitcher
lid when processing hot liquids.
• Stop and check the consistency of foods
after a few seconds to avoid
over-processing.
How To ...
Reconstitute frozen juice: For a 6 oz
(175 mL) can of orange juice concentrate,
combine the juice and correct amount of
water in the pitcher. Cover and blend at
LOW until thoroughly combined, about
10 to 15 seconds.
For a 12 oz (355 mL) can, combine the
juice and 1 can of water in the pitcher.
Cover and blend at LOW until thoroughly
combined, about 20 to 30 seconds. Stir in
remaining 2 cans of water.
Dissolve flavored gelatin: Pour boiling
water into the pitcher; add gelatin.
Remove center ingredient cap and blend
at LOW until gelatin is dissolved, about
10 to 30 seconds. Add other ingredients.
Make cookie and graham cracker
crumbs: Break larger cookies into pieces
1
about 1
/2" (3.75 cm) in diameter. Use
smaller cookies as is. Place in pitcher.
Cover and blend at LOW until desired
consistency is reached. Use the crumbs to
make a quick topping for frozen yogurt,
pudding, or a fruit compote.
To make a finer crumb for pie and dessert
crusts, break graham crackers or cookies
into pieces about 1
1
/2" (3.75 cm) in
diameter and place in the pitcher. Cover
and blend at MEDIUM until desired
consistency is reached, about 20 to
30 seconds.
Make cracker crumbs: Follow procedure
for cookies, blend at LOW. Use as a
topping or as an ingredient in main dish
casseroles and vegetable dishes.
Make bread crumbs: Tear bread into
pieces about 11/2" (3.75 cm) in diameter.
Follow procedure for cookies, blend at
LOW. Use as a topping or as an ingredient
in main dish casseroles and vegetable
dishes.
10
Page 14

Blender Tips
Chop fruits and vegetables: Put
2 cups (475 mL) of fruit or vegetable
chunks in pitcher. Cover and quickly PULSE
3 to 4 times, about 1 second each time,
until desired consistency is reached.
Puree fruits: Place 2 cups (475 mL)
canned or cooked fruit in pitcher. Add
2 to 4 tbs (30 to 60 mL) fruit
juice or water per cup (235 mL) of fruit.
Cover and blend at MEDIUM about 5 to
10 seconds.
Puree vegetables: Place 2 cups (475 mL)
canned or cooked vegetables in pitcher.
Add 2 to 4 tbs (30 to 60 mL) broth, water,
or milk per cup (235 mL) of vegetables.
Cover and blend at MEDIUM about 10 to
20 seconds.
Puree meats: Place cooked, cubed,
tender meat in pitcher. Add 3 to
4 tbs (45 to 60 mL) broth, water, or
milk per cup (235 mL) of meat. Cover
and blend on LOW 10 seconds. Stop the
blender and scrape sides of pitcher. Cover
and blend on MEDIUM 10 to 20 seconds
longer. Stop the blender and scrape sides
as needed.
Puree cottage cheese or ricotta
cheese: Place cottage cheese or ricotta
cheese in pitcher. Cover and blend at
MEDIUM until smooth, about 25 to
35 seconds. Stop the blender and scrape
sides as needed. If necessary, add
1 tbs (15 mL) of skim milk per cup
(235 mL) of cottage cheese. Use as a base
for low-fat dips and spreads.
Combine liquid ingredients for baked
goods: Pour liquid ingredients in pitcher.
Cover and blend at HIGH until well mixed,
about 10 to 15 seconds. Pour liquid
mixture over dry ingredients and stir well.
Take lumps out of gravy: If sauce or
gravy becomes lumpy, place in the pitcher.
Cover and blend at MEDIUM until smooth,
about 5 to 10 seconds.
Combine flour and liquid for
thickening: Place flour and liquid in
pitcher. Cover and blend at LOW until
smooth, about 5 to 10 seconds.
Prepare white sauce: Place milk, flour,
and salt, if desired, in pitcher. Cover, and
blend at LOW until well-mixed, about
5 to 10 seconds. Pour into saucepan and
cook as usual.
Prepare pancake or waffle batter
from mix: Place mix and other ingredients
in pitcher. Cover and blend at LOW until
well-mixed, 10 to 20 seconds. Stop the
blender and scrape sides of the pitcher as
needed.
Grate cheese: Cut very cold cheese into
1
/2" to 1" (1.25 to 2.5 cm) cubes. Place
1
up to
/2 cup (120 mL) cheese in the
pitcher. Cover and blend at HIGH about
5 to 10 seconds. For hard cheeses, such
as Parmesan, bring to room temperature,
then blend at HIGH for 10 to 15 seconds.
Make oatmeal for a baby: Place
uncooked rolled oats in pitcher. Cover and
blend at LOW about 5 to 10 seconds, until
desired consistency. Cook as usual.
Make baby food from adult food:
Place prepared adult food in pitcher.
Cover and blend at LOW about
10 seconds. Then blend at MEDIUM
about 10 to 30 seconds.
Clean your blender pitcher: Fill pitcher
one-half full with warm water. Add a
few drops of dishwashing liquid. Cover
and blend at LOW until sides are clean,
about 5 to 10 seconds. Rinse and dry. For
complete cleaning, pitcher and lid can also
be cleaned in an automatic dishwasher.
ENGLISH
11
Page 15

KitchenAid® Blender Warranty
Length of
Warranty:
50 United States, the
District of Columbia,
ENGLISH
Canada, and Puerto
Rico: One-year limited
warranty from date of
purchase.
DISCLAIMER OF IMPLIED WARRANTIES; LIMITATION OF REMEDIES IMPLIED
WARRANTIES, INCLUDING TO THE EXTENT APPLICABLE WARRANTIES OF
MERCHANTABILITY OR FITNESS FOR A PARTICULAR PURPOSE, ARE EXCLUDED TO THE
EXTENT LEGALLY PERMISSIBLE. ANY IMPLIED WARRANTIES THAT MAY BE IMPOSED BY
LAW ARE LIMITED TO ONE YEAR, OR THE SHORTEST PERIOD ALLOWED BY LAW. SOME
STATES AND PROVINCES DO NOT ALLOW LIMITATIONS OR EXCLUSIONS ON HOW LONG
AN IMPLIED WARRANTY OF MERCHANTABILITY OR FITNESS LASTS, SO THE ABOVE
LIMITATIONS OR EXCLUSIONS MAY NOT APPLY TO YOU.
KitchenAid
Will Pay For:
50 United States, the
District of Columbia
and Canada: Hassle-free
replacement of your
blender. See the following
page for details on how to
arrange for replacement.
OR
In Puerto Rico:
The replacement parts
and repair labor costs to
correct defects in materials
and workmanship. Service
must be provided by an
Authorized KitchenAid
Service Center. To arrange
for service, see the
following pages.
KitchenAid
Will Not Pay For:
A. Repairs when blender
is used in other than
normal single family
home use.
B. Damage resulting from
accident, alteration,
misuse or abuse or
use with products
not approved by
KitchenAid.
C. Replacement parts
or repair labor costs
for blender when
operated outside the
country of purchase.
IF THIS PRODUCT FAILS TO WORK AS WARRANTED, CUSTOMER’S SOLE AND EXCLUSIVE
REMEDY SHALL BE REPAIR OR REPLACEMENT ACCORDING TO THE TERMS OF THIS
LIMITED WARRANTY. KITCHENAID AND KITCHENAID CANADA DO NOT ASSUME ANY
RESPONSIBILITY FOR INCIDENTAL OR CONSEQUENTIAL DAMAGES. This warranty gives
you specific legal rights and you may also have other rights which vary from state to
state or province to province.
12
Page 16

Hassle-Free Replacement Warranty –
50 United States and District of Columbia
We’re so confident the quality of our
products meets the exacting standards of
KitchenAid that, if your blender should
fail within the first year of ownership,
KitchenAid will arrange to deliver an
identical or comparable replacement to
your door free of charge and arrange to
have your original blender returned to us.
Your replacement unit will also be covered
by our one year limited warranty. Please
follow these instructions to receive this
quality service.
If your KitchenAid
within the first year of ownership, simply
call our toll-free Customer Satisfaction
Center at 1-800-541-6390 Monday
through Friday, 8 a.m. to 8 p.m. (Eastern
Time), or Saturday, 10 a.m. to 5 p.m. Give
the consultant your complete shipping
address. (No P.O. Box numbers, please.)
When you receive your replacement
blender, use the carton and packing
materials to pack up your original blender.
In the carton, include your name and
address on a sheet of paper along with
a copy of the proof of purchase (register
receipt, credit card slip, etc.).
®
blender should fail
Hassle-Free Replacement Warranty – Canada
We’re so confident the quality of our
products meets the exacting standards
of the KitchenAid
blender should fail within the first year
of ownership, KitchenAid Canada will
replace your blender with an identical
or comparable replacement. Your
replacement unit will also be covered
by our one year limited warranty. Please
follow these instructions to receive this
quality service.
®
brand that, if your
If your KitchenAid
within the first year of ownership, take the
blender or ship collect to an Authorized
KitchenAid Canada Service Centre. In the
carton include your name and complete
shipping address along with a copy of the
proof of purchase (register receipt, credit
card slip, etc.). Your replacement blender
will be returned prepaid and insured. If you
are unable to obtain satisfactory service
in this manner call our toll-free Customer
eXperience Centre at 1-800-807-6777.
Or write to us at:
Customer eXperience Centre
KitchenAid Canada
1901 Minnesota Court
Mississauga, ON L5N 3A7
®
blender should fail
ENGLISH
How To Arrange for Warranty Service
in Puerto Rico
Your KitchenAid® blender is covered
by a one-year limited warranty from
the date of purchase. KitchenAid will
pay for replacement parts and labor
costs to correct defects in materials and
workmanship. Service must be provided by
an Authorized KitchenAid Service Center.
Take the blender or ship prepaid and
insured to an Authorized KitchenAid
Service Center. Your repaired blender will
be returned prepaid and insured. If you
are unable to obtain satisfactory service in
this manner, call toll-free 1-800-541-6390
to learn the location of a Service Center
near you.
13
Page 17

How To Arrange for Service
after the Warranty Expires – All Locations
Before calling for service, please review the
”Troubleshooting” section.
For service information in the 50
ENGLISH
United States, District of Columbia,
and Puerto Rico,
call toll-free 1-800-541-6390.
Or write to:
Customer Satisfaction Center
KitchenAid Portable Appliances
P.O. Box 218
St. Joseph, MI 49085-0218
Or contact an Authorized Service Center
near you.
How To Arrange for Service
Outside these Locations
Consult your local KitchenAid dealer or the
store where you purchased the blender for
information on how to obtain service.
For service information in Canada,
call toll-free 1-800-807-6777.
Or write to:
Customer eXperience Centre
KitchenAid Canada
1901 Minnesota Court
Mississauga, ON L5N 3A7
For service information in Mexico,
call toll-free
01-800-024-17-17
(JV Distribuciones)
Or
01-800-902-31-00
(Industrias Birtman)
How To Order Accessories
and Replacement Parts
To order accessories or replacement
parts for your blender in the 50
United States, District of Columbia,
and Puerto Rico,
call toll-free 1-800-541-6390 Monday
through Friday, 8 a.m. to 8 p.m. (Eastern
Time), or Saturday, 10 a.m. to 5 p.m.
Or write to:
Customer Satisfaction Center,
KitchenAid Portable Appliances,
P.O. Box 218,
St. Joseph, MI 49085-0218
To order accessories or replacement
parts for your blender in Canada,
call toll-free 1-800-807-6777.
Or write to:
Customer eXperience Centre
KitchenAid Canada
1901 Minnesota Court
Mississauga, ON L5N 3A7
To order accessories or replacement
parts for your blender in Mexico,
call toll-free
01-800-024-17-17
(JV Distribuciones)
Or
01-800-902-31-00
(Industrias Birtman)
14
Page 18

Table des matières
INTRODUCTION
Preuve d’achat et carte d’enregistrement du produit....................Deuxième de couverture
Sécurité du mélangeur ..................................................................................................16
Consignes de sécurité importantes ................................................................................16
Contraintes électriques ..................................................................................................17
CARACTÉRISTIQUES ET FONCTIONNEMENT
Caractéristiques du mélangeur ......................................................................................18
Préparation du mélangeur avant l’utilisation ................................................................. 20
Avant la première utilisation .................................................................................. 20
Assemblage du mélangeur ....................................................................................20
Utilisation du mélangeur ...............................................................................................21
Avant l’utilisation ...................................................................................................21
Fonctionnement du mélangeur ..............................................................................21
Caractéristique du mode PULSE (IMPULSION) ........................................................22
Capuchon doseur d’ingrédients ............................................................................. 22
Guide des touches de vitesse ........................................................................................22
ENTRETIEN ET NETTOYAGE
Nettoyage du mélangeur ..............................................................................................23
Dépannage ................................................................................................................... 24
FRANÇAIS
CONSEILS SUR LE MÉLANGEUR
Conseils rapides .....................................................................................................25
Comment... ........................................................................................................... 25
INFORMATION SUR LA GARANTIE ET LES RÉPARATIONS
Garantie du mélangeur KitchenAid
®
.............................................................................. 28
Garantie de satisfaction totale et de remplacement -
50 États des États-Unis, district fédéral de Columbia. .................................................... 29
Garantie de satisfaction totale et de remplacement – Canada .......................................29
Comment obtenir une réparation sous garantie à Puerto Rico ......................................29
Comment obtenir une réparation hors garantie – tous les territoires .............................30
Comment obtenir une réparation en dehors de ces territoires .......................................30
Comment commander des accessoires et des pièces de rechange. ................................30
NOTA : Du fait du design unique du récipient et de la lame, veuillez lire ces instructions
avant d'utiliser ce mélangeur KitchenAid
®
pour obtenir des résultats optimums.
15
Page 19

Sécurité du mélangeur
Sécurité du mélangeur
Votre sécurité et celle des autres est très importante.
Nous donnons de nombreux messages de sécurité importants dans ce manuel
et sur votre appareil ménager. Assurez-vous de toujours lire tous les messages
de sécurité et de vous y conformer.
Voici le symbole d’alerte de sécurité.
Ce symbole d’alerte de sécurité vous signale les dangers
potentiels de décès et de blessures graves à vous et à d’autres.
Tous les messages de sécurité suivront le symbole d’alerte de
sécurité et le mot “DANGER” ou “AVERTISSEMENT”. Ces mots
FRANÇAIS
AVERTISSEMENT
Tous les messages de sécurité vous diront quel est le danger potentiel et vous
disent comment réduire le risque de blessure et ce qui peut se produire en cas
de non-respect des instructions.
signifient :
DANGER
Risque possible de décès ou de
blessure grave si vous ne suivez pas
immédiatement les instructions.
Risque possible de décès ou de
blessure grave si vous ne suivez
pas les instructions.
CONSIGNES DE SÉCURITÉ
IMPORTANTES
Lorsque vous utilisez un appareil électrique, vous devez toujours respecter les consignes
de sécurité fondamentales afin de réduire les risques d’incendie, de choc électrique et/
ou de blessure y compris les consignes suivantes :
1. Lisez toutes les instructions.
2. Pour éviter le risque de choc électrique, ne pas immerger le batteur dans de l’eau
ou tout autre liquide.
3. Il est nécessaire de surveiller de près l’utilisation de cet appareil par des enfants ou
à proximité de ceux-ci.
4. Débranchez l’appareil de la prise de courant lorsqu’il n’est pas utilisé, avant de
monter ou de démonter des pièces et avant de le nettoyer.
5. Évitez de toucher aux pièces mobiles.
6. N’utilisez pas le mélangeur si le cordon ou la fiche sont endommagés ou s’ils
présentent un défaut de fonctionnement ou s’ils tombent ou sont endommagés de
quelque manière que ce soit. Rapportez l’appareil au centre de réparation le plus
proche pour le faire examiner, réparer ou régler.
7. N’utilisez pas l’appareil à l’extérieur.
8. Ne laissez pas pendre le cordon du bord de la table ou du comptoir.
9. N’introduisez pas les doigts ni des ustensiles dans le récipient pendant le mélange
pour limiter les risques de blessures graves ou de dommages au mélangeur. Utilisez
un grattoir, mais seulement quand le mélangeur est arrêté.
16
Page 20

CONSIGNES DE SÉCURITÉ
IMPORTANTES
10. Les lames sont aiguisées. Manipulez-les avec soin.
11. Utilisez toujours le mélangeur avec le couvercle en place.
12. L’utilisation d’accessoires, dont les bocaux de conserve, non recommandés par
KitchenAid peut présenter un risque de blessure.
13. Enlevez la pièce centrale du couvercle à deux pièces si vous mélangez des liquides
chauds.
14. Ce produit est réservé uniquement à un usage domestique.
CONSERVEZ CES INSTRUCTIONS
Contraintes électriques
Caractéristiques électriques : 120 V CA
60 Hz 6 A
NOTA : Votre mélangeur est muni d’une
fiche de terre à 3 broches. Pour réduire
les risques de choc électrique, cette fiche
ne peut rentrer dans la prise que d’une
façon. S’il est impossible d’introduire la
fiche dans la prise, appelez un électricien
compétent. Ne modifiez pas la prise de
quelque façon que ce soit.
N’utilisez pas une rallonge. Si le cordon
fourni est trop court, demandez à un
électricien ou technicien compétent
d’installer une prise près de l’appareil.
AVERTISSEMENT
Risque de choc électrique
Brancher sur une prise à 3
alvéoles reliée à la terre.
Ne pas enlever la broche de
liaison à la terre.
Ne pas utiliser un adaptateur.
Ne pas utiliser un câble de
rallonge.
Le non-respect de ces
instructions peut causer
un décès, un incendie ou un
choc électrique.
FRANÇAIS
17
Page 21

Caractéristiques du mélangeur
Couvercle
Stay-Put avec
capuchon doseur
d’ingrédients
transparent
contenant
60 ml (2 oz)
Récipient
en polycarbonate
de 1,75 l (56 oz)
FRANÇAIS
Coupleurs
durables
renforcés d’acier
Récipient
monopièce
facile à
nettoyer
Lame en acier
inoxydable
brevetée
Touches de
sélection de
la vitesse
Clavier de
commande
Clean Touch™
Socle en métal
coulé sous
pression
18
Page 22

Caractéristiques du mélangeur
Ce mélangeur a été construit et testé
suivant les normes de qualité de KitchenAid
pour fournir une performance optimum et
une vie utile longue et sans problèmes.
Moteur robuste
Un moteur robuste de 0,9 HP fournit
l’énergie nécessaire à une performance
excellente pour tous les types de mélange
- de la mise en purée de sauces aux
salsas en morceaux, ou pour concasser
uniformément et rapidement des
glaçons ou des fruits surgelés lors de la
préparation d’un yogourt fouetté.
Récipient monopièce facile à nettoyer
Le design monopièce intègre un récipient
fonctionnel avec des contours intérieurs
dynamiques qui dirigent de façon continue les
aliments sur la lame pour un mélange rapide
et complet. Le design monopièce signifie aussi
que l’on peut nettoyer la lame et d’autres
pièces sans les enlever. Le récipient peut
résister à des températures extrêmes – des
soupes bouillantes aux margaritas glacées
- et possède un bec large pour verser sans
éclabousser. Le récipient va au lave-vaisselle.
Récipient en verre
Récipient en polycarbonate
Récipient monopièce de
1,75 l (56 oz) transparent fait
de polycarbonate. Résiste aux
bris, aux égratignures et aux
taches. Poignée avec prise
souple pour assurer le confort et
l’adhérence.
Lame en acier inoxydable brevetée
Les dents très grandes de la lame sont
placées à quatre niveaux différents pour
fournir un mélange rapide, complet
et uniforme. Notre design de lame
durable est incorporé dans le récipient
pour pouvoir le manipuler et le nettoyer
facilement.
Touches de sélection de la vitesse
Créez des boissons glacées et mettez des
sauces ou des soupes en purée en quelques
secondes. Mélangez avec confiance, contrôle
et consistance sur tous les réglages de vitesse :
LOW (BASSE), MEDIUM (MOYENNE) et
HIGH (ÉLEVÉE). Le mode PULSE (IMPULSION)
fournit un contrôle supplémentaire pour
les taches qui demandent des impulsions
courtes et rapides ou des impulsions
d’énergie plus longues.
Clavier de commande Clean Touch™
Se nettoie en un instant. Le clavier de
commandes lisse n’a pas de fentes ni
de fissures qui peuvent emprisonner des
aliments.
Coupleurs durables renforcés d’acier
Des coupleurs de qualité commerciale
avec 12 dents entrecroisées transfèrent
directement l’énergie du moteur à la lame.
Le coupleur du récipient est renforcé,
offrant un fonctionnement silencieux.
Couvercle Stay-Put avec capuchon
doseur d’ingrédients transparent
d’une contenance de 60 ml (2 oz)
Fournit une grande étanchéité. Le
couvercle flexible maintiendra son
étanchéité pendant toute la vie utile du
mélangeur. Le couvercle comprend un
capuchon amovible de 60 ml (2 oz) pour
faciliter la mesure et l’ajout d’ingrédients.
Socle en métal coulé sous pression
Le socle en métal coulé sous pression
assure un fonctionnement stable et
silencieux lors du mélange d’une grande
quantité d’ingrédients dans le récipient.
Quatre pieds en caoutchouc sur un large
socle solide font bien tenir sans glisser
ni salir. Le socle lisse et arrondi est facile
à nettoyer et comprend un pratique
compartiment de rangement du cordon.
FRANÇAIS
19
Page 23

Préparation du mélangeur avant l’utilisation
Avant la première utilisation
Avant d’utiliser le mélangeur pour la
première fois, essuyez le socle avec un
chiffon savonneux tiède, puis essuyez-le bien
avec un chiffon humide. Séchez-le avec un
chiffon doux. Lavez le récipient, couvercle
et bouchon d’ingrédient en une pièce dans
l’eau tiède savonneuse ou ajoutez tout
simplement le savon et l’eau tiède dans le
récipient, placez-le ensuite sur le socle du
mélangeur et mélanger pour nettoyer. Voir
la section “Entretien et nettoyage“. Rincez et
essuyez les pièces.
FRANÇAIS
Assemblage du mélangeur
1. Réglez la longueur du cordon
d’alimentation en fonction des besoins.
A. Si vous prévoyez
utiliser le mélangeur à
61 cm (2 ft) ou
moins d’une prise, vous
pouvez raccourcir le
cordon en l’enroulant
dans la section de
rangement sous le
socle de la manière
indiquée à droite (par
des flèches) :
C. Pour ranger presque tout
le cordon d’alimentation
sous le socle de votre
mélangeur, suivez le
motif d’enroulement
“B“ au bas, à gauche.
Commencez ensuite au
point “A“ du dessin
à droite, enroulez un
deuxième niveau de
cordon dans le socle
selon le motif indiqué
par les flèches :
A
2. Placer le récipient sur le socle du
mélangeur.
3. Avant de brancher le mélangeur, n’oubliez
pas d’appuyer sur OFF (ARRÊT) pour
que le mélangeur soit bien arrêté.
B. Si vous prévoyez
utiliser le mélangeur à
41 cm (16") ou
moins d’une prise, vous
pouvez raccourcir le
cordon en l’enroulant
dans la section de
rangement sous le
socle de la manière
suivante :
20
Page 24

Préparation du mélangeur avant l’utilisation
4. Branchez sur une prise à 3 alvéoles
AVERTISSEMENT
Risque de choc électrique
Brancher sur une prise à 3
alvéoles reliée à la terre.
Ne pas enlever la broche de
liaison à la terre.
Ne pas utiliser un adaptateur.
Ne pas utiliser un câble de
rallonge.
Le non-respect de ces
instructions peut causer
un décès, un incendie ou un
choc électrique.
reliée à la terre. Vous pouvez
maintenant utiliser le mélangeur.
5. Avant de retirer le récipient du socle
après utilisation, enfoncez toujours la
touche OFF (ARRÊT) et débranchez le
cordon d’alimentation. Tenez le récipient
bien droit quand vous soulevez le socle.
FRANÇAIS
Utilisation du mélangeur
Avant l’utilisation
NOTA : Pendant que le mélangeur
fonctionne :
- Ne touchez pas aux lames.
- Ne retirez pas le couvercle du récipient.
Fonctionnement du mélangeur
Le mélangeur KitchenAid
LOW (BASSE), MEDIUM (MOYENNE)
et HIGH (ÉLEVÉE). Il possède aussi une
touche PULSE (IMPULSION).
1. Grâce à son fonctionnement en une
seule étape pratique, cet appareil ne se
met en marche que si une touche de
vitesse est enfoncée.
®
a trois vitesses :
2. Avant d’utiliser le mélangeur, assurezvous que le récipient est bien en place
sur le socle. Mettez les ingrédients dans
le récipient et fermez bien le couvercle.
3. Appuyez sur la touche de vitesse
désirée pour faire tourner le mélangeur
de façon continue à cette vitesse.
Le voyant rouge près de la vitesse
sélectionnée reste allumé. Il est possible
de changer de vitesse sans arrêter
l’appareil en appuyant sur une autre
touche de vitesse.
IMPORTANT : Si vous mélangez des
aliments ou des liquides chauds, retirez
la partie centrale du couvercle. Utilisez
seulement la vitesse LOW (BASSE).
21
Page 25

Utilisation du mélangeur
4. Pour éteindre le mélangeur, appuyez
sur la touche OFF (ARRÊT).Cette touche
arrête toutes les vitesses en même temps
que le mélangeur. Avant de retirer le
récipient du socle, désactivez le mélangeur
en enfonçant la touche OFF (ARRÊT) et
débranchez le cordon d’alimentation.
Caractéristique du mode PULSE
(IMPULSION)
Le mélangeur KitchenAid
®
dispose d’une
fonction d’impulsion.
1. Avant d’utiliser le mélangeur, assurez-
FRANÇAIS
vous que le récipient est correctement
placé sur le socle.
2. Mettez les ingrédients dans le récipient
et fermez bien le couvercle.
3. Appuyez sur PULSE (IMPULSION) et
tenez le temps désiré. L’indicateur
rouge apparaîtra. La fonction PULSE
(IMPULSION) permet à l’utilisateur de
contrôler facilement des pulsations
brèves ou plus longues.
4. Relâchez la touche PULSE (IMPULSION)
pour arrêter la fonction PULSE
(IMPULSION). Le mélangeur est
maintenant prêt à être utilisé de façon
continue.
5. Avant d’enlever le récipient, appuyez
sur OFF (ARRÊT) pour désactiver le
mélangeur et débrancher le cordon
électrique.
Capuchon doseur d’ingrédients
Le capuchon doseur d’ingrédients de
60 ml (2 oz) peut être utilisé pour mesurer
et ajouter des ingrédients. Enlevez le
capuchon et ajoutez des ingrédients à LOW
(BASSE) vitesse. Si vous utilisez le mélangeur
à grande vitesse avec un
récipient plein ou un
contenu chaud, arrêtez
60 ml
2 oz
30 ml
1 oz
le mélangeur, puis
ajoutez les ingrédients.
Guide des touches de vitesse
Article Vitesse
Gâteau au fromage. . . . . . . . High (Élevée)
Fruits hachés . . . . . . . . . .Pulse (Impulsion)
Glace concassée . . . . . . . Pulse (Impulsion)
Légumes hachés . . . . . . .Pulse (Impulsion)
Glace pilée . . . . . . . . Medium (Moyenne),
. . . . . . . . . . . . . . . . . . . . . High (Élevée)
. . . . . . . . . . . . . . . ou Pulse (Impulsion)
Boisson à base de
yogourt congelé . . . . . . . . High (Élevée)
Boisson à base
de fruits . . . . . . . . . . . . . .High (Élevée)
Article Vitesse
Jus de fruits à partir
de concentré congelé . . . . . Low (Basse)
Fromage dur râpé . . . . . . . . .High (Élevée)
Sauce . . . . . . . . . . . . .Medium (Moyenne)
Boisson à base
de crème glacée . . . . . . . . High (Élevée)
Mousse . . . . . . . . . . . . . . . . . High (Élevée)
Pâte à crêpe . . . . . . . . . . . . . . Low (Basse)
Boisson à base de sorbet . . . . High (Élevée)
Ricotta velouté ou
fromage cottage . . .Medium (Moyenne)
22
Page 26

Guide des touches de vitesse
Garniture à Streusel . . . . . . . .Low (Basse)
Garniture émiettée sucrée . . . . Low (Basse)
CONSEIL : Broyez jusqu’à un plateau à glaçons standard ou 12 à 14 glaçons de format
standard à la fois. Vous n’avez pas à ajouter de liquide pour la préparation, mais il serait
utile de mélanger à l’occasion avec une spatule. Ceci ne doit se faire que lorsque le
mélangeur est ÉTEINT.
Pâte à gaufres . . . . . . . . . . . . . Low (Basse)
Sauce béchamel . . . . . . . . . . .Low (Basse)
Entretien et nettoyage
Le récipient et la lame peuvent être
nettoyés sans avoir à les démonter.
• Nettoyez soigneusement le mélangeur
après chaque utilisation.
• N’immergez pas le socle ni le cordon
dans l’eau.
• N’utilisez pas de produits de nettoyage
abrasifs ni de tampons à récurer.
1. Pour nettoyer le socle, placez le
récipient sur le socle du mélangeur,
remplissez-le à moitié d’eau tiède (pas
chaude) et ajoutez 1 ou 2 gouttes
de détergent pour vaisselle. Placez le
couvercle sur le récipient, appuyez sur
le réglage de vitesse LOW (BASSE) et
faites tourner le mélangeur pendant
5 à 10 secondes. Retirez le récipient
et videz-le de son contenu. Rincez le
récipient à l’eau tiède jusqu’à ce qu’il
soit propre. Il peut aussi être lavé dans
le panier inférieur d’un lave-vaisselle.
2. Pour nettoyer le couvercle et le
capuchon doseur d’ingrédients, lavezles dans l’eau tiède et savonneuse, puis
rincez-les et séchez-les soigneusement.
Ces pièces peuvent aussi être lavées
dans le panier supérieur d’un lavevaisselle. Pour de meilleurs résultats, il
est recommandé de les laver à la main.
3. Essuyez le socle et le cordon avec un
chiffon tiède et savonneux, puis avec
un chiffon humide. Séchez-les avec
un chiffon doux. Rangez le cordon en
l’enroulant dans l’espace de rangement
sous le socle.
FRANÇAIS
23
Page 27

Dépannage
• Si le mélangeur ne fonctionne pas
sur le réglage choisi :
– Assurez-vous que le mélangeur est
branché sur une prise à 3 alvéoles reliée à
la terre. Si tel est le cas, appuyez sur OFF
(ARRÊT), puis débranchez le mélangeur.
AVERTISSEMENT
FRANÇAIS
Risque de choc électrique
Brancher sur une prise à 3
alvéoles reliée à la terre.
Ne pas enlever la broche de
liaison à la terre.
Ne pas utiliser un adaptateur.
Ne pas utiliser un câble de
rallonge.
Le non-respect de ces
instructions peut causer
un décès, un incendie ou un
choc électrique.
• Si le mélangeur ralentit de façon
excessive quand on mélange des
ingrédients denses :
– Le mélangeur est peut-être exagérément
sollicité. Appuyez sur OFF (ARRÊT) pour
arrêter le mélangeur. Enlevez le récipient
du socle et divisez le contenu en portions
plus petites. Ajouter du liquide dans le
récipient peut aussi réduire la charge à
laquelle est soumis le mélangeur.
• Si la lame s’arrête de tourner :
– Les ingrédients du mélangeur ou un
objet peuvent l’avoir enrayé. Appuyez
sur OFF (ARRÊT) pour arrêter le mélangeur.
Enlevez le récipient du socle et libérez
la lame en divisant ou en enlevant le
contenu au fond du récipient.
Si le problème ne peut pas être résolu
en suivant les étapes de cette section,
contactez KitchenAid ou un centre de
réparation autorisé.
États-Unis/
Puerto Rico : 1-800-541-6390,
Canada : 1-800-807-6777,
Mexico: 01-800-024-17-17
(JV Distribuciones)
ou
01-800-902-31-00
(Industrias Birtman)
Rebranchez-le dans la même prise. Si le
mélangeur ne fonctionne toujours pas,
vérifiez le fusible ou le disjoncteur du
circuit électrique alimentant le mélangeur
et assurez-vous que le circuit est fermé.
Consultez la section Garantie et réparations
des produits KitchenAid pour obtenir plus
de détails. Ne retournez pas le mélangeur
chez le détaillant, car celui-ci n’offre pas
de service de réparation.
24
Page 28

Conseils sur le mélangeur
Conseils rapides
• Mélangez sur HIGH si vous préparez
une grande quantité de boisson avec
beaucoup de glace. Pour une moindre
quantité, utilisez MEDIUM (MOYENNE).
• Les petits glaçons peuvent être cassés ou
concassés plus rapidement que les gros.
• Ce mélangeur accepte de plus grandes
quantités d’aliments que les autres
mélangeurs – vous pouvez ajouter 475 à
710 ml (2 à 3 tasses) au même moment
plutôt que des portions de 235 ml (1 tasse)
• Pour de nombreux mélanges
d’ingrédients, commencez sur LOW
(BASSE) pour bien mélanger tous les
ingrédients. Augmentez ensuite la
vitesse si nécessaire.
• Assurez-vous que le couvercle est en
place sur le récipient pendant que vous
mélangez.
• Au besoin, enlevez le capuchon central
du couvercle du récipient pour ajouter
des liquides ou des glaçons pendant que
le mélangeur tourne à la vitesse LOW
(BASSE).
• À haute vitesse, lorsque le récipient est
plein ou contient un aliment chaud,
arrêtez le mélangeur avant d’ajouter les
ingrédients.
• Arrêtez le mélangeur et débranchez-le
avant d’introduire des ustensiles dans le
récipient. Utilisez une spatule de caoutchouc
pour mélanger des ingrédients uniquement
si le mélangeur est la position
OFF (ARRÊT). N’introduisez jamais des
ustensiles, y compris des spatules, dans
le récipient si le moteur fonctionne.
• Laissez refroidir les aliments chauds,
si possible, avant de les mélanger.
Commencez à mélanger les aliments
tièdes sur LOW (BASSE). Augmentez
ensuite la vitesse au besoin.
• Retirez le capuchon doseur d'ingrédients
central lorsque vous mélangez des
liquides chauds et utilisez seulement
la position LOW (BASSE). Ne placez
pas votre main nue sur le couvercle
du récipient si ce dernier contient des
liquides chauds.
• Arrêtez le mélangeur et vérifiez la
consistance des aliments après quelques
secondes pour éviter de trop les
transformer.
Comment : ...
Reconstituer les jus surgelés : Pour une
boîte de 175 ml (6 oz) de jus d’orange
concentré, versez le jus et la quantité
appropriée d’eau dans le récipient.
Couvrez et mélangez parfaitement à la
position LOW (BASSE) pendant 10 à
15 secondes.
Pour une boîte de 335 ml (12 oz), versez
le jus et 1 boîte d’eau dans le récipient.
Couvrez et mélangez parfaitement à la
position LOW (BASSE) pendant 20 à
30 secondes. Ajoutez ensuite les deux
autres boîtes d’eau.
Dissoudre la gélatine aromatisée :
Versez l’eau bouillante dans le récipient,
ajoutez la gélatine. Retirez le capuchon
central du couvercle et mélangez à la
position LOW (BASSE) jusqu’à ce que la
gélatine soit dissoute, entre 10 et
30 secondes. Ajoutez les autres
ingrédients.
Émietter des biscuits et des biscuits
Graham : Brisez les gros biscuits en
morceaux d’environ 3,75 cm (1
1
/2") de
diamètre. Utilisez les plus petits biscuits
tels quels. Placez-les dans le récipient.
Couvrez et mélangez à LOW (BASSE)
jusqu’à obtention de la consistance
désirée. Utilisez les miettes comme
garniture rapide sur le yogourt glacé, les
crèmes-desserts ou la compote de fruits.
Pour obtenir des miettes plus fines pour
la pâte à tarte ou les desserts, brisez
les biscuits Graham ou ordinaires en
morceaux d’environ 3,75 cm (1
1
/2")
diamètre et placez-les dans le récipient.
Mettez dans le récipient. Couvrez et
mélangez à MEDIUM (MOYENNE), jusqu’à
obtention de la consistance désirée,
pendant 20 à 30 secondes.
Émietter les craquelins : Suivez la
méthode d’émiettement des biscuits.
Mélangez à LOW (BASSE). Utilisez comme
garniture ou comme ingrédient dans les
ragoûts et les plats de légumes.
25
FRANÇAIS
Page 29

Conseils sur le mélangeur
Faire de la chapelure : Rompez le pain
en morceaux d’environ 3,75 cm (1
diamètre. Utilisez la même méthode que
pour l’émiettement des biscuits. Mélangez
à LOW (BASSE). À utiliser comme garniture
ou comme ingrédient dans les ragoûts et
les plats de légumes.
Hacher fruits et légumes : Mettez
475 ml (2 tasses) de morceaux de fruits
ou de légumes dans le récipient. Couvrez
et mélangez en utilisant 3 ou 4 impulsions
rapides, d’environ 1 seconde chaque
fois, jusqu’à obtention de la consistance
FRANÇAIS
désirée.
Écraser les fruits en purée : Mettez
475 ml (2 tasses) de fruits cuits ou en
boîte dans le récipient. Ajoutez 30 à
60 ml (2 à 4 cuillerées à soupe) de jus de
fruits ou d’eau par 235 ml (1 tasse) de
fruits. Couvrez et mélangez à MEDIUM
(MOYENNE) de 5 à 10 secondes.
Écraser les légumes en purée : Mettez
475 ml (2 tasses) de légumes en boîte ou
cuits dans le récipient. Ajoutez 30 à
60 ml (2 à 4 cuillerées à soupe) de
bouillon, d’eau ou de lait par 235 ml
(1 tasse) de légumes. Couvrez et mélangez
à MEDIUM (MOYENNE) de 10 à
20 secondes.
Écraser la viande en purée : Mettez
la viande tendre cuite ou en cubes
dans le récipient. Ajoutez 45 à 60 ml
(3 à 4 cuillerées à soupe) de bouillon,
d’eau ou de lait par 235 ml (1 tasse)
de viande. Couvrez et mélangez à LOW
(BASSE) pendant 10 secondes. Arrêtez le
mélangeur et passez une spatule sur les
parois du récipient. Couvrez et mélangez à
MEDIUM (MOYENNE) pendant 10 à
20 secondes de plus.
Écraser le fromage cottage ou ricotta
en purée : Mettez le fromage cottage
ou ricotta dans le récipient. Couvrez
et mélangez parfaitement à MEDIUM
(MOYENNE) pendant 25 à 35 secondes
pour obtenir une consistance onctueuse.
Arrêtez le mélangeur et raclez les parois du
récipient au besoin. Au besoin, ajoutez
15 ml (1 cuillerée à soupe) de lait écrémé
par 235 ml (1 tasse) de fromage cottage.
Idéal comme base pour les trempettes ou
les tartinades allégées.
1
/2") de
Combiner les ingrédients liquides
pour les aliments cuits au four : Versez
les ingrédients liquides dans le récipient.
Couvrez et mélangez bien à HIGH (ÉLEVÉE)
pendant 10 à 15 secondes. Versez le
mélange liquide sur les ingrédients secs et
mélangez bien.
Éliminer les grumeaux des sauces : Si
la sauce comporte des grumeaux, placez-la
dans le récipient. Couvrez et mélangez à
MEDIUM (MOYENNE) pendant 5 à
10 secondes.
Combiner la farine et le liquide pour
épaissir : Mettez la farine et le liquide
dans le récipient. Couvrez et mélangez à
LOW (BASSE) pendant 5 à 10 secondes.
Préparer la sauce béchamel : Mettez
le lait, la farine et le sel, si désiré, dans
le récipient. Couvrez et mélangez à
LOW (BASSE) pendant 5 à 10 secondes.
Versez dans la casserole et cuisez comme
d’habitude.
Préparer la pâte à crêpes ou à gaufres
à partir d’un mélange : Mettez le
mélange et les autres ingrédients dans
le récipient. Couvrez et remuez bien à
LOW (BASSE), pendant 10 à 20 secondes.
Arrêtez le mélangeur et raclez les parois du
récipient au besoin.
Râper le fromage : Coupez du fromage
très froid en cubes de 1,25 à 2,5 cm
1
(
/2" à 1"). Mettez jusqu’à 120 ml (1/2 tasse)
de fromage dans le récipient. Couvrez et
mélangez à HIGH (ÉLEVÉE) pendant 5 à
10 secondes. Pour les fromages durs,
comme le parmesan, amenez-le à
température de la pièce, puis mélangez à
HIGH (ÉLEVÉE) pendant 10 à 15 secondes.
Préparer le porridge pour bébés :
Placez les floçons d’avoine non cuits dans
le récipient. Couvrez et mélangez à LOW
(BASSE) pendant 5 à 10 secondes jusqu’à
obtention de la consistance désirée. Cuisez
comme d’habitude.
26
Page 30

Conseils sur le mélangeur
Préparer des aliments pour bébé à
partir d’aliments pour adultes : Mettez
les aliments pour adultes préparés dans le
récipient. Couvrez et mélangez à LOW (BASSE)
pendant 10 secondes. Remuez ensuite à
MEDIUM (MOYENNE) de 10 à 30 secondes.
Nettoyez votre récipient de
mélangeur : Remplissez le récipient à
la moitié d’eau tiède. Ajoutez quelques
gouttes de détergent liquide. Couvrez et
mélangez à LOW (BASSE) jusqu’à
ce que les parois soient propres, entre 5
et 10 secondes. Rincez et séchez. Pour
nettoyer complètement, lavez le récipient
et le couvercle dans un lave-vaisselle.
FRANÇAIS
27
Page 31

Garantie du mélangeur KitchenAid®
Durée de la garantie :
50 États des États-Unis,
le district fédéral de
Columbia, le Canada et
Puerto Rico : Garantie
limitée d’un an à compter
de la date d’achat.
FRANÇAIS
DÉSAVEU DE GARANTIE TACITE, LIMITATION DES RECOURS LES GARANTIES
TACITES, Y COMPRIS DANS LA MESURE APPLICABLE LES GARANTIES DE QUALITÉ
MARCHANDE OU D’APTITUDE À UN EMPLOI PARTICULIER, SONT EXCLUES DANS LA
MESURE AUTORISÉE PAR LA LOI. TOUTE GARANTIE TACITE IMPOSÉE PAR LA LOI EST
LIMITÉE À UN AN, OU LA DURÉE MINIMUM PERMISE PAR LA LOI. PUISQUE CERTAINES
JURIDICTIONS NE PERMETTENT PAS L’EXCLUSION OU LA LIMITATION DE DURÉE DES
GARANTIES IMPLICITES DE QUALITÉ MARCHANDE OU D’APTITUDE À UN EMPLOI
PARTICULIER, LES LIMITATIONS CI-DESSUS PEUVENT DONC NE PAS S’APPLIQUER À VOUS.
KitchenAid
prendra en charge :
50 États des États-Unis,
district fédéral de
Columbia et le Canada :
Garantie de satisfaction
totale et de remplacement
de votre mélangeur.
Consultez la page
suivante pour obtenir des
détails sur la procédure
à suivre pour obtenir un
remplacement.
OU
À Puerto Rico :
Les coûts des pièces de
rechange et de la maind’œuvre pour corriger
les défauts de matériaux
et de main-d’œuvre. Le
service après-vente doit
être assuré par un Centre
de réparation autorisé
KitchenAid. Pour obtenir
une réparation, suivez
les directives des pages
suivantes.
KitchenAid ne prendra
pas en charge :
A. Les réparations
découlant de
l’utilisation du
mélangeur dans un
contexte autre qu’un
foyer unifamilial
normal.
B. Les dommages
attribuables aux causes
suivantes : un accident,
une modification, la
mauvaise utilisation,
un emploi abusif
ou une utilisation
non approuvée par
KitchenAid.
C. Les coûts des pièces
de rechange ou de
main-d’œuvre pour le
mélangeur si ce dernier
est utilisé à l’extérieur
du pays d’achat.
SI CET APPAREIL NE FONCTIONNE PAS COMME GARANTI, LE SEUL ET EXCLUSIF
RECOURS DES CLIENTS EST LA RÉPARATION OU LE REMPLACEMENT SELON LES
DISPOSITIONS DE LA GARANTIE LIMITÉE. KITCHENAID ET KITCHENAID CANADA
N’ASSUMENT AUCUNE RESPONSABILITÉ EN CAS DE DOMMAGES ACCESSOIRES OU
INDIRECTS. Cette garantie vous confère des droits spécifiques auxquels peuvent s’ajouter
d’autres droits variant d’un État ou d’une province à l’autre.
28
Page 32

Garantie de satisfaction totale et de
remplacement - 50 États des États-Unis,
district fédéral de Columbia
Nous sommes tellement certains que
la qualité de nos produits satisfait aux
normes exigeantes de KitchenAid que, si le
mélangeur cesse de fonctionner au cours
de la première année, KitchenAid livrera
gratuitement un appareil identique ou
comparable à votre porte et s’occupera de
récupérer le mélangeur originel. L’appareil
de rechange sera aussi couvert par notre
garantie limitée d’un an. Veuillez suivre
ces instructions pour recevoir ce service de
qualité.
Si le mélangeur KitchenAid
fonctionner durant la première année, il
suffit d’appeler le numéro sans frais
®
cesse de
Garantie de satisfaction totale et de
remplacement - Canada
Nous sommes tellement certains que
la qualité de nos produits satisfait aux
normes exigeantes de KitchenAid
si le mélangeur cesse de fonctionner au
cours de la première année, KitchenAid
Canada le remplacera par un appareil
identique ou comparable. L’appareil de
rechange sera aussi couvert par notre
garantie limitée d’un an. Veuillez suivre
ces instructions pour recevoir ce service de
qualité.
Si le mélangeur KitchenAid
fonctionner au cours de la première année,
apportez-le ou retournez-le port dû à un
Centre de réparation KitchenAid Canada
®
®
cesse de
que,
1-800-541-6390 du Centre de satisfaction
de la clientèle du lundi au vendredi de
8 h à 20 h (heure de l’Est) ou le samedi de
10 h à 17 h. Fournissez votre adresse de
livraison complète au représentant. (Pas de
boîte postale).
Quand vous recevez le mélangeur de
rechange, veuillez utiliser le carton et les
matériaux d’emballage pour emballer le
mélangeur originel. Écrivez vos nom et
adresse sur une feuille de papier et mettezla dans le carton avec une copie de la
preuve d’achat (reçu de caisse, facture de
règlement par carte de crédit, etc.)
autorisé. Écrivez vos nom et adresse
complète sur une feuille de papier et
mettez-la dans le carton avec une copie de
la preuve d’achat (reçu de caisse, facture
de règlement par carte de crédit, etc.) Le
mélangeur de rechange sera expédié port
prépayé et assuré. Si le service ne s’avère
pas satisfaisant, appelez le numéro sans
frais du Centre pour l'eXpérience de la
clientèle: 1-800-807-6777. Ou écrivez à :
Centre pour l'eXpérience de la clientèle
KitchenAid Canada
1901 Minnesota Court
Mississauga, ON L5N 3A7
FRANÇAIS
Comment obtenir une réparation sous
garantie à Puerto Rico
Le mélangeur KitchenAid® est couvert par
une garantie limitée d’un an à partir de
la date d’achat. KitchenAid prendra en
charge les coûts des pièces de rechange
et de main-d’œuvre pour corriger les vices
de matériaux et de fabrication. Le service
après-vente doit être assuré par un Centre
de réparation autorisé KitchenAid.
Apportez le mélangeur ou retournez-le port
payé et assuré à un Centre de réparation
autorisé de KitchenAid. Le mélangeur réparé
vous sera retourné port prépayé et assuré.
S’il est impossible d’obtenir des réparations
satisfaisantes de cette manière, appelez le
numéro sans frais 1-800-541-6390 pour
obtenir l’adresse d’un Centre de réparation
près de chez vous.
29
Page 33

Comment obtenir une réparation hors
garantie – tous les territoires
Avant d’appeler pour faire réparer l’appareil.
Voir la section “Dépannage“.
Pour obtenir de l’information sur
les réparations dans les 50 États
des États-Unis, le district fédéral de
Columbia et Puerto Rico, appelez le
numéro sans frais 1-800-541-6390.
Ou écrivez à :
Centre de satisfaction de la clientèle
KitchenAid Portable Appliances
FRANÇAIS
P.O. Box 218
St. Joseph, MI 49085-0218
Comment obtenir une réparation
en dehors de ces territoires
Demandez à votre distributeur local
KitchenAid ou au détaillant où le
mélangeur a été acheté où le faire réparer.
Comment commander des accessoires
et des pièces de rechange
Ou contactez un centre de réparation
autorisé près de chez vous.
Pour obtenir de l’information sur
les réparations au Canada, appelez le
numéro sans frais 1-800-807-6777.
Ou écrivez à :
Centre pour l'eXpérience de la clientèle
KitchenAid Canada
1901 Minnesota Court
Mississauga, ON L5N 3A7
Pour obtenir de l’information sur les
réparations au Mexique, appelez le
numéro sans frais
01-800-024-17-17
(JV Distribuciones)
ou
01-800-902-31-00
(Industrias Birtman)
Pour commander des accessoires
ou des pièces de rechange pour le
mélangeur dans les 50 États des
États-Unis, dans le district fédéral de
Columbia et à Puerto-Rico,
appelez sans frais le 1-800-541-6390 du
lundi au vendredi, de 8 h à 20 h (heure de
l’Est), le samedi de 10 h à 17 h.
Ou écrivez à :
Centre de satisfaction de la clientèle
KitchenAid Portable Appliances
P.O. Box 218
St. Joseph, MI 49085-0218
Pour commander des accessoires
ou des pièces de rechange pour le
mélangeur au Canada, appelez le
numéro sans frais 1-800-807-6777.
Ou écrivez à :
Centre pour l'eXpérience de la clientèle
KitchenAid Canada
1901 Minnesota Court
Mississauga, ON L5N 3A7
Pour commander des accessoires
ou des pièces de rechange pour le
mélangeur au Mexique, appelez le
numéro sans frais
01-800-024-17-17
(JV Distribuciones)
ou
01-800-902-31-00
(Industrias Birtman)
30
Page 34

Índice
INTRODUCCIÓN
Comprobante de compra y tarjeta de registro del producto ..................En el interior de la portada
Seguridad de la licuadora .............................................................................................32
Medidas de seguridad importantes ...............................................................................32
Requisitos eléctricos ......................................................................................................33
CARACTERÍSTICAS Y FUNCIONAMIENTO
Características de la licuadora .......................................................................................34
Preparación de la licuadora para su uso ........................................................................36
Antes de utilizarla por primera vez ........................................................................36
Ensamblado de la licuadora ................................................................................... 36
Cómo utilizar la licuadora ............................................................................................. 37
Antes de utilizarla .................................................................................................. 37
Funcionamiento de la licuadora .............................................................................37
Función Pulse (Pulsar) ............................................................................................ 38
Tapa para el agregado de ingredientes ..................................................................38
Guía para el control de la velocidad ..............................................................................38
CUIDADO Y LIMPIEZA
Limpieza de la licuadora ...............................................................................................39
Solución de problemas .................................................................................................40
CONSEJOS PARA LA LICUADORA
Consejos rápidos ........................................................................................................... 41
Consejos prácticos ........................................................................................................41
INFORMACIÓN SOBRE LA GARANTÍA Y EL SERVICIO TÉCNICO
Garantía de la licuadora KitchenAid
®
.............................................................................44
Garantía de reemplazo sin dificultades en los 50 estados
de los Estados Unidos y en el Distrito de Columbia .......................................................45
Garantía de reemplazo sin dificultades en Canadá ........................................................ 45
Cómo obtener el servicio de garantía en Puerto Rico ....................................................45
Cómo obtener el servicio de garantía una vez que
ésta haya expirado – Todos los lugares .......................................................................... 46
Cómo obtener el servicio técnico en otros lugares ........................................................46
Como realizar un pedido de accesorios y repuestos ......................................................46
NOTA: Debido a que el diseño del recipiente y de la cuchilla es exclusivo, lea estas
instrucciones antes de utilizar su nueva licuadora KitchenAid
®
para obtener los máximos
resultados de funcionamiento.
31
ESPAÑOL
Page 35

Seguridad de la licuadora
Su seguridad y la seguridad de los demás
es muy importante.
Hemos incluido muchos mensajes importantes de seguridad en este manual y en
su electrodoméstico. Lea y obedezca siempre todos los mensajes
de seguridad.
Este es el símbolo de advertencia de seguridad.
Este símbolo le llama la atención sobre peligros potenciales que
pueden ocasionar la muerte o una lesión a usted y a los demás.
Todos los mensajes de seguridad irán a continuación del símbolo
de advertencia de seguridad y de la palabra “PELIGRO” o “ADVERTENCIA”.
Estas palabras significan:
Si no sigue las instrucciones de
PELIGRO
ADVERTENCIA
ESPAÑOL
Todos los mensajes de seguridad le dirán el peligro potencial, le dirán cómo
reducir las posibilidades de sufrir una lesión y lo que puede suceder si no se
siguen las instrucciones.
inmediato, usted puede morir o
sufrir una lesión grave.
Si no sigue las instrucciones, usted
puede morir o sufrir una lesión grave.
MEDIDAS DE SEGURIDAD
IMPORTANTES
Cuando utilice electrodomésticos, siempre se deben seguir las precauciones básicas de
seguridad para reducir la posibilidad de riesgos de incendios, descargas eléctricas y/o
lesiones a personas, incluyendo las siguientes:
1. Lea todas las instrucciones.
2. Para evitar el riesgo de choque eléctrico, no ponga la licuadora en agua ni en
ningún otro líquido.
3. Es necesario que supervise de cerca cuando algún electrodoméstico está siendo utilizado cerca de los niños o está siendo utilizado por éstos.
4. Desenchúfela cuando no esté en uso, antes de colocar o quitar las piezas y antes de
la limpieza.
5. Evite el contacto con las piezas móviles.
6. No utilice la licuadora con un cable o un enchufe dañado ni luego de un mal funcionamiento ni si se ha caído o dañado de alguna forma. Devuelva la licuadora al
Centro de servicio técnico autorizado más cercano para su inspección, reparación o
ajuste eléctrico o mecánico.
7. No la utilice a la intemperie.
8. No deje que el cable cuelgue del borde de la mesa o mostrador.
32
Page 36

MEDIDAS DE SEGURIDAD
IMPORTANTES
9. Mantenga las manos y los utensilios lejos del recipiente mientras mezcle para
reducir el riesgo de lesiones graves a personas o de daños a la licuadora. Puede
utilizarse una espátula raspadora pero se debe utilizar sólo cuando la licuadora no
esté en funcionamiento.
10. Las cuchillas son filosas. Manipúlelas con cuidado.
11. Siempre haga funcionar la licuadora con la tapa en su lugar.
12. El uso de accesorios como potes enlatados no recomendados por KitchenAid
pueden ocasionar lesiones a las personas.
13. Cuando procese líquidos calientes, retire la parte central de la tapa de dos piezas.
14. Este producto está diseñado para ser utilizado sólo para uso doméstico.
GUARDE ESTAS INSTRUCCIONES
Requisitos eléctricos
Características eléctricas: 120 VCA, 60 Hz,
6 A.
NOTA: Su licuadora tiene un enchufe de
3 clavijas con conexión a tierra. Para
reducir el riesgo de descargas eléctricas,
este enchufe encajará en el tomacorriente
sólo de una manera. Si el enchufe no
encaja en el tomacorriente, comuníquese
con un electricista autorizado. No
modifique el enchufe de ninguna
manera.
No utilice un cable eléctrico de extensión.
Si el cable del suministro eléctrico es
demasiado corto, solicite a un electricista
o a un técnico calificado que instale un
tomacorriente cerca del electrodoméstico.
ADVERTENCIA
Peligro de Choque Eléctrico
Conecte a un contacto de pared
de conexión a tierra de 3
terminales.
No quite la terminal de conexión
a tierra.
No use un adaptador.
No use un cable eléctrico de
extensión.
No seguir estas instrucciones
puede ocasionar la muerte,
incendio o choque eléctrico.
ESPAÑOL
33
Page 37

Características de la licuadora
Tapa fija con tapa
transparente para
el agregado de
ingredientes de
60 mL (2 oz)
Jarra de
policarbonato
de 1,75 L (56 oz)
ESPAÑOL
Acopladores
durables y
reforzados
de acero
Fácil de limpiar,
diseño de jarra
de una pieza
Cuchilla
patentada de
acero inoxidable
Botones
selectores de
velocidad
Base de control
Clean Touch™
Base de metal
fundido
34
Page 38

Características de la licuadora
Esta licuadora fue diseñada y probada
para cumplir con las normas de calidad de
KitchenAid para un funcionamiento
óptimo y de larga duración sin dificultades.
Motor potente
El potente motor de 0,9 caballos de
fuerza suministra la potencia para un
funcionamiento espléndido con todas las
tareas que puede realizar una licuadora –
desde hacer puré las salsas hasta elaborar
salsas con trozos, triturar uniformemente
los hielos de una jarra o la fruta congelada
en segundos para lograr suaves batidos.
Diseño de jarra de una sola
pieza fácil de limpiar
El diseño de una pieza integra una jarra
funcional con contornos interiores dinámicos
que dirigen continuamente los alimentos
hacia la cuchilla para una mezcla rápida y
uniforme. El diseño de una pieza significa
también que se puede limpiar sin retirar la
cuchilla ni cualquier otra pieza. La jarra
resiste temperaturas extremas - desde sopas
hirviendo hasta margaritas congeladas y
tiene un pico vertedor amplio para verter
el contenido sin derramar. La jarra puede
lavarse en el lavavajillas.
Jarra de policarbonato
Jarra de policarbonato
transparente de una pieza
de 1,75 L (56 oz), resistente
a los golpes, las rayaduras y
las manchas. El mango de la
jarra presenta un agarre interno blando
y antideslizante para un control firme y
confortable.
Cuchilla patentada de acero
inoxidable
Los dientes filosos y de gran tamaño de
las cuchillas están ubicados en cuatro
planos diferentes para una mezcla rápida,
completa y consistente. El diseño de
nuestra cuchilla durable está construido
dentro de la jarra para facilitar el manejo y
la limpieza.
Botones selectores de velocidad
Prepare bebidas congeladas y salsas de
puré o sopas en segundos. Procese con
confianza, control y consistencia en todas
las velocidades: LOW (Baja), MEDIUM
(Media) y HIGH (Alta). El botón PULSE
(Pulsar) le da mayor control para tareas
que requieren disparos cortos, rápidos o
disparos más prolongados.
Base de control Clean Touch™
Se limpia en un instante. La base de
control lisa no tiene grietas ni fisuras en
donde los ingredientes puedan quedar
atrapados.
Acopladores durables y reforzados de
acero
Los acopladores de calidad comercial con
12 dientes entrelazados proporcionan
una transferencia directa desde el motor
a la cuchilla. El acoplador de la jarra
está revestido para un funcionamiento
silencioso.
Tapa fija con tapa transparente para
el agregado de ingredientes de 60 mL
(2 oz)
Proporciona un cierre hermético. La tapa
flexible mantendrá su cierre hermético
durante toda la vida útil de la licuadora. La
tapa incluye una tapa desmontable de
60 mL (2 oz) para mayor comodidad al
medir o agregar ingredientes.
Base de metal fundido
La pesada base de metal fundido asegura
la estabilidad y el funcionamiento
silencioso de la licuadora cuando se
mezcla una jarra llena de ingredientes. Los
cuatro pies de goma en la base amplia
y sólida aseguran que ésta no se deslice
y se dañe. Lisa y redondeada, la base es
fácil de limpiar y presenta un conveniente
compartimiento para guardar el cordón en
la parte inferior.
ESPAÑOL
35
Page 39

Preparación de la licuadora para su uso
Antes de utilizarla por primera vez
Antes de utilizarla por primera vez, limpie
la base de la licuadora con un trapo
humedecido en agua jabonosa tibia, y
luego limpie con un trapo húmedo. Seque
con un trapo suave. Lave la jarra de una
pieza, la tapa y la tapa para el agregado
de ingredientes en agua tibia jabonosa o
sólo agregue jabón y agua tibia a la jarra,
colóquela en la base de la licuadora, y mezcle
para limpiar. Vea “Cuidado y limpieza“.
Enjuague las piezas y séquelas.
Ensamblado de la licuadora
1. Ajuste el largo del cable según sea
necesario.
A. Si va a utilizar la licuadora
a 2 ft (61 cm) de
distancia de un enchufe
ESPAÑOL
eléctrico, puede reducir
la longitud del cable
enrollándolo en el área
para guardarlo en la
parte inferior de la
base, de acuerdo con el
patrón que se muestra
a la derecha (indicado
con flechas):
B. Si va a utilizar la licuadora
a 16" (41 cm) de
distancia de un enchufe
eléctrico, puede reducir
la longitud del cable
enrollándolo en el área
para guardarlo en la
parte inferior de la base,
de acuerdo con este
patrón:
C. Para almacenar la
mayor parte del cable
debajo de la base de su
licuadora, siga el patrón
“B” que se muestra
abajo a la izquierda
para enrollar el cable.
Después, comenzando
en el punto “A” que se
muestra en el dibujo
a la derecha, enrolle
un segundo tramo de
cable en la base de
acuerdo con el patrón
indicado por las flechas:
A
2. Coloque la jarra de una pieza en la
base de la licuadora.
3. Antes de enchufar la licuadora,
asegúrese de presionar OFF (Apagado)
para asegurarse de que la licuadora
esté apagada.
36
Page 40

Preparación de la licuadora para su uso
4. Enchufe en un tomacorriente para
ADVERTENCIA
Peligro de Choque Eléctrico
Conecte a un contacto de pared
de conexión a tierra de 3
terminales.
No quite la terminal de conexión
a tierra.
No use un adaptador.
No use un cable eléctrico de
extensión.
No seguir estas instrucciones
puede ocasionar la muerte,
incendio o choque eléctrico.
3 clavijas con conexión a tierra. Ahora
la licuadora está lista para ser utilizada.
5. Antes de retirar la jarra de la base
luego de haber sido utilizada, siempre
presione OFF (Apagado) y desenchufe
el cable. Levante la jarra en línea recta
para sacarla de la base de la licuadora.
Cómo utilizar la licuadora
ESPAÑOL
Antes de utilizarla
NOTA : Mientras la licuadora está
encendida:
- No interfiera con el movimiento de la
cuchilla.
- No retire la tapa de la jarra.
Funcionamiento de la licuadora
La licuadora KitchenAid
velocidades: LOW (Baja), MEDIUM (Media)
y HIGH (Alta). También tiene un botón
PULSE (Pulsar).
1. Con un conveniente funcionamiento en
un solo paso, esta unidad funcionará
sólo si se presiona un botón de
selección de velocidad.
®
tiene tres
2. Antes de poner en funcionamiento la
licuadora, asegúrese de que la jarra esté
colocada correctamente en la base de
la licuadora. Coloque los ingredientes
en la jarra y asegure la tapa.
3. Presione el botón para seleccionar la
velocidad deseada para un manejo
continuo a esa velocidad. El indicador
rojo arriba de la velocidad elegida
se encenderá. Puede cambiar las
velocidades sin apagar la unidad
presionando otro botón de velocidad.
IMPORTANTE: Si va a procesar alimentos
o líquidos calientes, retire la tapa central
para el agregado de ingredientes. Haga
funcionar sólo en velocidad LOW (Baja).
37
Page 41

Cómo utilizar la licuadora
4. Para apagar la licuadora, presione
OFF (Apagado). El botón
OFF (Apagado) detendrá cualquier
velocidad y apagará la licuadora
simultáneamente. Antes de retirar la
jarra, presione OFF (Apagado) para
apagar la licuadora y desenchufe el
cable.
Función Pulse (Pulsar)
Su licuadora KitchenAid
®
cuenta con la
función Pulse (Pulsar).
1. Antes de poner en funcionamiento la
licuadora, asegúrese de que la jarra
esté colocada correctamente en la base
de la licuadora.
2. Coloque los ingredientes en la jarra y
asegure la tapa.
3. Presione PULSE (Pulsar) y mantenga
presionado durante el tiempo deseado.
El indicador rojo se encenderá. La
ESPAÑOL
función Pulse (Pulsar) le permite al
usuario tener un fácil control de
disparos cortos, rápidos o prolongados.
4. Para apagar la función Pulse (Pulsar),
simplemente suelte el botón Pulse.
Ahora la licuadora está lista para ser
utilizada de forma continua.
5. Antes de retirar la jarra, presione
OFF (Apagado) para apagar la
licuadora y desenchufe el cable.
Tapa para el agregado de ingredientes
La tapa para el agregado de ingredientes
de 60 mL (2 oz) puede ser utilizada para
medir o agregar ingredientes. Retire la
tapa y agregue los ingredientes a velocidad
LOW (Baja). Cuando opere a velocidades
más altas, con una jarra llena
o con contenidos calientes,
detenga la licuadora y
luego, agregue los
60 ml
2 oz
30 ml
1 oz
ingredientes.
Guía para el control de la velocidad
Producto Velocidad
Pastel de queso . . . . . . . . . . . . High (Alta)
Fruta picada . . . . . . . . . . . . . Pulse (Pulsar)
Hielo picado . . . . . . . . . . . . .Pulse (Pulsar)
Verduras picadas. . . . . . . . . .Pulse (Pulsar)
Hielo triturado . . . . . . . Medium (Media),
. . . . . . . . . . . . . . . . . . . . . . High (Alta)
. . . . . . . . . . . . . . . . . . . o Pulse (Pulsar)
Bebida congelada
a base de yogur . . . . . . . . . High (Alta)
Bebida a base de frutas . . . . . High (Alta)
Producto Velocidad
Jugo de frutas de
concentrados
congelados . . . . . . . . . . . . . .Low (Baja)
Queso duro rallado . . . . . . . . . High (Alta)
Salsa de carne (gravy) . . . Medium (Media)
Bebida a base
de helados . . . . . . . . . . . . . High (Alta)
Mousse . . . . . . . . . . . . . . . . . . High (Alta)
Mezcla para
panqueques . . . . . . . . . . . . . Low (Baja)
Bebida a base
de sorbetes . . . . . . . . . . . . . High (Alta)
38
Page 42

Guía para el control de la velocidad
Producto Velocidad
Ricota suave o
queso cottage . . . . . . . Medium (Media)
Cobertura Streusel . . . . . . . . . .Low (Baja)
CONSEJO: Procese hasta una cubetera estándar de hielo de 12 a 14 cubos de hielo
por vez. No se necesita agregar líquido al procesar; remover ocasionalmente con una
espátula será útil, pero sólo deberá hacerlo cuando la licuadora esté APAGADA.
Producto Velocidad
Cobertura crujiente dulce . . . . . Low (Baja)
Mezcla para waffles . . . . . . . . . Low (Baja)
Salsa blanca . . . . . . . . . . . . . . .Low (Baja)
Cuidado y limpieza
La jarra de la licuadora y la cuchilla pueden
limpiarse sin necesidad de retirarlas.
• Limpie la licuadora muy bien luego de
cada uso.
• No sumerja la base de la licuadora ni el
cable en agua.
• No utilice limpiadores abrasivos ni
estropajos.
1. Para limpiar la cuchilla, coloque la
jarra en la base de la licuadora, llene
la mitad con agua tibia (no caliente)
y agregue 1 ó 2 gotas de detergente.
Coloque la tapa en la jarra, presione la
velocidad LOW (Baja) y haga funcionar
la licuadora de 5 a 10 segundos. Retire
la jarra y vacíe el contenido. Enjuague
la jarra con agua tibia hasta que quede
limpia. La jarra también se puede lavar
en el estante más bajo del lavavajillas.
2. Para limpiar la tapa y la tapa para el
agregado de ingredientes, lave con
agua tibia jabonosa, luego, enjuague
y seque completamente. Estas piezas
también se pueden lavar en el estante
más alto del lavavajillas. Para obtener
los mejores resultados, se recomienda
el lavado a mano.
3. Limpie la base de la licuadora y el cable
con un trapo con agua tibia jabonosa;
limpie con un trapo húmedo y seque
con un trapo suave. Para guardarla,
el cable se puede enroscar en la parte
inferior de la base.
ESPAÑOL
39
Page 43

Solución de problemas
• Si la licuadora no funciona
cuando se selecciona una velocidad:
– Verifique si la licuadora está enchufada
en un tomacorriente para 3 clavijas con
conexión a tierra. Si lo está, presione OFF
(Apagado), luego desenchufe la licuadora.
ADVERTENCIA
Peligro de Choque Eléctrico
Conecte a un contacto de pared
de conexión a tierra de 3
terminales.
No quite la terminal de conexión
ESPAÑOL
a tierra.
No use un adaptador.
No use un cable eléctrico de
extensión.
No seguir estas instrucciones
puede ocasionar la muerte,
incendio o choque eléctrico.
• Si la licuadora reduce la velocidad
excesivamente cuando procesa
ingredientes pesados:
– La licuadora puede estar sobrecargada.
Presione OFF (Apagado) para detener
la licuadora. Retire la jarra de la base
y separe el contenido de la jarra en
cantidades más pequeñas. El agregar
líquido a la jarra también puede reducir
la carga de la licuadora.
• Si la cuchilla deja de girar:
– Los ingredientes de la licuadora o un
objeto extraño pueden haber atorado la
licuadora. Presione OFF (Apagado) para
detener la licuadora. Retire la jarra de la
base y libere la cuchilla del contenido al
desintegrarlo o al retirar los ingredientes
del fondo de la jarra.
Si el problema no se resuelve con los pasos
dados en esta sección, comuníquese con
KitchenAid o con el Centro de servicio
técnico autorizado.
EE.UU./Puerto Rico: 1-800-541-6390,
Canadá: 1-800-807-6777,
México: 01-800-024-17-17
(JV Distribuciones)
o
01-800-902-31-00
(Industrias Birtman)
Vuélvala a enchufar en el mismo
tomacorriente. Si la licuadora aún no
funciona, verifique si el fusible o el
interruptor del circuito eléctrico de la
licuadora está conectado y asegúrese de
que el circuito está cerrado.
Para obtener más detalles, consulte la
sección de garantía KitchenAid y servicio
técnico. No devuelva la licuadora a la
tienda donde la compró - ellos no brindan
el servicio técnico.
40
Page 44

Consejos para la licuadora
Consejos rápidos
• Procese en HIGH (Alta) si está
preparando una gran cantidad
de bebida con mucho hielo. Para
cantidades más pequeñas, utilice
MEDIUM (Media).
• Los cubos de hielo más pequeños se
pueden picar o triturar más rápido que
los cubos grandes.
• Agregue alimentos a esta jarra de la
licuadora en cantidades más grandes
de las que pondría en otras licuadoras
– puede agregar de 2 a 3 tazas (475 a
710 mL) a la vez en lugar de 1 taza
(235 mL).
• Para mezclas con muchos ingredientes,
comience el proceso de procesamiento
en LOW (Baja) para combinar los
ingredientes completamente. Luego,
aumente la velocidad si es necesario.
• Asegúrese de tapar la jarra mientras
mezcla.
• Si lo desea, retire la tapa central de
la jarra para agregar líquidos o cubos
de hielo mientras la licuadora está
funcionando a velocidad LOW (Baja).
• Cuando la haga funcionar a velocidades
más altas, con una jarra llena o
con contenidos calientes, detenga
la licuadora y luego agregue los
ingredientes.
• Detenga la licuadora antes de introducir
utensilios en la jarra. Utilice una espátula
de goma para mezclar los ingredientes
sólo cuando la licuadora está en OFF
(Apagado). No utilice utensilios como
por ejemplo espátulas en la jarra
mientras el motor está encendido.
• Si es posible, enfríe los alimentos
calientes antes de mezclarlos. Comience
a procesar los alimentos tibios en LOW
(Baja). Aumente la velocidad si es
necesario.
• Retire la tapa central para el agregado
de ingredientes cuando mezcla líquidos
calientes y hágala funcionar sólo en
LOW (Baja). No introduzca la mano
sin protección sobre la tapa de la jarra
cuando procesa líquidos calientes.
• Detenga la licuadora y verifique la
consistencia de los alimentos luego
de unos segundos para evitar que se
procesen de manera excesiva.
Consejos prácticos
Reconstituir jugos congelados: Para
una lata de 175 mL (6 oz) de jugo de
naranja concentrado, combine el jugo y
la cantidad correcta de agua en la jarra.
Tape y procese en LOW (Baja) hasta que
se mezcle bien durante 10 a 15 segundos
aproximadamente.
Para una lata de 355 mL (12 oz), combine
el jugo y 1 lata de agua en la jarra.
Tape y procese en LOW (Baja) hasta que
se mezcle bien de 20 a 30 segundos
aproximadamente. Revuelva las 2 latas de
agua restantes.
Disolver gelatina saborizada: Vierta agua
caliente en la jarra; agregue la gelatina.
Retire la tapa central para el agregado
de ingredientes y procese en LOW (Baja)
hasta que la gelatina esté disuelta, de 10 a
30 segundos aproximadamente. Agregue
otros ingredientes.
Preparar migas de galletas dulces y
galletas graham: Troce las galletas más
grandes en pedacitos de 3,75 cm (1
de diámetro aproximadamente. Utilice
galletas más pequeñas tal como están.
Colóquelas en la jarra. Tape y procese en
LOW (Baja) hasta alcanzar la consistencia
deseada. Utilice las migas para realizar
coberturas rápidas para yogur congelado,
budines o compota de frutas.
Para realizar una cobertura más fina para
una tarta o postres, troce galletas graham
o galletas dulces en pedacitos de
3,75 cm (1
1
/2") de diámetro
aproximadamente y colóquelas en la jarra.
Tape y procese en MEDIUM (Media) hasta
lograr la consistencia deseada, de 20 a
30 segundos aproximadamente.
Preparar migas de galletas: Siga el
procedimiento para las galletas dulces,
procese en LOW (Baja). Utilice como
cobertura o como un ingrediente en
cazuelas de platos principales o para
platos de verduras.
41
1
/2")
ESPAÑOL
Page 45

Consejos para la licuadora
Preparar migas de pan: Troce el pan en
pedacitos de 3,75 cm (1
aproximadamente. Siga el procedimiento
para las galletas dulces, procese en LOW
(Baja). Utilice como cobertura o como
un ingrediente en cazuelas de platos
principales o para platos de verduras.
Picar frutas y verduras: Coloque 2 tazas
(475 mL) de trozos de frutas o verduras
en la jarra. Tape y pulse de manera rápida
de 3 a 4 veces, alrededor de un segundo
cada vez, hasta alcanzar la consistencia
deseada.
Preparar puré de frutas: Coloque
2 tazas (475 mL) de frutas enlatadas
o cocidas en la jarra. Agregue de 2 a
4 cucharadas (30 a 60 mL) de jugo de
frutas o de agua por cada taza (235 mL)
de fruta. Tape y procese en MEDIUM
(Media) durante 5 a 10 segundos
aproximadamente.
ESPAÑOL
Preparar puré de verduras: Coloque
2 tazas (475 mL) de verduras enlatadas
o cocidas en la jarra. Agregue de 2 a
4 cucharadas (30 a 60 mL) de caldo,
agua o leche por cada taza (235 mL) de
verduras. Tape y procese en MEDIUM
(Media) durante 10 a 20 segundos
aproximadamente.
Preparar puré de carne: Coloque carne
tierna, cocida y cortada en cubos en la
licuadora. Agregue de 3 a 4 cucharadas
(45 a 60 mL) de caldo, agua o leche
por cada taza (235 mL) de carne. Tape y
procese en LOW (Baja) durante
10 segundos. Detenga la licuadora y pase
la espátula retirando el contenido de
los lados del interior de la jarra. Tape y
procese en MEDIUM (Media) de 10 a
20 segundos más. Detenga la licuadora y
pase la espátula retirando el contenido de
los lados según sea necesario.
1
/2") de diámetro
Preparar puré de queso cottage o
de ricota: Coloque el queso cottage o la
ricota en la jarra. Tape y procese durante
25 a 35 segundos aproximadamente en
MEDIUM (Media) hasta que quede una
pasta suave. Detenga la licuadora y pase
la espátula retirando el contenido de los
lados según sea necesario. Si es necesario,
agregue 1 cucharada (15 mL) de leche
descremada por cada taza (235 mL) de
queso cottage. Utilice como base para
salsas de bajo contenido en grasas y como
queso para untar.
Combinar ingredientes líquidos
para productos horneados: Vierta
ingredientes líquidos en la jarra. Tape y
procese en HIGH (Alta) hasta que se
mezcle bien, de 10 a 15 segundos
aproximadamente. Vierta la mezcla líquida
sobre los ingredientes secos y revuelva bien.
Eliminar los grumos de la salsa de carne
(gravy): Si la salsa o la salsa de carne
se torna grumosa, colóquela en la jarra.
Tape y procese durante 5 a 10 segundos
aproximadamente en MEDIUM (Media)
hasta que quede una pasta suave.
Combinar harina y líquidos para
espesar: Coloque harina y líquido en la
jarra. Tape y procese durante 5 a
10 segundos aproximadamente en LOW
(Baja) hasta que quede una pasta suave.
Preparar salsa blanca: Coloque leche,
harina y sal, si lo desea, en la jarra. Tape
y procese en LOW (Baja) hasta que esté
bien mezclado, de 5 a 10 segundos
aproximadamente. Vierta en una cacerola
y cocine como lo hace habitualmente.
Preparar mezcla para panqueques
o waffles: Coloque la mezcla y demás
ingredientes en la jarra. Tape y procese
en LOW (Baja) hasta que se mezcle bien,
de 10 a 20 segundos aproximadamente.
Detenga la licuadora y pase la espátula
retirando el contenido de los lados de la
jarra según sea necesario.
42
Page 46

Consejos para la licuadora
Rallar queso: Corte queso bien frío
en cubos de 1,25 a 1,5 cm (de
1"). Coloque hasta
1
/2 taza (120 mL)
1
/2" a
de queso en la jarra. Tape y procese en
HIGH (Alta) durante 5 a 10 segundos
aproximadamente. Para quesos duros,
como por ejemplo el parmesano, espere a
que alcancen temperatura ambiente, luego
procese en HIGH (Alta) durante
10 a 15 segundos.
Preparar harina de avena para un
bebé: Coloque la harina de avena sin
cocinar en la jarra. Tape y procese en
LOW (Baja) durante 5 a 10 segundos
aproximadamente hasta alcanzar la
consistencia deseada. Cocine como lo hace
habitualmente.
Preparar comida para bebé de la
comida de los adultos: Coloque la comida
para adultos ya preparada en la jarra.
Tape y procese en LOW (Baja) durante
10 segundos aproximadamente. Luego
procese en MEDIUM (Media) durante 10 a
30 segundos aproximadamente.
Limpie la jarra de su licuadora: Llene la
mitad de la jarra con agua tibia. Agregue
unas gotas de detergente. Tape y procese
en LOW (Baja) durante 5 a 10 segundos
aproximadamente hasta que los lados
queden limpios. Enjuague y seque. Para
una limpieza completa, la jarra y la tapa
también se pueden lavar en un lavavajillas
automático.
ESPAÑOL
43
Page 47

Garantía de la licuadora KitchenAid
®
Duración de la
garantía:
50 estados de los
Estados Unidos, el
distrito de Columbia,
Canadá y Puerto Rico:
Un año de garantía
limitada a partir de la
fecha de compra.
ESPAÑOL
LA EXENCIÓN DE RESPONSABILIDAD DE LAS GARANTÍAS IMPLÍCITAS; LAS
GARANTÍAS IMPLÍCITAS DE LIMITACIÓN DE LOS RECURSOS, INCLUYENDO GARANTÍAS
EN LA MEDIDA EN QUE SE APLIQUEN A LA COMERCIABILIDAD O APTITUD CON UN
FIN DETERMINADO, SON EXCLUIDAS EN LA MEDIDA PERMISIBLE POR LEY. CUALQUIER
GARANTÍA IMPLÍCITA QUE PUEDA SER IMPUESTA POR LEY ESTÁ LIMITADA A UN AÑO O
AL PERÍODO MÁS CORTO PERMITIDO POR LEY. ALGUNOS ESTADOS Y PROVINCIAS NO
PERMITEN LIMITACIONES NI EXCLUSIONES EN RELACIÓN CON LA DURACIÓN DE UNA
GARANTÍA IMPLÍCITA DE COMERCIABILIDAD O DE APTITUD, DE MANERA TAL QUE LAS
LIMITACIONES O EXCLUSIONES ANTERIORES PUEDEN QUE NO SE APLIQUEN EN SU CASO.
KitchenAid
pagará por:
50 estados de los
Estados Unidos, el
Distrito de Columbia y
Canadá: El reemplazo de
su licuadora sin dificultades.
Consulte la siguiente página
para obtener los detalles
sobre cómo realizar el
reemplazo.
O
En Puerto Rico:
Los costos de los repuestos
y del trabajo de reparación
para corregir los defectos
en los materiales y la mano
de obra. El servicio técnico
debe ser provisto por un
Centro de servicio técnico
de KitchenAid autorizado.
Para solicitar servicio
técnico, consulte las páginas
siguientes.
KitchenAid
no pagará por:
A. Las reparaciones
cuando la licuadora
sea utilizada con otro
fin que no sea el uso
doméstico normal de
una familia.
B. Los daños como
consecuencia de un
accidente, alteración,
mal uso, abuso o
uso con productos
no aprobados por
KitchenAid.
C. Los costos de
repuestos o de mano
de obra de reparación
para la licuadora
cuando ha sido
utilizada fuera del país
donde fue comprada.
SI ESTE PRODUCTO NO FUNCIONA SEGÚN SE GARANTIZA, EL ÚNICO Y EXCLUSIVO
RECURSO DEL CLIENTE SERÁ LA REPARACIÓN O EL REEMPLAZO SEGÚN LOS TÉRMINOS
Y LAS CONDICIONES DE ESTA GARANTÍA LIMITADA. KITCHENAID Y KITCHENAID CANADA
NO ASUMEN NINGUNA RESPONSABILIDAD POR DAÑOS INCIDENTALES O CONSECUENTES.
Esta garantía le otorga derechos legales específicos y es posible que usted goce de otros
derechos que varían de estado en estado o de provincia en provincia.
44
Page 48

Garantía de reemplazo sin dificultades -
50 estados de los Estados Unidos
y el Distrito de Columbia
Confiamos tanto en que la calidad de
nuestros productos cumple con las exigentes
normas de KitchenAid, que si la licuadora
presentara alguna falla durante el primer
año, le enviaremos un reemplazo sin cargo
idéntico o comparable a su domicilio y
arreglaremos la devolución de la licuadora
original. La unidad de reemplazo también
estará cubierta por nuestra garantía limitada
de un año. Siga estas instrucciones para
recibir este servicio de calidad.
Si su licuadora KitchenAid
falla durante el primer año, simplemente
llame gratis a nuestro Centro de satisfacción
®
presentara alguna
al cliente al 1-800-541-6390, de lunes
a viernes de 8 a.m. a 8 p.m. (Hora del
Este), o los sábados, de 10 a.m. a 5
p.m. Proporcione al asesor su dirección
completa para el envío. (No se aceptan
números de casillas postales).
Cuando reciba la unidad de reemplazo de
su licuadora, utilice la caja y los materiales
de embalaje para embalar la licuadora
original. En la caja, escriba su nombre y
dirección en un papel junto con la copia
del comprobante de compra (recibo de
compra, ticket de la tarjeta de crédito, etc.)
Garantía de reemplazo sin dificultades
en Canadá
Confiamos tanto en que la calidad de
nuestros productos cumple con las
exigentes normas de la marca KitchenAid
que, si su licuadora presentara alguna falla
durante el primer año, KitchenAid Canada la
reemplazará por una idéntica o comparable.
La unidad de reemplazo también estará
cubierta por nuestra garantía limitada de
un año. Siga estas instrucciones para recibir
este servicio de calidad.
Si su licuadora KitchenAid
alguna falla durante el primer año, lleve
la licuadora o mándela con envío por
cobrar a un Centro de servicio técnico
®
presentara
KitchenAid Canada autorizado. En la caja,
escriba su nombre y dirección postal en un
®
papel junto con la copia el comprobante
de compra (recibo de compra, ticket de
la tarjeta de crédito, etc.). La licuadora de
reemplazo se le entregará de forma prepaga
y asegurada. Si usted no queda satisfecho
con el servicio llame sin cargo al Centro
para la eXperiencia del cliente al
1-800-807-6777.
O escríbanos a:
Customer eXperience Centre
KitchenAid Canada
1901 Minnesota Court
Mississauga, ON L5N 3A7
ESPAÑOL
Cómo obtener el servicio de garantía
en Puerto Rico
Su licuadora KitchenAid® tiene garantía
de un año a partir de la fecha de compra.
KitchenAid pagará por los repuestos y la
mano de obra para corregir defectos en
los materiales y en la mano de obra. El
servicio técnico debe ser provisto por un
Centro de servicio técnico de KitchenAid
autorizado.
Lleve la licuadora o mándela con envío
a cobrar y asegurado a un Centro de
servicio técnico de KitchenAid autorizado.
Su licuadora reparada se le entregará de
forma prepaga y asegurada. Si no queda
satisfecho con el servicio, llame de manera
gratuita al 1-800-541-6390 para averiguar
la ubicación del Centro de servicio técnico
más cercano.
45
Page 49

Cómo obtener el servicio una vez vencida la
garantía – Todos los lugares
Antes de llamar al servicio técnico, revise
la sección de “Solución de problemas“.
Para obtener información sobre el
servicio técnico en los 50 estados
de los Estados Unidos, Distrito de
Columbia y Puerto Rico,
llame de manera gratuita al
1-800-541-6390.
O escriba a:
Customer Satisfaction Center
KitchenAid Portable Appliances
P.O. Box 218
St. Joseph, MI 49085-0218
Cómo obtener el servicio técnico
en otros lugares
ESPAÑOL
Consulte su distribuidor de KitchenAid
local o a la tienda donde compró la
licuadora para obtener información sobre
el servicio técnico.
O comuníquese con un Centro de servicio
técnico autorizado cercano a su domicilio.
Para obtener información sobre el
servicio técnico en Canadá,
llame de manera gratuita al
1-800-807-6777.
O escriba a:
Customer eXperience Centre
KitchenAid Canada
1901 Minnesota Court
Mississauga, ON L5N 3A7
Para obtener información sobre el
servicio técnico en México,
llame de manera gratuita al
01-800-024-17-17
(JV Distribuciones)
o
01-800-902-31-00
(Industrias Birtman)
Cómo solicitar accesorios y repuestos
Para solicitar accesorios o repuestos
para su licuadora en los 50 estados
de los Estados Unidos, Distrito de
Columbia y Puerto Rico,
llame de manera gratuita al
1-800-541-6390, de lunes a viernes,
de 8 a.m. a 8 p.m. (Hora del Este) o los
sábados, de 10 a. m. a 5 p. m.
O escriba a:
Customer Satisfaction Center,
KitchenAid Portable Appliances,
P.O. Box 218,
St. Joseph, MI 49085-0218
Para solicitar accesorios o repuestos
para su licuadora en Canadá,
llame de manera gratuita al 1-800-807-6777.
O escriba a:
Customer eXperience Centre
KitchenAid Canada
1901 Minnesota Court
Mississauga, ON L5N 3A7
Para solicitar accesorios o repuestos
para su licuadora en México,
llame de manera gratuita al
01-800-024-17-17
(JV Distribuciones)
o
01-800-902-31-00
(Industrias Birtman)
46
Page 50

47
Page 51

48
Page 52

® Registered trademark/Marque déposée/Marca registrada de KitchenAid, U.S.A.
™ Trademark/Marque de commerce/Marca de comercio de KitchenAid, U.S.A.,
KitchenAid Canada licensee in Canada/Emploi licencié par KitchenAid Canada au Canada/
Usada en Canadá bajo licencia de KitchenAid Canada.
© 2009. All rights reserved. Tous droits réservés. Todos los derechos reservados.
9709948A 3/09
BIEN PENSÉ. BIEN FABRIQUÉ.
®
®
 Loading...