

Page 1

STAND MIXER/BATTEURS SUR SOCLE
INSTRUCTIONS AND RECIPES/INSTRUCTIONS ET RECETTES
FOR THE WAY IT’S MADE.
®
BIEN PENSÉ. BIEN FABRIQUÉ.
®
™
1-800-461-5681
Call our Consumer Interaction Centre
with questions or comments
Website: www. KitchenAid.ca
1-800-461-5681
Des questions ? des commentaires ?
Appelez notre centre du service à la clientèle.
Site Web : www.KitchenAid.ca
Page 2

Product Registration Card
Before you use your stand mixer,
please fill out and mail your product
registration card packed with the
Instructions and Recipes manual. This
card will enable us to contact you in
the unlikely event of a product safety
notification and assist us in complying
with the provisions of the Consumer
Product Safety Act. THIS CARD DOES
NOT VERIFY YOUR WARRANTY.
KEEP A COPY OF THE SALES
RECEIPT SHOWING THE DATE OF
PURCHASE OF YOUR STAND MIXER.
PROOF OF PURCHASE WILL ASSURE
YOU OF IN-WARRANTY SERVICE.
Please complete the following for
your personal records:
Model Number _______________________________________________________
Date Purchased _______________________________________________________
Dealer's Name ________________________________________________________
Address______________________________________________________________
Phone _______________________________________________________________
Page 3

1
Table of Contents
Product Registration Card ........................................................Inside Front Cover
Important Safeguards........................................................................................2
Electrical Requirements......................................................................................3
About Your Mixer
Bowl-Lift Models................................................................................................4
Tilt-Head Models ...............................................................................................6
Using Your KitchenAid
®
Attachments.................................................................8
Mixing Time ......................................................................................................8
Mixer Use ..........................................................................................................8
Care and Cleaning .............................................................................................9
Beater to Bowl Clearance...................................................................................9
Speed Control Guide - 10 Speed Mixers ..........................................................10
Mixing Tips......................................................................................................11
Attachments and Accessories - General Information........................................13
Speed Control Guide - Commercial Mixers.......................................................14
Warranty .........................................................................................................15
How To Arrange For Warranty Service - Canada........................................15
How To Arrange For Out-Of-Warranty Service ...........................................16
Troubleshooting...............................................................................................16
Recipes............................................................................................................17
Appetizers, Entrees, and Vegetables..........................................................17
Cakes and Frostings ..................................................................................25
Cookies, Bars, and Candies........................................................................35
Pies and Desserts ......................................................................................41
Yeast Breads and Quick Breads..................................................................46
General Instructions for Mixing and Kneading Yeast Dough ......................46
Bread Making Tips ....................................................................................47
KitchenAid®Attachments and Accessories .......................................................64
Page 4

2
IMPORTANT SAFEGUARDS
When using electrical appliances, basic safety precautions should always be
followed including the following:
1. Read all instructions.
2. To protect against risk of electrical shock, do not put mixer in water or
other liquid.
3. Close supervision is necessary when this or any appliance is used near children.
4. Unplug mixer from outlet when not in use, before putting on or taking off
parts and before cleaning.
5. Avoid contacting moving parts. Keep hands, hair, clothing, as well as
spatulas and other utensils away from beater during operation to reduce
the risk of injury to persons and/or damage to the mixer.
6. Do not operate mixer unattended or near edge of work surface. When
used for heavy loads or at high speeds, mixer may move on work surface.
7. Do not operate mixer with a damaged cord or plug or after the mixer
malfunctions, or is dropped or damaged in any manner. Call the KitchenAid
Consumer Interaction Centre at 1-800-461-5681 for more information.
8. The use of attachments not recommended or sold by KitchenAid may cause
fire, electrical shock or injury.
9. Do not use the mixer outdoors.
10. Do not let the cord hang over edge of table or counter.
11. Remove flat beater, wire whip or dough hook from mixer before washing.
12. This product is designed for household use only. (Except Model 4KSMC50S
which is designed for commercial use.)
SAVE THESE INSTRUCTIONS
Page 5

3
Your safety and the safety of others are very important.
We have provided many important safety messages in this manual and on your
appliance. Always read and obey all safety messages.
This is the safety alert symbol.
This symbol alerts you to potential hazards that can kill or hurt you
and others.
All safety messages will follow the safety alert symbol and either the
word “DANGER”or “W ARNING.” These words mean:
You can be killed or seriously injured if
you don’t immediatel
y follow
instructions.
You can be killed or seriously injured if
you don’t follow instructions.
All safety messages will tell you what the potential hazard is, tell you how to
reduce the chance of injury, and tell you what can happen if the instructions are
not followed.
!
WARNING
!
DANGER
!
Electrical Requirements
Electrical Shock Hazard
Plug into a grounded 3 prong
outlet.
Do not remove ground prong.
Do not use an adapter.
Do not use an extension cord.
Failure to follow these
instructions can result in death,
fire or electrical shock.
WARNING
!
Volts: 120 A.C. only. Hertz: 60
The wattage rating for your mixer is
printed on the trim band or on the
serial plate.
Model 4KSMC50S Only:
Watts 350
Volts 120
Amps 3.0
Horsepower 2/5
Hertz 60
Page 6
4
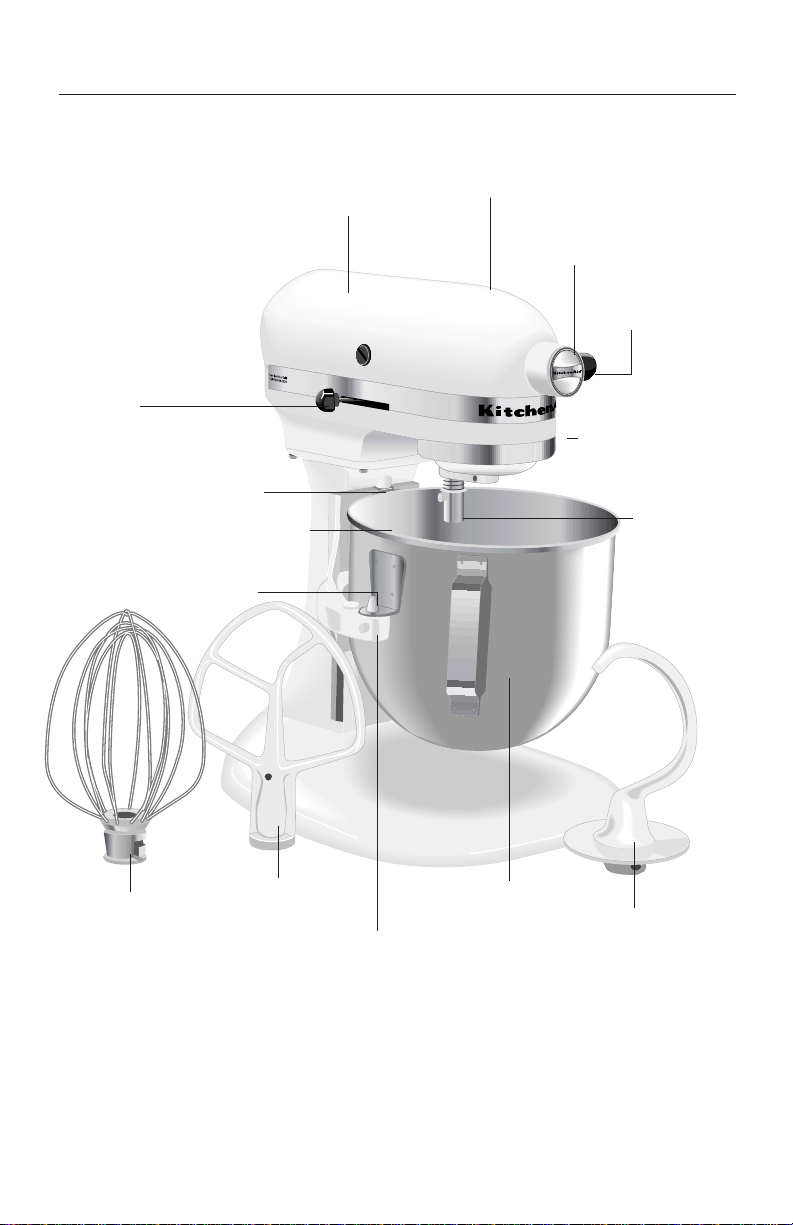
Bowl-Lift Models*Stand Mixer Features
Motor Head
Beater Height
Adjustment Screw
(not shown, see page 9)
Bowl Lift Handle
(not shown)
Spring Latch and Bowl Pin
(not shown)
Attachment
Knob
Attachment Hub
(see page 13)
Locating Pins
Wire Whip
(see page 8)
Flat Beater
(see page 8)
Dough Hook
(see page 8)
Speed Control
Lever
(see page 7)
Bowl Support
Beater
Shaft
5 Quart Stainless
Steel Bowl
*Bowl-Lift models include 4K5SS, 4KSM5, 4KSM50P, 4KSMC50S
Commercial model not shown.
Overload Reset Button
Model 4KSMC50S only
(not shown)
Solid State Speed Control
K
itc
h
e
n
S
A
t. J
id
o
s
e
p
h
, M
ic
h
ig
a
n
U
S
A
O
ff
S
tir 2
4
6
8
1
0
Heavy Duty
C
A
U
T
I
O
N
:
U
n
p
l
u
g
b
e
f
o
r
e
i
n
s
e
r
t
i
n
g
o
f
r
e
m
o
v
i
n
g
p
a
r
t
s
Page 7
5
Assembling Your Bowl-Lift Mixer
** See page 3.
To Attach Bowl
1. Be sure speed control is OFF and
mixer is unplugged.
2. Place bowl lift handle in down
position.
3. Fit bowl supports over locating
pins.
4. Press down on back of bowl until
bowl pin snaps into spring latch.
5. Raise bowl before mixing.
6. Plug mixer in proper electrical
outlet.**
To Remove Bowl
1. Be sure speed control is OFF and
mixer is unplugged.
2. Place bowl lift handle in down
position.
3. Remove flat beater, wire whip, or
dough hook.
4. Grasp bowl handle and lift straight
up and off locating pins.
To Raise Bowl
1. Rotate handle to straight-up
position.
2. Bowl must always be in raised,
locked position when mixing.
To Lower Bowl
1. Rotate handle back and down.
Injury Hazard
Unplug mixer before inserting
or removing beaters.
Unplug mixer before cleaning.
Failure to do so can result in
broken bones or cuts.
WARNING
!
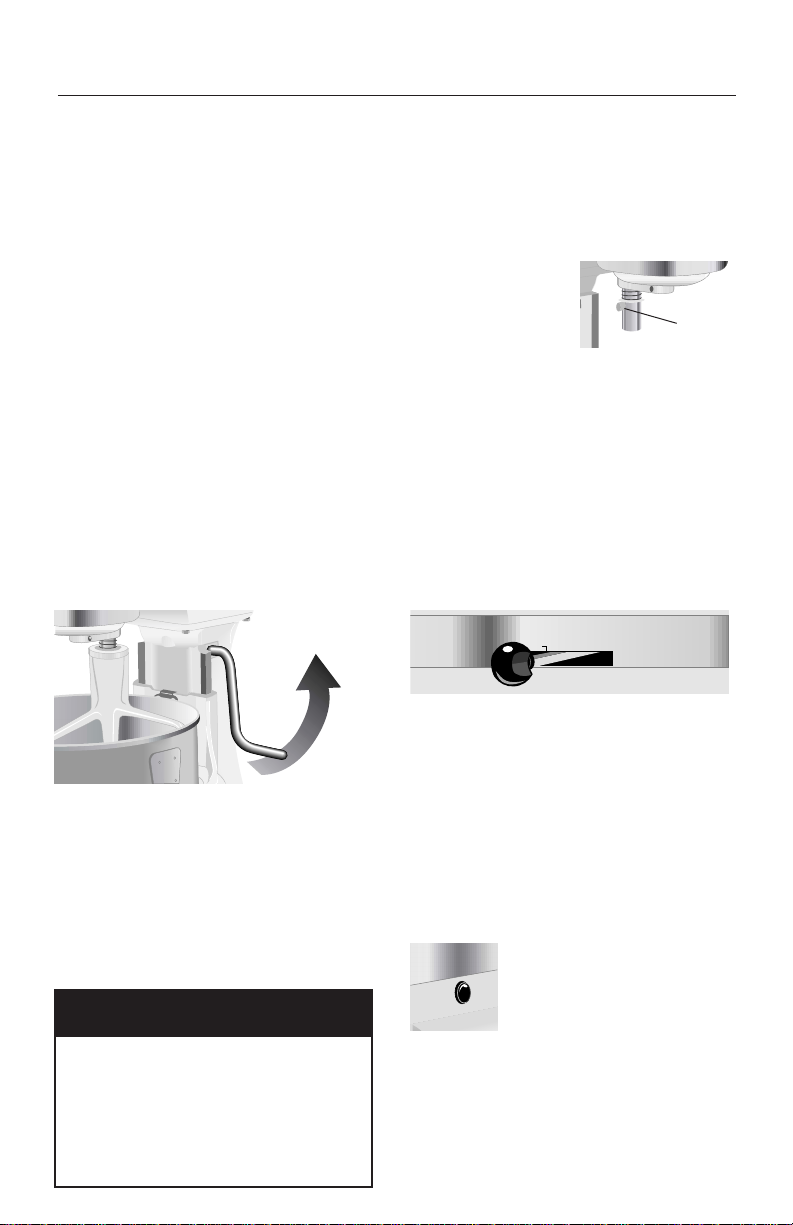
To Attach Flat Beater, Wire Whip,
or Dough Hook
1. Turn speed control to OFF and
unplug.
2. Slip flat beater on beater shaft and
press upward as far as possible.
3. Turn beater to
right, hooking
beater over the
pin on shaft.
4. Plug mixer in
proper electrical outlet.**
To Remove Flat Beater, Wire
Whip, or Dough Hook
1. Turn speed control to OFF and
unplug.
2. Press beater upward as far as
possible and turn left.
3. Pull beater from beater shaft.
4. Plug mixer in proper electrical
outlet.**
Household mixer SPEED Control
Plug mixer in proper electrical
outlet.** Speed control lever should
always to be set on lowest speed for
starting, then gradually moved to
desired higher speed to avoid
splashing ingredients out of bowl.
See pages 10, 14 for Speed Control
Guide.
Overload Reset Button
Model 4KSMC50 only
If the mixer is overloaded,
the Overload Reset Button
will pop out and the mixer
will shut off. Turn the Speed Control
Lever to OFF. Wait a few minutes,
then push in the Reset Button. Turn
the Speed Control Lever to the
desired speed and continue mixing.
RAISE
PIN
C
Solid State Speed Control
Off Stir 2 4 6 8 10
t
se
e
R
d
a
rlo
ve
O
Page 8
6
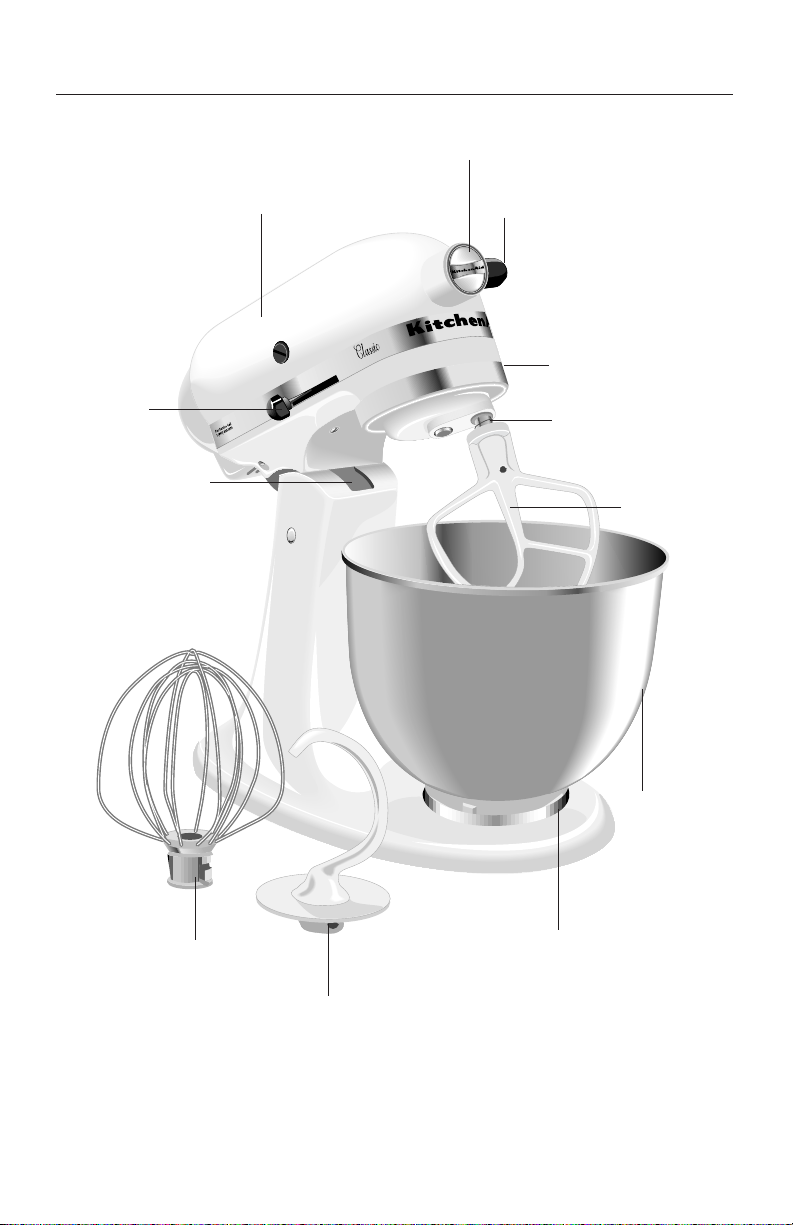
Tilt-Head Models*Stand Mixer Features
Motor Head
Beater Height
Adjustment Screw
(see page 9)
Motor Head
Locking Lever
(not shown)
Attachment Knob
Attachment Hub
(see page 13)
Flat Beater
(see page 8)
Wire Whip
(see page 8)
Dough Hook
(see page 8)
Speed
Control
Lever (see
page 7)
Bowl Clamping Plate
Beater Shaft
4
1
⁄2 or 5
Quart
Stainless
Steel Bowl
*41⁄2 Quart models include 4K45, 4KSM90, 4KSM110PS
*5 Quart model 4KSM150
Solid State Speed Control
id
A
n
e
h
itc
K
St. Joseph, Michigan USA
s
t
r
a
p
g
n
i
v
o
m
e
r
f
o
g
n
i
t
r
e
s
n
i
e
r
o
f
e
b
g
u
l
p
n
U
:
N
O
0
I
T
U
A
C
1
8
6
4
tir 2
S
ff
O
Page 9
7
To Remove Flat Beater, Wire Whip
or Dough Hook
1. Turn speed control to OFF and
unplug.
2. Press beater
upward as far
as possible
and turn left.
3. Pull beater
from beater shaft.
4. Plug mixer in proper electrical
outlet.**
To Lock Motor Head
1. Make sure motor head is
completely down.
2. Place locking lever in LOCK
position.
3. Before mixing, test lock by
attempting to raise head.
To Unlock Motor Head
1. Place lever in UNLOCK position.
NOTE: Motor head should always be
kept in LOCK position when using
mixer.
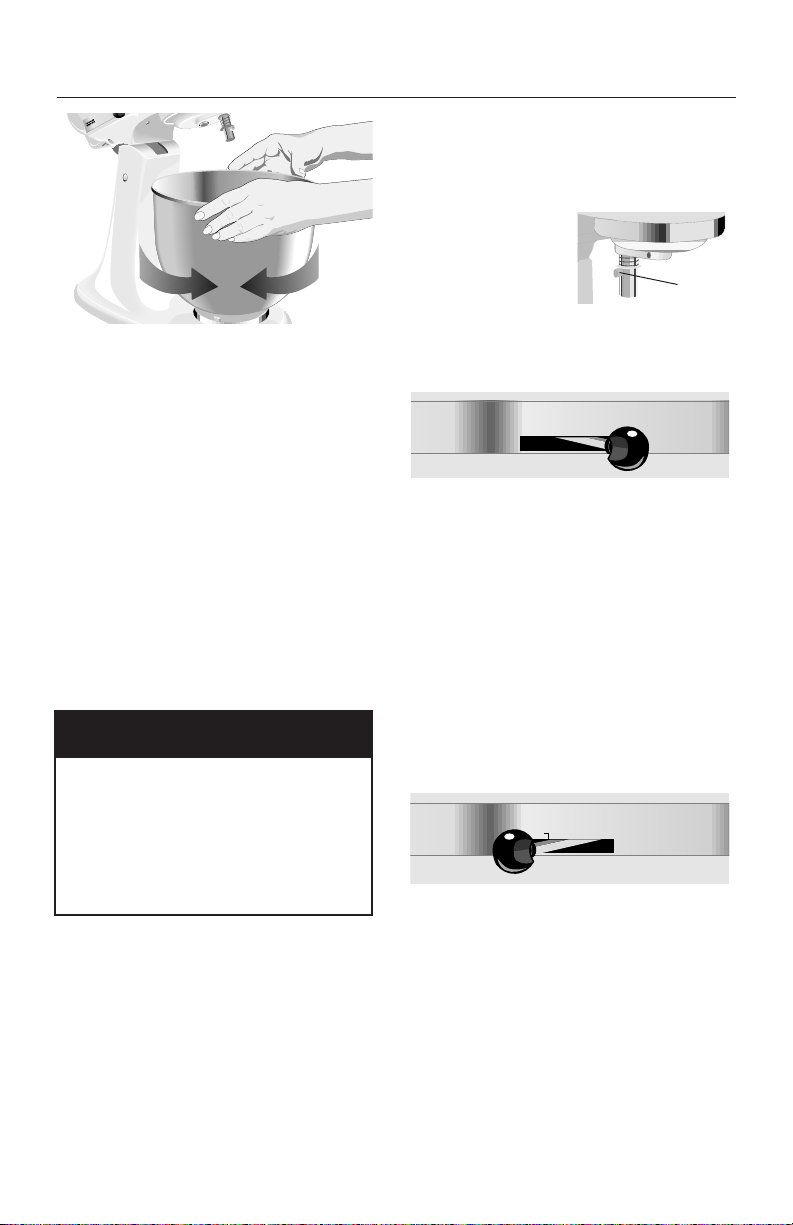
To Operate Speed Control
Plug mixer in proper electrical
outlet.** Speed control lever should
always be set on lowest speed for
starting, then gradually moved to
desired higher speed to avoid
splashing ingredients out of bowl.
See page 10 for Speed Control Guide.
To Attach Bowl
1. Be sure speed control is OFF and
mixer is unplugged.
2. Tilt motor head back.
3. Place bowl on bowl clamping plate.
4. Turn bowl gently in clockwise
direction.
5. Plug mixer in proper electrical
outlet.**
To Remove Bowl
1. Be sure speed control is OFF and
mixer is unplugged.
2. Tilt motor head back.
3. Turn bowl in counterclockwise
direction.
To Attach Flat Beater, Wire Whip,
Or Dough Hook
1. Turn speed control to OFF and
unplug.
2. Raise motor head.
3. Slip beater onto beater shaft and
press upward as far as possible.
4. Turn beater to right, hooking
beater over pin on shaft.
5. Plug mixer in proper electrical
outlet.**
Assembling Your Tilt-Head Mixer
** See page 3.
n
A
id
USA
ON
OFF
Injury Hazard
Unplug mixer before inserting
or removing beaters.
Unplug mixer before cleaning.
Failure to do so can result in
broken bones or cuts.
WARNING
!
PIN
e
h
c
it
K
Joseph, Michigan
St.
Lock Unlock
Solid State Speed Control
Off Stir 2 4 6 8 10
Page 10

8
Using Your KitchenAid®Attachments
Flat Beater for normal to heavy mixtures:
cakes biscuits
creamed frostings quick breads
candies meat loaf
cookies mashed potatoes
pie pastry
Wire Whip for mixtures that need air incorporated:
eggs sponge cakes
egg whites angel food cakes
heavy cream mayonnaise
boiled frostings some candies
Dough Hook for mixing and kneading yeast doughs:
breads coffee cakes
rolls buns
Mixing Time
Your KitchenAid®Mixer will mix faster
and more thoroughly than most
other electric mixers. Therefore, the
mixing time in most recipes must be
adjusted to avoid overbeating. With
cakes, for example, beating time may
be half as long as with other mixers.
Mixer Use
NOTE: Do not scrape bowl while
mixer is operating.
The bowl and beater are designed to
provide thorough mixing without
frequent scraping. Scraping the bowl
once or twice during mixing is usually
sufficient. Turn unit off before
scraping.
The mixer may warm up during use.
Under heavy loads with extended
mixing time, you may not be able to
comfortably touch the top of the
unit. This is normal.
Page 11
9
Bowl, white flat beater and white
dough hook may be washed in an
automatic dishwasher. Or, clean them
thoroughly in hot sudsy water and
rinse completely before drying.
Care and Cleaning
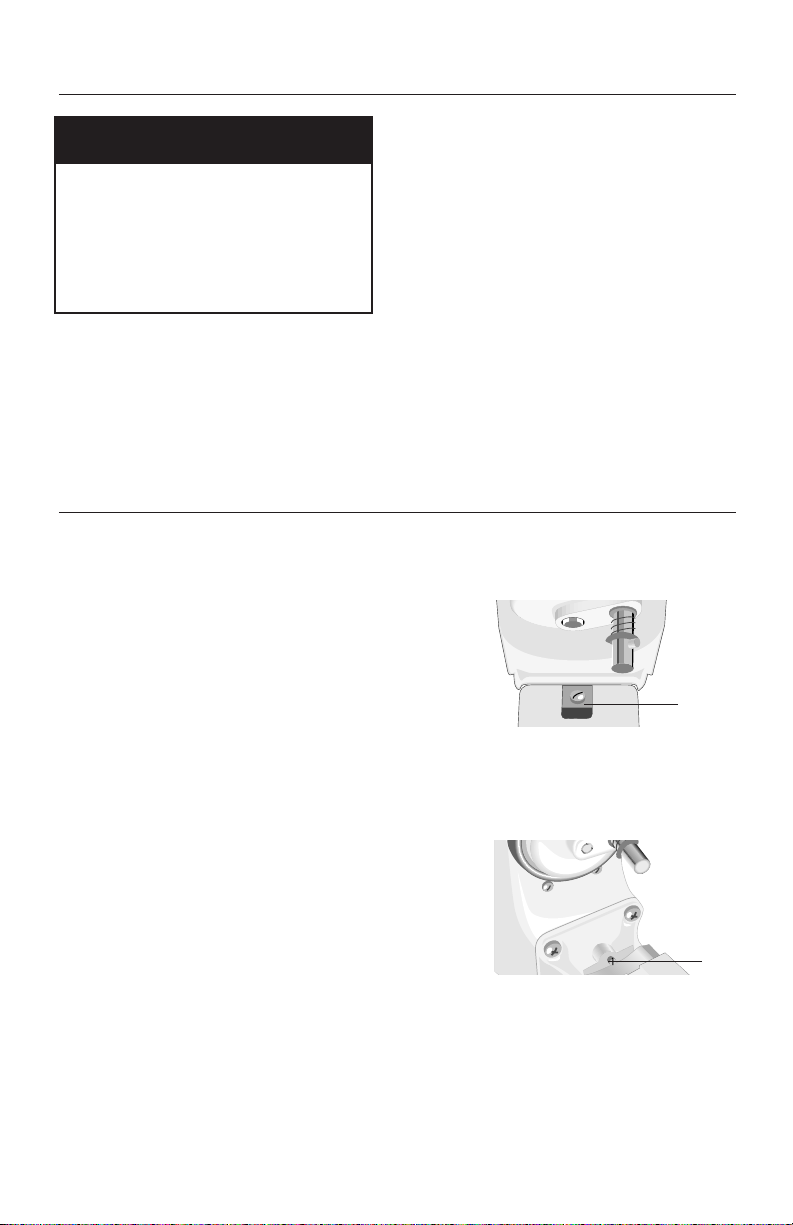
Beater To Bowl Clearance
Your mixer is adjusted at the factory so that the flat beater just clears the
bottom of the bowl. If for any reason, the flat beater hits the bottom of the
bowl or is too far away from the bowl, clearance can be corrected as follows:
Wire whip, burnished dough hook
and burnished flat beater should be
hand washed and dried immediately.
Do not wash wire whip, burnished
dough hook and burnished flat
beater in a dishwasher. Do not store
beaters on shaft.
NOTE: Always be sure to unplug
mixer before cleaning. Wipe mixer
with a soft, damp cloth. Do not use
household/commercial cleaners. Do
not immerse in water. Wipe off
beater shaft frequently, removing any
residue that may accumulate.
Injury Hazard
Unplug mixer before inserting
or removing beaters.
Unplug mixer before cleaning.
Failure to do so can result in
broken bones or cuts.
WARNING
!
Tilt-Head models
• Unplug mixer.
• Lift motor head.
•Turn screw (A) SLIGHTLY counter clockwise
(left) to raise flat beater or clockwise (right) to
lower flat beater.
• Make adjustment with flat beater, so it just
clears surface of bowl.
If you over adjust the screw, the bowl lock lever
may not lock into place.
Bowl-Lift models
• Unplug mixer.
• Place bowl lift handle in down position.
•Turn screw (B) SLIGHTLY counter clockwise
(left) to raise flat beater and clockwise (right)
to lower flat beater.
• Make adjustments with flat beater, so it just
clears surface of bowl.
NOTE: When properly adjusted, the flat beater will not strike on bottom or side
of bowl. If beater or wire whip is adjusted too close so that it strikes bottom of
bowl, coating may wear off beater or wires may wear through on wire whip.
A
B
Page 12

10
Speed Control Guide – 10 Speed Mixers
Number of Speed
Stir
Speed STIR For slow stirring, combining, mashing,
starting all mixing procedures. Use to
add flour and dry ingredients to batter,
add liquids to dry ingredients, and
combine heavy mixtures.
2SLOW MIXING For slow mixing, mashing, faster
stirring. Use to mix heavy batters and
candies, start mashing potatoes or other
vegetables, cut shortening into flour,
mix thin or splashy batters, and mix
and knead yeast dough. Use with Can
Opener attachment.
4 MIXING, For mixing semi-heavy batters, such as
BEATING cookies. Use to combine sugar and
shortening and to add sugar to egg
whites for meringues. Medium speed for
cake mixes. Use with: Food Grinder,
Rotor Slicer/Shredder, and
Fruit/Vegetable Strainer.
6 BEATING, For medium fast beating (creaming) or
CREAMING whipping. Use to finish mixing cake,
doughnut, and other batters. High speed
for cake mixes. Use with Citrus Juicer
attachment.
8FAST BEATING, For whipping cream, egg whites, and
WHIPPING boiled frostings.
10 FAST WHIPPING For whipping small amounts of cream
or egg whites. Use with Pasta Maker
and Grain Mill attachments.
NOTE: Will not maintain fast speeds
under heavy loads, such as when using
Pasta Maker or Grain Mill attachments.
NOTE: The Speed Control Lever can be set between the speeds listed in the
above chart to obtain speeds 3, 5, 7 and 9 if a finer adjustment is required.
Do not exceed Speed 2 when preparing yeast doughs as this may cause damage to the mixer.
Page 13

11
Mixing Tips
Converting Your Recipe
for the Mixer
The mixing instructions for recipes in
this book can guide you in converting
your own favourite recipes for
preparation with your KitchenAid
®
mixer. Look for recipes similar to
yours and then adapt your recipes to
use the procedures in the similar
KitchenAid recipes.
For example, the "quick mix"
method (sometimes referred to as the
"dump" method) is ideal for simple
cakes, such as the Quick Yellow Cake
and Easy White Cake included in this
book. This method calls for
combining dry ingredients with most
or all liquid ingredients in one step.
More elaborate cakes, such as
Caramel Walnut Banana Torte, should
be prepared using the traditional cake
mixing method. With this method,
sugar and the shortening, butter or
margarine are thoroughly mixed
(creamed) before other ingredients
are added.
For all cakes, mixing times may
change because your KitchenAid
®
mixer works more quickly than other
mixers. In general, mixing a cake with
the KitchenAid®mixer will take about
half the time called for in most cake
recipes.
To help determine the ideal mixing
time, observe the batter or dough
and mix only until it has the desired
appearance described in your recipe,
such as "smooth and creamy."
To select the best mixing speeds,
use the Speed Control Guide on
pages 10 and 14.
Adding Ingredients
Always add ingredients as close to
side of bowl as possible, not directly
into moving beater. The Pouring
Shield can be used to simplify adding
ingredients.
NOTE: If ingredients in very bottom of
bowl are not thoroughly mixed, then
the beater is not far enough into the
bowl. See "Beater to Bowl Clearance,"
page 9.
Cake Mixes
When preparing packaged cake
mixes, use Speed 2 for low speed,
Speed 4 for medium speed, and
Speed 6 for high speed. For best
results, mix for the time stated on the
package directions.
Adding Nuts, Raisins or
Candied Fruits
Follow individual recipes for
guidelines on including these
ingredients. In general, solid materials
should be folded in the last few
seconds of mixing on Stir Speed. The
batter should be thick enough to
prevent the fruit or nuts from sinking
to the bottom of the pan during
baking. Sticky fruits should be dusted
with flour for better distribution in
the batter.
Liquid Mixtures
Mixtures containing large amounts of
liquid ingredients should be mixed at
lower speeds to avoid splashing.
Increase speed only after mixture has
thickened.
Page 14

12
Egg Whites
Place room temperature egg whites in
clean, dry bowl. Attach bowl and wire
whip. To avoid splashing, gradually
turn to designated speed and whip to
desired stage. See chart below.
AMOUNT SPEED
1 egg white........GRADUALLY to 10
2-4 egg whites ........GRADUALLY to 8
6 or more
egg whites ........GRADUALLY to 8
Whipping Stages
With your KitchenAid®mixer, egg
whites whip quickly. So, watch
carefully to avoid overwhipping. This
list tells you what to expect.
Frothy
Large, uneven air bubbles.
Begins to Hold Shape
Air bubbles are fine and compact;
product is white.
Soft Peak
Tips of peaks fall over when wire
whip is removed.
Almost Stiff
Sharp peaks form when wire whip is
removed, but whites are actually soft.
Stiff but not Dry
Sharp, stiff peaks form when wire
whip is removed. Whites are uniform
in colour and glisten.
Stiff and Dry
Sharp, stiff peaks form when wire
whip is removed. Whites are speckled
and dull in appearance.
Whipped Cream
Pour cold whipping cream into chilled
bowl. Attach bowl and wire whip. To
avoid splashing, gradually turn to
designated speed and whip to desired
stage. See chart below.
AMOUNT SPEED
1
⁄4 cup (50 mL)........GRADUALLY to 10
1
⁄2 cup (125 mL)......GRADUALLY to 10
1 cup (250 mL) ........GRADUALLY to 8
1 pint (500 mL)........GRADUALLY to 8
Whipping Stages
Watch cream closely during
whipping. Because your KitchenAid
®
mixer whips so quickly, there are just
a few seconds between whipping
stages. Look for these characteristics:
Begins to Thicken
Cream is thick and custard-like.
Holds Its Shape
Cream forms soft peaks when wire
whip is removed. Can be folded into
other ingredients when making
desserts and sauces.
Stiff
Cream stands in stiff, sharp peaks
when wire whip is removed. Use for
topping on cakes or desserts, or filling
for cream puffs.
Page 15
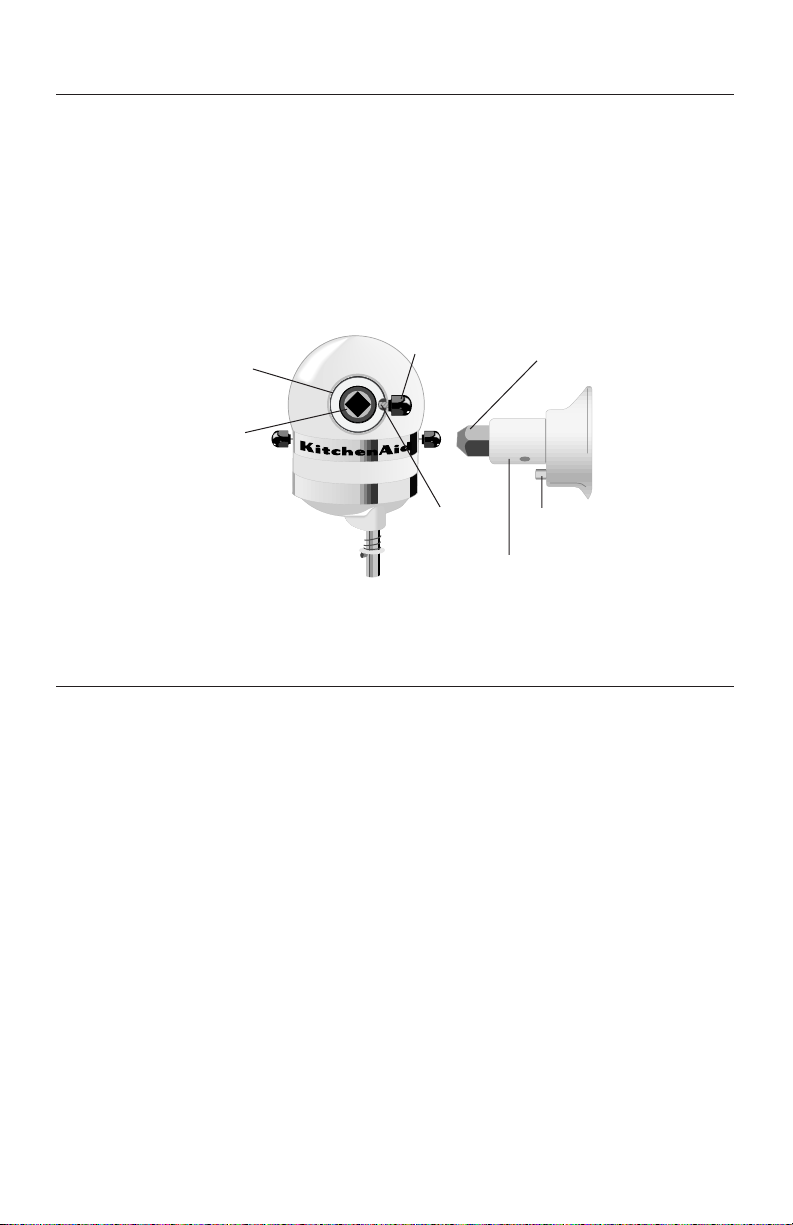
13
Attachments and Accessories
To Attach
1. Turn mixer off and unplug.
2. Loosen attachment knob by
turning it counterclockwise.
3. Remove attachment hub cover.
4. Insert attachment shaft housing
into attachment hub, making
certain that attachment power
shaft fits into square attachment
hub socket. It may be necessary to
rotate attachment back and forth.
When attachment is in proper
position, the pin on the
attachment will fit into the notch
on the hub rim.
5. Tighten attachment knob by
turning clockwise until attachment
is completely secured to mixer.
6. Plug mixer in proper electrical
outlet.**
To Remove
1. Turn mixer off and unplug.
2. Loosen attachment knob by
turning it counterclockwise. Rotate
attachment slightly back and forth
while pulling out.
3. Replace attachment hub cover.
Tighten attachment knob by
turning it clockwise.
General Information
KitchenAid
®
attachments are designed to assure long life. The attachment
power shaft and hub socket are of a square design, to eliminate any possibility
of slipping during the transmission of power to the attachment. The hub and
shaft housing are tapered to assure a snug fit, even after prolonged use and
wear. KitchenAid®attachments require no extra power unit to operate them;
the power unit is built in.
General Instructions
** See page 3.
Hub
Attachment
Hub Socket
Attachment
Knob
Notch
Pin
Attachment Shaft
Housing
‡
Attachment
Power Shaft
‡
‡
Not part of mixer.
(Attachments not NSF Approved for 4KSMC50S)
®
Page 16

14
Number of Speed
Stir
Speed STIR For slow stirring, combining, mashing,
starting all mixing procedures.
1SLOW MIXING For slow beating, mashing and kneading
yeast doughs.
2MIXING, For mixing cookie and cake batters.
BEATING
3 BEATING, For beating, creaming and medium fast
CREAMING whipping.
4FAST BEATING, For whipping heavy cream, egg whites,
WHIPPING and boiled frostings.
5FAST WHIPPING For whipping small amounts of heavy
cream or egg whites.
Do not exceed Speed 1 when preparing yeast doughs as this may
cause damage to the mixer.
Speed Control Guide – Commercial Mixers
*
Solid State Speed Control
Off Stir 1 2 3 4 5
*Commercial model 4KSMC50S
Page 17

15
KitchenAid®Mixer Warranty
Length of
Warranty:
One Year Full Warranty
from date of purchase.
KitchenAid Canada
Will Pay For:
Replacement parts and
repair labour costs to
correct defects in
materials and
workmanship. Service
must be provided by a
designated KitchenAid
Service Centre.
KitchenAid Canada
Will Not Pay For:
A. Repairs when mixer is
used in other than
normal single-family
household use.
B. Damage resulting
from accident,
alteration, misuse or
abuse, fire, floods,
acts of God, or use of
products not
approved by
KitchenAid Canada.
C. Any incidental
shipping or handling
costs to deliver your
mixer to a designated
KitchenAid Service
Centre.
D. Replacement parts or
repair labour costs for
mixer operated
outside Canada.
KITCHENAID CANADA DOES NOT ASSUME ANY RESPONSIBILITY FOR
INCIDENTAL OR CONSEQUENTIAL DAMAGES. Some provinces do not allow
the exclusion or limitation of incidental or consequential damages, so this
exclusion may not apply to you. This warranty gives you specific legal rights and
you may also have other rights which vary from province to province.
How To Arrange For Warranty Service – Canada
First review the Troubleshooting
section, to possibly avoid the need for
service.
One Year Full warranty from date of
purchase KitchenAid Canada will pay
for replacement parts and repair
labour costs to correct defects in
materials and workmanship. Service
must be provided by a designated
KitchenAid Service Centre.
Take the mixer or ship prepaid and
insured to a designated KitchenAid
Service Centre. Your repaired mixer
will be returned prepaid and insured.
If you are unable to obtain satisfactory
service in this manner, contact
KitchenAid Canada, 1901 Minnesota
Court, Mississauga, Ontario L5N 3A7.
Telephone 1-800-807-6777.
Page 18
16
How To Arrange For Out-Of-Warranty Service
Troubleshooting
• First review the Troubleshooting
section below.
• Then, consult your telephone
directory for a designated
KitchenAid Service Centre near you.
If one is not listed contact
KitchenAid Service from anywhere in
Canada at 1-800-807-6777.
•Take the mixer or ship prepaid and
insured to a designated KitchenAid
Service Centre. Your repaired mixer
will be returned prepaid and
insured.
•All out-of-warranty service should be
handled by a designated KitchenAid
Service Centre.
First try the solutions suggested here
and possibly avoid the cost of service.
If your mixer should malfunction
or fail to operate, check the
following:
- Is the mixer plugged in?
- Is the fuse in the circuit to the mixer
in working order? If you have a
circuit breaker box, be sure the
circuit is closed.
- Try unplugging and waiting 15-20
minutes before re-plugging the
mixer.
- If the problem is not due to one of
the above items, see "How to
Arrange For Service" sections.
- DO NOT return the mixer to the
retailer as they do not provide
service.
-For assistance throughout Canada
call KitchenAid Consumer
Interaction Centre toll-free 8:30 a.m.
- 5:30 p.m. (EST): 1-800-461-5681.
or write to:
Consumer Relations Centre
KitchenAid Canada
1901 Minnesota Court
Mississauga, ON L5N 3A7
Electrical Shock Hazard
Unplug before servicing.
Failure to do so can
result in death or
electrical shock.
WARNING
!
Page 19

17
Crabmeat Dip
1 package (8 oz. [250
g]) light cream
cheese
1 cup (250 mL)
reduced-fat cottage
cheese
1
⁄4 cup (50 mL) reduced-
calorie mayonnaise
1 can (6
1
⁄2 oz. [195 g])
crabmeat, flaked
1 tablespoon (15 mL)
lemon juice
3 tablespoons (45 mL)
chopped green
onions
1
⁄2
teaspoon (2 mL)
garlic salt
3 drops hot pepper
sauce
Place cream cheese, cottage cheese, and
mayonnaise in mixer bowl. Attach bowl and flat
beater to mixer. Turn to Speed 6 and beat about
1 minute, or until well blended. Stop and scrape
bowl. Add all remaining ingredients. Turn to Speed
6 and beat about 1 minute, or until all ingredients
are combined.
Refrigerate until well chilled. Serve with assorted
crackers or raw vegetables.
Yield: 24 servings (2 tablespoons [30 mL] per
serving).
Per serving: About 42 cal, 4 g pro, 1 g carb, 3 g fat,
12 mg chol, 180 mg sod.
Creamy Pineapple Fruit Dip
4 ounces (120 g) light
cream cheese
1
⁄
2 cup (125 mL)
marshmallow cream
1 can (8 oz. [250 g])
crushed pineapple,
well drained
2 teaspoons (10 mL)
grated orange peel
Place cream cheese in mixer bowl. Attach bowl and
flat beater to mixer. Turn to Speed 2 and mix about
30 seconds. Stop and scrape bowl. Add marshmallow
cream, pineapple, and orange peel. Turn to Speed 4
and beat about 30 seconds. Stop and scrape bowl.
Turn to Speed 4 and beat about 30 seconds.
Refrigerate at least 2 hours. Serve with sliced fresh
fruit, if desired.
Yield: 12 servings (2 tablespoons [30 mL] per
serving).
Per serving: About 61 cal, 1 g pro, 11 g carb,
2 g fat, 3 mg chol, 58 mg sod.
APPETIZERS, ENTREES, AND VEGETABLES
Page 20

18
Layered Mexican Dip
1 package (8 oz. [250
g]) light cream
cheese
1
⁄2 cup (125 mL)
shredded hot pepper
Monterey Jack
cheese
1
⁄4 cup (50 mL) bean or
black bean dip
1
⁄2 cup (125 mL) thick
and chunky salsa
1
⁄2
cup (125 mL)
chopped green
onions
1
⁄4 cup (50 mL) sliced
pitted ripe olives
Place cream cheese in mixer bowl. Attach bowl and
flat beater to mixer. Turn to Speed 2 and mix about
30 seconds. Stop and scrape bowl. Add Monterey
Jack cheese. Turn to Speed 2 and mix about 30
seconds.
Spread cheese mixture on 10-inch (25-cm) serving
plate to within 1 or 2 inches (2.5 or 5 cm) of edge.
Spread bean dip over cheese. Spread salsa over
bean dip. Top with onions and olives. Refrigerate
until ready to serve. Serve with tortilla chips, if
desired.
Yield: 12 servings (1⁄4 cup [50 mL] per serving).
Per serving: About 70 cal, 4 g pro, 3 g carb, 5 g fat,
12 mg chol, 265 mg sod.
Nutty Cheese Ball
1 cup (250 mL)
shredded sharp
Cheddar cheese
1 cup (250 mL)
shredded Swiss
cheese
1 package (8 oz.
[250 g]) light cream
cheese
2 tablespoons (30 mL)
chopped fresh chives
2 teaspoons (10 mL)
Worcestershire sauce
1
⁄4 teaspoon (1 mL)
paprika
1
⁄2 teaspoon (2 mL)
garlic powder
1
⁄4 cup (50 mL) finely
chopped pecans
Place all ingredients, except pecans, in mixer bowl.
Attach bowl and flat beater to mixer. Turn to Speed
4 and beat about 1 minute, or until well blended.
On waxed paper, shape mixture into a ball. Roll ball
in chopped pecans. Wrap in waxed paper.
Refrigerate until serving time. Serve with assorted
crackers or raw vegetables.
Yield: 24 servings (2 tablespoons [30 mL] per serving).
Per serving: About 65 cal, 4 g pro, 1 g carb, 5 g fat,
13 mg chol, 109 mg sod.
Page 21

19
Spinach and Cheese Crostini
1 baguette loaf,
cut into
1
⁄2-inch (1.25-
cm) slices
2 teaspoons (10 mL)
butter or margarine
1
⁄2 cup (125 mL) finely
chopped onion
1 clove garlic, minced
1 package (9 oz.
[270 g]) frozen
chopped spinach,
thawed and
squeezed dry
1 package (8 oz.
[250 g]) light cream
cheese
1
⁄4 cup (50 mL) roasted
red peppers
1
⁄2 cup (125 mL)
shredded Cheddar
cheese
Place baguette slices on baking sheet. Bake at 375°F
(190°C) for 4 to 6 minutes, or until toasted. Set
aside.
Melt butter in 10-inch (25-cm) skillet over medium
heat. Add onion and garlic. Cook and stir 2 to 3
minutes, or until softened. Add spinach. Cook and
stir 30 to 60 seconds, or until warm. Cool slightly.
Place cream cheese in mixer bowl. Attach bowl and
flat beater to mixer. Turn to Speed 2, mix about 30
seconds. Add spinach mixture. Continuing on Speed
2, mix about 30 seconds. Add red peppers.
Continuing on Speed 2, mix about 30 seconds.
Spread spinach mixture on toasted baguette slices.
Top each slice with about 1 teaspoon (5 mL)
Cheddar cheese. Bake at 375°F (190°C) for 5 to 8
minutes, or until thoroughly heated and cheese is
melted. Serve warm.
Yield: 12 servings (2 crostini per serving).
Per serving: About 141 cal, 6 g pro, 16 g carb,
6 g fat, 12 mg chol, 324 mg sod.
Meatballs with Salsa
1
⁄
4 cup (50 mL) fat-free
egg substitute or 1
egg
1
⁄3 cup (75 mL) fresh
bread crumbs
1
⁄2 teaspoon (2 mL)
chili powder
1
⁄
4 teaspoon (1 mL)
garlic powder
1
⁄
8 teaspoon (.5 mL)
cayenne pepper
1 pound (500 g)
ground turkey
1
⁄2 cup (125 mL) thick
and chunky salsa
1
⁄2 cup (125 mL)
chili sauce
1
⁄2 cup (125 mL) water
Place egg substitute, bread crumbs, chili powder,
garlic powder, pepper, and ground turkey in mixer
bowl. Attach bowl and flat beater to mixer. Turn to
Stir Speed and mix about 30 seconds.
Form turkey mixture into 1-inch (2.5-cm) balls.
Spray 12-inch (30-cm) skillet with no-stick cooking
spray. Cook meatballs over medium–high heat until
well browned; drain.
Mix salsa, chili sauce, and water in small bowl. Add
to meatballs and stir. Reduce heat to low. Cook,
covered, about 10 minutes, or until meatballs are
thoroughly cooked, stirring frequently. Serve warm.
Yield: 12 servings (3 meatballs per serving).
Per serving: About 84 cal, 8 g pro, 5 g carb, 3 g fat,
30 mg chol, 280 mg sod.
Page 22

20
Mushroom-Onion Tartlets
Pastry Crusts
4 oz. (120 g) light
cream cheese
3 tablespoons (45 mL)
butter or margarine,
divided
3
⁄4 cup plus 1 teaspoon
(180 mL) all-purpose
flour
8 oz. (250 mL) fresh
mushrooms, coarsely
chopped
1
⁄2 cup (125 mL)
chopped green
onions
Filling
1 egg
1
⁄4 teaspoon (1 mL)
dried thyme leaves
1
⁄2 cup (125 mL)
shredded Swiss
cheese
To make Pastry Crusts, place cream cheese and 2
tablespoons (30 mL) butter in mixer bowl. Attach
bowl and flat beater to mixer. Turn to Speed 4 and
beat about 1 minute. Stop and scrape bowl. Add
3
⁄4 cup (175 mL) flour. Turn to Speed 2 and mix
about 1 minute, or until well blended. Form mixture
into a ball. Wrap in waxed paper and chill 1 hour.
Clean mixer bowl and beater.
To make Filling, melt remaining 1 tablespoon
(15 mL) butter in 10-inch (25-cm) skillet over medium
heat. Add mushrooms and onions. Cook and stir
until tender. Remove from heat. Cool slightly.
Divide chilled dough into 24 pieces. Press each piece
into miniature muffin cup (greased, if desired).
For Filling, place egg, remaining 1 teaspoon (5 mL)
flour, and thyme in mixer bowl. Attach bowl and
flat beater to mixer. Turn to Speed 6 and beat about
30 seconds. Stir in cheese and cooled mushroom
mixture. Spoon into pastry-lined muffin cups. Bake
at 375°F (190°C) for 15 to 20 minutes, or until egg
mixture is puffed and golden brown. Serve warm.
Yield: 12 servings (2 tartlets per serving).
Per serving: About 98 cal, 4 g pro, 8 g carb, 6 g fat,
33 mg chol, 83 mg sod.
Page 23

21
Stuffed New Potatoes
8 small new red
potatoes, boiled in
skins
1
⁄4 cup (50 mL) reduced-
fat sour cream
1 tablespoon (15 mL)
margarine or butter,
melted
1
⁄4
teaspoon (1 mL)
garlic salt
1
⁄4 teaspoon (1 mL)
dried thyme leaves
1
⁄4 cup (50 mL) finely
chopped green
onions
1
⁄4
cup (50 mL)
finely shredded
Cheddar cheese
Paprika, if desired
Cut potatoes in half. Scoop out insides of potatoes,
leaving 1⁄8-inch (3-mm) shells. Place insides of
potatoes in mixer bowl. Attach bowl and flat beater
to mixer. Turn to Speed 2 and mix about 1 minute.
Add sour cream, margarine, garlic salt, and thyme.
Turn to Speed 2 and mix about 30 seconds. Stop
and scrape bowl. Turn to Speed 2 and mix about 30
seconds. Turn to Stir Speed and add onions, mixing
just until blended.
Spoon or pipe potato mixture into potato shells.
Place filled shells in shallow baking dish. Bake at
375°F (190°C) for 20 to 25 minutes, or until
thoroughly heated. Sprinkle with cheese and
paprika, if desired. Bake 5 minutes longer, or until
cheese is melted. Serve warm.
Yield: 8 servings (2 potato halves per serving).
Per serving: About 58 cal, 2 g pro, 6 g carb, 3 g fat,
5 mg chol, 108 mg sod.
Sweet Potato Puff
2 medium sweet
potatoes, cooked
and peeled
1
⁄2 cup (125 mL) low-fat
milk
1
⁄3 cup (75 mL) sugar
2 eggs
2 tablespoons (30 mL)
butter or margarine
1
⁄2 teaspoon (2 mL)
nutmeg
1
⁄2 teaspoon (2 mL)
cinnamon
Crunchy Praline Topping
2 tablespoons (30 mL)
butter or margarine,
melted
3
⁄4 cup (175 mL) corn
flakes
1
⁄4 cup (50 mL) chopped
walnuts or pecans
1
⁄4 cup (50 mL) firmly
packed brown sugar
Place potatoes in mixer bowl. Attach bowl and flat
beater to mixer. Turn to Speed 2 and mix about 30
seconds. Add milk, sugar, eggs, 2 tablespoons (30
mL) butter, nutmeg, and cinnamon. Turn to Speed 4
and beat about 1 minute. Spread mixture in greased
9-inch (23-cm) pie plate. Bake at 400°F (200°C) for
20 minutes, or until set. Clean bowl and beater.
Place all Topping ingredients in mixer bowl. Attach
bowl and flat beater to mixer. Turn to Stir Speed
and mix about 15 seconds. Spread on hot puff.
Bake 10 minutes longer.
Yield: 6 servings (1⁄2 cup [125 mL] per serving).
Per serving: About 268 cal, 6 g pro, 35 g carb,
12 g fat, 2 mg chol, 176 mg sod.
Page 24

22
Mashed Potatoes
5 large potatoes (about
2
1
⁄2
lbs. [1250 g]),
peeled, quartered,
and boiled
1
⁄2
cup (125 mL) low-fat
milk, heated
2 tablespoons (30 mL)
butter or margarine
1 teaspoon (5 mL) salt
1
⁄8 teaspoon (.5 mL)
black pepper
Warm mixer bowl and flat beater with hot water;
dry. Place hot potatoes in bowl. Attach bowl and
flat beater to mixer. Gradually turn to Speed 2 and
mix about 1 minute, or until smooth.
Add all remaining ingredients. Turn to Speed 4 and
beat about 30 seconds, or until milk is absorbed.
Gradually turn to Speed 6 and beat about 1 minute,
or until fluffy. Stop and scrape bowl. Exchange flat
beater for wire whip. Turn to Speed 10 and whip 2
to 3 minutes.
Yield: 9 servings (3⁄4 cup [175 mL] per serving).
Per serving: About 111 cal, 2 g pro, 19 g carb, 3 g
fat, 8 mg chol, 296 mg sod.
VARIATIONS
Garlic Mashed Potatoes
Substitute 1 teaspoon (5 mL) garlic salt for salt.
Per serving: About 111 cal, 2 g pro, 19 g carb, 3 g
fat, 8 mg chol, 239 mg sod.
Parmesan Mashed Potatoes
Increase milk to 3⁄4 cup (175 ml). Add 1⁄3 cup (75 mL)
grated Parmesan cheese with milk.
Per serving: About 205 cal, 6 g pro, 32 g carb,
6 g fat, 7 mg chol, 524 mg sod.
Sour Cream-Chive Mashed Potatoes
Substitute 1⁄
4 cup (50 mL) reduced-fat sour cream for
1
⁄4 cup (50 mL) milk. Add 2 tablespoons (30 mL)
chopped fresh chives.
Per serving: About 178 cal, 4 g pro, 32 g carb,
4 g fat, 2 mg chol, 417 mg sod.
Page 25

23
Herbed Whipped Squash
1 large butternut
squash, baked
(about 3 cups
[750 mL] cooked)
1
⁄4
cup (50 mL) butter
or margarine, melted
1
⁄2 teaspoon (2 mL)
dried tarragon leaves
1
⁄8 teaspoon (.5 mL) salt
1
⁄8 teaspoon (.5 mL)
black pepper
Scoop cooked squash out of shell and place in
mixer bowl. Attach bowl and wire whip to mixer.
Turn to Speed 4 and beat about 30 seconds. Add all
remaining ingredients. Turn to Speed 2 and mix
about 30 seconds. Turn to Speed 4 and beat about
2 minutes.
Yield: 6 servings (1⁄2 cup [125 mL] per serving).
Per serving: About 107 cal, 1 g pro, 11 g carb,
7 g fat, 0 mg chol, 137 mg sod.
Black Bean Frittata
2 cups (500 mL) fat-
free egg substitute
or 8 eggs
1
⁄4 cup (50 mL) low-fat
milk
1 tablespoon (15 mL)
oil
1
⁄2 medium red bell
pepper, chopped
4 green onions, sliced
1 can (16 oz.) (500 g)
black beans, rinsed
and drained
1 cup (250 mL)
shredded Monterey
Jack cheese
Place egg substitute and milk in mixer bowl. Attach
bowl and wire whip to mixer. Turn to Speed 2 and
mix about 30 seconds. Set aside.
Heat oil in large skillet over medium heat until oil
sizzles. Add bell pepper and onions. Cook about
1 minute, or until slightly tender. Stir in beans. Cook
about 1 minute, or until thoroughly heated.
Reduce heat to medium-low. Pour egg mixture over
vegetables. Cook about 6 minutes, or until almost
set. As bottom of egg mixture sets, carefully lift
edges with spatula and let uncooked egg run to the
bottom of the pan. Cook, covered, about 2
minutes, or until top is set but still shiny. Sprinkle
with cheese. Cook, covered, about 1 minute, or
until cheese melts.
Yield: 6 servings.
Per serving: About 208 cal, 18 g pro, 15 g carb,
8 g fat, 18 mg chol, 463 mg sod.
Tip: For browned top on frittata, place under broiler
about 1 minute, or until cheese is browned and
bubbly.
Page 26

24
Garden Quiche
Baked Pastry Shell
(see page 41)
1 tablespoon (15 mL)
oil
1 small onion,
chopped
1medium green bell
pepper, chopped
8 oz. (250 g) sliced
fresh mushrooms
6 eggs
1
⁄3
cup (75 mL) low-fat
milk
1 tablespoon (15 mL)
chopped fresh
parsley
1 teaspoon (15 mL)
salt
5 drops hot pepper
sauce
1 cup (4 oz. [120 g])
reduced-fat shredded
Swiss cheese
Follow procedure for Baked Pastry Shell. Cool
10 minutes.
Meanwhile, heat oil in large non-stick skillet over
medium-high heat. Add onion and bell pepper.
Cook about 1 minute, stirring frequently. Add
mushrooms. Cook and stir about 2 minutes, or until
vegetables are tender. Set aside.
Place eggs, milk, parsley, salt, and hot pepper sauce
in mixer bowl. Attach bowl and wire whip to mixer.
Turn to Speed 2 and mix 1 to 2 minutes.
Sprinkle half of cheese in pastry shell. Top with
vegetables. Pour egg mixture over vegetables. Top
with remaining cheese. Bake at 350°F (180°C) for 30
to 35 minutes, or until knife inserted in center comes
out clean. Let stand about 5 minutes before serving.
Yield: 8 servings.
Per serving (filling and crust): About 264 cal, 12 g
pro, 17 g carb, 16 g fat, 172 mg chol, 561 mg sod.
Cheese-Stuffed Shells
1
⁄2 cup (125 mL) fat-
free egg substitute
or 2 eggs
1 container (15 oz.)
(450 g) no-fat ricotta
cheese
2 cups (500 mL)
shredded part-skim
mozzarella cheese
1
⁄4 cup (50 mL) grated
Parmesan cheese
2 teaspoons (10 mL)
dried parsley leaves
2 teaspoons (10 mL)
no-salt herb and
garlic seasoning
24 jumbo pasta shells,
cooked and drained
2 cups (500 mL)
prepared Marinara
Sauce
Place egg substitute, ricotta cheese, mozzarella
cheese, Parmesan cheese, parsley, and seasoning in
mixer bowl. Attach bowl and flat beater to mixer.
Tu rn to Speed 2 and mix about 30 seconds, or until
combined.
Fill each shell with 2 to 3 tablespoons (30-45 mL)
cheese mixture. Place filled shells in 13x9x2-inch
(33x23x5-cm) baking pan. Pour Marinara Sauce
over shells. Cover pan with foil. Bake at 350°F
(180°C) for 30 to 35 minutes, or until bubbly.
Yield: 4 to 6 servings.
Per serving: About 527 cal, 46 g pro, 56 g carb,
15 g fat, 57 mg chol, 865 mg sod.
Page 27

25
Quick Yellow Cake
21⁄4 cups (550 mL)
all-purpose flour
1
1
⁄3 cups (325 mL) sugar
3 teaspoons (15 mL)
baking powder
1
⁄2 teaspoon (2 mL) salt
1
⁄2 cup (125 mL) short-
ening
1cup (250 mL) low-fat
milk
1 teaspoon (5 mL)
vanilla
2 eggs
Combine dry ingredients in mixer bowl. Add
shortening, milk, and vanilla. Attach bowl and flat
beater to mixer. Turn to Speed 2 and mix about 1
minute. Stop and scrape bowl. Add eggs.
Continuing on Speed 2, mix about 30 seconds. Stop
and scrape bowl. Turn to Speed 6 and beat about 1
minute.
Pour batter into two greased and floured 8- or
9-inch (20- or 23-cm) round baking pans. Bake at
350°F (180°C) for 30 to 35 minutes, or until
toothpick inserted in center comes out clean. Cool
10 minutes. Remove from pans. Cool completely on
wire rack. Frost if desired.
Yield: 12 to 16 servings.
Per serving: About 272 cal, 4 g pro, 42 g carb,
10 g fat, 37 mg chol, 175 mg sod.
Easy White Cake
2 cups (500 mL)
all-purpose flour
1
1
⁄2
cups (375 mL) sugar
3 teaspoons (15 mL)
baking powder
1
⁄
2 teaspoon (2 mL) salt
1
⁄2 cup (125 mL)
shortening
1cup (250 mL) low-fat
milk
1 teaspoon (5 mL)
vanilla
4 egg whites
Combine dry ingredients in mixer bowl. Add
shortening, milk, and vanilla. Attach bowl and flat
beater to mixer. Turn to Speed 2 and mix about 1
minute. Stop and scrape bowl. Add egg whites.
Turn to Speed 6 and beat about 1 minute, or until
smooth and fluffy.
Pour batter into two greased and floured 8- or 9inch (20- or 23-cm) round baking pans. Bake at
350°F (180°C) for 30 to 35 minutes, or until
toothpick inserted in center comes out clean. Cool
10 minutes. Remove from pans. Cool completely on
wire rack. Frost if desired.
Yield: 12 to 16 servings.
Per serving: About 267 cal, 4 g pro, 42 g carb,
9 g fat, 2 mg chol, 183 mg sod.
CAKES AND FROSTINGS
Page 28

26
Caramel Walnut Banana Torte
Topping
1 cup (250 mL) firmly
packed brown sugar
1
⁄2 cup (125 mL) butter
or margarine
1
⁄4 cup (50 mL)
whipping cream
1 cup (250 mL)
chopped walnuts
Cake
1
1
⁄2 cups (375 mL) sugar
1
⁄2 cup (125 mL) butter
or margarine,
softened
1 cup (250 mL)
(2 medium) mashed
ripe banana
1 teaspoon (5 mL)
vanilla
3 eggs
2
1
⁄2 cups (625 mL)
all-purpose flour
1
1
⁄4 teaspoons (6 mL)
baking powder
1 teaspoon (5 mL)
baking soda
1
⁄2 teaspoon (2 mL) salt
3
⁄4 cup (175 mL)
buttermilk
Filling
1
⁄2 cup (125 mL) sugar
3 tablespoons (45 mL)
all-purpose flour
1
⁄4 teaspoon (1 mL) salt
1cup (250 mL) low-fat
milk
1 egg, beaten
1 teaspoon (5 mL)
vanilla
1 tablespoon (15 mL)
butter or margarine
2 medium bananas,
thinly sliced
1
⁄
2 cup (125 mL)
whipping cream,
whipped
To make Topping, place brown sugar, butter, and
cream in small saucepan. Heat over low heat just
until butter melts, stirring constantly. Pour over
bottoms of three 8- or 9-inch (20- or 23-cm) round
baking pans. Sprinkle with walnuts.
To make Cake, place sugar and butter in mixer
bowl. Attach bowl and flat beater to mixer. Turn to
Speed 2 and mix about 30 seconds. Stop and
scrape bowl. Add banana and vanilla. Continuing
on Speed 2, mix about 30 seconds. Continuing on
Speed 2, add eggs, one at a time, mixing about 15
seconds after each addition. Stop and scrape bowl.
Combine flour, baking powder, baking soda, and
salt in small bowl. Add half of flour mixture to sugar
mixture in mixer bowl. Turn to Speed 2 and mix
about 30 seconds. Add buttermilk and remaining
flour mixture. Gradually turn to Speed 6 and beat
about 30 seconds. Spread batter evenly over nut
mixture in pans. Bake at 350°F (180°C) for 25 to 30
minutes, or until toothpick inserted in center comes
out clean. Cool in pans about 3 minutes. Remove
from pans and cool completely on wire racks.
Meanwhile, to make Filling, combine sugar, flour,
and salt in medium saucepan. Gradually stir in milk.
Heat to boiling over medium heat, stirring constantly.
Stir about 1⁄4 cup (50 mL) hot mixture into beaten
egg in separate bowl. Pour egg mixture into
saucepan. Cook until mixture is bubbly, stirring
constantly. Remove from heat. Stir in vanilla and
butter. Cool slightly. Refrigerate 1 hour while cake
is cooling.
To assemble torte, place one cake layer, nut side up,
on large plate. Spread with half of Filling. Arrange
half of banana slices over Filling. Top with second
layer, nut side up. Spread with remaining Filling
and banana slices. Top with remaining cake layer,
nut side up. Top torte with whipped cream. Store in
refrigerator.
Yield: 16 to 20 servings.
Per serving: About 451 cal, 7 g pro, 65 g carb,
19 g fat, 58 mg chol, 384 mg sod.
Page 29

27
Angel Food Cake
11⁄4 cups (300 mL)
all-purpose flour
1
1
⁄2 cups (375 mL) sugar,
divided
1
1
⁄2 cups (375 mL) egg
whites (about 12 to
15 egg whites)
1
1
⁄2 teaspoons (7 mL)
cream of tartar
1
⁄4 teaspoon (1 mL) salt
1
1
⁄2 teaspoons (7 mL)
vanilla or
1
⁄2 teaspoon
(2 mL) almond
extract
Mix flour and 1⁄2 cup (125 mL) sugar in small bowl.
Set aside.
Place egg whites in mixer bowl. Attach bowl and
wire whip to mixer. Gradually turn to Speed 6 and
whip 30 to 60 seconds, or until egg whites are
frothy.
Add cream of tartar, salt, and vanilla. Turn to Speed
8 and whip 2 to 21⁄2 minutes, or until whites are
almost stiff but not dry. Turn to Speed 2. Gradually
add remaining 1 cup (250 mL) sugar and mix about
1 minute. Stop and scrape bowl.
Remove bowl from mixer. Spoon flour-sugar mixture, one-fourth at a time, over egg whites. Fold in
gently with spatula, just until blended.
Pour batter into ungreased 10-inch (25-cm) tube
pan. With knife, gently cut through batter to
remove large air bubbles. Bake at 375°F (190°) for
35 minutes, or until crust is golden brown and
cracks are very dry. Immediately invert cake onto
funnel or soft drink bottle. Cool completely. Remove
from pan.
Yield: 16 servings.
Per serving: About 124 cal, 4 g pro, 27 g carb,
0 g fat, 0 mg chol, 79 mg sod.
Page 30

28
Old-Fashioned Pound Cake
3 cups (750 mL) all-
purpose flour
2cups (500 mL) sugar
3 teaspoons (15 mL)
baking powder
1
⁄2 teaspoon (2 mL) salt
2 cups (500 mL) butter,
softened
1
⁄2 cup (125 mL) low-fat
milk
1 teaspoon (5 mL)
vanilla
1 teaspoon (5 mL)
almond extract
6 eggs
Combine dry ingredients in mixer bowl. Add butter,
milk, vanilla, and almond extract. Attach bowl and
flat beater to mixer. Turn to Stir Speed and mix
about 1 minute. Stop and scrape bowl. Turn to
Speed 6 and beat about 2 minutes. Stop and scrape
bowl.
Tu rn to Speed 2 and add eggs, one at a time, mixing
about 15 seconds after each addition. Turn to
Speed 4 and beat about 30 seconds.
Pour batter into greased and floured 10-inch
(25-cm) tube pan. Bake at 350°F (180°C) for 1 hour
15 minutes, or until toothpick inserted in center
comes out clean. Cool completely on wire rack.
Remove cake from pan.
Yield: 16 servings.
Per serving: About 419 cal, 5 g pro, 44 g carb,
25 g fat, 143 mg chol, 378 mg sod.
Double Chocolate Pound Cake
3 cups (750 mL)
all-purpose flour
2 cups (500 mL) sugar
1
⁄2 cup (125 mL)
unsweetened Dutchprocessed cocoa powder
3 teaspoons (15 mL)
baking powder
1
⁄2 teaspoon (2 mL) salt
1 cup (250 mL) butter,
softened
1
1
⁄
4 cups (300 mL)
low-fat milk
1 teaspoon (5 mL) vanilla
5 eggs
Chocolate Glaze
2 squares (1 oz. [30 g]
each) unsweetened
chocolate
3 tablespoons (45 mL)
margarine or butter
1 cup (250 mL)
powdered sugar
3
⁄4 teaspoon (3 mL) vanilla
2 tablespoons (30 mL)
hot water
Combine dry ingredients in mixer bowl. Add butter,
milk, and vanilla. Attach bowl and flat beater to
mixer. Turn to Stir Speed and mix about 1 minute.
Stop and scrape bowl. Turn to Speed 6 and beat
about 2 minutes. Stop and scrape bowl.
Turn to Speed 2 and add eggs, one at a time,
mixing about 15 seconds after each addition. Turn
to Speed 4 and beat about 30 seconds.
Pour batter into greased and floured 10-inch (25-cm)
tube pan. Bake at 325°F (160°C) for 1 hour 20
minutes, or until toothpick inserted in center comes
out clean. Cool completely on wire rack. Remove
cake from pan and drizzle with Chocolate Glaze.
To make Glaze, melt chocolate and margarine in
small saucepan over low heat. Remove from heat.
Stir in powdered sugar and vanilla. Stir in water, 1
teaspoon (5mL) at a time, until glaze is of desired
consistency.
Yield: 16 servings.
Per serving: About 390 cal, 6 g pro, 55 g carb,
18 g fat, 99 mg chol, 289 mg sod.
Page 31

29
Chocolate Cake
2 cups (500 mL) all-
purpose flour
1
1
⁄3 cups (325 mL) sugar
1 teaspoon (5 mL)
baking powder
1
⁄2 teaspoon (2 mL)
baking soda
1
⁄2 teaspoon (2 mL) salt
1
⁄2 cup (125 mL)
shortening
1cup (250 mL) low-fat
milk
1 teaspoon (5 mL)
vanilla
2 eggs
2 squares (1 oz. [30 g]
each) unsweetened
chocolate, melted
Combine dry ingredients in mixer bowl. Add
shortening, milk, and vanilla. Attach bowl and flat
beater to mixer. Turn to Speed 2 and mix about 1
minute. Stop and scrape bowl. Add eggs and
chocolate. Continuing on Speed 2, mix about 30
seconds. Stop and scrape bowl. Turn to Speed 6
and beat about 1 minute.
Pour batter into two greased and floured 8- or
9-inch (20- or 23-cm) round baking pans. Bake
at 350°F (180°C) for 30 to 35 minutes, or until
toothpick inserted in center comes out clean. Cool
10 minutes. Remove from pans. Cool completely on
wire rack. Frost if desired.
Yield: 12 to 16 servings.
Per serving: About 285 cal, 4 g pro, 41 g carb,
12 g fat, 37 mg chol, 185 mg sod.
Page 32

30
Sunshine Chiffon Cake
2 cups (500 mL)
all-purpose flour
1
1
⁄2 cups (375 mL) sugar
1 tablespoon (15 mL)
baking powder
1
⁄2 teaspoon (2 mL) salt
3
⁄4 cup (175 mL) cold
water
1
⁄2 cup (125 mL) oil
7 egg yolks, beaten
1 teaspoon (5 mL)
vanilla
2 teaspoons (10 mL)
grated lemon rind
7 egg whites
1
⁄2 teaspoon (2 mL)
cream of tartar
Lemon Glaze
1 cup (250 mL)
powdered sugar
1 tablespoon (15 mL)
butter or margarine,
softened
2-3 tablespoons (30-
45 mL) lemon juice
Combine flour, sugar, baking powder, and salt in
mixer bowl. Add water, oil, egg yolks, vanilla, and
lemon rind. Attach bowl and wire whip to mixer.
Turn to Speed 4 and beat about 1 minute. Stop and
scrape bowl. Continuing on Speed 4, beat about
15 seconds. Pour mixture into another bowl. Clean
mixer bowl and wire whip.
Place egg whites and cream of tartar in mixer bowl.
Attach bowl and wire whip to mixer. Turn to Speed
8 and whip 2 to 21⁄2 minutes, or until whites are stiff
but not dry.
Remove bowl from mixer. Gradually add flour mixture to egg whites. Fold in gently with spatula, just
until blended.
Pour batter into ungreased 10-inch (25-cm) tube
pan. Bake at 325°F (160°C) for 60 to 75 minutes, or
until top springs back when lightly touched.
Immediately invert cake onto funnel or soft drink
bottle. Cool completely. Remove from pan. Drizzle
with Lemon Glaze.
Combine powdered sugar and butter in small bowl.
Stir in lemon juice, 1 tablespoon (15 mL) at a time,
until glaze is of desired consistency.
Yield: 16 servings.
Per serving: About 256 cal, 4 g pro, 38 g carb,
10 g fat, 93 mg chol, 152 mg sod.
Page 33

31
Chocolate Almond Brownie Cake
Cake
7 squares (1 oz. [30 g]
each) semi-sweet
chocolate
1
⁄2 cup (125 mL) butter
or margarine
3 eggs, separated
1
⁄2
cup (125 mL) sugar
1
⁄2
teaspoon (2 mL)
almond extract
2 tablespoons (30 mL)
all-purpose flour
Glaze
1 square (1 oz. [30 g] )
semi-sweet chocolate
1 teaspoon (5 mL)
shortening
Topping
1
⁄2 cup (125 mL)
whipping cream
1 tablespoon (15 mL)
powdered sugar
1
⁄4 teaspoon (1 mL)
almond extract
2 tablespoons (30 mL)
sliced almonds
To make Cake, melt chocolate and butter in medium
saucepan over low heat, stirring constantly. Remove
from heat; cool slightly.
Place egg whites in mixer bowl. Attach bowl and
wire whip to mixer. Turn to Speed 8 and whip 1 to
2 minutes, or until stiff peaks form. Place egg
whites in another bowl. Clean mixer bowl and wire
whip.
Place chocolate mixture, sugar, and almond extract
in mixer bowl. Attach bowl and flat beater to mixer.
Turn to Speed 4 and beat about 1 minute. Stop and
scrape bowl. Continuing on Speed 4, add egg yolks,
one at a time, beating about 30 seconds after each
addition. Continuing on Speed 4, add flour and
beat about 15 seconds. Gently fold in egg whites
with spatula.
Spoon batter into 8-inch (20-cm) springform pan
that has been greased and floured on the bottom
only. Bake at 375°F (190°C) for 20 to 25 minutes, or
until set in center. Cool completely on wire rack
before glazing. Clean mixer bowl.
To make Glaze, melt chocolate and shortening in
small saucepan over low heat, stirring to blend.
Drizzle over cake.
To make Topping, place cream, powdered sugar,
and almond extract in mixer bowl. Attach wire whip
and bowl to mixer. Turn to Speed 10 and whip 30
to 60 seconds, or until stiff peaks form. Pipe or
spoon whipped cream in ring over top of cake.
Sprinkle with almonds. Store in refrigerator.
Yield: 16 servings.
Per serving: About 180 cal, 3 g pro, 17 g carb,
13 g fat, 58 mg chol, 74 mg sod.
Page 34

32
Applesauce Cake
11⁄2 cups (375 mL)
all-purpose flour
1 cup (250 mL) whole
wheat flour
1
1
⁄2 cups (375 mL) sugar
1 teaspoon (5 mL)
baking powder
1 teaspoon (5 mL)
baking soda
1
⁄2 teaspoon (2 mL) salt
1
1
⁄2 teaspoons (7 mL)
cinnamon
1
⁄2 teaspoon (2 mL)
nutmeg
1
1
⁄2 cups (375 mL)
applesauce
1
⁄2
cup (125 mL) butter
or margarine, melted
2 eggs
1 cup (250 mL) chopped,
peeled apple
1
⁄2 cup (125 mL) chopped
walnuts
Caramel Creme
Frosting, if desired
(see page 34)
Combine dry ingredients in mixer bowl. Add
applesauce, margarine, and eggs. Attach bowl and
flat beater to mixer. Turn to Speed 2 and mix about
1 minute. Stop and scrape bowl. Turn to Speed 4
and beat about 30 seconds. Turn to Stir Speed and
add apple and walnuts, mixing just until blended.
Pour batter into greased and floured 13x9x2-inch
(33x23x5-cm) baking pan. Bake at 350°F (180°C) for
35 to 40 minutes, or until toothpick inserted in
center comes out clean. Cool completely on wire
rack. Frost with Caramel Creme Frosting, if desired.
Yield: 12 to 16 servings.
Per serving: About 318 cal, 5 g pro, 51 g carb,
11 g fat, 36 mg chol, 315 mg sod.
Spice Cake
21⁄4cups (550 mL)
all-purpose flour
1 cup (250 mL) firmly
packed brown sugar
1
⁄
2
cup (125 mL) sugar
1 teaspoon (5 mL)
baking soda
1
⁄2teaspoon (2 mL) salt
1 teaspoon (5 mL)
cinnamon
1
⁄
2
teaspoon (2 mL) cloves
1
⁄2teaspoon (2 mL)
nutmeg
1 cup (250 mL) buttermilk
1
⁄2cup (125 mL) shortening
1 teaspoon (5 mL) vanilla
3 eggs
1
⁄2cup (125 mL) raisins
Orange Cream Cheese
Frosting, if desired
(see page 34)
Combine dry ingredients in mixer bowl. Add
buttermilk, shortening, vanilla, and eggs. Attach
bowl and flat beater to mixer. Turn to Speed 2 and
mix about 1 minute. Stop and scrape bowl. Turn to
Speed 4 and beat about 30 seconds. Turn to Stir
Speed and add raisins, mixing just until blended.
Pour batter into greased and floured 13x9x2-inch
(33x23x5-cm) baking pan. Bake at 350°F (180°C) for
35 to 40 minutes, or until toothpick inserted in
center comes out clean. Cool completely on wire
rack. Frost with Orange Cream Cheese Frosting, if
desired.
Yield: 12 to 16 servings.
Per serving: About 310 cal, 5 g pro, 50 g carb,
10 g fat, 54 mg chol, 240 mg sod.
Page 35

33
Chocolate Frosting
1 cup (250 mL) butter,
softened
2 tablespoons (30 mL)
light corn syrup
4 cups (1 L) powdered
sugar
2 squares (1 oz. [30 g]
each) unsweetened
chocolate, melted
Place butter in mixer bowl. Attach bowl and flat
beater to mixer. Turn to Speed 4 and beat about
11⁄2 minutes, or until creamy. Stop and scrape bowl.
Add corn syrup. Turn to Speed 2 and mix well. Stop
and scrape bowl.
Turn to Stir Speed. Gradually add powdered sugar,
mixing until blended. Turn to Speed 4 and beat
about 1 minute. Stop and scrape bowl. Turn to
Speed 2. Slowly add melted chocolate and mix
about 11⁄2 minutes. Stop and scrape bowl. Turn to
Speed 4 and beat about 1 minute.
Yield: 12 to 16 servings (frosting for 2-layer or
13x9x2-inch [33x23x5-cm] cake).
Per serving: About 325 cal, 1 g pro, 44 g carb,
18 g fat, 41 mg chol, 160 mg sod.
Buttercream Frosting
1
⁄3 cup (75 mL) butter,
softened
1
⁄4 cup (50 mL) cream
or evaporated milk
1 teaspoon (5 mL)
vanilla
1
⁄4 teaspoon (1 mL) salt
4 cups (1 L) powdered
sugar, divided
Low-fat milk, if
necessary
Place butter in mixer bowl. Attach bowl and flat
beater to mixer. Turn to Speed 4 and beat about
1 minute, or until creamy. Stop and scrape bowl.
Add cream, milk, vanilla, salt, and 1 cup (250 mL)
powdered sugar. Turn to Stir Speed and mix about
30 seconds. Stop and scrape bowl. Turn to Speed 2
and mix about 11⁄2 minutes, or until well blended.
Stop and scrape bowl.
Tu rn to Stir Speed. Gradually add remaining 3 cups
(750 mL) powdered sugar and mix until blended.
Stop and scrape bowl, if necessary. Add milk, 1
teaspoon (5 mL) at a time, if necessary. Turn to
Speed 4 and beat about 1 minute, or until smooth.
Yield: 12 to 16 servings (frosting for 2-layer or
13x9x2-inch [33x23x5-cm] cake).
Per serving: About 208 cal, 0 g pro, 40 g carb,
6 g fat, 16 mg chol, 99 mg sod.
Page 36

34
Caramel Creme Frosting
1
⁄2 cup (125 mL) butter
or margarine
1 cup (250 mL) firmly
packed brown sugar
1
⁄4 cup (50 mL) low-fat
milk
1 cup (250 mL)
miniature
marshmallows
2 cups (500 mL)
powdered sugar
1
⁄2 teaspoon (2 mL)
vanilla
Melt butter in medium saucepan. Add brown sugar
and milk, stirring to blend. Heat to boiling. Cook
about 1 minute, stirring constantly. Remove from
heat. Add marshmallows. Stir until marshmallows
melt and mixture is smooth.
Place powdered sugar in mixer bowl. Add brown
sugar mixture and vanilla. Attach bowl and flat
beater to mixer. Turn to Stir Speed and mix about
30 seconds. Turn to Speed 4 and beat about 1
minute, or until smooth and creamy. Spread on
cake while warm.
Yield: 12 to 16 servings (frosting for 2-layer or
13x9x2-inch [33x23x5-cm] cake).
Per serving: About 228 cal, 0 g pro, 41 g carb,
7 g fat, 0 mg chol, 98 mg sod.
Fluffy KitchenAid Frosting
11⁄2 cups (375 mL) sugar
1
⁄2 teaspoon (2 mL)
cream of tartar
1
⁄2 teaspoon (2 mL) salt
1
⁄2 cup (125 mL) water
1
1
⁄2 tablespoons (20 mL)
light corn syrup
2 egg whites
1
1
⁄2 teaspoons (7 mL)
vanilla
Place sugar, cream of tartar, salt, water, and corn
syrup in saucepan. Cook and stir over medium heat
until sugar is completely dissolved, forming a syrup.
Place egg whites in mixer bowl. Attach bowl and
wire whip to mixer. Turn to Speed 10 and whip
about 45 seconds, or until whites begin to hold
shape. Continuing on Speed 10, slowly pour hot
syrup into egg whites in a fine stream and whip
1 to 11⁄
2 minutes. Add vanilla and whip about 5
minutes longer, or until frosting loses its gloss and
stands in stiff peaks. Frost cake immediately.
Yield: 12 to 16 servings (frosting for 2-layer or
13x9x2-inch [33x23x5-cm] cake).
Per serving: About 109 cal, 1 g pro, 27 g carb,
0 g fat, 0 mg chol, 101 mg sod.
Orange Cream Cheese Frosting
4 cups (1 L) powdered
sugar
1 package (8 oz.
[250 g]) light cream
cheese
1 teaspoon (5 mL)
orange juice
1
⁄
2 teaspoon (2 mL)
grated orange peel
Place all ingredients in mixer bowl. Attach bowl and
flat beater to mixer. Turn to Stir Speed and mix about
30 seconds, or until blended. Turn to Speed 4 and
beat about 2 minutes, or until smooth and creamy.
Yield: 12 to 16 servings (frosting for 2-layer or
13x9x2-inch cake[33x23x 5-cm]).
Per serving: About 196 cal, 2 g pro, 41 g carb,
3 g fat, 7 mg chol, 107 mg sod.
Page 37

35
Creamy No-Cook Mints
3 ounces (90 g) light
cream cheese
1
⁄4 teaspoon (1 mL) mint
flavouring
2 drops green food
colour or colour of
choice
4
1
⁄4-41⁄2cups (1.05-1.125 L)
powdered sugar
Superfine sugar
Place cream cheese, flavouring, and food colour in
mixer bowl. Attach bowl and flat beater to mixer.
Tu rn to Speed 2 and mix about 30 seconds, or until
smooth. Continuing on Speed 2, gradually add
powdered sugar and mix about 11⁄2 minutes, or until
mixture becomes very stiff.
To make mints, dip individual flexible candy molds
in superfine sugar. Press in mint mixture. Turn out
onto waxed paper covered with superfine sugar.
Repeat until all mixture is used. OR: Shape mixture
into 3⁄4-inch (2-cm) balls, using about 1 teaspoon
(5 mL) for each ball. Roll in superfine sugar. Place on
waxed paper covered with superfine sugar. Flatten
slightly with thumb to form 1⁄4-inch (5-mm) thick
patties. If desired, press back of fork lightly on
patties to form ridges.
Store mints, tightly covered, in refrigerator. Mints
also freeze well.
Yield: 42 servings (2 candies per serving).
Per serving: About 54 cal, 0 g pro, 13 g carb,
0 g fat, 1 mg chol, 12 mg sod.
Chocolate Fudge
Butter
2cups (500 mL) sugar
1
⁄8 teaspoon (.5 mL) salt
3
⁄4
cup (175 mL)
evaporated milk
1 teaspoon (5 mL) light
corn syrup
2 squares (1 oz. [30 g]
each) unsweetened
chocolate
2 tablespoons (30 mL)
butter or margarine
1 teaspoon (5 mL)
vanilla
2 cup (500 mL)
chopped walnuts or
pecans
Butter sides of heavy 2-quart (1.9L) saucepan.
Combine sugar, salt, evaporated milk, corn syrup,
and chocolate in pan. Cook and stir over medium
heat until chocolate melts and sugar dissolves. Cook
to soft ball stage (236°F [113°C]) without stirring.
Remove immediately from heat. Add butter without
stirring
. Cool to lukewarm (110°F [43°C]). Stir in
vanilla.
Pour mixture into mixer bowl. Attach bowl and flat
beater to mixer. Turn to Speed 2 and mix about 8
minutes, or until fudge stiffens and loses its gloss.
Quickly turn to Stir Speed and add walnuts, mixing
just until blended. Spread in buttered 9x9x2-inch
(23x23x 5-cm) baking pan. Cool at room temperature.
Cut into 1-inch (2.5-cm) squares when firm.
Yield: 64 servings (1 square per serving).
Per serving: About 59 cal, 1 g pro, 7 g carb, 3 g fat,
1 mg chol, 12 mg sod.
COOKIES, BARS AND CANDIES
Page 38

36
Divinity
3cups (750 mL) sugar
3
⁄4
cup (175 mL) light
corn syrup
1
⁄2 cup (125 mL) water
2 egg whites
1 teaspoon (5 mL)
almond extract
1 cup (250 mL)
chopped walnuts or
pecans
Place sugar, corn syrup, and water in heavy
saucepan. Cook and stir over medium heat to hard
ball stage (248°F [120°C]). Remove from heat and
let stand until temperature drops to 220°F (100°C),
without stirring.
Place egg whites in mixer bowl. Attach bowl and
wire whip to mixer. Turn to Speed 8 and whip about
1 minute, or until soft peaks form. Gradually add
syrup in a fine stream and whip about 21⁄2 minutes
longer.
Turn to Speed 4. Add almond extract and whip 20
to 25 minutes, or until mixture starts to become dry.
Turn to Stir Speed and add walnuts, mixing just
until blended.
Drop mixture from measuring tablespoon onto
waxed paper or greased baking sheet to form patties.
Yield: 20 servings (2 pieces per serving).
Per serving: About 192 cal, 2 g pro, 40 g carb,
4 g fat, 0 mg chol, 15 mg sod.
Chocolate Chip Cookies
1 cup (250 mL) granu-
lated sugar
1 cup (250 mL) brown
sugar
1 cup (250 mL) butter
or margarine,
softened
2 eggs
1
1
⁄2 teaspoons (7 mL)
vanilla
1 teaspoon (5 mL)
baking soda
1 teaspoon (5 mL) salt
3 cups ( 750 mL)
all-purpose flour
12 ounces (360g)
semi-sweet
chocolate chips
Place sugars, butter, eggs, and vanilla in mixer bowl.
Attach bowl and flat beater to mixer. Turn to Speed
2 and mix about 30 seconds. Stop and scrape bowl.
Turn to Speed 4 and beat about 30 seconds. Stop
and scrape bowl.
Turn to Stir Speed. Gradually add baking soda, salt,
and flour to sugar mixture and mix about 2 minutes.
Turn to Speed 2 and mix about 30 seconds. Stop
mixer and scrape bowl. Add chocolate chips. Turn
to Stir Speed and mix about 15 seconds.
Drop by rounded teaspoonfuls onto greased baking
sheets, about 2 inches (5-cm) apart. Bake at 375°F
(190°C) for 10 to 12 minutes. Remove from baking
sheets immediately and cool on wire racks.
Yield: 54 servings (1 cookie per serving).
Per serving: About 117 cal, 1 g pro, 17 g carb,
5 g fat, 8 mg chol, 106 mg sod.
VARIATIONS
2 cups (500 mL) raisins, coconut, or chopped
walnuts may be substituted for chocolate chips.
Page 39

37
Macadamia Chocolate Chunk Cookies
1 cup (250 mL) firmly
packed brown sugar
3
⁄4 cup (175 mL)sugar
1 cup (250 mL)
margarine or butter,
softened
2 teaspoons (10 mL)
vanilla
2 eggs
2
1
⁄4 cups (550 mL)
all-purpose flour,
divided
1
⁄2 cup (125 mL)
unsweetened cocoa
powder
1 teaspoon (5 mL)
baking soda
1
⁄2 teaspoon (2 mL) salt
1 package (8 oz. [250
g]) semi-sweet
baking chocolate, cut
into small chunks
1 jar (3
1
⁄2 oz.[105 g])
macadamia nuts,
coarsely chopped
Place brown sugar, sugar, margarine, vanilla, and
eggs in mixer bowl. Attach bowl and flat beater to
mixer. Turn to Speed 2 and mix about 30 seconds.
Stop and scrape bowl. Turn to Speed 4 and beat
about 1 minute. Stop and scrape bowl.
Add 1 cup (250 mL) flour, cocoa powder, baking
soda, and salt. Turn to Stir Speed and mix about 30
seconds. Gradually add remaining 11⁄4 cups (300 mL)
flour and mix about 30 seconds longer. Turn to
Speed 2 and mix about 30 seconds. Turn to Stir
Speed and add chocolate chunks and nuts, mixing
just until blended.
Drop by rounded teaspoonfuls onto greased baking
sheets, about 2 inches (5 cm) apart. Bake at 325°F
(160°C) for 12 to 13 minutes, or until edges are set.
DO NOT OVERBAKE. Cool on baking sheets about 1
minute. Remove to wire racks and cool completely.
Yield: 48 servings (1 cookie per serving).
Per serving: About 125 cal, 2 g pro, 16 g carb,
7 g fat, 9 mg chol, 107 mg sod.
Sugar Cookies
1 cup (250 mL)
margarine or butter,
softened
1 teaspoon (5 mL)
vanilla
3
⁄4 cup (175 mL) sugar
2 eggs, beaten
1 teaspoon (5 mL)
cream of tartar
1
⁄2 teaspoon (2 mL)
baking soda
1
⁄4 teaspoon (1 mL)
nutmeg
1
⁄4 teaspoon (1 mL) salt
2 cups (500 mL)
all-purpose flour
Sugar
Place margarine and vanilla in mixer bowl. Attach
bowl and flat beater to mixer. Turn to Speed 6 and
beat about 2 minutes, or until mixture is smooth.
Gradually add 3⁄4 cup (175 mL) sugar and beat about
11⁄2 minutes longer. Add eggs and beat about 30
seconds. Stop and scrape bowl.
Turn to Stir Speed. Gradually add cream of tartar,
baking soda, nutmeg, salt, and flour to sugar
mixture. Mix about 1 minute, or until well blended.
Drop by rounded teaspoonfuls onto greased baking
sheets, about 3 inches (7.5 cm) apart. Bake at 400°F
(200°C) for 6 to 8 minutes. Sprinkle with sugar
while still hot. Remove from baking sheets
immediately and cool on wire racks.
Yield: 48 servings (1 cookie per serving).
Per serving: About 69 cal, 1 g pro, 8 g carb, 4 g fat,
9 mg chol, 70 mg sod.
Page 40

38
Peanut Butter Cookies
1
⁄2 cup (125 mL) peanut
butter
1
⁄2 cup (125 mL) butter
or margarine,
softened
1
⁄2 cup (125 mL) granu-
lated sugar
1
⁄2 cup (125 mL) brown
sugar
1 egg
1
⁄2 teaspoon (2 mL)
vanilla
1
⁄2 teaspoon (2 mL)
baking soda
1
⁄4
teaspoon (1 mL) salt
1
1
⁄4 cups (300 mL)
all-purpose flour
Place peanut butter and butter in mixer bowl.
Attach bowl and flat beater to mixer. Turn to Speed
6 and beat about 1 minute, or until mixture is
smooth. Stop and scrape bowl. Add sugars, egg,
and vanilla. Turn to Speed 4 and beat about 1
minute. Stop and scrape bowl.
Turn to Stir Speed. Gradually add all remaining
ingredients to sugar mixture and mix about 30
seconds. Turn to Speed 2 and mix about 30 seconds.
Roll dough into 1-inch (2.5-cm) balls. Place about
2 inches (5-cm) apart on ungreased baking sheets.
Press flat with fork in a criss-cross pattern to 1⁄4-inch
(5-mm) thickness.
Bake at 375°F (190°C) for 10 to 12 minutes, or
until golden brown. Remove from baking sheets
immediately and cool on wire racks.
Yield: 36 servings (1 cookie per serving).
Per serving: About 83 cal, 2 g pro, 10 g carb,
4 g fat, 6 mg chol, 81 mg sod.
Nutty Shortbread Bars
1 cup (250 mL) butter
or margarine,
softened
1 cup (250 mL) firmly
packed brown sugar
2 cups (500 mL)
all-purpose flour
1 teaspoon (5 mL)
baking powder
1
⁄2 teaspoon (2 mL) salt
2 egg whites
1 cup (250 mL)
chopped walnuts or
pecans
Place butter and brown sugar in mixer bowl. Attach
bowl and flat beater to mixer. Turn to Speed 2 and
mix about 1 minute. Stop and scrape bowl. Add
flour, baking powder, and salt. Turn to Speed 2 and
mix about 11⁄2 minutes, or until soft dough forms.
Press dough into greased 151⁄2x101⁄2x1-inch
(40x25x2-cm) baking pan. Beat egg whites with
fork until slightly foamy. Brush dough with egg
whites, using only as much as needed to cover
lightly. Sprinkle with chopped walnuts.
Bake at 375°F (190°C) for 20 to 25 minutes. Cut
into bars while warm. Cool on wire rack.
Yield: 30 servings (1 bar per serving).
Per serving: About 139 cal, 2 g pro, 14 g carb,
8 g fat, 17 mg chol, 114 mg sod.
Page 41

39
Fudge Brownies
1 cup (250 mL)
margarine or butter,
softened
4 squares (1 oz. [30 g]
each) unsweetened
chocolate
2cups (500 mL) sugar
1 teaspoon (5 mL)
vanilla
3 eggs
1 cup (250 mL)
all-purpose flour
1
⁄2 teaspoon (2 mL) salt
1 cup (250 mL)
chopped walnuts or
pecans
Melt 1⁄2 cup (125 mL) margarine and chocolate in
small saucepan over low heat; cool. Place remaining
1
⁄2 cup (125 mL) margarine, sugar, and vanilla in
mixer bowl. Attach bowl and flat beater to mixer.
Tu rn to Speed 2 and mix about 30 seconds. Turn to
Speed 6 and beat about 2 minutes. Turn to Speed
4. Add eggs, one at a time, beating about 15
seconds after each addition. Stop and scrape bowl.
Add cooled chocolate mixture. Turn to Speed 2 and
mix about 30 seconds. Stop and scrape bowl. Add
all remaining ingredients. Turn to Stir Speed and mix
about 30 seconds, or until well blended.
Pour into greased and floured 13x9x2-inch
(33x23x5-cm) baking pan. Bake at 350°F (180°C) for
45 minutes. Cool in pan on wire rack and cut.
Yield: 36 servings (1 brownie per serving).
Per serving: About 143 cal, 2 g pro, 16 g carb,
9 g fat, 18 mg chol, 93 mg sod.
Page 42

40
Lemon Cream Cheese Bars
Crust
2 cups (500 mL)
all-purpose flour
1
⁄2 cup (125 mL)
powdered sugar
1 cup (250 mL) (2
sticks) chilled butter,
cut into chunks
Cream Cheese Filling
1 package (8 oz.
[250 g]) light cream
cheese
1
⁄2 cup (125 mL)
powdered sugar
2 tablespoons (30 mL)
flour
2 eggs
1 teaspoon (5 mL)
vanilla
Lemon Filling
4 eggs
2 cups (500 mL)
granulated sugar
1
⁄
4 cup (50 mL)
all-purpose flour
1 teaspoon (5 mL)
grated lemon peel
1
⁄4 cup (50 mL) lemon
juice
Powdered sugar, if
desired
Place Crust ingredients in mixer bowl. Attach bowl
and flat beater to mixer. Turn to Stir Speed and mix
about 1 minute, or until well blended and mixture
starts to stick together. Press into ungreased
151⁄2x101⁄2x1-inch (40x25x2-cm) baking pan. Bake at
350°F (180°C) for 14 to 16 minutes, or until set.
(Note: Check Crust after 10 minutes and prick with
fork if it puffs up during baking.) Remove from
oven.
Meanwhile, clean mixer bowl and beater. Place
Cream Cheese Filling ingredients in mixer bowl.
Attach bowl and flat beater to mixer. Turn to Stir
Speed and mix about 30 seconds. Turn to Speed 4
and beat about 2 minutes, or until smooth and
creamy. Pour over partially baked Crust. Bake at
350°F (180°C) for 6 to 7 minutes, or until filling is
slightly set. Remove from oven.
Meanwhile, clean mixer bowl and beater. Place all
Lemon Filling ingredients, except lemon juice, in
mixer bowl. Attach bowl and flat beater to mixer.
Turn to Stir Speed and mix about 30 seconds. Turn
to Speed 2. Gradually add lemon juice and mix
about 30 seconds, or until well blended. Pour over
Cream Cheese Filling. Bake at 350°F (180°C) for
14 to 16 minutes, or until filling is set. (Note: Filling
may puff up during baking but will fall when
removed from oven.) Sprinkle with powdered sugar,
if desired. Cool completely in pan.
Yield: 48 servings (1 bar per serving).
Per serving: About 115 cal, 2 g pro, 16 g carb,
5 g fat, 39 mg chol, 65 mg sod.
Page 43

41
KitchenAid Pie Pastry
21⁄4 cups (550 mL) all-
purpose flour
3
⁄4 teaspoon (3 mL) salt
1
⁄2 cup (125 mL)
shortening,
well chilled
2 tablespoons (30 mL)
butter or margarine,
well chilled
5-6 tablespoons (60-
70 mL) cold water
Place flour and salt in mixer bowl. Attach bowl and
flat beater to mixer. Turn to Stir Speed and mix
about 15 seconds. Cut shortening and butter into
pieces and add to flour mixture. Turn to Stir Speed
and mix 30 to 45 seconds, or until shortening
particles are size of small peas.
Continuing on Stir Speed, add water, 1 tablespoon
(15 mL) at a time, mixing until all particles are
moistened and dough begins to hold together.
Divide dough in half. Pat each half into a smooth
ball and flatten slightly. Wrap in plastic wrap. Chill
in refrigerator 15 minutes.
Roll one half of dough to 1⁄8-inch (3 mm) thickness
between waxed paper. Fold pastry into quarters.
Ease into 8- or 9-inch (20- or 23-cm) pie plate and
unfold, pressing firmly against bottom and sides.
Continue with one of the procedures that follow.
For One-crust Pie: Fold edge under. Crimp, as
desired. Add desired pie filling. Bake as directed.
For Two-crust Pie: Trim pastry even with edge of
pie plate. Using second half of dough, roll out
another pastry crust. Add desired pie filling. Top
with second pastry crust. Seal edge. Crimp, as
desired. Cut slits for steam to escape. Bake as
directed.
For Baked Pastry Shell: Fold edge under. Crimp,
as desired. Prick sides and bottom with fork. Bake at
450°F (230°C) for 8 to 10 minutes, or until lightly
browned. Cool completely on wire rack and fill.
Alternate Method for Baked Pastry Shell: Fold
edge under. Crimp, as desired. Line shell with foil.
Fill with pie weights or dried beans. Bake at 450°F
(230°C) for 10 to 12 minutes, or until edges are
lightly browned. Remove pie weights and foil. Cool
completely on wire rack and fill.
Yield: 8 servings (two 8- or 9-inch [20- or 23-cm]
crusts).
Per serving (one crust): About 134 cal, 2 g pro,
13 g carb, 8 g fat, 0 mg chol, 118 mg sod.
Per serving (two crusts): About 267 cal, 4 g pro,
27 g carb, 16 g fat, 0 mg chol, 236 mg sod.
PIES AND DESSERTS
Page 44

42
Apple Pie
1 cup (250 mL) sugar
2 tablespoons (30 mL)
all-purpose flour
1 teaspoon (5 mL)
cinnamon
1
⁄8 teaspoon (.5 mL)nutmeg
1
⁄8 teaspoon (.5 mL) salt
6-8 medium tart cooking
apples, peeled, cored,
and thinly sliced
2 tablespoons (30 mL)
margarine or butter
KitchenAid Pie Pastry
for Two-crust Pie
(see page 41)
Combine sugar, flour, cinnamon, nutmeg, and salt
in large bowl. Stir in apples.
Follow procedure for Two-crust Pie. Fill with apple
mixture and dot with margarine. Sprinkle top crust
with sugar, if desired.
Bake at 400°F (200°C) for 50 minutes.
Yield: 8 servings.
Per serving (filling and crust): About 451 cal,
4 g pro, 68 g carb, 19 g fat, 0 mg chol,
301 mg sod.
Country Pear Cobbler
Filling
3
⁄4 cup (175 mL) firmly
packed brown sugar
3 tablespoons (45 mL)
all-purpose flour
1
⁄8 teaspoon (.5 mL) salt
1
⁄8 teaspoon (.5 mL)
nutmeg
Dash cloves
2 tablespoons (30 mL)
lemon juice
6-8 medium pears,
peeled, cored, and
thinly sliced
Topping
1 cup (250 mL)
all-purpose flour
2 tablespoons (30 mL)
sugar
1 teaspoon (5 mL) baking
powder
1
⁄2teaspoon (2 mL) baking
soda
1
⁄2cup (125 mL) buttermilk
3 tablespoons (45 mL)
margarine or butter,
melted
1 tablespoon (15 mL)
sugar, if desired
Light cream, if desired
Combine all Filling ingredients, except pears, in
large skillet. Stir in sliced pears. Cook over medium
heat about 5 minutes, or until hot and bubbly,
stirring gently. Set aside.
To make Topping, place flour, sugar, baking
powder, and baking soda in mixer bowl. Attach
bowl and flat beater to mixer. Turn to Stir Speed
and mix about 30 seconds. Add buttermilk and
melted margarine. Continuing on Stir Speed, mix
about 30 seconds, or just until blended.
Pour hot Filling into 8- or 9-inch (20- or 23-cm)
baking pan. Top evenly with large spoonfuls of
Topping. Sprinkle with 1 tablespoon (15 mL) sugar,
if desired. Bake at 375°F (190°C) for 30 to 35
minutes, or until pears are tender and bubbly and
Topping is golden brown. Serve warm with light
cream, if desired.
Yield: 8 to 10 servings.
Per serving: About 276 cal, 3 g pro, 57 g carb,
5 g fat, 1 mg chol, 219 mg sod.
Page 45

43
Vanilla Cream Pie
1
⁄2 cup (125 mL) sugar
6 tablespoons (90 mL)
all-purpose flour
1
⁄4
teaspoon (1 mL) salt
2
1
⁄2 cups (625 mL)
low-fat milk
3 egg yolks
1 tablespoon (15 mL)
margarine or butter
1 teaspoon (5 mL)
vanilla
KitchenAid Baked
Pastry Shell
(see page 41)
Meringue
1
⁄4 teaspoon (1 mL)
cream of tartar
1
⁄8 teaspoon (.5 mL) salt
3 egg whites
1
⁄2 cup (125 mL) sugar
Combine sugar, flour, and salt in heavy saucepan.
Add milk and cook over medium heat until
thickened, stirring constantly. Reduce heat to low.
Cook, covered, about 10 minutes longer, stirring
occasionally. Set aside.
Place egg yolks in mixer bowl. Attach bowl and wire
whip to mixer. Turn to Speed 8 and whip about
1 minute. Slowly stir small amount of milk mixture
into yolks. Add yolk mixture to saucepan. Cook over
medium heat 3 to 4 minutes, stirring constantly.
Remove from heat. Add margarine and vanilla; cool.
Pour into Baked Pastry Shell.
To make Meringue, place cream of tartar, salt, and
egg whites in mixer bowl. Attach bowl and wire
whip to mixer. Gradually turn to Speed 8 and whip
about 1 minute, or until soft peaks form. Turn to
Speed 4. Gradually add sugar and whip about 1
minute, or until stiff peaks form.
Lightly pile Meringue on pie and spread to edge.
Bake at 325°F (160°C) for 15 minutes, or until
lightly browned.
Yield: 8 servings.
Per serving (filling and crust): About 332 cal,
7 g pro, 47 g carb, 13 g fat, 86 mg chol,
297 mg sod.
Variations continued on next page.
Page 46

44
Vanilla Cream Pie CONTINUED
VARIATIONS
Chocolate Cream Pie
Add 2 squares (1 oz. [30 g] each) melted,
unsweetened chocolate to filling along with
margarine and vanilla. Proceed as directed on
previous page.
Per serving (filling and crust): About 368 cal,
8 g pro, 49 g carb, 16 g fat, 86 mg chol,
298 mg sod.
Banana Cream Pie
Slice 2 or 3 ripe bananas into pastry shell before
adding filling. Proceed as directed on previous page.
Per serving (filling and crust): About 359 cal,
8 g pro, 54 g carb, 13 g fat, 86 mg chol,
298 mg sod.
Coconut Cream Pie
Add 1⁄2 cup (125 mL) flaked coconut to filling before
adding to pastry shell. Before baking, sprinkle 1⁄
4 cup
(50 mL) flaked coconut on meringue. Proceed as
directed on previous page.
Per serving (filling and crust): About 376 cal,
8 g pro, 51 g carb, 16 g fat, 86 mg chol,
320 mg sod.
Page 47

45
Lemony Light Cheesecake
Crust
15 reduced-fat creme-
filled chocolate
sandwich cookies,
finely crushed (about
1
1
⁄2 cups [375 mL]
crumbs)
2 tablespoons (30 mL)
butter or margarine,
melted
Filling
3 packages (8 oz. [250
g] each) light cream
cheese
1 cup (250 mL) sugar
1 tablespoon (15 mL)
all-purpose flour
4 eggs
1
⁄
4 cup (50 mL) lemon
juice
1 teaspoon (5 mL)
grated lemon peel
Spray bottom and sides of 9-inch (23-cm) springform
pan with no-stick cooking spray.
To make Crust, combine cookie crumbs and butter
in medium bowl; mix well. Press mixture firmly into
bottom of springform pan. Chill while making Filling.
To make Filling, place cream cheese, sugar, and
flour in mixer bowl. Attach bowl and flat beater to
mixer. Turn to Speed 2 and mix about 30 seconds.
Stop and scrape bowl. Turn to Speed 2 and mix
about 30 seconds longer. Stop and scrape bowl.
Add eggs, lemon juice, and lemon peel. Turn to Stir
Speed and mix about 30 seconds. Stop and scrape
bowl. Turn to Speed 2 and mix 15 to 30 seconds
longer, just until blended. Do not overbeat. Pour
Filling into Crust.
Place top oven rack in center of oven. Place pan of
hot water on bottom rack of oven. Place cheesecake
on rack in center of oven. Bake at 325°F (160°C) for
50 to 60 minutes, or until cheesecake is set when
pan is jiggled slightly. Do not overbake.
Turn off oven; open oven door. Let cheesecake
stand in oven 30 minutes. Remove from oven. Cool
completely on wire rack away from drafts. Cover
and refrigerate 6 to 8 hours before serving.
Yield: 16 servings.
Per serving: About 169 cal, 6 g pro, 20 g carb,
7 g fat, 68 mg chol, 214 mg sod.
Tawny Pumpkin Pie
1 can (16 oz. [500 g])
pumpkin
3
⁄4 cup (175 mL) firmly
packed brown sugar
3 eggs
1 teaspoon (5 mL)
cinnamon
1
⁄2 teaspoon (2 mL)
ginger
1
⁄2 teaspoon (2 mL) salt
1
⁄4 teaspoon (1 mL)
cloves
1
1
⁄4 cups (300 mL)
low-fat milk
Pie Pastry for One-
crust Pie (see page 41)
Place pumpkin, brown sugar, eggs, cinnamon,
ginger, salt, and cloves in mixer bowl. Attach bowl
and flat beater to mixer. Turn to Speed 2 and mix
about 30 seconds. Stop and scrape bowl. Continuing
on Speed 2, slowly add milk and mix about 11⁄2
minutes.
Follow procedure for One-crust Pie. Fill with
pumpkin mixture. Bake at 400°F (200°C) for 40 to
50 minutes, or until knife inserted near center comes
out clean.
Yield: 8 servings.
Per serving (filling and crust): About 280 cal, 6 g pro,
41 g carb, 11 g fat, 87 mg chol, 325 mg sod.
Page 48

46
General Instructions
For Making And Kneading Yeast Dough
with the Rapid Mix Method
“Rapid Mix” describes a bread baking
method that calls for dry yeast to be
mixed with other dry ingredients
before liquid is added. In contrast,
the traditional method is to dissolve
yeast in warm water.
1. Place all dry ingredients including
yeast into bowl, except last 1 to 2
cups (250 to 500 mL) flour.
2. Attach bowl and dough hook.
Turn to Speed 2 and mix about 15
seconds, or until ingredients are
combined.
3. Continuing on Speed 2, gradually
add liquid ingredients to flour
mixture and mix 1 to 2 minutes
longer. See Illustration A.
Note: If liquid ingredients are added
too quickly, they will form a pool
around the dough hook and slow
down mixing process.
4. Continuing on Speed 2, gently add
remaining flour, 1⁄2 cup (125 mL) at
a time. See Illustration B. Mix until
dough clings to hook and cleans
sides of bowl, about 2 minutes.
5. When dough clings to hook,
knead on Speed 2 for 2 minutes,
or until dough is smooth and
elastic. See Illustration C.
6. Unlock and tilt back head (tilt-head
models) or lower bowl (bowl-lift
models) and remove dough from
hook. Follow directions in recipe
for rising, shaping and baking.
When using the traditional method
to prepare a favourite recipe, dissolve
yeast in warm water in warmed bowl.
Add remaining liquids and dry ingredients, except last 1 to 2 cups (250 to
500 mL) flour. Turn to Speed 2 and mix
about 1 minute, or until ingredients
are thoroughly mixed. Proceed with
Steps 4 through 6.
Both methods work equally well for
bread preparation. However, the
“Rapid Mix” method may be a bit
faster and easier for new bread
bakers. It is slightly more temperature
tolerant because the yeast is mixed
with dry ingredients rather than with
warm liquid.
ILLUSTRATION A
ILLUSTRATION B
ILLUSTRATION C
c
h
e
n
A
id
J
o
s
e
p
h
,
M
i
c
h
i
g
a
n
U
S
A
O
f
f
S
t
i
r
2
4
6
8
1
0
S
o
lid
S
ta
te
S
p
e
e
d
C
o
n
t
ro
l
c
h
e
n
A
i
d
J
o
s
e
p
h
,
M
i
c
h
i
g
a
n
U
S
A
O
f
f
S
t
ir
2
4
6
8
1
0
S
o
lid
S
ta
te
S
p
e
e
d
C
o
n
t
r
o
l
c
h
e
n
A
i
d
J
o
s
e
p
h
,
M
ic
h
i
g
a
n
U
S
A
O
f
f
S
t
ir
2
4
6
8
1
0
S
o
lid
S
ta
te
S
p
e
e
d
C
o
n
tro
l
YEAST BREADS AND QUICK BREADS
Page 49

47
Bread Making Tips
Making bread with a mixer is quite
different from making bread by hand.
Therefore, it will take some practice
before you are completely comfortable
with the new process. For your
convenience, we offer these tips to
help you become accustomed to
bread making the KitchenAid®way.
• Start out with an easy recipe, like
Basic White Bread, page 49, until
you are familiar with using the
dough hook.
•ALWAYS use the dough hook to
mix and knead yeast doughs.
• NEVER exceed Speed 2 when using
the dough hook.
• NEVER use recipes calling for more
than 8 cups (2 L) all-purpose flour
or 6 cups (1.5 L) whole wheat flour
when making dough with a 41⁄
2
quart (4.26 L) mixer.
• NEVER use recipes calling for more
than 10 cups (2.5 L) all-purpose
flour or 6 cups (1.5 L) whole wheat
flour when making dough with a 5
quart (4.73 L) mixer.
• Use a candy or other kitchen
thermometer to assure that liquids
are at temperature specified in the
recipe. Liquids at higher temperature
can kill yeast, while liquids at lower
temperatures will retard yeast
growth.
•Warm all ingredients to room
temperature to insure proper rising
of dough. If yeast is to be dissolved
in bowl, always warm bowl first by
rinsing with warm water to prevent
cooling of liquids.
• Allow bread to rise in a warm place,
80°F to 85°F (27°C to 30°C), free
from draft, unless otherwise specified
in recipe.
• Here are some alternative rising
methods to use: (1) The bowl
containing the dough can be
placed on a wire rack over a pan
of hot water. (2) The bowl can be
placed on the top rack of an
unheated oven; put a pan of hot
water on the rack below. (3) Turn
the oven to 400°F (200 °C) for 1
minute; then turn it off; place the
bowl on the center rack of the oven
and close the door.
Cover bowl with waxed paper, if
desired. Always cover with towel to
retain warmth in the bowl and
protect the dough from drafts.
• Recipe rising times may vary due to
temperature and humidity in your
kitchen. Dough has doubled in bulk
when indentation remains after tips
of fingers are pressed lightly and
quickly into dough.
• Most bread recipes give a range for
the amount of flour to be used.
Enough flour has been added when
the dough clings to the hook and
cleans sides of bowl. If dough is
sticky or humidity is high, slowly
add more flour, about 1⁄2 cup (125
mL) at a time but NEVER exceed
recommended flour capacity. Knead
after each addition until flour is
completely worked into dough. If
too much flour is added, a dry loaf
will result.
• Some types of dough, especially
those made with whole grain
flours, may not form a ball on the
hook. However, as long as the hook
comes in contact with the dough,
kneading will be accomplished.
Continued on next page.
Page 50

48
Bread Making Tips Shaping A Loaf
• Some large recipes and soft doughs
may occasionally climb over the
collar of the hook. This usually
indicates that the dough is sticky
and more flour should be added.
The sooner all the flour is added, the
less likely the dough will climb the
hook. For such recipes, try starting
with all but the last cup of flour in
the initial mixing process. Then add
the remaining flour as quickly as
possible.
• When done, yeast breads and rolls
should be deep golden brown in
colour. Other tests for doneness of
breads are: Bread pulls away from
the sides of pan, and tapping on the
top of the loaf produces a hollow
sound. Turn loaves and rolls onto
racks immediately after baking to
prevent sogginess.
Divide dough in half. On lightly
floured surface, roll each half into a
rectangle, approximately 9x14 inches
(23x36 cm). A rolling pin will smooth
dough and remove bubbles.
Starting at a short end, roll dough
tightly. Pinch dough to seal seam.
Pinch ends and turn under. Place,
seam side down, in loaf pan. Follow
directions in recipe for rising and
baking.
Page 51

49
Basic White Bread
1
⁄2 cup (125 mL) low-fat
milk
3 tablespoons (45 mL)
sugar
2 teaspoons (10 mL)
salt
3 tablespoons (45 mL)
butter or margarine
2 packages active dry
yeast
1
1
⁄2 cups (375 mL) warm
water (105°F to
115°F [40°C to 46°C])
5-6 cups (1.25-1.5 L)
all-purpose flour
Place milk, sugar, salt, and butter in small saucepan.
Heat over low heat until butter melts and sugar
dissolves. Cool to lukewarm.
Dissolve yeast in warm water in warmed mixer
bowl. Add lukewarm milk mixture and 41⁄2 cups
(1.125 L) flour. Attach bowl and dough hook to
mixer. Turn to Speed 2 and mix about 1 minute.
Continuing on Speed 2, add remaining flour, 1⁄2 cup
(125 mL) at a time, and mix about 2 minutes, or
until dough clings to hook and cleans sides of bowl.
Knead on Speed 2 about 2 minutes longer, or until
dough is smooth and elastic. Dough will be slightly
sticky to the touch.
Place dough in greased bowl, turning to grease top.
Cover. Let rise in warm place, free from draft, about
1 hour, or until doubled in bulk.
Punch dough down and divide in half. Shape each
half into a loaf, as directed on page 48, and place
in greased 81⁄2x41⁄2x21⁄2-inch (21x12x6-cm) baking
pans. Cover. Let rise in warm place, free from draft,
about 1 hour, or until doubled in bulk.
Bake at 400°F (200°C) for 30 minutes, or until
golden brown. Remove from pans immediately and
cool on wire racks.
Yield: 32 servings (16 slices per loaf).
Per serving: About 95 cal, 3 g pro, 18 g carb,
1 g fat, 0 mg chol, 148 mg sod.
Variations continued on next page.
Page 52

50
Basic White Bread CONTINUED
VARIATIONS
Cinnamon Bread
Prepare dough, divide, and roll out each half to a
rectangle, as directed on page 48. Mix together
1
⁄2 cup (125 mL) sugar and 2 teaspoons (10 mL)
cinnamon in small bowl. Spread each rectangle with
1 tablespoon (15 mL) softened butter or margarine.
Sprinkle with half of sugar mixture. Finish rolling
and shaping loaves. Place in well-greased
81⁄2x41⁄2x21⁄2-inch (21x12x6-cm) baking pans. Cover.
Let rise in warm place, free from draft, about 1
hour, or until doubled in bulk. If desired, brush tops
with beaten egg white. Bake at 375°F (190°C) for
40 to 45 minutes, or until golden brown. Remove
from pans immediately and cool on wire racks.
Yield: 32 servings (16 slices per loaf).
Per serving: About 111 cal, 3 g pro, 21 g carb,
2 g fat, 0 mg chol, 152 mg sod.
Sixty-Minute Rolls
Increase yeast to 3 packages and sugar to 1⁄4 cup
(50 mL). Mix and knead dough as directed for Basic
White Bread on page 49. Place in greased bowl,
turning to grease top. Cover. Let rise in warm place,
free from draft, about 15 minutes. Turn dough
onto lightly floured surface. Shape as desired (see
following suggestions). Cover. Let rise in slightly
warm oven (90°F [32°C]) about 15 minutes. Bake at
425°F (215°C) for 12 minutes, or until golden brown.
Remove from pans immediately and cool on wire
racks.
Curlicues: Divide dough in half and roll each half
to 12x9-inch (30x22-cm) rectangle. Cut 12 equal
strips about 1 inch (2.5 cm) wide. Roll each strip
tightly to form a coil, tucking ends underneath.
Place on greased baking sheets about 2 inches
(5 cm) apart.
Cloverleafs: Divide dough into 24 equal pieces.
Form each piece into a ball and place in greased
muffin pan. With scissors, cut each ball in half, then
quarters.
Yield: 24 servings (1 roll per serving).
Per serving: About 130 cal, 4 g pro, 25 g carb,
2 g fat, 0 mg chol, 198 mg sod.
Page 53

51
Whole Grain Wheat Bread
1
⁄3 cup (75 mL) plus
1 tablespoon
(15 mL) brown sugar
2 cups (500 mL) warm
water (105°F to
115°F [40°C to 46°C])
2 packages active dry
yeast
5-6 cups (1.25 to 1.5 L)
whole wheat flour
3
⁄4 cup (175 mL)
powdered milk
2 teaspoons (10 mL)
salt
1
⁄3
cup (75 mL) oil
Dissolve 1 tablespoon (15 mL) brown sugar in warm
water in small bowl. Add yeast and let mixture
stand.
Place 4 cups (1 L) flour, powdered milk, 1⁄3 cup
(75 mL) brown sugar, and salt in mixer bowl. Attach
bowl and dough hook to mixer. Turn to Speed 2
and mix about 15 seconds. Continuing on Speed 2,
gradually add yeast mixture and oil to flour mixture
and mix about 11⁄2 minutes longer. Stop and scrape
bowl, if necessary.
Continuing on Speed 2, add remaining flour, 1⁄2 cup
(125 mL) at a time, and mix about 2 minutes, or
until dough clings to hook and cleans sides of bowl.
Knead on Speed 2 about 2 minutes longer.
Note: Dough may not form a ball on hook.
However, as long as hook comes in contact with
dough, kneading will be accomplished. Do not add
more than the maximum amount of flour specified
or a dry loaf will result.
Place dough in greased bowl, turning to grease top.
Cover. Let rise in warm place, free from draft, about
1 hour, or until doubled in bulk.
Punch dough down and divide in half. Shape each
half into a loaf as directed on page 48. Place in
greased 81⁄2x41⁄2x21⁄2-inch (21x12x6-cm) baking pan.
Cover. Let rise in warm place, free from draft, about
1 hour, or until doubled in bulk.
Bake at 400°F (200°C) for 15 minutes. Reduce oven
temperature to 350°F (180°C) and bake 30 minutes
longer. Remove from pans immediately and cool on
wire racks.
Yield: 32 servings (16 slices per loaf).
Per serving: About 112 cal, 4 g pro, 19 g carb,
3 g fat, 2 mg chol, 146 mg sod.
Page 54

52
French Bread
2 packages active dry
yeast
2
1
⁄2 cups (625 mL) warm
water (105°F to
115° F [40° C to 46°
C])
1 tablespoon (15 mL)
salt
1 tablespoon (15 mL)
butter or margarine,
melted
7 cups (1.75 L)
all-purpose flour
2 tablespoons (10 mL)
cornmeal
1 egg white
1 tablespoon (15 mL)
cold water
Dissolve yeast in warm water in warmed mixer
bowl. Add salt, butter, and flour. Attach bowl and
dough hook to mixer. Turn to Speed 2 and mix
about 1 minute, or until well blended. Knead on
Speed 2 about 2 minutes longer. Dough will be
sticky.
Place dough in greased bowl, turning to grease top.
Cover. Let rise in warm place, free from draft, about
1 hour, or until doubled in bulk.
Punch dough down and divide in half. Roll each
half into 12x15-inch (30x37-cm) rectangle. Roll
dough tightly, from longest side, tapering ends if
desired. Place loaves on greased baking sheets that
have been dusted with cornmeal. Cover. Let rise in
warm place, free from draft, about 1 hour, or until
doubled in bulk.
With sharp knife, make 4 diagonal cuts on top of
each loaf. Bake at 450°F (230°C) for 25 minutes.
Remove from oven. Beat egg white and water
together with a fork. Brush each loaf with egg
mixture. Return to oven and bake 5 minutes longer.
Remove from baking sheets immediately and cool
on wire racks.
Yield: 30 servings (15 slices per loaf).
Per serving: About 114 cal, 3 g pro, 23 g carb,
1 g fat, 0 mg chol, 221 mg sod.
Page 55

53
Honey Oatmeal Bread
11⁄2 cups (375 mL) water
1
⁄2
cup (125 mL) honey
1
⁄3 cup (75 mL) butter
or margarine
5
1
⁄2-61⁄2cups (1.375-1.75 L)
all-purpose flour
1 cup (250 mL) quick
cooking oats
2 teaspoons (10 mL)
salt
2 packages active dry
yeast
2 eggs
1 egg white
1 tablespoon (15 mL)
water
Oatmeal
Place water, honey, and butter in small saucepan.
Heat over low heat until mixture is very warm
(120°F to 130°F [48°C to 54°C]).
Place 5 cups (1.25 L) flour, oats, salt, and yeast in
mixer bowl. Attach bowl and dough hook to mixer.
Turn to Speed 2 and mix about 15 seconds.
Continuing on Speed 2, gradually add warm mixture
to flour mixture and mix about 1 minute. Add eggs
and mix about 1 minute longer.
Continuing on Speed 2, add remaining flour, 1⁄2 cup
(125 mL) at a time, and mix about 2 minutes, or
until dough clings to hook and cleans sides of bowl.
Knead on Speed 2 about 2 minutes longer.
Place dough in greased bowl, turning to grease top.
Cover. Let rise in warm place, free from draft, about
1 hour, or until doubled in bulk.
Punch dough down and divide in half. Shape each
half into a loaf as directed on page 48. Place in
greased 81⁄2x41⁄2x21⁄2-inch (21x12x6-cm) baking pans.
Cover. Let rise in warm place, free from draft, about
1 hour, or until doubled in bulk.
Beat egg white and water together with a fork.
Brush tops of loaves with mixture. Sprinkle with
oatmeal. Bake at 375°F (190°C) for 40 minutes.
Remove from pans immediately and cool on wire
racks.
Yield: 32 servings (16 slices per loaf).
Per serving: About 134 cal, 4 g pro, 24 g carb,
3 g fat, 13 mg chol, 162 mg sod.
Page 56

54
Light Rye Bread
1
⁄4 cup (50 mL) honey
1
⁄4
cup (50 mL) light
molasses
2 teaspoons (10 mL)
salt
2 tablespoons (30 mL)
butter or margarine
2 tablespoons (30 mL)
caraway seed
1 cup (250 mL) boiling
water
2 packages active dry
yeast
3
⁄4 cup (175 mL) warm
water (105°F to
115° F [40° C to
46° C])
2 cups (500 mL) rye
flour
3
1
⁄2-4 cups (875mL-1 L)
all-purpose flour
Place honey, molasses, salt, butter, caraway seed,
and boiling water in small bowl. Stir until honey
dissolves. Cool to lukewarm.
Dissolve yeast in warm water in warmed mixer
bowl. Add lukewarm honey mixture, rye flour, and 1
cup (250 mL) all-purpose flour. Attach bowl and
dough hook to mixer. Turn to Speed 2 and mix
about 1 minute, or until well mixed. Stop and
scrape bowl if necessary.
Continuing on Speed 2, add remaining all-purpose
flour, 1⁄2 cup (125 mL) at a time, and mix about 2
minutes, or until dough clings to hook and cleans
sides of bowl. Knead on Speed 2 about 2 minutes
longer.
Place dough in greased bowl, turning to grease top.
Cover. Let rise in warm place, free from draft, about
1 hour, or until doubled in bulk.
Punch dough down and divide in half. Shape each
half into a round loaf. Place on two greased baking
sheets. Cover. Let rise in warm place, free from
draft, 45 to 60 minutes, or until doubled in bulk.
Bake at 350°F (180°C) for 30 to 45 minutes. Cover
loaves with aluminum foil for last 15 minutes if tops
brown too quickly. Remove from baking sheets
immediately and cool on wire racks.
Yield: 32 servings (16 slices per loaf).
Per serving: About 96 cal, 2 g pro, 20 g carb,
1 g fat, 0 mg chol, 143 mg sod.
Page 57

55
Dill Batter Bread
2 packages active dry
yeast
1
⁄2 cup (125 mL) warm
water (105°F to
115° F [40° C to
46° C])
4 tablespoons (60 mL)
honey, divided
2 cups (500 mL) large
curd cottage cheese
2 tablespoons (30 mL)
grated fresh onion
4 tablespoons (60 mL)
butter or margarine,
softened
3 tablespoons (45 mL)
dill seed
3 teaspoons (15 mL)
salt
1
⁄
2 teaspoon (2 mL)
baking soda
2 eggs
1 cup (250 mL) whole
wheat flour
3-3
1
⁄2 cups (750-875 mL)
all-purpose flour
Dissolve yeast in warm water in warmed mixer
bowl. Add 1 tablespoon (15 mL) honey and let
stand 5 minutes.
Add cottage cheese, remaining 3 tablespoons
(45 mL) honey, onion, butter, dill seed, salt, and
soda. Attach bowl and flat beater to mixer. Turn to
Stir Speed and mix about 30 seconds. Add eggs.
Continuing on Stir Speed, mix about 15 seconds.
Add whole wheat flour and 2 cups (500 mL)
all-purpose flour. Turn to Speed 2 and mix about 2
minutes, or until combined. Continuing on Speed 2,
add remaining flour, a little at a time, and mix until
dough forms a stiff batter. Stop and scrape bowl, if
necessary. Continuing on Speed 2, mix about 2
minutes longer.
Cover. Let rise in warm place, free from draft, about
1 hour, or until doubled in bulk.
Stir dough down. Place in two well-greased
81⁄2x41⁄2x21⁄2-inch (21x12x6-cm) baking pans or two
well-greased 11⁄2- to 2-quart (1.4 to 1.8 L)
casseroles. Cover. Let rise in warm place, free from
draft, about 45 minutes, or until doubled in bulk.
Bake at 350°F (180°C) for 40 to 50 minutes.
Remove from pans immediately and cool on wire
racks.
Yield: 32 servings (16 slices per loaf).
Per serving: About 98 cal, 4 g pro, 15 g carb,
3 g fat, 15 mg chol, 298 mg sod.
Page 58

56
Vegetable Cheese Bread
2 packages active dry
yeast
1 cup (250 mL) warm
water (105°F to
115° F [40° C to
46° C])
2 cups (500 mL) whole
wheat flour
3-3
1
⁄2 cups (750-875 mL)
all-purpose flour
2 tablespoons (30 mL)
sugar
2 teaspoons (10 mL)
salt
2 tablespoons (30 mL)
butter or margarine
1 cup (250 mL) warm
low-fat milk (105° F
to 115° F [40° C to
46° C])
1
⁄4 cup (50 mL) chopped
sun-dried tomatoes
2 teaspoons (10 mL)
instant minced onion
2 teaspoons (10 mL)
dried parsley leaves
1
⁄
2 cup (125 mL)
shredded sharp
Cheddar cheese
Dissolve yeast in warm water in small bowl. Set
aside.
Combine whole wheat flour, 2 cups (500 mL)
all-purpose flour, sugar, and salt in mixer bowl.
Attach bowl and dough hook to mixer. Turn to
Speed 2 and mix about 30 seconds. Continuing on
Speed 2, gradually add yeast mixture, butter, and
warm milk to flour mixture and mix about 11⁄2
minutes. Stop and scrape bowl. Add tomatoes,
onion, parsley, and cheese. Turn to Speed 2 and
mix about 30 seconds. Continuing on Speed 2, add
remaining flour, 1⁄2 cup (125 mL) at a time and mix
about 2 minutes, or until dough clings to hook and
cleans sides of bowl. Knead on Speed 2 about 2
minutes longer.
Place dough in greased bowl, turning to grease top.
Cover. Let rise in warm place, free from draft, about
1 hour, or until doubled in bulk.
Punch dough down and divide in half. Shape each
half into a loaf as directed on page 48. Place in
well-greased 81⁄2x41⁄2x21⁄2-inch (21x12x6-cm) baking
pans. Cover. Let rise in warm place, free from draft,
45 to 60 minutes, or until doubled in bulk.
Bake at 375°F (190°C) for 40 minutes. Remove from
pans immediately and cool on wire rack.
(Note: Loaves may need to be released by running
a knife around edges of pans.)
Yield: 32 servings (16 slices per loaf).
Per serving: About 99 cal, 3 g pro, 18 g carb,
2 g fat, 2 mg chol, 160 mg sod.
Page 59

57
Blueberry Oat Bread
2 cups (500 mL)
all-purpose flour
1 cup (250 mL) rolled
oats
1 cup (250 mL) sugar
1
1
⁄2 teaspoons (7 mL)
baking powder
1
⁄2 teaspoon (2 mL)
baking soda
1
⁄4 teaspoon (1 mL) salt
1
⁄4
teaspoon (1 mL)
all spice
3
⁄4 cup (175 mL) low-fat
milk
1
⁄2 cup (125 mL) butter
or margarine, melted
1 tablespoon (15 mL)
grated orange peel
2 eggs
1
1
⁄4 cups (300 mL) fresh
or frozen blueberries
(not thawed)
Combine dry ingredients in mixer bowl. Add milk,
butter, orange peel, and eggs. Attach bowl and flat
beater to mixer. Turn to Stir Speed and mix about
30 seconds. With spoon, gently stir in blueberries.
Spoon batter into 9x5x3-inch (23x13x7.5-cm)
baking pan that has been greased on the bottom
only. Bake at 350°F (180°C) for 55 to 65 minutes, or
until toothpick inserted in center comes out clean.
Cool in pan 10 minutes. Remove from pan and cool
completely on wire rack.
Yield: 16 servings (16 slices per loaf).
Per serving: About 196 cal, 3 g pro, 31 g carb,
7 g fat, 27 mg chol, 177 mg sod.
Basic Sweet Dough
3
⁄4 cup (175 mL) low-fat
milk
1
⁄
2 cup (125 mL) sugar
1
1
⁄4 teaspoons (6 mL) salt
1
⁄2 cup (125 mL) butter
or margarine
2 packages active dry
yeast
1
⁄
3 cup (75 mL) warm
water (105° F to
115° F [40° C to
46° C])
3 eggs, room
temperature
5
1
⁄2-61⁄2cups (1.375-1.625 L)
all-purpose flour
Place milk, sugar, salt, and butter in small saucepan.
Heat over low heat until butter melts and sugar
dissolves. Cool to lukewarm.
Dissolve yeast in warm water in warmed mixer
bowl. Add lukewarm milk mixture, eggs, and 5 cups
(1.25 L) flour. Attach bowl and dough hook to
mixer. Turn to Speed 2 and mix about 2 minutes.
Continuing on Speed 2, add remaining flour, 1⁄
2 cup
(125 mL) at a time, and mix about 2 minutes, or
until dough clings to hook and cleans sides of bowl.
Knead on Speed 2 about 2 minutes longer.
Place dough in greased bowl, turning to grease top.
Cover. Let rise in warm place, free from draft, about
1 hour, or until doubled in bulk.
Punch dough down and shape as desired for rolls or
coffee cakes.
Page 60

58
Cinnamon Swirl Rounds
1 cup (250 mL) firmly
packed brown sugar
1 cup (250 mL) sugar
1
⁄2 cup (125 mL) butter
or margarine,
softened
1
⁄4 cup (50 mL)
all-purpose flour
1
1
⁄2 tablespoons
(22.5 mL) cinnamon
1
⁄2 cup (125 mL)
chopped walnuts or
pecans
1 recipe Basic Sweet
Dough (see page 57)
Place brown sugar, sugar, butter, flour, cinnamon,
and walnuts in mixer bowl. Attach bowl and flat
beater to mixer. Turn to Speed 2 and mix about
1 minute.
Turn dough onto lightly floured surface. Roll dough
to 10x24-inch (25x60-cm) rectangle. Spread
sugar-cinnamon mixture evenly on dough. Roll
dough tightly from long side to form 24-inch
(60-cm) roll, pinching seam together. Cut into 24
slices, 1-inch (2.5-cm) each.
Place 12 rolls each in two greased 13x9x2-inch
(33x23x5-cm) baking pans. Cover. Let rise in warm
place, free from draft, 45 to 60 minutes, or until
doubled in bulk.
Bake at 350°F (180°C) for 20 to 25 minutes.
Remove from pans immediately. Spoon Caramel
Glaze over warm rolls.
Caramel Glaze
1
⁄3 cup (75 mL)
evaporated milk
2 tablespoons (30 mL)
brown sugar
1
1
⁄2 cups (375 mL)
powdered sugar
1 teaspoon (5 mL)
vanilla
Place evaporated milk and brown sugar in small
saucepan. Cook over medium heat until mixture
begins to boil, stirring constantly.
Place milk mixture, powdered sugar, and vanilla in
mixer bowl. Attach bowl and flat beater to mixer.
Turn to Speed 4 and beat about 2 minutes, or until
creamy.
Yield: 24 servings (1 roll per serving)
Per serving: About 338 cal, 6 g pro, 57 g carb,
10 g fat, 28 mg chol, 219 mg sod.
Page 61

59
Rapid Mix Cool Rise White Bread
6-7 cups (1.5-1.75 L)
all-purpose flour
2 tablespoons (30 mL)
sugar
3
1
⁄2 teaspoons (17 mL)
salt
3 packages active dry
yeast
1
⁄4 cup (50 mL) butter
or margarine,
softened
2 cups (500 mL) very
warm water (120° F
to 130° F [48° C to
54° C])
Place 51⁄2 cups (1.375 L) flour, sugar, salt, yeast, and
butter in mixer bowl. Attach bowl and dough hook
to mixer. Turn to Speed 2 and mix about 20 seconds.
Gradually add warm water and mix about 11⁄2 minutes
longer.
Continuing on Speed 2, add remaining flour, 2 cups
(500 mL) at a time, and mix about 2 minutes, or
until dough clings to hook and cleans sides of bowl.
Knead on Speed 2 about 2 minutes longer.
Cover dough with plastic wrap and a towel. Let rest
20 minutes.
Divide dough in half. Shape each half into a loaf as
directed on page 48. Place in greased 81⁄2x41⁄2x21⁄2-inch
(21x12x6-cm) baking pans. Brush each loaf with oil
and cover loosely with plastic wrap. Refrigerate 2 to
12 hours.
When ready to bake, uncover dough carefully. Let
stand at room temperature 10 minutes. Puncture
any gas bubbles which may have formed.
Bake at 400°F (200°C) for 35 to 40 minutes.
Remove from pans immediately and cool on wire
racks.
Yield: 32 servings (16 slices per loaf).
Per serving: About 110 cal, 3 g pro, 21 g carb,
2 g fat, 0 mg chol, 251 mg sod.
Page 62

60
Crusty Pizza Dough
1 package active dry
yeast
1 cup (250 mL) warm
water (105° F to
115° F [40° C to
46° C])
1
⁄2 teaspoon (2 mL) salt
2 teaspoons (10 mL)
olive oil
2
1
⁄2-31⁄2cups (625-875 mL)
all-purpose flour
1 tablespoon (15 mL)
cornmeal
Dissolve yeast in warm water in warmed mixer
bowl. Add salt, olive oil, and 21⁄2 cups (625 mL)
flour. Attach bowl and dough hook to mixer. Turn
to Speed 2 and mix about 1 minute.
Continuing on Speed 2, add remaining flour, 1⁄2 cup
(125 mL) at a time, and mix about 2 minutes, or
until dough clings to hook and cleans sides of bowl.
Knead on Speed 2 about 2 minutes longer.
Place dough in greased bowl, turning to grease top.
Cover. Let rise in warm place, free from draft, about
1 hour, or until doubled in bulk. Punch dough
down.
Brush 14-inch (35 cm) pizza pan with oil. Sprinkle
with cornmeal. Press dough across bottom of pan,
forming a collar around edge to hold toppings. Add
toppings, as desired. Bake at 450°F (230°C) for 15
to 20 minutes.
Yield: 4 servings (1⁄4 pizza per serving).
Per serving: About 373 cal, 11 g pro, 74 g carb,
3 g fat, 0 mg chol, 271 mg sod.
Banana Nut Bread
1
⁄3 cup (75 mL)
shortening
1
⁄2 cup (125 mL) sugar
2 eggs
1
3
⁄4 cups (425 mL)
all-purpose flour
1 teaspoon (5 mL)
baking powder
1
⁄2 teaspoon (2 mL)
baking soda
1
⁄2 teaspoon (2 mL) salt
1 cup (250 mL)
(2 medium) mashed
ripe banana
1
⁄2 cup (125 mL)
chopped walnuts or
pecans
Place shortening and sugar in mixer bowl. Attach
bowl and flat beater to mixer. Turn to Speed 6 and
beat about 1 minute. Stop and scrape bowl.
Continuing on Speed 6, beat about 1 minute
longer. Add eggs. Turn to Speed 4 and beat about
30 seconds. Stop and scrape bowl. Turn to Speed 6
and beat about 11⁄2 minutes.
Combine flour, baking powder, baking soda, and salt
in separate bowl. Add half of flour mixture and half
of mashed banana to mixer bowl. Turn to Stir Speed
and mix about 30 seconds. Add remaining flour and
banana. Continuing on Stir Speed, mix about 30
seconds. Stop and scrape bowl. Add walnuts.
Continuing on Stir Speed, mix about 15 seconds.
Pour mixture into greased and floured 9x5x3-inch
(23x13x7.5-cm) baking pan. Bake at 350° F (180° C)
for 40 to 45 minutes. Cool 5 minutes in pan.
Remove from pan and cool completely on wire rack.
Yield: 16 servings (16 slices).
Per serving: About 157 cal, 3 g pro, 21 g carb,
7 g fat, 27 mg chol, 131 mg sod.
Page 63

61
Baking Powder Biscuits
2 cups (500 mL)
all-purpose flour
4 teaspoons (20 mL)
baking powder
1
⁄2 teaspoon (2 mL) salt
1
⁄3 cup (75 mL)
shortening
2
⁄3 cup (150 mL) low-fat
milk
Melted butter or
margarine, if desired
Place flour, baking powder, salt, and shortening in
mixer bowl. Attach bowl and flat beater to mixer.
Turn to Stir Speed and mix about 1 minute. Stop
and scrape bowl. Add milk. Continuing on Stir
Speed, mix until dough starts to cling to beater.
Avoid overbeating.
Turn dough onto lightly floured surface and knead
about 20 seconds, or until smooth. Pat or roll to
1
⁄2-inch (1 cm) thickness. Cut with floured 2-inch
(5 cm) biscuit cutter.
Place on greased baking sheets and brush with
melted butter, if desired. Bake at 450°F (230°C) for
12 to 15 minutes. Serve immediately.
Yield: 12 servings (1 biscuit per serving).
Per serving: About 135 cal, 3 g pro, 17 g carb,
6 g fat, 1 mg chol, 183 mg sod.
Bran Muffins
1 cup (250 mL) boiling
water
1 cup (250 mL) wheat
bran
1 cup (250 mL) firmly
packed brown sugar
1
⁄2
cup (125 mL) sugar
1
⁄2 cup (125 mL)
shortening
2 eggs
2 cups (500 mL)
buttermilk
1 teaspoon (5 mL)
vanilla
2
1
⁄2 cups (625 mL)
all-purpose flour
2
1
⁄2 teaspoons (12 mL)
baking soda
1 teaspoon (5 mL)
baking powder
1
⁄2 teaspoon (2 mL) salt
2 cups (500 mL)
bran cereal flakes
Pour boiling water over bran in small bowl.
Set aside.
Place brown sugar, sugar, and shortening in mixer
bowl. Attach bowl and flat beater to mixer. Turn to
Speed 4 and beat about 1 minute. Add eggs. Turn
to Speed 4 and beat about 30 seconds. Add
buttermilk and vanilla. Turn to Stir Speed and mix
about 30 seconds. Stop and scrape bowl.
Add flour, baking soda, baking powder, and salt.
Turn to Stir Speed and mix about 30 seconds. Stop
and scrape bowl. Turn to Stir Speed and mix about
30 seconds longer. Gradually turn to Speed 4 and
beat about 1 minute. Add moistened bran and bran
cereal flakes. Turn to Stir Speed and mix about
30 seconds, or until ingredients are combined.
Spoon batter into greased or paper-lined muffin
pans. Bake at 400°F (200°C) for 20 minutes, or until
toothpick inserted in center comes out clean.
Remove from pans immediately. Serve warm.
Yield: 24 servings (1 muffin per serving).
Per serving: About 170 cal, 3 g pro, 29 g carb,
5 g fat,19 mg chol, 242 mg sod.
Tip: Batter can be refrigerated in tightly covered
container up to 1 week.
Page 64

62
Sour Cream Coffee Cake
1
⁄2 cup (125 mL) firmly
packed brown sugar
1
1
⁄2 teaspoons (7 mL)
cinnamon
1 cup (250 mL)
chopped walnuts or
pecans
3 cups (750 mL)
all-purpose flour
1
1
⁄2 cups (375 mL)
granulated sugar
3 teaspoons (15 mL)
baking powder
1 teaspoon (5 mL)
baking soda
1
⁄2 teaspoon (2 mL) salt
1 cup (250 mL) butter
or margarine,
softened
1 cup (250 mL)
reduced-fat sour
cream
1 teaspoon (5 mL)
vanilla
3 eggs
Combine brown sugar, cinnamon, and walnuts in
small bowl. Set aside.
Combine flour, granulated sugar, baking powder,
baking soda, and salt in mixer bowl. Add butter,
sour cream, and vanilla. Attach bowl and flat beater
to mixer. Turn to Speed 2 and mix about 45 seconds,
or until ingredients are combined. Stop and scrape
bowl. Turn to Speed 4 and beat about 11⁄2 minutes.
Stop and scrape bowl.
Turn to Stir Speed and add eggs, one at a time,
mixing about 15 seconds after each addition. Turn
to Speed 2 and mix about 30 seconds.
Spread half of batter in greased and floured
13x9x2-inch (33x23x5-cm) baking pan or
10-inch (25-cm) tube pan. Sprinkle with half of
cinnamon-sugar mixture. Spread remaining batter
in pan and top with remaining cinnamon-sugar
mixture. Bake at 350°F (180°C) for 40 to 50 minutes
(13x9x2-inch [33x23x5-cm] pan) or 50 to 60
minutes (10-inch [25-cm] tube pan). Serve warm.
Yield: 16 servings.
Per serving: About 362 cal, 6 g pro, 47 g carb,
17 g fat, 44 mg chol, 349 mg sod.
Caramel Apple Kuchen
1 recipe Basic Sweet
Dough (see page 57)
2 cups (500 mL) firmly
packed brown sugar
6 tablespoons (90 mL)
all-purpose flour
2 teaspoons (10 mL)
cinnamon
6 tablespoons (90 mL)
butter or margarine,
softened
6-8 apples (8 cups [2 L]),
peeled and thinly
sliced
Divide dough in half. Press each half into greased
13x9x2-inch (33x23x5-cm) baking pan. Gently press
edges 1⁄2 inch (1 cm) up sides.
Cover. Let rise in warm place, free from draft, 45 to
60 minutes, or until doubled in bulk.
Meanwhile, place brown sugar, flour, cinnamon,
and butter in mixer bowl. Attach bowl and flat
beater to mixer. Turn to Speed 2 and mix about
1 minute.
Arrange apple slices over dough in each of two
pans. Sprinkle evenly with brown sugar mixture.
Bake at 350°F (180°C) for 35 to 45 minutes, or until
golden brown and apples are tender. Serve warm.
Yield: 24 servings (12 pieces per kuchen).
Per serving: About 301 cal, 5 g pro, 54 g carb,
8 g fat, 27 mg chol, 207 mg sod.
Page 65

63
Pancakes
11⁄2 cups (375 mL)
all-purpose flour
2 teaspoons (10 mL)
baking powder
1 teaspoon (5 mL)
sugar
1
⁄2 teaspoon (2 mL) salt
1
⁄2 cup (125 mL) fat-free
egg substitute or 2
eggs
1
1
⁄4 cups (300 mL)
low-fat milk
3 tablespoons (45 mL)
shortening, melted
Combine flour, baking powder, sugar, and salt in
mixer bowl. Add all remaining ingredients. Attach
bowl and flat beater to mixer. Turn to Speed 4 and
mix about 30 seconds, or until ingredients are
combined. Stop and scrape bowl. Turn to Speed 4
and mix about 15 seconds, or until smooth.
Spray griddle or heavy skillet with no-stick cooking
spray. Heat griddle to medium-high heat. Pour
about 1⁄3 cup (75 mL) batter for each pancake onto
griddle. Cook 1 to 2 minutes, or until bubbles form
on surface and edges become dry. Turn and cook 1
to 2 minutes longer, or until golden brown on
underside.
Yield: 4 servings (2 pancakes per serving).
Per serving: About 318 cal, 11 g pro, 41 g carb,
11 g fat, 6 mg chol, 490 mg sod.
Crispy Waffles
2 cups (500 mL)
all-purpose flour
3 teaspoons (15 mL)
baking powder
2 tablespoons (30 mL)
sugar
1
⁄2 teaspoon (2 mL) salt
2 eggs, separated
1
1
⁄4 cups (300 mL)
low-fat milk
1
⁄4 cup (50 mL) butter
or margarine, melted
Combine flour, baking powder, sugar, and salt in
mixer bowl. Add egg yolks, milk, and butter. Attach
bowl and flat beater to mixer. Turn to Speed 4 and
mix about 30 seconds, or until ingredients are
combined. Stop and scrape bowl. Continuing on
Speed 4, mix about 15 seconds, or until smooth.
Pour mixture into another bowl. Clean mixer bowl.
Place egg whites in mixer bowl. Attach bowl and
wire whip to mixer. Turn to Speed 8 and whip until
whites are stiff but not dry. Gently fold egg whites
into flour mixture.
Spray waffle iron with no-stick cooking spray. Heat
waffle iron. Pour about 1⁄
3 cup (75 mL) batter for
each waffle onto iron. Bake 3 to 5 minutes, or until
golden brown.
Yield: 6 servings (1 waffle per serving).
Per serving: About 287 cal, 8 g pro, 39 g carb,
10 g fat, 75 mg chol, 441 mg sod.
Page 66

64
Multi-Function Attachment Pack
Attachments –
For More Information call 1-800-461-5681
Model 4FPPA
KitchenAid has packaged its three
most popular attachments in one
carton. It includes a Rotor
Slicer/Shredder (4RVSA), Food Grinder
(4FGA), and Fruit/Vegetable Strainer
Parts (4FVSP).
Food Grinder
Model 4FGA
Grinds meat, firm fruits and
vegetables, and dry bread.
Fruit/Vegetable Strainer
Model 4FVSFGA
Makes preparing jams, purées, sauces
and baby foods quick and easy.
o
®
KitchenA
Kitch
St. Joseph, Michig
enA
So
id
l
id S
an USA
t
ate Sp
O
f
f
e
S
e
t
i
d
r
2
4
6
8
lid
S
ta
te
S
O
f
f
p
e
S
e
t
i
d
r
C
2
o
4
n
tro
6
8
l
1
0
St. Joseph, Mic
S
o
id
l
id S
higan USA
t
ate Sp
O
f
f
e
S
e
t
i
d
r
C
C
o
n
t
ro
l
1
0
2
o
4
n
t
6
r
o
8
l
1
0
®
®
®
lid
S
ta
te
S
O
f
f
p
e
S
e
t
i
d
r
C
2
o
4
n
tro
6
8
l
1
0
Page 67

65
Attachments –
For More Information call 1-800-461-5681
Food Tray
8
ol
Model 4FT
Holds large quantities of food for
quicker and easier juicing, puréeing
and grinding. For use with 4FGA.
Sausage Stuffer
A
Model 4SSA
3
⁄8
" and
5
⁄8
" (10 and 16 mm) stuffing
tubes make Bratwurst, Kielbasa,
Italian or Polish Sausage and
breakfast links. For use with 4FGA.
Rotor Slicer/Shredder
Model 4RVSA
Includes 4 cones: thin and thick slicer,
fine and coarse shredder.
®
K
S
it
t
c
.
J
h
o
e
s
Solid State Speed Contr
n
e
p
A
h
id
,
M
i
c
h
i
g
a
n
U
S
A
O
ff
S
tir 2 4
6
S
o
id
lid
ig
a
S
n
U
S
ta
A
te
S
O
f
f
p
e
S
e
t
i
d
r
C
2
o
4
n
tro
6
8
l
1
0
KitchenAid
S
t
.
J
o
s
S
e
p
h
o
,
M
lid
i
c
h
i
g
a
S
n
U
S
ta
A
te
S
O
f
f
p
e
S
e
t
i
d
r
C
2
o
4
n
tro
6
8
l
1
0
Page 68

66
Grain Mill
Model 4GMA
Grinds low-moisture grains from very
fine to extra coarse textures.
Can Opener
Model 4CO
Opens cans quickly, leaves edges
smooth and snag-free.
Attachments – For More Information call 1-800-461-5681
Pasta Roller Set
Model 4KPRA
Makes lasagna noodles, fettuccini and
linguine fini. Three piece set includes
Roller, Fettuccine Cutter and Linguine
Fini Cutter.
enAid
S
o
lid
ic
h
i
g
a
S
n
U
S
ta
A
te
S
O
f
f
p
e
S
e
t
i
d
r
C
2
o
4
n
tro
6
8
l
1
0
KitchenAid
S
t
.
J
o
s
S
e
p
h
o
,
M
lid
i
c
h
ig
a
S
n
U
S
ta
A
te
S
O
f
f
p
e
S
e
t
i
d
r
C
2
o
4
n
tro
6
8
l
1
0
KitchenAid
S
t
.
J
o
s
So
e
p
h
,
M
lid S
i
c
h
i
g
a
n
U
S
t
A
ate Sp
O
f
f
e
S
e
t
i
d
r
C
2
o
4
n
tro
6
8
l
1
0
Page 69

67
Citrus Juicer
Model 4JE
Juices citrus fruits quickly and
thoroughly, strains out pulp.
Pasta Maker
Model 4SNFGA
5 plates make thin and thick
spaghetti, flat noodles, macaroni, and
lasagna. Comes with 4FGA.
Water Jacket
D
M
a
d
Model 4K5AWJ
Fill with ice, cold or hot water to keep
cold mixtures cold, hot ones hot.
Attachments –
For More Information call 1-800-461-5681
ta
te
S
p
e
S
e
t
i
d
r
C
2
o
4
n
t
6
ro
8
l
1
0
Heavy Duty
n
U
:
N
O
I
T
U
A
C
®
L
O
S
S
H
5
SE
l K
U
e
d
O
o
H
M
5
2
LY
3
N
tts
a
O
E
. W
S
x
a
U
M
5
1
1
lts
o
V
0
6
z
H
ofremoving parts
g
n
i
t
r
e
s
n
i
e
r
o
f
e
b
g
u
l
p
Page 70

68
Pouring Shield
Model 4KPS2CL
Minimizes splash-out when adding
ingredients.
Attachments –
For More Information call 1-800-461-5681
Mixer Covers
Model 4K45CR
(For 41⁄2 quart mixers)
Model 4K5CR
(For 5 quart mixers)
To protect mixers when not in use.
Made of cotton and polyester, they
are machine washable.
Bowl Covers
Model 4KBC90N
(For 41⁄2 quart mixers)
Model 4KBC5N
(For 5 quart mixers)
2 pack, non-sealing bowl covers are
dishwasher-safe (top rack).
K
i
t
c
h
e
n
St
A
. Josep
i
d
h,
M
ichig
an
Solid State Speed Control
U
SA
O
f
f
S
t
i
r
2
4
6
8
1
0
C
A
U
T
I
O
Pasta
&
N
:
U
n
p
H
e
l
u
g
b
e
f
o
Sauces
a
v
y
D
u
ty
r
e
i
n
s
e
r
t
i
n
g
o
f
r
e
m
o
v
i
n
g
p
a
r
t
s
Page 71

69
Page 72

70
Carte d'enregistrement de guarantie
Avant d’utiliser votre batteur,
remplissez la fiche d’inscription
fournie avec le manuel Directives et
Recettes et postez-la. Cette carte nous
permet de vous contacter dans le cas
peu probable d’un avis de sécurité et
nous aide à nous conformer aux
directives de la législation sur la
sécurité des produits de
consommation. CETTE CARTE NE
CONFIRME PAS VOTRE GARANTIE.
GARDEZ UNE COPIE DE LA
FACTURE DE VENTE INDIQUANT LA
DATE D'ACHAT DE VOTRE BATTEUR
SUR SOCLE. LA PREUVE D'ACHATEST
NECESSAIRE POUR LES SERVICES
DANS LE CADRE DE LA GARANTIE.
Indiquez les renseignements suivants
pour votre dossier personnel :
Numéro du modèle____________________________________________________
Date d’achat _________________________________________________________
Nom du commerçant __________________________________________________
Adresse______________________________________________________________
Numéro de téléphone _________________________________________________
Page 73

71
Table des matières
Carte d'enregistrement de garantie .................................................................70
Consignes de securite importantes...................................................................72
Spécifications électriques .................................................................................73
Caractéristiques de votre batteur
Modèles à élévateur de bol..............................................................................74
Modèles à tête inclinable.................................................................................77
Utilisation des accessoires KitchenAid
®
.............................................................79
Durée de mélange ...........................................................................................80
Utilisation du batteur.......................................................................................80
Entretien et nettoyage .....................................................................................80
Jeu entre le fouet et le bol...............................................................................81
Guide de réglage de la vitesse – Batteurs à 10 vitesses ....................................82
Conseils de mélange........................................................................................83
Accessoires – Renseignements généraux ..........................................................85
Guide de réglage de la vitesse – Batteurs Commerciaux...................................86
Garantie ..........................................................................................................87
Comment arranger un service après-vente au titre de la garantie - Canada ......87
Comment arranger un service après-vente en dehors du cadre de la garantie...88
Dépannage......................................................................................................88
Recettes...........................................................................................................89
Hors-d’oeuvre, entrées et légumes ............................................................89
Gâteaux et glaçages................................................................................100
Biscuit, bâtonnets et bonbons.................................................................113
Tartes et desserts.....................................................................................123
Pain à la levure et pains éclairs................................................................130
Instructions générales pour faire et pétrir la pâte à la levure....................130
Conseils pour la fabrication de pain ........................................................131
Accessoires KitchenAid®.................................................................................153
Page 74

72
CONSIGNES DE SECURITE
Lorsque vous utilisez des appareils électriques, il importe de suivre les consignes
de sécurité de bases suivantes :
1. Lisez toutes les directives.
2. Pour éviter contre les risqué de choc électrique, ne mettez pas le batteur
dans l’eau, ni dans tout autre liquide.
3. Il est indispensable d’exercer une surveillance étroite lors de l’emploi à proximité
d’enfants de cet appareil ou de tout autre appareil électroménager.
4. Débranchez le batteur lorsque vous ne l’utilisez pas, avant de mettre ou de
sortir des pièces et avant de le nettoyer.
5. Évitez tout contact avec les pièces en mouvement. Tenez les mains, cheveux,
vêtements ainsi que les spatules et autres ustensiles à l’écart du batteur
lorsqu’il fonctionne afin de réduire le risque de blessures ou de détériorations
du batteur.
6. Ne laissez pas le batteur au bord de la surface de travail ou sans surveillance
Lorsque utilisé pour des charges volumineuses ou à vitesses élevées, le
mélangeur peut se déplacer sur la surface de travail.
7. N’utilisez pas le batteur si le cordon ou la fiche est endommagé ou s’il présente
un défaut de fonctionnement, s’il est tombé ou s’il a été endommagé de
quelque manière que ce soit. Pour de plus amples informations, appelez le
centre de service autorisé KitchenAid au 1-800-461-5681.
8. L’utilisation d’accessoires non recommandés ou vendus par KitchenAid pose
des risques d’incendie, de choc électrique ou des blessures.
9. N’utilisez pas le batteur à l’extérieur.
10. Ne laissez pas le cordon pendre du bord de la table ou du comptoir.
11. Enlevez le fouet plat, le fouet fin ou le crochet pétrisseur avant de laver le
batteur.
12. Ce produit est conçu pour un usage domestique seulement. (Sauf le modèle
4KSMC50S qui est désigné pour un usage commercial.)
CONSERVEZ CES DIRECTIVES
Page 75

73
Votre sécurité et celle des autres sont très importantes.
De nombreux messages de sécurité figurent dans ce manuel et sur l’appareil.
Lisez toujours tous les messages de sécurité et respectez-les.
Voici le symbole d’alerte à la sécurité.
Ce symbole vous avertit des dangers potentiels pouvant causer
blesser ou tuer toute personne à proximité de l’appareil.
Les messages de sécurité suivent le symbole d’alerte à la sécu-
rité et le mot « DANGER » ou « AVERTISSEMENT ». Ces mots
ont la signification suivante :
Vous risquez d’être tué ou gravement
blessé si vous ne suivez pas immédiatement les directives.
Vous risquez d’être tué ou gravement
blessé si vous ne suivez pas les directives.
Tous les messages de sécurité identifient le danger potentiel, expliquent comment
réduire le risque de blessures et ce qui peut arriver si vous ne suivez pas les directives.
!
!
DANGER
!
Spécifications électriques
Risque de choc électrique
Branchez l’appareil dans une
prise de courant 3 broches à
contact de mise à la terre.
N’enlevez pas la broche de
mise à la terre.
N’utilisez pas d’adaptateur.
N’utilisez pas de rallonge
électrique.
La non-conformité à ces
directives peut entraîner la
mort, un incendie ou un choc
électrique.
AVERTISSEMENT
!
Volts : 120 V c.a. seulement.
Hertz : 60
La consommation d'électricité mesurée
en watts pour votre batteur est imprimé
sur le jonc ou sur la plaque de série.
Modèle 4KSMC50S seulement :
350 Watts
120 Volts
3.0 Ampères
2/5 Chevaux-vapeur
60 Hertz
AVERTISSEMENT
Page 76

74
*
Caractéristiques du batteur sur
socle à élévateur de bol
Culasse
du moteur
Vis de réglage de la
hauteur du bol
(non illustré, voir page 81)
Poignée pour
soulever le bol
(non illustré)
Loquet à ressort et cheville du bol
(non illustré)
Bouton de
blocage
Connecteur
d'accessoires
(voir page 85)
Goujon de guidage
Fouet fin
(voir page 79)
Fouet plat
(voir page 79)
Crochet
pétrisseur
(voir page 79)
Magnette de reglage
de la vitesse
(voir page 79)
Support
du bol
Arbre du
fouet
Bol en acier
inoxydable
de 4,73 l
(5 pintes)
*Les modèle élévateur de bol incluent 4K5SS, 4KSM5, 4KSM50P, 4KSMC50S
Les modèles commerciaux ne sont pas illustrés.
Réenclenchement en cas de
surcharges Modèle 4KSMC50S
seulement
(non illustré)
Solid State Speed Control
K
it
c
h
e
n
S
A
t. J
id
o
s
e
p
h
, M
ic
h
ig
a
n
U
S
A
O
ff
S
t
ir 2
4
6
8
1
0
C
A
U
T
I
O
N
:
U
n
Heavy Duty
p
l
u
g
b
e
f
o
r
e
i
n
s
e
r
t
i
n
g
o
f
r
e
m
o
v
i
n
g
p
a
r
t
s
Page 77

75
Assemblage de votre batteur
Pour fixer le bol
1. Assurez-vous que magnette de
reglage de la vitesse est à la
position OFF et que le batteur est
débranché.
2. Abaissez la poignée du bol
3. Placez les supports du bol sur les
ergots d’alignement.
4. Appuyez sur la partie arrière du
bol jusqu’à ce que les ergots
s’enclenchent dans les loquets à
ressort.
5. Levez le bol avant de mélanger
6. Branchez le batteur dans une prise
à trois broches mise à la terre.**
Pour retirer le bol
1. Assurez-vous que magnette de
reglage de la vitesse est à la
position OFF et que le batteur est
débranché.
2. Abaissez la poignée du bol.
3. Retirez le fouet plat, le fouet fin,
ou le crochet pétrisseur.
4. Saisissez la poignée du bol, levez
le bol en le tenant droit et retirezle des ergots d’alignement.
Pour lever le bol
1. Tournez la poignée de façon à ce
qu’elle soit droite.
2. Le bol doit toujours être soulevé et
verrouillé durant le mélange.
Pour abaisser le bol
1. Tournez la poignée vers l’arrière et
le bas.
Pour fixer le fouet plat, le fouet
fin, ou le crochet pétrisseur
1. Faites glisser magnette de réglage
de la vitesse à la position OFF puis
débranchez le batteur.
2. Glissez le fouet
plat sur l’arbre
du fouet et
enfoncez-le le
plus loin
possible en poussant vers le haut.
3. Tournez le fouet vers la droite, en
accrochant le fouet sur l’ergot
situé sur l’arbre.
4. Branchez le batteur dans une prise
à trois broches mise à la terre.**
Pour enlever le fouet plat, le
fouet fin, ou le crochet pétrisseur
1. Faites glisser magnette de réglage
de la vitesse à la position OFF, puis
débranchez le batteur
2. Poussez le fouet vers le haut, le
plus loin possible, puis tournez-le
pour le décrocher
3. Retirez le fouet de l’arbre.
4. Branchez le batteur dans une prise
à trois broches mise à la terre.**
LEVER
Risque de blessure
Débranchez le batteur avant
d’insérer ou de retirer les fouets.
Débranchez le batteur avant de
le nettoyer.
Ne pas suivre ces directives peut
se traduire par des os brisés ou
des coupures.
ERGOT
AVERTISSEMENT
!
** Voir page 73.
Page 78

** Voir page 73.
Batteur domestique Réglage de
la VITESSE
Branchez le batteur dans une prise à
trois broches mise à la terre.** Le
réglage de vitesse doit toujours être
au plus bas pour le démarrage, puis
augmenté progressivement à la
vitesse supérieure recherchée afin
d’éviter les éclaboussures des
ingrédients hors du bol. Reportezvous aux pages 79, 82 pour consulter
le Guide de réglage de la vitesse.
Solid State Speed Control
Réenclenchement en cas de
surcharges
Modèle 4KSMC50S
seulement
Si le batteur cesse de
fonctionner en raison
d’une surcharge, le
réenclenchement en cas de
surcharges se déclanchera
automatiquement et le batteur
s’éteindra. Réglez la vitesse à la
position OFF. Attendez quelques
minutes, puis réenclenchez magnette
de remise en marche. Augmentez
progressivement à la vitesse
supérieure recherchée et continuez le
mélange.
C
76
Off Stir 2 4 6 8 10
O
t
se
e
R
d
rloa
ve
Page 79

77
*
Caractéristiques du modèle de
batteur-sur socle à tête inclinable
Culasse du moteur
Vis de réglage
de la hauteur
du bol (voir page 81)
Levier de
verrouillage de la
culasse du
moteur
(non illustré)
Bouton de blocage
Connecteur
d'accessoires
(voir page 85)
Fouet Plat
(voir page 79)
Fouet fin
(voir page 79)
Crochet
pétrisseur
(voir page 79)
Magnette de
reglage de la
vitesse (voir
page 79)
Plaque de serrage du bol
Arbre du fouet
Bol en acier
inoxydable
de 4,26 l
(4,5 pintes)
et de 4,73 l
(5 pintes)
*Les modèles de 4,26 l (4,5 pintes) incluent 4K45, 4KSM90, 4KSM110PS
*Le modèle de 4,73 l (5 pintes) est 4KSM150
Solid State Speed Control
id
A
n
e
h
itc
K
St. Joseph, Michigan USA
s
t
r
a
p
g
n
i
v
o
m
e
r
f
o
g
n
i
t
r
e
s
n
i
e
r
o
f
e
b
g
u
l
p
n
U
:
N
O
0
I
T
U
A
C
1
8
6
4
tir 2
S
ff
O
Page 80

Assemblage de votre batteur à tête inclinable
** Voir page 73.
78
Pour fixer le bol
1. Assurez-vous que magnette de
réglage de la vitesse est à la
position OFF et que le batteur est
débranché.
2. Relevez la culasse du moteur.
3. Placez le bol sur les plaques de
serrage du bol.
4. Tournez délicatement le bol dans
le sens des aiguilles d’une montre.
5. Branchez le batteur dans une prise
à trois broches mise à la terre.**
Pour retirer le bol
1. Assurez-vous que magnette de
réglage de la vitesse est à la
position OFF et que le batteur est
débranché.
2. Relevez la culasse du moteur.
3. Tournez le bol dans le sens inverse
des aiguilles d’une montre.
Pour fixer le fouet plat, le fouet
fin, ou le crochet pétrisseur
1. Faites glisser magnette de réglage
de la vitesse à la position OFF et
débranchez.
2. Soulevez la culasse du moteur.
3. Glissez le fouet plat sur l’arbre du
fouet et enfoncez-le le plus loin
possible en poussant vers le haut.
4. Tournez le fouet vers la droite, en
accrochant le fouet sur l’ergot
situé sur l’arbre.
5. Branchez le batteur dans une prise
à trois broches mise à la terre.**
Pour enlever le fouet plat, le
fouet fin, ou le crochet pétrisseur
1. Faites glisser magnette de réglage
de la vitesse à la position OFF et
débranchez.
2. Poussez le fouet
vers le haut, le
plus loin possible,
puis tournez-le
vers la gauche pour le décrocher.
3. Retirez le fouet de l’arbre
4. Branchez le batteur dans une prise
à trois broches mise à la terre.**
Pour verrouiller la culasse du
moteur
1. Assurez-vous que la culasse du
moteur est complètement
abaissée.
2. Placez le levier de verrouillage en
position VERROUILLAGE.
3. Avant le mélange, éprouvez le
loquet en essayant de soulever la
culasse.
ON
OFF
Risque de blessure
Débranchez le batteur avant
d’insérer ou de retirer les fouets.
Débranchez le batteur avant de
le nettoyer.
Ne pas suivre ces directives peut
se traduire par des os brisés ou
des coupures.
AVERTISSEMENT
!
ERGOT
Lock Unlock
Page 81

Pour opérer le réglage de la
vitesse
Branchez le batteur dans une prise à
trois broches mise à la terre.** Le
réglage de vitesse doit toujours être
au plus bas pour le démarrage, puis
augmentez progressivement à la
vitesse supérieure recherchée afin
d’éviter les éclaboussures des
ingrédients hors du bol. Reportezvous à la page 80 pour consulter le
Guide de réglage de la vitesse.
Pour déverrouiller la culasse du
moteur
1. Placez le levier en position
DÉVERROUILLAGE.
REMARQUE : Lors de l’utilisation du
batteur, la culasse du moteur doit être
gardée en tout temps en position
VERROUILLAGE.
79
** Voir page 73.
Utilisation des accessoires KitchenAid
®
Fouet plat pour préparations standard à épaisses :
gâteaux biscuits
glaçages à la crème pains éclairs
bonbons pains de viande
biscuits pommes de terre en purée
pâte à tarte
Fouet fin pour les préparations auxquelles il faut incorporer de l’air :
œufs gâteaux éponge
blancs d’œufs gâteaux des anges
crème épaisse mayonnaise
glaçages bouillis certains bonbons
Crochet pétrisseur pour mélanger et pétrir des pâtes à levure :
pains brioches
petits pains mollets petits pains au lait
Solid State Speed Control
Off Stir 2 4 6 8 10
Page 82

80
Durée de mélange
Le batteur KitchenAid®mélange plus
rapidement et plus homogène que la
plupart des autres batteurs
électriques. Par conséquent, la durée
de mélange indiquée dans la plupart
des recettes doit être ajustée pour
éviter un fouettement excessif. Par
exemple, dans le cas des gâteaux, la
durée de fouettement peut être 2 fois
plus courte que celle requise pour les
autres batteurs.
Utilisation du batteur
REMARQUE : Ne raclez pas le bol
lorsque le batteur est en fonctionnement.
Le bol et le fouet sont conçus pour
assurer une homogénéité du mélange
sans raclage fréquent. Il suffit
habituellement de racler le bol une ou
deux fois durant le mélange. Éteignez
l’appareil avant de racler.
Le batteur peut s’échauffer lorsqu’il
fonctionne. Dans le cas de charges
importantes et d’une durée de
mélange prolongée, il est possible
que vous ne puissiez pas toucher
confortablement le dessus de
l’appareil. C’est normal.
Entretien et nettoyage
Risque de blessure
Débranchez le batteur avant
d’insérer ou de retirer les fouets.
Débranchez le batteur avant de
le nettoyer.
Ne pas suivre ces directives peut
se traduire par des os brisés ou
des coupures.
AVERTISSEMENT
!
Le bol, le fouet plat blanc et le
crochet pétrisseur blanc peuvent
passer au lave-vaisselle automatique.
Vous pouvez aussi les nettoyer
soigneusement à l’eau savonneuse
chaude puis les rincer complètement
avant de les faire sécher.
Le fouet fin, le crochet pétrisseur poli
et le fouet plat poli doivent être lavés
à la main, puis séchés
immédiatement. Ne passez pas le
fouet fin, le crochet pétrisseur poli et
le fouet plat poli au lave-vaisselle. Ne
stockez pas les fouets sur l'arbre.
REMARQUE : Assurez-vous toujours
de débrancher le batteur avant de le
nettoyer Essuyez le batteur à l’aide
d’un chiffon humide doux. N’utilisez
pas de produits d'entretiens ménagers
ou commerciaux N’immergez pas
l’appareil dans l’eau Essuyez
fréquemment l’arbre du fouet pour
enlever tout résidu pouvant
s’accumuler.
Page 83

81
Jeu entre le fouet et le bol
Votre batteur est réglé en usine de manière à ce que le jeu entre le fouet plat et
le fond du bol soit minimal. Si pour quelle que raison que ce soit le fouet plat
heurte le fond du bol ou que l’espace entre le fouet et le fond du bol est trop
important, le jeu peut être corrigé de la façon suivante :
Modèle à tête inclinable
• Débranchez le batteur.
• Soulever la culasse du moteur.
•Tournez la vis (A) LÉGÈREMENT dans le sens
contraire des aiguilles d’une montre (gauche)
pour monter le fouet plat ou dans le sens des
aiguilles d’une montre (droit) pour le baisser.
• Réglez le fouet plat de façon à dégager tout
juste la surface du bol.
Si vous réglez excessivement la vis, la manette
de verrouillage du bol risque de ne pas se
bloquer en place.
Modèles à élévateur de bol
• Débranchez le batteur.
• Placez le levier du bol en position abaissée.
•Tournez la vis (B) LÉGÈREMENT dans le sens
contraire des aiguilles d’une montre (gauche)
pour monter le fouet plat et dans le sens des
aiguilles d’une montre (droit) pour le baisser.
• Réglez le fouet plat de façon à dégager tout
juste la surface du bol.
REMARQUE : Réglé adéquatement, le fouet plat ne heurtera ni le fond ni les
parois du bol. Si le fouet plat ou le fouet fin est mal réglé (trop près du fond) et
qu’il heurte le fond du bol, le revêtement du fouet plat peut disparaître ou les
fils métalliques du fouet fin peuvent percer par usure.
A
B
Page 84

82
Guide de Réglage de la Vitesse –
Batteurs à 10 Vitesses
Nombre de vitesses
Agiter
Vitesse BRASSAGE Pour un brassage, un mélange, un empâtage,
ou un démarrage de toutes les procédures de
mélange. Utilisez cette vitesse pour ajouter de
la farine et des ingrédients secs, pour écraser,
ajouter des ingrédients liquides à sec, et
combiner les mélanges épais.
2 MÉLANGE LENT Pour le mélange lent, l’empâtage et le
brassage rapide. Utilisez cette vitesse pour
mélanger les pâtes épaisses et les bonbons,
commencer à presser en purée des pommes
de terre et d’autres légumes, incorporer la
matière grasse à la farine, mélanger les pâtes
claires ou qui éclaboussent et mélanger et pétrir
la pâte à levure. Utilisez avec l’ouvre-boîte.
4 MÉLANGE, Pour mélanger les pâtes semi-épaisses comme
BATTAGE des biscuits. Utilisez cette vitesse pour travailler
le sucre et la matière grasse et ajouter le sucre
aux blancs d’œufs pour les meringues. Vitesse
moyenne pour les mélanges à gâteaux. Utilisez
avec : Broyeur d’aliments, dis positif rotatif à
trancher/déchiqueter et tamis à fruits/légumes.
6BATTAGE, Pour un battage à vitesse moyenne élevée
CRÉMAGE (crémage) ou fouettage. Utilisez pour finir de
mélanger la pâte à gâteau, la pâte à beignets et
autres pâtes. Vitesse élevée pour les mélanges à
gâteaux. Utilisez avec le presse-agrumes.
8BATTAGE RAPIDE, Pour fouetter la crème, les blancs d’œufs
FOUETTAGE glaçages bouillis.
10 FOUETTAGE RAPIDE Pour fouetter de petites quantités de crème
ou de blancs d’œufs. Utilisez avec l’accessoire
pour fabriquer les pâtes et le moulin à grains.
REMARQUE : La vitesse élevée ne sera pas
maintenue dans le cas de charges importantes
comme c’est le cas lorsque l’accessoire pour
fabriquer les pâtes ou le moulin à grains est
utilisé.
REMARQUE : Le levier de contrôle de vitesse peut être réglé entre les vitesses
indiquées dans le tableau ci-dessus pour obtenir les vitesses 3, 5, 7 et 9 si un
réglage plus précis est nécessaire. N’excédez pas la 2e vitesse lorsque vous
préparez des pâtes à levure, car cela peut endommager le batteur.
Page 85

83
Conseils de mélange
Adaptez votre recette au batteur
Les directives de mélange pour les
recettes, figurant dans ce manuel,
peuvent vous guider dans l’adaptation
de vos recettes favorites, pour la
préparation, au batteur KitchenAid
®
.
Cherchez des recettes similaires aux
vôtres, puis adaptez-les pour suivre les
méthodes mentionnées dans les
recettes similaires de KitchenAid.
Par exemple, la méthode « mélange
rapide » (quelquefois appelée méthode
« versage ») convient parfaitement
pour les gâteaux simples comme le
Gâteau jaune rapide ou le Gâteau
blanc facile dont les recettes figurent
dans le présent manuel Cette méthode
demande de travailler les ingrédients
secs avec tous, ou presque tous, les
ingrédients liquides en une seule
étape.
Les gâteaux plus élaborés comme la
Tourte à la banane aux noix et au
caramel doivent être préparés à l’aide
de la méthode de mélange
traditionnelle. Cette méthode vous
permet de bien mélanger (crémer) le
sucre et la matière grasse, le beurre ou
la margarine avant l’ajout d’autres
ingrédients.
Pour tous les gâteaux, la durée de
mélange peut différer parce que le
batteur KitchenAid®travaille plus
rapidement que les autres batteurs. En
générale, le mélange d’une pâte à
gâteau avec le batteur KitchenAid
®
prendra deux fois moins de temps que
la durée indiquée dans la plupart des
recettes à gâteaux.
Pour trouver la durée de mélange
idéale, observez la pâte ou la
préparation et mélangez seulement
jusqu’à obtenir l’apparence recherchée
décrite dans votre recette, par exemple
une apparence « lisse et crémeuse »
Pour sélectionner la vitesse de
mélange idéale, consultez le Guide de
réglage de la vitesse aux pages 82 et
84.
Ajout des ingrédients
Ajoutez toujours les ingrédients aussi
près que possible des parois du bol et
non directement dans la zone du fouet
en mouvement. Vous pouvez utiliser
l’écran anti-projection pour simplifier
l’ajout des ingrédients.
REMARQUE : Si les ingrédients qui se
trouvent dans le fond du bol ne sont
pas bien mélangés, cela signifie que le
fouet n’est pas suffisamment près du
fond du bol. Consultez la section « Jeu
entre le fouet et le bol » à la page 81.
Mélanges à gâteaux
Lorsque vous préparez des mélanges
à gâteaux du commerce, utilisez la 2e
vitesse comme vitesse basse, la 4e
vitesse comme vitesse moyenne et la
6e vitesse comme vitesse élevée. Pour
obtenir de meilleurs résultats,
mélangez la pâte selon le temps
indiqué sur l’emballage.
Ajout de noix, de raisins ou de
fruits confits
Suivez chaque recette pour connaître
les directives sur l’ajout de ces
ingrédients. En général, les matières
solides doivent être incorporées au
cours des dernières secondes de
mélange à la vitesse d'agitation La pâte
doit être suffisamment épaisse pour
que les fruits ou les noix ne tombent
pas au fond du moule durant la
cuisson. Les fruits collants doivent être
saupoudrés de farine afin qu’ils soient
mieux répartis dans la pâte.
Mélanges liquides
Les mélanges renfermant de grandes
quantités d’ingrédients liquides
doivent être mélangés à basse vitesse
pour éviter les éclaboussures.
Augmentez la vitesse seulement
lorsque le mélange a épaissi.
Page 86

84
Blancs d’œufs
Placez les blancs d’œufs à température
ambiante dans un bol sec et propre
Fixez le bol et le fouet fin. Pour éviter les
éclaboussures, tournez graduellement
magnette à la vitesse désignée et
fouettez jusqu’à obtenir l’effet désiré.
Consultez le tableau ci-dessous.
QUANTITÉ VITESSE
1 blanc
d’œuf ......GRADUELLEMENT à 10
2-4 blancs
d’œufs.......GRADUELLEMENT à 8
6 blancs d’œufs
ou plus ......GRADUELLEMENT à 8
Étapes de fouettage
Les blancs d’œufs sont fouettés
rapidement grâce au batteur
KitchenAid®. Soyez donc très attentif
pour éviter tout fouettage excessif.
Cette liste vous indique à quoi vous
attendre.
Mousseux
Grosses bulles d’air inégales.
Commence à garder sa forme
Les bulles d’air sont petites et
compactes ; le produit est blanc.
Pointe souple
Les pointes tombent lorsque le fouet
est enlevé
Presque ferme
Des pointes bien nettes se forment
lorsque le fouet est enlevé, mais les
blancs d’œufs sont souples.
Ferme sans être sec
Des pointes fermes et nettes se
forment lorsque le fouet est enlevé.
Les blancs d’œufs présentent une
couleur et une brillance uniformes.
Ferme et sec
Des pointes fermes et nettes se
forment lorsque le fouet est enlevé.
Les blancs d’œufs présentent une
apparence tachetée et matte.
Crème fouettée
Versez la crème à fouetter froide
dans un bol refroidi. Fixez le bol et le
fouet fin au batteur. Pour éviter les
éclaboussures, tournez progressivement
magnette à la vitesse désignée et
fouettez jusqu’à obtenir l’état désiré.
Consultez le tableau ci-dessous.
QUANTITÉ VITESSE
50 ml
(1⁄4 tasse) ......GRADUELLEMENT à 10
125 ml
(1⁄2 tasse) ......GRADUELLEMENT à 10
250 ml
(1 tasse) ........GRADUELLEMENT à 8
500 ml
(2 tasse) ........GRADUELLEMENT à 8
Étapes de fouettage
Surveillez la crème de près durant le
fouettage. Le batteur KitchenAid
®
fouette si rapidement que seules
quelques secondes séparent les
étapes de fouettage. Regardez si les
caractéristiques suivantes sont
présentes :
Commence à épaissir
La crème est épaisse et ressemble à
une crème anglaise.
Garde sa forme
La crème forme des pointes souples
lorsque le fouet fin est enlevé. Dans le
cas des desserts et des sauces, la
crème peut être incorporée à d’autres
ingrédients.
Ferme
La crème présente des pointes nettes
et fermes lorsque le fouet fin est
enlevé. Utilisez la crème pour napper
des gâteaux ou d’autres desserts ou
pour fourrer des choux à la crème.
Page 87

85
** Voir page 73.
Connecteur
La douille de prise
d’accessoires
Le bouton
de blocage
Entaille
Ergot
Logement d’arbre des accessoires Encoche
‡
L’arbre de commande
d’accessoires
‡
‡
Ne fait pas partie du batteur.
Accessoires
Pour fixer
1. Arrêtez le batteur et débranchez-le.
2. Desserrez magnette d’accessoires en
le tournant dans le sens contraire
des aiguilles d’une montre.
3. Enlevez le couvercle de la prise
d’accessoires.
4. Insérez le logement d’arbre des
accessoires dans la prise
d’accessoires. Assurez-vous que
l’arbre de commande d’accessoires
s’emboîte dans la douille carrée de
la prise d’accessoires. Il peut être
nécessaire de faire tourner
l’accessoire d’avant en arrière.
Lorsque l’accessoire est bien placé,
l’ergot situé sur l’accessoire
s’emboîte dans l’encoche sur le
rebord de la prise
5. Serrez magnette d’accessoires en
le tournant dans le sens des
aiguilles d’une montre jusqu’à ce
que l’accessoire soit
complètement assujetti au
batteur.
6. Branchez l’appareil dans une prise
de courant 3 broches à contact de
mise à laterre.**
Pour enlever
1. Arrêtez le batteur et débranchez-le.
2. Desserrez magnette d’accessoires
en le tournant dans le sens
contraire des aiguilles d’une
montre. Tournez légèrement
l’accessoire d’avant en arrière au
moment de le retirer.
3. Replacez le couvercle de la prise
d’accessoires. Serrez magnette
d’accessoires en le tournant dans
le sens des aiguilles d’une montre.
Renseignements généraux
Les accessoires KitchenAid
®
sont conçus pour assurer une longue vie. L’arbre
de commande d’accessoires et la douille de prise d’accessoires sont carrés afin
d’éliminer toute possibilité de glissement durant la transmission de puissance à
l’accessoire. Les logements de la prise d’accessoires et de l’arbre sont effilés
afin d’assurer un ajustement serré même après une utilisation et une usure
prolongées. Les accessoires KitchenAid®ne requièrent aucune unité de
puissance supplémentaire pour les faire fonctionner, car l’unité est intégrée.
Directives générales
(Accessoires non-approuvé NSF pour 4KSMC50S)
®
Page 88

86
Nombre de vitesses
Agiter
Vitesse BRASSAGE Pour un brassage, un mélange, un empâtage,
ou un démarrage de toutes les procédures de
mélange.
1 MÉLANGE LENT Pour le mélange lent, l’empâtage et pétrir
la pâte à levure.
2 MÉLANGE, Pour mélanger les pâtes à biscuits et à
BATTAGE gâteaux
3BATTAGE, Pour un battage, crémage et fouettage à
CRÉMAGE vitesse moyenne élevée.
4BATTAGE RAPIDE, Pour fouetter la crème épaisse, les blancs
FOUETTAGE d’œufs et des glaçages bouillis.
5 FOUETTAGE RAPIDE Pour le fouettage des petites quantités de
crème épaisse ou de blancs d’œufs.
N’excédez pas la première vitesse lorsque vous préparez des pâtes à
levure, car cela peut endommager le batteur
*Modèle commercial 4KSMC50S
*
Guide de réglage de la vitesse –
batteur-sur socle à tête inclinable
Solid State Speed Control
Off Stir 1 2 3 4 5
Page 89

87
Garantie du batteur KitchenAid
®
Durée de
la garantie :
Garantie complète d’un an
à partir de la date d’achat.
KitchenAid assumera
les coûts pour ce qui
suit :
Les pièces de rechange et les
coûts de la main d’œuvre de
réparation pour corriger les
défauts de matériaux et de
fabrication. Le service doit
être assuré par un centre de
service KitchenAid désigné.
KitchenAid n’assumera
pas les coûts pour ce
qui suit :
A. Les réparations si le
batteur n’est pas utilisé
dans le cadre normal
d’une utilisation domestique pour une famille.
B. Les dégâts résultent des
causes suivantes :
accident, altération,
mauvaise utilisation ou
abus, feu, inondation,
catastrophes naturelles ou
utilisation des produits
non approuvée par
KitchenAid Canada.
C. Les frais accessoires
(expédition ou manutention) liés à la livraison
de votre batteur à un
centre de service
KitchenAid désigné.
D. Les pièces de rechange
ou les frais de main
d’œuvre de réparation si
le batteur est utilisé à
l’extérieur du Canada.
KITCHENAID CANADA NE SE CONSIDÈRE PAS RESPONSABLE DES
DOMMAGES FORTUITS OU CIRCONSTANCIELS. Certaines provinces n’autorisent
pas l’exclusion ni la restriction des dommages fortuits ou circonstanciels, cette
exclusion peut donc ne pas s’appliquer dans votre cas. Cette garantie vous
donne des droits légaux particuliers. Il est possible que vous ayez d’autres
droits qui varient d’une province à l’autre.
Dispositions à prendre pour un entretien et
une réparation sous garantie - Canada
Examinez d’abord la section
Dépannage, ce qui peut peut-être vous
éviter d’avoir besoin d’un entretien ou
d’une réparation.
Une garantie complète d’un an à partir
de la date d’achat sur les pièces de
rechange et les coûts de main d’œuvre
de réparation pour corriger les défauts
de matériaux et de fabrication.
L’entretien ou la réparation doit être
assuré par un centre d’entretien et de
réparation KitchenAid désigné.
Apportez le batteur à un centre
d’entretien et de réparation KitchenAid
désigné ou expédiez-le au centre (port
payé et assurance). Une fois réparé, le
batteur vous sera retourné (port payé
et assurance).
S’il vous est impossible d’obtenir une
réparation ou un entretien satisfaisants de cette façon, contactez
KitchenAid Canada aux coordonnées
suivantes : 1901 Minnesota Court,
Mississauga, Ontario L5N 3A7.
Téléphone : 1-800-807-6777.
Page 90

88
Dispositions à prendre pour un entretien
et une réparation hors garantie
Dépannage
• Examinez d’abord la section
Dépannage suivante.
• Puis, cherchez un centre d’entretien
et de réparation KitchenAid désigné
près de chez vous dans votre
annuaire téléphonique. Si aucun
centre n’est listé dans l’annuaire, où
que vous soyez au Canada, appelez
le service a la clientèle KitchenAid
Canada au numéro suivant :
1-800-807-6777.
• Apportez le batteur à un centre
d’entretien et de réparation
KitchenAid désigné ou expédiez-le
au centre (port payé et assurance).
Une fois réparé, le batteur vous sera
retourné (port payé et assurance).
•L’entretien et la réparation hors
garantie doivent être traités par un
centre d’entretien et de réparation
KitchenAid désigné.
Essayez d’abord les solutions suggérées
dans le présent manuel, ce qui pourrait
vous éviter le coût du dépannage.
Si le batteur fonctionne mal ou
pas du tout, vérifiez les points
suivants :
- Le batteur est-il branché?
- Le fusible du circuit relié au batteur
est-il en état de marche? Si vous
avez un disjoncteur, assurez-vous
que le circuit est fermé.
- Débranchez le batteur et attendez
15 à 20 minutes avant de le
rebrancher.
- Si le problème ne résulte pas d’un
des points susmentionnés, consultez
la section « Mesures à prendre pour
l’entretien et la réparation ».
- NE retournez PAS le batteur au
détaillant, car il n’assure pas
l’entretien ni la réparation.
-Pour obtenir de l’aide au Canada,
composez le numéro sans frais du
Centre d’aide à la clientèle
KitchenAid, entre 8h30 et 17h30
(EST) : 1-800-461-5681.
Ou contactez-nous par écrit à :
Centre de relations aux
consommateurs
KitchenAid Canada
1901 Minnesota Court
Mississauga, ON L5N 3A7
Risque d’électrocution
Débranchez le batteur
avant d’effectuer le
dépannage.
Ne pas suivre ces
directives peut causer
la mort ou une
électrocution.
AVERTISSEMENT
!
Page 91

89
Trempette à la chair de crabe
1 paquet (250 g [8 oz])
de fromage à la
crème allégé
250 ml (1 tasse) de
cottage réduit en
matières grasses
50 ml (
1
⁄4 tasse) de
mayonnaise à
calories réduites
1 boîte (195 g [6
1
⁄2 oz])
de chair de crabe,
déchiquetée
15 ml (1 c. à thé) de jus
de citron
45 ml (3 c. à thé)
d’oignons verts
hachés
2 ml (
1
⁄2 c. à thé) de sel
à l’ail
3 gouttes de sauce au
piment fort
Placez le fromage à la crème, le cottage et la mayonnaise dans le bol du batteur. Fixez le bol et le fouet à
lame plate au batteur. Réglez à la vitesse 6 et battez
1 minute environ ou jusqu’à ce qu’un mélange
homogène soit obtenu. Arrêtez le batteur et raclez le
bol. Ajoutez tous les ingrédients restants. Réglez à la
vitesse 6 et battez 1 minute environ ou jusqu’à ce
que tous les ingrédients soient mélangés.
Réfrigérez jusqu’à ce que le mélange soit bien froid.
Servez avec un assortiment de biscuits salés ou de
crudités
Donne : 24 portions (25 ml [2 c. à soupe] par
portion).
Par portion : Environ 42 cal, 4 g protéine, 1 g glucide,
3 g matières grasses, 12 mg cholestérol, 180 mg
sodium.
Trempette crémeuse à l’ananas pour les fruits
120 g (4 oz) de fromage
à la crème allégé
125 ml (
1
⁄
2 tasse) de crème
de guimauve
1 boîte (250 g [8 oz])
d’ananas broyés,
bien égouttés
10 ml (2 cuillerées à thé)
de zeste d’orange
râpé
Placez le fromage à la crème dans le bol du batteur.
Fixez le bol et le fouet à lame plate au batteur Réglez
à la vitesse 2 et mélangez pendant environ 30
secondes. Arrêtez le batteur et raclez le bol. Ajoutez la
crème de guimauve, les ananas et le zeste d’orange.
Réglez à la vitesse 4 et battez pendant environ 30
secondes. Arrêtez le batteur et raclez le bol. Réglez à
la vitesse 4 et battez pendant environ 30 secondes.
Réfrigérez au moins 2 heures. Servez avec des fruits
frais en tranches, si vous le souhaitez.
Donne : 12 portions (25 ml [2 cuillerées à soupe]
par portion).
Par portion : Environ 61 cal, 1 g protéine,
11 g glucide, 2 g matières grasses, 3 mg cholestérol,
58 mg sodium.
HORS-D’OEUVRE, ENTRÉES ET LÉGUMES
Page 92

90
Trempette mexicaine en couches
1 paquet (250 g [8 oz])
de fromage à la
crème allégé
125 ml (
1
⁄2 tasse) de fro-
mage Monterey Jack
au piment fort râpé
50 ml (
1
⁄4 tasse) de trem-
pette aux haricots ou
aux haricots noirs
125 ml (
1
⁄2 tasse) de salsa
épaisse avec des
morceaux
125 ml (
1
⁄2 tasse)
d’oignons verts
hachés
50 ml (
1
⁄4 tasse) d’olives
mûres dénoyautées
coupées en rondelles
Placez le fromage à la crème dans le bol du batteur.
Fixez le bol et le fouet à lame plate au batteur.
Réglez à la vitesse 2 et mélangez pendant environ
30 secondes. Arrêtez le batteur et raclez le bol.
Ajoutez du fromage Monterey Jack. Réglez à la
vitesse 2 et mélangez pendant environ 30 secondes.
Étalez le mélange de fromage sur un plat de 25 cm
(10 pouces) jusqu’à 2,5 ou 5 cm (1 ou 2 pouces )
du bord. Étalez la trempette aux haricots sur le
fromage. Étalez la salsa sur la trempette aux
haricots. Puis recouvrez d’oignons et d’olives.
Réfrigérez jusqu’au moment de servir. Servez avec
des chips tortilla, si vous voulez.
Donne : 12 portions (50 ml [1⁄4 tasse] par portion).
Par portion : Environ 70 cal, 4 g protéine, 3 g glucide,
5 g matières grasses, 12 mg cholestérol,
265 mg sodium.
Boule de fromage aux noix
250 ml (1 tasse) de fro-
mage Cheddar
piquant râpé
250 ml (1 tasse) de suisse
râpé
1 paquet (250 g [8 oz])
de fromage à la
crème allégé
30 ml (2 c. à soupe) de
ciboulette fraîche
hachée
10 ml (2 c. à thé) de
sauce Worcestershire
1 ml (
1
⁄4 c. à thé) de
paprika
2 ml (
1
⁄2 c. à thé) d’ail
en poudre
50 ml (
1
⁄4 tasse) de noix
de pacane finement
hachées
Mettez tous les ingrédients, sauf les noix de pacane,
dans le bol du batteur. Fixez le bol et le fouet à
lame plate au batteur Réglez à la vitesse 4 et battez
1 minute environ ou jusqu’à ce qu’un mélange
homogène soit obtenu.
Sur du papier paraffiné, formez une boule avec le
mélange. Roulez la boule sur les noix de pacane
hachées Enveloppez dans du papier paraffiné
Réfrigérez jusqu’au moment de servir. Servez avec
un assortiment de biscuits salés ou de crudités.
Donne : 24 portions (30 ml [2 c. à soupe]
par portion).
Par portion : Environ 65 cal, 4 g protéine, 1 g glucide,
5 g matières grasses, 13 mg cholestérol,
109 mg sodium.
Page 93

91
Crostini aux épinards et au fromage
1 baguette, coupée en
tranches de 1,25 cm
(
1
⁄
2 pouce)
10 ml (2 c. à thé) de
beurre ou margarine
125 ml (
1
⁄2 tasse)
d’oignons finement
hachés
1 gousse d’ail, hachée
finement
1 paquet (270 g [9 oz])
d’épinards hachés
surgelés, décongelés
et essorés
1 paquet (250 g [8 oz])
de fromage à la
crème allégé
50 ml (
1
⁄4 tasse) de
piments forts rouges
torréfiés
125 ml (
1
⁄2 tasse) de
fromage Cheddar
râpé
Placez les tranches de baguette sur une plaque à
pâtisserie. Faites cuire au four à 190°C (375°F)
pendant 4 à 6 minutes ou jusqu’à ce que ce soit
grillé. Mettez de côté.
Faites fondre le beurre dans une poêle de 25 cm (10
pouces) à feu moyen. Ajoutez l’ail et l’oignon. Faites
cuire et brassez 2 à 3 minutes ou jusqu’à ce que la
préparation soit ramollie. Ajoutez les épinards.
Faites cuire et brassez 30 à 60 secondes ou jusqu’à
ce que la préparation soit chaude. Laissez refroidir
légèrement.
Placez le fromage à la crème dans le bol du batteur.
Fixez le bol et le fouet à lame plate au batteur
Réglez à la vitesse 2 et mélangez pendant environ
30 secondes. Ajoutez le mélange d’épinards.
Continuez à la vitesse 2, mélangez pendant environ
30 secondes Ajoutez les piments forts rouges.
Continuez à la vitesse 2, mélangez pendant environ
30 secondes Étalez le mélange d’épinards sur les
tranches de baguette grillées. Recouvrez chaque
tranche d’une c. à thé (5 ml) de fromage Cheddar.
Faites cuire au four à 190°C (375°F) pendant 5 à 8
minutes ou jusqu’à ce que ce soit complètement
chauffé et que le fromage soit fondu. Servez chaud.
Donne : 12 portions (2 crostinis par portion).
Par portion : Environ 141 cal, 6 g protéine,
16 g glucide, 6 g matières grasses, 12 mg cholestérol,
324 mg sodium.
Page 94

92
Boulettes de viande mexicaines
50 ml (1⁄4 de tasse) de
substitut d’oeufs
sans gras ou un oeuf
75 ml (
1
⁄3 de tasse) de
chapelure fraîche
2 ml (
1
⁄2 c. à thé) de
poudre de chili
1 ml (
1
⁄4 de c. à thé) de
poudre d’ail
0.5 mL (
1
⁄8 de c. à thé) de
poivre de cayenne
500 g (1 livre) de dinde
hachée
125 ml (
1
⁄2 tasse) de salsa
épaisse avec des
morceaux
125 ml (
1
⁄2 tasse) de sauce
chili
125 ml (
1
⁄2 tasse) d’eau
Placez le substitut d’oeuf, la chapelure, la poudre de
chili, la poudre d’ail, le poivre et la dinde hachée
dans le bol du batteur. Fixez le bol et le fouet à
lame plate au batteur. Mettez à la Vitesse Brassage
et mélangez pendant environ 30 secondes.
Formez des boulettes de 2,5 cm (1 pouce) avec le
mélange de dinde Vaporisez la poêle à frire de 30cm (12-pouces) avec un enduit anti-adhésif pour la
cuisson. Faites cuire les boulettes à feu moyen-vif
jusqu’à ce qu’elles soient bien brunes, égouttez.
Mélangez la salsa, la sauce chili, et l’eau dans un
petit bol. Ajoutez aux boulettes et brassez. Réduisez
le feu à doux Cuire, couvrir, environ 10 minutes, ou
jusqu’à ce que les boulettes soient assez cuites,
remuez fréquemment. Servez chaud.
Donne : 12 portions (3 boulettes par portion).
Par portion : Environ 84 cal, 8 g protéine, 5 g
glucide, 3 g matières grasses, 30 mg cholestérol,
280 mg sodium.
Page 95

93
Tartelettes aux champignons et aux oignons
Pâtes à tarte
120 g (4 oz) de fromage
à la crème allégé
45 ml (3 c. à soupe ) de
beurre ou margarine,
séparées
180 ml (
3
⁄4 tasse) plus 5 ml
(1 c. à thé) de farine
tout-usage
250 ml (8 oz) de
champignons frais,
grossièrement hachés
125 ml (
1
⁄2 tasse)
d’oignons verts
hachés
Garniture
1 oeuf
1 ml (
1
⁄4 c. à thé) de
feuilles de thym
séchées
125 ml (
1
⁄2 tasse) de
fromage Suisse râpé
Pour faire les pâtes à tarte, placez le fromage à la
crème et 25 ml (2 c. à soupe ) de beurre dans le bol
du batteur. Fixez le bol et le fouet à lame plate au
batteur. Réglez à la vitesse 4 et battez pendant
environ 1 minute. Arrêtez le batteur et raclez le bol.
Ajoutez 175 ml (3⁄4 tasse ) de farine. Réglez à la
vitesse 2 et battez 1 minute environ ou jusqu’à ce
qu’un mélange homogène soit obtenu. Formez une
boule avec le mélange. Enveloppez de papier
paraffiné et laissez refroidir 1 heure. Nettoyez le bol
du batteur et le fouet.
Pour faire la garniture, faites fondre les 5 ml (1c. à
soupe ) restants de beurre dans une poêle de 25 cm
(10 pouces) sur feu moyen. Ajoutez les
champignons et les oignons. Faites cuire et brassez
jusqu’à ce qu’ils soient tendres. Retirez du feu. Laissez
refroidir légèrement. Coupez la pâte refroidie en 24
morceaux. Écrasez chaque morceau dans un moule
à muffins miniature (graissé, si vous préférez).
Pour la garniture, placez l’œuf, les 5 ml (1 c. à thé)
restants de farine et le thym dans le bol du batteur.
Fixez le bol et le fouet à lame plate au batteur.
Réglez à la vitesse 6 et battez pendant environ 30
secondes. Incorporez le fromage et le mélange de
champignons refroidi. Introduisez à la cuillère dans
les moules à muffins garnis de pâte à tarte. Faites
cuire au four à 190°C (375°F) pendant 15 à 20
minutes ou jusqu’à ce que le mélange d’œufs soit
gonflé et doré. Servez chaud.
Donne : 12 portions (2 tartelettes par portion).
Par portion : Environ 98 cal, 4 g protéine, 8 g glucide,
6 g matières grasses, 33 mg cholestérol,
83 mg sodium.
Page 96

94
Pommes de terre nouvelles garnies
8 petites pommes
rouges, bouillie avec
leurs peaux
50 ml (
1
⁄4 tasse) de crème
sure à faible tenure
en matières grasses
15 ml (1 c. à soupe) de
margarine ou de
beurre, fondu
1 ml (
1
⁄4 c. à thé) de sel
d’ail
1 ml (
1
⁄4
c. à thé) de
feuilles de thym
séchées
50 ml (
1
⁄4 tasse)
d’oignons finement
hachés
50 ml (
1
⁄4 tasse) de
fromage cheddar
finement râpé
Paprika, si désiré
Coupez les pommes de terres en deux. Écopez
l’intérieurs des pommes de terre, laissant des coquilles
de 3 mm (1⁄8 de pouce). Placez l’intérieurs des pommes
de terre dans le bol du batteur. Fixer le bol et le fouet
plat au batteur. Réglez à la vitesse 2 et mélangez
pendant environ 1 minute. Ajoutez la crème sure, la
margarine, le sel d’ail et le thym. Réglez à la vitesse 2
et mélangez pendant environ 30 secondes. Arrêtez le
batteur et raclez le bol. Réglez à la vitesse 2 et
mélangez pendant environ 30 secondes. Mettez à la
vitesse de mélange et ajouter des oignons, mélanger
jusqu'à l’obtention d’un mélange homogène.
Remplissez à la cuillère ou dresser à la poche le
mélange de pomme de terre à l’intérieur des coquilles
de pomme de terre Placez les coquilles remplies dans
un plat peu profond allant au four. Faites cuire à 190°C
(375°F) pendant 20 à 25 minutes, ou jusqu’à ce que
ce soit bien chaud. Saupoudrez de fromage et de
paprika, si desiré. Faites cuire 5 minutes de plus, ou
jusqu’à ce que le fromage soit fondu Servez chaud.
Donne : 8 portions (2 demi-pommes de terre par
portion).
Par portion : Environ 58 calories, 2 g protéine,
6 g glucide, 3 g matières grasses, 5 mg cholestérol,
108 mg sodium.
Page 97

95
Croquette de patate douce
2 patates douces
moyennes, cuites et
épluchées
125 ml (
1
⁄2 tasse) de lait à
basse teneur en
matières grasses
75 ml (
1
⁄3 tasse) de sucre
2 oeufs
30 ml (2 c. à soupe) de
beurre ou margarine
2 ml (
1
⁄2 c. à thé) de
muscade
2 ml (1⁄2 c. à thé) de
cannelle
Nappage
praline croquant
30 ml (2 c. à soupe) de
beurre ou margarine,
fondu
175 ml (
3
⁄4 tasse) de
flocons de maïs
50 ml (
1
⁄4 tasse) de noix
ou de noix de
pacane hachés
50 ml (
1
⁄4 tasse) de sucre
brun fermement
tassé
Placez les patates dans le bol du batteur. Fixez le bol
et le fouet à lame plate au batteur. Réglez à la
vitesse 2 et mélangez pendant environ 30 secondes.
Ajoutez le lait, le sucre, les œufs, 30 ml (2 c. à
soupe) de beurre, la muscade et la cannelle. Réglez à
la vitesse 4 et battez pendant environ 1 minute.
Étalez le mélange dans un plat à tarte graissé de 23
cm (9 pouces). Faites cuire au four à 200°C (400°F)
pendant 20 minutes, ou jusqu’à ce que ce soit pris.
Nettoyez le bol du batteur et le fouet.
Placez tous les ingrédients du nappage dans le bol
du batteur Fixez le bol et le fouet à lame plate au
batteur. Réglez à la vitesse d’agitation et mélangez
environ 15 secondes. Étalez sur la croquette très
chaude. Faites cuire au four 10 minutes de plus.
Donne : 6 portions (125 ml [1⁄2 tasse] par portion).
Par portion : Environ 268 cal, 6 g protéine, 35 g
glucide, 12 g matières grasses, 2 mg cholestérol,
176 mg sodium.
Page 98

96
Purée de pommes de terre
5 grosses pommes de
terre (environ 1250 g
[2
1
⁄2 lb]),. épluchées,
coupées en quartiers
et bouillies
125 ml (
1
⁄2 tasse) de lait à
basse teneur en
matières grasses,
chauffé
30 ml (2 c. à soupe) de
beurre ou margarine
5 ml (1 c. à thé) de sel
1
⁄2 ml (1⁄8 c. à thé) de
poivre noir
Chauffez le bol du batteur et le fouet à lame plate à
l’eau chaude; séchez. Mettez les pommes de terre
chaudes dans le bol. Fixez le bol et le fouet à lame
plate au batteur. Réglez progressivement à la vitesse
2 et battez 1 minute environ ou jusqu’à ce qu’un
mélange lisse soit obtenu.
Ajoutez tous les ingrédients restants. Réglez à la
vitesse 4 et battez 30 secondes environ ou jusqu’à
ce que le lait soit absorbé. Réglez progressivement à
la vitesse 6 et battez 1 minute environ ou jusqu’à ce
qu’un mélange velouté soit obtenu. Arrêtez le batteur et raclez le bol. Changez le fouet à lame plate
pour le fouet fin.Réglez à la vitesse 10 et fouettez
pendant 2 à 3 minutes.
Donne : 9 portions (175 ml [3⁄4 tasse] par portion).
Par portion : Environ 111 cal, 2 g protéine,
19 g glucide, 3 g matières grasses, 8 mg cholestérol,
296 mg sodium.
VARIATIONS
Purée de pommes de terre à l’ail
Substituez 5 ml (1 c. à thé) de sel à l’ail au sel
Par portion : Environ 111 cal, 2 g protéine, 19 g
glucide, 3 g matières grasses, 8 mg cholestérol, 239
mg sodium.
Purée de pommes de terre au parmesan
Augmentez le lait à 175 ml (3⁄4 de tasse). Ajoutez 75
ml (1⁄3 de tasse) de parmesan parmesan râpé avec du
lait.
Par portion : Environ 205 cal, 6 g protéine, 32 g
glucide, 6 g de matières grasses, 7 mg cholestérol,
524 mg sodium.
Purée de pommes de terre à la crème sure et
à la ciboulette
Substituez 50 ml (1⁄4 tasse) crème sure à faible teneur
en matières grasses pour 50 ml (1⁄4 tasse) de lait.
Ajoutez 30 ml (2 c. à soupe de ciboulette hachées
fraiche.
Par portion : Environ 178 cal, 4 g protéine, 32 g
glucide, 4 g matières grasses, 2 mg cholestérol, 417
mg sodium.
Page 99

97
Purée de courge fouettée aux herbes
1 grosse courge
musquée, cuite au
four (environ 750 ml
[3 tasses] de courge
cuite)
50 ml (
1
⁄4 tasse) de
beurre ou margarine,
fondu
2 ml (
1
⁄2 c. à thé) de
feuilles d’estragon
séchées
1
⁄2 ml (
1
⁄8 c. à thé) de sel
1
⁄2 ml (
1
⁄8 c. à thé) de
poivre noir
Sortez à la cuillère la courge de sa coquille et
mettez dans le bol du batteur. Fixez le bol et le
fouet fin au batteur. Réglez à la vitesse 4 et battez
pendant environ 30 secondes. Ajoutez tous les
ingrédients restants. Réglez à la vitesse 2 et
mélangez pendant environ 30 secondes. Réglez à la
vitesse 4 et battez pendant environ 2 minutes.
Donne : 6 portions (125 ml [1⁄2 tasse] par portion).
Par portion : Environ 107 cal, 1 g protéine, 11 g
glucide, 7 g matières grasses, 0 mg cholestérol, 137
mg sodium.
Fricassée de Haricots Noirs
500 ml (2 tasses) de
substitut d’oeufs
sans matière grasse
ou 8 oeufs
50 ml (
1
⁄4 tasse) de lait à
faible teneur en
matières grasses
15 ml (1 c. à soupe)
d’huile
1
⁄
2 poivron rouge de
taille moyenne haché
4 oignons, tranchés
500 g (1 boite de 16 oz)
d’haricots noirs,
rincés et égouttés
250 ml (1 tasse) de
fomage Monterey
Jack rapé
Placez le substitut d’oeufs et le lait dans le bol du
batteur. Fixer le bol et le fouet fin au batteur. Réglez
à la vitesse 2 et mélangez pendant 30 secondes.
Mettez de côté.
Chauffez l'huile dans le grand poèlon à feu moyen
jusqu’à ce que l’huile grésille. Ajoutez le piment et les
oignons. Faites cuire pendant environ une minute ou
jusqu’à ce que ce soit légèrement tendre. Incorporez
les haricots. Faites cuire pendant environ 1 minute ou
jusqu’à ce que ce soit suffisamment chaud.
Réduisez le feu à moyen-doux. Versez le mélange
d'oeufs au-dessus des légumes. Faites cuire environ
6 minutes, ou jusqu’à ce que ce soit presque prêt.
Comme le fond du mélange d'oeufs se positionne,
soulevez soigneusement les bords avec la spatule et
laissez l'oeuf cru descendre au fond de la casserole.
Faites cuire, couvert, environ 2 minutes, ou jusqu'à ce
que le dessus soit positionné mais encore brillant.
Saupoudrez de fromage. Faites cuire, couvert, environ
1 minute, ou jusqu'à ce que le fromage fonde.
Donne : 6 portions.
Par portion : Environ 208 calories, 18 g protéine,
15 g glucide, 8 g de matières grasses,
18 mg cholestérol, 463 mg sodium.
Truc : Pour un dessus de fricassé bruni, placez sous
la rôtissoire environ 1 minute, ou jusqu'au fromage
brunisse et fasse des bulles d’air.
Page 100

98
Quiche potagère
Fond de pâtisserie
cuit (voir page 124)
15 ml (1 c. à soupe)
d’huile
1 petit oignon, haché
1 poivron vert moyen,
haché
250 g (8 oz) de
champignons frais
émincés
6 oeufs
75 ml (
1
⁄3
tasse) de lait à
basse teneur en
matières grasses
15 ml (1 c. à soupe) de
persil frais haché
5 ml (1 c. à thé) de sel
5 gouttes de sauce au
piment fort
1 tasse (120 g [4 oz])
de suisse à teneur
réduite en matières
grasses râpé
Suivez la procédure pour un fond de pâtisserie cuit.
Laissez refroidir, 10 minutes.
Pendant ce temps-là, chauffez l’huile à feu moyenvif dans une grande poêle à revêtement antiadhésif.
Ajoutez l’oignon et le poivron. Faites cuire environ
1 minute, en mélangeant fréquemment Ajoutez les
champignons. Faites cuire et mélangez environ
2 minutes ou jusqu’à ce que les légumes soient
tendres. Mettez de côté.
Mettez les œufs, le lait, le persil, le sel, et la sauce
au piment fort dans le bol du batteur. Fixez le bol et
le fouet fin au batteur. Réglez à la vitesse 2 et
mélangez pendant 1 à 2 minutes.
Saupoudrez le fond de pâtisserie de la moitié du
fromage. Recouvrez des légumes. Versez le mélange
d’œufs sur les légumes. Recouvrez du fromage
restant. Faites cuire au four à 180°C (350ºF)
pendant 30 à 35 minutes ou jusqu’à ce que la lame
de couteau insérée au centre en sorte propreLaissez
reposer environ 5 minutes avant de servir.
Donne : 8 portions
Par portion (garniture et pâte à tarte) :
Environ 264 cal, 12 g protéine, 17 g glucide,
16 g matières grasses, 172 mg cholestérol,
561 mg sodium.
 Loading...