


P RO LINE™ SERIES
GUIDE TO
PROFESSIONAL
RESULTS
Model 4KPCM050 Coffee Maker
P RO LINE™ SERIES
MODEL
4KPCM050
COFFEE MAKER
Introduction
Section Contents
Table of Contents ............................... 3
Coffee Maker Safety ........................... 4
Important Safeguards ........................ 5
Proof of Purchase & Registration ........ 6
Electrical Requirements ......................7
INTRODUCTION
1

The KitchenAid® PRO LINE™ Series Coffee Maker brings commercial
performance to the home, combining outstanding construction and durability
with features that make brewing abundant amounts of superb coffee easy.
The commercial 1350-watt stainless steel heat pump brews quickly, providing
exceptionally smooth and flavorful coffee. The elegant die-cast metal housing
and stainless steel brew basket will stand up to the heaviest use. The front-fill
water reservoir and slide-out basket design offer remarkable convenience.
With a 12-cup carafe, the Coffee Maker features exceptional capacity. The
warming plate offers two temperature selections: “low” preserves the flavor of
coffee served at a leisurely pace, while “high” keeps coffee piping hot.
An easy-to-set digital brew timer makes waking up to fresh coffee every morning simple. After brewing,
keep an eye on coffee freshness with the handy “Time Since Brewing” display. And don’t worry about
leaving the Coffee Maker on: it automatically shuts off two hours after brewing.
The KitchenAid
®
PRO LINE™ Series: commercial quality for the discriminating home chef. From the
company distinguished by its legendary craftsmanship.
2

TABL E OF CONTENTS
INTRODUCTION
Introduction ...................................................................2
Coffee Maker Safety
Important Safeguards
Proof of Purchase & Product Registration
Electrical Requirements
......................................................... 4
......................................................... 5
........................... 6
....................................................... 7
FEATURES AND OPERATION
Coffee Maker Features ............................................................. 10
Preparing the Coffee Maker For Use
Pre-Use Cleaning
Installing the Water Filter
Setting the Time-of-Day Clock
Brewing Coffee ....................................................................... 16
Using the Warming Plate
Adjusting Warming Plate Temperature .......................... 19
Turning Off the Warming Plate ...................................... 19
Automatic Shutoff Feature ............................................. 19
Programming the Automatic Brew Timer
Adjusting Message Tone Volume
Resetting the Water Filter Icon
Coffee Brewing Suggestions: Advice for Great Taste
............................................................... 13
............................................... 13
........................................14
............................... 20
......................................... 22
..............................................23
............ 24
CARE AND CLEANING
Cleaning the Coffee Maker ............................................... 28
Descaling
Storing the Coffee Maker
Cleaning the Optional Permanent Filter
Troubleshooting & Error Codes
.............................................................................29
................................................. 30
............................ 30
.........................................31
WARRANTY AND SERVICE INFORMATION
Total Satisfaction Warranty for Canada ............................... 34
Arranging for Warranty Service
Arranging for Service After the Warranty Expires
........................................... 35
................. 36
INTRODUCTION
3
COFFEE MAKER SAFETY
Your safety and the safety of others are very important.
We have provided many important safety messages in this manual and on your appliance.
Always read and obey all safety messages.
This is the safety alert symbol.
This symbol alerts you to potential hazards that can kill or hurt you and others.
All safety messages will follow the safety alert symbol and either the word
“DANGER” or “WARNING.” These words mean:
You can be killed or seriously injured if you don’t
DANGER
WARNING
All safety messages will tell you what the potential hazard is, tell you how to reduce the chance
of injury, and tell you what can happen if the instructions are not followed.
immediately follow instructions.
You can be killed or seriously injured if you don’t follow
instructions.
4

IMPORTANT SAFEGUARDS
When using electrical appliances, basic safety precautions
should always be followed, including the following:
1. Read all instructions.
2. Do not touch hot surfaces. Use handles or knobs.
3. To protect against electrical shock, do not immerse cord,
plugs, or Coffee Maker in water or other liquid.
4. Close supervision is necessary when any appliance is used by
or near children.
5. Unplug Coffee Maker from outlet before cleaning. Allow
to cool before putting on or taking off parts, and before
cleaning the appliance.
6. Do not operate any appliance with a damaged cord or plug,
or after the appliance malfunctions or has been damaged
in any manner. Return appliance to the nearest authorized
service facility for examination, repair, or adjustment.
7. The use of accessories not recommended by the appliance
manufacturer may result in fire, shock or injury to persons.
SAVE THESE INSTRUCTIONS
8. Do not use outdoors.
9. Do not let cord hang over edge of table or counter, or touch
hot surfaces.
10. Do not place on or near a hot gas or electric burner, or in a
heated oven.
11. Do not use appliance for other than its intended use.
12. Do not use appliance without lid properly placed on
container.
13. The container is designed for use with this appliance. It must
never be used on a range top.
14. Do not set a hot container on a wet or cold surface.
15. Do not use a cracked container or a container having a loose
or weakened handle.
16. Do not clean container with cleaners, steel wool pads, or
other abrasive material.
17. This product has been cUL Listed for household and
commercial use.
INTRODUCTION
5

PROOF OF PURCHASE
& PRODUCT REGISTRATION
Always keep a copy of the sales receipt showing the date of
purchase of your Coffee Maker. Proof of purchase will assure you
of in-warranty service.
Before you use your Coffee Maker, please fill out and mail your
product registration card packed with the unit. This card will
enable us to contact you in the unlikely event of a product
safety notification. This card does not verify your warranty.
Please complete the following for your personal records:
Model Number: 4KPCM050
Date Purchased
Dealer’s Name __________________________________________
Address ________________________________________________
Phone _________________________________________________
__________________________________________
6
ELECTRICAL REQUIREMENTS
Volts: 120 V.A.C. only.
Hertz: 60 Hz
NOTE: Your Coffee Maker has a 3 prong grounded plug. To
reduce the risk of electrical shock, this plug will fit in an outlet
only one way. If the plug does not fit in the outlet, contact a
qualified electrician. Do not modify the plug in any way.
A short power-supply cord is provided to reduce the risks resulting
from becoming entangled in or tripping over a longer cord. Do
not use an extension cord. If the power supply cord is too short,
have a qualified electrician or serviceman install an outlet near
the appliance.
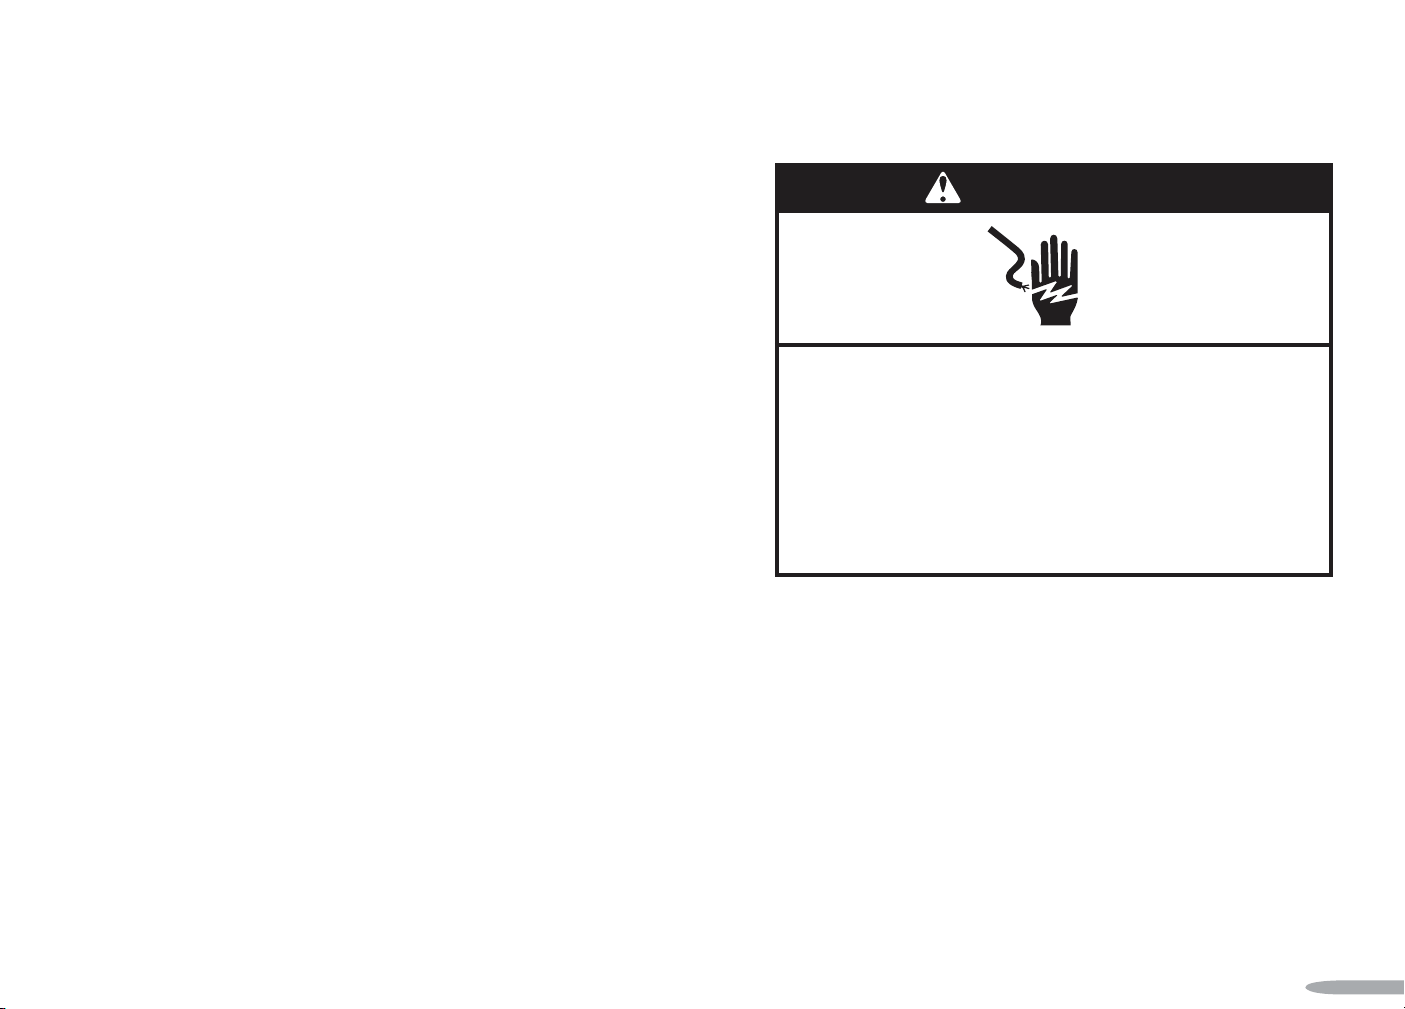
WARNING
Electrical Shock Hazard
Plug into a grounded 3 prong outlet.
Do not remove ground prong.
Do not use an adapter.
Do not use an extension cord.
Failure to follow these instructions can result in death,
fire, or electrical shock.
INTRODUCTION
7

P RO LINE™ SERIES
FEATURES
AND
OPERATION
Features and Operation
Section Contents
Coffee Maker Features ..................... 10
Preparing For Use
Pre-Use Cleaning .......................... 13
Installing the Water Filter ............. 13
Setting the Time-of-Day Clock ..... 14
Brewing Coffee ................................ 16
Using the Warming Plate ................. 19
Programming the Brew Timer ..........20
Adjusting Message Tone Volume ...... 22
Resetting the Water Filter Icon ......... 23
Coffee Brewing Suggestions ............. 24
FEATURES AND OPERATION
9
MODEL 4KPCM050
COFFEE MAKER FEATURES
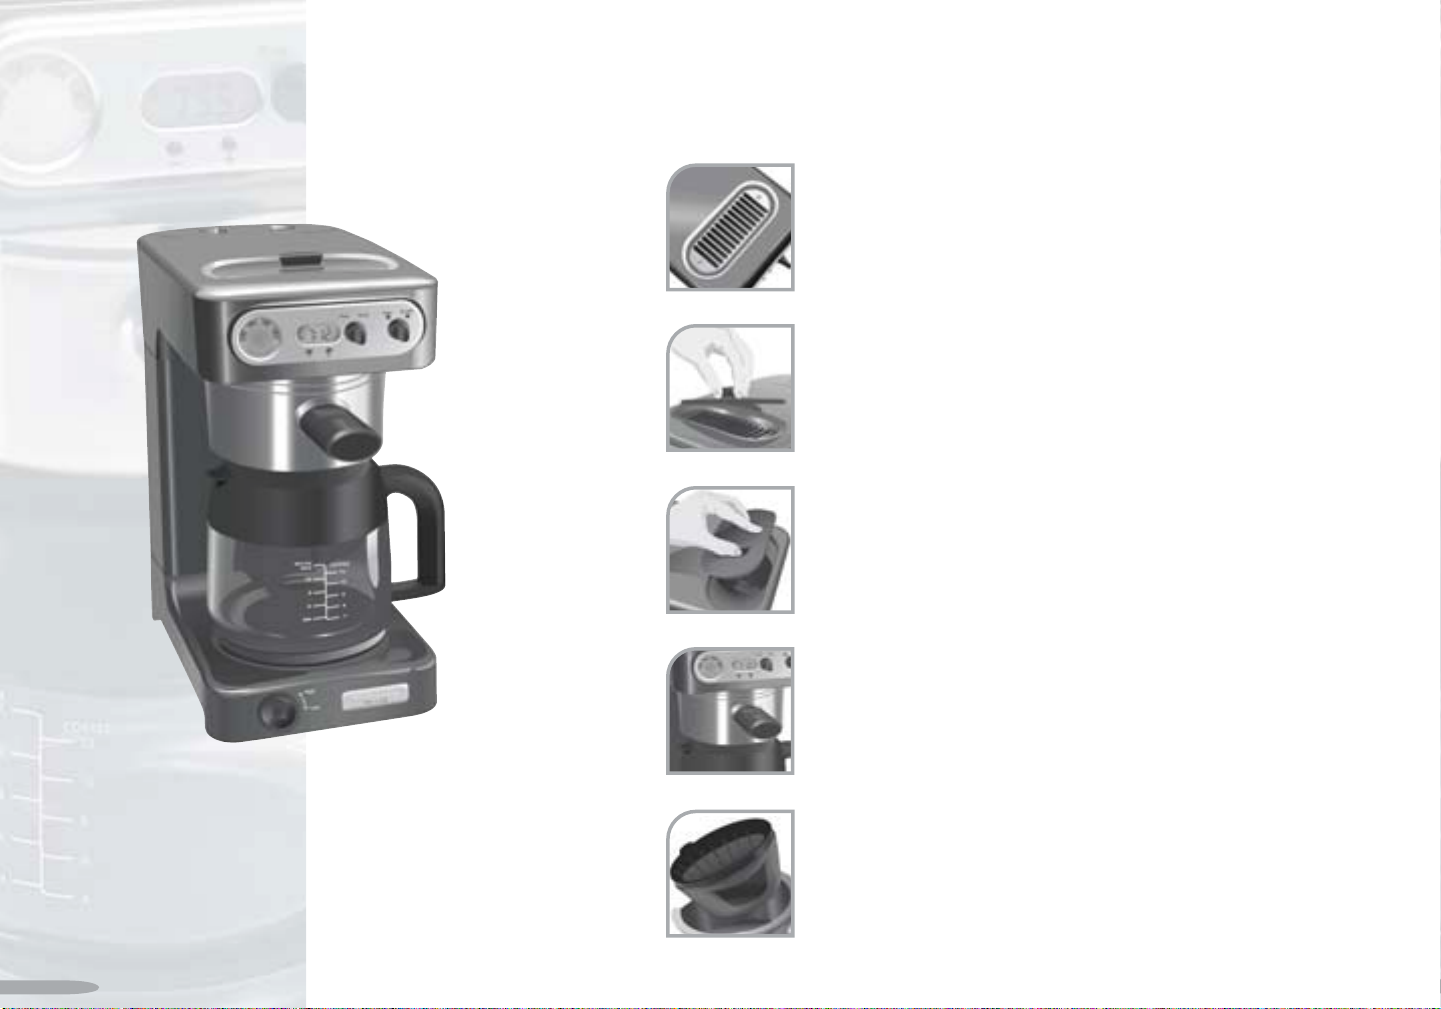
Front-Fill Water Guide
Fill the water reservoir through the convenient
front-fill water guide. A tone sounds to prevent
overfilling when the maximum water level is reached.
Water Guide Cover
Cover prevents debris from falling into the
water guide.
Water Filter Access Cover
Cover snaps in and out for convenient access to the
water reservoir and filter.
10
Stainless Steel Brew Basket
Durable basket slides in and out from the front for
easy access.
Model 4KPCM050
Coffee Maker
Brew Basket Insert
Insert removes from the brew basket for easy
cleaning.
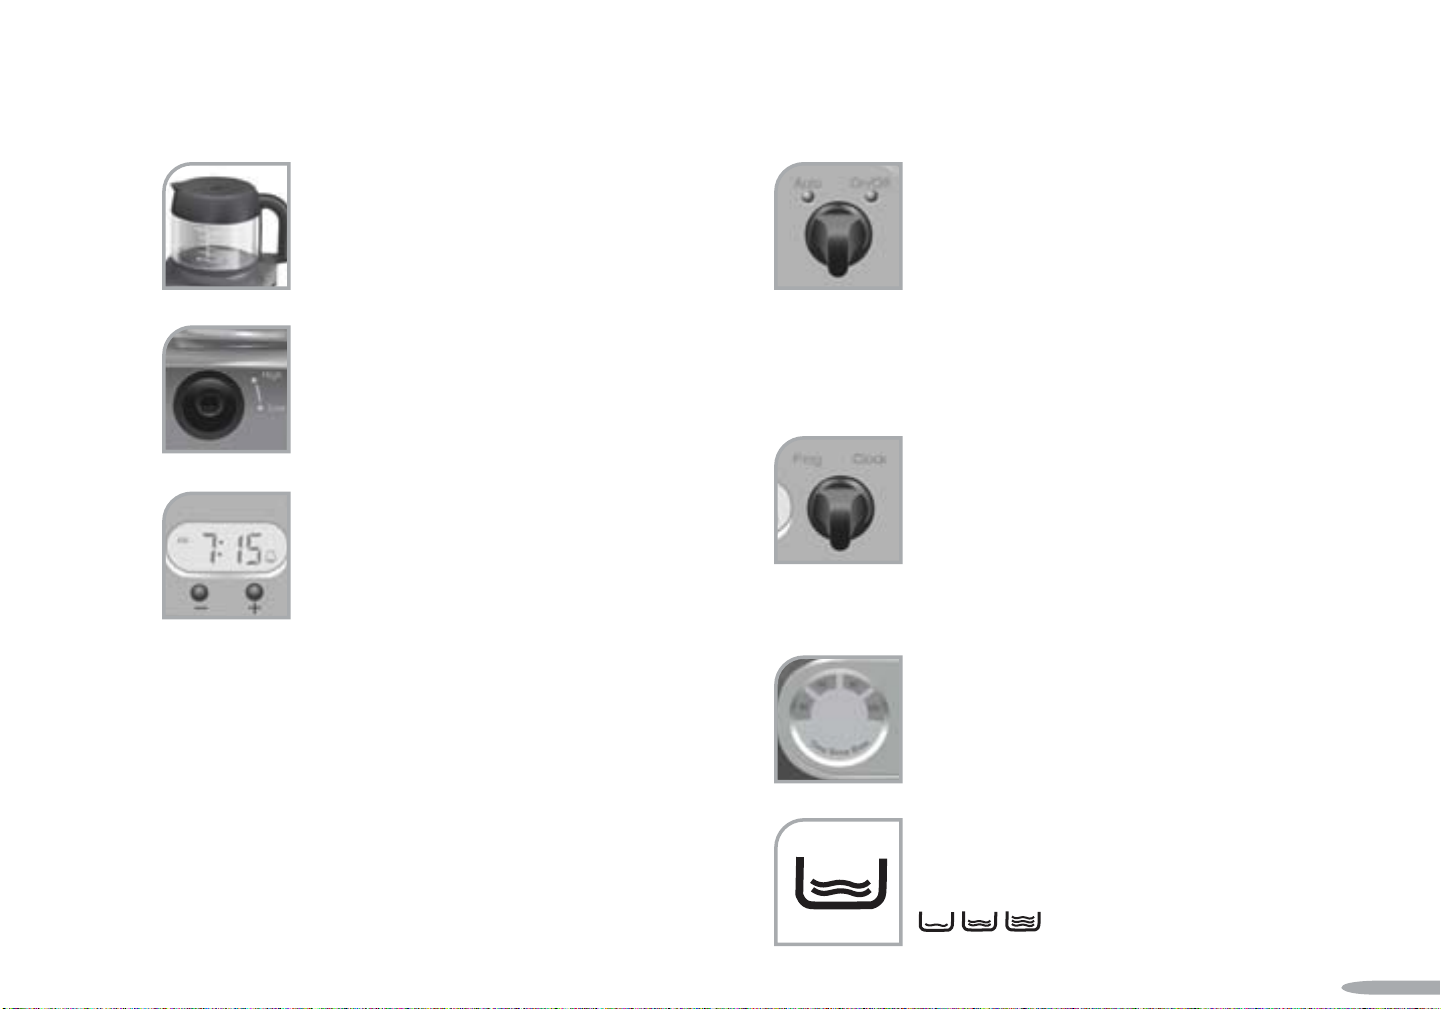
12-Cup Glass Carafe
Carafe features drip-free pouring, comfortable
handle, and a removable lid that snaps in and out.
Orange and black lids can be alternated to indicate
regular or decaffeinated coffee.
Warming Plate Temperature Switch
Keep coffee heated to taste: “low” preserves the
flavor of coffee served at a leisurely pace, while
“high” keeps coffee piping hot.
Brew Timer Display and
Timer Adjustment Buttons
Digital display shows the AM or PM time-of-day
along with the water level, sound, and filter icons.
The easy-to-set brew timer will brew coffee at the
selected time, day or night. “Flicker protection” ensures that the
timer and clock will maintain settings during a momentary power
outage. The “+” and “–” timer adjustment buttons set the brew
timer and clock.
Auto-On/Off Switch
To switch the Coffee Maker on or off, turn
the auto-on/off switch momentarily to the “On/Off”
position. To activate or deactivate the automatic brew
timer, turn the switch momentarily to the “Auto”
position. Indicator lights show when the Coffee Maker is on or the
brew timer is activated. The Coffee Maker or brew timer cannot be
switched on if there are fewer than 4 cups (17 oz [500 ml]) of brew
water in the reservoir.
Program-Clock Switch
The program-clock switch is used with the timer
adjustment buttons to program the brew timer and
set the time-of-day clock. To enter the clock-setting
mode, turn the program-clock switch momentarily
to the “Clock” position. To program the brew timer, turn the
program-clock switch momentarily to the “Prog” position.
Time Since Brewing Display
Display shows coffee freshness at a glance. 30, 60,
90, and 120-minute quadrants light up to indicate
the time elapsed since the last carafe was brewed.
FEATURES AND OPERATION
Water Level Icons
Icons on the brew timer display show whether the
water reservoir is low, medium, or full.
Continued…
11

MODEL 4KPCM050
COFFEE MAKER FEATURES
Water Filter Icon
Icon appears on the brew timer display when the
water filter needs to be replaced.
Sound Level Icon
Icon is displayed when message tones are enabled.
Message Tones
Convenient message tones instantly communicate Coffee Maker
status. The Coffee Maker will beep three times when a brewing
cycle is complete. If the Coffee Maker is turned on or the brew
timer is activated without sufficient water in the reservoir, the
Coffee Maker will beep once; it will also beep once when the
reservoir is near full during filling. Message tone volume can be
set high or low, or turned off for silent operation.
Automatic Shutoff
Coffee maker shuts off two hours after the last carafe is brewed.
Stainless Steel Heat Pump
The 1350-watt heat pump brews quickly, providing exceptionally
smooth and flavorful coffee. The commercial stainless steel
construction minimizes calcium build-up for maximum durability.
Advanced Ion-Exchange Water Filter
Replaceable filter reduces chlorine and other
contaminants which impair coffee flavor. Filter
also softens the water, which extends the time
between descalings.
Quiet Finish™ Brewing
The advanced brew system design reduces noisy hissing and
gurgling throughout the brewing cycle.
Optional Permanent Filter
The permanent filter eliminates the need for paper coffee filters.
The fine, metal screen delivers exceptional brewing performance.
12

PREPARING
THE COFFEE MAKER FOR USE
Pre-Use Cleaning
Wash the filter basket, basket insert, carafe, and carafe lids in
hot, soapy water, then rinse with clean water and dry. Do not
use abrasive cleansers or scouring pads. These parts may also be
washed in the top rack of the dishwasher.
Installing the Water Filter
Since most tap water is chlorinated and contains some level of
calcium, the use of a PRO LINE™ Series Water Filter is recommended.
The advanced ion-exchange water filter reduces chlorine and other
contaminants which impair coffee flavor. The filter also softens the
water, which extends the time between descalings.
The PRO LINE™ Series Water Filter will filter approximately
25 gallons (95 liters) of water (60 full carafes). When a
filter has reached the end of its life, the water filter icon
will appear on the brew timer display.
Use of the water filter is optional: the Coffee Maker will operate
normally without it. If a water filter is not used, the filter icon will
still appear on the brew timer display as a reminder to descale the
Coffee Maker. To reset the icon after it appears, see page 23.
The water filter is for use only with municipally treated tap water
or well water that is regularly tested for contaminants.
To Install the Filter:
1. Remove the cartridge from its packaging.
2. Place the filter cartridge in a separate container filled with
fresh, cool water; the cartridge should remain submerged in
the water for 10 minutes.
3. Remove the water filter access cover from the Coffee Maker.
FEATURES AND OPERATION
Continued…
13

PREPARING
THE COFFEE MAKER FOR USE
4. Place the filter cartridge in the circular well at the bottom of
the water reservoir. Push the cartridge slightly to make sure it
fits snugly.
5. Replace the water filter access cover and run the Coffee Maker
through a complete brewing cycle without coffee. Use a full
carafe of clean, cool water.
WARNING
Electrical Shock Hazard
Plug into a grounded 3 prong outlet.
Do not remove ground prong.
Do not use an adapter.
Do not use an extension cord.
Failure to follow these instructions can result in death,
fire, or electrical shock.
Setting the Time-of-Day Clock
When the Coffee Maker is first plugged in or when power is
restored after an interruption, the brew timer display
automatically enters the clock-setting mode. The hour digits on
the display will flash until a time is set.
14

To Enter Clock-Setting Mode
If the digits on the brew timer display are not flashing, enter the
clock-setting mode by turning the Program-Clock Switch clockwise
to the “Clock” position, then releasing. The hour digits will begin
to flash.
To Set The Clock
1. Press the “–” Timer Adjustment Button to decrease the hour
or the “+” Timer Adjustment Button to increase the hour. If a
Timer Adjustment Button is pressed and held, the hour digits
will scroll. The AM and PM icons will change when the hour
digits roll past “12”. Make certain the hour set is correct with
regard to AM or PM.
Timer Adjustment Buttons
2. Once the hour is set, turn the Program-Clock Switch clockwise
to the “Clock” position, then release. The minute digits will
begin to flash.
3. Press the “–” or “+” Timer Adjustment Buttons to adjust the
minutes. If a Timer Adjustment Button is pressed and held, the
minute digits will scroll.
4. Once the minutes are set, turn the Program-Clock Switch
clockwise to the “Clock” position, then release. The minute
digits will stop flashing and the brew timer display will exit the
clock-setting mode.
FEATURES AND OPERATION
15

BREWING COFFEE
Before brewing coffee for the first time, run the Coffee Maker
through a complete brewing cycle without coffee. Use a full
carafe of clean, cool water. This rinses the water reservoir, heat
pump, and showerhead. This first brew cycle will yield slightly less
water than the amount added, since the brew system retains a
small amount of water.
1. Fill a carafe with enough fresh, cool water to make the desired
amount of coffee. A graduated scale on the side of the carafe
helps measure the amount of water required. The right side
of the scale (“coffee”) is an accurate measurement of carafe
volume in 41⁄4 ounce (125 ml) cups. The left side of the scale
(“water”) indicates the amount of water needed to produce a
given number of cups. (Brewing always produces less coffee than
the volume of water added, since coffee grounds retain water.)
NOTE: Use at least 4 cups (17 oz [500 ml]) of water to brew
coffee. The Coffee Maker will not operate with less.
2. Remove the water guide cover and pour the water into the guide.
16
The water level icons on the brew timer
display will indicate whether the water reservoir is low, medium,
or near full.

If message tones are enabled, the Coffee Maker will beep
once when the water reservoir is near full.
3. After filling the reservoir, place the carafe on the Coffee Maker
warming plate.
4. Grasp the brew basket handle and remove the brew basket
from the front of the Coffee Maker.
5. Make certain the plastic brew basket insert is placed in the
brew basket. Insert a 10–12 cup flat-bottom paper filter or
the optional permanent filter into the brew basket. Using the
included scoop, fill the filter with one rounded scoop of ground
coffee for each cup desired. Add more coffee for a stronger
brew, less for a weaker brew. Use a medium grind appropriate
for automatic drip Coffee Makers: too fine a grind will produce
bitterness and may cause water to overflow the brew basket.
6. Slide the brew basket into the Coffee Maker as far as possible.
7. To begin brewing, turn the Auto-On/Off Switch clockwise to
the “On/Off” position, then release. The on/off indicator light
will illuminate when the Coffee Maker is on. Do not remove
the carafe from the Coffee Maker until brewing is complete.
FEATURES AND OPERATION
Continued…
17

BREWING COFFEE
NOTE: The Coffee Maker cannot be switched on if there are fewer
than 4 cups (17 oz [500 ml]) of brew water in the reservoir.
If message tones are enabled, the Coffee Maker will:
• beep once if there are fewer than 4 cups (17 oz [500 ml]) of
brew water in the reservoir
• beep three times when brewing is complete
8. When brewing is finished, the 30, 60, 90, and 120-minute
segments on the time since brewing display will light up to indicate
the time elapsed since the completion of the brewing cycle. At the
end of two hours, the Coffee Maker will shut off automatically. To
shut off the Coffee Maker manually, turn the Auto-On/Off Switch
clockwise to the “On/Off” position, then release.
9. Repeat steps 1–7 to brew additional carafes of coffee. Always
turn off the Coffee Maker and allow it to cool for five minutes
before starting the next carafe.
18

USING THE WARMING PLATE
Adjusting Warming Plate Temperature
The warming plate can hold coffee at a choice of two serving
temperatures. Turn the temperature switch clockwise to the “Low”
position to preserve the flavor of coffee served at a leisurely pace.
Turn the temperature switch counter-clockwise to the “High”
position to keep coffee piping hot.
Turning Off the Warming Plate
The Coffee Maker warming plate is on whenever the on/off
indicator light is illuminated. To shut off the Coffee Maker, turn
the Auto-On/Off Switch clockwise to the “On/Off” position, then
release.
The Automatic Shutoff Feature
The Coffee Maker warming plate will remain on for 2 hours after
the last carafe is brewed, then automatically shut off.
FEATURES AND OPERATION
19

PROGRAMMING THE
AUTOMATIC BREW TIMER
The KitchenAid® PRO LINE™ Series Coffee Maker can be programmed
to brew coffee at a preset time, making it easy to wake up to
fresh coffee every morning. To set the automatic brew timer,
perform the following steps:
1. Enter the brew timer program mode by turning the Program-Clock
Switch counter-clockwise to the “Prog” position, then releasing.
The brew timer display background color will change from blue
to red and the hour digits will begin to flash. The red background
indicates program mode is active.
3. Once the hour is set, turn the Program-Clock Switch
counter-clockwise to the “Prog” position, then release. The
minute digits will begin to flash.
4. Press the “–” or “+” Timer Adjustment Buttons to adjust the
minutes. If a Timer Adjustment Button is pressed and held, the
minute digits will scroll.
Timer Adjustment Buttons
2. Press the “–” Timer Adjustment Button to decrease the hour
or the “+” Timer Adjustment Button to increase the hour. If a
Timer Adjustment Button is pressed and held, the hour digits
will scroll. The AM and PM icons will change when the hour
digits roll past “12”. Make certain the hour set is correct in
regard to AM or PM.
20
5. Once the minutes are set, turn the Program-Clock Switch
counter-clockwise to the “Prog” position, then release. The
brew timer will exit the program mode and the brew timer
display background color will return to blue.

6. Fill the Coffee Maker with coffee and fresh water, then activate
the automatic brew timer by turning the Auto-On/Off Switch
counter-clockwise to the “Auto” position, then releasing.
When the brew timer is active, the auto indicator light will
be illuminated.
7. When brewing starts at the programmed time, the on/off
indicator light will illuminate and the auto indicator light will
go out.
If message tones are enabled, the Coffee Maker will beep
three times when brewing is complete.
NOTE: The automatic brew timer must be activated each time you
want the Coffee Maker to brew at the programmed time.
NOTE: The brew timer will not activate if there are fewer than
4 cups (17 oz [500 ml]) of brew water in the reservoir.
If message tones are enabled, the Coffee Maker will beep on
every attempt to activate the brew timer without sufficient water
in the reservoir.
If automatic brewing needs to be cancelled, deactivate the brew
timer by turning the Auto-On/Off Switch counter-clockwise to
the “Auto” position, then releasing. When deactivated, the auto
indicator light will go out.
FEATURES AND OPERATION
21

ADJUSTING THE
MESSAGE TONE VOLUME
Message tones instantly communicate Coffee Maker status. Tone
volume can be set high or low, or turned off for silent operation.
When first used, the Coffee Maker automatically defaults to high
volume tones.
The sound level icon will be visible on the brew timer display
when message tones are enabled:
High-Volume Icon
Low-Volume Icon
With message tones enabled, the Coffee Maker will produce
3 one-second tones when the brewing cycle is complete, and a
single one-second tone when:
• you attempt to turn on the Coffee Maker or activate the brew
timer without sufficient water in the reservoir
• the water reservoir nears the maximum level during filling
• the water filter icon is reset
To Adjust the Message Tone Volume
Press and hold the “–” and “+” Timer Adjustment Buttons
simultaneously for about 5 seconds to enable, disable, or change
the volume of the message tones.
Timer Adjustment Buttons
As the Timer Adjustment Buttons are pressed:
• If the high-volume sound level icon is visible, it will disappear.
The message tones are now disabled.
• If the message tones are disabled (no sound level icon is
visible), the low-volume sound level icon will appear. The
Coffee Maker will now produce low-volume tones.
• If the low-volume sound level icon is visible, it will change to
the high-volume icon. The Coffee Maker will now produce
high-volume tones.
22
If the Timer Adjustment Buttons are held down continuously, the
message tones will alternate between disabled, low volume, and
high volume.

RESETTING THE
WATER FILTER ICON
The PRO LINE™ Series Water Filter will filter approximately
25 gallons (95 liters) of water (60 full carafes). When a filter has
reached the end of its life, the water filter icon will appear on the
brew timer display. The Coffee Maker will keep track of the
remaining filter life even when unplugged.
To maintain the best performance, the Coffee Maker should be
descaled whenever the water filter icon appears. If a water filter is
not used, the Coffee Maker will still display the water filter icon as
a reminder to descale. For descaling instructions, see page 29.
To Reset the Water Filter Icon
After the water filter has been replaced (see “Installing the Water
Filter” on page 13), press and hold the “+” Timer Adjustment
Button until the water filter icon disappears. Doing this resets the
function that tracks how much coffee has been brewed. The
water filter icon will re-appear when the new filter has reached
the end of its life.
Filter Icon
“+” Timer Adjustment Button
FEATURES AND OPERATION
23

COFFEE BREWING
SUGGESTIONS:
ADVICE FOR GREAT TASTE
The flavor of coffee depends on a variety
of factors, including the quality, freshness,
and roast of the beans, the fineness and
consistency of the grind, the ratio of coffee
to brew water, the cleanliness of the brewing
equipment, and the brew water purity.
Fresh Coffee Beans
Great coffee can only come from fresh coffee
beans, properly roasted. Many experts
recommend buying beans roasted no darker than
a medium roast, the color of which appears as an
even chocolate brown. This roast preserves the natural sugars
and flavor of the bean, and sets the stage for an excellent cup
of coffee. A medium roast is the darkest a bean can be roasted
without oils developing on the surface.
Darkly roasted beans – which appear dark brown or
nearly black – look great, but the extra roasting
will overwhelm the more delicate coffee flavors
and caramelize any sugars. A heavy “roasted”
coffee flavor, often bitter and sharp, will
predominate with a dark roast.
To preserve the freshness of coffee beans:
Keep beans in an opaque, air-tight container and
store them in a cool, dry place. Refrigeration is not
recommended, as condensation tends to form on
the beans whenever the container is opened. Freezing
can help preserve beans stored for an extended period, but it will
also impair the flavor.
24

The Right Grind
Freshly ground coffee loses flavor and aroma quickly – within
minutes. The best cup of coffee will always come from coffee
beans that are ground just before brewing.
If you prefer substantially weaker-than-average coffee, it’s best to
brew using a normal amount of ground coffee and then dilute
the result with hot water. Doing this will maximize flavor and
minimize bitterness.
A proper grind is critical for good coffee, and that means using a
quality burr grinder like the PRO LINE™ Series Burr Coffee Mill or
the KitchenAid® Model A-9™ Coffee Mill. A good burr grinder will
produce an extremely consistent grind with little frictional heating,
and preserve the full flavor of your coffee.
Be sure to grind your coffee to the correct size – use a medium
grind level appropriate for automatic drip coffee makers. Feel free
to experiment with slightly finer or coarser grinds, but don’t
overdo it: too fine a grind will result in very bitter coffee, and too
coarse a grind will produce weak flavor. If the correct grind is
used, adding more coffee simply makes a brew stronger without
making it excessively bitter.
The Proper Amount of Ground Coffee
For standard drip-process coffee, a good starting point is to use
1 ounce (28 g) of coffee for every 4 cups of brew water as
measured with the carafe (a carafe “cup” is about 41⁄4 ounces
[125 ml]). Finer grinds usually require less coffee, but using too
fine a grind will produce bitterness and may cause water to
overflow the brew basket.
Brew Water Purity
The PRO LINE™ Series water filter that comes with your Coffee
Maker is one of the most effective in the industry at removing
off-tastes and contaminants from your brew water. It also
softens the water and extends the time between coffee maker
descalings. For great tasting coffee, be sure to use the filter –
and replace it promptly when the water filter icon appears on
the brew timer display.
Where local water quality is extremely poor, you may wish to use
bottled, purified water with your Coffee Maker. Do not use distilled
water or mineral water – they can damage the Coffee Maker.
If the Coffee Maker hasn’t been used in awhile, run it through a
complete brewing cycle without coffee. Use a full carafe of
clean, cool water. This rinses the water reservoir, heat pump,
and showerhead, and eliminates any stale water within the unit.
FEATURES AND OPERATION
Continued…
25

COFFEE BREWING
SUGGESTIONS:
ADVICE FOR GREAT TASTE
Coffee Maker Cleanliness
Coffee oils build up quickly within the brew basket and carafe.
Over time, these oils will go stale and taint the flavor of freshly
brewed coffee. Daily cleaning of the brew basket, brew basket
insert, and carafes is strongly recommended for the
best-tasting coffee.
Warming Plate Temperature
If you intend to keep coffee on the warming plate for an extended
period, use the “low” temperature setting. This will help preserve
coffee flavor.
26

P RO LINE™ SERIES
CARE
AND
CLEANING
Care and Cleaning
Cleaning the Coffee Maker ............... 28
Descaling ......................................... 29
Storing the Coffee Maker ................. 30
Cleaning the Optional
Permanent Filter ...............................30
Troubleshooting & Error Codes ......... 31
CARE AND CLEANING
Section Contents
27

CARE AND CLEANING
Cleaning the Coffee Maker
1. Unplug the Coffee Maker.
2. Remove the brew basket insert from the brew basket.
3. Wash the brew basket, brew basket insert, carafe, and carafe
lid in hot, soapy water and rinse with hot water. Do not use
abrasive cleansers or scouring pads. These parts can also be
washed in the upper rack of the dishwasher.
28
4. Wipe the Coffee Maker housing with a clean damp cloth, and dry
with a soft cloth. Do not use abrasive cleansers or scouring pads.

Descaling
Calcium deposits (“scale”) from water will build up in the Coffee
Maker heat pump over time and impair brewing efficiency and
coffee quality. With normal use, scale should be removed every
three months or whenever the water filter icon appears on the brew
timer display. Local water conditions, use of the Coffee Maker more
than once a day, or use without a water filter may require more
frequent descaling.
Descaling Steps
1. Before descaling, always remove the water filter (see “Installing
the Water Filter” on page 13) and make certain the brew basket
contains no coffee or coffee filters.
2. Run the Coffee Maker through a complete brewing cycle using
the descaling solution. If the Coffee Maker has not been descaled
for an extended period, run it through a second brewing cycle
using fresh descaling solution.
The following conditions indicate an immediate need for descaling:
• the presence of loud sounds during brewing
• a brewing time greater than 10 minutes for 12 cups of coffee
• the appearance of “E1” or “E2” on the brew timer display
Mixing The Descaling Solution
The Coffee Maker can be descaled using a packaged descaling
agent or vinegar.
• When using a descaling agent, follow the directions on the
package for the recommended amounts of descaling agent and
water to use.
• When using vinegar, fill the carafe with a half vinegar and half
water solution.
3. Rinse the Coffee Maker by running it through two brewing cycles
using fresh, cool water.
4. Wash the brew basket, brew basket insert, carafe, and carafe lid
in hot, soapy water and rinse with hot water. These parts can
also be washed in the upper rack of the dishwasher.
5. Reinstall the water filter and reset the water filter icon if
necessary (see page 23).
Error Codes During Descaling
If “E1” or “E2” error codes appear during descaling, unplug the
Coffee Maker for 30 seconds to reset the display, then plug it back
in and continue. If error codes continue to appear after cleaning, see
the KitchenAid Canada Warranty and Service section on page 33.
Continued…
29
CARE AND CLEANING

CARE AND CLEANING
Storing the Coffee Maker
Since the Coffee Maker retains a small amount of water after
brewing, never use it in environments where the temperature drops
below freezing (32˚F or 0˚C).
If the Coffee Maker will not be used for a prolonged period, or if it
will be stored at temperatures below freezing, empty all water from
the unit. To empty, unplug the Coffee Maker, then remove the water
guide cover, the water filter access cover, the water filter, and the
brew basket. Hold the Coffee Maker over a sink, and repeatedly turn
it upside down until all the water drains from the unit. Wipe the
Coffee Maker dry, and store.
When the Coffee Maker is taken out of storage, run it through
a complete brewing cycle without coffee. Use a full carafe of
clean, cool water. This rinses the water reservoir, heat pump, and
showerhead.
Cleaning the Optional Permanent Filter
After several uses, clean the filter with a soft brush or sponge. Avoid
using abrasive cleansers or steel wool pads. The filter can also be
washed in the top rack of a dishwasher.
30

TROUBLESHOOTING
AND ERROR CODES
• If “E1” or “E2” appears on the brew timer display:
WARNING
The Coffee Maker needs to be descaled. Unplug the Coffee
Maker for 30 seconds to reset the display, then plug it back in
again. See “Descaling” on page 29. If error codes continue to
appear after cleaning, see the KitchenAid Canada Warranty and
Service section on page 33.
Electrical Shock Hazard
Plug into a grounded 3 prong outlet.
Do not remove ground prong.
Do not use an adapter.
Do not use an extension cord.
Failure to follow these instructions can result in death,
fire, or electrical shock.
• If the brew timer display is not illuminated:
Check to see if the Coffee Maker is plugged in. If it is, unplug
the Coffee Maker, then plug it back in. If the brew timer display
remains dark, check the fuse or circuit breaker on the electrical
circuit the Coffee Maker is connected to and make certain the
circuit is closed.
• If “E3” appears on the brew timer display:
A button or switch is jammed. Unplug the Coffee Maker, press
or turn each switch and button several times, then plug the
Coffee Maker back in. (If the Coffee Maker has been stored or
used in a cool environment, warm the unit to normal room
temperature before doing this.) If “E3” appears again on the
display, repeat this procedure.
• If it requires more than 10 minutes to brew 12 cups
of coffee:
The Coffee Maker needs to be descaled. See “Descaling” on
page 29.
CARE AND CLEANING
31

TROUBLESHOOTING
AND ERROR CODES
• If the Coffee Maker makes loud sounds during brewing:
The Coffee Maker needs to be descaled. See “Descaling” on
page 29.
If the problem cannot be fixed with the steps above, see the
KitchenAid Canada Warranty and Service section on page 33.*
*Do not return the Coffee Maker to the retailer. Retailers do not provide service.
32

P RO LINE™ SERIES
WARRANTY
AND SERVICE
INFORMATION
Warranty Information
Section Contents
Total Satisfaction
Warranty for Canada ........................ 34
Arranging for
Warranty Service .............................. 35
Arranging for Service
After the Warranty Expires ............... 36
WARRANTY AND SERVICE INFORMATION
33

TOTAL SATISFACTION WARRANTY
FOR CANADA
Length of
Warranty:
Two Year Full
Warranty for
Household Use, from
date of purchase.
KITCHENAID CANADA DOES NOT ASSUME ANY RESPONSIBILITY FOR INCIDENTAL OR
CONSEQUENTIAL DAMAGES. Some provinces do not allow the exclusion or limitation of incidental or
consequential damages, so this exclusion may not apply to you. This warranty gives you specific legal
rights and you may also have other rights which may vary from province to province.
KitchenAid Canada
Will Pay For:
Replacement parts and
repair labour costs to correct
defects in materials and
workmanship. Service must
be provided by a designated
KitchenAid Canada Servicer.
OR
Replacement of your
KitchenAid® PRO LINE™ small
appliance will be arranged if
deemed unserviceable at the
sole discretion of KitchenAid
Canada. See page 35 for
how to arrange for warranty
service.
A. Repairs when KitchenAid® PRO LINE™
B. Damage resulting from accident,
C. Any incidental shipping or
D. Replacement parts or repair labour
KitchenAid Canada Will
Not Pay For:
small appliance is used in other than
normal single family home use.
alteration, misuse or abuse,
fire, floods, acts of God, or use
of products not approved by
KitchenAid Canada.
handling cost to deliver your
KitchenAid® PRO LINE™ small
appliance to a designated
KitchenAid Canada Servicer.
costs for KitchenAid® PRO LINE™ small
appliance operated outside Canada.
34

ARRANGING FOR
WARRANTY SERVICE
• First review the Troubleshooting section on page 31, to possibly
avoid the need for service or visit our web site at
www.KitchenAid.ca
• If you reside in Canada and your KitchenAid® PRO LINE™ Series small
appliance should fail within the first two years of ownership, simply
call our toll-free Customer Interaction Centre at 1-800-461-5681
Monday through Friday, 8 a.m. to 6 p.m. (Eastern Time), Saturday,
8:30 a.m. to 4:30 p.m. or email cac@whirlpool.com
• KitchenAid Canada will arrange for service of your KitchenAid®
PRO LINE™ Series small appliance through a designated KitchenAid
Canada Servicer or should the product be deemed unserviceable, at the
sole discretion of KitchenAid Canada, the unit may be replaced with
an identical or comparable replacement to your door free of charge.
KitchenAid Canada will also provide directions on how to return your
original KitchenAid® PRO LINE™ Series small appliance to us. Your
replacement unit will also be covered by our two year full warranty.
• When you receive your replacement KitchenAid® PRO LINE™ Series
small appliance, use the carton and packing materials to pack-up
your original KitchenAid® PRO LINE™ Series small appliance. In the
carton, include your name and address on a sheet of paper along
with a copy of the proof of purchase (register receipt, credit card
charge slip, etc…).
WARRANTY AND SERVICE INFORMATION
35

ARRANGING FOR SERVICE AFTER
THE WARRANTY EXPIRES
• First review the Troubleshooting section on page 31 or visit our web
site at www.KitchenAid.ca
• If you do not have access to the internet, consult your telephone
directory for a designated KitchenAid Canada Servicer near you. If
one is not listed, contact KitchenAid Canada Service from anywhere
in Canada at 1-800-807-6777.
• Take the KitchenAid® PRO LINE™ Series small appliance or ship
prepaid and insured to a designated KitchenAid Canada Servicer.
Your repaired KitchenAid® PRO LINE™ Series small appliance will be
returned prepaid and insured.
• All out-of-warranty service should be handled by a designated
KitchenAid Canada Servicer.
For more information on your KitchenAid® PRO LINE™ Series small
appliance, please visit our web site at www.KitchenAid.ca
36

®
FOR THE WAY IT’S MADE.
® Registered Trademark/™ Trademark of KitchenAid, U.S.A.
KitchenAid Canada licensee in Canada. © 2006. All rights reserved.
Specifications subject to change without notice.
®
5501dZw706
 Loading...