

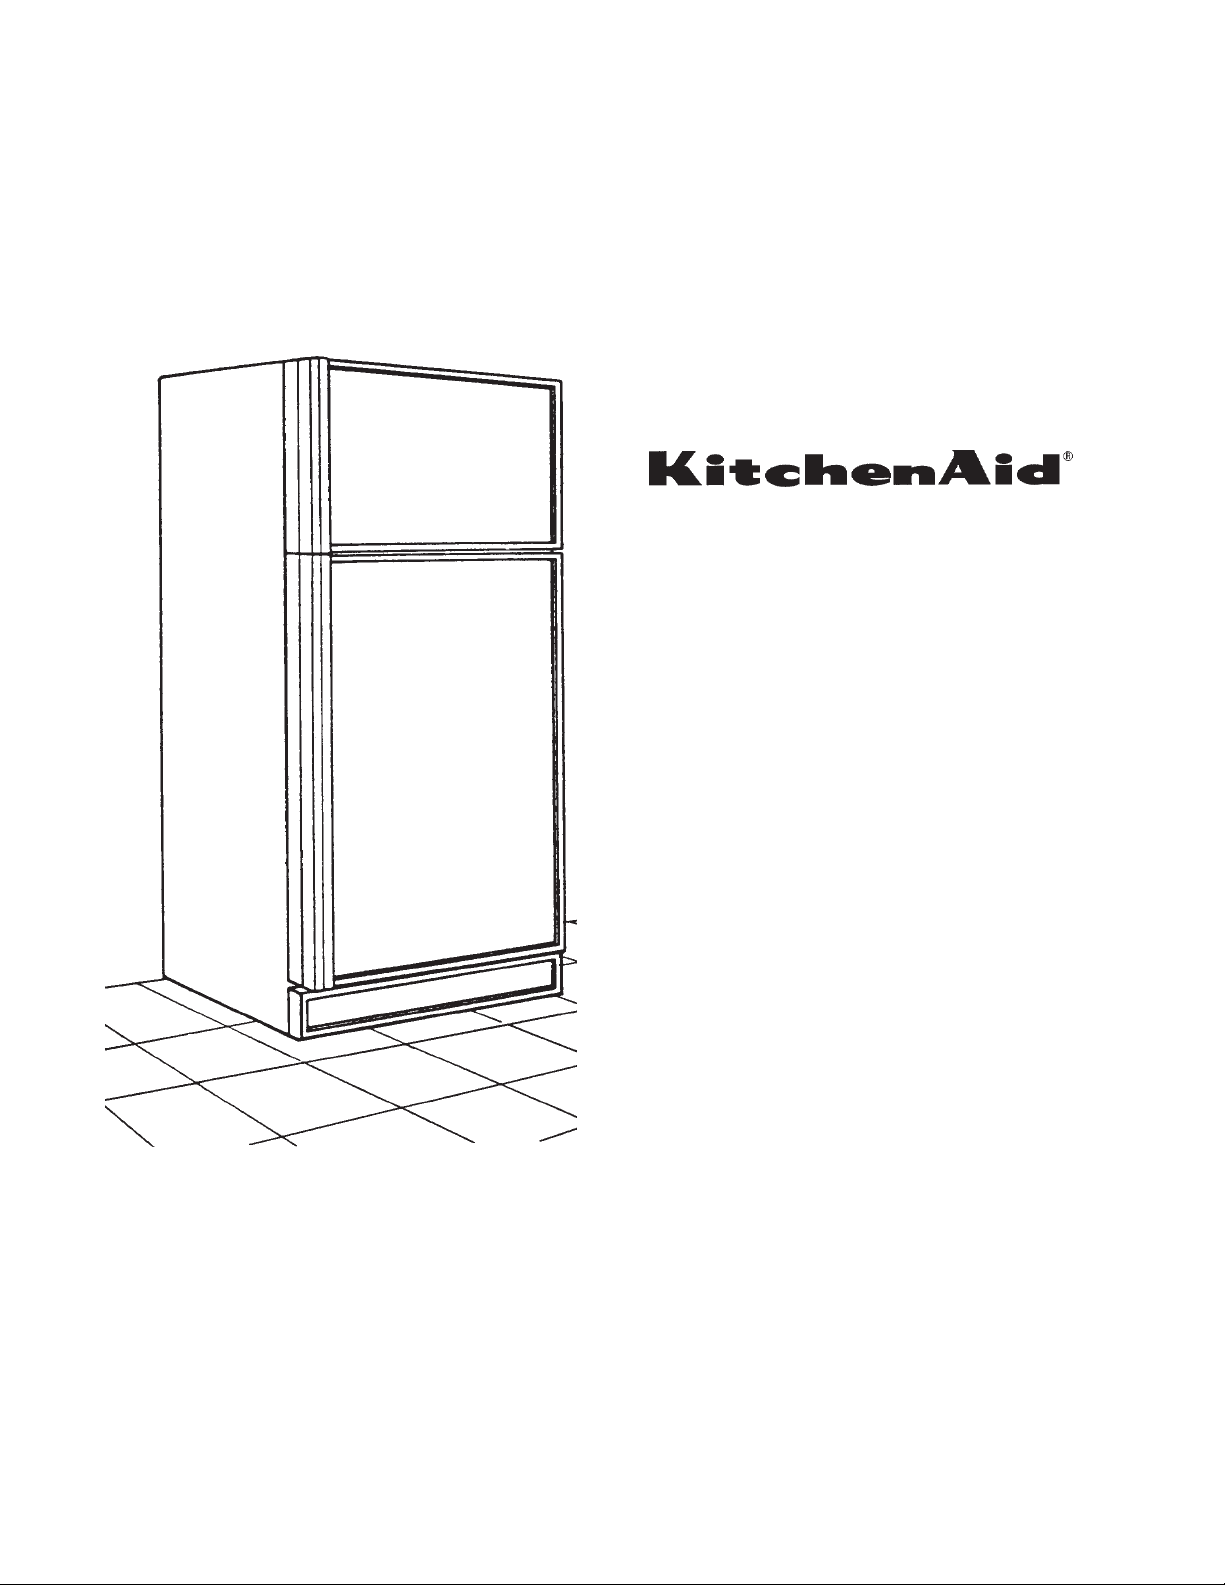
INSTALLATION INSTRUCTIONS
For the way it’s made.™
20 & 21 cu. ft.
Top Mount
Refrigerator
Trim Kit
Model 4378629
© Whirlpool Corporation 2000
(All Rights Reserved)
Installation Instructions 4378798 Rev. A 9/00
1
4378798-A

Before you start...
Proper installation is your responsibility. Make sure you have all tools and parts necessary for correct installation. Take
special care when removing parts from packaging to avoid scratches.
INSTALLATION REQUIRES THAT YOU REMOVE THE DOORS FROM THE REFRIGERATOR AND LAY THEM ON A
FLAT PADDED SURFACE. CARE SHOULD BE TAKEN NOT TO BREAK THE INNER DOOR SHELVES AND TRIM.
Work on one door at a time.
Read each step carefully before trying. You will need
help during certain steps to assure proper trim piece
attachment. Some pieces removed need to be saved
and certain trim pieces once applied cannot be changed.
Trim Kit can be installed with the handle on either the
right or left side. After the kit is installed, the handle can
not be reversed.
4378798-A
Shut-off
valve
(continued)
2
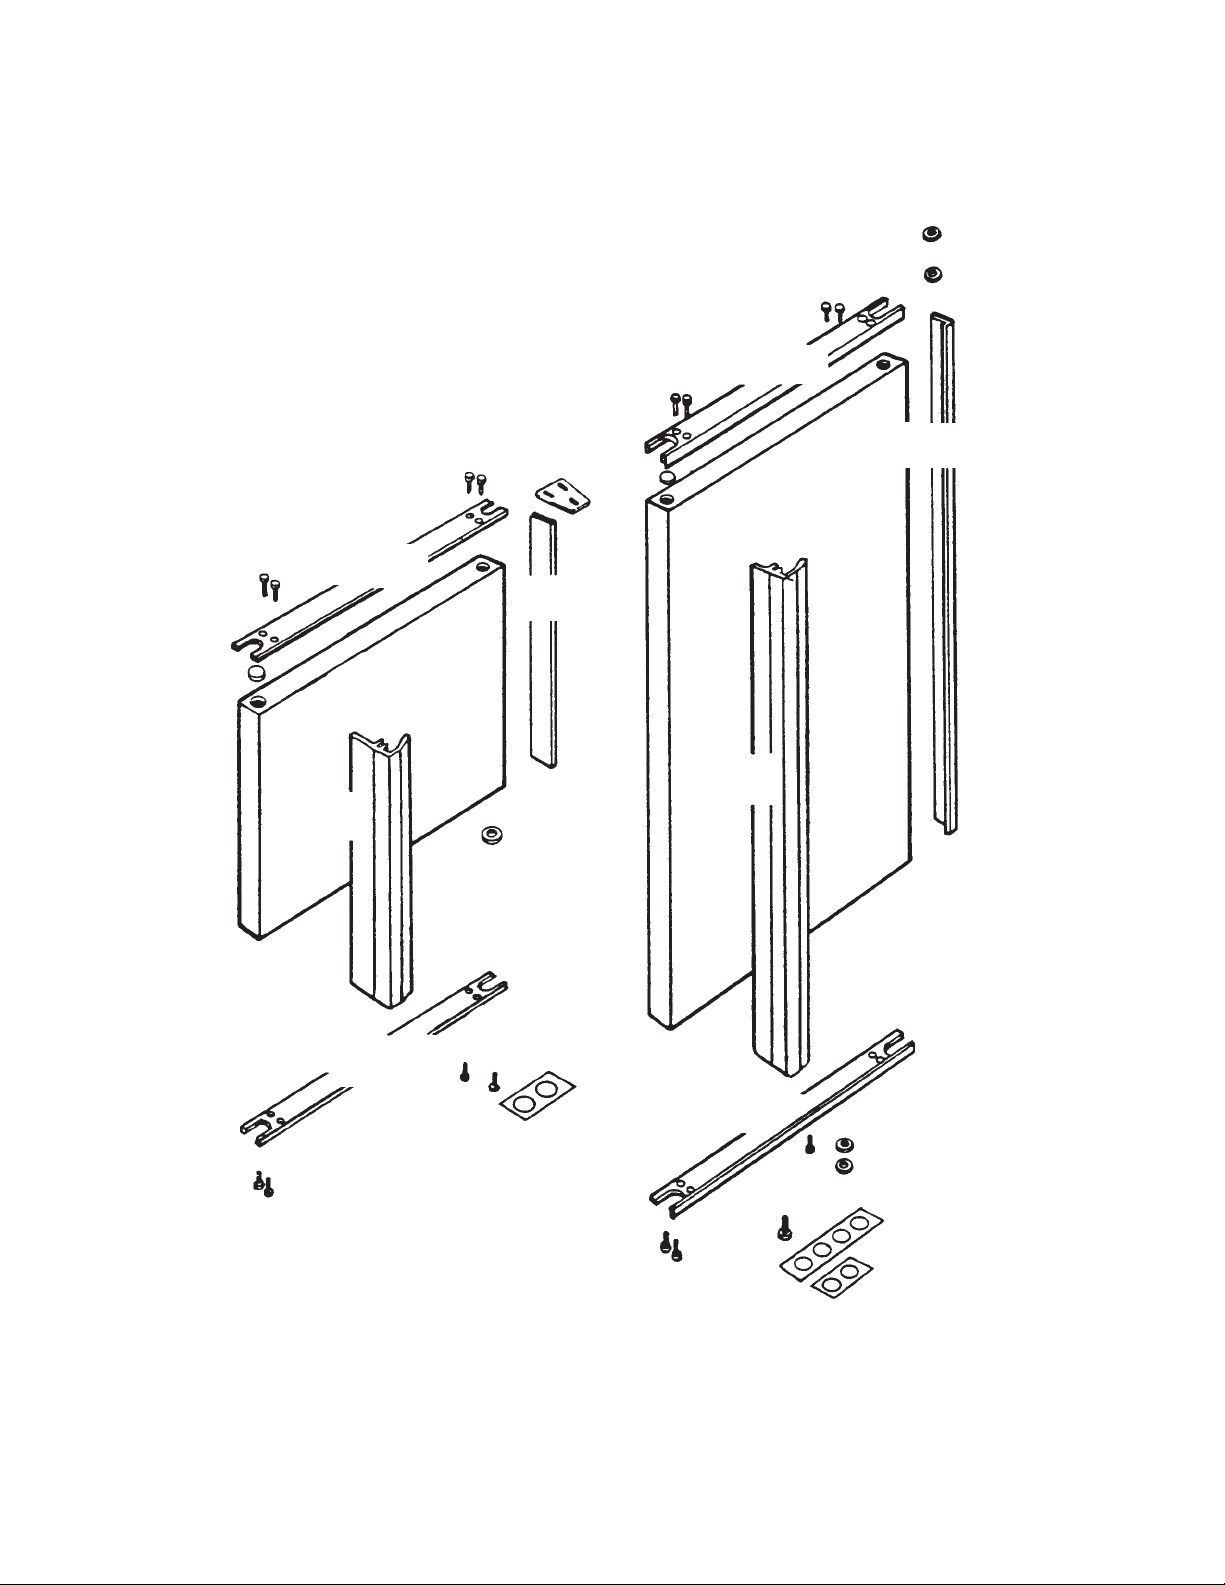
Trim kit parts
Remove parts from packages.
Check that you have all the parts.
1 Washer 1⁄16"
(487576)
1 Washer 1⁄16"
(487576)
1 Top trim
(4378693)
(489028)
1 Top trim
(4378693)8 Screws
FREEZER DOOR
1 Handle
(4378695)
1 Hinge shim
(941047)
1 Side trim
(4378694)
1 Washer 1⁄16"
(487576)
1 Side trim
(4378696)
REFRIGERATOR
DOOR
1 Handle
(4378697)
1 Bottom trim
(4378693)
Hole-seals
(941765)
1 Bottom trim
(4378693)
8 Screws
(489028)
1 Washer
(487576)
1 Washer 1⁄16"
(487576)
Hole-seals
(941765)
1
⁄16"
(continued)
3
4378798-A
Tools needed for installation
1
⁄2" Socket
Wrench Phillips
Flathead Screwdriver
Masking tape
Screwdriver
Rubbing
alcohol Dime
Now start...
wWARNING
Electrical Shock Hazard
Disconnect power before servicing.
Replace all panels before operating.
Failure to do so can result in death or
electrical shock.
Putty knife
4. To remove the freezer door handle, remove the two
screws on the top of the door handle and the two
screws on the bottom of the door handle.
1. Remove all food from the refrigerator and freezer.
2. If you have an icemaker, shut off the water supply to
the refrigerator by turning the valve of your water line
clockwise.
3. Use putty knife to pry off KitchenAid nameplate from
freezer door. Be careful not to scratch paint. Remove
excess adhesive using thumbnail, lighter fluid or
WD-40.
4378798-A
(continued)
4
To remove the refrigerator door handle, pry out the
handle insert, remove the one exposed screw in the
center of the door. Then remove the two screws on
the top of the door handle and the two screws on the
bottom of the door. Cover exposed hole with hole-seal
(941765) provided. Discard screws and handle insert.
7. Remove the door stop from the bottom of the freezer
door. Save screw and door stop. On the bottom of the
freezer door there are two plastic plugs covering two
holes. You must remove these plugs using a putty
knife or screwdriver. Discard the plugs and cover the
two holes with the hole-seals (941765) provided.
Remove the plastic plug from the top of the freezer
door but do not cover the hole. Remove the two filler
screws from the top of the door and one from the
bottom of the door. Use rubbing alcohol to clean all
edges of door where trim pieces will be applied. Allow
alcohol to dry before continuing.
Use a putty knife to pry off the round plastic plug on
the right-hand side of the door. Cover exposed hole
with hole-seal (941765) provided.
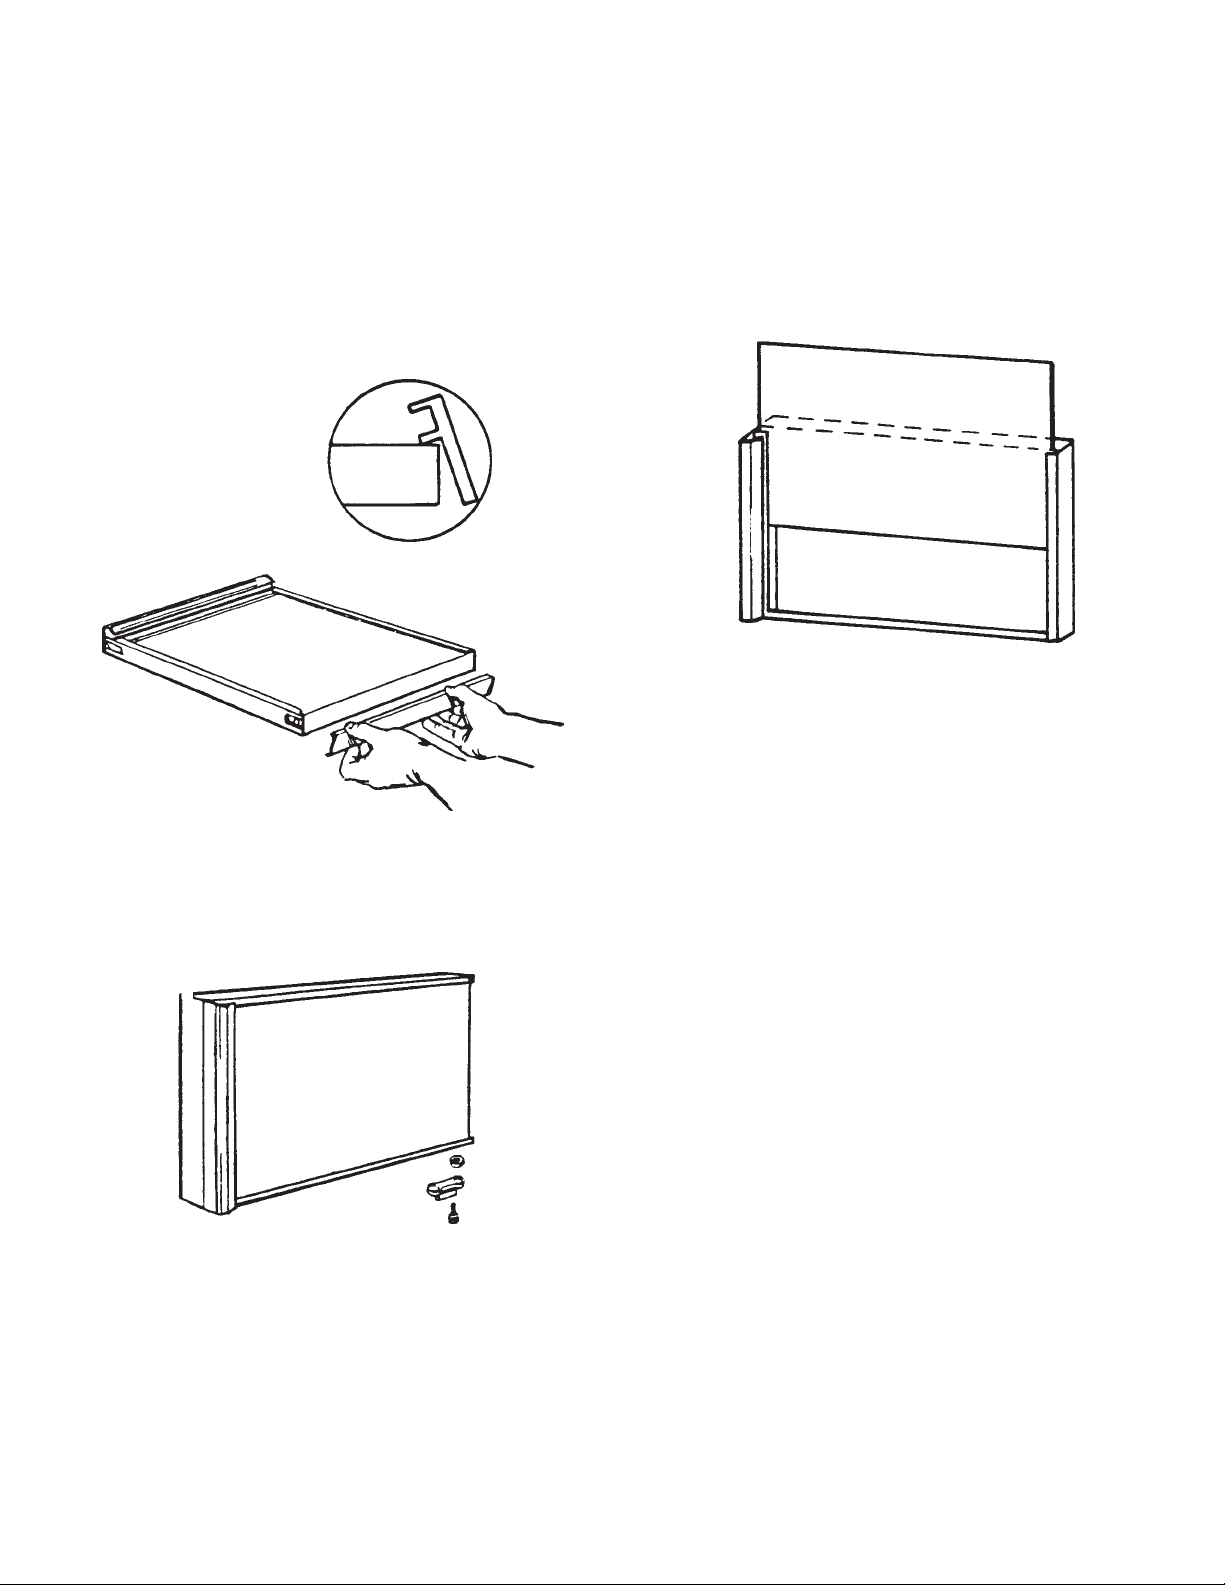
Remove the freezer door.
5. Remove the freezer door top hinge cover by tapping
the underside of the hinge near the gasket area.
Remove screws that hold the hinge and shim (if any)
in place. Save screws, hinge and cover,
6. With help to support freezer door, carefully lift freezer
door up and off the center hinge. Place the door, shelf
side down, on a flat, padded surface.
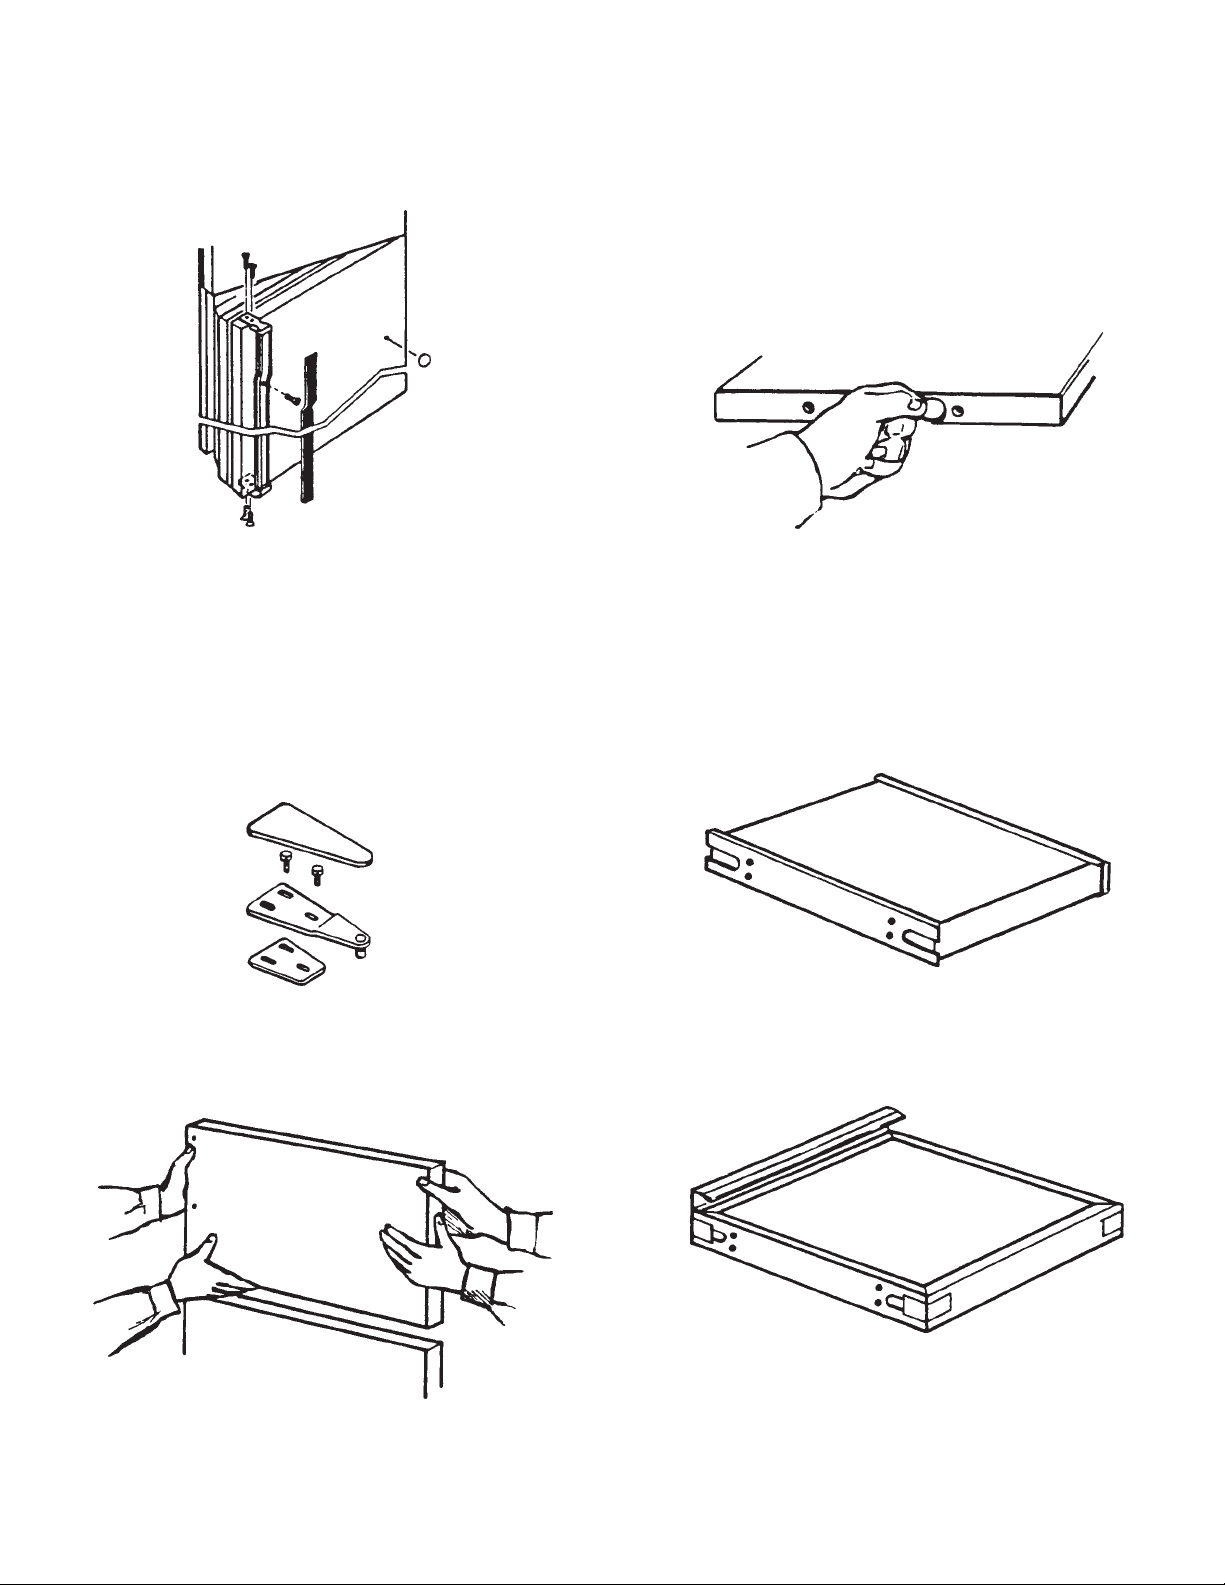
Practice lining up trim pieces before removing adhesive backing. Keep adhesive side of trim pieces away
from door until ready to press in place. The adhesive
forms a permanent bond upon contact.
8. Attach the top and bottom (4378693) trim pieces to
the freezer door using the new screws provided
(489028). Do not tighten screws now. Both trim pieces
will be used to judge the fit of the other trim pieces.
9. Attach side trim piece (4378694) and handle
(4378695) to the door with masking tape. Check that
corners of the top trim are flush with the side trim and
handle.
(continued)
5
4378798-A
10. Remove handle trim piece. Remove adhesive backing from freezer door handle trim piece. Carefully
press handle in place, making sure top corner is
flush with top trim. The lower lip of the trim channel
must fit snugly to the door.
11. Remove side trim. Remove adhesive backing from
freezer door side trim piece. Use inside edge of trim
channel as a guide for alignment. Press trim in
place, making sure top corner is flush with top trim
piece. Tighten screw on hinge side of bottom trim so
it is flush with side trim. A slight gap at one end of the
bottom trim is acceptable and will not be noticeable
when door is reinstalled.
THE FOLLOWING INSTRUCTIONS ARE FOR
INSTALLING KITCHENAID PROVIDED DECORATOR
PANELS. IF YOU HAVE CUSTOM DESIGNED PANELS
PLEASE REFER TO THE CUSTOMIZED PANEL
SECTION TO ENSURE PROPER FIT. IF YOU DO NOT
PLAN ON INSTALLING YOUR PANELS NOW,
PLEASE SAVE THESE INSTRUCTIONS FOR FUTURE
REFERENCE.
13. Remove the four screws holding top trim piece in
place. Slide the filler board into the “U”-shaped track
of the trim pieces.
12. Remove screw from hinge side of bottom trim piece.
Slide screw through door stop and 1/16" washer
(487576). Insert doorstop screw into doorstop hole in
bottom trim and tighten. Make sure the flange side is
toward the front edge of the door.
14. Remove the protective paper covering from the good
side of the decorator panel before sliding the panel
into place. When installing Almond decorator panels,
both sides are good and protective paper covering
must be removed from both sides before installing.
Handle the panels carefully to avoid scratching the
surface. Install decorator panels, with the good side
out, on top of the filler boards using the trim as a
guide. Reattach the top trim. Tighten screws in top
and bottom trim.
4378798-A
(continued)
6
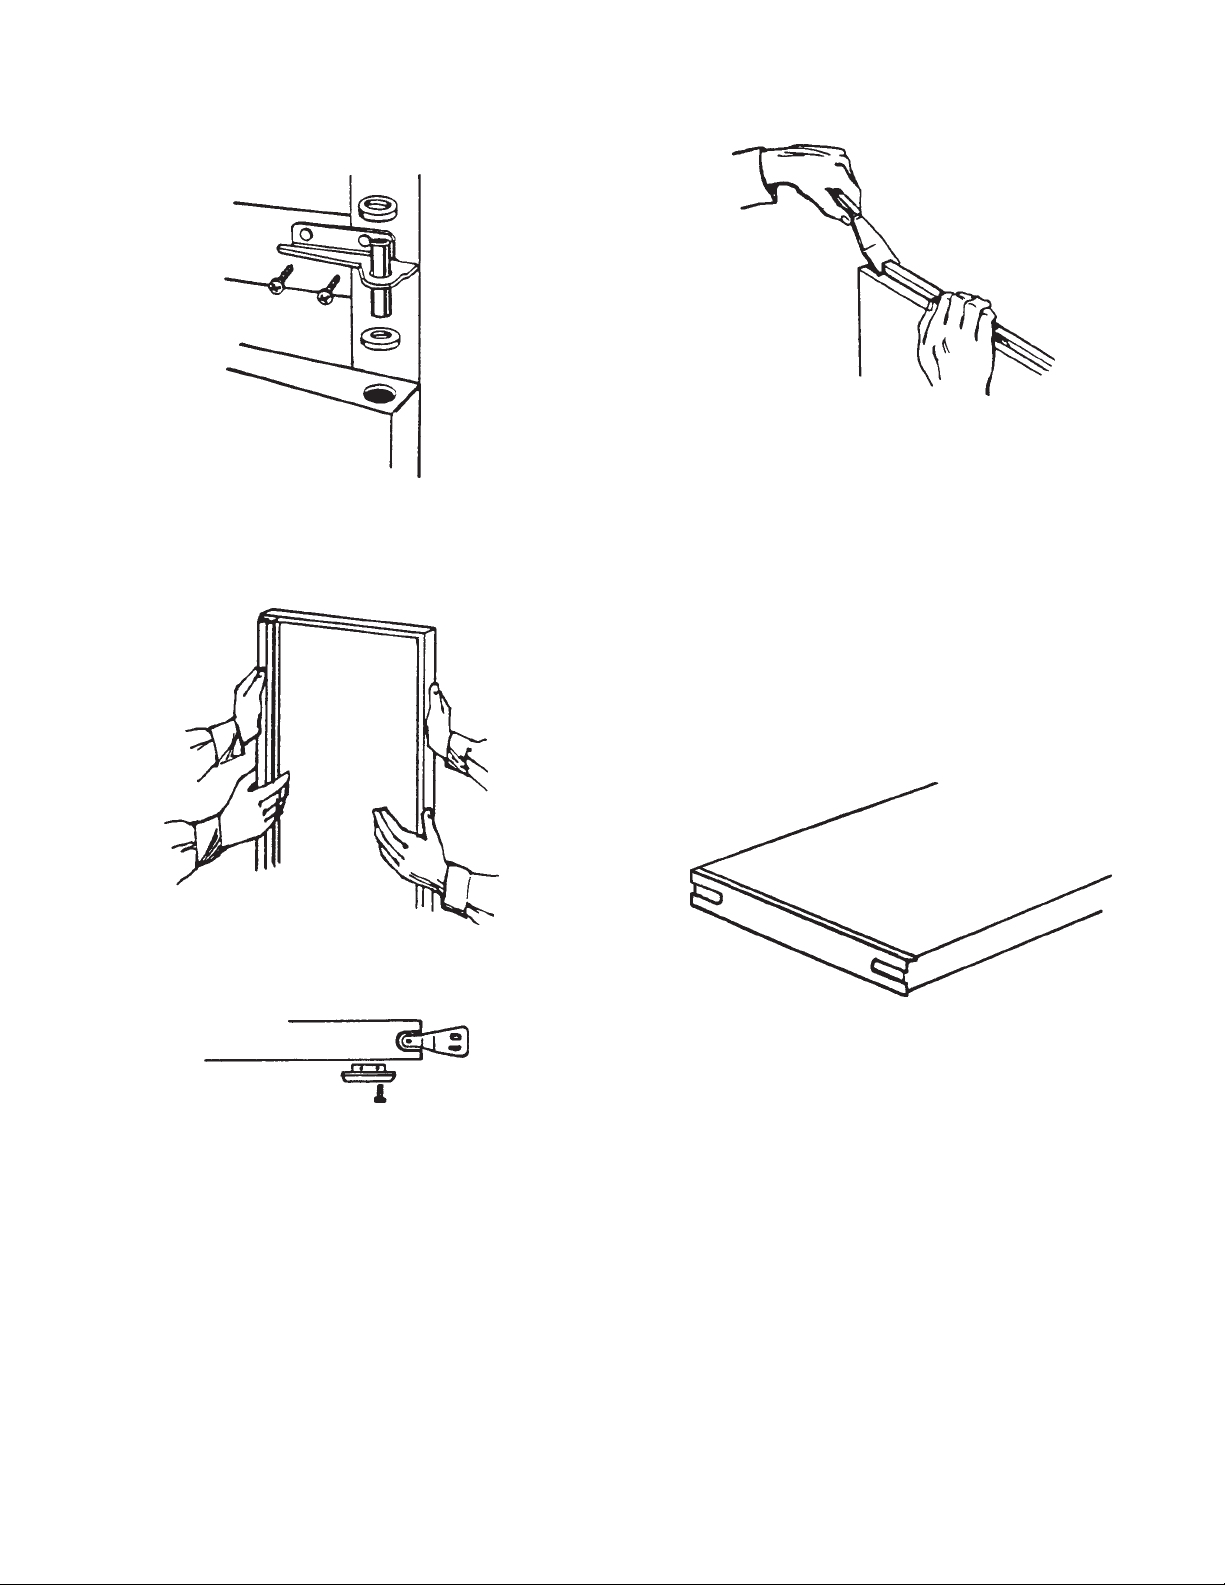
Remove the refrigerator door.
15. Remove the two screws, center hinge, and washers.
Save screws, hinge and washers.
16. With assistance, carefully lift the refrigerator door up
and off the bottom hinge. Place door, shelf side
down, on a flat, padded surface.
18. Use a putty knife to pry off top door trim. Remove
excess adhesive. Discard trim. Clean with lighter
fluid or WD-40.
19. Remove and discard screws and 2 center plastic
plugs from the bottom of the door. Use rubbing
alcohol to clean all edges of door where trim pieces
will be applied. Allow alcohol to dry. Cover 2 center
plug holes and door handle screw hole with
hole-seals (941765) provided.
Practice lining up trim pieces before removing
adhesive backing. Keep adhesive side of trim pieces
away from door until ready to press in place. The
adhesive forms a permanent bond upon contact.
20. Attach the top and bottom (4378693) trim pieces to
the refrigerator door using the new screws provided
(489028). Do not tighten screws now. Both trim
pieces will be used to judge the fit of the other
trim pieces.
17. Remove the door stop. Save screw and door stop.
(continued)
7
4378798-A

21. Attach side trim piece (4378696) and handle
(4378697) to the door with masking tape. Check that
corners of the top trim are flush with the side trim
and handle.
24. Remove screw from hinge side of bottom trim piece.
Slide screw through doorstop and 1/16" washer
(487576). Insert doorstop screw into doorstop hole in
bottom trim and tighten. Make sure the flange side is
toward the front edge of the door.
22. Remove handle trim piece. Remove adhesive
backing from refrigerator door handle trim piece.
With assistance to align corners, carefully press
handle in place, making sure top corner is flush with
top trim. The lower lip of the trim channel must fit
snugly to the door.
23. Remove side trim. Remove adhesive backing from
refrigerator door side trim piece. Use inside edge
of trim channel as a guide for alignment. With
assistance check to make sure the corners are flush
with top and bottom trim pieces before pressing the
trim piece in place. After aligning corners, you and
your assistant must press the side trim piece in place
at the same time. Tighten screw on hinge side of
bottom trim so it is flush with side trim. A slight gap
at one end of the bottom trim is acceptable and will
not be noticeable when door is reinstalled.
THE FOLLOWING INSTRUCTIONS ARE FOR
INSTALLING KITCHENAID PROVIDED DECORATOR
PANELS. IF YOU HAVE CUSTOM DESIGNED PANELS
PLEASE REFER TO THE CUSTOMIZED PANEL
SECTION TO ENSURE PROPER FIT. IF YOU DO
NOT PLAN ON INSTALLING YOUR PANELS NOW,
PLEASE SAVE THESE INSTRUCTIONS FOR
FUTURE REFERENCE.
25. Remove the four screws holding top trim piece in
place. Slide the filler board into the “U”-shaped track
of the trim pieces.
4378798-A
(continued)
8

26. Remove the protective paper covering from the good
side of the decorator panel before sliding the panel
into place. When installing Almond decorator panels,
both sides are good and protective paper covering
must be removed from both sides before installing.
Handle the panels carefully to avoid scratching the
surface. Install decorator panels, with the good side
out, on top of the filler boards using the trim as a
guide. Reattach the top trim. Tighten screws in top
and bottom trim.
27. Place 1/6" washer (487576) on top of existing washer
on bottom hinge pin. With assistance, lift refrigerator
door and rest it on the bottom-door hinge. Hold door
closed. Place 1/16" washer (487576) and one washer
(saved from step 15) on bottom of center-hinge pin
and insert into hole in top of refrigerator door. Attach
hinge to cabinet. Do Not tighten screws.
29. Place 1/16" washer (487576) and one washer (saved
from step 15) on top of center-hinge pin. With assistance, lift freezer door and rest it on the center hinge
post.
30. Align screw holes in the new shim (941047) and
hinge, Then reattach hinge to cabinet. The gap
between the door and cabinet (at top and side)
should be 11/16", about the diameter of a dime. Check
the gap in several places. Adjust the gap by moving
the top hinge, Tighten the two hinge screws. Snap
on the hinge cover.
31. Check that all new trim pieces are installed. See
parts list. If there is an extra part, go back through
the steps to see which step was skipped,
32. Check that you have all your tools.
33.Turn the valve in the water line counter-clockwise to
the “On” position and check for leaks.
28. Line up top and sides of the door with cabinet. Keep
bottom shim and center hinge in place. When the
door is in position, the gap between the door and the
cabinet (at top and side) should be 11/16", about the
diameter of a dime. Check the gap in several places.
Tighten the hinge screws.
34. Plug in refrigerator or reconnect power.
9
(continued)
4378798-A

Customized panels
Custom-match your refrigerator to your kitchen cabinets. Your cabinetmaker can cut quarter-inch panels to the following
dimensions to give your refrigerator a built-in appearance.
Freezer door
Refrigerator door
3
⁄8"
21
(54.3 cm)
40 3⁄16"
(102.1 cm)
3
32
⁄4"
(83.2 cm)
1
⁄4"
(.64 cm)
Quarter-inch panels
5
⁄8"
1
(4.1 cm)
For panels more than 1⁄4" (.64 cm) thick, a 15⁄8" (4.1 cm) I.D. panel border,
routed to 1⁄4" (.64 cm) thickness is needed.
4378798-A
10

Ready-made Decorator Panels
Three pre-cut Decorator Panel Kits are available from Whirlpool dealers.
Almond Decorator Panel Kit
Part Number 4378637
Black Decorator Panel Kit
Part Number 4378635
White Decorator Panel Kit
Part Number 4378636
Black Grille Kit
Part Number 4378648
Refrigerator Accessories
These refrigerator accessories are available from KitchenAid dealers.
Coil Brush
Part Number 4210463
Specially designed coil brush makes cleaning refrigerator coils fast and easy.
Cleaner coils will lower refrigerator consumption too!
Micron 5™ Ice Cube & Water Filter
Part Number 4210573
Eliminates bad tastes, odors, chlorine, dirt, rust and other particles from your water before they enter
your refrigerator. Conveniently packaged in a double pack, each filter will last approximately six months.
Easy to install.
Egg/Wine Rack
Part Number 1125913
The convenient wine rack also doubles as a handy holding space for a carton of eggs. Hang this rack
from your refrigerator shelf for even more storage space.
Anti-Static Cleaner
Part Number 978849
Great cleaner for any smooth glass or acrylic surface. Cleans while it applies a hard glaze that resists
fingerprints and dust.
Appliance Polish & Cleaner
Part Number 285607
This easy-to-use silicone formula cleaner is made especially for cleaning and shining appliances in one
easy step.
Touch Up Paint
White – Part Number 72017
Almond – Part Number 72107
Keep your Whirlpool appliances looking like new with acrylic paint. Order yours today in the convenient
1
⁄2" oz. bottle with brush.
For the way it’s made.™
Prepared by KitchenAid Corporation, St. Joseph, Michigan
11
Printed in the U.S.A.
4378798-A

INSTRUCTIONS D’INSTALLATION
Pour la façon dont ils sont
fabriqués.
MD
Nécessaire
de garnitures
pour les
réfrigérateurs
de 20 et 21 pi
congélateur
supérieur
Modèle 4378629
3
à
(Tous droits réservés)
Feuille d’instructions 4378798 Rév. A 9/00© Whirlpool Corporation, 2000
1

Avant de commencer . . .
Vous avez la responsabilité de procéder à une bonne installation. Assurez-vous que vous avez tous les outils et toutes les
pièces nécessaires pour procéder à une bonne installation. Faites bien attention de ne pas rayer les pièces lorsque vous
les sortirez de l’emballage.
L’INSTALLATION NÉCESSITE LA DÉPOSE DES PORTES DU RÉFRIGÉRATEUR. VOUS DEVREZ ENSUITE LES
COUCHER À PLAT SUR UNE SURFACE PLANE REMBOURRÉE. FAITES BIEN ATTENTION DE NE PAS BRISER LES
BALCONNETS DE LA PORTE NI LA GARNITURE.
Intervenez sur une porte à la fois.
Avant d’essayer de poser une pièce, lisez attentivement
chaque opération. Vous aurez besoin d’aide lors de
certaines opérations pour vous assurer que la garniture
est bien fixée. Vous devrez conserver certaines pièces
déposées et, une fois collées, certaines pièces de
garniture ne pourront pas être modifées.
Le nécessaire de garnitures peut être installé avec la
poignée étant à droite ou à gauche. Après avoir installé
le nécessaire, la poignée ne peut pas être renversée.
4378798-A
Robinet
d’arrêt
(suite)
2

Pièces du nécessaire de garnitures
Sortez les pièces de l’emballage.
Assurez-vous que vous avez toutes les pièces.
1 garniture
supérieure
(4378693)
1 rondelle de 1⁄16 de
pouce (487576)
1
1 rondelle de
⁄16 de
pouce (487576)
8 vis
(489028)
1 garniture
supérieure
(4378693)
PORTE DU
CONGÉLATEUR
1 poignée
(4378695)
1 cale de
charnière
(941047)
1 garniture
latérale
(4378694)
1 rondelle de
1
⁄16 de pouce
(487576)
1 garniture
latérale
(4378696)
PORTE DU
RÉFRIGÉRATEUR
1 poignée
(4378697)
1 garniture
inférieure
(4378693)
Obturateurs
(941765)
1 garniture
inférieure
(4378693)
1 rondelle de
pouce (487576)
1 rondelle de
1
⁄16 de
1
⁄16 de
pouce (487576)
8 vis
(489028)
Obturateurs
(941765)
(suite)
3
4378798-A

Outils requis pour l’installation
Un tournevis à
Alcool à
frictionner
Une pièce
de dix sous
Une clé à
douille de
de pouce
1
⁄2
Maintenant, vous pouvez commencer . . .
wAVERTISSEMENT
lame plate
Un couteau à
mastic
Un tournevis
Phillips
Ruban-cache
4. Pour déposer la poignée de la porte du congélateur,
déposez les deux vis qui se trouvent en haut de la
poignée de la porte et les deux vis qui se trouvent en
bas de la poignée de la porte.
Risque de choc électrique
Déconnecter la source de courant électrique
avant l’entretien.
Replacer tous les panneaux avant de faire
la remise en marche.
Le non-respect de ces instructions peut causer
un décès ou un choc électrique.
1. Sortez tous les aliments du réfrigérateur et du
congélateur.
2. Si le réfrigérateur comporte une machine à glaçons,
fermez l’arrivée d’eau du réfrigérateur en tournant le
robinet de la conduite d’eau à droite.
3. À l’aide d’un couteau à mastic, dégagez la plaque
KitchenAid de la porte du congélateur. Faites bien
attention de ne pas rayer la peinture. Avec l’ongle de
votre pouce, de l’essence à briquet ou du WD-40,
enlevez l’adhésif.
4378798-A
4
(suite)

Pour déposer la poignée de la porte du réfrigérateur,
dégagez la garniture de la poignée. Déposez la vis
exposée qui se trouve au centre de la porte. Déposez
ensuite les deux vis qui se trouvent en haut de la
poignée de la porte, puis les deux vis qui se trouvent
en bas de la porte. Bouchez le trou exposé avec du
bouche-trous (941765) fourni. Jetez les vis et la
garniture de la poignée.
À l’aide d’un couteau à mastic, dégagez l’obturateur
en plastique rond du côté droit de la porte. Bouchez le
trou exposé avec du bouche-trous (941765) fourni.
Dépose de la porte du congélateur
5. Déposez le couvercle supérieur de la charnière de la
porte du congélateur en tapant sous la charnière,
près du joint. Déposez les vis de fixation de la
charnière et la cale (le cas échéant). Conservez les
vis, la charnière et le couvercle de la charnière.
7. Déposez la butée du bas de la porte du congélateur.
Conservez les vis et la butée. En bas de la porte du
congélateur se trouvent deux obturateurs en plastique
qui couvrent deux trous. Vous devez déposer ces
obturateurs à l’aide d’un couteau à mastic ou d’un
tournevis. Jetez les obturateurs et bouchez les deux
trous avec le bouche-trous (941765) fourni. Déposez
l’obturateur en plastique en haut de la porte du
congélateur, mais ne bouchez pas le trou. Déposez
les deux vis de remplissage en haut de la porte et une
en bas de la porte. Utilisez de l’alcool à frictionner
pour nettoyer les bords de la porte, là où les
garnitures étaient collées. Laissez sécher l’alcool
avant de poursuivre.
Pratiquez-vous à aligner la garniture supérieure avant
d’enlever le protecteur de son adhésif. N’approchez
pas le côté adhésif de la garniture de la porte tant que
vous n’êtes pas prêt à coller la garniture en place.
L’adhésif forme une adhérence permanente dès qu’il
vient en contact avec la porte.
8. Posez les garnitures supérieure et inférieure
(4378693) sur la porte du congélateur à l’aide des vis
neuves (489028) fournies. Ne serrez pas les vis pour
le moment. Les deux garnitures seront utilisées pour
déterminer l’ajustement des autres garnitures.
6. Avec l’aide d’une personne, levez prudemment la
porte du congélateur et dégagez-la de la charnière
du centre. Posez la porte sur une surface plane et
rembourrée en orientant son côté balconnets vers
le bas.
9. Posez la garniture latérale (4378694) et la poignée
(4378695) sur la porte avec du ruban-cache.
Assurez-vous que les angles de la garniture
supérieure affleurent la garniture latérale et la
poignée.
5
(suite)
4378798-A

10. Déposez la garniture de la poignée. Enlevez la
pellicule de protection de l’adhésif de la garniture de
la poignée de la porte du congélateur. Prudemment,
appuyez la poignée en place en vous assurant que
son angle supérieur affleure avec la garniture du
haut. Le rebord inférieur du profilé de la garniture
doit être ajusté serré sur la porte.
11. Déposez la garniture latérale. Enlevez la pellicule de
protection de l’adhésif de la garniture latérale de la
porte du congélateur. Utilisez le bord intérieur du
profilé de la garniture en tant que guide pour
l’alignement. Appuyez la garniture en place en vous
assurant que l’angle supérieur affleure avec la
garniture supérieure. Serrez la vis côté charnière de
la garniture inférieure de façon qu’elle affleure avec
la garniture latérale. Un léger espace à une des
extrémités de la garniture inférieure est acceptable
et ne se remarquera pas lorsque la porte sera
reposée.
LES INSTRUCTIONS SUIVANTES SE RAPPORTENT
À L’INSTALLATION DE PANNEAUX DÉCORATIFS
FOURNIS PAR KITCHENAID. SI VOUS AVEZ DES
PANNEAUX QUI ONT ÉTÉ CONÇUS
PERSONNELLEMENT, VEUILLEZ VOUS REPORTER
À LA PARTIE PANNEAUX PERSONNALISÉS POUR
VOUS ASSURER QU’ILS S’ADAPTENT BIEN. SI
VOUS NE PLANIFIEZ PAS POSER VOS PANNEAUX
MAINTENANT, CONSERVEZ CES INSTRUCTIONS
POUR VOUS Y REPORTER ULTÉRIEUREMENT.
13. Déposez les quatre vis qui retiennent la garniture en
place. Glissez la plaque de garnissage dans la
glissière en forme de «U» des garnitures.
12. Déposez la vis côté charnière de la garniture
inférieure. Glissez la vis dans la butée de la porte
et dans la rondelle de 1⁄16 de pouce (487576).
Introduisez la vis dans le trou de la butée de la porte
de la garniture inférieure, et serrez-la. Assurez-vous
que le côté à rebord est orienté vers le bord avant
de la porte.
14. Déposez le papier de protection du bon côté du
panneau décoratif avant de glisser le panneau en
place. Lorsque vous posez des panneaux décoratifs
de couleur amande, les deux côtés sont bons et le
papier de protection devra être enlevé des deux
côtés avant que vous posiez le panneau en place.
Manipulez les panneaux avec précaution pour ne
pas rayer leur surface. Posez les panneaux
décoratifs, avec le bon côté vers l’extérieur,
par-dessus les plaques de remplissage en utilisant
la garniture en tant que guide. Reposez la garniture
supérieure. Serrez les vis du haut et du bas de la
garniture.
(suite)
4378798-A
6

Dépose de la porte du réfrigérateur
15. Déposez les deux vis, centrez la charnière et les
rondelles. Conservez les vis, la charnière et les
rondelles.
16. Avec l’aide d’une personne, levez prudemment la
porte du réfrigérateur et dégagez-la de la charnière
inférieure. Posez la porte sur une surface plane et
rembourrée en orientant son côté balconnets vers
le bas.
18. À l’aide d’un couteau à mastic, dégagez la garniture
supérieure de la porte. Enlevez tout excès d’adhésif.
Jetez la garniture. Nettoyez avec de l’essence à
briquet ou du WD-40.
19. Déposez et jetez les deux obturateurs en plastique
du centre du bas de la porte. Utilisez de l’alcool à
frictionner pour nettoyer tous les bords de la porte, là
où les garnitures étaient collées. Laissez sécher
l’alcool. Bouchez les deux trous d’obturateur du
centre et le trou de la vis de la poignée de la porte
avec les bouche-trous (941765) fournis.
Pratiquez-vous à aligner la garniture supérieure
avant d’enlever le protecteur de l’adhésif.
N’approchez pas le côté adhésif de la garniture de la
porte tant que vous n’êtes pas prêt à la coller en
place. L’adhésif forme une adhérence permamente
dès qu’il vient en contact avec la porte.
20. Posez les garnitures supérieure et inférieure
(4378693) sur la porte du réfrigérateur à l’aide des
vis neuves (489028) fournies. Ne serrez pas les vis
pour le moment. Les deux garnitures serviront à
déterminer l’ajustement des autres garnitures.
17. Déposez la butée de la porte. Conservez les vis et la
butée de la porte.
(suite)
7
4378798-A

21. Posez la garniture latérale (4378696) et la poignée
(4378697) sur la porte avec du ruban-cache.
Assurez-vous que les angles de la garniture
supérieure affleurent la garniture latérale et
la poignée.
24. Déposez la vis côté charnière de la garniture
inférieure. Glissez la vis dans la butée de la porte et
dans la rondelle de 1⁄16 de pouce (487576).
Introduisez la vis dans le trou de la butée de la porte
de la garniture inférieure et serrez-la. Assurez-vous
que le côté rebord est orienté vers le bord avant de
la porte.
22. Déposez la garniture de la poignée. Enlevez la
pellicule de protection de l’adhésif de la garniture de
la poignée de la porte du réfrigérateur. Avec l’aide
d’une autre personne, alignez les angles, appuyez
prudemment la poignée en place en vous assurant
que l’angle supérieur affleure avec la garniture du
haut. Le rebord inférieur du profilé de la garniture
doit être ajusté serré sur la porte.
23. Déposez la garniture latérale. Enlevez la pellicule de
protection de l’adhésif de la garniture latérale de la
porte du réfrigérateur. Utilisez le bord intérieur du
profilé de la garniture en tant que guide pour
l’alignement. Avec l’aide d’une personne, assurezvous que les angles sont alignés avec les garnitures
supérieure et inférieure avant d’appuyer les
garnitures en place. Après avoir aligné les angles,
vous et une autre personne devez appuyer en même
temps sur la garniture latérale. Serrez la vis côté
charnière de la garniture inférieure de façon qu’elle
affleure avec la garniture latérale. Un léger espace à
une des extrémités de la garniture inférieure est
acceptable et ne se remarquera pas lorsque la porte
sera reposée.
LES INSTRUCTIONS SUIVANTES SE RAPPORTENT
À L’INSTALLATION DE PANNEAUX DÉCORATIFS
FOURNIS PAR KITCHENAID. SI VOUS AVEZ DES
PANNEAUX QUI ONT ÉTÉ CONÇUS
PERSONNELLEMENT, VEUILLEZ VOUS REPORTER
À LA PARTIE PANNEAUX PERSONNALISÉS POUR
VOUS ASSURER QU’ILS S’ADAPTENT BIEN. SI
VOUS NE PLANIFIEZ PAS POSER VOS PANNEAUX
MAINTENANT, CONSERVEZ CES INSTRUCTIONS
POUR VOUS Y REPORTER ULTÉRIEUREMENT.
25. Déposez les quatre vis qui retiennent la garniture
en place. Glissez la plaque de garnissage dans la
glissière en forme de «U» des garnitures.
4378798-A
8
(suite)

26. Déposez le papier de protection du bon côté du
panneau décoratif avant de glisser le panneau en
place. Lorsque vous posez des panneaux décoratifs
de couleur amande, les deux côtés sont bons et le
papier de protection devra être enlevé des deux
côtés avant que vous posiez le panneau en place.
Manipulez les panneaux avec précaution pour ne
pas rayer leur surface. Posez les panneaux
décoratifs, en orientant le bon côté vers l’extérieur,
par-dessus les plaques de remplissage, en utilisant
la garniture en tant que guide. Reposez la garniture
supérieure. Serrez les vis du haut et du bas de la
garniture.
27. Mettez une rondelle de 1⁄16 de pouce (487576) sur la
rondelle existante de l’axe du bas de la charnière. À
l’aide d’une personne, levez la porte du réfrigérateur
et faites-la reposer sur la charnière inférieure. Tenez
la porte fermée. Mettez une rondelle de 1⁄16 de pouce
(487576) et une rondelle (que vous avez conservée
de l’opération 15.) sur la partie inférieure de l’axe de
la charnière du centre et introduisez-la dans le trou
du haut de la porte du réfrigérateur. Posez la
charnière sur la carrosserie. Ne serrez pas les vis.
29. Mettez une rondelle de 1⁄16 de pouce (487576) et une
rondelle (que vous avez conservée de l’opération
15.) en haut de l’axe de la charnière du centre. Avec
l’aide d’une personne, levez la porte du congélateur
et essayez-la sur l’axe du centre de la charnière.
30. Alignez les trous des vis de la nouvelle cale
(941047) et de la charnière. Reposez la charnière
sur la carrosserie. L’espace entre la porte et la
carrosserie (en haut et sur les côtés) doit être de
11
⁄16 de pouce, environ le diamètre d’une pièce de
dix sous. Vérifiez l’espace à plusieurs endroits.
Réglez l’espace du joint de la porte en déplaçant
la charnière du haut. Serrez les deux vis de la
charnière. Enclenchez en place le couvercle de la
charnière.
31. Assurez-vous que toutes les garnitures neuves sont
maintenant posées. Reportez-vous à la liste des
pièces. Si vous avez des pièces en trop, revoyez les
opérations et voyez celles que vous avez manquées.
32. Assurez-vous que vous avez tous vos outils.
33. Ouvrez le robinet de la conduite d’eau en le tournant
à gauche et assurez-vous qu’il n’y a pas de fuites
d’eau.
28. Alignez le haut et les côtés de la porte avec la
carrosserie. Laissez la cale du bas et la charnière
du centre en place. Lorsque la porte est en position,
l’espace entre la porte et la carrosserie (en haut et
sur le côté) doit être de 11⁄16 de pouce, environ le
diamètre d’une pièce de dix sous. Vérifiez l’espace
à plusieurs endroits. Serrez les vis de charnière.
34. Reconnectez la source de courant électrique ou
rebranchez le réfrigérateur.
9
(suite)
4378798-A

Panneaux personnalisés
Assortissez les panneaux personnalisés de votre réfrigérateur aux placards de votre cuisine. Votre menuisier peut couper
des panneaux d’un quart de pouce aux dimensions suivantes pour que votre réfrigérateur ressemble à un réfrigérateur
encastré.
3
21
Porte du congélateur
Porte du réfrigérateur
⁄8 pouces
(54,3 cm)
3
⁄16 pouces
40
(102,1 cm)
4378798-A
3
32
⁄4 pouces
(83,2 cm)
1
⁄4 de
pouce
(0,64 cm)
Panneaux d’un quart de pouce
5
⁄8 pouce
1
(4,1 cm)
Dans le cas de panneaux dont l’épaisseur est supérieure à
1
⁄4 de pouce (0,64 cm), vous devez toupiller sur 1⁄4 de pouce
(0,64 cm) le bord du panneau de 15⁄8 pouce (4,1 cm) de
diamètre intérieur.
10

Panneaux décoratifs préfabriqués
Vous pouvez vous procurer auprès des marchards Whirlpool trois nécessaires de
panneaux décoratifs préfabriqués.
Nécessaire de panneaux décoratifs amandes
Numéro de pièce 4378637
Nécessaire de panneaux décoratifs noirs
Numéro de pièce 4378635
Nécessaire de panneaux décoratifs blancs
Numéro de pièce 4378636
Nécessaire de grille noire
Numéro de pièce 4378648
Accessoires pour le réfrigérateur
Vous pouvez vous procurer ces accessoires de réfrigérateurs auprès de votre marchand
KitchenAid.
Brosse de serpentin
Numéro de pièce 4210463
Cette brosse de serpentin spécialement conçue vous permet de nettoyer facilement et
rapidement les serpentins de votre réfrigérateur. Des serpentins de réfrigérateur propres
abaissent la consommation d’électricité!
Filtre de glaçons et d’eau Micron 5
Numéro de pièce 4210573
Élimine les mauvais goûts, les mauvaises odeurs, le chlore, la saleté, la rouille et les
autres particules de votre eau avant qu’elle pénètre dans votre réfrigérateur.
Pratiquement emballé dans un double emballage, chaque filtre durera environ six mois.
Ils sont faciles à installer.
Étagères à oeufs/porte-bouteilles à vin
Numéro de pièce 1125913
Le porte-bouteilles à vin sert également d’espace de remisage pratique pour une boîte
d’oeufs en carton. Pour obtenir encore plus d’espace de remisage, accrochez ce
porte-bouteilles sur l’étagère de votre réfrigérateur.
Nettoyant antistatique
Numéro de pièce 978849
Nettoyant idéal pour toutes les surfaces en acrylique et en verre. Il nettoie tout en
appliquant un brillant dur qui résiste aux marques de doigts et à la poussière.
Nettoyant et poli d’appareils électroménagers
Numéro de pièce 285607
Ce nettoyant à silicone facile à utiliser est spécialement fabriqué pour nettoyer et faire
briller en une seule application les appareils électroménagers.
Peinture de retouche
Blanc — Numéro de pièce 72017
Amande — Numéro de pièce 72107
Gardez l’apparence du neuf à vos appareils électroménagers Whirlpool grâce à cette
nouvelle peinture acrylique. Vous pouvez la commander aujourd’hui même, elle est livrée
en flacons pratiques de 1⁄2 once avec un pinceau.
MD
Pour la façon dont ils sont fabriqués.
Préparé par KitchenAid, St, Joseph, Michigan
11
MD
Imprimé aux États-Unis
4378798-A
 Loading...