

KitchenAid 24"" Above-the-Counter Microwave Oven Installation Instructions Manual
F
or quick reference, please record the following:
Model Number
Serial Number
Model/Serial plate located on the oven behind the door.
Date of Purchase
Dealer Phone No.
Installation Instructions
24" Above-the-Counter
Microwave Oven
IMPORTANT:
Read and save
these instructions.
IMPORTANT:
Installer: Leave Installation Instructions with
the homeowner.
Homeowner: Keep Installation Instructions for
future reference.
Save Installation Instructions for local electrical
inspector's use.
Part No. 8205028/TINSEB229MRR1
Quick Reference
Table of Contents:
Pages
Before you start
Product dimensions
Location
Electrical requirements
Installation steps
2
3
3
4
4- 6
www.KitchenAid.com

Before you start...
This is the safety alert
symbol.
This symbol alerts you to
potential hazards that can kill or
hurt you and others.
All safety messages will follow the
safety alert symbol and either the
word “DANGER” or “WARNING.”
These words mean:
You can be killed or seriously
injured if you don’t follow
instructions.
DANGER
WARNING
Your safety and the safety of
others are very important.
We have provided many important
safety messages in this manual
and on your appliance.Always read
and obey all safety messages.
All safety messages will tell you
what the potential hazard is, tell
you how to reduce the chance of
injury, and tell you what can
happen if the instructions are not
followed.
You can be killed or seriously
injured if you don’t immediatel
y
follow instructions.
Tools
recommended
for installation:
Parts included for
Installation:
You need to:
✔ observe all governing codes and
ordinances.
✔ install microwave oven as
specified in these instructions or
as specified on wall and upper
cabinet templates.
✔ have everything you need to
properly install microwave oven.
✔ check the microwave oven for
damage. If any damage is
evident, do not operate the
microwave oven until it is
checked by an authorized service
technician.
✔ place a portion of carton or other
heavy material between the
microwave oven and the floor or
countertop. Do not use a plastic
cover.
Assemble the required tools and parts
before starting installation. Read and
follow the instructions provided with
any tools listed here.
• Phillips screwdriver
• electric drill
• 1/2", 5/8" and 3/32" drill bits
•1-1/2" wood bit or metal hole
cutter (if metal cabinet is used)
• protective covering, such as a
blanket for microwave oven and
countertop (you may also use
carton for protection)
• scissors
• pencil
• measuring tape
• masking tape or similar
• 6 - wood screws,
5 mm x 30 mm long
• 4 - toggle bolts with nuts,
#10-24 x 50 mm long
• 2 - top cabinet screws,
5 mm x 60 mm long
• 1 - power cord hanger
• 3 - tapping screws,
4 mm x 12 mm long
• 2 - flat washers, 30 mm diameter
• 1 - grommet
• 2 - spacer plates
The installation hardware items
are in a small bag. The 2 spacer
plates are packed separately. All
items are in a small carton packed
below the oven.
2
✔ remove shipping materials and
parts from inside the microwave
oven. Locate templates and set
them aside to be used later.
✔ make sure the microwave oven
will be mounted against and
supported by both a flat, vertical
wall and upper cabinet or other
horizontal structure.
✔ support for weight of 110 pounds,
which includes microwave oven
and items placed in the oven and
upper cabinet.
✔ make sure the microwave oven
mounting bracket will be
attached to a minimum of one,
vertical 2" x 4" wall stud.
✔ make sure not to mount the
microwave oven to an island or
peninsula cabinet.
The Utensil Bar Kit is packed in a
separate carton inside the
microwave oven carton. The first
three items are in a small bag.
• 4 - sleeves
• 4 - screws
• 8 - S-hooks
• 2 - accessory bars
3
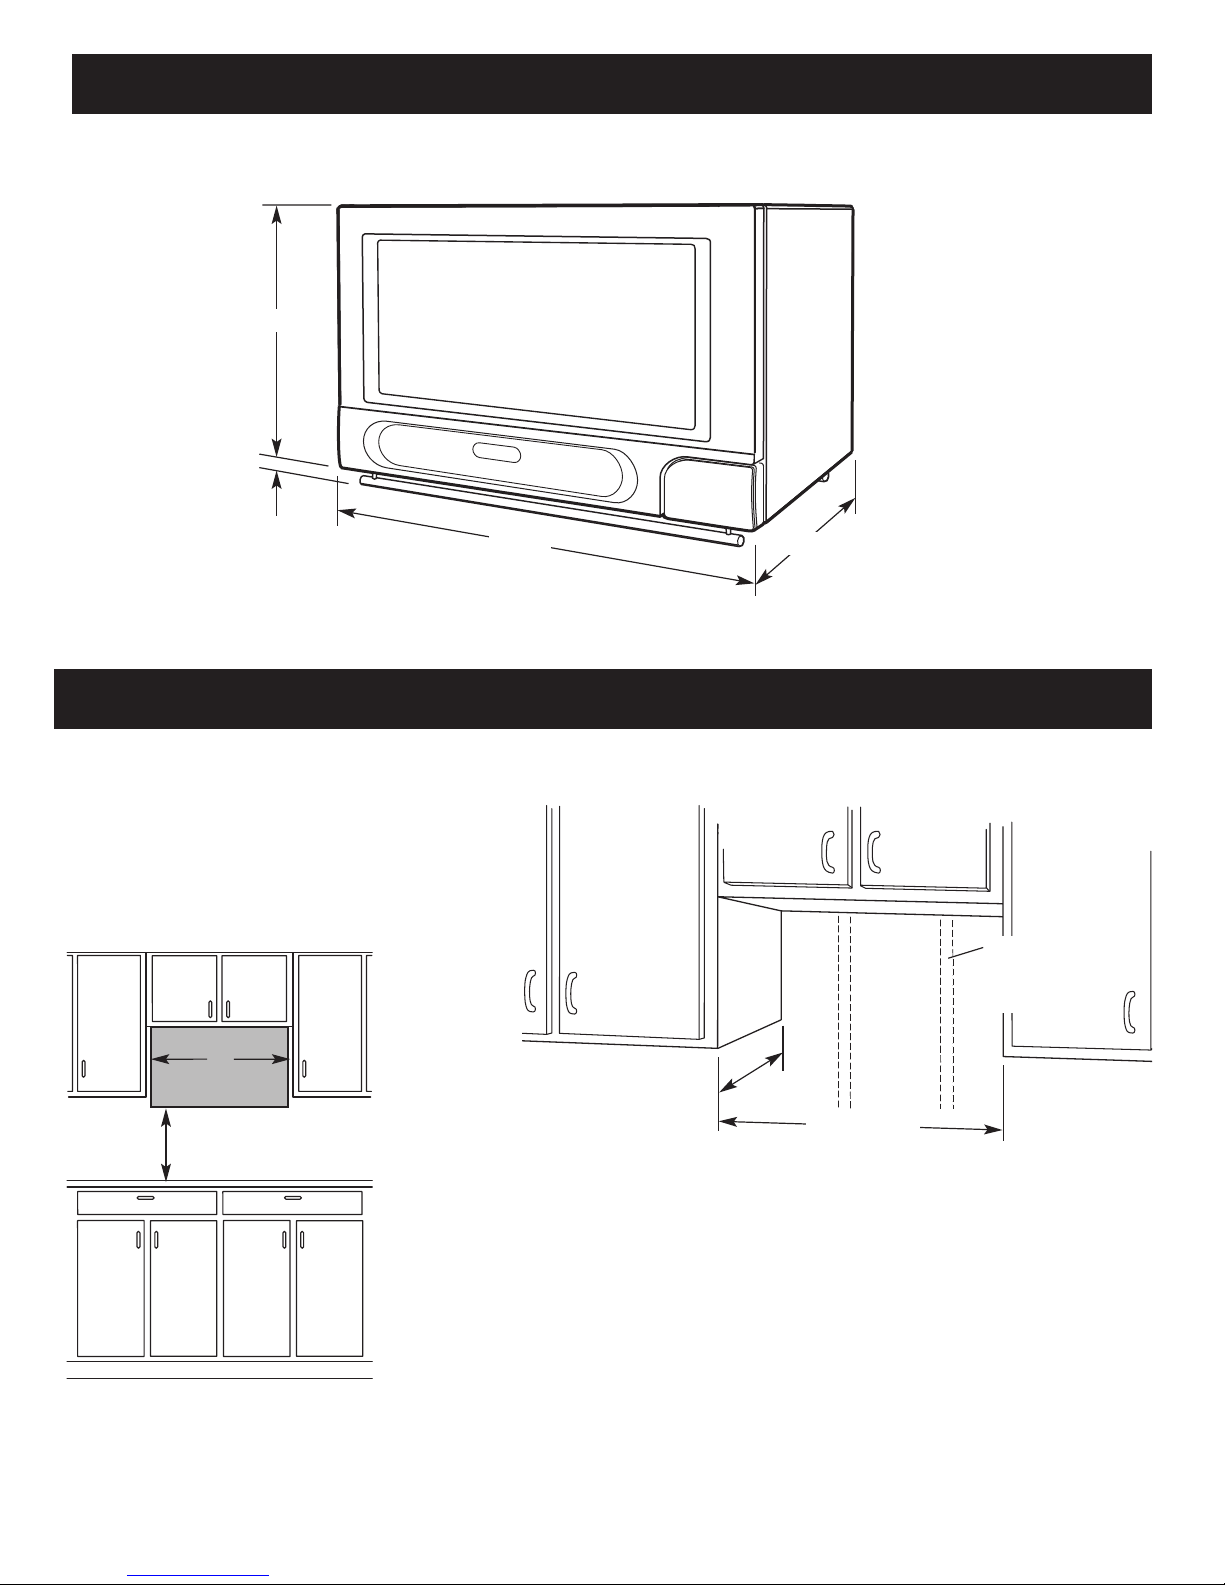
Location
Product dimensions
14-1/16"
23-7/8"
1-1/8" to
bottom of
utensil bar
15-9/16"
12" to 14"
recommended
depth
24" minimum
there must be at
least one wall
stud within
cabinet opening
24"
minimum
13-3/16" minimum above
countertop when
Utensil Bar Kit is installed
WALL CONSTRUCTION
This microwave oven should be mounted against and supported by a flat
vertical wall. The wall must be flat for proper installation. If the wall is not
flat, use spacers to fill in the gaps. Wall construction should be a minimum
of 2”x 4” wood studding and 3/8” or more thick dry wall or plaster/lath.
The mounting surfaces must be capable of supporting weight of 110
pounds (the oven and contents) and the weight of all items which would
normally be stored in the top cabinet above the microwave.
The microwave must be attached to a minimum of one 2”x 4” wall stud.
To find the location of the studs, one of the following methods may be
used:
A. Use a stud finder, a magnetic device which locates the nails in the
stud.
B. Use a hammer to tap lightly across the mounting surface to find a
solid sound. This will indicate stud location.
NOTE:
This microwave oven is
intended for installation over a
countertop. Do not install this
microwave oven above any heat
source such as a range or
cooktop.
 Loading...