

Page 1
2209477 www.kitchenaid.com
36
" (91.4 cm)
, 42
" (106.7 cm)
, 48"(121.9 cm)
side-by-side
built-in refrigerators
with water filtration
For the way it’s made
®
®
Page 2

2
A N
OTE TO
Y
OU
Thank you for buying a KitchenAid
®
appliance.
KitchenAid designs the best tools for the most important
room in your house.To ensure that you enjoy years of
trouble-free operation, we developed this Use and Care
Guide. It contains valuable information about how to
operate and maintain your appliance properly and safely.
Please read it carefully.
Also, please complete and mail the Product Registration
Card provided with your appliance.The card helps us
notify you about any new information for your appliance.
Record your model’s information.
Write down the following information about your refrigerator to better help you obtain assistance or service if you
ever need it.You will need to know your complete model
number and serial number.You can find this information
on the model and serial number label/plate.
If you need assistance or service, first see the
“Troubleshooting” section of this book. After checking
“Troubleshooting,” additional help can be found by
checking the “Requesting Assistance or Service” section.
Dealer name
Address
Phone number
Model number
Serial number
Purchase date
(See the “Parts and Features” section for model and serial
number label/plate location.)
Keep this book and your sales slip
together for future reference.
Page
A Note to You.................................................................... 2
Refrigerator Safety......................................................... 3
Proper disposal of your old refrigerator....................... 3
Parts and Features ......................................................... 4
Using Y our Refrigerator.................................................. 5
Removing the upper ventilation panel......................... 5
Using the Power On/Off Switch ................................... 5
ExtendFresh*
Temperature Management System............................. 6
Setting temperature controls....................................... 6
Refrigerator features................................................... 7
Utility compartment.............................................. 7
Door bins............................................................... 7
SpillClean* glass refrigerator shelves .................. 7
FreshChill* Meat Locker ....................................... 8
Humidity-controlled
ClearVue* crispers................................................ 9
Covered egg container.........................................10
Wine rack.............................................................10
Freezer features..........................................................10
Freezer shelves.................................................... 10
Pull-out freezer baskets........................................ 10
Page
Automatic ice maker ......................................................11
Solving common ice maker problems......................... 11
Removing the ice maker storage bin...........................12
Ice and cold water dispensers .................................... 13
Water Filtration and Monitoring System......................15
Base grille.....................................................................16
Defrost pan...................................................................17
Light bulbs ...................................................................17
Understanding the sounds you may hear ...................18
Saving energy.................................................................18
Caring for Your Refrigerator.............................................19
Cleaning your refrigerator ...........................................19
Vacation and moving care............................................20
Power Interruptions.....................................................20
Food Storage Guide.......................................................21
Storing fresh food..........................................................21
Storing frozen food........................................................22
Troubleshooting Guide.......................................................23
Requesting Assistance or Service ...............................28
Warranty..........................................................................30
T
ABLE OF
C
ONTENTS
Page 3
3
•
Plug into grounded 3 prong outlet.
•
Do not remove ground prong.
•
Do not use an adapter.
•
Do not use an extension cord.
•
Disconnect power before servicing.
•
Remove doors from your old refrigerator.
•
Use nonflammable cleaner only.
•
Do not install the refrigerator near an oven,
radiator, or other heat source.
•
Keep flammable materials and vapors, such as
gasoline, away from refrigerator.
•
Use two or more people to move or install
refrigerator.
•
Unplug refrigerator before installing ice maker.
•
Use a sturdy glass when dispensing ice or water
(on some models).
IMPORTANT SAFETY INSTRUCTIONS
You can be killed or seriously injured if you don’t follow
instructions.
D ANGER
WARNING
Your safety and the safety of others is very important.
We have provided many important safety messages in this manual and on your appliance. Always read and obey all safety
messages.
This is the safety alert symbol. This symbol alerts you to potential hazards that can kill or hurt you and others. All safety
messages follow the safety alert symbol and either the word “DANGER” or “WARNING”. These words mean:
All safety messages will tell you what the potential hazard is, tell you how to reduce the chance of injury, and tell you what can
happen if the instructions are not followed.
You can be killed or seriously injured if you don’t
immediately
follow instructions.
R
EFRIGERATOR
S
AFETY
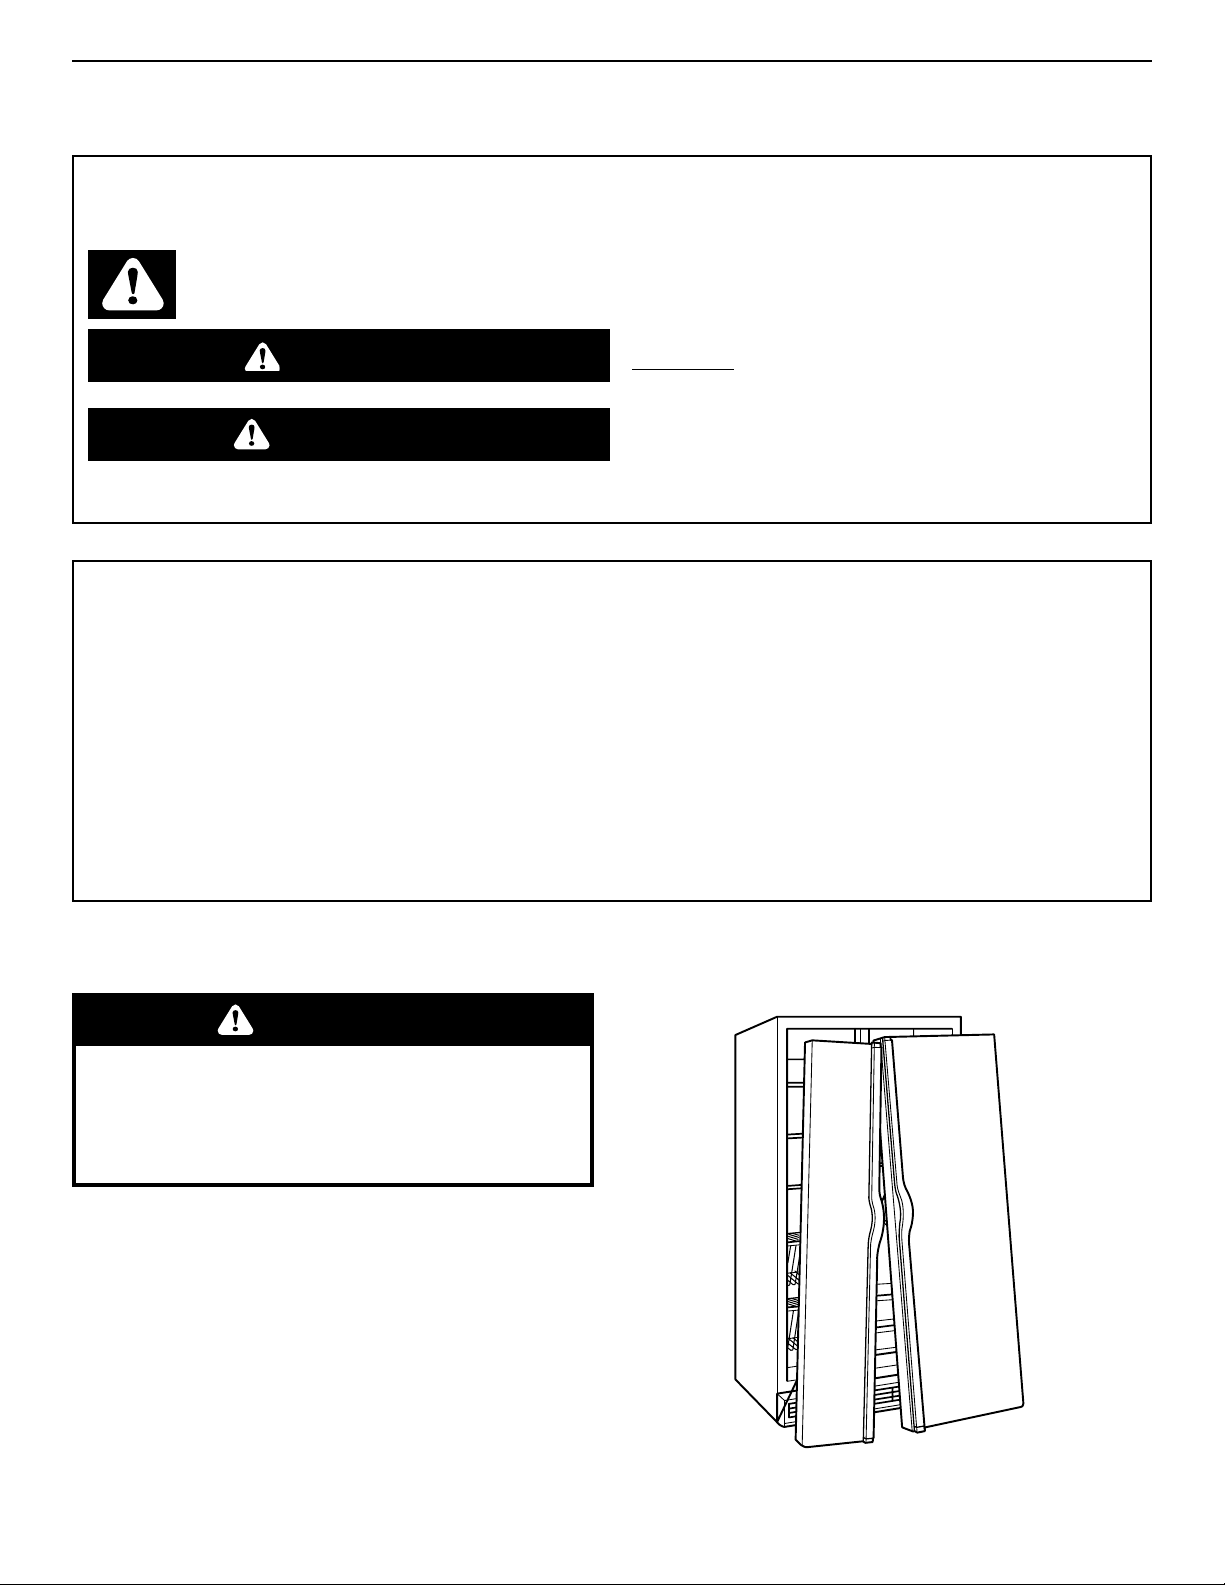
Suffocation Hazard
Remove doors from your old refrigerator.
Failure to do so can result in death or brain
damage.
Proper disposal of your old refrigerator
IMPORTANT: Child entrapment and suffocation are not
problems of the past. Junked or abandoned refrigerators
are still dangerous... even if they will sit for “just a few
days.” If you are getting rid of your old refrigerator, please
follow the instructions below to help prevent accidents.
BEFORE Y OU THROW AW A Y Y OUR OLD
REFRIGERATOR OR FREEZER:
•
Take off the doors.
•
Leave the shelves in place so that children may not
easily climb inside.
WARNING
– SAVE THESE INSTRUCTIONS –
WARNING: To reduce the risk of fire, electric shock, or injury when using your refrigerator, follow these
basic precautions:
Page 4
4
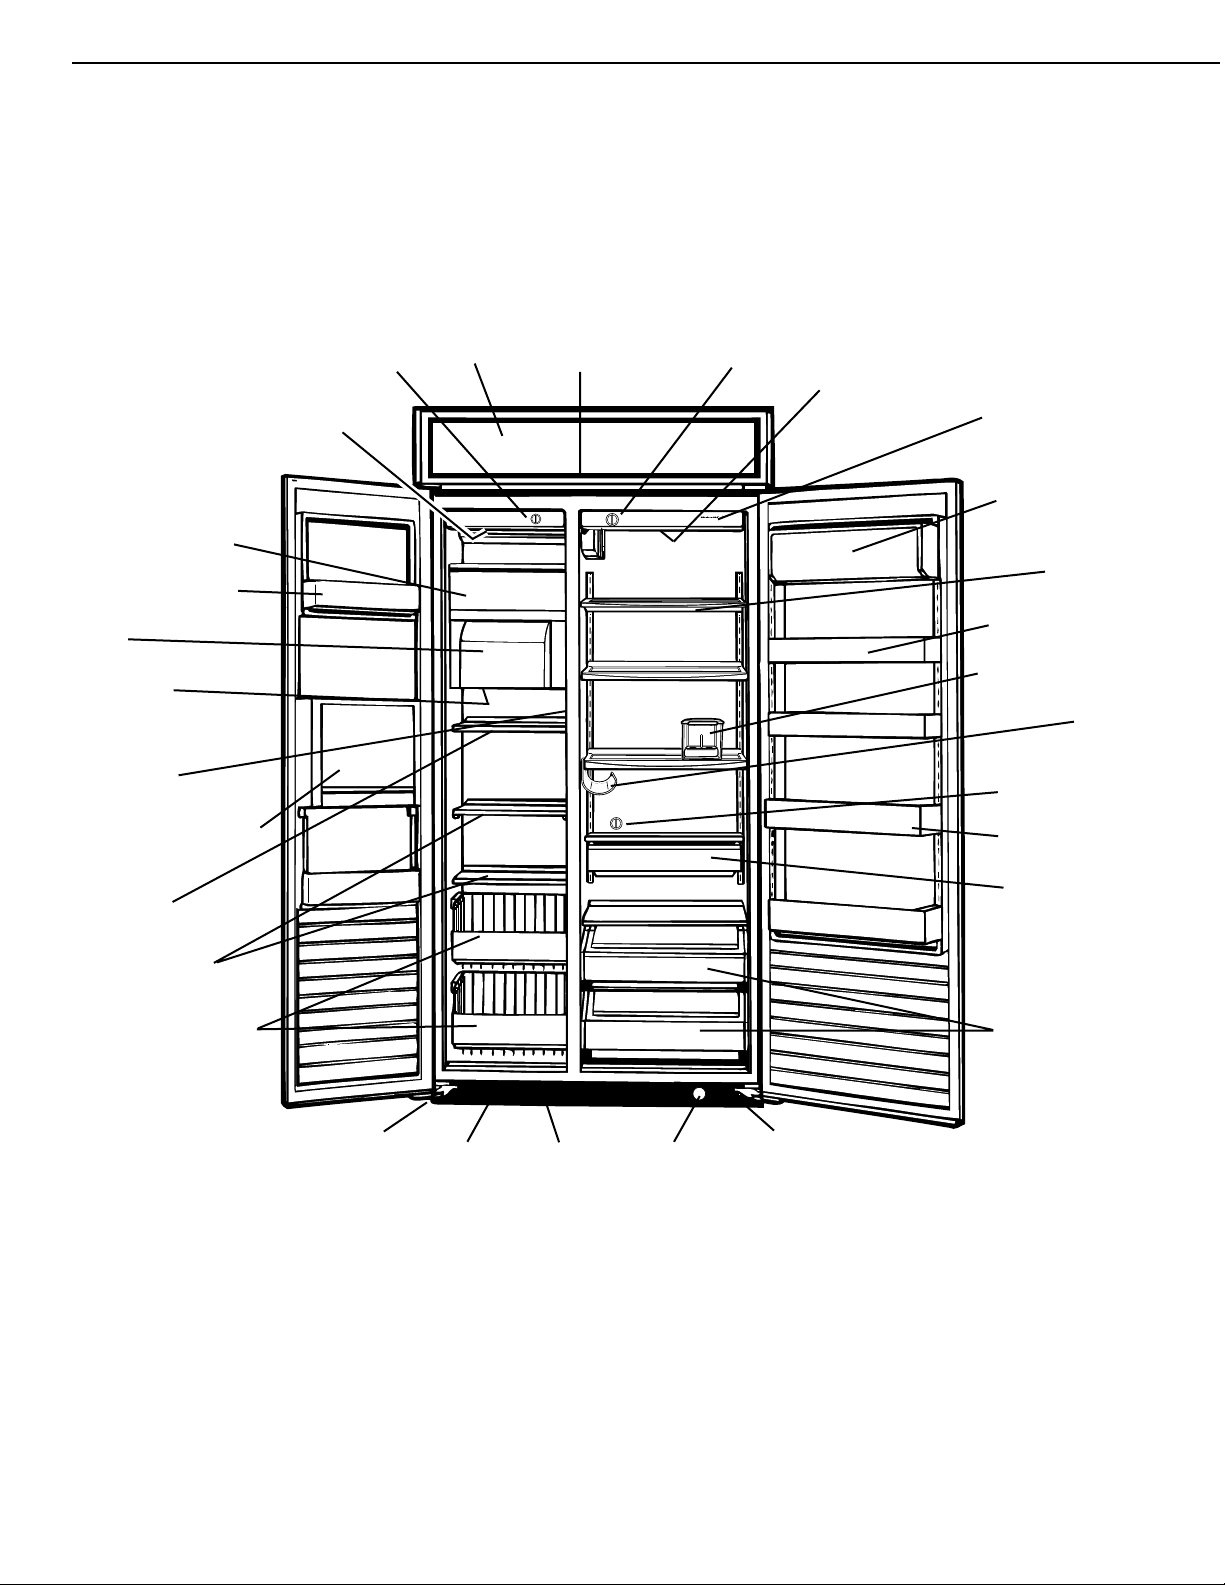
This section contains an illustration of your refrigerator.
Use it to become more familiar with the parts and features.
Page references are included for your convenience.
NOTE: This manual covers several different models.The
refrigerator you have purchased may have some or all of
the parts and features listed below.
24
51
Cold Colder
▲
Superba 48
24
51
Cold Colder
Off
▲
Cold Colder
FreshChill
Meat Locker
ExtendFresh
Temperature System
▲
Automatic ice maker
(p.11)
Stationary door shelf
(not removable)
Ice bin
(p.12)
Freezer light
(below ice bin)
(p.17)
Model and serial
number label
(p.2)
Water and ice dispenser
area (on some models)
(p.13)
Adjustable
freezer shelf
(p.10)
Stationary freezer
shelves
(p.10)
Pull-out freezer baskets
(p.10)
Utility compartment
(p.7)
Adjustable SpillClean*
glass shelves
(p.7)
Adjustable door bins
(p.7)
Covered egg container
(p.10)
Wine rack
(p.10)
FreshChill* meat locker
temperature control
(p.8)
Gallon door bin
(p.7)
Roll-out adjustable
FreshChill* Meat Locker
(p.8)
Roll-out humidity
controlled ClearVue*
crispers
(p.9)
Freezer light
(behind control
panel)
(p.17)
Freezer
control
(p.6)
Upper
ventilation
panel
(p.5)
Power on/off
switch (behind
upper ventilation
panel)
(p.5)
Refrigerator
control
(p.6)
Refrigerator
light (behind
control panel)
(p.17)
Water filter
indicator light
(p.15)
Water/electrical
dispenser
supply tube
(behind base
grille)
Defrost pan
(behind base
grille)
(p.17)
Base grille
(p.16)
Water valve
(behind base
grille)
P
ARTS AND
F
EATURES
Water
filtration
and
Monitoring
System
(p.15)
Page 5

5
Electrical Shock Hazard
Plug into a grounded 3 prong outlet.
Do not remove ground prong.
Do not use an adapter.
Do not use an extension cord.
Failure to follow these instructions can result in
death, fire, or electrical shock.
To obtain the best possible results from your refrigerator, it
is important that you operate it properly.This section tells
you how to set the controls, remove and adjust the
features in your refrigerator, and how to save energy.
Explosion Hazard
Keep flammable materials and vapors, such as
gasoline, away from refrigerator.
Failure to do so can result in death, explosion, or
fire.
WARNING
U
SING YOUR REFRIGERATOR
WARNING
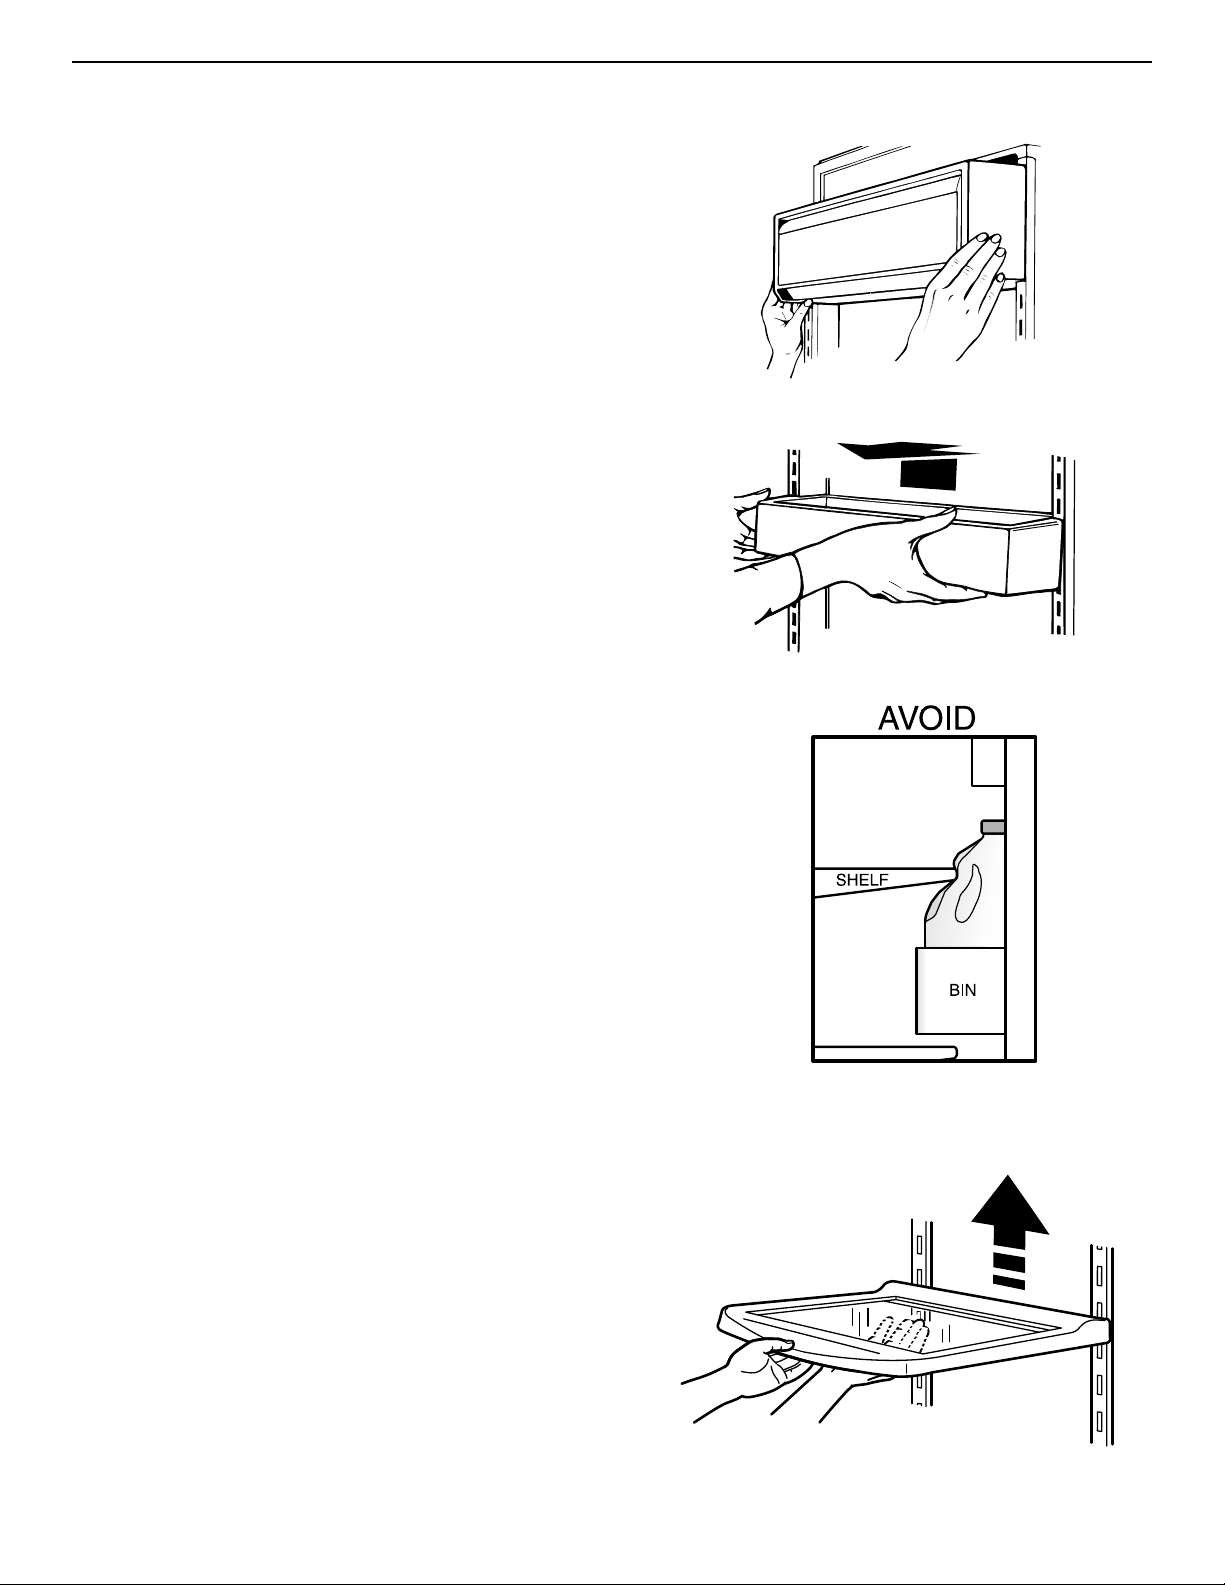
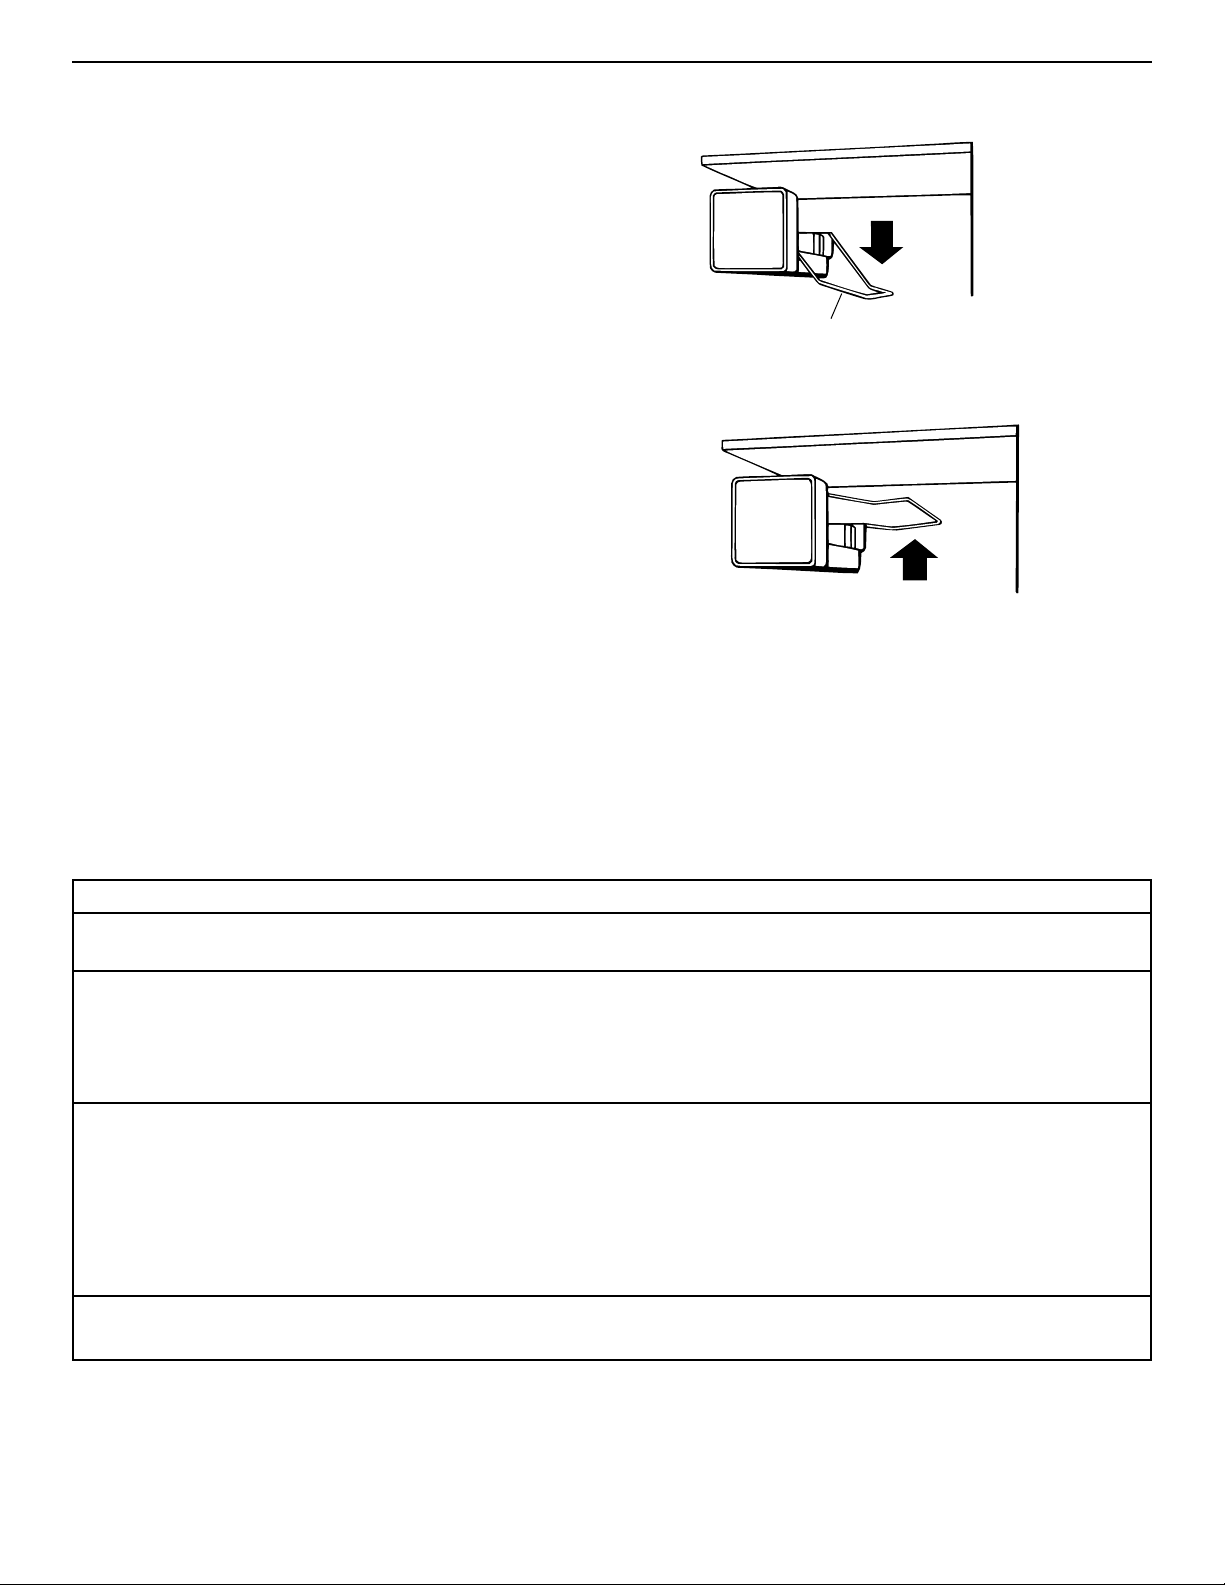
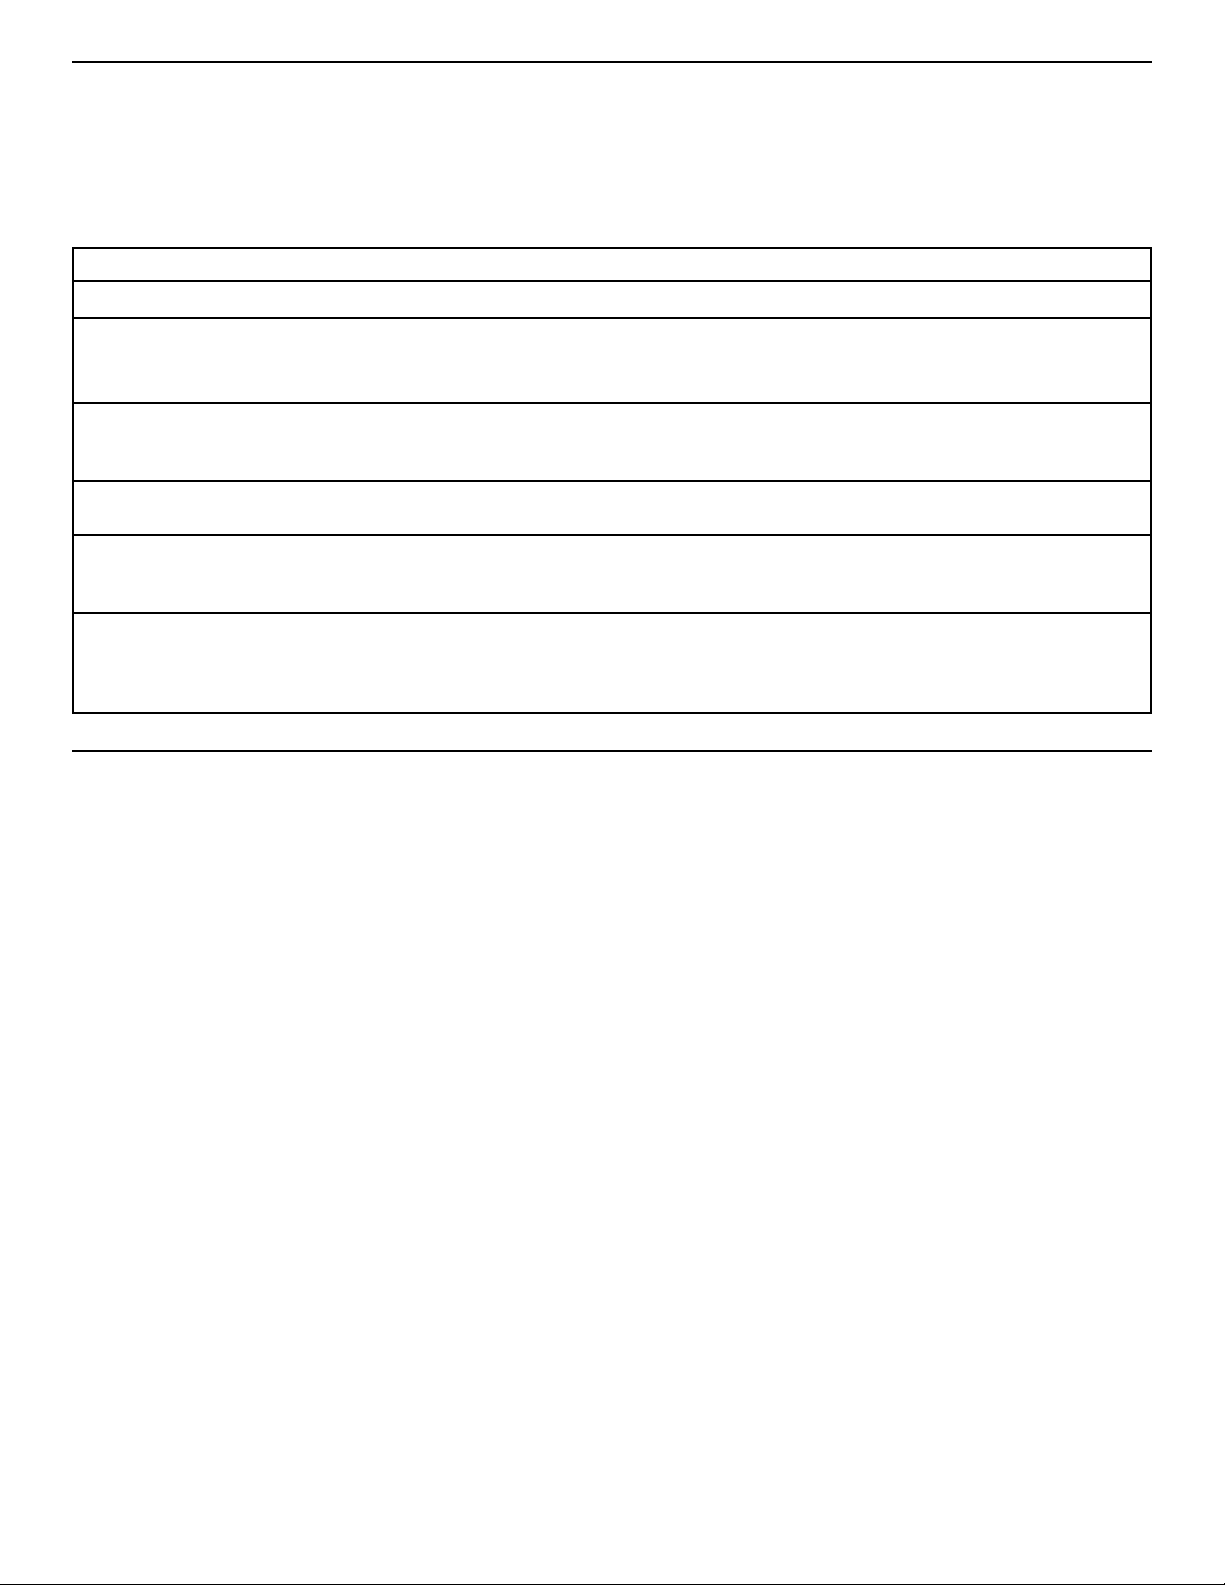
Panel models —
To remove:
1. Grasp both ends of the panel.
2. Push straight up, then pull straight out.
To replace:
1. Insert hooks (located on back of ventilation panel) into
bracket slots.
2. Pull panel down slightly to lock into place.
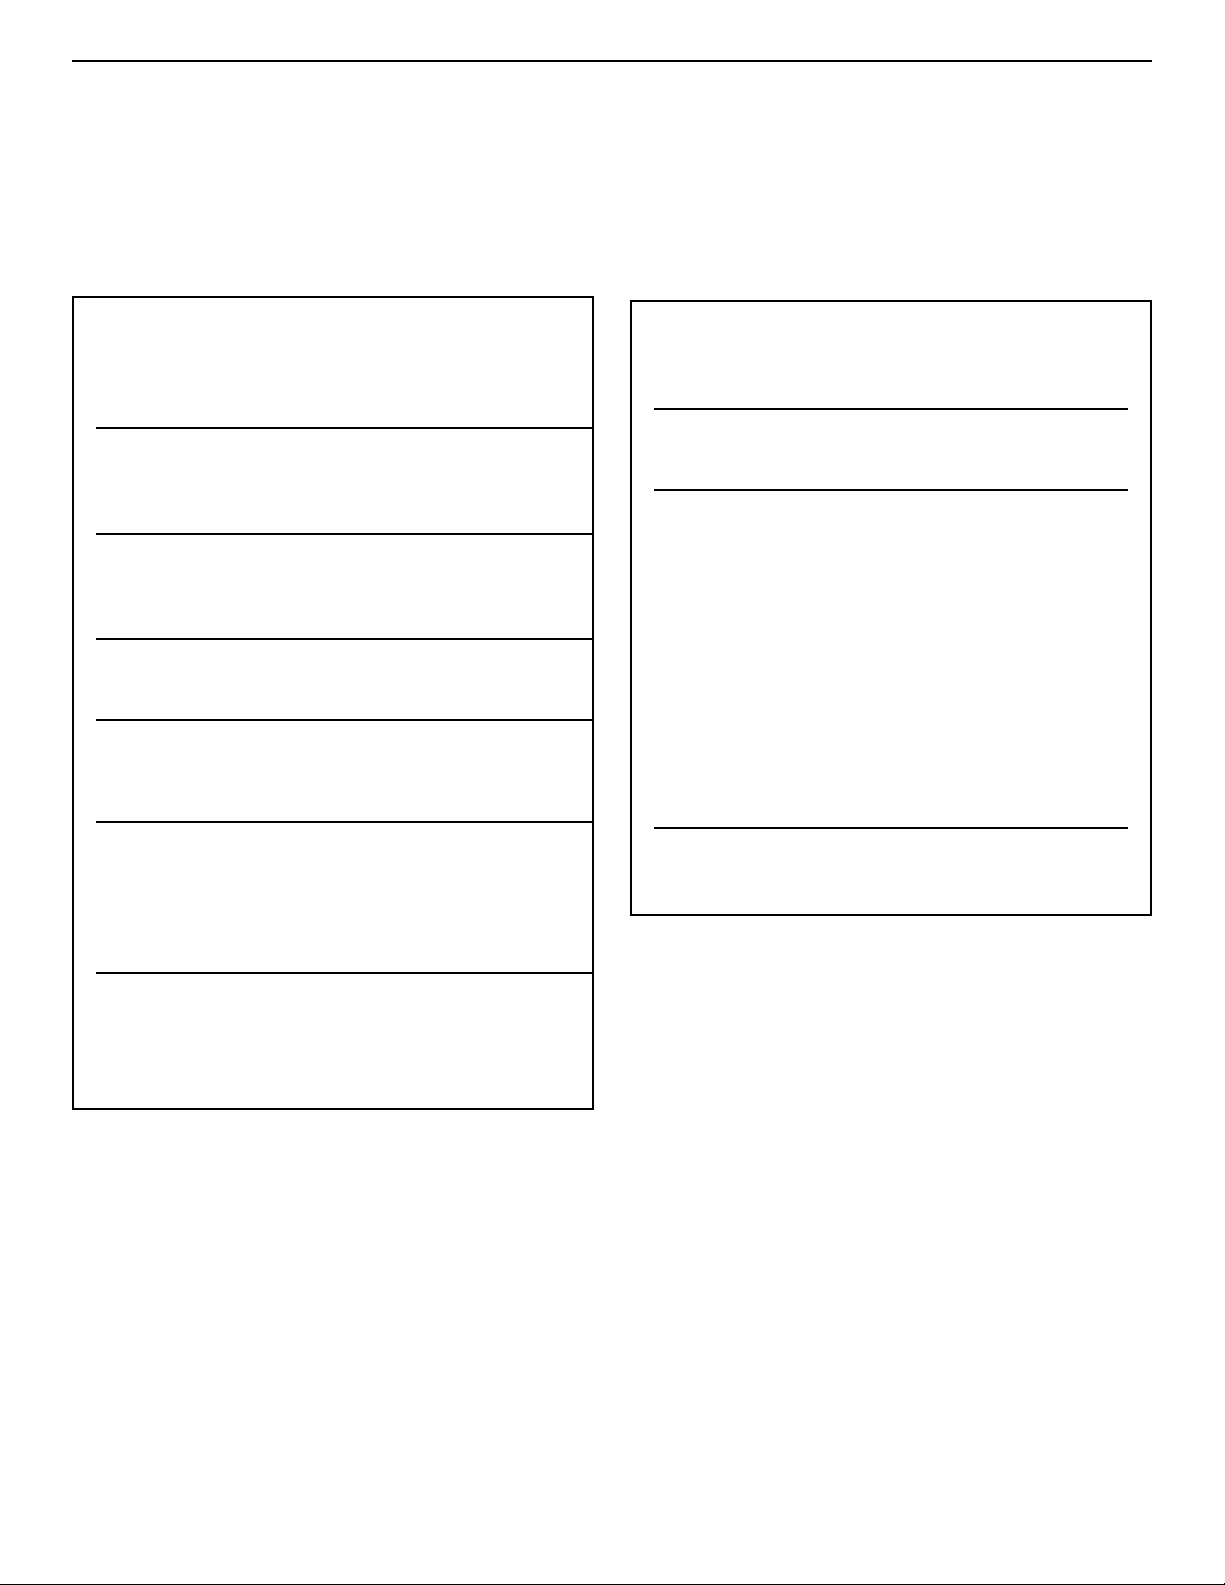
Wraparound metal door models —
KSSC36F, KSSC42F, KSSC48F
To remove:
1. Grasp both ends of the louver panel.
2. Push straight up, then pull straight out.
To replace:
1. Insert hooks (located on back of louver panel) into slots on
side trim.
2. Pull louver panel down slightly to lock into place.
Removing the upper ventilation panel
O
FF
O
N
Using the Power On/Off Switch
The Power On/Off Switch is located behind the upper
ventilation panel. It is used to tur n the power to the
refrigerator off when cleaning it or changing light bulbs.
To turn power off:
1. Remove upper ventilation panel from panel models.
Remove lower panel from wrap- around stainless steel models.
2. Press Power On/Off Switch to “OFF”position.
To turn power on:
1. Press Power On/Off Switch to “ON”position.
2. Replace upper ventilation panel or lower panel.
IMPORTANT: Be sure the Power On/Off Switch is in the “ON”
position after cleaning refrigerator or changing light bulbs.
6
Page 6
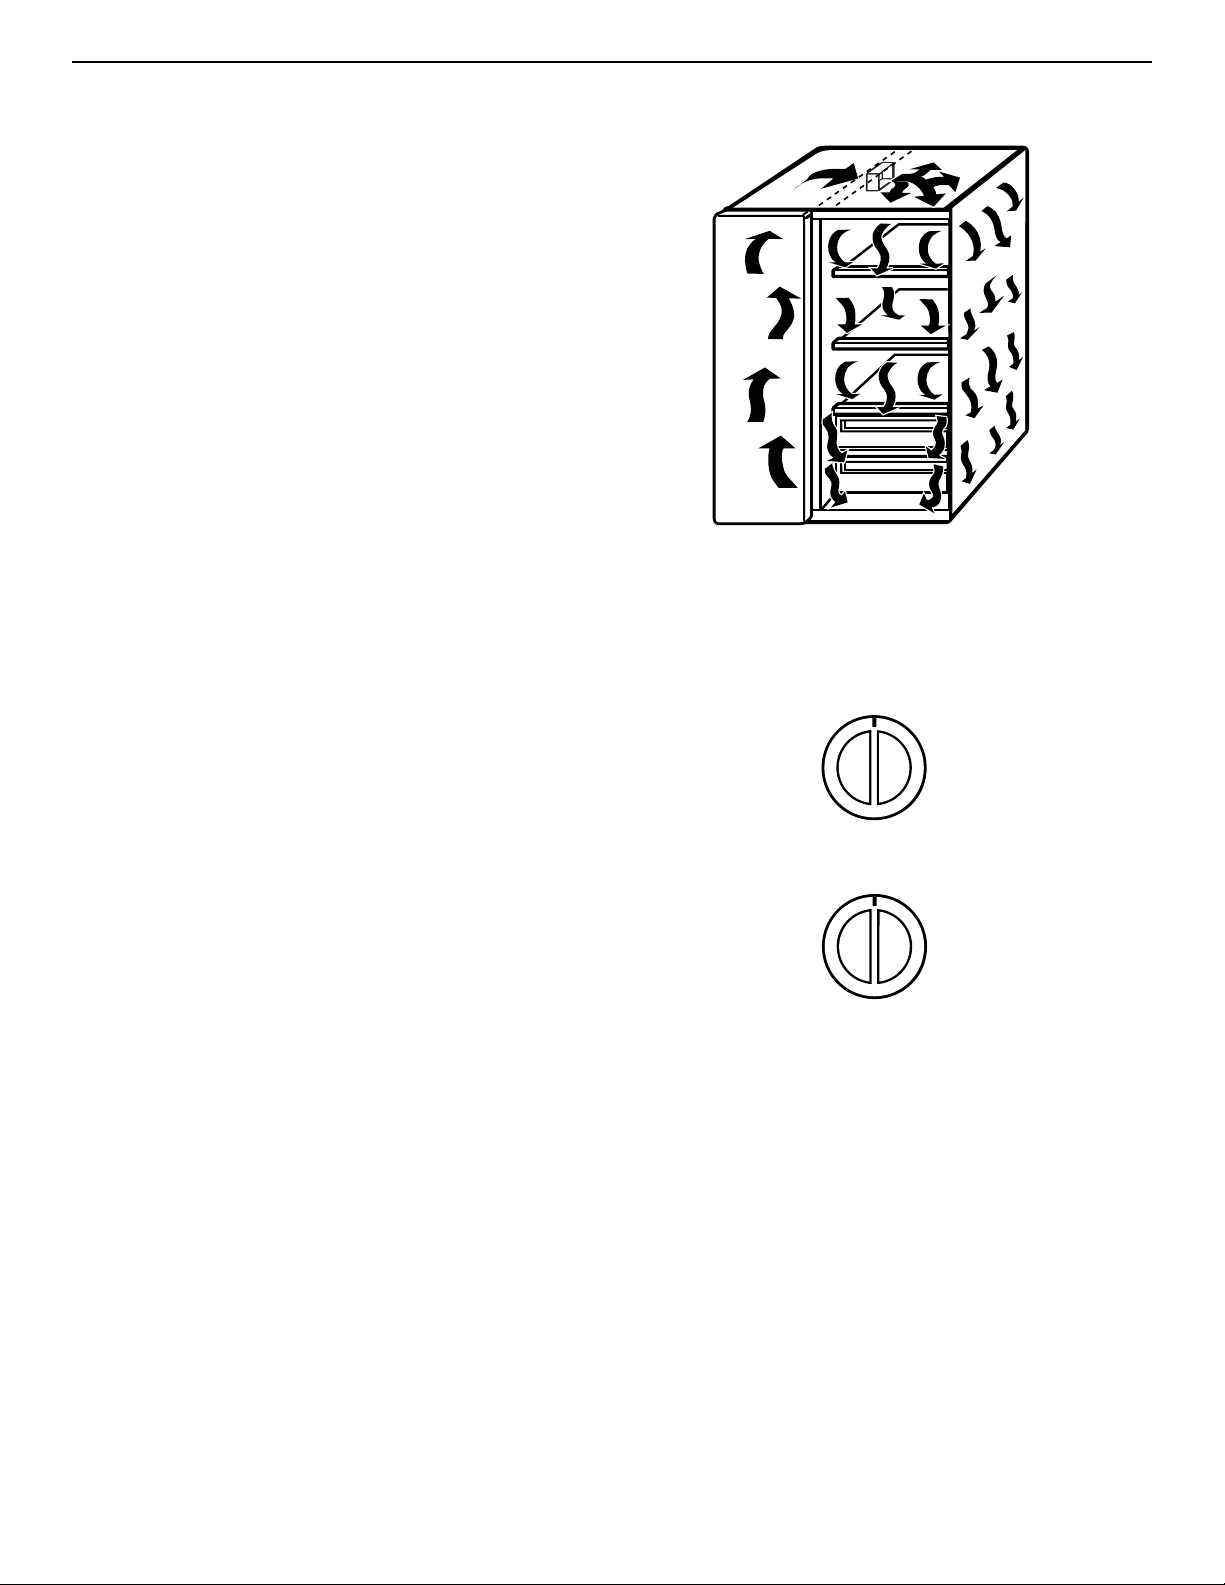
The ExtendFresh Temperature Management System
controls the temperature in both the refrigerator
compartment and the freezer compartment independently.
The system helps extend the freshness of the food in your
refrigerator by responding to temperature changes as
small as 1°F. Unlike most refrigerators on the market
today, the ExtendFresh System uses a Smart* Fan to
transfer cold air immediately from the freezer to the
refrigerator for faster response to temperature changes
without the need for the compressor to turn on. Also, the
system maintains consistent temperatures, which are less
affected by external temperature changes such as
seasonal changes and programmable home thermostats
or even the temperature of other compartments inside the
refrigerator.
EXTENDFRESH™ Temperature Management System
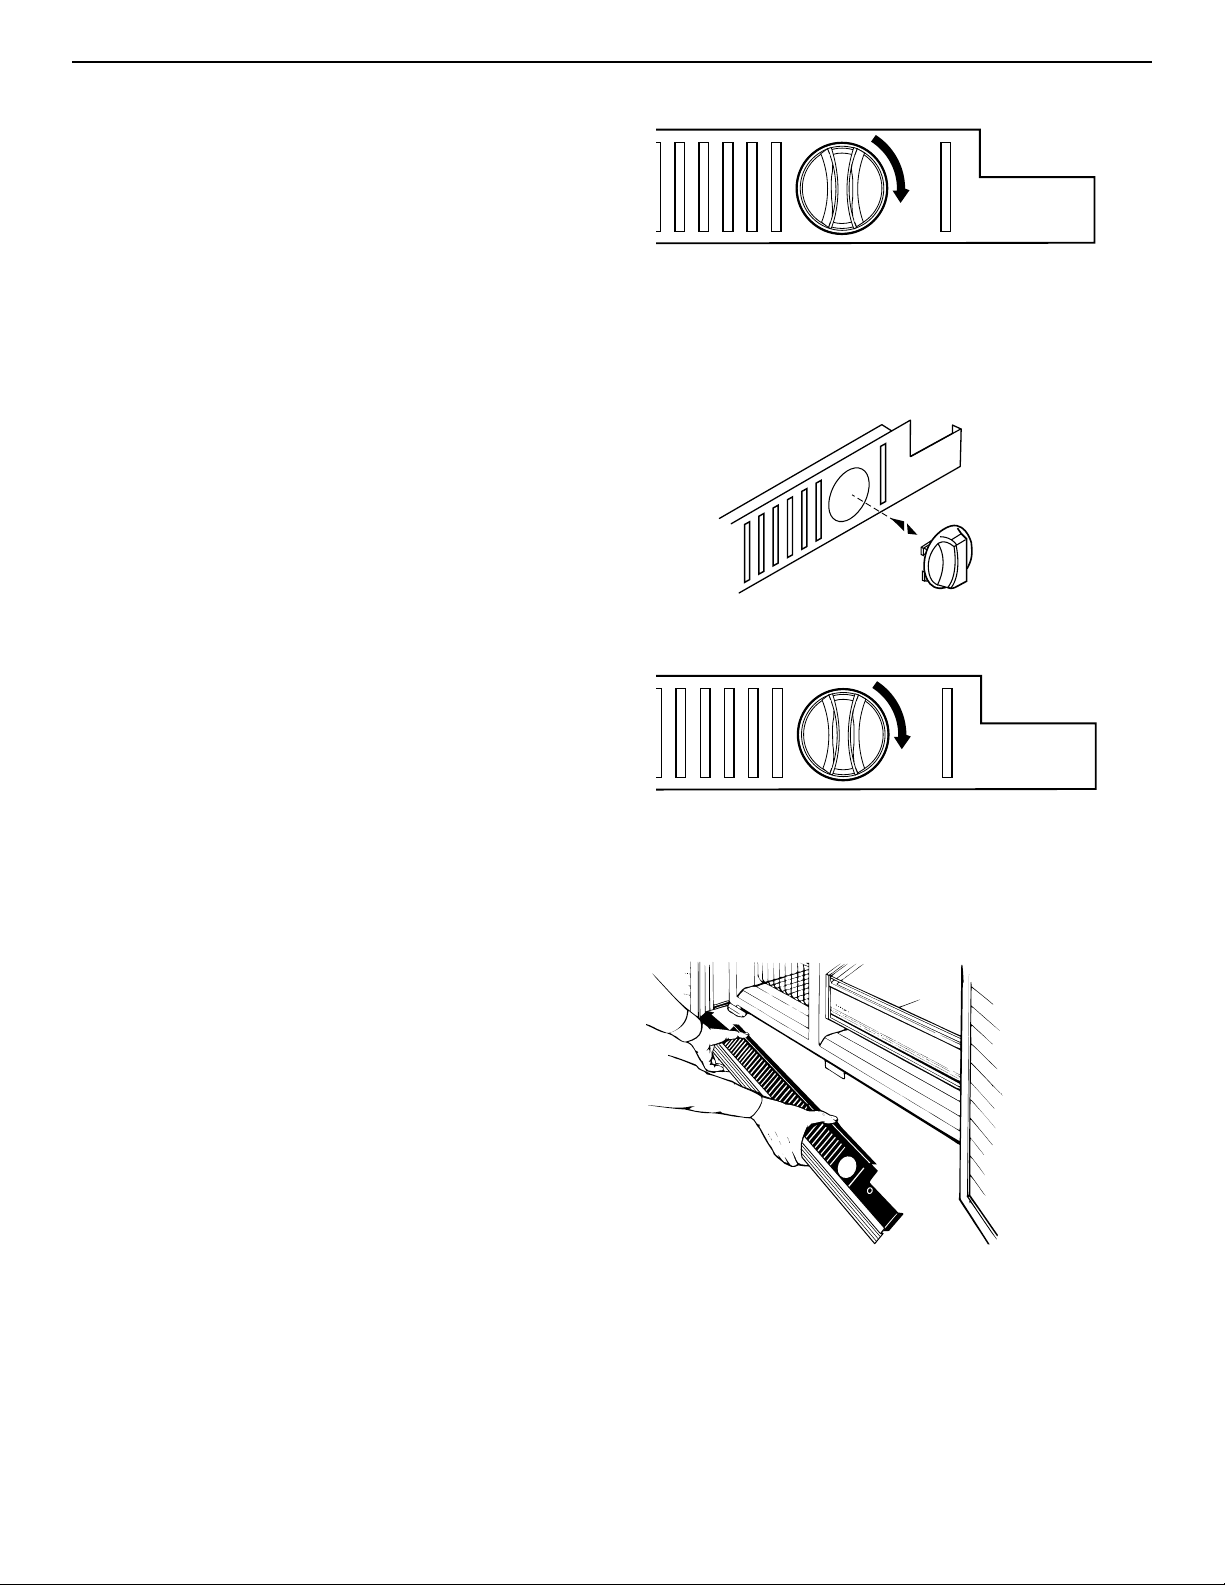
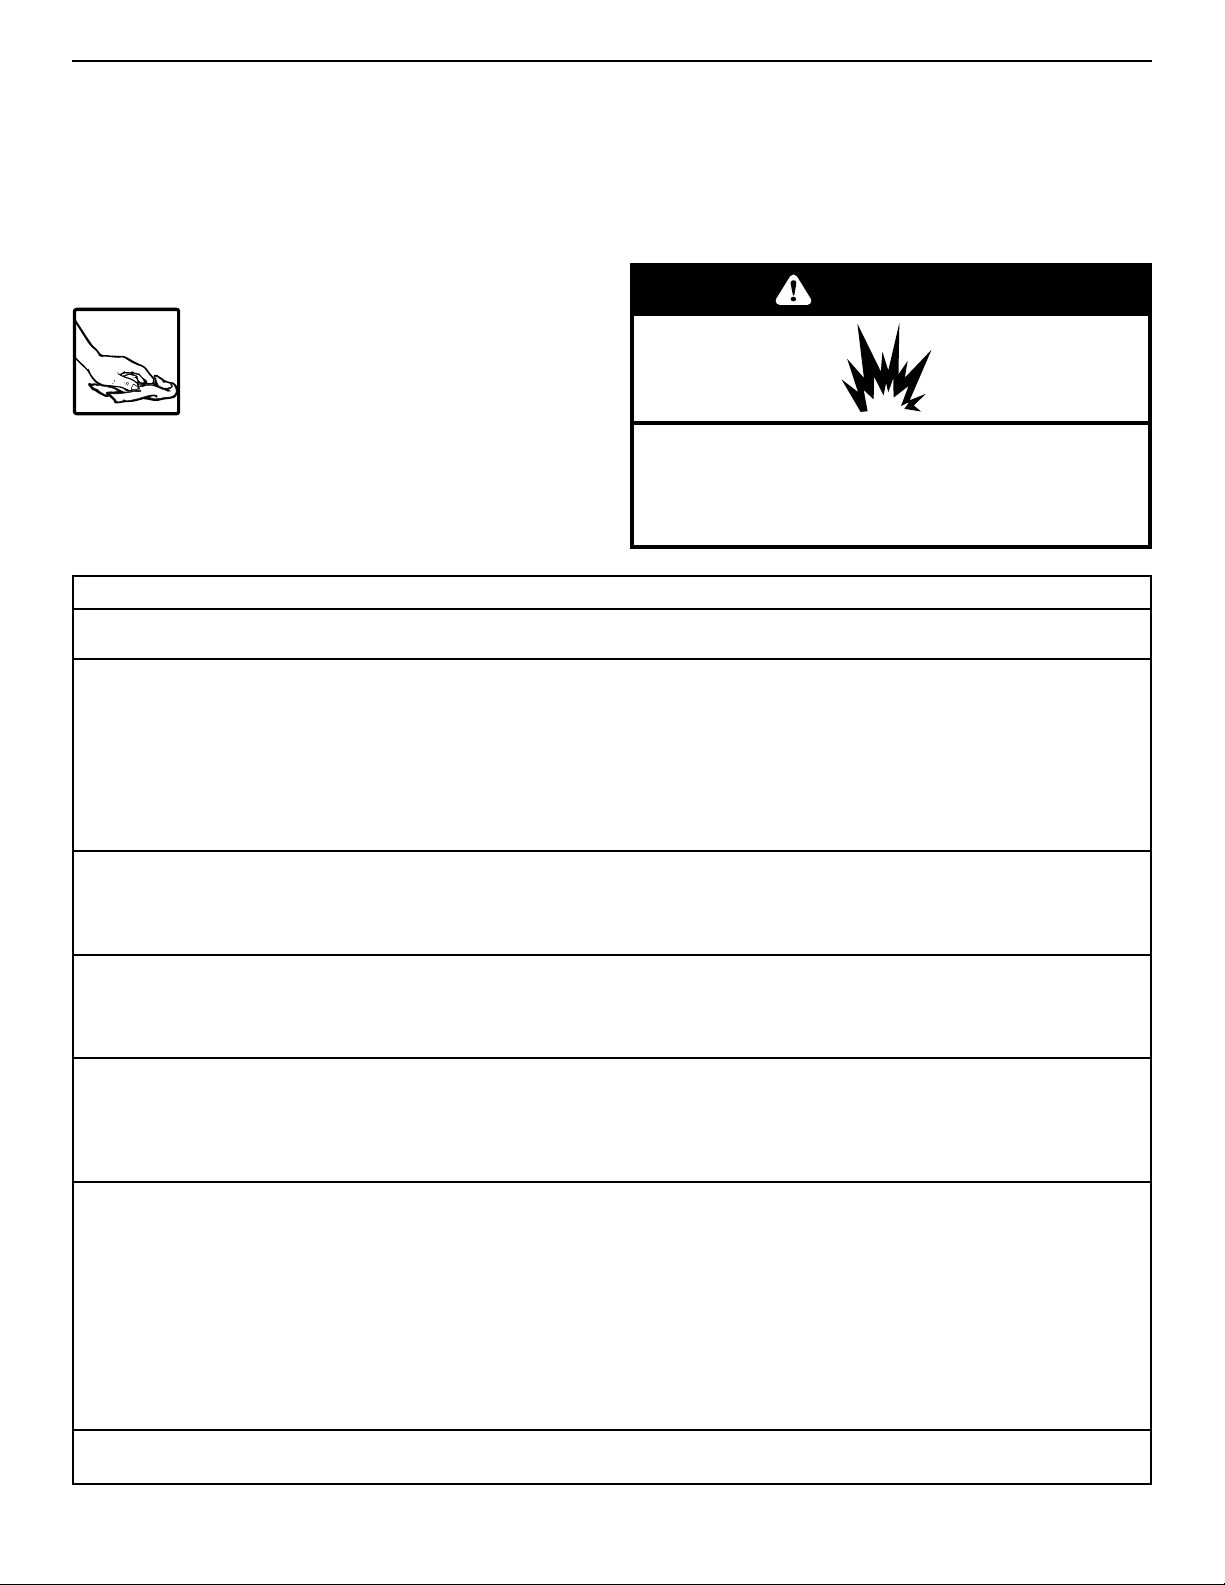
Setting temperature Controls
The Refrigerator and the Freezer Controls have been
preset at the factory. These settings should be correct for
normal household refrigerator use. Let the refrigerator
operate for 24 hours to cool both sections before
changing settings.
To change a temperature setting:
Adjust the Refrigerator and/or Freezer Control.
• To make the refrigerator or freezer colder, turn the
control knob clockwise.
• To make the refrigerator or freezer less cold, turn the
control knob counterclockwise.
IMPORTANT: The OFF setting on the Freezer Control
stops all cooling action in the refrigerator, but it does not
disconnect the refrigerator from the power supply.
If possible, wait to add food until after this 24-hour period.
Turning the controls to higher number settings will not
cool the sections faster. Adding foods before the
refrigerator has cooled completely could cause the
refrigerator to take longer to reach the desired
temperatures and cause some foods to spoil.
After 24 hours, adjust the controls, one number at a time
as desired. “1” is the warmest setting and “5” is the
coldest. Allow the refrigerator to operate for 24 hours after
each control change.
Cold Colder
Off
24
51
▲
Cold Colder
Off
24
51
▲
Refrigerator Control
Freezer Control
Page 7
7
Refrigerator features
Utility compartment
The utility compartment can be placed in any position on the
refrigerator door.
To remove:
1. Grasp both ends of compartment.
2. Lift compartment up and pull out.
To replace:
1. Insert compartment hooks into ladder slots on both sides of
refrigerator door.
2. Push compartment down to lock into place.
Door bins
Door bins hold two-liter bottles and can be placed in any
position on the refrigerator door.
To remove:
1. Grasp door bin.
2. Lift door bin up and pull out.
To replace:
1. Insert door bin hooks into ladder slots on both sides of
refrigerator door.
2. Push door bin down to lock into place.
Gallon Door Bin
The gallon door bin holds several gallon-sized containers and
can be placed in any position on the refrigerator door.
Note: Positioning the gallon door bin directly across from an
interior shelf or covered storage bin will prevent the refrigerator
door from closing and could cause damage to bins and shelves.
To install:
1. Insert the attachment brackets into the adjustment slots on
the door.
2. Push down on the bin to secure tabs.
3. If necessary, adjust inter ior shelves to allow for milk jugs and
tall beverage containers stored in the gallon door bin.
SpillClean™
glass refrigerator shelves
Adjust the shelves to match the way you use your refrigerator.
IMPORTANT: Do not clean glass shelves with warm water
when they are cold. Shelves may break if exposed to sudden
temperature changes or impact. For your protection, tempered
glass is designed to shatter into many small pebble-sized
pieces.This is normal.
To remove:
1. Tilt shelf up at front and lift shelf up at back.
2. Pull shelf straight out.
IMPORTANT: Glass shelves are heavy. Handle them carefully.
To replace:
1. Guide the rear shelf hooks into slots in the shelf supports on
the back of the refrigerator wall.
2. Tilt shelf up at front until hooks drop into slots.Lower front of
shelf to level position.
3. Check the stability of the shelf to be sure hooks have been
inserted properly.
Page 8
8
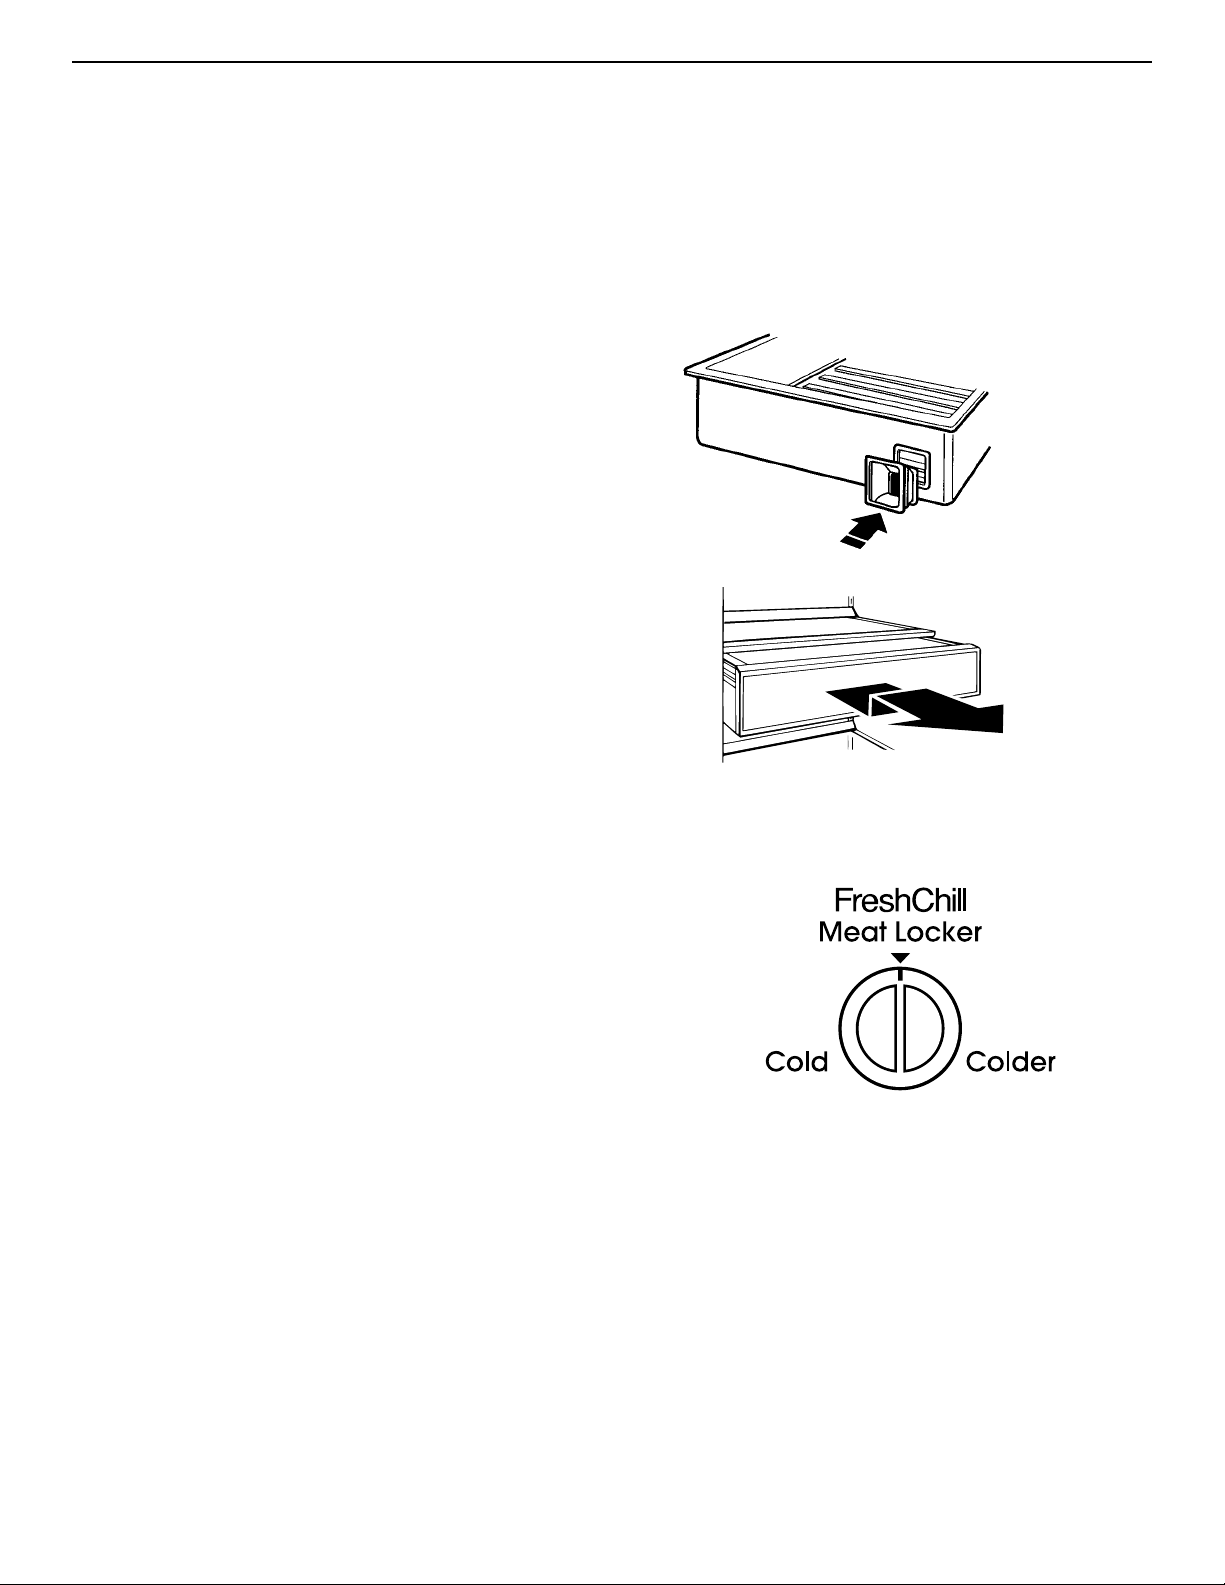
FreshChill™
Meat Locker
Setting the FreshChill™ Meat Locker
Temperature Control
The FreshChill Meat Locker Temperature Control allows
you to adjust the storage temperature of the FreshChill
meat locker.
Cold air flows into the meat locker through an air duct
between the freezer and the refrigerator. Setting the
control allows more or less cold air through the air duct.
Set the control to “Cold” to close the air duct.
IMPORTANT: If a food item freezes in the FreshChill Meat
Locker, utility drawer, or cr isper, turn the FreshChill Meat
Locker Temperature Control to “Cold”. If the water
dispenser stops working, water in the line may have
frozen. If this happens, turn the FreshChill Meat Locker
Temperature Control to “Cold”.
The FreshChill Meat Locker is designed to provide colder
storage temperatures than the average refrigerator
temperature.The Meat Locker can be located in any set
of ladder slots. For temperature-controlled use,
however, the Meat Locker must be located in the
second to last (bottom) set of ladder slots. The
FreshChill Meat Locker can be removed for cleaning.
IMPORTANT: If the meat locker is placed in any set of
slots other than the second to last (bottom) set of ladder
slots, the air supply hole must be sealed. Use the plug
taped to the inside bottom of the meat locker to seal the
air supply hole.
The rubber air connector (located on back of meat locker)
directs air from the air supply hole into the meat locker. If
the air connector comes off, replace it by pushing it into
the square opening on back of meat locker.
To remove:
1. Roll meat locker out to the stop.
2. Lift front of meat locker slightly.
3. Pull meat locker out the rest of the way.
To replace:
1. Position meat locker rollers between front roller of track
and the track.
2. Push meat locker up and onto track.
3. Slide meat locker back until it stops.
M
E
A
T
L
O
C
K
E
R
Page 9
9
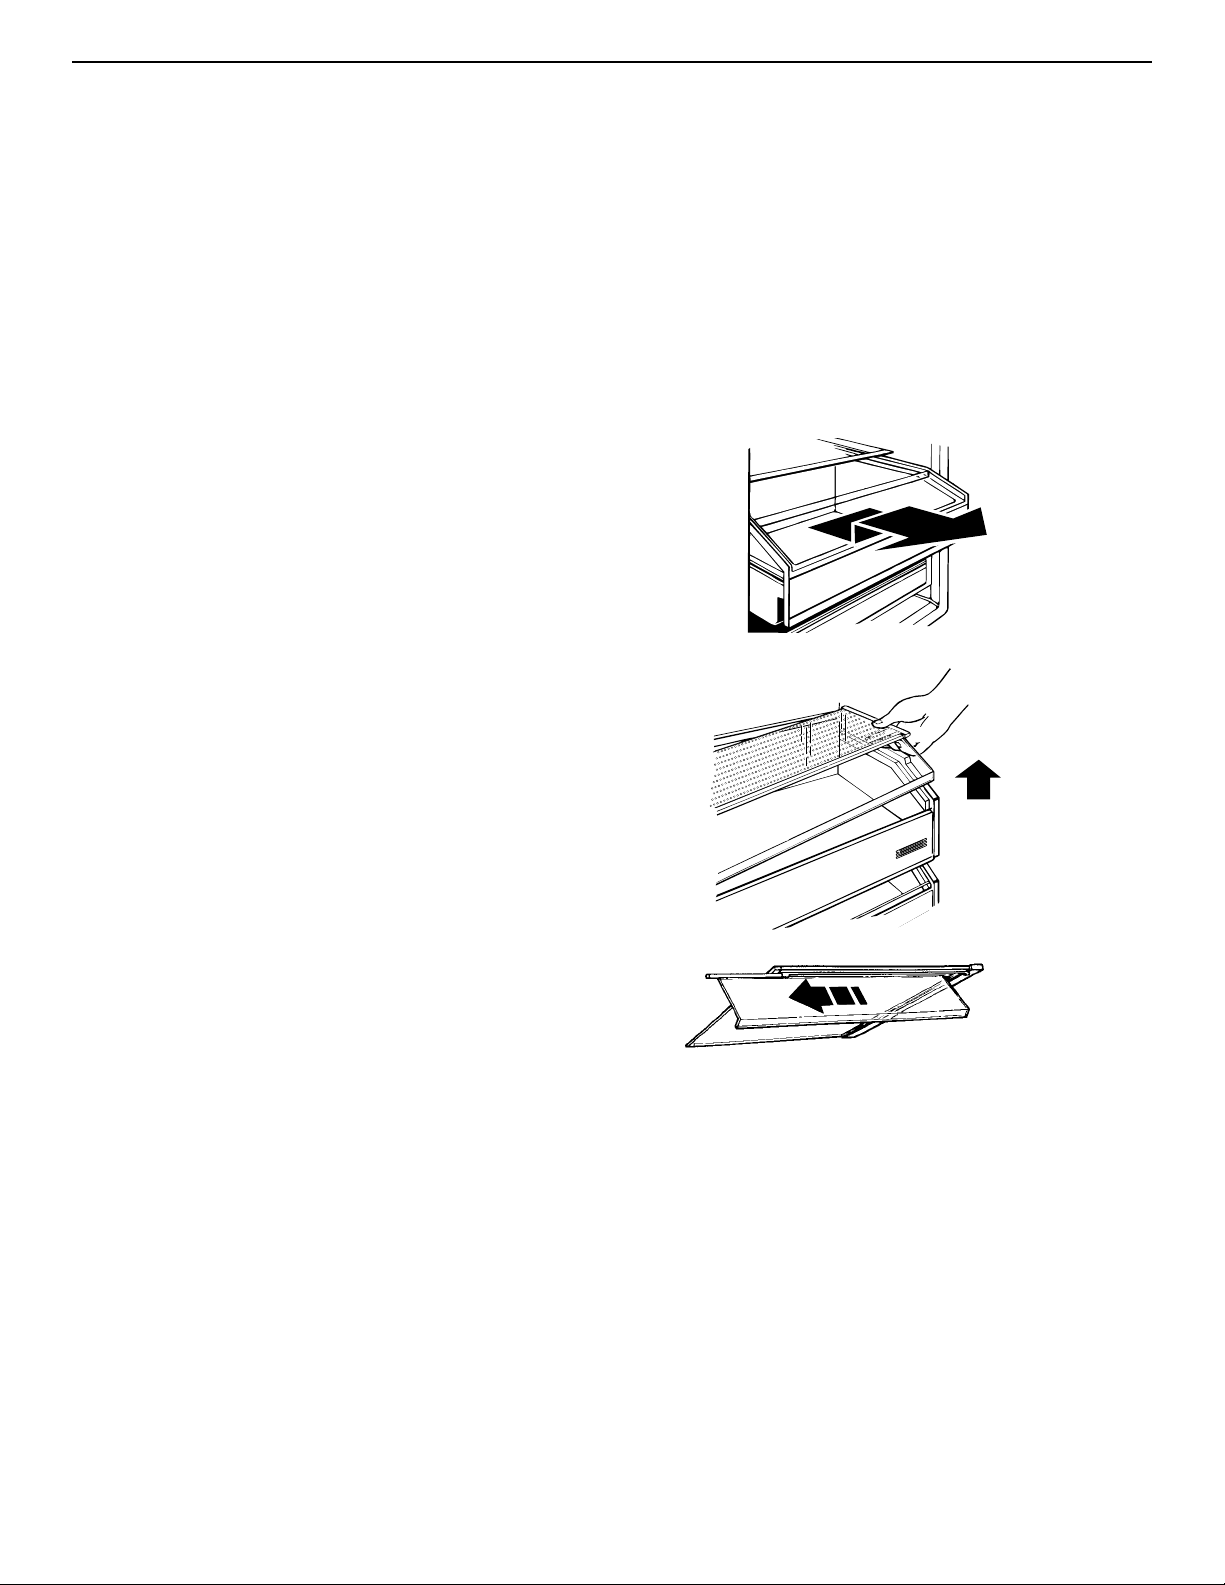
Humidity-controlled
ClearVue™ crispers
The humidity-controlled crispers are designed to keep
fresh vegetables and fruits longer.The Crisper Controls
are located on the front of the crispers.The controls
adjust the humidity (moisture) in the drawers.Slide control
to “HIGH” for lettuce, cabbage and other produce that
have leaves. Slide control to “LOW” for apples, corn and
other produce that have skins.
The humidity-controlled crispers are interchangeable.The
ClearVue section allows you to see into the crisper
without opening them.
IMPORTANT: Occasionally, a food item may freeze in the
FreshChill* Meat Locker, utility drawer, or crisper.When
this occurs, turn the FreshChill Meat Locker Temperature
Control to “cold.”
To remove crispers:
1. Roll drawer out to the stop.
2. Lift front of drawer and pull out the rest of the way.
To replace crispers:
1. Position drawer rollers between front roller of track and
the track.
2. Push crisper up and onto track.
3. Slide crisper back until it stops.
To remove glass covers:
1. Lift right side of glass cover to free retainer and left
side of cover.
2. Carefully remove glass cover.
To replace glass covers:
1. Place retainer on right side of glass cover.
2. Insert left side of glass cover into groove on left side of
drawer.
3. Lower cover so that the retainer pins are in the guide
holes on right side of drawer.
To remove ClearVue section:
1. Remove glass cover.
2. Slide ClearVue section down track, away from the
retainer.
3. Replace in reverse order.
U
T
IL
IT
Y
L
O
W
H
I
G
H
1
2
3
4
5
H
um
id
ityC
o
n
tro
l
L
O
W
H
I
G
H
1
2
3
4
5
H
u
m
id
ity
C
o
n
tro
l
Page 10
10
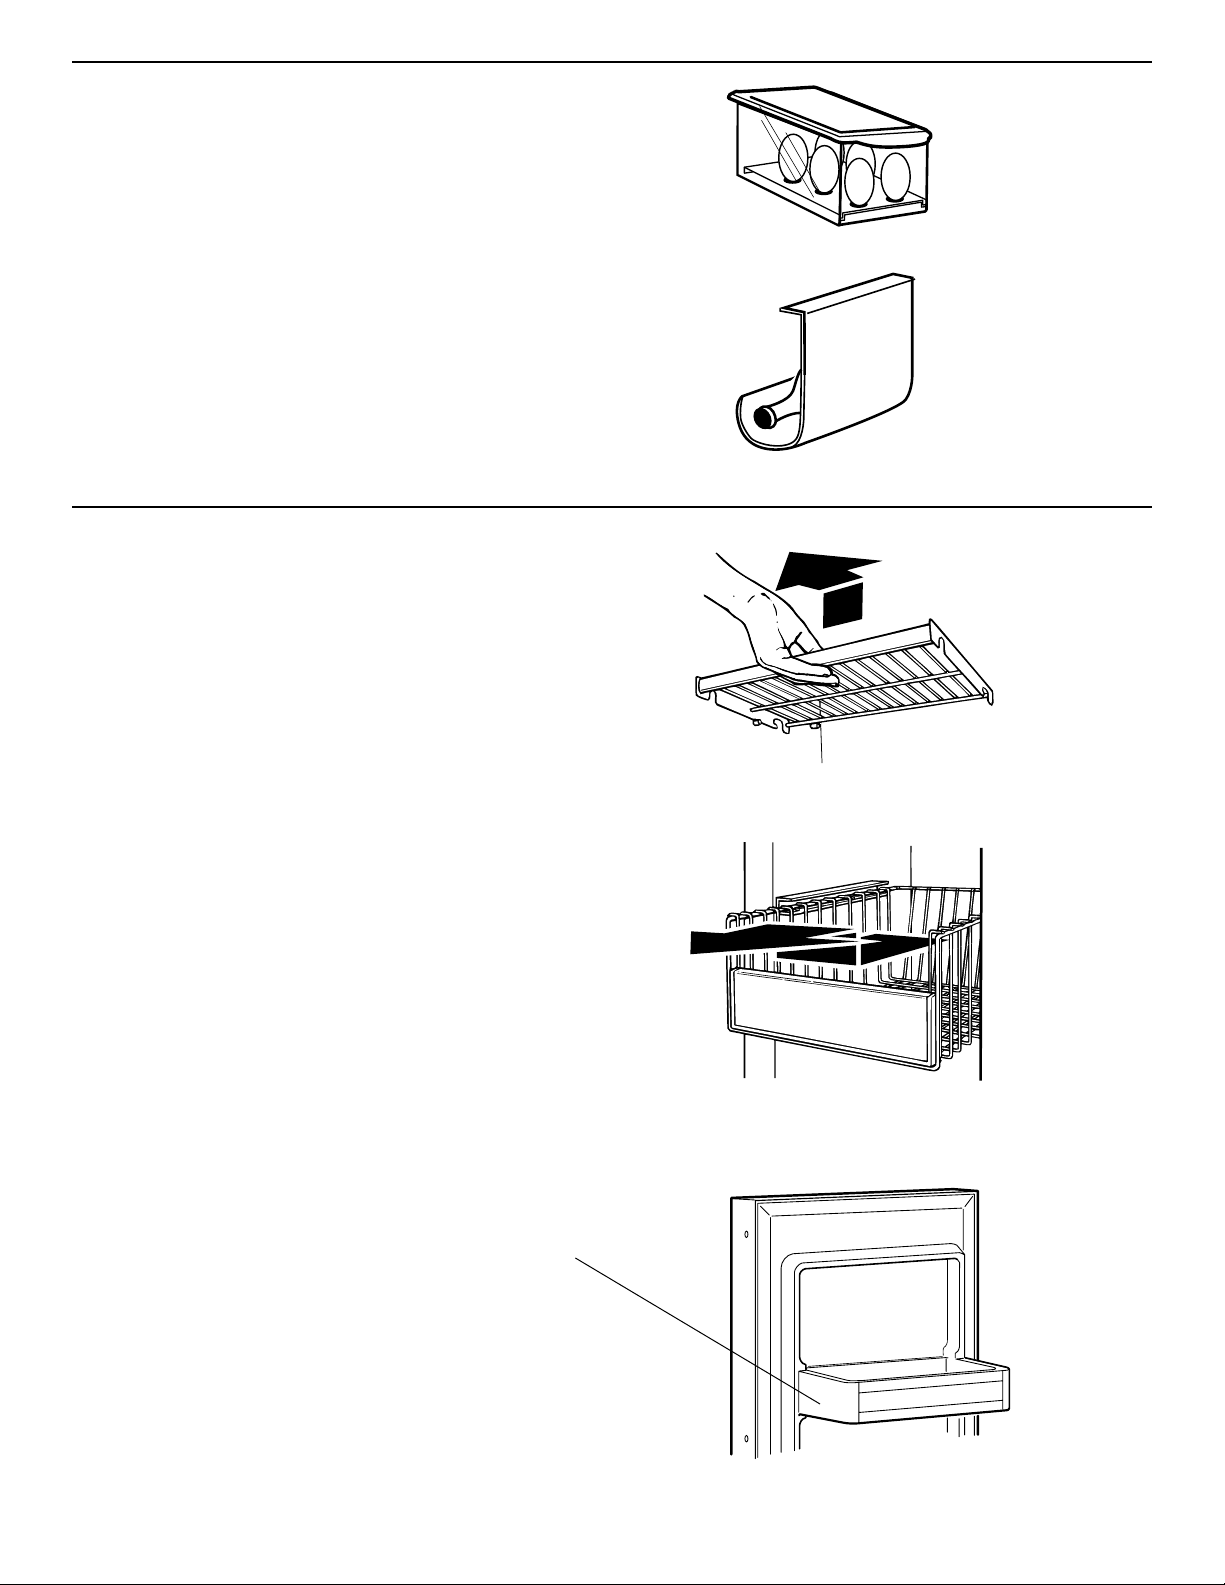
Covered Egg Container
The covered egg container with carrier provides extra
protection for storing eggs anywhere inside your
refrigerator section.The ClearVue* container allows you
to see how many eggs you have stored.
Wine rack
Insert the wine rack into position by sliding it between a
refrigerator shelf and the wall of the refrigerator
compartment.
Freezer features
Freezer shelves
To remove:
1. Lift shelf up.
2. Pull shelf straight out.
3. Replace in reverse order.
Pull-out freezer baskets
To remove:
1. Pull basket out to the stop.
2. Lift basket slightly and move it to the left.
3. Pull basket out the rest of the way.
To replace:
1. Place basket in shelf tracks and move basket to the
left.
2. Push basket in to the stop on the left side.
3. Lift left side of basket slightly to clear the stop.
4. Push basket in the rest of the way.
IMPORTANT: Be sure both sides of basket are in the
shelf tracks before filling with food.
Note: Stationary shelf on freezer door is not removable.
Page 11
11
Automatic ice maker
To start ice maker:
• For dispenser models only: Pull ice maker cover
panel out from the bottom and slide it to the rear.
• Push ice maker wire arm down to the “ON” position.
The ice maker fills with water and begins forming ice.
Allow 24 hours to produce the first batch of ice. Ice maker
should then produce 7 to 9 batches of ice in a 24-hour
period under normal conditions. Discard the first three
batches of ice. After ice is formed, ice cubes drop into
storage bin.When ice bin is full, ice maker arm raises to
the “OFF” position (arm up).
To stop ice maker:
• Lift the ice maker wire arm until you feel it click into the
“OFF” position.
• Do not force arm up or down. Do not store anything on
top of ice maker or in ice bin.
Wire arm
On
Off
Solving common ice maker problems
POSSIBLE CAUSE/SOLUTION
This is normal. They break apar t easily.Shake bin occasionally to keep cubes
separated.
ON/OFF wire arm is in the “OFF” (up) position. Lower wire arm to the “ON” (down)
position.
Freezer is not cold enough.Adjust temperature controls and wait 24 hours.
(See “Setting temperature controls” on page 6.)
Copper tubing is kinked. Check water tubing.
New plumbing connections can cause discolored or off-flavored ice. Discard the first
few batches of ice.
Cubes are stored too long.Throw them away and make a new supply.
Food is not wrapped properly. See page 20.
Freezer and ice bin need to be cleaned.See page 17.
Water may contain minerals (such as sulfur). A filter may be required to
remove them.
There is no water in the tank. Press the water dispenser lever and hold it in for
several minutes.When water dispenses, tank is full.
PROBLEM
Ice crescents attached at
corners
Ice maker will not operate
or ice is not made fast
enough
Off-taste or odor in ice
No ice produced
Page 12
12
Removing the ice maker storage bin
Depending on the model, the ice maker storage bin holds
the following amounts of ice:
36" - 8.5 pounds (3.9 kg)
42" - 13.5 pounds (6.1 kg)
48" - 17.6 pounds (8.0 kg)
Remove and discard unused ice periodically to reduce the
potential for off-taste or odor buildup in ice.The storage
bin can be removed for cleaning or to dispense large
amounts of ice at one time.
Note: On models without ice and cold water dispenser,
the storage bin cannot be removed full of ice if the freezer
door stop is set to a 90° opening.
S
to
ra
g
e
B
in
Ice maker
cover panel
down
Ice maker
cover panel
up
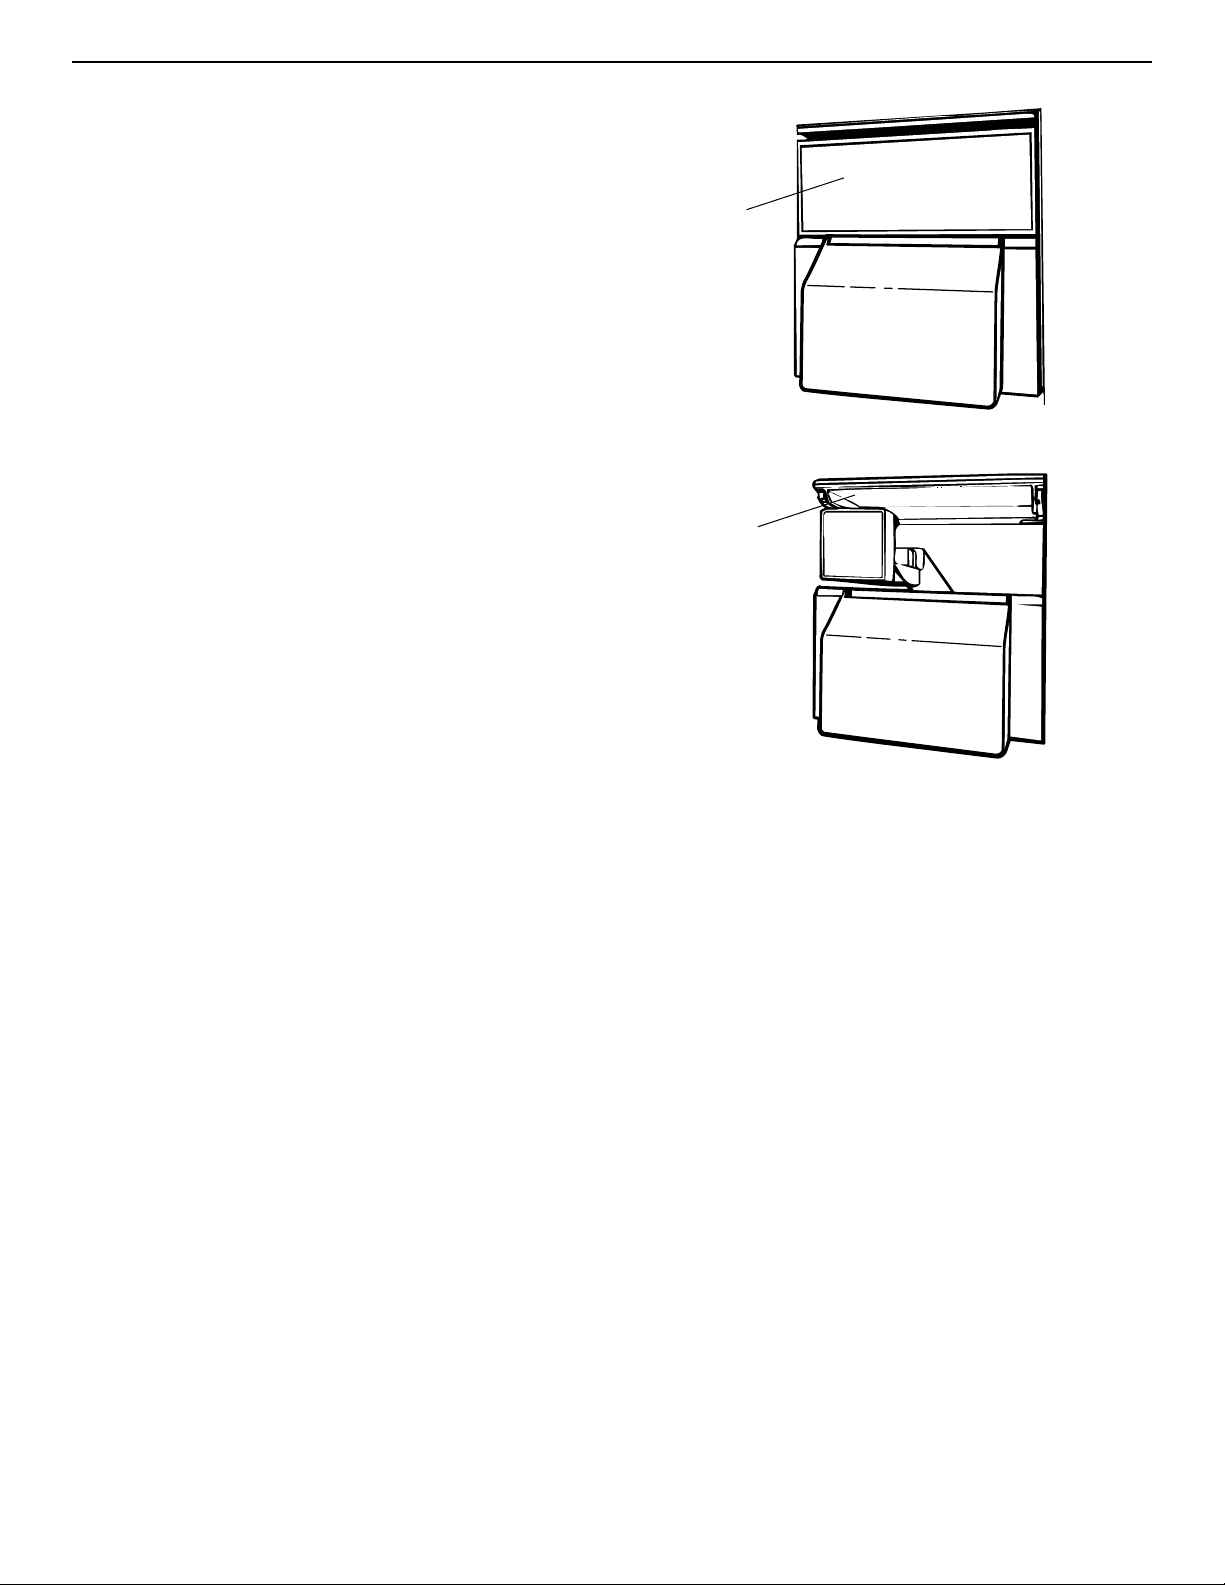
To remove:
1. Pull the ice maker cover panel out from the bottom and
slide it to the rear.
2. Lift the ice maker wire arm until you feel it click into the
“OFF” position.
For dispenser models only: While the ice maker is
“OFF,” no more ice can be produced, but ice can still
be dispensed when the freezer door is closed.
3. Lift the front of the storage bin, then pull it out.
4. Empty the storage bin.Use hot or warm water to melt
ice if necessary. Never use anything sharp to break up
ice in the storage bin.This can damage the storage bin
and the dispenser mechanism.
To replace:
1. Push storage bin in all the way.
2. Lower the ice maker wire arm down to the “ON”
position to restart ice maker.
3. Lower the ice maker cover panel.
Page 13

ICE
13
Ice and cold water dispensers
(models KSSP36Q, KSSP42Q, KSSP48Q,
KSSS36Q, KSSS42Q, KSSS48Q)
Ice dispenser
Ice dispenses from ice maker storage bin in the freezer.
When dispenser bar is pressed, a trap door opens in a
chute between the dispenser and ice bin. Ice moves from
the bin and falls through the chute.When dispenser bar is
released, a buzzing sound may be heard for a few
seconds.
Your refrigerator dispenses both cubed and
crushed ice. Before dispensing ice, select
which type of ice you prefer. For crushed ice,
press pad on left above “ICE”. For cubed ice,
press pad on right above “ICE”.
To dispense ice:
1. Press pad for desired type of ice.
2. Press a sturdy glass against the ice dispenser bar.
Hold glass close to dispenser opening so ice does not
fall outside of glass.
3. Remove the glass to stop dispensing.
Water dispenser
IMPORTANT: If the water dispenser stops working, water
may be frozen in the water line leading to the dispenser. If
this happens, turn the FreshChill* Meat Locker
Temperature Control toward “Cold.”
Chilled water comes from a reservoir behind the crispers.
Allow about 24 hours to chill the first reservoir full of
water.
When the refrigerator is first hooked up, press the
water dispenser bar until you draw and discard 2 to 3
quarts (1.9 to 2.9 L) of water.This removes air from the
system and rinses the water filter, reservoir, and pipes.
Ice maker will not produce ice without filling reservoir.
If the dispenser is not used regularly, dispense enough
water every week to freshen the supply. Allow two to three
hours for a new supply of water to chill.
IMPORTANT: The small tray under the dispenser is
designed to evaporate small spills.There is no drain in
the tray. Do not pour water into it.
To dispense water:
1. Press a sturdy glass against the water dispenser bar.
2. Remove glass to stop dispensing.
WARNING
Cut Hazard
Use a sturdy glass when dispensing ice or water.
Failure to do so can result in cuts.
ICE
ICE
Page 14
CAUSE SOLUTION
Freezer door open Close the freezer door.
Ice bin not properly installed Make sure ice bin is pushed in all the way.
Wrong ice in bin Use only crescents from ice maker. Shake ice bin
occasionally to keep cubes separated and to obtain
increased storage capacity.
Dispenser not used for Dump old ice and make a new supply.
extended periods of time,
causing ice cubes to melt
together
Ice dispenser bar held Wait about three minutes for the dispenser motor to reset.
in too long Large amounts of ice should be taken from the bin,
not through the dispenser.
Lock Out has been chosen Turn Lock Out off.
Low water pressure Call local utility company.
Using a reverse osmosis Remove the refrigerator water filter. Replace filter cap
water filtering system in grille. See page 16.
Water filtration system Check Water Filtration Installation Instructions to see that
installed incorrectly or clogged filter was installed correctly and is not clogged.
Ice attracts airborne odors; Dump old ice and make a new supply; store excess
old ice ice in a covered container.
Water quality For best results, avoid connecting ice maker to a
softened water supply. If softened water supply cannot
be avoided, make sure the water softener is well
maintained and operating properly.
Foods not properly wrapped Wrap foods properly in airtight and moisture-proof
materials. See page 20.
Ice bin and freezer may need Clean freezer and ice bin.See “Cleaning the
cleaning refrigerator” on page 17 for instructions.
Plumbing to ice maker Follow Installation Instructions for proper ice maker
water supply hookup.
New ice maker The first few batches of ice from a new ice maker may
have an off-taste.Dump this ice and make a new supply.
14
Dispenser/ice maker operating tips
PROBLEM
Dispensers won’t work
Ice dispenser won’t work
Off-taste or odor in ice
Page 15
15
Water Filtration and Monitoring
System
The water filter indicator light
The water filter indicator light will help you know when to
change your water filter cartridge. The light is located at
the top of the refrigerator compartment. The light will
change from green to yellow. This tells you that it is
almost time to change the water filter cartridge (90% of
the filter life has been used). It is recommended that you
replace the water filter cartridge when the water filter
indicator light changes to red OR water flow to your
water dispenser or ice maker decreases noticeably. (See
“Changing a water filter cartridge” below.
NOTE: Do not use with water that is microbiologically
unsafe or of unknown quality without adequate
disinfection before or after the system.
After changing the water filter cartridge, reset the water
filter indicator light by depressing the Light Switch button
5 times.The indicator light will change from red to green
when the system is reset.
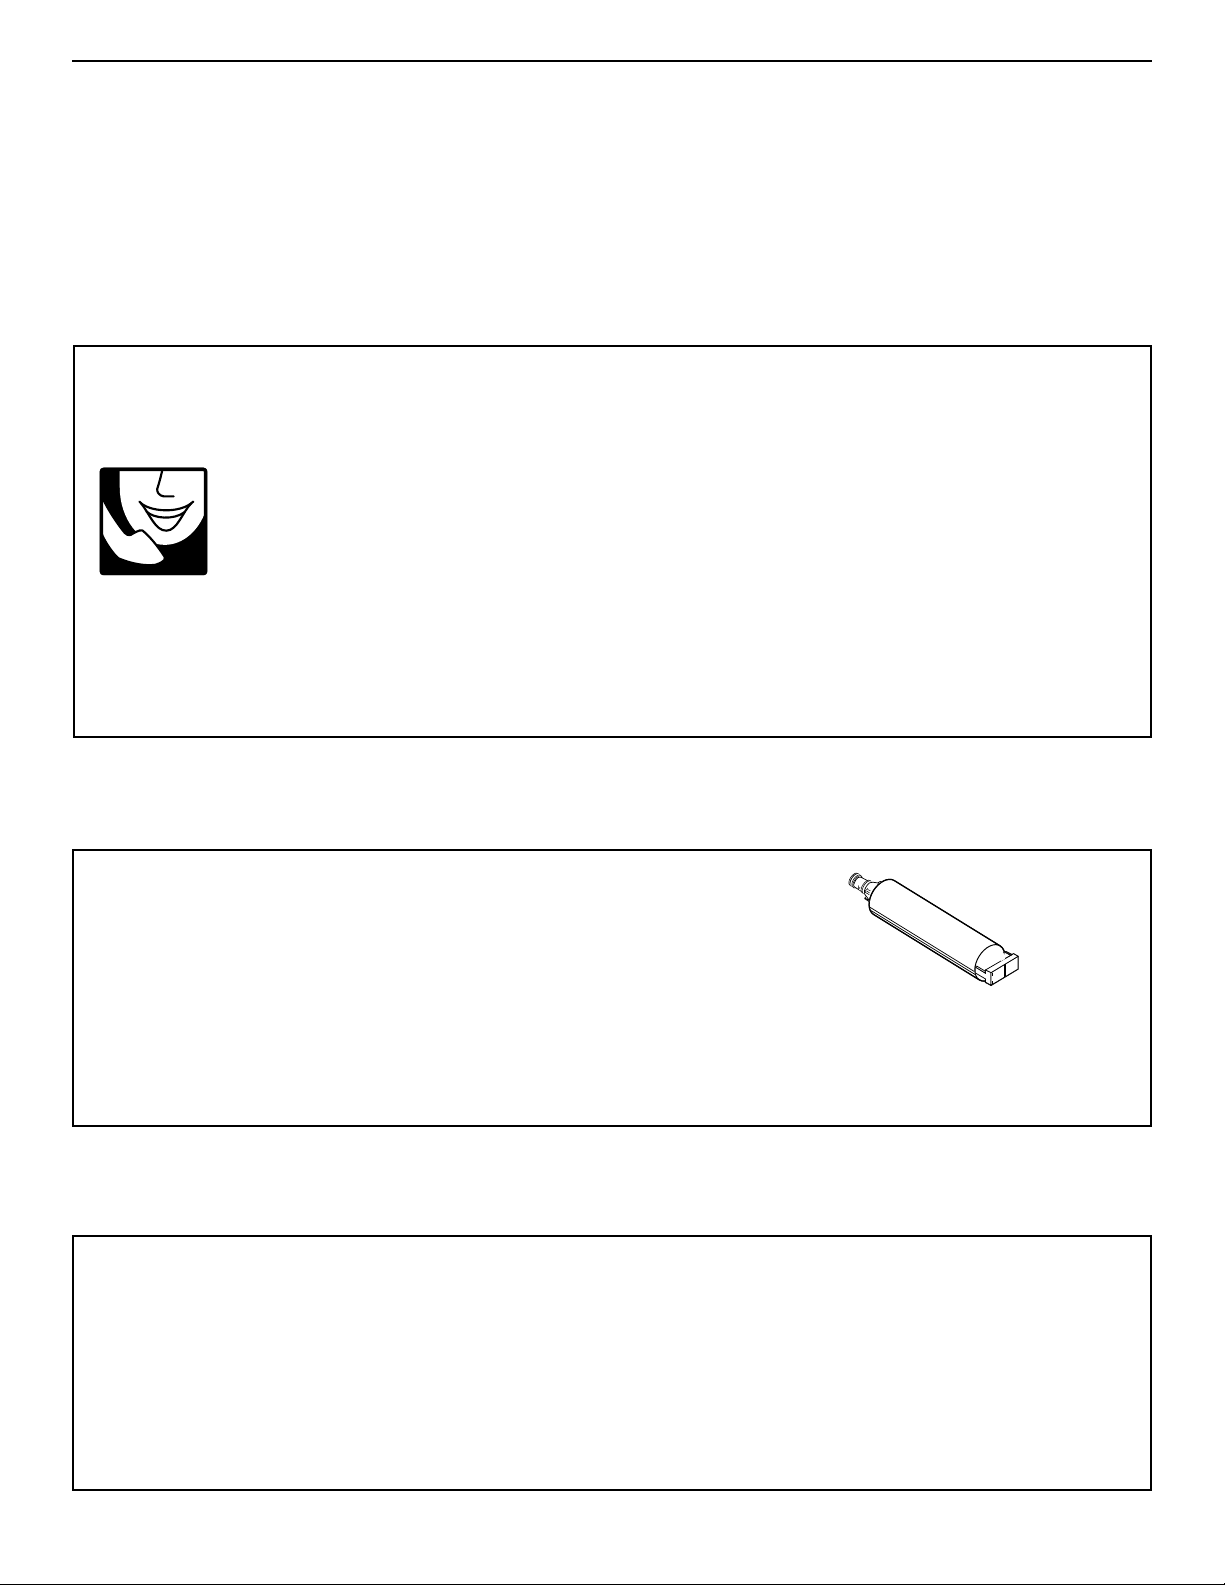
Changing a water filter cartridge
The water filter is located below the refrigerator
compartment door.
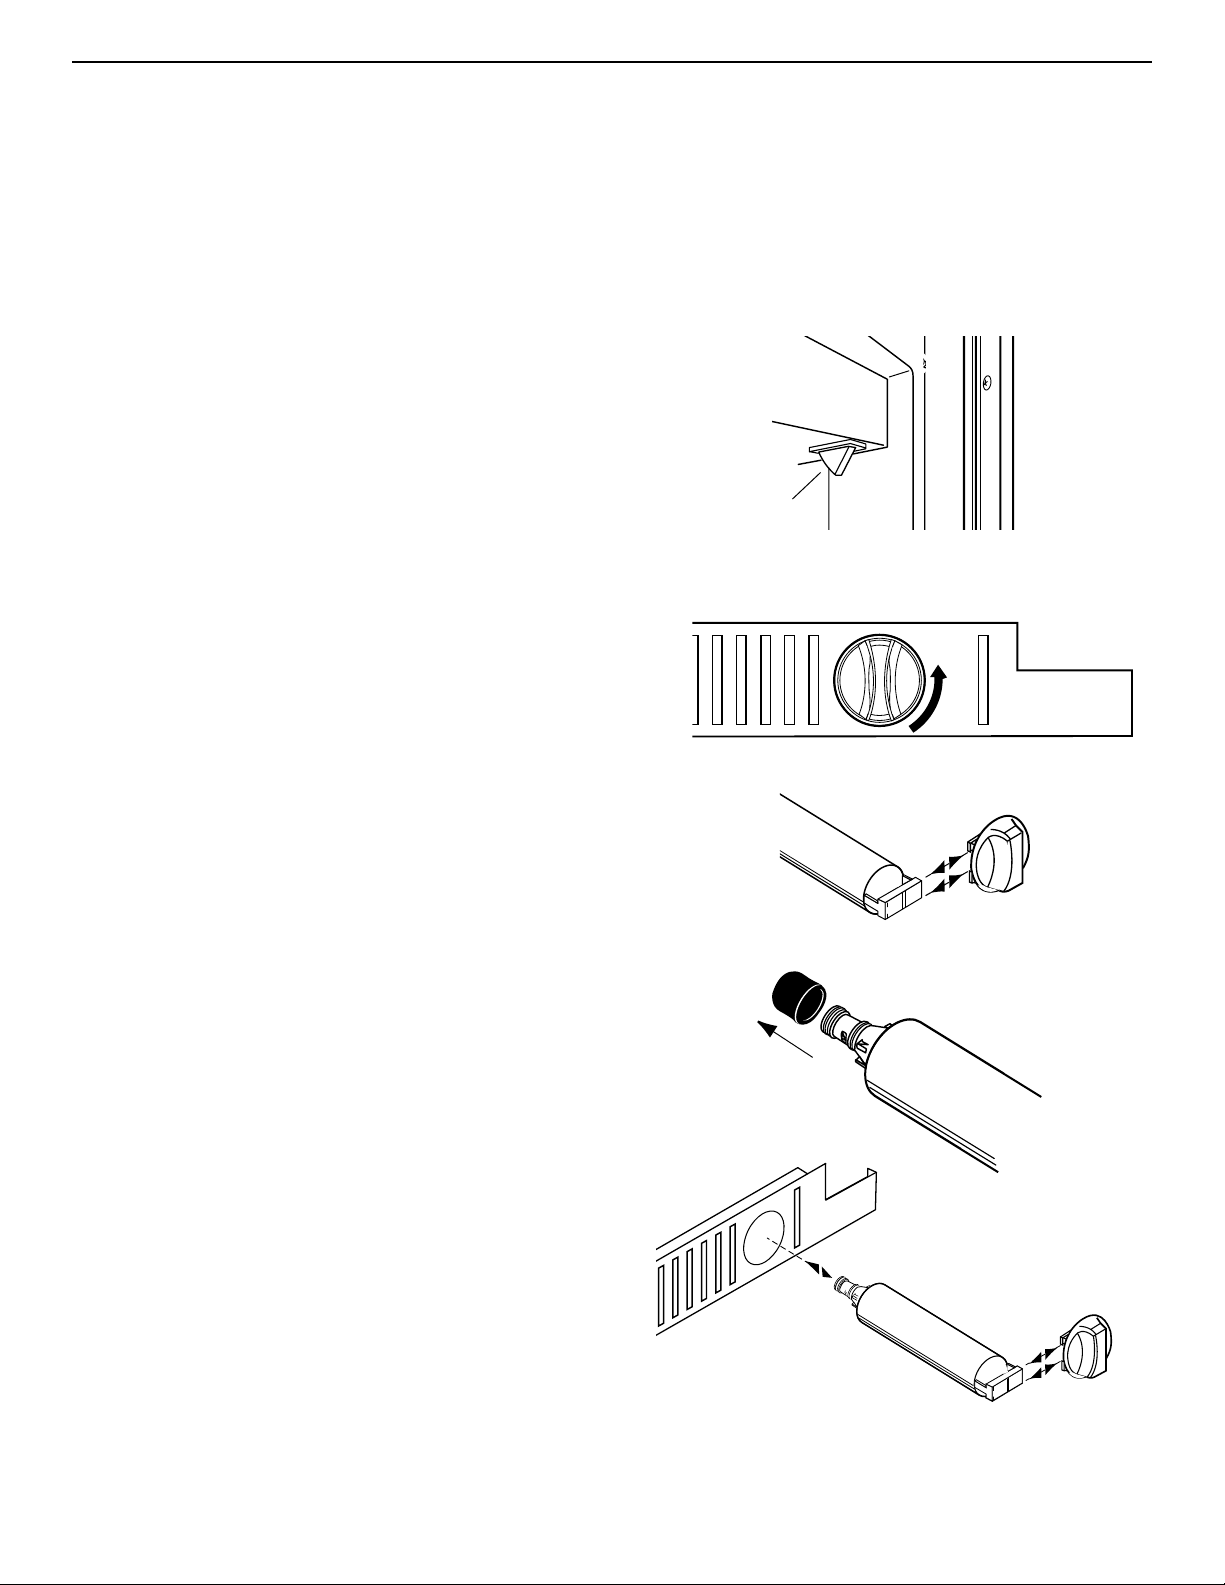
1. Locate the water filter cartridge cap in the front base
grille below the freezer compartment door.Rotate the
cap counterclockwise to a vertical position and pull
the cap and filter cartridge out through the base grille.
NOTE: There will be water in the car tr idge. Some
spilling may occur.
2. Remove the cartridge cap by sliding it off the end of
the old cartridge. The cap will slide to the left or right.
DO NOT DISCARD THE CAP.
3. Take the new cartridge out of its packaging and
remove protective cover from o-rings.
4. Slide the cartridge cap onto the new cartridge as
shown.
1.
2.
3.
4.
light switch
Page 16
16
Base grille
To remove:
1. Remove one screw at each end of the base grille.
2. Remove base grille.
3. Replace in reverse order.
5. With cartridge cap in the vertical position, push the
new filter cartridge into the base grille until it stops.
Rotate the cartridge cap clockwise to a horizontal
position.
6. R UN WATER THROUGH THE DISPENSER UNTIL
THE WATER RUNS CLEAR (about 2-3 gallons or 6-7
minutes).This will clean the system and clear air from
the lines. Additional flushing may be required in some
households.
NOTE: As air is cleared from the system, water may
spurt out of the dispenser.
Using the dispenser
without a water filter
You can run the dispenser without a water filter cartr idge.
Your water will not be filtered. If you run the dispenser
without a water filter cartridge, keep the cartridge cap
and replace it in the base grille for future use.
1. Remove the water filter cartridge (See “Changing a
water filter cartridge” earlier in this section.) Then
slide the cartridge cap off the end of the filter
cartridge. DO NOT DISCARD THE CAP.
2. With the cartridge cap in the vertical position, inser t
the cap into the base grille until it stops.
3. Rotate the cartridge cap to a horizontal position.
NOTE: The cartridge cap may not be even with the
base grille.
Ordering replacement filters
To order more water filter cartr idges, call 1-800-253-1301
and ask for accessory Part #4392857 or contact your
authorized KitchenAid dealer.
Water Filtration and Monitoring System (cont.)
Page 17

17
Defrost pan
The defrost pan is located behind the base grille, toward
the left side of the refrigerator.
To remove:
1. Press Power On/Off Switch to the “OFF”position.
(See page 5 for instructions).
2. Remove base grille.
3. Find retaining clip (A) under refrigerator.
4. Push up on the clip and, at the same time, slide the
pan forward and out.
5. Clean the pan. (See page 17 for instructions.)
To replace:
1. Position the edge of the defrost pan approximately
7 inches (17.8 cm) from the left side of the
refrigerator.
2. Lift defrost pan into guides and push back until you
hear the “click” or “snap” of the retaining clip moving
into place.
3. Replace the base grille.
4. Press Power On/Off Switch to the “ON”position.
Defrost pan
Retaining clip (A)
Light bulbs
Light bulbs are located behind the Refrigerator and
Freezer Controls:
1. Unplug refrigerator or disconnect power to refrigerator.
2. Reach behind control panel.
3. Unscrew bulb and replace it with a 40-watt,
incandescent, medium-base, tubular bulb.
4. Plug refrigerator power cord into outlet or reconnect
power to refrigerator.
Light bulb below ice storage bin:
1. Unplug refrigerator or disconnect power to refrigerator.
2. Remove light cover.
3. Unscrew bulb and replace it with a 40-watt,
incandescent, medium-base, tubular bulb.
4. Replace light cover.
5. Plug refrigerator power cord into outlet or reconnect
power to refrigerator.
Light bulb in dispenser area: (dispenser models)
1. Unplug refrigerator or disconnect power to refrigerator.
2. Unscrew the bulb from the top, inside of the dispenser
area.
3. Replace bulb with a heavy-duty, 10-watt bulb.
4. Plug refrigerator power cord into outlet or reconnect
power to refrigerator.
IMPORTANT: Be sure to press Power On/Off Switch to
the “ON” position after changing light bulb(s).
Page 18
18
Saving Energy
You can help your refrigerator use less electricity.
• Clean the condenser coils regularly.
• Open the door as few times as possible.Think about
what you need before you open the door.Get
everything out at one time.Keep food organized so you
won’t have to search for what you want.Close door as
soon as food is removed.
• Fill up the refrigerator, but don’t overcrowd it so air
movement is blocked.
• It is a waste of electricity to set the refrigerator and
freezer to temperatures colder than they need to be.If
ice cream is firm in the freezer and drinks are as cold
as your family likes them, that’s cold enough.
CAUSES
The refrigerator’s fan motor and moving air.
The thermostat makes a definite click when the refrigerator stops running. It also
makes a sound when the refrigerator starts.
The defrost timer will click when the defrost cycle starts and stops.
You may hear buzzing (from the water valve), trickling water, and the clatter of ice
falling into the bin.
The high-efficiency compressor and motor will run longer than older designs.The
internal fan may occasionally run when the compressor is off.
During the defrost cycle, the refrigerator will not be running. The tr ickling water is the
frost accumulated on the freezer coil melting and running into the defrost pan.When
the refrigerator stops running, you will hear gurgling in the tubing for a few minutes.
You may feel air blowing from behind the upper ventilation panel and base grille when
the refrigerator is running. This is nor mal.
SOUNDS/OBSERVATIONS
Hum or hiss
Clicking or snapping
sounds
Ice maker sounds
• trickling water
• clatter of ice
Running sounds
Trickling water/
water sounds
Warm air from upper
ventilation panel/
base grille
Understanding the sounds you may hear
Your new refrigerator may make sounds that your old one
didn’t make.Because the sounds are new to you, you
might be concerned about them. Most of the new sounds
are normal. Hard surfaces like the floor, walls, and
cabinets can make the sounds seem louder than they
actually are. Due to new product designs, there may be
sounds that you are not familiar with.The following chart
describes the kinds of sounds that might be new to you
and what may be making them.
Page 19
19
The refrigerator and freezer compartments
defrost automatically. However, clean both
once a month to prevent odors from building
up.Wipe up spills immediately.
Before cleaning, disconnect the refrigerator
from its power supply by pressing the Power On/Off
Switch to the “OFF” position.Then, take out all removable
parts and clean the refrigerator according to the directions
given below. Be sure to press the Power On/Off Switch to
the “ON” position when you are finished cleaning.
C
ARING
F
OR
Y
OUR
R
EFRIGERATOR
Explosion Hazard
Use nonflammable cleaner.
Failure to do so can result in death, explosion,
or fire.
Your refrigerator is built to give you many years of
dependable service. However, there are a few things
you can do to help extend its product life.This section tells
you how to clean your refrigerator and what to do when
going on vacation, moving, or during a power outage.
Cleaning your refrigerator
WHA T TO USE
Sponge or cloth with mild
detergent and warm water
Sponge, cloth, or paper
towel with mild detergent,
warm water, and a good
appliance wax (or good
auto paste wax)
Sponge, soft cloth, or paper
towel with baking soda or
mild detergent and warm
water
Sponge, soft cloth, or paper
towel with mild detergent
and warm water
Soft, clean sponge or soft,
clean cloth with mild
detergent and warm water
Sponge or cloth with mild
detergent and warm water
Stainless steel cleaner
PROBLEM
Removable parts
(shelves, crisper, etc.)
Outside
Inside walls
(allow freezer to warm up so
cloth won’t stick)
Door liners and gaskets
Plastic parts
(covers and panels)
Defrost pan
Stainless steel
doors and grille
HOW T O CLEAN
Hand wash and dry thoroughly.
Wash outside of cabinet.Do not use abrasive or harsh
cleaners.
Wipe and dry thoroughly.
Wax painted metal surfaces at least twice a year.
Apply wax with a clean, soft cloth. Waxing painted
metal surfaces provides rust protection.
Do not wax plastic parts.
Wash with mixture of warm water and:
• mild detergent, or
• baking soda (2 tbs to 1 qt [26 g to .95 L] of water).
Wipe and dry thoroughly.
Wipe and dry thoroughly.
DO NOT USE cleaning waxes, concentrated
detergents, bleaches, or cleaners containing
petroleum on plastic parts.
Wipe and dry thoroughly.
DO NOT USE paper towels, window sprays,
scouring cleansers, or flammable fluids.These can
scratch or damage material. See “Important Safety
Instructions” on page 3.
Press Power On/Off Switch to the “OFF” position.
Remove base grille.(See page 14.)
Reach into small opening at right edge and remove
the defrost pan. (See page 15.)
Wash, rinse, and dry thoroughly.
Replace defrost pan. Make sure to push it
completely into the opening.
Replace base grille.
Press Power On/Off Switch to the “ON” position.
Wipe with soft cloth.
WARNING
Page 20

If the refrigerator must be moved, contact the dealer from
whom you purchased the unit or your local KitchenAid
authorized servicer.
If you will be gone for a month or more, follow these steps
to prepare your refrigerator.
1. Remove all food from the refrigerator.
2. If your refrigerator has an automatic ice maker:
•
Turn off the water supply to the ice maker at least one
day ahead of time.
•
When the last load of ice drops, turn off the ice maker.
Make sure all ice is dispensed out of the ice maker
mechanism.
3. Unplug the refrigerator.
4. Clean it, wipe it, and dry well.
5. Tape rubber or wood blocks to the tops of both doors
to prop them open far enough for air to get in. This
stops odor and mold from building up.
If electricity goes off, call the power company. Ask how
long power will be off.
1. If power will be interrupted 24 hours or less, keep both
doors closed.This helps food stay cold and frozen.
2. If ser vice will be interr upted longer than 24 hours:
(a) Remove all frozen food and store in a frozen food
locker.
OR
(b) Place 2 lbs. (900g) of dry ice in freezer for every
cubic foot (28 liters) of freezer space.This will keep
food frozen for two to four days.Wear gloves to protect
your hands from dry ice burns.
OR
(c) If neither a food locker nor dry ice is available, use
or can perishable food at once.
20
Short vacations
If you will be away for less than four weeks, use these tips
to prepare your refrigerator before you leave.
1. Use up any perishables and freeze other items.
2. If your refrigerator has an automatic ice maker:
•
Raise wire arm to “OFF” (up) position.
•
Shut off water supply to the ice maker.
3. Empty the ice bin.
WHA T TO USE
Vacuum cleaner with
extended narrow attachment
Vacuum cleaner with brush
attachment
A professional stainless
steel cleaner.
PART
Condenser coils
Base grille
Stainless steel
HOW T O CLEAN
Remove upper ventilation panel to expose condenser
coils. (See page 5.)
Vacuum coils when dusty or dirty.Coils may need to
be cleaned as often as every other month.
Replace upper ventilation panel.
Vacuum base grille.
Follow directions included with cleaner.
Vacation and moving care
Long vacations
Moving
Power interruptions
Remember: A full freezer stays cold longer than a partly
filled one. A freezer full of meat stays cold longer than a
freezer full of baked goods.If food contains ice crystals,
it may be safely refrozen, although the quality and flavor
may be affected.If the condition of the food is poor, or if
you feel it is unsafe, dispose of it.
Questions?
Call our Consumer Assistance Center telephone number,
1-800-235-0665, from anywhere in the U.S.A. or Canada.
Page 21
21
There is a correct way to package and store refrigerated
or frozen food.
To keep food fresher, longer, take the time to study these
recommended steps.
F
OOD
S
TORAGE
G
UIDE
Wrap or store food in the refrigerator in airtight and
moisture-proof material unless otherwise noted. This
prevents food odor and taste transfer throughout the
refrigerator. For dated products, check code date to
ensure freshness.
Butter or margarine
Keep opened butter in covered dish or closed
compartment. When storing an extra supply, wrap in
freezer packaging and freeze.
Cheese
Store in the original wrapping until you are ready to
use it. Once opened, rewrap tightly in plastic wrap
or aluminum foil.
Milk
Wipe milk cartons. For best storage, place milk on
interior shelf.
Eggs
Store in original carton on interior shelf. On some
models, an egg storage container is provided for your
convenience.
Fruit
Wash, let dry, and store in refrigerator in plastic bags
or crisper. Do not wash or hull berries until they are
ready to use. Sort and keep berries in original
container in a crisper, or store in a loosely closed
paper bag on a refrigerator shelf.
Leafy vegetables
Remove store wrapping and trim or tear off bruised
and discolored areas. Wash in cold water and drain.
Place in plastic bag or plastic container and store in
crisper.
Storing fresh food
Vegetables with skins
(carrots, peppers)
Place in plastic bags, or plastic container and store
in crisper.
Fish
Use fresh fish and shellfish the same day as
purchased.
Meat
Store most meat in original wrapping as long as it
is airtight and moisture-proof. Rewrap if necessary.
See the following for storage times. When storing
meat longer than the times given, freeze the meat.
Chicken ........................................................1-2 days
Bacon............................................................5-7 days
Ground beef ..................................................1-2 days
Cold cuts ......................................................3-5 days
Steaks/roasts ................................................3-5 days
Variety meats ................................................1-2 days
Cured meats................................................7-10 days
Leftovers
Cover leftovers with plastic wrap or aluminum foil.
Plastic containers with tight lids can also be used.
NOTE: Keep your refrigerator smelling fresh with an
open box of baking soda.
Storing fresh food (cont.)
Page 22

22
The freezer section is designed for storing
commercially frozen food and for freezing food
at home.
NOTE: For further information about preparing food
for freezing or food storage times, check a freezer
guide or reliable cookbook.
Packaging
Successful freezing depends on the correct packaging.
When you close and seal the package you must not
allow air or moisture in or out. If you do, you could
have food odor and taste transfer throughout the
refrigerator, and also dry out frozen food.
Packaging recommendations:
•
Rigid plastic containers with tight-fitting lids
•
Straight-sided canning/freezing jars
•
Heavy-duty aluminum foil
•
Plastic-coated paper
•
Non-permeable plastic wraps (made from
saran film)
•
Specified freezer self-sealing plastic bags
Follow package or container instructions for proper
freezing methods.
Do not use:
•
Bread wrappers
•
Non-polyethylene plastic containers
•
Containers without tight lids
•
Wax paper or wax-coated freezer wrap
•
Thin, semi-permeable wrap
Freezing
Your freezer will not quick-freeze any large quantity of
food. Put no more unfrozen food into the freezer than
will freeze within 24 hours (about 2 to 3 lbs of food
per cubic foot [907-1,350 g per liter] of freezer space).
Leave enough space in the freezer for air to circulate
around packages. Also leave enough room at the front
so the door can close tightly.
Storage times vary according to the quality and
type of food, the type of packaging used (airtight
and moisture-proof), and the storage temperature.
Ice crystals inside a sealed package are normal.
It means that moisture in the food and air inside the
package have condensed, creating ice crystals.
Storing frozen food
NOTE: Allow hot foods to cool at room temperature for
30 minutes, then package and freeze. Cooling hot
foods before freezing saves energy.
Page 23
23
There is water in the defrost drain pan
Check if ...
The refrigerator is defrosting.
It is more humid than normal.
Water in the defrost pan is overflowing.
Then ...
The water will evaporate. It is normal for water to drip into
the defrost pan.
Expect that the water in the defrost pan will take longer to
evaporate. This is normal when it is hot or humid.
Check to make sure your refrigerator is level. (See the
“Leveling” section.) If it is still overflowing, there is probably
something wrong with the refrigerator. Call the Consumer
Assistance Center.
T
ROUBLESHOOTING
G
UIDE
Check if ...
The power supply cord is unplugged.
A household fuse has blown or circuit breaker
has tripped.
The Refrigerator Control is turned to the
“OFF” position.
The refrigerator is defrosting.
Then ...
Firmly plug the cord into a live outlet with proper voltage.
Replace the fuse or reset the circuit.
Refer to the “Setting temperature controls” section.
Recheck to see if the refrigerator is operating in 30 minutes.
Your refrigerator will regularly run an automatic defrost cycle.
If it is still not running after checking the above items, call
the Consumer Assistance Center.
The lights do not work
Check if ...
The power supply cord is unplugged.
A household fuse or circuit breaker has tripped.
A light bulb is loose in the socket.
A light bulb has burned out.
Then ...
Firmly plug the cord into a live outlet with proper voltage.
Replace the fuse or reset the circuit.
Turn the Freezer Control to OFF. Disconnect the
refrigerator from the electrical supply. Gently remove the
bulb and reinsert. Then reconnect the refrigerator to the
electrical supply and reset the Freezer Control.
Replace with an appliance bulb of the same wattage, size,
and shape. See the “Changing the light bulbs” section.
Your refrigerator will not operate
You can solve many common refrigerator problems
easily, saving you the cost of a possible service call.
Try the suggestions below to see if you can solve your
problem without outside help. If the suggestions do not
work, please call the KitchenAid Consumer Assistance
Center.
Page 24
24
The motor seems to run too much
Check if ...
The room temperature is hotter than normal.
A large amount of food has just been added to
the refrigerator.
The door is opened often.
The controls are not set correctly for the
surrounding conditions.
The doors are not closed completely.
The base grille is dirty or blocked.
The condenser coils are dirty.
The door gaskets are not sealed all the way around.
Then ...
Expect the motor to run longer under warm conditions. At
normal room temperatures, expect your motor to run about
40% to 80% of the time. Under warmer conditions, expect
it to run even more of the time.
Adding a large amount of food warms the refrigerator. It
is normal for the motor to run longer in order to cool the
refrigerator back down. See the “Food Storage Guide”
section.
Expect the motor to run longer when this occurs. In order
to conserve energy, try to get everything you need out of
the refrigerator at once, keep food organized so it is easy
to find, and close the door as soon as the food is removed.
Refer to the “Setting temperature controls” section.
Push the doors firmly shut. If they will not shut all the
way, see “The doors will not close completely,” later in
this section.
This prevents air circulation and makes the motor work
harder. Remove the grille and clean.
This prevents air transfer and makes the motor work harder.
Clean the condenser coils. Refer to the “Cleaning your
refrigerator” section.
Contact a qualified person or a technician.
If the problem is not due to any of the above, remember
that your new refrigerator will run longer than your old one
due to its high-efficiency motor.
The refrigerator seems to make too much noise
Check if ...
The sounds and noises are common for new
refrigerators.
Then ...
Refer to the “Understanding the sounds you may hear”
section.
Troubleshooting (cont.)
Page 25
25
Off-taste or odor in the ice
Check if ...
The plumbing connections are new, causing
discolored or off-flavored ice.
The ice cubes have been stored for too long.
Food in the freezer has not been wrapped properly.
Freezer and ice bin need to be cleaned.
Water contains minerals (such as sulfur).
Then ...
Discard the first few batches of ice.
Throw old ice away and make a new supply.
Refer to the “Storing frozen food” section.
See the “Cleaning your refrigerator” section.
A filter may need to be installed to remove the minerals.
The ice maker is not producing ice
Check if ...
The freezer temperature is not cold enough to
produce ice.
The ice maker arm is in the “OFF” (arm up) position.
The water line shutoff valve to the refrigerator is
not turned on.
An ice cube is jammed in the ejector arm.
The ice maker mold has no water in it or no ice
has been produced.
Then ...
See the “Setting controls” section.
Lower arm to the “ON” (arm down) position. See the “Ice
maker operation” section.
Turn on the water valve.
Remove the ice from the ejector arm with a plastic utensil.
Refer to the “Ice maker operation” section.
Check to see if your refrigerator has been connected to
your home water supply and the supply shutoff valve is
turned on.
If not due to any of the above, there may be a problem with
the water line. Contact the Consumer Assistance Center.
The ice maker is producing too little ice
Check if ...
The ice maker has just been installed.
A large amount of ice has just been removed.
The controls are not set correctly.
The water shutoff valve is not turned completely on.
There is a water filter installed on the refrigerator.
This filter may be clogged or installed incorrectly.
Then ...
Wait 72 hours for full ice production to begin. Once your
refrigerator is cooled down, the ice maker should begin
producing 56-72 cubes every 24 hours.
Allow 24 hours for ice maker to produce more ice.
Refer to the “Setting temperature controls” section.
Turn valve on fully. Refer to the “Ice maker operation”
section.
First, check the filter installation instructions to ensure
that the filter was installed correctly and is not clogged.
If installation or clogging is not a problem, call a qualified
person or a technician.
Page 26
26
The divider between the two compartments is warm
Check if ...
The condenser coils or base grille are dirty or clogged.
The motor has quit working.
Then ...
Clean according to the “Cleaning your refrigerator” section.
See “Your refrigerator will not operate” earlier in this section.
NOTE: The refrigerator temperature may turn from warm
to hot.
If not due to any of the above, the warmth is probably due
to normal operation of the automatic exterior moisture
control. If still concerned, call the Consumer Assistance
Center or an authorized KitchenAid service company.
Temperature is too warm
There is interior moisture build-up
Check if …
The door is opened often.
The room is humid.
Then ...
To avoid humidity build-up, try to get everything you need
out of the refrigerator at once, keep food organized so it is
easy to find, and close the door as soon as the food is
removed. (When the door is opened, humidity from the
room air enters the refrigerator. The more often the door is
opened, the faster humidity builds up, especially when the
room itself is very humid.)
It is normal for moisture to build up inside the refrigerator
when the room air is humid.
Check if ...
The door(s) are opened often.
A large amount of food has just been added to
the refrigerator or freezer.
The controls are not set correctly for the surrounding
conditions.
Then ...
Be aware that the refrigerator will warm when this occurs.
In order to keep the refrigerator cool, try to get everything
you need out of the refrigerator at once, keep food
organized so it is easy to find, and close the door as soon
as the food is removed.
Adding a large amount of food warms the refrigerator.
It can take several hours for the refrigerator to return to the
normal temperature.
Refer to the “How controls work” section.
Page 27
27
The doors will not close completely
Check if ...
Food packages are blocking the door open.
The ice bin is out of position.
The pans, shelves, bins, or baskets are out
of position.
The gaskets are dirty.
The doors were removed during product installation
and not properly replaced.
Then ...
Rearrange containers so that they fit more tightly and take
up less space.
Push the ice bin in all the way.
Put all pans, shelves, bins, and baskets back into their
correct position.
Clean gaskets according to the directions in the “Caring for
Your Refrigerator” section.
The doors are difficult to open
Check if ...
The gaskets are dirty or sticky.
Then ...
Clean gaskets according to the directions in the “Caring
for Your Refrigerator” section.
There is interior moisture build-up (cont.)
Check if ...
The food is not packaged correctly.
The controls are not set correctly for the
surrounding conditions.
A self-defrost cycle was completed.
Then ...
Check that all food is securely wrapped. If necessary,
repackage food according to the guidelines in the “Food
Storage Guide” section. Wipe off damp food containers
before placing in the refrigerator.
Refer to the “Setting temperature controls” section.
It is normal for droplets to form on the back wall after the
refrigerator self-defrosts.
Remove and replace the doors or, contact a qualified
person.
Page 28
28
Call the KitchenAid Customer Interaction
Center toll-free at 1-800-235-0665.
Our consultants are available to assist you.
When calling: Please know the purchase date, and the
complete model and serial number of
your appliance (see the “A Note to You”
section). This information will help us
better respond to your request.
Our consultants provide assistance with:
•
Features and specifications on our full line
of appliances
•
Installation information
If you need replacement parts
If you need to order replacement parts, we recommend
that you only use factory-authorized parts. These parts
will fit right and work right, because they are made to
the same exacting specifications used to build every
new KitchenAid®appliance.
To locate factory-authorized parts in your area, call our
Customer Interaction Center telephone number, your
nearest authorized service center, or KitchenAid
Factory Service at 1-800-442-1111.
Base grille water filter
cartridges:
Standard Cartridge - order part number 4392857 (L500)
Cyst Cartridge - order part number 4392922 (LC400)
For further assistance
If you need further assistance, you can write to
KitchenAid with any questions or concerns at:
KitchenAid Brand Home Appliances
Customer Interaction Center
c/o Correspondence Dept.
2000 North M-63
Benton Harbor, MI 49022-2692
Please include a daytime phone number in your
correspondence.
•
Use and maintenance procedures
•
Accessory and repair parts sales
•
Specialized customer assistance (Spanish speaking,
hearing impaired, limited vision, etc.)
•
Referrals to local dealers, service companies, and
repair parts distributors
KitchenAid designated service technicians are
trained to fulfill the product warranty and provide afterwarranty service, anywhere in the United States.
To locate the designated KitchenAid service company
in your area, you can also look in your telephone
directory Yellow Pages.
To avoid unnecessary service calls, please
check the “Troubleshooting Guide” section. It
may save you the cost of a service call. If you
still need help, follow the instructions below.
If you need assistance or service in U.S.A.
R
EQUESTING
A
SSISTANCE OR
S
ERVICE
Page 29

29
R
EQUESTING
A
SSISTANCE OR
S
ERVICE
2. If you need service✝...
Contact your nearest KitchenAid Canada Appliance
Service branch or authorized servicing outlet to
service your appliance. (See list below.)
Make sure the service company you contact is
authorized to service your appliance during the
warranty period.
1. If the problem is not due to one of the items
listed in “Troubleshooting Guide”
✝
...
Contact the dealer from whom you
purchased your appliance, or call the
KitchenAid Canada Customer Interaction
Centre toll-free, 8:30 a.m. – 6 p.m. (EST),
at 1-800-235-0665.
KitchenAid Canada Appliance Service – Consumer Services
Direct service branches:
BRITISH COLUMBIA 1-800-665-6788
ALBERTA 1-800-661-6291
ONTARIO Ottawa area 1-800-267-3456
(except 807 area code) Outside the Ottawa area 1-800-807-6777
MANITOBA,SASKATCHEWAN 1-800-665-1683
and 807 area code in ONTARIO
QUEBEC Montreal (except South Shore) 1-800-361-3032
South Shore Montreal 1-800-361-0950
Quebec City 1-800-463-1523
Sherbrooke 1-800-567-6966
ATLANTIC PROVINCES 1-800-565-1598
For further assistance
If you need further assistance, you can write to
KitchenAid Canada with any questions or concerns at:
Consumer Relations Department
KitchenAid Canada
1901 Minnesota Court
Mississauga, Ontario L5N 3A7
Please include a daytime phone number in your
correspondence.
✝
When asking for assistance or service, please
provide a detailed description of the problem,
your appliance’s complete model and serial
numbers, and the purchase date. (See the “A
Note to You” section.) This information will help
us respond properly to your request.
Before calling for assistance or service, please
check the “Troubleshooting Guide” section. It may
save you the cost of a service call. If you still need
help, follow the instructions below.
If you need assistance or service in Canada
Page 30

KITCHENAID AND KITCHENAID CANADA DO NOT ASSUME ANY RESPONSIBILITY FOR INCIDENTAL OR
CONSEQUENTIAL DAMAGES. Some states or provinces do not allow the exclusion or limitation of incidental or
consequential damages, so this exclusion or limitation may not apply to you.
This warranty gives you specific legal rights, and you may also have other rights which may vary from state to
state or province to province.
Outside the United States and Canada, a different warranty may apply. For details, please contact your
authorized KitchenAid dealer.
If you need service, first see the “Troubleshooting Guide” section of this book. After checking the “Troubleshooting
Guide,” additional help can be found by checking the “Requesting Assistance or Service” section or by calling our
Consumer Assistance Center, 1-800-235-0665 (toll-free), from anywhere in the U.S.A. or Canada.
LENGTH OF
WARRANTY:
ONE YEAR FULL
WARRANTY
FROM DATE OF
INSTALLATION
TWO YEAR FULL
WARRANTY
FROM DATE OF
INSTALLATION
KITCHENAID
WILL NOT PAY FOR:
A. Service calls to:
1. Correct the installation of the refrigerator.
2. Instruct you how to use the refrigerator.
3. Replace house fuses or correct house
wiring.
4. Replace house plumbing.
B. Repairs when refrigerator is used in other
than normal home use.
C. Damage resulting from accident, alteration,
misuse, abuse, improper installation, or
installation not in accordance with local
electrical codes or plumbing codes.
D. Any food loss due to product failure.
E. Any labor costs during the limited
warranty.
F. Replacement parts or repair labor costs for
units operated outside the United States or
Canada.
G. Repairs to parts or systems resulting from
unauthorized modifications made to the
appliance.
H. Removal and replacement of trim or
decorative panels that interfere with
servicing the product.
I. Labor or parts installed by any non-
designated service company during the
full warranty period, unless approved by
KitchenAid before service is performed.
J. Any medicine loss due to product failure.
KITCHENAID
WILL PAY FOR:
Replacement parts and labor costs to
correct defects in light bulbs. Service must
be provided by a designated KitchenAid
servicing outlet.
Replacement parts and repair labor costs
to correct defects in materials or workmanship. Service must be provided by a
designated KitchenAid servicing outlet.
Replacement parts and repair labor costs
to correct defects in materials or
workmanship in the sealed refrigeration
system.
These parts are:
1. Compressor; 2. Evaporator;
3. Condenser; 4. Drier;
5. Connecting Tubing.
Service must be provided by a designated
KitchenAid servicing outlet.
Replacement parts to correct defects in
materials or workmanship in the sealed
refrigeration system.
These parts are:
1. Compressor; 2. Evaporator;
3. Condenser; 4. Drier;
5. Connecting Tubing.
Replacement parts to correct defects in
materials of workmanship in the
refrigerator door bins.
11/99
Built-In Refrigerator Warranty
THIRD THROUGH
SIXTH YEAR FULL
WARRANTY
FROM DATE OF
INSTALLATION
SEVENTH THROUGH
TWELFTH YEAR
LIMITED
WARRANTY
FROM DATE OF
INSTALLATION
LIFETIME LIMITED
WARRANTY ON
REFRIGERATOR
DOOR BINS
®
30
Page 31

31
WATER FILTER CERTIFICATES
Page 32

Base Grille Water Filtration System Model WF-L500/L500
Capacity:
500 Gallons (1893 Liters)
Service Flow Rate:
0.5 GPM (1.89 L/min.) @ 60 psi.
■
It is essential that operational, maintenance, and filter
replacement requirements be carried out for the product to
perform as advertised.
■
■
Model WF-NL500
The filter monitor system measures the
amount of water that passes through the filter and alerts you
to replace the filter. When 90% of the filter’s rated life is used,
the filter indicator light changes from green to yellow. When
100% of the filter’s rated life is used, the filter indicator light
changes from yellow to red, and it is recommended that you
replace the filter. Use replacement cartridge L500, part#
4392857. 2000 Suggested retail price of $29.95 U.S.A./
$39.95 Canada.
■
The product is for cold water use only.
■
Do not use with water that is microbiologically unsafe or of
unknown quality without adequate disinfection before or after
the system.
■
Refer to the “Assistance or Service” section for the
Manufacturer’s name, address and telephone number.
■
Refer to the “Warranty” section for the Manufacturer’s limited
warranty.
Application Guidelines/Water Supply Parameters
†
Te
*Test requirement is at least 100,000 particles/ml of AC Fine Test Dust. **Cyst performance is % reduction based on NSF Standard 53. ***Test
requirement is 0.15 mg/L ± 10%. These contaminants are not necessarily in your water supply. Performance may vary based on local water conditions.
st requirement is 0.15 mg/L ± 10%.
††
These contaminants are not necessarily in your water supply. Performance may vary based on local water conditions.
®
NSF is a registered trademark of NSF International.
Substance
Reduction
Average
Influent
Maximum
Effluent
Average
Effluent
Minimum %
Reduction
Average %
Reduction
NSF Test
Number
Chlorine, Taste/Odor 2.0 mg/L N/A 0.1 mg/L N/A 95% 981788
Contaminant
Reduction
Performance
††
U.S. EPA
MCL
Average
Influent
Maximum
Effluent
Average
Effluent
Minimum%
Reduction
Average%
Reduction
NSF Test
Number
Lead: @ pH 6.5
Lead: @ pH 8.5
0.015 mg/L
0.015 mg/L
0.16 mg/L
†
0.14 mg/L
†
0.007 mg/L
0.012 mg/L
0.005 mg/L
0.008 mg/L
95%
91%
97%
94%
976115
976116
Tested and certified by NSF International against ANSI/NSF
Standard 42 for the reduction of Chlorine (Class I) Taste and Odor
and against ANSI/NSF Standard 53 for the reduction of Lead.
Water Supply
Water Pressure
Water Temperature
City or Well
30 - 120 psi (207 - 827 kPa)
33° - 100°F (0.6° - 37.8° C)
Base Grille Water Filtration System Model WF-LC400/LC400
Capacity:
400 Gallons (1514 Liters)
Service Flow Rate:
0.5 GPM (1.89 L/min.) @ 60 psi.
Substance Reduction
Aesthetic Effects
Chlorine Taste/Odor
Particulate
U.S. EPA
MCL
N/A
N/A
Average
Influent
2.0 mg/L
610,000/mL*
Maximum
Effluent
N/A
N/A
Average
Effluent
0.04 mg/L
154/mL
Minimum %
Reduction
N/A
N/A
Average %
Reduction
98%
99%
NSF Test
Number
994707
994711
Contaminant
Reduction
U.S. EPA
MCL
Average
Influent
Maximum
Effluent
Average
Effluent
Minimum %
Reduction
Average %
Reduction
NSF Test
Number
Cyst
Turb id it y
99.95%**
0.5 NTU
89,250/mL*
29 NTU
6/mL
0.12 NTU
2.3/mL
0.09 NTU
99.993%
99.59%
99.997%
99.69%
994710
994710
Lead
: @ pH 6.5
Lead
: @ pH 8.5
0.015 mg/L
0.015 mg/L
0.16 mg/L***
0.16 mg/L***
0.001mg/L
0.002 mg/L
0.001 mg/L
0.001 mg/L
99.4%
98.8%
99.4%
99.4%
994708
994709
Tested and certified by NSF International against ANSI/NSF Standard
42 for the reduction of Chlorine (Class I) Taste and Odor and against
ANSI/NSF Standard 53 for the reduction of Lead, Cysts and Turbidity.
Model WF-LC400
The filter monitor system measures the
amount of water that passes through the filter and alerts you
to replace the filter. When 90% of the filter’s rated life is used,
the filter indicator light changes from green to yellow. When
100% of the filter’s rated life is used, the filter indicator light
changes from yellow to red, and it is recommended that you
replace the filter. Use replacement cartridge LC400,
part# 9902. 2000 suggested retail price of $39.95 U.S.A./
$49.95 Canada.
PRODUCT DATA SHEETS
9/00
Printed in U.S.A.
PART NO. 2209477
© 2000 KitchenAid
® Registered trademark/TMtrademark of KitchenAid, U.S.A., KitchenAid Canada licensee in Canada
Page 33

2209477 www.kitchenaid.com
RÉFRIGÉRATEURS ENCASTRÉS côte à
côte de 91,4
cm (36 po), 106,7 cm (42 po),
121,9
cm (48 po) avec FILTRATION D’EAU
BIEN PENSé, BIEN fabriqué
®
®
Page 34

2
N
OTE À L’UTILISATEUR
Merci d’avoir acheté un appareil
électroménager KitchenAid
®
.
KitchenAid conçoit les meilleurs appareils pour la pièce la
plus importante de votre domicile. Pour que ce produit
puisse vous procurer de nombreuses années de service
sans problème, nous avons préparé ce guide d’utilisation
et d’entretien.Vous y trouverez de nombreux
renseignements sur les méthodes d’entretien convenables
et sur l’utilisation en sécurité de votre nouvel appareil.
Veuillez les lire attentivement.
Veuillez aussi remplir et retourner la carte d’inscription
du produit, fournie avec votre appareil. Cette carte nous
aidera à vous tenir au courant de tout nouveau
renseignement au sujet de votre appareil électroménager.
Page
Note à l’utilisateur .......................................................... 2
Sécurité du réfrigérateur ............................................... 3
Mise au rebut appropriée de votre
vieux réfrigérateur....................................................... 3
Pièces et caractéristiques ............................................. 4
Utilisation du réfrigérateur ............................................ 5
Retrait du panneau de ventilation supérieur............... 5
Utilisation du commutateur On/Off (marche/arrêt) ..... 5
Système de gestion de la température
ExtendFresh
MC
............................................................. 6
Réglage des commandes de température ................. 6
Caractéristiques du réfrigérateur ................................ 7
Compartiment range-tout..................................... 7
Balconnets réglables de la porte ......................... 7
Tablettes en verre du réfrigérateur SpillCleanMC.. 7
Bac à viande FreshChillMC.................................... 8
Bacs à légumes à humidité
contrôlée ClearVueMC............................................ 9
Oeufrier avec couvercle.......................................10
Casier à vin..........................................................10
Caractéristiques du congélateur .................................10
Clayettes du congélateur......................................10
Paniers coulissants du congélateur.....................10
Page
Utilisation de la machine à
glaçons automatique ............................................11
Solutions aux problèmes de fonctionnement
de la machine à glaçons......................................11
Retrait du bac de la machine à glaçons..............12
Utilisation des distributeurs d’eau froide
et de glaçons .......................................................13
Système de filtration d’eau et de surveillance............15
Grille de la base.......................................................... 16
Plateau de dégivrage...................................................17
Ampoules ....................................................................17
Les bruits de l’appareil................................................ 18
Économie d’énergie ....................................................18
Entretien du réfrigérateur..............................................19
Nettoyage du réfrigérateur..........................................19
Entretien avant les vacances ou lors
d’un déménagement ...................................................20
Pannes de courant......................................................20
Guide de conservation des aliments............................21
Conservation des aliments frais ..................................21
Conservation des aliments congelés..........................22
Guide de dépannage ........................................................23
Demande d’assistance ou de service ..........................28
Garantie...........................................................................30
T
ABLE DES MATIÈRES
Inscrivez ces renseignements concernant votre
modèle.
Veuillez inscrire les renseignements suivants au sujet de votre
réfrigérateur pour nous permettre de mieux vous aider à obtenir
une assistance ou un service si vous en avez besoin.Vous devrez
connaître le numéro au complet du modèle et le numéro de série.
Ces renseignements sont indiqués sur la plaque
signalétique/étiquette indiquant les numéros de modèle et de série.
Si vous avez besoin d’assistance ou de service, voir la section
« Dépannage » de ce livret. Après cette consultation, une autre
aide peut être obtenue en vérifiant la section « Demande
d’assistance ou de service ».
Nom du marchand
Adresse
Numéro de téléphone
Numéro de modèle
Numéro de série
Date d’achat
(Voir la section « Pièces et caractéristiques » pour l’emplacement
de la plaque signalétique des numéros de modèle et de série.)
Conservez ce livret et votre reçu de vente pour
référence ultérieure.
Page 35

3
•
Brancher l’appareil sur une prise à 3 alvéoles reliée à la
terre.
•
Ne pas enlever la broche de liaison à la terre.
•
Ne pas utiliser un adaptateur.
•
Ne pas utiliser un câble de rallonge.
•
Débrancher la source de courant électrique avant
l’entretien.
•
Enlever les portes de votre vieux réfrigérateur.
•
Utiliser un produit de nettoyage ininflammable
seulement.
•
Ne pas installer le réfrigérateur près d’un four, radiateur,
ou autre source de chaleur.
•
Garder les matériaux et les vapeurs inflammables, telle
que l’essence, loin du réfrigérateur.
•
Deux personnes ou plus doivent déplacer et installer le
réfrigérateur.
•
Débrancher le réfrigérateur avant l’installation de la
machine à glaçons.
•
Utiliser un verre robuste pour prendre des glaçons
ou de l’eau (sur certains modèles).
IMPORTANTES INSTRUCTIONS DE SÉCURITÉ
Risque possible de décès ou de blessure grave si vous ne
suivez pas les instructions.
D ANGER
AVERTISSEMENT
Votre sécurité et celle des autres est très importante .
Nous donnons de nombreux messages de sécurité importants dans ce manuel et sur votre appareil ménager. Assurez-vous de
toujours lire tous les messages de sécurité et de vous y conformer.
Voici le symbole d’alerte de sécurité.
Ce symbole d’alerte de sécurité vous signale les dangers potentiels de décès et de blessures graves à vous et à d’autres.
Tous les messages de sécurité suivront le symbole d’alerte de sécurité et le mot «DANGER» ou «AVERTISSEMENT». Ces mots signifient :
Tous les messages de sécurité vous diront quel est le danger potentiel et vous disent comment réduire le risque de blessure et ce qui peut se
produire en cas de non-respect des instructions.
Risque possible de décès ou de blessure grave si vous ne
suivez pas immédiatement
les instructions.
S
ÉCURITÉ DU RÉFRIGÉRATEUR
Risque de suffoquer
Enlever les portes de votre vieux réfrigérateur.
Le non-respect de cette instruction peut causer un
décès ou des lésions cérébrales.
Mise au rebut appropriée de votre vieux réfrigérateur
IMPORTANT : Les enfants qui s’enferment ou qui suffoquent
dans un réfrigérateur ne sont pas d’anciens problèmes. Les
réfrigérateurs abandonnés ou mis au rebut présentent des
dangers même s’ils sont laissés abandonnés « pendant
quelques jours » seulement. Si vous vous débarrassez de
votre vieux réfrigérateur, veuillez observer les instructions
suivantes pour aider à éviter les accidents.
AVANT DE METTRE AU REBUT VOTRE VIEUX
RÉFRIGÉRATEUR :
•
Enlever les portes.
•
Laisser les tablettes en place de sorte que les enfants ne
peuvent pas facilement se glisser à l’intérieur.
AVERTISSEMENT
– CONSERVEZ CES INSTRUCTIONS –
AVERTISSEMENT : Pour réduire les risques d’incendie, de choc électrique ou de blessures lors de
l’utilisation du réfrigérateur, prendre quelques précautions fondamentales, y compris les suivantes :
Page 36

4
Cette section présente une illustration descriptive de votre
réfrigérateur.Veuillez utiliser ces renseignements pour bien
connaître les pièces et les caractéristiques. Les références
de page sont incluses pour vous accommoder.
REMARQUE : Ce manuel couvre plusieurs modèles
différents.Le réfrigérateur que vous avez acheté peut avoir
certaines ou toutes les caractéristiques indiquées cidessous.
P
IÈCES ET CARACTÉRISTIQUES
24
51
Cold Colder
▲
Superba 48
24
51
Cold Colder
Off
▲
Cold Colder
FreshChill
Meat Locker
ExtendFresh Temperature System
▲
Machine à glaçons
automatique
(p.11)
Balconnet fixe de la
porte
Bac à glaçons
(p.12)
Ampoule du congélateur
(sous le bac à glaçons)
(p.17)
Étiquette signalétique
des numéros de modèle
et de série (p.2)
Distributeur d’eau et de
glaçons (sur certains
modèles)
(p.13)
Clayette réglable du
congélateur
(p.10)
Clayettes fixes du
congélateur
(p.10)
Paniers coulissants du
congélateur
(p.10)
Compartiment
range-tout
(p.7)
Clayette en verre
réglable
SpillClean*
(p.7)
Balconnets réglables
de la porte
(p.7)
Oeufrier avec couverde
(p.10)
Casier à vin
(p.10)
Balconnet dans la
porte pour remiser
les gallons
(p.7)
Thermostat du bac à
viande FreshChill*
(p.8)
Bac à viande coulissant
réglable FreshChill*
(p.8)
Bac à légumes
coulissant à humidité
contrôlée ClearVue*
(p.9)
Ampoule du congélateur
(derrière le panneau de
commandes)
(p.17)
Thermostat du
congélateur
(p.6)
Panneau de
ventilation
supérieur
(p.5)
Interrupteur
(derrière le
panneau de
ventilation
supérieur)
(p.5)
Thermostat du
réfrigérateur
(p.6)
Ampoule du réfrigérateur
(derrière le panneau de
commandes)
(p.17)
Témoin lumineux
du filtre d’eau
(p.15)
Tube d’alimentation en
eau du distributeur
électrique
(derrière la grille
de la base)
Plateau de
dégivrage
(derrière la grille
de la base)
(p.17)
Soupape d’eau
(derrière la
grille de la
base)
Grille de
la base
(p.16)
Système de
filtration d’eau
et de
surveillance
(p.15)
Page 37

5
Risque de choc électrique
Brancher sur une prise à 3 alvéoles reliée à la
terre.
Ne pas enlever la broche de liaison à la terre.
Ne pas utiliser un adaptateur.
Ne pas utiliser un câble de rallonge.
Le non-respect de ces instructions peut causer
un décès, un incendie ou un choc électrique.
Pour obtenir le meilleur rendement du réfrigérateur, il est
important de l’utiliser convenablement. On décrit dans
cette section les méthodes de réglage de la température,
comment effectuer le réglage de certaines fonctions du
réfrigérateur, et comment économiser l’énergie.
Risque d’explosion
Garder les matériaux et les vapeurs inflammables
telle que l’essence, loin du réfrigérateur.
Le non-respect de cette instruction peut causer
un décès, une explosion, ou un incendie .
AVERTISSEMENT
U
TILISATION DU RÉFRIGÉRATEUR
AVERTISSEMENT
Modèles à panneau —
Pour le retirer :
1. Saisir les deux extrémités du panneau
2. Pousser vers le haut et retirer.
Pour le replacer :
1. Insérer les crochets (situés à l’arrière du panneau de ventilation) dans
les fentes du support.
2. Tirer le panneau légèrement vers le bas jusqu’à ce qu’il tombe bien
en place.
Modèles à panneau métallique enveloppant —
KSSC36F, KSSC42F , KSSC48F
Pour le retirer :
1. Saisir les deux extrémités du panneau de ventilation.
2. Pousser directement vers le haut, ensuite le retirer.
Pour le replacer :
1. Insérer les crochets (situés à l’arrière du panneau de ventilation) dans
les fentes de la garniture latérale.
2. Abaisser légèrement le panneau de ventilation jusqu’à ce qu’il tombe
bien en place.
Retrait du panneau de ventilation supérieur
O
FF
O
N
Utilisation de l’interrupteur
L’interrupteur se trouve derrière le panneau de ventilation supérieur.On l’utilise
pour arrêter le courant du réfrigérateur avant le nettoyage de l’appareil ou le
remplacement d’une ampoule électrique.
Pour arrêter le courant :
1. Retirer le panneau de ventilation supérieur.
2. Régler l’interrupteur en position «OFF» (arrét).
Pour remettre le courant :
1. Régler l’interrupteur en position «ON» (en marche).
2. Replacer le panneau de ventilation supérieur.
IMPORTANT : S’assurer que l’interrupteur est en position «ON» (en marche)
après le nettoyage du réfrigérateur ou le remplacement d’une ampoule
électrique.
Page 38

6
Système de gestion de la température EXTENDFRESH™
Le système de gestion de la température ExtendFresh
contrôle la température indépendamment dans le
compartiment de congélation et dans le compar timent de
réfrigération. Le système aide à prolonger la fraîcheur des
aliments dans le réfrigérateur en réagissant à des
variations de température aussi faibles que 1°F. À la
différence de la plupart des réfrigérateurs qu’on trouve
aujourd’hui sur le marché, le système ExtendFresh de ce
réfrigérateur utilise un ventilateur spécial Smart* Fan pour
faire passer immédiatement de l’air froid du congélateur
au réfrigérateur pour produire un abaissement de la
température plus rapide, sans qu’une mise en marche du
compresseur soit nécessaire. De même, le système
maintient une température constante qui est moins
affectée par les variations de la température extérieure,
comme celles imputables aux variations saisonnières et
au thermostat programmable, ou même par les variations
de température dans d’autres compartiments à l’intérieur
du réfrigérateur.
Réglage des commandes de température
Les commandes de température du réfrigérateur et du
congélateur ont été préréglées à l’usine. Ces réglages
devraient être appropriés pour l’usage normal d’un
réfrigérateur ménager.Laisser au réfrigérateur le temps
d’atteindre la température préréglée (environ 24 heures)
avant de changer la position de réglage.
Pour changer le réglage de la température :
Régler le thermostat du réfrigérateur et/ou du
congélateur.
• Pour faire baisser la température, tourner la commande
dans le sens des aiguilles d’une montre.
• Pour faire monter la température, tourner la commande
dans le sens inverse.
IMPORTANT : Le réglage Off (arrêt) arrête toute action
refroidissante mais ne débranche pas le réfrigérateur de
la source de courant.
Si c’est possible, laisser s’écouler une période de 24
heures avant de placer des aliments dans le réfrigérateur.
Le réfrigérateur ne se refroidira pas plus vite si on choisit
une position de réglage plus élevée. Si on introduit des
aliments dans le réfrigérateur avant qu’il se soit
complètement refroidi, il lui faudra plus de temps pour
atteindre la température désirée, et certains de ces
aliments pourraient se détériorer.
Après 24 heures, ajuster la température progressivement
jusqu’au niveau désiré, en modifiant la position de
réglage de la commande par intervalle d’une unité. La
position «1» correspond à la température la plus élevée;
la position «5» correspond à la température la plus basse.
Après chaque ajustement du réglage, laisser le
réfrigérateur fonctionner pendant 24 heures.
Cold Colder
Off
24
51
▲
Cold Colder
Off
24
51
▲
Thermostat du réfrigérateur
(froid)
(Plus froid)
(froid)
(Plus froid)
Thermostat du congélateur
Page 39

7
Caractéristiques du réfrigérateur
Compartiment range-tout
Le compartiment range-tout peut être placé n’importe où dans la porte du
réfrigérateur.
Pour le retirer :
1. Prendre le compartiment par les deux extrémités.
2. Lever et tirer.
Pour le replacer :
1. Insérer les crochets du compartiment dans les crans de crémaillère situés
de chaque côté de la porte.
2. Pousser vers le bas pour mettre en place .
Balconnets réglables de la porte
Les balconnets de la porte peuvent recevoir des bouteilles de deux litres et être
placés n’importe où dans la porte du réfrigérateur.
Pour le retirer :
1. Saisir le balconnet.
2. Lever et tirer.
Pour le replacer :
1. Insérer les crochets du balconnet dans les crans de crémaillère situés de
chaque côté de la porte.
2. Pousser vers le bas pour mettre en place.
Balconnet dans la porte pour gallons
Le balconnet dans la porte peut contenir plusieurs récipients de un gallon
et peut être placé à n’importe quelle position dans la por te du
réfrigérateur.
Remarque : Si on place le balconnet dans la por te pour gallons
directement en face d’une tablette intérieure ou d’un bac avec couvercle,
on empêchera la porte du réfrigérateur de fermer, ce qui pourrait
endommager les bacs et les tablettes.
Installation :
1.
Insérer les crochets de retenue dans les fentes appropriées sur la porte.
2. Abaisser le balconnet pour fixer les crochets.
3. Si nécessaire, ajuster les tablettes intérieures pour recevoir les
contenants de lait et grands contenants de boisson placés dans le
balconnet dans la porte pour gallons.
Tablettes en verre du réfrigérateur
SpillClean™
Ajuster la position des tablettes dans le réfrigérateur en fonction des besoins.
IMPORTANT : Ne pas nettoyer les tablettes en verre dans l’eau tiède
quand elles sont froides. Les tablettes peuvent casser si elles sont
exposées à des changeménts de température soudains ou à un impact.
Pour votre protection, le verre trempé est conçu pour éclater en
d’innombrables petits morceaux. Ceci est nor mal.
Pour enlever les tablettes :
1. Soulever la tablette à l’avant et à l’arrière.
2. Tirer la tablette en ligne droite pour l’extraire du réfrigérateur.
IMPORTANT : Les tablettes en verre sont lourdes.Les manipuler prudement.
Pour remettre en place les tablettes :
1. Guider les crochets arrière de la tablette dans les ouvertures d’appui
sur la paroi arrière du réfrigérateur.
2. Soulever la tablette à l’avant pour que les crochets puissent descendre dans
les ouvertures. Abaisser l’avant pour placer la tablette horizontalement.
3. Contrôler la stabilité de la tablette pour vérifier que les crochets ont été
convenablement insérés.
ÉVITER
tablette
balconnet
Page 40

8
Bac à viande FreshChill™
Réglage du thermostat du bac à viande
FreshChill™
Le thermostat du bac à viande FreshChill permet de
régler la température de rangement du bac à viande
FreshChill.
L’air froid circule dans le bac à viande FreshChill par une
conduite d’air qui relie le congélateur au réfrigérateur.Le
réglage de la température permet à plus ou moins d’air
de passer par l’ouverture. Régler le thermostat à «Cold»
pour fermer le conduit d’air.
IMPORTANT : Si un aliment gèle dans le bac à viande
FreshChill, le compartiment range-tout ou le bac à
légumes, tourner le réglage de la température du bac à
viande FreshChill à «Cold» (Froid).Si le distributeur d’eau
cesse de fonctionner, l’eau dans le conduit peut être
gelée. Dans ces cas, tourner le réglage de la température
du bac à viande FreshChill à «Cold» (Froid).
Le bac à viande FreshChill a été conçu pour permettre de
ranger les aliments à des températures plus basses que
la température moyenne du réfrigérateur. On peut placer
le réceptacle du bac à viande dans n’importe quelle série
de crans à crémaillère. Par contre, pour un usage à
température contrôlée, il faut que le bac à viande soit
installé dans l’avant-dernière rangée de crans, en
partant du bas. Le bac à viande FreshChillMCpeut être
retiré pour le nettoyage.
IMPORTANT : Si le bac à viande est installé dans
n’importe quelle rangée de crans autre que l’avantdernière rangée de crans en partant du bas, boucher
l’orifice d’alimentation d’air.À cette fin, un bouchon est
collé à l’aide d’un ruban adhésif au fond du bac à viande.
Le raccord à air en caoutchouc (placé derrière le bac à
viande) dirige l’air provenant des trous de l’alimentation
en air dans le bac à viande. Si le raccord d’air se
détache, le remettre en le poussant dans l’ouverture
carrée au dos du bac à viande.
Pour le retirer :
1. Faire glisser le bac à viande vers l’extérieur jusqu’à la
butée.
2. Soulever légèrement l’avant du bac à viande.
3. Tirer le bac à viande complètement vers l’extérieur.
Pour le replacer :
1. Positionner les roulettes du bac à viande entre la
roulette avant du rail et le rail.
2. Pousser vers le haut et sur le rail.
3. Faire glisser vers l’arrière jusqu’à la butée.
M
E
A
T
L
O
C
K
E
R
(Bac à viande)
(Plus froid)(Froid)
Page 41

9
U
T
IL
IT
Y
L
O
W
H
I
G
H
1
2
3
4
5
H
um
id
ityC
o
n
tro
l
L
O
W
H
I
G
H
1
2
3
4
5
H
u
m
id
ity
C
o
n
tro
l
Bacs à légumes à humidité contrôlée
ClearVue™
Les bacs à légumes à température contrôlée permettent de
maximiser la conservation des légumes et fruits frais.Les
commandes des bacs à légumes sont placées sous le bord
avant des bacs.Ces organes de commande permettent
d’ajuster le niveau hygrométrique dans les bacs.Placer les
commandes à la position HIGH pour la conservation de laitue,
chou et autres légumes à feuilles.Placer les commandes à la
position LOW pour la conservation de pommes, maïs et
autres produits frais qui comportent une pelure.
Les bacs à l'humidité contrôlée sont interchangeables.La
section ClearV ue transparente vous permet de voir à l'intérieur
des bacs à légumes sans les ouvrir.
IMPORTANT : À l’occasion, un aliment peut geler dans le bac
à viande FreshChill, le compartiment range-tout ou le bac à
légumes.Quand ceci ce produit, tourner le réglage de la
température du bac à viande FreshChill à «Cold» (Froid).
Pour retirer les bacs à légumes :
1. Tirer le bac jusqu’à la butée.
2. Soulever le devant du bac et le tirer complètement.
Pour replacer les bacs :
1. Placer en position les roulettes du bac entre la roulette
avant du rail et le rail.
2. Pousser le bac vers le haut et sur le rail.
3. Glisser le bac vers l’arrière jusqu’à l’arrêt.
Pour retirer les couvercles en verre :
1. Soulever le côté droit du couvercle en v erre pour dégager
le dispositif de retenue et le côté gauche du couvercle.
2. Retirer soigneusement le couvercle en verre.
Pour replacer les couvercles en verre :
1. Placer le dispositif de retenue sur le côté droit du couvercle
en verre.
2. Insérer le côté gauche du couvercle en verre dans la
rainure à la gauche du bac.
3. Abaisser le couvercle de façon à ce que les tiges du
dispositif de retenue tombent en place dans les trous à la
droite du bac
Pour retirer la section ClearVue :
1. Retirer le couvercle en verre.
2. Faire glisser la section ClearVue le long du rail, à l’écart de
la pièce de retenue.
3. Replacer dans l’ordre inverse.
Page 42

10
Oeufrier avec couvercle
L’oeufrier avec couvercle fournit une protection
supplémentaire pour garder les oeufs n’importe où à
l’intérieur de la section du réfrigérateur. Le contenant
ClearVueMCvous permet de voir combien d’oeufs vous
avez en réserve.
Casier à vin
Introduire le casier à vin en position en le glissant entre
une tablette du réfrigérateur et la paroi du compartiment
de réfrigération.
Caractéristiques du
congélateur
Clayettes du congélateur
Pour les retirer :
1. Soulever la clayette.
2. Tirer la clayette vers l’extérieur.
3. Replacer dans l’ordre inverse.
Paniers coulissants du congélateur
Pour les retirer :
1. Tirer le panier vers l’extérieur jusqu’à la butée.
2. Soulever légèrement le panier et le déplacer vers la
gauche.
3. Tirer le panier vers l’avant pour le sortir.
Pour les replacer :
1. Mettre le panier dans les rails de l’étagère et le
déplacer vers la gauche.
2. Pousser le panier jusqu’à la butée du côté gauche.
3. Soulever légèrement le côté gauche du panier pour
franchir la butée.
4. Pousser le panier vers l’intérieur.
IMPORTANT : S’assurer que les deux côtés du panier
sont dans les rails de l’étagère, avant d’y placer des
aliments.
Remarque : Le balconnet fixe dans la por te ne peut pas
être enlevé.
Page 43

11
Utilisation de la machine à glaçons
automatique
Pour mettre la machine à glaçons en marche :
• Pour les modèles avec distributeur seulement : Tirer
le couvercle de la machine à glaçons et le glisser vers
l’arrière.
• Abaisser le levier de la machine à glaçons en position
«EN MARCHE».
La machine à glaçons se remplit d’eau et commence à
former des glaçons. Prévoir 24 heures pour la production
de la première quantité de glaçons. La machine à glaçons
devrait produire 7 à 9 quantités de glaçons par période de
24 heures dans des conditions normales. Jeter les trois
premières quantités de glaçons. Après avoir été formés,
les glaçons tombent dans le bac à glaçons. Lorsque le bac
est plein, le levier de la machine à glaçons se soulève à la
position «ARRÊT» (levier relevé).
Pour arrêter la machine à glaçons :
• Soulever le levier de la machine à glaçons pour qu’il
s’enclenche en position «ARRÊT».
• Ne pas forcer le levier vers le bas ou vers le haut. Ne
rien ranger sur le dessus de la machine à glaçons ou
dans le bac à glaçons.
Levier de commande
En
marche
Arrêt
Solutions aux problèmes de fonctionnement de la machine à glaçons
CAUSE/SOLUTION POSSIBLE
C’est normal. Ils se séparent facilement. Agiter le bac occasionnellement pour
séparer les glaçons.
Le levier MARCHE/ARRÊT est à la position ARRÊT (soulevé). Abaisser le levier à la
position MARCHE (abaissé).
Le congélateur n’est pas assez froid. Régler d’abord les commandes et attendre au
moins 24 heures.Voir page 6.Le tube en cuivre est déformé.Vérifier le conduit d’eau.
On peut observer une coloration de la glace ou noter la présence d’un mauvais goût,
après l’exécution de nouveaux raccordements de plomberie. Jeter la glace et en faire
d’autre.
Les glaçons sont trop vieux. Les jeter et en faire d’autres.
Emballage incorrect des aliments dans le congélateur.Voir page 20.
Nettoyage nécessaire du bac à glaçons et du congélateur. Voir page 17.
L’eau peut contenir des minéraux (comme le soufre). Un filtre peut être requis pour
les enlever.
Il n’y a pas d’eau dans le réservoir.Appuyer sur le levier de distribution d’eau et le
tenir pendant quelques minutes. Le réser voir se remplit lorsque l’eau coule.
PROBLÈME
Les glaçons en demi-lune
sont collés
Fabrication lente des
glaçons ou la machine à
glaçons ne fonctionne pas
Arrière-goût ou mauvaise
odeur de la glace
Absence de glaçons
Page 44

12
Retrait du bac de la machine à glaçons
Selon le modèle, le bac de la machine à glaçons contient
les quantités suivantes de glace :
36 po - 3,9 kg (8,5 livres)
42 po - 6,1 kg (13,5 livres)
48 po - 8,0 kg (17,6 livres)
Jeter périodiquement les vieux glaçons pour diminuer les
chances que leur goût ne soit altéré ou qu’ils ne dégagent
une mauvaise odeur. Le bac à glace peut être retiré pour
la distribution de grandes quantités de glace ou pour le
nettoyage.
Remarque : Sur les modèles sans distributeur de glace
et d’eau froide, le bac à glaçons ne peut pas être retiré
plein de glace si la butée de la porte du congélateur est
réglée à une ouverture de 90°.
S
to
ra
g
e
B
in
Couvercle de
la machine à
glaçons
abaissé
Couvercle de
la machine à
glaçons
relevé
Pour retirer le bac à glace :
1. Tirer le couvercle de la machine à glaçons et le glisser
vers l’arrière.
2. Soulever le levier de la machine à glaçons pour qu’il
s’enclenche en position ARRÊT.
Pour les modèles avec distributeur : Lorsque la
machine à glaçons est en position ARRÊT, la
production de glaçons est interrompue, mais la
distribution de glaçons continue lorsque la porte du
congélateur est fermée.
3. Soulever l’avant du bac de rangement, puis le retirer.
4. Vider le bac. Au besoin, utiliser de l’eau chaude ou
tiède pour faire fondre les glaçons. Ne jamais utiliser
un objet pointu pour briser les glaçons dans le bac;
cela peut endommager le bac et le mécanisme du
distributeur.
Pour replacer le bac à glace :
1. S’assurer que le bac est poussé jusqu’au fond.
2. Abaisser le levier de la machine à glaçons en position
EN MARCHE pour faire reprendre la production.
3. Abaisser le couvercle de la machine à glaçons.
Page 45

13
Utilisation des distributeurs d’eau froide et de glaçons
(modèles KSSP36Q, KSSP42Q, KSSP48Q, KSSS36Q, KSSS42Q, KSSS48Q)
Le distributeur de glaçons
Les glaçons sont distribués à partir du bac de la machine à glaçons
dans le congélateur.Lorsqu’on appuie sur le levier du distributeur, une
trappe s’ouvre sur la chute entre le distributeur et le bac à glace.Les
glaçons tombent dans la chute.Lorsqu’on relâche le levier du
distributeur, on peut entendre un bruit pendant quelques secondes.
Le réfrigérateur distribue des glaçons en cubes et
de la glace broyée.Avant la distribution de la glace,
choisir le type de glace préféré.Pour la glace
broyée, appuyer sur la touche ICE à gauche cidessus. Pour des glaçons en cubes, appuyer sur la touche ICE à
droite ci-dessus.
Pour distribuer la glace :
1. Appuyer sur la touche selon le type de glace désiré.
2. Appuyer un verre robuste contre le levier de distribution de la
glace.Tenir le verre près de l’ouverture de sor te que la glace
ne tombe pas hors du verre.
3. Retirer le verre pour arrêter la distribution.
Le distributeur d’eau froide
IMPORTANT : Si le distributeur d’eau cesse de fonctionner, l’eau
peut geler dans le conduit d’eau qui apporte l’eau froide au
distributeur.Dans ce cas, tourner le réglage de la température
du bac à viande FreshChill* vers « Cold ».
L’eau froide provient d’un réservoir, situé derrière les bacs à
légumes. La première fois, prévoir environ 24 heures pour
refroidir un plein réservoir d’eau.
Lorsque le réfrigérateur est branché pour la première fois,
appuyer un verre ou un bocal contre le levier du distributeur
d’eau pour faire sortir entre 1,9 à 2,9 L (2 à 3 pintes) d’eau qu’il
faudra jeter. L’air s’échappera du système et l’eau rincera le filtre,
le réservoir et les tuyaux. Ra machine à galçons ne produira pas
de glace si le réservoir n'est pas rempli. Si le distributeur n’est
pas utilisé régulièrement faire couler assez d’eau chaque
semaine pour rafraîchir l’approvisionnement.Accorder un délai
de deux à trois heures pour refroidir une nouvelle provision
d’eau.
IMPORTANT : Le petit plateau situé sous le distributeur a été conçu
afin que les petites quantités d’eau répandue puissent s’évaporer .Ce
plateau ne possède pas de tuyau d’écoulement.Ne pas verser d’eau
dans le plateau.
Pour distribution de l’eau froide :
1. Appuyer un verre robuste contre le levier du distributeur d’eau.
2. Retirer le verre pour arrêter la distribution.
ICE
AVERTISSEMENT
Risque de coupures
Utiliser un verre robuste pour prendre des glaçons
ou de l’eau.
Le non-respect de cette instruction peut causer
des coupures.
ICE
ICE
Page 46

14
Conseils sur le fonctionnement du distributeur
SOLUTION
Fermer la porte du congélateur.
S’assurer que le bac est poussé à fond.
N’utiliser que des glaçons en forme de
croissants. Secouer le bac de temps en temps
pour garder les glaçons séparés et pour
augmenter la capacité d’entreposage.
Jeter les vieux glaçons et en faire d’autres.
Attendre trois minutes environ pour que le moteur
du distributeur soit réarmé. De grandes quantités
de glaçons devraient être enlevées du bac et non
pas par le distributeur.
Déverrouiller le fonctionnement.
Contacter la compagnie de service public.
Enlever le filtre d'eau du réfrigérateur. Replacer le
bouchon du filtre dans la grille.Voir page 16.
Vérifier les instructions d'installation du filtre d'eau
pour s'assurer que le filtre n'est pas obstrué et a
été installé correctement.
Jeter les vieux glaçons et en faire d’autres;
conserver l’excédent de glaçons dans un récipient
couvert.
Pour les meilleurs résultats, éviter de brancher la
machine à glaçons à un système
d’adoucissement de l’eau. S’il faut utiliser de l’eau
adoucie, s’assurer que l’adoucisseur d’eau est
bien entretenu et qu’il fonctionne comme il faut.
Bien emballer les aliments dans des matériaux
imperméables à l’air et à l’humidité.Voir page 20.
Nettoyer le congélateur et le bac à glace.Voir
«Nettoyage du réfrigérateur» à la page 17 pour les
instructions.
Suivre les instructions d’installation pour le
branchement approprié de l’alimentation en eau
de la machine à glaçons.
Les premières quantités de glaçons provenant
d’une machine à glaçons neuve peuvent avoir un
goût altéré. Jeter ces glaçons et en faire de
nouveaux.
PROBLÈME
Le distributeur ne marche pas
Le distributeur de glaçons
ne fonctionne pas
Mauvais goût ou odeur des
glaçons
CAUSE
Porte du congélateur ouverte
Le bac à glace n’est pas
installé comme il faut
Glaçons non appropriés
Le distributeur n’est pas
utilisé pendant une longue
période, faisant fondre les
glaçons
On a appuyé trop
longtemps sur la barre
du distributeur
Le verrouillage a été choisi
Pression d’ eau trop basse
Utilisation d'un système de
filtration d'eau à osmose
inverse
Système de filtration d'eau
obstrué ou installé
incorrectement
Les glaçons attirent des
odeurs en suspension dans
l’air; vieux glaçons
Qualité de l’eau
Aliments mal emballés
Le bac à glace et le
congélateur peuvent avoir
besoin d’être nettoyés
Canalisation à la machine à
glaçons
Machine à glaçons neuve
Page 47

15
Système de filtration d’eau et de
surveillance
Témoin lumineux du système de filtration d’eau
Le témoin lumineux du système de filtration d’eau
signale à l’utilisateur le besoin de changement de la
cartouche de filtration; il est situé au sommet du
compartiment de réfrigération. La couleur du témoin
passera de vert à jaune, ce qui indique qu’il devient
nécessaire de changer la cartouche de filtration d’eau
(capacité de filtration épuisé à 90 %). On recommande
de changer les cartouches de filtration lorsque le témoin
devient rouge, OU lorsque le débit du distributeur d’eau
ou d’alimentation de la machine à glaçons diminue
sensiblement. (Voir « Changement de la car touche de
filtration » ci-dessous.)
REMARQUE : Ne pas utiliser avec de l’eau
microbiologiquement dangereuse ou de qualité
inconnue sans une désinfection adéquate avant ou
après le fonctionnement du système.
Après un changement de la cartouche de filtration d’eau,
il suffit d’appuyer 5 fois sur le bouton d’allumage de la
lampe pour régler le témoin lumineux du filtre d’eau. Le
témoin lumineux passera de rouge à vert lorsque le
système est réglé de nouveau.
Changement de la cartouche de
filtration d’eau
Le filtre à eau est situé sous la porte du compar timent
de réfrigération.
1. Identifier le bouchon de la cartouche de filtration
d’eau dans la grille de la base avant, sous la porte du
compartiment de réfrigération. Retour ner le bouchon
dans le sens antihoraire pour le placer verticalement
et extraire le bouchon et la cartouche de filtration à
travers la grille de la base.
REMARQUE : Il y aura de l’eau dans la cartouche.
Un peu d’eau peut s’écouler.
2. Enlever le bouchon de la cartouche (extraction par
coulissement vers le côté droit ou le côté gauche). NE
PAS JETER LE BOUCHON.
3. Retirer la cartouche neuve de son emballage et
enlever les matériaux de protection des joints
toriques.
4. Placer le bouchon sur la cartouche neuve – voir
l’illustration.
1.
2.
3.
4.
bouton
d’allumage de
la lampe
Page 48

16
5. Alors que le bouchon de la cartouche est placé
verticalement, introduire la cartouche neuve dans la
grille de la base jusqu’à la position de butée. Faire
tourner le bouchon de la cartouche dans le sens
horaire pour le placer horizontalement.
6. FAIRE COULER L’EAU AU NIVEAU DU
DISTRIBUTEUR JUSQU’À CE QUE L’EAU
S’ÉCOULE CLAIRE (environ 2-3 gallons ou pendant
6-7 minutes). Ceci permettra d’évacuer l’air du
système et de le rincer.Un écoulement de rinçage
additionnel peut être nécessaire dans certaines
habitations.
REMARQUE : La présence d’air dans le circuit peut
affecter l’écoulement de l’eau.
Utilisation du distributeur sans un
filtre à eau
On peut utiliser le distributeur d’eau sans une cartouche
de filtration de l’eau. Dans ce cas, conserver le bouchon
de la cartouche dans la grille de la base pour
réutilisation ultérieure.
1. Retirer la cartouche de filtration (voir « Changement
de la cartouche de filtration d’eau » dans cette
section). Séparer le bouchon de la cartouche de
filtration. NE PAS JETER LE BOUCHON.
2. Orienter le bouchon verticalement pour l’insérer dans
la grille de la base jusqu’à la butée.
3. Faire pivoter le bouchon de la cartouche pour le
placer horizontalement.
REMARQUE : Le bouchon de la cartouche de
filtration peut ne pas être en affleurement avec la
grille de la base.
Commande de filtres
Pour commander des cartouches de filtre, composer le
1-800-253-1301; demander le produit nº 4392857, ou
contacter votre marchand KitchenAid autorisé.
Système de filtration d’eau et de surveillance (suite)
Grille de la base
Enlèvement :
1. Ôter une vis à chaque extrémité de la grille de la base.
2. Retirer la grille de la base.
3. Pour le replacement, procéder dans l’ordre inverse.
Page 49

17
Plateau de dégivrage
Le plateau de dégivrage est situé derrière la grille de la
base, du côté gauche du réfrigérateur.
Pour le retirer :
1. Mettre l’interrupteur en position ARRÊT (OFF). (Voir
les instructions à la page 5.)
2. Retirer la grille de la base.
3. Repérer la patte de retenue (A) située sous le
réfrigérateur.
4. Pousser la patte vers le haut tout en tirant le plateau
directement vers l’extérieur.
5.
Nettoyer le plateau.(Voir les instructions à la page 17.)
Pour le replacer :
1. Placer le rebord du plateau à environ 17,8 cm (7 po)
du côté gauche du réfrigérateur.
2. Remettre le plateau en place en le faisant glisser le
long des coulisses latérales, jusqu’à ce qu’un déclic
se fasse entendre.
3. Replacer la grille de la base.
4. Mettre l’interrupteur en position EN MARCHE (ON).
Plateau de
dégrivage
Patte de retenue (A)
Ampoules
Ampoules derrière les commandes du réfrigérateur
et du congélateur:
1. Débrancher la source de courant électrique au
réfrigérateur ou fermer l’interrupteur.
2. Saisir l’ampoule située derrière le panneau de
commandes.
3. Dévisser l’ampoule et la remplacer par une ampoule
tubulaire incandescente de 40 watts à culot moyen.
4. Rebrancher la source de courant électrique ou
rallumer l’interrupteur.
Ampoule sous le bac à glaçons :
1. Débrancher la source de courant électrique ou fermer
l’interrupteur.
2. Retirer le protège-ampoule.
3. Dévisser l’ampoule et la remplacer par une ampoule
tubulaire incandescente de 40 watts à culot moyen.
4. Remettre le protège-ampoule en place.
5. Rebrancher la source de courant électrique ou
rallumer l’interrupteur.
Ampoule du distributeur : (modèles avec distributeur)
1. Débrancher la source de courant électrique ou fermer
l’interrupteur.
2. Dévisser l’ampoule située dans la partie supérieure du
distributeur.
3. Remplacer l’ampoule par une ampoule de 10 watts à
haut rendement.
4. Rebrancher la source de courant électrique ou
rallumer l’interrupteur.
IMPORTANT : S’assurer que le commutateur
marche/arrêt est remis en position EN MARCHE (ON)
après avoir changé une ampoule.
Page 50

18
Economie d’énergie
• Nettoyer périodiquement les serpentins de
condensation.
• Ouvrir les portes le moins souvent possible. Ranger les
aliments de façon à ce que vous n’ayez pas besoin de
chercher ce que vous désirez. Sortir tous les ar ticles
dont on a besoin en même temps. Fermer la porte dès
que les aliments sont sortis.
• Remplir le réfrigérateur, mais ne pas le surcharger
pour ne pas bloquer la circulation d’air.
• C’est un gaspillage d’électricité de régler le
réfrigérateur et le congélateur à des températures plus
froides que nécessaires. Si la crème glacée est ferme
dans le congélateur et les boissons sont aussi froides
dans le réfrigérateur que le désire votre famille, c’est
suffisant.
Les bruits de l’appareil
Votre nouveau réfrigérateur peut faire des bruits différents
de ceux de votre ancien appareil. Comme les br uits sont
nouveaux pour vous, il se peut que vous ayez des
questions. La plupart des nouveaux bruits sont normaux.
Des surfaces dures comme le plancher, les murs et les
armoires peuvent faire paraître les bruits plus forts qu'en
réalité. Le tableau suivant décrit les genres de bruits qui
peuvent être nouveaux pour vous et leur origine. Les
nouveaux concepts des produits peuvent causer des
bruits qui ne vous sont pas familiers.
CAUSES
Le moteur du ventilateur du réfrigérateur et la circulation d’air en action.
Le thermostat fait un déclic net lorsque le réfrigérateur cesse de fonctionner. Il fait
également un bruit lorsque le réfrigérateur se met en marche.
La minuterie du système de dégivrage fait un déclic lorsque le cycle de dégivrage
commence et s’arrête.
On peut entendre un bourdonnement provenant de la vanne d’eau, de l’eau qui
dégoutte et le cliquetis des glaçons qui tombent dans le bac.
Le compresseur à grand rendement et le moteur fonctionneront plus longtemps que
ceux des anciens modèles. Il se peut que le ventilateur interne se mette en marche
lorsque le compresseur est arrêté.
Durant le cycle de dégivrage, le réfrigérateur ne fonctionnera pas. L’eau qui dégoutte
provient de l’accumulation de givre sur le serpentin du congélateur.Ce givre fond et
s’écoule dans le plateau de dégivrage. Lorsque le réfr igérateur arrête de fonctionner,
vous entendrez peut-être un bruit de gargouillement dans la tuyauterie pendant
quelques minutes.
Vous sentirez peut-être de l’air qui s’échappe derrière le panneau de ventilation
supérieur et de la grille de la base lorsque fonctionne le réfrigérateur.C’est tout à fait
normal.
BRUITS/OBSERVATIONS
Ronflement ou sifflement
Claquements
Bruits du distributeur de
glaçons
• eau qui dégoutte
• cliquetis des glaçons
Bruits de fonctionnement
Eau qui coule/bruits d’eau
Air chaud s’échappant du
panneau de ventilation
supérieur et de la grille
de la base
Vous pouvez aider votre réfrigerateur à utiliser moins
d’électricité.
Page 51

19
Risque d’explosion
Utiliser un produit de nettoyage ininflammable.
Le non-respect de cette instruction peut causer un
décès, une explosion ou un incendie.
Les compartiments réfrigérateur et congélateur se
dégivrent automatiquement.Tous deux doivent
cependant être nettoyés environ une fois par mois,
afin de prévenir l’accumulation d’odeurs. Essuyer
immédiatement les produits renversés.
Avant le nettoyage, déconnecter le réfrigérateur du courant
électrique en appuyant sur l’interrupteur MARCHE/ARRÊT en
le mettant à la position ARRÊT. Puis, retirer toutes les pièces
amovibles et les nettoyer conformément aux instructions
suivantes.Pour remettre le réfrigérateur en marche, appuyer
sur l’interrupteur marche/arrêt et le mettre en position EN
MARCHE (ON).
E
NTRETIEN DU RÉFRIGÉRATEUR
Ce réfrigérateur a été conçu et construit pour offrir de
nombreuses années de service fiable. L’utilisateur peut
cependant faire certaines choses pour en augmenter la
longévité.Cette section décrit comment nettoyer le
réfrigérateur, et ce qu’il faut faire avant une période de
vacances, avant un déménagement, ou à l’occasion d’une
interruption du courant électrique.
Nettoyage du réfrigérateur
MATÉRIEL À UTILISER
Éponge ou chiffon avec
détergent doux et eau tiède
Éponge, chiffon ou essuietout en papier avec
détergent doux, eau tiède et
cire pour appareil
électroménager (ou cire en
pâte de qualité pour
automobile)
Éponge, chiffon doux ou
essuie-tout en papier avec
bicarbonate de soude ou
détergent doux et eau tiède
Éponge, chiffon doux ou
essuie-tout en papier avec
détergent doux et eau tiède
Éponge douce et propre ou
chiffon doux et propre avec
détergent doux et eau tiède
Éponge ou chiffon avec
détergent doux et eau tiède
PROBLÈME
Pièces amovibles (clayettes,
bac à légumes, etc.)
Extérieur
Parois intérieures (le
congélateur doit être assez
tiède pour que le chiffon
n’adhère pas)
Garnitures et joints des
portes
Pièces en plastique
(couvercles et panneaux)
Plateau de dégivrage
MÉTHODE DE NETTOYAGE
Laver à la main, rincer et sécher à fond.
Laver l’extérieur du réfrigérateur. Ne pas utiliser de
nettoyants durs ou abrasifs.
Rincer et sécher à fond.
Cirer les surfaces métalliques peintes au moins deux
fois par an. Appliquer la cire avec un chiffon doux et
propre. Le cirage des surfaces métalliques peintes
les protège contre la rouille. Ne pas utiliser de cire
sur les pièces en plastique.
Laver avec de l’eau tiède et :
• du détergent doux ou
• du bicarbonate de soude (26 g [2 cuillères à soupe]
ajoutés à 0,95 L [1 pinte] d’eau).
Rincer et sécher à fond.
Laver, essuyer et sécher à fond.
NE PAS UTILISER de cires nettoyantes, de
détergents concentrés, d’eau de Javel ni de
nettoyants contenant du pétrole, sur des pièces en
plastique.
Laver, essuyer et sécher à fond.
NE PAS UTILISER d’essuie-tout en papier, de
nettoyants pour vitres, de produits à récurer ni de
solvants inflammables, car ils risquent
d’égratigner ou d’endommager le matériel.Voir
«Importantes Instructions de Sécurité» à la page 3.
Appuyer sur la touche de mise en marche/arrêt
(ON/OFF) pour la positionner à la position d’arrêt
(OFF).
Retirer la grille de la base.Voir page 16.
Retirer le plateau de dégivrage, que l’on peut
atteindre par la petite ouverture sur le côté droit.Voir
page 17. Laver, rincer et sécher à fond.
AVERTISSEMENT
Page 52

Si le réfrigérateur doit être déménagé, communiquer avec
le dépositaire chez qui vous avez acheté le réfrigérateur
ou avec le bureau de service d’entretien autorisé
KitchenAid de votre région.
Si vous vous absentez pendant un mois ou plus, suivre
les étapes suivantes pour préparer votre réfrigérateur.
1. Enlever tous les aliments du réfrigérateur.
2. Si votre réfrigérateur a une machine à glaçons
automatique :
•
Fermer l’approvisionnement d’eau à la machine à
glaçons au moins une journée à l’avance.
•
Lorsque la dernière quantité de glaçons est déposée,
arrêter la machine à glaçons et s’assurer que tous les
glaçons sont distribués hors du mécanisme de la
machine à glaçons.
3. Débrancher le réfrigérateur de la prise.
4. Bien nettoyer, essuyer et sécher le plateau.
5. À l’aide de ruban adhésif, fixer des blocs de
caoutchouc ou de bois à la partie supérieure de
chaque porte de façon à ce qu’elles soient
suffisamment ouvertes pour permettre la circulation de
l’air à l’intérieur, afin d’éviter l’accumulation d’odeurs ou
de moisissure.
En cas de panne de courant, téléphoner à la compagnie
d’électricité pour s’enquérir de la durée de la panne.
1. Si le ser vice doit être interrompu durant 24 heures ou
moins, garder fermées les deux portes. Ceci
permettra d’éviter que les aliments dégèlent.
2. Si le ser vice doit être interrompu durant plus de
24 heures :
(a) Retirer tous les aliments congelés et les déposer
dans un entrepôt frigorifique.
OU
(b) Placer 900 g (2 lb) de neige carbonique dans le
congélateur pour chaque pied cube (28 litres) par
d’espace de congélation. Cela permettra de garder les
aliments congelés durant deux à quatre jours. Porter
des gants pour protéger les mains contre les morsures
de la neige.
OU
(c) S’il n’y a pas d’entrepôt frigorifique ni de neige
carbonique, consommer ou mettre immédiatement en
conserve les aliments périssables.
20
Courtes vacances
Si vous vous absentez pendant moins de quatre
semaines, suivre ces conseils pour préparer votre
réfrigérateur avant d’aller en vacances.
1. Consommer tous les aliments périssables et congeler
les autres articles.
2. Si votre réfrigérateur a une machine à glaçons
automatique :
•
Soulever le bras de commande à glaçons à la
position OFF (élevée).
•
Fermer l’approvisionnement d’eau à la machine à
glaçons.
3. Vider le bac à glaçons.
Entretien avant les vacances ou lors d’un
déménagement
Longues vacances
Déménagement
Pannes de courant
Éponge ou chiffon avec
détergent doux et eau tiède
Nettoyant pour acier
inoxydable
Accessoire étroit et long de
l’aspirateur
Accessoire brosse de
l’aspirateur
Un nettoyant professionnel
d’acier inoxydable
Plateau de dégivrage (suite)
Portes et grille en acier
inoxydable
Serpentins du condenseur
Grille de la base
Acier inoxydable
Réinstaller le plateau de dégivrage.Veiller à bien
l’enfoncer complètement dans l’ouverture.
Réinstaller la grille de la base.
Appuyer sur la touche de mise en marche/arrêt
(ON/OFF) pour la positionner à la position de mise en
marche (ON).
Essuyer avec un chiffon doux.
Retirer le panneau de ventilation supérieur (Voir la
page 5).
Nettoyer les serpentins lorsqu’ils sont sales ou
poussiéreux. Il se peut que les serpentins aient besoin
d’être nettoyés tous les deux mois.
Réinstaller le panneau de ventilation supérieur.
Nettoyer la grille de la base avec l’asperateur.
Suivre le mode d’emploi inclus avec le nettoyant.
Page 53

21
Il existe une façon correcte d’emballer et de conserver les
aliments au réfrigérateur ou au congélateur.Pour garder
les aliments plus frais, plus longtemps, prendre le temps
d’étudier ces étapes recommandées.
G
UIDE DE CONSERVATION DES ALIMENTS
Les aliments placés au réfrigérateur doivent être
enveloppés ou gardés dans un emballage hermétique et
à l’épreuve de l’humidité.Cette méthode empêche l’odeur
et le goût des aliments de se répandre dans tout le
réfrigérateur.Pour des produits datés, vérifier les dates
indiquées pour s’assurer de la fraîcheur des aliments.
Beurre ou margarine
Garder le beurre entamé dans un beurrier muni d’un
couvercle ou dans le balconnet fermé.Envelopper les
quantités excessives dans un emballage pour
congélateur et faire congeler.
Fromage
Le conserver dans son emballage original jusqu’à
l’emploi. Une fois le paquet ouvert, réemballer
hermétiquement le fromage dans une pellicule en
plastique ou du papier d’aluminium.
Lait
Essuyer les contenants.Pour qu’il se conserve mieux,
placer le lait sur une tablette intérieure.
Oeufs
Conserver sans les laver dans le carton original sur une
tablette intérieure.Dans certains modèles, un oeufrier
est fourni.
Fruits
Laver, laisser sécher et mettre au réfrigérateur dans un
sac en plastique ou le bac à légumes. Ne pas laver ni
équeuter les petits fruits avant le moment de leur
utilisation. Les trier et les conserver dans l’emballage du
magasin, dans le bac à légumes ou les conserver sur
une tablette du réfrigérateur dans un sac fermé en
papier sans être serré.
Légumes à feuilles
Retirer l’emballage original et éliminer les taches jaunes
ou décolorées. Laver à l’eau froide et égoutter.Placer
dans un sac ou un contenant en plastique et ranger
dans le bac à légumes.
Conservation des aliments
frais
À NOTER : Un congélateur plein restera froid plus
longtemps qu’un congélateur partiellement rempli. Un
congélateur plein de viandes demeure froid plus
longtemps qu’un congélateur rempli de pains et de
pâtisseries. Si les aliments contiennent des cristaux de
glace, ils peuvent être remis à congeler sans danger
même si la qualité et la saveur risquent d’être affectées.
Si les aliments semblent de piètre qualité ou douteux, les
jeter.
Questions?
Composer notre numéro de téléphone du Centre
d’assistance aux consommateurs, 1-800-235-0665 de
partout aux États-Unis ou au Canada.
Conservation des aliments frais (suite)
Légumes à pelure
(carottes, poivrons)
Ranger dans des sacs en plastique ou un contenant
en plastique et garder dans le bac à légumes .
Poisson
Le poisson et les fruits de mer frais doivent être
consommés le jour même de l’achat.
Viande
La plupart des viandes peuvent être conservées dans
leur emballage original tant que cet emballage est
hermétique et à l’épreuve de l’humidité. Emballer de
nouveau si nécessaire. Voir le tableau suivant pour les
périodes de conservation. Si la viande doit être
conservée durant une période plus longue, suivre les
instructions relatives à la congélation.
Poulet..........................................................1 à 2 jours
Bacon ........................................................5 à 7 jours
Boeuf haché ..............................................1 à 2 jours
Charcuterie ................................................3 à 5 jours
Steaks/rôtis ................................................3 à 5 jours
Abats ........................................................1 à 2 jours
Viandes traitées ......................................7 à 10 jours
Restes
Couvrir les restes avec de la pellicule en plastique ou
du papier d’aluminium. Il est aussi convenable
d’utiliser des contenants en plastique à couvercle
hermétique.
REMARQUE : Garder une boîte de bicarbonate de
soude ouverte pour maintenir une odeur de fraîcheur
dans votre réfrigérateur.
Page 54

22
Conservation des aliments congelés
La section du congélateur est conçue pour conserver les
aliments surgelés commerciaux et pour faire congeler les
aliments à la maison.
REMARQUE : Pour d’autres renseignements au sujet de
la préparation des aliments pour la congélation, consulter
un guide de congélation ou un livre de recettes fiable.
Emballage
Le secret d’une congélation efficace réside dans
l’emballage. Il doit être fermé et scellé de façon à prévenir
la pénétration et l’évacuation de l’air ou de l’humidité.
Toute autre méthode d’emballage risque d’entraîner la
propagation de saveurs et d’odeurs dans tout le
réfrigérateur et l’assèchement des aliments congelés.
Emballage recommandé :
•
Contenants rigides en plastique avec couvercles
hermétiques
•
Bocaux de conserves/congélation à bords droits
•
Papier d’aluminium résistant
•
Papier recouvert de plastique
•
Emballages en plastique étanches (faits d’une
pellicule saran)
•
Sacs en plastique autohermétiques spécifiés pour
congélateur
Suivre les instructions de l’emballage ou du contenant
pour les méthodes de congélation appropriées.
Ne pas utiliser :
•
Emballages pour pain
•
Contenants en plastique autres qu’en polyéthylène
•
Contenants sans couvercles hermétiques
•
Papier paraffiné ou emballage de congélateur
enduit de cire
•
Emballage mince semi-perméable
Congélation
Ne pas prévoir que votre congélateur congèle rapidement
une grande quantité d’aliments. Veiller à ce que la quantité
d’aliments ne prenne pas plus de 24 heures à congeler (au
plus 907 à 1350 g par litre [2 à 3 lb d’aliments par pied
cube]). Laisser assez d’espace pour permettre la
circulation d’air entre les emballages. S’assurer aussi de
laisser assez d’espace à l’avant pour que la porte ferme
hermétiquement.
Les périodes de conservation varieront selon la qualité et
le type des aliments, le type d’emballage ou de pellicule
utilisée (hermétique et à l’épreuve de l’humidité) et la
température d’entreposage.
Les cristaux de glace à l’intérieur d’un emballage scellé
sont normaux. Ces cristaux signifient simplement que
l’humidité dans les aliments et l’air à l’intérieur de
l’emballage se sont condensés en créant des cristaux de
glace.
REMARQUE : Laisser les aliments chauds refroidir
à la température ambiante pendant 30 minutes,
ensuite les emballer et les congeler. Le
refroidissement des aliments chauds avant la
congélation fera économiser de l’énergie.
Page 55

23
Vérifier si ...
Le cordon du courant électrique est débranché.
Un fusible a sauté ou le disjoncteur s’est déclenché.
Une ampoule d’éclairage est dégagée dans la douille.
Une ampoule est grillée.
Alors ...
Brancher fermement le cordon du courant électrique
dans une prise de courant active avec tension appropriée.
Remplacer le fusible ou enclencher de nouveau le
disjoncteur.
Tourner le réglage du réfrigérateur à OFF (arrêt).
Débrancher le réfrigérateur de la source de courant
électrique. Enlever délicatement l’ampoule et la réinsérer.
Ensuite rebrancher le réfrigérateur à la source de courant
électrique et faire de nouveau le réglage du réfrigérateur.
Remplacer par une ampoule d’appareil électroménager
de tension, de grosseur et de forme similaires. Voir
«Remplacement des ampoules d’éclairage».
Alors ...
Brancher fermement le cordon du courant électrique
dans une prise de courant active avec tension
appropriée.
Remplacer le fusible ou enclencher de nouveau le
disjoncteur.
Voir «Réglage des commandes de température».
Vérifier de nouveau pour voir si le réfrigérateur
fonctionne au bout de 30 minutes. Le réfrigérateur fera
régulièrement un programme automatique de dégivrage.
S’il ne fonctionne pas encore après avoir vérifié ce
qui précède, téléphoner au Centre d’assistance aux
consommateurs.
Le cordon du courant électrique est débranché.
Les ampoules n’éclairent pas
Le réfrigérateur ne fonctionne pas
Vous pouvez résoudre de nombreux problèmes communs
des réfrigérateurs, ce qui vous économise le coût possible
d’un appel de service. Essayez les suggestions cidessous pour voir si vous pouvez résoudre votre
problème sans aide de l’extérieur. Si les suggestions ne
fonctionnent pas, veuillez appeler le Centre d’assistance
aux consommateurs KitchenAid.
G
UIDE DE DÉPANNAGE
Vérifier si ...
Un fusible a sauté ou le disjoncteur s’est déclenché.
Le réglage du réfrigérateur est à la position OFF (arrêt).
Le réfrigérateur se dégivre.
Page 56

24
Vérifier si ...
La température ambiante est plus chaude que
normalement.
Une grande quantité d’aliments vient d’être ajoutée
au réfrigérateur.
La porte est fréquemment ouverte.
Les réglages ne sont pas faits correctement pour les
conditions ambiantes.
Les portes ne sont pas complètement fermées.
La grille de la base est sale ou bloquée.
Les serpentins du condenseur sont sales.
Les joints des portes ne sont pas scellés
complètement autour de l’ouverture.
Alors ...
Prévoir que le moteur fonctionnera plus longtemps dans
des conditions de chaleur. Aux températures ambiantes
normales, prévoir que le moteur fonctionnera environ
40% à 80% du temps. Dans des conditions plus
chaudes, prévoir un fonctionnement encore plus
fréquent.
L’addition d’une grande quantité d’aliments réchauffe le
réfrigérateur. Il est normal que le moteur fonctionne plus
longtemps afin de refroidir de nouveau le réfrigérateur. Voir
la section «Conservation des aliments».
Prévoir que le moteur fonctionnera plus longtemps
dans ce cas. Afin de conserver l’énergie, essayer de
sortir tout ce dont vous avez besoin du réfrigérateur à
la fois, garder les aliments organisés de sorte qu’ils sont
faciles à trouver et fermer la porte dès que les aliments sont
enlevés.
Voir la section «Réglage des commandes de température».
Pousser les portes pour qu’elles soient bien fermées. Si les
portes ne ferment pas complètement, voir «Les portes ne se
ferment pas complètement» plus loin dans cette section.
Cette situation empêche la circulation de l’air et fait
travailler davantage le moteur. Enlever la grille et la
nettoyer.
Cette situation empêche le transfert de l’air et fait
travailler davantage le moteur. Nettoyer les serpentins
du condenseur. Voir la section «Nettoyage du réfrigérateur».
Contacter une personne qualifiée ou un technicien.
Si le problème n’est pas attribuable à l’une des
situations ci-dessus, rappelez-vous que votre nouveau
réfrigérateur fonctionnera plus longtemps que votre ancien
appareil, du fait de son moteur très efficace.
Vérifier si ...
Le réfrigérateur se dégivre.
Le réfrigérateur est plus humide que normalement.
L’eau dans le plateau de dégivrage déborde.
Alors ...
L’eau s’évaporera. C’est normal pour l’eau de dégoutter
dans le plateau de dégivrage.
Prévoir que l’eau dans le plateau de dégivrage prenne
plus de temps à s’évaporer. Ceci est normal lorsqu’il fait
chaud ou humide.
Vérifier pour s’assurer que le réfrigérateur est de niveau
(voir «Nivellement»). Si le plateau déborde encore, il
existe probablement une anomalie avec le réfrigérateur.
Téléphoner au Centre d’assistance aux consommateurs.
Le plateau de dégivrage contient de l’eau
Le moteur semble fonctionner excessivement
Page 57

25
Alors ...
Voir la section «Réglages des commandes de température».
Abaisser le bras à la position «ON» (abaissée). Voir la section
«Utilisation de la machine à glaçons automatique».
Ouvrir le robinet d’eau.
Enlever le glaçon du bras éjecteur avec un ustensile
en plastique. Voir «Utilisation de la machine à glaçons».
Vérifier pour voir si le réfrigérateur a été branché à la
canalisation d’eau de la maison, et si le robinet de la
canalisation est ouvert.
Si cette situation n’est pas attribuable à ce qui précède,
il peut exister un problème avec la canalisation d’eau.
Contacter le Centre d’assistance aux consommateurs.
Vérifier si ...
La température du congélateur n’est pas assez froide
pour produire des glaçons
Le levier de la machine à glaçons est en position
“OFF” (élevée).
Le robinet de la canalisation d’eau reliée au
réfrigérateur n’est pas ouvert.
Un glaçon est coincé dans le bras éjecteur.
Le moule de la machine à glaçons n’a pas d’eau ou
aucun glaçon n’a été produit.
Vérifier si ...
Certains sons et bruits sont communs pour les
réfrigérateurs neufs.
Alors ...
Voir la section «Les bruits de l'appareil».
Le réfrigérateur semble faire trop de bruit
La machine à glaçons ne produit pas de glaçons
La machine à glaçons produit trop peu de glaçons
Vérifier si ...
La machine à glaçons vient juste d’être installée.
Une grande quantité de glaçons vient d’être enlevée.
Les réglages ne sont pas faits correctement.
Le robinet d’eau n’est pas complètement ouvert.
Un filtre à eau est installé sur le réfrigérateur. Ce filtre
peut être obstrué ou installé incorrectement.
Alors ...
Attendre 72 heures pour le commencement de la
production complète de glaçons. Une fois que le
réfrigérateur est refroidi, la machine à glaçons devrait
commencer à produire de 56 à 72 glaçons à toutes
les 24 heures.
Attendre 24 heures pour que la machine à glaçons
produise plus de glaçons.
Voir la section «Réglage des commandes de température».
Tourner complètement le robinet à la position ouverte.
Voir la section «Utilisation de la machine à glaçons
automatique».
Vérifier d’abord les instructions d’installation
du filtre pour s’assurer que le filtre a été installé
correctement et qu’il n’est pas obstrué. Si l’installation
ou l’obstruction n’est pas le problème, téléphoner à un
technicien qualifié.
Page 58

26
Alors ...
Prévoir que le réfrigérateur deviendra tiède dans ces
cas. Pour garder le réfrigérateur froid, essayer de
retirer rapidement tout ce dont vous avez besoin du
réfrigérateur, garder les aliments rangés de sorte qu’il
soit facile de les trouver et fermer la porte dès que les
aliments sont retirés.
L’addition d’une grande quantité d’aliments réchauffe le
réfrigérateur. Plusieurs heures peuvent être nécessaires pour
que le réfrigérateur revienne à la température normale.
Voir la section «Réglage des commandes de température».
Vérifier si ...
La(les) porte(s) est(sont) souvent ouverte(s).
Une grande quantité d’aliments vient d’être ajoutée
au réfrigérateur ou au congélateur.
Les réglages ne sont pas faits correctement pour
les conditions ambiantes.
Alors ...
Nettoyer en consultant la section «Nettoyage du
réfrigérateur».
Voir «Le réfrigérateur ne fonctionne pas» à une section plus
loin.
REMARQUE : La température du réfrigérateur peut passer
de tiède à chaude.
Si la cause n’est pas attribuable à ce qui précède, la
chaleur est probablement attribuable à l’opération normale
du réglage automatique de l’humidité à l’extérieur. S’il
existe encore une inquiétude à ce sujet, téléphoner au
Centre d’assistance aux consommateurs.
Vérifier si ...
Les serpentins du condenseur ou la grille de la base
sont sales ou obstrués.
Le moteur a cessé de fonctionner.
Alors ...
Jeter les premières quantités de glaçons.
Jeter les vieux glaçons et en faire une nouvelle provision.
Voir la section «Conservation des aliments congelés».
Voir la section «Nettoyage du réfrigérateur».
L’installation d’un filtre peut être requise afin d’enlever
les minéraux.
Vérifier si ...
Les raccords de plomberie sont neufs et causent une
décoloration et une mauvaise saveur des glaçons.
Les glaçons ont été gardés trop longtemps.
Les aliments dans le congélateur n’ont pas été bien
emballés.
Le congélateur et le bac à glaçons ont besoin d’être
nettoyés.
L’eau contient des minéraux (tels que le soufre).
Mauvais goût ou odeur des glaçons
La cloison au centre entre les deux sections est tiède
La température est trop tiède
Page 59

27
Alors ...
Réorganiser les contenants de sorte qu’ils soient plus
rapprochés et prennent moins d’espace.
Pousser le bac à glaçons jusqu’au fond.
Placer tous les plats, tablettes, bacs et paniers à leur
position correcte.
Nettoyer les joints d’après les instructions à la section
«Entretien du réfrigérateur».
Enlever et replacer les portes ou contacter une personne
qualifiée.
Vérifier si ...
Les emballages des aliments empêchent la porte
de fermer.
Le bac à glaçons n’est pas en bonne position.
Les plats, tablettes, bacs ou paniers ne sont pas
en bonne position.
Les joints sont sales.
Les portes ont été enlevées durant l’installation
de l’appareil et n’ont pas été bien réinstallées.
Alors ...
Pour éviter l’accumulation d’humidité, essayer de retirer
rapidement tout ce dont vous avez besoin du réfrigérateur,
garder les aliments rangés de sorte qu’il soit facile de les
trouver, et fermer la porte dès que les aliments sont retirés.
(Lorsque la porte est ouverte, l’humidité de l’air extérieur
pénètre dans le réfrigérateur. Le plus souvent la porte est
ouverte, le plus rapidement l’humidité s’accumule, surtout
lorsque la pièce elle-même est très humide.)
Il est normal pour l’humidité de s’accumuler à l’intérieur
du réfrigérateur lorsque l’air de l’extérieur est humide.
Vérifier que tous les aliments sont bien emballés. Si
nécessaire, emballer de nouveau les aliments d’après
les directives à la section «Guide de conservation des
aliments». Essuyer les contenants humides d’aliments
avant de les placer au réfrigérateur.
Voir la section «Réglage des commandes de température».
Il est normal que des gouttelettes se forment sur la paroi
arrière après que le réfrigérateur se dégivre de lui-même.
Vérifier si ...
La porte est fréquemment ouverte.
La pièce est humide.
Les aliments ne sont pas correctement emballés.
Les réglages ne sont pas correctement faits pour
les conditions ambiantes.
Un programme autodégivreur a été complété.
Il existe une accumulation d’humidité à l’intérieur
Les portes ne se ferment pas complètement
Les portes sont difficiles à ouvrir
Alors ...
Nettoyer les joints d’après les instructions à la section
«Entretien du réfrigérateur».
Vérifier si ...
Les joints sont sales ou collants.
Page 60

28
Téléphonez au Centre d’interaction avec la clientèle
KitchenAid, sans frais d’interurbain en composant
le 1-800-235-0665. Nos consultants sont
disponibles pour vous aider.
Lors de votre appel, veuillez connaître la date d’achat,
les numéros au complet de modèle et de
série de votre appareil (voir section
« Noté à l’utilisateur »). Ces
renseignements nous aideront à mieux
répondre à votre demande.
Nos consultants fournissent l’assistance pour :
•
Caractéristiques et spécifications de notre gamme
complète d’appareils électroménagers.
•
Renseignements concernant l’installation.
Si vous avez besoin de pièces de rechange
Si vous avez besoin de commander des pièces de
rechange, nous vous recommandons d’utiliser
seulement des pièces autorisées par l’usine. Ces
pièces conviendront bien et fonctionneront bien parce
qu’elles sont fabriquées selon les mêmes
spécifications précises utilisées pour construire chaque
nouvel appareil KitchenAid®.
Pour localiser des pièces autorisées par l’usine dans
votre région, téléphonez à notre Centre d’interaction
avec la clientèle, votre Centre de service autorisé le
plus proche, ou le Service de l’usine KitchenAid en
composant le 1-800-442-1111.
Cartouche de filtre
d’eau de la grille de la base
Cartouche standard-
commandez le n° de pièce 4392857 (L500)
Cartouche de kyste –
commandez le n° de pièce 4392922 (LC400)
Pour plus d’assistance
Si vous avez besoin de plus d’assistance, vous pouvez
écrire à KitchenAid en soumettant toute question ou
problème à :
KitchenAid Brand Home Appliances
Costumer Interaction Center
c/o Correspondence Dept.
2000 North M-63
Benton Harbor, MI 49022-2692
Dans votre correspondance, veuillez indiquer un
numéro de téléphone où on peut vous joindre dans la
journée.
•
Procédé d’utilisation et d’entretien.
•
Vente d’accessoires et de pièces de rechange.
•
Assistance spécialisée aux clients (langue espagnole,
malentendants, malvoyants, etc.)
•
Les références aux marchands, compagnies de
service de réparation, et distributeurs de pièces de
rechange locaux.
Les techniciens de service désignés par
KitchenAid sont formés pour exécuter la garantie des
produits et fournir un service après la garantie, partout
aux É.-U.
Pour localiser la compagnie de service désignée par
KitchenAid dans votre région, vous pouvez consulter les
pages jaunes de votre annuaire de téléphone.
Pour éviter des appels inutiles de service,
veuillez vérifier la section « Guide de
dépannage » cette vérification pourrait vous faire
économiser le coût d’un appel de service. Si
vous avez encore besoin d’aide suivez les
instructions ci-dessus :
Si vous avez besoin d’assistance ou de service aux
États-Unis
D
EMANDE D’ASSISTANCE OU DE SERVICE
Page 61

29
Service d’appareils ménagers KitchenAid Canada –
Service aux consommateurs
Succursales de service direct :
COLOMBIE-BRITANNIQUE 1-800-665-6788
ALBERTA 1-800-661-6291
ONTARIO Région d’Ottawa 1-800-267-3456
(à l’exception de l’indicatif régional 807) En dehors de la région d’Ottawa 1-800-807-6777
MANITOBA,SASKATCHEWAN 1-800-665-1683
et indicatif régional 807 en ONTARIO
QUÉBEC Montréal (à l’exception de la Rive-Sud) 1-800-361-3032
Rive-Sud Montréal 1-800-361-0950
Québec 1-800-463-1523
Sherbrooke 1-800-567-6966
PROVINCES DE L’ATLANTIQUE 1-800-565-1598
Pour plus d’assistance
1. Si le problème n’est pas attribuable à l’une
des causes indiquées dans “Guide de
dépannage”
✝
...
Communiquer avec le marchand chez qui
vous avez acheté votre appareil
électroménager, ou téléphoner au Centre
d'Interaction avec la Clientèle KitchenAid,
sans frais d’interurbain, entre 8 h 30 et
18 h 00 (HNE), en composant 1-800-235-0665.
2. Si vous avez besoin de service✝...
Communiquer avec la succursale ou établissement de
service autorisé de KitchenAid Canada la plus proche
pour l’entretien de votre appareil. (Voir liste ci-dessous.)
S’assurer que la compagnie de service que vous
contactez est autorisée à faire l’entretien de votre
appareil durant la période de garantie.
Si vous avez besoin de plus d’assistance, vous
pouvez écrire en soumettant toute question ou
problème au :
Service des relations avec la clientèle
KitchenAid Canada
1901 Minnesota Court
Mississauga, Ontario L5N 3A7
Veuillez indiquer dans votre correspondance un numéro
de téléphone où l’on peut vous joindre le jour.
D
EMANDE D’ASSISTANCE OU DE SERVICE
✝
Lorsque vous demandez de l’assistance ou un
service, veuillez fournir une description détaillée
du problème, les numéros complets du modèle et
de série de l’appareil, et la date d’achat. (Voir la
section «Note à l’utilisateur.» Ces renseignements
nous aideront à mieux répondre à votre demande.
Avant de faire un appel pour assistance ou service,
veuillez vérifier la section “Guide de dépannage”.
Cette vérification pourrait vous faire économiser le
coût d’une visite de service. Si vous avez encore
besoin d’aide, suivre les instructions ci-dessous.
Si vous avez besoin d'assistance ou de service au
Canada
Page 62

Garantie du réfrigérateur encastré
KITCHENAID PAIERA POUR
Les pièces de remplacement et le coût de la
main-d’œuvre pour réparer les vices des
ampoules d’éclairage. Le service doit être
fourni par un établissement de service
désigné par KitchenAid.
Les pièces de remplacement et le coût
de la main-d’œuvre pour réparer les vices
de matériaux ou de main-d’œuvre. Le
service doit être fourni par un
établissement de service désigné par
KitchenAid.
Les pièces de remplacement et le coût
de la main-d’œuvre pour réparer les vices
de matériaux ou de main-d’œuvre dans
le système scellé de réfrigération.
Ces pièces sont :
1. Compresseur;
2. Évaporateur;
3. Condenseur;
4. Déshydratateur;
5. Tuyau de raccordement.
Le service doit être fourni par un
établissement de service désigné par
KitchenAid.
Les pièces de remplacement pour
corriger les vices de matériau ou de
main-d’œuvre du système scellé de
réfrigération.
Ces pièces sont :
1. Compresseur;
2. Évaporateur;
3. Condenseur;
4. Déshydratateur;
5. Tuyau de raccordement.
Les pièces de remplacement pour
corriger les vices de matériau ou de
main-d’œuvre dans les balconnets de la
porte du réfrigérateur.
KITCHENAID ET KITCHENAID CANADA NE SONT PAS RESPONSABLES POUR LES DOMMAGES FORTUITS OU
INDIRECTS. Certains États ou certaines provinces ne permettent pas l’exclusion ou la limitation des dommages
fortuits ou indirects de sorte que cette exclusion ou limitation peut ne pas s’appliquer dans votre cas.
Cette garantie vous confère des droits juridiques spécifiques et vous pouvez également avoir d’autres droits,
variables d’un État à l’autre ou d’une province à l’autre.
À l’extérieur du Canada et des États-Unis, une garantie différente peut s’appliquer. Pour des détails,
communiquer avec votre marchand KitchenAid autorisé.
Si vous avez besoin de service, voir d’abord la section «Guide de dépannage» dans ce livret. Après avoir vérifié le
«Guide de dépannage», une aide additionnelle peut être trouvée en vérifiant la section «Demande d’aide ou de service»
ou en téléphonant à notre Centre d’assistance aux consommateurs au numéro de téléphone, 1-800-235-0665 (sans
frais), de partout aux É.-U. ou au Canada.
KITCHENAID NE PAIERA PAS POUR :
A. Les visites de service pour :
1. Rectifier l’installation du réfrigérateur.
2. Donner des instructions concernant
l’utilisation du réfrigérateur.
3. Remplacer les fusibles ou rectifier le
câblage électrique du domicile.
4. Remplacer la plomberie du domicile.
B. Les réparations lorsque le réfrigérateur
est utilisé à des fins autres que l’usage
normal domestique.
C. Les dommages au réfrigérateur
causés par un accident, des
modifications, un mauvais usage, des
abus, une installation inappropriée ou
non conforme aux règlements locaux
en matière d’électricité ou de
plomberie.
D. Toute perte d’aliments due à une
panne de l’appareil.
E. Tous frais de main-d’oeuvre au cours
des périodes de garantie limitée.
F. Les pièces de remplacement ou les
frais de main-d’oeuvre pour les
appareils utilisés à l’extérieur des
États- Unis ou du Canada.
G. Les réparations des pièces ou
systèmes résultant de modifications
non autorisées apportées à l’appareil.
H. L’enlèvement et le remplacement des
garnitures ou panneaux décoratifs qui
entravent l’entretien du produit.
I. La main-d’oeuvre ou les pièces
installées par une compagnie de
service non autorisée durant la période
de garantie complète, à moins d’avoir
été approuvées par KitchenAid avant
l’exécution du service.
J. Toute perte de médicaments due à
une panne de l’appareil.
DURÉE DE LA GARANTIE :
GARANTIE COMPLÈTE
DE UN AN
À COMPTER DE LA DATE
D’INSTALLA TION
GARANTIE COMPLÈTE DE
DEUX ANS
À COMPTER DE LA DATE
D’INSTALLATION
GARANTIE COMPLÈTE DE LA
TROISIÈME À LA SIXIÈME
ANNÉE INCLUSIVEMENT
À COMPTER DE LA DATE
D’INSTALLA TION
GARANTIE LIMITÉE DE LA
SEPTIÈME À LA DOUZIÈME
ANNÉE INCLUSIVEMENT
À COMPTER DE LA DATE
D’INSTALLA TION
GARANTIE LIMITÉE À VIE
SUR LES BALCONNETS
DANS LA PORTE DU
RÉFRIGÉRATEUR
11/99
®
30
Page 63

31
CERTIFICATS DE FILTRATION D'EAU
Page 64

9/00
Imprimé aux É.-U.
Pièce n° 2209477
© 2000 KitchenAid, U.S.A.
® Marque déposée de KitchenAid U.S.A., KitchenAid porteur de licence au Canada.
FEUILLES DE DONNÉES SUR LE PRODUIT
Système de filtration d`eau à la grille de la base, modèle WF-LC400/LC400
Système de filtration d’eau à la grille de la base, modèle WF-L500/L500
Ce produit a été testé et certifié par NSF International en vertu de la
norme 42 ANSI/NSF pour la réduction du goût et de l`odeur du chlore
(catégorie I) et en vertu de la norme 53 ANSI/NSF pour la réduction du
plomb, kystes et turbidité.
Réd. de substances U.S. EPA Affluent Effluent Effluent % de réd. % de réd. Numéro de
Effets esthétiques MCL moyen maximal moyen mínimale moyenne test NSF
Goût/odeur de chlore n.d. 2,0 mg/L n.d. 0,04 mg/L n.d. 98% 994707
Particules n.d. 610000/mL* n.d. 154/mL n.d. 99% 994711
Réduction de U.S. EPA Affluent Effluent Effluent % de réd. % de réd. Numéro de
contamination MCL moyen maximal moyen mínimale moyenne test NSF
Kyste 99,95%** 89,250/mL* 6/mL 2,3/mL 99,993% 99,997% 994710
Turbidité 0,5 NTU 29 NTU 0,12 NTU 0,09 NTU 99,59% 99,69% 994710
Plomb: @ pH 6,5 0,015 mg/L 0,16 mg/L*** 0,001 mg/L 0,001 mg/L 99,4% 99,4% 994708
Plomb: @ pH 8,5 0,015 mg/L 0,16 mg/L*** 0,002 mg/L 0,001 mg/L 98,8% 99,4% 994709
Capacité 400 gallons (1514 litres)
Débit de service : 0,5 GPM (1,89 L/min)
à 60 lb/po
2
.
*L’exigence de test est au moins de 100 000 particules/mL de poussière de test fine AC. **Le rendement en rapport au kyste est le % de réduction,
d’après la norme 53 NSF. ***L’exigence de test est 0,15 mg/L+ 10%. Ces contaminants ne sont pas nécessairement dans votre approvisionnement
d’eau. Le rendement peut varier d’après les conditions locales de l’eau.
■
Il est essentiel que les exigences de fonctionnement,
d’entretien et de remplacement de filtre soient respectées pour
que ce produit donne le rendement annoncé.
■
Modèle WF-LC400 Le système de contrôle du filtre mesure la
quantité d’eau qui passe par le filtre et vous signale quand
remplacer le filtre. Lorsque 90% de la vie utile du filtre est
écoulé, le témoin lumineux du filtre passe du vert au jaune.
Lorsque 100% de la vie utile du filtre est écoulé, le témoin
lumineux du filtre passe du jaune au rouge et il est
recommandé de remplacer le filtre. Utiliser la car touche de
remplacement LC400, nº 9902. Pr ix suggéré au détail en 2000
de 39.95 $US/49,95 $CAN.
■
Modèle WF-NL500 Le système de contrôle du filtre mesure la
quantité d’eau qui passe par le filtre et vous signale quand
remplacer le filtre. Lorsque 90% de la vie utile du filtre est
écoulé, le témoin lumineux du filtre passe du vert au jaune.
Lorsque 100% de la vie utile du filtre est écoulé, le témoin
lumineux du filtre passe du jaune au rouge et il est
recommandé de remplacer le filtre. Utiliser la car touche de
remplacement L500, nº de pièce 4392857. Pr ix suggéré au
détail en 2000 de 29,95 US/39,95 $CAN.
■
Le produit ne doit être utilisé que pour l’eau froide seulement.
■
Ne pas utiliser avec de l’eau microbiologiquement dangereuse
ou de qualité inconnue sans une désinfection avant ou après le
système.
■
Se référer à la section « Assistance ou Service » pour le nom,
l’adresse et le numéro de téléphone du fabricant.
■
Se référer à la section « Garantie » pour la garantie limitée du
fabricant.
Approvisionnement en eau Collectivité ou puits
Pression d’eau 30-120 lb/po2(207 – 827 kPa)
Température d’eau 33° - 100°F (0,6° - 37,8°C)
Directives d’application/Paramètres
d’approvisionnement en eau.
Ce produit a été testé et certifié par NSF International en vertu de la
norme 42 ANSI/NSF pour la réduction du goût et de l`odeur du chlore
(catégorie I) et en vertu de la norme 53 ANSI/NSF pour la réduction du
plomb, kystes et turbidité.
Réd. de substances Affluent Effluent Effluent % de réd. % de réd. Numéro de
Effets esthétiques moyen maximal moyen mínimale moyenne test NSF
Goût/odeur de chlore 2,0 mg/L n.d. 0,1 mg/L n.d. 95% 981788
Réduction de U.S. EPA Affluent Effluent Effluent % de réd. % de réd. Numéro de
contamination MCL moyen maximal moyen mínimale moyenne test NSF
Performance
††
Plomb: @ pH 6,5 0,015 mg/L 0,16 mg/L
†
0,007 mg/L 0,005 mg/L 95% 97% 976115
Plomb: @ pH 8,5 0,015 mg/L 0,14 mg/L
†
0,0012 mg/L 0,008 mg/L 91% 9 4% 976116
Capacité 500 gallons (1893 litres)
Débit de service : 0,5 GPM (1,89 L/min)
à 60 lb/po
2
.
†
L’exigence du test est de 0,15 mg/L + 10%
††
Ces contaminants ne sont pas nécessairement dans votre approvisionnement d’eau.Le rendement peut varier selon les conditions de l’eau
®
NSF est une marque de commerce déposée de NSF International
Page 65

2209477 www.kitchenaid.com
REFRIGERADORES EMPOTRADOS, CON
PUERTAS LATERALES, DE 36 PULG. (91.4 CM),
42
PULG. (106.7 CM
), 48 PULG. (121.9 CM)
con FILTRACIÓN DE AGUA
®
POR LA FORMA EN QUE ESTÁ HECHA
®
Page 66

2
U
NA NOTA PARA USTED
Gracias por comprar un electrodoméstico
KitchenAid®.
KitchenAid diseña los mejores artefactos para la sección
más importante de su casa. Para asegurar que usted
disfrute de muchos años de funcionamiento sin
problemas, hemos diseñado este Manual de Uso y
Cuidado.Contiene información valiosa sobre cómo operar
y dar mantenimiento a su electrodoméstico en forma
adecuada y segura. Por favor, léalo detenidamente.
Pagina
Una nota para usted ....................................................... 2
Seguridad del Refrigerador........................................... 3
Cómo desechar debidamente su
refrigerador antiguo ..................................................... 3
Partes y Características................................................. 4
Cómo usar su refrigerador............................................ 5
Cómo quitar el panel superior de ventilación.............. 5
Cómo usar el interruptor On/Off ................................. 5
Sistema de control de temperatura
ExtendFresh™ ............................................................ 6
Cómo ajustar los controles de temperatura ................ 6
Características del refrigerador................................... 7
Compartimiento de uso general .......................... 7
Bandejas de la puerta .......................................... 7
Anaqueles voladizos SpillClean™....................... 7
Cajón para carne FreshChill™............................. 8
Cajones para verduras ClearVue™
con control de humedad...................................... 9
Recipiente con tapa para huevos........................10
Anaquel para vinos..............................................10
Características del congelador ...................................10
Rejillas del congelador..........................................10
Cestas corredizas del congelador .......................10
Page
Funcionamiento de la máquina de hacer hielo...........11
Solución de problemas comunes de la
máquina de hacer hielo .......................................11
Cómo quitar el recipiente de la máquina
de hacer hielo .....................................................12
Distribuidores de hielo y agua fría.......................13
Sistema de filtración de agua y monitoreo..................15
Rejilla de la base.........................................................16
Bandeja colectora del agua.........................................17
Cómo cambiar los focos .............................................17
Sonidos provenientes de su refrigerador....................18
Ahorro de energía.......................................................18
Cuidado de su refrigerador...........................................19
Limpieza del refrigerador ............................................19
Cuidado durante las vacaciones y mudanzas............20
Interrupciones de energía eléctrica ............................20
Guía para la conservación de los alimentos...............21
Almacenamiento de alimentos frescos.......................21
Almacenamiento de alimentos congelados ................22
Diagnóstico de problemas...............................................23
Cómo solicitar ayuda o servicio técnico .....................28
Garantía...........................................................................30
Í
NDICE
Anote la información sobre su modelo.
Escriba la siguiente información sobre su refrigerador
para que podamos ayudarlo mejor a obtener asistencia o
servicio si llegara a necesitarlos. Usted deberá saber el
número del modelo y el número de serie completos.
Puede encontrar esta información en la etiqueta/placa del
número del modelo y serie.
Si necesita asistencia o servicio, primero consulte la
sección de “Diagnóstico de problemas” de este manual.
Después de consultar esta sección, podrá obtener ayuda
adicional consultando la sección de “Cómo solicitar ayuda
o servicio”.
Nombre del vendedor
Dirección
Número de teléfono
Número del modelo
Número de serie
Fecha de compra
(Consulte la sección de “Partes y características” para
ubicar la etiqueta/placa del número del modelo y serie.)
Guarde este manual y su recibo de compra
juntos para referencia futura.
Page 67

3
•
Conecte el refrigerador en un tomacorriente con
conexión a tierra de tres terminales.
•
No retire el terminal de conexión.
•
No utilice un adaptador.
•
No utilice un cable eléctrico de extensión.
•
Desconecte el suministro de energía antes de darle
mantenimiento o servicio.
•
Quite las puertas de su refrigerador antiguo.
•
Utilice únicamente productos de limpieza no
inflamables.
•
No instale el refrigerador cerca de un horno, radiador u
otra fuente de calor.
•
Mantenga materiales inflamables y vapores, tales como
gasolina, lejos del refrigerador.
•
Se necesitan dos o más personas para mover o
instalar el refrigerador.
•
Desconecte el refrigerador antes de instalar la máquina
de hacer hielo.
•
Utilice un vaso resistente para sacar hielo o agua (en
algunos modelos).
INSTRUCCIONES IMPORTANTES DE SEGURIDAD
Si no sigue las instrucciones, usted puede morir o sufrir una
lesión grave.
PELIGRO
AD VERTENCIA
Su seguridad y la seguridad de los demás es muy importante.
Hemos incluido muchos mensajes importantes de seguridad en este manual y en su electrodoméstico.
Lea y obedezca siempre todos los mensajes de seguridad.
Este es el símbolo de advertencia de seguridad.
Este símbolo le llama la atención sobre peligros potenciales que pueden ocasionar la muerte o una lesión a usted y a los demás.
Todos los mensajes de seguridad irán a continuación del símbolo de advertencia de seguridad y de la palabra “PELIGRO”
o “ADVERTENCIA”. Estas palabras significan:
Todos los mensajes de seguridad le dirán el peligro potencial, le dirán cómo reducir las posibilidades de
sufrir una lesión y lo que puede suceder si no se siguen las instrucciones.
Si no sigue las instrucciones de inmediato
, usted puede
morir o sufrir una lesión grave.
S
EGURIDAD DEL REFRIGERADOR
Peligro de asfixia
Quite las puertas de su refrigerador antiguo.
No seguir esta instrucción puede ocasionar la muerte o
daño al cerebro.
Como desechar debidamente su refrigerador antiguo
IMPORTANTE: Los niños que se asfixian o quedan
atrapados dentro de un refrigerador no son problemas del
pasado.Los refrigeradores que son abandonados o
desechados aún constituyen un peligro ... aun si se “dejan en
el garaje por sólo unos días”. Si usted va a descartar su
refrigerador antiguo, siga por favor las siguientes
instrucciones para ayudar a evitar accidentes.
ANTES DE DESECHAR SU REFRIGERADOR O
CONGELADOR ANTIGUO:
•
Quite las puertas.
•
Deje los anaqueles en su lugar para que los niños no
puedan subirse con facilidad dentro del refrigerador.
AD VERTENCIA
– C
ONSERVE ESTAS INSTRUCCIONES
–
ADVERTENCIA: Para reducir el riesgo de incendio, choque eléctrico o lesión cuando
use su refrigerador, siga estas precauciones básicas:
Page 68

4
Esta sección contiene una ilustración de su refrigerador.
Úsela para familiarizarse más con las partes y
características. Para su conveniencia, se han indicado
también los números de las páginas correspondientes.
NOTA: este manual abarca varios modelos. El refrigerador
que usted ha comprado puede tener todas o algunas de
las partes y características que se indican a continuación.
P
ARTES Y CARACTERÍSTICAS
24
51
Cold Colder
▲
Superba 48
24
51
Cold Colder
Off
▲
Cold Colder
FreshChill
Meat Locker
ExtendFresh Temperature System
▲
Máquina de hacer hielo
(p.11)
Anaquel fijo de la puerta
(no es separable)
Recipiente para hielo
(p.12)
Luz del congelador
(debajo del recipiente
para hielo)
(p.17)
Etiqueta/placa del
número del modelo y
serie (p. 2)
Área de distribución de
agua y hielo (en algunos
modelos)
(p.13)
Rejilla ajustable del
congelador
(p.10)
Rejillas fijas del
congelador
(p.10)
Cestas corredizas del
congelador
(p.10)
Compartimiento
para uso general
(p.7)
Anaqueles voladizos
SpillClean™
ajustables
(p.7)
Bandejas de la
puerta ajustables
(p.7)
Recipiente con tapa
para huevos
(p.10)
Anaquel para vinos
(p.10)
Bandeja de la puerta
para galones
(p.7)
Control de temperatura
del cajón para carne
FreshChill™
(p.8)
Cajón para carne
ajustable Fresh Chill™,
roll-out (p.8)
Cajones para
verduras ClearVue™
roll-out, con control de
humedad
(p.9)
Luz del congelador
(detrás del panel de
control)
(p.17)
Control del
congelador
(p.6)
Panel
superior de
ventilación
(p.5)
Interruptor de
on/off (detrás
del panel
superior de
ventilación)
(p.5)
Control del
refrigerador
(p.6)
Luz del refrigerador
(detrás del panel de
control)
(p.17)
Luz indicadora del
filtro de agua
(p.15)
Tubo de suministro
de agua al
distribuidor (detrás
de la rejilla de la
base)
Bandeja colectora
del agua (detrás
de la rejilla de la
base)
(p.17)
Válvula de
agua (detrás
de la rejilla de
la base)
Rejilla de
la base
(p.16)
Sistema de
filtración de
agua y
monitoreo
(p.15)
Page 69

5
Peligro de choque eléctrico
Conecte el refrigerador en un tomacorriente con
conexión a tierra de tres terminales.
No retire el terminal de conexión a tierra.
No utilice un adaptador.
No utilice un cable eléctrico de extensión
No seguir estas instrucciones puede ocasionar la
muerte, un incendio o un choque eléctrico.
Para obtener los mejores resultados posibles de su
refrigerador, es importante que usted lo haga funcionar en
forma debida. Esta sección le explica cómo ajustar los
controles, cómo sacar y ajustar los componentes de su
refrigerador y cómo ahorrar energía.
Peligro de explosión
Mantenga materiales inflamables y vapores, tales como
gasolina, lejos del refrigerador.
No seguir esta instrucción puede ocasionar la muerte,
una explosión o un incendio.
AD VERTENCIA
C
ÓMO USAR SU REFRIGERADOR
AD VERTENCIA
Modelos con paneles
Para quitarlo:
1. Sujete el panel por ambos extremos.
2. Empuje derecho hacia arriba, luego jale derecho hacia afuera.
Para volver a colocarlo:
1. Inser te los ganchos (ubicados en la parte trasera del panel de
ventilación) en las ranuras de los soportes.
2. Jale el panel ligeramente hacia abajo para que encaje en su lugar.
Modelos con puertas laterales metálicas —
KSSC36F, KSSC42F , KSSC48F
Para quitarlo:
1. Sujete el panel con rejilla por ambos extremos.
2. Empuje derecho hacia arriba, luego jale derecho hacia afuera.
Para volver a colocarlo:
1. Inserte los ganchos (ubicados en la parte trasera del panel con rejilla)
en las ranuras de los soportes.
2. Jale el panel ligeramente hacia abajo para que encaje en su lugar.
Cómo quitar el panel superior de ventilación
O
FF
O
N
Cómo usar el interruptor On/Off (Encendido/Apagado)
El interruptor On/Off se encuentra detrás del panel superior de ventilación. Se
usa para apagar el suministro de energía al refrigerador para limpiarlo o
cambiar los focos.
Para apagar el suministro de energía:
1. Quite el panel superior de ventilación en los modelos con paneles.Quite el
panel inferior en los modelos con puertas laterales de acero inoxidable.
2. Ponga el interruptor On/Off en la posición de “OFF” (Apagado).
Para encender el suministro de energía:
1. Ponga el interruptor On/Off en la posición de “ON”.
2. Vuelva a colocar el panel de ventilación o el panel inferior.
IMPORTANTE: asegúrese de que el interr uptor On/Off esté en la posición de
“ON” después de limpiar el refrigerador o cambiar los focos.
Page 70

6
Sistema de control de temperatura
EXTENDFRESH™
El Sistema de control de temperatura ExtendFreshTM
controla la temperatura tanto en el compartimiento del
refrigerador como en el compartimiento del congelador
independientemente. El sistema ayuda a extender la
frescura de los alimentos en su refrigerador respondiendo
a cambios de temperatura de tan solo 1ºF. A diferencia de
la mayoría de los refrigeradores en el mercado
actualmente, el Sistema ExtendFresh utiliza un ventilador
Smart* para transferir el aire frío inmediatamente del
congelador al refrigerador para una respuesta más rápida
a los cambios de temperatura sin necesidad de que el
compresor se encienda. Asimismo, el sistema mantiene
temperaturas consistentes que son menos afectadas por
cambios de temperatura externa, como los cambios
estacionales y termostatos programables caseros o
incluso la temperatura de otros compartimientos dentro
del refrigerador.
Cómo ajustar los controles de temperatura
Los controles del refrigerador y del congelador han sido
preprogramados en la fábrica.Estas posiciones deben
ser correctas para el uso normal de un refrigerador
doméstico.Deje que el refrigerador funciones durante 24
horas para que enfríe ambas secciones antes de cambiar
las posiciones.
Para cambiar una posición de temperatura:
Ajuste el control del refrigerador y/o del congelador.
• Para que el refrigerador o el congelador enfríe más,
haga girar la perilla de control en el sentido de las
agujas del reloj.
• Para que el refrigerador o el congelador enfríen menos,
haga girar la perilla de control en sentido contrario de
las agujas del reloj.
IMPORTANTE: la posición “OFF” (Apagado) en el control
del congelador interrumpe totalmente la acción de
enfriamiento del refrigerador, pero no desconecta el
refrigerador del suministro de energía eléctrica.
Si fuera posible, espere a introducir los alimentos hasta
que haya transcurrido este período de 24 horas.Poner
los controles en posiciones de números más altos no
enfriará las secciones con más rapidez. Introducir
alimentos antes de que el refrigerador se haya enfriado
completamente puede hacer que al refrigerador le tome
más tiempo alcanzar las temperaturas deseadas y que
algunos alimentos se estropeen.
Después de 24 horas, ajuste los controles, un número a
la vez, según lo desee.El número “1” es la posición
menos fría y el “5” la más fría. Deje que el refrigerador
funcione durante 24 horas después de cada cambio en el
control.
Cold Colder
Off
24
51
▲
Cold Colder
Off
24
51
▲
Control del refrigerador
Control del congelador
(frio)
(mas frio)
(frio)
(mas frio)
(apagado)
Page 71

7
Características del refrigerador
Compartimiento de uso general
El compartimiento de uso general puede colocarse en cualquier posición
en la puerta del refrigerador.
Para quitarlo:
1. Sujete el compartimiento por ambos extremos.
2. Levante el compartimiento y jálelo.
Para volver a colocarlo:
1. Inserte los ganchos del compartimiento en las ranuras sucesivas en
ambos lados de la puerta del refrigerador.
2. Empuje el compartimiento hacia abajo para que encaje en su lugar.
Bandejas de la puerta
Las bandejas de la puerta tienen capacidad para botellas de dos litros y
pueden colocarse en cualquier posición en la puerta del refrigerador.
Para quitarlas:
1. Sujete la bandeja de la puerta.
2. Levante la bandeja hacia arriba y jálela.
Para volver a colocarlas:
1. Inserte los ganchos de la bandeja de la puerta en las ranuras
sucesivas en ambos lados de la puerta del refrigerador.
2. Empuje la bandeja hacia abajo para que encaje en su lugar..
Bandeja de la puerta para galones
La bandeja de la puerta para galones tiene capacidad para varios
recipientes tamaño galón y puede colocarse en cualquier posición en la
puerta del refrigerador.
Nota: colocar la bandeja de la puerta para galones directamente frente a
un anaquel interior o bandeja con tapa impedirá que la puerta del
refrigerador se cierre y puede dañar las bandejas y los anaqueles.
Para instalarla:
1.Inserte los sopor tes de fijación en las ranuras de ajuste de la puerta.
2. Empuje hacia abajo la bandeja para asegurar las lengüetas.
3. Si fuera necesario, ajuste los anaqueles interiores para que las jarras
de leche y los recipientes altos para bebidas puedan guardarse en la
bandeja para galones.
Anaqueles voladizos SpillClean
™
Ajuste los anaqueles de acuerdo con la forma en que usted usa su
refrigerador.
IMPORTANTE: no limpie los anaqueles voladizos con agua tibia cuando
estén fríos. Los anaqueles pueden romperse si son expuestos a cambios
o impactos súbitos de temperatura. Para su protección, el vidrio templado
de estos anaqueles está diseñado para romperse en muchos pedazos
tamaño guijarros. Esto es normal.
Para quitarlos:
1. Incline el anaquel hacia arriba por la parte delantera y levántelo por la
parte trasera.
2. Jale el anaquel derecho hacia fuera.
IMPORTANTE: los anaqueles voladizos son pesados. Manipúlelos con
cuidado.
Para volver a colocarlos:
1. Inserte los ganchos posteriores del anaquel en las ranuras de los
soportes del anaquel, en la par te trasera de la pared del refrigerador.
2. Incline el anaquel hacia arriba por la par te delantera hasta que los
ganchos encajen en las ranuras.Baje la par te delantera del anaquel
para nivelar su posición.
3. Verifique la establidad del anaquel para asegurarse de que los ganchos han
sido insertados debidamente.
EVITE
ANAQUEL
BANDEJA
Page 72

8
Cajón para carne
FreshChill
™
Cómo ajustar el control de temperatura del
cajón para carne
FreshChill™
El control de temperatura del cajón para carne FreshChill
le permite ajustar la temperatura de almacenamiento del
cajón para carne FreshChill.
El aire frío fluye hacia el cajón para carne a través de un
conducto de aire entre el congelador y el refrigerador.
Ajustar el control permite que un cantidad mayor o menor
de aire frío pase por el conducto de aire. Ponga el control
en “Cold” (Frío) para cerrar el conducto de aire.
IMPORTANTE: si un alimento se congela en el cajón
para carne FreshChill, en el compartimiento de uso
general o en uno de los cajones para verduras, ponga el
control de temperatura del cajón para carne FreshChill en
“Cold” (Frío). Si el distribuidor de agua deja de funcionar,
podría haberse congelado el agua en la tubería. Si esto
ocurriera, ponga el control de temperatura del cajón para
carne FreshChill en “Cold” (Frío).
El cajón para carne FreshChillTM está diseñado para
proporcionar temperaturas de almacenamiento más frías
que la temperatura media de un refrigerador.El cajón
para carne puede colocarse en cualquier par de ranuras
sucesivas.No obstante, para uso con temperatura
controlada, el cajón para carne debe insertarse en el
penúltimo (hacia abajo) par de ranuras. El cajón para
carne FreshChill puede desprenderse para su limpieza.
IMPORTANTE: si se coloca el cajón para car ne en
cualquier par de ranuras que no sean las penúltimas
(hacia abajo), debe obturarse el orificio de suministro de
aire. Use el tapón pegado a la parte inferior interna del
cajón para carne para obturar el orificio de suministro de
aire.
El conector de aire de goma (ubicado en la parte trasera
del cajón) dirige aire del orificio de suministro de aire
hacia el cajón. Si se desprende el conector de aire vuelva
a colocarlo introduciéndolo en la abertura cuadrada que
está en la parte trasera del cajón.
Para quitarlo:
1. Deslice el cajón hacia fuera, hasta el tope.
2. Levante ligeramente la parte delantera del cajón.
3. Deslice el cajón hasta sacarlo completamente.
Para volver a colocarlo:
1. Coloque los rodadillos del cajón entre el rodadillos
delantero de la carrilera y la carrilera.
2. Empuje el cajón hacia arriba sobre la carrilera.
3. Deslice el cajón hacia adentro hasta el tope.
M
E
A
T
L
O
C
K
E
R
(Cajón para
carne)
(Más frío)(Frío)
Page 73

9
U
T
IL
IT
Y
L
O
W
H
I
G
H
1
2
3
4
5
H
um
id
ityC
o
n
tro
l
L
O
W
H
I
G
H
1
2
3
4
5
H
u
m
id
ity
C
o
n
tro
l
Cajones para verduras ClearVue
™
con control de humedad
Los cajones para verduras con control de humedad están
diseñados para mantener los vegetales y las frutas
frescos por más tiempo.Los controles del cajón para
verduras se encuentran en la parte delantera del cajón.
Los controles ajustan la humedad en los cajones. Deslice
el control hasta “HIGH” (Alto nivel) para las lechugas,
coles y otros productos agrícolas que tienen hojas.
Deslice el control hasta “LOW”(Bajo nivel) para las
manzanas, maíz y otros productos agrícolas que tienen
cáscara.
Los cajones para verduras con control de humedad son
intercambiables.La sección de ClearVue (“transparente”)
le permite ver el contenido de los cajones para verduras
sin abrirlos.
IMPORTANTE: ocasionalmente, un alimento se puede
congelar en el cajón para carne FreshChill, en el
compartimiento de uso general o en uno de los cajones
para verduras.Cuando esto ocurra, ponga el control de
temperatura del cajón para carne FreshChill en “Cold”
(Frío).
Para quitar los cajones para verduras:
1. Deslice el cajón hacia fuera hasta el tope.
2. Levante la parte delantera del cajón y deslice el cajón
completamente hacia afuera.
Para volverlos a colocar:
1. Coloque los rodadillos del cajón entre el rodadillos
delantero de la carrilera y la carrilera.
2. Empuje el cajón hacia arriba sobre la carrilera.
3. Deslice el cajón hacia adentro hasta el tope.
Para quitar las cubiertas de vidrio:
1. Levante el lado derecho de la cubierta de vidrio para
liberar el retenedor y el lado izquierdo de la cubierta.
2. Quite con cuidado la cubier ta de vidrio.
Para volver a colocar la cubierta de vidrio:
1. Coloque el retenedor en el lado derecho de la cubier ta
de vidrio.
2. Inser te el lado izquierdo de la cubier ta de vidr io en la
muesca en el lado izquierdo del cajón..
3. Baje la cubier ta de manera que las espigas del
retenedor queden en los orificios guía en el lado
derecho del cajón.
Para quitar la sección ClearVue:
1. Quite la cubierta de vidr io.
2. Deslice la sección ClearVue por la carrilera, alejándola
del retenedor.
3. Vuelva a colocarla en el orden inverso.
Page 74

10
Recipiente con tapa para huevos
El recipiente con tapa para huevos con transportador
proporciona protección adicional para guardar huevos en
cualquier parte dentro de la sección de su refrigerador. El
recipiente ClearVue™ le permite ver cuántos huevos
tiene guardados.
Anaquel para vinos
Inserte el anaquel para vinos deslizándolo entre un
anaquel del refrigerador y la pared del compartimiento
del refrigerador.
Características del
congelador
Rejillas del congelador
Para quitarlas:
1. Levante la rejilla.
2. Deslice la rejilla derecho hacia afuera..
3. Vuelva a colocarla en el orden inverso.
Cestas corredizas del congelador
Para quitarlas:
1. Deslice la cesta hacia fuera hasta el tope.
2. Levante ligeramente la cesta y muévala hacia la
izquierda.
3. Deslice la cesta completamente hacia afuera.
Para volver a colocarlas:
1. Coloque la cesta en las carrileras para rejillas y
muévala hacia la izquierda.
2. Empuje la cesta hasta el tope en el lado izquierdo.
3. Levante ligeramente el lado izquierdo de la cesta para
despejar el tope.
4. Empuje la cesta completamente hacia adentro.
IMPORTANTE: asegúrese de que ambos lados de la
cesta estén en las carrileras antes de llenarla con
alimentos.
Nota: el anaquel fijo en la puerta del congelador no es
separable.
Page 75

11
Funcionamiento de la máquina de
hacer hielo
Para poner en marcha la máquina de hacer hielo:
• Sólo para modelos con distribuidor: tire del panel
que cubre la máquina de hacer hielo hacia afuera
desde la parte inferior y deslícelo hacia atrás. e.
• Empuje hacia abajo la palanca de la máquina de hacer
hielo, a la posición de “ON” (Encendido).
La máquina de hacer hielo se llena de agua y comienza a
hacer hielo.Deje que transcurran 24 horas para que se
produzca el primer lote de hielo. La máquina de hacer
hielo deberá producir a partir de entonces de 7 a 9 lotes
de hielo en cada período de 24 horas bajo condiciones
normales. Deseche los primeros tres lotes de hielo.
Cuando se haya formado el hielo, los cubos de hielo caen
en el recipiente para hielo.Cuando el recipiente está lleno,
la palanca de la máquina de hacer hielo sube a la posición
de “OFF” (Apagado).
Para detener la máquina de hacer hielo:
• Levante la palanca de la máquina de hacer hielo hasta
que haga “clic” en la posición de “OFF”.
• No fuerce la palanca hacia arriba o hacia abajo. No
guarde nada sobre la máquina de hacer hielo ni en el
recipiente para hielo.
Palanca
hacia
abajo
(ON)
hacia
arriba
(OFF)
Solución de problemas comunes de la máquina de hacer hielo
CAUSA/SOLUCIÓN POSIBLE
Esto es normal. Los cubos se rompen fácilmente. Agite ocasionalmente el recipiente
para hielo para que los cubos se mantengan separados.
La palanca de ON/OFF está en la posición de “OFF” (hacia arriba). Baje la palanca a
la posición de “ON” (hacia abajo).
El congelador no está lo suficientemente frío. Ajuste los controles de temperatura y
espere 24 horas. (Vea “Cómo ajustar los controles de temperatura” en la página 6).
La tubería de cobre está enroscada. Revise la tubería de agua.
Las nuevas conexiones de plomer ía pueden ocasionar hielo descolor ido o con mal
sabor.Deseche los primeros lotes de hielo.
Los cubos han estado en el recipiente mucho tiempo.Deséchelos y haga un nuevo
lote.
La comida no está debidamente envuelta.Vea la página 21.
El congelador y el recipiente para hielo necesitan limpieza.Ver página 19.
El agua podría contener minerales (como azufre). Podría ser necesario instalar un
filtro para eliminarlos.
No hay agua en el tanque.Mantenga presionada por varios minutos la palanca del
distribuidor de agua. Cuando salga el agua el tanque estará lleno.
PROBLEMA
Los cubos de hielo se pegan
por las esquinas
La máquina de hacer hielo
no funciona o el hielo no se
hace con la suficiente
rapidez
El hielo tiene mal sabor o
mal olor
No se produce hielo
Page 76

12
Cómo quitar el recipiente de la
máquina de hacer hielo
Según el modelo, el recipiente de la máquina de hacer
hielo tiene capacidad para las siguientes cantidades de
hielo:
36 pulg. - 8.5 libras (3.9 kg)
42 pulg. – 13.5 libras (6.1 kg)
48 pulg. – 17.6 libras (8 kg)
Saque y deseche periódicamente el hielo que no se ha
utilizado para reducir las posibilidades de que adquiera
mal sabor o mal olor.Se puede sacar el recipiente para
hielo para limpiarlo o para desechar grandes cantidades
de hielo de una sola vez.
Nota: en los modelos sin distribuidor de hielo y agua fría,
el recipiente para hielo no se puede sacar lleno de hielo
si el tope de la puerta del congelador está fijado a una
apertura de 90°.
S
to
ra
g
e
B
in
Panel que
cubre la
máquina de
hacer hielo
hacia abajo.
Panel que
cubre la
máquina de
hacer hielo
hacia arriba.
Para sacar el recipiente:
1. Tire del panel que cubre la máquina de hacer hielo
hacia afuera desde la parte inferior y deslícelo hacia
atrás.
2. Levante la palanca de la máquina de hacer hielo hasta
que haga “clic” en la posición de “OFF”.
Únicamente para modelos con distribuidor: no se
puede producir más hielo mientras la máquina de
hacer hielo esté en la posición de “OFF”, pero podrá
seguir siendo distribuido cuando la puerta del
congelador esté cerrada.
3. Levante la parte delantera del recipiente y tire de él
para sacarlo.
4. Vacíe el recipiente. Utilice agua caliente o tibia para
derretir el hielo, si fuera necesario hacerlo.Nunca
utilice objetos puntiagudos para romper el hielo que
esté en el recipiente.
Para volver a colocarlo:
1. Empuje completamente hacia adentro el recipiente
para hielo.
2. Baje la palanca de la máquina de hacer hielo a la
posición de “ON” para reiniciar la máquina de hacer
hielo.
3. Baje el panel que cubre la máquina de hacer hielo.
Page 77

13
Distribuidores de hielo y agua fría
(modelos KSSP36Q, KSSP42Q, KSSP48Q, KSSS36Q, KSSS42Q, KSSS48Q)
Distribuidor de hielo:
El hielo sale del recipiente de hielo de la máquina de
hacer hielo en el congelador.Cuando se presiona la barra
del distribuidor, se abre una escotilla en un conducto entre
el distribuidor y el recipiente para hielo.El hielo cae del
recipiente y pasa a través del conducto. Cuando se suelta
la barra del distribuidor, se podrá oír un zumbido durante
unos segundos..
Su refrigerador distribuye hielo en cubos y
triturado.Antes de recibir el hielo, seleccione
el tipo de hielo que prefiere. Para hielo
triturado, presione el botón a la izquierda sobre la palabra
“ICE” (Hielo). Para hielo en cubos, presione el botón a la
derecha sobre la palabra “ICE”.
Para que salga hielo:
1. Presione el botón del tipo de hielo que desee.
2. Presione un vaso resistente contra la barra del
distribuidor de hielo.Mantenga el vaso cerca de la
abertura del distribuidor para que el hielo no caiga fuera
del vaso.
3. Retire el vaso para que deje de salir hielo.
Distribuidor de agua
IMPORTANTE: si el distr ibuidor de agua deja de funcionar,
el agua podría estar congelada en la tubería de agua que
va al distribuidor. Si esto sucede, ponga el control de
temperatura del cajón para carne FreshChill* en “Cold”
(Frío).
El agua fría viene de un depósito que está detrás de los
cajones para verduras.Deje que transcurran 24 horas para
que se enfríe el primer depósito lleno de agua.
El agua fría viene de un depósito que está detrás de los
cajones para verduras.Deje que transcurran 24 horas para
que se enfríe el primer depósito lleno de agua.
Cuando el refrigerador se conecta por primera vez,
presione la barra del distribuidor de agua hasta que haya
obtenido y desechado de 2 a 3 cuartos (de 1.9 a 2.9 L) de
agua. Esto elimina el aire del sistema y enjuaga el filtro de
agua, el depósito y los tubos. La máquina de hacer hielo
no producirá hielo sin que se llene el depósito.
Si el distribuidor no se utiliza con regularidad, haga correr
una cantidad suficiente de agua cada semana para
refrescar el suministro de agua. Deje que transcurran de
dos a tres horas para que se enfríe un nuevo suministro
de agua.
ICE
AD VERTENCIA
Peligro de cortadura
Utilice un vaso resistente para recibir hielo o agua.
No seguir esta instrucción puede resultar en
cortaduras.
ICE
IMPORTANTE: la pequeña bandeja que está debajo del
distribuidor está diseñada para evaporar pequeños
derrames de agua. No hay desagüe en la bandeja. No vierta
agua en ella.
Para que salga agua:
1. Presione un vaso resistente contra la barra del
distribuidor de agua.
2. Retire el vaso para que deje de salir agua.
ICE
Page 78

14
Consejos para el funcionamiento del distribuidor y la máquina de hacer hielo
SOLUCIÓN
Cierre la puerta del congelador
Asegúrese de que el recipiente para hielo haya
sido empujado completamente.
Utilice únicamente cubos individuales. Agite
ocasionalmente el recipiente para hielo para
mantener los cubos separados y que haya más
espacio.
Deseche el hielo viejo y haga un nuevo lote.
Deje que el motor del distribuidor descanse unos
tres minutos. Las cantidades grandes de hielo
deben sacarse del recipiente para hielo, no a
través del distribuidor.
Apague el Lock Out.
Llame a la compañía de servicios públicos de su
localidad.
Quite el filtro de agua del refrigerador.Vuelva a
colocar la tapa del filtro en la rejilla.Ver página
16.
Consulte las instrucciones de instalación del
sistema de filtración de agua para verificar si el
filtro fue instalado correctamente y no está
obstruido.
Deseche el hielo viejo y haga un nuevo lote;
guarde el exceso de hielo en un recipiente con
tapa.
Para obtener mejores resultados, evite conectar la
máquina de hacer hielo a un suministro de agua
blanda. Si no se puede evitar el suministro de
agua blanda, asegúrese de que al ablandador de
agua se le dé el debido mantenimiento y de que
funciona adecuadamente.
Envuelva bien los alimentos en materiales a
prueba de aire y humedad.Ver página 21.
Limpie el congelador y el recipiente para hielo.
Para instrucciones, ver “Limpieza del refrigerador”
en la página 19.
Siga las instrucciones de instalación para la
debida conexión del suministro de agua de la
máquina de hacer hielo.
Los primeros lotes de hielo de una máquina de
hacer hielo nueva podrían tener mal sabor.
Deseche este hielo y haga un nuevo lote.
PROBLEMA
Los distribuidores no
funcionan
El distribuidor de hielo no
funciona
Hielo con mal sabor y olor
CAUSA
La puerta del congelador
está abierta
El recipiente para hielo no ha
sido instalado debidamente
El recipiente tiene el tipo de
hielo incorrecto
El distribuidor no ha sido
usado por mucho tiempo, lo
que ha hecho que los cubos
de hielo se peguen.
La barra del distribuidor de
hielo ha sido presionada por
mucho tiempo.
Se ha seleccionado “Lock
Out”
Baja presión de agua
Se está utilizando un
sistema de filtración de agua
por ósmosis invertida.
El sistema de filtración de
agua fue instalado
incorrectamente o está
obstruido.
El helo atrae olores
aerotransportados; el hielo
es muy viejo.
Calidad del agua.
Los alimentos no están
envueltos debidamente.
El recipiente para hielo y el
congelador podrían necesitar
limpieza.
Las cañerías podrían infiltrar
la máquina de hacer hielo.
Máquina de hacer hielo
nueva
Page 79

15
Sistema de filtración de agua y
monitoreo
La luz indicadora del filtro de agua
La luz indicadora del filtro de agua le ayudará a
determinar cuándo cambiar el cartucho de su filtro de
agua. La luz se encuentra en la parte superior del
compartimiento del refrigerador. La luz cambiará de
verde a amarillo.Esto le indica que ya es tiempo de
cambiar el cartucho del filtro de agua (el 90% del filtro
ha sido utilizado). Se recomienda reemplazar el cartucho
del filtro de agua cuando la luz indicadora del filtro de
agua cambie a rojo O cuando el flujo de agua a su
distribuidor de agua o a la máquina de hacer hielo se
reduzca en forma evidente.(Ver abajo “Cómo cambiar
un cartucho del filtro de agua”).
NOTA: no utilice agua que sea microbiológicamente
peligrosa o de calidad desconocida sin la debida
desinfección, antes o después del sistema.
Después de cambiar el cartucho del filtro de agua,
reposicione la luz indicadora del filtro de agua
oprimiendo 5 veces el botón del interruptor de la luz. La
luz indicadora cambiará de rojo a verde cuando el
sistema haya sido reposicionado.
Cómo cambiar un cartucho del filtro
de agua
El filtro de agua se encuentra debajo de la puerta del
compartimiento del refrigerador.
1. Localice la tapa del cartucho del filtro de agua en la
rejilla de la base delantera debajo de la puerta del
compartimiento del congelador. Haga girar la tapa en
sentido contrario al de las agujas del reloj hasta una
posición vertical y tire de la tapa y el cartucho del
filtro para sacarlos a través de la rejilla de la base.
NOTA: habrá agua en el cartucho. Podría derramarse
un poco.
2. Quite la tapa del cartucho deslizándola fuera del
extremo del cartucho viejo. La tapa se deslizará hacia
la izquierda o hacia la derecha. NO DESECHE LA
TAPA.
3. Saque el cartucho nuevo de su caja y quite la
cubierta protectora de los anillos en “O”.
4. Deslice la tapa del cartucho en el cartucho nuevo
como se muestra.
1.
2.
3.
4.
interruptor
de la luz
Page 80

16
5. Con la tapa del cartucho en la posición vertical,
empuje el cartucho nuevo dentro de la rejilla de la
base hasta el tope. Haga girar la tapa del cartucho en
el sentido de las agujas del reloj hasta la posición
horizontal.
6. HAGA CORRER AGUA A TRAVÉS DEL
DISTRIBUIDOR HASTA QUE EL AGUA SALGA
CLARA (aproximadamente 2 ó 3 galones o 6 ó 7
minutos). Esto limpiará el sistema y eliminará aire de
las tuberías. En algunas casas podría ser necesario
limpiar con descargas de agua adicionales.
NOTA: a medida que el aire va siendo eliminado del
sistema, podrían salir chorros de agua del
distribuidor.
Cómo usar el distribuidor sin filtro de
agua
Usted puede hacer funcionar el distribuidor sin un
cartucho de filtro de agua. El agua no será filtrada. Si
usted hace funcionar el distribuidor sin un cartucho de
filtro de agua, guarde la tapa del cartucho y colóquela
en la rejilla de la base para uso en el futuro.
1. Quite el cartucho del filtro de agua (ver “Cómo
cambiar un cartucho del filtro de agua” anteriormente
en esta sección). Luego deslice la tapa del cartucho
para sacarla del extremo del cartucho del filtro. NO
DESECHE LA TAPA.
2. Con la tapa del cartucho en la posición vertical,
inserte la tapa en la rejilla de la base hasta el tope.
3. Haga girar la tapa del cartucho hasta la posición
horizontal.
NOTA: la tapa del car tucho podría no estar nivelada
con la rejilla de la base.
Cómo pedir filtros de reemplazo
Para pedir más cartuchos de filtro de agua, llame al 1800-253-1301 y pida el accesorio Parte # 4392857 o
contacte a su vendedor de productos KitchenAid
autorizado.
Sistema de filtración de agua y monitoreo (cont.)
Rejilla de la base
Para quitarla:
1. Quite un tornillo en cada extremo de la rejilla de la
base.
2. Quite la rejilla de la base.
3. Vuelva a colocarla en el orden inverso.
Page 81

17
Bandeja colectora del agua
La bandeja colectora de agua se encuentra detrás de la
rejilla de la base, hacia el lado izquierdo del refrigerador.
Para sacarla:
1. Ponga el interruptor On/Off (Encendido/Apagado) en la
posición de “OFF”.(Ver instrucciones en la página 5).
2. Quite la rejilla de la base.
3. Localice la presilla de retención (A) debajo del
refrigerador.
4. Empuje la presilla hacia arriba y, al mismo tiempo,
deslice la bandeja hacia delante para sacarla.
5. Limpie la bandeja.(Ver instrucciones en la página 19).
Para volver a colocarla:
1. Coloque el borde de la bandeja colectora de agua
aproximadamente 7 pulgadas (17.8 cm) del lado
izquierdo del refrigerador.
2. Levante la bandeja colectora de agua para colocarla en
las guías y empújela hasta que oiga “clic” o el sonido de
la presilla de retención al encajar en su lugar.
3. Vuelva a colocar la rejilla de la base.
4. Ponga el interruptor On/Off (Encendido/apagado) en la
posición de “ON”.
bandeja
colectora
de agua
presilla de
retención (A)
Cómo cambiar los focos
Los focos se encuentran detrás de los controles del
refrigerador y el congelador:
1. Desconecte el refrigerador o el suministro de energía
eléctrica al refrigerador.
2. Alcance el foco detrás del panel de control.
3. Desenrosque el foco y reemplácelo con un foco tubular
incandescente de base mediana, de 40 watt.
4. Conecte el cordón de suministro de energía del
refrigerador en el tomacorriente o reconecte el
suministro de energía eléctrica al refrigerador.
Foco debajo del recipiente para hielo:
1. Desconecte el refrigerador o el suministro de energía
eléctrica al refrigerador.
2. Quite la cubierta liviana.
3. Desenrosque el foco y reemplácelo con un foco tubular
incandescente de base mediana, de 40 watt.
4. Vuelva a colocar la cubier ta liviana.
5. Conecte el cordón de suministro de energía del
refrigerador en el tomacorriente o reconecte el
suministro de energía eléctrica al refrigerador.
Foco en el área del distribuidor (modelos con
distribuidor):
1. Desconecte el refrigerador o el suministro de energía
eléctrica al refrigerador.
2. Desenrosque el foco desde la parte superior, dentro
del área del distribuidor.
3. Reemplace el foco con un foco reforzado de 10 watt.
4. Conecte el cordón de suministro de energía eléctrica
en el tomacorriente o reconecte el suministro de
energía al refrigerador.
IMPORTANTE: asegúrese de poner el interr uptor On/Off
(Encendido/Apagado) en la posición de “ON” después de
cambiar el foco o los focos.
Page 82

18
Ahorro de energía
• Limpie los serpentines del condensador regularmente.
• Abra la puerta tan pocas veces como sea posible.
Piense en lo que necesita sacar antes de abrir la
puerta. Saque todo de una sola vez. Mantenga los
alimentos organizados de modo que usted no tenga
que comenzar a buscar lo que necesita. Cierre la
puerta tan pronto haya sacado los alimentos.
• Usted puede llenar el refrigerador.Sin embargo, debe
dejar espacio para que el aire pueda circular
libremente.
• Es un desperdicio de electricidad colocar el
refrigerador y el descongelador a temperaturas más
frías de lo necesario. Si el helado está firme en el
congelador y las bebidas están frías como a su familia
les gustan, el refrigerador está lo suficientemente frío.
Sonidos provenientes de su refrigerador
Su nuevo refrigerador pude emitir sonidos que el viejo no
emitía. Debido a que estos sonidos son nuevos para
usted, usted podría preocuparse. La mayoría de los
nuevos sonidos son normales.Las superficies duras
como el piso, las paredes y los gabinetes pueden hacer
que los sonidos se escuchen más fuertes de lo que son.
Debido a los diseños de los nuevos productos, podría
haber sonidos con los que usted no esté familiarizado.La
siguiente tabla describe la clase de sonidos que podrían
ser nuevos para usted y la causa de los mismos.
CAUSAS
Pueden provenir del motor del ventilador del refrigerador y del movimiento del aire.
El termostato emite un chasquido definido cuando el refrigerador deja de funcionar.
También produce un sonido cuando el refrigerador comienza a funcionar.
El medidor de descongelación también produce un chasquido cuando comienza y
termina el ciclo de descongelación.
Usted puede oír un zumbido (de la válvula del agua), agua que gotea y el ruido de
los cubos del hielo al caer al recipiente para hielo.
El compresor y el motor de alta eficiencia funcionarán por períodos más prolongados
que los modelos anteriores. El ventilador interno podría funcionar ocasionalmente
cuando el compresor está apagado.
El refrigerador no funcionará durante el ciclo de descongelación. El goteo del agua
es la escarcha acumulada en el serpentín del congelador que se derrite y cae en la
bandeja colectora de agua. Cuando el refrigerador deja de funcionar podrá oír
gorgoteo en la tubería por algunos minutos.
Cuando el refrigerador está funcionando usted podrá sentir aire proveniente de la
parte trasera del panel superior de ventilación y la rejilla de la base. Esto es normal.
SONIDOS/OBSERVACIONES
Leve murmullo o silbido
suave
Chasquidos o golpes secos
Sonidos de la máquina de
hacer hielo
• goteo de agua
• caída del hielo
Sonidos del funcionamiento
del refrigerador
Goteo de agua, sonidos del
agua
Aire cálido del panel
superior de ventilación o de
la rejilla de la base
Usted puede ayudar a que su refrigerador utilice menos
energía.
Page 83

19
Peligro de explosión
Utilice limpiadores no inflamables.
No seguir esta instrucción puede ocasionar la
muerte, una explosión o un incendio.
Tanto el compar timiento del refr igerador como
el del congelador se descongelan
automáticamente. Sin embargo, limpie ambos
por lo menos una vez al mes para evitar los
olores que se acumulan. Limpie los derrames
inmediatamente.
Para limpiar su refrigerador, desconéctelo de su fuente de
energía eléctrica, poniendo el interruptor On/Off
(Encendido/Apagado) en la posición de “OFF”.Luego saque
todas las piezas removibles y limpie el refrigerador de
acuerdo con las siguientes instrucciones. Asegúrese de
poner el interruptor On/Off en la posición de “ON” cuando
haya terminado la limpieza.
C
UIDADO DE SU REFRIGERADOR
Su refrigerador ha sido diseñado para proporcionarle
muchos años de servicio seguro. Sin embargo, hay
algunas sugerencias que pueden ayudarle a prologar su
vida útil. Esta sección describe cómo limpiar su
refrigerador y cómo proceder cuando se va de vacaciones,
durante las mudanzas o cuando haya interrupciones de
energía eléctrica.
Limpieza del refrigerador
QUÉ UTILIZAR
Esponja o paño con
detergente suave y agua
tibia
Esponja, paño o toalla de
papel con detergente suave,
agua tibia y una buena cera
para aparatos eléctricos (o
una buena cera para limpiar
automóviles)
Esponja, paño suave o toalla
de papel con bicarbonato de
sodio o detergente suave y
agua tibia
Esponja, paño suave o toalla
de papel con detergente
suave y agua tibia
Esponja limpia y suave o
paño suave y limpio con
detergente suave y agua
tibia
Esponja o paño con
detergente y agua tibia
Producto de limpieza para
acero inoxidable
PARTE
Piezas removibles
(parrillas, cajones para
verduras, etc.)
Exterior
Paredes interiores (deje
que el congelador se
caliente para que el
paño no se pegue)
Revestimientos y
empaquetaduras de las
puertas
Piezas de plástico
(tapas y paneles)
Bandeja colectora de
agua
Puertas y rejillas de
acero inoxidable
CÓMO LIMPIAR
Lavar a mano y secar bien.
Lave la parte exterior de la caja del refrigerador. No utilice limpiadores
fuertes o abrasivos.
Limpie, enjuague y seque bien.
Aplique cera en las superficies de metal pintadas por lo menos dos veces
al año. Aplique cera con un paño limpio y suave. La cera protege las
superficies de metal pintadas contra la oxidación.
No aplique cera en las piezas de plástico.
Lave con una mezcla de agua tibia y:
• detergente suave o
• bicarbonato de sodio (2 cucharadas [26 g] por cuarto de galón [0.95 L]
de agua).
Lave, enjuague y seque bien.
Lave, enjuague y seque bien.
NO USE ceras de limpieza, detergentes concentrados, blanqueadores
o limpiadores a base de petróleo en las piezas de plástico.
Lave, enjuague y seque bien.
NO USE toallas de papel, rociadores para limpiar ventanas, limpiadores
para fregar o líquidos inflamables. Estos pueden rayar o dañar el material.
Ver “Instrucciones importantes de seguridad” en la página 3.
Ponga el interruptor On/Off (Encendido/Apagado) en la posición “OFF”.
Saque la rejilla de la base. (Ver página 14).
Introduzca la mano en la pequeña abertura en el borde derecho y saque
la bandeja colectora de agua. (Ver página 15).
Lave, enjuague y seque bien.
Vuelva a colocar la bandeja colectora de agua. Asegúrese de empujar la
bandeja completamente en la abertura.
Vuelva a colocar la rejilla de la base.
Ponga el interruptor On/Off (Encendido/Apagado) en la posición de “ON”.
Limpie con un paño suave.
ADVERTENCIA
Page 84

Si el refrigerador tiene que ser trasladado, llame al
vendedor que le vendió la unidad o al servidor autorizado
de KitchenAid de su localidad.
Si usted estará ausente por un mes o más, siga estos
pasos para preparar su refrigerador.
1. Saque todos los alimentos del refr igerador.
2. Si su refr igerador tiene una máquina de hacer hielo:
•
Corte el suministro de agua a la máquina de hacer
hielo por lo menos con un día de anticipación.
•
Cuando caiga el último lote de hielo, apague la
máquina de hacer hielo.Asegúrese de que todo el
hielo sea distribuido fuera del mecanismo de la
máquina de hacer hielo.
3. Desconecte el refr igerador.
4. Límpielo, enjuáguelo y séquelo bien.
5. Adhiera con cintas adhesivas bloques de caucho o
madera a la parte superior de ambas puer tas para
mantenerlas entreabiertas lo suficiente para que
penetre aire. Esto evita la acumulación de olores y
moho.
Si la energía eléctrica se interrumpe, llame a la compañía
de luz. Pregunte cuánto tiempo va a estar la corriente
cortada.
1. Si el ser vicio será interr umpido durante 24 horas o
menos, mantenga ambas puertas cerradas. Esto
ayuda a mantener los alimentos fríos y congelados.
2. Si el ser vicio estará interr umpido por más de 24 horas:
(a) Saque todos los alimentos congelados y colóquelos
en un congelador separado.
O
(b) coloque 2 libras (900 g) de hielo seco en el
congelador por cada pie cúbico (28 litros) de espacio
del congelador.Esto ayudará a mantener los
alimentos congelados de 2 a 4 días. Use guantes
para proteger sus manos contra las quemaduras del
hielo seco.
O
(c) Si no dispone de un congelador separado o de hielo
seco, use o coloque en conserva los alimentos que
puedan descomponerse.
20
Vacaciones cortas
Si estará ausente por menos de cuatro semanas, utilice
los siguientes consejos para preparar su refrigerador antes
de partir :
1. Consuma todos los alimentos que puedan echarse a
perder y congele los demás
2. Si su refr igerador tiene una máquina de hacer hielo:
•
Levante la palanca a la posición de “OFF” (hacia
arriba).
•
Corte el suministro de agua a la máquina de hacer
hielo.
3. Vacíe el recipiente para hielo.
Cuidado durante las vacaciones y mudanzas
Vacaciones largas
Mudanzas
Interrupciones de energía eléctrica.
QUÉ UTILIZAR
Aspiradora con el accesorio
angosto largo
Aspiradora con accesorio de
cepillo
Un producto de limpieza
profesional para acero
inoxidable
PARTE
Serpentines del
condensador
Rejilla de la base
Acero inoxidable
CÓMO LIMPIAR
Quite el panel superior de ventilación para que los
serpentines del condensador queden al descubier to. (Ver
página 5)
Aspire los serpentines cuando estén sucios o con polvo.Los
serpentines pueden necesitar limpieza cada dos meses.
Vuelva a colocar el panel superior de ventilación.
Aspire la rejilla de la base.
Siga las instrucciones incluidas con el producto de limpieza.
Page 85

21
Existe una manera correcta de guardar y empaquetar los
alimentos refrigerados o congelados. Para mantener los
alimentos más frescos durante más tiempo, estudie los
pasos que se recomiendan a continuación.
G
UÍA PARA LA CONSERVACIÓN DE LOS ALIMENTOS
Envuelva o guarde los alimentos en el refrigerador en
materiales herméticos o a prueba de humedad
excepto cuando se indique otra cosa.Esto evita que el
olor y el sabor de los alimentos circulen por el
refrigerador.Para los productos que tienen fecha de
caducidad, verifique la fecha en los códigos para
asegurar su frescura.
Mantequilla o margarina
Mantenga la mantequilla que haya usado en un plato
tapado o en un compartimiento cerrado. Cuando
guarde mantequilla adicional, envuélvala en papel
para congelador y congélela.
Queso
Guárdelo en su envoltura original hasta que vaya a
consumirlo. Una vez abier to, vuelva a envolverlo bien
con plástico o papel de aluminio.
Leche
Limpie las cajas de cartón. Para guardarla mejor,
coloque la leche en la parrilla interior.
Huevos
Guárdelos en su caja de cartón original en las rejillas
interiores. Para su conveniencia, en algunos modelos
se ha incluido un recipiente para guardar huevos.
Frutas
Lávelas, déjelas secar y colóquelas en el refrigerador
en bolsas de plástico o en el cajón para verduras.No
lave ni limpie las frutillas hasta que estén listas para
ser consumidas. Clasifique y mantenga las bayas en
su envase original en el cajón para verduras o
guárdelas en una bolsa de papel a medio cerrar en
una división del refrigerador.
Verduras con hojas
Quite la envoltura original y elimine los tallos o áreas
descoloridas o maltratadas. Lávelas en agua fría y
escúrralas. Colóquelas en una bolsa plástica o en un
envase de plástico y guárdelas en el cajón para
Almacenamiento de
alimentos frescos
Recuerde: un congelador lleno se mantiene fr ío por más
tiempo que un congelador parcialmente lleno.Un
congelador lleno de carne se mantiene más frío que un
congelador lleno de productos de panadería. Si el alimento
tiene cristales de hielo, puede ser recongelado con toda
seguridad, aunque la calidad y el sabor pueden ser
inferiores.
Si el estado del alimento es deficiente o si usted piensa
que no es seguro, descártelo.
¿Tiene alguna pregunta?
Llame a nuestro Centro de Asistencia al Consumidor al
1-800-235-0665, desde cualquier parte de EE.UU. o Canadá.
Almacenamiento de alimentos frescos (cont.)
Vegetales con piel
(zanahorias, pimientos)
Colóquelos en bolsas plásticas o en envases de
plástico y guárdelos en el cajón para verduras.
Pescados
Consuma los pescados y los mariscos frescos el
mismo día que los compre.
Carne
La mayoría de las carnes pueden ser guardadas en
su envoltura original siempre que sea hermética y a
prueba de humedad.Vuélvalas a envolver si es
necesario.Vea los siguientes períodos de
conservación. Cuando se almacena carne por
períodos de tiempo más prolongados que los
indicados a continuación, congele la carne.
Pollo................................................................1-2 días
Tocino ............................................................5-7 días
Carne de res molida ......................................1-2 días
Carnes frías ..................................................3-5 días
Bistecs/carnes para asar ..............................3-5 días
Carnes variadas ............................................1-2 días
Carnes curadas ..........................................7-10 días
Sobras
Envuelva las sobras con plástico o papel de aluminio.
También se pueden usar recipientes plásticos con
tapas herméticas.
NOTA: mantenga su refrig erador con buen olor
utilizando una caja abierta de bicarbonato de sodio.
Page 86

22
Almacenamiento de alimentos congelados
La sección del congelador está diseñada para guardar
alimentos congelados comercialmente y aquellos que se
desean congelar en el hogar.
NOTA: para mayor información acerca de la preparación
de alimentos para congelarlos o los períodos de
conservación de los alimentos, consulte una guía sobre
congelación de alimentos o un libro de cocina.
Cómo envasar los alimentos
El secreto de la congelación exitosa es el envase correcto.
El envase no debe permitir la entrada o salida de aire o
humedad. De lo contrario, el olor y el sabor de los
alimentos circulará a través del refrigerador y secará el
alimento congelado.
Envolturas recomendadas:
•
Envases de plástico rígidos con tapas herméticas.
•
Botes para conservas/congelación de costados rectos.
•
Papel de aluminio grueso.
•
Papel con forro de plástico.
•
Envolturas plásticas impermeables (hechas de película
sarán)
•
Bolsas plásticas de cierre propio específicas para
congelador.
Siga las instrucciones del paquete o del envase para los
métodos de congelación adecuados.
No usar:
•
Bolsas de pan.
•
Envases plásticos que no sean de polietileno.
•
Envases sin tapas herméticas.
•
Papel de cera o papel encerado de congelador.
•
Papel delgado semipermeable.
Congelación
Su congelador no congelará grandes cantidades de
alimentos rápidamente. No ponga más alimentos en el
congelador de los que puedan congelarse dentro de
24horas (no más de 2-3 libras de alimentos por pie cúbico
[907-1,350 g por litro] de espacio del congelador). Deje
suficiente espacio para que circule el aire alrededor de los
paquetes. Deje también suficiente espacio al frente de
manera que la puerta pueda cerrarse herméticamente.
Los períodos de tiempo de conservación varían de
acuerdo con la calidad y la clase de los alimentos, la
envoltura usada (hermética y a prueba de humedad) y la
temperatura de almacenamiento.Los cristales de hielo
dentro de un envase sellado son normales.Significan que
la humedad en los alimentos y el aire dentro del envase se
han condensado, creando cristales de hielo.
NOTA: deje que los alimentos se enfríen a temperatura
ambiente durante 30 minutos. Luego envuélvalos y
congélelos. Enfriar los alimentos calientes antes de
congelarlos ahorra energía.
Page 87

23
Verifique si ...
El cordón de suministro de energía está
desenchufado.
Un fusible de la casa se ha quemado o un disyuntor
se ha disparado.
Un foco está flojo en el casquillo.
Se ha quemado un foco.
Luego ...
Enchufe con firmeza el cordón de suministro de energía en
un tomacorriente activo con el debido voltaje.
Reemplace el fusible o reposiciones el circuito.
Ponga el control del congelador en “OFF” (Apagado).
Desconecte el refrigerador del suministro eléctrico. Con
cuidado quite el foco y reinsértelo. Luego vuelva a conectar
el refrigerador en el suministro eléctrico y reposicione el
control de congelador.
Reemplácelo con un foco para electrodoméstico del mismo
vataje, tamaño y forma. Vea la sección de “Cómo cambiar
los focos”.
Luego ...
Enchufe con firmeza el cordón de suministro de energía en
un tomacorriente activo con el debido voltaje.
Reemplace el fusible o reposiciones el circuito.
Consulte la sección de “Cómo ajustar los controles de
temperatura”.
Vuelva a verificar en 30 minutos si el refrigerador está
funcionando.Su refrigerador correrá regularmente un ciclo
automático de descongelación.
Si continúa sin funcionar después de revisar las opciones
indicadas, llame al Centro de Asistencia al Consumidor.
El cordón de suministro de energía está
desenchufado.
Las luces no funcionan
Su refrigerador no funciona
Usted puede resolver fácilmente muchos problemas
comunes de un refrigerador, ahorrándose el costo de una
posible llamada de servicio.Trate las sugerencias que se
indican a continuación para determinar si puede resolver
su problema sin ayuda exterior.Si la sugerencia no
resuelve el problema, llame por favor al Centro de
Asistencia al Consumidor de KitchenAid.
D
IAGNÓSTICO DE PROBLEMAS
Verifique si ...
Un fusible de la casa se ha quemado o un disyuntor
se ha disparado.
El control del refrigerador está en la posición de
“OFF” (Apagado)
El refrigerador se está descongelando.
Page 88

24
Verifique si ...
La temperatura ambiente es más caliente de lo
normal.
Se agregó una gran cantidad de alimentos al
refrigerador.
La puerta se abre muy a menudo.
Los controles no han sido ajustado correctamente
para las condiciones circundantes.
La puertas no están cerradas completamente.
La rejilla de la base está sucia o bloqueada.
Los serpentines del condensador están sucios.
Las empaquetaduras de las puertas no están
selladas totalmente alrededor.
Luego ...
El motor funciona por más tiempo bajo condiciones de
calor.A temperaturas ambiente normales, su motor
funcionará entre un 40 y un 80 por ciento del tiempo.Bajo
condiciones de calor, su motor funcionará por más tiempo.
Agregar grandes cantidades de alimentos calienta el
refrigerador.Es normal que el motor funcione por más
tiempo para volver a enfriar el refrigerador.Ver la sección
de “Guía para la conservación de los alimentos”.
El motor funciona por más tiempo cuando esto ocurre. Para
ahorrar energía, trate de tomar todo lo que necesite del
refrigerador de una sola vez, mantenga los alimentos
organizados de manera que sea fácil encontrarlos y cierre
la puerta inmediatamente después de sacar los que
necesite.
Consulte la sección de “Cómo ajustar los controles de
temperatura”.
Cierre las puertas con firmeza. Si no se cierran totalmente,
consulte “Las puertas no se cierren totalmente”, más
adelante en esta sección.
Esto impide la circulación del aire y hace que el motor
trabaje más. Saque la rejilla y límpiela.
Esto impide la transferencia de aire y hace que el motor
trabaje más. Limpie los ser pentines del condensador.
Consulte la sección, “Limpieza del refrigerador”.
Llame a una persona calificada o a un técnico.
Si su problema no se debe a ninguna de las opciones
anteriores, recuerde que el motor de su nuevo refrigerador
funcionará por más tiempo que el de su refrigerador
anterior debido a su alta eficiencia.
Verifique si ...
El refrigerador se está descongelando.
Está más húmedo que lo normal.
El agua en la bandeja colectora del agua se está
derramando.
Luego ...
El agua se evaporará. Es normal que el agua gotee en la
bandeja colectora del agua.
Espere que el agua en la bandeja colectora del agua
tome más tiempo para evaporarse. Esto es normal
cuando hay calor y humedad.
Verifique si su refrigerador está nivelado.(Vea la sección
de “Nivelación”). Si continúa derramándose,
probablemente haya un problema con el refrigerador.
Llame al Centro de Asistencia al Consumidor.
Hay agua en la bandeja colectora del agua
El motor parece que funciona excesivamente
Page 89

25
Luego ...
Vea la sección de “Cómo ajustar los controles”.
Baje la palanca a la posición de “ON” (hacia abajo).Vea la
sección de “Funcionamiento de la máquina de hacer hielo”.
Abra la válvula del agua.
Quite el hielo del brazo eyector con un utensilio plástico.
Consulte la sección de “Funcionamiento de la máquina de
hacer hielo”.
Verifique si su refrigerador ha sido conectado al suministro
de agua de su casa y que la válvula de cierre manual esté
abierta.
Si su problema no se debe a ninguna de las opciones
anteriores, podría haber un problema con la tubería del
agua. Consulte con el Centro de Asistencia al Consumidor.
Verifique si ...
La temperatura del congelador no está lo
suficientemente fría como para producir hielo.
La palanca de la máquina de hacer hielo se
encuentra en la posición “OFF” (hacia arr iba).
La válvula de cierre manual de la tubería de
suministro de agua al refrigerador no está abierta.
Un cubo de hielo se ha atascado en el brazo eyector.
El molde de la máquina de hacer hielo no tiene agua
o no se ha producido hielo.
Verifique si ...
Los sonidos y los ruidos son normales en un
refrigerador nuevo.
Luego ...
Consulte la sección, “Sonidos provenientes de su
refrigerador”.
El refrigerador parece hacer mucho ruido
La máquina de hacer hielo no está produciendo hielo
La máquina de hacer hielo está produciendo muy poco hielo
Verifique si ...
La máquina de hacer hielo acaba de ser instalada.
Se acaba de sacar una gran cantidad de hielo.
Los controles no se han ajustado correctamente.
La válvula de cierre manual no está abierta
totalmente.
Se ha instalado un filtro de agua en el refrigerador.El
filtro podría estar obstruido o haberse instalado
incorrectamente.
Luego ...
Espere 72 horas para que empiece la producción de hielo
completa. Una vez que su refrigerador se ha enfriado, la
máquina de hacer hielo debe empezar a producir entre 56
y 72 cubos cada 24 horas.
Deje que transcurran 24 horas para que la máquina de
hacer hielo produzca más hielo.
Consulte la sección de “Cómo ajustar los controles de
temperatura”.
Abra la válvula completamente.Consulte la sección de
“Funcionamiento de la máquina de hacer hielo”.
Primero, revise las instrucciones de instalación del filtro
para asegurarse de que el filtro fue instalado
correctamente y no está obstruido. Si no hay problemas de
instalación u obstrucción, llame a una persona calificada o
a un técnico.
Page 90

26
Luego ...
Tenga en cuenta que el refrigerador se calienta cuando esto
ocurre. Para mantener el refrigerador frío, trate de sacar todo
lo que necesite del refrigerador de una sola vez, mantenga los
alimentos organizados para que se puedan encontrar con
facilidad y cierre la puerta tan pronto haya sacado los
alimentos.
Agregar una gran cantidad de alimentos calienta el
refrigerador.Podrían pasar varias horas para que el
refrigerador recupere la temperatura normal.
Consulte la sección, “Cómo ajustar los controles de
temperatura”.
Verifique si ...
La(s) puerta(s) se abre(n) muy a menudo.
Se acaba de agregar una gran cantidad de alimentos
en el refrigerador o en el congelador.
Los controles no han sido ajustados correctamente
para las condiciones circundantes.
Luego ...
Limpie de acuerdo con la sección, “Limpieza del
refrigerador”.
Consulte “Su refrigerador no funciona” anteriormente en
esta sección.
NOTA: la temperatura del refrigerador podría pasar de tibia
a caliente.
Si el calor no se debe a ninguna de las opciones
anteriores, podría deberse al funcionamiento normal del
control automático de humedad exterior.Si sigue
preocupado, llame al Centro de Asistencia al Consumidor o
a una compañía de servicio autorizada de KitchenAid.
Verifique si ...
Los serpentines del condensador o la rejilla de la base
están sucios o obstruidos.
El motor ha dejado de funcionar.
Luego ...
Deseche los primeros lotes de hielo.
Deseche el hielo viejo y haga un nuevo lote.
Consulte la sección, “Almacenamiento de alimentos
congelados”.
Consulte la sección, “Limpieza del refrigerador”.
Podría ser necesario instalar un filtro para eliminar los
minerales.
Verifique si ...
Las conexiones de cañerías son nuevas, lo que
produce hielo descolorido o con mal sabor.
Los cubos de hielo han estado depositados por
mucho tiempo.
Los alimentos en el congelador no han sido envueltos
debidamente.
El congelador y el recipiente para hielo necesitan
limpieza.
El agua contiene minerales (como azufre).
El hielo tiene mal sabor o mal olor
El separador de los dos compartimientos está caliente
La temperatura es muy cálida
Page 91

27
Luego ...
Coloque los recipientes de manera que utilicen menos
espacio.
Empuje el recipiente par hielo completamente hacia
adentro.
Coloque correctamente las bandejas, las rejillas, los
recipientes y las cestas.
Limpie las empaquetaduras de acuerdo con las
instrucciones contenidas en la sección, “Cuidado de su
refrigerador”.
Quite y vuelva a colocar las puertas o llame a una
persona calificada.
Verifique si ...
Envases de alimentos están bloqueando el cierre
de la puerta.
El recipiente para hielo está mal colocado.
Las bandejas, las rejillas, los recipientes o las
cestas están mal colocados.
Las empaquetaduras están sucias.
Se quitaron las puertas durante la instalación del
producto y no se reinstalaron debidamente. .
Luego ...
Para evitar la acumulación de humedad, trate de sacar del
refrigerador todo lo que necesita de una sola vez,
mantenga los alimentos organizados de manera que sea
fácil localizarlos y cierre la puerta inmediatamente después
de sacar lo que necesite. (Cuando la puerta está abier ta, la
humedad del ambiente penetra en el refrigerador.Cuanto
más se abra la puerta, más rápida será la acumulación de
humedad, especialmente cuando el ambiente es muy
húmedo).
Es normal que se acumule humedad dentro del
refrigerador cuando el aire de la sala está húmedo.
Verifique que todos los alimentos estén debidamente
envueltos.Si fuera necesario, vuelva a envolver los
alimentos siguiendo las directrices de la sección, “Guía
para la conservación de los alimentos”. Limpie los
recipientes de alimentos húmedos antes de colocarlos en
el refrigerador.
Consulte la sección, “Cómo ajustar los controles de
temperatura”.
Es normal que se formen gotitas en la pared trasera
después de que el refrigerador se auto-descongele.
Verifique si ...
La puerta se abre muy a menudo.
El ambiente es muy húmedo.
Los alimentos no están envueltos correctamente.
Los controles no han sido ajustado correctamente
para las condiciones circundantes.
Se completó un ciclo de auto-descongelación.
Hay acumulación de humedad en el interior
Las puertas no se cierren totalmente
Resulta difícil abrir las puertas
Luego ...
Limpie las empaquetaduras de acuerdo con las instrucciones
contenidas en la sección, “Cuidado de su refrigerador”.
Verifique si ...
Las empaquetaduras están sucias o pegajosas.
Page 92

28
Llame gratis al Centro de Interacción con el Cliente
de KitchenAid al 1-800-235-0665. Nuestros
consultores están disponibles para ayudarlo.
Cuando llame, tenga a mano la fecha de compra y el
número de modelo y el número de serie
completos de su aparato
electrodoméstico (ver la sección “Una
nota para usted”). Esta información nos
ayudará a atenderle mejor.
Nuestros consultores le proporcionan ayuda para:
•
Características y especificaciones para nuestra línea
completa de aparatos electrodomésticos.
•
Información sobre instalación.
Si necesita refacciones
Si necesita pedir refacciones, le recomendamos que
utilice únicamente partes autorizadas por la fábrica.
Estas partes se adaptarán y funcionarán
correctamente porque han sido hechas siguiendo las
mismas rigurosas especificaciones utilizadas para
construir todos los nuevos aparatos electrodomésticos
de KitchenAid®appliance.
Para localizar partes autorizadas por la fábrica en su
localidad, llame a nuestro Centro de Asistencia al
Consumidor, al centro de servicio autorizado más
cercano o al Servicio de Fábrica de KitchenAid al
1-800-442-1111.
Cartuchos de filtro de
agua de la rejilla de la base:
Cartucho estándar -
pida la parte número 4392857 (L500)
Cartucho cisto –
pida la parte número 4392922 (LC400)
Para asistencia adicional
Si necesita asistencia adicional puede escribir a
KitchenAid con cualquier pregunta o problema, a la
siguiente dirección:
KitchenAid Brand Home Appliances
Customer Interaction Center
c/o Correspondence Dept.
2000 North M-63
Benton Harbor, MI 49022-2692
Por favor incluya en su correspondencia un número de
teléfono en el que se le pueda localizar durante el día.
•
Procedimientos de uso y mantenimiento.
•
Ventas de accesorios y refacciones.
•
Asistencia especializada al cliente (asistencia en
español, para personas con problemas auditivos,
problemas de la vista, etc.)
•
Direcciones de vendedores, compañías de servicio y
distribuidores de refacciones en su localidad.
Los técnicos en servicio designados por
KitchenAid están capacitados para satisfacer la
garantía del producto y proporcionar servicios
posteriores a la garantía, en cualquier parte de los
Estados Unidos.
Para localizar a una compañía de servicios designada
por KitchenAid en su área, puede buscar en las páginas
amarillas de su Guía Telefónica.
Para evitar llamadas innecesarias solicitando
servicio, revise la sección “Diagnóstico de
problemas”. Podría ahorrarle el costo de una
llamado solicitando servicio. Si aún necesita
ayuda, siga estas instrucciones.
Si necesita ayuda o servicio técnico en los Estados
Unidos
C
ÓMO SOLICITAR AYUDA O SERVICIO TÉCNICO
Page 93

2929
Service d’appareils ménagers KitchenAid Canada –
Service aux consommateurs
Succursales de service direct :
COLOMBIE-BRITANNIQUE 1-800-665-6788
ALBERTA 1-800-661-6291
ONTARIO Région d’Ottawa 1-800-267-3456
(à l’exception de l’indicatif régional 807) En dehors de la région d’Ottawa 1-800-807-6777
MANITOBA,SASKATCHEWAN 1-800-665-1683
et indicatif régional 807 en ONTARIO
QUÉBEC Montréal (à l’exception de la Rive-Sud) 1-800-361-3032
Rive-Sud Montréal 1-800-361-0950
Québec 1-800-463-1523
Sherbrooke 1-800-567-6966
PROVINCES DE L’ATLANTIQUE 1-800-565-1598
Pour plus d’assistance
1. Si le problème n’est pas attribuable à l’une
des causes indiquées dans “Guide de
dépannage”
✝
...
Communiquer avec le marchand chez qui
vous avez acheté votre appareil
électroménager, ou téléphoner à
KitchenAid Canada au Centre
d’assistance aux consommateurs, sans
frais d’interurbain, entre 8 h 30 et 18 h 00 (HNE), en
composant 1-800-235-0665.
2. Si vous avez besoin de service✝...
Communiquer avec la succursale ou établissement de
service autorisé de KitchenAid Canada la plus proche
pour l’entretien de votre appareil. (Voir liste ci-dessous.)
S’assurer que la compagnie de service que vous
contactez est autorisée à faire l’entretien de votre
appareil durant la période de garantie.
Si vous avez besoin de plus d’assistance, vous
pouvez écrire en soumettant toute question ou
problème au :
Service des relations avec la clientèle
KitchenAid Canada
1901 Minnesota Court
Mississauga, Ontario L5N 3A7
Veuillez indiquer dans votre correspondance un numéro
de téléphone où l’on peut vous joindre le jour.
C
ÓMO SOLICITAR AYUDA O SERVICIO TÉCNICO
✝
Lorsque vous demandez de l’assistance ou un
service, veuillez fournir une description détaillée
du problème, les numéros complets du modèle et
de série de l’appareil, et la date d’achat. (Voir la
section «Note à l’utilisateur.» Ces renseignements
nous aideront à mieux répondre à votre demande.
Avant de faire un appel pour assistance ou service,
veuillez vérifier la section “Guide de dépannage”.
Cette vérification pourrait vous faire économiser le
coût d’une visite de service. Si vous avez encore
besoin d’aide, suivre les instructions ci-dessous.
Si vous avez besoin d'assistance ou de service au
Canada
Page 94

30
Garantía para refrigerador empotrado
KITCHENAID PAGARÁ POR:
Refacciones y trabajos de reparación
para corregir defectos en los focos. El
servicio debe ser proporcionado por una
compañía de servicio designada por
KitchenAid.
Refacciones y trabajos de reparación
para corregir defectos en los materiales o
mano de obra. El servicio debe ser
proporcionado por una compañía de
servicio designada por KitchenAid.
Refacciones y trabajos de reparación
para corregir defectos en los materiales o
mano de obra en el sistema de
refrigeración sellado.
Estas piezas son:
1. Compresor;
2. Evaporador;
3. Condensador;
4. Secador;
5. Tubos de conexión.
El servicio debe ser proporcionado por
una compañía de servicio designada por
KitchenAid.
Refacciones para corregir defectos en los
materiales o mano de obra en el sistema
de refrigeración sellado.
Estas piezas son:
1. Compresor;
2. Evaporador;
3. Condensador;
4. Secador;
5. Tubos de conexión.
Refacciones para corregir defectos en los
materiales o mano de obra en las
bandejas de la puerta del refrigerador.
KITCHENAID Y KITCHENAID CANADA NO ASUMEN NINGUNA RESPONSABILIDAD POR DAÑOS INCIDENTALES
O INDIRECTOS. Algunos estados o provincias no permiten la exclusión o limitación de daños incidentales o indirectos,
por lo que esta exclusión o limitación podría no ser aplicable a su caso.
Esta garantía le da derechos legales específicos, y usted podría tener otros derechos que varían de estado a
estado o de provincia a provincia.
Una garantía diferente podría ser aplicable fuera de los Estados Unidos y Canadá. Para detalles, llame por favor
a su distribuidor autorizado de KitchenAid.
Si necesita servicio técnico, vea primero la sección de “Diagnóstico de problemas” en este manual. Después de revisar
la sección de “Diagnóstico de problemas”, puede recibir ayuda adicional consultando la sección “Cómo solicitar ayuda o
servicio técnico” o llamando (gratis) al número de teléfono de nuestro Centro de Asistencia al Consumidor, 1-800-235-
0665, desde cualquier parte en los EE. UU. o Canadá.
KITCHENAID NO PAGARÁ POR:
A. Llamadas de servicio para:
1. Corregir la instalación del
refrigerador.
2. Darle instrucciones sobre cómo
usar el refrigerador.
3. Reemplazar fusibles caseros o
corregir las conexiones eléctricas.
4. Reemplazar las tuberías de la casa.
B. Reparaciones cuando el refrigerador
es usado para algo que no sea el
uso normal en una casa.
C. Daños por accidente, alteración, uso
indebido, abuso, instalación indebida
o instalación no hecha de acuerdo
con los códigos eléctricos locales o
los códigos de plomería.
D. Cualquier pérdida de alimentos
debida a falla del producto.
E. Cualquier costo de mano de obra
durante la garantía limitada
F. Refacciones o costos de trabajos de
reparación para unidades que
funcionan fuera de los Estados
Unidos o Canadá.
G. Reparaciones a partes o sistemas
debidas a modificaciones no
autorizadas hechas al aparato
electrodoméstico.
H. Remoción y reemplazo de la
moldura o paneles decorativos que
interfieran con el servicio al
producto.
I. Mano de obra o piezas instaladas
por cualquier compañía de servicio
no autorizada durante el período de
la garantía completa, a menos que
haya sido aprobada por KitchenAid
antes de que se realice el servicio.
J. Cualquier pérdida de medicinas
debida a falla del producto.
TÉRMINO DE LA GARANTÍA:
GARANTÍA COMPLETA
POR UN AÑO
DESDE LA FECHA DE
INSTALACIÓN
GARANTÍA COMPLETA POR
DOS AÑOS
DESDE LA FECHA DE
INSTALACIÓN
GARANTÍA COMPLETA
DEL TERCERO HASTA EL
SEXTO AÑO
DESDE LA FECHA DE
INSTALACIÓN
GARANTÍA LIMITADA
DEL SÉPTIMO HASTA EL
DOCEAVO AÑO
DESDE LA FECHA DE
INSTALACIÓN
GARANTÍA LIMITADA DE
POR VIDA PARA LAS
BANDEJAS DE LA PUERTA
DEL REFRIGERADOR
11/99
®
Page 95

31
CERTIFICADOS DE FILTRO DE AGUA
Page 96

9/00
Impreso en los EE. UU.
Parte No.2209477
© 2000 KitchenAid, U.S.A.
® Marca registrada/TM marca de KitchenAid U.S.A., KitchenAid Canada licenciataria en Canadá.
HOJA DE DATOS DEL PRODUCTO
Sistema de filtración de agua de la rejilla de la base Modelo WF-LC400/LC400
Sistema de filtración de agua de la rejilla de la base Modelo WF-LC500/LC500
Probado y certificado por NSF International contra la Norma 42 de
ANSI/NSF para la reducción de sabor y olor a cloro (Clase 1) y contra la
Norma 53 de ANSI/NSF para la reducción de plomo, cisto y turbidez.
Probado y certificado por NSF International contra la Norma 42 de
ANSI/NSF para la reducción de sabor y olor a cloro (Clase 1) y contra la
Norma 53 de ANSI/NSF para la reducción de plomo.
Efectos estéticos de U.S. EPA Influente Efluente Efluente % de reducción % de reducciónNúmero de
reducción de substancia MCL promedio máximo promedio mínimo promedio prueba de NSF
Sabor/olor a cloro N/A 2.0 mg/L N/A 0.04 mg/L N/A 98% 994707
Partículas N/A 610,000/mL* N/A 154/mL N/A 99% 994711
Reducción de U.S. EPA Influente Efluente Efluente % de reducción % de reducciónNúmero de
elementos contaminantes MCL promedio máximo promedio mínimo promedio prueba de NSF
Cisto 99.95% 89,250/mL* 6/mL 2.3/mL 99.993% 99.997% 994710
Turbidez 0.5 NTU 29 NTU 0.12 NTU 0.09 NTU 99.59% 99.69% 994710
Plomo: @ pH 6.5 0.015 mg/L 0.16 mg/L*** 0.001 mg/L 0.001 mg/L 99.4% 99.4% 994708
Plomo: @ pH 8.5 0.015 mg/L 0.16 mg/L*** 0.002 mg/L 0.001 mg/L 98.8% 99.4% 994709
Reducción Influente Efluente Efluente % de reducción % de reducciónNúmero de
de substancia promedio máximo promedio mínimo promedio prueba de NSF
Sabor/olor a cloro N/A 2.0 mg/L N/A 0.1 mg/L N/A 95% 981788
Desempeño
††
U.S. EPA Influente Efluente Efluente % de reducción % de reducciónNúmero de
reducción de MCL promedio máximo promedio mínimo promedio prueba de NSF
elementos contaminantes
Plomo: @ pH 6.5 0.015 mg/L 0.16 mg/L*** 0.007mg/L 0.005 mg/L 95% 97% 976115
Plomo: @ pH 8.5 0.015 mg/L 0.14 mg/L*** 0.012 mg/L 0.008 mg/L 91% 94% 976116
Capacidad: 400 galones (1541 litros)
Medida de flujo de servicio:
0.5 GPM (1.89 L/min.) @ 60 psi
Capacidad: 500 galones (1893 litros)
Medida de flujo de servicio:
0.5 GPM (1.89 L/min.) @ 60 psi
* El requisito de la prueba es al menos 100,000 partículas/ml de Polvo de prueba fino AC.** El desempeño de cisto es el % de reducción basado en
la Norma 53 de NSF. *** El requisito de prueba es 0.15 mg/L ± 10%. Estos elementos contaminantes no se encuentran necesariamente en su
suministro de agua. El desempeño podría variar en base a las condiciones locales del agua.
■
Es esencial que se cumplan los requisitos de operación,
mantenimiento y reemplazo de filtro para que el producto
desempeñe como se anuncia.
■
Modelo WF-LC400 El sistema de monitoreo de filtro mide la
cantidad de agua que pasa a través del filtro y le avisa que
reemplace el filtro.Cuando el 90% de la vida nominal del filtro
ha sido usada, la luz indicadora del filtro cambia de verde a
amarillo. Cuando el 100% de la vida nominal del filtro ha sido
usada, la luz indicadora del filtro cambia de amarillo a rojo, y
se recomienda que usted reemplace el filtro.Use el cartucho
de repuesto LC400, parte # 9902. El precio de venta sugerido
en el año 2000 es de $39.95 EE. UU./$49.95 Canadá.
■
Modelo WF-NL500 El sistema de monitoreo de filtro mide la
cantidad de agua que pasa a través del filtro y le avisa que
reemplace el filtro.Cuando el 90% de la vida nominal del filtro
ha sido usada, la luz indicadora del filtro cambia de verde a
amarillo. Cuando el 100% de la vida nominal del filtro ha sido
usada, la luz indicadora del filtro cambia de amarillo a rojo, y
se recomienda que usted reemplace el filtro.Use el cartucho
de repuesto L500, parte # 4392857. El precio de venta
sugerido en el año 2000 es de $29.95 EE. UU./$39.95
Canadá.
■
El producto es para uso únicamente con agua fría.
■
No lo utilice con agua que sea microbiológicamente
peligrosa o de calidad desconocida sin la debida
desinfección, antes o después del sistema.
■
Consulte en la sección “Asistencia o Servicio” el
nombre, la dirección y el número de teléfono del
fabricante.
■
Consulte en la sección de “Garantía” la garantía limitada
del fabricante.
Suministro de agua Ciudad o pozo
Presión del agua 30 – 120 psi (207 – 827 kPa)
Temperatura del agua 33° – 100°F (0.6° – 37.8°C)
Directrices de aplicación/Parámetros
de suministro de agua
†
El requisito de prueba es 0.15 mg/L ± 10%.
††
Estos elementos contaminantes no se encuentran necesariamente en su suministro de agua. El desempeño podría variar en base a las condiciones locales del agua.
® NSF es marca registrada de NSF International.
 Loading...