

Page 1
2200139A
In the U.S. for questions about features,
accessories or service,
operation/performance, parts, call:
1-800-422-1230
In Canada, call:
for assistance
installation and service 1-800-807-6777
1-800-461-5681
or visit our website at...
www.kitchenaid.com
Page 2

TABLE OF
TABLE DES
CONTENTS
REFRIGERATOR SAFETY ............................................... 3
PARTS AND FEATURES................................... ....... ...... .. 4
INSTALLING YOUR REFRIGERATOR .............................. 5
Unpacking Your Refrigerator ............................................ 5
Space Requirements......................................................... 5
Electrical Requirements.................................................... 6
Removing the Doors......................................................... 6
Water System Preparation................................................ 7
Connecting the Refrigerator to a Water Source............... 8
Factory Trim Kit................................................................. 9
Base Grille....................................................................... 11
Door Closing ................................................................... 11
Understanding Sounds You May Hear........................... 12
USING YOUR REFRIGERATOR....................................... 12
Ensuring Proper Air Circulation....................................... 12
Setting the Controls ........................................................13
Adjusting Control Settings.............................................. 13
Food Storage Guide........................................................14
REFRIGERATOR FEATURES........................................... 15
Ice Maker Storage Bin .................................................... 15
Water and Ice Dispensers............................................... 16
Water Filtration and Monitoring System......................... 17
Refrigerator Shelves........................................................ 18
Deli Drawer...................................................................... 19
Convertible Vegetable/Meat Drawer and Cov er.......... ...19
Convertible Vegetable/Meat Drawer
Temperature Control....................................................... 20
Crisper and Crisper Cover.............................................. 20
Crisper Humidity Control................................................20
Door Rails........................................................................21
Door Accessories............................................................ 21
Freezer Shelf ................................................................... 22
Freezer Basket ................................................................ 22
CARING FOR YOUR REFRIGERATOR........................... 22
Cleaning Your Refrigerator ............................................. 22
Changing the Light Bulbs ............................................... 23
Power Interruptions......................................................... 24
Vacation and Moving Care ............................................. 24
TROUBLESHOOTING....................................................... 25
ASSISTANCE OR SERVICE ............................................. 29
WARRANTY....................................................................... 30
WATER FILTER CERTIFICATIONS ................................. 31
MATIÈRES
SÉCURITÉ DU RÉFRIGÉRATEUR.................................33
PIÈCES ET CARACTÉRISTIQUES.................................34
INSTALLATION DU RÉFRIGÉRATEUR .......................... 35
Déballage de votre réfrigérateur..................................... 35
Espacement requis......................................................... 35
Spécifications électriques............................................... 36
Enlèvement des portes................................................... 36
Préparation du système d’eau........................................ 37
Raccordement du réfrigérateur
à une canalisation d’eau................................................. 38
Ensembles décoratifs de l’usine..................................... 40
Grille de la base .............................................................. 41
Fermeture des portes ..................................................... 42
Les bruits de l’appareil que vous pouvez entendre ....... 42
UTILISATION DU RÉFRIGÉRATEUR .............................. 43
Pour s’assurer d’une circulation d’air approp riée.......... 43
Réglage des commandes............................................... 43
Ajustement des réglages de contrôle............................. 44
Guide d’entreposage des aliments................................. 44
CARACTÉRISTIQUES DU RÉFRIGÉRATEUR................ 46
Bac d’entreposage de la machine à glaçons................. 46
Distributeurs d’eau et de glaçons................................... 46
Système de filtration
et de contrôle d’eau........................................................ 48
Tablettes du réfrigérateur ............................................... 49
Casier pour petits aliments............................................. 50
Tiroir et couvercle convertibles
pour légumes/viande..................................................... 50
Réglage de la température
du tiroir convertible à légumes/viande ........................... 51
Bac à légumes et couvercle ........................................... 51
Réglage de l’humidité dans les bacs à légumes............ 52
Tringles dans la porte ..................................................... 52
Accessoires de porte...................................................... 52
Clayette de congélateur.................................................. 53
Panier du congélateur..................................................... 53
ENTRETIEN DE VOTRE RÉFRIGÉRATEUR ................... 53
Nettoyage du réfrigérateur.............................................. 53
Remplacement des ampoules d’éclairage.................... 54
Pannes de courant.......................................................... 55
Entretien avant les vacances
ou lors d’un déménagement........................................... 56
DÉPANNAGE..................................................................... 57
ASSISTANCE OU SERVICE ............................................. 61
GARANTIE......................................................................... 62
CERTIFICATIONS DE FILTRE À EAU............................. 63
2
Page 3
REFRIGERATOR SAFETY
Your safety and the safety of others is very important.
We have provided many important safety messages in this manual and on your appliance. Always read and obey all
safety messages.
This is the safety alert symbol.
This symbol alerts you to hazards that can kill or hurt you and others.
All safety messages will be preceded by the safety alert symbol and the word “DANGER” or
“WARNING.” These words mean:
You will be killed or seriously injured if you don't
DANGER
WARNING
All safety messages will identify the hazard, tell you how to reduce the chance of injury, and tell you what can
happen if the instructions are not followed.
IMPORTANT SAFETY INSTRUCTIONS
WARNING:
precautions:
■
Plug into a grounded 3 prong outlet.
■
Do not remove ground prong.
■
Do not use an adapter.
■
Do not use an extensio n cord.
■
Disco n n e c t po wer befo re s er v ic i n g .
■
Replace all panels before operating.
■
Remove doors from your old refriger a tor.
To reduce th e ris k of fire, electric shock , or injury whe n u sin g your refrigerator, follow thes e ba s ic
follow instructions.
can be killed or seriously injured if you don't
You
follow instructions.
■
Use nonflammable cleaner.
■
Keep flammable mater ia ls and vapors, such as
gasoline, aw ay from refr iger ato r.
■
Use two or mo re peop le to mov e and install
refrigerator.
■
Disconnect power before installing ice maker.
■
Use a sturdy glass when dispensing ice or water (on
some models).
SAVE THESE INSTRUCTIONS
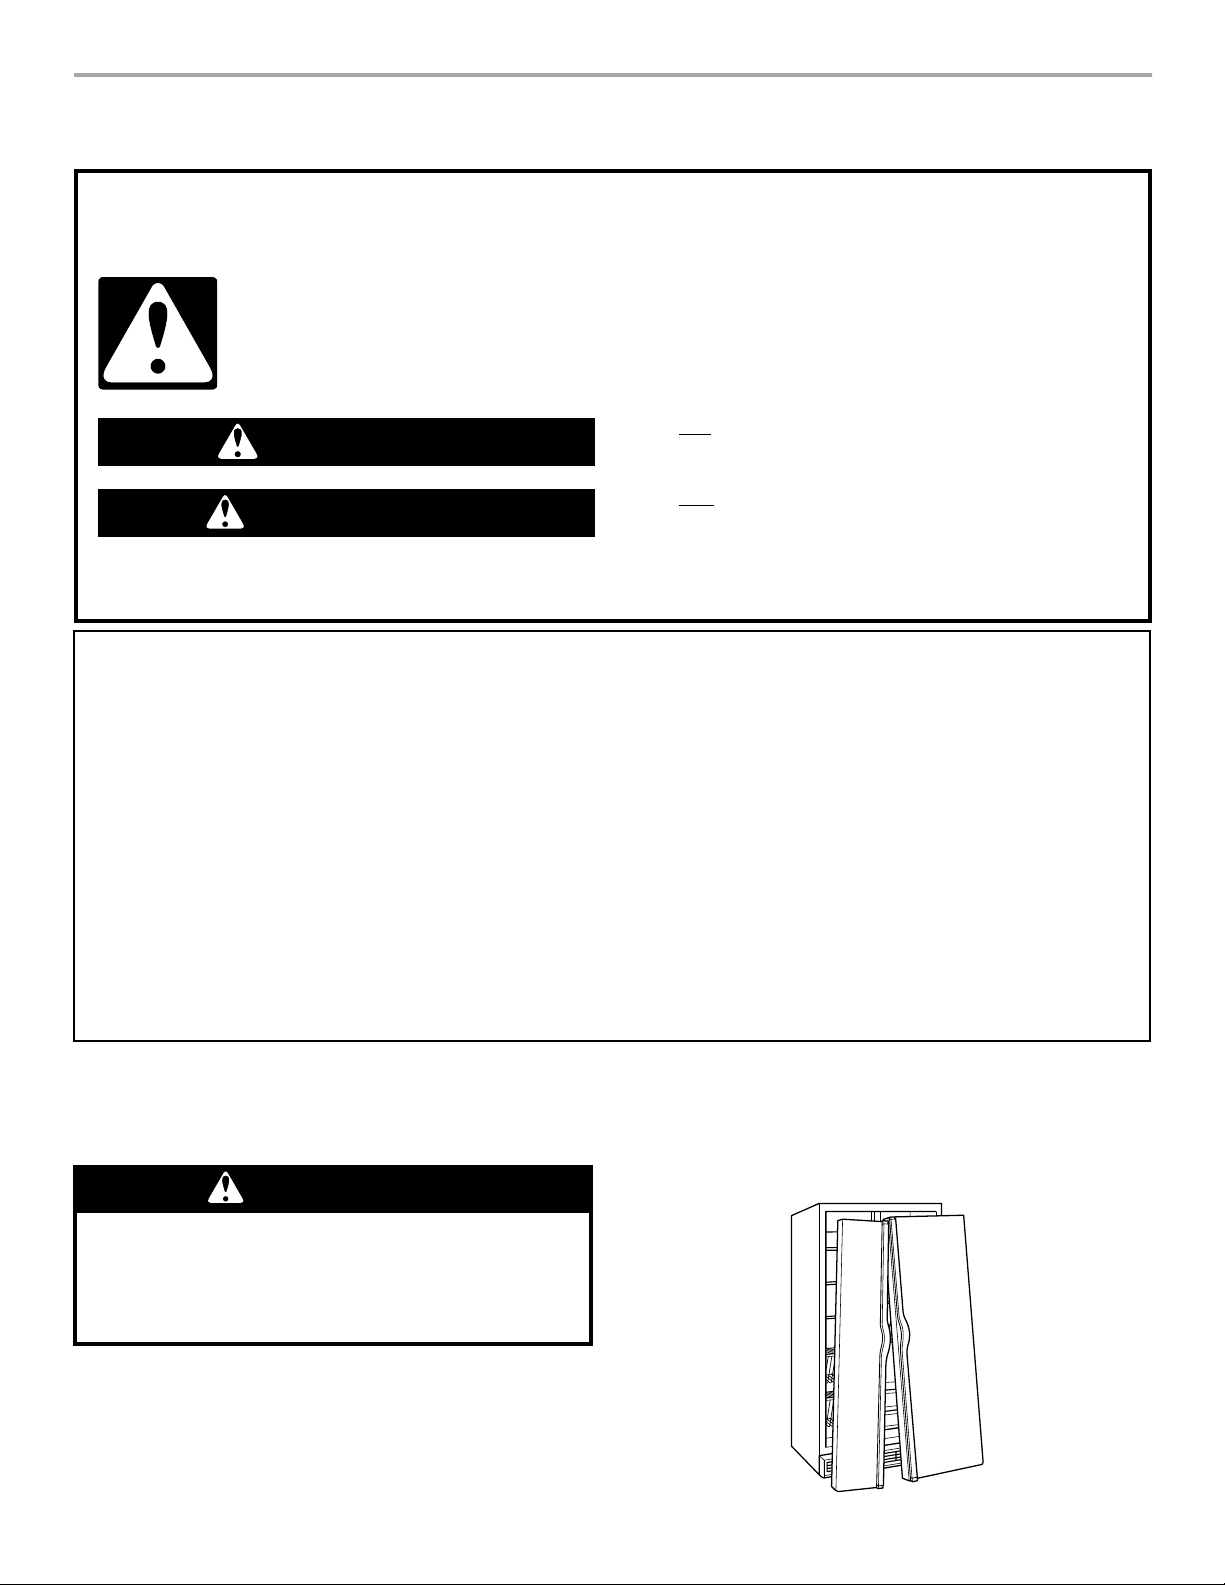
Proper Disposal of
Your Old Refrigerator
W ARNING
Suffocation Hazard
Remove doors from your old refrigerator.
Failure to do so can result in death or
brain damage.
IMPORTANT – Child entrapment and suffocation are not
problems of the past. Junked or abandoned refrigerators
are still d a ngerous – even if th ey will sit for “just a few
days.” If you are getting rid of your old refrigerator, please
follow these instructions to help prevent accidents.
Before you throw away your old refrigerator or freezer:
■ Take off the doors.
■ Leave the shelves in place so that children may not
easily climb inside.
3
Page 4
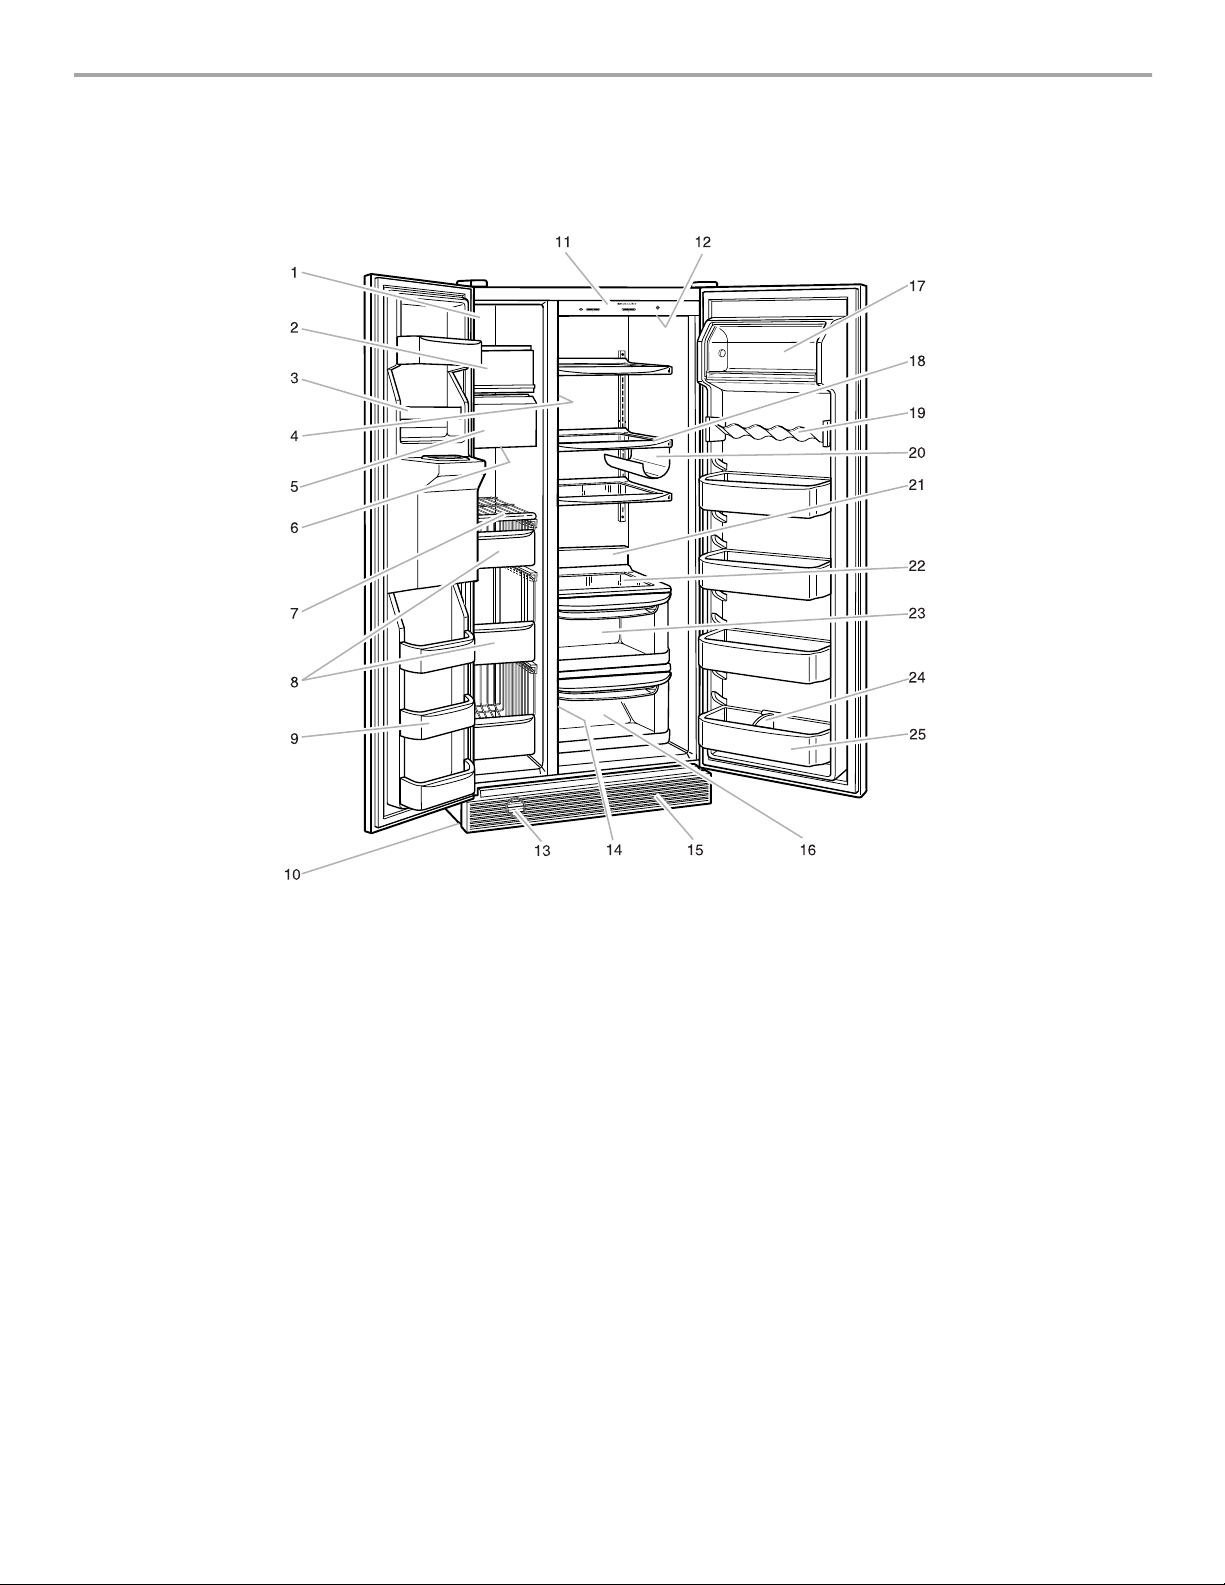
PARTS AND FEATURES
This manual covers sev eral diff erent models. The refrigerator you have purchased may hav e some or all of the items listed.
The locations of the features may not match your model.
Chrisper
Meat Locker
ExtendFreshExtendFresh
SuperbaSuperba
RefrigeratorRefrigerator
Freezer
4
Colder
3
1
2
Off
Automatic Exterior Moisture ControlAutomatic Exterior Moisture Control
ColderColder
4
3
1
2
ColdCold
1. Upper Freezer Light
2. Automatic Ice Maker (on some models)
3. Drop-in Door Rails
4. Model and Serial Number Label (on side wall)
5. Ice Maker Storage Bin (on some models)
6. Freezer Light (below Ice Maker Storage Bin)
7. Removable Freezer Shelf
8. Slide-out Freezer Baskets (number varies with model)
9. Snap-on Door Rails
10. Leveling Rollers (behind base grille)
11. Control Panel
12. Light
13. (AQUASENSE™) Water Filtration System
(on some models)
14. (FRESH CHILL™) Convertible Vegetable/Meat Drawer
Temperature Control (on side wall)
15. Base Grille
16. (FRESH CHILL™) Convertible Vegetable/Meat Drawer
with cover
17. Utility Compartment
18. (ROLLER TRAC™ SPILLCLEAN™) Shelves
19. Can Rack (number varies with model)
20. Wine Rack
21. Crisper Light
22. Crisper Cover with Humidity Control
23. Crisper Drawer
24. Door Bin with Stor-Lock
25. (SLIDE ‘N’ LOCK
TM
) Door Bins (on some models)
Other parts and features
(not shown in illustration above/optional on some
models)
Ice cube trays
Crisper humidity control
Egg/utility bin
4
Page 5
INSTALLING
Space Requirements
YOUR
REFRIGERATOR
Unpacking Y our Refrigerator
WARNING
Excessive Weight Hazard
Use two or more people to move and install
refrigerator.
Failure to do so can result in back or other injury.
Removing packa ging materials
■ Remove tape and any labels from your refrigerator
before using (except the model and serial numb er
label).
To remove any remaining tape or glue, rub the area
briskly with your thumb. Tape or glue residue can also
be easily removed by rubbing a small amount of liquid
dish soap over the adhesive with your fingers. Wipe
with warm water and dry.
■ Do not use sharp instruments, rubbing alcohol,
flammable fluids, or abrasive cleaners to remove tape
or glue. These products can damage the surface of
your refrigerat or. For more information, see the
“Important Safety Instructions” section.
IMPORTANT: Do not remove any permanent instruction
labels inside your refrigerator, or the Tech Sheet that is
fastened to the base grille.
Cleaning before use
After you remove all of the packaging materials, clean the
inside of your refrigerator before using it. See the cleaning
instructions in the “Caring for your Refrigerator” section.
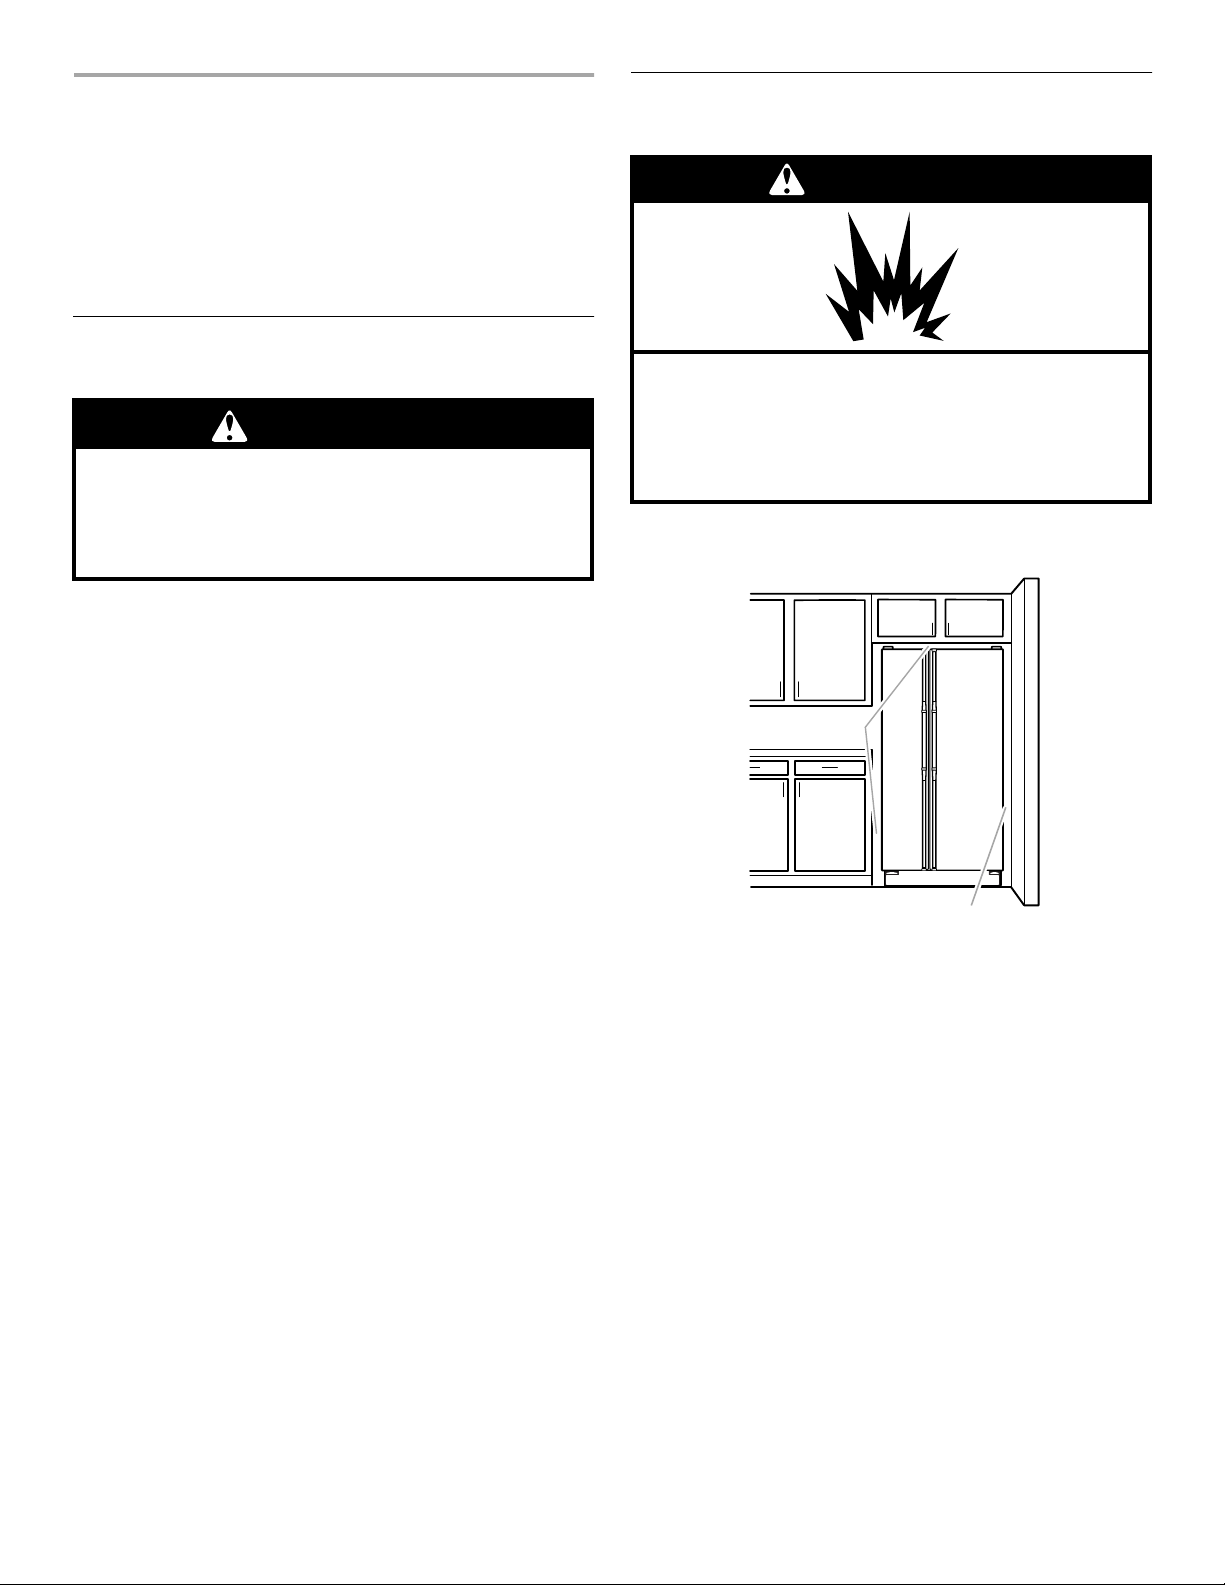
WARNING
Explosion Hazard
Keep flammable materials and vapors, such as
gasoline, away from refrigerator.
Failure to do so can result in death, explosion,
or fire.
■ To ensure proper ventilation for your refrigerator, allow
for .5" (1.25 cm) spa ce on each side and at the top.
.5" (1.25cm)
2" (5.08 cm)
■ If your refrigerator has an ice maker, make sure you
leave some extra space at the back for the water line
connections. The refrigerator can be flush against the
back wall if you do not have an ice maker installed.
■ If you are installin g your refr igerator n ext to a fixed wall,
leave 2" (5.08 cm) minimum on each side (depending
on your model) to allow for the door to swing open.
NOTE: Do not install the r efrig erator near an ove n, radiator,
or other heat source, nor in a location where the
temperature will fall below 55°F (13°C).
5
Page 6
Electrical Requirements
Removing the Doors
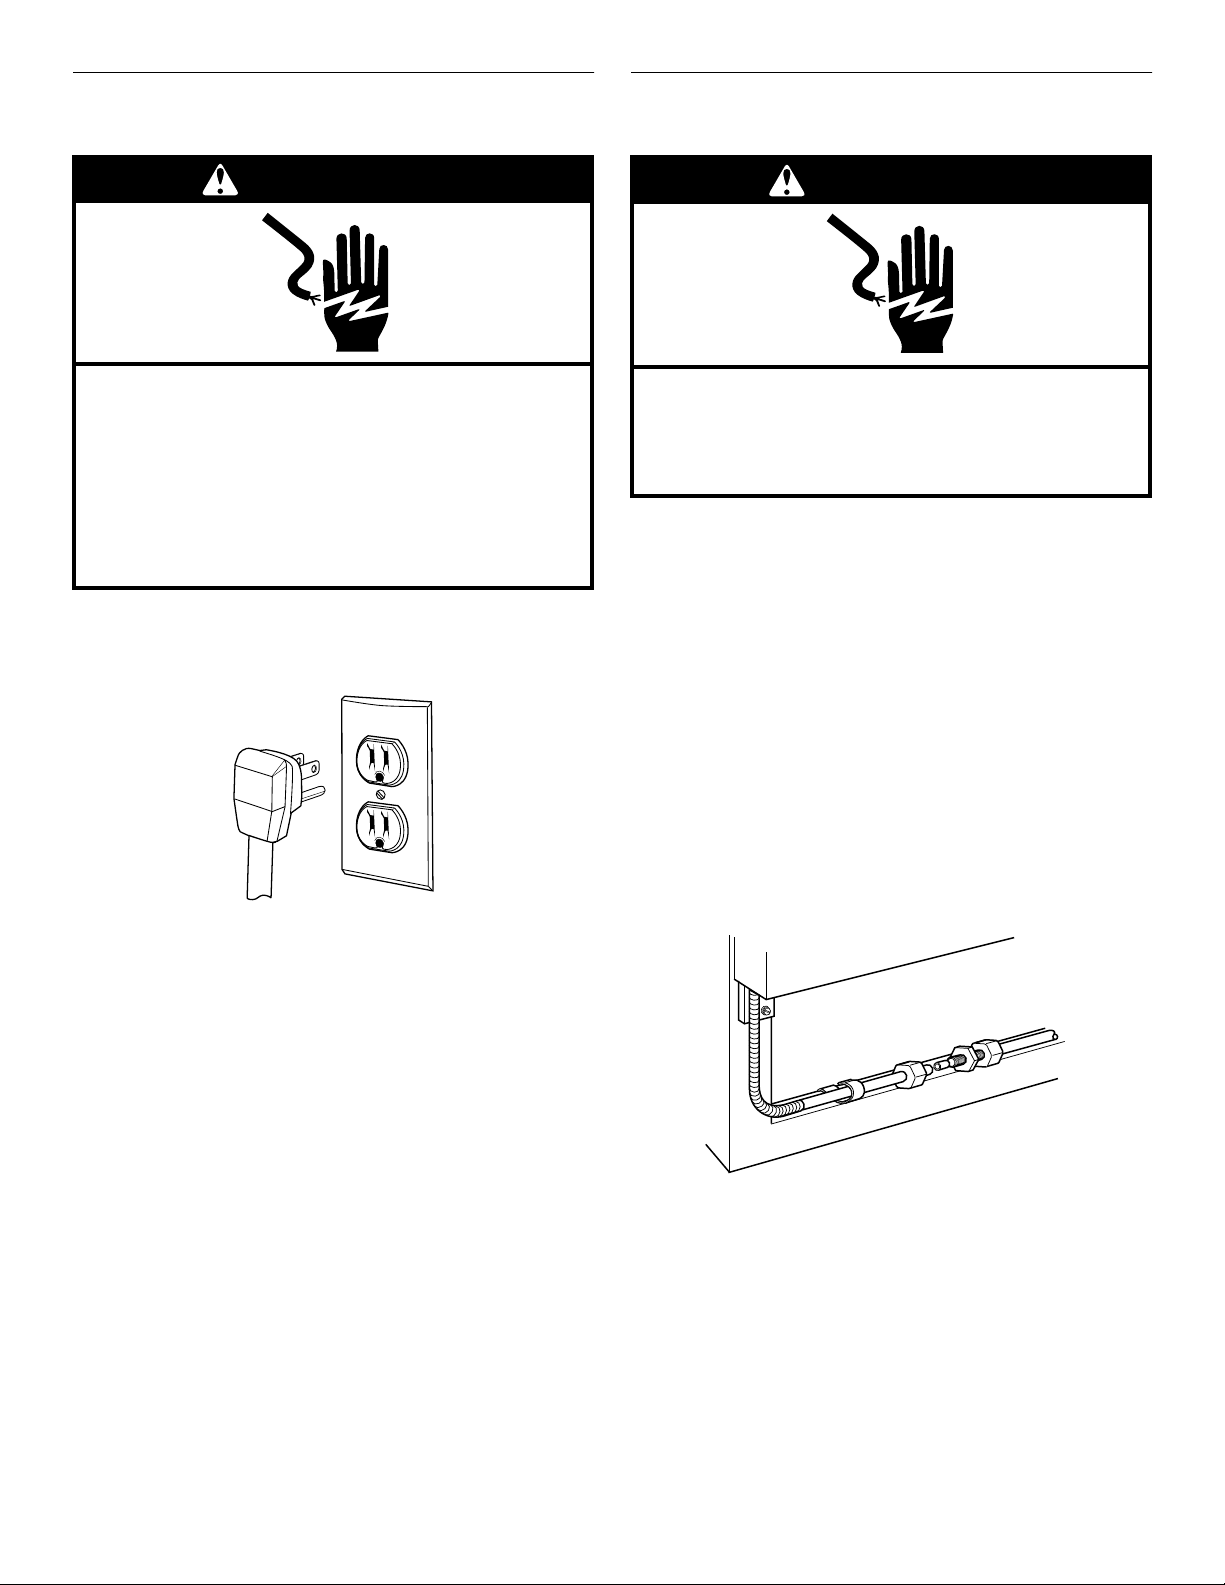
WARNING
Electrical Shock Hazard
Plug into a grounded 3 prong outlet.
Do not remove ground prong.
Do not use an adapter.
Do not use an extension cord.
Failure to follow these instructions can result in
death, fire, or electrical shock.
Before you move your refrigerator into its final location, it is
important to make sure you have the proper electrical
connection:
WARNING
Electrical Shock Hazard
Disconnect power before removing doors.
Failure to do so can result in death or
electrical shock.
NOTE: Before removing doors, open both doors and
remove base grille (see the “Base Grille” section).
Tools Needed:
¹⁄₄-inch hex-head socket wrench and ⁵⁄₁₆-inch hex-head
socket wrench.
1. Unplug refrigerator or disconnect power.
2. If you have a dispen ser ( ice or wa ter), di sconnect water
line (behind base grille).
Recommended Grounding Method
A 115 Volt, 60 Hz., AC only 15 or 20 ampere fused,
grounded electrical supply is required. It is recommended
that a separate circuit serving only your refrigerator be
provided. Use an outlet that cannot be turned off by a
switch. Do not use an extension cord.
NOTE: Before performing any t ype of installation, cleaning ,
or removing a light bulb, turn the control, (Thermostat,
Refrigerator or Fr eezer Contr ol dep ending on the mo del) t o
OFF and then disconnect the refrigerator from the
electrical source. When you are finished, reconnect the
refrigerator to the electrical source and reset the control
(Thermostat, Refrigerat or o r Fr e ezer Control depending on
the model) to the desired setting.
■ Remove hose from clip.
■ Disconnect union nut and slide it back onto tube.
■ Remove metal insert from tube.
■ Remove union nut and spring.
6
Page 7
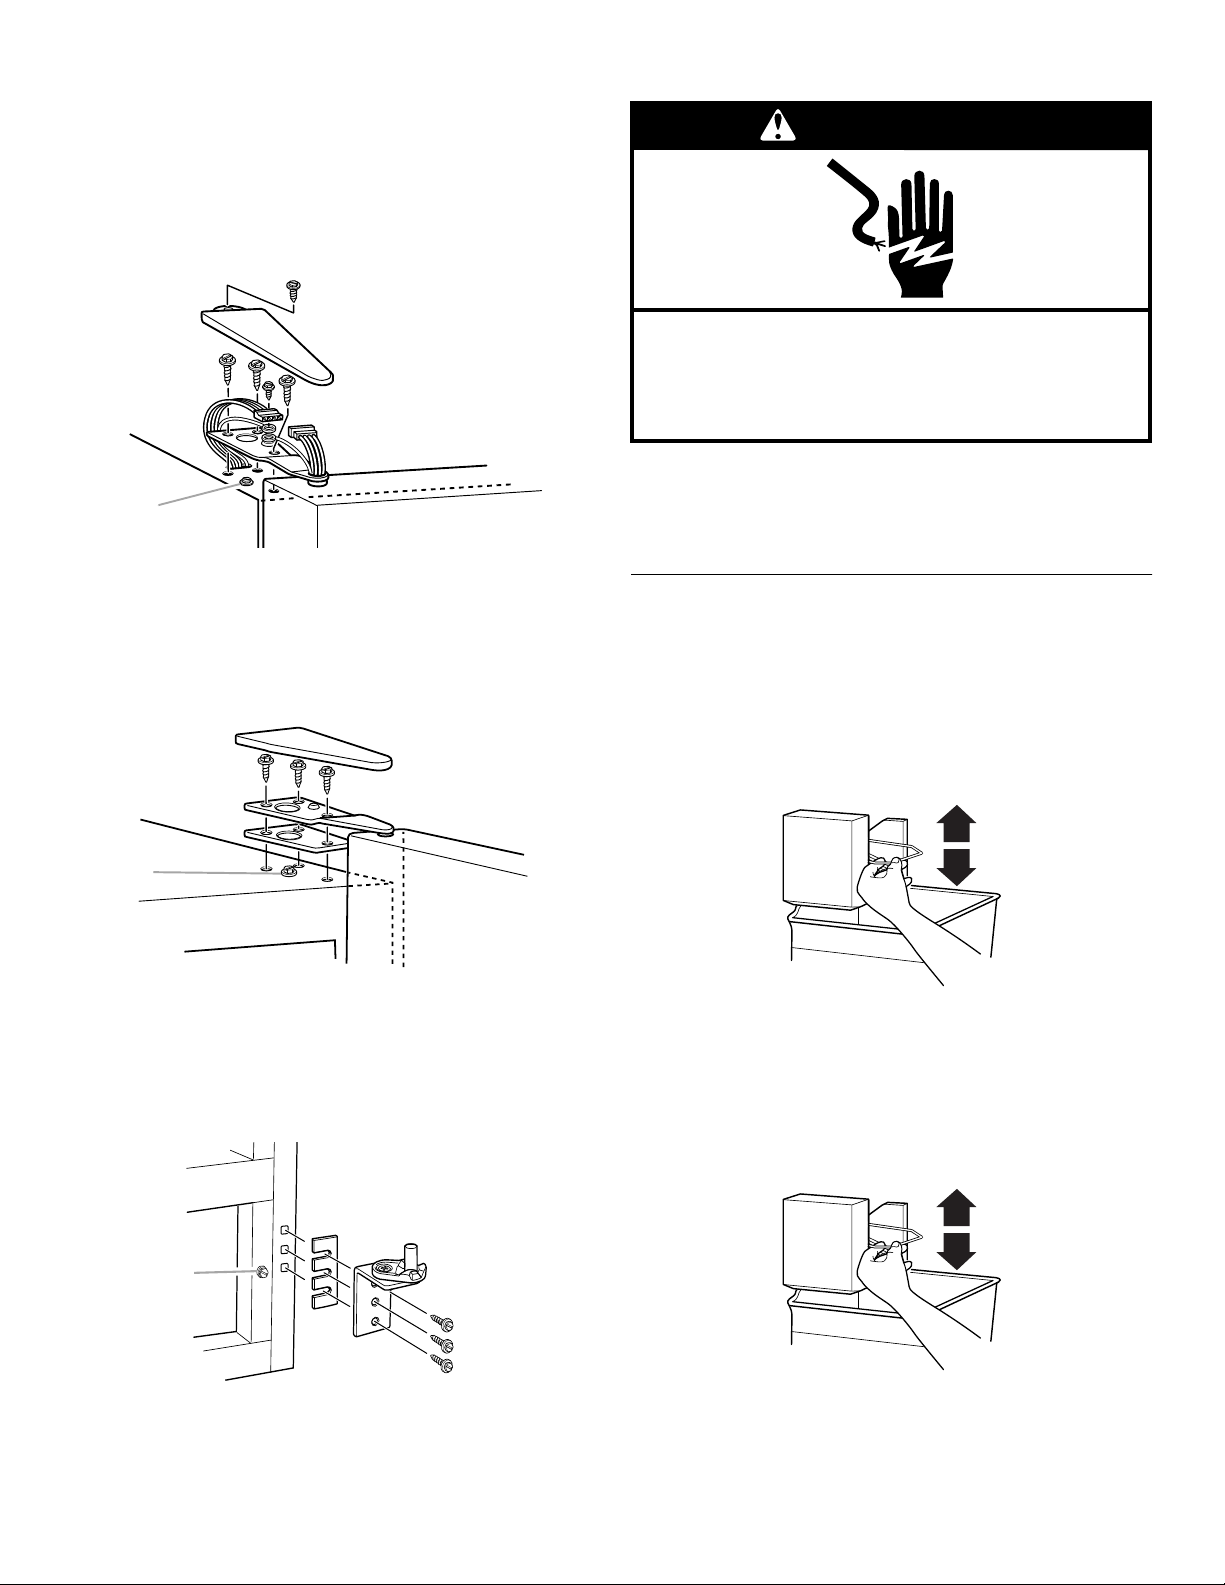
3. Remove left top hinge.
6. Replace doors.
■ Remove hinge cover and screws. DO NOT
REMOVE SCREW 1 AS SHOWN IN DIAGRAM.
■ Disconnect wiring plug and both ground wires.
■ Carefully lift door up off bottom hinge. Make sure
you protect water line from damage.
1
4. Disassemble right top hinge.
■ Remove hinge cover and screws. DO NOT
REMOVE SCREW 2 AS SHOWN IN DIAGRAM.
■ Lift door up off bottom hinge.
WARNING
Electrical Shock Hazard
Reconnect both ground wires.
Failure to do so can result in death or
electrical shock.
7. Reconnect wiring plug and both grounding wires.
8. Replace hinge cover and screws.
9. Plug in refrigerator or reconnect power.
W ater System Preparation
Please read before using the water system.
Immediately after installation, follow the steps below to
make sure that the water system is properly cleaned.
1. Turn off the ice maker by opening the freezer door and
lifting up the signal arm as shown.
2
5. Remove bottom hinge, if necessary. Both bottom
hinges have similar construction. DO NOT REMOVE
SCREW 3 AS SHOWN IN DIAGRAM.
NOTE: It may not be necessary to remove the bottom
hinge to move refrigerator through a doorway.
3
2. Flush the water system by dispensing and discarding
2-3 gallons (approximately 6-7 minutes) of water
through the dispenser. This will clean the system and
help clean air from the lines. Additional flushing may be
required in some households.
3. Turn on the ice maker by opening the freezer door and
lowering the signal arm as shown.
4. Allow 24 hours to produce the first batch of ice. Ice
maker should then produce approximately 7 to 9
batches of ice in a 24-hour period. Discard the first
three batches of ice produced.
7
Page 8
Connecting to water line:
Connecting the Refrigerator
to a Water Source
Read all directions carefully bef ore y ou begin.
IMPORTANT :
■ If operating the refrigerator before installing the water
connection, turn ice maker to the OFF position to
prevent operation without water.
■ All installations must be in accordance with local
plumbing code requirements.
■ Use copper tubing and check for leaks.
■ Install copper tubing only in areas wh ere temperatures
will remain above freezing.
■ It may take up to 24 hours for your ice maker to begin
producing ic e.
Tools required:
■ Standard screwdriver
■ ⁷⁄₁₆-inch and ¹⁄₂-inch open-end wrench es or two
adjustable wrenches
■ ¹⁄₄-inch nut driver
1. Unplug refrigerator or disconnect power.
2. Turn OFF main water supply. Turn ON nearest faucet
long enough to clear line of water.
3. Find a ¹⁄₂-inch to 1¹⁄₄-inch vertical COLD water pipe
near the refrigerator.
NOTE: Horizontal pipe will work, but the following
procedure must be followed: Drill on the top side of the
pipe, not the bottom. This will help keep water away
from the drill. This also keeps normal sed iment from
collecting in the valve.
4. To determine the length of copper tubing you will need,
measure from connection on lower left rear of
refrigerator to water pipe. Add 7 feet (2.1 m) to allow for
moving refrigerator for cleaning. Use ¹⁄₄-inch O.D.
(outside diameter) copper tubing. Be sure both ends of
copper tubing are cut square.
5. Using a grounded drill, drill a ¹⁄₄-inch hole in the cold
water pipe you have selected.
■ ¹⁄₄-inch drill bit
■ Hand drill or electric drill (properly grounded)
NOTE: Your refrigerator dealer has a kit available with a
¹⁄₄-inch saddle-type shut-off valve, a union, and copper
tubing. Before p urchasing, make sure a saddle-type valve
complies with your local plumbing codes. Do not use a
piercing-type or ³⁄₁₆-inch saddle valve which reduces water
flow and clogs more easily.
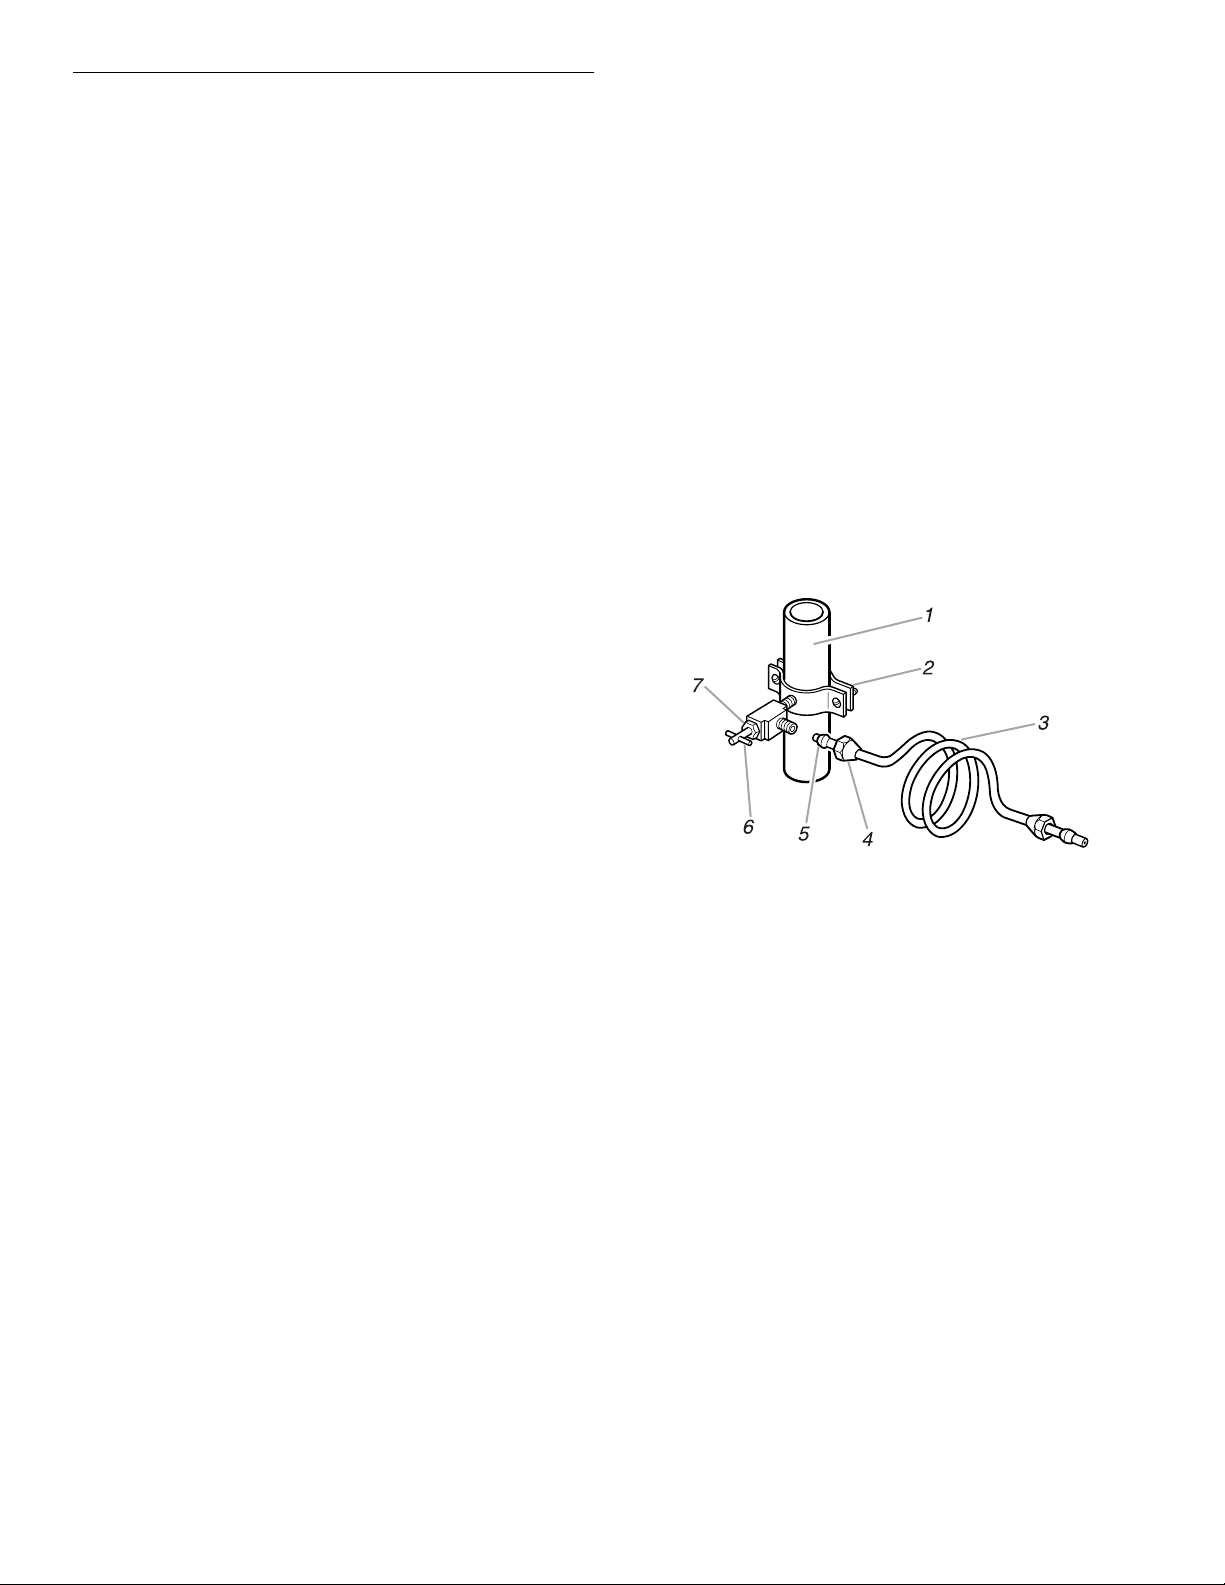
Cold Water Supply
The ice maker wate r v al ve con t ains a fl ow was her wh ic h is
used as a water pressure regulator. The ice maker needs to
be connected to a cold water line with water pressure
between 30 and 120 psi. If a problem occurs, call your
utility company.
1. Cold Water Pipe
2. Pipe Clamp
3. Copper Tubing
4. Compression Nut
5. Compression Sleeve
6. Shut Off Valve
7. Packing Nut
6. Fasten shut-off valve to cold water pipe with pipe
clamp. Be sure outlet end is soli dly in the ¹⁄₄-inch drilled
hole in the water pipe and that washer is under the pipe
clamp. Tighten packing nut. Tighten the pipe clamp
screws carefully and evenly so washer makes a
watertight seal. Do not overtighten or you may crush
the copper tubing, especially if soft (coiled) copper
tubing is used. Now you are ready to connect the
copper tubing.
7. Slip compression sleeve and compression nut on
copper tubing as shown. Insert end of tubing into outlet
end squarely as far as it will go. Scr ew compr ession nut
onto outlet end with adjustable wrench. Do not
overtighten.
8. Place the free en d of the tubi ng into a cont ainer or sin k,
and turn ON main water supply and flush out tubing
until water is clear . Turn OFF shut-off valve on the water
pipe. Coil copper tubing.
8
Page 9
Connecting to refrigerator:
1. Attach the copper tube to the valve inlet using a
compression nut and sleeve as shown. Tighten the
compression nut. Do not overtighten. Use the tube
clamp on the back of the refrigerator to secure the
tubing to the refrigerator as shown. This will help
prevent damage to the tubing when the refrigerator is
pushed back against the wall. Move to step 2.
2. Turn shut-off valve ON. Check For Leaks. Tighten
any connections (including connections at the
valve) or nuts that leak.
Factory Trim Kit
(on some models)
There may be an occasion when you will need to remove
the factory-installed trim kit, such as moving the
refrigerator to a new home or installing custom-made
decorator panels. Please read all instructions carefully
before removing the trim kit and decorator panels.
2 1
3
1. Tube Clamp
2. Copper Tubing
3. Compression Nut
4. Valve Inlet
3. The ice maker is equipped with a built-i n water straine r.
If local water conditions require periodic cleaning or a
well is your source of water supply, a second water
strainer should be inst al le d in the ¹⁄₄-inch water line.
Obtain a water strainer from your nearest appliance
dealer. Install at either tube connection.
4. Plug in refrigerator or reconnect power.
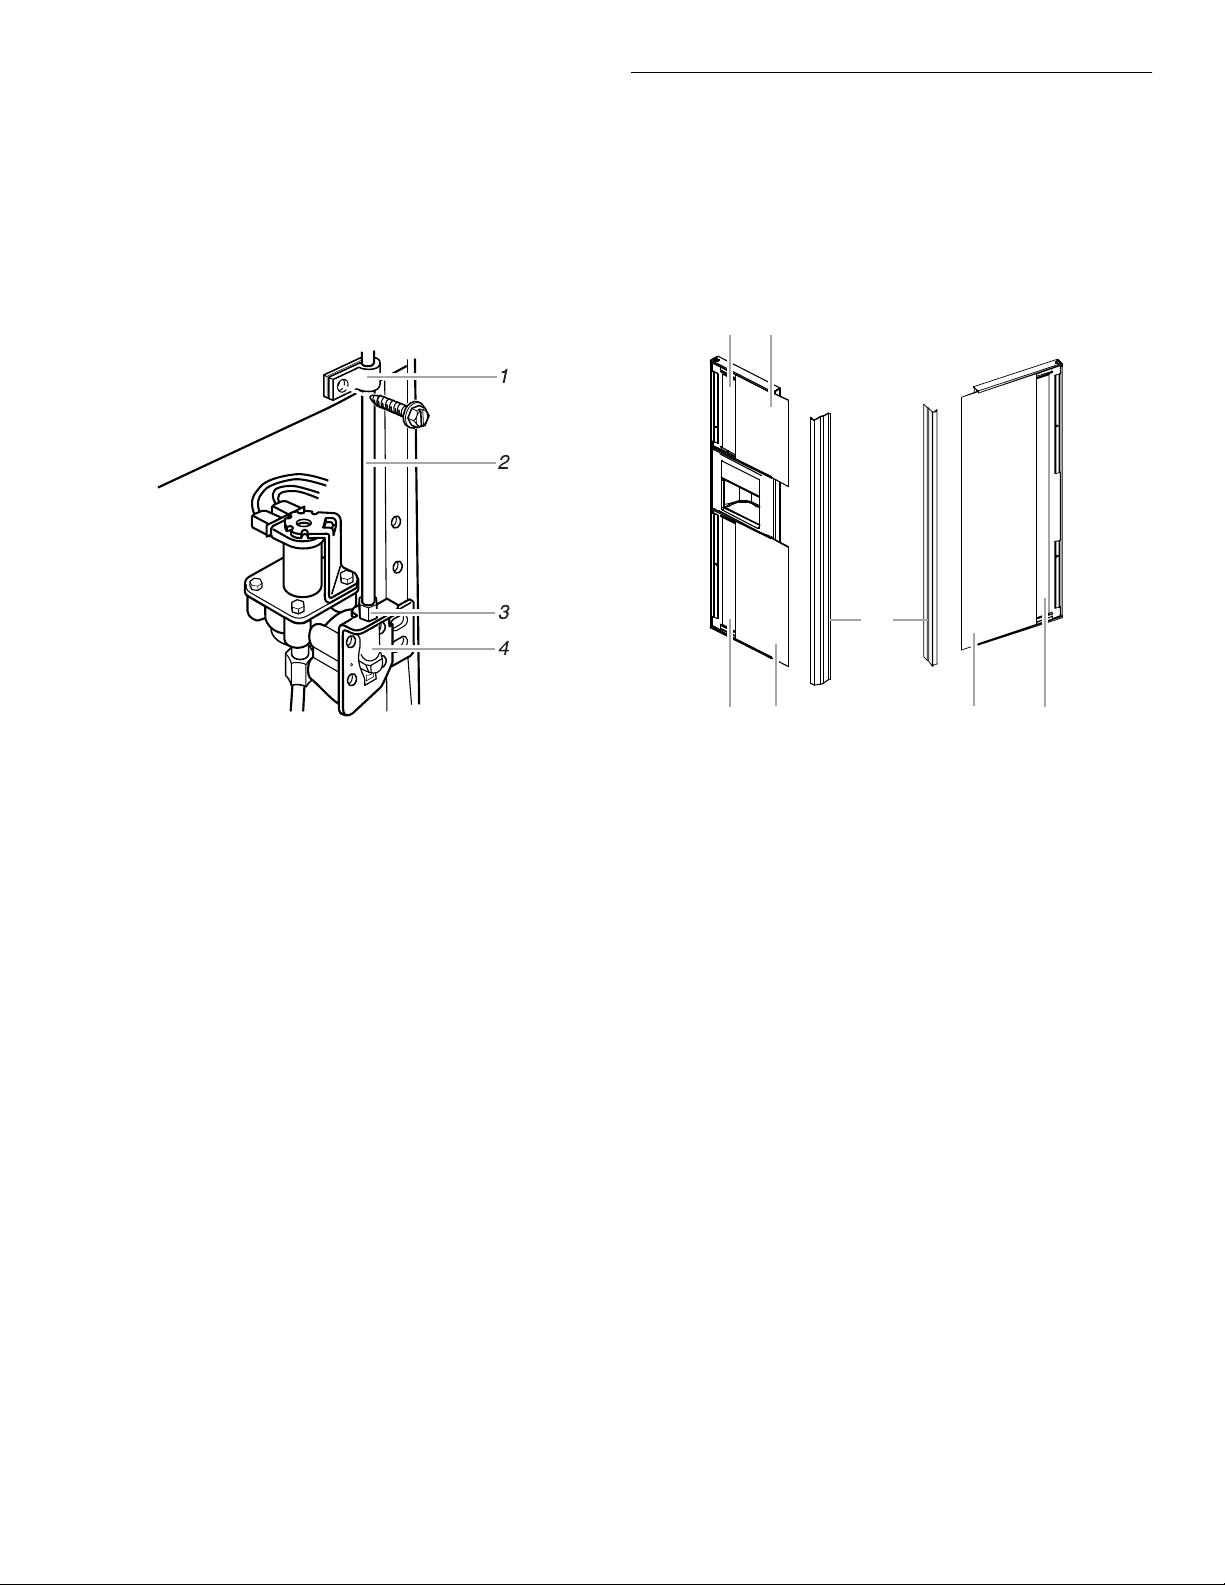
2 1
Freezer Door Refrigerator Door
1. Decorator Panels
2. Filler Panels
3. Handles
1
2
Removing the Door P anels
NOTE: When removing and replacing decorator panels,
only the handle is removed. All other trim pieces remain
attached to the doors.
1. Remove the refrigerator and freezer handles:
■ Using a Phillips screwdriver, remove the screws that
hold each handle i n place.
■ Lift off handle. Make sure you keep screws for
reattaching handles.
2. Remove the door panels:
■ Open refrigerator or freezer door.
■ Slide out decorator panel and filler board.
■ Repeat process for other panels and filler boards.
■ Store panel and filler boards carefully to prevent
scratching.
9
Page 10
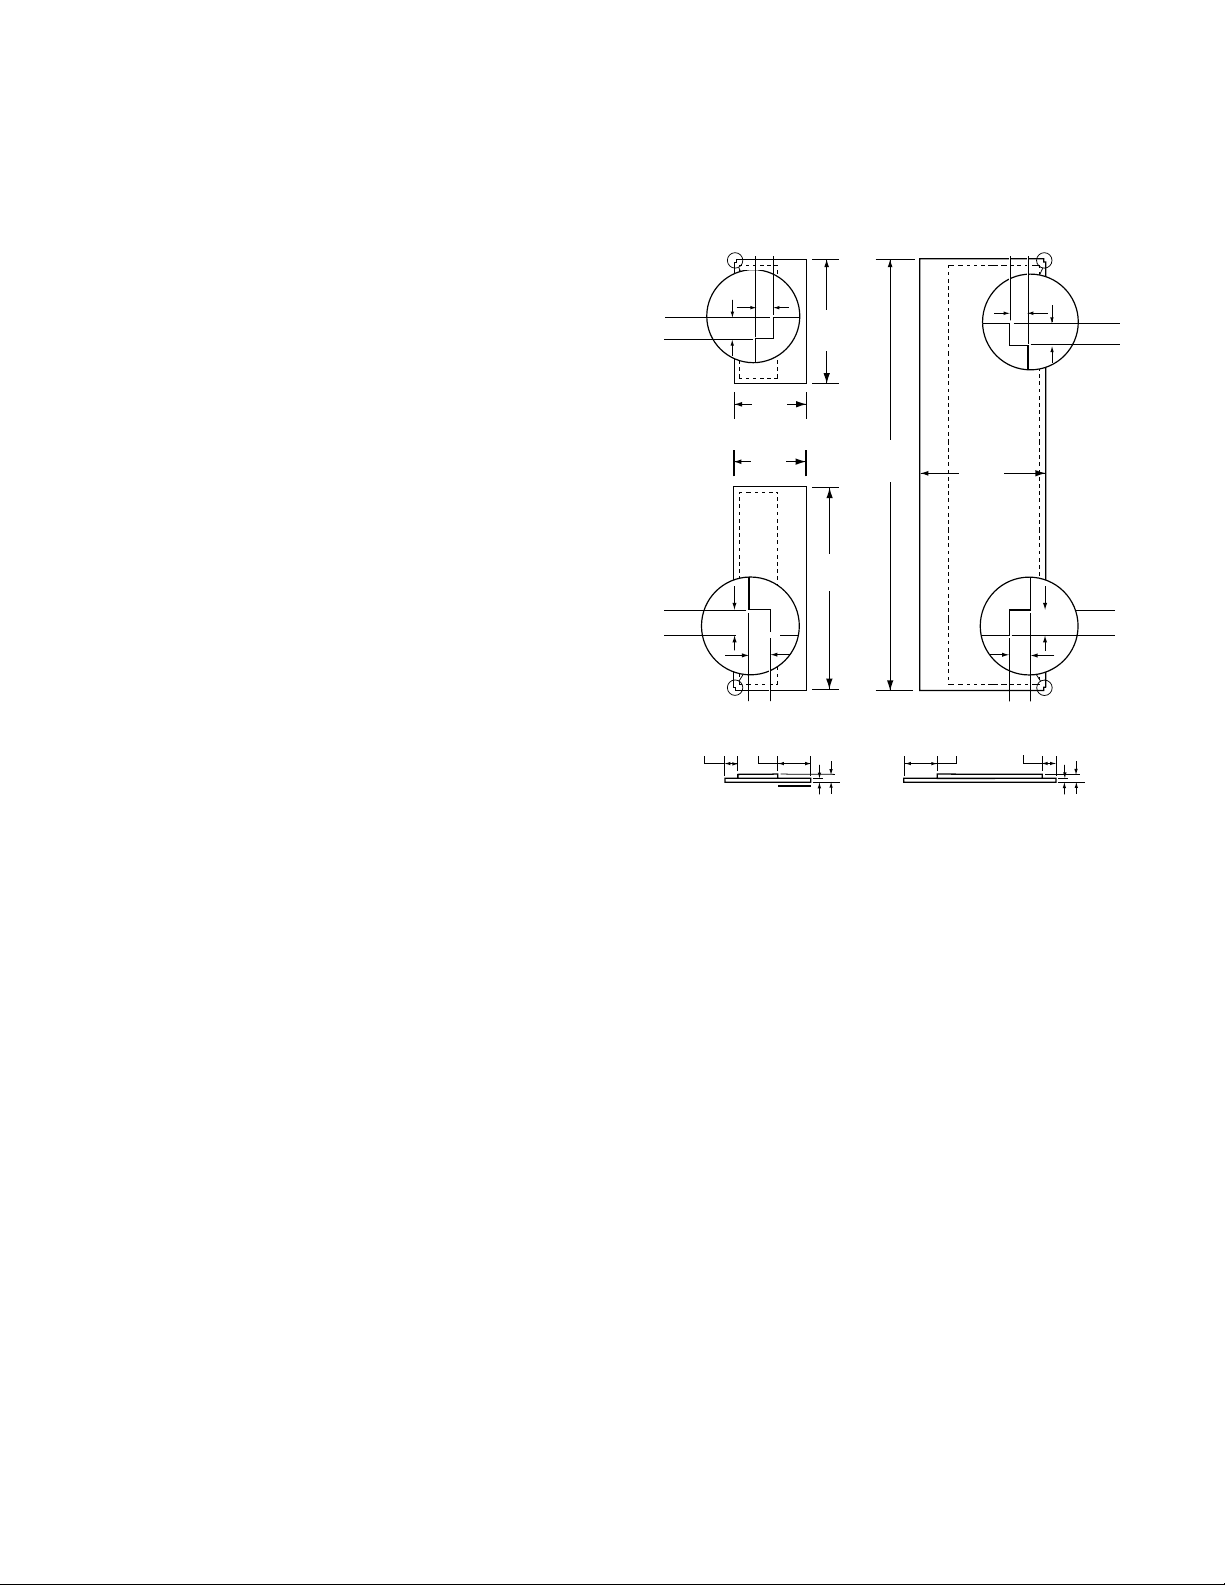
Replacing the Door Panels
17
7/16
"
12
3/16
"
28
1/2
"
60
3/8
"
1/4"
5/16"
TOP VIEW
3/4" min.
3/4"
1/4"
19
11/16
"
12
3/16
"
(7.93 mm)
(6.35 mm)
1/4"
5/16"
(7.93 mm)
1/4"
5/16"
(6.35 mm)
(7.93 mm)
(30.96 cm)
(
30.96 cm)
(
44.3 cm)
(
153.35 cm)
(
50.01 cm)
(
72.4 cm)
(19.05 mm min.)
(19.05 mm)
(6.35 mm)
(6.35 mm)
1/4"
5/16"
(6.35 mm)
(7.93 mm)
TOP VIEW
3/4" min.
(19.05 mm min.)
3 1/4"
3/4"
1/4"
(82.55 mm min.)
(19.05 mm)
(6.35 mm)
3 1/4"
(82.55 mm min.)
1. Replace the refrigerator or freezer door panels:
■ Open refrigerator or freezer door.
■ Carefully slide the ¹⁄₈" decorator panel into place
behind the side trim.
■ Push the filler boar d into pla ce behind the dec orator
panel.
■ Repeat process for other panels and filler boards.
2. Attach the handles:
NOTE: Freezer door handle is notched to fit around the
dispenser panel.
■ Align the top of the refrigerator or freezer handle
flush with the top trim. Fasten the handle to the
refrigerator or freezer door with the screws, using a
Phillips screwdriver.
■ Repeat the process for the other handle.
Care of Decorator Pa nels
1. Clean panels with an anti-static cleaner (available in
electronics or computer departments) or mild soap and
water with a clean, soft, damp cloth.
2. Rinse panels thoroughly and blot dry using a dry, soft
cloth or chamois.
Dimensions for Custom Wood Panels:
22 cu. ft. 22 cu. ft.
Freezer door Refrigerator door
panel dimensions panel dimensions
3. DO NOT use paper towels or cleaners which contain
solvents such as ammonia. They can damage the
surface of the panels.
4. If small scratches should appear on the panels, they
may be filled using an automotive paste wax (NOT a
cleaner/wax combinatio n). Apply wax sparingly and
buff lightly with a clean, soft cloth using a circular
motion.
Installing Custom Wood P anels
If you plan to install custom wood decorator panels, yo u
will need to create the panels yourself or consult your
cabinet maker or carpenter. See dimensional drawings for
wood panel inserts.
Flat panels:
You can create a custom flat panel ¹⁄₄" (6 mm) thick to
replace your decorator panels. Fl at wood panels less than
¹⁄₄" (6 mm) thick are not recommended.
Raised panels:
A raised panel design can be created by screwing or
gluing wood panels to ¹⁄₄" (6 mm) backing or by using ³⁄₄"
(19 mm) stock with routed edges.
Weight requirements for raised panel inserts:
■ Refrigerator door panel should not exceed 25 lbs
■ Freezer door panels should not exceed 18 lbs (6.80
(9.98 kg).
kg) combined weight.
10
Page 11
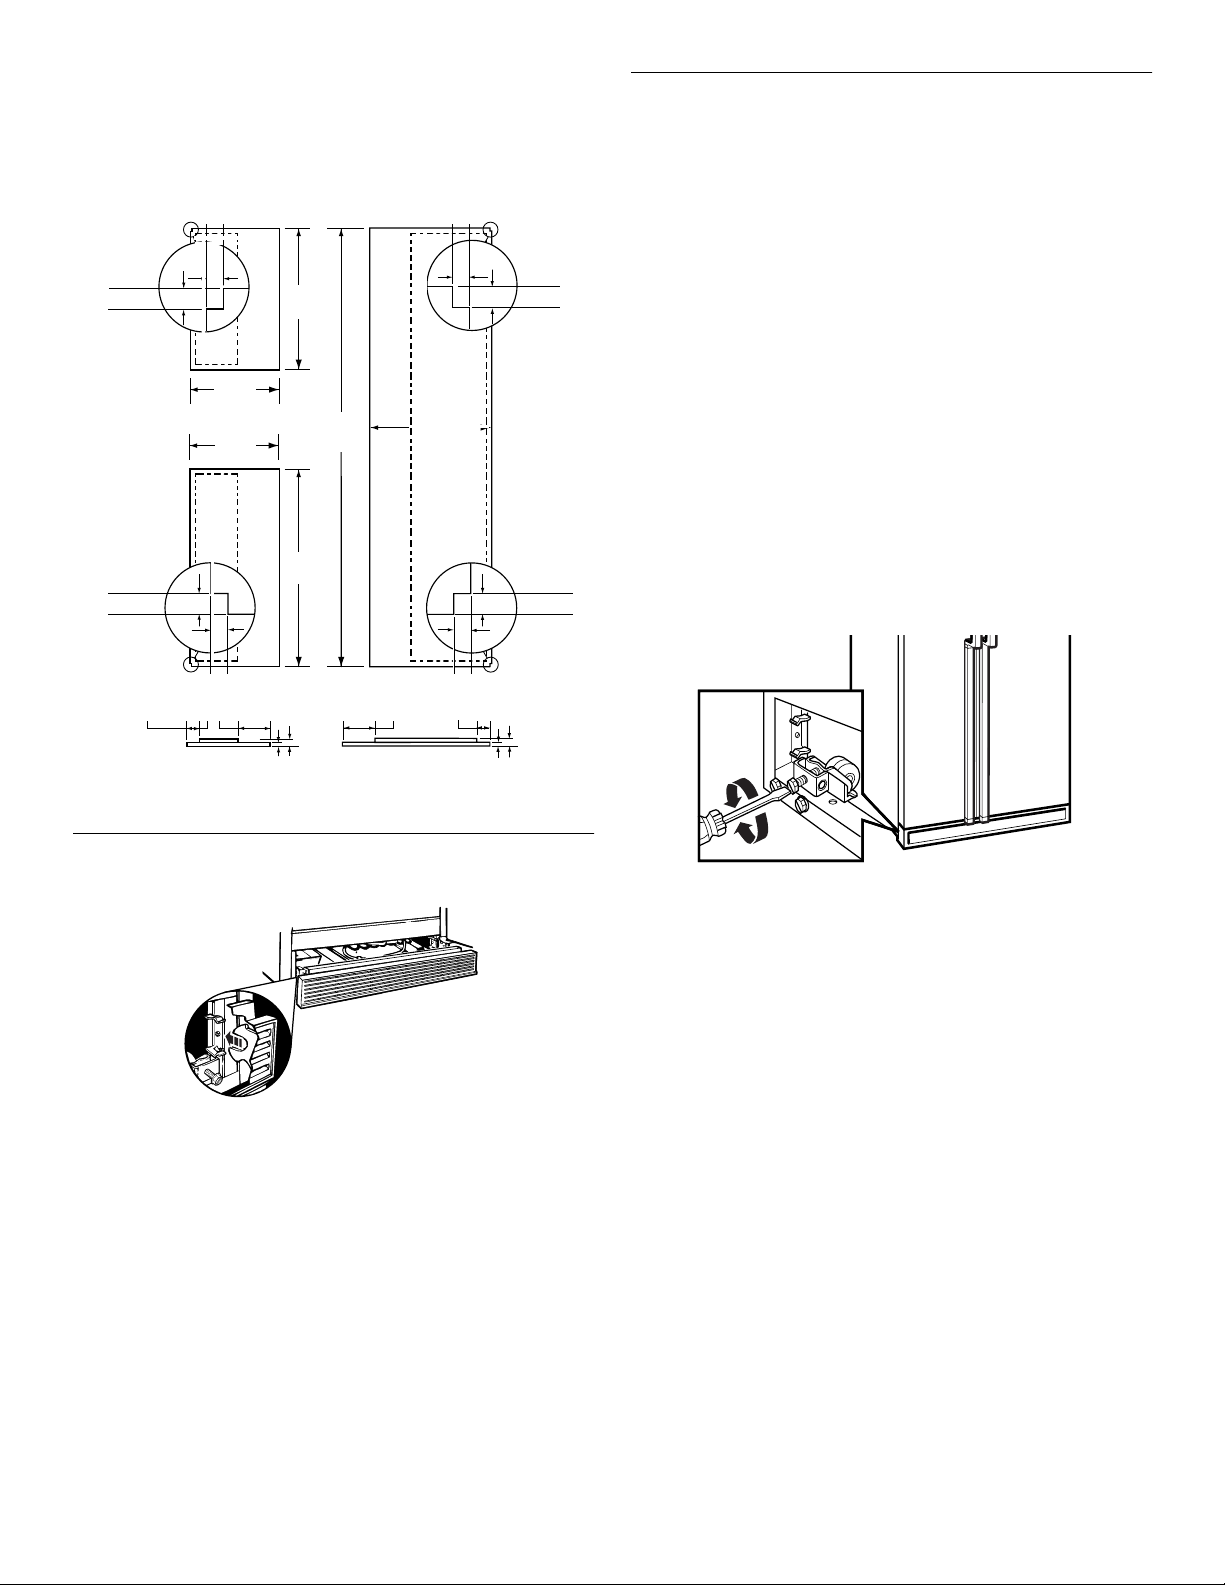
25 and 27 cu. ft. 25 and 27 cu. ft.
Freezer door Refrigerator door
panel dimensions panel dimensions
11/16
19
(50.01 cm)
1/4"
(6.35 mm)
"
5/16"
(7.93 mm)
1/4"
(6.35 mm)
14
(37.94 cm)
14
(37.94 cm)
15/16
15/16
"
"
7/16
20
"
(51.91 cm)
(160.97 cm)
3/8
63
"
5/16"
(7.93 mm)
Door Closing
Your r efrig erator has 2 fr ont adju stable r ollers — one o n the
right and one on the left. If your refrigerator seems
unsteady or you want the doors to close easier, adjust the
refrigerator's tilt using the instructions below:
1. Plug in refrigerator.
2. Move the refrigerator into its fina l position.
3. Remove the base grille (see “Base Grille” earlier in this
section). The two leveling screws are part of the front
roller assemblies which are at the base of the
refrigerator on either side.
4. Use a screwdriver to adjust the leveling screws. Turn
the leveling screw to the right to raise that side of the
refrigerator or turn the leveling screw to the left to lower
that side. It may take several turns of the leveling
screws to adjust the tilt of the refrigerator.
5/16"
(7.93 mm)
3/4" min.
(19.05 mm min.)
1/4"
(6.35 mm)
3 1/4"
(82.55 mm min.)
TOP VIEW
28
(72.4 cm)
3/4"
(19.05 mm)
1/4"
(6.35 mm)
Base Grille
To remove the base grille:
1/2
"
3 1/4"
(82.55 mm min.)
TOP VIEW
1/4"
(6.35 mm)
3/4" min.
(19.05 mm min.)
3/4"
(19.05 mm)
1/4"
(6.35 mm)
5/16"
(7.93 mm)
NOTE: Having someone push against the top of the
refrigerator takes some weight off the leveling screws
and rollers. This makes it easier to adjust the screws.
5. Open both doors again and check to make sure that
they close as easily as you like. If not, tilt the
refrigerator slightly more to the rear by turning both
leveling screws to the right. It may tak e several more
turns, and you should turn both leveling screws the
same amount.
6. Replace the base grille.
1. Open both refrigerator doors.
2. Place hands along the ends of the grille, with your
thumbs along the top. Push in with your thumbs and
pull up on the bottom.
NOTE: Be sure to refasten the Tech Sheet behind the base
grille after cleaning.
To replace the grille:
1. Open the doors.
2. Line up the grille support tabs with the metal clips.
3. Push the grille firmly to snap it into place.
11
Page 12
Understanding Sounds
You May Hear
USING YOUR
Your new refrigerator may make sounds that your old one
didn’t make. Because the sounds are new to you, you
might be concerned about them. Most of the new sounds
are normal. Hard surfaces, like the floor, walls, and
cabinets, can make the sounds seem louder than they
actually are. The following describes the kinds of sounds
and what may be making them.
■ If your product i s equipped with an ice maker, you will
hear a buzzing sound when the water valve opens to fill
the ice maker for each cycle.
■ The defrost timer will click when the automatic defrost
cycle begins and ends. Also, the thermostat refrigerator control, will click when cycling on and off.
■ Rattling noises may come from the flow of refrigerant,
the water line, or items stored on top of the refrigerator.
■ Your refrigerator is designed to run more efficiently to
keep your food items at the desired temperature. The
high efficiency compressor may cause yo ur new
refrigerator to run longer than your old one, and you
may hear a pulsating or high-pitched sound.
■ Water dripping on the defrost heater during a defrost
cycle may cause a sizzling sound.
■ You may hear the evaporator fan motor circulating the
air through the refrigerator and freezer compartments.
REFRIGERATOR
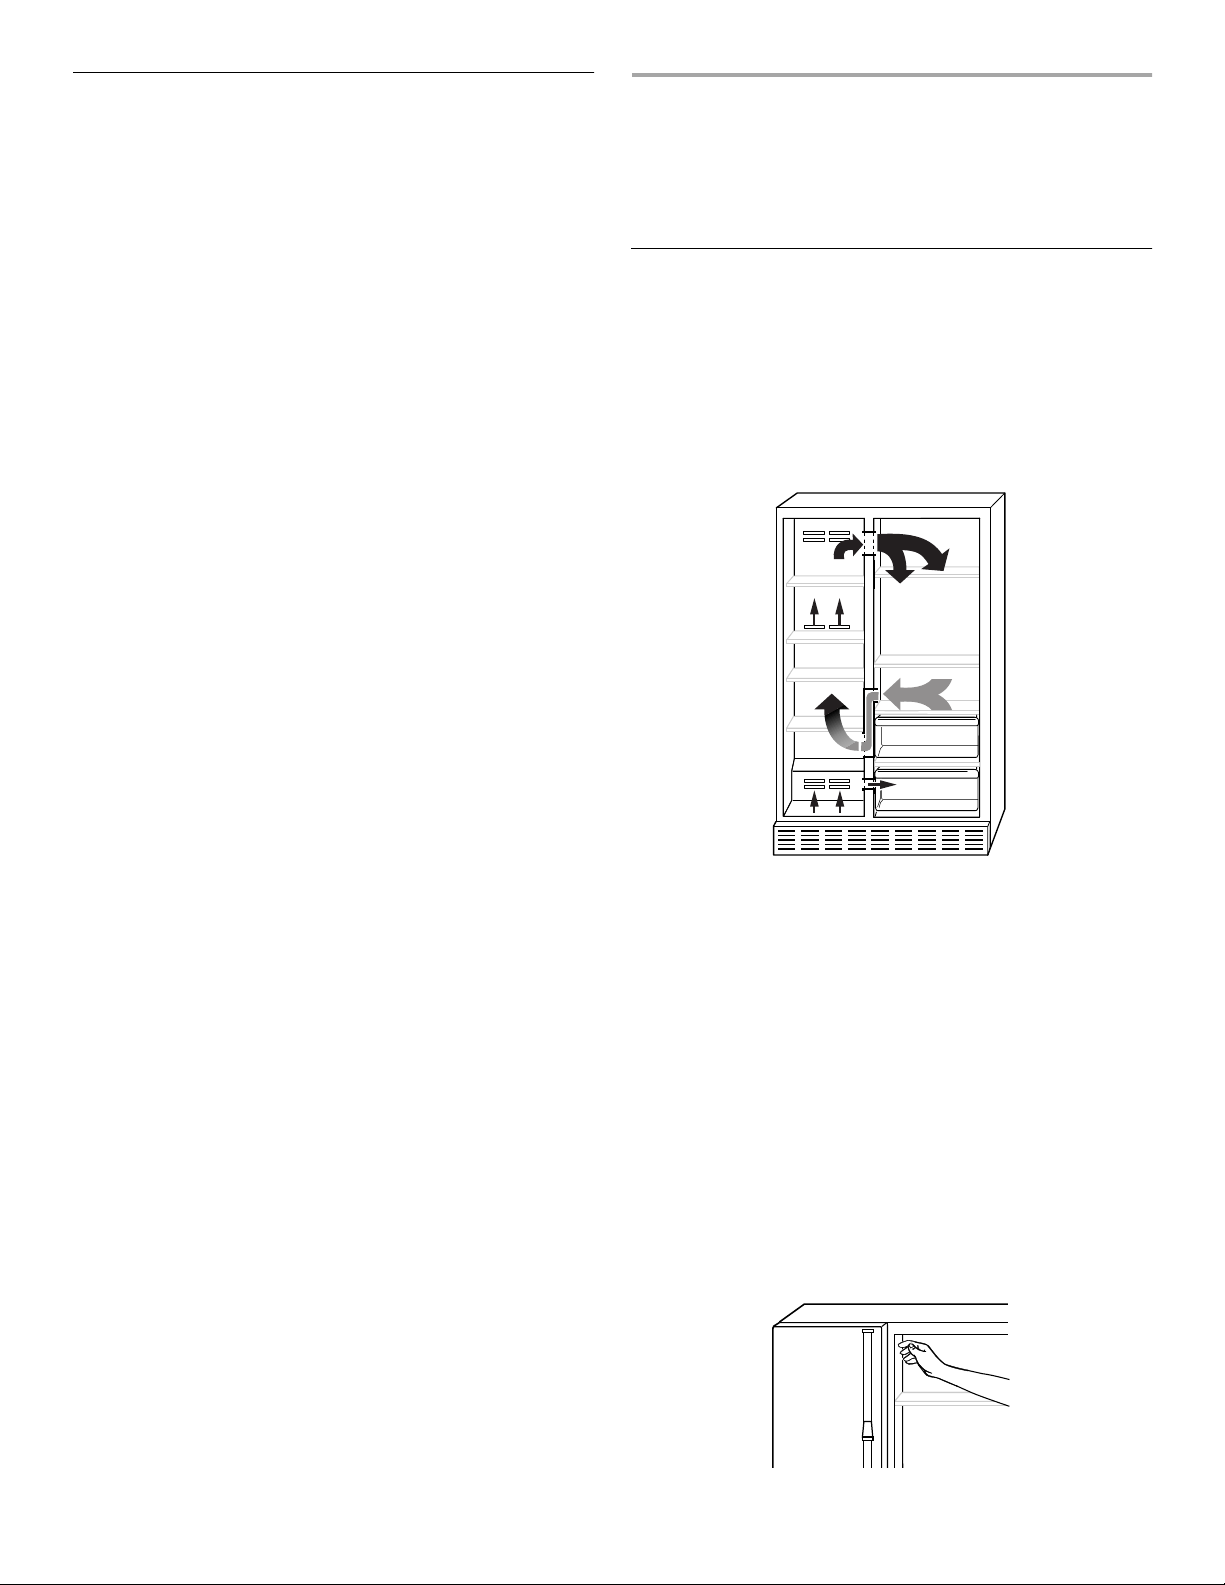
Ensuring Proper
Air Circul ation
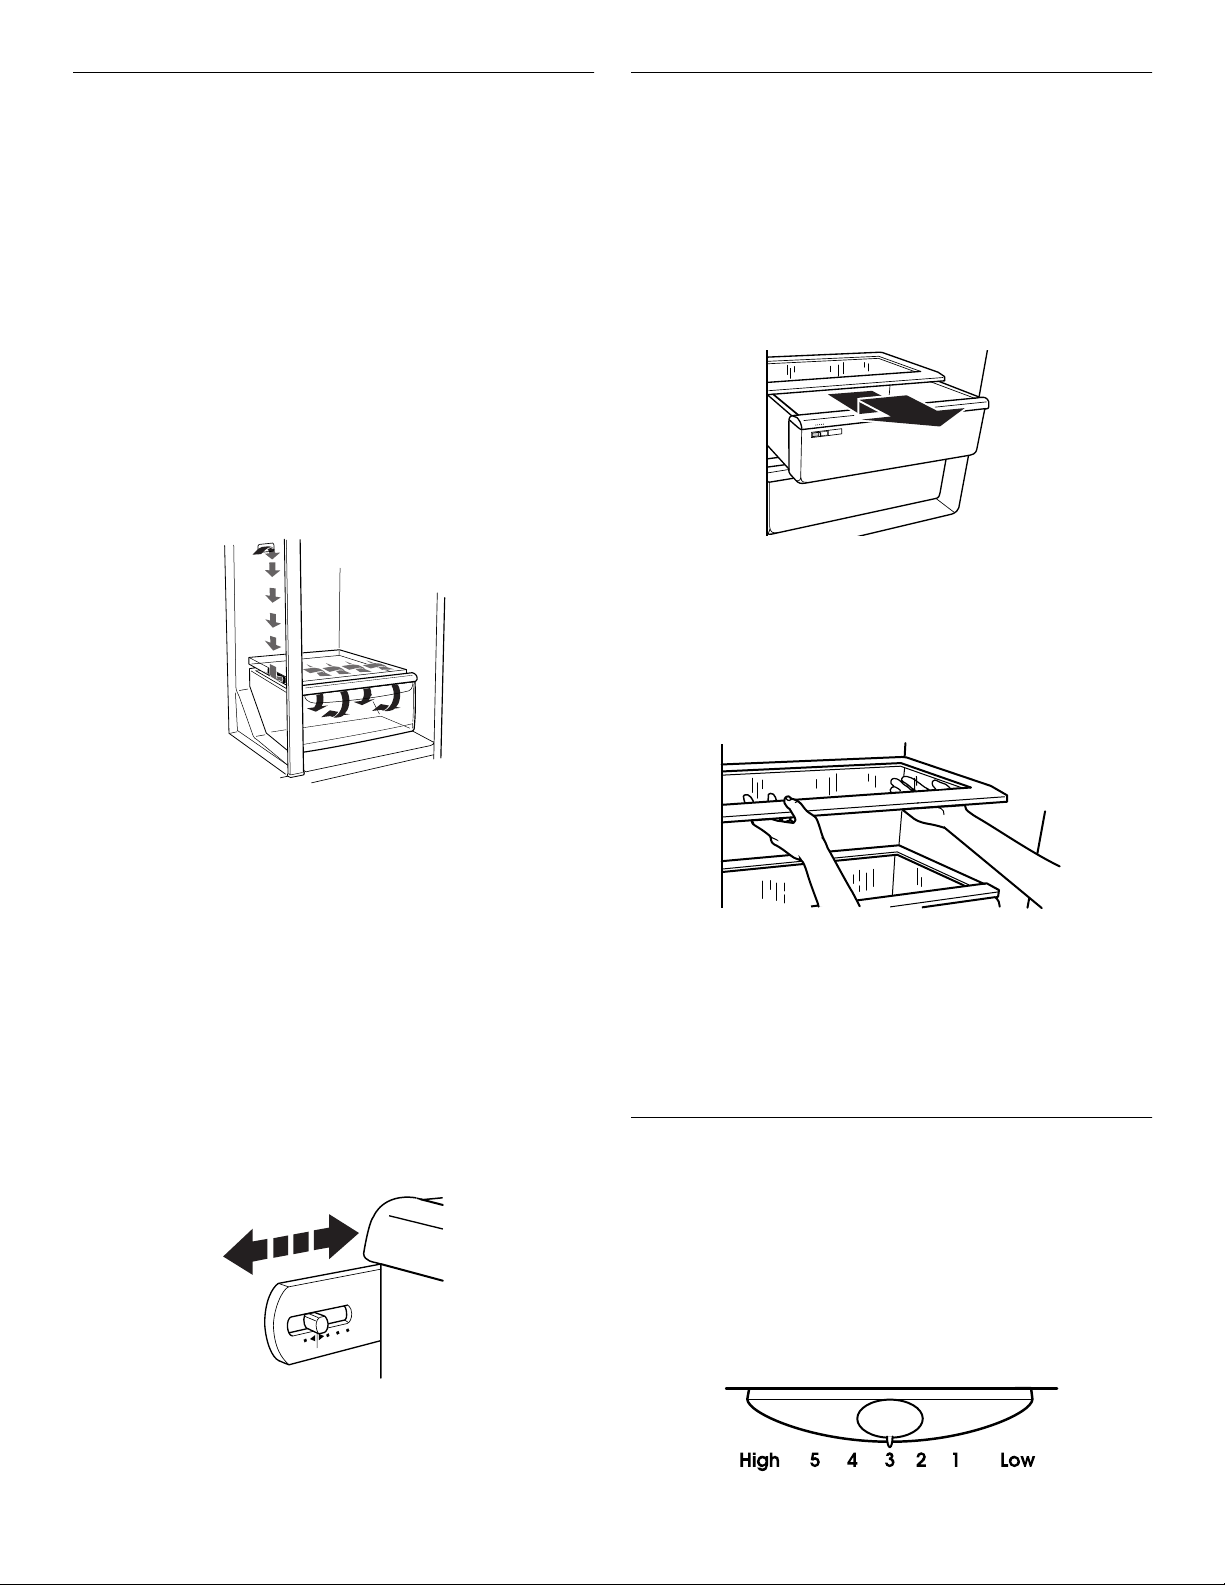
In order to ensur e prop er temperatur es, you need to permi t
air to flow between the two sections. Cold air enters the
bottom of the fr e ezer se ction an d move s up. It th en en te rs
the refrigerator section through the top vent. Air then
returns to the freezer as shown.
■ As each cycle ends, you may hear a gurgling sound
due to the ref r igerant flowing in your refrigerator.
■ Contraction and exp a nsion of the inside walls may
cause a popping noise.
■ You may hear air being forced over the condenser by
the condenser fan.
■ You may hear water r unning into the drain pan dur ing
the defrost cycle.
Do not block any of these vents with food such as soda,
cereal, bread, etc. If the vents are blocked, airflow will be
prevented and the temperature controls will not function
properly.
IMPORTANT: Because air circulates between both
sections, any odors formed in one section will transfer to
the other. You must thoroughly clean both sections to
eliminate odors. To prevent odor transfer from food, wrap
or cover foods tightly.
Checking airfl ow
To measure the amount of cold air being directed from the
freezer compartment into the refrigerator section, hold
your hand in front of the top vent. You can adjust the Air
Balance Control to feel the different amounts of airflow.
For further information on temperatures inside your
refrigerator, refer to the “Troubleshooting” section.
12
Page 13
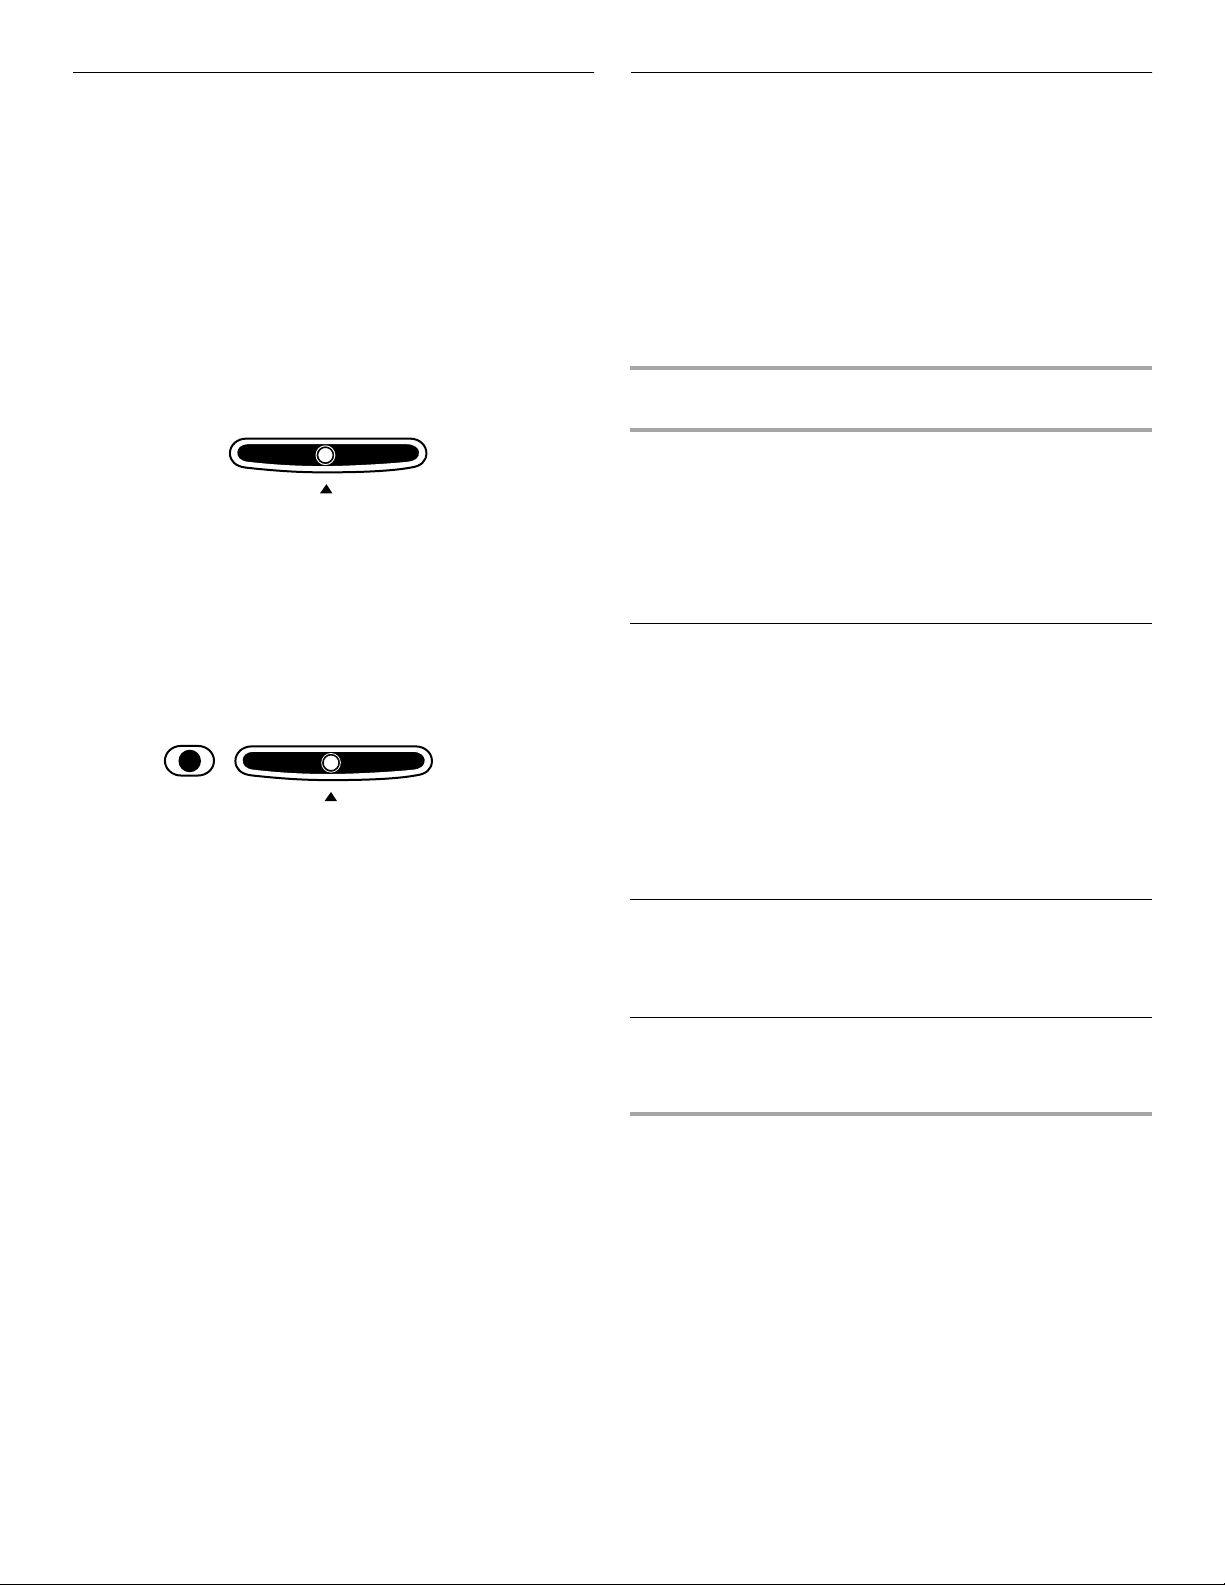
Setting the Controls
Adjusting Control Settings
For your convenience, your refrigerator controls are
preset at the factory. When you first install your
refrigerator, make sure that the controls are still preset.
The Refrigerator Control and the Freezer Control should
both be at the “mid-settings” as shown in the illustrations
below.
The Refrigerator Control adjusts the refrigerator
compartment temperature. Settings to the left of the
mid-setting make the temperature less cold. Settings to
the right of the mid-setting make the temperature colder.
Refrigerator
Colder
Cold
The Freezer Control adjusts the freezer compartment
temperature. Settings to the left of the mid-setting make
the temperature less cold. Settings to the right of the midsetting make the temperature colder.
NOTE: You r pr oduct w ill not cool when the Fre ezer Contr ol
is set to OFF.
1
2
4
3
Freezer
Give the refrigerator time to cool down completely before
adding food. It is best to wait 24 hours before you put food
into the refrigerator. The settings indicated in the previous
section should be correct for normal household
refrigerato r usage. The con trol s are set corr ectl y when milk
or juice is as cold as you like and when ice cream is firm.
If you need to adjust temp eratures in the refrigerator or
freezer, use the settings listed in the char t below as a
guide. Wait at least 24 hours between adjustments.
RECOMMENDED
CONDITION/REASON:
REFRIGERATOR section
too warm
■ Door opened often
■ Large amount of food added
■ Room temperature very warm
FREEZER section too warm/ice
not made fast enough
■ Door opened often
■ Large amount of food added
ADJUSTMENT:
Turn
REFRIGERATOR
Control one-half
setting higher,
wait 24 hours,
then check the
freezer
temperature
Turn FREEZER
Control one-half
setting higher
Off
Give your refri gerator time to coo l down co mpletely befor e
adding food. It is best to wait 24 hours before you put food
into the refrigerator.
IMPORTANT: If you ad d food before the refrigerator has
cooled completely, your food may spoil. Turning the
Refrigerator and Freezer Controls to a higher (colder)
than recommended setting will not cool the
compartments any faster.
NOTE: The Automatic Exterior Moisture control
continuously guards against moisture buildup on the
outside of your refrigerator cabinet. This control does not
have to be set or adjusted.
1
2
4
3
Colder
■ Very cold room temperature
(can’t cycle often enough)
■ Heavy ice usage
■ Air diffuser blocked by items
REFRIGERATOR section
too cold
■ Controls not set correctly for
your conditions
FREEZER section too cold
■ Controls not set correctly for
your conditions
Move packages
out of airstream
Turn
REFRIGERATOR
Control to next
lower number
Turn FREEZER
Control one-half
setting lower
13
Page 14

Food Storage Guide
Storing fresh food
Wrap or store food in the refrigerator in airtight and
moisture-proof material unless otherwise noted. Th is
prevents food odor and taste transfer throughout the
refrigerator. For dated products, check code date to
ensure freshness.
Butter or margarine
Keep opened butter in covered dish or closed
compartment. When storing an extra supply, wrap in
freezer packaging and freeze.
Cheese
Store in the original wrapping until you are ready to use
it. Once opened, rewrap tightly in plastic wra p or
aluminum foil.
Milk
Wipe milk cartons. For best storage, place milk on
interior shelf.
Eggs
Store in original carton on interior shelf.
Fruit
Wash, let dry, and st or e in r efr igerator in pl asti c bags or
crisper. Do not wash or hull berries until they are read y
to use. Sort and keep berries in original container in a
crisper, or store in a loosely closed paper bag on a
refrigerator shelf.
Leafy vegetables
Remove store wrapping and trim or tear off bruised and
discolored ar eas. Wash in cold water an d drain. Pl ace in
plastic bag or plastic conta i ne r an d sto re in crisp er.
Vegetables with skins (carrots, peppers)
Place in plastic bags or plastic container and store in
crisper.
Fish
Use fresh fish and shellfish the same day as purchased.
Meat
Store most meat in original wrapping as long as it is
airtight and moist ure-proof. Rewrap if necessary. See
the following chart for storage times. When storing meat
longer than the times given, freeze the meat.
Chicken.................. ....... ...... ............................ 1 -2 days
Ground beef.................................................... 1-2 days
V ariety meats (liver, heart, etc.)....................... 1-2 days
Cold cuts......................................................... 3-5 days
Steaks/roasts......... ....... ...... ....... ...... ....... ........ 3-5 days
Cured meats ........................................... ...... 7-10 days
Leftovers
Cover leftovers with pl astic wrap or aluminum foil.
Plastic containers with tight lids can also b e used.
Storing frozen food
NOTE: For further information a bout preparing food fo r
freezing or food storage times, check a freezer guide or
reliable cookbook.
Packaging
Successful freezing depends on the correct packaging.
When you close and seal the package you must not allow
air or moisture in or out. If you do, you could have food
odor and taste transfer throughout the refrigerato r, and
also dry out frozen food.
Packaging recommendations:
■ Rigid plastic containers with tight-fitting lids
■ Straight-sided canning/freezing jars
■ Heavy-duty aluminum foil
■ Plastic-coated paper
■ Non-permeable plastic wraps (made from saran
film)
■ Specified freezer self-sealing plastic bags
Follow package or container instructions for proper
freezing methods.
14
Page 15

Do not use:
■ Bread wrappers
■ Non-polyethylene plastic containers
■ Containers without tight lids
■ Wax paper or wax-coated freezer wrap
■ Thin, semi-permeable wrap
Freezing
Your freezer will not quick-freeze any lar ge quantity of
food. Put no more unfrozen food into the freezer than will
freeze within 24 hours (no more than 2 to 3 lbs of food per
cubic foot [907-1,350 g per liter] of freezer space). Leave
enough space in the freezer for air to circulate around
packages. Be careful to leave enough room at the fr ont so
the door can close tightly.
Storage times will vary a ccor ding to t he qu ality and t ype of
food, the type of packaging or wrap used (airtight and
moisture-proof), and the storage temp erature. Ice crystals
inside a sealed package are normal. This simply means
that moisture in the food and air inside the package have
condensed, creating ice crystals.
NOTE: Allow hot foods to cool at room temperature for 30
minutes, then package and freeze. Cooling hot foods
before freezing saves energy.
REFRIGERATOR
FEATURES
Ice Maker Storage Bin
To remove the ice bin:
1. Pull the covering panel out from the bottom and then
slide it back toward the rear.
2. Lift the signal arm so it clicks into the OFF (up) position.
Ice can still be dispensed, but no more can be made.
3. Lift up the front of the storage bin and pull it out.
4. Empty the ice bin. Use warm water to melt the ice if
necessary. Never use anything sharp to break up the
ice in the bin. This can cause damage to the bin an d
the dispenser mechanism.
5. Wash with a mild detergent, rinse well and dry
thoroughly. Do not use harsh or abrasive cleaners or
solvents.
6. When you replace the bin, make sure it is pushed in
all the way or the dispenser will not work. Then push
the signal arm down to the ON position to restart ice
production. Make sure the door is closed tightly.
15
Page 16
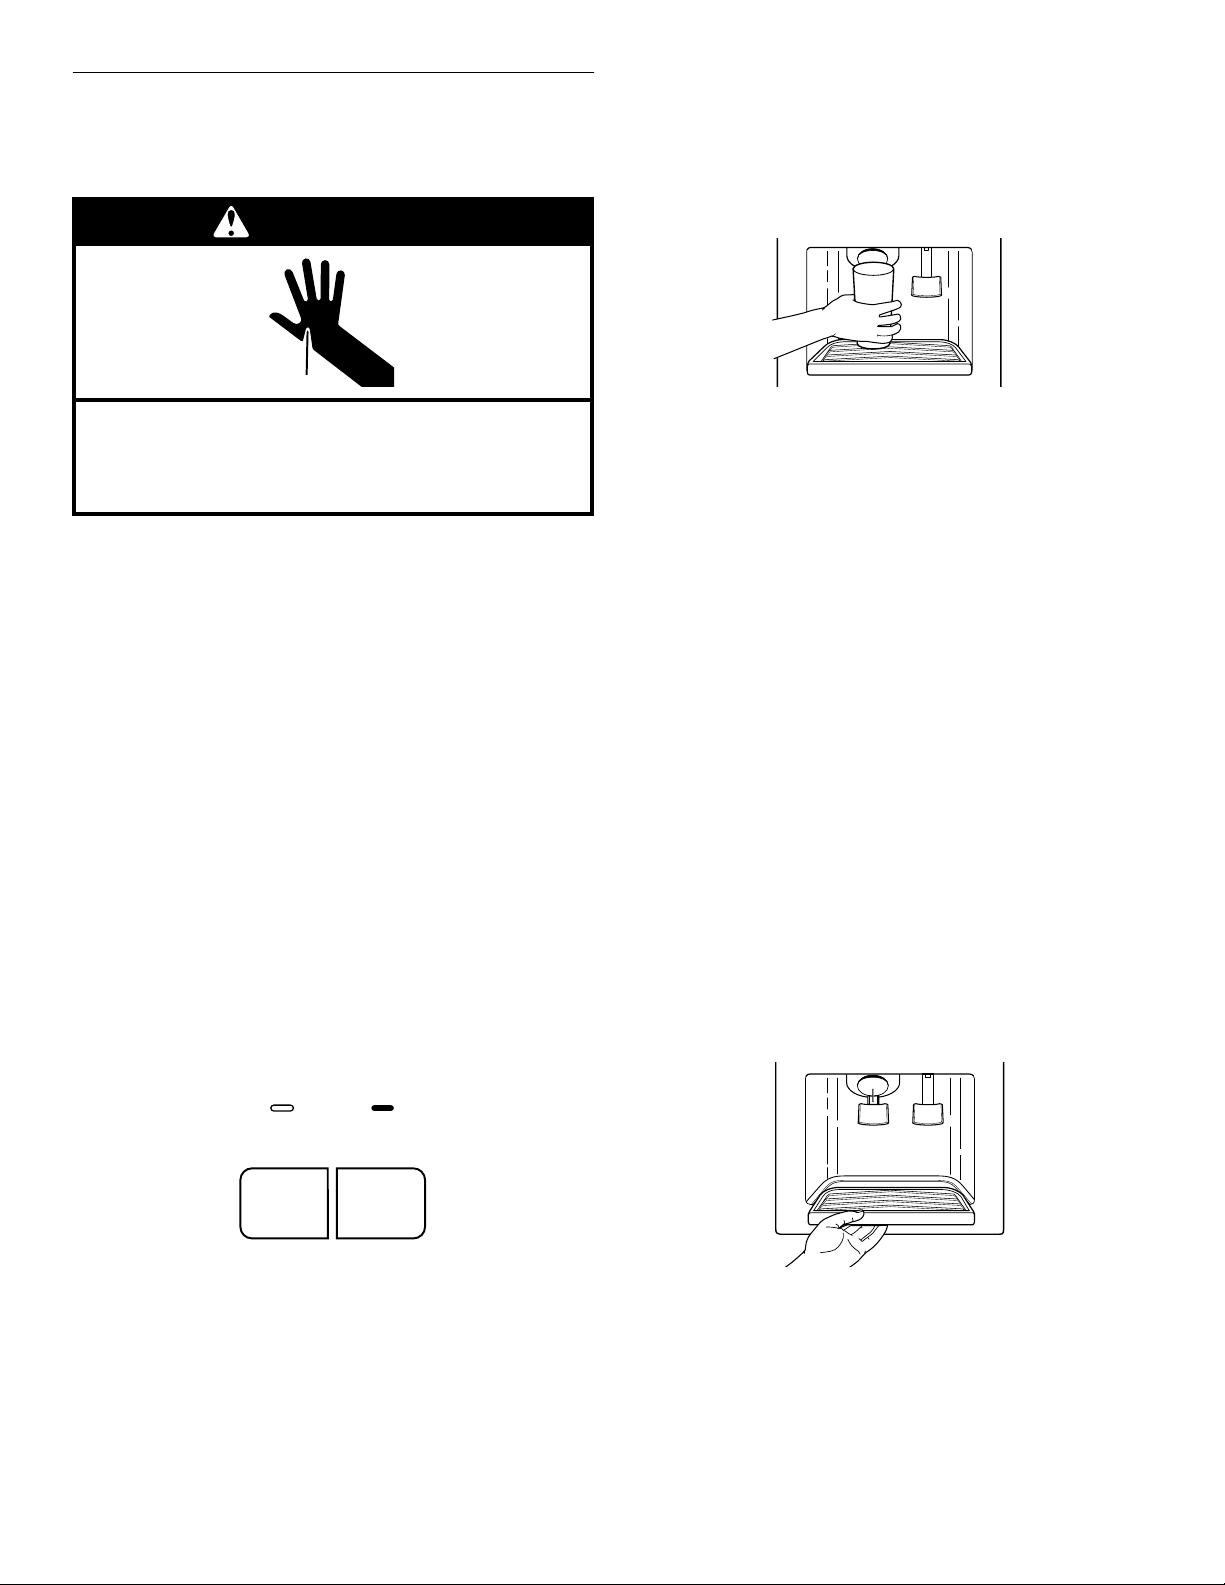
To dispense ice:
W ater and Ice Dispensers
(on some models)
WARNING
Cut Hazard
Use a sturdy glass when dispensing ice or water.
Failure to do so can result in cuts.
Depending on your model, you may have one or more of
the following optio ns: The ability to select eit her crushed or
cubed ice, a special light that turns on when you use the
dispenser, or a lock option to avoid accidental dispensing.
The ice dispenser
Ice dispenses from t he ice maker storage bin in the freez er.
When the dispenser lever is pressed:
■ A trapdoor opens in a chute between the dispenser
and the ice bin.
■ Ice moves from the bin and falls through the chute.
■ When you release the dispenser lever, the trap door
closes and the ice dispensing stops. The dispensing
system will not operate when the freezer door is open.
Some models dispense both cu bed and crushed ice.
Before dispen sing ice, select which type of ice you prefer.
The button controls are designed for easy use and
cleaning.
■ For cubed ice, press the CUBE button until the red
indicator appears in the window above the CUBE
button.
1. Press button for the desired type of ice.
2. Press a sturdy glass against the ice dispenser lever.
Hold the glass close to the dispenser opening so ice
does not fall outside of the glass.
IMPORTANT: You do not need to apply a lot of
pressure to the lever in order to activate the ice
dispenser. Pr essing hard will not make the ice dispense
faster or in greater quantities.
3. Remove the glass to stop dispensing.
NOTE: The first few batches of ice may have an off-
flavor from new plumbing and parts. Throw the ice
away. Also, take large amounts of ice from the ice bin,
not through the dispenser.
The water dispenser
Chilled water comes from a container behind the meat
drawer. It holds approximately 1¹⁄₂ quarts (1.5 L).
When the refrigerator is first hooked up, press the water
dispenser bar with a glass or jar until you draw and discard 2 or 3 quarts (1.9 to 2.8 L). It will take three to four
minutes for the water to begin dispensing. The water you
draw and discard rinses the tank and pipes.
Allow several hours to chill a new tankful.
IMPORTANT: The small removable tray at the bottom of
the dispenser is d e signed to catch small spills and allow
for easy cleaning. Th ere is no drain i n the tray. Th e tray can
be removed from the dispenser and carried to the sink to
be emptied or cleaned.
ICE
CRUSH CUBE
■ For crushed ice, press the CRUSH button until the red
indicator appears in the window above the CRUSH
button.
For crushed ice, cubes are crushed before being
dispensed. This may cause a slight delay when dispensing
crushed ice. Noise from the ice crusher is normal, and
pieces of ice may vary in size. When changing from
CRUSH to CUBE, a few ounces of crushed ice will be
dispensed along with the first cubes.
16
Page 17
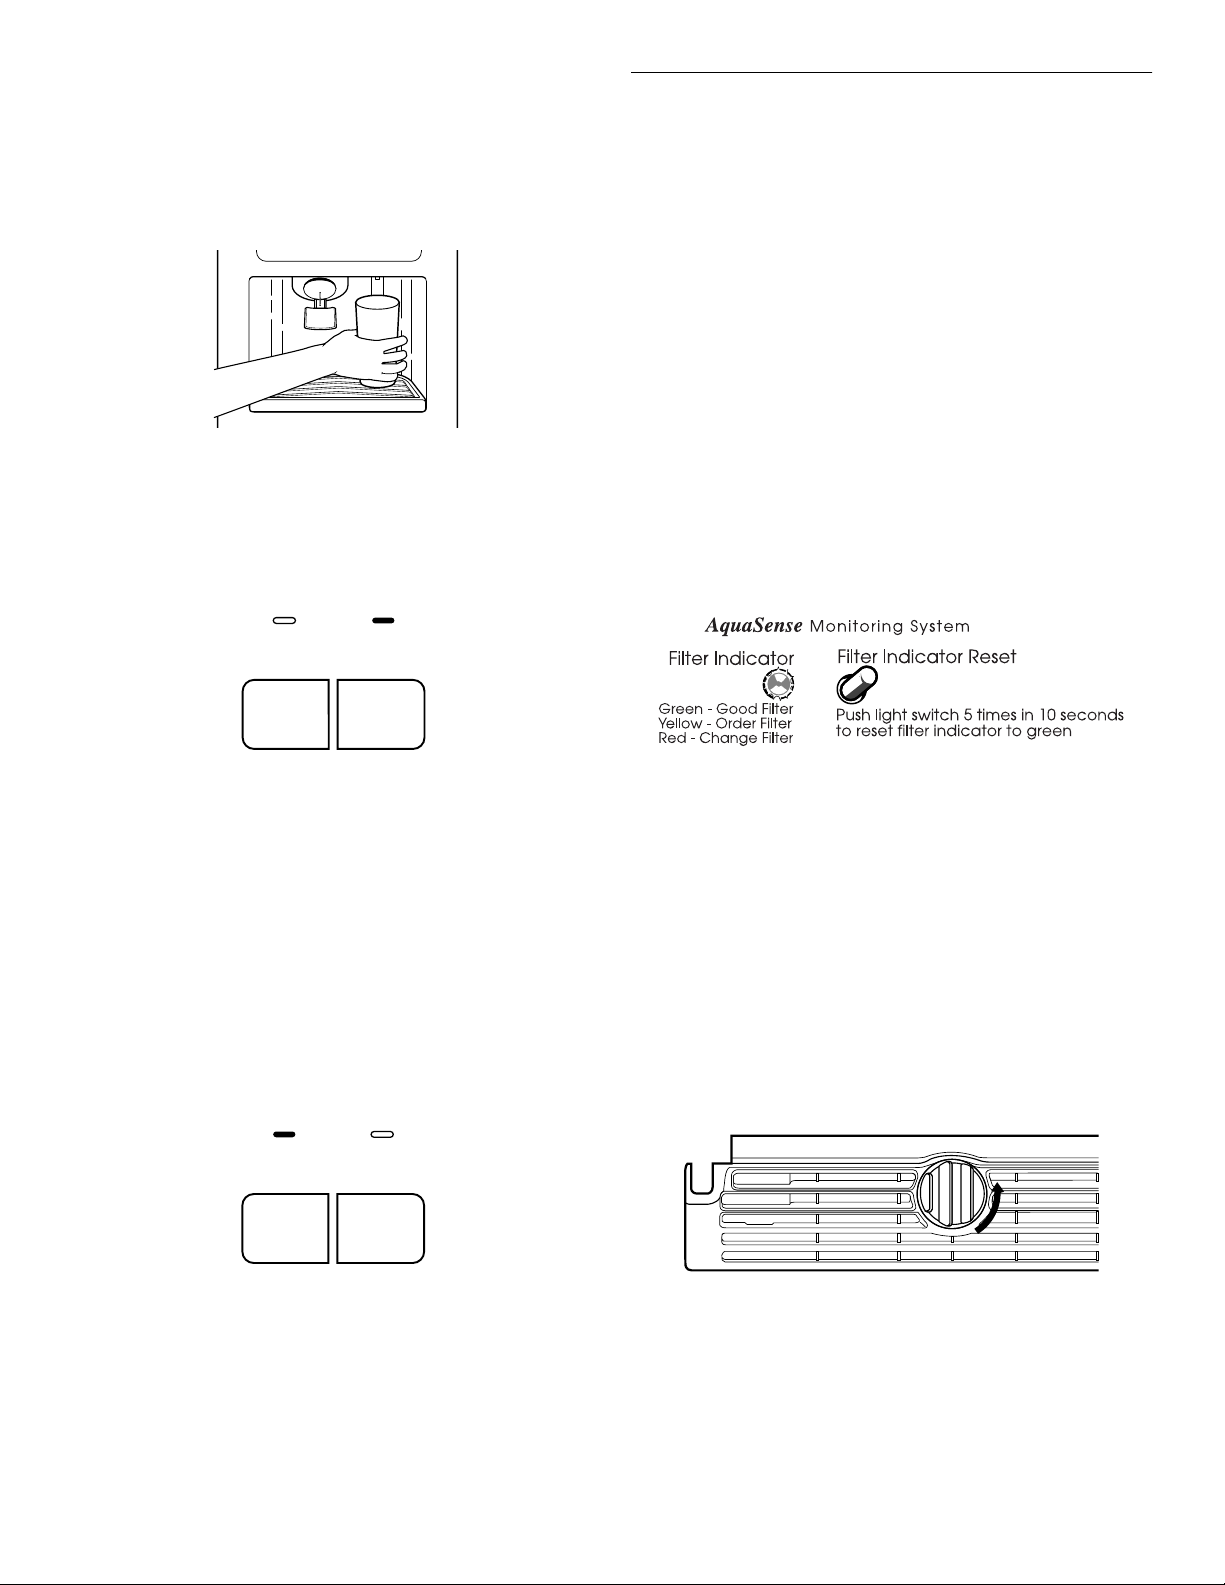
To dispense water:
1. Press a glass against the water dispenser lever.
2. Remove the glass to stop dispensing.
NOTE: Dispense enough water every week to maintain a
fresh supply.
The dispenser light
The dispenser area has a light. It can be turned on
manually by pressing the “ON” button at the right hand
side of the contr ol panel . The red indicator above the “ON”
button will appear. On some models: Whenever you use
the dispenser the lever will automatically turn the light on.
LIGHT
W ater Filtration and
Monitoring System
(on some models)
The water filter indicator light
The water filter indicator light will help you know when to
change your water filter cartridge. The light is located at
the top of the refrigerator compartment. The light will
change from green to yellow. This tells you that it is almost
time to change the water filter cartridge (90% of the filter
life has been used). It is recommended that you replace
the water filter car tridge when the wate r filter indic ator light
changes to red OR water flow to your water dispenser or
ice maker decreases noticeably. (See “Changing a water
filter cartridge ” la ter in thi s se c tio n. )
NOTE: Do not use with water that is microbiologically
unsafe or of unknown quality without adequate
disinfection before or after the system.
OFF ON
NOTE: See the “Changing the Light Bulbs” section for
information on changing the dispenser light bulb.
On models without crushed ice, the light switch is a
rocker-style type. Push the switch to turn the light on, and
push again to turn the light off.
The dispenser lock
Your dispenser can be turned of f for easy cleaning or to
prevent accidental dispensing by small children and pets.
To turn off the dispenser, press the LOCK button. The
indicator will appear above the LOCK button and the ice
and water dispensers will not work. To unlock the
dispenser, press the UNLOCK button until the indicator
appears. Then continue to dispense ice or water as usual.
(on some mode ls)
DISPENSER
LOCK
NOTE: The lock feature does not shut off power to the
product, to the ice maker, or to the dispenser light. It
simply deactivates the dispenser levers.
UNLOCK
After changing the water filter cartridge, reset the water
filter indicator light by pressing the light switch 5 times
within 10 seconds. The in dica to r li gh t wi ll chan ge from red
to green when the system is reset.
Changing a water filter cartridge
The water filter is located below the freezer comp artment
door.
1. Locate the water filter cartridge cap in the front base
grille below the freezer compartment door. Rotate the
cap counterclockwise to a vertical position and pull the
cap and filter cartridge out through the base grille.
NOTE: There will be water in the cartridge. Some
spilling may occur.
17
Page 18
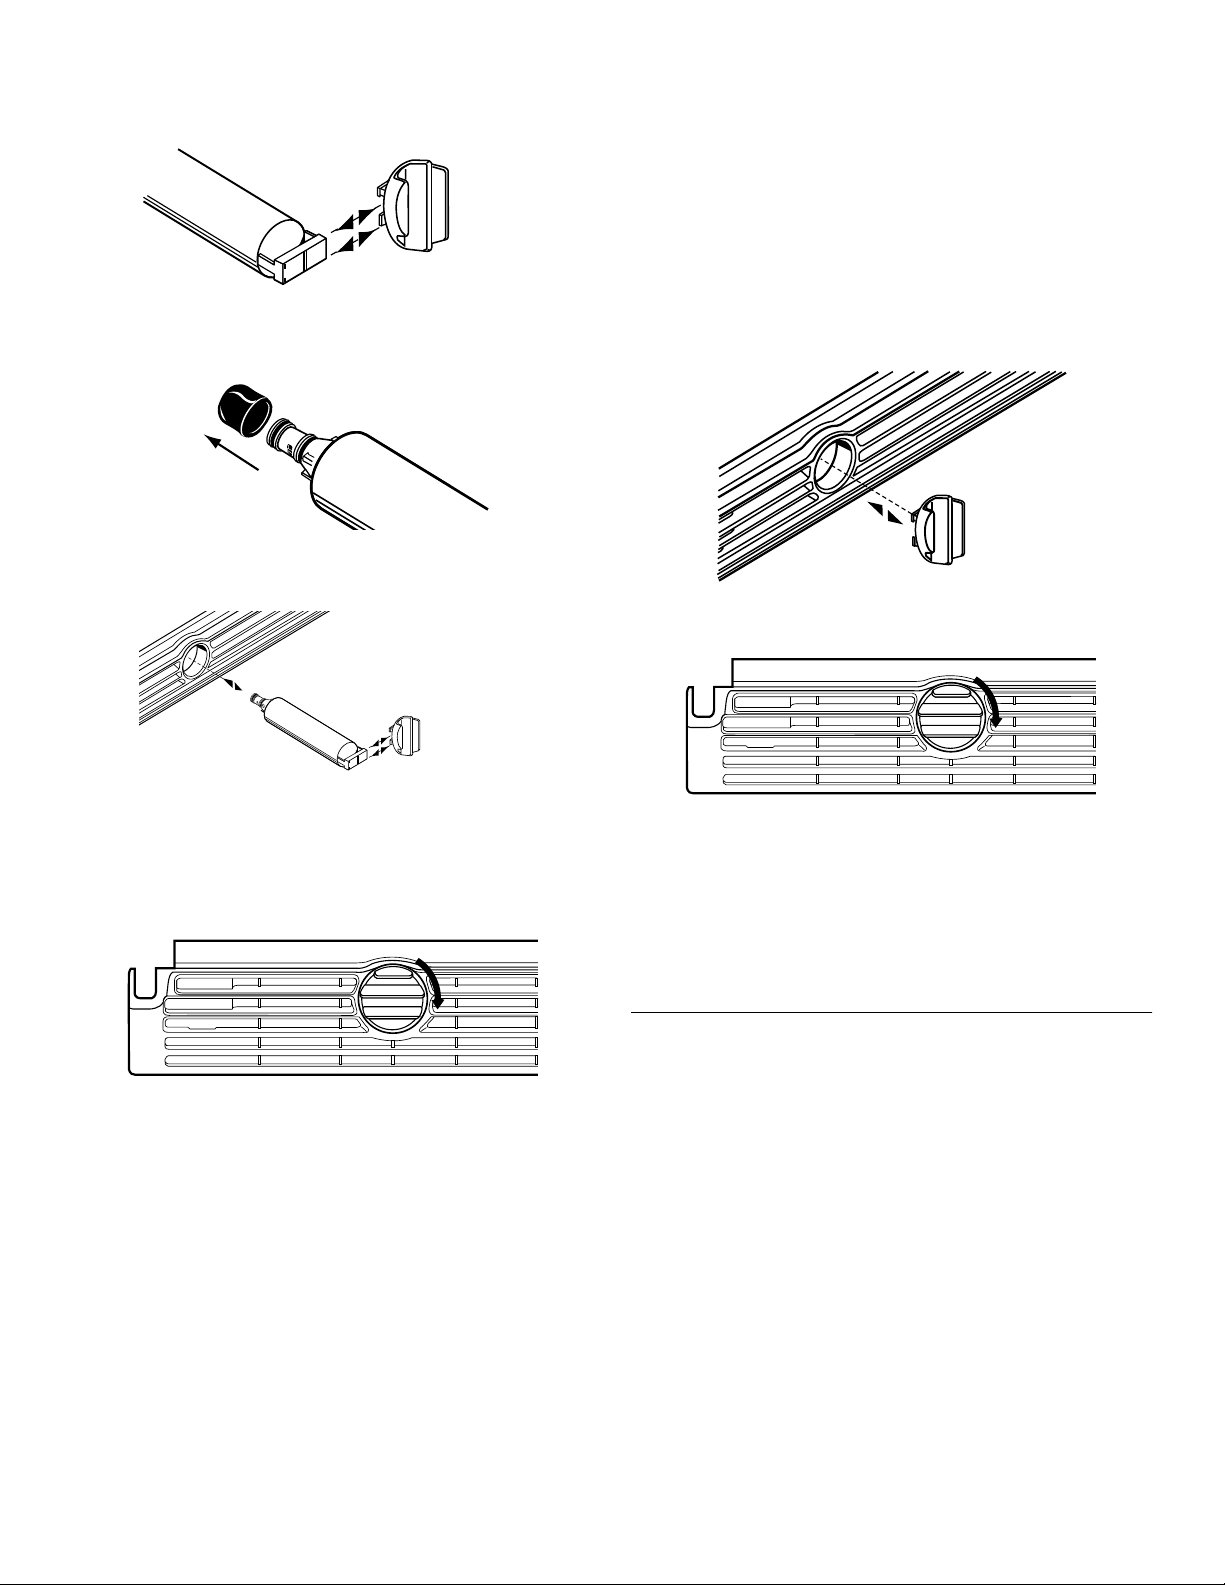
2. Remove the cartr idge cap b y sliding i t of f the end of the
old cartridge. The cap will slide to the left or right. DO
NOT DISCARD THE CAP.
Using the dispenser without the water filter
You can run the dispenser without a water filter cartridge.
Your water will not be filtered. If you run the dispenser
without a water filter cartridge, keep the cartridge cap and
replace it in the base grille for future use.
1. Remove the water filter cartridge (See “Changing a
water filter cartridge” earlier in this section.) Then slide
the cartridge ca p off the end of the filter cartridge. DO
NOT DISCARD THE CAP.
3. Take th e new cartridge out of it s packaging and r emove
protective cover from o-rings.
4. Slide the cartrid ge cap onto the new cartridge as
shown.
5. With cartridge cap in the vertical position, push the
new filter cartridge into the base grille until it stops.
Rotate the cartridge cap clockwise to a horizontal
position.
2. With the cartridge cap in the ver tical pos ition, i nsert the
cap into the base grille until it stops.
3. Rotate the cartridge cap to a horizontal position.
NOTE: The cartridge cap may not be even with the
base grille.
Ordering replacement filter s
To order more water filter cartridges, call 1-800-422-1230
and ask for accessory Part #4392857 or contact your
authorized KitchenAid dealer.
6. RUN WATER THROUGH THE DISPENSER UNTIL THE
WATER RUNS CLEAR (about 2-3 gallons or 6-7
minutes). This will clean the system and clear air from
the lines. Additional flushing may be required in some
households.
NOTE: As air is cleared from the system, water may
spurt out of the dispenser.
18
Refrigerator Shelves
The shelves in y our r efrigera tor ar e adju stable t o meet y our
individual storage needs. Your model may have glass or
wire shelves.
Storing similar food items together in your refrigerator and
adjusting the shelves to fit different heights of items will
make finding the exact item you want easier. It will also
reduce the amount of ti me the refrigerator door is open,
and save energy.
IMPORTANT: Do not clean glass shelv es with warm water
when they are col d. Shelves may break if exp o sed to
sudden temperature changes or impact. For your
protection tempere d glass is d esigned to sh atter into many
small pebble-size pieces. This is normal.
NOTE: Glass shelves are heavy. Use special care when
removing them to avoid impact from dropping.
Page 19
To remove shelves from the shipping position (shelves
LOWLOW
HIGH
are shipped upside down):
1. Grasp front of upper shelf with one hand and use other
hand to remove packing material from shelf area.
2. Lower front of upper shelf until shelf hooks can be
removed from slots in shelf supports on the back
refrigerator wall. Pull shelf forward to remove.
3. Flip shelf over.
4. Insert rear shelf hooks into slots in shelf supports.
5. Tilt front of shelf up until rear hooks drop into slots.
6. Lower front of shelf. Check to make sure that shelf is
securely in position.
Slide-out shelves (on some models)
Some shelves slide out, providing easier access to foods
stored in back.
To slid e out shelf, carefully pull front of shelf toward
you.
To slide in shelf, push shelf in until it stops.
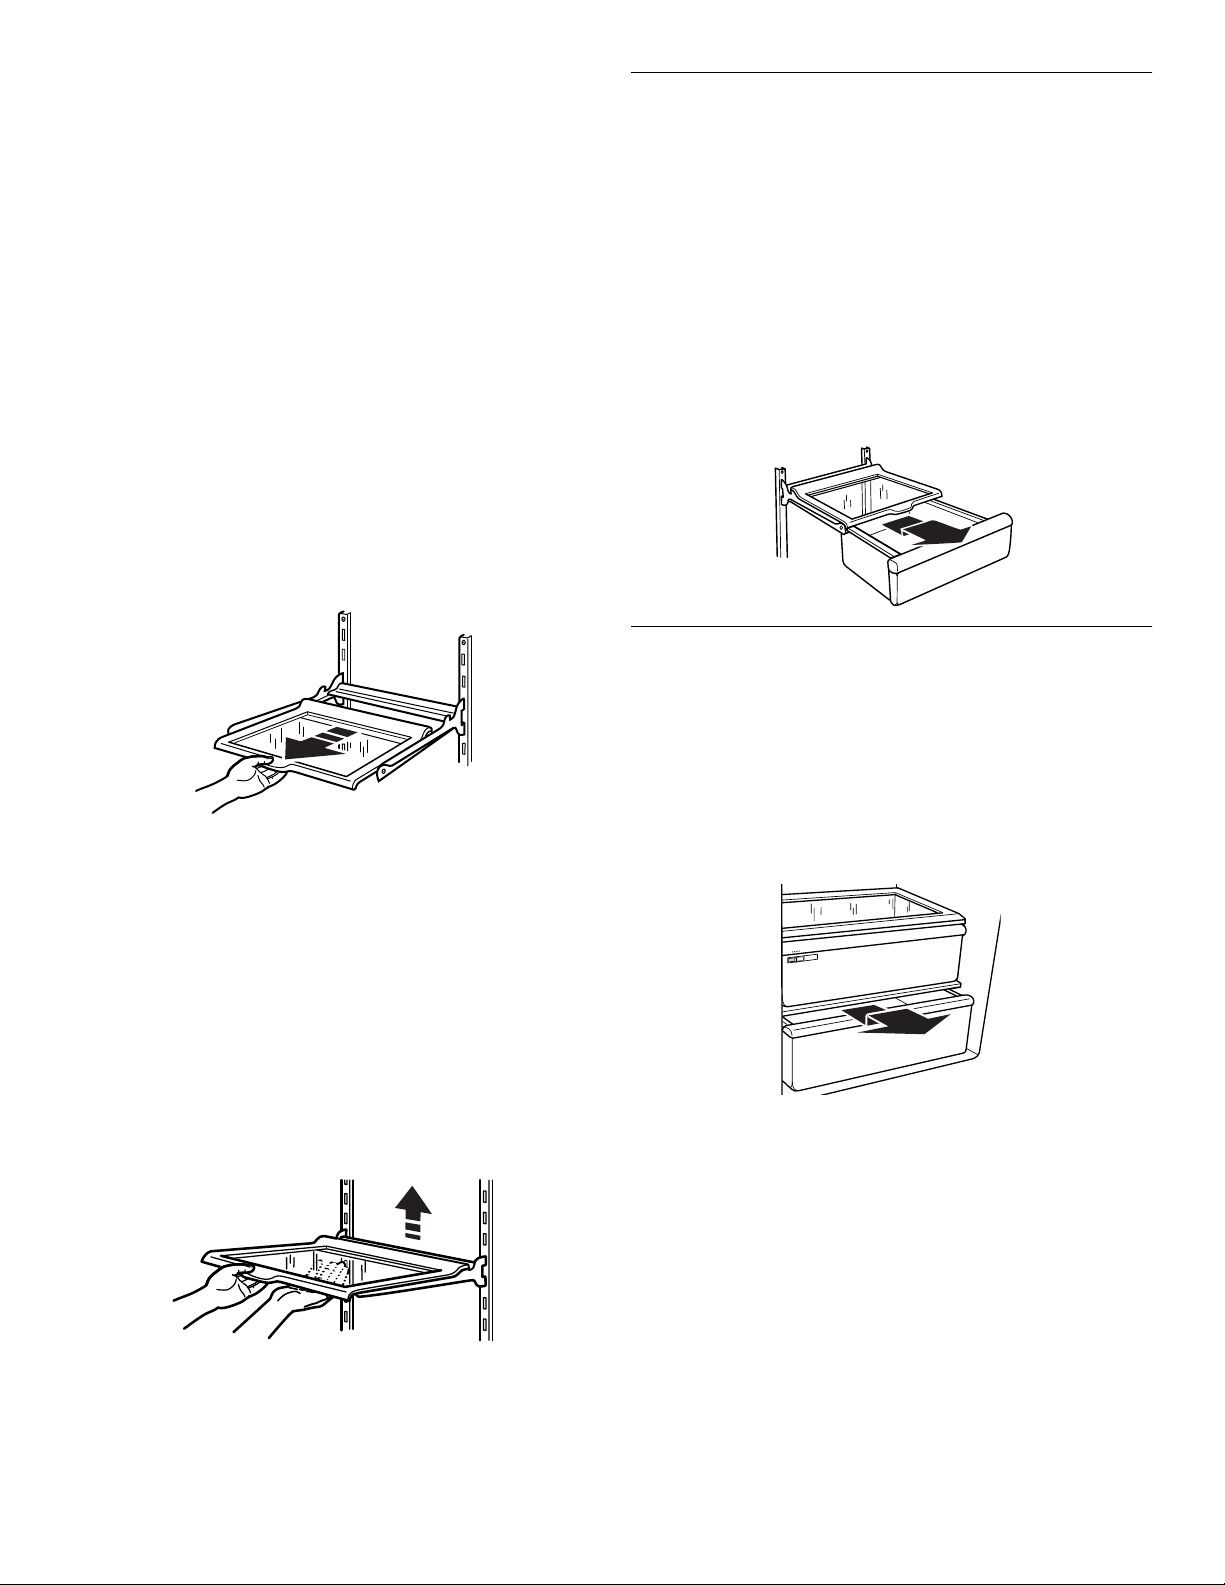
Deli Drawer
(on some models)
The deli drawer provides a convenient place to store
raisins, nuts, spreads, and other small items at normal
refrigerator temperatures.
To remove the deli drawer:
1. Slide the deli drawer straight out to the stop.
2. Lift the front and slide the drawer out the rest of the
way.
Replace the deli drawer by sliding it back in fully past
the drawer stop.
To remove a shelf from the metal frame:
1. Pull shelf out to the stop.
2. Tilt front of the shelf up and pull it out a little further.
3. Lift up shelf so that it moves through the slot in the
frame.
Replace the shelf in the reverse order.
Shelves and shelf frame s
To remove a shelf/frame:
1. Tilt up front of the shelf/frame.
2. Pull shelf/frame.
Convertible Vegetable/Meat
Drawer and Cover
To remove the drawer:
1. Slide the drawer straight out to the stop.
2. Lift the front slightly and slide it out t h e rest of the way.
3. Replace the drawer by sliding it past the drawer stop.
To remove the cover:
1. Remove the drawer and the crisper.
2. Lift the front of the cover off of the supports and
remove it by pulling up and out.
To replace the cover:
1. Fit the back of the cover into the notch supports on the
walls of the refrigerator and lower it into place.
2. Replace the drawer and crisper.
To replace a shelf/frame:
1. Guide the rear shelf hooks into the slots in the shelf
supports on the back refrigerator wall.
2. Tilt up front of shelf/frame.
3. Lower the front of the shelf into position.
19
Page 20
Convertible Vegetable/Meat
LOW
HIGH
Crisper and Crisper Cover
Drawer Temperature Control
The convertible v egeta ble/mea t dr awer can be ad justed to
properly chill meats or vegetables. Unlike most chilled
meat drawer systems, the Temperature Control cools the
air inside the pan. (Most systems chill only the pan itself,
which doesn’t cool the air inside the pan evenly).
Chilling the air inside the pan provides more even cooling
and reduces “sp ot ” freezing. The Temperature Control can
be set to keep meats at the recommended storage
temperatures (28°F-32°F are the recommended storage
temperatures from the National Livestock and Meat
Board).
To store vegetables at their optimal storage temperatures
(which need to be warmer than those for meat), set the
control at the Vegetable setting, all the way to the left.
To remove the crisper:
1. Slide crisper straight out to the stop.
2. Lift the front.
3. Slide crisper out the rest of the way.
Replace the crisper by sliding it back in ful ly past the
drawer stop.
To remove the crisper cover:
1. Remove crisper.
2. Holding glass insert firmly, grasp one side of crisper
cover and lift the other side up from the bottom.
3. Slide the glass insert out to remove.
4. Lift cover frame up and remove.
IMPORTANT: To extend freshness even more, remember
to wrap meats in airtight, moisture-proof materials before
storing. Always store meat as recommended by the
National Livestock and Meat Board. See “Storing Fresh
Food” in the “Food Storage Guide” section for more
information.
Adjusting the control
The convertible co nt rol comes preset f or yo u a t th e lo west
meat setting. Move it to the mid-setting or “colder” as
desired.
To ch ange a c ontr o l setti ng: Move the control to the right
(colder) or to the left (less cold).
To store vegetables: Move the control all the way to the
left to the VEG setting.
Veg/Meats Veg/Meats
Temperature Temperature
MEATS
VEG
To replace the crisper cover:
1. Fit back of cover frame into supports on side walls of
the refrigerator.
2. Lower front of the cover frame into place.
3. Slide rear of glass insert into cover frame and lower
front into place.
Crisper Humidity Control
You can control the amount of humidity in the moisturesealed crisper. Adjust the control to any setting between
LOW and HIGH.
■ LOW (open) lets moist air out of the crisper for best
storage of fruits and vegetables with skins.
■ HIGH (closed) keeps moist air in the crisper for best
storage of fresh, leafy vegetables .
IMPORTANT: If food starts to freeze, move the control to
the left (less cold). Remember to wait 24 hours between
adjustments. Doing so gives the temperature of the food
time to change.
20
Page 21

Door Rails
The door rails may be removed for easier cleaning.
Snap-on Door Rails
To remove the rails:
1. Remove all items from the shelf.
2. Push in slightly on the front of the bracket while pulling
out on the inside tab.
3. Repeat these steps for the other end of the rail.
To replace the rails:
1. Line up the ends of the brackets with the buttons on
the sides of the door liner.
2. Firmly snap bracket and rail assembly onto the tabs
above the shelf as shown.
Drop-in Door Rails
To remove the rails:
1. Remove all items from the shelf.
2. Pull straight up on each end of the rail.
Door Accessories
Door Bins
The door bins are removable for easy cleaning and
adjusting.
1. To remove the bin, simply lift the bin up and pull
straight out.
2. To replace the bin, slide it in above the desired
support button and push down until it stops.
Can Rack
To remove the rack:
1. Remove all items from the rack.
2. Lift the rack up.
3. Pull the rack strai ght out.
To replace the rails:
1. Slide the shelf rail into the slots on the door.
2. Push the rail straight down until it stops.
To replace the rack:
1. Hold the back of the rack above the desired guide.
2. Push the back of the rack back and down until it stops.
21
Page 22

Freezer Shelf
(number varies with model)
To remove the shelf:
1. Lift the shelf off of the supports.
CARING FOR
YOUR
2. Slide it out of the shelf support holes.
Replace shelf in the reverse order.
Freezer Basket
(plastic bin on some models)
The freezer basket can be used to store bags of frozen
fruits and vegetables that may slide off freezer shelves.
To remove the freezer basket:
1. Slide it out to the stop.
2. Lift the front and slide it out the rest of the way.
REFRIGERATOR
Cleaning Y our Refrigerator
WARNING
Explosion Hazard
Use nonflammable cleaner.
Failure to do so can result in death, explosion,
or fire.
Both the refrigerator and free zer sections defrost
automatically. However, clean both sections about once a
month to prevent odors from building up. Wipe up spills
immediately.
To replace the basket:
1. Position it on the slides, making sure that the wire
stops are clear of the front of the slides.
2. Slide it back in all the way.
Energy Saving Tip:
Clean the condenser coils regularly, as described i n the
cleaning chart in this section.
To clean your refrigerator:
■ Unplug refrigerator or disconnect power.
■ Remove all removable parts from inside, such as
shelves, crispers, etc.
■ Use a clean sponge or soft cloth and a mild deter gent in
warm water. Do not use abrasive or harsh cleaners.
■ Hand wash, rins e, and dry all sur f ace s thoroughl y.
■ Plug in refrigerator or reconnect power.
22
Page 23

■ Additional cleaning tips are listed below:
Light behind control panel:
PART COMMENTS
Outside
■ Waxing external painted metal
surfaces helps provide rust
protection. Do not wax plastic
parts. Wax painted metal surfaces
at least twice a year using
appliance wax (or auto paste wax).
Apply wax with a clean, soft cloth.
Inside walls
(allow freezer
to warm up so
cloth won’t
■ To help remove odors, you can
wash with a mixture of warm water
and baking soda (2 tbs to 1 qt [26 g
to .95 L] of water).
stick)
Door liners
and gaskets
■ Do not use cleaning waxes,
concentrated detergents, bleaches,
or cleaners containing petroleum
on plastic parts.
Plastic parts
(covers and
panels)
Condenser
coils
■ Do not use paper towels, window
sprays, scouring cleansers or
flammable fluids. These can
scratch or damage material.
■ Remove base grille. (See the
“Base Grille” sec tio n.)
■ Use a vacuum with an extended
attachment to clean condenser
coils.
■ Vacuum coils when dusty or dirty.
Coils may need to be cleaned as
often as every other month.
■ Replace base grille.
1. Unplug refrigerator or disconnect power.
2. Reach behind the Control Panel and remove the bulb.
3. Replace the bulb with a 40-watt appliance bulb.
4. Plug in refrigerator or reconnect power.
Crisper light (on some models):
1. Unplug refrigerator or disconnect power.
2. Remove the light shield by grasping the top center of
the shield and pullin g forwa r d while turning it slig htly to
one side.
3. Replace the bulb with a 40-watt appliance bulb.
4. Replace the light shield by gra sping the top center of
the shield and inserting the tabs on one end into the
slotted holes in the refrigerator liner. Then, carefully
bend the shield at the center to insert the tabs on the
other end.
Changing the Light Bulbs
NOTE: Not all appliance bulbs will fit your refrigerator. Be
sure to replace the bulb with one of the same size and
shape.
Refrigerator Light Bulbs
Dispenser area light (on some models):
1. Unplug refrigerator or disconnect power.
2. Reach through the dispenser area to remove the bulb.
3. Replace the bulb with a heavy-duty 10-watt bulb,
which can be purchased from your d ealer.
4. Plug in refrigerator or reconnect power.
5. Plug in refrigerator or reconnect power.
NOTE: To clean the light shield, wash it with warm water
and a liquid detergent. Rinse and dry the shield well.
Freezer Light Bulbs
Light below the ice bin:
1. Unplug refrigerator or disconnect power.
2. Push in the sides of the light shield and pull down until
the shield snaps free.
3. Replace the bulb with a 40-watt appliance bulb.
4. Replace the light shield.
5. Plug in refrigerator or reconnect power.
23
Page 24

Upper freezer light (on some models):
1. Unplug refrigerator or disconnect power.
2. Remove the light shield by grasping the top center of
the shield and pull ing for war d w hile tu rning it slig htl y to
one side.
3. Replace the bulb with a 40-watt appliance bulb.
4. Replace the light shield by grasping the top center of
the shield and inserting the tabs on one end into the
slotted holes in the freezer liner. Then, carefully bend
the shield at the center to insert the tabs on the other
end.
5. Plug in refrigerator or reconnect power.
Power Interruptions
If the electricity in your house goes off, call the power
company and ask how long it will be off.
1. If the power will be out for 24 hours or less , keep both
refrigerator door s closed to help foods stay cold and
frozen.
2. If the power will be out for more than 24 hours:
a) Remove all frozen food and store it in a frozen food
locker.
Vacation and Moving Care
V acations
If you choose to leave the refrigerator on while you’re
away, use these steps to prepare your refrigerator before
you leave.
1. Use up any perishables and freeze other items.
2. If your refrigerator has an automatic ice maker:
■ Raise ice maker arm to OFF (up) position.
■ Shut off water supply to the ice maker.
3. Empty the ice bin.
If you choose to turn the refrig erator off before you
leave, follow these steps.
1. Remove all food from the refrigerator.
2. If your refrigerator has an automatic ice maker:
■ Turn off the water supply to the ice maker at least
one day ahead of time.
■ When the last load of ice drops, raise the ice maker
arm to the OFF (up) position.
3. Depending on yo ur model, turn the Th erm ostat C ontr o l
(or Refrigerator Contr ol, depending on the model) to
OFF. See the “Setting the Controls” section.
4. Clean refrigerator, wipe it, and dry well.
5. Tape rubber or wood blocks to the tops of both doors
to prop them open far enough for air to get in. This
stops odor and mold from building up.
OR
b) Place 2 lbs (907 g) of dry ice in the freezer for every
cubic foot (28 L) of freezer space. This will k eep th e
food frozen for two to four days . While hand li ng dry
ice, wear gloves to protect your hands from ice
burns.
OR
c) If neither a food locker nor dry ice is available,
consume or can perishable food at once.
REMEMBER: A full freezer stays cold longer than a
partially filled one. A freezer full of meat stays cold longer
than a freezer full of baked goods. If you see that food
contains ice cry stals, it may be safely refrozen, although
the quality and flavor may be affected. If the condition of
the food is poor, or if you feel it is unsafe, dispose of it.
24
Page 25

Moving
When you are moving your refrigerator to a new home,
follow these steps to prepare it for the move.
1. If your refrigerator has an automatic ice maker:
■ Turn off the water supply to the ice maker at least
one day ahead of time.
TROUBLE-
SHOOTING
■ Disconnect the water line from the back of the
refrigerator.
■ When the last load of ice drops, raise the ice maker
arm to the OFF (up) position.
2. Remove all food from the refrigerator and pack all
frozen food in dry ice.
3. Depending o n your mode l, t urn the Th erm ostat Contr o l
(or Refrigerator Control, depending on the model) to
OFF. See the “Setting the Controls” section.
4. Unplug the refrigerator.
5. Empty water from the defrost pan.
6. Clean, wipe, and dry thoroughly.
7. Take out all removable parts, wrap them well, a nd tape
them together so they don’t shift and rattle during the
move.
8. Depending on the model, raise the front of the
refrigerator so it rolls easier OR screw in the leveling
legs so they don't scrape the floor. See the "Door
Closing" section.
9. Tape the doors shut and the power cord to the
refrigerator cabinet.
When you get to your new home, put everything back
and refer to the “Installing Your Refrigerator” section for
preparation instructions. Also, if your refrigerator has an
automatic ice maker, remember to reconnect the water
supply to the refrigerator.
Try the solutions suggested here first in order to
avoi d the cost of an unnecessary service call.
Your refrigerator will not operate
Is the power supply cord unplugged?
■■■■
Firmly plug the cord into a live outlet with proper voltage.
Has a household fuse or circuit breaker tripped?
■■■■
Replace the fuse or reset the circuit.
Is the refrigerator control turned to the “OFF”
■■■■
position?
Refer to the “Setting the Controls” section.
Is the refrigerator defrosting?
■■■■
Recheck to see if the refrigerator is operating in 30
minutes. Your refrigerator will regularly run an automatic
defrost cycle.
The lights do not work
Is the power supply cord unplugged?
■■■■
Firmly plug the cord into a live outlet with proper voltage.
Is a light bulb loose in the socket?
■■■■
Turn the refrigerator control to “OFF”. Disconnect the
refrigerator from the electrical supply . Gently remove the
bulb and reinsert. Then reconnect the refrigerator to the
electrical supply and reset the refrigerator control.
Is a light bulb burned out?
■■■■
Replace with an appliance bulb of the same wattage,
size, and shape. See the “Changing the Light Bulbs”
section.
There is water in the defrost drain pan
Is the refrigerator defrosting?
■■■■
The water will evaporate. It is normal for water to drip
into the defrost pan.
Is it more humid than normal?
■■■■
Expect that the water in the defrost pan will take longer
to evaporate. This is normal when it is hot or humid.
25
Page 26

The motor seems to run too much
Is the room temperature hotter than normal?
■■■■
Expect the motor to run longer under warm conditions.
At normal room temperatures, expect your motor to run
about 40% to 80% of the time. Under warmer conditions,
expect it to run even more of the time.
Has a large amount of food just been added to the
■■■■
refrigerator?
Adding a large amount of food warms the refrigerator. It
is normal for the motor to run longer in order to cool the
refrigerator back down.
Is the door opened often?
■■■■
Expect the motor to run longer when this occurs. In
order to conserve energy, try to get everything you need
out of the refrigerator at once, keep food organized so it
is easy to find, and close the door as soon as the food is
removed.
Are the controls not set correctly for the
■■■■
surrounding conditions?
Refer to the “Setting the Controls” section.
Are the doors not closed completely?
■■■■
Push the doors firmly shut. If they will not shut all the
way, see “The doors will not close completely” later in
this section.
Are the condenser coils dirty?
■■■■
This prevents air transfer and makes the motor work
harder. Clean the condenser coils. Refer to the
“Cleaning Your Refrigerator” section.
Are the door gaskets not sealed all the way around?
■■■■
Contact a qualified person or a technician.
NOTE:
If the problem is not due to any of the above,
remember that your new refrigerator will run longer than
your old one due to its high efficiency motor.
The refrigerator seems to ma ke too m uc h
noise
The sounds may be normal for your refrigerator.
■■■■
Refer to the “Understanding Sounds You May Hear”
section.
The ice maker is not producing ice
Is an ice cube jammed in the ejector arm?
■■■■
Remove the ice from the ejector arm with a plastic
utensil. Refer to the “Ice Maker Operation” section.
Does the ice maker mold have water in it?
■■■■
Check to see if your refrigerator has been connected to
your home water supply and the supply shut-off valve is
turned on. Refer to the “Connecting the Refrigerator to a
Water Source” section.
NOTE:
If not due to any of the above, there may be a
problem with the water line. Call for service.
The ice maker is producing too little ice
Has the ice maker just been installed?
■■■■
Wait 72 hours for full ice production to begin. Once your
refrigerator is cooled down, the ice maker should begin
producing 70-120 cubes every 24 hours.
Has a large amount of ice has just been removed?
■■■■
Allow 24 hours for ice maker to produce more ice.
Are the controls set correctly?
■■■■
Refer to the “Setting the Controls” section.
Is the water shut-off valve turned completely on?
■■■■
Turn valve on fully. Refer to the “Connecting the
Refrigerator to a Water Source” section.
Is there a water filter installed on the refrigerator?
■■■■
This filter may be clogged or installed incorrectly. First,
check the filter installation instructions to ensure that the
filter was installed correctly and is not clogged. If
installation or clogging is not a problem, call a qualified
person or a technician.
Off-taste, odor or grey color in the ice
Are the plumbing connections new , causing
■■■■
discolored or off-flavored ice?
Discard the first few batches of ice.
Have the ice cubes been stored for too long?
■■■■
Throw old ice away and make a new supply.
Do the freezer and ice bin need to be cleaned?
■■■■
See the “Cleaning Your Refrigerator” section.
■ Has food in the freezer or refrigerator been
wrapped properly?
Refer to the "Food Storage Guide" section.
Is the freezer temperature not cold enough to
■■■■
produce ice?
Wait 24 hours after ice maker hook-up for ice production.
Refer to the “Setting the Controls” section.
Is the ice maker arm in the “OFF” (arm up) position?
■■■■
Lowe r arm to the “ON” (arm down ) pos ition . See t he ”Ic e
Maker Operation” section.
Is the water line shut-off valve to the refrigerator not
■■■■
turned on?
Turn on the water valve. See the “Connecting the
Refrigerator to a Water Source” section.
26
Does the water contain minerals (such as sulfur)?
■■■■
A filter may need to be installed to remove the minerals.
Is there a water filter installed on the refrigerator?
■■■■
Grey or dark discoloration in ice indicates that the water
filtration system needs additiona l flus hing. Run
additional water through the water dispenser to flush the
water filtration system more thoroughly (at least 2-3
gallons or 6-7 minutes initially). Discard discolored ice.
Page 27

The ice dispenser will not operate properly
Is the freezer door closed completely?
■■■■
Push the door firmly shut. If it will not shut all the way,
see “The doors will not close completely” later in this
section.
Is the ice bin installed correctly?
■■■■
Push the ice bin in all the way. If the ice bin does not go
in all the way, it may not be put in straight. Pull it out and
try again.
Has the wrong ice has been added to the bin?
■■■■
Use only cubes produced by the current ice maker. If
other cubes have been added, remove all cubes and
check to see that none have become stuck in the
delivery chute.
Has the ice frozen in the ice bin?
■■■■
Shake the ice bin to separate cubes. If cubes do not
separate, empty bin and wait 24 hours for ice to restock.
Has the ice melted around the auger (metal spiral) in
■■■■
the ice bucket ?
Dump the ice cubes and clean the ice bucket completely.
Allow 24 hours for the ice maker to restock. Do not try to
remove the melted ice with a sharp object. You could
damage the ice bucket.
Is ice stuck in the delivery chute?
■■■■
Clear the ice from the delivery chute with a plastic
utensil. Do not use anything sharp to remove the ice.
You could cause damage.
Is there ice in the bucket?
■■■■
See “The ice maker is not producing ice” earlier in this
section.
Has the dispenser arm been held in too long?
■■■■
Release dispenser arm. Ice will stop dispensing when
the arm is held in too long. Wait three minutes for
dispenser motor to reset before using again. (For future
use, take large amounts of ice directly from the ice
maker so that the dispenser arm is not held in too long.)
The water dispenser will not operate properly
Is the freezer door not closed completely?
■■■■
Push the door firmly shut. If it will not shut all the way,
see “The doors will not close completely” later in this
section.
Has the water tank not filled?
■■■■
The water tank needs to be filled the first time it is used.
Depress the water dispenser bar with a large container
until you draw two or three quarts (1.9 to 2.8 L) of water.
Discard water. (Refer to the “Water and Ice Dispensers”
section for further instructions on filling the water tank.)
Is the water shut-off valve clogged or incorrectly
■■■■
installed?
Refer to the “Connecting the Refrigerator to a Water
Source” section. If clogging or installation is not a
problem, call for service or a contact a plumber.
Is there a kink in the home water source line?
■■■■
If you find or suspect a kink in the water line, call for
service.
Is there a water filter installed on the refrigerator?
■■■■
This filter may be clogged or incorrectly installed. First,
check the filter installation instructions to ensure that the
filter was installed correctly and is not clogged. If
installation or clogging is not a problem, call for service.
W ater or ice is le aking fr om the dispenser
Is the glass not being held under the ice dispenser
■■■■
long enough, causing the ice to spill?
Hold the container under the ice chute for two to three
seconds after releasing the dispenser lever. A small
amount of ice may dispense after the lever is released.
Is the glass not being held under the water
■■■■
dispenser long enough, causing water to drip?
Hold the container under the water dispenser two to
three seconds a fter rele asing the di spenser le v er . Wat er
may continue to dispense during this time.
Is an ice cube stuck in the chute and holding the
■■■■
trap door open?
Remove the cube.
Is there a water filter installed on the refrigerator?
■■■■
The water filtration system may have air in the lines,
causing water to drip. Additional flushing may help clear
air from the lines. Normal dispenser use should flush air
from the lines within 24-72 hours.
The dispenser water is not cool enough
Has the refrigerator been newly installed?
■■■■
Allow 24 hours for the tank to cool completely.
Has a large amount of water been recently
■■■■
dispensed?
Allow 24 hours for the tank to cool completely.
Has water not been recently dispensed?
■■■■
The first glass of water may not be cool. Discard the first
glass of water.
Is the water shut-of f v alve n ot turned on or the water
■■■■
line connected at the source?
Check to be sure the water shut-off valve is turned on
and the water source is connected to the refrigerator.
Refer to the “Connecting the Refrigerator to a Water
Source” section for direction s.
27
Page 28

The divider between the two compartments is
warm
■ The warmth is probably due to normal operation of the
automatic exterior moisture control. If still concerned,
call for service.
T emperature is too war m
Are the air vents blocked in either compartment?
■■■■
This prevents the movement of cold air from the
freezer to the refrigerator.
Remove any objects from in front of the air vents. Refer
to the “Ensuring Proper Air Circulation” section for the
location of air vents.
Are the door(s) opened often?
■■■■
Be aware that the refrigerator will warm when this
occurs. In order to keep the refrigerator cool, try to get
everything you need out of the refrigerator at once, keep
food organized so it is easy to find, and close the door as
soon as the food is removed.
Has a large amount of food just been added to the
■■■■
refrigerator or freezer?
Adding a large amount of food warms the refrigerator. It
can take several hours f or the refrigerator to return to the
normal temperature.
Are the controls set correctly for the surrounding
■■■■
conditions?
Refer to the “Setting the Controls” section.
There is interior moisture build-up
The doors will not c lose completely
Are food packages blocking the door open?
■■■■
Rearrange containers so that they fit more tightly and
take up less space.
Is the ice bin out of position?
■■■■
Push the ice bin in all the way.
Are the pans, shelves, bins, or baskets out of
■■■■
position?
Put the crisper cover and all pans, shelves, bins, and
baskets back into their correct position. See the “Crisper
and Crisper Cover” section for more information.
Are the gaskets sticking?
■■■■
Clean gaskets and then apply paraffin wax according to
the directions in the “Cleaning Your Refrigerator”
section.
Does the refrigerator wobble or seem unstable?
■■■■
Level the refrigerator. Refer to the “Door Closing and
Alignment” section.
Were the doors removed during product installation
■■■■
and not properly replaced?
Remove and replace the doors according to the
“Removing the Doors” section, or call a qualified service
technician.
The doors are difficult to open
Are the gaskets dirty or sticky?
■■■■
Clean gaskets according to the directions in the
“Cleaning Your Refrigerator” section.
Are the air vents blocked in the refrigerator?
■■■■
Remove any objects from in front of the air vents. Refer
to the “Ensuring Proper Air Circulation” section for the
location of air vents.
Are the door(s) opened often?
■■■■
To avoid humidity build-up, try to get everything you
need out of the refrigerator at once, keep food organized
so it is easy to find, and close the door as soon as the
food is removed. (When the door is opened, humidity
from the room air enters the refrigerator. The more often
the door is opened, the faster humidity builds up,
especially when the room itself is very humid.)
Is the room humid?
■■■■
It is normal for moisture to build up inside the refrigerator
when the room air is humid.
Is the food packaged correctly?
■■■■
Check that all food is securely wrapped. Wipe off damp
food containers before placing in the refrigerator.
Are the controls set correctly for the surrounding
■■■■
conditions?
Refer to the “Setting the Controls” section.
Was a self-defrost cycle completed?
■■■■
It is normal for droplets to form on the back wall after the
refrigerator self-de fro st s.
W ater flo w fr om the di spenser decreas es
noticeably
Is there a water filter installed on the refrigerator?
■■■■
This filter may be full or incorrectly installed.
Remove the water filter cartridge (see the “Water
Filtration System” section.) Operate the dispenser. If the
water flow increases noticeably, your filter is full and
needs to be replaced.
28
Page 29

ASSISTANCE
OR SERVICE
In Canada
Call the KitchenAid Canada Consumer Assistance Center
toll free: 1-800-461-5681 8:30 a.m. - 6:00 p.m. (EST).
Our consultants provide assistance with:
Before callin g for assistance or service, pl ease check
“Troubleshooting.” It may save you the cost of a service
call. If you still need help, follow the instructions below.
When calling, please know the purchase da te and the
complete model and serial number of your appliance. This
information will help us to better respond to your request.
If you need replacement parts
If you need to order replacement parts, we recommend
that you only use factory specified replacement parts.
Factory specified replacement parts will fit right and work
right because they are made with the same precision used
to build every new KitchenAid appliance.
To locate factory specified replacement parts in your area,
call our Consume r Assist ance Center teleph one numbe r or
your near est designated service center.
In the U.S.A.
Call the KitchenAid Consumer Assistance Center
toll free: 1-800-422-1230.
Our consultants provide assistance with:
■ Features and specifications on our full line of
appliances.
■ Referrals to local dealers.
For service in Canada
Call 1-800-807-6777. KitchenAid Canada designated
service technicians are trained to fulfill the product
warranty and pr ovide after-warranty service, anywhere in
Canada.
For further assistance
If you need further assistance, you can write to KitchenAid
Canada with any questions or concerns at:
Consumer Relations Center
KitchenAid Canada
1901 Minnesota Court
Mississauga, Ontario L5N 3A7
Please include a daytime phone number in your
correspondence.
■ Features and specifications on our full line of
appliances.
■ Installation information.
■ Use and maintenance procedures.
■ Accessory and repair parts sales.
■ Specialized customer assistance (Spanish speaking,
hearing impaired, limited vision, etc.).
■ Referrals to local dealers, repair parts distributors, and
service companies. KitchenAid designated service
technicians are trained to fulfill the product warranty
and provide after-warranty service, anywhere in the
United States.
To locate the KitchenAid designated service company
in your area, you can also look in your telephone
directory Yellow Pages.
For further assistance
If you need fur the r as sist an ce, y ou can wr it e to Kit ch enA id
with any questions or concerns at:
KitchenAid Brand Home Appliances
Consumer Assistance Center
c/o Correspondence Dept.
2000 North M-63
Benton Harbor, MI 49022-2692
Please include a daytime phone number in your
correspondence.
29
Page 30

WARRANTY KITCHENAID
FULL ONE-YEAR WARRANTY ON REFRIGERATOR
For one year from the date of purchase, when this refrigerator (excluding the water filter) is operated and maintained according to instruction s
attached to or furnished with the product, KitchenAid will pay for factory specified replacement parts and repair labor to correct defects in
materials or workmanship. Service must be provided by a KitchenAid designated service company.
30 day limited warranty on water filter. For 30 days from the date of purchase, when this filter is operated and maintained according to
instructions attached to or furnished with the product, KitchenAid will pay for replacement parts to correct defects in materials and
workmanship.
SECOND THROUGH FIFTH YEAR FULL WARRANTY
In second through fifth years from the date of purchase, KitchenAid will pay for replacement or repair of the refrigerator/freezer cavity liner
(including labor costs) if the part cracks due to defective materials workmanship. Service must be provided by a KitchenAid desig nated service
company.
Also, KitchenAid will pay for factory specified replacement parts and repair labor costs to correct defects in materials or workmanship in the
sealed refrigeration system. These parts are compressor, evaporator, condenser, drier, and connecting tubing. Service must be performed by a
KitchenAid designated service company.
SIXTH THROUGH TENTH YEAR LIMITED WARRANTY
In sixth through tenth years fro m date of purchase, replacement parts to correct defect s in materi als or workmanship in t he sealed refr igerat ion
system. These parts are compressor, evaporator, condenser, drier, and connecting tubing. Service must be performed by a KitchenAid
designated service company.
LIMITED LIFETIME WARRANTY
In second year through life of product fr om date of pur chase, Kit chenAid will pay for repl acement of all SLIDE ‘N’ LOCK™ Door Bins and SLIDE
‘N’ LOCK™ Can Racks due to defective materials or workmanship.
REFRIGERATOR
®
KitchenAid will not pay for:
Service calls to correct the installation of your refrigerator, to instruct you how to use your refrigerator, to replace house fuses or correct
1.
house wiring or plumbing, to replace light bulbs, or replacement water filters other than as noted above.
Repairs when your refrigerator is used in other than normal, single-family household use.
2.
Damage resulting from accident, alteration, misuse, abuse, fire, flood, acts of God, or use of product not approved by KitchenAid or
3.
KitchenAid Canada.
Any food loss due to product failure.
4.
Any labor costs during the limited warranty period.
5.
Replacement parts or repair labor costs for units operated outside the United States or Canada.
6.
Pickup and delivery. This product is designed to be repaired in the home.
7.
Repairs to parts or systems resulting from unauthorized modifications made to the appliance.
8.
In Canada, travel or transportation expenses for customers who reside in remote areas.
9.
KITCHENAID AND KITCHENAID CANADA CORPORATION SHALL NOT BE LIABLE FOR INCIDENTAL OR CONSEQUENTIAL
Some states or provinces do not allow the exclusion or limitat ion of incidental or consequential damages, so this exclusion or limitation may not
apply to you. This warranty gives you specific legal rights, and you may also have other rights which vary from state to state or province to
province.
Outside the United States and Canada, a different warranty may apply. For details, please contact your authorized KitchenAid dealer.
If you need service, first see the “Troubleshooting” section of this book. After checking “Troubleshooting,” additional help can be found by
checking the “Requesting Assistance or Service” section or by calling the KitchenAid Consumer Assistance Center, 1-800-422-1230 (toll-free),
from anywhere in the U.S.A. In Canada, contact your authorized KitchenAid Appliance service company or call 1-800-807-6777.
DAMAGES.
3/99
For warranty information in Canada:
Please contact your authorized KitchenAid dealer or call the Consumer Assistance Centre at 1-800-461-5681 (toll free) between
8:30 a.m. and 6 p.m. EST from anywhere in Canada.
Keep this book and your sales slip together for future
Dealer name_________________________________________
reference. You must provide proof of purchase or
installation date for in-warranty service.
Write down the followi ng in formation abou t your r efri gerator to bett er
help you obtain assistance or service if you ever need it. You will
need to know your complete m odel nu mb er and ser ial number. You
can find this information on the model and serial number label,
located on your appliance as shown in the Parts and Features
section of this book.
Address ____________________________________________
Phone number_______________________________________
Model number _______________________________________
Serial number _______________________________________
30
Purchase date _______________________________________
Page 31

WATER FILTER CERTIFICATIONS
31
Page 32

Product Data Sheet
Water Filtration System Model WF-L500
This product has been tested and certified by NSF International under ANSI/NSF Standard 42 for
Chlorine reduction (Class I), Taste and Odor reduction and to Standard 53 for Lead reduction.
Specifications:
Lead and Taste/Odor/Chlorine reduction (Class I) capacity
500 Gallons (1893 Liters)
Service Flow Rate 0.5 GPM (1.89 L/min) @ 60 psi
U.S. EPA
MCL
††
0.015 mg/L
0.015 mg/L
Average
Influent
2.0 mg/L N/A
†
†
General
Performance
Chlorine
Contaminant
Reduction
Performance
Lead @ pH 6.5
Lead @ pH 8.5
†
Test requirement is 0.15 mg/L ± 10%
††
These contaminants are not necessarily in your water supply. Performance may vary based on local water conditions.
Maximum
Effluent
Average
Influent
0.16 mg/L
0.14 mg/L
Average
Effluent
0.1 mg/L
Maximum
Effluent
†
0.007 mg/L 95%
†
0.012 mg/L
Average
Effluent
0.004 mg/L
0.008 mg/L
Minimum %
Reduction
N/A
Minimum %
Reduction
91%
Average %
Reduction
93%
Average %
Reduction
97%
94%
NSF Test
Requirement
minimum 75% reduction
(Class I)
NSF Test Requirement
maximum effluent 0.015 mg/L
maximum effluent 0.015 mg/L
Application Guidelines/
Water Supply Parameters
Water Supply City or Well
Water Pressure 30-120 psi (207-827 kPa)
® NSF is a registered trademark of NSF International
Water Temperature 33˚-100
F (0.6
˚
-37.8
˚
˚
C)
• It is essential that operational, maintenance, and filter
replacement requirements be carried out for this
product to perform as advertised.
• The filter monitor system measures the amount of
water that passes through the filter and alerts you to
replace the filter. When 90% of the filter's rated life is
used, the filter indicator light changes from green to
yellow. When 100% of the filter's rated life is used,
the filter indicator light changes from yellow to red,
and it is recommended that you replace the filter. Use
replacement cartridge part #L500 or #4392857.
1998 suggested retail price of $29.95 U.S.A/$39.95
Canada.
• The product is for cold water use only.
• Do not use with water that is microbiologically unsafe
or of unknown quality without adequate disinfection
before or after the system.
32
Page 33

SÉCURITÉ DU RÉFRIGÉRATEUR
Votre sécurité et celle des autres est très importante.
Nous donnons de nombreux messages de sécurité importants dans ce manuel et sur votre appareil ménager.
Assurez-vous de toujours lire tous les messages de sécurité et de vous y conformer.
Voici le symbole d’alerte de sécurité.
Ce symbole d’alerte de sécurité vous signale les dangers susceptibles de causer le décès et
des blessures graves à vous et à d’autres.
Tous les messages de sécurité seront précédés du symbole d’alerte de sécurité et du mot
“DANGER” ou “AVERTISSEMENT”. Ces mots signifient :
Risque certain de décès ou de blessure grave si
DANGER
vous ne suivez pas les instructions.
Risque
AVERTISSEMENT
Tous les messages de sécurité identifient le danger et vous disent comment réduire le risque de blessure et ce
qui peut se produire en cas de non-respect des instructions.
si vous ne suivez pas les instructions.
possible de décès ou de blessure grave
IMPORTANTES INSTRUCTIONS DE SÉCURITÉ
AVERTISSEMENT :
l'utilisation du réfrigérateur, prendre quelques précautions fondamentales, y compris les suivantes :
■
Brancher l'appareil sur une prise à 3 alvéoles
reliée à la terre.
■
Ne pas enlever la broche de liaison à la terre.
■
Ne pas utiliser un adaptateur.
■
Ne pas utiliser un câble de rallonge.
■
Utiliser deux ou plus de personnes pour
déplacer et installer le réfrigérateur.
■
Débrancher la source de courant électrique
avant l'entretien.
Po
ur réduire les risques d'incendie, de choc électrique ou des blessures lors de
■
Replacer tous les panneaux avant de faire la
remise en marche.
■
Utiliser un produit de nettoyage ininflammable.
■
Garder les matériaux et les vapeurs inflammables,
telle que l'essence, loin du réfrigérateur.
■
Débrancher le réfrigérateur avant l'installation de la
machine à glaçons.
■
Utiliser un verre robuste pour prendre des glaçons
ou de l'eau (sur certains modèles).
■
Enlever les portes de votre vieux réfrigérateur.
CONSERVEZ CES INSTRUCTIONS
Mise au rebut de
votre vieux réfrigérateur
Av ant de jeter votre vieux réfrigérateur ou
congélateur :
■ Enlever les po rt es .
■ Laisser les tablettes en place de sorte que les enfants
ne peuvent pas y pénétrer facilement.
AVERTISSEMENT
Risque de suffoquer
Enlever les portes de votre vieux réfrigérateur.
Le non-respect de cette instruction peut causer
un décès ou des lésions cérébrales.
IMPORTANT – L’emprisonnement et l’étouffement des
enfants ne sont pas un problème du passé. Les
réfrigérateurs jetés ou abandonnés sont encore
dangereux, même s’ils sont laissés abandonnés pendant
“quelques jours se ulement”. Si vous vous débarrassez de
votre vieux réfrigérateur, veuillez suivre les instructions
suivantes pour aider à éviter les accidents.
33
Page 34

PIÈCES ET CARACTÉRISTIQUES
Ce manuel couvre plusieurs modèles différents. le réfrigérateur que vous avez acheté peut avoir certaines ou toutes les
caractéristiques indiquées ci-dessous. Les emplacements des caractéristiques peuvent ne pas correspondre à votre
modèle.
Chrisper
Meat Locker
ExtendFreshExtendFresh
SuperbaSuperba
RefrigeratorRefrigerator
Freezer
4
Colder
3
1
2
Off
Automatic Exterior Moisture ControlAutomatic Exterior Moisture Control
ColderColder
4
3
1
2
ColdCold
1. Lampe supérieure du congélateur
2. Machine à glaçons automatique (sur certains modèles)
3. Tringles déposées dans la porte
4. Plaque signaléti que des numér os de modèl e et de série
(sur paroi latérale)
5. Bac à glaçons (sur cert a ins modèles)
6. Lampe du congélateur (en-dessous du bac à glaçons
de la machine)
7. Clayette de congélateur amovible
8. Paniers du congélateur sur glissière (le nombre varie
selon le modèle)
9. Tringles enclenchables dans la porte
10. Roulettes de nivellement (derrière la grille de la base)
11. Tableau de commande
12. Éclairage
13. Système de filtrage d’eau (AQUASENSE
TM
) (sur
certains m od èl e s)
14. Réglage de la température du bac convertible à
légumes/viande (FRESH CHILL
TM
) (sur paroi latérale)
15. Grille de la base
34
16. Bac à légumes/viande (FRESH CHILL
TM
) avec
couvercle
17. Compartiment utilitaire
18. Tablettes en ver re (RO LLE R TR AC
TM
SPILLCLEANTM)
19. Porte-cannettes (le nombre varie selon le modèle)
20. Casier à vin
21. Éclairage du bac à légumes
22. Couvercle de bac à légumes avec contrôle de
l’humidité
23. Bac à légumes
24. Compartiment dans la porte avec Stor-Lock
25. Compartiments dans la porte (SLIDE ’N’ LOCK
TM
certains modèles)
Autres pièces et caractéristiques
(non illustrées ci-dessus/facultatives sur certains
modèles)
Plateaux pour glaçons
Commande de l’humidité du bac à légumes
Oeufrier/compartiment utilitaire
) (sur
Page 35
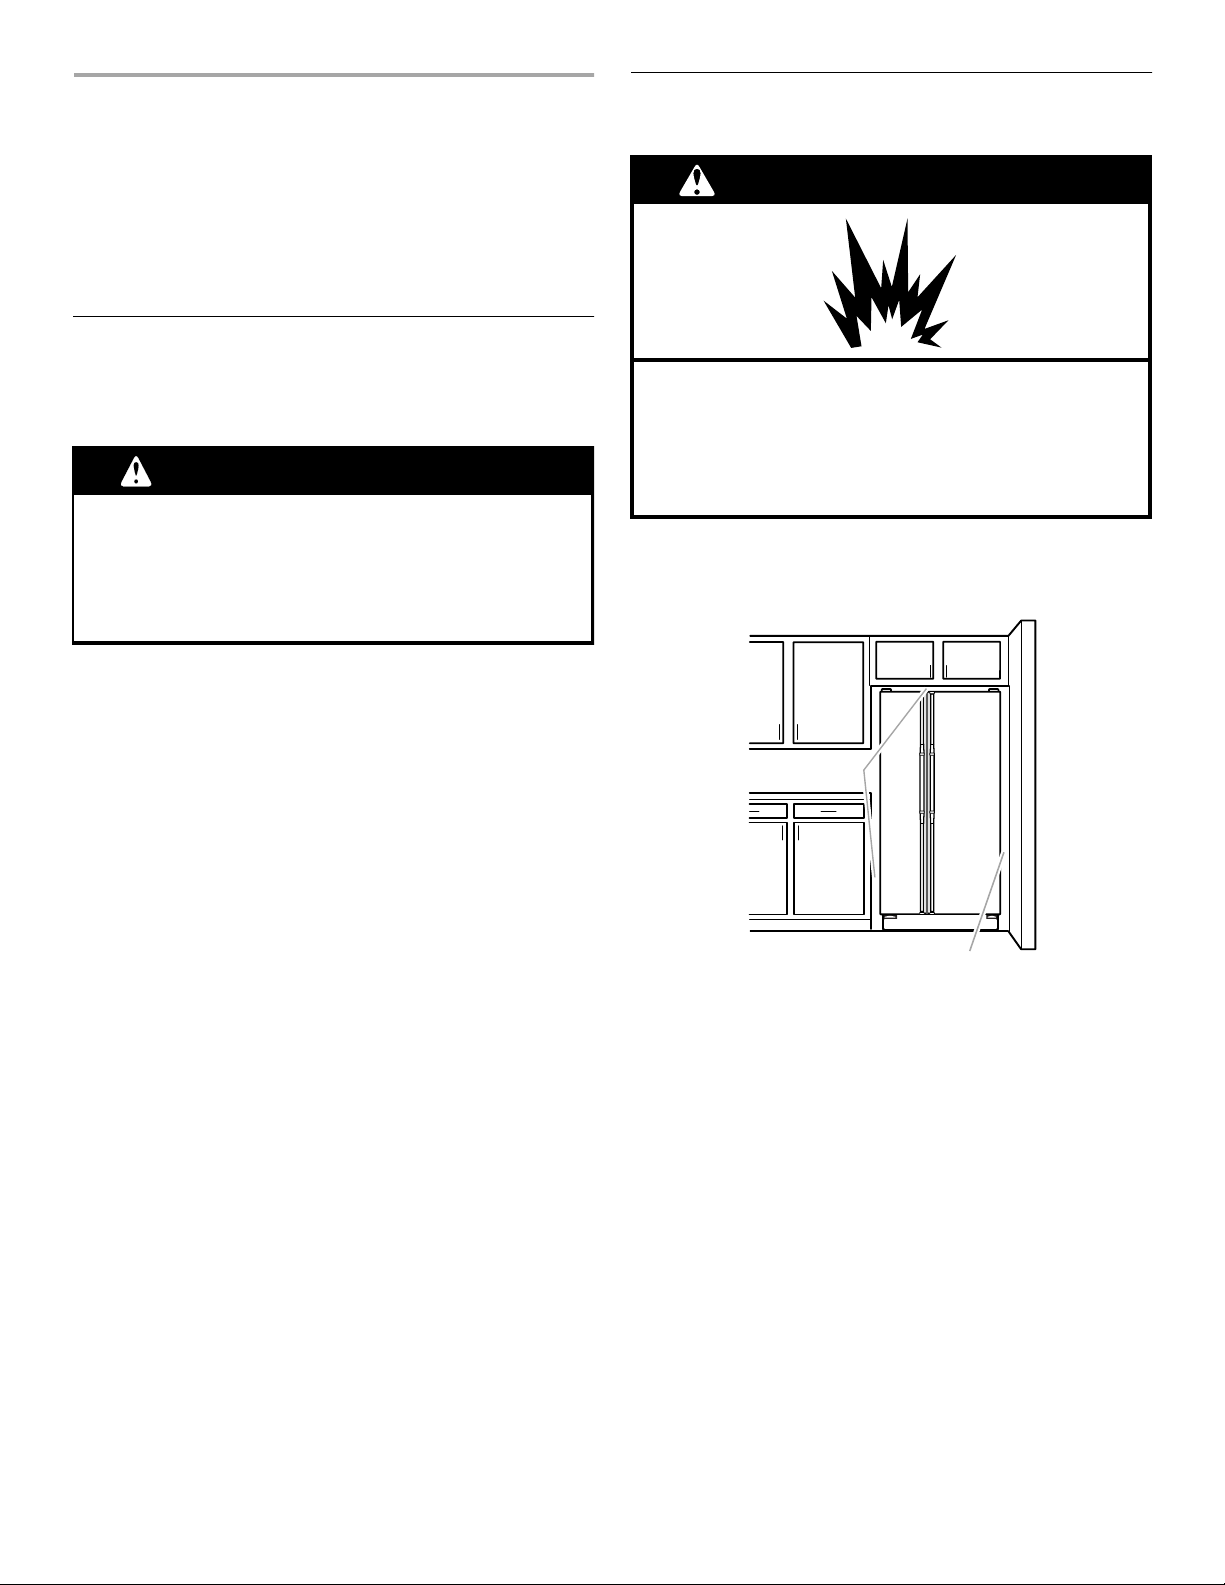
INSTALLATION
Espacement requis
DU
RÉFRIGÉRATEUR
Déballage de votre
réfrigérateur
AVERTISSEMENT
Risque du poids excessif
Utiliser deux ou plus de personnes pour déplacer
et installer le réfrigérateur.
Le non-respect de cette instruction peut causer
une blessure au dos ou d'autre blessure.
Enlèvement des matériaux d’emballage
■ Enlever le ruban adhésif et toutes les étiquettes de
votre réfrigérateur avant de l’utiliser (excepté l’étiquette
des numéros de modèle et de série).
Pour enlever ce qui reste du ruban adhésif ou de
l’adhésif, frotter la surface vi vement avec le pouce. La
colle ou l’adhésif qui reste peut être facilement enlevé
par frottage avec les doigts et une petite quantité de
savon liquide pour la vaisselle sur l’adhésif. Rincer à
l’eau tiède et essuyer.
AVERTISSEMENT
Risque d'explosion
Garder les matériaux et les vapeurs inflammables,
telle que l'essence, loin du réfrigérateur.
Le non-respect de cette instruction peut causer
un décès, une explosion ou un incendie.
■ Pour obtenir une aération appropriée pour votre
réfrigérateur, laisser un espace de 1,25 cm (0,5 po) de
chaque côté et au sommet.
1,25 cm (0,5 po)
■ Ne pas utiliser d’instrument s acérés, d’ alcool à fri ction,
de liquides inflammables ou de nettoyants abrasifs
pour enlever le ruban adhésif ou la colle. Ces produits
peuvent endommager la surface de votre réfrigérateur.
Voir “Importantes instructions de sécurité” pour plus de
renseignements, à la section “Sécurité du
réfrigérateur”.
IMPORTANT: Ne pas enlever les étiquettes permanentes
d’instruction à l’intérieur du réfrigérateur, ou la fiche
technique fixée à la base de la grille.
Nettoy a ge av ant l’utilisation
Après avoir enlevé tous les matériaux d’emballage,
nettoyer l’intérieur du réfrigérateur avant de l’utiliser. Voir
les instructions de nettoyage dans la section “Entretien de
votre réfrigérateur”.
5 cm (2 po)
■ Si votre ré frigér ateur c omport e une ma chine à glaç ons,
s’assurer qu’ un es pac e addi t ionn el e st pr évu à l’a rri ère
pour permettre les connexions des conduits d’eau. Le
réfrigérateur peut être près du mur arrière si vous ne
faites pas installer une machine à glaçons.
■ Si vous installez votre réfrigérateur près d ’u n mur fixe,
laisser un minimum de 5,08 cm (2 po) du côté des
charnières (selon le modèle) pour permettre à la porte
de s’ouvrir sans obstruction.
REMARQUE : Ne pas installer le réfrigérateur près d’un
four, d’un radiateur ou d’une a utre source de chaleur, ni
dans un endroit où la température baissera au-dessous de
13° C (55° F).
35
Page 36

Spécifications électriques
Enlèvement des portes
AVERTISSEMENT
Risque de choc électrique
Brancher sur une prise à 3 alvéoles reliée
à la terre.
Ne pas enlever la broche de liaison à la terre.
Ne pas utiliser un adaptateur.
Ne pas utiliser un câble de rallonge.
Le non-respect de ces instructions peut causer
un décès, un incendie ou un choc électrique.
Avant de placer le r éfr igér ateu r à son empl aceme nt fi na l, il
est important d e vous assurer d’avoir la connexion
électrique appropriée :
AVERTISSEMENT
Risque de choc électrique
Déconnecter la source de courant électrique
avant d'enlever les portes.
Le non-respect de cette instruction peut causer
un décès ou un choc électrique.
REMARQUE : Avant d’enlever les portes, ouvrir les deux
portes et retirer la grille de la base (voir la section “Grille
de la base”).
Outils requis :
Clé à douille à tête hexagonale de ¼ po, clé à douille à
tête hexagonale de ⁵⁄₁₆ po.
1. Débrancher le réfrigérateur ou déconnecter la source
de courant électrique.
Méthode recommandée de mise à la terre
Une source d’alimentation de 115 volts, 60 Hz, type 15 ou
20 ampères CA seulement, protégée par fusibles et
adéquatement mise à la terre est nécessaire. Il est
recommandé d’utiliser un circuit distinct pour alimenter
uniquement votre réfrigérateur. Utiliser une prise murale
qui ne peut pa s être mise hors circuit à l’aide d’un
commutateur. Ne pas employer de rallonge.
REMARQUE : Avant d’exécuter toute type d’installation,
nettoyage ou remplacement d’une ampoule d’éclairage,
tourner le réglage (réglage du thermostat, du réfrigérateur
ou du congélateur selon le modèle) à OFF (ARRÊT) et
débrancher ensuite le réfrigérateur de la source
d’alimentation électrique. Lorsque vous avez terminé,
reconnecter le réfrigérateur à la source d’alimentation
électrique et mettre de nouveau l e réglage (réglage du
thermostat, du réfrigérateur ou du congélateur selon le
modéle) au réglage désiré.
2. Si vous avez un distributeur (glaçons ou eau),
déconnecter le conduit d’eau (derrière la grille de la
base).
■ Enlever le tuyau de la bride.
■ Débrancher l’ann e au de raccord et le glisser sur le
tube.
■ Enlever l’insertion de métal du tube.
■ Enlever l’anneau de raccord et le ressort.
36
Page 37

3. Enlever la charnière supérieure à gauche.
■ Enlever le couvercle de la charnière et les vis. NE
PAS ENLEVER LA VIS 1, TEL QU’INDIQUÉ DANS
LE SCHÉMA.
■ Débrancher la fiche et les deux fils de liai son à la
terre.
■ Soulever soigneusement la porte de la charnière
inférieure. S’assurer de protéger le conduit d’eau
contre les dommages.
1
4. Démonter la charnière supérieure à droite.
6. Réinstaller le s por te s.
AVERTISSEMENT
Risque de choc électrique
Reconnecter les deux fils de liaison à la terre.
Le non-respect de cette instruction peut
causer un décès ou un choc électrique.
7. Reconnecter la fiche e t les deux f ils de liai son à la te rre.
8. Réinstaller le couvercle de la charnière et les vis.
9. Brancher le réfrigérateur ou reconnecter la source de
courant électrique.
■ Enlever le couvercle de la charnière et les vis. NE
PAS ENLEVER LA VIS 2 TEL QU’ILLUSTRÉ
DANS LE SCHÉMA.
■ Soulever la porte de la charnière inférieure.
2
5. Enlever la charnière inférieure si nécessaire. Les deux
charnières à la base ont une constructi on semblable.
NE PAS ENLEVER LA VIS 3 TEL QU’ILLUSTRÉ
DANS LE SCHÉMA.
REMARQUE : Il peut ne pas être nécessaire d’enlever
la charnière inf é rieure pour déplacer le réfrigérateur
dans un cadre de porte.
Préparation du système d’eau
Veuillez lire avant l’installation
Immédiatement après l’installation, suivre les étapes cidessous pour avoir la certitude que le système d’eau est
bien nettoyé.
1. Arrêter la machine à glaçons en ouvrant la porte du
congélateur et en soulevant le levier de signal comme
illustré.
2. Vider le système d’eau en laissant couler et en jetant 2
à 3 gallons (environ 6 à 7 minutes) d’eau à travers le
distributeur. Ceci nettoie le système d’eau et aide à
dégager l’air des conduits. Un écoulement additionnel
peut être requis dans certains domiciles.
3
37
Page 38

3. Mettre la machine à glaçons en marche en ouvrant la
porte du congélateur et en abaissant le levier de sign al
comme illustré.
4. Accorder 24 heures pour produire la première quantité
de glaçons. La machine à glaçons devrait ensuite
produire environ 7 à 9 lots de glaçons au cours d’une
période de 24 heure s. Jeter les trois premiers lots de
glaçons produits.
REMARQUE : Votre marchand de réfrigérateurs présente
une trousse di spon ib le avec un robinet de genr e à se ll e d e
¹⁄₄-po, un raccord et un tube en cuivre. Avant l’achat ,
s’assurer que le robinet de gen re à sell e est conf o r me à
vos codes locaux de plomberie. Ne pas employer de
robinet de genre à selle ou de ³⁄₁₆-po de type à percer , ce
qui réduit le débit d’eau et cause une obstruction plus
facilement.
Arrivée d’eau froide
La valve d’entr ée d’eau de l a machine à gla çons compr end
une rondelle de contrôle du débit, qui est utilisée comme
élément de régulation de la pression d’eau. La machine à
glaçons a besoin d’être connectée à une canalisation
d’eau froide av ec limitation s de press ion d’eau de 30 à 120
2
lb-po
. Si un problème survient, contacter la compagnie de
distribution d’e a u.
Raccordement à une canalisation d’eau :
Raccordement du
réfrigérateur à une
canalisation d’eau
Lire attentivement toutes les instructions avant
de commencer .
IMPORTANT:
■ Si on doit utilise r le réfrigérateur avant qu’il soit
raccordé à la canalisation d’eau, placer la commande
de la machine à glaçon s à la pos ition d’ar rêt (OFF) p our
empêcher que la mach ine à glaçons fonctionne sans
eau.
■ Toutes les installations doivent être conformes aux
exigences des codes locaux de plomberie.
■ Utiliser un tube en cuivre et vérifier s’il y a des fuites.
■ Installer les tubes en cuivre seulement à des endroits
où la températ ure se maintient au-dessus du point de
congélation.
■ Une période d’attente allant jusqu’à 24 heures est
nécessaire avant que l’appare il commence à produire
des glaçons.
1. Débrancher le réfrigérateur ou déconnecter la source
de courant électrique.
2. Fermer (OFF) le robinet principal d’ar rivée d’eau. Ouvr ir
(ON) le robinet de puisage le plus proche pendant une
période suffisante pour que la canalisation d’eau se
vide.
3. Trouver une canalisatio n d’eau FROIDE vertic ale de 1,3
à 3,2 cm (¹⁄₂-po à 1¹⁄₄-po) près du réfrigérateur.
REMARQUE : Un conduit horizontal fonctionnera, mais
le procédé suivant doit être suivi : percer par le dessus
de la canalisa tion et non pas par le dessous. Ainsi,
l’eau ne risquera pas d’arroser la perceuse. Ceci
empêche également les sédiments qu’on trouve
normalement dans l’eau de s’accumuler dans le robinet
d’arrêt.
4. Pour déterminer la longueur du tube en cuivre, il faut
mesurer la distance entre le point de connexion à
gauche au bas à l’arrière du réfrigérateur et le tuyau
d’arrivée d’eau. Ajouter une longueur de 7 pieds (2,1 m)
pour permettre le déplacement du réfrigérateur pour le
nettoyage. Utiliser un tube en cuivre de ¹⁄₄ po de
diamètre. Veiller à ce que le tube soit coupé d’équerre
aux deux extrémités.
Outils requis :
■ Tournevis standard
■ Clés plates de ⁷⁄₁₆-po et ¹⁄₂-po ou deux clés à molette
réglables
■ Tourne-écrou de ¹⁄₄-po
■ Foret de ¹⁄₄-po
■ Perceuse manuelle ou perceuse électrique
(convenablement reliée à la terre)
38
Page 39

5. À l’aide d’une perceuse électrique reliée à la terre,
percer un trou de ¹⁄₄-po dans le tuyau de canalis ation
d’eau froide choisie.
1. Canalisation d’eau froide
2. Bride de tuyau
3. Tube en cuivre
4. Écrou de compression
5. Bague de compression
6. Robinet d’arrêt
7. Écrou de serrage
6. Fixer le robinet sur la canalisation d’eau froide avec la
bride de prise en ch arge. Vérifier que le raccord du
robinet est bien engagé dans le trou de ¹⁄₄-po percé
dans la canalisation et que la rondelle d’étanchéité est
placée sous la bride de prise en charge. Serrer l’écrou
de serrage sur la tige du robinet. Serrer soigneusement
et uniformément les vis fixant la bride de prise en
charge sur la tuyauterie afin que la rondelle forme une
jonction étanche. Ne pas serr er excessive ment car ceci
pourrait provoquer l’écrasement du tube en cuivre,
particulièrement s’il s’agit d’un tube en cuivre
malléable. On est maintenant prêt à connecter le tube
de raccordement en cuivre.
7. Enfiler l’écrou et la bague de compression du raccord
sur le tube en cuivre comme on le voit sur l’illustration.
Insérer l’ extré mité du tube au ssi loin qu e pos sible d ans
l’ouverture de sortie du robinet. Visser l’écrou du
raccord de compression sur le raccord de sortie avec
une clé à molette. Ne pas serrer excessivement.
8. Placer le bout libre du tube dans l’évier et OUVRIR le
robinet principal d’arrivée d’eau et laisser l’eau
s’écouler par le tube jusqu’à ce que l’eau soit limpide.
FERMER le robinet principal d’arrivée d’eau. Enrouler
le tube en cuivre en spirale.
Raccordement au réfrigérateur :
1. Connecter le tube en cuivre au robi net d’eau en
utilisant un écrou et une bague de compression tel
qu’illustré. Serrer l’écrou de compression. Ne pas
serrer excessivement. Réattacher la bride du tube et le
tube à l’arrière de la caisse. Passer à l’étape 2.
2. OUVRIR le robinet d’arrêt. Inspecter pour
rechercher les fuites. Serrer tous les raccords (y
compris les raccordements de la valve d’entrée
d’eau) ou les écrous qui coulent.
1. Bride du tube
2. Tube en cuivre
3. Bague de compression
4. Entrée d’eau de la valve
3. La machine à glaçons est équipée d’un filtre à eau
incorporé. Si la qualité de l’eau distribuée localement
nécessite un nettoyage périodique, ou si l’eau qui
alimente l’appareil provient d’un puits, il serait utile
d’installer un deuxième filtre dans le tube de
raccordement de ¹⁄₄-po. On peut obtenir un tel filtre à
eau chez le marchand d’appareils électroménagers le
plus proche. Installer le filtre au niveau de n’importe
laquelle des connexions du tube de raccordement .
4. Brancher le réfrigérateur ou reconnecter la source de
courant électrique.
39
Page 40

2. Enlever les panneaux de porte :
Ensembles décoratifs
de l’usine
(sur certains modèles)
Une occasion peut survenir lorsque vous devez enlever
l’ensemble décoratif installé à l’usine, comme les cas de
déménagement du réfrigérateur à une nouvelle habitation
ou l’installation de panneaux décoratifs sur demande.
V euill ez bien l ir e tout es les instru ctio ns avant d’enlever
l’ensemble décoratif et les panneaux.
2 1
3
2 1
Porte
du congélateur
1. Panneaux décoratif
2. Panneaux de remplissage
3. Poignées
Enlèvement des panneaux de la porte
REMARQUE : Lors de l’enlèvement et du remplacement
des panneaux décoratifs, seulement la poignée est
enlevée. Toutes les autres pièces décoratives demeurent
fixées aux portes.
1. Enlever les poignées du réfrigérateur et
du congélateur :
■ En utilisant un tourznevis Phillips, enlever les vis qui
retiennent chaque poignée en place.
■ Soulever la poignée pour l’enlever. S’assurer de
garder les vis pour réinstaller les poignées.
1
du réfrigérateur
2
Porte
■ Ouvrir la porte du réfrigérateur ou du congélateur.
■ Sortir le panneau décoratif et le panneau de
remplissage en les glissant.
■ Répéter le processus pour les autres panneaux et
les panneaux de remplissage.
■ Garder avec soin les panneaux et les panneaux de
remplissage pour éviter les égratignures.
Remplacement des panneaux de porte
1. Remplacer le panneau de porte du réfrigérateur ou du
congélat eu r :
■ Ouvrir la porte du réfrigérateur ou du congélateur.
■ Glisser soigneusement le panneau décoratif de ¹⁄₈
po en place derrière la garniture la térale.
■ Abaisser le panneau de remplissage en place en
arrière du panneau décoratif.
■ Répéter le processus pour les autres panneaux et
les panneaux de remplissage.
2. Réinstaller les poignées :
REMARQUE : La poignée du congélateur est entaillée
pour convenir autour du panneau du distributeur.
■ Aligner le sommet de la poi gnée d u réfri géra te ur ou
du congélateur avec la garniture supérieur e. Fixer l a
poignée à la porte du réfrigérateur ou du
congélateur avec les vis et un to urz n e vi s Ph il lips.
■ Répéter le procédé pour l’autre poignée.
Entretien des panneaux décoratifs :
1. Nettoyer les panneaux avec un nettoyant antistatique
(disponible dans les magasins de produits
électroniques ou d’ordinateurs) ou un savon doux et de
l’eau avec un linge doux, propre et humide.
2. Rincer à fond les panneaux et sécher en absorbant
l’eau comme un buvard, à l’aide d’un chi ffon ou d’un
chamois.
3. NE PAS utiliser des essuie-tout en papier ou des
nettoyants qui contiennent des solvants tels que
l’ammoniaque. Ils peuvent endommager la surface des
panneaux.
4. Si de petites égratignures apparaissent sur les
panneaux, elles peuvent être remplies en utilisant une
cire en pât e pour automobile (NON une combinaison
de nettoyant/cire). Appliquer un peu de cire et polir
légèrement avec un chiffon doux et par un mouvement
circulaire.
40
Page 41

Installation de panneaux en bois sur commande
20
7/16
"
14
15/16
"
28
1/2
"
63
3/8
"
TOP VIEW
3/4"
1/4"
5/16"
5/16"
14
15/16
"
(6.35 mm)
(7.93 mm)
(51.91 cm)
(37.94 cm)
(37.94 cm)
(72.4 cm)
(7.93 mm)
1/4"
(6.35 mm)
1/4"
(6.35 mm)
5/16"
(7.93 mm)
(160.97 cm)
1/4"
(6.35 mm)
(19.05 mm)
3 1/4"
(82.55 mm min.)
19
11/16
"
(50.01 cm)
5/16"
(7.93 mm)
1/4"
(6.35 mm)
3/4" min.
(19.05 mm min.)
TOP VIEW
3/4" min.
3/4"
1/4"
(19.05 mm min.)
(19.05 mm)
(6.35 mm)
3 1/4"
(82.55 mm min.)
Si vous avez l’intention d’installer des panneaux décoratifs
en bois, vous aurez besoin de créer les panneaux vousmême ou consulter votre fabricant de meubles ou un
menuisier. Voir les dessins dimensionnels pour les encarts
des panneaux en bois.
Panneaux unis :
On peut créer un panneau uni sur demande de 6 mm (¹⁄₄
po) d’épaisseur po ur remplacer vos panneaux décoratifs.
Les panneaux en bois unis de moins de 6 mm (¹⁄₄ po)
d’épaisseur ne sont pas recommandés.
Panneaux en relie f :
Un panneau en relief peut être créé en vissant ou en
collant des panneaux en bois à un appui de 6 mm (¹⁄₄ po)
ou en utilisant un panneau de 19 mm (³⁄₄ po) avec rebord
aminci.
Exigences de poids pour les encarts de panneaux en
relief :
■ Le panneau de la porte du réfrigérateur ne devrait
pas excéder 9,98 kg (25 lb).
■ Le poids combiné des panneaux des portes du
congélateur ne devrait pas excéder 6,80 kg (18 lb).
Dimensions de la Dimensions de la
porte du congélateur porte du congélateur
de 25 et 27 pi cu de 25 et 27 pi cu
Dimensions pour les panneau x en bois sur commande
Dimensions de la Dimensions de la
porte du congélateur porte du réfrigérateur
de 22 pi cu de 22 pi cu
(6.35 mm)
11/16
19
"
(
50.01 cm)
(6.35 mm)
(19.05 mm min.)
VUE DE DESSUS
1/4"
1/4"
3/4" min.
(7.93 mm)
5/16"
(7.93 mm)
3/4"
(19.05 mm)
1/4"
(6.35 mm)
5/16"
5/16"
(7.93 mm)
5/16"
(7.93 mm)
3/4" min.
(19.05 mm min.)
(6.35 mm)
(30.96 cm)
(
30.96 cm)
(6.35 mm)
(82.55 mm min.)
VUE DE DESSUS
1/4"
3/16
12
3/16
12
1/4"
3 1/4"
"
"
17
44.3 cm)
(
28
(
72.4 cm)
(19.05 mm)
1/4"
(6.35 mm)
7/16
1/2
3/4"
"
60
(
153.35 cm)
"
3/8
"
3 1/4"
(82.55 mm min.)
Grille de la base
Pour enlever la grille de la base :
1. Ouvrir les deux portes du réfrigérateur.
2. Placer les mains le long des extrémités de la grille,
avec vos pouces sur le dessus. Appuyer avec vos
pouces et retirer la base.
REMARQUE : Ne pas enlever la fiche technique derrièr e la
grille de la base après le nettoyage.
Réinstallation de la grille :
1. Ouvrir les portes.
2. Aligner les languettes d’appui de la grille avec les
agrafes en métal.
3. Appuyer fermement sur la grille pour l’enclencher en
place.
41
Page 42

Fermeture des portes
Les bruits de l’appareil que
V otre r éfrigérateu r présente 2 roule ttes régla bles à l’ava nt –
l’une du côté droit et l’une du côte gauche. Si votre
réfrigérateur semble instable ou si vous désirez que les
portes se ferment plus facilement, faire le réglage de
l’inclinaison du réfrigérateur en suivan t les instructions cidessous :
1. Brancher le réfrigérateur.
2. Placer le réfrigérateur à son emplacement final.
3. Enlever la grille de la base (voir “Grille de la base” au
début de cette section). Les deux vis de nivellement
font partie des montages de roulettes avant qui sont à
la base du réfrigérateur d’un côté et de l’autre.
4. Utiliser un tournevis pour ajuster les vis de nivellement.
Tourner la vis de nivellement vers la droite pour
soulever ce côté du réfrigérateur ou tourner la vis de
nivellement vers la gauche pour abaisser ce côté.
Plusieurs tours des vis de nivellement peuvent être
nécessaires pour régler l’inclinaison du réfrigérateu r.
REMARQUE : Si une autre personne pousse le haut du
réfrigérateur, le poids devient moins lourd sur les vis de
nivellement et les roulettes, ce qui rend plus facile
l’ajustement des vis.
vous pouvez entendre
Il est possible que le réfrigérateur neuf émette des bruits
que l’appareil précédent ne produisait pas. Comme ces
bruits sont nouveaux, ils peuvent vous inquiéter. La plupart
de ces nouveaux bruits sont nor maux. D es s urface s dures
comme le plancher, les murs et les armoires peuven t faire
paraître les bruits plus forts qu’en réalité. Les descriptions
suivantes indiquent le genre de bruits et leur origine.
■ Si votre appareil est équipé d’une machine à glaçons,
vous entendrez un bruit de gargouillement lorsque la
valve d’eau s’ouvre pour remplir la machine à glaçons
pour chaque programme.
■ La minuterie du dégivreur produit un déclic au début et
à la fin du programme de dégivrage. Le thermostat et le
réglage fer o nt aussi entendre un déclic lors de la mise
en marche et de l’arrêt du programme.
■ Les vibrations sonores peuvent provenir de
l’écoulement du réfri gérant , de la canal isatio n d’eau ou
d’articles placés sur le réfrigérateur.
■ Votre réfrigérateur est conçu pour fonctionner plus
efficacement afin de garder les aliments à la
température désirée. Le compr esseur t rès ef ficace peu t
faire fonctionner votre réfrigérateur neuf plus
longtemps que l’ancien et vous pouvez entendre des
bruits aigus ou des vibrations sonores.
5. Ouvrir les deux portes de nouveau et vérifier pour
s’assurer qu’elle s se ferment aussi f acilement que vou s
le désirez. Sinon, inclinez le réfrigérateur un peu plus
vers l’arrière en tournant les deux vis de nivellement
vers la droite. Plusie urs tours peuvent être nécessaires
et vous devez tourner les deux vis de nivellement d’un
espace égal.
6. Réinstaller la grille de la base.
■ L’eau qui dégoutte sur le dispos itif de chau f fage durant
le programme de dégivrage peut produire un
grésillement.
■ V ous pouvez entendre le moteur du ventilateur
d’évaporation qui fait circuler l’air dans le réfrigérateur
et le congélateur.
■ À la fin de chaque programme, vous pouvez entendre
un gargouillement attribuable au réf rig éra nt qui se
trouve dans votre réfrigérat eur.
■ La contraction et l’expansion des parois internes
peuvent produire un bruit sec.
■ Vous pouvez entendre de l’air qui est tran smis au
condenseur dans le ventilateur du condenseur.
■ Vous pouvez entendre l’écoulement de l’eau dans le
plat de récupération d’eau de dégivrage pendant le
programme de dégivrage.
42
Page 43

UTILISATION DU
RÉFRIGÉRATEUR
Pour s’assurer d’une
circulation d’air appropriée
Pour s’assurer d’av oir les températ ur es appro priées, il faut
permettre à l’air de circuler entre les deux compartiments.
Comme l’indique l’illustration, l’air froid pénètre à la base
de la section du cong élateur et se déplace vers le haut. Il
pénètre ensuite dans la section d’aliments frais à travers
l’ouverture d’aération supérieure. L’air retourne au
congélateur tel qu’illustré.
Pour d’autres renseignements sur les températures à
l’intérieur de votre réfrigérateur, se référer à la section
“Dépannage”.
Réglage des commandes
Pour votre commodité, les commandes du
réfrigérateur sont préréglées à l’usine. Lors de
l’installation in itiale du réfrigérateur, s’assurer que les
commandes sont encore préréglées. La commande du
réfrigérateur et celle du congélateur devraient toutes les
deux se trouver aux "réglages moyens" tel qu’indiqué
dans les schémas ci-dessous.
La commande du réfrigér at eur règl e l a t emp érat ure du
compartiment de réfrigér ation. Les réglages à la gauche
du réglage moyen sont pour une température moins froide.
Ceux qui se trouvent à droite sont pour une température
plus froide.
Ne pas obstruer l’une ou l’autre de ces ouvertures
d’aération avec des aliments tel s que bois sons gazeu ses,
céréales, pain, etc. Si les ouvertures d’aération sont
obstruées, le débit d’air sera bloqué et le réglage de la
température ne fonctionnera pas bien.
REMARQUE: Comme l’air circule entre les deux sections,
toutes les odeurs formées dans une section seront
transférées à l’autre. Vous devez nettoyer à fond les deux
sections pour élimi ner les odeurs. Pour empêcher le
transfert d’odeurs, bien envelopper les aliments.
Vérification de l’air
Pour mesurer la quantité d’air froid transmise du
congélateur au réfrigérateur tenir la main en avant de
l’ouverture supérieure de l’air. Le réglage du congélateur
peut être ajusté pour éprouver différentes quantités d’air.
Refrigerator
Colder
Cold
La commande du congélateur règle la température du
compartiment de congélation. Les réglages à la gauche
du réglage moyen sont pour une température moins froide.
Ceux qui se trouvent à droite sont pour une température
plus froide.
REMARQUE : Votre produit ne se refroidira pas quand la
commande du réfrigérateur se trouve à OFF.
1
2
4
3
Freezer
Off
Donner au réfrigérateur le temps de se refroidir
complètement avant d’y ajouter des aliments. Il est
préférable d’attendre 24 heures avant d’ajouter des
aliments.
IMPORTANT : Si vous ajoutez des aliments avant que le
réfrigérateur ne se soit refroidi complètement, les aliments
pourront se gâter. Tourner les commandes du
réfrigérateur et du congélateur à plus froid que le
réglage recommandé ne refroidira pas les
compartiments plus rapidement.
1
2
4
3
Colder
REMARQUE : La commande automatique d’humidité
extérieure empêche continuellement une accumulation
d’humidité à l’ext érieur de la caiss e du réfrigérat eur. Il n’est
pas nécessaire de régler ou d’ajuster cette commande.
43
Page 44

Ajustement des réglages
Guide d’entreposage
de contrôle
Donner au réfrigérateur le temps de se refroidir
complètement avant d’y ajouter des aliments. Il est
préférable d’attendre 24 heures avant d’ajouter des
aliments. Les réglages indiqués dans la section
précédente devraient être adéquats pour une utilisation
normale du réfrigérateur à domicile. Les commandes sont
bien réglées lorsque le lait ou le jus est aussi froid que
vous l’aimez et lorsque la crème glacée est ferme.
S’il est nécessaire de modifier les températures du
réfrigérateur ou du congélateur, utiliser les réglages
indiqués dans le tableau ci-dessous comme guide.
Attendre au moins 24 heures entre les ajustements.
RÉGLAGE
CONDITION/RAISON :
RÉFRIGÉRATEUR trop chaud
■ Ouverture fréquente
de la porte
■ Grande quantité d’aliments
ajoutée
■ Température ambiante trop
chaude
CONGÉLATEUR trop chaud/les
glaçons ne sont pas faits assez
vite
■ Ouverture fréquente de la
porte
■ Grande quantité d’aliments
ajoutée
■ Température ambiante très
froide (le réfrigérateur ne se
met pas en marche assez
souvent)
■ Emploi abondant de glaçons
■ Diffiuseur d’air bloqué par des
articles
RÉFRIGÉRATEUR trop froid
■ Réglage incorrect des
commandes pour les
conditions dans votre domicile.
CONGÉLATEUR trop froid
■ Réglage incorrect des
commandes pour les
conditions dans votre domicile.
RECOMMANDÉ :
Tourner la
commande du
RÉFRIGÉRATEUR
au chiffre plus
ÉLEVÉ suivant.
Tourner la
commande du
CONGÉLATEUR à
un demi-réglage
vers la lettre plus
ÉLEVÉE suivante.
Déplacer les
articles hors du
débit d’air.
Tourner la
commande du
RÉFRIGÉRATEUR
au chiffre PLUS
BAS suivant.
Touner la
commande du
CONGÉLATEUR à
un demi-réglage
vers la lettre
PLUS B ASSE
suivante.
des aliments
Conservation des aliments frais
Des aliments placés au réfrigérateur doivent être
enveloppés ou gardés dans un emballage hermétiq ue et à
l’épreuv e de l’humidité à moins d’indications contraires.
Ceci empêche l’odeur et le goût des aliments de se
répandre dans tout le réfrigérateur. Pour des produits
datés, vérifier les dates indiquées pour s’assurer de la
fraîcheur des aliments.
Beurre ou margarine
Garder le beurre entamé dans un beurrier muni d’un
couvercle ou dans un compartiment fermé. Lors de la
conservation de quantités supplémentaires, utiliser un
emballage pour congélateur et faire congeler.
Fromage
Conserver dans son emballage original jusqu’à l’emploi.
Une fois le paquet ouvert, réemba ller hermétiquement le
fromage dans une pellicule en plastique ou du papier
d’aluminium.
Lait
Essuyer les contenants. Pour qu’il se conserve mieux,
placer le lait sur une tablette à l’intérieur.
Œufs
Conserver les œufs sans le s laver dans l e carton or iginal
sur une tablette à l’intérieur.
Fruits
Laver, laisser sécher et mettre au réfrigérateur dans un
sac en plastique ou dans le ba c à légumes. Ne pas laver
ni équeuter les petits fruits avant le moment de leur
utilisation. Les trier et les conserver dans l’emballage
original dans le bac à légumes ou les conserver sur une
tablette du réfrigérateur dans un sac fermé en papier
sans être serré.
Légumes à feuilles
Retirer l’emballage original et couper ou éliminer les
sections endommagées et décolorées. Laver à l’eau
froide et égoutter. Placer dans un sac ou un contenant
en plastique et ranger dans le bac à légumes.
Légumes à pelure (carottes, poivrons)
Placer dans des sacs en plastique ou contenants en
plastique et rang er dans le bac à légumes.
Poisson
Utiliser du poisson et des fruits de mer frais le jour
même de leur achat.
44
Page 45

Viande
La plupart des viandes peuvent être conservées dans
leur emballage original tant que cet emballage est
hermétique et à l’ épreuve de l’humidité. Emballer de
nouveau si nécessaire. Voir le tableau su ivant pour les
périodes de conservation. Si la viande doit être
conservée pour une période plus longue que la durée
donnée, faire congeler la viande.
Poulet........................................................... 1 à 2 jours
Boeuf haché................................................. 1 à 2 jours
Viandes de variété (foie, coeur, etc.) ............ 1 à 2 jours
Charcuterie................................................... 3 à 5 jours
Steaks/rôtis.................................................. 3 à 5 jours
Viandes traitées.......................................... 7 à 10 jours
Les restes
Couvrir les r estes av ec de la pel licule en plasti que ou du
papier d’aluminium. Il est convenable aussi d’utiliser
des contenants en plastique avec couvercle
hermétique.
Conservation des aliments congelés
REMARQUE : Pour plus de renseignements au sujet de la
préparation des aliments pour la congélation ou pour les
temps de conservation d’aliments, consulter un guide pour
congélateur ou un livre de recettes fiable.
Emballage
Le secret d’une congélation efficace réside dans
l’emballage. Il doit être fermé et scellé de façon à
empêcher la pénétration et l’évacuation de l’air ou de
l’humidité. Toute autre méthode d’emballage risque
d’entraîner la propagation des saveurs et d’odeurs dans
tout le réfrigérateur et l’assèchement des aliments
congelés.
Recommandations pour l’emballage :
Ne pas utiliser :
■ Emballages pour le pain
■ Contenants en plastique autres qu’en polyéthylène
■ Contenants sans couvercle hermétique
■ Papier paraffiné ou emballage pour congélateur
enduit de cire
■ Emballage mince semi-perméable
Congélation
Le congélateur ne congèlera pas rapidement une grande
quantité d’aliments. Ne pas placer plus d’aliments non
congelés dans le congélateur que la quantité qui
congélera dans l’intervalle de 24 heures (pas de plus de
907 à 1 350 g. par litre [2 à 3 lb] d’aliments par pied cube
d’espace dans le congélateur). Laisser assez d’espace
pour permettre la circulation d’air entre les emballages.
S’assurer auss i de laisser assez d’espace à l’avant pour
que la porte se ferme hermétiquement.
Les périodes de conservation varieront selon la qualité et
le type des aliments, le type d’emballage et le type de
pellicule utilisés (hermétiques et à l’épreuve de l’humidité)
et la température d’entreposage. Les cristaux de glace à
l’intérieur d’un emballage scellé sont normaux. Les
cristaux signifient simplement que l’humidité dans les
aliments et l’air à l’intérieur de l’emballage se sont
condensés en créant des cristaux de glace.
REMARQUE : Laisser les aliments chauds refroidir à la
température de la pièce pendant 30 minutes, ensuite
préparer l’emballage et faire congeler. Le refroidissement
des aliments chauds avant la congélation économise de
l’énergie.
■ Contenants rigides en plastique avec couvercle
hermétique
■ Bocaux de conserve/congélation à bord droit
■ Papier d’aluminium résistant
■ Papier recouvert de plastique
■ Emballages en papier étanche (pellicule Saran)
■ Sacs en plastique autohermétiques spécifiés pour
congélateur
Suivre les instructions de l’emballage ou du contenant
pour les méthodes de congélation appropriées.
45
Page 46

CARACTÉRIS-
4. Vider le bac à glaçons. Utiliser de l’ea u tiède pour faire
fondre la glace si nécessaire. Ne jamais utiliser un
objet pointu pour briser les glaçons dan s le bac. Cette
action peut endommager le bac et le mécanisme du
distributeur.
TIQUES DU
RÉFRIGÉRATEUR
Bac d’entreposage de la
machine à glaçons
Pour retirer le bac à glaçons :
1. Tirer le pannea u qui recouvre le bac à glaçons en le
retirant à la base et ensuite en le glissant vers l’arrière.
2. Soulever le levier jusqu’à ce qu’il s’enclenche à la
position OFF (ARRÊT) (vers le haut). Des glaçons
peuvent encore être distribués mais aucun autre ne
peut être préparé.
5. Laver à l’aide d’un détergent doux, bien rincer et
sécher à fond. Ne pas utiliser de nettoyant s forts ou
abrasifs ou des di ssolvants.
6. Lors de la réinstallation du bac, s’assurer qu’il est
poussé complètement à l’intérieur sinon le distributeur
ne fonctionnera p a s. Ensuite appuyer sur le levier de
signal vers le bas à la position ON (EN MARCHE) pour
recommencer la pr odu ction de glaçon s. S’assur er qu e
la porte est bien fermée.
Distributeurs d’eau et
de glaçons
(sur certains modèles)
AVERTISSEMENT
Risque de coupure
Utiliser un verre robuste pour prendre des glaçons
ou de l'eau.
Le non-respect de cette instruction peut causer
des coupures.
3. Soulever le devant du bac à glaçons et le r e tirer.
46
Selon le modèle du réfrigérateur , vous pouvez avoir une ou
plusieurs des opt ions suivantes : la capacité de choisir de
la glace concassée ou des glaçons, une lumière spéciale
qui s’allume lorsque vous employez le distributeur ou une
option de verrouill age pour éviter la distribution
accidentelle.
Le distributeur de glaçons
Les glaçons sont distribués du bac d’entreposage de
glaçons du congélateur. Lorsqu’on appuie sur le levier du
distributeur :
■ Une trappe s’ouvre dans une goulotte entre le
distributeur et le bac d’entreposage de glaçons.
■ Les glaçons passent du bac et tombent dans la
goulotte.
■ Lorsqu’on relâche le levier du distributeur, la trappe se
ferme et la dist ri but ion de gl açons s’a rrête. Le s ystème
de distribution ne fonctionne pas lorsque la porte du
congélateur est ouverte.
Page 47

Certains modèles distribuent des glaçons et de la glace
LIGHT
OFF ON
concassée. Avant la distribution de glaçons, choisir quelle
sorte vous préférez. Les réglages sont conçus pour une
utilisation et un nettoyage faciles.
■ Pour les glaçons en cubes, appuyer sur le bouton
CUBE jusqu’à l’indicateur rouge dans le voyant audessus du bouton CUBE.
ICE
CRUSH CUBE
■ Pour la glace concassée, appuyer sur le bouton
CRUSH jusqu’à l’indicateur rouge dans le voyant audessus du bouton CRUSH.
Pour de la glace concassée, les glaçons sont concassés
avant d’être distribués. Cette action peut causer un court
délai lors de la distribution de glace concassée. Le bruit
du broyeur de glaçons est normal et la dimension des
morceaux de glace peut varier. Lorsqu’on change de
CRUSH (concassée) à CUBE (cubes), quelques onces
de glace concassée seront distribu és avec les premiers
glaçons.
Le distributeur d’eau
L’eau refroidie provien t d’un rés ervo ir plac é de rri ère le bac
à viande. Sa contenance est d’environ 1 ,5 L (1¹⁄₂ pinte ).
Lors du branche ment initi al du r éfrig érateu r, appuyer sur le
levier du dist ributeur d’eau avec un v erre ou autr e réci pient
pour puiser de 1,9 à 2,8 L (2 ou 3 pintes) d’eau qui sera
jetée. Il faudra de trois à quatre minutes pour que la
distribution de l’eau commence. Cette eau ainsi puisée et
jetée rince le réservoir et les tuyauteries.
Laisser ensuite le contenu du nouveau réservoir plein se
refroidir pendant plusieurs heures.
IMPORTANT : Le petit plateau amovible situé sous le
distributeur est conçu pour recevoir les petits
renversements et permet aussi un nettoyage facile. Il n’y
pas d’écoulement dan s le plateau. Le plateau peut être
enlevé du distributeur et transporté à l’évier pour être vidé
ou nettoyé.
Distribution de glaçons :
1. Appuyer sur le bouton pour le type de glace désirée.
2. Appuyer un verre robuste contre le levier de
distribution de glaçons. Tenir le verre près de
l’ouverture du distributeur pour que les glaçons ne
tombent pas à côté du verre.
IMPORTANT : Il n’est pas nécessaire d’appliquer
beaucoup de pression au levier pour activer le
distributeur de glaçons. Une pression forte ne donne
pas une distribution plus rapide de glaçons ou des
quantités plus grandes.
3. Retirer le verre pour arrêter la distribution.
REMARQUE : Les quelques premières quantités de
glaçons peuvent avoir une odeur désagréable
provenant d’une plomberie et de pièces neuves. Jeter
ces glaçons. Par ailleurs, prenez de grandes quantités
de glaçons du ba c à glaço ns plut ôt que par l’ entr emi se
du distributeur.
Distribution d’eau :
1. Appuyer un verre contre le levier du distributeur d’eau.
2. Retirer le verre pour discontinuer l’écoulement.
REMARQUE : Puiser une qu antité suf fisante d’eau chaq ue
semaine pour maintenir un approvisionnement frais.
Témoin lumineux du distributeur
Le distributeur comporte un indicateur lumineux. Il peut
être allumé ma nuellement en appuyant sur le bouton ON
(allumé) au côté droit du panneau de réglage. L’indicateur
rouge apparaîtra au-dessus du bouton ON. Sur certains
modèles : chaque fois que vous utilisez le distributeur, le
levier allumera automatiquement l’indicateur lumineux.
47
Page 48

REMARQUE : Voir la section “Remplacement des
ampoules d’éclairage” pour des renseignements sur le
changement de l’ampoule du distributeur.
Sur les modèles sans fonction de glace concassée,
l’indicateur lumi neux es t de type b ascul eur. Appuyer sur le
commutateur pour l’allumer et appuyer de nouveau pour
l’éteindre.
V err ouillage du distrib uteur
(sur certains modèles)
Le distributeur peut être arrêté pour le nettoyage facile ou
pour empêcher la distribution accidentelle par de petits
enfants et animaux de compagnie. Pour arrêter le
distributeur, appuyer sur le bouton LOCK (verrouillage).
L’indicateur rouge apparaîtra au-dessus du bouton LOCK
et les distributeurs de glaçons et d’eau ne fonctionneront
pas. Pour déverrouiller le distributeur, appuyer sur le
bouton UNLOCK (déverrouillage) jusqu’à ce que
l’indicateur rouge apparaisse au-dessus du bouton
UNLOCK. Ensuite con tinuer à distri buer des glaçons ou de
l’eau comme d’habitude.
DISPENSER
LOCK
REMARQUE : La caractéristique de verrouillage ne
discontinuera pas le courant électrique à l’appareil, à la
machine à glaçons ou à l’éclai rage du d istributeu r. Elle sert
simplement à désactiver les leviers du distributeur.
UNLOCK
REMARQUE : Ne pas utiliser avec de l’eau
microbiologiquement dangereuse ou de qualité
inconnue sans une désinfection adéquate avant ou
après le système.
Après avoir changé la cartouche de filtre à eau, régler de
nouveau le témoin lumineux du filtre à eau en appuyant sur
le commutateur du témoin 5 fois en deçà de 10 secondes.
Le témoin lumineux passera du rouge au vert dès que le
système est restauré.
Remplacement de la cartouche de fi ltre à eau
Le filtre à eau est situé sous la porte du compartiment
congélateur.
1. Repérer le couvercle de la cartouche de filtre situé
dans la grille supérieure avant, sous la porte du
compartiment congé lateur. T ou rner le couvercle dan s le
sens inverse d es aigui lles d ’une montr e ju squ’à ce qu’ il
soit en position verticale. Retir er ensuite le couver cle et
la cartouche de filtre par la grille inférieure.
REMARQUE : Il y aura de l’eau dans la cartouche. Il
est possible qu’il y ait un déversement.
Système de filtration
et de contrôle d’eau
(sur certains modèles)
Le témoin lumineux du filtre à eau
Le témoin lumineux du filtre à eau vous aidera à savoir
quand changer votre cartouche de filtre à eau. Le témoin
se trouve à la partie supérieure interne du compartiment
de réfrigération à côté du bouton de commande du
réfrigérateur. Le témoin lumineux passera du vert au jaune.
Ce changement vous signale qu’il est presque temps de
changer la cartouche du filtr e à eau (90 % de la vie utile du
filtre s’est écoulée) et que vous devriez commander une
nouvelle cartouche de filtre à eau. Il est recommandé de
remplacer la cartouche de filtre à eau lorsque le témoin
lumineux du filtre à eau passe au rouge OU lorsque le
débit d’eau à votre distributeur ou à la machine à glaçons
diminue beaucoup. (V oir “C hangement d’ une cartou che de
filtre à eau” plus loin dans cette section.)
2. Retirer le couvercle de la veille cartouche de filtre en le
faisant glisser vers l’extérieur. Le couvercle glissera
vers la gauche ou la droit e. NE PAS JETER LE
COUVERCLE.
3. Sortir la nouvelle cartouche de son emballage, puis
dégager le capuchon p rotecteur des anneaux
d’étanchéité.
48
Page 49

4. Faire glisser le couvercle de la cartouche sur la
nouvelle cartouche comme le montre l’illustration.
5. Mettre le c ouvercle de la cartouche en position
verticale, puis insérer la nouvelle cartouche de filtre
dans la grille inférieure en la poussant jusqu’au fond.
Tourner le couvercle d e la cartouche dans le sens des
aiguilles d’une montre jusqu’à ce qu’il soit en position
horizontale.
6. FAIRE COULER DE L’EAU PAR LE DISTRIBUTEUR
JUSQU’À CE QUE L’EAU COULE CLAIRE (environ 2 à
3 gallons ou 6 à 7 minutes). Cela permet de nettoyer le
système et d’évacuer l’air des conduits. Un nettoyage
additionnel peut s’avérer nécessaire dans certains
domiciles.
REMARQUE : Pendant l’évacuation de l’air, l’eau peut
gicler de la fontaine réfrigérée.
Utilisation de la fontaine réfrigérée sans
filtre à eau
Il est possible de faire fonctionner la fontaine réfrigérée
sans utiliser de cartouche de filtre. L’eau ne sera pas
filtrée. Si l’utili sateur décid e de fair e fonctio nner la fontai ne
réfrigérée sans cartouche de filtre à eau, garder le
couvercle de la cartouche à l’intérieur de la grille pour
pouvoir l’utiliser ultérieurement.
1. Retirer la cartouche de filtre à eau (voir la section
“Remplacement de la cartouche de filtre à eau”
présentée précédemment). Ensuite, faire glisser le
couvercle de la cartouche vers l’extérieur. NE PAS
JETER LE COUVERCLE.
2. Mettre le c ouvercle de la cartouche en position
verticale, puis l’insérer dans la grille inférieure jusqu’à
ce qu’il s’immobilise.
3. Tourner le couvercle de la cartouche jusqu’à ce qu’il
soit en position horizontale.
REMARQUE : Le couvercle de la cartouche risque de
ne pas être au même niveau que la grille inférieure.
Commande de filtres de rechange
Pour commander d’autres cartouches de filtre à eau,
composer le 1-800-422-1230 et demander l’accessoroire
no de pièce 4392857 ou contacter votre marchand
KitchenAid agréé.
Tablettes du réfrigérateur
Les tablettes dans votre réfrigérateur peuvent être réglées
pour correspondre à vos besoins individuels.
Le remisage d’aliments semblables ensemble dans le
réfrigérateur et le réglage des tablettes pour convenir à
différentes hauteurs d’articles alimentaires et de
contenants, permettra de trouver l ’article exact plus
facilement et ré duira aussi l e temps d’ouvert ure de la p orte
du réfrigérateur, ce qui économisera de l’énergie.
IMPORTANT : Ne pas nettoyer les tablettes en verre avec
de l’eau tiède quand elles sont froides. Les tablettes
peuvent se briser si elles sont exposées à des
changements soudains de température ou à un impact.
Pour votre protection, le verre tremp é est conçu pour
éclater en d’innombrables pièces minuscules. Ceci est
normal.
REMARQUE : Les tablettes en verre sont lourdes. Un soin
spécial s’impose lors de leur déplacement pour éviter
l’impact d’une chute.
Pour retir er les tablettes de l a position d’expédi tion (les
tablettes sont expédiées à l’envers) :
1. Saisir le devant de la tablette supérieure avec une main
et utiliser l’autre main pour enlever le matériau
d’emballage de l’esp ace des étagères.
2. Abaisser le devant de la tablette supérieure jusqu’à ce
que les crochets de la tablette puissent être enlevés
des crans sur les supports de tablettes sur la paroi
arrière du réfrigérateur. Retirer la tablette pour l’enlever.
3. Tourner complètement la tablette.
4. Insérer les crochets arrière de la tablette dans les crans
sur les supports de tablette.
5. Incliner le devant de la tablette vers le haut jusqu’à ce
que les crochets à l’arrière tombent dans les crans.
6. Abaisser le devant de la tablette. Vérifier pour vous
assurer que la tablette est bien fixée en position.
49
Page 50

Tablettes sur r oulett es (sur ce rtains modèles)
LOWLOW
HIGH
Certaines tablettes roulent vers l’extérieur et facilitent
l’accès aux aliments placés à l’arrière.
Casier pour petits aliments
Pour faire glisser la tablette vers l’extérieur, tirer la
tablette soigneusement vers vous.
Pour faire glisser la tablette vers l’intérieur, pousser la
tablette jusqu’au fond.
Pour enlever une tablette du cadre en métal :
1. Retirer la tablette jusqu’à la butée.
2. Incliner le devant de la tablette vers le haut et la retirer
vers l’extérieur un peu plus.
3. Soulever la tablette de sorte que les roulettes se
déplacent dans la fente sur le cadre.
Réinstaller la tablette en suivant l’ordre inverse.
Tablettes et cadres de t ablet te
Pour retirer un cadre de tablette :
1. Incliner le devant du cadre de la tablette et le soulever
à l’arrière.
2. Retirer le cad re de la tablette.
(sur certains modèles)
Le casier pour petits aliments fournit un endroit pratique
pour garder les raisins, noix, tartinades et autres petits
aliments à des températures normales de réfrigérateur.
Pour retirer le casier pour petits aliments :
1. Faire glisser le casier droit vers l’extérieur jusqu’à la
butée.
2. Soulever le devant et le fai re gli sser complète ment vers
l’extérieur .
Replacer le casier pour petits aliments en suivant
l’ordre inverse.
T iroir et couvercle
convertibles pour légumes/
viande
Pour retirer le tiroir :
1. Faire glisser directement vers l’extérieur jusqu’à la
butée.
2. Soulever le devant légèrement et glisser le reste du
tiroir complètement.
3. Replacer dans le sens inverse.
Pour réinstaller un cadre de tablette :
1. Guider les crochets à l’arrière du cadre de la tablette
dans les crans sur les supports de tablette à la paroi
arrière du réfrigérateur.
2. Incliner le devant du cadre de la tablette jusqu’à ce que
les crochet s arrière tombent dans les crans.
3. Abaisser le devant du cadre de la tablette en position.
Pour retirer le couvercle :
1. Retirer le tiroir et le bac à légumes.
2. Soulever le devant du couvercle de ses appuis et
l’enlever en le retirant vers l’extérieur.
Pour replacer le couvercle :
1. Placer l’arrière du couvercle dans les appuis sur les
parois du réfrigérateur et l’abaisser en place.
2. Replacer le tiroir et le bac à légumes.
50
Page 51

Pour garder les légumes : déplacer le réglage
Temperature Temperature
Veg/Meats Veg/Meats
VEG
MEATS
LOW
HIGH
complètement vers la gauche au réglage VEG.
Réglage de la température du
tiroir convertible à légumes/
viande
Le tiroir convertible à légumes/viande peut être ajusté pour
refroidir correctement les viandes ou les légumes.
Contrairement à la plupart des systèmes de
refroidissement des tiroirs à viande, la command e de
température refroidit l’air à l’intérieur du contenant. (La
plupart des systèmes refroidissent seulement le contenant
lui-même, ce qui ne refroidit pas uniformément l’air à
l’intérieur du contenant.)
Le refroidissement de l’air à l’intérieur du contenant fournit
un refroidissement plus uniforme et réduit les “petits
espaces” de congélation. Le réglage de la température
peut être fait pour maintenir la viande aux températures
recommandées d’entreposage (28°F-32°F) qui sont des
températures d’entreposage recommandées par l’Office
national du bétail et des viandes.
Pour entreposer les légumes aux températures
d’entreposage optimales (il faut des températures plus
chaudes que celles pour les viandes) faire le réglage
“VEG” (légumes) complètement vers la gauche.
IMPORTANT : Si les aliments commencent à geler,
déplacer le réglage vers la gauche (moins froid). Se
rappeler d’attendre 24 heures entre les ajustements. En
agissant ainsi, les tempé ratu res de l’ali me nt ont le temps
de changer.
Pour retirer le bac à légumes :
1. Glisser le bac à légumes en lign e droite vers l’extérieur
2. Soulever le devant.
3. Faire glisser le bac à légumes complètement ver s
Réinstaller le bac à légume s en suivant l’ordre inverse.
Bac à légumes et couvercle
jusqu’à la butée.
l’extérieur.
IMPORTANT : Pour prolonger encore plus la fraîcheur, se
rappeler d’envelopper les viandes dans des contenants
hermétiques et à l’épreuve de l’humidité avant
l’entreposage. Toujours garder les viandes selon les
recommandations de l’Office national du bétail et des
viandes.
Ajustement du réglage
Le réglage convertible est fourni préréglé pour vous au
réglage le plus bas pour les viand es. Le déplacer vers le
réglage central ou “plus froid” si désiré.
Pour changer un réglage : déplacer la commande de
réglage vers la droite (plus froid) vers la gauche (moins
froid).
Pour retirer le couvercle du bac à légumes :
1. Retirer le bac à légumes.
2. En tenant le verre fermement, choisir un côté du
couvercle du bac et soulever l’autre côté par endessous.
3. Glisser la plaque de verre vers l ’extérieur pour l’enlever.
4. Soulever le cadr e du couvercle et le retirer.
Pour réinstaller le couvercle du bac à légumes :
1. Placer l’arrière du cadre du couvercle dans les ap puis
de la paroi latérale du réfrigérate ur.
2. Abaisser le devant du cadre en place.
3. Faire glisser l’arrière du couvercle en verre dans le
cadre du couvercle et abaisser le devant en place.
51
Page 52
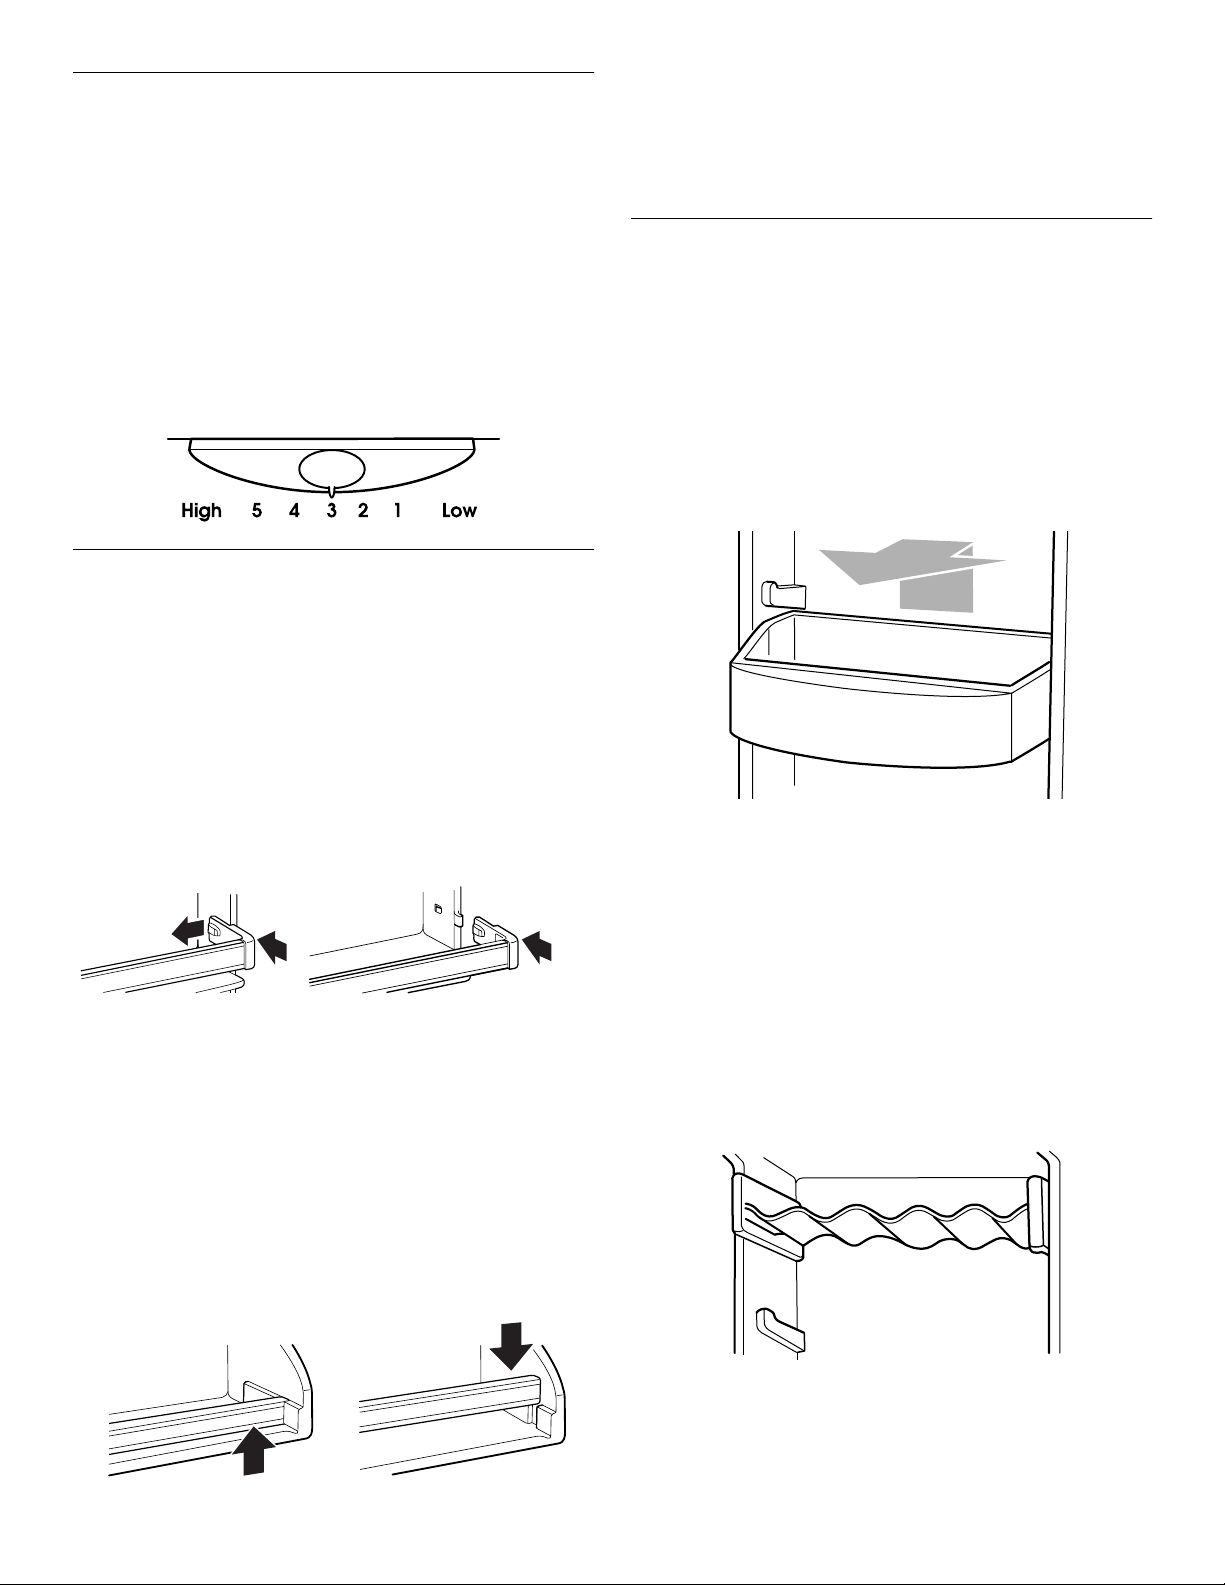
Pour réinstaller les tringles :
Réglage de l’humidité dans
les bacs à légumes
Ce réglage permet de contrôler le degré d’humidité dans
les bacs à légumes étanches. La commande peut être
réglée à n’importe quel réglage entre LOW et HIGH.
■ En position LOW (ou vert) le réglage laisse échapper
l’air humide pour mieux conserver les fruits et légumes
à pelure.
■ En position HIGH (fermé) le régl age permet de retenir
l’humidité à l’i nt ér ie ur du ba c po ur mieux co ns erve r l es
légumes frais et le s légumes à feuilles.
Tringles dans la porte
Les tringles dans la porte peuvent être enlevées pour
faciliter le nettoyage.
1. Glisser la tringle de la tablette da ns les fentes sur l a
porte.
2. Pousser direct ement v ers le bas su r les tringl es jusq u’à
l’arrêt.
Accessoires de porte
Compartiments dans la porte
Les compartiments dans la porte sont amovibles pour
faciliter le nettoyage et le réglage.
1. Pour retirer le compartiment, le soulever tout
simplement et le retirer directement vers l’extérieur.
2. Pour réinstaller le compartiment, le glisser audessus de bouton d’appui désiré et abaisser jusqu’à
son arrêt.
Tringles enclenchables dans la porte
Pour réinstaller les tringles :
1. Enlever tous les articles rangés sur la tablette.
2. Appuyer légèrement sur le devant du joint en tirant sur
la languette intérieure.
3. Répéter ces étapes pour l’autre extrémité de la tringle.
Pour retirer les tringles :
1. Positionner chaqu e extrémité de la t ringle en ligne avec
les attaches de chaque côté de la paroi de la porte.
2. Pousser la tringle directement au fond jusqu’à ce
qu’elle s’enclenche en position.
Tringles déposées dans la porte
Pour enlever les tringles :
1. Enlever tous les artic le s rang és su r la tabl et te .
Porte-ca nnettes
Pour enlever le porte-cannettes :
1. Enlever tous les articles du port e- c an nette s.
2. Soulever le porte-cannettes.
3. Le retirer directement vers vous.
Pour remettre en place le porte-cannettes :
1. Tenir l’arriére du porte-cannettes au-dessus du guide
désiré.
2. Pousser le porte-ca nnettes vers l’arriére et le bas
jusqu’à la butée.
2. Soulever verticalement chaque extrémité des tringles.
52
Page 53

Clayette de congélateur
(le nombre varie selon le modèle)
Pour retirer la clayette :
1. Soulever la clayette de ses appuis.
ENTRETIEN
DE VOTRE
2. La glisser vers l’extérieur des trous d’appui de la
clayette.
Replacer la clayette selon l’ordre inverse.
Panier du congélateur
(bac en plastique sur certains modèles)
Le panier du congélateur peut être utilisé pour entreposer
des sacs de fruits et de légumes sur gelés qui pourraient
glisser hors de l’étagère du congélateur.
Pour retirer le panier du congélateur :
1. Le glisser vers l’extérieur jusqu’à la butée.
2. Soulever le devant et le côté pour le retirer
complètement.
RÉFRIGÉRATEUR
Nettoyage du réfrigérateur
AVERTISSEMENT
Risque d'explosion
Utiliser un produit de nettoyage ininflammable.
Le non-respect de cette instruction peut causer
un décès, une explosion ou un incendie.
Les sections du réfrigérateur et du congélateur se
dégivrent automatiquement. Toutes deux doivent
cependant êtr e nettoyé es envir on un e fois par mois afi n de
prévenir l’accumulat ion d’odeu rs. Essuy er immédiat ement
les produits renversés.
Conseil pour économie d’énergie :
Pour réinstaller le panier :
1. Le positionner sur la glissière en s’assurant que les
butées en broches sont dégagées du devant des
glissières.
2. Glisser de nouveau le panier vers l’intérieur.
Nettoyer régulièrement les serpentins du condenseur, tel
que décrit dans le tableau de nettoyage dans cette
section.
Nettoyage du réfrigérateur :
■ Débrancher le réfrigérateur ou déconnecter la source
du courant électrique.
■ Enlever toutes les pièces amovibles de l’intérieur telles
que tablette s, bacs, etc.
■ Utiliser une éponge propre ou un linge doux et un
détergent doux avec de l’eau tiède. Ne pas utiliser de
nettoyants abrasifs ou durs.
■ Laver manuellement, rinc er et sé che r toute s les
surfaces à fond.
■ Brancher le réfrigérateur ou reconnecter la source de
courant électrique.
53
Page 54

■ Autres conseils de nettoyage indiqués ci-dessous :
PIÈCES COMMENTAIRES
Extérieur
Parois
intérieures
(le congélateur
doit être assez
tiède pour que
le chiffon
n’adhère pas)
Garnitures et
joints des
portes
Pièces en
plastique
(couvercles et
panneaux)
Serpentins du
condenseur
■ Le cirage de surfaces métalliques
peintes à l’extérieur, aide à fournir
une protection antirouille. Ne pas
cirer les pièces en plastique. Cirer
les surfaces métalliques peintes au
moins deux fois par année avec
une cire pour appareils
électroménagers (ou cire en pâte
de qualité pour automobile).
Appliquer la cire avec un linge
propre et doux.
■ Pour aider à éliminer les odeurs, on
peut faire le lavage av ec un
mélange d’eau tiède et de
bicarbonate de soude (26 g à 0,95
L [2 c. à soupe à 1 pinte] d'eau).
■ Ne pas utiliser de cires
nettoyantes, de détergents
concentrés, d’eau de Javel ni de
nettoyants contenant du pétrole sur
les pièces en plastique.
■ Ne pas utiliser d’essuie-tout en
papier, de nettoyants à vitre en
atomiseur, de nettoyants à récurer
ou de liquides inflammables. Ces
produits risquent d’égratigner ou
d’endommager le matériau.
■ Retirer la grille de la base. (Voir
section
■ Employer un aspirateur avec un
accessoire long pour nettoyer les
serpentins du condenseur.
■ Nettoyer à l’aspirateur les
serpentins lorsqu’ils sont sales ou
poussiéreux. Il se peut que les
serpentins aient besoin d’être
nettoyés aussi souvent qu’à tous
les deux mois.
■ Replacer la grille de la base.
“
Grille de la base”.)
Remplacement des
ampoules d’éclairage
REMARQUE : Votre réfrigérateur ne pourra pas
accommoder toutes les ampoules pour les appareils
ménagers. S’assurer de faire le remplacement par une
ampoule de grosseur et de forme semblables.
Ampoules d’éclairage du réfrigérateur
Lumière de l’espace de distribut ion
(sur certains modèles) :
1. Débrancher le réfrigé rateur ou débr ancher la sour ce de
courant électrique.
2. Saisir l’ampoule dans l’espace de distribution et
l’enlever.
3. Remplacer l’ampoule par une autre ampoule de 10
watts pour service intense, qui peut être achetée chez
votre marchand.
4. Brancher le réfrigérateur ou reconnecter la source de
courant électrique.
Lumière en arrière du tableau de commande :
1. Débrancher le réfrigérateur ou déconnecter la source
de courant électrique.
2. Passer la main à l’arrière du tableau de commande et
enlever l’ampoule.
3. Remplacer l’ampoule par une autre ampoule de 40
watts pour appareil électroménager.
54
4. Brancher le réfrigérateur ou reconnecter la source de
courant électrique.
Page 55

Lumière des bacs (sur certains modèles) :
1. Débrancher le réfrigérateur ou déconnecter la source
de courant électrique.
2. Enlever le protecteur de l’ampoule en saisissant le
centre supé rieur du protecteur et le retirer vers l’avant
en le tournant légèreme nt d’un côté.
3. Remplacer l’ampoule p a r une autre ampoule de 40
watts pour appareil électroménager.
3. Remplacer l’ampoule par une ampoule de 40 watts
pour appareil électroménager.
4. Remplacer le protecteur de l’ampoule en saisissant le
centre supérieur du protecteur et en insérant les
languettes à une extrémité dans les fentes sur la
surface interne du réfrigérateur. Ensuite, plier
délicatement le protecteur au centre pour insérer les
languettes à l’autre extrémité.
4. Remplacer le protecteur de l’ampoule en saisissant le
centre supérieur du protecteur et en insérant les
languettes à une extrémité dans les fentes sur la
surface interne du réfrigérateur. Ensuite plier
délicatement le protecteur au centre pour insérer les
languettes à l’autre extrémité.
5. Brancher le réfrigérateur ou reconnecter la source de
courant électrique.
REMARQUE : Pour nettoyer le protecteur de l’ampoule, le
laver dans de l’eau tiède avec un détergent liquide doux.
Rincer le couvercle et bien le sécher.
Ampoules d’éclairage du congélateur
Lumière au-dessous du bac à glaçons :
1. Débrancher le réfrigérateur ou déconnecter la source
de courant électrique.
2. Appuyer sur les côtés du prote cteur de l’ampoule et
l’abaisser jusqu’à ce que le protecteur se dégage.
3. Remplacer l’ampoule par une ampoule de 40 watts
pour appareil électroménager.
4. Replacer le protecteur de l’ampoule.
5. Brancher le réfrigérateur ou reconnecter la source de
courant électrique.
Lumière à la partie supérieure du congélateur
(sur certains modèles) :
1. Débrancher le réfrigérateur ou déconnecter la source
de courant électrique.
5. Brancher le réfrigérateur ou reconnecter la source de
courant électrique.
Pannes de courant
En cas de panne de courant, téléphoner à la compagnie
d’électricité pour demander la durée de la panne.
1. Si le service doit être interrompu durant 24 heures ou
moins, garder les deux portes fermées pour aider
les aliments à demeurer froids et congelés.
2. Si le service doit êtr e interrompu pendant plus de
24 heures :
a) Retirer tous les aliments congelés et les entreposer
dans un entrepôt frigorifique.
OU
b) Placer 907 g (2 lb) d e neige carbonique dans le
congélateur po ur chaque pied cube (28,32 L)
d’espace de congélation. Cette quantité permettra
de garder les aliments congelés durant deux à
quatre jours. Porter des gants pour protéger les
mains contre les morsures de la glace lorsque vous
employez de la neige carbonique.
OU
c) S’il n’y a pas d’entrepôt frigorifique ni de neige
carbonique, consommer ou mettre immédiatement
en conserve les ali ments périssables.
REMARQUE
longtemps qu’un congélateur partiellement rempli. Un
congélateur plein de viandes demeure froid plus
longtemps qu’un congélateur rempli de pains et de
patisseries. Si les aliments contiennent des cristaux de
glace, ils peuvent êt re re mis à congeler sans dan ger même
si la qualité et la saveur risquent d’être affectées. Si les
aliments semblent de piètre qualité ou douteux, les jeter.
: Un congélateur plein restera froid plus
2. Enlever le protecteur de l’ampoule en saisissant le
centre supé rieur du protecteur et le retirer vers l’avant
en le tournant légèreme nt d’un côté.
55
Page 56

Entretien avant les vacances
ou lors d’un déménagement
V acances
Si vous choisissez de laisser le réfrigérateur en
fonctionnement pendant votre absence, utiliser ces
étapes pour préparer votre réfrigérateur avant d’aller en
vacances.
1. Consommer tous les aliments périssables et congeler
les autres articles au con gé l at eu r.
2. Si votre réfrigérateur a une machine à glaçons
automatique :
■ Soulever le bras de la mach ine à glaçons à la
position OFF (élevée).
■ Fermer l’approvisionnement d’eau à la machine à
glaçons.
3. Vider le bac à glaçons.
Si vous choisissez d’arrêter le fonctionnement du
réfrigérateur avant votre absence, observer ces étapes.
1. Enlever tous les aliments du réfrigérateur.
2. Si votre réfrigérateur a une machine à glaçons
automatique :
■ Fermer l’approvisionnement d’eau à la machine à
glaçons au moins une jo urnée à l’avan ce.
■ Lorsque la dernière quantité de glaçons est
déposée, soulever le b as de la mach ine à gla çons à
la position OFF (élevée).
3. Tourner la commande du thermostat (ou la commande
du réfrigérateur, selon le modèle) à OFF. Voir la section
“Réglage des commandes”.
4. Nettoyer le réfrigérateur, l’essuyer et bien le sécher.
5. À l’aide d’un ruban adhésif, placer des blocs de
caoutchouc ou de bois dans la partie supérieure de
chaque porte de façon à ce qu’elles soient
suffisamment ouvertes pour permettre la circulation de
l’air à l’inté rieur, afin d’éviter l’accumulation d’odeur ou
de moisissure.
Déménagement
Lorsque vous déménagez votre réfrigérateu r à une
nouvelle habitation, suivre ces étapes pour préparer le
déménagement.
1. Si votre réfrigérateur a une machine à glaçons
automatique :
■ Fermer l’approvisionnement d’eau de la machine à
glaçons au moins une journée à l’avance.
■ Débrancher la canalisation d’eau de l’arrière du
réfrigérateur.
■ Lorsque la dernière quantité de glaçons est
tombée, soulever le bras de commande à la
position OFF (élevée).
2. Retirer tous les aliments du réfrigérateur et placer tous
les aliments congelés dans de la neige carbonique.
3. Tourner le thermostat (ou réglage du réfrigérateur , selon
le modèle) à OFF (arrêt). Vo ir la section “Réglage de s
commandes”.
4. Débrancher le réfrigérateur de la prise.
5. Vider l’eau du plat de dégivrage.
6. Nettoyer, essuyer et sécher à fond.
7. Retirer toutes les pièces amovibles, bien les
envelopper et les attacher ensemble à l’aide de ruban
adhésif pour qu’elles ne bougent pas ni ne
s’entrechoquent durant le déménagement.
8. Selon le modèle, soulever le devant du réfrigérateur
pour qu’il roule plus facilement OU glisser les pieds de
nivellement pour qu’ils n’égratignent pas le plancher.
Voir la section “Fermeture des portes”.
9. Fermer la porte à l’aide de ruban adhésif et fixer le
cordon d’alimentation à la caisse d u réfrigérateur.
Lorsque vous arriverez à votre nouvelle habitation,
remettre tout en place et consulter la section “Installation
du réfrigérateur” pour les instructions de préparation.
Aussi, si votre réfrigérateur a une machine à glaçons
automatique , rappelez-vous de rebrancher
l’approvisionnement d’eau au réfr igérateur.
56
Page 57

Le moteur semble fonctionner e xcessivement
DÉPANNAGE
Essayer les solutions suggér ées ici en prem ier
afin d’éviter les coûts d’ une visite de service
inutile.
Le réfrigérateur ne fonctionne pas
Le cordon d’alimentation électrique est-il
■■■■
débranché?
Brancher fermement le cordon du courant électrique
dans une prise de courant active et de tension
appropriée.
Un fusible est-il grillé ou le disjoncteur s’est-il
■■■■
déclenché?
Remplacer le fusible ou réenclencher le disjoncteur.
Le réglage du réfrigérateur est-il à la position “OFF”
■■■■
(arrêt)?
Voir la section “Réglage des commandes”.
Le réfrigérateur est-il en train de se dégivrer?
■■■■
Vérifier pour voir si le réfrigérateur fonctionne au bout de
30 minutes. Le réfrigérateur exécutera régulièrement un
programme automatique de dégivrage.
Les ampoules n’éclairent pas
Le cordon d’alimentation électrique est-il
■■■■
débranché?
Brancher fermement le cordon du courant électrique
dans une prise de courant active et de tension
appropriée.
Une ampoule d’éclairage est-elle desserrée dans la
■■■■
douille?
Tourner le réglage du réfrigérateur à OFF (arrêt).
Débrancher le réfrigérateur de la source d’alimentation
électrique. Enlever délicatement l’ampoule et la
réinsérer. Ensuite rebrancher le réfrigérateur à la
source de courant électrique et faire de nouveau le
réglage du réfrigérateur.
Une ampoule est-elle grillée?
■■■■
Remplacer par une ampoule d’appareil électroménager
de tension, de grosseur et de format similaires. Voir la
section “Remplacement des ampoules d’éclairage”.
La température ambiante est-elle plus chaude que
■■■■
d’habitude?
Prévoir que le moteur fonctionnera plus longtemps dans
des conditions de chaleur. Pour des températures
ambiantes normales, prévoir que le moteur fonctionne
environ 40% à 80% du temps. Dans des conditions plus
chaudes, prévoir un fonctionnement encore plus
fréquent.
Vient-on d’ajouter une grande quantité d’aliments au
■■■■
réfrigérateur?
L’addition d’une grande quantité d’aliments réchauffe le
réfrigérateur. Il est normal que le moteur fonctionne plus
longtemps afin de refroidir de nouveau le réfrigérateur.
Voir la section “Conservation des aliments”.
La porte est-elle ouverte fréquemment?
■■■■
Prévoir que le moteur fonctionnera plus longtemps dans
ce cas. Afin de conserver l’énergie, essayer de sortir
tout ce dont vous avez besoin du réfrigérateur à la fois,
garder les aliments organisés de sorte qu’ils sont faciles
à trouver et fermer la porte dès que les aliments sont
retirés.
Les réglages ne sont-ils pas faits correctement pour
■■■■
les conditions ambiantes?
Voir la section “Réglage des commandes”.
Les portes ne sont-elles pas complètement
■■■■
fermées?
Pousser les portes pour qu’elles soient bien fermées. Si
les portes ne ferment pas complètement, voir “Les
portes ne se ferment pas complètement” plus loin dans
cette section.
Les serpentins du condenseur sont-ils sales?
■■■■
Cette situation empêche le transfert de l’air et fait
travailler davantage le moteur. Nettoyer les serpentins
du condenseur. Voir la section “Nettoyage du
réfrigérateur”.
Les joints des portes ne sont-ils pas hermétiques
■■■■
sur tout le contour?
Contacter une personne qualifiée ou un technicien.
REMARQUE :
Si le problème n’est pas attribuable à
l’une des situations ci-dessus, rappelez-vous que votre
réfrigérateur neuf fonctionnera plus longtemps que
l’ancien appareil du fait de son moteur très efficace.
Le réfrigérateur semble faire tr op de bruit
Le plat de dégivrage contient de l’eau
Le réfrigérateur est-il en train de se dégivrer?
■■■■
L’eau s’évaporera. C’est normal pour l’eau de dégoutter
dans le plat de dégivrage.
Y a-t-il plus d’humidité que d’habitude?
■■■■
Prévoir que l’eau dans le plat de dégivrage prend plus
de temps à s’évaporer. Ceci est normal quand il fait
chaud ou humide.
Les bruits peuvent être normaux pour votre
■■■■
réfrigérateur?
Voir la section “Les bruits de l’appareil que vous pouvez
entendre”.
57
Page 58

La machine à glaçons ne produit pas de
glaçons
Mauvais goût, odeur ou couleur grise des
glaçons
La température du congélateur n’est-elle pas assez
■■■■
froide pour produire des glaçons?
Attendre 24 heures après la connexion de la machine à
glaçons pour la production de glaçons. Voir la section
“Réglage des commandes”.
Le levier de la machine à glaçons est-il en position
■■■■
“OFF” (élevée)?
Abaisser le bras à la position “ON” (abaissée). Voir la
section “Fonctionnement de la machine à glaçons”.
La valve de la canalisation d’eau reliée au
■■■■
réfrigérateur n’est-elle pas ouverte?
Ouvrir la valve d’eau. Voir la section “Raccordement du
réfrigérateur à une canalisation d’eau”.
Un glaçon est-il coincé dans le bras éjecteur?
■■■■
Enlever le glaçon du bras éjecteur avec un ustensile en
plastique. Voir “Fonctionnement de la machine à
glaçons”.
Y a-t-il de l’eau dans le moule de la machine à
■■■■
glaçons?
Vérifier pour voir si le réfrigérateur a été branché à la
canalisation d’eau de la maison, et si la valve d’arrêt de
la canalisation est ouverte. Voir la section
“Raccordement du réfrigérateur à une canalisation
d’eau.”
REMARQUE :
Si cette situation n’est pas attribuable à
ce qui précède, il peut exister un problème avec la
canalisation d’eau. Faire un appel de service.
La machine à glaçons produit tr op peu de
glaçons
La machine à glaçons vient-elle juste d’être
■■■■
installée?
Attendre 72 heures pour le commencement de la
production complète de glaçons. Une fois que le
réfrigérateur est refroidi, la machine à glaçons devrait
commencer à produire de 70 à 120 glaçons à toutes les
24 heures.
Une grande quantité de glaçons vient-elle d’être
■■■■
enlevée?
Attendre 24 heures pour que la machine à glaçons
produise plus de glaçons.
Les réglages ne sont-ils pas faits correctement?
■■■■
Voir la section “Réglage des commandes”.
Les raccords de plomberie sont-ils neufs et causent-
■■■■
ils une décoloration et un mauvais goût des
glaçons?
Jeter les premières quantités de glaçons.
Les glaçons ont-ils été gardés trop longtemps?
■■■■
Jeter les vieux glaçons et en faire une nouvelle
provision.
Les aliments dans le congélateur ou le réfrigérateur
■■■■
ont-ils été bien emballés?
Voir la section “Guide de conservation des aliments”.
Le congélateur et le bac à glaçons ont-ils besoin
■■■■
d’être nettoyés?
Voir la section “Nettoyage du réfrigérateur”.
L’eau contient-elle des minéraux (tels que le
■■■■
soufre)?
L’installation d’un filtre peut être requise afin d’enlever
les minéraux.
Un filtre à eau est-il installé sur le réfrigérateur?
■■■■
Une décoloration grise ou foncée dans la glace indique
que le système de filtration de l’eau a besoin d’un
rinçage additionn el.
Faire couler de l’eau supplémentaire dans le distributeur
d’eau pour mieux nettoyer le système de filtration de
l’eau (au moins deux à trois gallons ou pendant 6 à 7
minutes initialement). Jeter la glace décolorée.
Le distributeur de glaçons ne fonctionne pas
correctement
La porte du congélateur est-elle fermée
■■■■
complètement?
Pousser la porte pour qu’elle soit bien fermée. Si elle ne
ferme pas complètement, voir plus loin dans cette
section “Les portes ne se ferment pas complètement”.
Le bac à glaçons est-il bien installé?
■■■■
Pousser le bac à glaçons complètement. Si le bac à
glaçons n’est pas poussé jusqu’au fond, il peut ne pas
avoir été placé droit. Le retirer et essayer de nouveau.
Les mauvais glaçons ont-ils été ajoutés au bac?
■■■■
Utiliser seulement des cubes produits par la machine à
glaçons courante. Si d’autres cubes ont été ajoutés,
enlever tous les cubes et vérifier pour voir si un glaçon
s’est coincé dans la chute de livraison.
Le robinet d’eau n’est-il pas complètement ouvert?
■■■■
Ouvrir complètement le robinet. Voir la section
“Raccordement du réfrigérateur à une canalisation
d’eau”.
Un filtre à eau est-il installé sur le réfrigérateur?
■■■■
Vérifier d’abord les instructions d’installation du filtre
pour s’assurer que le filtre a été bien installé et qu’il n’est
pas obstrué. Si l’installation ou l’obstruction n’est pas le
problème, téléphoner à un technicien qualifié.
58
Page 59

Les glaçons ont-ils gelé dans le bac à glaçons?
■■■■
Secouer le bac à glaçons pour séparer les cubes. Si les
cubes ne se séparent pas, vider le bac et attendre 24
heures pour regarnir le stock de glaçons.
La glace a-t-elle fondu autour de la tige en métal
■■■■
dans le seau à glaçons?
Vider les cubes de glace et nettoyer le seau à glaçons
complètement. Accorder 24 heures pour que la
machine à glaçons regarnisse le stock. Ne pas essayer
d’enlever la glace fondue avec un objet pointu. Vous
pourriez endommager le seau à glace.
Un glaçon est-il coincé dans la chute de livraison?
■■■■
Dégager le glaçon de la chute de livraison à l’aide d’un
ustensile en plastique. Ne pas utiliser un article pointu
pour enlever la glace. Vous pourriez causer des
dommages.
Y a-t-il des glaçons dans le seau?
■■■■
Voir “La machine à glaçons ne produit pas de glaçons”
plus haut dans cette section.
Le levier de distribution a-t-il été tenu trop
■■■■
longtemps?
Dégager le levier de distribution. Les glaçons cesseront
d’être distribués lorsque le levier est tenu trop
longtemps. Attendre 3 minutes pour que le moteur du
distributeur soit réglé de nouveau avant d’être utilisé.
(Pour utilisation ultérieure, prenez de grandes quantités
de glaçons directement de la machine à glaçons de
sorte que le levier de distribution n’est pas tenu trop
longtemps.)
Le distributeur d’eau ne fonctionne pas bien
La porte du congélateur n’est-elle pas
■■■■
complètement fermée?
Pousser la porte fermement. Si elle n’est pas fermée
complètement, voir “Les portes ne se ferment pas
complètement” plus loin dans cette section.
Le réservoir d’eau ne s’est-il pas rempli?
■■■■
Le réservoir d’eau a besoin d’être rempli la première fois
qu’il est utilisé. Abaisser la barre de distribution avec un
grand contenant jusqu’au retrait de 2 ou 3 pintes (1,9 à
2,8 L) d’eau. Jeter l’eau (se référer à la section
“Distributeur d’eau et de glaçons” pour d’autres
instructions sur la façon de remplir le réservoir d’eau.)
Le robinet de fermeture d’eau n’est-il pas ouvert ou
■■■■
la canalisation d’eau n’est-elle pas raccordée à la
source?
Vérifier pour s’assurer que le robinet d’arrêt d’eau est
ouvert et que la source d’eau est connectée au
réfrigérateur. Voir la section “Raccordement du
réfrigérateur à une source d’eau”.
Le robinet de fermeture d’eau est-il obstrué ou
■■■■
incorrectement installé?
Se référer à la section “Raccordement du réfrigérateur à
une source d’eau”. Faire un appel de service ou faire
venir un plombier.
La canalisation de la source d’eau du domicile
■■■■
comporte-t-elle une déformation?
Si vous découvrez ou soupçonnez une déformation de
la canalisation d’eau, faire un appel de service.
Un filtre à eau est-il installé sur le réfrigérateur?
■■■■
Le filtre peut être obstrué ou incorrectement installé.
Vérifier d’abord les instructions d’installation du filtre
pour s’assurer que le filtre a été installé correctement et
n’est pas obstrué. Si l’installation ou l’obstruction n’est
pas un problème, faire un appel de service.
L’eau ou la glace coule du distributeur
Le verre n’est-il pas tenu sous le distributeur de
■■■■
glaçons assez longtemps, ce qui cause le
renversement des glaçons?
Tenir le contenant sous la chute de glaçons pendant 2 à
3 secondes après avoir relâché le levier de distribution.
Une petite quantité de glaçons peut être distribuée
après le dégagement du levier.
L’eau dégoutte-t-elle parce que le verre n’est pas
■■■■
tenu sous le distributeur d’eau assez longtemps?
Tenir le contenant sous le distributeur d’eau pendant 2 à
3 secondes après le dégagement du levier de
distribution. L’eau peut continuer à couler durant ce
temps.
Un glaçon coincé dans la chute maintient-il ouverte
■■■■
la porte de distribution?
Enlever le glaçon.
Un filtre à eau est-il installé sur le réfrigérateur?
■■■■
Il peut y avoir de l’air dans les canalisations du système
de filtration de l’eau ce qui cause des gouttes. Une
purge supplémentaire pourrait aider à faire sortir l’air
des canalisations. L’utilisation normale du distributeur
devrait expulser l’air des canalisations en deçà de 24 à
72 heures.
L’eau du distributeur n’est pas assez froide
Le réfrigérateur vient-il d’être installé?
■■■■
Accorder 24 heures pour que le réservoir se refroidisse
complètement.
Une grande quantité d’eau a-t-elle été récemment
■■■■
distribuée?
Accorder 24 heures pour que le réservoir se refroidisse
complètement.
N’a-t-on pas récemment distribué de l’eau?
■■■■
Le premier verre d’eau peut ne pas être froid. Jeter le
premier verre d’eau.
59
Page 60

La cloison entre les deux sections est tiède
■ La température tiède est probablement attribuable à un
fonctionnement normal du réglage automatique de
l’humidité de l’extérieur. En cas de doute, faire un appel
de service.
La température est trop tiède
Les ouvertures d’aération sont-elles bloquées dans
■■■■
une section ou l’autre? Cette obstruction empêche
le mouvement de l’air froid du congélateur au
réfrigérateur.
Enlever tous les objets placés en avant des ouvertures
d’aération. Consulter “Pour s’assurer d’une circulation
d’air appropriée” pour l’emplacement des ouvertures
d’aération.
La ou les portes sont-elles ouvertes?
■■■■
Prévoir que le réfrigérateur deviendra tiède dans ce cas.
Pour garder le réfrigérateur froid, essayer de sortir tout
ce dont vous avez besoin du réfrigérateur à la fois,
garder les aliments bien rangés de sorte qu’il soit facile
de les trouver et fermer la porte dès que les aliments
sont retirés.
Vient-on d’ajouter une grande quantité d’aliments au
■■■■
réfrigérateur ou au congélateur?
L’addition d’une grande quantité d’aliments réchauffe le
réfrigérateur. Plusieurs heures peuvent être
nécessaires pour que le réfrigérateur revienne à la
température normale.
Les réglages sont-ils faits correctement pour les
■■■■
conditions ambiantes?
Voir la section “Réglage des commandes”.
Les aliments sont-ils bien emballés?
■■■■
Vérifier que tous les aliments sont bien emballés. Si
nécessaire, emballer de nouveau les aliments d’après
les directives à la section “Guide de conservation des
aliments”. Essuyer les contenants humides d’aliments
avant de les placer au réfrigérateur.
Les réglages sont-ils faits correctement pour les
■■■■
conditions ambiantes?
Voir la section “Réglage des commandes”.
Un programme autodégivreur vient-il de se
■■■■
terminer?
Il est normal que des gouttelettes se forment sur la paroi
arrière après que le réfrigérateur se dégivre
automatiquement.
Les portes ne se ferment pas complètement
Les emballages d’aliments empêchent-ils la porte
■■■■
de fermer?
Réorganiser les contenants de sorte qu’ils soient plus
rapprochés et prennent moins d’espace.
Le bac à glaçons n’est-il pas en bonne position?
■■■■
Pousser le bac à glaçons jusqu’au fond.
Les plats, tablettes, bacs ou paniers ne sont-ils pas
■■■■
en bonne position?
Placer le couvercle du bac à légumes et tous les plats,
tablettes, bacs et paniers à la position correcte. V oir plus
de renseignements à la section “Bac à légumes et
couvercle du bac à légumes”.
Les joints collent-ils?
■■■■
Nettoyer les joints et ensuite appliquer de la paraffine
d’après les instructions fournies à la section “Fermeture
des portes”.
Il y a une accum ulation d’humidité à l’intérieur
Les ouvertures de circulation d’air sont-elles
■■■■
obstruées dans le réfrigérateur?
Enlever tous les objets en avant des ouvertures d’air. Se
référer à la section “Pour s’assurer d’une circulation d’air
appropriée” pour l’emplacement des ouvertures d’air.
La porte est-elle souvent ouverte?
■■■■
Pour éviter l’accumulation d’humidité, essayer de sortir
tout ce dont vous avez besoin du réfrigérateur à la fois,
en gardant les aliments organisés pour qu’ils soient
faciles à trouver, et fermer la porte dès que les aliments
sont retirés. (Lorsque la porte est ouverte, l’humidité
ambiante de la pièce pénètre dans le réfrigérateur. Le
plus souvent la porte est ouverte, le plus rapidement
l’humidité s’accumule, surtout lorsque la pièce ellemême est très humide.)
La pièce est-elle humide?
■■■■
Il est normal que l’humidité s’accumule à l’intérieur du
réfrigérateur lorsque l’air de l’extérieur est humide.
Le réfrigérateur branle-t-il ou semble-t-il instable?
■■■■
Niveler le réfrigérateur. Consulter la section “Fermeture
des portes”.
Les portes ont-elles été enlevées durant
■■■■
l’installation de l’appareil et mal réinstallées?
Enlever et replacer les portes en suivant la section
“Enlèvement des portes” ou faire venir une personne
qualifiée.
Les portes sont difficiles à ouvrir
Les joints sont-ils sales ou collants?
■■■■
Nettoyer les joints et ensuite appliquer de la paraffine en
suivant les directives à la section “Nettoyage du
réfrigérateur”.
Le débit d’eau du distributeur diminue
beaucoup
Un filtre à eau est-il installé sur le réfrigérateur? Le
■■■■
filtre peut être plein ou incorrectement installé.
la cartouche du filtre à eau (voir la section “Système de
filtration d’eau”). Faire fonctionner le distributeur. Si le
débit d’eau s’accroît beaucoup, votre filtre est plein et
doit être remplacé.
Ôter
60
Page 61

ASSISTANCE
OU SERVICE
Avant de de mander une assistance ou un service, veuillez
vérifier la section “Dépannage”. Cette vérification peut
vous faire économiser le coût d’une visite de réparation.
Si vous avez encore besoin d’aide, suivre les instructions
ci-dessous.
Lors d’un appel, veuillez connaître la date d’achat et les
numéros au complet de modèle et de série de votre
appareil. Ces renseignements nous aideront à mieux
répondre à votre demande.
Pour plus d’assistance . ..
Si vous avez besoin de plus d’assistance, vous pouvez
écrire à KitchenAid en soumettant toute question ou
problème à :
KitchenAid Brand Home Appliances
Consumer Assistance Center
c/o Correspondence Dept.
2000 North M-63
Benton Harbor, MI 49022-2692
Dans votre correspondance, veuillez indiquer un numéro
de téléphone où on peut vous joindre dans la journée.
Au Canada
Si vous a vez besoin de pièces de rechange…
Si vous avez besoin de commander des pièces de
rechange, nous vous recommandons d’utiliser seulement
des pièces de re chang e d’origi ne. Les pi èces de r ec hange
d’origine conviendron t bien et fonctionneront bien parce
qu’elles sont fabriquées selon les mêmes spécifications
précises utilisées pour construire chaque nouvel appareil
KitchenAid.
Pour localiser des pièces de rechan ge d’origine dans votr e
région, téléphoner à notre Centre d’assistance aux
consommateurs ou au centre de service désigné le plus
proche.
Aux États-Unis :
Téléphoner au centr e d’assistance aux
consommateurs KitchenAid en composant le
1-800-422-1230.
Nos consultants fournissent l’assistance pour :
■ Caractéristiques et spécifications à notre gamme
complète d’appareils électroménagers
■ Renseignements d’installation
■ Procédés d’utilisation et d’entretien
■ Banque d’accessoires et de pièces de rechange
Téléphoner sans frais au Centre d’assistance aux
consommateurs de KitchenAid Canada au :
1-800-461-5681 de 8 h 30 à 18 h (HNE).
Nos consultants fournissent l’assistance pour :
■ Caractéristiques et spécifications à notre gamme
complète d’appareils électroménagers.
■ Les références aux concessionnaires locaux.
Pour service au Canada
Composer le 1-800-807-6777. Les techniciens de service
désignés par KitchenAid Canada sont formés pour remplir
la garantie des produits et fournir un service après la
garantie partout au Canada.
Pour plus d’assistance
Si vous avez besoin de plus d’assistance, vous pouvez
écrire à KitchenAid en soumettant toute question ou
problème à :
Consumer Relations Department
KitchenAid Canada
1901 Minnesota Court
Mississauga, Ontario L5N 3A7
Dans votre correspondance, veuillez indiquer un numéro
de téléphone où on peut vous joindre dans la journée.
■ Assistance spécialisée au client (langue espagnole,
malentendants, malvoyants, etc.)
■ Les références aux concessionnaires, compagnies de
service de réparation et distributeurs de pièces de
rechange locaux.
Pour localiser la compagnie de service KitchenAid
autorisée dans votre région, vous pouvez consulter les
pages jaunes de votre annuaire téléphonique.
61
Page 62

GARANTIE DE RÉFRIGÉRATEUR KITCHENAID
®
GARANTIE COMPLÈTE DE UN AN SUR LE RÉFRIGÉRATEUR
Pour une période de un an à partir de la date d’achat, lorsque ce réfrigérateur est utilisé et entretenu conformément aux instructions fournies
avec le produit, KitchenAid paiera pour les pièces de rechange d’origine et les frais de réparation pour corriger les vices de matériaux ou de
fabrication. Les travaux doivent être effectués par une compagnie de service désignée par KitchenAid.
Garantie limitée de 30 jours du filtre à eau. Pour une période de 30 jours à partir de la date d’achat, lorsque ce filtre est utilisé et entretenu
conformément aux instructions fournies avec le produit, KitchenAid paiera pour les pièces de rechange pour corriger les vices de matériaux ou
de fabrication.
GARANTIE COMPLÈTE DE LA DEUXIÈME À LA CINQUIÈME ANNÉE INCLUSIVEMENT
De la deuxième à la cinquième année inclusivement à partir de la date d’achat, KitchenAid paiera pour le remplacement et la réparation de la
cuve du réfrigérateur/congélateur (y compris les frais de réparation) si la cuve se fend par suite de vices de matériaux ou de fabrication. Les
travaux doivent être effectués par une compagnie de service désignée par KitchenAid.
Aussi, les pièces de rechange d’origine et les frais de réparation pour corriger les vices de matériaux ou de fabrication dans le système de
réfrigération scellé. Ces pièces sont : le compresseur, l’évaporateur, le condenseur, le dispositif de séchage et les tubes de raccord. Les travaux
doivent être effectués par une compagnie de service désignée par KitchenAid.
GARANTIE LIMITÉE DE LA SIXIÈME À LA DIXIÈME ANNÉE INCLUSIVEMENT
De la sixième à la dixième année inclusivement à partir de la date d’achat, les pièces de rechange pour corriger les vices de matériaux ou de
fabrication dans le système de réfrigération scellé. Ces pièces sont : le compresseur, l’évaporateur, le condenseur, le dispositif de séchage et
les tubes de raccord. Les travaux doivent être effectués par une compagnie de service désignée par KitchenAid.
GARANTIE LIMITÉE À VIE
De la deuxième année à partir de la date d’achat jusqu’à la fin de la vie utile du produit, KitchenAid paiera pour le remplacement de tous les
balconnets SLIDE ‘N’ LOCK™ et porte-cannettes SLIDE ‘N’ LOCK™ par suite de vices de matériaux ou de fabrication.
KitchenAid ne paiera pas pour :
Les visites de service pour rectifier l’installation du réfrigérateur, montrer à l’utilisateur comment utiliser le réfrigérateur ou remplacer des
1.
fusibles, rectifier le câblage électrique ou la plomberie du domicile, remplacer des ampoules électriques ou le remplacement des filtres à
eau, sauf tel que décrit plus haut.
Les réparations lorsque le réfrigérateur est utilisé à des fins autres qu’un usage unifamilial normal.
2.
Les dommages causés par : accident, modification, usage inapproprié, incendie, inondation, actes de Dieu, ou l’utilisation de produits non
3.
approuvés par KitchenAid ou KitchenAid Canada.
Toute perte d’aliments attribuable à une panne de courant.
4.
Les frais de main-d’oeuvre durant la période de la garantie limitée.
5.
Les pièces de rechange ou les frais de réparation des appareils utilisés à l’extérieur du Canada ou des États-Unis.
6.
Le transport pour aller chercher et livrer l’appareil. Ce produit est conçu pour être réparé sur place.
7.
Les réparations de pièces ou systèmes attribuables à des modifications non autorisées de l’appareil ménager.
8.
Au Canada, les frais de déplacement ou de transport pour les clients qui habitent dans des régions éloignées.
9.
KITCHENAID ET KITCHENAID CANADA DÉCLINENT TOUTE RESPONSABILITÉ AU TITRE DE DOMMAGES
SECONDAIRES OU INDIRECTS
Certains États ou provinces peuvent ne pas admettre l’exclusion ou la limitation des dommages secondaires ou indirects; par conséquent,
l’exclusion ou la limitation mentionnée ci-dessus peut ne pas s’appliquer dans votre cas. Cette garantie vous confère des droits juridiques
spécifiques; vous pouvez également jouir d’autres droits, variables d’un État à un autre ou d’une province à une autre.
À l’extérieur du Canada et des États-Unis, une garantie différente peut s’appliquer. Pour plus de détails, prière de contacter votre marchand
KitchenAid autori sé .
Si vous avez besoin de service, consulter d’abord la section “Dépannage” dans cette br ochur e. Apr ès avoir vérifié la section “Dépannage”, une
aide additionnelle peut être trouvée en vérifiant la section “Demande d’assistance ou de service” ou en téléphonant au Centre d’assistance aux
consommateurs KitchenAid au 1-800-422-1230 (sans frais), de n’importe où aux É.-U. Au Canada, contacter votre compagnie de service
autorisée par KitchenAid Canada ou téléphoner au 1-800-807-6777.
3/99
Pour des renseignements sur la garantie au Canada :
Veuillez contacter votre marchand autorisé KitchenAid ou appeler le Centre d’assistance aux consommateurs au 1-800-461-5681 (sans frais
d’interurbain) de 8 h 30 à 18 h (HNE) de n’importe où au Canada.
Conserver ce livret et le reçu de vente ensemble pour
référence ultérieure. Il faut fournir une preuve d’achat ou de
date d’installation pour le service au titre de la garantie.
Veuillez noter les renseignements suivants à propos du réfrigérateur
pour mieux obtenir assistance ou service en cas de besoin. Vous
devriez connaître les numéros de modèle et de série complets. Vous
pouvez trouver cette information sur la plaque signalétique de votre
appareil ménager à l’endroit indiqué dans la section “Pièces et
caractéristiques” de ce livret.
62
Nom du marchand____________________________________
Adresse ____________________________________________
Numéro de téléphone _________________________________
Numéro de modèle ___________________________________
Numéro de série _____________________________________
Date d’achat_________________________________________
Page 63

CERTIFICATIONS DE FILTRE À EAU
Feuille de données sur le produit
Système de filtration d'eau modèle WF-L500
Ce produit a été testé et homologué par NSF International en vertu de la norme 42 ANSI/NSF
pour le goût, l'odeur et la réduction de chlore (catégorie I) et de la norme 53 pour la réduction
¨
de plomb.
Spécifications :
Capacité de réduction de plomb et goût/odeur/chlore (catégorie I)
1893 Liters (500 gallons)
Débit de service 0,5 GPM (1,89 L/mn) à 60 lb/po
Rendement
général
Chlore
Performance de
réduction de
contaminant
Plomb à pH 6,5
Plomb à pH 8,5
†
L’exigence de test est de 0,15 mg/L± 10 %
††
Ces contaminants ne se trouvent pas nécessairement dans votre approvisionnement d'eau. La performance peut varier en fonction
des conditions d'eau locales.
Affluent moyen
2,0 mg/L
U.S. EPA
MCL
††
0,015 mg/L
0,015 mg/L
Effluent maximal
N/A
Affluent
moyen
0,16 mg/L
0,14 mg/L
Effluent
maximal
†
0,007 mg/L
†
0,012 mg/L
Effluent
moyen
0,1 mg/L
% de réduction
minimal
N/A
Effluent
moyen
0,004 mg/L
0,008 mg/L
2
% de
réduction
minimal
95 %
91 %
% de
réduction
moyen
93 %
% de
réduction
moyen
97 %
94 %
Exigence de test
NSF
réduction minimale de 75 %
(catégorie I)
Exigence de test NSF
effluent maximal 0,015 mg/L
effluent maximal 0,015 mg/L
Directives d'application/ Paramètres
d'approvisionnement en eau
Approvisionnement
en eau
Pression d'eau
Ville ou puits
30-120lb/po2(207-827 kPa)
® NSF est une marque déposée de NSF International
Température de l'eau
33-100˚ F (0,6˚-
37,8˚ C)
• Il est essentiel que les exigences de fonctionnement,
d'entretien et de remplacement de filtre soient respectées
pour que ce produit donne le rendement annoncé.
• Le système de contrôle du filtre mesure la quantité
d’eau qui passe par le filtre et vous signale quand
remplacer le filtre. Lorsque 90 % de la vie utile du filtre
sont écoulés, le témoin lumineux du fitre passe du vert
au jaune. Lorsque 100 % de la vie utile du filtre sont
écoulés, le témoin lumineux du fitre passe du jaune au
rouge, et il est recommandé que vous remplaciez le
filtre. Utiliser la cartouche de remplacement n˚ de pièce
L500. Le prix conseillé au détail est 29,95 $ U.S.A/
39,95 $ Canada.
• Le produit ne doit être utilisé que pour l'eau
froide seulement.
• Ne pas utiliser avec de l'eau microbiologiquement
dangereuse ou de qualité inconnue sans une
déinfection adéquate avant et après l'unité.
3/99
63
Page 64

2200139A
© 1999 KitchenAid ® Marque déposée/Mar que de Commer ce de Kitc henAid, U.S.A., Emploi Licencie par KitchenAi d Canada Imprimé aux É-U
® Registered Trademark/TM of KitchenAid, U.S.A., KitchenAid Canada licensee in Canada Printed in U.S.A.
4/99
 Loading...