

Page 1
2006136 Rev. A www.kitchenaid.com
36", 42", 48"side-by-side
built-in refrigerator
For the way it’s made
®
®
Page 2

2
A N
OTE TO
Y
OU
Thank you for buying a KitchenAid
®
appliance.
KitchenAid designs the best tools for the most important
room in your house.To ensure that you enjoy years of
trouble-free operation, we developed this Use and Care
Guide. It contains valuable information about how to
operate and maintain your appliance properly and safely.
Please read it carefully.
Also, please complete and mail the Product Registration
Card provided with your appliance.The card helps us
notify you about any new infor mation for your appliance.
Record your model’s information.
Write down the following information about your refrigerator to better help you obtain assistance or service if you
ever need it.You will need to know your complete model
number and serial number.You can find this information
on the model and serial number label/plate.
If you need assistance or service, first see the
“Troubleshooting” section of this book. After checking
“Troubleshooting,” additional help can be found by
checking the “Requesting Assistance or Service” section.
Dealer name
Address
Phone number
Model number
Serial number
Purchase date
(See the “Parts and Features” section for model and serial
number label/plate location.)
Keep this book and your sales slip
together for future reference.
Page
A Note to You .................................................................... 2
Refrigerator Safety......................................................... 3
Proper disposal of your old refrigerator....................... 3
Parts and Features ......................................................... 4
Using Y our Refrigerator.................................................. 5
Removing the upper ventilation panel......................... 5
Using the Power On/Off Switch ................................... 5
ExtendFresh*
Temperature Management System ............................. 6
Setting temperature controls....................................... 6
Refrigerator features................................................... 7
Utility compartment.............................................. 7
Door bins............................................................... 7
SpillClean* glass refrigerator shelves .................. 7
FreshChill* Meat Locker....................................... 8
Humidity-controlled
ClearVue* crispers................................................ 9
Covered egg container.........................................10
Wine rack.............................................................10
Freezer features ..........................................................10
Freezer shelves....................................................10
Pull-out freezer baskets........................................10
Page
Automatic ice maker......................................................... 11
Solving common ice maker problems.................. 11
Removing the ice maker storage bin....................12
Ice and cold water dispensers.............................13
Base grille.....................................................................14
Defrost pan...................................................................15
Light bulbs ...................................................................15
Understanding the sounds you may hear...................16
Saving energy.................................................................16
Caring for Your Refrigerator .............................................17
Cleaning your refrigerator...........................................17
Vacation and moving care............................................18
Power Interruptions.....................................................18
Food Storage Guide.......................................................19
Storing fresh food..........................................................19
Storing frozen food........................................................20
Troubleshooting Guide.......................................................21
Requesting Assistance or Service ...............................26
Warranty..........................................................................28
T
ABLE OF
C
ONTENTS
Page 3
3
•
Plug into grounded 3 prong outlet.
•
Do not remove ground prong.
•
Do not use an adapter.
•
Do not use an extension cord.
•
Disconnect power before servicing.
•
Remove doors from your old refrigerator.
•
Use nonflammable cleaner only.
•
Do not install the refrigerator near an oven,
radiator, or other heat source.
•
Keep flammable materials and vapors, such as
gasoline, away from refrigerator.
•
Use two or more people to move or install
refrigerator.
•
Unplug refrigerator before installing ice maker.
•
Use a sturdy glass when dispensing ice or water
(on some models).
IMPORTANT SAFETY INSTRUCTIONS
You can be killed or seriously injured if you don’t follow
instructions.
DANGER
WARNING
Your safety and the safety of others is very important.
We have provided many important safety messages in this manual and on your appliance. Always read and obey all safety
messages.
This is the safety alert symbol. This symbol alerts you to hazards that can kill or hurt you and others. All safety messages
will be preceded by the safety alert symbol and the word “DANGER” or “WARNING”. These words mean:
All safety messages will identify the hazard, tell you how to reduce the chance of injury, and tell you what can happen if the
instructions are not followed.
You will be killed or seriously injured if you don’t follow
instructions.
R
EFRIGERATOR
S
AFETY
Suffocation Hazard
Remove doors from your old refrigerator.
Failure to do so can result in death or brain
damage.
Proper disposal of your old refrigerator
IMPORTANT: Child entrapment and suffocation are not
problems of the past. Junked or abandoned refrigerators
are still dangerous... even if they will sit for “just a few
days.” If you are getting rid of your old refrigerator, please
follow the instructions below to help prevent accidents.
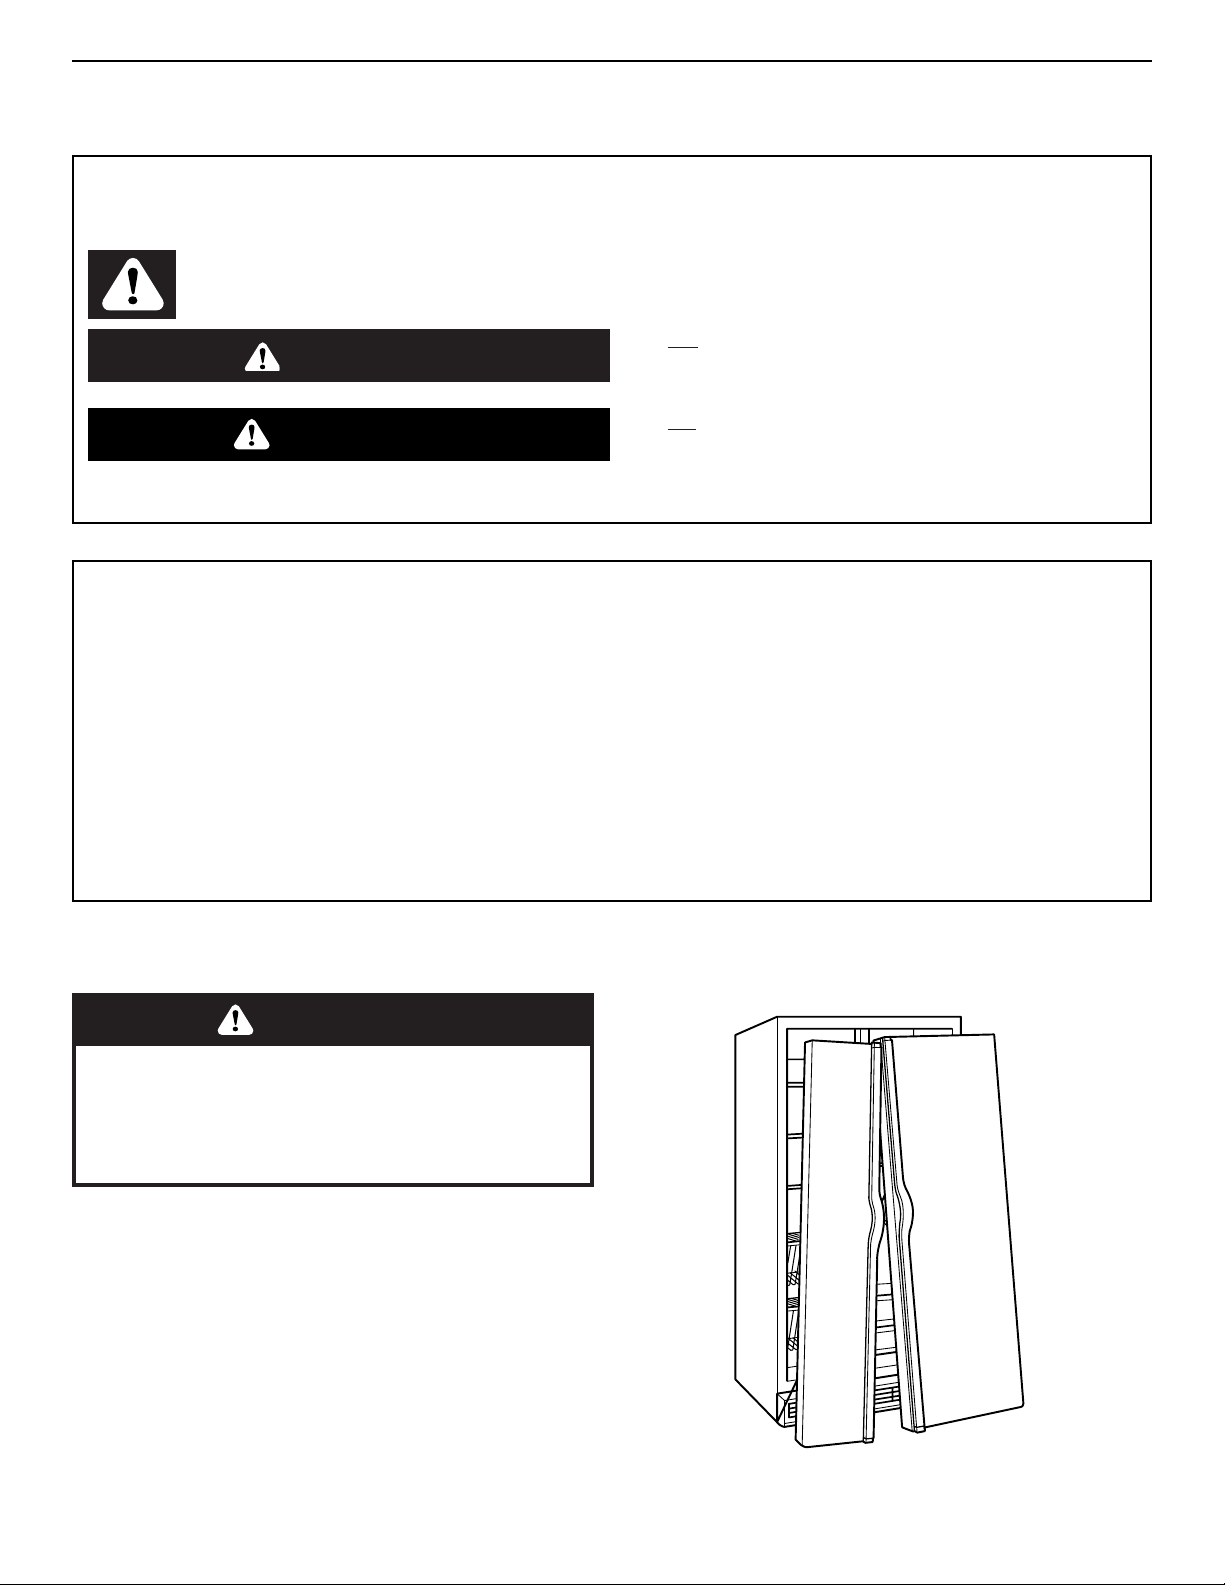
BEFORE Y OU THROW AW A Y Y OUR OLD
REFRIGERATOR OR FREEZER:
•
Take off the doors.
•
Leave the shelves in place so that children may not
easily climb inside.
WARNING
– SAVE THESE INSTRUCTIONS –
WARNING: To reduce the risk of fire, electric shock, or injur y when using your refrigerator, follow these
basic precautions:
Page 4

4
This section contains an illustration of your refrigerator.
Use it to become more familiar with the parts and features.
Page references are included for your convenience.
NOTE: This manual covers several different models. The
refrigerator you have purchased may have some or all of
the parts and features listed below.
24
51
Cold Colder
▲
Superba 48
24
51
Cold Colder
Off
▲
Cold Colder
FreshChill
Meat Locker
ExtendFresh
Temperature System
▲
Automatic ice maker
(p.11)
Stationary door shelf
(not removable)
Ice bin
(p.12)
Freezer light
(below ice bin)
(p.15)
Model and serial
number label
(p.2)
Water and ice dispenser
area (on some models)
(p.13)
Adjustable
freezer shelf
(p.10)
Stationary freezer
shelves
Pull-out freezer baskets
(p.10)
Utility compartment
(p.7)
Adjustable SpillClean*
glass shelves
(p.7)
Adjustable door bins
(p.7)
Covered egg container
(p.10)
Wine rack
(p.10)
FreshChill* meat locker
temperature control
(p.8)
Gallon door storage
(p.7)
Roll-out adjustable
FreshChill* Meat Locker
(p.8)
Roll-out humidity
controlled ClearVue*
crispers
(p.9)
Freezer light
(behind control
panel)
(p.15)
Freezer
control
(p.6)
Upper
ventilation
panel
(p.5)
Power on/off
switch (behind
upper ventilation
panel)
(p.5)
Refrigerator
control
(p.6)
Refrigerator
light (behind
control panel)
(p.15)
Water/electrical
dispenser
supply tube
(behind base
grille)
Defrost pan
(behind base
grille)
(p.15)
Base grille
(p.14)
Water valve
(behind base
grille)
P
ARTS AND
F
EATURES
Page 5
5
Electrical Shock Hazard
Plug into a grounded 3 prong outlet.
Do not remove ground prong.
Do not use an adapter.
Do not use an extension cord.
Failure to follow these instructions can result in
death, fire, or electrical shock.
To obtain the best possible results from your refrigerator, it
is important that you operate it properly.This section tells
you how to set the controls, remove and adjust the
features in your refrigerator, and how to save energy.
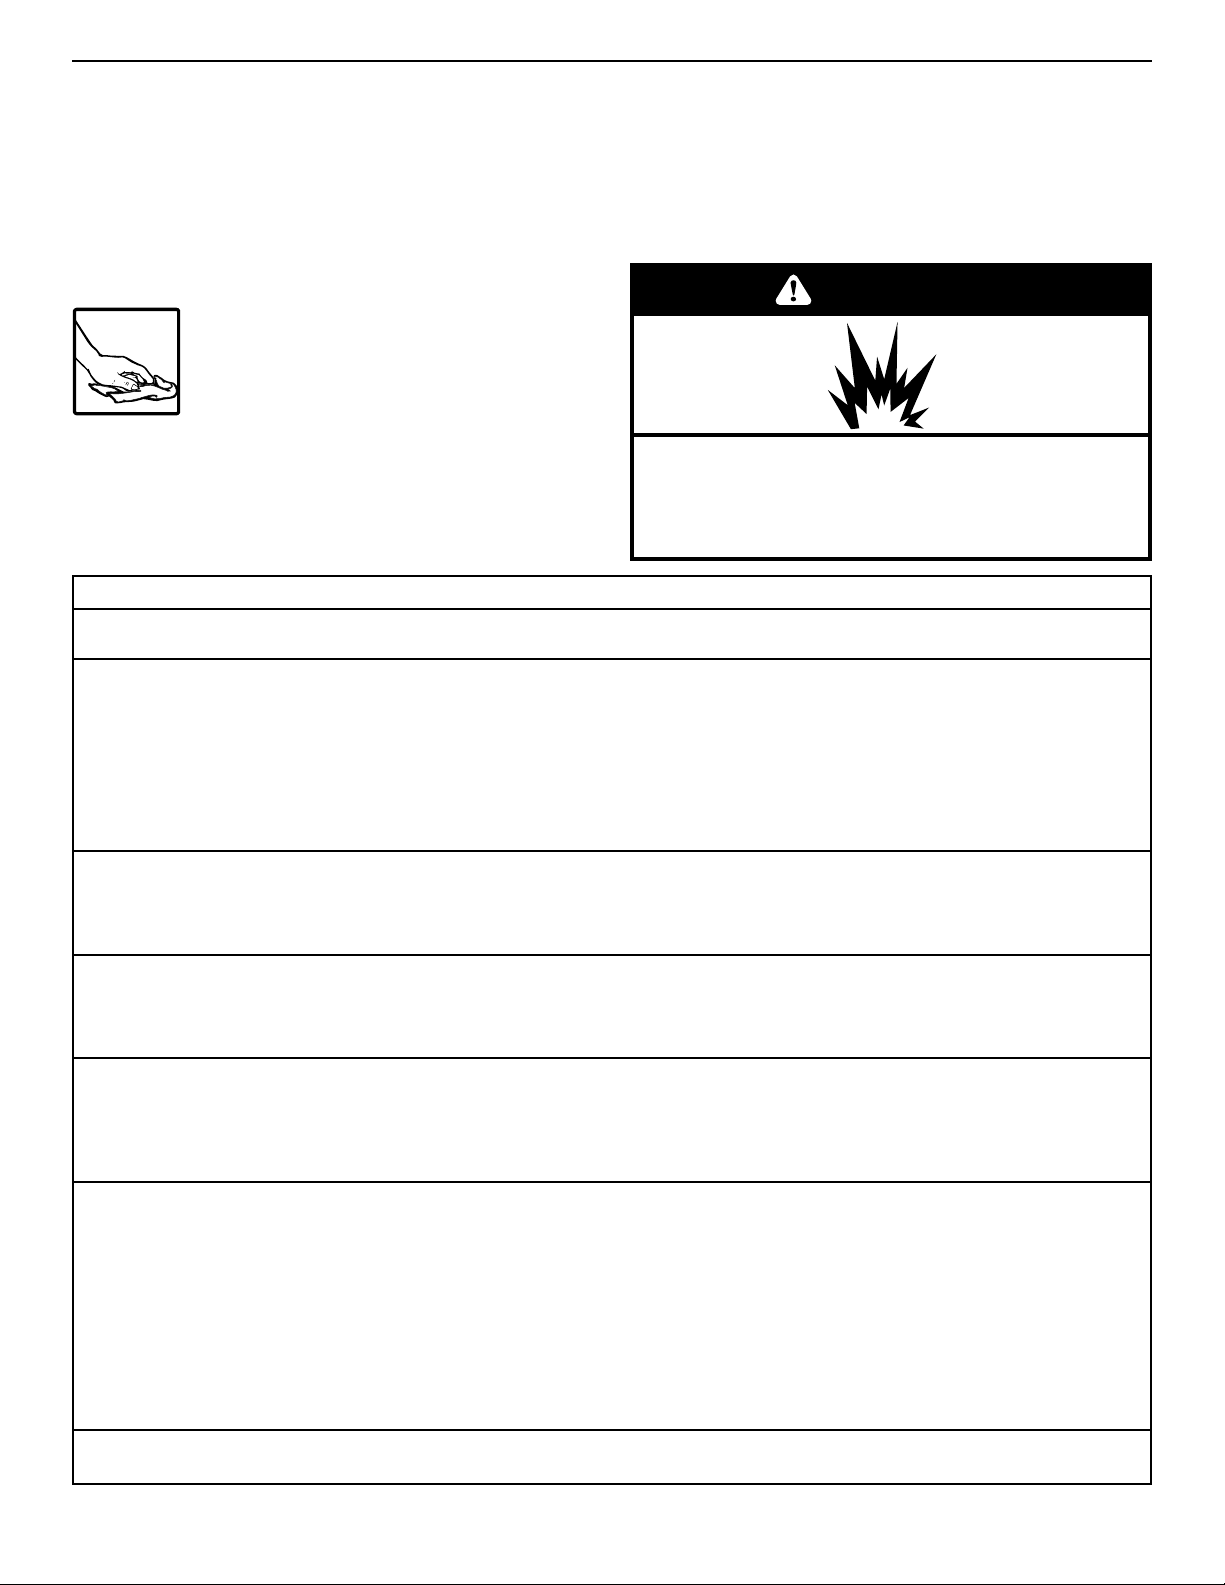
Explosion Hazard
Keep flammable materials and vapors, such as
gasoline, away from refrigerator.
Failure to do so can result in death, explosion, or
fire.
WARNING
U
SING YOUR REFRIGERATOR
WARNING
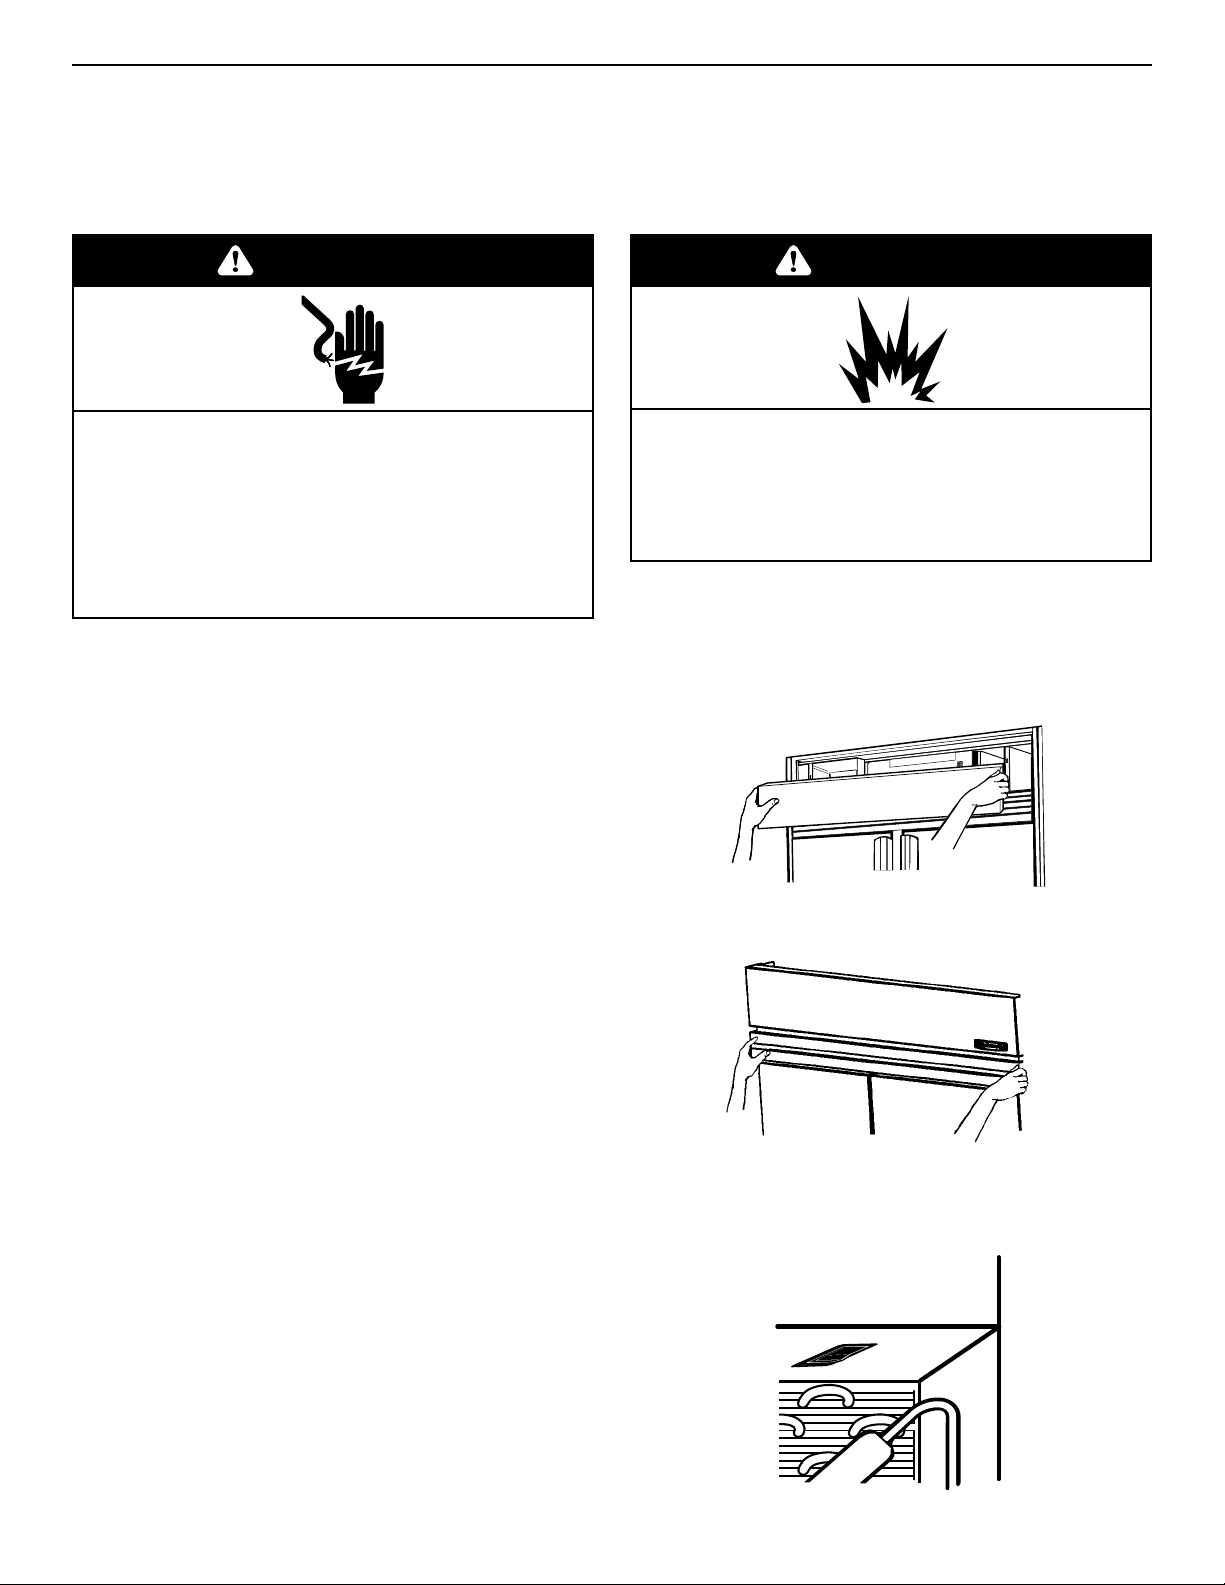
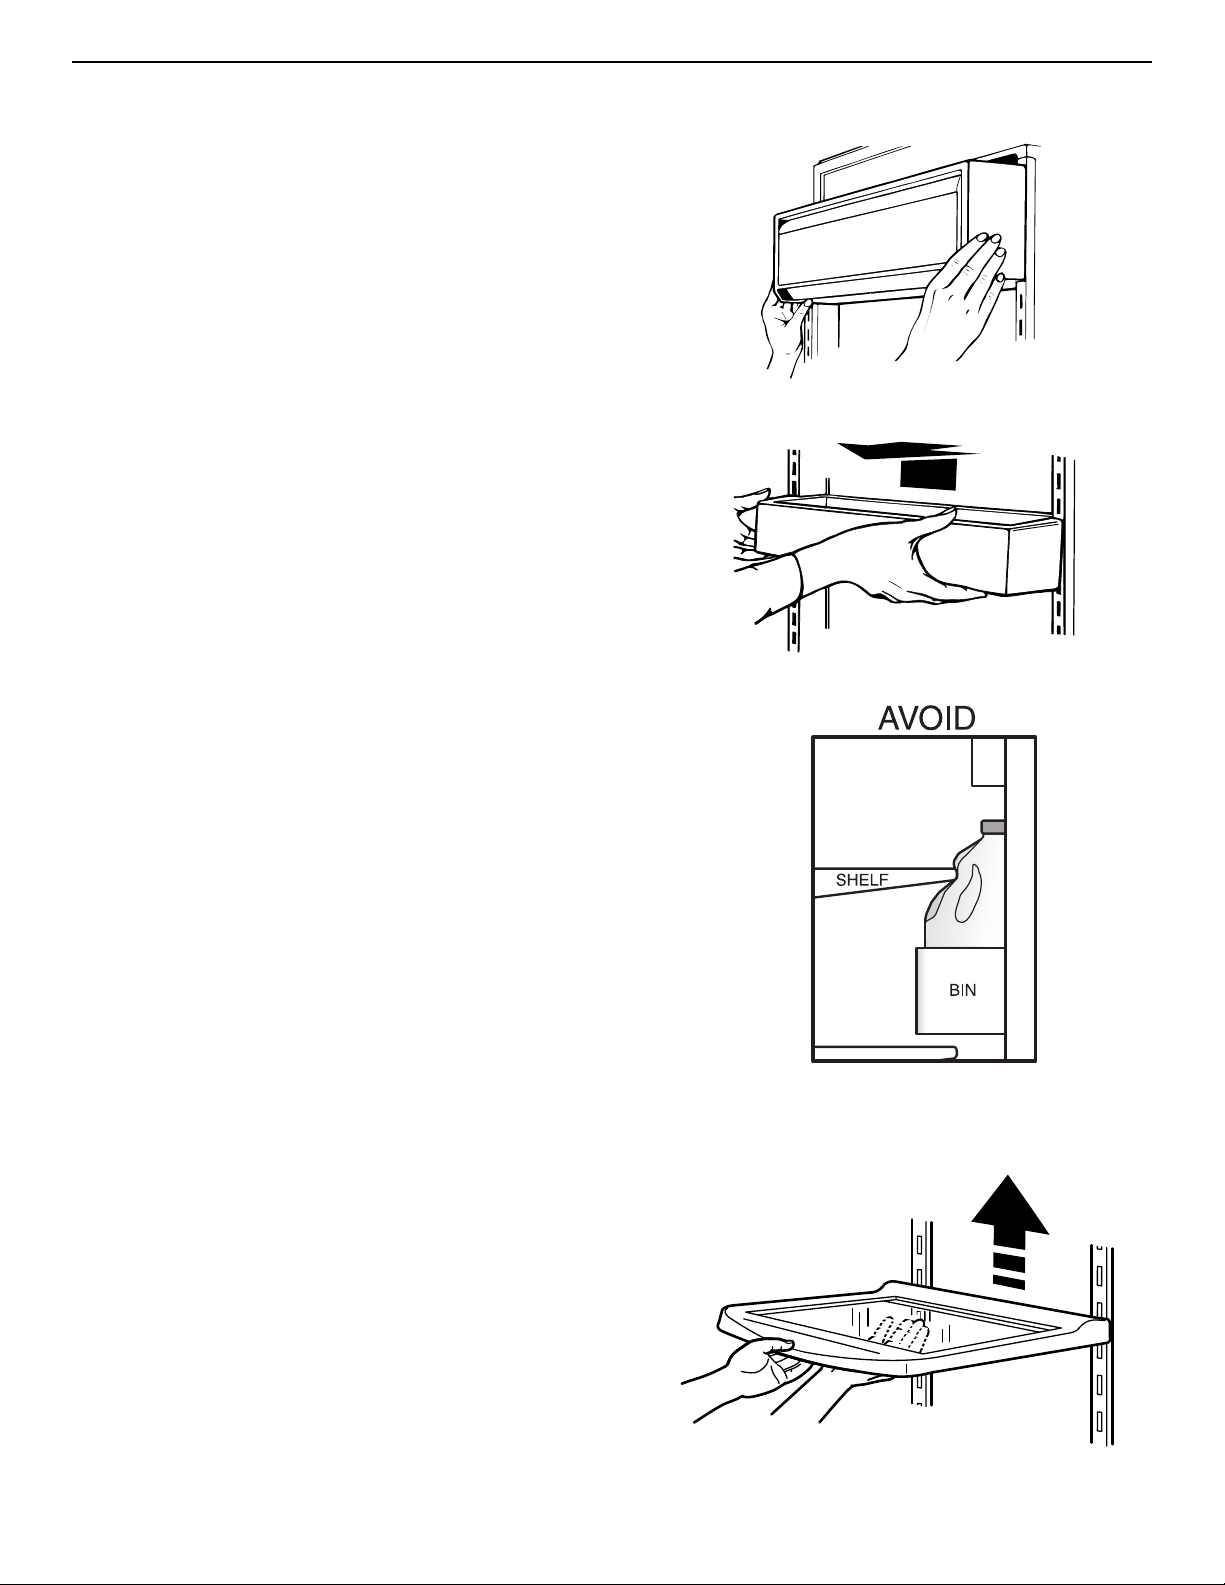
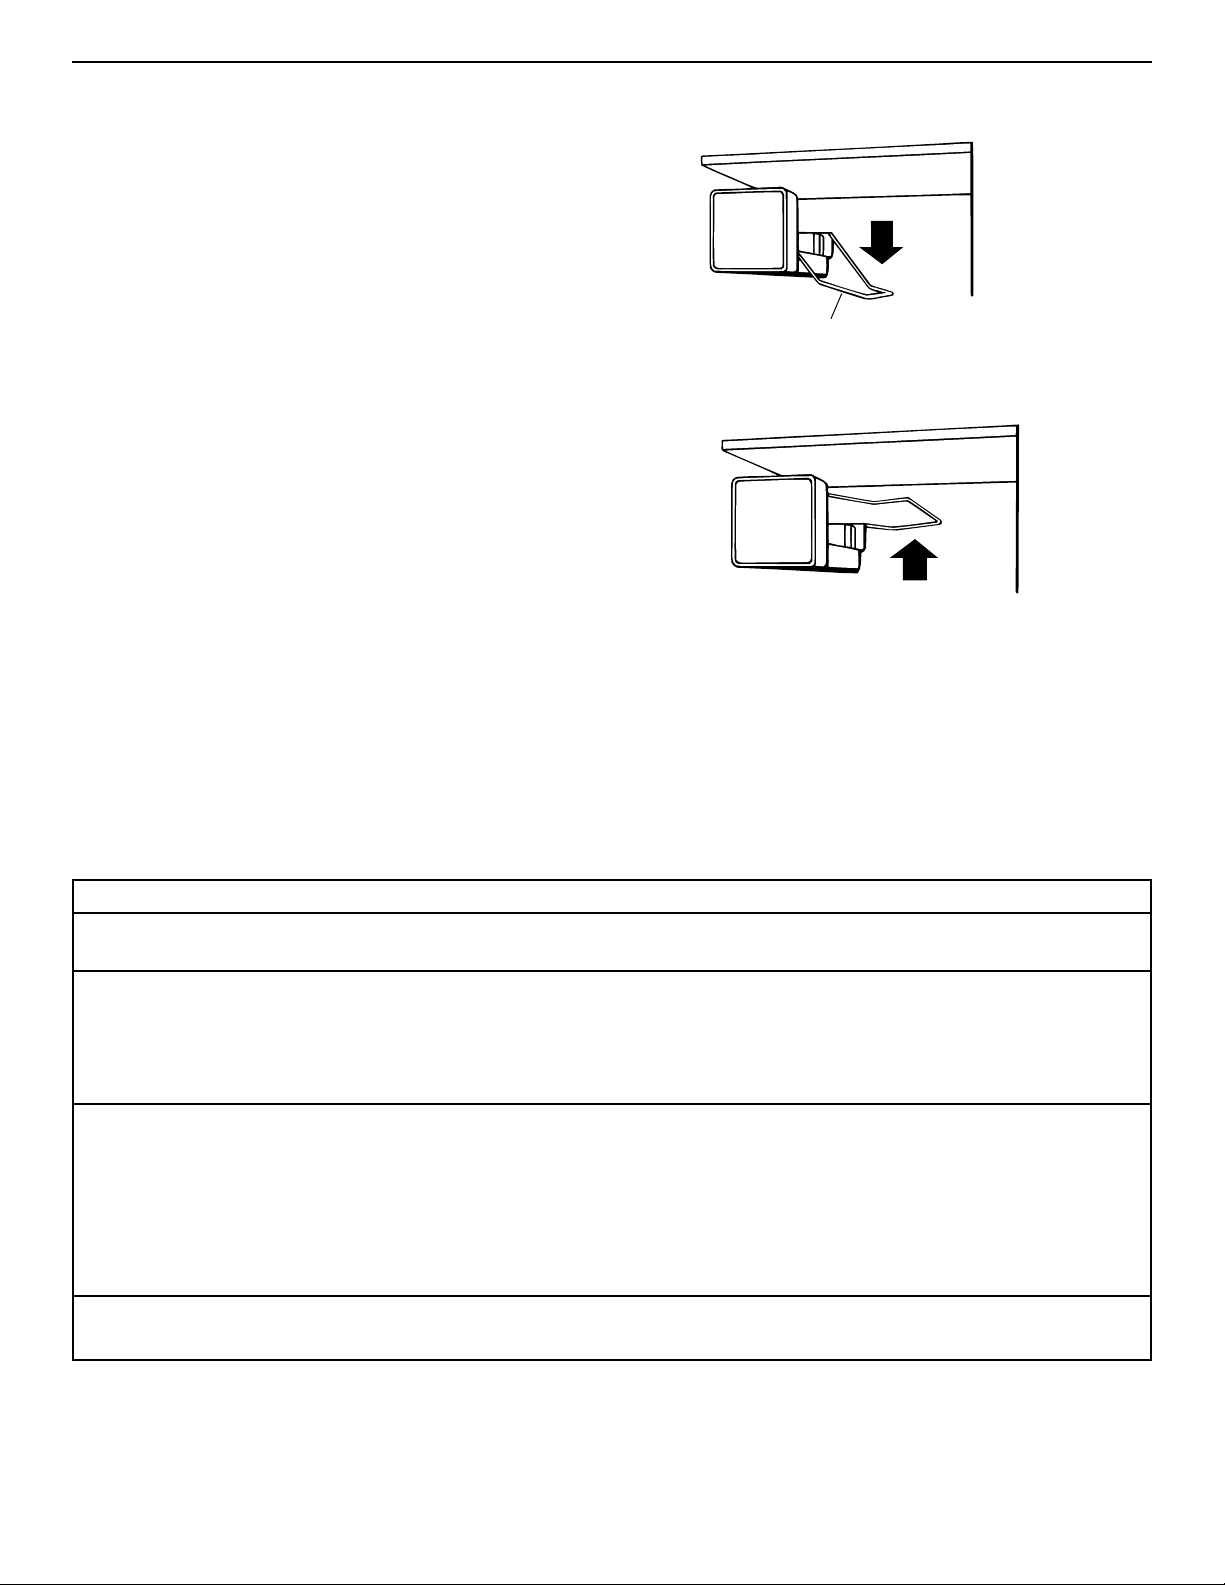
Panel models —
To remove:
1. Grasp both ends of the panel.
2. Push straight up, then pull straight out.
To replace:
1. Inser t hooks (located on back of ventilation panel) into
bracket slots.
2. Pull panel down slightly to lock into place.
Wraparound Stainless Steel models —
KSSC36M, KSSC42M, KSSC48M
To remove:
1. Grasp both ends of the louver panel.
2. Push straight up, then pull straight out.
To replace:
1. Inser t hooks (located on back of louver panel) into slots on
side trim.
2. Pull louver panel down slightly to lock into place.
Removing the upper ventilation panel
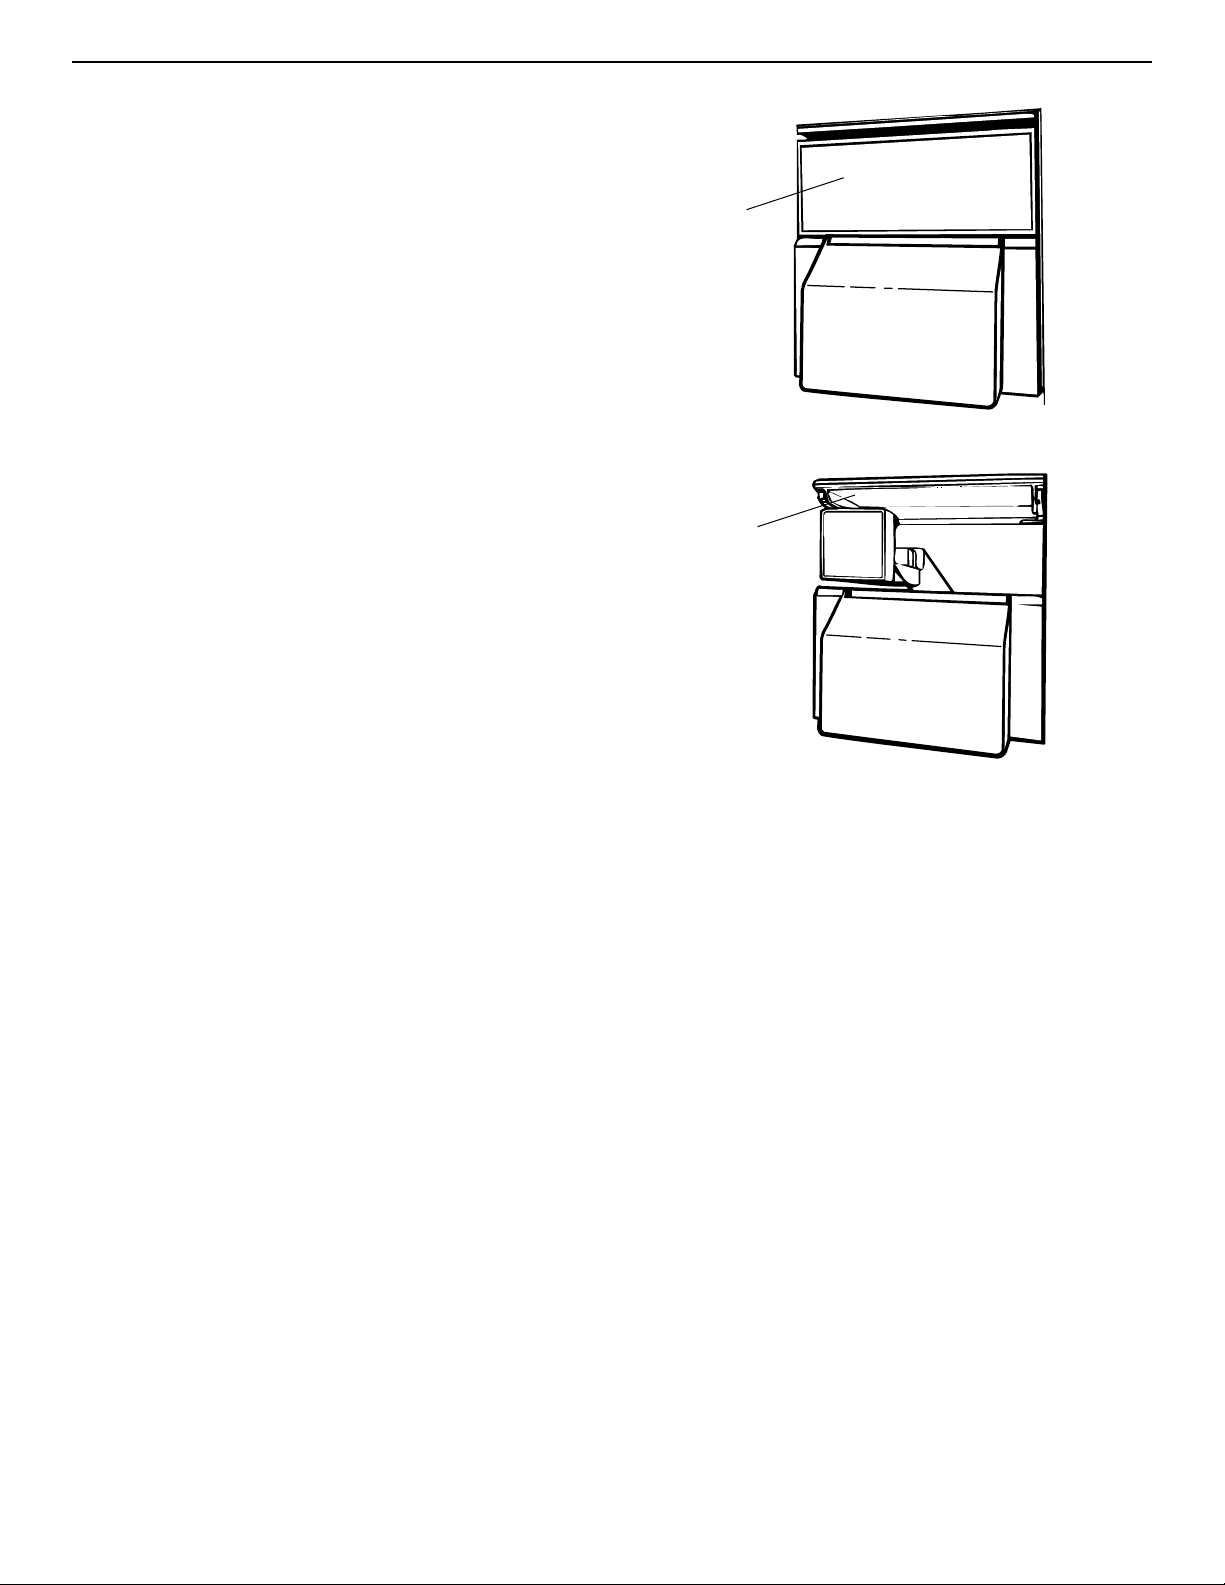
O
FF
O
N
Using the Power On/Off Switch
The Power On/Off Switch is located behind the upper
ventilation panel. It is used to tur n the power to the
refrigerator off when cleaning it or changing light bulbs.
To turn power off:
1. Remove upper ventilation panel from panel models.
Remove lower panel from wrap- around stainless steel
models.
2. Press Power On/Off Switch to “OFF”position.
To turn power on:
1. Press Power On/Off Switch to “ON”position.
2. Replace upper ventilation panel or lower panel.
IMPORTANT: Be sure the Power On/Off Switch is in the “ON”
position after cleaning refrigerator or changing light bulbs.
Page 6
6
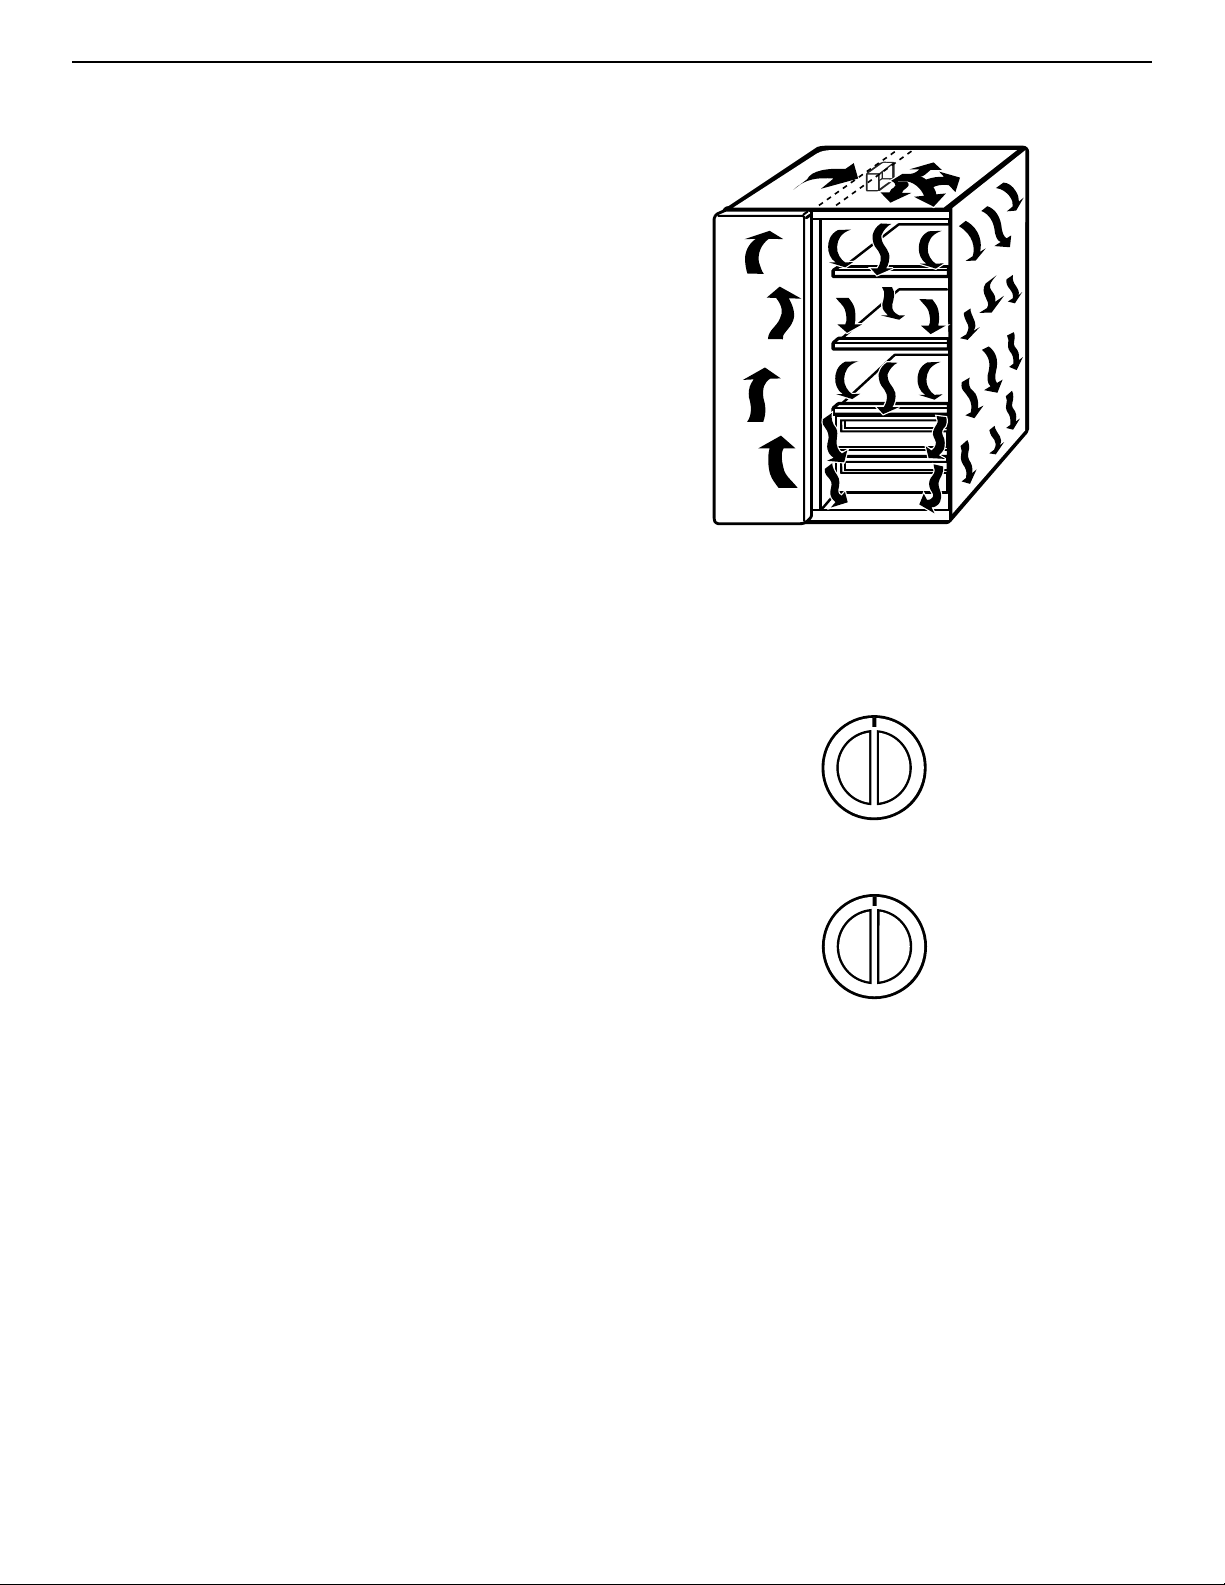
The ExtendFresh Temperature Management System
controls the temperature in both the refrigerator
compartment and the freezer compartment independently.
The system helps extend the freshness of the food in your
refrigerator by responding to temperature changes as
small as 1°F. Unlike most refrigerators on the market
today, the ExtendFresh System uses a Smart* Fan to
transfer cold air immediately from the freezer to the
refrigerator for faster response to temperature changes
without the need for the compressor to turn on. Also, the
system maintains consistent temperatures, which are less
affected by exter nal temperature changes such as
seasonal changes and programmable home thermostats
or even the temperature of other compartments inside the
refrigerator.
EXTENDFRESH™ Temperature Management System
Setting temperature Controls
The Refrigerator and the Freezer Controls have been
preset at the factory. These settings should be correct for
normal household refrigerator use. Let the refrigerator
operate for 24 hours to cool both sections before
changing settings.
To change a temperature setting:
Adjust the Refrigerator and/or Freezer Control.
• To make the refrigerator or freezer colder, turn the
control knob clockwise.
• To make the refrigerator or freezer less cold, turn the
control knob counterclockwise.
IMPORTANT: The OFF setting on the Freezer Control
stops all cooling action in the refrigerator, but it does not
disconnect the refrigerator from the power supply.
If possible, wait to add food until after this 24-hour per iod.
Turning the controls to higher number settings will not
cool the sections faster. Adding foods before the
refrigerator has cooled completely could cause the
refrigerator to take longer to reach the desired
temperatures and cause some foods to spoil.
After 24 hours, adjust the controls, one number at a time
as desired. “1” is the warmest setting and “5” is the
coldest. Allow the refrigerator to operate for 24 hours after
each control change.
Cold Colder
Off
24
51
▲
Cold Colder
Off
24
51
▲
Refrigerator Control
Freezer Control
Page 7
7
Refrigerator features
Utility compartment
The utility compartment can be placed in any position on the
refrigerator door.
To remove:
1. Grasp both ends of compar tment.
2. Lift compar tment up and pull out.
To replace:
1. Inser t compartment hooks into ladder slots on both sides of
refrigerator door.
2. Push compar tment down to lock into place.
Door bins
Door bins hold two-liter bottles and can be placed in any
position on the refrigerator door.
To remove:
1. Grasp door bin.
2. Lift door bin up and pull out.
To replace:
1. Inser t door bin hooks into ladder slots on both sides of
refrigerator door.
2. Push door bin down to lock into place.
Gallon Door Bin
The gallon door bin holds several gallon-sized containers and
can be placed in any position on the refrigerator door.
Note: Positioning the gallon door bin directly across from an
interior shelf or covered storage bin will prevent the refr igerator
door from closing and could cause damage to bins and shelves.
To install:
1. Inser t the attachment brackets into the adjustment slots on
the door.
2. Push down on the bin to secure tabs.
3. If necessar y, adjust interior shelves to allow for milk jugs and
tall beverage containers stored in the gallon door bin.
SpillClean™
glass refrigerator shelves
Adjust the shelves to match the way you use your refrigerator.
IMPORTANT: Do not clean glass shelves with warm water
when they are cold. Shelves may break if exposed to sudden
temperature changes or impact. For your protection, tempered
glass is designed to shatter into many small pebble-sized
pieces.This is normal.
To remove:
1. Tilt shelf up at front and lift shelf up at back.
2. Pull shelf straight out.
IMPORTANT: Glass shelves are heavy. Handle them carefully.
To replace:
1. Guide the rear shelf hooks into slots in the shelf suppor ts on
the back of the refrigerator wall.
2. Tilt shelf up at front until hooks drop into slots. Lower front of
shelf to level position.
3. Check the stability of the shelf to be sure hooks have been
inserted properly.
Page 8
8
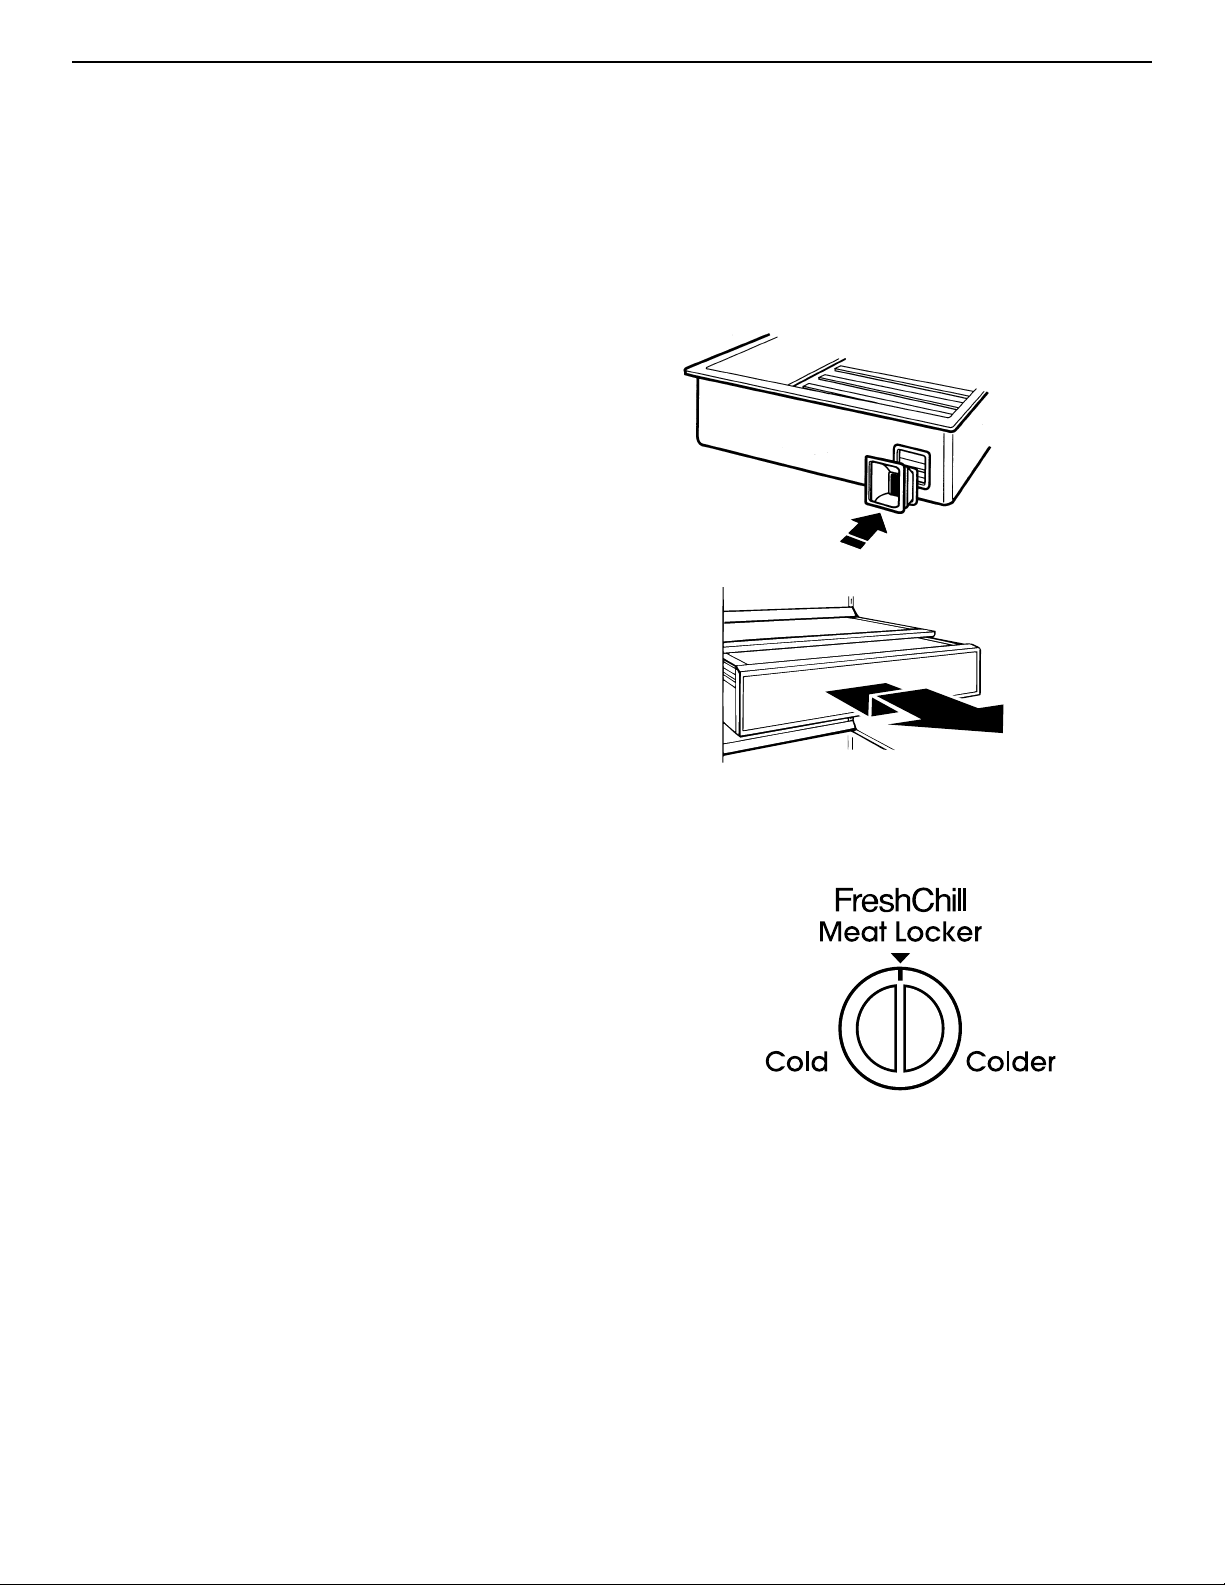
FreshChill™
Meat Locker
Setting the FreshChill™ Meat Locker
Temperature Control
The FreshChill Meat Locker Temperature Control allows
you to adjust the storage temperature of the FreshChill
meat locker.
Cold air flows into the meat locker through an air duct
between the freezer and the refrigerator. Setting the
control allows more or less cold air through the air duct.
Set the control to “Cold” to close the air duct.
IMPORTANT: If a food item freezes in the FreshChill Meat
Locker, utility drawer, or crisper, turn the FreshChill Meat
Locker Temperature Control to “Cold”. If the water
dispenser stops working, water in the line may have
frozen. If this happens, turn the FreshChill Meat Locker
Temperature Control to “Cold”.
The FreshChill Meat Locker is designed to provide colder
storage temperatures than the average refrigerator
temperature.The Meat Locker can be located in any set
of ladder slots. For temperature-controlled use,
however, the Meat Locker must be located in the
second to last (bottom) set of ladder slots. The
FreshChill Meat Locker can be removed for cleaning.
IMPORTANT: If the meat locker is placed in any set of
slots other than the second to last (bottom) set of ladder
slots, the air supply hole must be sealed. Use the plug
taped to the inside bottom of the meat locker to seal the
air supply hole.
The rubber air connector (located on back of meat locker)
directs air from the air supply hole into the meat locker. If
the air connector comes off, replace it by pushing it into
the square opening on back of meat locker.
To remove:
1. Roll meat locker out to the stop.
2. Lift front of meat locker slightly.
3. Pull meat locker out the rest of the way.
To replace:
1. Position meat locker rollers between front roller of track
and the track.
2. Push meat locker up and onto track.
3. Slide meat locker back until it stops.
M
E
A
T
L
O
C
K
E
R
Page 9
9
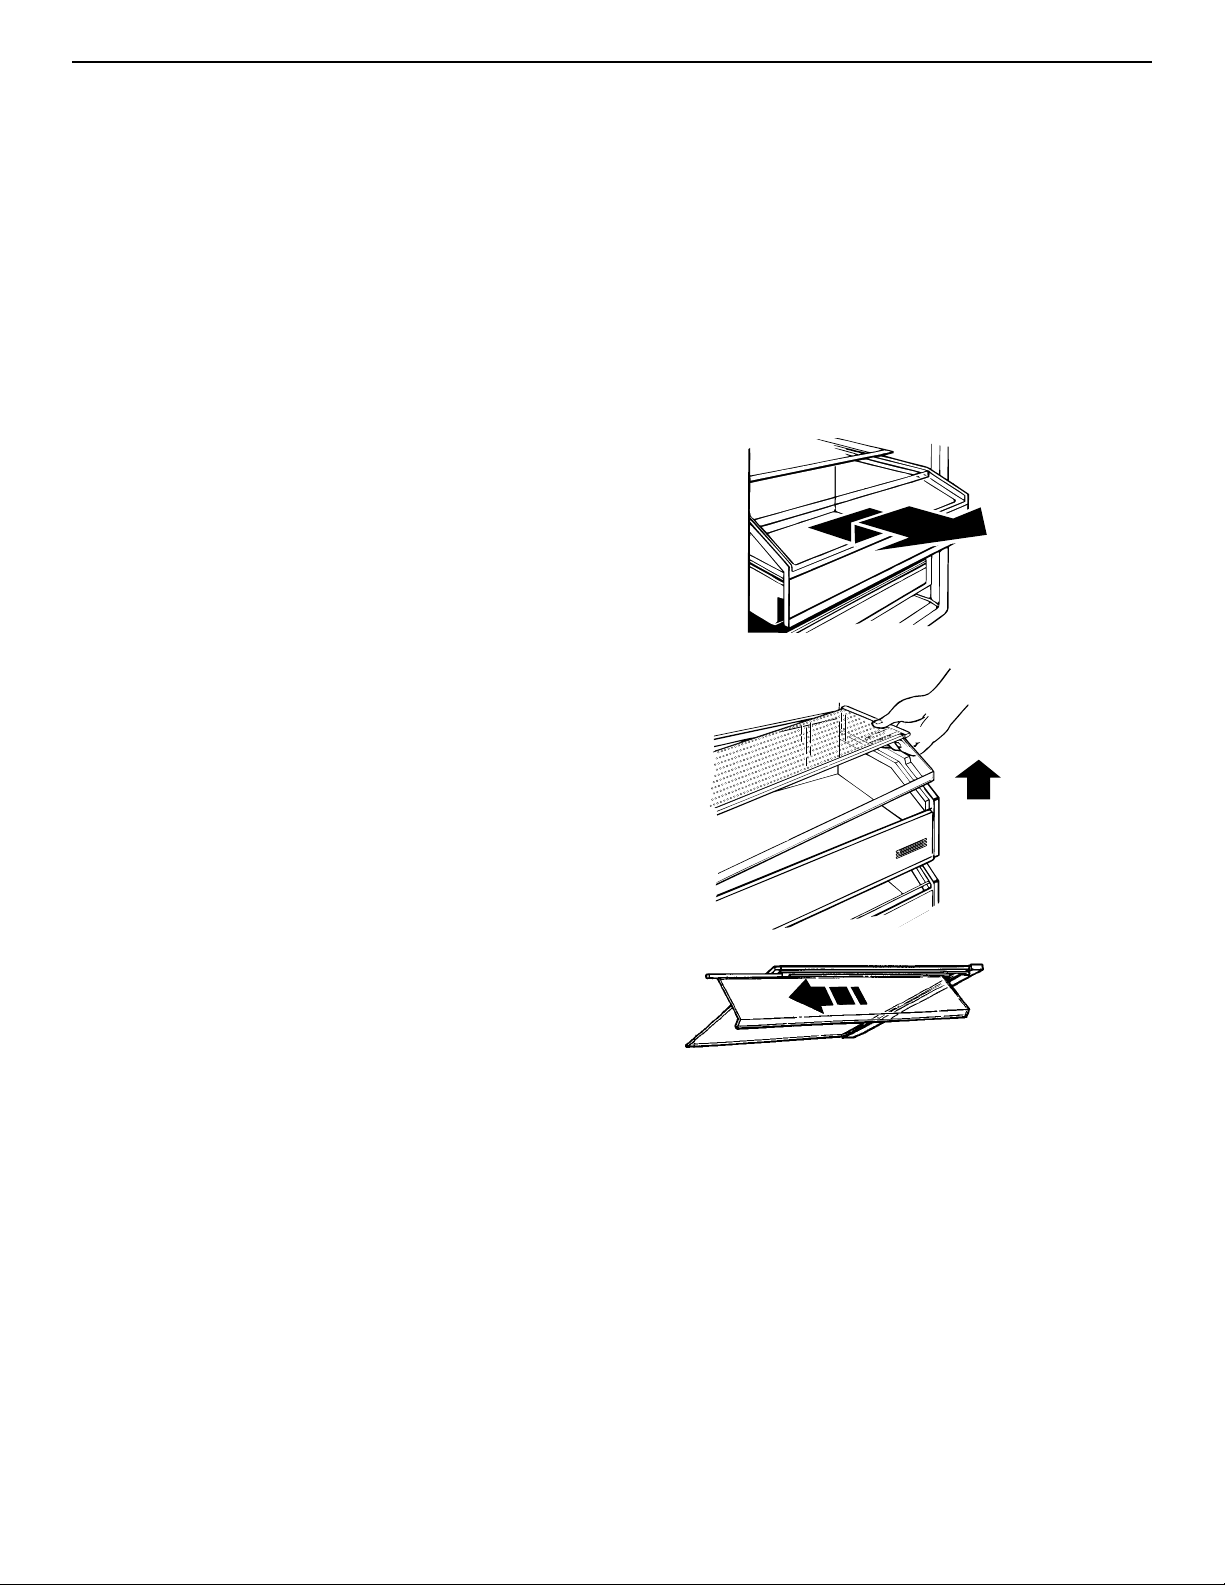
Humidity-controlled
ClearVue™ crispers
The humidity-controlled crispers are designed to keep
fresh vegetables and fruits longer. The Crisper Controls
are located on the front of the crispers.The controls
adjust the humidity (moisture) in the drawers.Slide control
to “HIGH” for lettuce, cabbage and other produce that
have leaves. Slide control to “LOW” for apples, corn and
other produce that have skins.
The humidity-controlled crispers are interchangeable.The
ClearVue section allows you to see into the crisper
without opening them.
IMPORTANT: Occasionally, a food item may freeze in the
FreshChill* Meat Locker, utility drawer, or crisper.When
this occurs, turn the FreshChill Meat Locker Temperature
Control to “cold.”
To remove crispers:
1. Roll drawer out to the stop.
2. Lift front of drawer and pull out the rest of the way.
To replace crispers:
1. Position drawer rollers between front roller of track and
the track.
2. Push crisper up and onto track.
3. Slide crisper back until it stops.
To remove glass covers:
1. Lift right side of glass cover to free retainer and left
side of cover.
2. Carefully remove glass cover.
To replace glass covers:
1. Place retainer on right side of glass cover.
2. Inser t left side of glass cover into groove on left side of
drawer.
3. Lower cover so that the retainer pins are in the guide
holes on right side of drawer.
To remove ClearVue section:
1. Remove glass cover.
2. Slide ClearVue section down track, away from the
retainer.
3. Replace in reverse order.
U
T
IL
IT
Y
L
O
W
H
I
G
H
1
2
3
4
5
H
um
id
ityC
o
n
tro
l
L
O
W
H
I
G
H
1
2
3
4
5
H
u
m
id
ity
C
o
n
tro
l
Page 10
10
Covered Egg Container
The covered egg container with carrier provides extra
protection for storing eggs anywhere inside your
refrigerator section.The ClearVue* container allows you
to see how many eggs you have stored.
Wine rack
Insert the wine rack into position by sliding it between a
refrigerator shelf and the wall of the refrigerator
compartment.
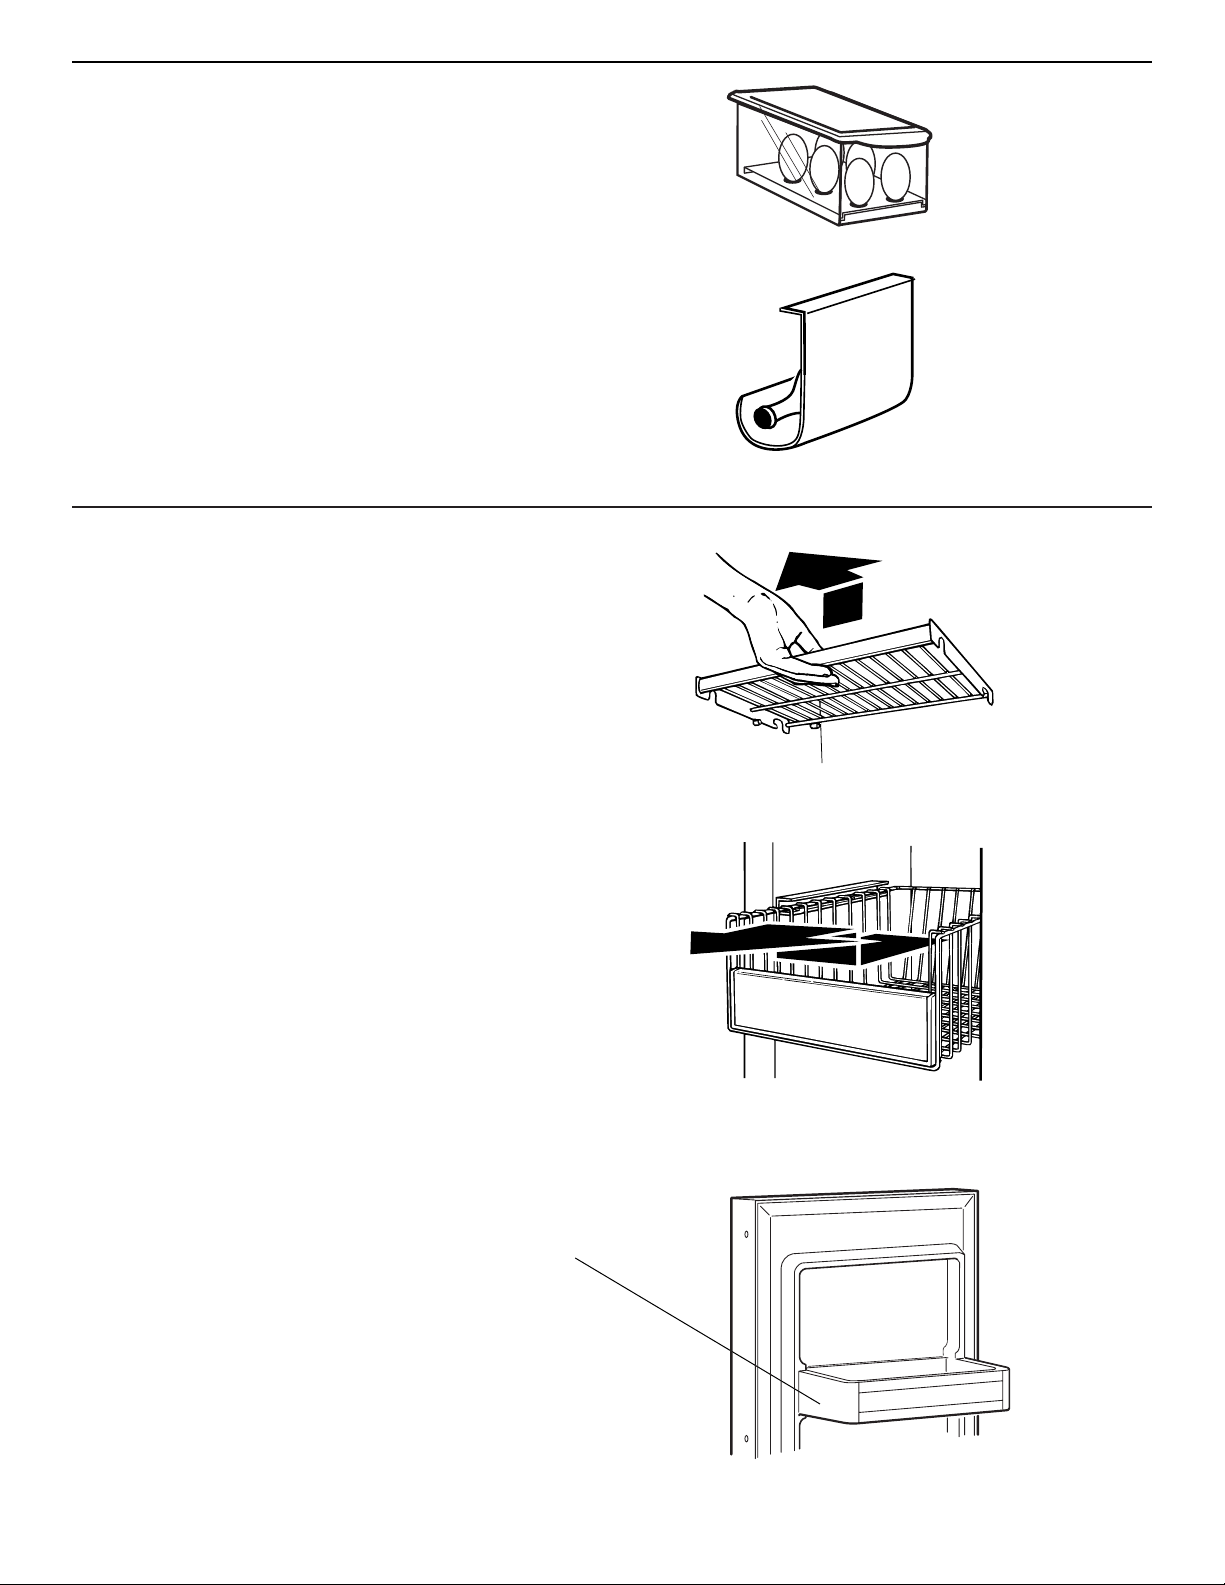
Freezer features
Freezer shelves
To remove:
1. Lift shelf up.
2. Pull shelf straight out.
3. Replace in reverse order.
Pull-out freezer baskets
To remove:
1. Pull basket out to the stop.
2. Lift basket slightly and move it to the left.
3. Pull basket out the rest of the way.
To replace:
1. Place basket in shelf tracks and move basket to the
left.
2. Push basket in to the stop on the left side.
3. Lift left side of basket slightly to clear the stop.
4. Push basket in the rest of the way.
IMPORTANT: Be sure both sides of basket are in the
shelf tracks before filling with food.
Note: Stationary shelf on freezer door is not removable.
Page 11
11
Automatic ice maker
To star t ice maker:
• For dispenser models only: Pull ice maker cover
panel out from the bottom and slide it to the rear.
• Push ice maker wire arm down to the “ON” position.
The ice maker fills with water and begins forming ice.
Allow 24 hours to produce the first batch of ice. Ice maker
should then produce 7 to 9 batches of ice in a 24-hour
period under normal conditions. Discard the first three
batches of ice. After ice is formed, ice cubes drop into
storage bin.When ice bin is full, ice maker arm raises to
the “OFF” position (arm up).
To stop ice maker:
• Lift the ice maker wire arm until you feel it click into the
“OFF” position.
• Do not force arm up or down. Do not store anything on
top of ice maker or in ice bin.
Wire arm
On
Off
Solving common ice maker problems
POSSIBLE CAUSE/SOLUTION
This is normal. They break apar t easily.Shake bin occasionally to keep cubes
separated.
ON/OFF wire arm is in the “OFF” (up) position. Lower wire arm to the “ON” (down)
position.
Freezer is not cold enough.Adjust temperature controls and wait 24 hours.
(See “Setting temperature controls” on page 6.)
Copper tubing is kinked. Check water tubing.
New plumbing connections can cause discolored or off-flavored ice. Discard the first
few batches of ice.
Cubes are stored too long.Throw them away and make a new supply.
Food is not wrapped properly. See page 20.
Freezer and ice bin need to be cleaned.See page 17.
Water may contain minerals (such as sulfur). A filter may be required to
remove them.
There is no water in the tank. Press the water dispenser lever and hold it in for
several minutes.When water dispenses, tank is full.
PROBLEM
Ice crescents attached at
corners
Ice maker will not operate
or ice is not made fast
enough
Off-taste or odor in ice
No ice produced
Page 12
12
Removing the ice maker storage bin
Depending on the model, the ice maker storage bin holds
the following amounts of ice:
36" - 8.5 pounds (3.9 kg)
42" - 13.5 pounds (6.1 kg)
48" - 17.6 pounds (8.0 kg)
Remove and discard unused ice periodically to reduce the
potential for off-taste or odor buildup in ice.The storage
bin can be removed for cleaning or to dispense large
amounts of ice at one time.
Note: On models without ice and cold water dispenser,
the storage bin cannot be removed full of ice if the freezer
door stop is set to a 90° opening.
S
to
ra
g
e
B
in
Ice maker
cover panel
down
Ice maker
cover panel
up
To remove:
1. Pull the ice maker cover panel out from the bottom and
slide it to the rear.
2. Lift the ice maker wire arm until you feel it click into the
“OFF” position.
For dispenser models only: While the ice maker is
“OFF,” no more ice can be produced, but ice can still
be dispensed when the freezer door is closed.
3. Lift the front of the storage bin, then pull it out.
4. Empty the storage bin. Use hot or warm water to melt
ice if necessary. Never use anything sharp to break up
ice in the storage bin.This can damage the storage bin
and the dispenser mechanism.
To replace:
1. Push storage bin in all the way.
2. Lower the ice maker wire arm down to the “ON”
position to restart ice maker.
3. Lower the ice maker cover panel.
Page 13
ICE
13
Ice and cold water dispensers
(models KSSC36M, KSSC42M, KSSC48M)
Ice dispenser
Ice dispenses from ice maker storage bin in the freezer.
When dispenser bar is pressed, a trap door opens in a
chute between the dispenser and ice bin. Ice moves from
the bin and falls through the chute.When dispenser bar is
released, a buzzing sound may be heard for a few
seconds.
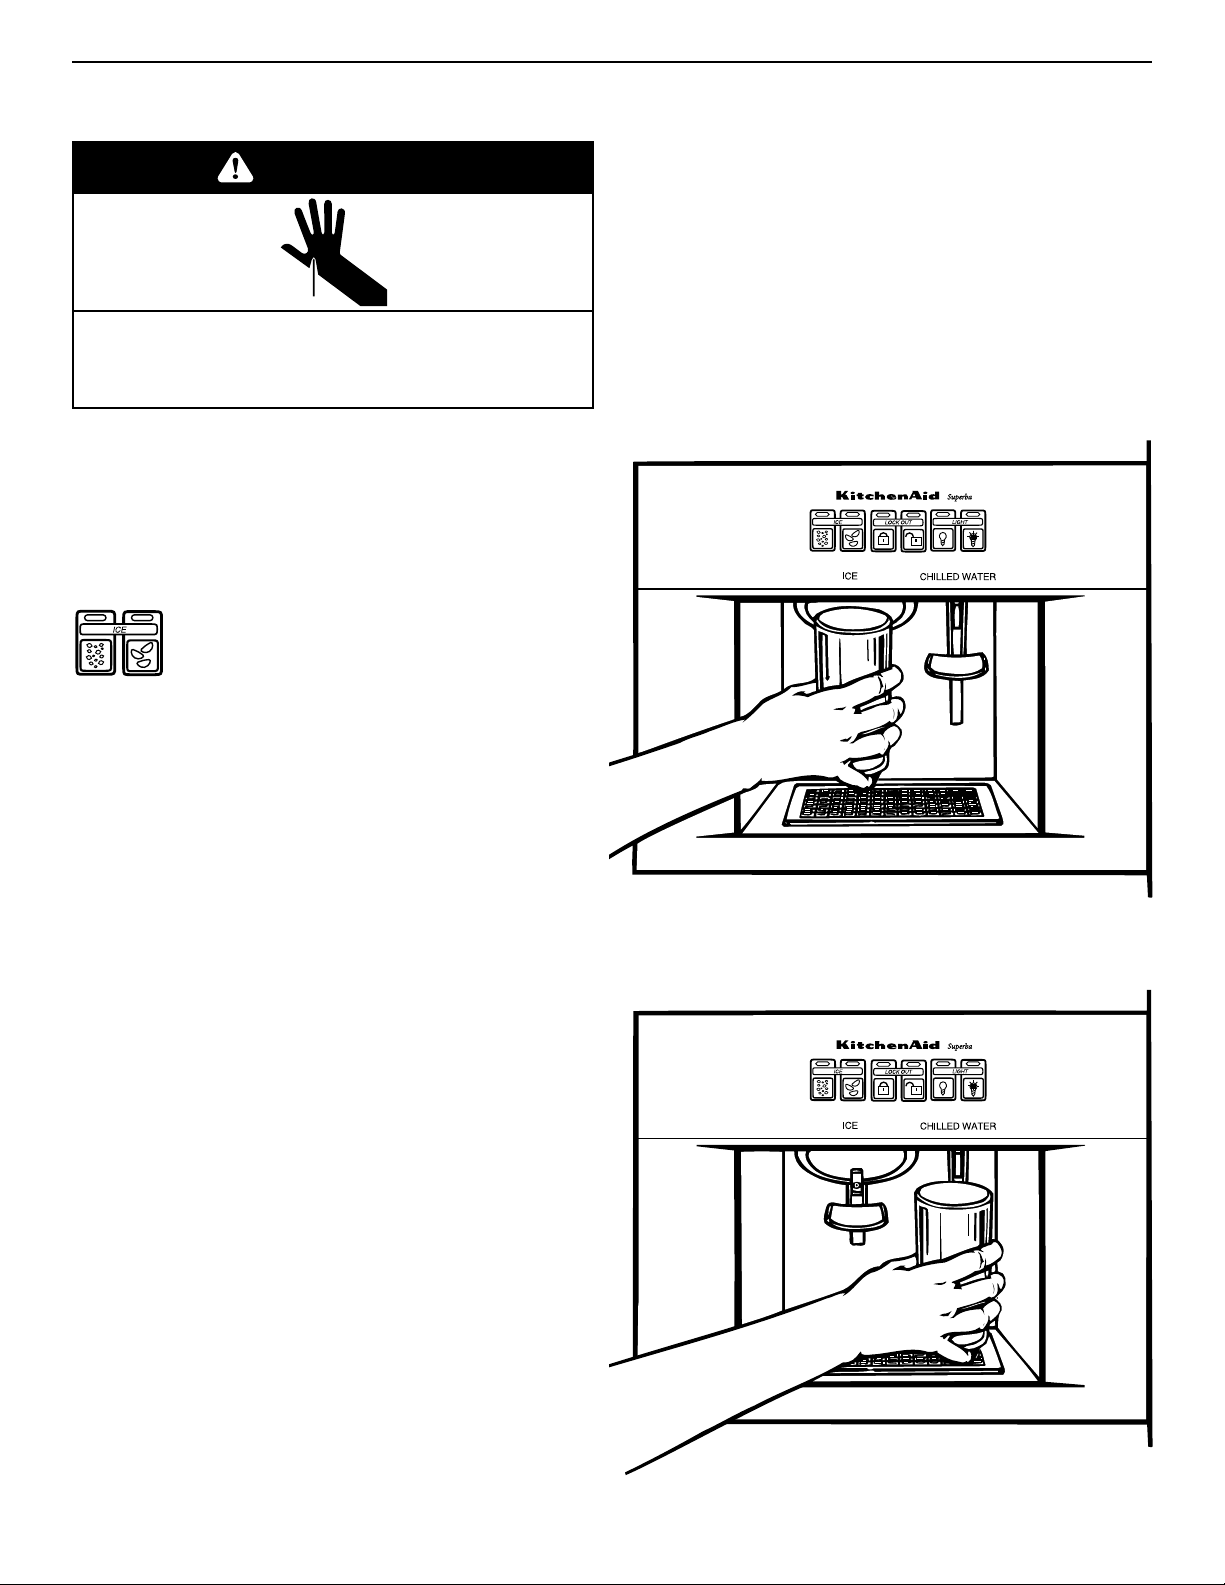
Your refrigerator dispenses both cubed and
crushed ice. Before dispensing ice, select
which type of ice you prefer. For crushed ice,
press pad on left above “ICE”. For cubed ice,
press pad on right above “ICE”.
To dispense ice:
1. Press pad for desired type of ice.
2. Press a sturdy glass against the ice dispenser bar.
Hold glass close to dispenser opening so ice does not
fall outside of glass.
3. Remove the glass to stop dispensing.
Water dispenser
IMPORTANT: If the water dispenser stops working, water
may be frozen in the water line leading to the dispenser. If
this happens, turn the FreshChill* Meat Locker
Temperature Control toward “Cold.”
Chilled water comes from a 50 oz. (1.5 L) tank behind the
crispers. Allow about 24 hours to chill the first tankful of
water.
When the refrigerator is first hooked up, press the
water dispenser bar until you draw and discard 2 to 3
quarts (1.9 to 2.9 L) of water.This removes air from the
system and rinses the water filter, tank, and pipes.Ice
maker will not produce ice without filling tank.
If the dispenser is not used regularly, dispense enough
water every week to freshen the supply. Allow two to three
hours for a new supply of water to chill.
IMPORTANT: The small tray under the dispenser is
designed to evaporate small spills.There is no drain in
the tray. Do not pour water into it.
To dispense water:
1. Press a sturdy glass against the water dispenser bar.
2. Remove glass to stop dispensing.
WARNING
Cut Hazard
Use a sturdy glass when dispensing ice or water.
Failure to do so can result in cuts.
ICE
ICE
Page 14
14
Dispenser/ice maker operating tips
CAUSE SOLUTION
Freezer door open Close the freezer door.
Ice bin not properly installed Make sure ice bin is pushed in all the way.
Wrong ice in bin Use only crescents from ice maker. Shake ice bin
occasionally to keep cubes separated and to obtain
increased storage capacity.
Dispenser not used for Dump old ice and make a new supply.
extended periods of time,
causing ice cubes to melt
together
Ice dispenser bar held Wait about three minutes for the dispenser motor to reset.
in too long Large amounts of ice should be taken from the bin,
not through the dispenser.
Lock Out has been chosen Turn Lock Out off.
Low water pressure Call local utility company.
Ice attracts airborne odors; Dump old ice and make a new supply; store excess
old ice ice in a covered container.
Water quality For best results, avoid connecting ice maker to a
softened water supply. If softened water supply cannot
be avoided, make sure the water softener is well
maintained and operating properly.
Foods not properly wrapped Wrap foods properly in airtight and moisture-proof
materials. See page 20.
Ice bin and freezer may need Clean freezer and ice bin. See “Cleaning the
cleaning refrigerator” on page 17 for instructions.
Plumbing to ice maker Follow Installation Instructions for proper ice maker
water supply hookup.
New ice maker The first few batches of ice from a new ice maker may
have an off-taste.Dump this ice and make a new supply.
PROBLEM
Dispensers won’t work
Ice dispenser won’t work
Off-taste or odor in ice
Base grille
To remove:
1. Remove one screw at each end of the base grille.
2. Remove base grille.
3. Replace in reverse order.
Page 15

15
Defrost pan
The defrost pan is located behind the base grille, toward
the left side of the refrigerator.
To remove:
1. Press Power On/Off Switch to the “OFF”position.
(See page 5 for instructions).
2. Remove base grille.
3. Find retaining clip (A) under refrigerator.
4. Push up on the clip and, at the same time, slide the
pan forward and out.
5. Clean the pan. (See page 17 for instructions.)
To replace:
1. Position the edge of the defrost pan approximately
7 inches (17.8 cm) from the left side of the
refrigerator.
2. Lift defrost pan into guides and push back until you
hear the “click” or “snap” of the retaining clip moving
into place.
3. Replace the base grille.
4. Press Power On/Off Switch to the “ON”position.
Defrost pan
Retaining clip (A)
Light bulbs
Light bulbs are located behind the Refrigerator and
Freezer Controls:
1. Unplug refrigerator or disconnect power to refrigerator.
2. Reach behind control panel.
3. Unscrew bulb and replace it with a 40-watt,
incandescent, medium-base, tubular bulb.
4. Plug refrigerator power cord into outlet or reconnect
power to refrigerator.
Light bulb below ice storage bin:
1. Unplug refrigerator or disconnect power to refrigerator.
2. Remove light cover.
3. Unscrew bulb and replace it with a 40-watt,
incandescent, medium-base, tubular bulb.
4. Replace light cover.
5. Plug refrigerator power cord into outlet or reconnect
power to refrigerator.
Light bulb in dispenser area: (dispenser models)
1. Unplug refrigerator or disconnect power to refrigerator.
2. Unscrew the bulb from the top, inside of the dispenser
area.
3. Replace bulb with a heavy-duty, 10-watt bulb.
4. Plug refrigerator power cord into outlet or reconnect
power to refrigerator.
IMPORTANT: Be sure to press Power On/Off Switch to
the “ON” position after changing light bulb(s).
Page 16
16
Saving Energy
You can help your refrigerator use less electricity.
• Clean the condenser coils regularly.
• Open the door as few times as possible.Think about
what you need before you open the door.Get
everything out at one time.Keep food organized so you
won’t have to search for what you want. Close door as
soon as food is removed.
• Fill up the refrigerator, but don’t overcrowd it so air
movement is blocked.
• It is a waste of electricity to set the refrigerator and
freezer to temperatures colder than they need to be.If
ice cream is firm in the freezer and drinks are as cold
as your family likes them, that’s cold enough.
CAUSES
The refrigerator’s fan motor and moving air.
The thermostat makes a definite click when the refrigerator stops running. It also
makes a sound when the refrigerator starts.
The defrost timer will click when the defrost cycle starts and stops.
You may hear buzzing (from the water valve), trickling water, and the clatter of ice
falling into the bin.
The high-efficiency compressor and motor will run longer than older designs.The
internal fan may occasionally run when the compressor is off.
During the defrost cycle, the refrigerator will not be running. The tr ickling water is the
frost accumulated on the freezer coil melting and running into the defrost pan.When
the refrigerator stops running, you will hear gurgling in the tubing for a few minutes.
You may feel air blowing from behind the upper ventilation panel and base grille when
the refrigerator is running. This is nor mal.
SOUNDS/OBSERVATIONS
Hum or hiss
Clicking or snapping
sounds
Ice maker sounds
• trickling water
• clatter of ice
Running sounds
Trickling water/
water sounds
Warm air from upper
ventilation panel/
base grille
Understanding the sounds you may hear
Your new refrigerator may make sounds that your old one
didn’t make.Because the sounds are new to you, you
might be concerned about them. Most of the new sounds
are normal. Hard surfaces like the floor, walls, and
cabinets can make the sounds seem louder than they
actually are. Due to new product designs, there may be
sounds that you are not familiar with.The following chart
describes the kinds of sounds that might be new to you
and what may be making them.
Page 17
17
The refrigerator and freezer compartments
defrost automatically. However, clean both
once a month to prevent odors from building
up.Wipe up spills immediately.
Before cleaning, disconnect the refrigerator
from its power supply by pressing the Power On/Off
Switch to the “OFF” position.Then, take out all removable
parts and clean the refrigerator according to the directions
given below. Be sure to press the Power On/Off Switch to
the “ON” position when you are finished cleaning.
C
ARING
F
OR
Y
OUR
R
EFRIGERATOR
Explosion Hazard
Use nonflammable cleaner.
Failure to do so can result in death, explosion,
or fire.
Your refrigerator is built to give you many years of
dependable service. However, there are a few things
you can do to help extend its product life. This section tells
you how to clean your refrigerator and what to do when
going on vacation, moving, or during a power outage.
Cleaning your refrigerator
WHAT TO USE
Sponge or cloth with mild
detergent and warm water
Sponge, cloth, or paper
towel with mild detergent,
warm water, and a good
appliance wax (or good
auto paste wax)
Sponge, soft cloth, or paper
towel with baking soda or
mild detergent and warm
water
Sponge, soft cloth, or paper
towel with mild detergent
and warm water
Soft, clean sponge or soft,
clean cloth with mild
detergent and warm water
Sponge or cloth with mild
detergent and warm water
Stainless steel cleaner
PROBLEM
Removable parts
(shelves, crisper, etc.)
Outside
Inside walls
(allow freezer to warm up so
cloth won’t stick)
Door liners and gaskets
Plastic parts
(covers and panels)
Defrost pan
Stainless steel
doors and grille
HOW T O CLEAN
Hand wash and dry thoroughly.
Wash outside of cabinet.Do not use abrasive or harsh
cleaners.
Wipe and dry thoroughly.
Wax painted metal surfaces at least twice a year.
Apply wax with a clean, soft cloth. Waxing painted
metal surfaces provides rust protection.
Do not wax plastic parts.
Wash with mixture of warm water and:
• mild detergent, or
• baking soda (2 tbs to 1 qt [26 g to .95 L] of water).
Wipe and dry thoroughly.
Wipe and dry thoroughly.
DO NOT USE cleaning waxes, concentrated
detergents, bleaches, or cleaners containing
petroleum on plastic parts.
Wipe and dry thoroughly.
DO NOT USE paper towels, window sprays,
scouring cleansers, or flammable fluids.These can
scratch or damage material. See “Important Safety
Instructions” on page 3.
Press Power On/Off Switch to the “OFF” position.
Remove base grille.(See page 14.)
Reach into small opening at right edge and remove
the defrost pan. (See page 15.)
Wash, rinse, and dry thoroughly.
Replace defrost pan. Make sure to push it
completely into the opening.
Replace base grille.
Press Power On/Off Switch to the “ON” position.
Wipe with soft cloth.
WARNING
Page 18

If the refrigerator must be moved, contact the dealer from
whom you purchased the unit or your local KitchenAid
authorized servicer.
If you will be gone for a month or more, follow these steps
to prepare your refrigerator.
1. Remove all food from the refrigerator.
2. If your refrigerator has an automatic ice maker:
•
Turn off the water supply to the ice maker at least one
day ahead of time.
•
When the last load of ice drops, turn off the ice maker.
Make sure all ice is dispensed out of the ice maker
mechanism.
3. Unplug the refrigerator.
4. Clean it, wipe it, and dry well.
5. Tape rubber or wood blocks to the tops of both doors
to prop them open far enough for air to get in. This
stops odor and mold from building up.
If electricity goes off, call the power company. Ask how
long power will be off.
1. If power will be interrupted 24 hours or less, keep both
doors closed.This helps food stay cold and frozen.
2. If ser vice will be interr upted longer than 24 hours:
(a) Remove all frozen food and store in a frozen food
locker.
OR
(b) Place 2 lbs. (900g) of dry ice in freezer for every
cubic foot (28 liters) of freezer space.This will keep
food frozen for two to four days.Wear gloves to protect
your hands from dry ice burns.
OR
(c) If neither a food locker nor dry ice is available, use
or can perishable food at once.
18
Short vacations
If you will be away for less than four weeks, use these tips
to prepare your refrigerator before you leave.
1. Use up any perishables and freeze other items.
2. If your refrigerator has an automatic ice maker:
•
Raise wire arm to “OFF” (up) position.
•
Shut off water supply to the ice maker.
3. Empty the ice bin.
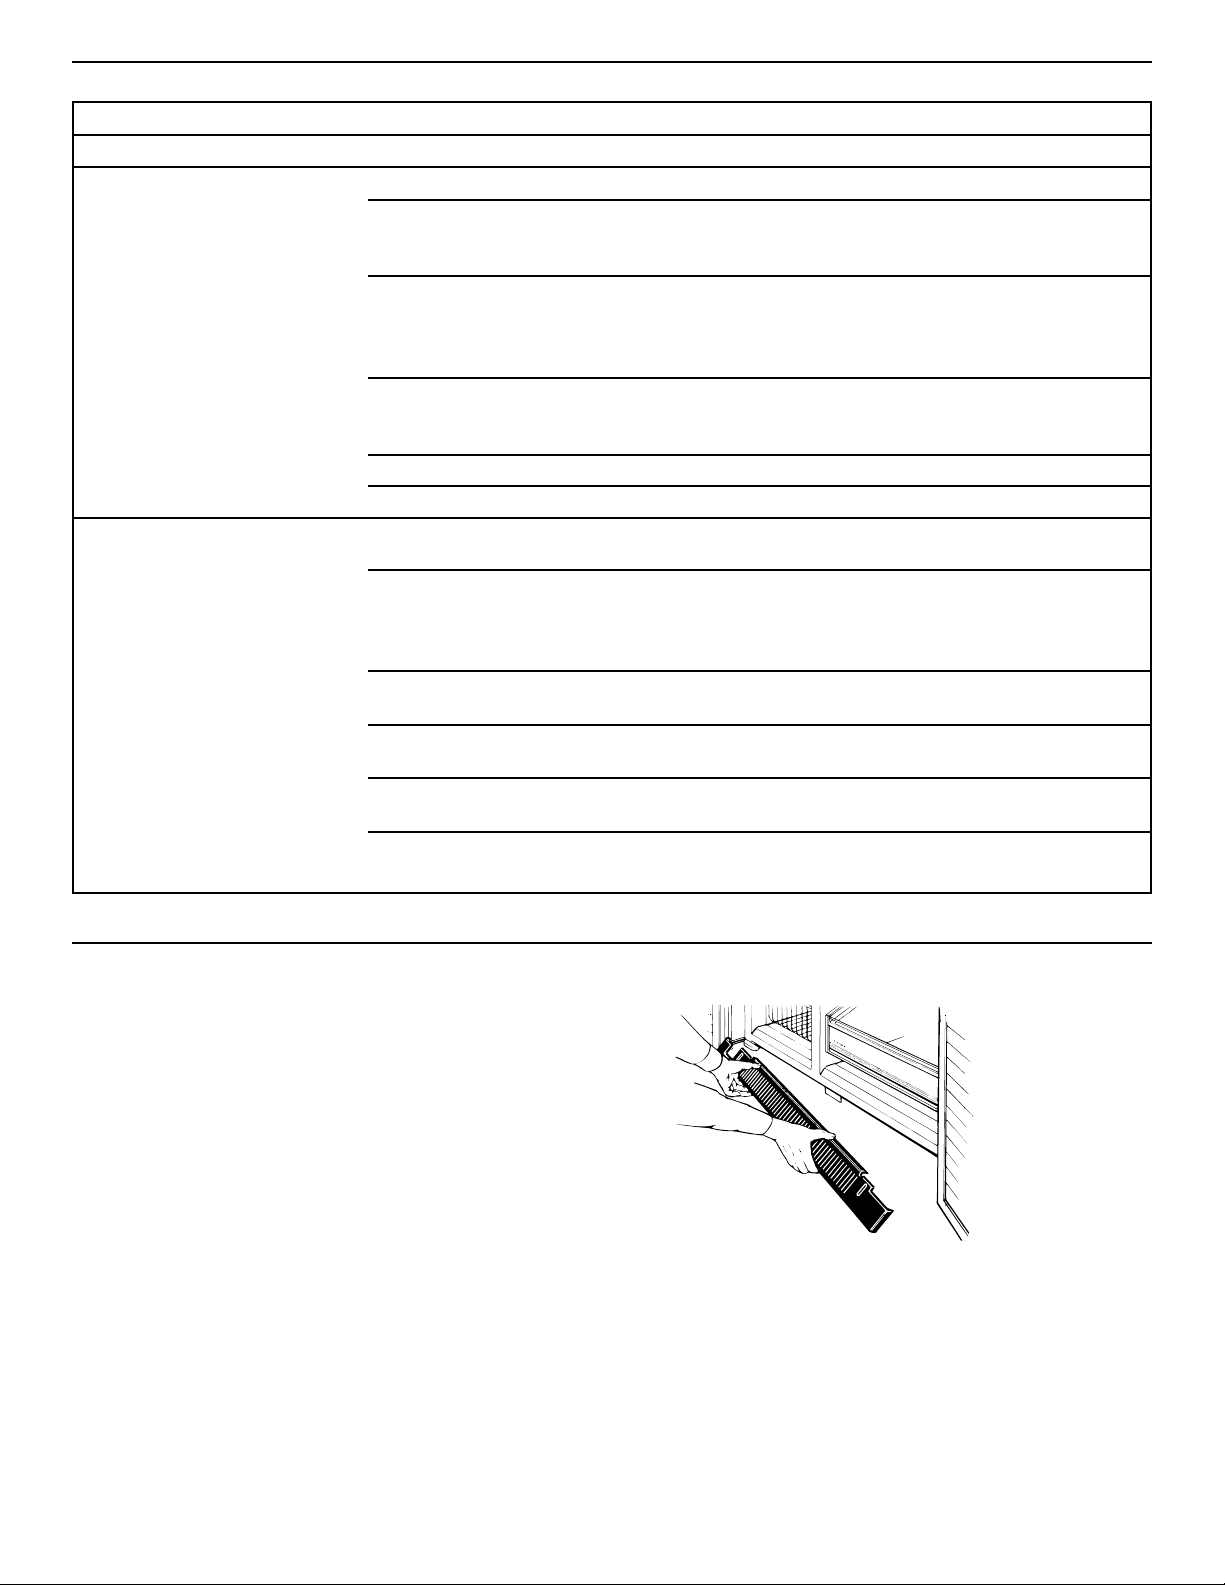
WHAT TO USE
Vacuum cleaner with
extended narrow attachment
Vacuum cleaner with brush
attachment
A professional stainless
steel cleaner.
PART
Condenser coils
Base grille
Stainless steel
HOW T O CLEAN
Remove upper ventilation panel to expose condenser
coils. (See page 5.)
Vacuum coils when dusty or dirty.Coils may need to
be cleaned as often as every other month.
Replace upper ventilation panel.
Vacuum base grille.
Follow directions included with cleaner.
Vacation and moving care
Long vacations
Moving
Power interruptions
Remember: A full freezer stays cold longer than a partly
filled one. A freezer full of meat stays cold longer than a
freezer full of baked goods.If food contains ice crystals,
it may be safely refrozen, although the quality and flavor
may be affected.If the condition of the food is poor, or if
you feel it is unsafe, dispose of it.
Questions?
Call our Consumer Assistance Center telephone number,
1-800-235-0665, from anywhere in the U.S.A. or Canada.
Page 19

19
There is a correct way to package and store refrigerated
or frozen food.
To keep food fresher, longer, take the time to study these
recommended steps.
F
OOD
S
TORAGE
G
UIDE
Wrap or store food in the refrigerator in airtight and
moisture-proof material unless otherwise noted. This
prevents food odor and taste transfer throughout the
refrigerator. For dated products, check code date to
ensure freshness.
Butter or margarine
Keep opened butter in covered dish or closed
compartment. When storing an extra supply, wrap in
freezer packaging and freeze.
Cheese
Store in the original wrapping until you are ready to
use it. Once opened, rewrap tightly in plastic wrap
or aluminum foil.
Milk
Wipe milk cartons. For best storage, place milk on
interior shelf.
Eggs
Store in original carton on interior shelf. On some
models, an egg storage container is provided for your
convenience.
Fruit
Wash, let dry, and store in refrigerator in plastic bags
or crisper. Do not wash or hull berries until they are
ready to use. Sort and keep berries in original
container in a crisper, or store in a loosely closed
paper bag on a refrigerator shelf.
Leafy vegetables
Remove store wrapping and trim or tear off bruised
and discolored areas. Wash in cold water and drain.
Place in plastic bag or plastic container and store in
crisper.
Storing fresh food
Vegetables with skins
(carrots, peppers)
Place in plastic bags, or plastic container and store
in crisper.
Fish
Use fresh fish and shellfish the same day as
purchased.
Meat
Store most meat in original wrapping as long as it
is airtight and moisture-proof. Rewrap if necessary.
See the following for storage times. When storing
meat longer than the times given, freeze the meat.
Chicken ........................................................1-2 days
Bacon............................................................5-7 days
Ground beef..................................................1-2 days
Cold cuts ......................................................3-5 days
Steaks/roasts ................................................3-5 days
Variety meats ................................................1-2 days
Cured meats................................................7-10 days
Leftovers
Cover leftovers with plastic wrap or aluminum foil.
Plastic containers with tight lids can also be used.
NOTE: Keep your refrigerator smelling fresh with an
open box of baking soda.
Storing fresh food (cont.)
Page 20

20
The freezer section is designed for storing
commercially frozen food and for freezing food
at home.
NOTE: For further information about preparing food
for freezing or food storage times, check a freezer
guide or reliable cookbook.
Packaging
Successful freezing depends on the correct packaging.
When you close and seal the package you must not
allow air or moisture in or out. If you do, you could
have food odor and taste transfer throughout the
refrigerator, and also dry out frozen food.
Packaging recommendations:
•
Rigid plastic containers with tight-fitting lids
•
Straight-sided canning/freezing jars
•
Heavy-duty aluminum foil
•
Plastic-coated paper
•
Non-permeable plastic wraps (made from
saran film)
•
Specified freezer self-sealing plastic bags
Follow package or container instructions for proper
freezing methods.
Do not use:
•
Bread wrappers
•
Non-polyethylene plastic containers
•
Containers without tight lids
•
Wax paper or wax-coated freezer wrap
•
Thin, semi-permeable wrap
Freezing
Your freezer will not quick-freeze any large quantity of
food. Put no more unfrozen food into the freezer than
will freeze within 24 hours (about 2 to 3 lbs of food
per cubic foot [907-1,350 g per liter] of freezer space).
Leave enough space in the freezer for air to circulate
around packages. Also leave enough room at the front
so the door can close tightly.
Storage times vary according to the quality and
type of food, the type of packaging used (airtight
and moisture-proof), and the storage temperature.
Ice crystals inside a sealed package are normal.
It means that moisture in the food and air inside the
package have condensed, creating ice crystals.
Storing frozen food
NOTE: Allow hot foods to cool at room temperature for
30 minutes, then package and freeze. Cooling hot
foods before freezing saves energy.
Page 21

21
There is water in the defrost drain pan
Check if ...
The refrigerator is defrosting.
It is more humid than normal.
Water in the defrost pan is overflowing.
Then ...
The water will evaporate. It is normal for water to drip into
the defrost pan.
Expect that the water in the defrost pan will take longer to
evaporate. This is normal when it is hot or humid.
Check to make sure your refrigerator is level. (See the
“Leveling” section.) If it is still overflowing, there is probably
something wrong with the refrigerator. Call the Consumer
Assistance Center.
T
ROUBLESHOOTING
G
UIDE
Check if ...
The power supply cord is unplugged.
A household fuse has blown or circuit breaker
has tripped.
The Refrigerator Control is turned to the
“OFF” position.
The refrigerator is defrosting.
Then ...
Firmly plug the cord into a live outlet with proper voltage.
Replace the fuse or reset the circuit.
Refer to the “Setting temperature controls” section.
Recheck to see if the refrigerator is operating in 30 minutes.
Your refrigerator will regularly run an automatic defrost cycle.
If it is still not running after checking the above items, call
the Consumer Assistance Center.
The lights do not work
Check if ...
The power supply cord is unplugged.
A household fuse or circuit breaker has tripped.
A light bulb is loose in the socket.
A light bulb has burned out.
Then ...
Firmly plug the cord into a live outlet with proper voltage.
Replace the fuse or reset the circuit.
Turn the Freezer Control to OFF. Disconnect the
refrigerator from the electrical supply. Gently remove the
bulb and reinsert. Then reconnect the refrigerator to the
electrical supply and reset the Freezer Control.
Replace with an appliance bulb of the same wattage, size,
and shape. See the “Changing the light bulbs” section.
Your refrigerator will not operate
You can solve many common refrigerator problems
easily, saving you the cost of a possible service call.
Try the suggestions below to see if you can solve your
problem without outside help. If the suggestions do not
work, please call the KitchenAid Consumer Assistance
Center.
Page 22

22
The motor seems to run too much
Check if ...
The room temperature is hotter than normal.
A large amount of food has just been added to
the refrigerator.
The door is opened often.
The controls are not set correctly for the
surrounding conditions.
The doors are not closed completely.
The base grille is dirty or blocked.
The condenser coils are dirty.
The door gaskets are not sealed all the way around.
Then ...
Expect the motor to run longer under warm conditions. At
normal room temperatures, expect your motor to run about
40% to 80% of the time. Under warmer conditions, expect
it to run even more of the time.
Adding a large amount of food warms the refrigerator. It
is normal for the motor to run longer in order to cool the
refrigerator back down. See the “Food Storage Guide”
section.
Expect the motor to run longer when this occurs. In order
to conserve energy, try to get everything you need out of
the refrigerator at once, keep food organized so it is easy
to find, and close the door as soon as the food is removed.
Refer to the “Setting temperature controls” section.
Push the doors firmly shut. If they will not shut all the
way, see “The doors will not close completely,” later in
this section.
This prevents air circulation and makes the motor work
harder. Remove the grille and clean.
This prevents air transfer and makes the motor work harder.
Clean the condenser coils. Refer to the “Cleaning your
refrigerator” section.
Contact a qualified person or a technician.
If the problem is not due to any of the above, remember
that your new refrigerator will run longer than your old one
due to its high-efficiency motor.
The refrigerator seems to make too much noise
Check if ...
The sounds and noises are common for new
refrigerators.
Then ...
Refer to the “Understanding the sounds you may hear”
section.
Troubleshooting (cont.)
Page 23

23
Off-taste or odor in the ice
Check if ...
The plumbing connections are new, causing
discolored or off-flavored ice.
The ice cubes have been stored for too long.
Food in the freezer has not been wrapped properly.
Freezer and ice bin need to be cleaned.
Water contains minerals (such as sulfur).
Then ...
Discard the first few batches of ice.
Throw old ice away and make a new supply.
Refer to the “Storing frozen food” section.
See the “Cleaning your refrigerator” section.
A filter may need to be installed to remove the minerals.
The ice maker is not producing ice
Check if ...
The freezer temperature is not cold enough to
produce ice.
The ice maker arm is in the “OFF” (arm up) position.
The water line shutoff valve to the refrigerator is
not turned on.
An ice cube is jammed in the ejector arm.
The ice maker mold has no water in it or no ice
has been produced.
Then ...
See the “Setting controls” section.
Lower arm to the “ON” (arm down) position. See the “Ice
maker operation” section.
Turn on the water valve.
Remove the ice from the ejector arm with a plastic utensil.
Refer to the “Ice maker operation” section.
Check to see if your refrigerator has been connected to
your home water supply and the supply shutoff valve is
turned on.
If not due to any of the above, there may be a problem with
the water line. Contact the Consumer Assistance Center.
The ice maker is producing too little ice
Check if ...
The ice maker has just been installed.
A large amount of ice has just been removed.
The controls are not set correctly.
The water shutoff valve is not turned completely on.
There is a water filter installed on the refrigerator.
This filter may be clogged or installed incorrectly.
Then ...
Wait 72 hours for full ice production to begin. Once your
refrigerator is cooled down, the ice maker should begin
producing 56-72 cubes every 24 hours.
Allow 24 hours for ice maker to produce more ice.
Refer to the “Setting temperature controls” section.
Turn valve on fully. Refer to the “Ice maker operation”
section.
First, check the filter installation instructions to ensure
that the filter was installed correctly and is not clogged.
If installation or clogging is not a problem, call a qualified
person or a technician.
Page 24

24
The divider between the two compartments is warm
Check if ...
The condenser coils or base grille are dirty or clogged.
The motor has quit working.
Then ...
Clean according to the “Cleaning your refrigerator” section.
See “Your refrigerator will not operate” earlier in this section.
NOTE: The refrigerator temperature may turn from warm
to hot.
If not due to any of the above, the warmth is probably due
to normal operation of the automatic exterior moisture
control. If still concerned, call the Consumer Assistance
Center or an authorized KitchenAid service company.
Temperature is too warm
There is interior moisture build-up
Check if …
The door is opened often.
The room is humid.
Then ...
To avoid humidity build-up, try to get everything you need
out of the refrigerator at once, keep food organized so it is
easy to find, and close the door as soon as the food is
removed. (When the door is opened, humidity from the
room air enters the refrigerator. The more often the door is
opened, the faster humidity builds up, especially when the
room itself is very humid.)
It is normal for moisture to build up inside the refrigerator
when the room air is humid.
Check if ...
The door(s) are opened often.
A large amount of food has just been added to
the refrigerator or freezer.
The controls are not set correctly for the surrounding
conditions.
Then ...
Be aware that the refrigerator will warm when this occurs.
In order to keep the refrigerator cool, try to get everything
you need out of the refrigerator at once, keep food
organized so it is easy to find, and close the door as soon
as the food is removed.
Adding a large amount of food warms the refrigerator.
It can take several hours for the refrigerator to return to the
normal temperature.
Refer to the “How controls work” section.
Page 25

25
The doors will not close completely
Check if ...
Food packages are blocking the door open.
The ice bin is out of position.
The pans, shelves, bins, or baskets are out
of position.
The gaskets are dirty.
The doors were removed during product installation
and not properly replaced.
Then ...
Rearrange containers so that they fit more tightly and take
up less space.
Push the ice bin in all the way.
Put all pans, shelves, bins, and baskets back into their
correct position.
Clean gaskets according to the directions in the “Caring for
Your Refrigerator” section.
The doors are difficult to open
Check if ...
The gaskets are dirty or sticky.
Then ...
Clean gaskets according to the directions in the “Caring
for Your Refrigerator” section.
There is interior moisture build-up (cont.)
Check if ...
The food is not packaged correctly.
The controls are not set correctly for the
surrounding conditions.
A self-defrost cycle was completed.
Then ...
Check that all food is securely wrapped. If necessary,
repackage food according to the guidelines in the “Food
Storage Guide” section. Wipe off damp food containers
before placing in the refrigerator.
Refer to the “Setting temperature controls” section.
It is normal for droplets to form on the back wall after the
refrigerator self-defrosts.
Remove and replace the doors or, contact a qualified
person.
Page 26

26
Call the KitchenAid Consumer Assistance
Center toll-free at 1-800-235-0665.
Our consultants are available to assist you.
When calling: Please know the purchase date, and the
complete model and serial number of
your appliance (see the “A Note to You”
section). This information will help us
better respond to your request.
Our consultants provide assistance with:
•
Features and specifications on our full line
of appliances
•
Installation information
If you need replacement parts
If you need to order replacement parts, we recommend
that you only use factory-authorized parts. These parts
will fit right and work right, because they are made to
the same exacting specifications used to build every
new KitchenAid* appliance.
To locate factory-authorized parts in your area, call our
Consumer Assistance Center telephone number, your
nearest authorized service center, or KitchenAid Factory
Service at 1-800-442-1111.
For further assistance
If you need further assistance, you can write to
KitchenAid with any questions or concerns at:
KitchenAid Brand Home Appliances
Consumer Assistance Center
c/o Correspondence Dept.
2000 North M-63
Benton Harbor, MI 49022-2692
Please include a daytime phone number in your
correspondence.
•
Use and maintenance procedures
•
Accessory and repair parts sales
•
Specialized customer assistance (Spanish speaking,
hearing impaired, limited vision, etc.)
•
Referrals to local dealers, service companies, and
repair parts distributors
KitchenAid designated service technicians are
trained to fulfill the product warranty and provide afterwarranty service, anywhere in the United States.
To locate the designated KitchenAid service company
in your area, you can also look in your telephone
directory Yellow Pages.
To avoid unnecessary service calls, please
check the “Troubleshooting Guide” section. It
may save you the cost of a service call. If you
still need help, follow the instructions below.
If you need assistance or service in U.S.A.
R
EQUESTING
A
SSISTANCE OR
S
ERVICE
Page 27

27
R
EQUESTING
A
SSISTANCE OR
S
ERVICE
2. If you need service✝...
Contact your nearest KitchenAid Canada Appliance
Service branch or authorized servicing outlet to
service your appliance. (See list below.)
Make sure the service company you contact is
authorized to service your appliance during the
warranty period.
1. If the problem is not due to one of the items
listed in “Troubleshooting Guide”
✝
...
Contact the dealer from whom you
purchased your appliance, or call the
KitchenAid Canada Consumer Assistance
Centre toll-free, 8:30 a.m. – 6 p.m. (EST),
at 1-800-235-0665.
KitchenAid Canada Appliance Service – Consumer Services
Direct service branches:
BRITISH COLUMBIA 1-800-665-6788
ALBERTA 1-800-661-6291
ONTARIO Ottawa area 1-800-267-3456
(except 807 area code) Outside the Ottawa area 1-800-807-6777
MANITOBA,SASKATCHEWAN 1-800-665-1683
and 807 area code in ONTARIO
QUEBEC Montreal (except South Shore) 1-800-361-3032
South Shore Montreal 1-800-361-0950
Quebec City 1-800-463-1523
Sherbrooke 1-800-567-6966
ATLANTIC PROVINCES 1-800-565-1598
For further assistance
If you need further assistance, you can write to
KitchenAid Canada with any questions or concerns at:
Consumer Relations Department
KitchenAid Canada
1901 Minnesota Court
Mississauga, Ontario L5N 3A7
Please include a daytime phone number in your
correspondence.
✝
When asking for assistance or service, please
provide a detailed description of the problem,
your appliance’s complete model and serial
numbers, and the purchase date. (See the “A
Note to You” section.) This information will help
us respond properly to your request.
Before calling for assistance or service, please
check the “Troubleshooting Guide” section. It may
save you the cost of a service call. If you still need
help, follow the instructions below.
If you need assistance or service in Canada
Page 28

11/99
Printed in U.S.A.
PART NO. 2006136 Rev. A
© 1999 KitchenAid
® Registered trademark/TMtrademark of KitchenAid, U.S.A., KitchenAid Canada licensee in Canada
KITCHENAID AND KITCHENAID CANADA DO NOT ASSUME ANY RESPONSIBILITY FOR INCIDENTAL OR
CONSEQUENTIAL DAMAGES. Some states or provinces do not allow the exclusion or limitation of incidental or
consequential damages, so this exclusion or limitation may not apply to you.
This warranty gives you specific legal rights, and you may also have other rights which may vary from state to
state or province to province.
Outside the United States and Canada, a different warranty may apply. For details, please contact your
authorized KitchenAid dealer.
If you need service, first see the “Troubleshooting Guide” section of this book. After checking the “Troubleshooting
Guide,” additional help can be found by checking the “Requesting Assistance or Service” section or by calling our
Consumer Assistance Center, 1-800-235-0665 (toll-free), from anywhere in the U.S.A. or Canada.
LENGTH OF
WARRANTY:
ONE YEAR FULL
WARRANTY
FROM DATE OF
INSTALLATION
TWO YEAR FULL
WARRANTY
FROM DATE OF
INSTALLATION
KITCHENAID
WILL NOT PAY FOR:
A. Service calls to:
1. Correct the installation of the refrigerator.
2. Instruct you how to use the refrigerator.
3. Replace house fuses or correct house
wiring.
4. Replace house plumbing.
B. Repairs when refrigerator is used in other
than normal home use.
C. Damage resulting from accident, alteration,
misuse, abuse, improper installation, or
installation not in accordance with local
electrical codes or plumbing codes.
D. Any food loss due to product failure.
E. Any labor costs during the limited
warranty.
F. Replacement parts or repair labor costs for
units operated outside the United States or
Canada.
G. Repairs to parts or systems resulting from
unauthorized modifications made to the
appliance.
H. Removal and replacement of trim or
decorative panels that interfere with
servicing the product.
I. Labor or parts installed by any non-
designated service company during the
full warranty period, unless approved by
KitchenAid before service is performed.
J. Any medicine loss due to product failure.
KITCHENAID
WILL PAY FOR:
Replacement parts and labor costs to
correct defects in light bulbs. Service must
be provided by a designated KitchenAid
servicing outlet.
Replacement parts and repair labor costs
to correct defects in materials or workmanship. Service must be provided by a
designated KitchenAid servicing outlet.
Replacement parts and repair labor costs
to correct defects in materials or
workmanship in the sealed refrigeration
system.
These parts are:
1. Compressor; 2. Evaporator;
3. Condenser; 4. Drier;
5. Connecting Tubing.
Service must be provided by a designated
KitchenAid servicing outlet.
Replacement parts to correct defects in
materials or workmanship in the sealed
refrigeration system.
These parts are:
1. Compressor; 2. Evaporator;
3. Condenser; 4. Drier;
5. Connecting Tubing.
Replacement parts to correct defects in
materials of workmanship in the
refrigerator door bins.
11/99
Built-In Refrigerator Warranty
THIRD THROUGH
SIXTH YEAR FULL
WARRANTY
FROM DATE OF
INSTALLATION
SEVENTH THROUGH
TWELFTH YEAR
LIMITED
WARRANTY
FROM DATE OF
INSTALLATION
LIFETIME LIMITED
WARRANTY ON
REFRIGERATOR
DOOR BINS
®
Page 29

2006136 Rev. A www.kitchenaid.com
Réfrigérateur-congélateur
encastré de 36 po, 42 po, 48 po
BIEN PENSé, BIEN fabriqué
®
®
Page 30

2
N
OTEÀL
’
UTILISATEUR
Merci d’avoir acheté un appareil
électroménager KitchenAid
®
.
KitchenAid conçoit les meilleurs appareils pour la pièce la
plus importante de votre domicile. Pour que ce produit
puisse vous procurer de nombreuses années de service
sans problème, nous avons préparé ce guide d’utilisation
et d’entretien.Vous y trouverez de nombreux
renseignements sur les méthodes d’entretien convenables
et sur l’utilisation en sécurité de votre nouvel appareil.
Veuillez les lire attentivement.
Veuillez aussi remplir et retourner la carte d’inscription
du produit, fournie avec votre appareil. Cette carte nous
aidera à vous tenir au courant de tout nouveau
renseignement au sujet de votre appareil électroménager.
Page
Note à l’utilisateur .......................................................... 2
Sécurité du réfrigérateur ............................................... 3
Mise au rebut prudente de votre
vieux réfrigérateur....................................................... 3
Pièces et caractéristiques ............................................. 4
Utilisation du réfrigérateur ............................................ 5
Retrait du panneau de ventilation supérieur............... 5
Utilisation de l’interrupteur .......................................... 5
Système de gestion de la température
ExtendFreshMC............................................................. 6
Thermostats ................................................................ 6
Caractéristiques du réfrigérateur ................................ 7
Compartiment range-tout..................................... 7
Balconnets réglables de la porte ......................... 7
Tablettes SpillCleanMCdu réfrigérateur................. 7
Bac à viande FreshChillMC.................................... 8
Bacs à légumes à humidité
contrôlée ClearVueMC............................................ 9
Oeufrier avec couvercle.......................................10
Casier à vin..........................................................10
Caractéristiques du congélateur .................................10
Clayettes réglables du congélateur......................10
Paniers coulissants du congélateur.....................10
Page
Utilisation de la machine à
glaçons automatique ............................................11
Solutions aux problèmes de fonctionnement
de la machine à glaçons......................................11
Retrait du bac de la machine à glaçons..............12
Utilisation des distributeurs d’eau froide
et de glaçons .......................................................13
Grille de la base.......................................................... 14
Plateau de dégivrage...................................................15
Ampoules ....................................................................15
Les bruits de l’appareil................................................ 16
Économie d’énergie ....................................................16
Entretien du réfrigérateur..............................................17
Nettoyage du réfrigérateur..........................................17
Entretien avant les vacances ou lors
d’un déménagement ...................................................18
Pannes de courant......................................................18
Guide de conservation des aliments............................19
Conservation des aliments frais ..................................19
Conservation des aliments congelés..........................20
Guide de dépannage ........................................................21
Demande d’assistance ou de service ..........................26
Garantie...........................................................................27
T
ABLE DES MATIÈRES
Inscrivez ces renseignements concernant votre
modèle.
Veuillez inscrire les renseignements suivants au sujet de votre
réfrigérateur pour nous permettre de mieux vous aider à obtenir
une assistance ou un service si vous en avez besoin. Vous
devrez connaître le numéro au complet du modèle et le numéro
de série. Ces renseignements sont indiqués sur la plaque
signalétique indiquant le numéro de modèle et le numéro de
série.
Si vous avez besoin d’assistance ou de service …
Voir la section «Guide de dépannage» de ce livret. Après cette
consultation, une autre aide peut être obtenue en vérifiant la
section «Demande d’assistance ou de service».
Nom du marchand
Adresse
Numéro de téléphone
Numéro de modèle
Numéro de série
Date d’achat
(Voir la section «Pièces et caractér istiques» pour l’emplacement
de la plaque signalétique du numéro de modèle et du numéro de
série.)
Conservez ce livret et votre reçu de vente pour
référence ultérieure.
Page 31

3
•
Brancher l’appareil à une prise à 3 alvéoles reliée à
la terre.
•
Ne pas enlever la broche de liaison à la terre.
•
Ne pas utiliser un adaptateur.
•
Ne pas utiliser un câble de rallonge.
•
Débrancher la source de courant électrique avant
l’entretien.
•
Enlever les portes de votre vieux réfrigérateur.
•
Utiliser un produit de nettoyage ininflammable
seulement.
•
Ne pas installer le réfrigérateur près d’un four, radiateur,
ou autre source de chaleur.
•
Garder les matériaux et les vapeurs inflammables, telle
que l’essence, loin du réfrigérateur.
•
Deux personnes ou plus doivent déplacer et installer le
réfrigérateur.
•
Débrancher le réfrigérateur avant l’installation de la
machine à glaçons.
•
Utiliser un verre robuste pour prendre des glaçons
ou de l’eau (sur certains modèles).
IMPORTANTES INSTRUCTIONS DE SÉCURITÉ
Risque possible de décès ou de blessure grave si vous ne
suivez pas les instructions.
DANGER
AVERTISSEMENT
Votre sécurité et celle des autres sont très importantes.
Nous donnons de nombreux messages de sécurité importants dans ce manuel et au sujet de votre appareil ménager. Assurez-vous
de toujours lire tous les messages de sécurité et de les respecter.
Ce symbole d’alerte de sécurité vous signale les dangers susceptibles de causer un décès et des blessures graves. Tous
les messages de sécurité seront précédés du symbole d’alerte de sécurité et du mot «DANGER» ou «AVERTISSEMENT».
Ces mots signifient :
Tous les messages de sécurité identifient le danger et vous indiquent comment réduire le risque de blessure et ce qui peut se
produire en cas de non-respect des instructions.
Risque certain de décès ou de blessure grave si vous ne
suivez pas les instructions.
S
ÉCURITÉ DU RÉFRIGÉRATEUR
Risque de suffoquer
Enlever les portes de votre vieux réfrigérateur.
Le non-respect de cette instruction peut causer un
décès ou des lésions cérébrales.
Mise au rebut prudente de votre vieux réfrigérateur
IMPORTANT : Les enfants qui s’enferment ou qui suffoquent
dans un réfrigérateur ne sont pas d’anciens problèmes. Les
réfrigérateurs abandonnés ou mis au rebut présentent des
dangers même s’ils sont laissés abandonnés «pendant
quelques jours» seulement. Si vous vous débarrassez de
votre vieux réfrigérateur, veuillez observer les instructions
suivantes pour aider à éviter les accidents.
AVANT DE METTRE AU REBUT VOTRE VIEUX
RÉFRIGÉRATEUR OU CONGÉLATEUR :
•
Enlever les portes.
•
Laisser les tablettes en place de sorte que les enfants ne
peuvent pas facilement se glisser à l’intérieur.
AVERTISSEMENT
– CONSERVEZ CES INSTRUCTIONS –
AVERTISSEMENT : Pour réduire les risques d’incendie, de choc électrique ou de blessures
lors de l’utilisation du réfrigérateur, prendre quelques précautions fondamentales, y compris
les suivantes :
Page 32

4
Cette section présente une illustration descriptive de votre
réfrigérateur.Veuillez utiliser ces renseignements pour bien
connaître les pièces et les caractéristiques. Les références
de page sont incluses pour vous accommoder.
REMARQUE : Ce manuel couvre plusieurs modèles
différents. Le réfrigérateur que vous avez acheté peut avoir
certaines ou toutes les caractéristiques indiquées cidessous.
P
IÈCES ET CARACTÉRISTIQUES
24
51
Cold Colder
▲
Superba 48
24
51
Cold Colder
Off
▲
Cold Colder
FreshChill
Meat Locker
ExtendFresh
Temperature System
▲
Machine à glaçons
automatique
(p.11)
Balconnet fixe de la
porte
Bac à glaçons
(p.12)
Ampoule du congélateur
(sous le bac à glaçons)
(p.15)
Étiquette signalétique
des numéros de modèle
et de série (p.2)
Distributeur d’eau et de
glaçons (sur certains
modèles)
(p.13)
Clayette réglable du
congélateur
(p.10)
Clayettes fixes du
congélateur
Paniers coulissants du
congélateur
(p.10)
Compartiment
range-tout
(p.7)
Clayette en verre
réglable
SpillClean*
(p.7)
Balconnets réglables
de la porte
(p.7)
Oeufrier avec couverde
(p.10)
Casier à vin
(p.10)
Balconnet dans la
porte pour remiser
les gallons
(p.7)
Thermostat du bac à
viande FreshChill*
(p.8)
Bac à viande coulissant
réglable FreshChill*
(p.8)
Bac à légumes
coulissant à humidité
contrôlée ClearVue*
(p.9)
Ampoule du congélateur
(derrière le panneau de
commandes)
(p.15)
Thermostat du
congélateur
(p.6)
Panneau de
ventilation
supérieur
(p.5)
Interrupteur
(derrière le
panneau de
ventilation
supérieur)
(p.5)
Thermostat du
réfrigérateur
(p.6)
Ampoule du réfrigérateur
(derrière le panneau de
commandes)
(p.15)
Tube d’alimentation en
eau du distributeur
électrique
(derrière la grille
de la base)
Plateau de
dégivrage
(derrière la grille
de la base)
(p.15)
Soupape d’eau
(derrière la
grille de la
base)
Grille de la base
Page 33

5
Risque de choc électrique
Brancher sur une prise à 3 alvéoles reliée à la
terre.
Ne pas enlever la broche de liaison à la terre.
Ne pas utiliser un adaptateur.
Ne pas utiliser un câble de rallonge.
Le non-respect de ces instructions peut causer
un décès, un incendie ou un choc électrique.
Pour obtenir le meilleur rendement du réfrigérateur, il est
important de l’utiliser convenablement. On décr it dans
cette section les méthodes de réglage de la température,
comment effectuer le réglage de certaines fonctions du
réfrigérateur, et comment économiser l’énergie.
Risque d’explosion
Garder les matériaux et les vapeurs inflammables
telle que l’essence, loin du réfrigérateur.
Le non-respect de cette instruction peut causer
un décès, une explosion, ou un incendie .
AVERTISSEMENT
U
TILISATION DU RÉFRIGÉRATEUR
AVERTISSEMENT
Modèles à panneau —
Pour le retirer :
1. Saisir les deux extrémités du panneau
2. Pousser vers le haut et retirer.
Pour le replacer :
1. Insérer les crochets (situés à l’arrière du panneau de ventilation) dans
les fentes du support.
2. Tirer le panneau légèrement vers le bas jusqu’à ce qu’il tombe bien
en place.
Modèles à panneau en acier inoxydable à contour —
KSSC36M, KSSC42M, KSSC48M
Pour le retirer :
1. Saisir les deux extrémités du panneau de ventilation.
2. Pousser directement vers le haut, ensuite le retirer.
Pour le retirer :
1. Insérer les crochets (situés à l’arrière du panneau de ventilation) dans
les fentes de la garniture latérale.
2. Abaisser légèrement le panneau de ventilation jusqu’à ce qu’il tombe
bien en place.
Retrait du panneau de ventilation supérieur
O
FF
O
N
Utilisation de l’interrupteur
L’interrupteur se trouve derrière le panneau de ventilation supérieur. On l’utilise
pour arrêter le courant du réfrigérateur avant le nettoyage de l’appareil ou le
remplacement d’une ampoule électrique.
Pour arrêter le courant :
1. Retirer le panneau de ventilation supérieur.
2. Régler l’interrupteur en position ARRÊT (OFF).
Pour remettre le courant :
1. Régler l’interrupteur en position EN MARCHE (ON).
2. Replacer le panneau de ventilation supérieur.
IMPORTANT : S’assurer que l’interrupteur est en position EN MARCHE après
le nettoyage de réfrigérateur ou le remplacement d’une ampoule électrique.
Page 34

6
Système de gestion de la température EXTENDFRESH
MC
Le système de gestion de la température ExtendFresh
contrôle la température indépendamment dans le
compartiment de congélation et dans le compar timent de
réfrigération. Le système aide à prolonger la fraîcheur des
aliments dans le réfrigérateur en réagissant à des
variations de température aussi faibles que 1°F. À la
différence de la plupart des réfrigérateurs qu’on trouve
aujourd’hui sur le marché, le système ExtendFresh de ce
réfrigérateur utilise un ventilateur spécial Smart* Fan pour
faire passer immédiatement de l’air froid du congélateur
au réfrigérateur pour produire un abaissement de la
température plus rapide, sans qu’une mise en marche du
compresseur soit nécessaire. De même, le système
maintient une température constante qui est moins
affectée par les variations de la température extér ieure,
comme celles imputables aux variations saisonnières et
au thermostat programmable, ou même par les variations
de température dans d’autres compartiments à l’intérieur
du réfrigérateur.
Réglage des commandes de température
Les commandes de température du réfrigérateur et du
congélateur ont été préréglées à l’usine. Ces réglages
devraient être appropriés pour l’usage normal d’un
réfrigérateur ménager.Laisser au réfrigérateur le temps
d’atteindre la température préréglée (environ 24 heures)
avant de changer la position de réglage.
Pour changer le réglage de la température :
Régler le thermostat du réfrigérateur et/ou du
congélateur.
• Pour faire baisser la température, tourner la commande
dans le sens des aiguilles d’une montre.
• Pour faire monter la température, tourner la commande
dans le sens inverse.
IMPORTANT : Le réglage Off (arrêt) arrête toute action
refroidissante mais ne débranche pas le réfrigérateur de
la source de courant.
Si c’est possible, laisser s’écouler une période de 24
heures avant de placer des aliments dans le réfrigérateur.
Le réfrigérateur ne se refroidira pas plus vite si on choisit
une position de réglage plus élevée.Si on introduit des
aliments dans le réfrigérateur avant qu’il se soit
complètement refroidi, il lui faudra plus de temps pour
atteindre la température désirée, et certains de ces
aliments pourraient se détériorer.
Après 24 heures, ajuster la température progressivement
jusqu’au niveau désiré, en modifiant la position de
réglage de la commande par intervalle d’une unité. La
position «1» correspond à la température la plus élevée;
la position «5» correspond à la température la plus basse.
Après chaque ajustement du réglage, laisser le
réfrigérateur fonctionner pendant 24 heures.
Cold Colder
Off
24
51
▲
Cold Colder
Off
24
51
▲
Thermostat du réfrigérateur
Thermostat du congélateur
Page 35

7
Caractéristiques du réfrigérateur
Compartiment range-tout
Le compartiment range-tout peut être placé n’importe où dans la porte du
réfrigérateur.
Pour le retirer :
1. Prendre le compartiment par les deux extrémités.
2. Lever et tirer.
Pour le replacer :
1. Insérer les crochets du compartiment dans les crans de crémaillère situés
de chaque côté de la porte.
2. Pousser vers le bas pour mettre en place.
Balconnets réglables de la porte
Les balconnets de porte peuvent recevoir des bouteilles de deux litres et être
placés n’importe où dans la porte du réfrigérateur.
Pour le retirer :
1. Saisir le balconnet.
2. Lever et tirer.
Pour le replacer :
1. Insérer les crochets du balconnet dans les crans de crémaillère situés de
chaque côté de la porte.
2. Pousser vers le bas pour mettre en place.
Balconnet dans la porte pour gallons
Le balconnet dans la porte peut contenir plusieurs récipients de un gallon
et peut être placé à n’importe quelle position dans la por te du
réfrigérateur.
Remarque : Si on place le balconnet dans la porte pour gallons
directement en face d’une tablette intérieure ou d’un bac avec couvercle,
on empêchera la porte du réfrigérateur de fermer, ce qui pourrait
endommager les bacs et les tablettes.
Installation :
1.
Insérer les crochets de retenue dans les fentes appropriées sur la porte.
2. Abaisser le balconnet pour fixer les crochets.
3. Si nécessaire, ajuster les tablettes intérieures pour recevoir les
contenants de lait et grands contenants de boisson placés dans le
balconnet dans la porte pour gallons.
SpillClean
MC
tablettes en verre du réfrigérateur
Ajuster la position des tablettes dans le réfrigérateur en fonction des besoins.
IMPORTANT : Ne pas nettoyer les tablettes en verre dans l’eau tiède
quand elles sont froides. Les tablettes peuvent casser si elles sont
exposées à des changeménts de température soudains ou à un impact.
Pour votre protection, le verre trempé est conçu pour éclater en
d’innombrables petits morceaux. Ceci est nor mal.
Pour enlever les tablettes :
1. Soulever la tablette à l’avant et à l’arrière.
2. Tirer la tablette en ligne droite pour l’extraire du réfrigérateur.
IMPORTANT : Les tablettes en verre sont lourdes. Les manipuler prudement.
Pour remettre en place les tablettes :
1. Guider les crochets arrière de la tablette dans les ouvertures d’appui
sur la paroi arrière du réfrigérateur.
2. Soulever la tablette à l’avant pour que les crochets puissent descendre dans
les ouvertures. Abaisser l’avant pour placer la tablette horizontalement.
3. Contrôler la stabilité de la tablette pour vérifier que les crochets ont été
convenablement insérés.
ÉVITER
Page 36

8
Bac à viande FreshChill
MC
Réglage du thermostat du bac à viande
FreshChill
MC
Le thermostat du bac à viande FreshChill permet de
régler la température de rangement du bac à viande
FreshChill.
L’air froid circule dans le bac à viande FreshChill par une
conduite d’air qui relie le congélateur au réfrigérateur.Le
réglage de la température permet à plus ou moins d’air
de passer par l’ouverture. Régler le thermostat à «Cold»
pour fermer le conduit d’air.
IMPORTANT : Si un aliment gèle dans le bac à viande
FreshChill, le compartiment range-tout ou le bac à
légumes, tourner le réglage de la température du bac à
viande FreshChill à «Cold» (Froid).Si le distributeur d’eau
cesse de fonctionner, l’eau dans le conduit peut être
gelée. Dans ces cas, tourner le réglage de la température
du bac à viande FreshChill à «Cold» (Froid).
Le bac à viande FreshChill a été conçu pour permettre de
ranger les aliments à des températures plus basses que
la température moyenne du réfrigérateur. On peut placer
le réceptacle du bac à viande dans n’importe quelle série
de crans à crémaillère. Par contre, pour un usage à
température contrôlée, il faut que le bac à viande soit
installé dans l’avant-dernière rangée de crans, en
partant du bas. Le bac à viande FreshChillMCpeut être
retiré pour le nettoyage.
IMPORTANT : Si le bac à viande est installé dans
n’importe quelle rangée de crans autre que l’avantdernière rangée de crans en partant du bas, boucher
l’orifice d’alimentation d’air.À cette fin, un bouchon est
collé à l’aide d’un ruban adhésif au fond du bac à viande.
Le raccord à air en caoutchouc (placé derrière le bac à
viande) dirige l’air provenant des trous de l’alimentation
en air dans le bac à viande. Si le raccord d’air se
détache, le remettre en le poussant dans l’ouverture
carrée au dos du bac à viande.
Pour le retirer :
1. Faire glisser le bac à viande vers l’extérieur jusqu’à la
butée.
2. Soulever légèrement l’avant du bac à viande.
3. Tirer le bac à viande complètement vers l’extérieur.
Pour le replacer :
1. Positionner les roulettes du bac à viande entre la
roulette avant du rail et le rail.
2. Pousser vers le haut et sur le rail.
3. Faire glisser vers l’arrière jusqu’à la butée.
M
E
A
T
L
O
C
K
E
R
(Bac à viande)
(Plus froid)(Froid)
Page 37

9
U
T
IL
IT
Y
L
O
W
H
I
G
H
1
2
3
4
5
H
um
id
ityC
o
n
tro
l
L
O
W
H
I
G
H
1
2
3
4
5
H
u
m
id
ity
C
o
n
tro
l
Bacs à légumes à humidité contrôlée
ClearVue
MC
Les bacs à légumes à température contrôlée permettent de
maximiser la conservation des légumes et fruits frais.Les
commandes des bacs à légumes sont placées sous le bord
avant des bacs.Ces organes de commande permettent
d’ajuster le niveau hyg rométrique dans les bacs.Placer les
commandes à la position HIGH pour la conservation de laitue,
chou et autres légumes à feuilles.Placer les commandes à la
position LOWpour la conservation de pommes, maïs et
autres produits frais qui comportent une pelure.
IMPORTANT : À l’occasion, un aliment peut geler dans le bac
à viande FreshChill, le compartiment range-tout ou le bac à
légumes.Quand ceci ce produit, tourner le réglage de la
température du bac à viande FreshChill à «Cold» (Froid).
Pour retirer les bacs à légumes :
1. Tirer le bac jusqu’à la butée.
2. Soulever le devant du bac et le tirer complètement.
Pour replacer les bacs :
1. Placer en position les roulettes du bac entre la roulette
avant du rail et le rail.
2. Pousser le bac vers le haut et sur le rail.
3. Glisser le bac vers l’arrière jusqu’à l’arrêt.
Pour retirer les couver cles en verre :
1. Soulever le côté droit du couvercle en verre pour dégager
le dispositif de retenue et le côté gauche du couvercle .
2. Retirer soigneusement le couvercle en verre.
Pour replacer les couver cles en verre :
1. Placer le dispositif de retenue sur le côté droit du couvercle
en verre.
2. Insérer le côté gauche du couvercle en verre dans la
rainure à la gauche du bac.
3. Abaisser le couvercle de façon à ce que les tiges du
dispositif de retenue tombent en place dans les trous à la
droite du bac
Pour retirer la section ClearVue :
1. Retirer le couvercle en v erre.
2. Faire glisser la section ClearVue le long du rail, à l’écart de
la pièce de retenue.
3. Replacer dans l’ordre inverse.
Page 38

10
Oeufrier avec couvercle
L’oeufrier avec couvercle fournit une protection
supplémentaire pour garder les oeufs n’importe où à
l’intérieur de la section du réfrigérateur. Le contenant
ClearVueMCvous permet de voir combien d’oeufs vous
avez en réserve.
Casier à vin
Introduire le casier à vin en position en le glissant entre
une tablette du réfrigérateur et la paroi du compartiment
de réfrigération.
Caractéristiques du
congélateur
Clayettes du congélateur
Pour les retirer :
1. Soulever la clayette.
2. Tirer la clayette vers l’extérieur.
3. Replacer dans l’ordre inverse.
Paniers coulissants du congélateur
Pour les retirer :
1. Tirer le panier vers l’extérieur jusqu’à la butée.
2. Soulever légèrement le panier et le déplacer vers la
gauche.
3. Tirer le panier vers l’avant pour le sortir.
Pour les replacer :
1. Mettre le panier dans les rails de l’étagère et le
déplacer vers la gauche.
2. Pousser le panier jusqu’à la butée du côté gauche.
3. Soulever légèrement le côté gauche du panier pour
franchir la butée.
4. Pousser le panier vers l’intérieur.
IMPORTANT : S’assurer que les deux côtés du panier
sont dans les rails de l’étagère, avant d’y placer des
aliments.
Remarque : Le balconnet fixe dans la porte ne peut pas
être enlevé.
Page 39

11
Utilisation de la machine
à glaçons automatique
Pour mettre la machine à glaçons en marche :
• Pour les modèles avec distributeur seulement :Tirer
le courvercle de la machine à glaçons et le glisser vers
l’arrière.
• Abaisser le levier de la machine à glaçons en position
EN MARCHE.
La machine à glaçons se remplit d’eau et commence à
former des glaçons. Prévoir 24 heures pour la production
de la première quantité de glaçons. La machine à glaçons
devrait produire 7 à 9 quantités de glaçons par période de
24 heures dans des conditions normales. Jeter les trois
premières quantités de glaçons. Après avoir été for més,
les glaçons tombent dans le bac à glaçons. Lorsque le bac
est plein, le levier de la machine à glaçons se soulève à la
position «ARRÊT» (levier relevé).
Pour arrêter la machine à glaçons :
• Soulever le levier de la machine à glaçons pour qu’il
s’enclenche en position «ARRÊT».
• Ne pas forcer le levier vers le bas ou vers le haut. Ne
rien ranger sur le dessus de la machine à glaçons ou
dans le bac à glaçons.
Levier de commande
En
marche
Arrêt
Solutions aux problèmes de fonctionnement de la machine à glaçons
CAUSE/SOLUTION POSSIBLE
C’est normal. Ils se séparent facilement. Agiter le bac occasionnellement pour
séparer les glaçons.
Le levier MARCHE/ARRÊT est à la position ARRÊT (soulevé).Abaisser le levier à la
position MARCHE (abaissé).
Le congélateur n’est pas assez froid. Régler d’abord les commandes et attendre au
moins 24 heures.Voir page 6.Le tube en cuivre est déformé. Vér ifier le conduit d’eau.
On peut observer une coloration de la glace ou noter la présence d’un mauvais goût,
après l’exécution de nouveaux raccordements de plomberie.Jeter la glace et en faire
d’autre.
Les glaçons sont trop vieux. Les jeter et en faire d’autres.
Emballage incorrect des aliments dans le congélateur.Voir page 20.
Nettoyage nécessaire du bac à glaçons et du congélateur. Voir page 17.
L’eau peut contenir des mineraux (comme le soufre). Un filtre peut être requis pour
les enlever.
Il n’y a pas d’eau dans le réservoir.Appuyer sur le levier de distribution d’eau et le
tenir pendant quelques minutes. Le réser voir se remplit lorsque l’eau coule.
PROBLÈME
Les glaçons en demi-lune
sont collés
Fabrication lente des
glaçons ou la machine à
glaçons ne fonctionne pas
Arrière-goût ou mauvaise
odeur de la glace
Absence de glaçons
Page 40

12
Retrait du bac de la machine à glaçons
Selon le modèle, le bac de la machine à glaçons contient
les quantités suivantes de glace :
36 po - 3,9 kg (8,5 livres)
42 po - 6,1 kg (13,5 livres)
48 po - 8,0 kg (17,6 livres)
Jeter périodiquement les vieux glaçons pour diminuer les
chances que leur goût ne soit altéré ou qu’ils ne dégagent
une mauvaise odeur. Le bac à glace peut être retiré pour
la distribution de grandes quantités de glace ou pour le
nettoyage.
Remarque : Sur les modèles sans distributeur de glace
et d’eau froide, le bac à glaçons ne peut pas être retiré
plein de glace si la butée de la porte du congélateur est
réglée à une ouverture de 90°.
S
to
ra
g
e
B
in
Couvercle de
la machine à
glaçons
abaissé
Couvercle de
la machine à
glaçons
relevé
Pour retirer le bac à glace :
1. Tirer le couvercle de la machine à glaçons et le glisser
vers l’arrière.
2. Soulever le levier de la machine à glaçons pour qu’il
s’enclenche en position ARRÊT.
Pour les modèles avec distributeur : Lorsque la
machine à glaçons est en position ARRÊT, la
production de glaçons est interrompue, mais la
distribution de glaçons continue lorsque la porte du
congélateur est fermée.
3. Soulever l’avant du bac de rangement, puis le retirer.
4. Vider le bac. Au besoin, utiliser de l’eau chaude ou
tiède pour faire fondre les glaçons. Ne jamais utiliser
un objet pointu pour briser les glaçons dans le bac;
cela peut endommager le bac et le mécanisme du
distributeur.
Pour replacer le bac à glace :
1. S’assurer que le bac est poussé jusqu’au fond.
2. Abaisser le levier de la machine à glaçons en position
EN MARCHE pour faire reprendre la production.
3. Abaisser le couvercle de la machine à glaçons.
Page 41

13
Utilisation des distributeurs
d’eau froide et de glaçons
(modèles KSSC36M, KSSC42M, KSSC48M)
Le distributeur de glaçons
Les glaçons sont distribués à partir du bac de la machine à glaçons
dans le congélateur.Lorsqu’on appuie sur le levier du distributeur, une
trappe s’ouvre sur la chute entre le distributeur et le bac à glace.Les
glaçons tombent dans la chute.Lorsqu’on relâche le levier du
distributeur, on peut entendre un bruit pendant quelques secondes.
Le réfrigérateur distribue des glaçons en cubes et
de la glace broyée.Avant la distribution de la glace,
choisir le type de glace préféré. Pour la glace
broyée, appuyer sur la touche ICE à gauche cidessus. Pour des glaçons en cubes, appuyer sur la touche ICE à
droite ci-dessus.
Pour distribuer le glace :
1. Appuyer sur la touche selon le type de glace désiré.
2. Appuyer un verre robuste contre le levier de distribution de la
glace.Tenir le verre près de l’ouverture de sor te que la glace
ne tombe pas hors du verre.
3. Retirer le verre pour arrêter la distribution.
Le distributeur d’eau froide
IMPORTANT : Si le distributeur d’eau cesse de fonctionner, l’eau peut
geler dans le conduit d’eau qui apporte l’eau froide au distributeur.
Dans ce cas, tourner le réglage de la température du bac à viande
FreshChill* v ers “Cold”.
L’eau froide provient d’un réservoir d’une capacité de 1,5 L (50 onces),
situé derrière les bacs à légumes.La première fois, prévoir en viron 24
heures pour refroidir un plein réservoir d’eau.
Lorsque le réfrigérateur est branché pour la première fois, appuyer un
verre ou un bocal contre le levier du distributeur d’eau pour faire sortir
entre 1,9 à 2,9 L (2 à 3 pintes) d’eau qu’il faudra jeter.L’air s’échappera du
système et l’eau rincera le réservoir et les tuyaux.
Si le distributeur n’est pas utilisé régulièrement, distribuer suffisamment
d’eau chaque semaine pour pouvoir renouveler l’approvisionnement.
Prévoir de 2 à 3 heures pour le refroidissement de la nouvelle
provision d’eau.
IMPORTANT : Le petit plateau situé sous le distributeur a été conçu
afin que les petites quantités d’eau répandue puissent s’évaporer.Ce
plateau ne possède pas de tuyau d’écoulement.Ne pas verser d’eau
dans le plateau.
Pour distribution de l’eau fr oide :
1. Appuyer un verre robuste contre le levier du distributeur d’eau.
2. Retirer le verre pour arrêter la distribution.
ICE
AVERTISSEMENT
Risque de coupures
Utiliser un verre robuste pour prendre des glaçons
ou de l’eau.
Le non-respect de cette instruction peut causer
des coupures.
ICE
ICE
Page 42

14
Conseils sur le fonctionnement du distributeur
SOLUTION
Fermer la porte du congélateur.
S’assurer que le bac est poussé à fond.
N’utiliser que des glaçons en forme de
croissants. Secouer le bac de temps en temps
pour garder les glaçons séparés et pour
augmenter la capacité d’entreposage.
Jeter les vieux glaçons et en faire d’autres.
Attendre trois minutes environ pour que le moteur
du distributeur soit réarmé. De grandes quantités
de glaçons devraient être enlevées du bac et non
pas par le distributeur.
Déverrouiller le fonctionnement.
Contacter la compagnie de service public.
Jeter les vieux glaçons et en faire d’autres;
conserver l’excédent de glaçons dans un récipient
couvert.
Pour les meilleurs résultats, éviter de brancher la
machine à glaçons à un système
d’adoucissement de l’eau. S’il faut utiliser de l’eau
adoucie, s’assurer que l’adoucisseur d’eau est
bien entretenu et qu’il fonctionne comme il faut.
Bien emballer les aliments dans des matériaux
imperméables à l’air et à l’humidité.Voir page 20.
Nettoyer le congélateur et le bac à glace.Voir
«Nettoyage du réfrigérateur» à la page 17 pour les
instructions.
Suivre les instructions d’installation pour le
branchement approprié de l’alimentation en eau
de la machine à glaçons.
Les premières quantités de glaçons provenant
d’une machine à glaçons neuve peuvent avoir un
goût altéré. Jeter ces glaçons et en faire de
nouveaux.
PROBLÈME
Le distributeur ne marche pas
Le distributeur de glaçons
ne marche pas
Mauvais goût ou odeur des
glaçons
Grille de la base
Pour la retirer :
1. Enlever une vis à chaque extrémité de la grille.
2. Retirer la grille de la base.
3. Replacer dans l’ordre inverse.
CAUSE
Porte du congélateur ouverte
Le bac à glace n’est pas
installé comme il faut
Glaçons non appropriés
Le distributeur n’est pas
utilisé pendant une longue
période, faisant fondre les
glaçons
On a appuyé trop
longtemps sur la barre
du distributeur
Le verrouillage a été choisi
Pression d’ eau trop basse
Les glaçons attirent des
odeurs en suspension dans
l’air; vieux glaçons
Qualité de l’eau
Aliments mal emballés
Le bac à glace et le
congélateur peuvent avoir
besoin d’être nettoyés
Canalisation à la machine à
glaçons
Machine à glaçons neuve
Page 43

15
Plateau de dégivrage
Le plateau de dégivrage est situé derrière la grille de la
base, du côté gauche du réfrigérateur.
Pour le retirer :
1. Mettre l’interrupteur en position ARRÊT (OFF). (Voir
les instructions à la page 5.)
2. Retirer la grille de la base.
3. Repérer la patte de retenue (A) située sous le
réfrigérateur.
4. Pousser la patte vers le haut tout en tirant le plateau
directement vers l’extérieur.
5.
Nettoyer le plateau.(Voir les instructions à la page 17.)
Pour le replacer :
1. Placer le rebord du plateau à environ 17,8 cm (7 po)
du côté gauche du réfrigérateur.
2. Remettre le plateau en place en le faisant glisser le
long des coulisses latérales, jusqu’à ce qu’un déclic
se fasse entendre.
3. Replacer la grille de la base.
4. Mettre l’interrupteur en position EN MARCHE (ON).
Plateau de
dégrivage
Patte de retenue (A)
Ampoules
Ampoules derrière les thermostats du réfrigérateur et
des commandes du congélateur:
1. Débrancher la source de courant électrique au
réfrigérateur ou fermer l’interrupteur.
2. Saisir l’ampoule située derrière le panneau de
commandes.
3. Dévisser l’ampoule et la remplacer par une ampoule
tubulaire incandescente de 40 watts à culot moyen.
4. Rebrancher la source de courant électrique ou
rallumer l’interrupteur.
Ampoule sous le bac à glaçons :
1. Débrancher la source de courant électrique ou fermer
l’interrupteur.
2. Retirer le protège-ampoule.
3. Dévisser l’ampoule et la remplacer par une ampoule
tubulaire incandescente de 40 watts à culot moyen.
4. Remettre le protège-ampoule en place.
5. Rebrancher la source de courant électrique ou
rallumer l’interrupteur.
Ampoule du distributeur : (modèles avec distributeur)
1. Débrancher la source de courant électrique ou fermer
l’interrupteur.
2. Dévisser l’ampoule située dans la par tie supér ieure du
distributeur.
3. Remplacer l’ampoule par une ampoule de 10 watts à
haut rendement.
4. Rebrancher la source de courant électrique ou
rallumer l’interrupteur.
IMPORTANT : S’assurer que le commutateur
marche/arrêt est remis en position EN MARCHE (ON)
après avoir changé une ampoule.
Page 44

16
Economie d’énergie
• Nettoyer périodiquement les serpentins de
condensation.
• Ouvrir les portes le moins souvent possible. Ranger les
aliments de façon à ce que vous n’ayez pas besoin de
chercher ce que vous désirez. Sortir tous les ar ticles
dont on a besoin en même temps. Fermer la porte dès
que les aliments sont sortis.
• Remplir le réfrigérateur, mais ne pas le surcharger
pour ne pas bloquer la circulation d’air.
• C’est un gaspillage d’électricité de régler le
réfrigérateur et le congélateur à des températures plus
froides que nécessaires. Si la crème glacée est ferme
dans le congélateur et les boissons sont aussi froides
dans le réfrigérateur que le désire votre famille, c’est
suffisant.
Les bruits de l’appareil
Votre nouveau réfrigérateur peut faire des bruits différents
de ceux de votre ancien appareil. Comme les br uits sont
nouveaux pour vous, il se peut que vous ayez des
questions. La plupart des nouveaux bruits sont normaux.
Les nouveaux concepts des produits peuvent causer des
bruits qui ne vous sont pas familiers.
CAUSES
Le moteur du ventilateur du réfrigérateur et la circulation d’air en action.
Le thermostat fait un déclic net lorsque le réfrigérateur cesse de fonctionner. Il fait
également un bruit lorsque le réfrigérateur se met en marche.
La minuterie du système de dégivrage fait un déclic lorsque le cycle de dégivrage
commence et s’arrête.
On peut entendre un bourdonnement provenant de la vanne d’eau, de l’eau qui
dégoutte et le cliquetis des glaçons qui tombent dans le bac.
Le compresseur à grand rendement et le moteur fonctionneront plus longtemps que
ceux des anciens modèles. Il se peut que le ventilateur interne se mette en marche
lorsque le compresseur est arrêté.
Durant le cycle de dégivrage, le réfrigérateur ne fonctionnera pas. L’eau qui dégoutte
provient de l’accumulation de givre sur le serpentin du congélateur.Ce givre fond et
s’écoule dans le plateau de dégivrage. Lorsque le réfr igérateur arrête de fonctionner,
vous entendrez peut-être un bruit de gargouillement dans la tuyauterie pendant
quelques minutes.
Vous sentirez peut-être de l’air qui s’échappe derr ière le panneau de ventilation
supérieur et de la grille de la base lorsque fonctionne le réfrigérateur.C’est tout à fait
normal.
BRUITS/OBSERVATIONS
Ronflement ou sifflement
Claquements
Bruits du distributeur de
glaçons
• eau qui dégoutte
• cliquetis des glaçons
Bruits de fonctionnement
Eau qui coule/bruits d’eau
Air chaud s’échappant du
panneau de ventilation
supérieur et de la grille
de la base
Vous pouvez aider votre réfrigerateur à utiliser moins
d’électricité.
Page 45

17
Risque d’explosion
Utiliser un produit de nettoyage ininflammable.
Le non-respect de cette instruction peut causer un
décès, une explosion ou un incendie.
Les compartiments réfrigérateur et congélateur se
dégivrent automatiquement.Tous deux doivent
cependant être nettoyés environ une fois par mois,
afin de prévenir l’accumulation d’odeurs.Essuyer
immédiatement les produits renversés.
Avant le nettoyage, déconnecter le réfrigérateur du courant
électrique en appuyant sur l’interrupteur MARCHE/ARRÊT en
le mettant à le position ARRÊT. Puis, retirer toutes les pièces
amovibles et les nettoyer conformément aux instr uctions
suivantes.Pour remettre le réfrigérateur en marche, appuyer
sur l’interrupteur marche/arrêt et le mettre en position EN
MARCHE (ON).
E
NTRETIEN DU RÉFRIGÉRATEUR
Ce réfrigérateur a été conçu et construit pour offrir de
nombreuses années de service fiable. L’utilisateur peut
cependant faire certaines choses pour en augmenter la
longévité. Cette section décrit comment nettoyer le
réfrigérateur, et ce qu’il faut faire avant une période de
vacances, avant un déménagement, ou à l’occasion d’une
interruption du courant électrique.
Nettoyage du réfrigérateur
MATÉRIEL À UTILISER
Éponge ou chiffon avec
détergent doux et eau tiède
Éponge, chiffon ou essuietout en papier avec
détergent doux, eau tiède et
cire pour appareil
électroménager (ou cire en
pâte de qualité pour
automobile)
Éponge, chiffon doux ou
essuie-tout en papier avec
bicarbonate de soude ou
détergent doux et eau tiède
Éponge, chiffon doux ou
essuie-tout en papier avec
détergent doux et eau tiède
Éponge douce et propre ou
chiffon doux et propre avec
détergent doux et eau tiède
Éponge ou chiffon avec
détergent doux et eau tiède
PROBLÈME
Pièces amovibles (clayettes,
bac à légumes, etc.)
Extérieur
Parois intérieures (le
congélateur doit être assez
tiède pour que le chiffon
n’adhère pas)
Garnitures et joints des
portes
Pièces en plastique
(couvercles et panneaux)
Plateau de dégivrage
MÉTHODE DE NETTOYAGE
Laver à la main, rincer et sécher à fond.
Laver l’extérieur du réfrigérateur. Ne pas utiliser de
nettoyants durs ou abrasifs.
Rincer et sécher à fond.
Cirer les surfaces métalliques peintes au moins deux
fois par an. Appliquer la cire avec un chiffon doux et
propre. Le cirage des surfaces métalliques peintes
les protège contre la rouille. Ne pas utiliser de cire
sur les pièces en plastique.
Laver avec de l’eau tiède et :
• du détergent doux ou
• du bicarbonate de soude (26 g [2 cuillères à soupe]
ajoutés à 0,95 L [1 pinte] d’eau).
Rincer et sécher à fond.
Laver, essuyer et sécher à fond.
NE PAS UTILISER de cires nettoyantes, de
détergents concentrés, d’eau de Javel ni de
nettoyants contenant du pétrole, sur des pièces en
plastique.
Laver, essuyer et sécher à fond.
NE PAS UTILISER d’essuie-tout en papier, de
nettoyants pour vitres, de produits à récurer ni de
solvants inflammables, car ils risquent
d’égratigner ou d’endommager le matériel.Voir
«Importantes Instructions de Sécurité» à la page 3.
Appuyer sur la touche de mise en marche/arrêt
(ON/OFF) pour la positionner à la position d’arrêt
(OFF).
Retirer la grille de la base.Voir page 14.
Retirer le plateau de dégivrage, que l’on peut
atteindre par la petite ouverture sur le côté droit.Voir
page 15. Laver, r incer et sécher à fond.
AVERTISSEMENT
Page 46

Si le réfrigérateur doit être déménagé, communiquer avec
le dépositaire chez qui vous avez acheté le réfrigérateur
ou avec le bureau de service d’entretien autorisé
KitchenAid de votre région.
Si vous vous absentez pendant un mois ou plus, suivre
les étapes suivantes pour préparer votre réfrigérateur.
1. Enlever tous les aliments du réfrigérateur.
2. Si votre réfrigérateur a une machine à glaçons
automatique :
•
Fermer l’approvisionnement d’eau à la machine à
glaçons au moins une journée à l’avance.
•
Lorsque la dernière quantité de glaçons est déposée,
arrêter la machine à glaçons et s’assurer que tous les
glaçons sont distribués hors du mécanisme de la
machine à glaçons.
3. Débrancher le réfrigérateur de la prise.
4. Bien nettoyer, essuyer et sécher le plateau.
5. À l’aide de ruban adhésif, fixer des blocs de
caoutchouc ou de bois à la partie supérieure de
chaque porte de façon à ce qu’elles soient
suffisamment ouvertes pour permettre la circulation de
l’air à l’intérieur, afin d’éviter l’accumulation d’odeurs ou
de moisissure.
En cas de panne de courant, téléphoner à la compagnie
d’électricité pour s’enquérir de la durée de la panne.
1. Si le ser vice doit être interrompu durant 24 heures ou
moins, garder fermées les deux portes. Ceci
permettra d’éviter que les aliments dégèlent.
2. Si le ser vice doit être interrompu durant plus de
24 heures :
(a) Retirer tous les aliments congelés et les déposer
dans un entrepôt frigorifique.
OU
(b) Placer 900 g (2 lb) de neige carbonique dans le
congélateur pour chaque pied cube (28 litres) par
d’espace de congélation. Cela permettra de garder les
aliments congelés durant deux à quatre jours. Porter
des gants pour protéger les mains contre les morsures
de la neige.
OU
(c) S’il n’y a pas d’entrepôt frigorifique ni de neige
carbonique, consommer ou mettre immédiatement en
conserve les aliments périssables.
18
Courtes vacances
Si vous vous absentez pendant moins de quatre
semaines, suivez ces conseils pour préparer votre
réfrigérateur avant d’aller en vacances.
1. Consommer tous les aliments périssables et congeler
les autres articles.
2. Si votre réfrigérateur a une machine à glaçons
automatique :
•
Soulever le bras de commande à glaçons à la
position OFF (élevée).
•
Fermer l’approvisionnement d’eau à la machine à
glaçons.
3. Vider le bac à glaçons.
Entretien avant les vacances ou lors d’un
déménagement
Longues vacances
Déménagement
Pannes de courant
Éponge ou chiffon avec
détergent doux et eau tiède
Nettoyant pour acier
inoxydable
Accessoire étroit et long de
l’aspirateur
Accessoire brosse de
l’aspirateur
Un nettoyant professionnel
d’acier inoxydable
Plateau de dégivrage (suite)
Portes et grille en acier
inoxydable
Serpentins du condenseur
Grille de la base
Acier inoxydable
Réinstaller le plateau de dégivrage.Veiller à bien
l’enfoncer complètement dans l’ouverture.
Réinstaller la grille de la base.
Appuyer sur la touche de mise en marche/arrêt
(ON/OFF) pour la positionner à la position de mise en
marche (ON).
Essuyer avec un chiffon doux.
Retirer le panneau de ventilation supérieur (Voir la
page 5).
Nettoyer les serpentins lorsqu’ils sont sales ou
poussiéreux. Il se peut que les serpentins aient besoin
d’être nettoyés tous les deux mois.
Réinstaller le panneau de ventilation supérieur.
Nettoyer la grille de la base avec l’asperateur.
Suivre le mode d’emploi inclus avec le nettoyant.
Page 47

19
Il existe une façon correcte d’emballer et de conserver les
aliments au réfrigérateur ou au congélateur.Pour garder
les aliments plus frais, plus longtemps, prendre le temps
d’étudier ces étapes recommandées.
G
UIDE DE CONSERVATION DES ALIMENTS
Les aliments placés au réfrigérateur doivent être
enveloppés ou gardés dans un emballage hermétique et
à l’épreuve de l’humidité.Cette méthode empêche l’odeur
et le goût des aliments de se répandre dans tout le
réfrigérateur.Pour des produits datés, vérifier les dates
indiquées pour s’assurer de la fraîcheur des aliments.
Beurre ou margarine
Garder le beurre entamé dans un beurrier muni d’un
couvercle ou dans le balconnet fermé.Envelopper les
quantités excessives dans un emballage pour
congélateur et faire congeler.
Fromage
Le conserver dans son emballage original jusqu’à
l’emploi. Une fois le paquet ouvert, réemballer
hermétiquement le fromage dans une pellicule en
plastique ou du papier d’aluminium.
Lait
Essuyer les contenants.Pour qu’il se conserve mieux,
placer le lait sur une tablette intérieure.
Oeufs
Conserver sans les laver dans le carton original sur une
tablette intérieure. Dans certains modèles, un oeufrier
est fourni.
Fruits
Laver, laisser sécher et mettre au réfr igérateur dans un
sac en plastique ou le bac à légumes. Ne pas laver ni
équeuter les petits fruits avant le moment de leur
utilisation. Les trier et les conserver dans l’emballage du
magasin, dans le bac à légumes ou les conserver sur
une tablette du réfrigérateur dans un sac fermé en
papier sans être serré.
Légumes à feuilles
Retirer l’emballage original et éliminer les taches jaunes
ou décolorées. Laver à l’eau froide et égoutter.Placer
dans un sac ou un contenant en plastique et ranger
dans le bac à légumes.
Conservation des aliments
frais
À NOTER : Un congélateur plein restera froid plus
longtemps qu’un congélateur partiellement rempli. Un
congélateur plein de viandes demeure froid plus
longtemps qu’un congélateur rempli de pains et de
pâtisseries. Si les aliments contiennent des cristaux de
glace, ils peuvent être remis à congeler sans danger
même si la qualité et la saveur risquent d’être affectées.
Si les aliments semblent de piètre qualité ou douteux, les
jeter.
Questions?
Composer notre numéro de téléphone du Centre
d’assistance aux consommateurs, 1-800-235-0665 de
partout aux États-Unis ou au Canada.
Conservation des aliments frais (suite)
Légumes à pelure
(carottes, poivrons)
Ranger dans des sacs en plastique ou un contenant
en plastique et garder dans le bac à légumes .
Poisson
Le poisson et les fruits de mer frais doivent être
consommés le jour même de l’achat.
Viande
La plupart des viandes peuvent être conservées dans
leur emballage original tant que cet emballage est
hermétique et à l’épreuve de l’humidité. Emballer de
nouveau si nécessaire. Voir le tableau suivant pour les
périodes de conservation. Si la viande doit être
conservée durant une période plus longue, suivre les
instructions relatives à la congélation.
Poulet..........................................................1 à 2 jours
Bacon ........................................................5 à 7 jours
Boeuf haché ..............................................1 à 2 jours
Charcuterie ................................................3 à 5 jours
Steaks/rôtis ................................................3 à 5 jours
Abats ........................................................1 à 2 jours
Viandes traitées ......................................7 à 10 jours
Restes
Couvrir les restes avec de la pellicule en plastique ou
du papier d’aluminium. Il est aussi convenable
d’utiliser des contenants en plastique à couvercle
hermétique.
REMARQUE : Garder une boîte de bicarbonate de
soude ouverte pour maintenir une odeur de fraîcheur
dans votre réfrigérateur.
Page 48

20
Conservation des aliments congelés
La section du congélateur est conçue pour conserver les
aliments surgelés commerciaux et pour faire congeler les
aliments à la maison.
REMARQUE : Pour d’autres renseignements au sujet de
la préparation des aliments pour la congélation, consulter
un guide de congélation ou un livre de recettes fiable.
Emballage
Le secret d’une congélation efficace réside dans
l’emballage. Il doit être fermé et scellé de façon à prévenir
la pénétration et l’évacuation de l’air ou de l’humidité.
Toute autre méthode d’emballage risque d’entraîner la
propagation de saveurs et d’odeurs dans tout le
réfrigérateur et l’assèchement des aliments congelés.
Emballage recommandé :
•
Contenants rigides en plastique avec couvercles
hermétiques
•
Bocaux de conserves/congélation à bords droits
•
Papier d’aluminium résistant
•
Papier recouvert de plastique
•
Emballages en plastique étanches (faits d’une
pellicule saran)
•
Sacs en plastique autohermétiques spécifiés pour
congélateur
Suivre les instructions de l’emballage ou du contenant
pour les méthodes de congélation appropriées.
Ne pas utiliser :
•
Emballages pour pain
•
Contenants en plastique autres qu’en polyéthylène
•
Contenants sans couvercles hermétiques
•
Papier paraffiné ou emballage de congélateur
enduit de cire
•
Emballage mince semi-perméable
Congélation
Ne pas prévoir que votre congélateur congèle rapidement
une grande quantité d’aliments. Veiller à ce que la quantité
d’aliments ne prenne pas plus de 24 heures à congeler (au
plus 907 à 1350 g par litre [2 à 3 lb d’aliments par pied
cube]). Laisser assez d’espace pour permettre la
circulation d’air entre les emballages. S’assurer aussi de
laisser assez d’espace à l’avant pour que la porte ferme
hermétiquement.
Les périodes de conservation varieront selon la qualité et
le type des aliments, le type d’emballage ou de pellicule
utilisée (hermétique et à l’épreuve de l’humidité) et la
température d’entreposage.
Les cristaux de glace à l’intérieur d’un emballage scellé
sont normaux. Ces cristaux signifient simplement que
l’humidité dans les aliments et l’air à l’intérieur de
l’emballage se sont condensés en créant des cristaux de
glace.
REMARQUE : Laisser les aliments chauds refroidir
à la température ambiante pendant 30 minutes,
ensuite les emballer et les congeler. Le
refroidissement des aliments chauds avant la
congélation fera économiser de l’énergie.
Page 49

21
Vérifier si ...
Le cordon du courant électrique est débranché.
Un fusible a sauté ou le disjoncteur s’est déclenché.
Une ampoule d’éclairage est dégagée dans la douille.
Une ampoule est grillée.
Alors ...
Brancher fermement le cordon du courant électrique
dans une prise de courant active avec tension appropriée.
Remplacer le fusible ou enclencher de nouveau le
disjoncteur.
Tourner le réglage du réfrigérateur à OFF (arrêt).
Débrancher le réfrigérateur de la source de courant
électrique. Enlever délicatement l’ampoule et la réinsérer.
Ensuite rebrancher le réfrigérateur à la source de courant
électrique et faire de nouveau le réglage du réfrigérateur.
Remplacer par une ampoule d’appareil électroménager
de tension, de grosseur et de forme similaires. Voir
«Remplacement des ampoules d’éclairage».
Alors ...
Brancher fermement le cordon du courant électrique
dans une prise de courant active avec tension
appropriée.
Remplacer le fusible ou enclencher de nouveau le
disjoncteur.
Voir «Réglage des commandes de température».
Vérifier de nouveau pour voir si le réfrigérateur
fonctionne au bout de 30 minutes. Le réfrigérateur fera
régulièrement un programme automatique de dégivrage.
S’il ne fonctionne pas encore après avoir vérifié ce
qui précède, téléphoner au Centre d’assistance aux
consommateurs.
Le cordon du courant électrique est débranché.
Les ampoules n’éclairent pas
Le réfrigérateur ne fonctionne pas
Vous pouvez résoudre de nombreux problèmes communs
des réfrigérateurs, ce qui vous économise le coût possible
d’un appel de service. Essayez les suggestions cidessous pour voir si vous pouvez résoudre votre
problème sans aide de l’extérieur. Si les suggestions ne
fonctionnent pas, veuillez appeler le Centre d’assistance
aux consommateurs KitchenAid.
G
UIDE DE DÉPANNAGE
Vérifier si ...
Un fusible a sauté ou le disjoncteur s’est déclenché.
Le réglage du réfrigérateur est à la position OFF (arrêt).
Le réfrigérateur se dégivre.
Page 50

22
Vérifier si ...
La température ambiante est plus chaude que
normalement.
Une grande quantité d’aliments vient d’être ajoutée
au réfrigérateur.
La porte est fréquemment ouverte.
Les réglages ne sont pas faits correctement pour les
conditions ambiantes.
Les portes ne sont pas complètement fermées.
La grille de la base est sale ou bloquée.
Les serpentins du condenseur sont sales.
Les joints des portes ne sont pas scellés
complètement autour de l’ouverture.
Alors ...
Prévoir que le moteur fonctionnera plus longtemps dans
des conditions de chaleur. Aux températures ambiantes
normales, prévoir que le moteur fonctionnera environ
40% à 80% du temps. Dans des conditions plus
chaudes, prévoir un fonctionnement encore plus
fréquent.
L’addition d’une grande quantité d’aliments réchauffe le
réfrigérateur. Il est normal que le moteur fonctionne plus
longtemps afin de refroidir de nouveau le réfrigérateur. Voir
la section «Conservation des aliments».
Prévoir que le moteur fonctionnera plus longtemps
dans ce cas. Afin de conserver l’énergie, essayer de
sortir tout ce dont vous avez besoin du réfrigérateur à
la fois, garder les aliments organisés de sorte qu’ils sont
faciles à trouver et fermer la porte dès que les aliments sont
enlevés.
Voir la section «Réglage des commandes de température».
Pousser les portes pour qu’elles soient bien fermées. Si les
portes ne ferment pas complètement, voir «Les portes ne se
ferment pas complètement» plus loin dans cette section.
Cette situation empêche la circulation de l’air et fait
travailler davantage le moteur. Enlever la grille et la
nettoyer.
Cette situation empêche le transfert de l’air et fait
travailler davantage le moteur. Nettoyer les serpentins
du condenseur. Voir la section «Nettoyage du réfrigérateur».
Contacter une personne qualifiée ou un technicien.
Si le problème n’est pas attribuable à l’une des
situations ci-dessus, rappelez-vous que votre nouveau
réfrigérateur fonctionnera plus longtemps que votre ancien
appareil, du fait de son moteur très efficace.
Vérifier si ...
Le réfrigérateur se dégivre.
Le réfrigérateur est plus humide que normalement.
L’eau dans le plateau de dégivrage déborde.
Alors ...
L’eau s’évaporera. C’est normal pour l’eau de dégoutter
dans le plateau de dégivrage.
Prévoir que l’eau dans le plateau de dégivrage prenne
plus de temps à s’évaporer. Ceci est normal lorsqu’il fait
chaud ou humide.
Vérifier pour s’assurer que le réfrigérateur est de niveau
(voir «Nivellement»). Si le plateau déborde encore, il
existe probablement une anomalie avec le réfrigérateur.
Téléphoner au Centre d’assistance aux consommateurs.
Le plateau de dégivrage contient de l’eau
Le moteur semble fonctionner excessivement
Page 51

23
Alors ...
Voir la section «Réglages des commandes de température».
Abaisser le bras à la position «ON» (abaissée). Voir la section
«Utilisation de la machine à glaçons automatique».
Ouvrir le robinet d’eau.
Enlever le glaçon du bras éjecteur avec un ustensile
en plastique. Voir «Utilisation de la machine à glaçons».
Vérifier pour voir si le réfrigérateur a été branché à la
canalisation d’eau de la maison, et si le robinet de la
canalisation est ouvert.
Si cette situation n’est pas attribuable à ce qui précède,
il peut exister un problème avec la canalisation d’eau.
Contacter le Centre d’assistance aux consommateurs.
Vérifier si ...
La température du congélateur n’est pas assez froide
pour produire des glaçons
Le levier de la machine à glaçons est en position
“OFF” (élevée).
Le robinet de la canalisation d’eau reliée au
réfrigérateur n’est pas ouvert.
Un glaçon est coincé dans le bras éjecteur.
Le moule de la machine à glaçons n’a pas d’eau ou
aucun glaçon n’a été produit.
Vérifier si ...
Certains sons et bruits sont communs pour les
réfrigérateurs neufs.
Alors ...
Voir la section «Les bruits de l'appareil».
Le réfrigérateur semble faire trop de bruit
La machine à glaçons ne produit pas de glaçons
La machine à glaçons produit trop peu de glaçons
Vérifier si ...
La machine à glaçons vient juste d’être installée.
Une grande quantité de glaçons vient d’être enlevée.
Les réglages ne sont pas faits correctement.
Le robinet d’eau n’est pas complètement ouvert.
Un filtre à eau est installé sur le réfrigérateur. Ce filtre
peut être obstrué ou installé incorrectement.
Alors ...
Attendre 72 heures pour le commencement de la
production complète de glaçons. Une fois que le
réfrigérateur est refroidi, la machine à glaçons devrait
commencer à produire de 56 à 72 glaçons à toutes
les 24 heures.
Attendre 24 heures pour que la machine à glaçons
produise plus de glaçons.
Voir la section «Réglage des commandes de température».
Tourner complètement le robinet à la position ouverte.
Voir la section «Utilisation de la machine à glaçons
automatique».
Vérifier d’abord les instructions d’installation
du filtre pour s’assurer que le filtre a été installé
correctement et qu’il n’est pas obstrué. Si l’installation
ou l’obstruction n’est pas le problème, téléphoner à un
technicien qualifié.
Page 52

24
Alors ...
Prévoir que le réfrigérateur deviendra tiède dans ces
cas. Pour garder le réfrigérateur froid, essayer de
retirer rapidement tout ce dont vous avez besoin du
réfrigérateur, garder les aliments rangés de sorte qu’il
soit facile de les trouver et fermer la porte dès que les
aliments sont retirés.
L’addition d’une grande quantité d’aliments réchauffe le
réfrigérateur. Plusieurs heures peuvent être nécessaires pour
que le réfrigérateur revienne à la température normale.
Voir la section «Réglage des commandes de température».
Vérifier si ...
La(les) porte(s) est(sont) souvent ouverte(s).
Une grande quantité d’aliments vient d’être ajoutée
au réfrigérateur ou au congélateur.
Les réglages ne sont pas faits correctement pour
les conditions ambiantes.
Alors ...
Nettoyer en consultant la section «Nettoyage du
réfrigérateur».
Voir «Le réfrigérateur ne fonctionne pas» à une section plus
loin.
REMARQUE : La température du réfrigérateur peut passer
de tiède à chaude.
Si la cause n’est pas attribuable à ce qui précède, la
chaleur est probablement attribuable à l’opération normale
du réglage automatique de l’humidité à l’extérieur. S’il
existe encore une inquiétude à ce sujet, téléphoner au
Centre d’assistance aux consommateurs.
Vérifier si ...
Les serpentins du condenseur ou la grille de la base
sont sales ou obstrués.
Le moteur a cessé de fonctionner.
Alors ...
Jeter les premières quantités de glaçons.
Jeter les vieux glaçons et en faire une nouvelle provision.
Voir la section «Conservation des aliments congelés».
Voir la section «Nettoyage du réfrigérateur».
L’installation d’un filtre peut être requise afin d’enlever
les minéraux.
Vérifier si ...
Les raccords de plomberie sont neufs et causent une
décoloration et une mauvaise saveur des glaçons.
Les glaçons ont été gardés trop longtemps.
Les aliments dans le congélateur n’ont pas été bien
emballés.
Le congélateur et le bac à glaçons ont besoin d’être
nettoyés.
L’eau contient des minéraux (tels que le soufre).
Mauvais goût ou odeur des glaçons
La cloison au centre entre les deux sections est tiède
La température est trop tiède
Page 53

25
Alors ...
Réorganiser les contenants de sorte qu’ils soient plus
rapprochés et prennent moins d’espace.
Pousser le bac à glaçons jusqu’au fond.
Placer tous les plats, tablettes, bacs et paniers à leur
position correcte.
Nettoyer les joints d’après les instructions à la section
«Entretien du réfrigérateur».
Enlever et replacer les portes ou contacter une personne
qualifiée.
Vérifier si ...
Les emballages des aliments empêchent la porte
de fermer.
Le bac à glaçons n’est pas en bonne position.
Les plats, tablettes, bacs ou paniers ne sont pas
en bonne position.
Les joints sont sales.
Les portes ont été enlevées durant l’installation
de l’appareil et n’ont pas été bien réinstallées.
Alors ...
Pour éviter l’accumulation d’humidité, essayer de retirer
rapidement tout ce dont vous avez besoin du réfrigérateur,
garder les aliments rangés de sorte qu’il soit facile de les
trouver, et fermer la porte dès que les aliments sont retirés.
(Lorsque la porte est ouverte, l’humidité de l’air extérieur
pénètre dans le réfrigérateur. Le plus souvent la porte est
ouverte, le plus rapidement l’humidité s’accumule, surtout
lorsque la pièce elle-même est très humide.)
Il est normal pour l’humidité de s’accumuler à l’intérieur
du réfrigérateur lorsque l’air de l’extérieur est humide.
Vérifier que tous les aliments sont bien emballés. Si
nécessaire, emballer de nouveau les aliments d’après
les directives à la section «Guide de conservation des
aliments». Essuyer les contenants humides d’aliments
avant de les placer au réfrigérateur.
Voir la section «Réglage des commandes de température».
Il est normal que des gouttelettes se forment sur la paroi
arrière après que le réfrigérateur se dégivre de lui-même.
Vérifier si ...
La porte est fréquemment ouverte.
La pièce est humide.
Les aliments ne sont pas correctement emballés.
Les réglages ne sont pas correctement faits pour
les conditions ambiantes.
Un programme autodégivreur a été complété.
Il existe une accumulation d’humidité à l’intérieur
Les portes ne se ferment pas complètement
Les portes sont difficiles à ouvrir
Alors ...
Nettoyer les joints d’après les instructions à la section
«Entretien du réfrigérateur».
Vérifier si ...
Les joints sont sales ou collants.
Page 54

26
Service d’appareils ménagers KitchenAid Canada –
Service aux consommateurs
Succursales de service direct :
COLOMBIE-BRITANNIQUE 1-800-665-6788
ALBERTA 1-800-661-6291
ONTARIO Région d’Ottawa 1-800-267-3456
(à l’exception de l’indicatif régional 807) En dehors de la région d’Ottawa 1-800-807-6777
MANITOBA,SASKATCHEWAN 1-800-665-1683
et indicatif régional 807 en ONTARIO
QUÉBEC Montréal (à l’exception de la Rive-Sud) 1-800-361-3032
Rive-Sud Montréal 1-800-361-0950
Québec 1-800-463-1523
Sherbrooke 1-800-567-6966
PROVINCES DE L’ATLANTIQUE 1-800-565-1598
Pour plus d’assistance
1. Si le problème n’est pas attribuable à l’une
des causes indiquées dans “Guide de
dépannage”
✝
...
Communiquer avec le marchand chez qui
vous avez acheté votre appareil
électroménager, ou téléphoner à
KitchenAid Canada au Centre
d’assistance aux consommateurs, sans
frais d’interurbain, entre 8 h 30 et 18 h 00 (HNE), en
composant 1-800-235-0665.
2. Si vous avez besoin de service✝...
Communiquer avec la succursale ou établissement
de service autorisé de KitchenAid Canada le plus proche
pour l’entretien de votre appareil. (Voir liste ci-dessous.)
S’assurer que la compagnie de service que vous
contactez est autorisée à faire l’entretien de votre
appareil durant la période de garantie.
Si vous avez besoin de plus d’assistance, vous
pouvez écrire en soumettant toute question ou
problème au :
Service des relations avec la clientèle
KitchenAid Canada
1901 Minnesota Court
Mississauga, Ontario L5N 3A7
Veuillez indiquer dans votre correspondance un numéro
de téléphone où l’on peut vous joindre le jour.
D
EMANDE D’ASSISTANCE OU DE SERVICE
✝
Lorsque vous demandez de l’assistance ou un
service, veuillez fournir une description détaillée
du problème, les numéros complets du modèle et
de série de l’appareil, et la date d’achat. (Voir la
section «Note à l’utilisateur.» Ces renseignements
nous aideront à mieux répondre à votre demande.
Avant de faire un appel pour assistance ou service,
veuillez vérifier la section “Guide de dépannage”.
Cette vérification pourrait vous faire économiser le
coût d’une visite de service. Si vous avez encore
besoin d’aide, suivre les instructions ci-dessous.
Si vous avez besoin d'assistance ou de service au
Canada
Page 55

27
Garantie du réfrigérateur encastré
KITCHENAID PAIERA POUR
Les pièces de remplacement et le coût de la
main-d’œuvre pour réparer les vices des
ampoules d’éclairage. Le service doit être
fourni par un établissement de service
désigné par KitchenAid.
Les pièces de remplacement et le coût
de la main-d’œuvre pour réparer les vices
de matériaux ou de main-d’œuvre. Le
service doit être fourni par un
établissement de service désigné par
KitchenAid.
Les pièces de remplacement et le coût
de la main-d’œuvre pour réparer les vices
de matériaux ou de main-d’œuvre dans
le système scellé de réfrigération.
Ces pièces sont :
1. Compresseur;
2. Évaporateur;
3. Condenseur;
4. Déshydratateur;
5. Tuyau de raccordement.
Le service doit être fourni par un
établissement de service désigné par
KitchenAid.
Les pièces de remplacement pour
corriger les vices de matériau ou de
main-d’œuvre du système scellé de
réfrigération.
Ces pièces sont :
1. Compresseur;
2. Évaporateur;
3. Condenseur;
4. Déshydratateur;
5. Tuyau de raccordement.
Les pièces de remplacement pour
corriger les vices de matériau ou de
main-d’œuvre dans les balconnets de la
porte du réfrigérateur.
KITCHENAID ET KITCHENAID CANADA NE SONT PAS RESPONSABLES POUR LES DOMMAGES FORTUITS OU
INDIRECTS. Certains États ou certaines provinces ne permettent pas l’exclusion ou la limitation des dommages
fortuits ou indirects de sorte que cette exclusion ou limitation peut ne pas s’appliquer dans votre cas.
Cette garantie vous confère des droits juridiques spécifiques et vous pouvez également avoir d’autres droits,
variables d’un État à l’autre ou d’une province à l’autre.
À l’extérieur du Canada et des États-Unis, une garantie différente peut s’appliquer. Pour des détails,
communiquer avec votre marchand KitchenAid autorisé.
Si vous avez besoin de service, voir d’abord la section «Guide de dépannage» dans ce livret. Après avoir vérifié le
«Guide de dépannage», une aide additionnelle peut être trouvée en vérifiant la section «Demande d’aide ou de service»
ou en téléphonant à notre Centre d’assistance aux consommateurs au numéro de téléphone, 1-800-235-0665 (sans
frais), de partout aux É.-U. ou au Canada.
KITCHENAID NE PAIERA PAS POUR :
A. Les visites de service pour :
1. Rectifier l’installation du réfrigérateur.
2. Donner des instructions concernant
l’utilisation du réfrigérateur.
3. Remplacer les fusibles ou rectifier le
câblage électrique du domicile.
4. Remplacer la plomberie du domicile.
B. Les réparations lorsque le réfrigérateur
est utilisé à des fins autres que l’usage
normal domestique.
C. Les dommages au réfrigérateur
causés par un accident, des
modifications, un mauvais usage, des
abus, une installation inappropriée ou
non conforme aux règlements locaux
en matière d’électricité ou de
plomberie.
D. Toute perte d’aliments due à une
panne de l’appareil.
E. Tous frais de main-d’oeuvre au cours
des périodes de garantie limitée.
F. Les pièces de remplacement ou les
frais de main-d’oeuvre pour les
appareils utilisés à l’extérieur des
États- Unis ou du Canada.
G. Les réparations des pièces ou
systèmes résultant de modifications
non autorisées apportées à l’appareil.
H. L’enlèvement et le remplacement des
garnitures ou panneaux décoratifs qui
entravent l’entretien du produit.
I. La main-d’oeuvre ou les pièces
installées par une compagnie de
service non autorisée durant la période
de garantie complète, à moins d’avoir
été approuvées par KitchenAid avant
l’exécution du service.
J. Toute perte de médicaments due à
une panne de l’appareil.
DURÉE DE LA GARANTIE :
GARANTIE COMPLÈTE
DE UN AN
À COMPTER DE LA DATE
D’INSTALLATION
GARANTIE COMPLÈTE DE
DEUX ANS
À COMPTER DE LA DATE
D’INSTALLATION
GARANTIE COMPLÈTE DE LA
TROISIÈME À LA SIXIÈME
ANNÉE INCLUSIVEMENT
À COMPTER DE LA DATE
D’INSTALLATION
GARANTIE LIMITÉE DE LA
SEPTIÈME À LA DOUZIÈME
ANNÉE INCLUSIVEMENT
À COMPTER DE LA DATE
D’INSTALLATION
GARANTIE LIMITÉE À VIE
SUR LES BALCONNETS
DANS LA PORTE DU
RÉFRIGÉRATEUR
11/99
®
Page 56

11/99
Imprimé aux É.-U.
Pièce n° 2006136 Rév. A
© 1999 KitchenAid, U.S.A.
® Marque déposée de KitchenAid U.S.A., KitchenAid porteur de licence au Canada.
 Loading...