

KiSS Networked Entertainment DP-558 User Manual
KiSS DP-558 Digital Video Recorder
Online Electronic Program Guide, Remote EPG, TimeShift, Network,
Online Services, Hard Disk, DVD/DivX/Nero Digital Player
www.kiss-technology.com
italiano español nederlands dansk deutsch français english

english
Contents
1 What's in the box 7
2 Overview 8
3 How to connect my player 9
4 PC to DVD connection 10
5 Quick setup 12
6 Television function 13
7 Advanced setup 14
8 Video Recorder Functions 16
9 Hard Disk and FTP 18
10 Playing Media 19
11 KiSS PC-Link 20
12 KiSS Online 21
13 KiSS Remote EPG 24
14 Advanced Functions 26
15 Updating the player 27
16 Support 28
17 Contacting KiSS 29
18 General Public License GNU 174
Congratulations on your KiSS DP-558
To enjoy all the new features of your new player, always make sure it has the latest firmware
installed. By updating your player, new features not described in this manual can be added
and some features described in this manual can be altered or removed. The number of the
current firmware can be obtained by pressing the setup button on the remote. It is located
on the top left corner of the screen. The latest firmware is available from our website: www.
kiss-technology.com/software. Refer to the "Updating the player" section of this manual or the
website's online guide for in-depth guidance.
THE LATEST VERSION OF THIS MANUAL IS AVAILABLE FROM WWW.KISSTECHNOLOGY.COM IN THE SUPPORT SECTION AT THE FOLLOWING ADDRESS:
WWW.KISS-TECHNOLOGY.COM/MANUALS
1
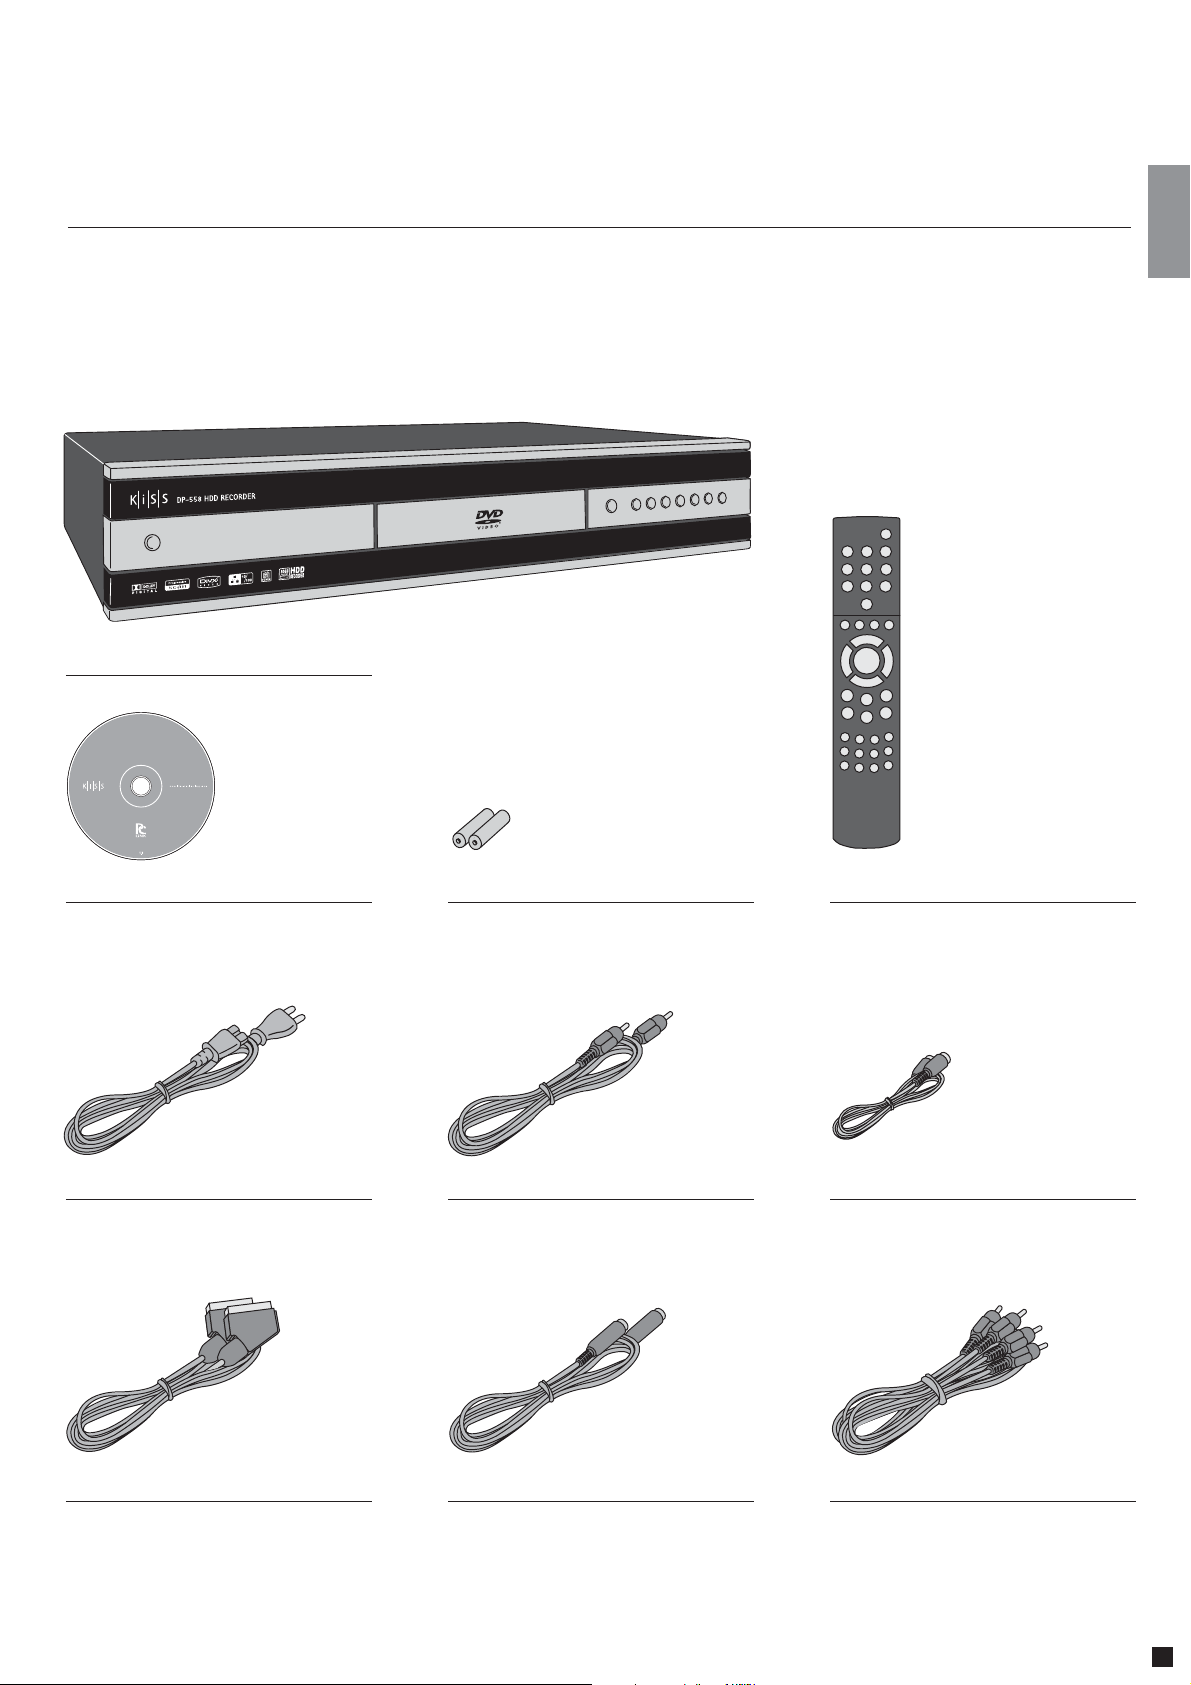
The following elements are included in the box.
KiSS DP-558
What's in the box
KiSS PC-Link Software CD
Power cable
Batteries for the remote
Composite Video
Remote Control
Antenna Cable
SCART Cable Provided in Europe only
S-Video Not provided in Europe
Audio cable
7
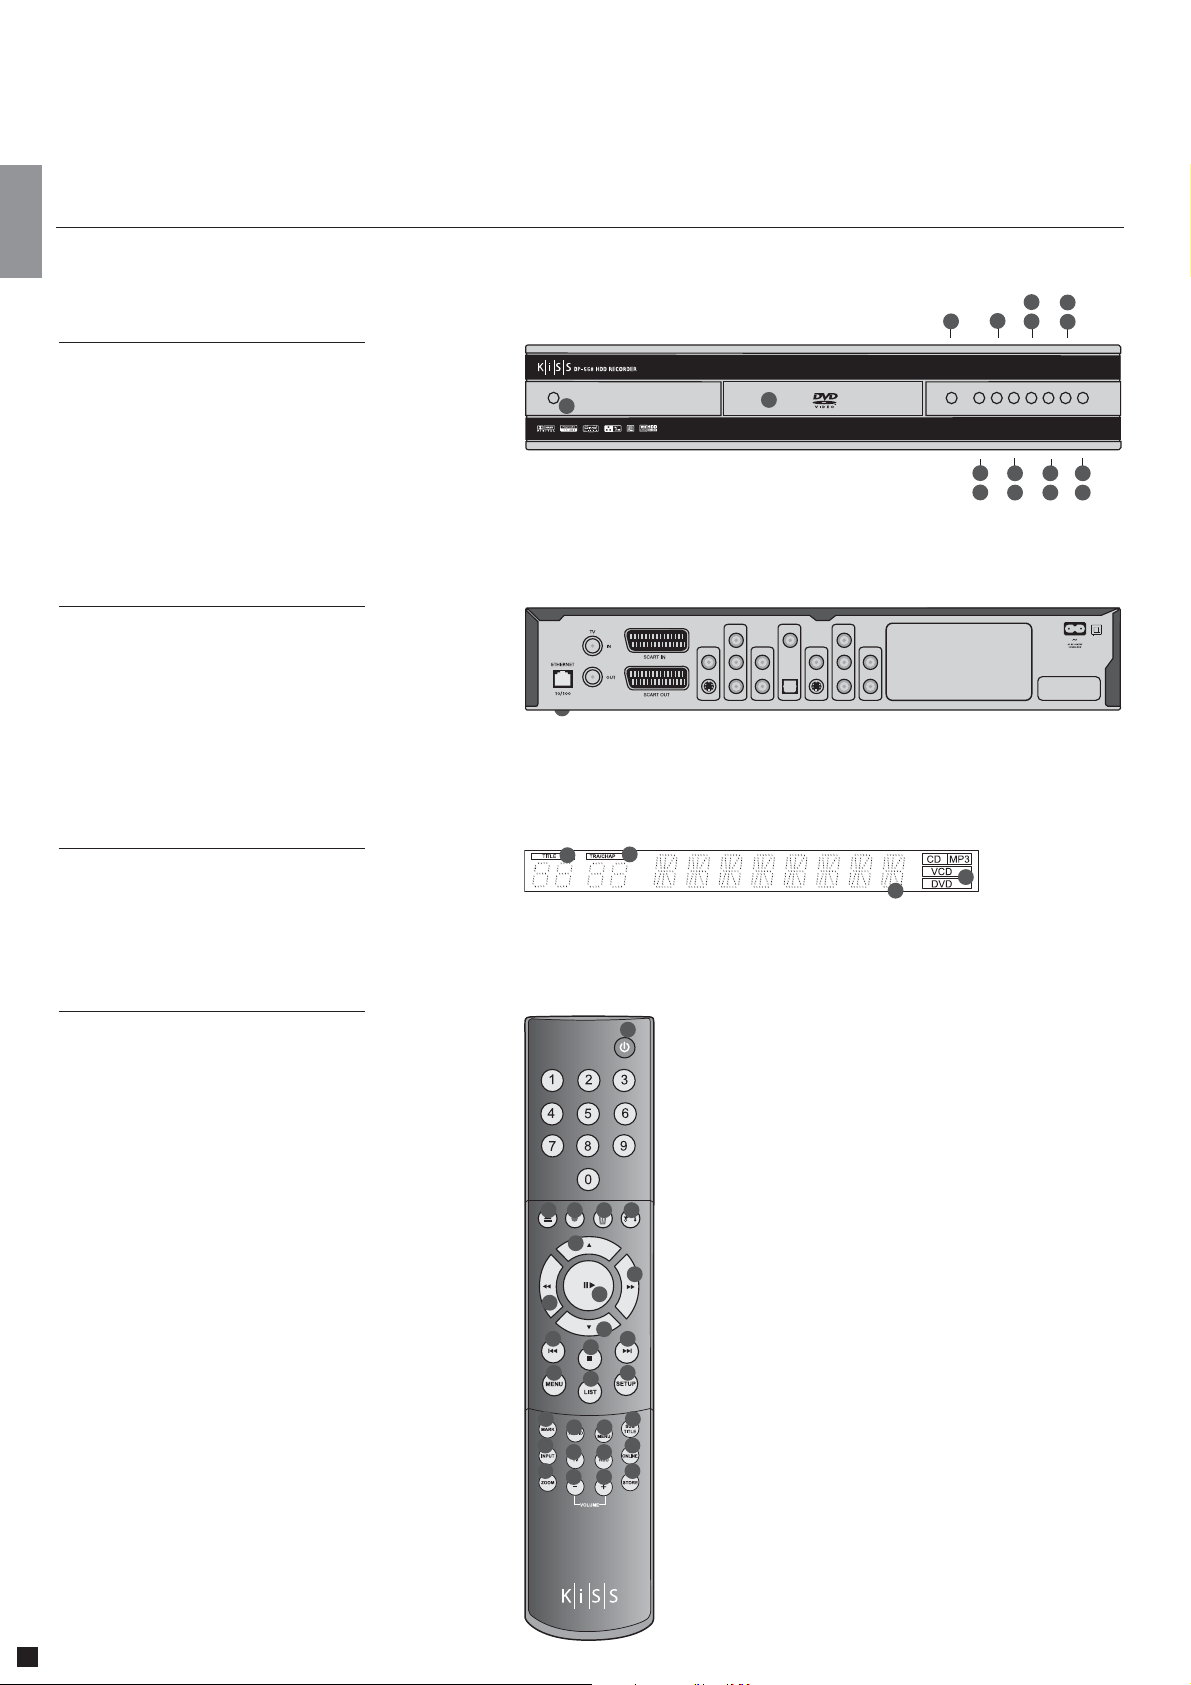
Front panel
2
Overview
7
5
3
9
13
15
1 On/Off
10 Menu
2 CD Tray
3 Open/Close
4 Play/Pause
5 Stop
6 Previous Chapter
7 Next Chapter
8 Rewind
9 Fast Forward
Option on the Setup Menu
11 Enter
12 Navigate Left
13 Navigate Right
14 Navigate Up
15 Navigate Down
16 Close
Back panel
1 Ethernet
2 TV Antenna in/out
3 SCART in/out
4 Video Output
5 S-Video Output
6 Component Video Output
7 Analog Audio Output
8 Coaxial Audio Output
9 Optical Audio Output
10 Video Input
11 S-Video Input
12 Component Video Input
13 Analog Audio Input
14 AC Input
Display
1 Indicates the selection of the disc being played
2 Indicates the number or chapter being shown/played
3 Indicates the current function, such as play or stop
4 Indicates the type of media being played
1
3
2
1
1
2
4
5
2
4
11
12614816
6
8
7
12
13
10
9
11
3
4
10
14
Remote control
1 Standby
2 Open/Close
3 Record
4 Delete
5 Back
6 Up Arrow
7 Left Arrow
8 Play/Pause/Enter
9 Right Arrow
10 Down Arrow
11 Previous Chapter
12 Stop
13 Next Chapter
14 Menu
15 List
16 Setup
17 Mark
18 Audio
19 Title Menu
20 Subtitle
21 Input
22 TV
23 HDD
24 Online
25 Zoom
26 Decrease Volume
27 Increase Volume
28 Store
1
5
3 4
2
6
9
8
7
10
11
14
17
21
25
12
15
18
22
26 27
13
16
20
19
24
23
28
8
3
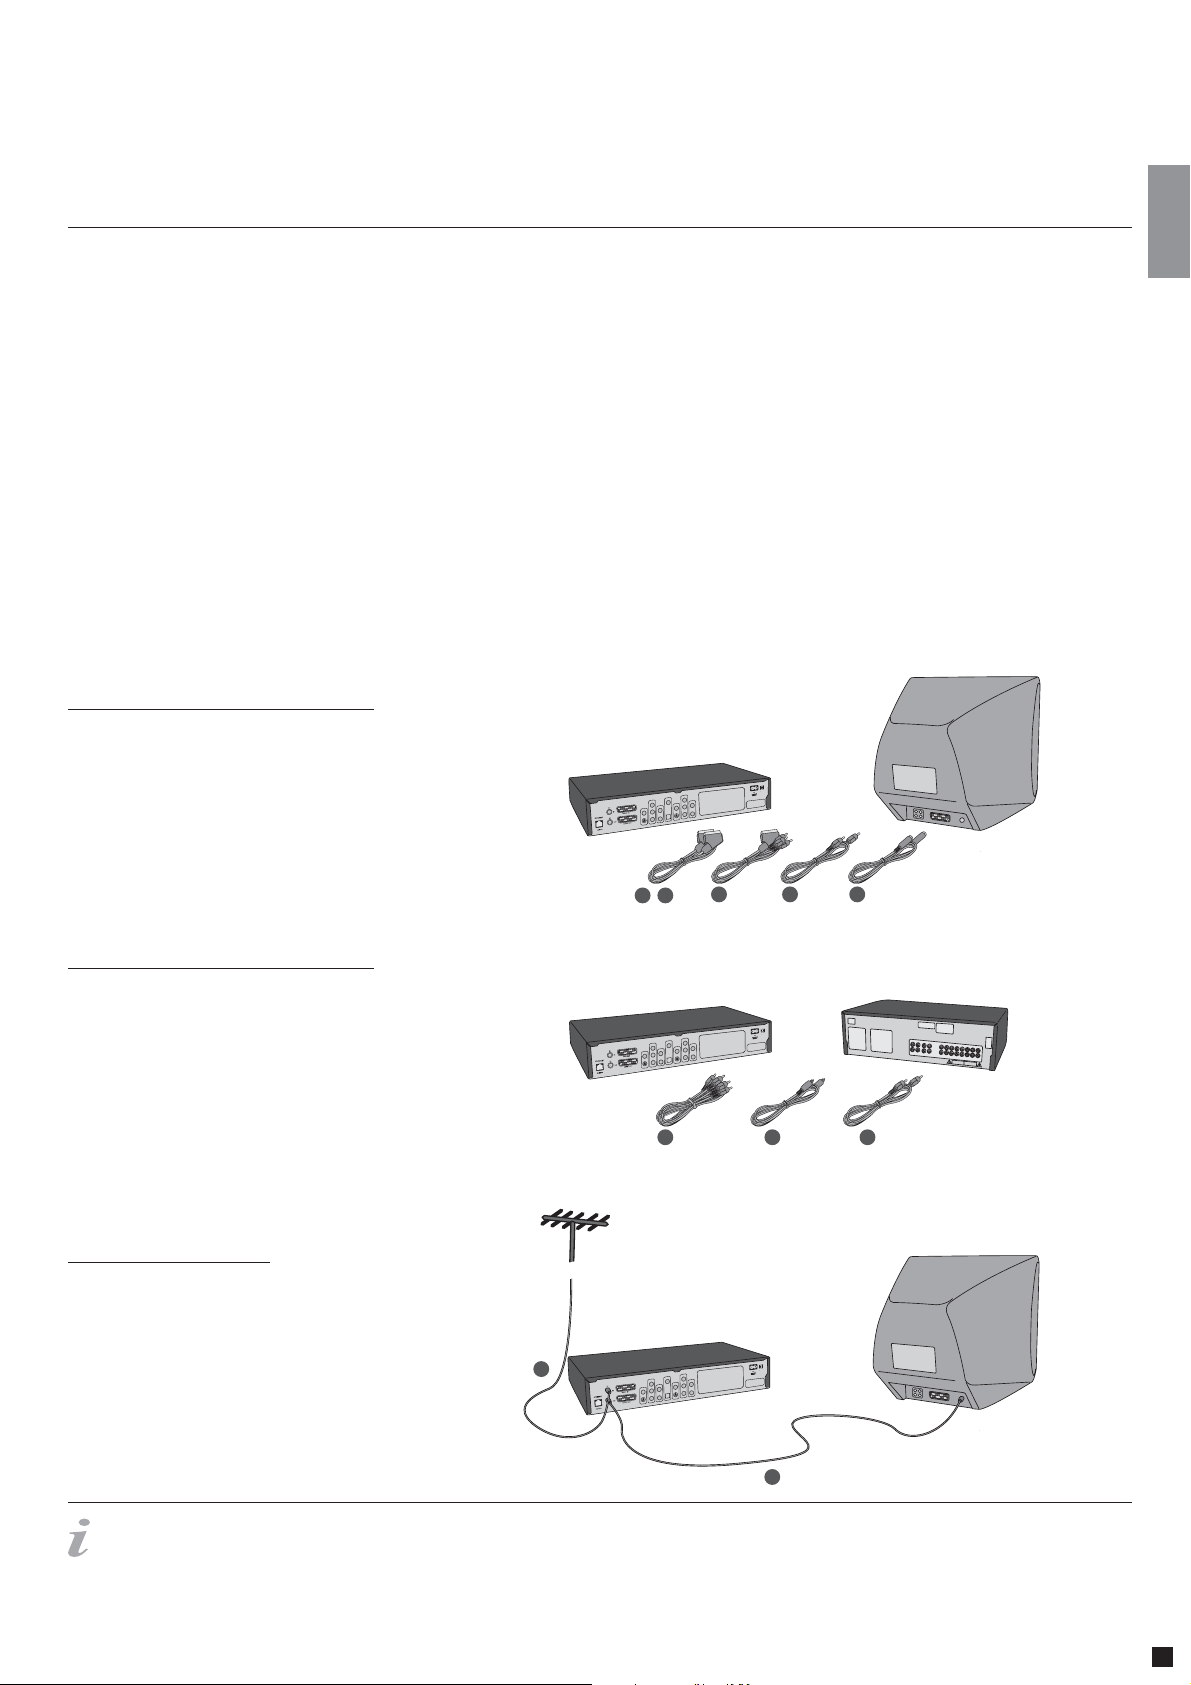
We recommend connecting your player to your television using the SCART cable that comes with your player. The SCART cable is the biggest cable with the large connectors in the ends.
Connect one end of the SCART cable to “SCART OUT” on your player. Connect the other end to the SCART input on your television. Then connect the antenna cable coming from your roof
or the wall with “TV IN” on the player. Connect “TV OUT” with the antenna input on your television using the provided cable. Connect the power cable to the power connector.
If your television does not have a SCART connector, you will have to connect both audio and video with separate cables.
For connecting video, you have the following options:
• VIDEO (composite video)
• S-VIDEO (or “super-VHS”, provides a better quality than VIDEO)
• COMPONENT VIDEO (provides an even better quality than the above)
After connecting the video, you will have to connect the audio. You can connect the audio to either the television or your HiFi set. The DP-558 outputs both analog and digital audio. Analog
audio is the most common format, and is supported by most devices. Digital audio is more common on high-end equipment and surround amplifiers.
For connecting the audio, you have the following options:
• Connect ANALOG AUDIO OUT to your television using phono (RCA) jacks
• Connect ANALOG AUDIO OUT to your HiFi stereo using phono (RCA) jacks
• Connect COAXIAL or OPTICAL digital audio to your HiFi stereo
How to connect my player
Video connection
Connecting your KiSS DP-558 DVD player to your TV can be done using any of the cables below.
(Only one cable can be connected at a time)
1 RGB via SCART
2 S-Video (the cable is an extra accessory)
3 Composite via SCART
4 Composite Video
5 Component SCART (the cable is an extra accessory)
KiSS DP-558 TV
123
Audio connection
Connecting your KiSS DP-558 DVD player to your amplifier can be done using any of the cables below.
(Only one cable can be connected at a time)
1 Analog Stereo
2 Coaxial Output (the cable is an extra accessory)
3 Optical Output (the cable is an extra accessory)
KiSS DP-558 Amplifier
Antenna connection
Connecting your KiSS DP-558 DVD player to your TV Antenna
45
1
2
3
1 Antenna In (Going to the roof Antenna)
2 Antenna Out (Going to the player, use provided cable)
- Extra information is also available from www.kiss-technology.com
1
KiSS DP-558
TV
2
9
4
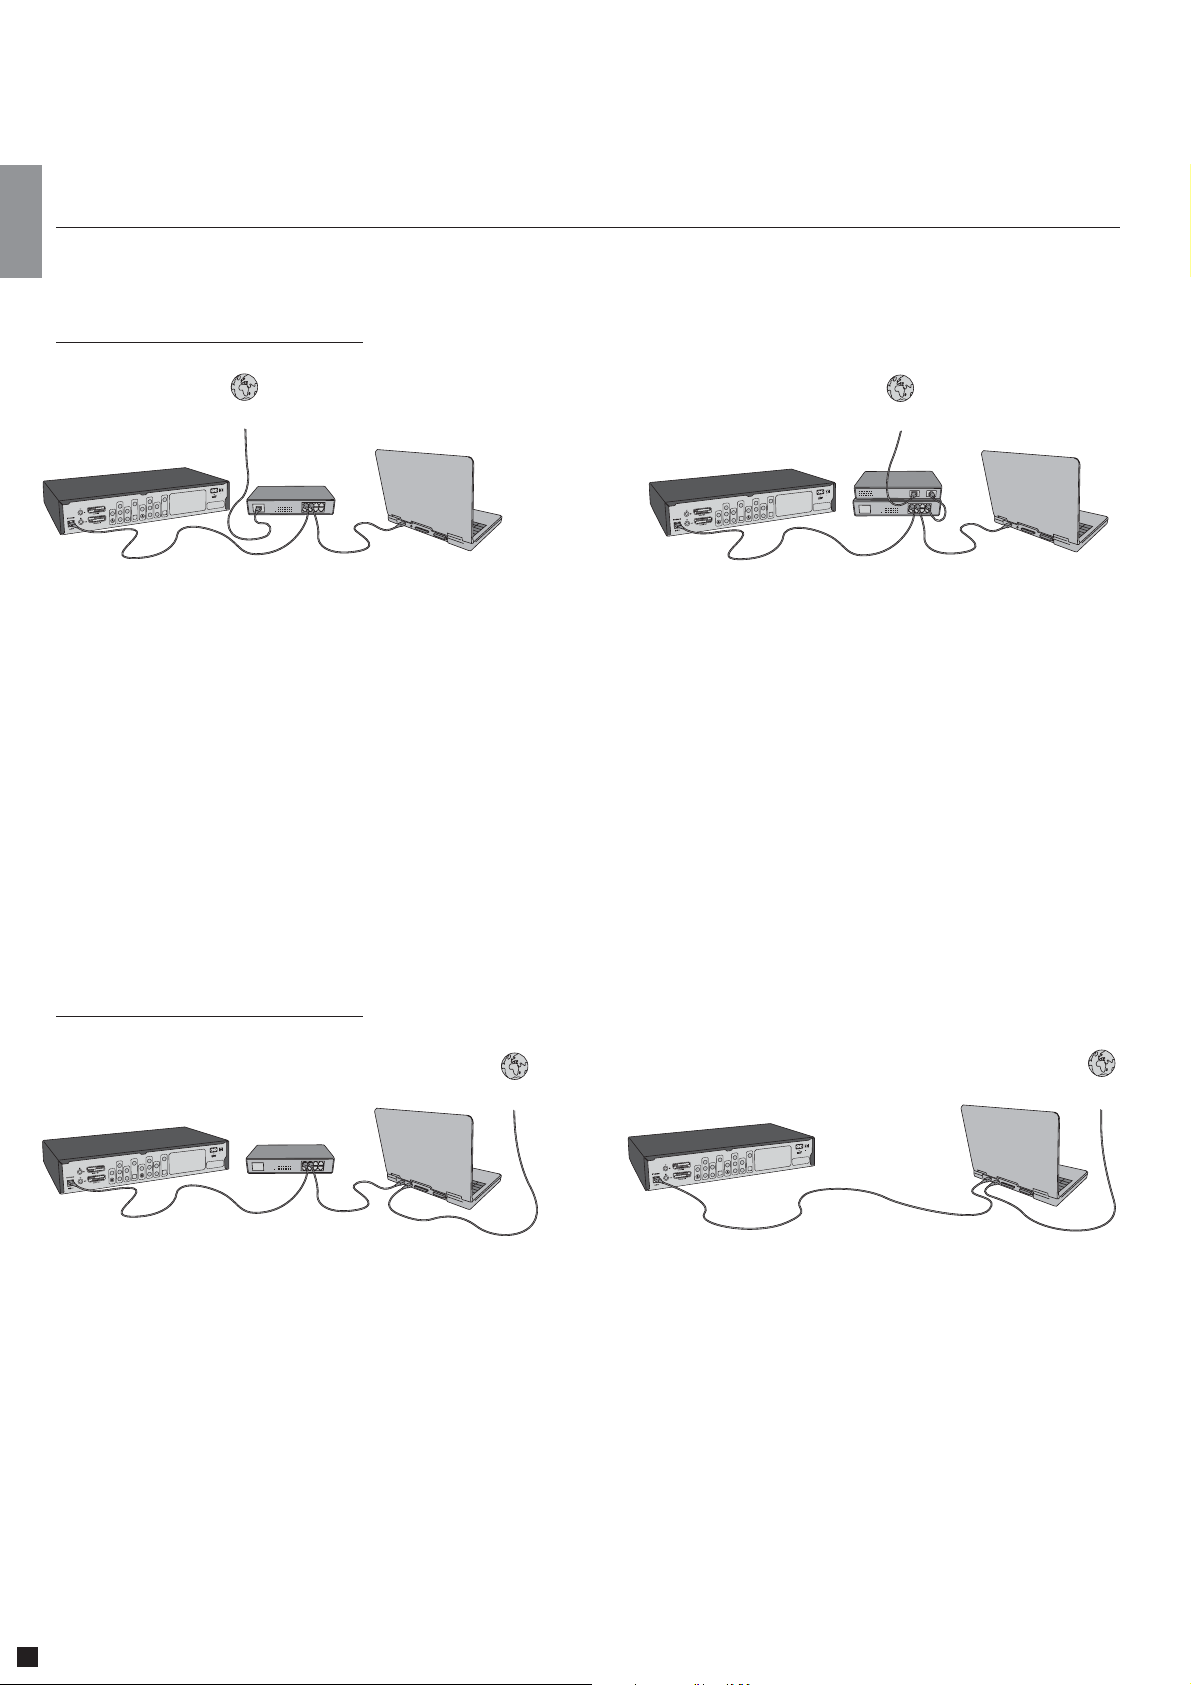
Connection using a router
PC to DVD connection
Internet
KiSS DP-558
Equipment required
• A router, with a built-in switch or a separate switch/hub.
• 2 or 3 straight Ethernet cables.
• A Windows PC with an Ethernet connection.
• The KiSS PC-link program.
Step-by-Step Guide
1 Connect the player to the router’s built-in switch or an external switch/hub which is connected to the router.
2 Connect the PC to the router’s built-in switch or an external switch which is connected to the router.
3 Check that your Internet connection is working. If any problems occur, contact your ISP (Internet Service provider).
4 Install KiSS PC-Link on the PC and select the content to be shared with your player.
5 Start the player, select SETUP and then select ETHERNET - TCP/IP. Check that DHCP Client is ENABLED. Press SETUP to exit this menu.
6 Press MENU and go to PC-LINK.
7 Press SEARCH FOR PC-LINK HOST, the name of the server should appear on your screen, press ENTER to select it.
8 Choose between Audio, Video or Picture. The player will display the list of fi les available from your PC.
9 If you have any problems please check the FAQ on our web site for any questions If that doesn’t help then contact the KiSS Hotline
Your player should now be connected
Router
PC
KiSS DP-558
Internet
Router
PC
Switch
Network with a PC using Internet connection sharing
Internet
KiSS DP-558
Equipment required
• Switch/hub and 2 straight cables or a crossed cable.
• A windows PC with an Ethernet connection.
• The KiSS PC-link program.
Step-by-Step Guide
1 Connect the player to the PC with a crossed cable or to a switch/hub connected to the PC.
2 Connect the PC to the Internet (LAN/Modem/ADSL).
3 Check that your Internet connection is working. If any problems occur, contact your ISP (Internet Service provider)
4 On the PC select Network Connection in the Control Panel. Open Properties for the network connection that is connected to the Internet.
5 Select Advanced where you enable Internet connection sharing.
6 Install KiSS PC-Link on the PC and select the content to be shared with your player.
7 Start the player, select SETUP and then select ETHERNET - TCP/IP. Check that DHCP Client is ENABLED. Press SETUP to exit this menu.
8 Press MENU and go to PC-LINK.
9 Press SEARCH FOR PC-LINK HOST, the name of the server should appear on your screen, press ENTER to select it.
10 Choose between Audio, Video or Picture. The player will display the list of fi les available from your PC.
11 If you have any problems, please check the FAQ on our web site for any questions. And if that doesn’t help then contact the KiSS Hotline
Switch
PC
KiSS DP-558
Crossed cable
Internet
PC
Your player should now be connected
10
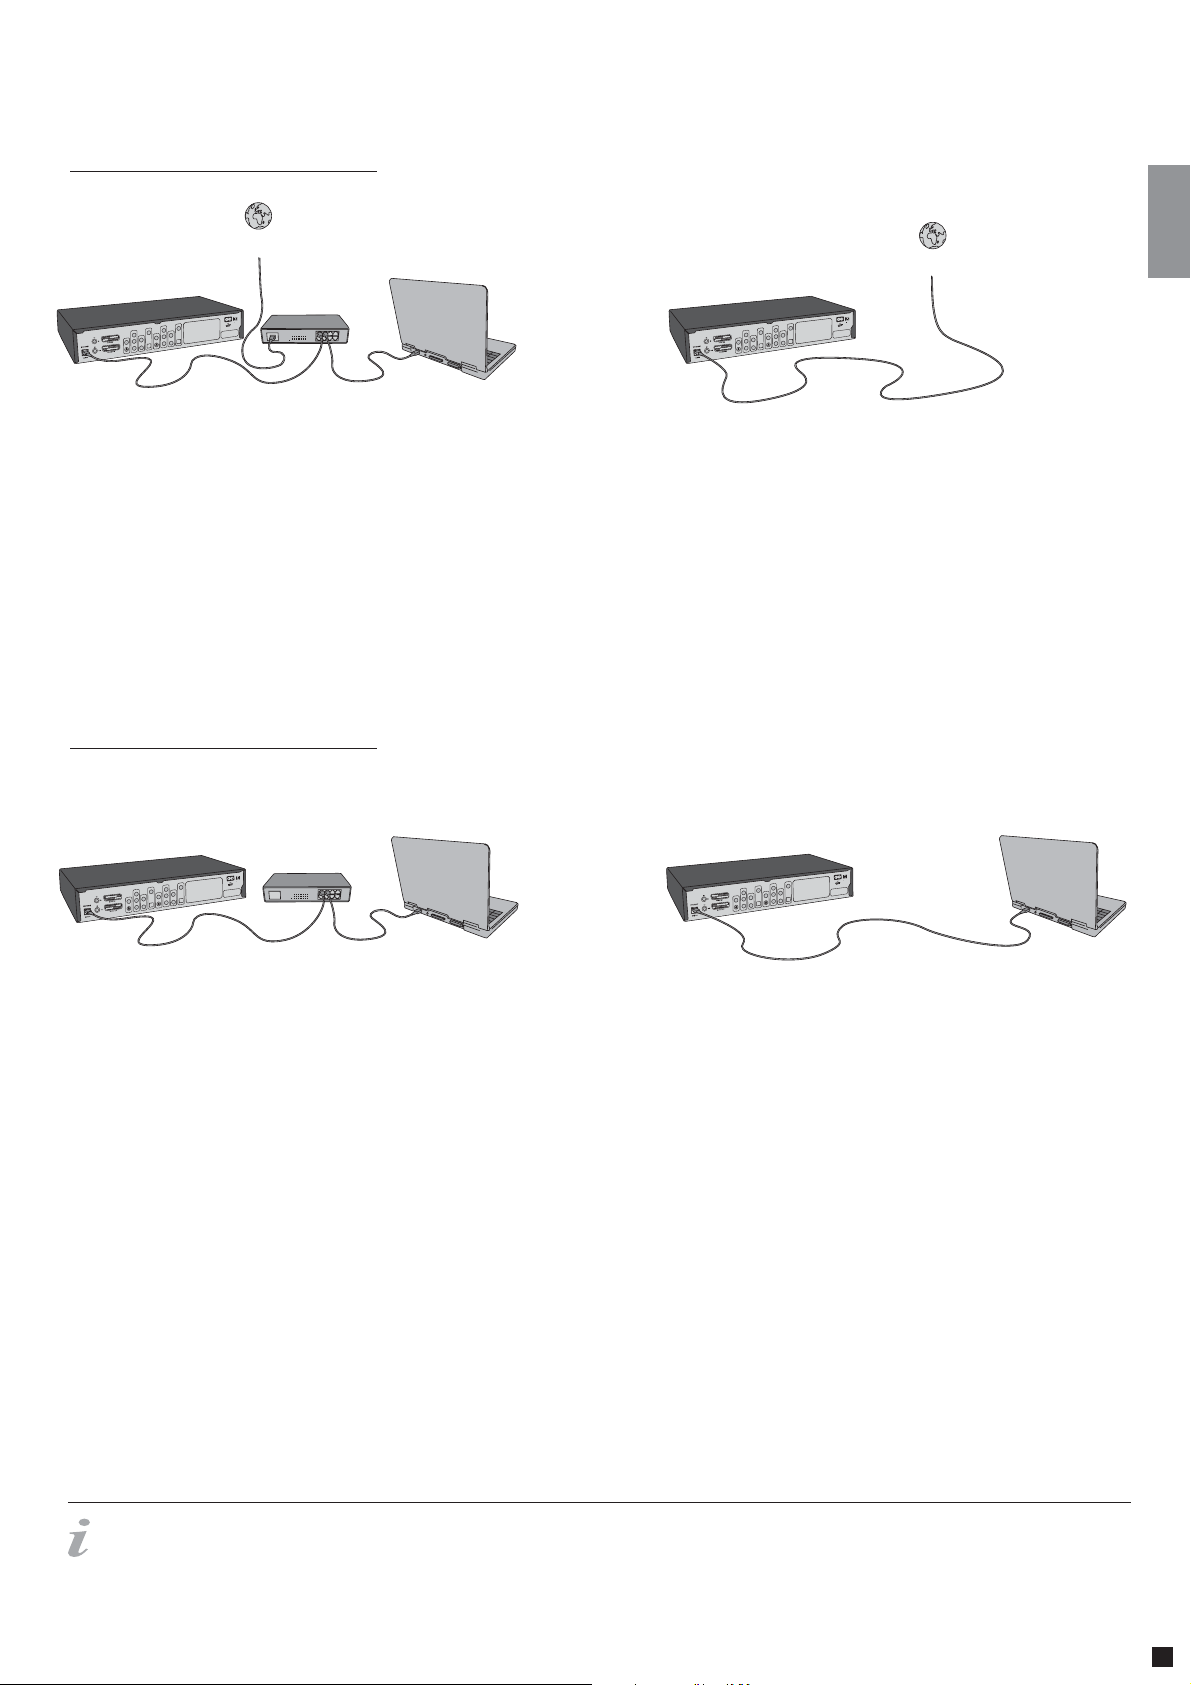
Network using a direct Internet connection
Internet
KiSS DP-558
Switch
PC
KiSS DP-558
Crossed cable
Equipment required
• Switch/hub and 2 straight cables or a crossed cable.
• A windows PC with an Ethernet connection.
• The KiSS PC-link program.
Step-by-Step Guide
1 With a direct Internet connection, you can only access the online features such as WebRadio. KiSS PC-Link can NOT be enabled.
2 Start the player, select SETUP and then select ETHERNET - TCP/IP, check that DHCP Client is ENABLED.
3 Press SETUP to exit this menu.
4 Press ONLINE on your remote to select the service you wish to use.
5 If you have any problems please check the FAQ on our web site for any questions, and if that doesn’t help then contact the KiSS Hotline.
Your player should now be connected
Network using a direct connection to the PC
Internet
KiSS DP-558
Switch
PC
KiSS DP-558
Equipment required
• Switch/hub and 2 straight cables or a crossed cable.
• A windows PC with an Ethernet connection.
• The KiSS PC-link program.
Step-by-Step Guide
1 Connect the player to the PC with a crossed cable or to a switch connected to the PC.
2 On the PC select Network Connection in the Control Panel.
Open Properties for the network connection that is connected to the Player.
3 Select Properties for the Internet Protocol (TCP/IP).
4 Select “Use the following IP address” and enter the IP address below:
IP address 192.168.0.1
Subnet mask 255.255.255.0
5 Select SETUP on the player, then ETHERNET - TCP/IP and set the DHCP client to DISABLED
6 Select “ENTER THE TCP/IP SETTINGS MANUALLY”
7 Then enter the following addresses:
IP ADDRESS: 192.168.000.002
NETWORK MASK: 255.255.255.000
DEFAULT GATEWAY: 192.168.000.001
DNS SERVER: 192.168.000.001
8 Press SETUP to exit this menu Then MENU and go to PC-LINK.
9 Press SEARCH FOR PC-LINK HOST, the name of the server should appear on your screen, press ENTER to select it.
10 Choose between Audio, Video or Picture. The player will display the list of fi les available from your PC.
11 If you have any problems, please check the FAQ on our web site for any questions. If that doesn’t help then contact the KiSS Hotline.
PC
Crossed cable
Your player should now be connected.
Possible errors.
- Cable problem, check that there is light in all the ports of the switch/hub
- There is a fi rewall installed on the PC which blocks the ports used by KiSS PC-link (port 8000 must be open)
- The player and the PC are not on the same Subnet (problem with playing video)
- Your PC has been assigned a new IP address from the DHCP server. It may differ from the one entered in the player. (Using a static IP on the PC will counter this)
- KiSS PC-Link has to be running for the player to access the data
11
5
Quick setup
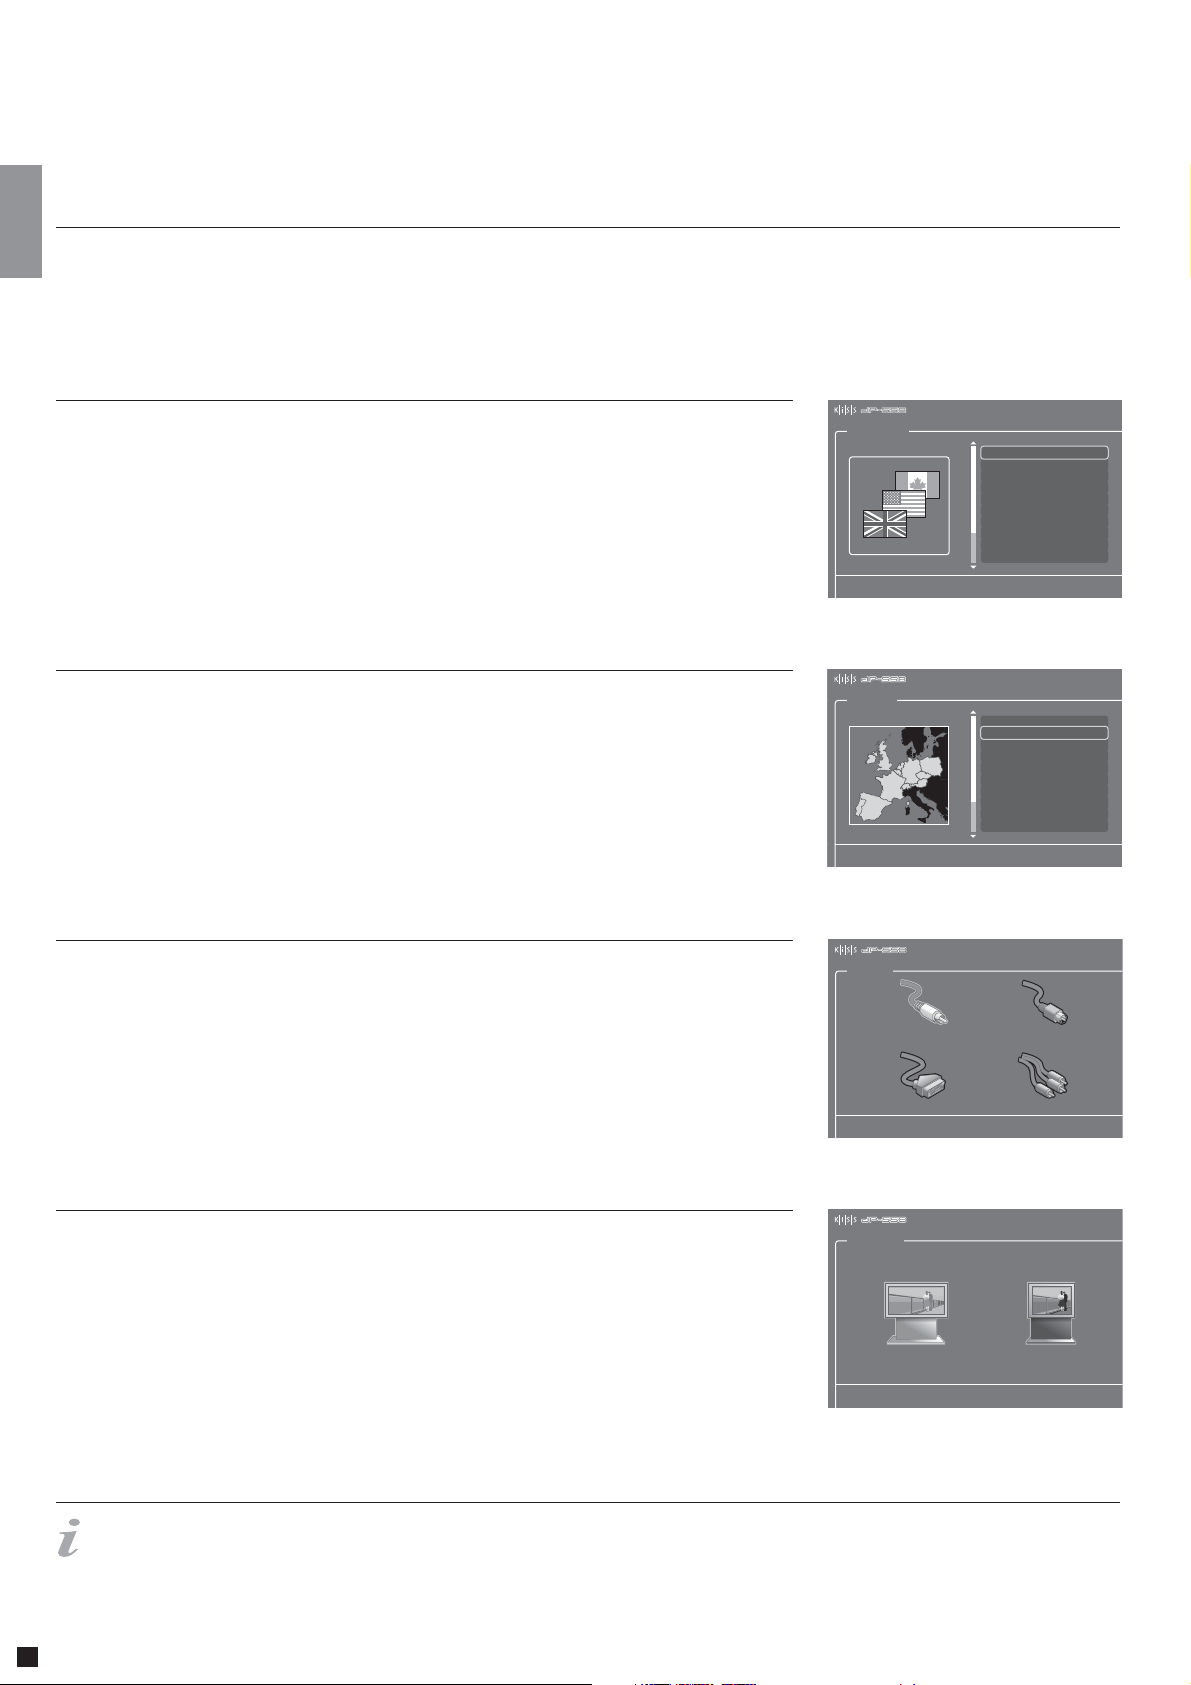
If your DVD Player is correctly connected, the language selection menu will appear.
1. Select Language
Select your preferred language
2. Select Region
From a list, choose the part of the world you live in. Then select your country.
3. Video Setup
Specify how your DVD Player is connected to your TV or monitor.
Quick Set-Up
Select Language
Please select your preferred language
Quick Set-Up
Select Region
Please select your region
Quick Set-Up
Video Setup
Mon 01 Nov 2004 12:00
English
Deutsch
Français
Dansk
Svenska
Norsk
Suomi
Español
Italiano
Nederlands
Mon 01 Nov 2004 12:00
Northern Europe
Western Europe
Southern Europe
Eastern Europe
Middle East
Central Asia
Southern Asia
Oceania
North America
Central America and Caribbean
Mon 01 Nov 2004 12:00
4. Display Format
Select between standard TV type (4:3) or wide screen TV type (16:9).
- If this menu does not appear when you start the DVD Player, re-check the cable connections.
- You can always go back and start again if you happen to do something wrong, Just press on the SETUP button of your remote, go to MISC. SETTINGS and select QUICK SETUP.
Composite
RGB SCART
How is your player connected to your display?
Quick Set-Up
Display Format
16:9 (widescreen) 4:3 (conventional)
What is the format of your TV screen?
S-Video
Component SCART
Mon 01 Nov 2004 12:00
12
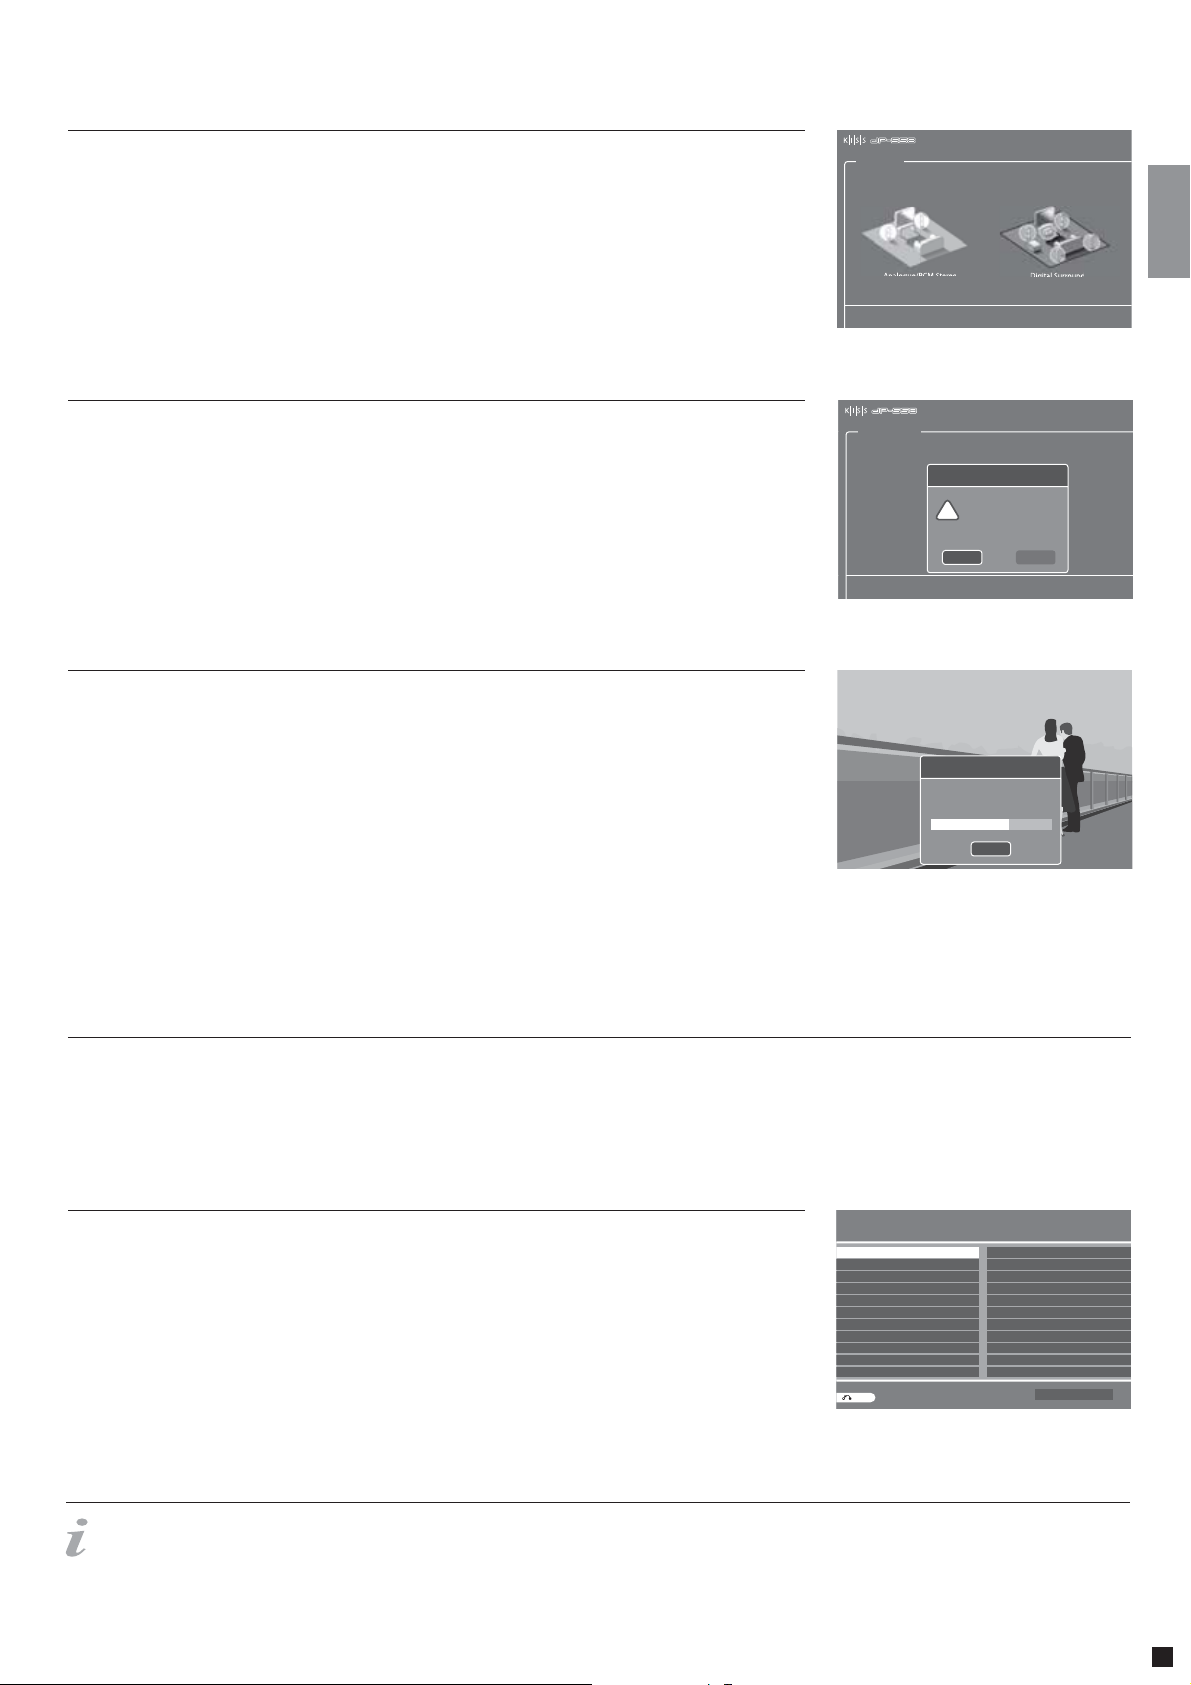
5. Audio Setup
Select which audio output is used on your DVD Player. The default Audio selection should be stereo unless your player is
connected to a digital amplifi er.
6. Format Hard Disk
You will be asked to format (erase) your Hard Disc. KiSS advise you to do this the first time you connect your player. Remember
that formatting the Hard Disk will delete all content held on it. Formatting takes a few minutes, when it is finished, press
DONE.
7. Tuning TV Channels
This last screen will ask you to choose if you wish to tune your TV Channels automatically. Pressing OK will start autoscan,
DONE will exit the Quick Setup.
Quick Set-Up
Audio Setup
Analogue/PCM Stereo Digital Surround
Please select your audio configuration.
Quick Set-Up
Format H ard Disk
The hard disk will now be formatted and prepared for use.
This will take approximately 2-3 minutes.
Format Hard Disk
Caution: You are about to
permanently erase your
!
hard disk. Are you sure?
OK
Format and prepare the hard disk
Mon 01 Nov 2004 12:00
Mon 01 Nov 2004 12:00
Cancel
Mon 01 Nov 2004 12:00
6
Television Function
To use plainly the DP-558 is is important that you watch television through your DP-558
Watching Television
Press TV on your remote to make sure that you are watching television through the DP-558. You can scroll the Channels by
pressing the TOP and BOTTOM ARROWS of your remote. If you are connected to Broadband Internet, you can "map" (register) the
channels. Press LIST to view the on-screen options, when you see CONFIGURE EPG ID, select by pressing ENTER. Choose your
country, and the channel you are mapping. Repeat this operation for all your channels. Now the channel name appear on the top
left corner of your screen. By doing this, you also have added your channels to the TV Guide's (EPG) favorites. This will be helpful
for future scheduled recording via EPG. See KiSS Online chapter for more information.
Searching for TV Channels...
Found 14 channel(s), 14 new
Match channel - Select Country
Australia
Belgium
Czech Republic
Estonia
Finland
Germany
Hungary
Ireland
Latvia
Luxembourg
New Zealand
d c Prev/Next page
Page 1/2
h g W Select item
Back
f e Move item
65% Done
Channel 85
Stop
Austria
Croatia
Denmark
Faroe Islan d
France
Greenland
Iceland
Italy
Lithuania
Netherlands
Norway
Enter name manually
- None of the recording functions will work if the Player is not correctly tuned
13
 Loading...