


THIS PRODUCT UTILIZES A LASER.
USE OF CONTROLS OR ADJUSTMENTS OR PER-FORMANCE OF PROCEDURES OTHER THAN THOSE SPECIFIED HEREIN MAY RESULT IN HAZARDOUS RADIATION EXPOSURE.
DO NOT OPEN COVERS AND DO NOT REPAIR YOUR-SELF. REFER SERVICING TO QUALIFIED PERSONNEL.
TO REDUCE THE RISK OF FIRE, ELECTRIC SHOCK OR PRODUCT DAMAGE, DO NOT EXPOSE THIS APPARATUS TO RAIN, MOISTURE, DRIPPING OR SPLASHING AND THAT NO
OBJECTS FILLED WITH LIQUIDS, SUCH AS VASES, SHALL BE PLACED ON THE APPARATUS.
• DO NOT INSTALL, OR PLACE THIS UNIT, IN A BOOKCASE, BUILT-IN CABINET OR IN ANOTHER CONFINED SPACE. ENSURE THE UNIT IS WELL VENTILATED. TO PREVENT RISK
OF ELECTRIC SHOCK OR FIRE HAZARD DUE TO OVERHEATING, ENSURE THAT CURTAINS AND ANY OTHER MATE-RIALS DO NOT OBSTRUCT THE VENTILATION VENTS.
• DO NOT OBSTRUCT THE UNIT’S VENTILATION OPENINGS WITH NEWSPAPERS, TABLECLOTHS, CURTAINS, AND SIMILAR ITEMS.
• DO NOT PLACE SOURCES OF NAKED FLAMES, SUCH AS LIGHTED CANDLES, ON THE UNIT.
• DISPOSE OF BATTERIES IN AN ENVIRONMEN-TALLY FRIENDLY MANNER.
THE FOLLOWING APPLIES ONLY IN THE U.S.A. AND CANADA:
TO PREVENT ELECTRIC SHOCK MATCH WIDE BLADE OF PLUG TO WIDE SLOT, FULLY INSERT.
For the Middle East, South Africa and Asia
THIS UNIT IS INTENDED FOR USE IN TROPICAL CLIMATES.
For Australia, N.Z. and units with PX printed on the outer packaging
THIS UNIT IS INTENDED FOR USE IN MODERATE CLIMATES.
This product may receive radio interference caused by mobile telephones during use. If such interference is apparent, please increase separation between the product and
the mobile telephone.
DANGER VISIBLE AND INVISIBLE LASER RADIATION WHEN OPEN. AVOID DIRECT EXPOSURE TO BEAM. (FDA 21 CFR)
CAUTION VISIBLE AND INVISIBLE LASER RADIATION WHEN OPEN. AVOID EXPOSURE TO BEAM. (IEC60825-1)
THE FOLLOWING APPLIES ONLY IN THE U.S.A.:
This equipment has been tested and found to comply with the limits for a Class B digital device, pursuant to Part 15 of the FCC Rules.
These limits are designed to provide reasonable protection against harmful interference in a residential installation. This equipment generates, uses and can radiate
radio frequency energy and, if not installed and used in accordance with the instructions, may cause harmful interference to radio communications. However, there is no
guarantee that interference will not occur in a particular installation. If this equipment does cause harmful interference to radio or television reception, which can be
determined by turning the equipment off and on, the user is encouraged to try to correct the interference by one or more of the following measures:
• Reorient or relocate the receiving antenna.
• Increase the separation between the equipment and receiver.
• Connect the equipment into an outlet on a circuit different from that to which the receiver is connected.
• Consult the dealer or an experienced radio/TV technician for help.
Any unauthorized changes or modifi cations to this equipment would void the user’s authority to operate this device.
This device complies with Part 15 of the FCC Rules. Operation is subject to the following two conditions: (1) This device may not cause harmful interference, and (2) this
device must accept any interference received, including interference that may cause undesired operation.
THE FOLLOWING APPLIES ONLY IN THE U.S.A. AND CANADA:
2

The laser product label has not been attached to products for U.S.A. and Canada.
Read these operating instructions carefully before using the unit. Follow the safety instructions on the unit and the safety precautions listed below. Keep these operating
instructions handy for future reference.
Safety
1.Power source :Connect the unit to a power source of the type described in these instructions or as marked on the unit.
2.Polarization - The unit is equipped with a polarized power plug where one blade is wider than the other. This safety feature ensures that the plug fi ts into your
household AC outlet only one way. If the plug doesn’t fi t one way, try reversing it. If the plug still doesn’t fi t, contact an electrician to replace the obsolete outlet. Do not
attempt to defeat the safety purpose of the plug.
3.Power cord protection - Route the AC power supply cord so that it will not be walked on or pinched by items placed on or against it. Never take hold of the plug or
cord with wet hands. Always grasp the plug body fi rmly when connecting and disconnecting it.
4.Overloading - When connecting the AC power supply cord, be careful not to overload the household AC outlet, extension cord, or outlet from any other device as this
can result in fi re or electric shock.
5.Nonuse periods - Turn the unit off when it is not in use. Unplug the unit from the household AC outlet if it is not to be used for a long time. Unplug the unit during
lightning storms.
6.Attachments and accessories - Use only the attachments and accessories recommended in these operating instructions.
Installation
Placement
1. Ventilation - Situate the unit so that it receives proper ventilation. Do not install in a confi ned space such as a bookcase or cabinet. Allow at least 10 cm (4
inches) clearance from the rear of the unit. To prevent the risk of electric shock or fi re due to overheating ensure curtains and other materials do not obstruct
the unit’s ventilation.
2. Foreign material - Ensure objects and liquids do not get into the unit. Avoid exposing the unit to excessive smoke, dust, mechanical vibration, and shock.
3. Magnetism - Situate the unit away from equipment and devices that generate strong magnetic fi elds.
4. Stacking - Do not place heavy objects on top of this unit.
5. Surface - Place the unit on a fl at, level surface.
6. Carts and stands - Use the unit only with carts and stands recommended by the manufacturer. Move carts with care.
Sudden stops, excessive force, and uneven surfaces can cause carts to overturn.
7. Wall and ceiling mounting - Do not mount the unit on walls or ceilings unless specifi ed in the instructions.
Environment
1. Water and moisture - Do not use the unit near water, such as near a bathtub or swimming pool. Avoid damp basements.
2. Heat - Situate the unit away from heat sources, such as radiators. Do not situate where temperatures fall below 5° C (41° F) or rise above 35° C (95° F).
Maintenance
Unplug the unit from the household AC outlet before cleaning.
Clean with a damp cloth.
Do not use abrasive pads, scouring powders, or solvents.
Service
1. Damage requiring service-The unit should be serviced by qualifi ed service personnel if: The AC power supply cord or the plug has been damaged; or Objects
or liquids have gotten into the unit; or The unit has been exposed to rain; or The unit does not operate normally or exhibits a marked change in performance;
or The unit has been dropped or the cabinet damaged.
2. Servicing - Do not attempt to service the unit beyond that described in these operating instructions. Refer all other servicing to authorized servicing
personnel.
3. Replacement parts - When parts need replacing ensure the servicer uses parts specifi ed by the manufacturer or parts that have the same characteristics as
the original parts. Unauthorized substitutes may result in fi re, electric shock, or other hazards.
4. Safety check - After repairs or service, ask the servicer to perform safety checks to confi rm that the unit is in proper working condition.
To clean this unit, wipe with a soft, damp cloth.
• Never use alcohol, paint thinner or benzine to clean this unit.
• Before using chemically treated cloth, read the instructions that came with the cloth carefully.
3

english
Contents
Accessories and Connections 5
Quick Setup 7
Advanced Setup 9
Playing Media 11
Advanced Functions 12
WebRadio 13
KiSS PC-Link 15
Support 17
Congratulations on your new DVD Player
The many different functions provided by your new player will be a source of pleasure to you for many years to
come. Naturally, you can play and watch DVD films with superb audio and visual quality.
You can watch films in many other formats than DVD, such as SVCD, MPEG-4, XviD, DivX.
The audio features also give you the option of playing music CDs, MP3 or Ogg Vorbis files. The DP-500
automatically recognises each format and can read CD-RW and DVD-RW alike. Your new DP-500 also supports
Picture CDs (jpg), which means that you can display your photos directly on the TV screen. This includes the
pictures developed at the photo shop and any photos you have scanned and saved on a CD yourself.
Note: Do not use the DVD Player until you have studied the configuration menu. To do so, the DVD Player must be connected to a TV set.
4
1
Accessories and Connections
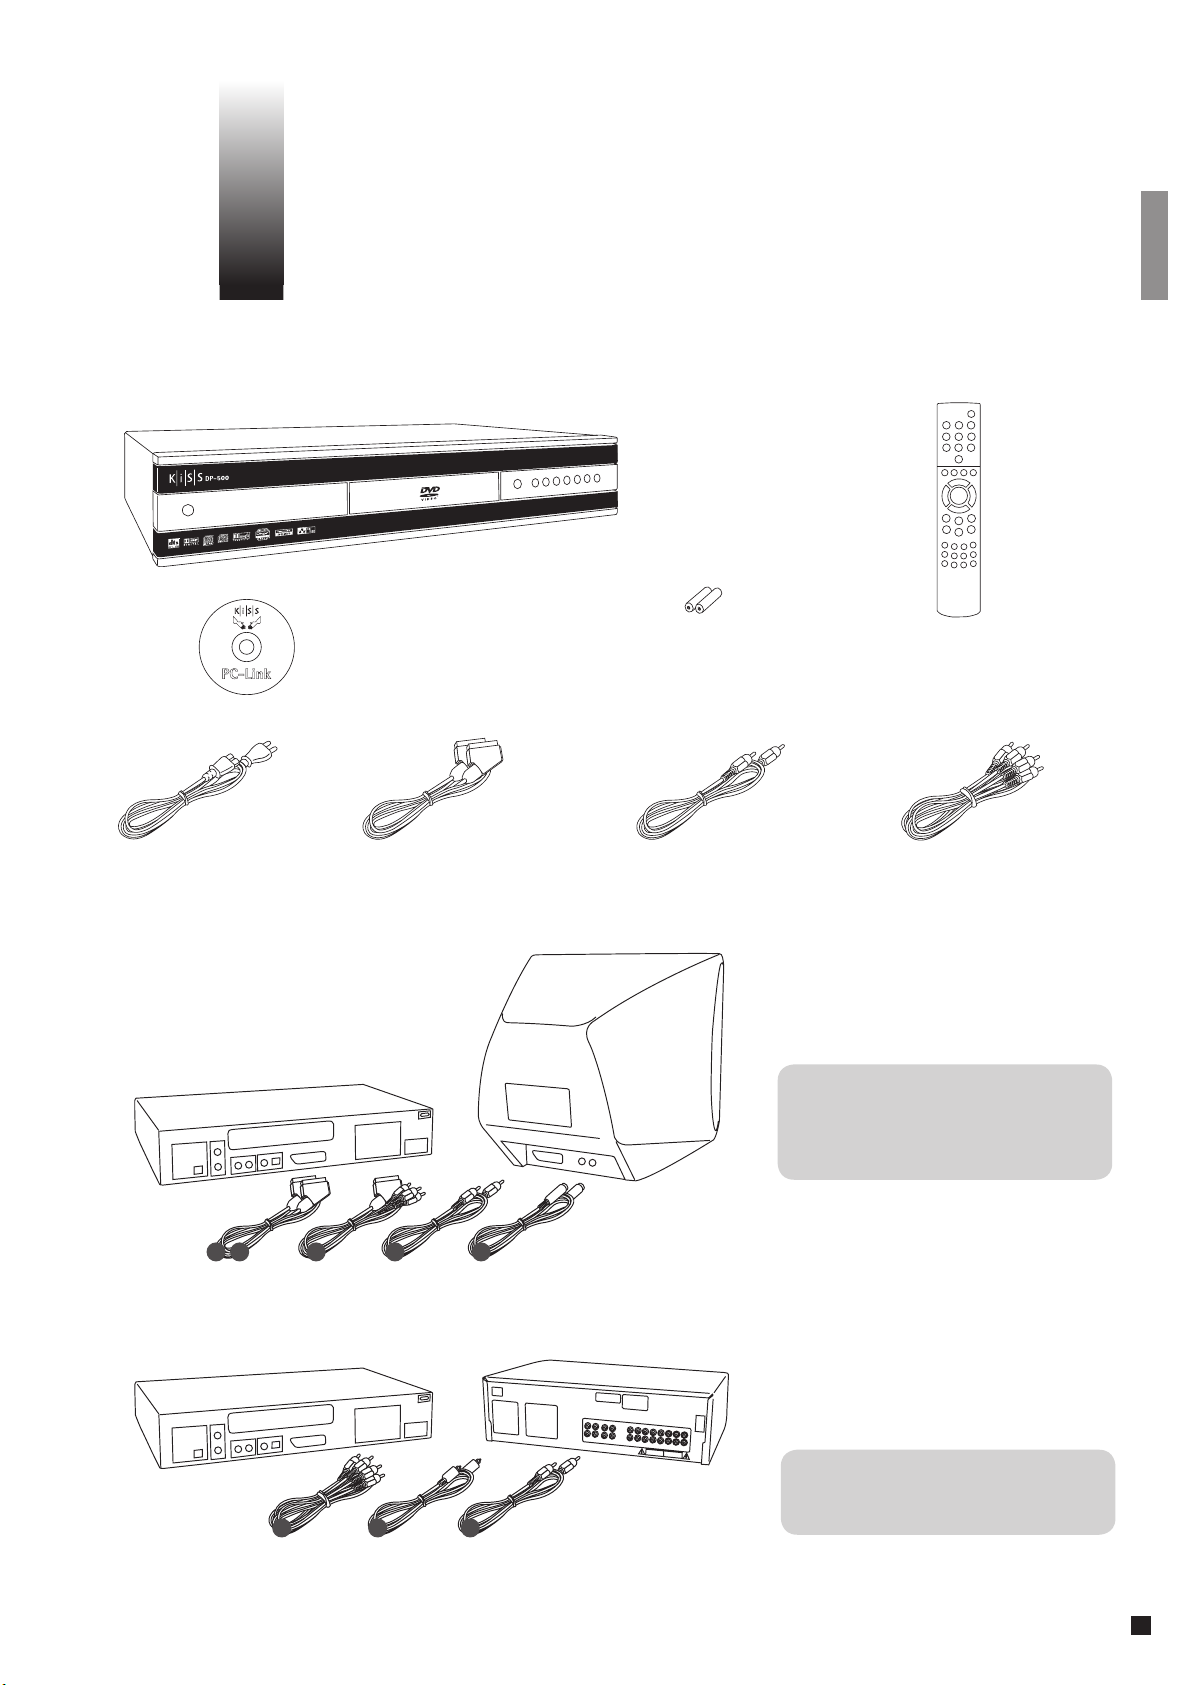
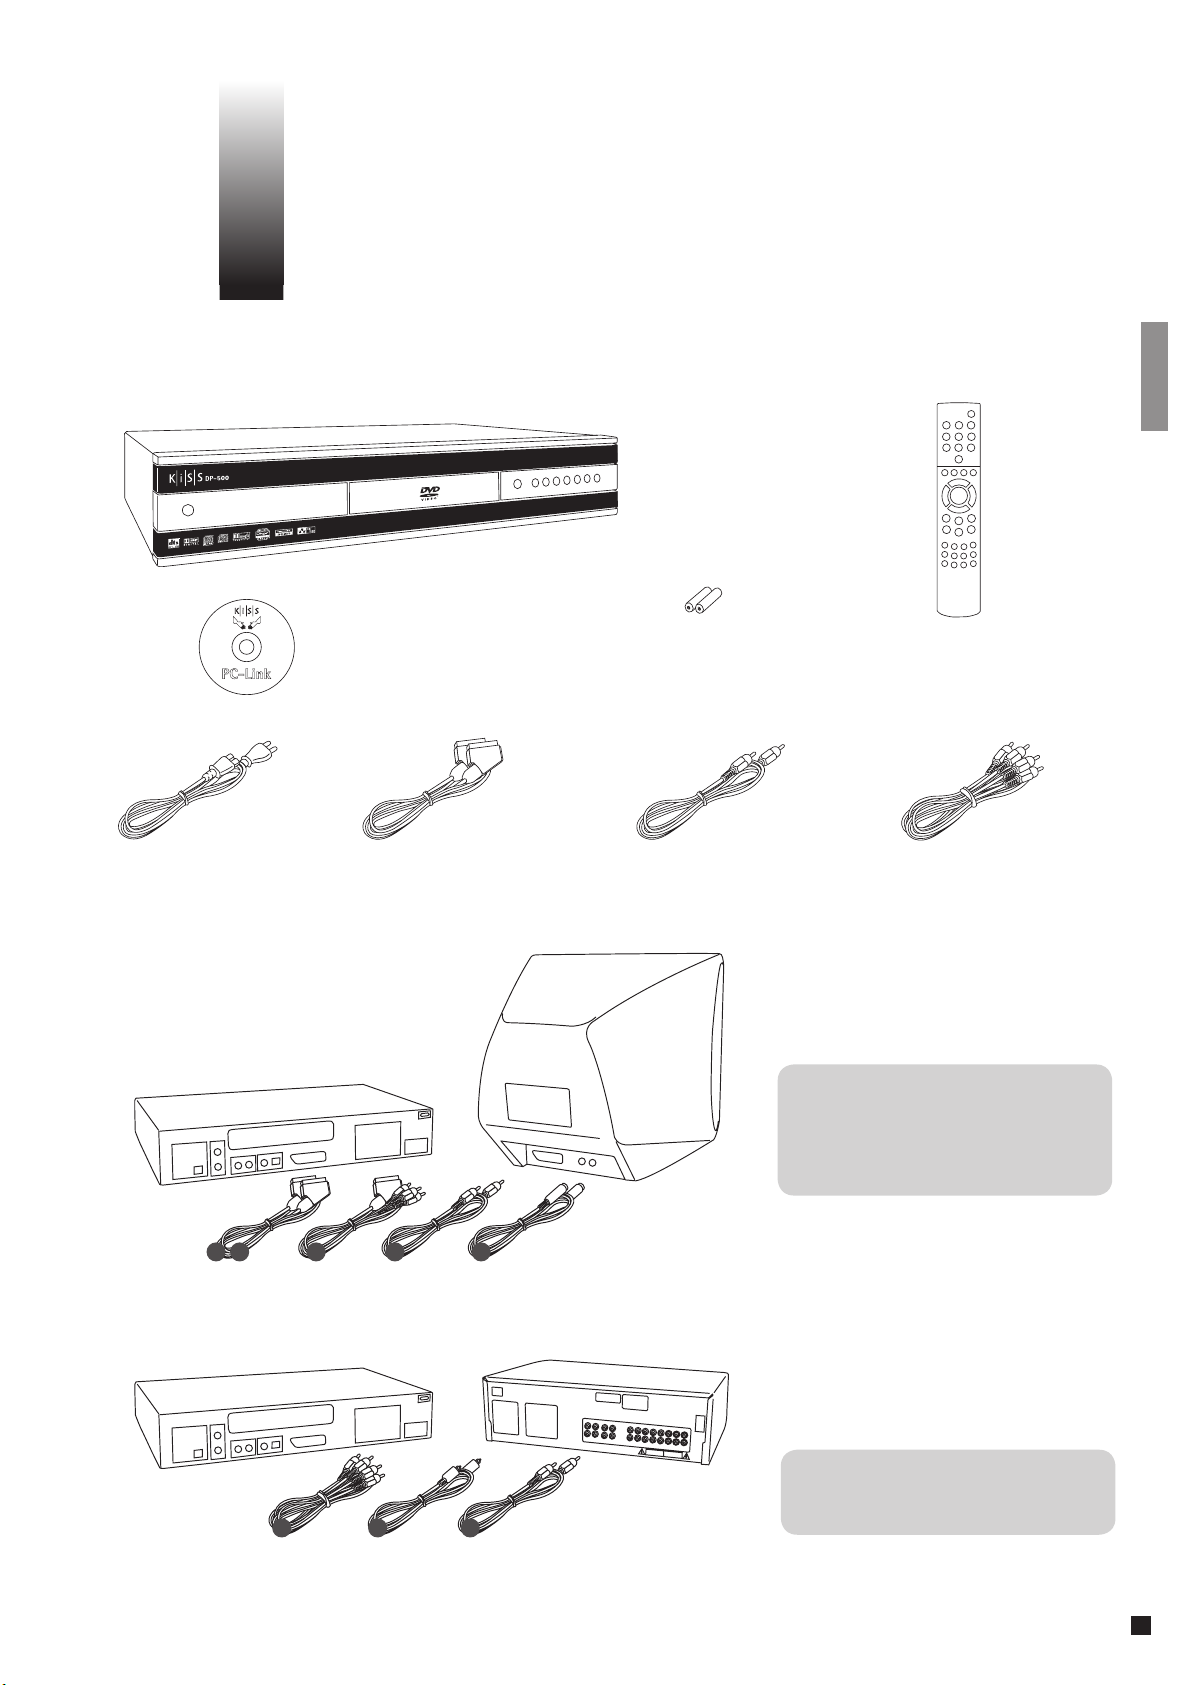
Make sure the following accessories are included with your DVD Player.
DVD-Player KiSS DP-500
Power Cable Audio CableScart Cable Composite Video
Video Connection
DP-500
KiSS PC-Link Software CD
for the remote control [size “AAA” (R6P)]
Batteries
Connecting your KiSS DP-500 DVD player to
your TV can be done with any of the cables
below. (Only one cable can be connected at a
time).
1. RGB via SCART
2. S-Video
3. Composite via SCART
4. Composite Video
5. Component SCART
TV
Remote control
(the cable is an extra accessory)
(the cable is an extra accessory)
1 3 5 4 2
Audio Connection
DP-500
Connecting your KiSS DP-500 DVD player to
your amplifier can be done with any of the
cables below. (Only one cable can be connected
at a time).
Amplifi er
6 78
6. Optical output
7. Coaxial output (the cable is an extra accessory)
8. Analogue Stereo
(the cable is an extra accessory)
5
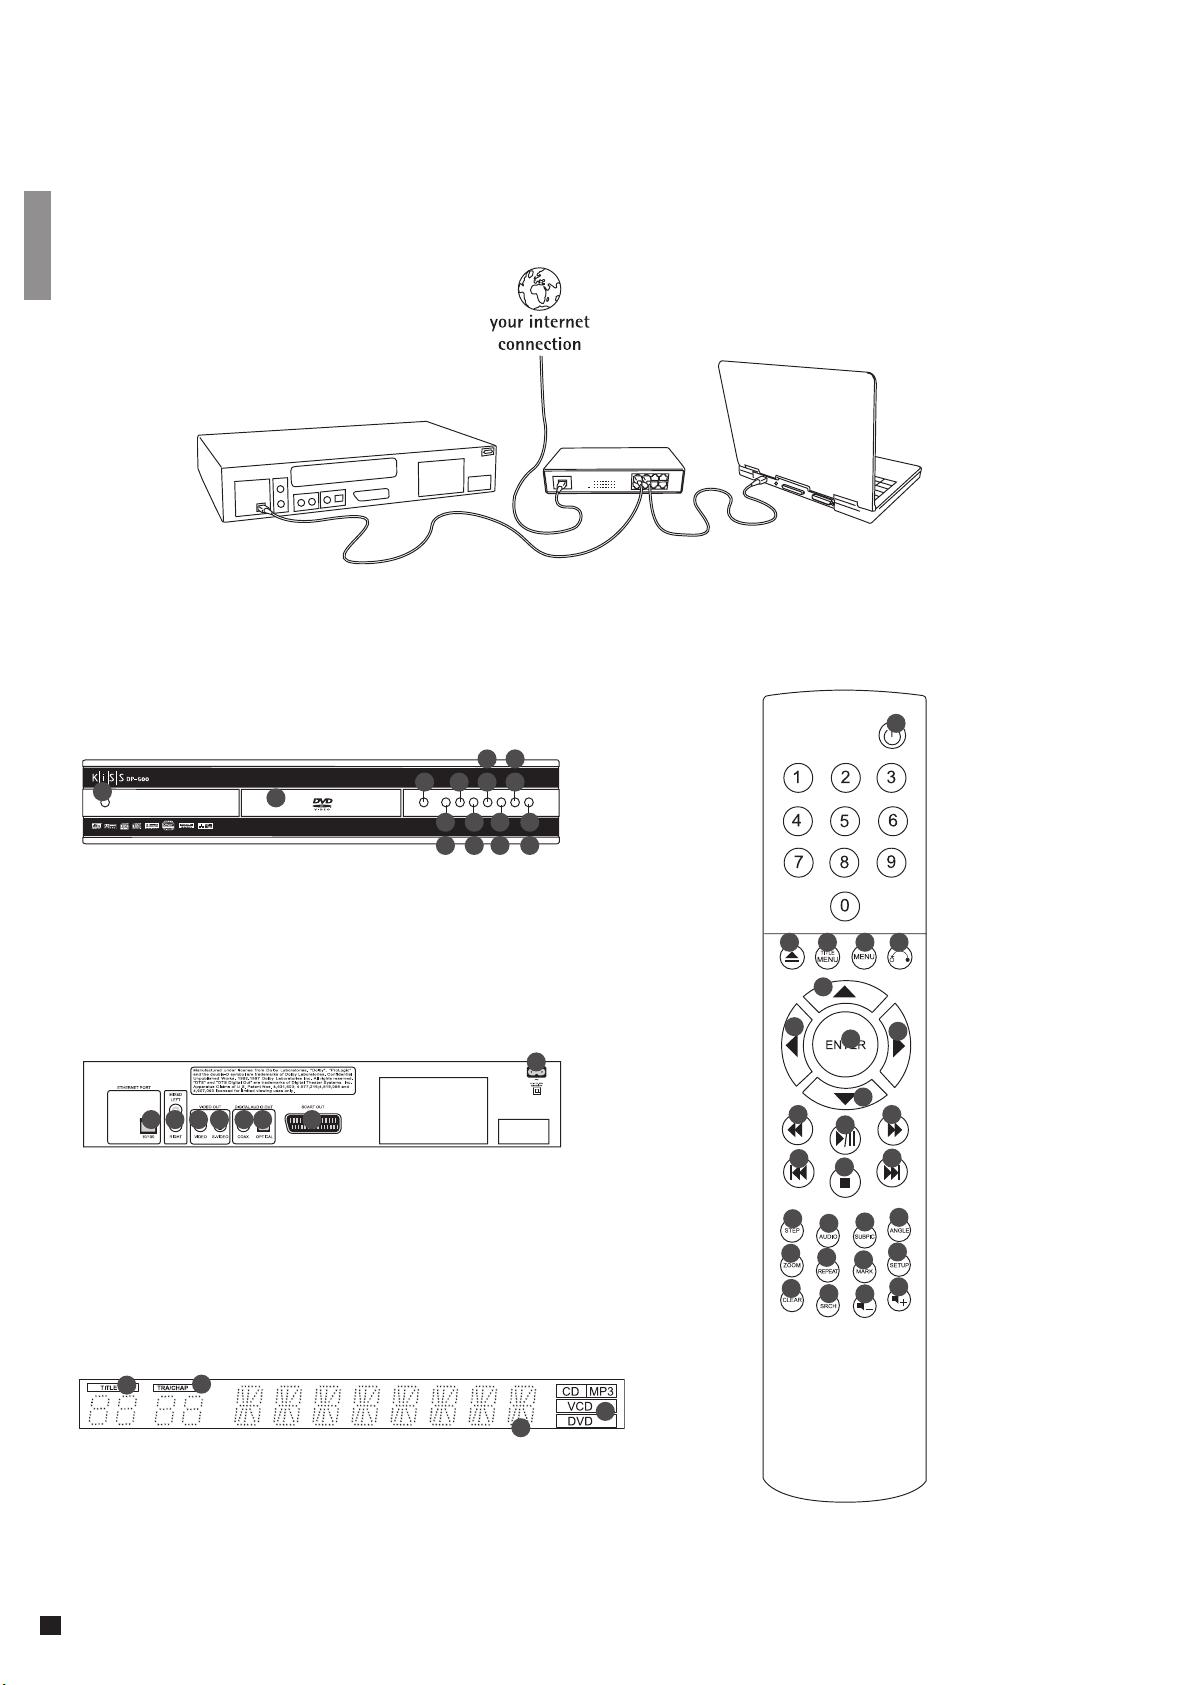
PC to DVD connection
Below is an example of a connection for your DP-500 to a PC via an Ethernet Switch, to enable use of all its features and programmes.
Extra information regarding cabling and connecting can be obtained by your local electronics´ supplier.
PCDP-500 Ethernet Switch
Presentation
The front panel has the following standard buttons. The functions of the buttons depend on
whether they are used for playing various media, or used in connection with the “Setup Menu”
9
7
3
5
15
4
12614816
11
13
10
7
1
1. On/Off
2. CD Tray
3. Open/Close
4. Play/Pause
5. Stop
6. Previous Chapter
7. Next Chapter
1 2 3 4 5 6
8
2
8. Rewind
9. Fast Forward
10. Menu
Option on the Setup Menu
11. Enter
12. Navigate Left
13. Navigate Right
14. Navigate Up
15. Navigate Down
16. Close
1. Ordinary Stereo Output
2. Composite Video Output for TV Set
3. S-Video Output for TV Set
4. Coaxial Output for Amplifi er
5. Optical Output for Amplifi er
6. SCART for TV Set
7. AC Input
8. Ethernet
2 3 4 5
6
7
8
17
22
26
12
15
10
13
16
19
23
28
11
14
18
21
25
1. Standby
1
2. Open/Close
3. Title/Menu
4. Menu
5. Back
6. Up Arrow
7. Left Arrow
8. Enter
9. Right Arrow
10. Down Arrow
11. Rewind
12. Play/Pause
13. Fast Forward
14. Previous Chapter
15. Stop
16. Next Chapter
17. Select Lang/Audio
9
18. Next Picture
19. Select Subtitles
20. Select Angle
21. Zoom
22. Repeat
23. Unused
24. Setup
25. Clear Input
26. Search
27. Increase Volume
20
28. Decrease Volume
24
Note:
Certain functions will
only work if supported
27
by the media.
1
2
4
3
The DVD Player is equipped with a VFD display which indicates the current ongoing activities.
1. Indicates the selection of the disk being played
2. Indicates the number or chapter being shown/played
3. Indicates the current function, such as play or stop
4. Indicates the type of media being played
6
2
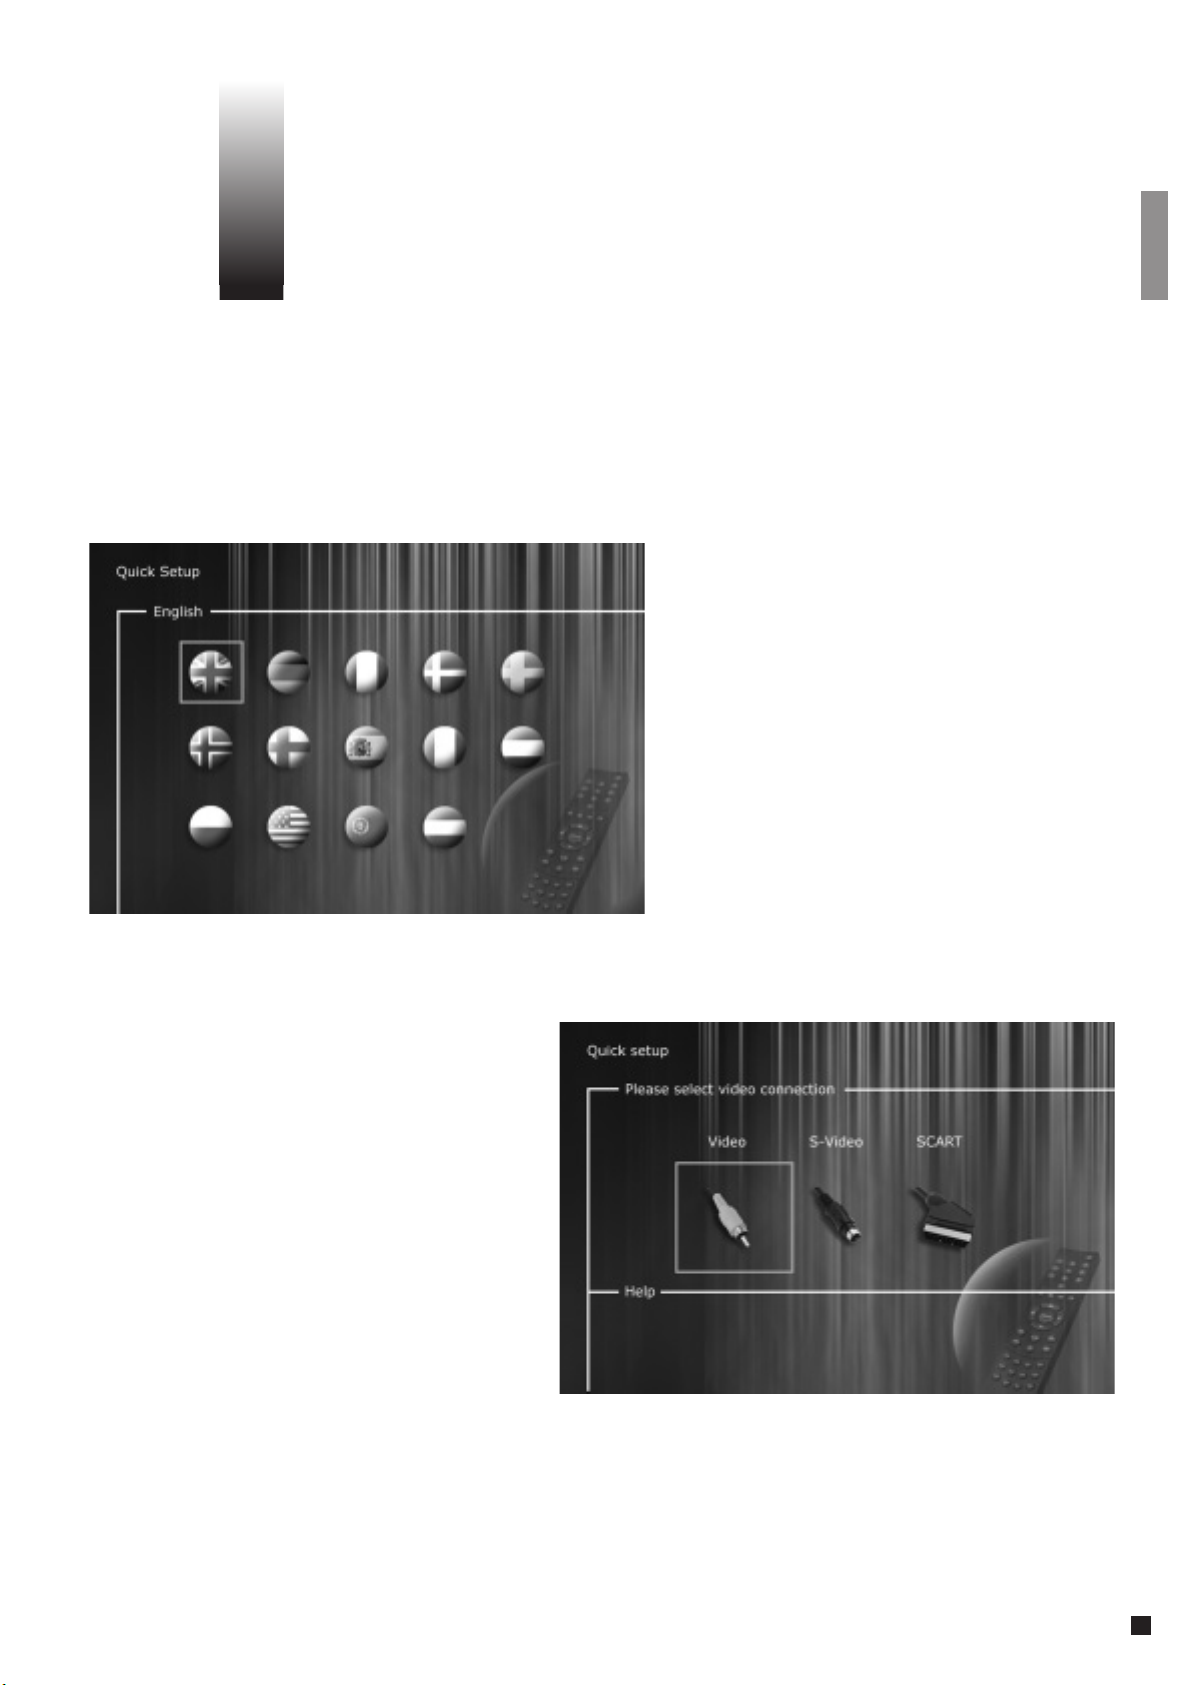
Quick Setup
If your DVD Player is correctly connected (see the chapter on cable connections), a menu will appear when you
turn on the DVD Player. The menu installs the most important settings for your TV set and language.
Note: If this menu does not appear when you start the DVD Player, recheck the cable connections.
Note: Try connecting your TV set using the Composite Video cables. Composite Video always produces a picture.
Language
Select the language that will be used whenever
you open the DP-500’s built-in menus. Use the
arrow buttons on the remote control to move
the rectangular frame to the language you wish
to select and press ENTER.
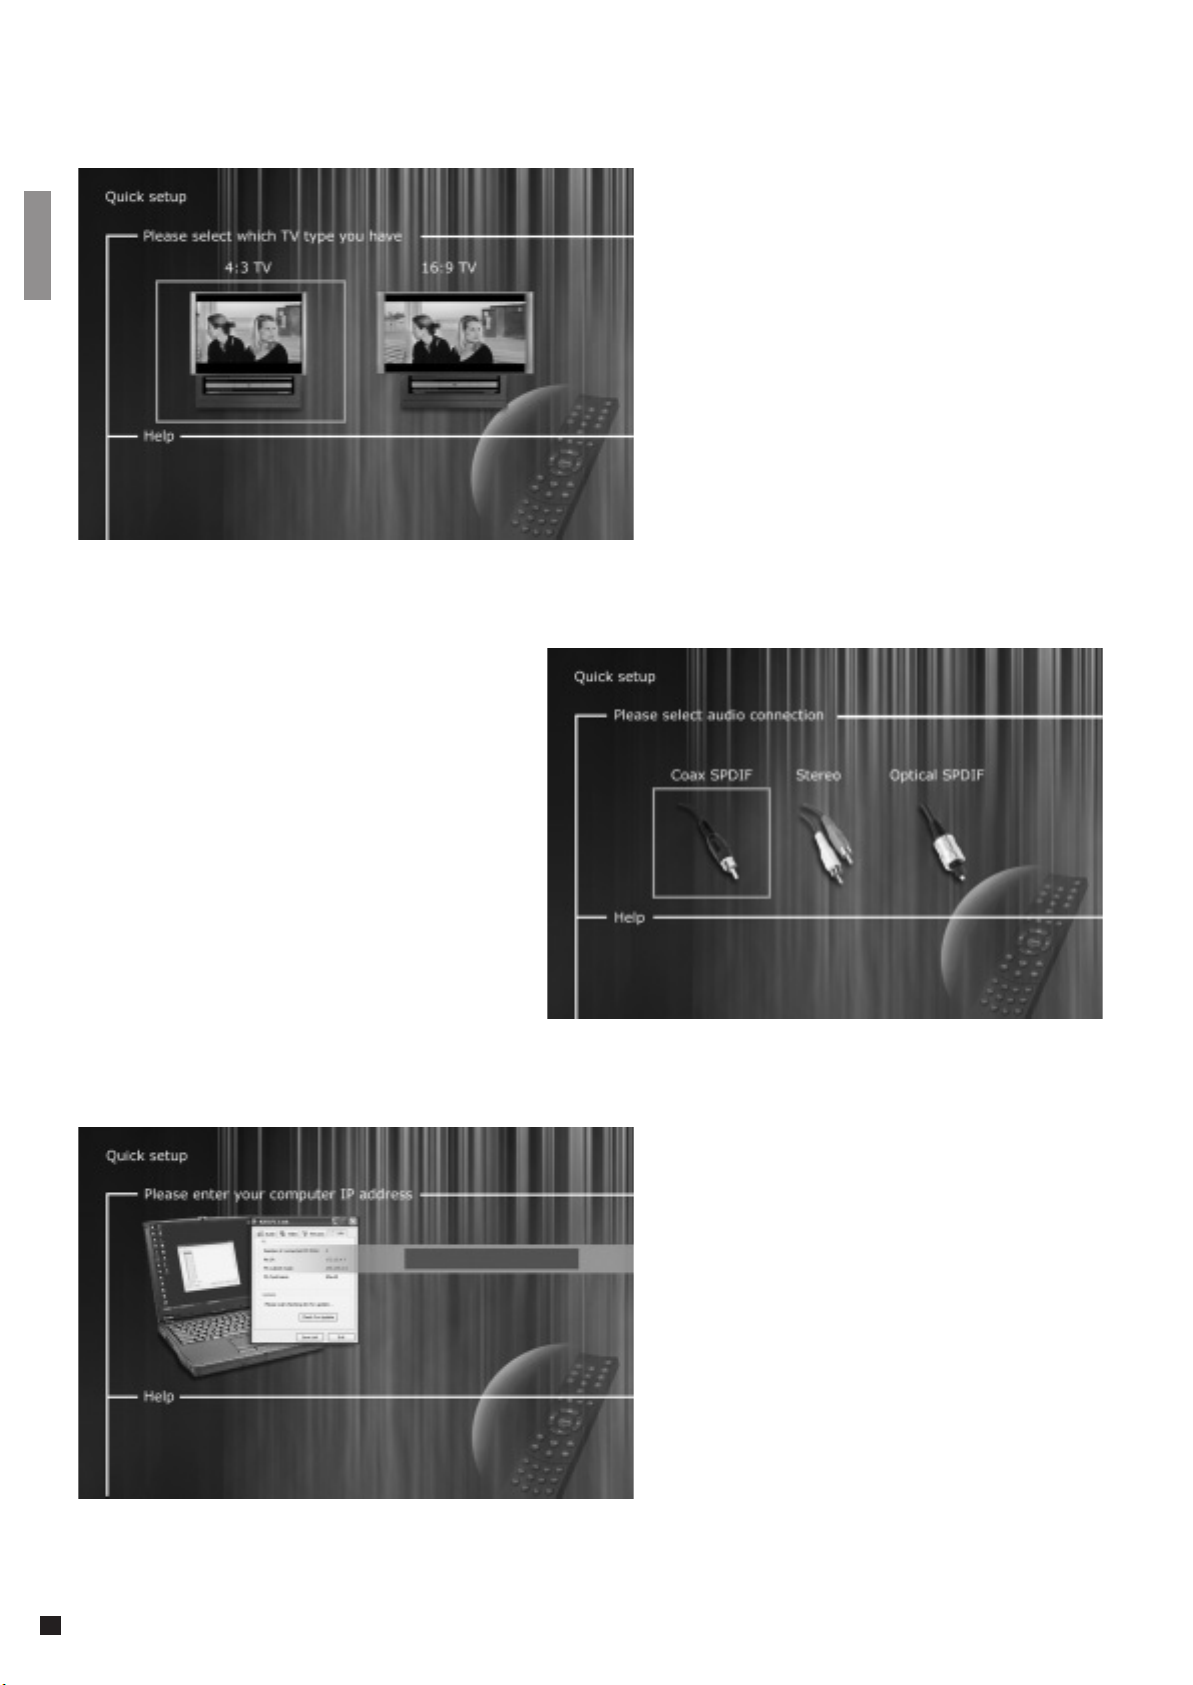
Connection
Select your TV set’s connection. Your options are
SCART, S-Video and Composite. The connection
depends on the inlets available on your TV set.
(If you select SCART, this connection also
includes RGB and Composite Video).
7
Note: Some 4:3 TV screens can display 16:9 format.
If your TV set is connected via SCART, your TV is
automatically provided with sound. If you would
rather use an amplifier to reproduce the sound,
you have two options to choose from: the phono
jack or one of the two digital outputs.
TV
This screen presents two different types of TV
formats: 4:3 (normal) or 16:9 (wide screen).
Audio
Note: The default Audio choice should be stereo
unless your player is connected to a digital
amplifi er
IP Address
In order to use the KiSS PC-Link software, you
need to provide your DVD player with your
computer IP address. To easily fi nd this number,
fi rst install the KiSS PC-Link software on your
computer. Once this step is completed, you will
fi nd the number under the Info Panel. Type it
on the provided screen. Leave it blank if you do
not want to set up your PC connection for the
moment. You can always go back to the quick
setup menu if you want to provide the IP address
at a later stage.
Note: Your KiSS PC-Link software will ONLY work if the KiSS DP-500 is provided with
a valid IP address.
You can always go back and start over if you happen to do something wrong, or if you wish to enter the Setup menu and edit it.
8
3
Advanced Setup
You can always access the Setup menu and adjust the DP-500 to your specific requirements and hardware. When
DP-500 appears on the main screen, press the SETUP button on your remote control, and a menu will appear with
the available options. The orange frame shows your position on the menu. Use the arrow buttons to move the
frame and select by pressing the ENTER button. The settings on some of the menus have already been determined
under Quick setup, but there are several settings available under Advanced setup as well.
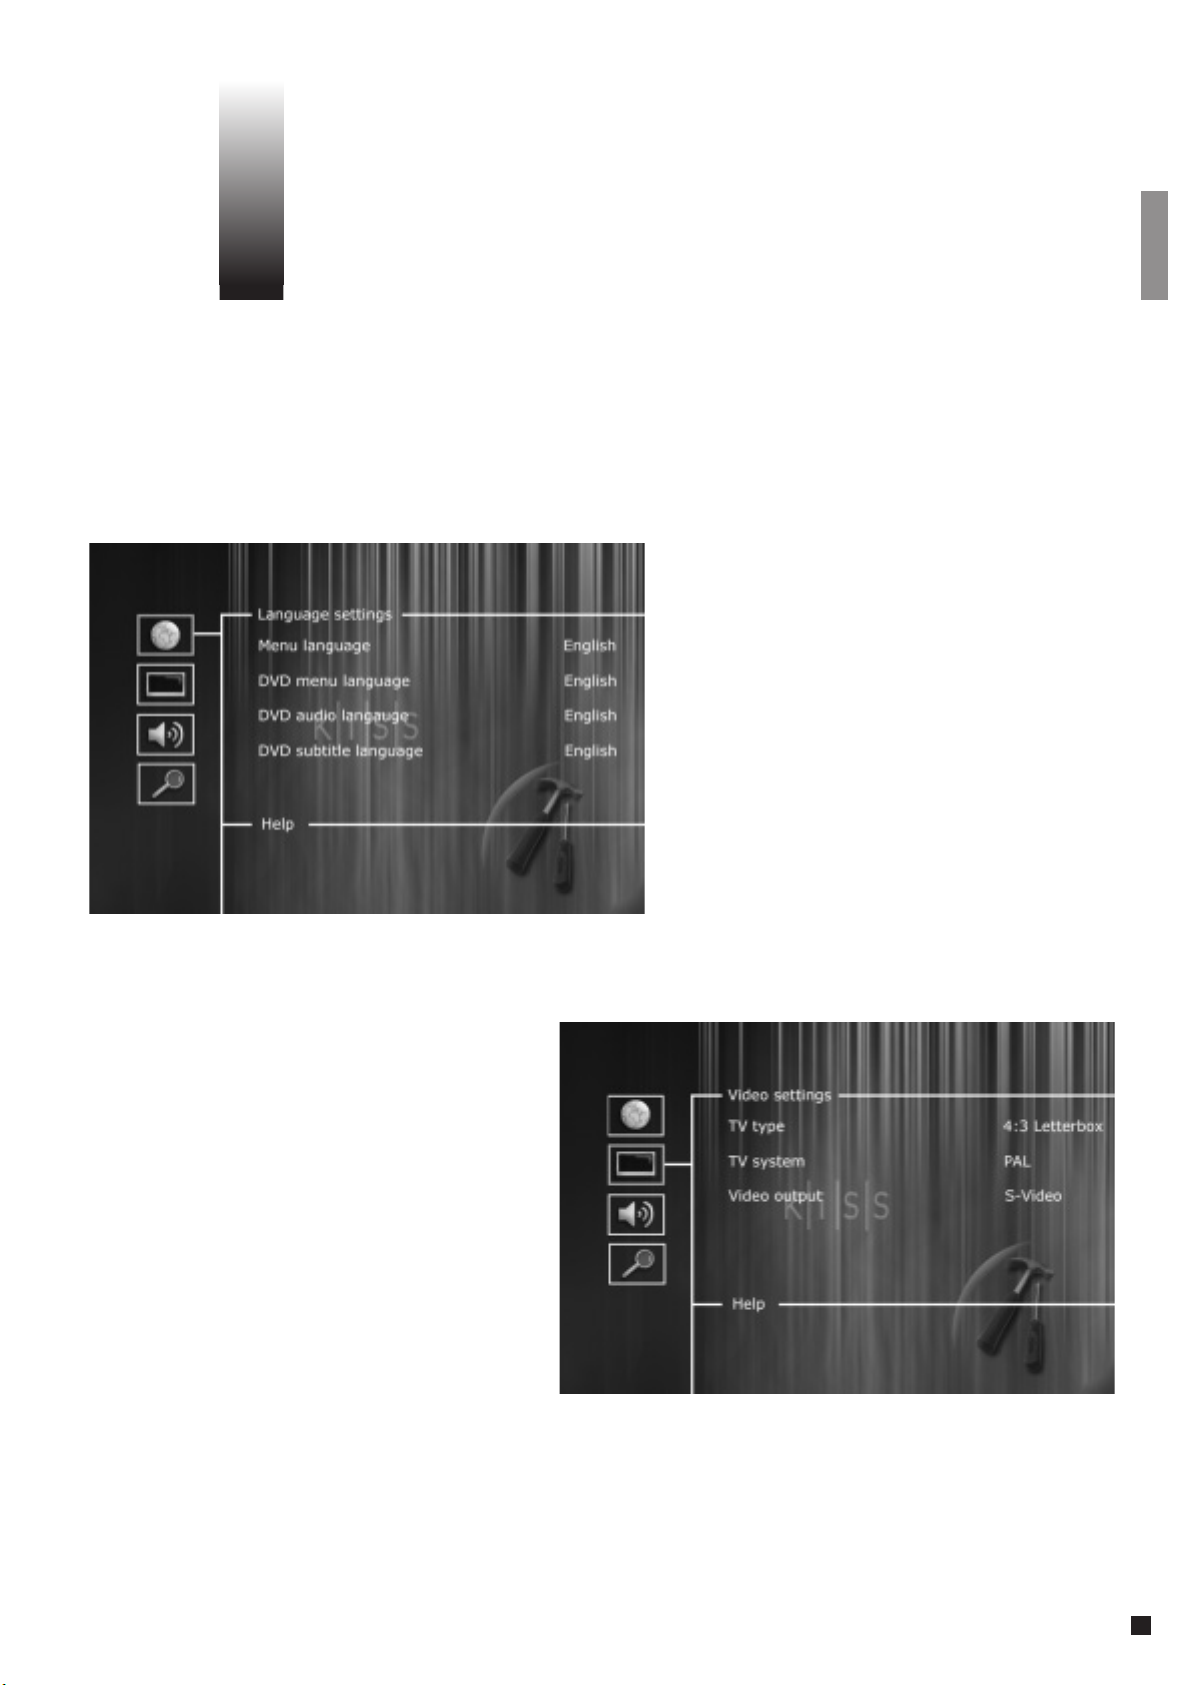
Language Settings
The first menu is the Language settings menu.
Here you select the language you wish to use
for the menus, that will appear on the screen,
and your preferred language when playing a DVD
film – for subtitles, speech and menus (they will
only be used if the film supports the language).
Video settings
You can also select a different TV system from
PAL (the European standard), and you can
indicate whether you have RGB via SCART,
Component via SCART or S-Video. Refer to your
TV set’s instruction manual before selecting
the connection. Only one setting at a time is
possible.
Note: Composite Video via SCART is always activated.
9
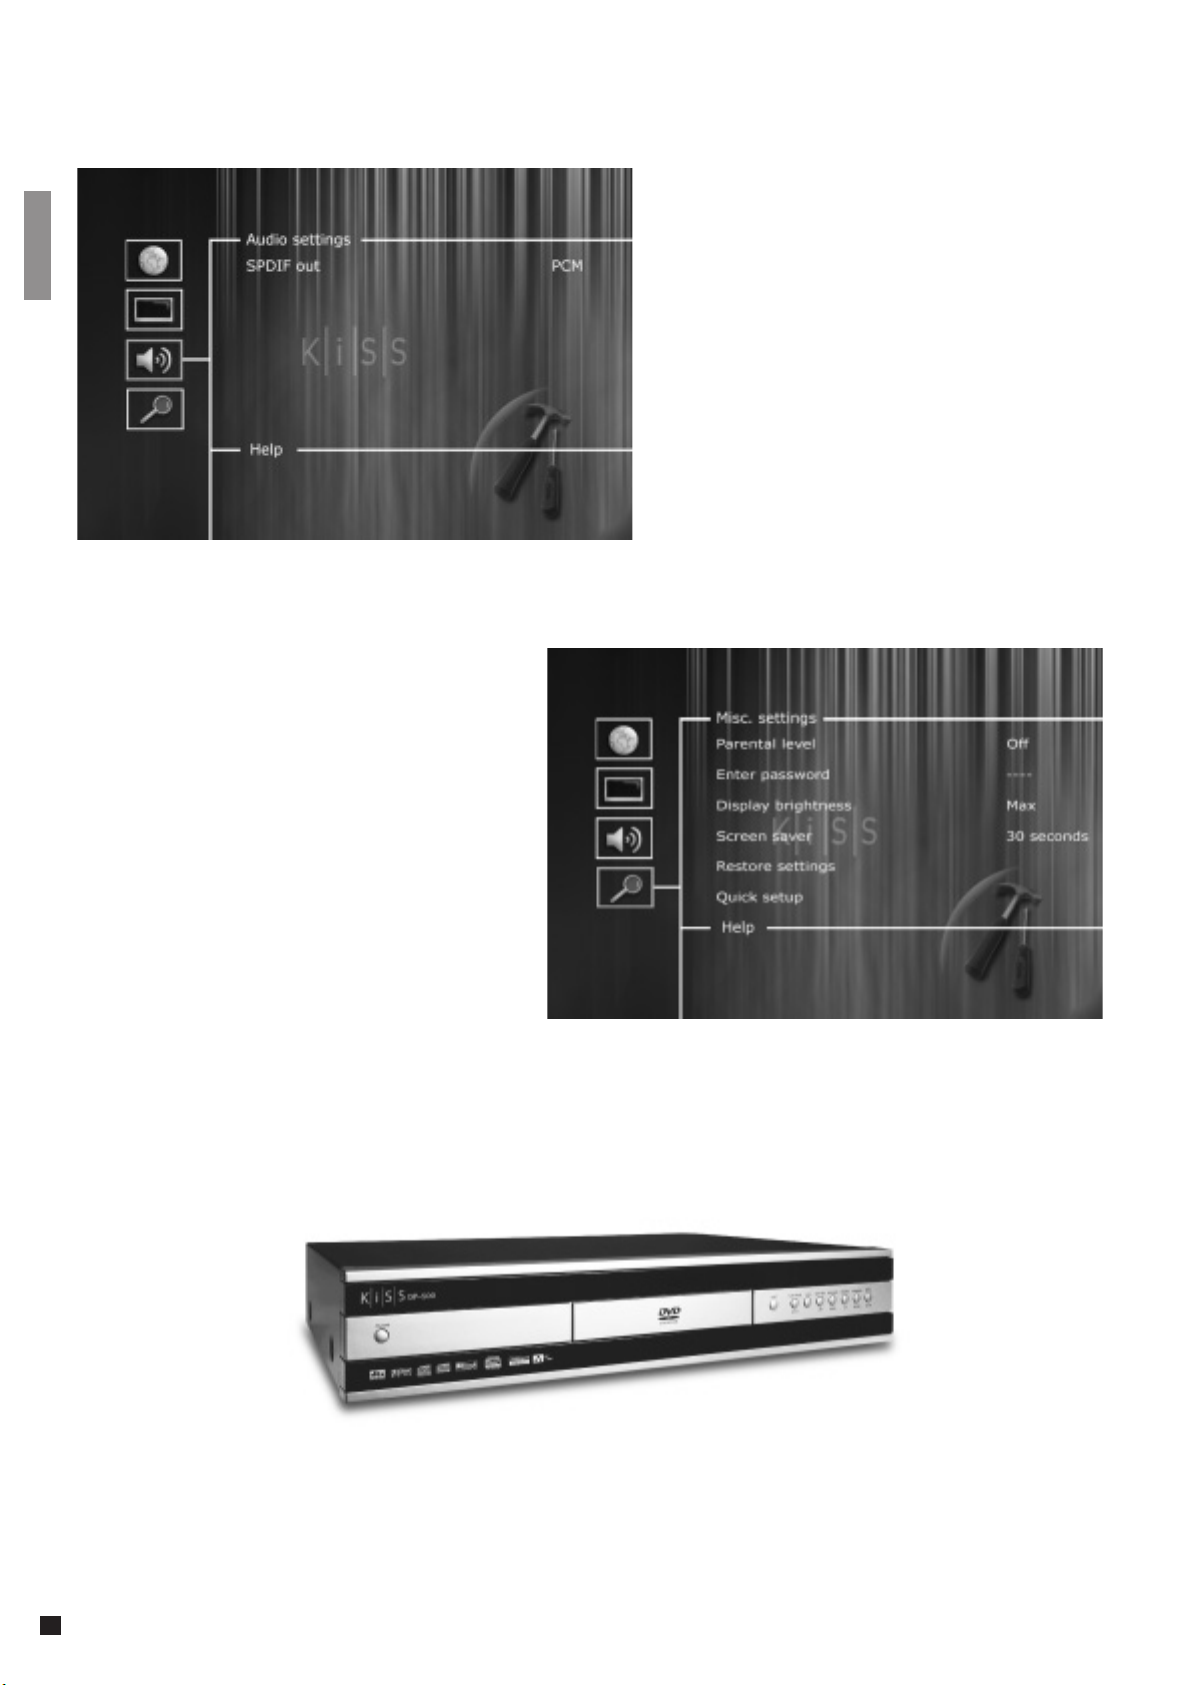
Miscellaneous Settings
This display lets you set your preferred level of
protection on the films. Some films are divided
into levels, so that parents can prevent their
children from seeing a specific type of film. In
the next menu item, you create a password that
is required for editing this setup*. The light in the
DVD Player’s display can be modified from dim
to normal or bright. All settings can be reset in
the “Restore settings” menu, and the Quick setup
can be re-initiated from the last menu.
Audio Settings
This menu enables you to select either RAW or PCM.
PCM: Stereo sound. Used for slightly older
amplifiers. Choose this option to obtain
analogue sound.
RAW: Plays the surround sound track on the disk.
Recommended as default.
*If you wish to modify this setup later on, you
must re-enter the password.
To leave a menu, press the left arrow on the remote control.
10

4
Playing Media
The DVD Player supports the following media: DVD Video, DivX, XviD, ISO MPEG-4, VCD, SVCD, Audio CD, MP3,
Ogg Vorbis and JPG.
DVD Menu
If you have adjusted your DVD Player according to the
instructions above, you can now insert a DVD into your
DVD Player. A moment later, the DVD menu will appear.
Use the arrow buttons to navigate in the menu and start
the film.
Note: As this menu is part of the DVD itself, it will vary from
DVD to DVD.
DivX, XviD and MPEG-4
The DP-500 recognises the format and automatically
starts playing the CD when you insert it into the drive. Use
the counter in the display to help you to see where you are
in the film. You have access to the usual playback options,
such as stop, pause, go to next, time search, etc.
MP3 and Ogg Vorbis
When you insert an audio CD with MP3 or Ogg Vorbis
music files, the player will automatically recognise the
format and let you select the songs you wish to hear. You
can choose the order in which you want to listen to the
tracks, listen to just a few songs/albums/folders or play
them at random by pressing the SETUP button on your
remote control and selecting the preferred method for the
playing order.
Photo CD and JPG
You can either have your photos burned on a disk in the
shop, where you had them developed or burn your own
disk on your computer.
Afterwards the photos can be shown on your TV to the
delight of your family and friends. You select whether the
photos should be shown one by one in the order you prefer
or as a slide show. Press SETUP to select slide show.
DVD films are normally supplied with a regional code (1), (2), etc., and can only be played on DVD players with the same regional code. You can see the
region on the back of the player. Region tags appear as follows:
11
5
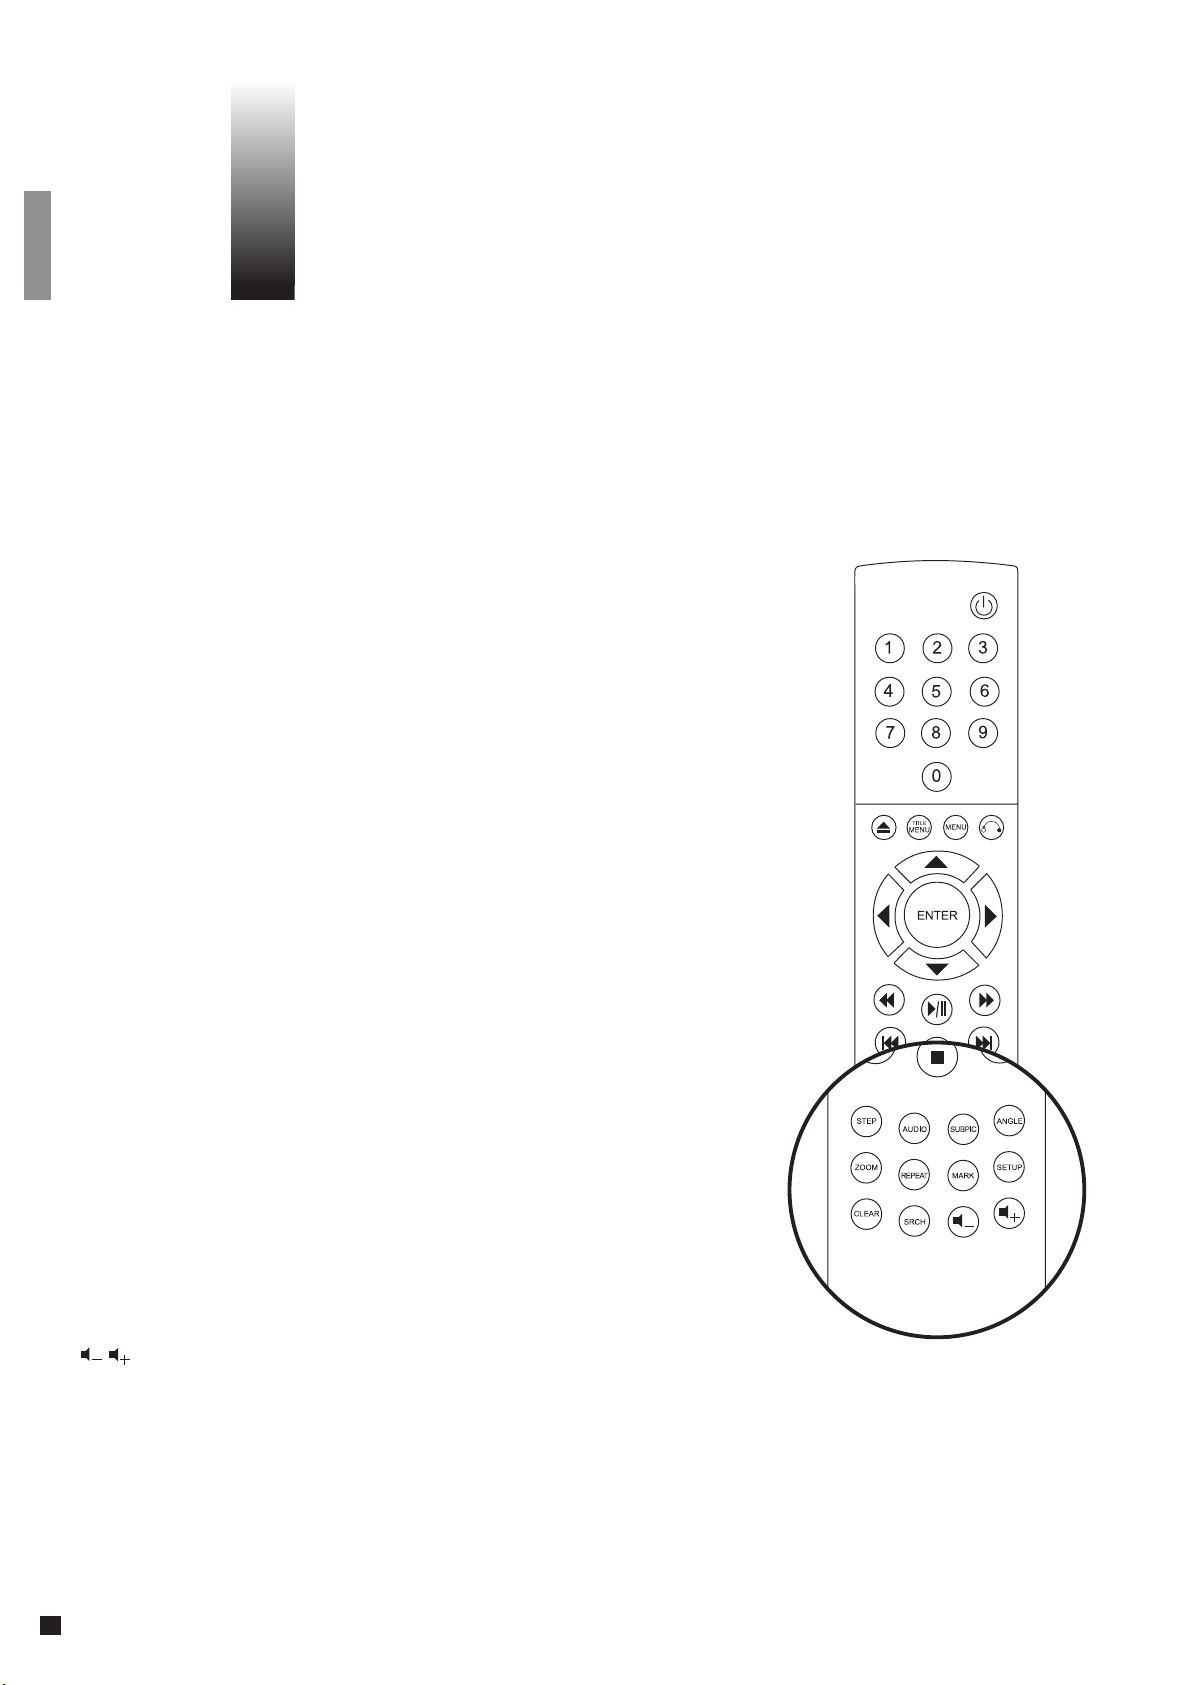
Advanced Functions
A number of advanced functions are located on the lower section of the remote control.
These functions are described below. Some functions may not work with all media formats.
STEP
This function not used
AUDIO
Press the (AUDIO) button to change the sound format. The audio format options, such as
two-channel stereo and six-channel surround, are determined by the film producer.
ZOOM
When watching the film, you can zoom in on specific areas. You can zoom in either as the
film is playing or after you have paused it. Activate the function by pressing the (ZOOM)
button, and return to the normal picture by pressing the button again.
TIP: Use the arrow buttons to move around the enlarged screen display.
REPEAT
As the film is playing, press the (REPEAT) button and three options will appear on the
screen.
MODE: Shuffle (random chapter playing) or Off (deactivated)
Repeat: Lets you decide whether to repeat the section or the entire film.
CLEAR
Use this function to delete all previous inputs.
SRCH
Use (SRCH) to find a specific spot on the disk.
Time: Specify time, minutes and seconds
Title/Chapter: Find the title or the chapter
ANGLE
If the film supports more than one camera angle, you can switch from one angle to
another by pressing the (ANGLE) button.
SUBPIC
Use this button to change the film’s subtitles. If you press the (SUBPIC) button, a message
will appear in the top left corner of the screen indicating the number of available
languages and the language that is currently active. If you press the (SUBPIC) button
again, you go to the next language option. The number of languages is also determined
by the film’s producer.
SETUP
If the DVD Player is in the process of showing a film or playing music, press the (SETUP)
button to see the available options on the disk. For instance, if you are watching a DVD
film, the left-hand side of the screen will show information about the film’s length, the
number of chapters, the language options and the number of subtitles.
If the DVD player is turned on, but not playing films or other media, pressing this button
will take you to a menu, where you can configure your DVD player. Here you can select the
default settings for language, sound, video, parental level, etc.
These buttons are used for increasing and decreasing the sound volume.
MARK
This function not used
12
6
WebRadio
WebRadio enables you to listen to a great number of radio stations via the internet.
Remember that all the functions disscussed below are only available if a valid IP address has been entered in
your Quick Setup menu (see Quick Setup Chapter).
Setting up your connection
To use the KiSS WebRadio service, you will have to connect your
DVD player DP-500 to the Internet (please refer to the “connection”
part of the manual). When done turn on your DVD player - press the
“menu” button on your remote, then press “enter”. Go to “WebRadio via
Internet” It will detect your connection.
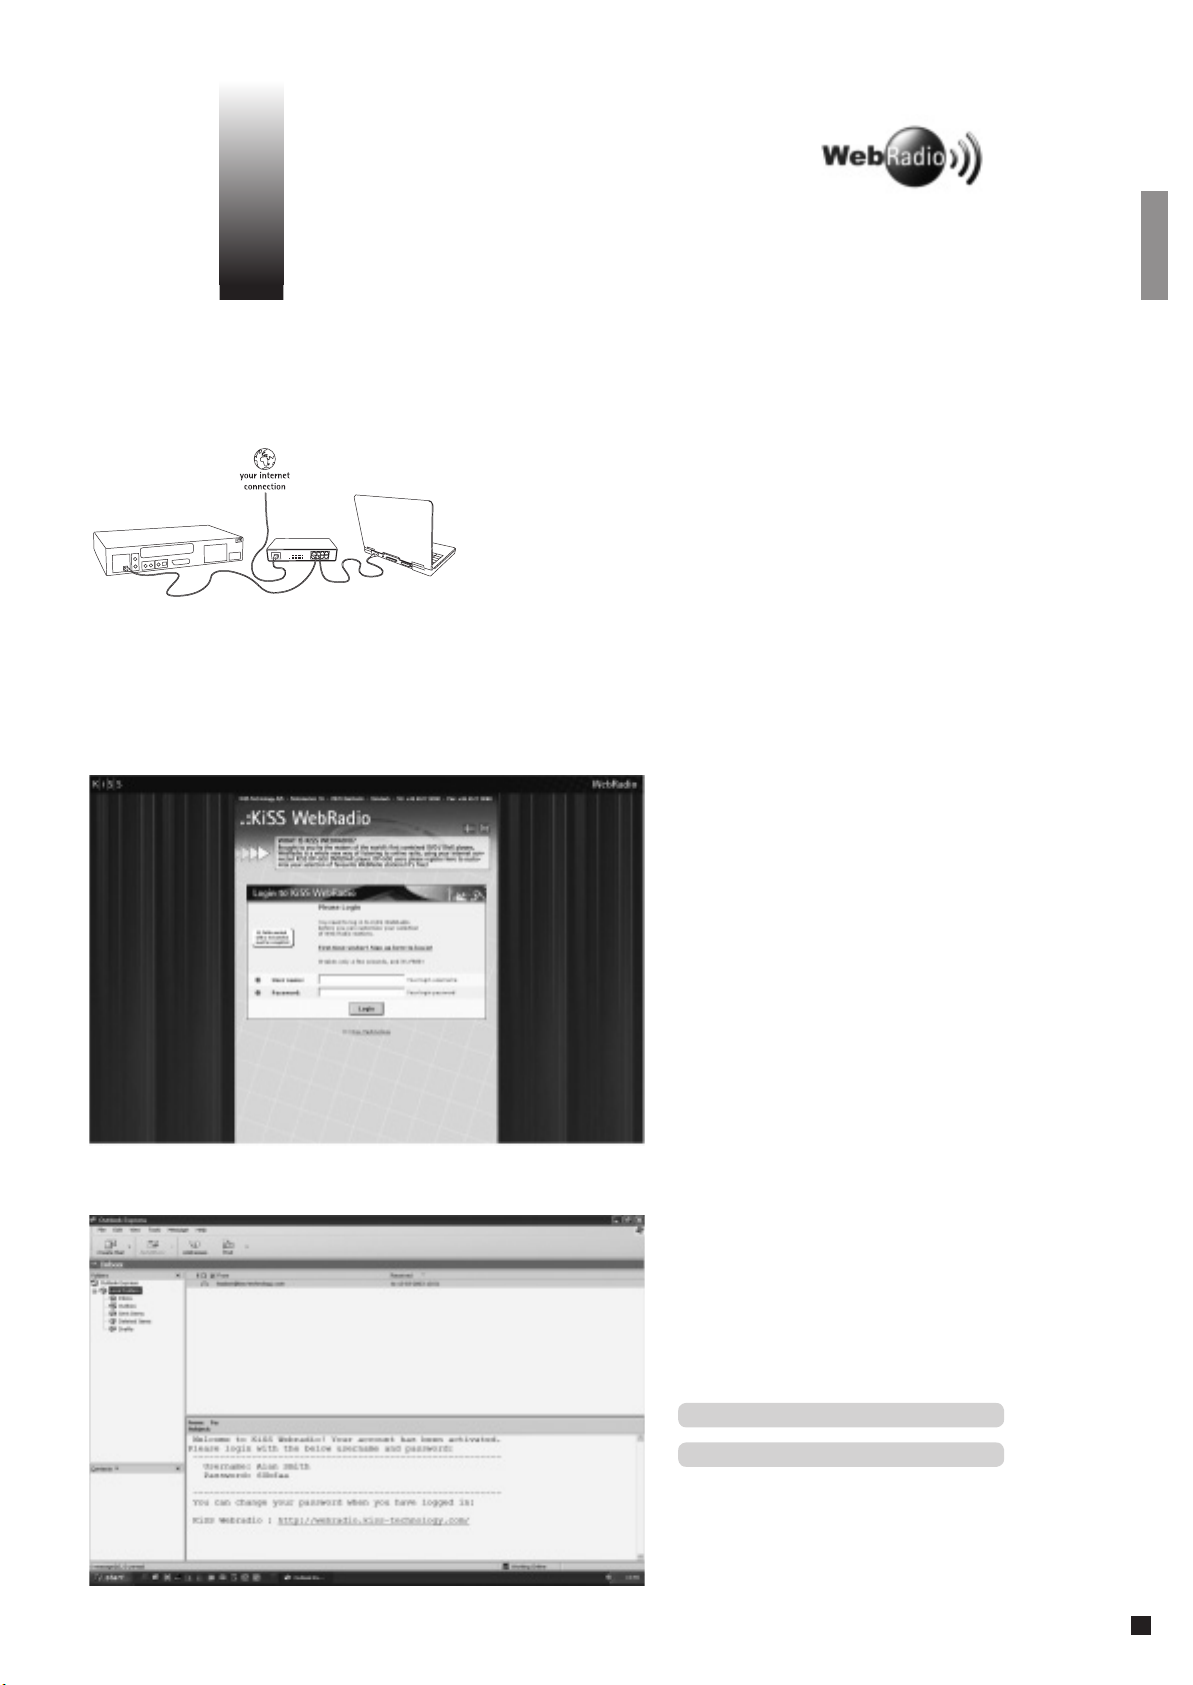
New User
On your PC, type:
technology.com
favourite web browser. The window shown here
should then open. If you are a fi rst time user on
our WebRadio web site press the link: “First time
visitor? Sign up here to log in!”
Complete the information form. The marked
areas HAVE to be fi lled in. If you already have
done this, log in with your existing username
and password.
E-mail confirmation
After sending your information, you will receive
an e-mail with your username and a password.
You can change the given password after you
have logged in.
Note: You can write your password and username
in the space below.
in the address menu of your
http://webradio.kiss-
Username:
Password:
13

Main radio menu
Once logged-in, a default list of online radio
station appear on your screen. You can add/
remove/edit your favourite radio stations by
providing their stream information. The selection
will then be available to play from your DVD
player.
Entering your player ID number
Now you will have to provide your WebRadio
account with your player ID – The player ID is
a 12-digit number, you can fi nd it by turning on
your DVD player DP-500, then press the “Menu”
button and the number will be displayed in the
top of the screen. Type this number into the
provided fi eld on your PC.
Selecting WebRadio from the DP-500
Pressing the "menu" button on your remote
control will send you to the WebRadio panel.
You can then see your radio selection on your TV
screen. This function is only available when the
player is NOT playing.
14
7
KiSS PC-Link
KiSS PC-Link enables you to connect your computer to your DVD player through the KiSS PC-Link software. You
can therefore play, watch or listen to your PC files on your TV via the KiSS DP-500.
Note: Clicking the search function will help your computer to find your multimedia files
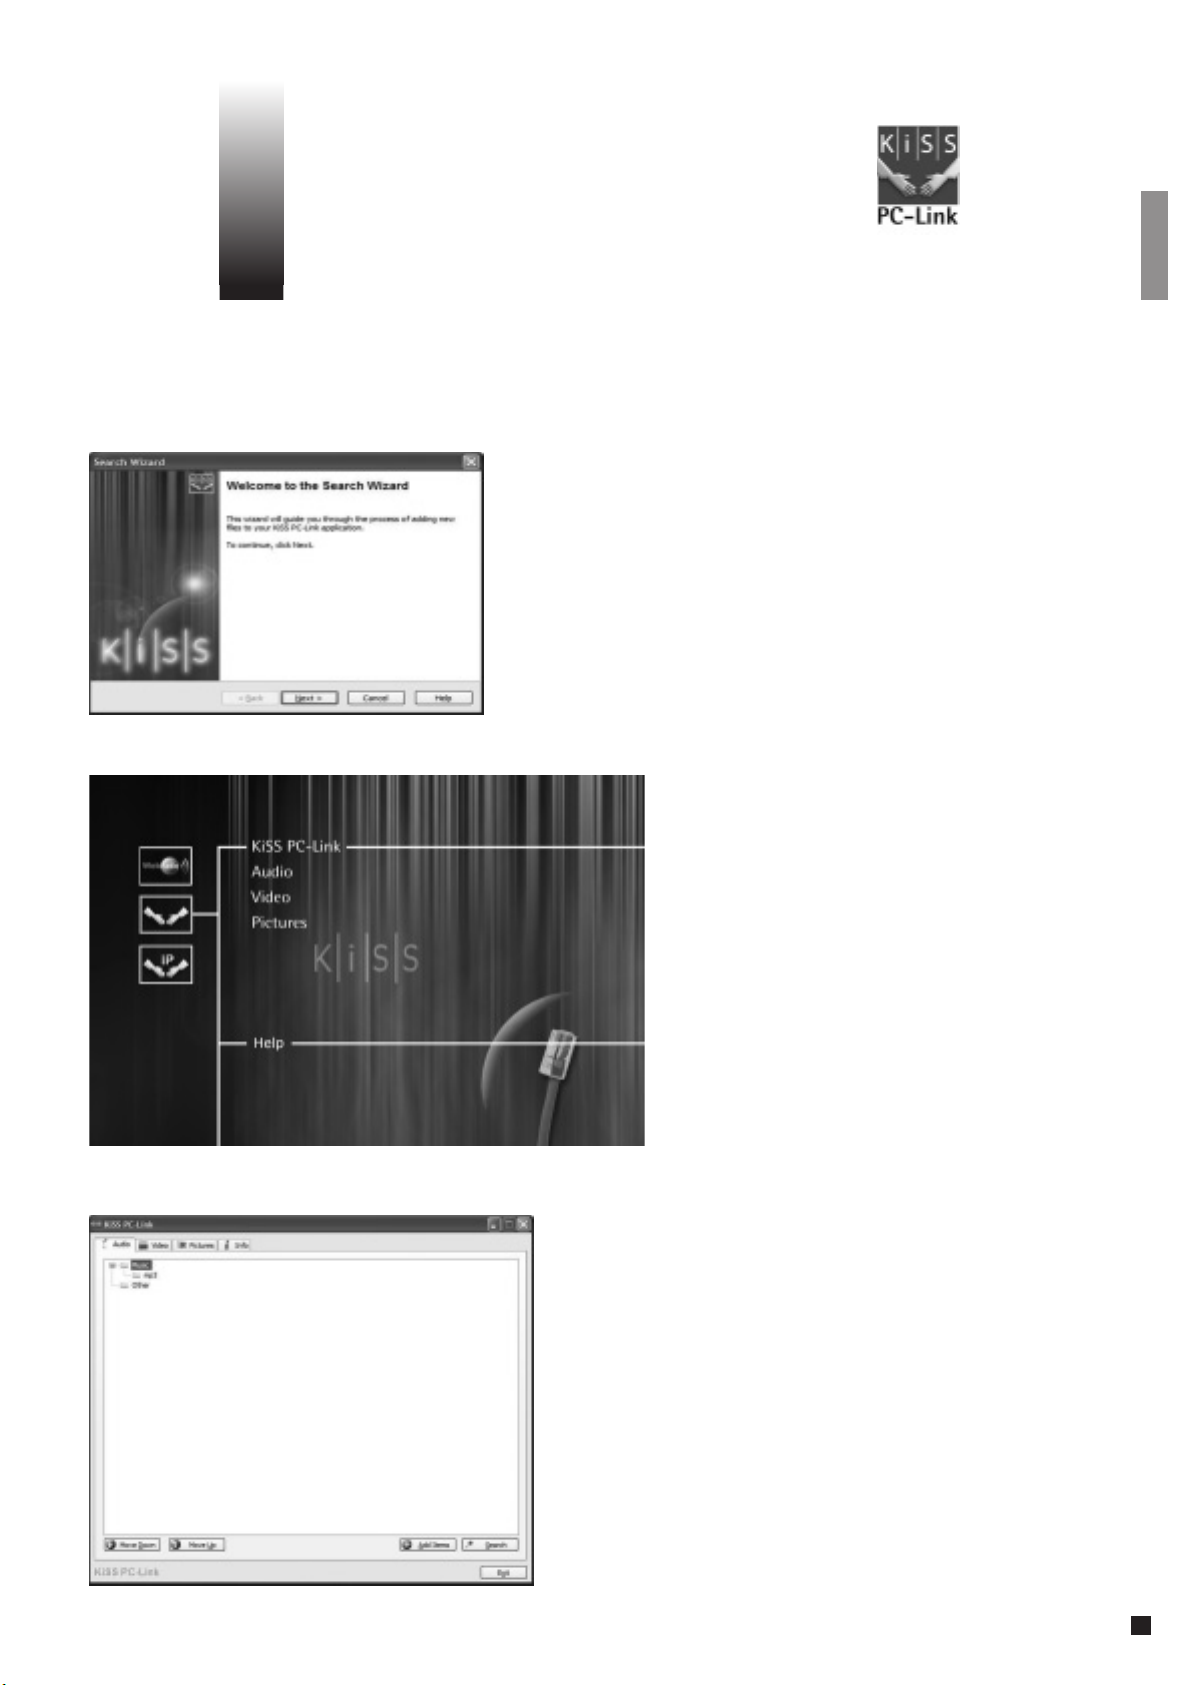
Installing the software
The KiSS PC-Link software must be installed on your computer, it is
PC compatible and requires a machine running minimum Microsoft
Windows 98, Internet Explorer 4. After inserting the disk, the
installation program will start automatically, if not double click the
"Setup" icon on your CD. Select your preferred language and click
"Next". Once the installation is completed, the KiSS PC-Link programme
will open. The main window is divided into four folders, Audio, Video,
Pictures and Info.
Accessing your files on the DP-500
After connecting your PC to your DP-500
(see Connection Chapter) and entering your
computer IP address on your DVD player (see
Quick Setup Chapter), press the “Menu” button
on your remote control and choose PC-Link. Then
from the submenu you can access, Audio, Video
or Pictures.
KiSS PC-Link Audio Panel
Drag and drop the audio files you would like to
access from your DP-500.
You can create folders with your favourite music
or specific types of music. You can easily add,
remove or move the files either by using the
window buttons or right clicking on the mouse
and select an action.
15
KiSS PC-Link Pictures Panel
Direct access to the picture fi les located on
your PC. These can be selected or dragged and
dropped. You can also tidy them into a folder
from the KISS PC-link window.
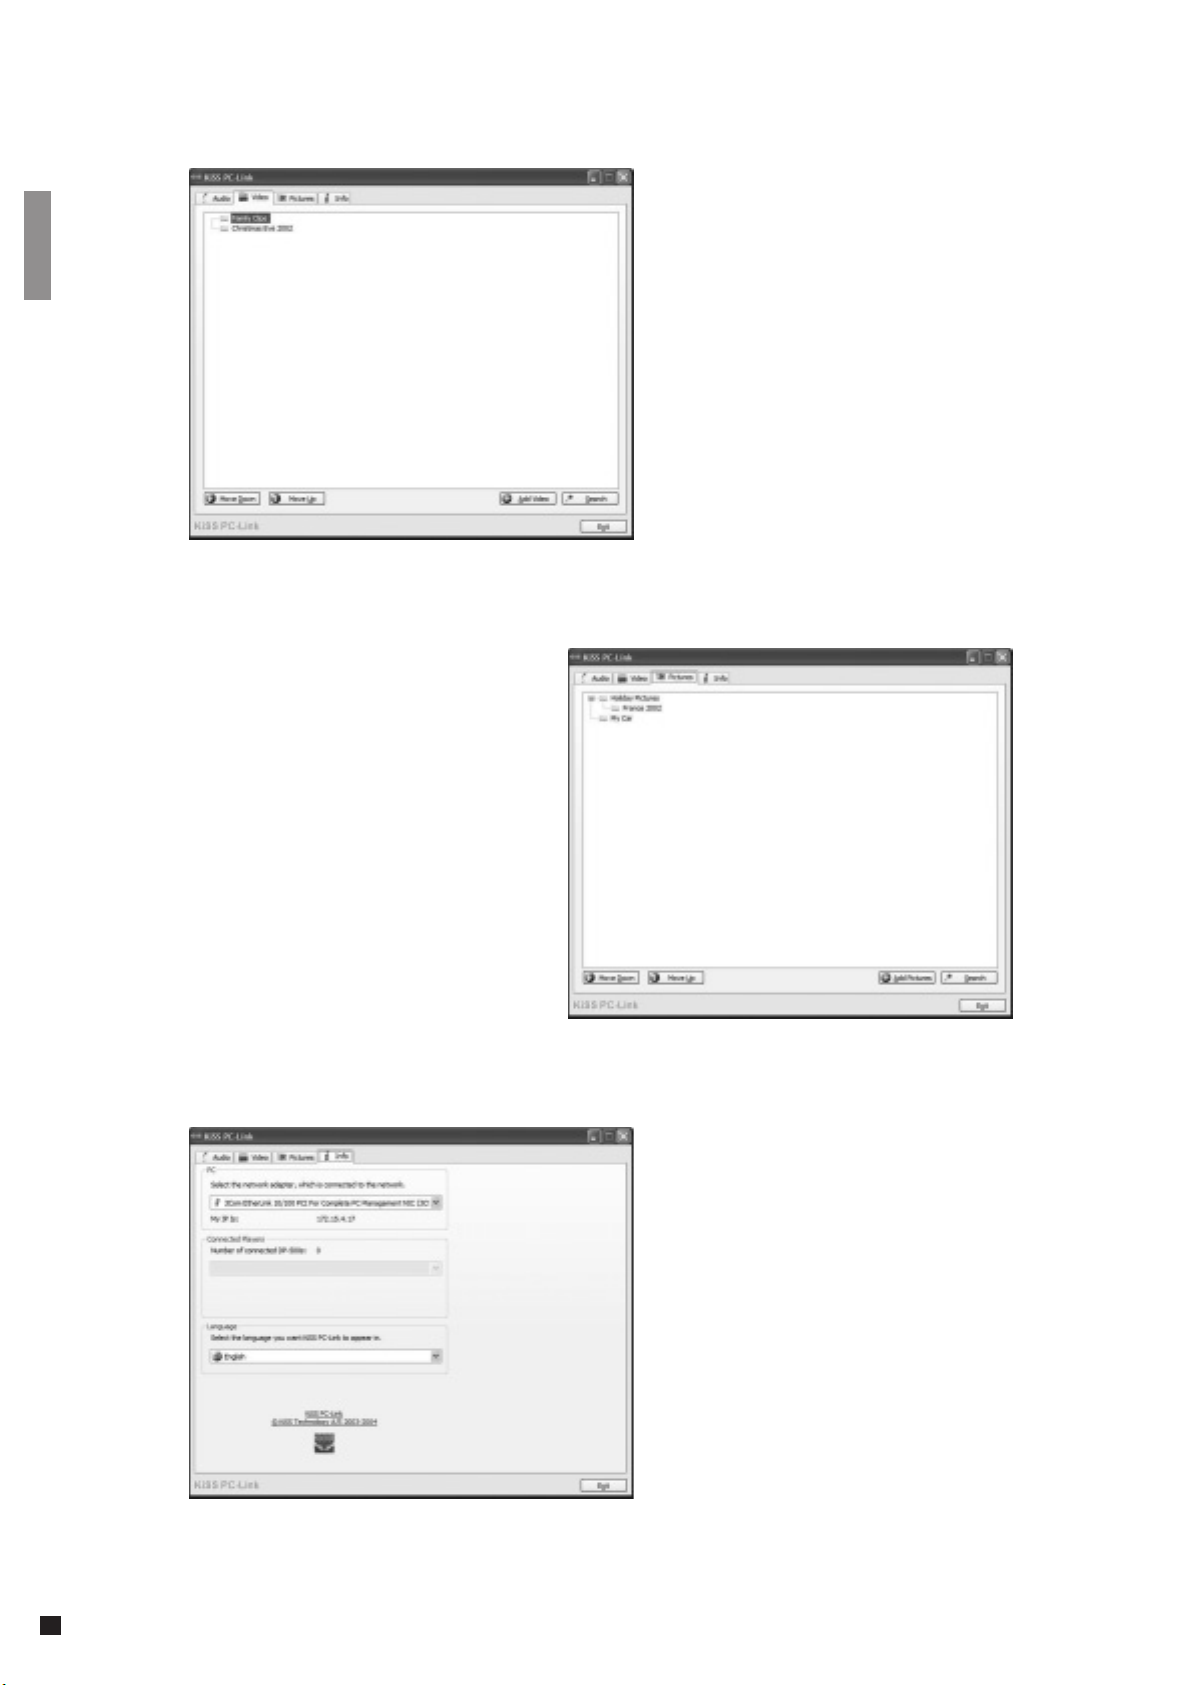
KiSS PC-Link Video Panel
Drag and drop or select a movie fi le through the
search window. As for the Audio Panel you can
defi ne actions by selecting, pressing the window
buttons or right-click a fi le.
KiSS PC-Link Info Panel
You will fi nd your computer IP address located
in this panel. This has to be entered in the
last menu of the Quick Setup (see Quick Setup
Chapter). This menu also enables you to “Check
for Updates” and access the KiSS web site.
16

8
Support
More information or assistance is available at KiSS Technology’s website under Support for DVD Player.
Address:
Updates
At our website, you can update the DVD Player’s firmware/operating system with the latest new features. To do so, download the software from the
support section at the www.kiss-technology.com website. Then burn it on a CD-R and load it into the DVD player. See our website under support for
additional information.
If you do not have Internet access, or do not own or have access to a CD burner, an update can be purchased from the dealer where you purchased your
DVD Player.
To reset the settings of the DP-500, press the following buttons on the remote control: “Open”, “Clear”, “1”, “2”, “3”
KiSS Technology A/S reserves the right to change all settings and specifications without notice.
Important safety information
• Read these instructions carefully and pay attention to all warnings and guidelines.
• Do not overload electrical sockets or extension cables. Overloading can result in fire or electric shock.
• Never insert objects into the DVD player’s cabinet door. They might come into contact with dangerous voltage points or short-circuit components,
which can cause fire or electric shock.
• Do not spill liquids on the DVD player.
• If the DVD Player does not function normally, or if it emits unusual sounds or odours, pull out the plug immediately and contact an authorised
technician.
• Do not attempt to service the DVD player yourself. If you open or dismantle the shielding, you expose yourself to dangerous voltage and other
hazards. All maintenance must be carried out by qualified service technicians.
www.kiss-technology.com
Environmental information
• The system is made of recyclable materials which can be reused if disassembled by authorised personnel.
• Please follow local regulations for the disposal of packaging materials, used batteries and discarded units.
Copyright
This product contains copyright technology which is protected pursuant to the patents that are the property of Macrovision Corporation and other
copyright holders. Any use of this copyright technology must be approved by Macrovision Corporation. The technology is intended for use in the home
unless otherwise approved by Macrovision Corporation. Breakdown and disassembly are prohibited.
Made under license from Dolby Laboratories. “Dolby” and the double “D” symbol are trademarks of Dolby Laboratories. “DTS” and “DTS Digital Out” are
trademarks of Digital Theater Systems, Inc.
KiSS Instant Repair Service
If the DVD player is STILL UNDER WARRANTY, KiSS Technology A/S will pay freight costs back and forth to the customer. Please follow the instructions
given by the HelpDesk. Always remember to write the RMA number (provided by the HelpDesk) on the freight bill. If the DVD player is NOT UNDER
WARRANTY, all costs must be held by the customer.
There are three ways to obtain an RMA number. “An RMA number is a reference number generated in every single case for administrative purposes.”
1. By fax or e-mail: Fax: +45 44 78 41 48 and e-mail:
sales receipt.
2. Personal contact: Phone KiSS’s Help Desk on +45 70 26 82 70 and request an RMA number.
3. From the dealer: take the product to the dealer, where it was purchased. Important: Never send the product to be repaired without obtaining an
RMA no. first, otherwise it will be rejected. The product must always be packed properly, otherwise the product warranty will be discontinued.
(Packaging can be purchased from KiSS Technology at the market price). Retrieval and delivery to the end user. The product can be picked up
from and delivered directly to the end user. To do so, the end user must follow the HelpDesk’s instructions at the time of the RMA enquiry. If
these instructions are not followed, the end user will be charged for extra costs that must be paid on delivery.
Warranty certificate
kiss@esupport.dk. Enclose the error description, serial no., invoice no., copy of the invoice/
KiSS Technology A/S provides a twenty-four (24) month warranty from the date of purchase against material and manufacturing defects. In the event of
defects covered by the warranty, the product must be returned to the dealer that sold the product, or refer to the enclosed appendix on the KiSS Instant
Repair Service. The expected time of repair, including transport, is approximately five working days (except for remote areas).
If any problems arise, information on our authorised service centres is available at the following address, or from the dealer who sold the product.
17

Terms of Warranty
1. The warranty is only valid on presentation of a correctly completed warranty certificate and sales ticket, and if the serial number on the product
is fully legible.
2. The obligations of KiSS Technology are limited either to repair or replacement of defective components. The repair or replacement of defective
components is based on an assessment by KiSS Technology.
Exchange is only possible if the repair cannot be performed.
3. Warranty repairs must be performed by an authorised KiSS Technology dealer, or an authorised service centre. No remuneration is provided for
repairs performed by unauthorised workshops. Any repairs or damage to the product caused by unauthorised intervention are not covered by this
warranty.
4. This product will not be viewed as defective, either in materials or in manufacture, if adaptation to national, local, technical or safety-related
requirements is required in countries other than the specific country for which the product was originally designed and manufactured.
5. This warranty does not cover these types of adaptations, and no remuneration will be offered for these types of adaptations or for any
consequential damages. The warranty does not cover the following:
a) Periodic inspection, maintenance and repair or replacement of parts resulting from normal wear.
b) Costs connected to transport, disassembly or installation of the product.
c) Misuse, including use for other purposes than was intended, or faulty installation.
d) Damage caused by lightning, water, fire, natural catastrophes, war, insurrection, incorrect line voltage, insufficient ventilation or other causes
beyond the control of KiSS Technology.
6. This warranty applies to every legal owner of the product during the warranty period.
KiSS Technology A/S, Slotsmarken 10, DK 2970 Hørsholm, Denmark
Hotline (user support) +45 45 17 00 07
hotline@kiss-technology.com
All contacts with KiSS Support should be addressed in English
Information we must receive before repairing the product:
Model name: KiSS DVD Player DP-500
Serial no.:
RMA no.:
Copy of the invoice or sales receipt
The dealer’s name, address and phone no.
Personal information: Name, address, post code/city, phone no. and e-mail address (optional).
Your signature
Dealer’s stamp and signature
Date
18

19

français
Sommaire
Accessoires et Connexion 21
Réglage rapide 23
Réglages avancés 25
Lecture de médias 27
Fonctions avancées 28
WebRadio 29
KiSS PC-Link 31
Assistance 33
Félicitations pour l’achat de votre nouveau lecteur de DVD
Votre nouveau lecteur présente un grand nombre de fonctions qui vous donneront satisfaction pendant de
longues années. Vous apprécierez notamment le niveau de qualité audio et vidéo des films visionnés. En
plus des DVD, vous pouvez regarder des films aux formats SVCD, MPEG-4, XviD ou DivX. Les fonctions audio
vous permettent également d’écouter des fichiers MP3, Ogg Vorbis ou des CD de musique.Le lecteur DP-500
reconnaît chaque format automatiquement et prend en charge les disques CD-RW et DVD-RW. Votre nouveau
DP-500 accepte également les CD de photos (jpg), ce qui vous permet de regarder vos photos directement sur
l’écran de votre téléviseur. Vous pouvez bien entendu regarder les photos qui ont été développées en laboratoire
ou celles que vous avez numérisées et enregistrées vous-même sur un CD.
Note : N’utilisez pas le lecteur de DVD avant d’avoir pris connaissance du menu de configuration. Pour ce faire, le lecteur de DVD doit être connecté à un téléviseur.
20
1
Accessoires et connexions
Vérifiez que les accessoires suivants accompagnent votre lecteur de DVD.
Lecteur DVD KiSS DP-500
Câble d'alimentation Câble AudioCâble Péritel Vidéo composite
Connexion vidéo
DP-500
Logiciel KiSS PC-Link
TV
Piles
Le raccordement de votre lecteur de DVD KiSS
DP-500 à votre téléviseur peut s’effectuer
avec n’importe lequel des câbles présentés cidessous. (Un seul câble peut être branché à la
fois).
1. RGB par prise Péritel
2. S-Video
3. Prise Péritel
4. Vidéo composite
5. Composante Péritel
(nécessite un câble supplémentaire)
pour la télécommande [size “AAA” (R6P)]
Télécommande
(nécessite un câble supplémentaire)
1 3 5 4 2
Connexion audio
DP-500
Le raccordement de votre lecteur de DVD KiSS
DP-500 à votre amplifi cateur peut s’effectuer
avec n’importe lequel des câbles présentés cidessous. (Un seul câble peut être branché à la
fois).
Amplifi cateur
6 78
6. Sortie optique
7. Sortie coaxiale (nécessite un câble supplémentaire)
8. Stéréo
(nécessite un câble supplémentaire)
21
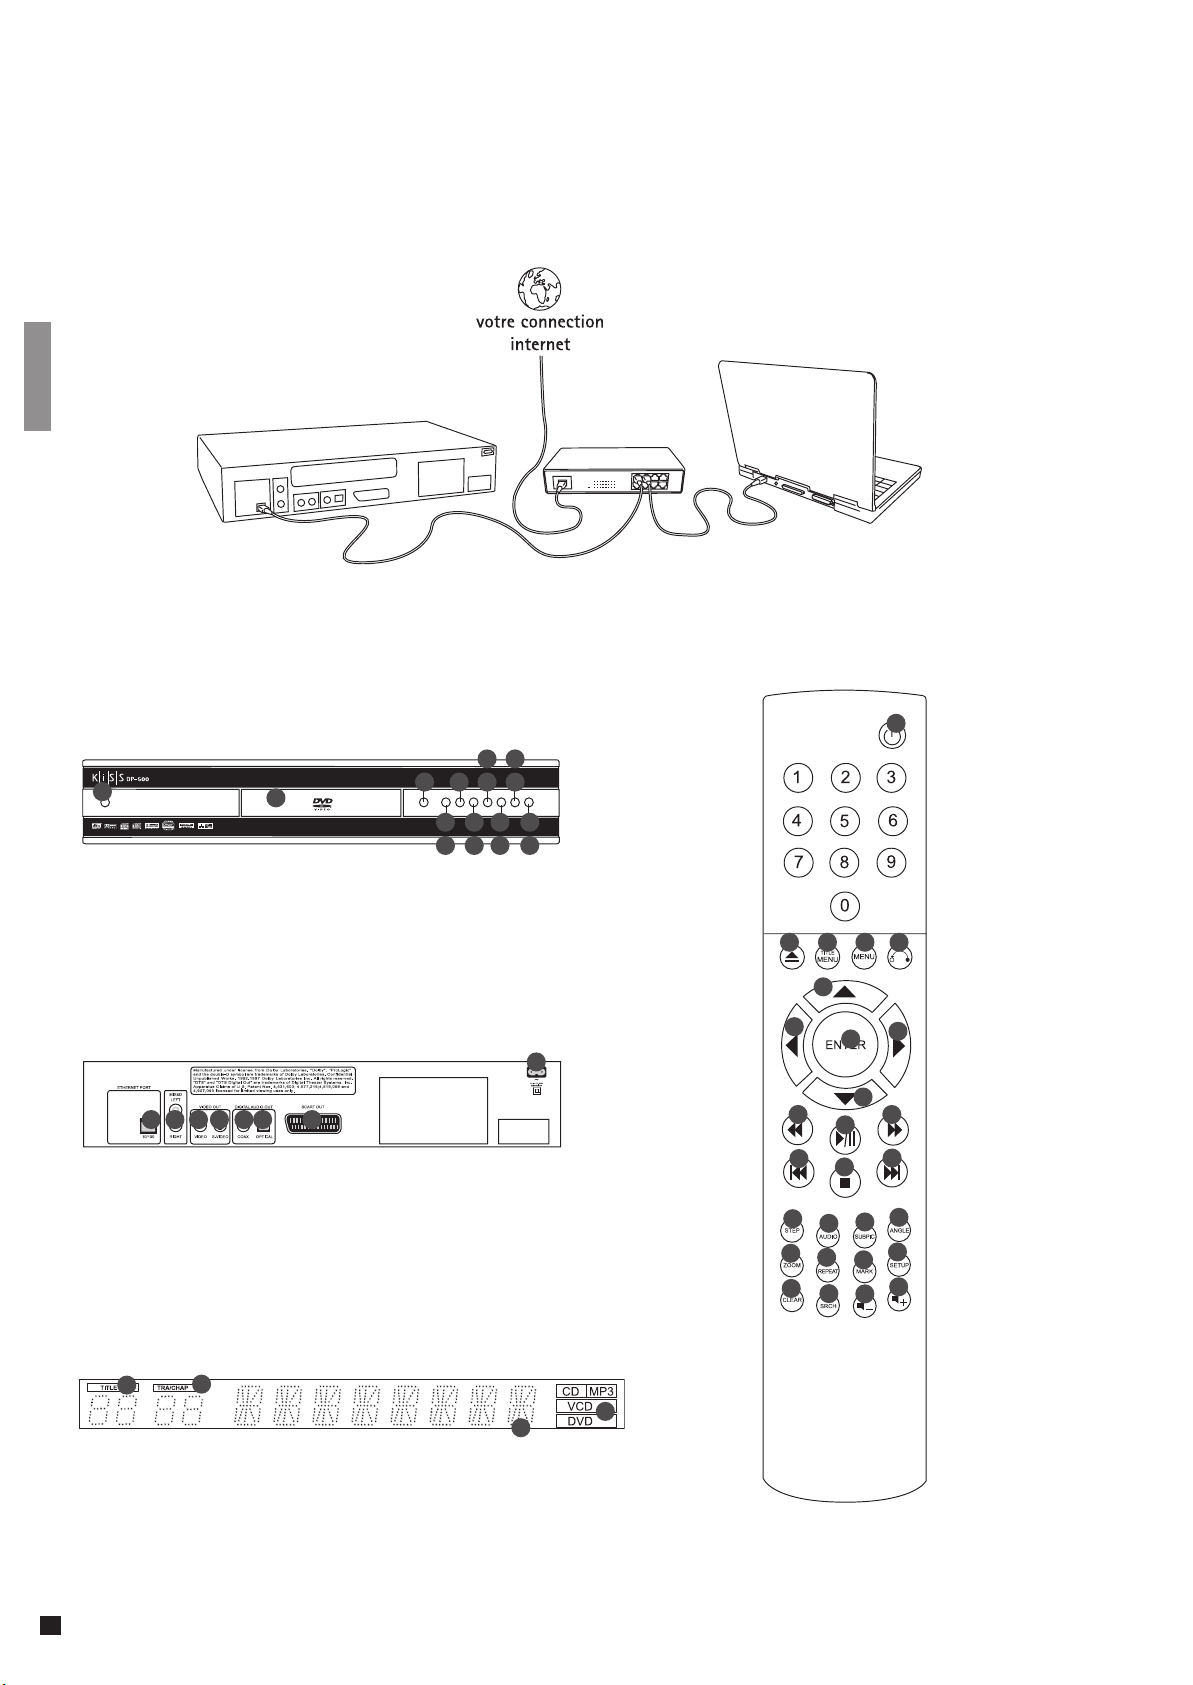
Connexion d’un PC au lecteur DVD
Exemple d'une connexion entre votre lecteur de DVD DP-500 et un PC. Une telle connexion permet d'utiliser tous les programmes et fonctions
offertes par le DP-500. Des informations supplémentaires peuvent être obtenues auprès de votre revendeur.
PCDP-500 Switch Ethernet
Présentation
Le panneau avant comporte les boutons standard suivants. Les options de ces boutons varient
selon que vous lisez divers médias ou que vous accédez au menu de configuration.
9
7
3
5
15
4
12614816
11
13
10
7
1
1. Marche/Arrêt
2. Tiroir du CD
3. Ouverture/Fermeture
4. Lecture/Pause
5. Stop
6. Chapitre précédent
7. Chapitre suivant
1 2 3 4 5 6
8
2
8. Retour arrière
9. Avance rapide
10. Menu
Options du menu de configuration:
11. Entrée
12. Navigation gauche
13. Navigation droite
14. Navigation haut
15. Navigation bas
16. Fermeture
1. Sortie stéréo
2. Sortie vidéo composite pour téléviseur
3. Sortie S-vidéo pour téléviseur
4. Sortie coaxiale pour amplifi cateur
5. Sortie optique pour amplifi cateur
6. Câble Péritel pour téléviseur
7. Alimentation
8. Ethernet
2 3 4 5
6
7
8
17
22
26
12
15
10
13
16
19
23
28
11
14
18
21
25
1. Veille
1
2. Ouverture/Fermeture
3. Titre/Menu
4. Menu
5. Précédent
6. Flèche haut
7. Flèche gauche
8. Entrée
9. Flèche droite
10. Flèche bas
11. Retour arrière
12. Lecture/Pause
13. Avance rapide
14. Chapitre précédent
15. Stop
16. Chapitre suivant
17. Sélection langue/son
9
18. Image suivante
19. Sélection sous-titres
20. Sélection de l’angle
21. Zoom
22. Répétition
23. Non utilisé
24. Réglage
25. Effacer la saisie
26. Recherche
27. Aug. du volume
20
28. Baisse du volume
24
Remarque :
Certaines fonctions ne
27
sont disponibles que si
le média le permet
1
2
Le lecteur de DVD dispose d’un écran VFD qui indique les activités en cours.
1. Titre : indique la section du disque en cours de lecture
2. Pis/Chap : affiche le numéro du chapitre affiché/lu
3. indique la fonction en cours (lecture ou stop, par exemple)
4. Indique le type du média en cours de lecture
22
3
4
2
Réglage rapide
Si votre lecteur de DVD est branché correctement (reportez-vous au chapitre consacré à la connexion des câbles),
un menu s’affiche lors de la mise sous tension. Ce menu permet de configurer les paramètres les plus importants
pour le téléviseur et de choisir la langue.
Remarque : si ce menu ne s’affiche pas lors du démarrage du lecteur de DVD, vérifiez à nouveau la connexion des câbles.
Remarque : essayez de connecter le téléviseur à l’aide des câbles vidéo composite. Cette solution permet d’obtenir
une image à coup sûr.
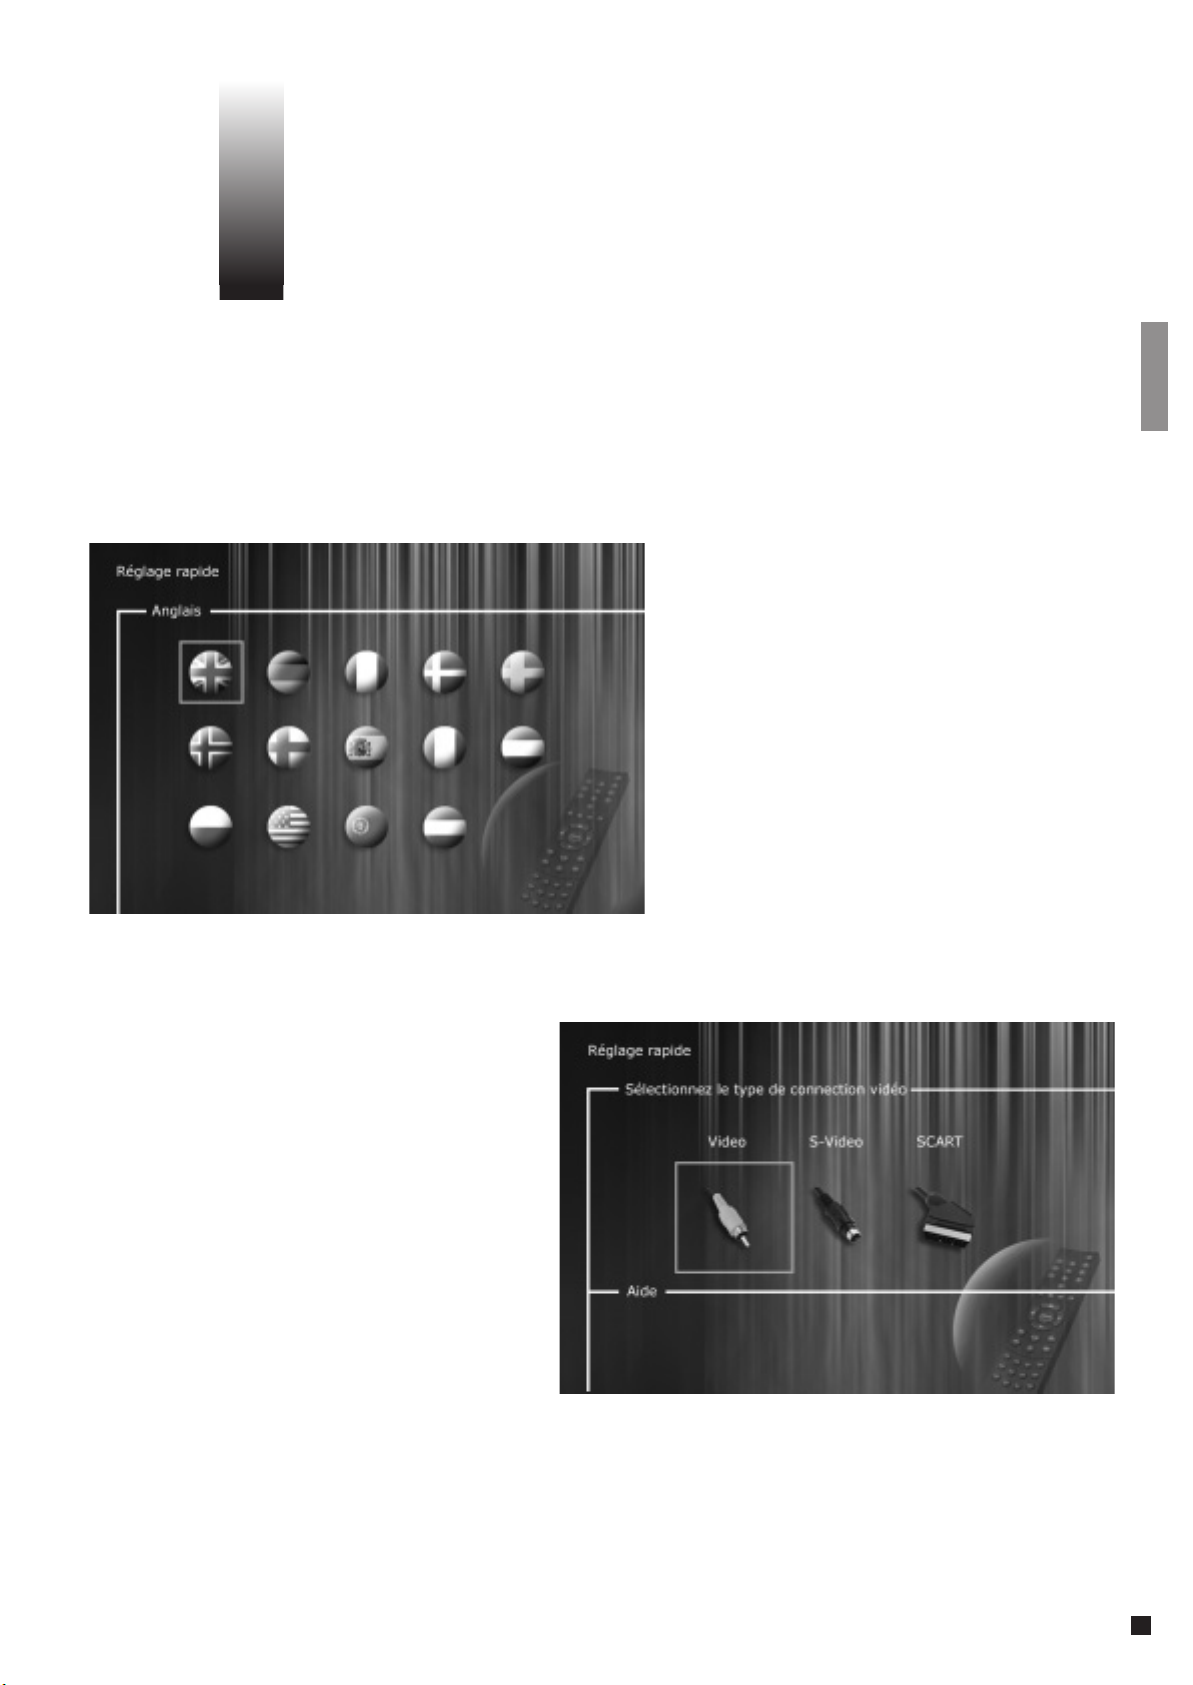
Langue
Sélectionnez la langue de votre choix pour
l’affichage des menus intégrés du lecteur DP-500.
Utilisez les touches fléchées de la télécommande
pour amener le cadre rectangulaire au niveau
de la langue que vous voulez sélectionner et
appuyez sur ENTER.
Connexion
Sélectionnez la connexion au téléviseur. Vous
avez le choix entre SCART (Péritel), S-vidéo et
Composite. Le mode de connexion dépend des
sorties disponibles sur votre téléviseur. (Si vous
sélectionnez l’option SCART (Péritel), sachez
que la connexion inclut également RGB et vidéo
composite.)
23
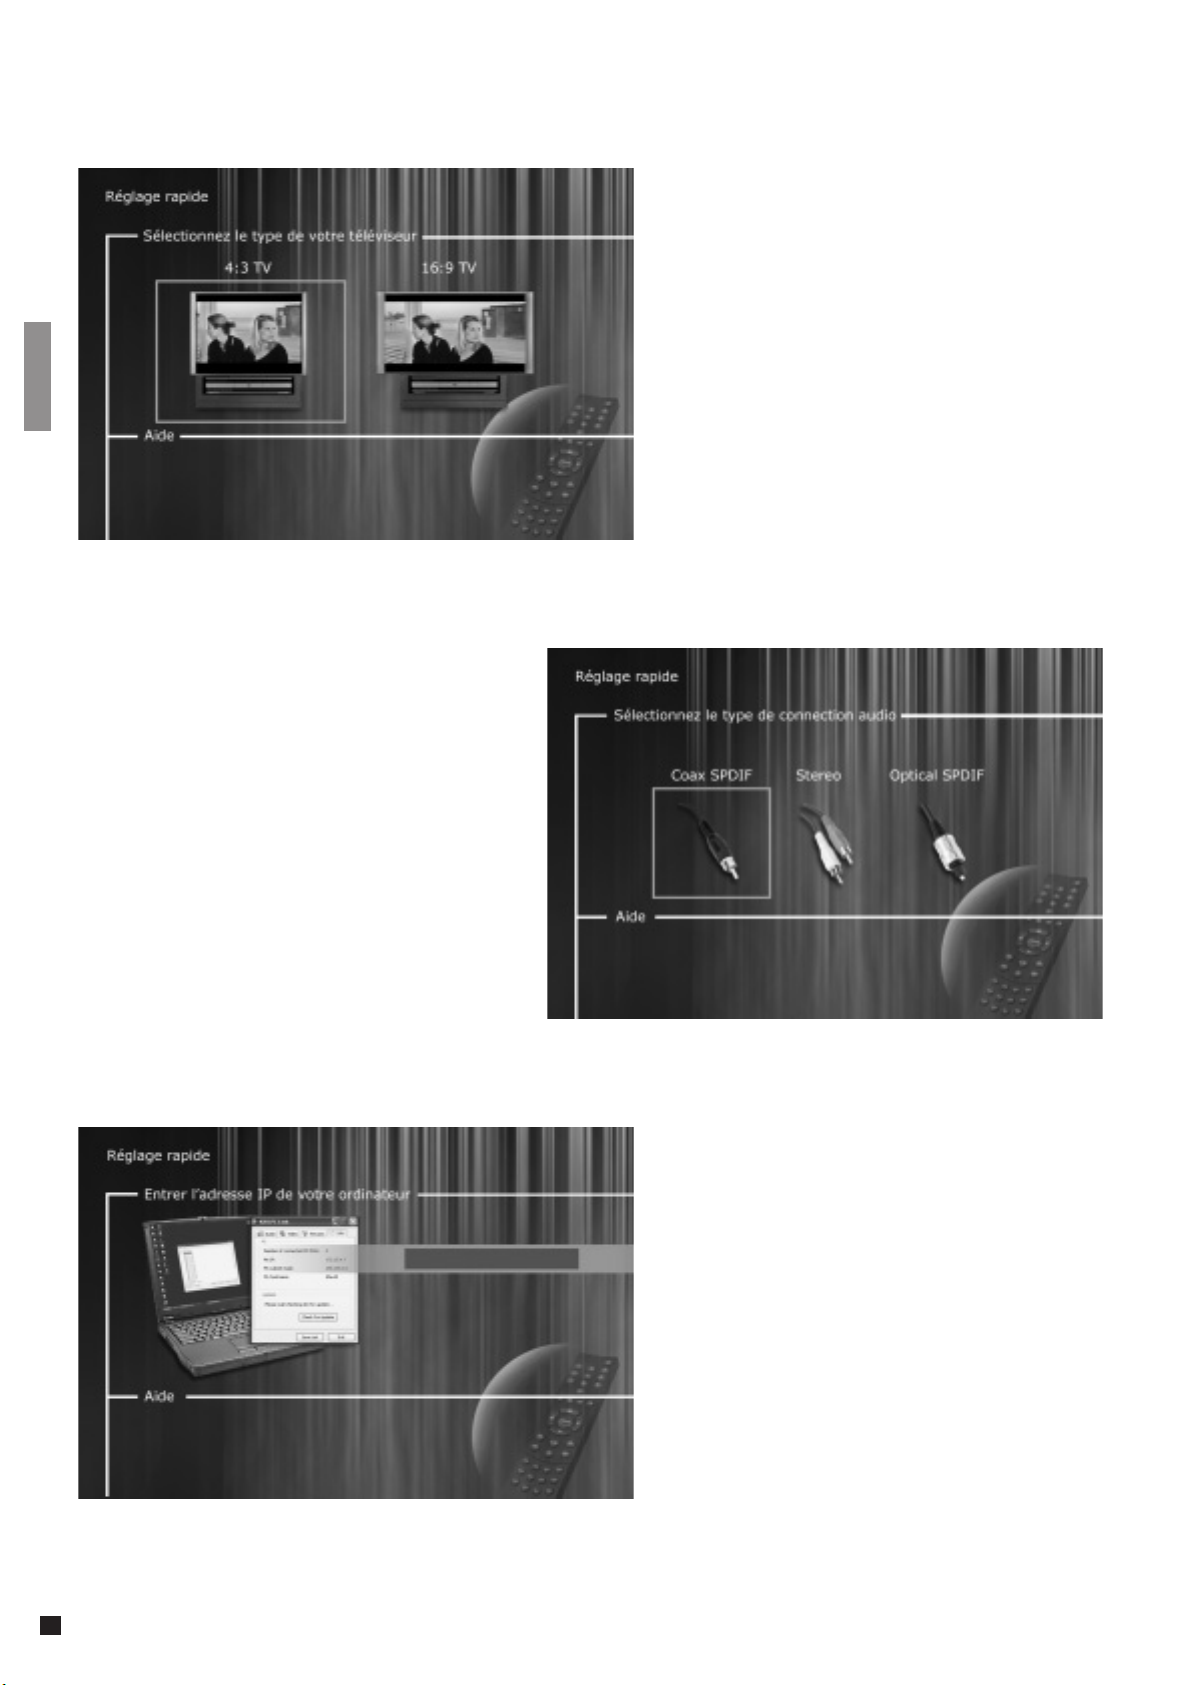
Remarque : certains écrans de téléviseur 4:3 acceptent le format 16:9.
Audio
Si votre téléviseur est connecté au moyen d’une
prise Péritel, il reçoit le son automatiquement.
Si vous préférez utiliser un amplificateur
numérique pour reproduire le son, vous avez le
choix entre deux options : prise phono ou l’une
des deux sorties numériques.
TV
Cet écran présente deux types de format de
téléviseur: 4:3 (normal) ou 16:9 (écran large).
Remarque : Par défaut le choix devrait être stéréo
à moins que le lecteur de DVD soit connecté à un
amplifi cateur digital.
Adresse IP
Pour pouvoir utiliser le logiciel KiSS PC-Link, vous
devrez entrer l’adresse IP de votre ordinateur
dans votre lecteur de DVD. Pour trouver cette
adresse facilement vous devrez dans un premier
temps installer le logiciel KiSS PC-Link sur votre
ordinateur.
Ensuite, cliquez sur Info et le numéro
s’affi che. Entrez-le ensuite sur votre DP-500.
Laissez l’écran vide si vous ne souhaitez pas
confi gurer votre connexion PC pour le moment.
Vous pourrez toujours accéder aux écrans de
réglage rapide plus tard.
Remarque : Le logiciel KiSS PC-Link ne fonctionne que si une adresse IP valide est
entrée dans le lecteur de DVD KiSS DP-500.
Vous avez la possibilité de revenir en arrière et de recommencer si vous avez fait une erreur ou si vous souhaitez accéder au menu de configuration pour
apporter des modifications.
24
3
Réglages avancés
Vous pouvez accéder au menu de configuration à tout moment afin de régler les paramètres de votre lecteur
DP-500 en fonction de vos besoins. Lorsque DP-500 apparaît dans l’écran principal, appuyez sur le bouton SETUP
de la télécommande afin d’afficher un menu présentant toutes les options disponibles. Le cadre orange indique
votre position dans le menu. Utilisez les touches fléchées pour déplacer ce cadre et effectuez votre sélection en
appuyant sur le bouton ENTER. Les paramètres de certains menus ont déjà été déterminés sous Réglage rapide,
mais plusieurs autres peuvent également être définis sous Réglages Avancés.
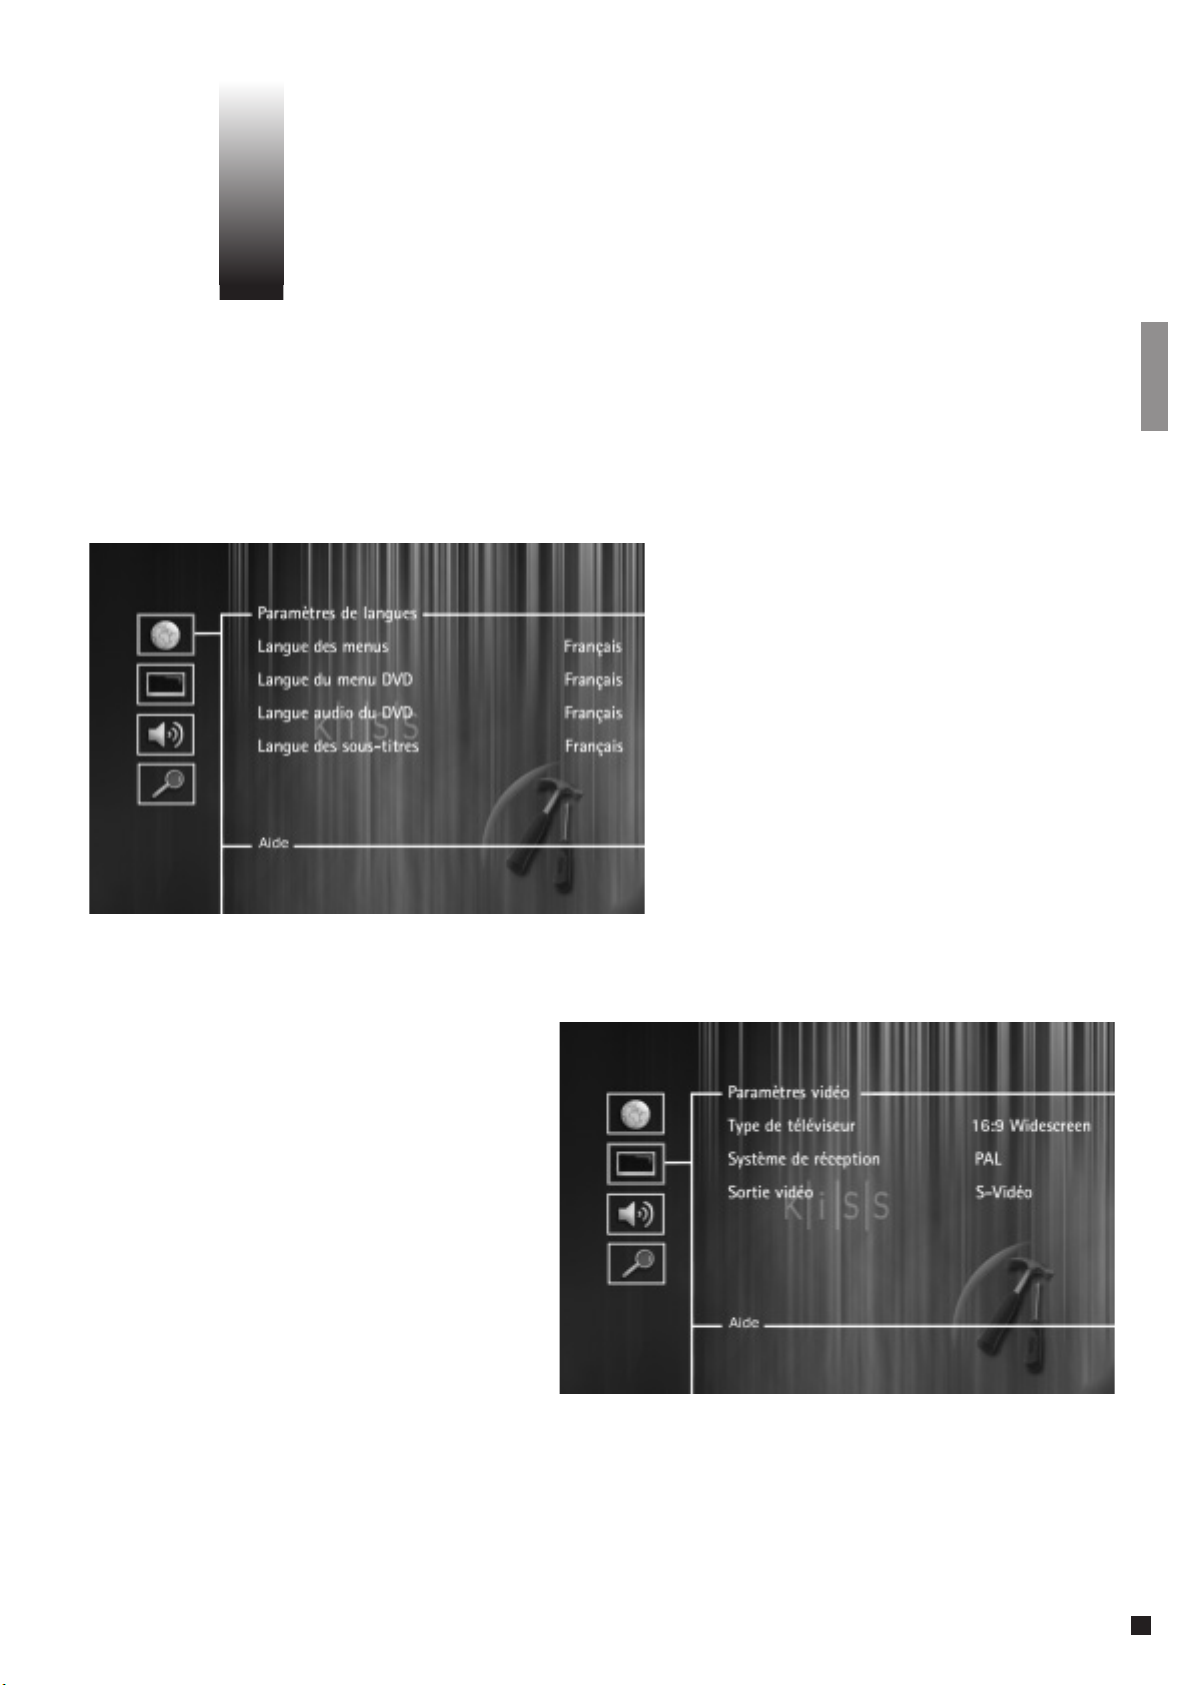
Paramètres de langue
Il s’agit du premier menu qui s’affiche. C’est ici
que vous sélectionnez la langue des menus qui
s’affichent à l’écran, ainsi que la langue de votre
choix pour la lecture d’un film DVD, notamment
les sous-titres, les dialogues et les menus (dans
la mesure où le film en question prend en charge
la langue choisie).
Paramètres vidéo
Vous avez déjà sélectionné votre téléviseur
dans un autre menu, mais vous pouvez apporter
des modifications dans cet écran également,
comme mentionné précédemment. Vous
pouvez également sélectionner un système
de réception autre que PAL (qui constitue la
norme européenne) ou indiquer si vous avez
une connexion de type RGB par prise Péritel,
Composante par prise Péritel ou S-vidéo.
Reportez-vous au manuel d’installation de votre
téléviseur avant de choisir la connexion.
Remarque : l’option vidéo composite par prise Péritel est toujours activée.
25
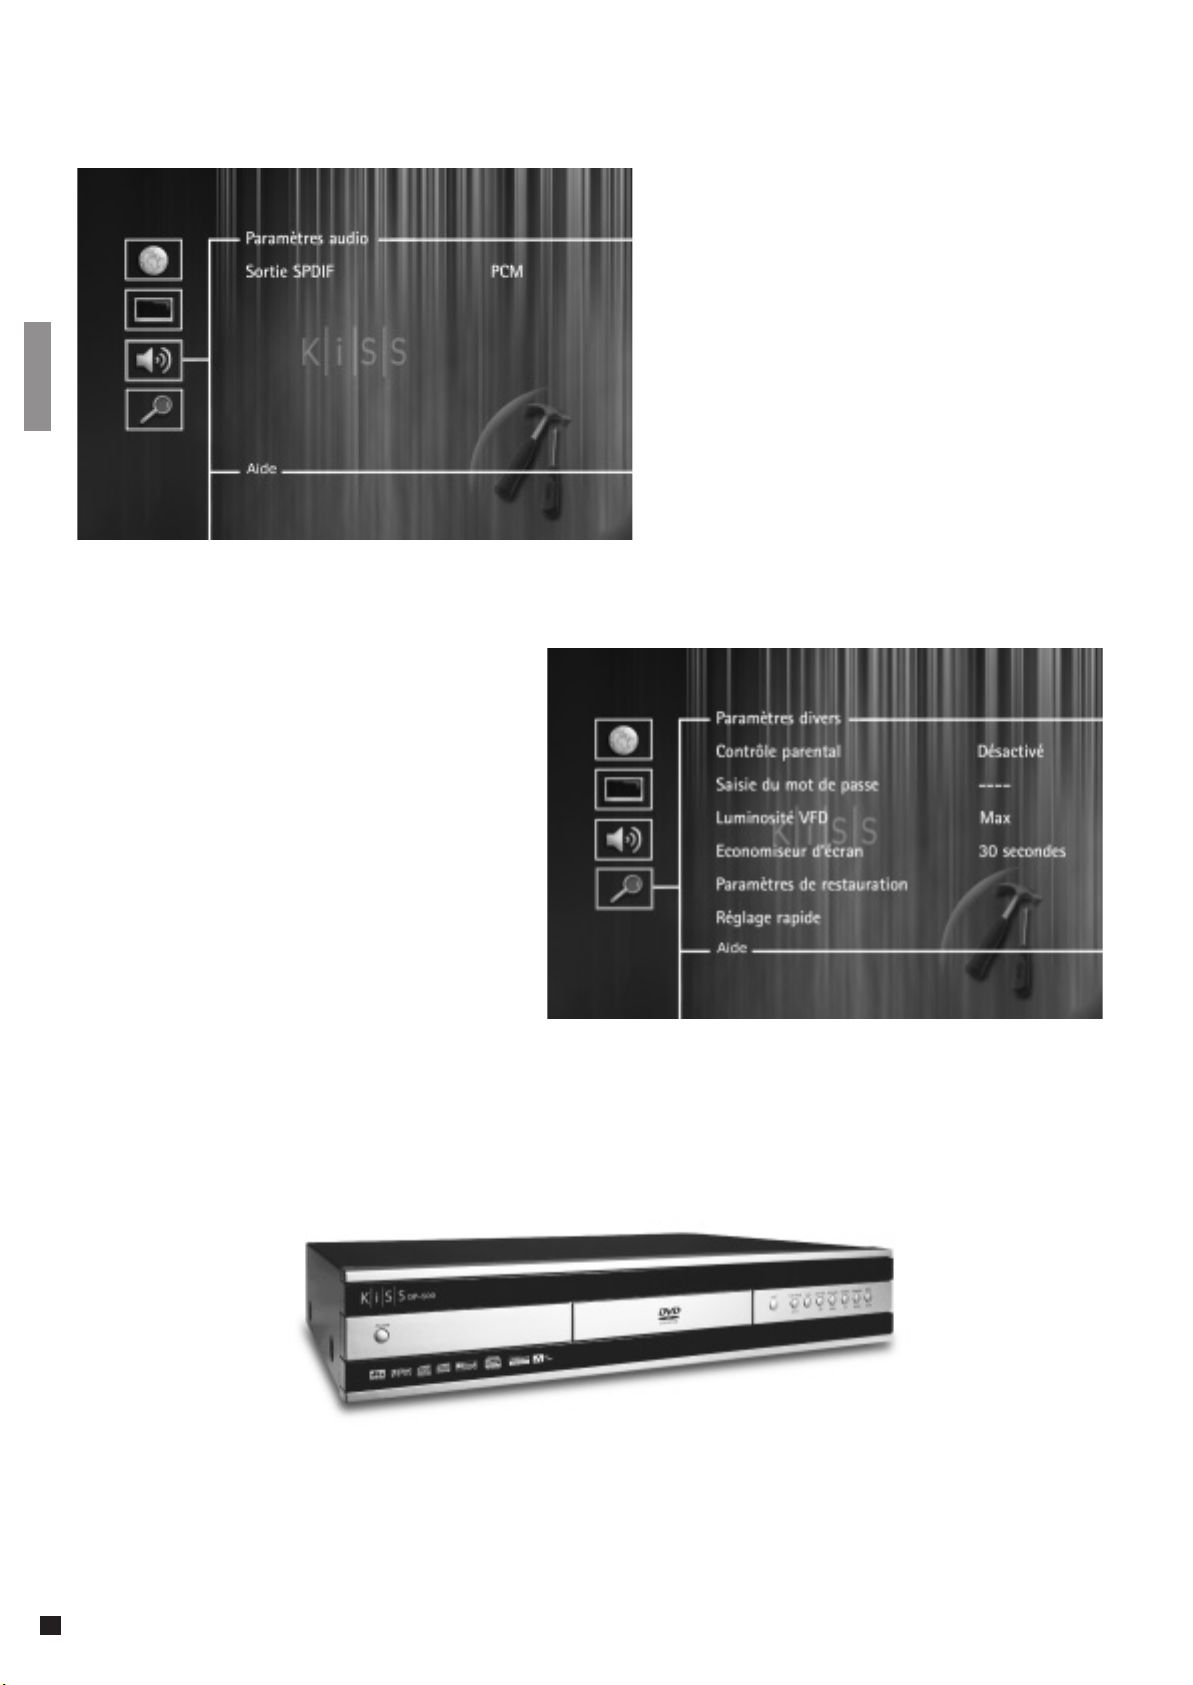
Paramètres divers
Cet écran vous permet de définir le niveau
de protection de votre choix pour les films.
La plupart des films sont classés dans une
catégorie spécifique afin de permettre aux
parents d’empêcher leurs enfants de regarder
certains types de films. Dans l’article de menu
suivant, vous devez obligatoirement définir un
mot de passe pour modifier ce réglage*. Il est
également possible de modifier la luminosité de
l’écran du lecteur de DVD et de régler un niveau
de luminosité faible, normal ou élevé. Tous les
paramètres peuvent être réinitialisés dans le
menu "Paramètres de restauration". Le réglage
rapide peut être réactivé à partir du dernier
menu.
Paramètres audio
Ce menu vous permet de sélectionner RAW ou PCM.
PCM : son stéréo. Utilisé pour les amplificateurs
de l’ancienne génération.
RAW : lit le type de son fourni sur le disque.
Option recommandée par défaut.
*Si vous souhaitez modifier ce paramètre
ultérieurement, vous devrez saisir une nouvelle
fois le mot de passe.
Pour quitter un menu, appuyez sur la flèche gauche de la télécommande.
26
4
Lecture de médias
Le lecteur de DVD supporte les médias suivants : DVD Video, DivX, XviD, ISO MPEG-4, VCD, SVCD, Audio CD,
MP3, Ogg Vorbis et JPG.
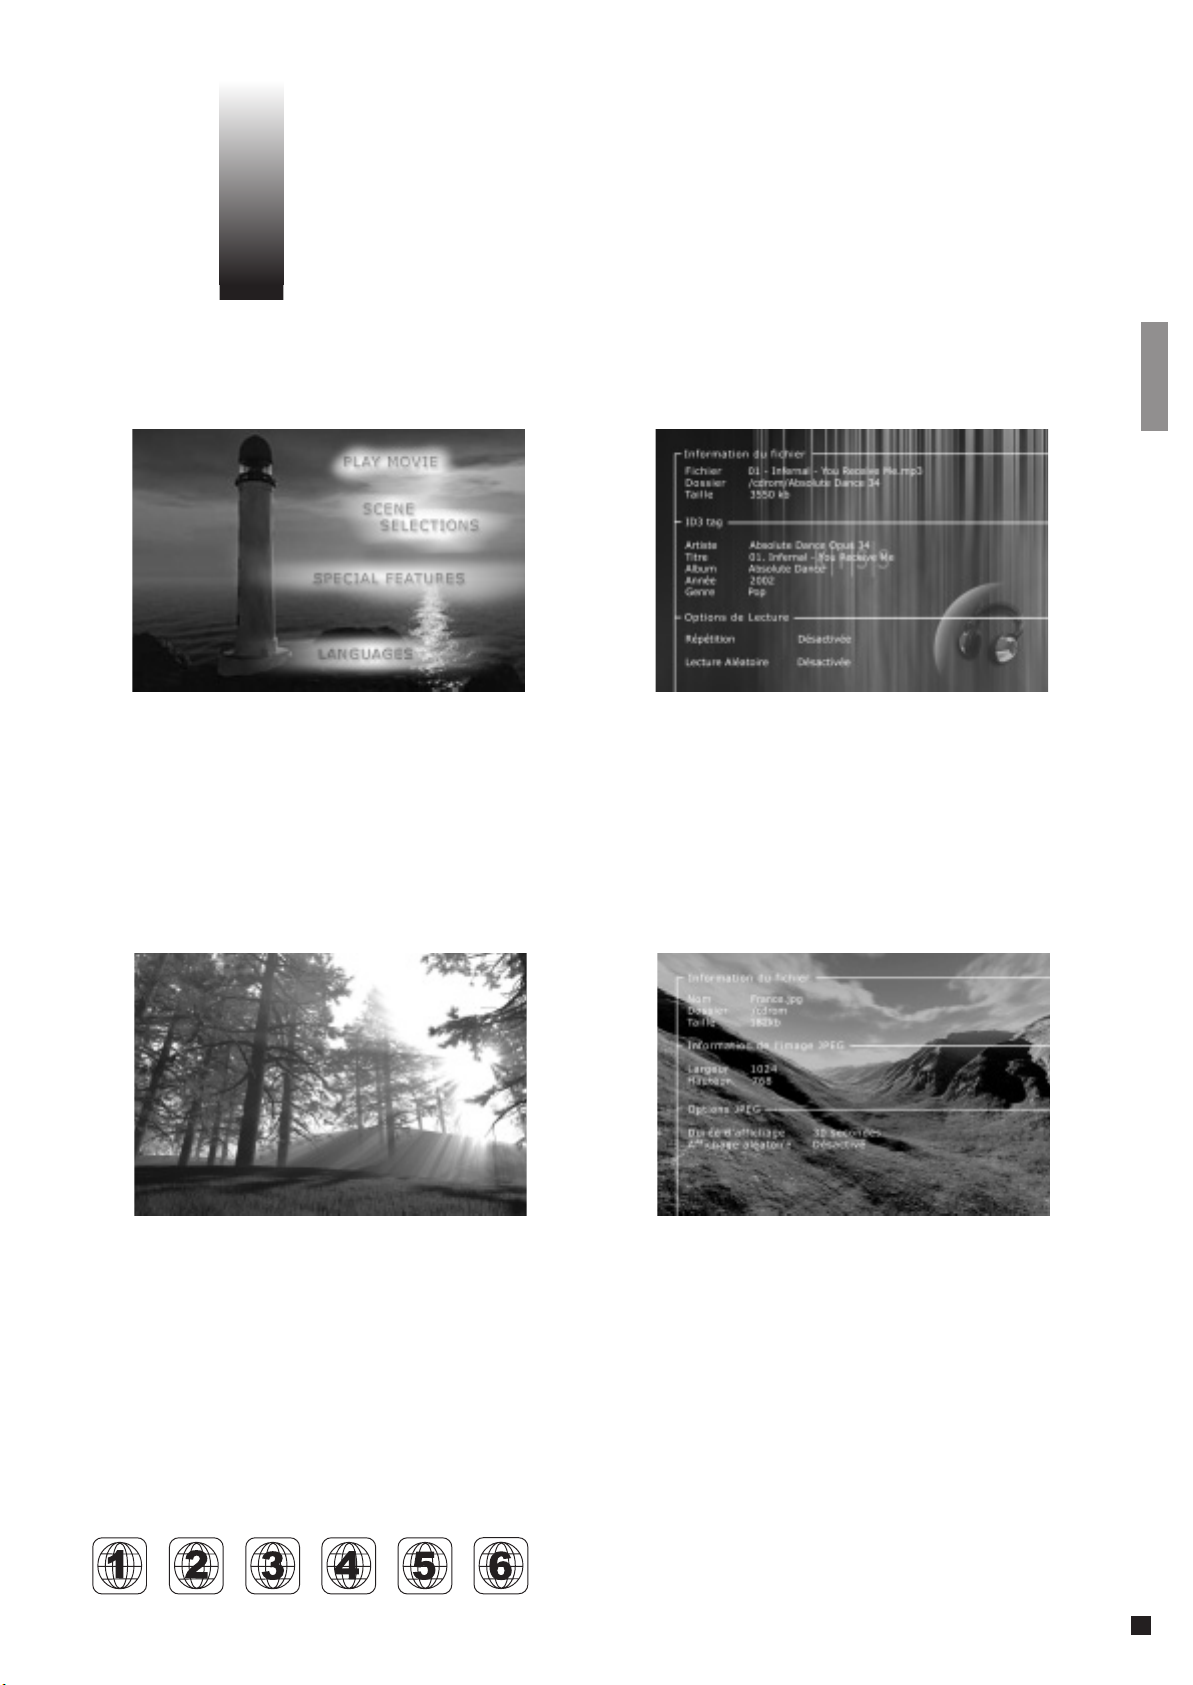
Menu DVD
Si vous avez configuré le lecteur de DVD conformément aux
instructions précédentes, vous pouvez maintenant insérer
un DVD dans votre lecteur. Après quelques secondes, le
menu DVD s’affiche. Utilisez les touches fléchées pour
naviguer dans le menu et démarrer la lecture du film.
Remarque : ce menu faisant partie du DVD, il varie selon
les disques.
DivX, XviD et MPEG-4
Le DP-500 reconnaît le format et démarre
automatiquement la lecture du CD lorsque vous l’insérez
dans le lecteur. Utilisez le compteur de l’écran pour
connaître votre position dans le film. Vous avez accès aux
options de lecture habituelles (arrêt, pause, suivant, etc.).
MP3 et Ogg Vorbis
Lorsque vous insérez un CD audio contenant de la musique
au format MP3, le lecteur reconnaît automatiquement
ce format et vous permet de sélectionner les chansons
que vous souhaitez écouter. Vous avez la possibilité de
sélectionner l’ordre dans lequel vous voulez écouter
les pistes, choisir de n’écouter que quelques chansons/
albums/dossiers ou de les diffuser dans un ordre aléatoire
en appuyant sur le bouton SETUP de la télécommande et
en sélectionnant un ordre de lecture.
Photo CD et JPG
Vous pouvez faire graver vos photos sur un CD dans le
laboratoire qui les a développées ou graver vos propres CD
sur ordinateur.
Les photos peuvent alors être visualisées sur votre
téléviseur, pour le plus grand plaisir de vos amis ou de votre
famille. Indiquez si vous voulez que les photos s’affichent
une par une, dans l’ordre de votre choix, ou sous forme de
diaporama. Appuyez sur SETUP pour sélectionner le mode
diaporama.
Les films DVD sont quelquefois équipés d’un code de zone (1), (2), etc., et ne peuvent être visionnés que sur les lecteurs de DVD présentant le même code.
Ce lecteur de DVD est prédéfini pour la zone 2, sauf indication contraire sur l’emballage.
27

5
Fonctions avancées
De nombreuses fonctions avancées se trouvent dans la partie inférieure de la télécommande.
Elles sont décrites ci-après.
STEP
Cette fonction n'est pas utilisée
AUDIO
Appuyez sur le bouton (AUDIO) pour changer le format audio. Les options de format
audio disponibles (par ex. stéréo 2 canaux ou 6 canaux à effet surround) sont
déterminées par les éditeurs du film.
ZOOM
Pendant que vous visionnez un film, vous pouvez effectuer un zoom avant sur certaines
zones de l’image. C’est possible pendant la lecture du film ou en mode Pause. Pour
activer la fonction, appuyez sur le bouton (ZOOM), puis revenez à l’image normale en
appuyant autant de fois que nécessaire sur le même bouton.
CONSEIL : Pour naviguer dans l’image agrandie, utilisez les touches fléchées.
REPEAT
Si vous appuyez sur le bouton (REPEAT) lors de la lecture du film, trois options s’affichent
à l’écran.
MODE : lecture aléatoire (des chapitres) ou Désactivé
Répétition : vous permet de répéter la lecture de la section ou du film dans son
intégralité.
CLEAR
Cette fonction vous permet de supprimer les informations préalablement saisies.
SRCH
Utilisez (SRCH) pour rechercher un passage spécifique sur le disque.
Heure : permet de définir les heures, les minutes et les secondes
Titre/Chapitre : permet de rechercher le titre ou le chapitre
ANGLE
Si le film a été filmé sous plusieurs angles, vous pouvez passer d’un angle de caméra à un
autre grâce au bouton (ANGLE).
SUBPIC
Ce bouton vous permet de modifier les sous-titres du film. Lorsque vous appuyez sur
le bouton (SUBPIC), un message s’affiche dans le coin supérieur gauche de l’écran. Il
indique le nombre de langues disponibles et la langue actuellement sélectionnée. Pour
passer à la langue suivante disponible, appuyez à nouveau sur le bouton (SUBPIC). Le
nombre de langues disponibles est également déterminé par les éditeurs du film.
SETUP
Si le lecteur de DVD lit un film ou un enregistrement musical, appuyez sur le bouton
(SETUP) pour voir les options disponibles sur le disque. Par exemple, si vous visionnez un
film sur DVD, le côté gauche de l’écran affiche des informations sur la durée du film, le
nombre de chapitres, les options de langue et le nombre de sous-titres.
Si le lecteur de DVD est sous tension, mais qu’aucun film ou média n’est en cours de
lecture, le fait d’appuyer sur ce bouton vous permet d’accéder au menu de configuration
de votre lecteur de DVD. De là, vous pouvez sélectionner les paramètres par défaut pour
la langue, le son, la vidéo, le contrôle parental, etc.
Ces boutons vous permettent d’augmenter et de diminuer le volume sonore.
MARK
Cette fonction n'est pas utilisée
28
6
WebRadio
WebRadio vous permet d’écouter d’innombrables stations de radio via Internet. Cependant, toutes les fonctions
décrites ci-dessous ne sont disponibles que si une adresse IP valide a été spécifi ée dans votre menu de confi guration
rapide (consultez le chapitre Réglage rapide).
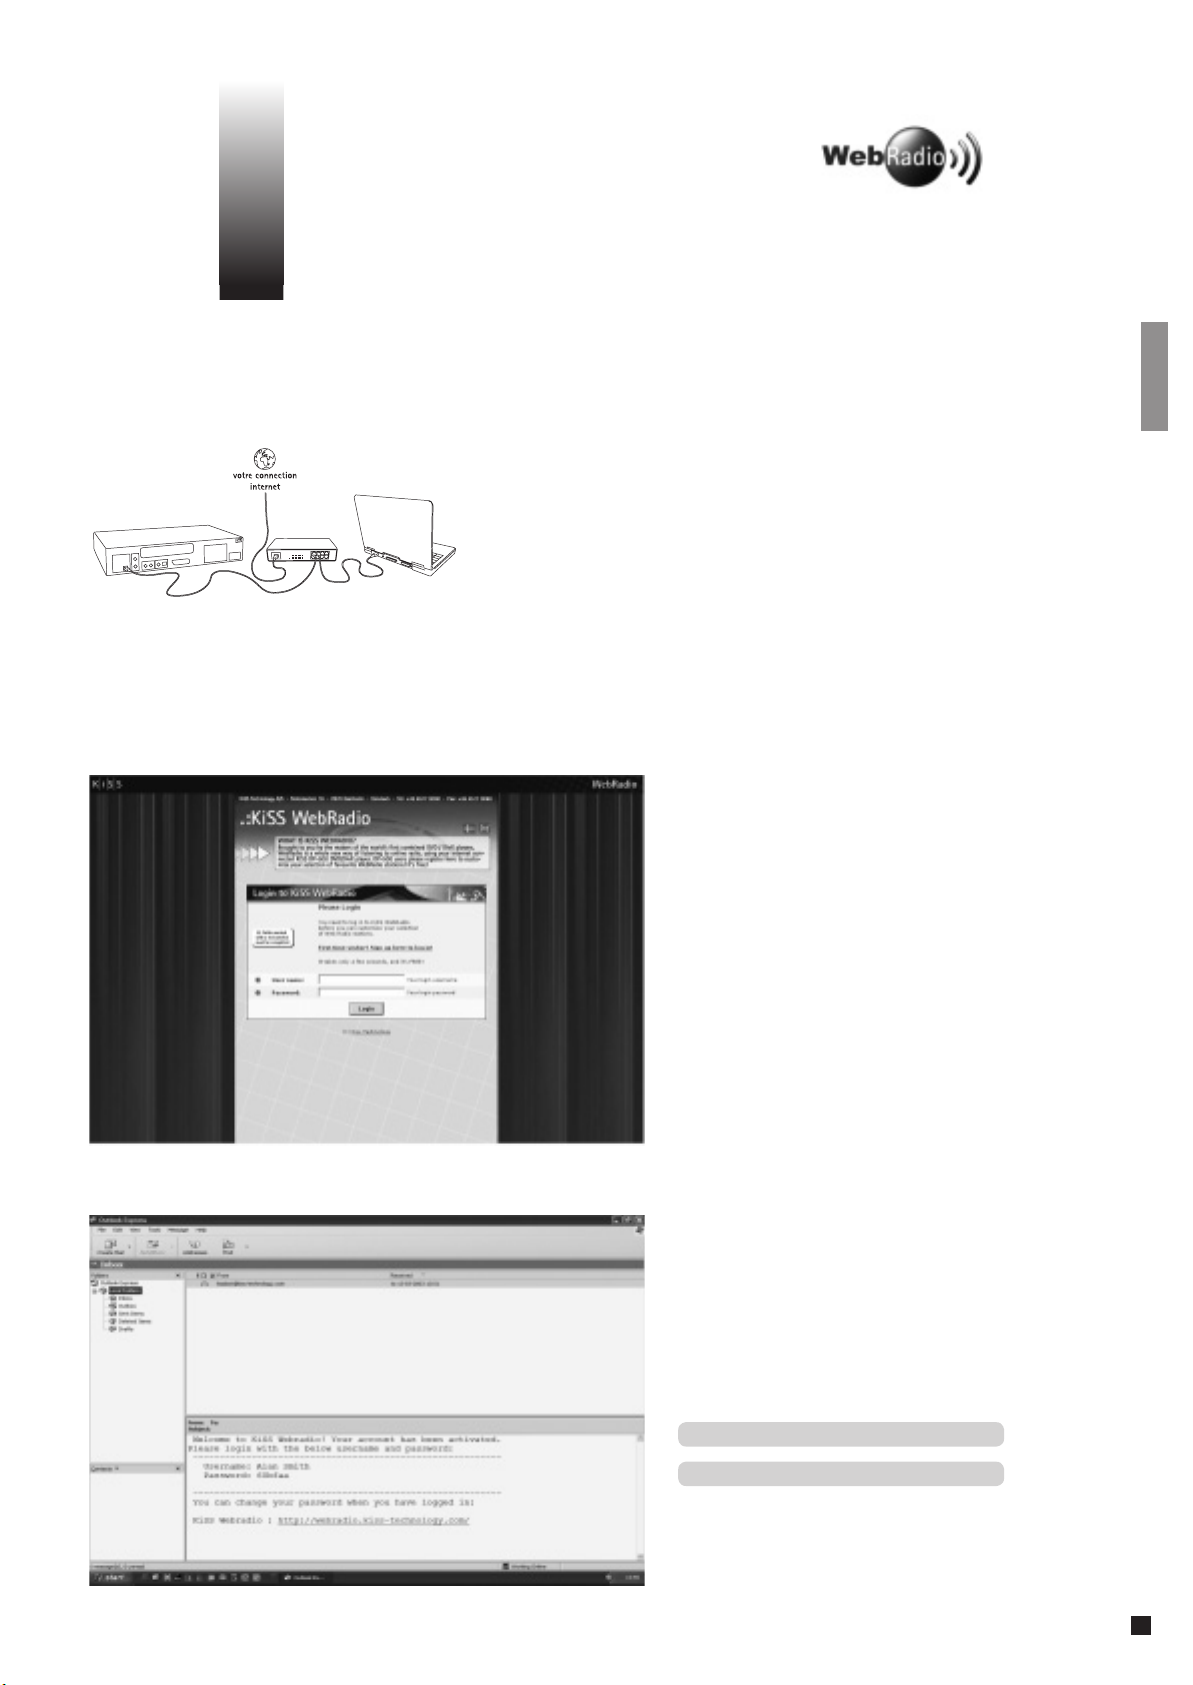
Confi guration de la connexion
Pour utiliser le service KiSS WebRadio, vous devrez connecter
votre lecteur de DVD DP-500 à Internet (reportez-vous à la section
« Connexion » du manuel). Une fois que c’est fait, allumez votre lecteur
de DVD : appuyez sur le bouton « Menu » de la télécommande, puis
sur « Entré ». Allez sur « WebRadio via Internet ». Votre connexion est
détectée.
New User (Nouvel utilisateur)
Sur votre ordinateur, tapez http://webradio.kisstechnology.com dans la barre d’adresse de
votre navigateur Internet préféré. La fenêtre
que vous voyez ci-contre doit s’ouvrir. Si
vous êtes un nouvel utilisateur sur notre site
WebRadio, cliquez sur le lien : « First time
visitor? » (Première visite ?) « Sign up here to log
in! » (Inscrivez-vous ici pour entrer !)
Remplissez le formulaire qui s’affi che. Les
champs dotés du symbole orange doivent
OBLIGATOIREMENT être remplis. Si vous avez
déjà effectué cette procédure, connectez-vous
avec votre nom d’utilisateur et votre mot de
passe.
Confi rmation par courrier électronique
Suite à l’envoi du formulaire de renseignement,
vous recevrez un courrier électronique avec
votre nom d’utilisateur et un mot de passe.
Vous pourrez modifi er ce mot de passe une fois
connecté sur le site.
Remarque : vous pouvez inscrire votre mot de
passe et votre nom d’utilisateur ci-dessous.
Nom d’utilisateur :
Mot de passe :
29
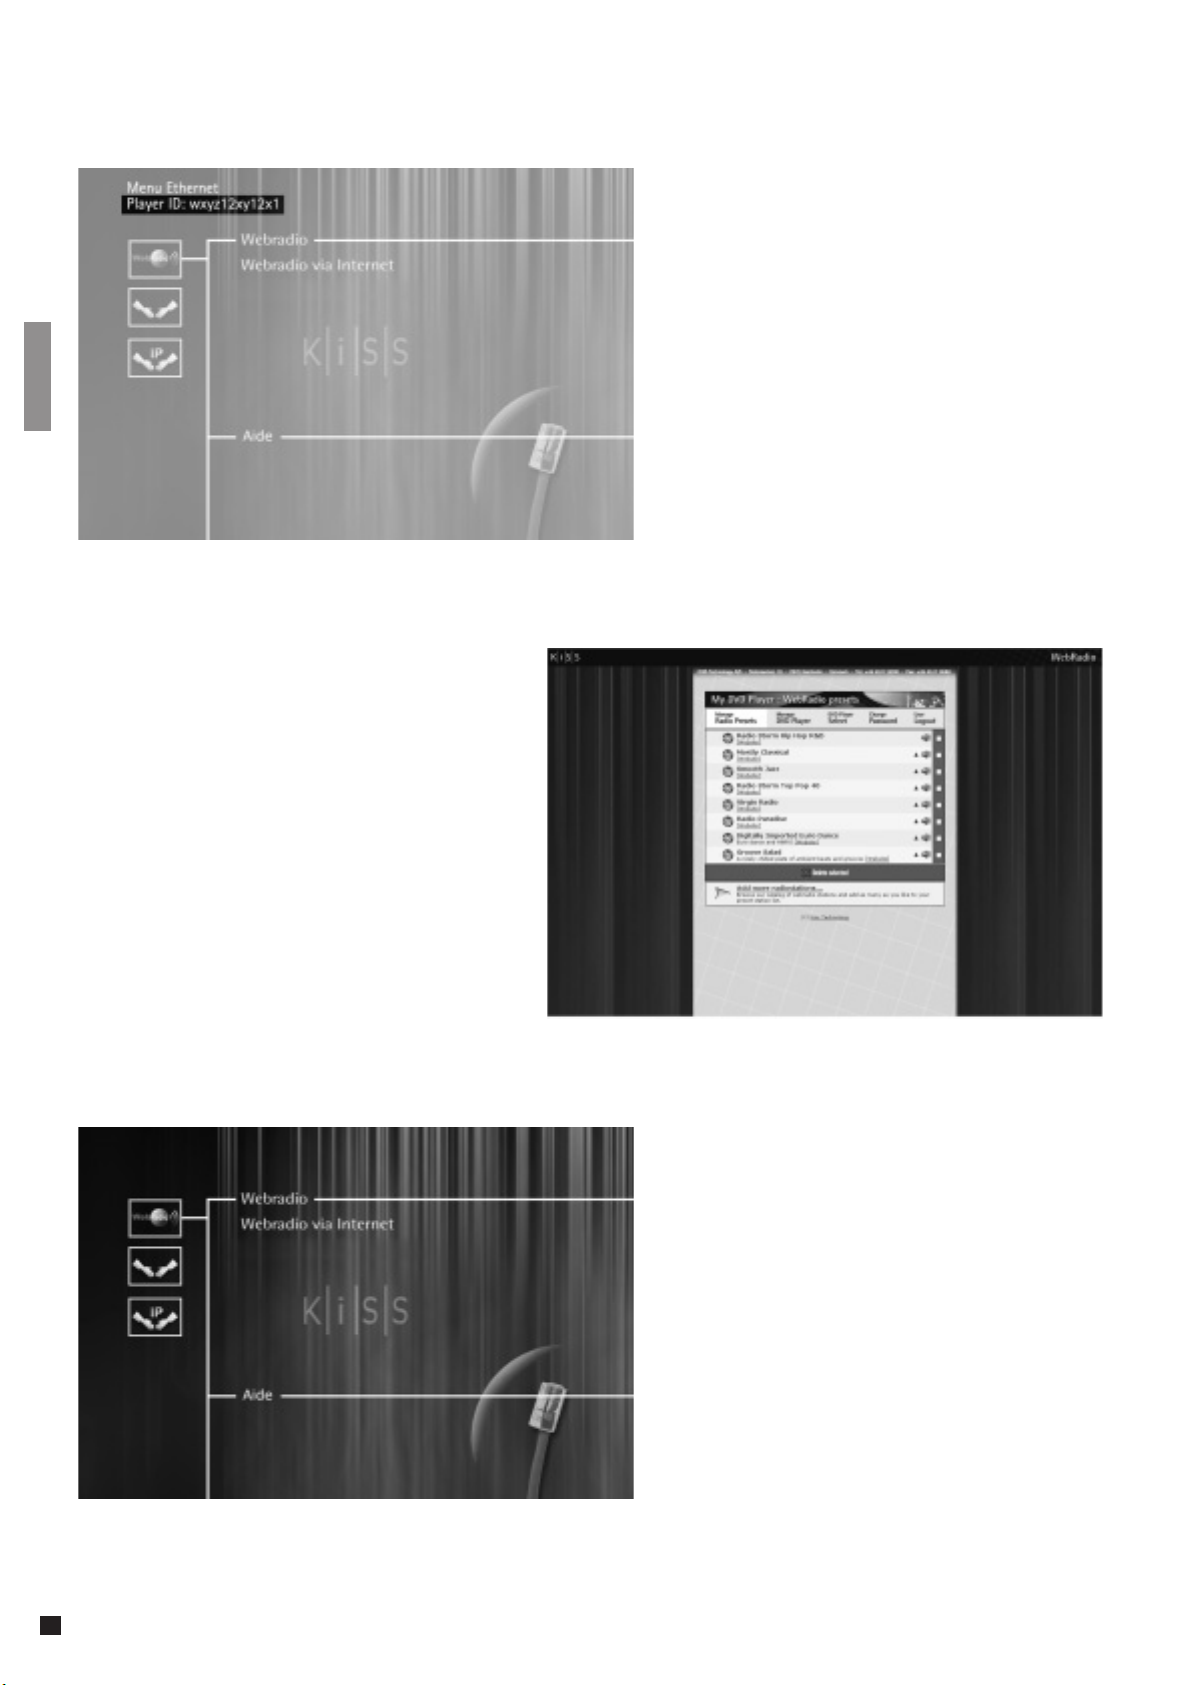
Menu radio principal
Une fois que vous êtes connecté sur le site,
une liste par défaut des stations de radio en
ligne s’affi che à l’écran. Vous pouvez ajouter/
supprimer/modifi er vos stations préférées en
fournissant leur informations de diffusion. Vous
pourrez ensuite écouter sur votre lecteur de DVD
la liste de stations que vous avez sélectionnées.
Saisie du numéro d’identifi cation de votre
lecteur
Vous devez maintenant fournir votre compte
WebRadio avec le numéro d’identifi cation de
votre lecteur, un nombre à 12 chiffres. Pour
trouver ce numéro, allumez votre lecteur de
DVD DP-500 et appuyez sur le bouton « Menu ».
Il s’affi che en haut de l’écran. Tapez ce numéro
dans le champ fourni à cet effet sur votre
ordinateur.
Sélection de WebRadio à partir du DP-500
Le bouton « Menu » de la télécommande vous
permet d’accéder à l’écran WebRadio. La liste
de vos stations radio préférées s’affi che sur
l’écran de votre téléviseur. Cette fonction n’est
disponible que si le lecteur n’est PAS en train de
lire un DVD.
30
 Loading...