


Change the way you think about time
INSTRUCTION MANUAL
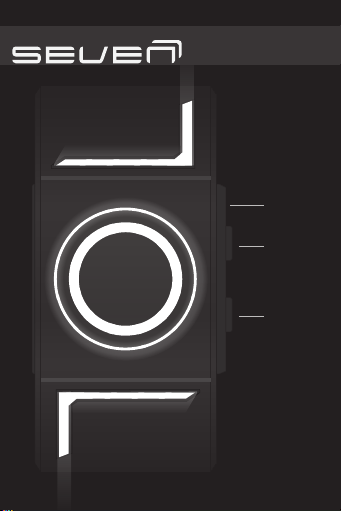
USB Cap
Button A
Button B
1. How to read the time
• Press button A once to display the time.
• The lights will fade in and the time will be displayed before fading
out.
I. Time
+1+1+2+2+3+3+4
00
0555
12
111
2
10
39
48
57
6
2535
30
+4
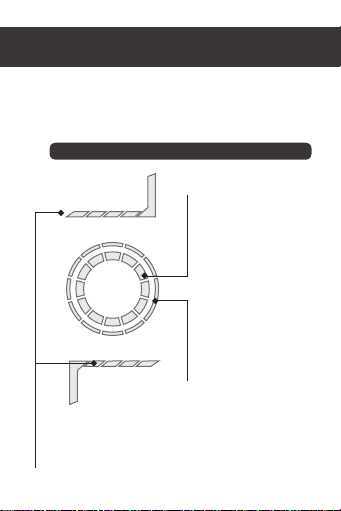
Singles minutes 1-4 are displayed above and below the ring. These
are identical and are only shown in two places for design purposes.
If one light is lit on each side, it indicates one minute. If two lights
are lit on each side, it indicates 2 minutes etc.
Hours are displayed in the
inner ring on the same position
as numbers on a clock. The
position of the gap in this ring
indicates the current hour.
1050
1545
5 minute intervals are
2040
displayed on the outer ring in
the same position as numbers
on a clock. The position of the
gap in this ring indicates the
current five minute group.

Example 1:
9:31
Example 2:
2:52
Example 3:
12:24
Example 4:
5:05

2. How to set the time and animation
• Press and hold button B for 3 seconds to enter setting
mode.
*Note after 9 seconds of inactivity setting mode will deactivate
I. Setting the hour
• The hour LEDs will flash when you are in hour setting
mode.
• Press button A to increase the hour as required.
• Hold button A to increase the hours more quickly.
• Press button B to confirm and move to the minutes.
II. Setting the minutes
• The minute LEDs will flash when you are in minute
setting mode.
• Press button A to increase the minutes as required.
• Hold button A to increase the minutes more quickly.
• Press button B to confirm and move to animation
setting mode.
III. Setting the animation
This watch has 3 user selectable animations:
Animation 1: When this animation is chosen
the display will pulse continuously.
In setting mode, animation 1 is indicated by
a light at the 12 o’clock position.

Animation 2: When this animation is chosen
the display will pulse every 30 seconds.
In setting mode, animation 2 is indicated by
a light at the 5 minute position.
Animation 3: When this animation is chosen
the display will pulse every 5 minutes.
In setting mode, animation 3 is indicated by
a light at the 20 minute position.
All three animations light up to display the current time.
The only difference between each is the regularity of the
animation.
• Press button A to select the animation you want.
• Press button B to confirm and move to animation on/
off setting mode.
IV. Turning the animation on/off
• Press button A to turn the animation on or off.
• Press button B to confirm and exit setting mode.
• Example for Animation 2:
Animation 2 on:
all indicators
except animation
2 are blinking
Animation 2 off:
indicator
animation 2 is
blinking
V. Short cut to turn the animation on/off
• At any time, press and hold buttons A and B for 3
seconds to turn the animation mode on or off.

3. How to recharge the battery
• This watch uses a USB rechargeable battery.
• When the lights become dim or do not light up, you should
recharge the battery.
• To recharge the battery, unscrew the USB cap using the
screw driver provided and connect the USB charging cable
to the USB charging jack.
• Connect the charging cable to a power source,
e.g. your computer.
• When charging, the LED charging indicator will blink.
• The charging indicator will stop blinking during recharging.
however, it is advised that you continue to charge the battery
for a full 3 hours to ensure the battery is 100% charged.
Charging indicator
• It is advised that you use the screw driver provided when
opening the USB cap so as not to damage the head of
the screw.
• Items included in the box:
• Watch
• USB cable
• Spare USB cap
• Screwdriver
• Instruction Manual

4. How to adjust the strap
• To adjust the strap to fit your wrist you will need a watch
hammer, a watch strap block and a pair of scissors.
*If unsure, you should ask a watch shop or jewelers for assistance.
I. Estimating strap length
• Put the watch on
your wrist and pinch
the two sides of the
strap together to
estimate the desired
length of each side
of the strap.
• Look at the pin
holes on the side
of the strap and
remember which point is the best position on each side.
• Each side doesn’t necessarily have to be the same length.
• At this stage, it is just an estimated length so keep the
strap a little loose as it will be checked more precisely in
the following steps.
(you are advised to allow one extra hole on each side of
the strap, so for example on the picture above, if the hole 7
seems to be a perfect fit, select hole 6 for now.)
5
4
3
2
1
6

II. Cutting the strap
• Cut both sides of
the strap along the
engraved lines next to
the pin hole.
6
III. Checking the strap length
• Try the watch on
again to check the fit.
• Keep in mind that
the buckle will be
between the strap and
the wrist so you are
advised not to select
the tightest position.
•image example:
one segment to be
removed.
6
remove one
segment

IV. Cutting the strap to fit
• Make sure when both sides of the strap touch each other
the watch is not too tight or too loose.
• To cut, follow the same engraved lines as before.
V. Fixing the buckle
• As the buckle has been removed from the strap during the
strap cutting process, it has now to be replaced.
• Cut the plastic strap along the pins to remove the pins.
• Fix each side of the buckle to the strap one side at a time.
• Make sure the buckle is the correct way around and the
“T” shaped metal plate is in position. (see drawing below.)
• Use a watch hammer, and a watch strap block to replace
the pins and to attach the buckle and the “T”shaped metal
plate to the strap.
Watch hammer
Pin
Watch strap block
• Once you have
completed this process,
the buckle should close
properly and the “T”
shaped metal plate
should cover the cut part
when the strap is closed.

5. User information
I. Battery
• This watch uses a PL402525 USB rechargeable battery.
• The battery is estimated to last at least one month on a
single charge if no animation mode is selected.
• Battery lifetime will vary depending on use, but is
estimated at approximately 300 charges.
• To maximize battery life you should limit use of the
animations.
II. Warranty
• This watch is covered by a 1 year warranty.
This warranty does not cover water damage, accidental
damage, neglect or unauthorized repair.
III. Caution
• This watch has limited resistance to water. Please do not
use the watch in the shower, for swimming or for other
water related activities.
• Please only use the cable provided with the watch for
recharging as it is designed especially for this watch.

SPECIFICATIONS
Case Materials
Strap Materials
Case Dimensions
Finish
Maximum Fit
Wrist Size
Weight
Display
Battery
ABS / Stainless Steel
PU
34.2 x 68 x 14.6 mm
Matte black / IP black
210mm (approx.)
60g
LED
PL402525 USB rechargeable

 Loading...