


Satellite Radio Plug & Play Receiver
User Guide

Congratulations on the Purchase of your new SIRIUS Sportster
4 Plug-n-Play Receiver
Your new SIRIUS Sportster ™ 4 Plug-n-Play Receiver lets you enjoy SIRIUS® Satellite Radio’s
digital entertainment any where you’ve installed the SU PH1 SIRIUS Universal Plug and Play
Home Kit, SUPV1 SIRIUS Un iversal Plug and Play Vehicle Kit, or the SUBX1 SIRIUS Plu g and
Play Universal Boombox (e ach sold separately). Use thi s manual to familiarize yours elf with all
of SIRIUS Sportster’s fea tures and capabilities. For t he latest information about t his and other
SIRIUS Sportster products and accessories, visit http: //www.sirius.com.

[ Tab le of Co nte nts ]
2
[ Tab le of Co nte nts ]
3
Table of Contents
TABLE OF CONTENTS . . . . . . . . . . . . . . . . . . . . . . . . . . . . . . 2
WARNING AND SAFETY INFORMATION . . . . . . . . . . . . . . . . . . . . . . 4
FCC Warning . . . . . . . . . . . . . . . . . . . . . . . . . . . . . . . . . . 4
FCC Compliance . . . . . . . . . . . . . . . . . . . . . . . . . . . . . . . . 4
Canadian Compliance . . . . . . . . . . . . . . . . . . . . . . . . . . . . . . 5
General Precautions . . . . . . . . . . . . . . . . . . . . . . . . . . . . . . . 5
COPYRIGHTS & TRADEMARKS . . . . . . . . . . . . . . . . . . . . . . . . . 7
PACKAGE CONTENTS . . . . . . . . . . . . . . . . . . . . . . . . . . . . . . 8
CONTROLS . . . . . . . . . . . . . . . . . . . . . . . . . . . . . . . . . . 9
SIRIUS Sportster Reference Guide . . . . . . . . . . . . . . . . . . . . . . . . . 9
Remote Control Reference Guide . . . . . . . . . . . . . . . . . . . . . . . . . 11
GETTING STARTED . . . . . . . . . . . . . . . . . . . . . . . . . . . . . . 13
Selecting an FM Frequency . . . . . . . . . . . . . . . . . . . . . . . . . . . 13
Subscribing to the SIRIUS Service . . . . . . . . . . . . . . . . . . . . . . . . 13
OPERATION . . . . . . . . . . . . . . . . . . . . . . . . . . . . . . . . . 15
Display Screen Information . . . . . . . . . . . . . . . . . . . . . . . . . . . 15
Navigating Menus and Lists . . . . . . . . . . . . . . . . . . . . . . . . . . . 16
Display (DISP) Button . . . . . . . . . . . . . . . . . . . . . . . . . . . . . 16
Search Modes (Category, Channel, Artist, Song Title) . . . . . . . . . . . . . . . . 17
Direct Tuning . . . . . . . . . . . . . . . . . . . . . . . . . . . . . . . . . 19
Jump Button . . . . . . . . . . . . . . . . . . . . . . . . . . . . . . . . . 20
Channel Presets (P.TUNE Mode) . . . . . . . . . . . . . . . . . . . . . . . . . 21
Memory (MEMO) and Song Seek (S-Seek) Functions . . . . . . . . . . . . . . . . . 23
Game Alert . . . . . . . . . . . . . . . . . . . . . . . . . . . . . . . . . . 30
Instant Replay . . . . . . . . . . . . . . . . . . . . . . . . . . . . . . . . 31
MENU OPTIONS . . . . . . . . . . . . . . . . . . . . . . . . . . . . . . . 36
Sirius ID . . . . . . . . . . . . . . . . . . . . . . . . . . . . . . . . . . . 37
Game Alert . . . . . . . . . . . . . . . . . . . . . . . . . . . . . . . . . . 38
Settings . . . . . . . . . . . . . . . . . . . . . . . . . . . . . . . . . . . 40
Jump Settings . . . . . . . . . . . . . . . . . . . . . . . . . . . . . . . 40
Display Options . . . . . . . . . . . . . . . . . . . . . . . . . . . . . . 41
Confirm Tone . . . . . . . . . . . . . . . . . . . . . . . . . . . . . . . 42
Memory Options . . . . . . . . . . . . . . . . . . . . . . . . . . . . . . 42
Audio Level . . . . . . . . . . . . . . . . . . . . . . . . . . . . . . . . 43
Parental Control . . . . . . . . . . . . . . . . . . . . . . . . . . . . . . 44
Time-Based Features . . . . . . . . . . . . . . . . . . . . . . . . . . . . . . 46
Clock . . . . . . . . . . . . . . . . . . . . . . . . . . . . . . . . . . . 46
Alarm . . . . . . . . . . . . . . . . . . . . . . . . . . . . . . . . . . . 46
Program Alert . . . . . . . . . . . . . . . . . . . . . . . . . . . . . . . 47
Auto Shutdown . . . . . . . . . . . . . . . . . . . . . . . . . . . . . . . 47
Signal Indicator . . . . . . . . . . . . . . . . . . . . . . . . . . . . . . . . 48
Factory Default . . . . . . . . . . . . . . . . . . . . . . . . . . . . . . . . 49
TROUBLESHOOTING . . . . . . . . . . . . . . . . . . . . . . . . . . . . . 51
OPTIONAL ACCESSORIES . . . . . . . . . . . . . . . . . . . . . . . . . . . 52
SPECIFICATIONS . . . . . . . . . . . . . . . . . . . . . . . . . . . . . . . 53
WARRANTY . . . . . . . . . . . . . . . . . . . . . . . . . . . . . . . . . 54
SIRIUS ID . . . . . . . . . . . . . . . . . . . . . . . . . . . . . . . . . . 55

[ War nin g and Sa fety Inf ormat ion ]
4
[ War nin g and Sa fety Inf ormat ion ]
5
Warning and Safety Information
Canadian Compliance
This Class B digital appa ratus complies with Canadian ICES-003.
Cet appareil numérique de la classe B est conforme à l a norme NMB-003 du Canada.
FCC Warning
This equipment may genera te or use radio frequency ene rgy. Changes or modifications to this
equipment may cause harmf ul interference unless the mo difications are expressly app roved in
this owners guide. The us er could lose the authority t o operate this equipment if a n unauthorized change or modificati on is made.
FCC Compliance
This equipment has been t ested and found to comply wit h Part 15 of the FCC Rules. T hese
rules are designed to pro vide reasonable protection ag ainst harmful interference. T his equipment may cause harmful in terference to radio communica tions if it is not installed and used in
accordance with these ins tructions. However, there is no guarantee that interferenc e will not
occur in a particular ins tallation. If this equipment does cause harmful interferen ce to radio
reception, which can be d etermined by turning the equi pment off and on, the user is encouraged to try to correct th e interference by one of more of the following measures:
Reorient or relocate the receiving antenna.
•
Increase the separation b etween the other equipment an d the receiver.
•
Connect the other equipme nt to a different circuit fro m that to which the receiver is con-
•
nected.
Consult the dealer or an experienced radio technician for help.
•
General Precautions
Liqu id Cr ysta l Precaut ions
If the LCD screen on the SIRIUS Sportster is damaged, do not to touch the liquid cr ystal fluid.
If any of the following s ituations happen, take the ac tion indicated:
If the liquid crystal flu id comes in contact with your skin, wipe the skin area wit h a cloth
1.
and then wash the skin th oroughly with soap and runnin g water.
If the liquid crystal flu id gets into your eye, flush the eye with clean water for at least 15
2.
minutes. Seek medical car e.
If the liquid crystal flu id is ingested, flush your mo uth thoroughly with water. Dr ink large
3.
quantities of water and i nduce vomiting. Seek medical care.
Safe ty Pr ecau tions
Be sure to observe the fo llowing warnings. Failure to follow these safety instructi ons and
warnings may result in a serious accident.
Do not operate the SIRIUS Sportster in a way that migh t divert your attention from driving
•
safely. As a driver, you alone are responsible for saf ely operating your vehicle in accordance with traffic safety laws at all times.
Do not install the unit w here it may obstruct your vie w through the windshield, or of your
•
vehicle’s indicator displ ays.
Do not install the unit w here it may hinder the functi on of safety devices such as an airbag.
•
Doing so may prevent the airbag from functioning prope rly in the event of an accide nt.
Be sure the unit is insta lled as described in the inst allation instructions which a ccompany
•
each accessory kit. SIRIU S Satellite Radio is not resp onsible for issues arising fr om installations which were not in stalled according to the inst ructions.

To avoid short circuits, do not open the unit, and nev er put or leave any metallic objects
•
(coins, tools, etc.) insi de the unit.
If the unit emits smoke o r unusual odors, turn the pow er off immediately, and disco nnect
•
the unit from any power s ource.
Do not drop the unit or s ubject it to strong shocks.
•
If the unit doesn’t seem to be working properly, turn the unit off, remove the batt ery from
•
the unit, wait 10 seconds , replace the battery and the n turn it on again.
The installation and use suggestions contained in this manual are subject to any re stric-
•
tions or limitations that may be imposed by applicable law. The purchaser should ch eck
applicable law for any re strictions or limitations bef ore installing and/or operati ng this unit.
Oper ating Tem perature
The SIRIUS Sportster is d esigned to operate between -2 0° to +85° C (-4° to +185° F) . Avoid
leaving the unit in a veh icle or elsewhere where the t emperature may fall outside t his range.
Extreme temperatures or e xtreme temperature fluctuatio ns can degrade the performanc e of
the LCD display screen, a nd possibly damage it.
Clea ning and Maintenan ce
If the SIRIUS Sportster b ecomes dirty, turn the power off and wipe it clean with a soft cloth.
Do not use hard cloths, s trong cleaning fluids, paint thinner, alcohol, or other vo latile solvents
to clean. These may cause damage to the unit.
Copyrights & Trademarks
© 2006 SIRIUS Satellite R adio Inc. All Rights Reserved .
® “SIRIUS”, the SIRIUS do g logo, channel names and log os are trademarks of SIRIUS
Satellite Radio Inc. “NFL ” and the NFL Shield logo, an d the NFL Sunday Drive name a nd logo
are registered trademarks of the National Football Lea gue. “NHL” and the NHL Shield are
registered trademarks of the National Hockey League. “ NBA” and the NBA silhouette l ogo are
registered trademarks of NBA Properties Inc. All other trademarks, service marks, s ports team
names, album art, and log os are the property of their respective owners. All Rights Reserved.
“Sportster” is a tradema rk of SIRIUS Satellite Radio.
™
Portions of the software on this receiver are licensed under the eCos License. Dist ribution of
eCos requires that the eC os source code be made availa ble to Sirius Satellite Radio customers. The eCos License and eCos source code are availab le to the public at http://ww w.sirius.
com/ecoslicense.
Sirius Satellite Radio re serves all rights to all rece iver software not covered und er the eCos
license. This includes al l portions of receiver softwa re that were not distributed to Sirius as
part of the eCos operatin g system.
Hardware, subscription an d activation fee required. Fo r full Terms & Conditions, vi sit
http://sirius.com. Prices and programming are subject to change. Not available in H I and AK.
Equipment and subscriptio n sold separately. Installati on required with some equipme nt.
[ War nin g and Sa fety Inf ormat ion ]
6
[ Cop yri ghts & T radem ark s ]
7
Package Contents
4
6
8 9
10
3
11 12 11
1 2
7
5
Figur e 1Figur e 1
The following items are i ncluded with your purchase of the SIRIUS Sportster SP4 rec eiver:
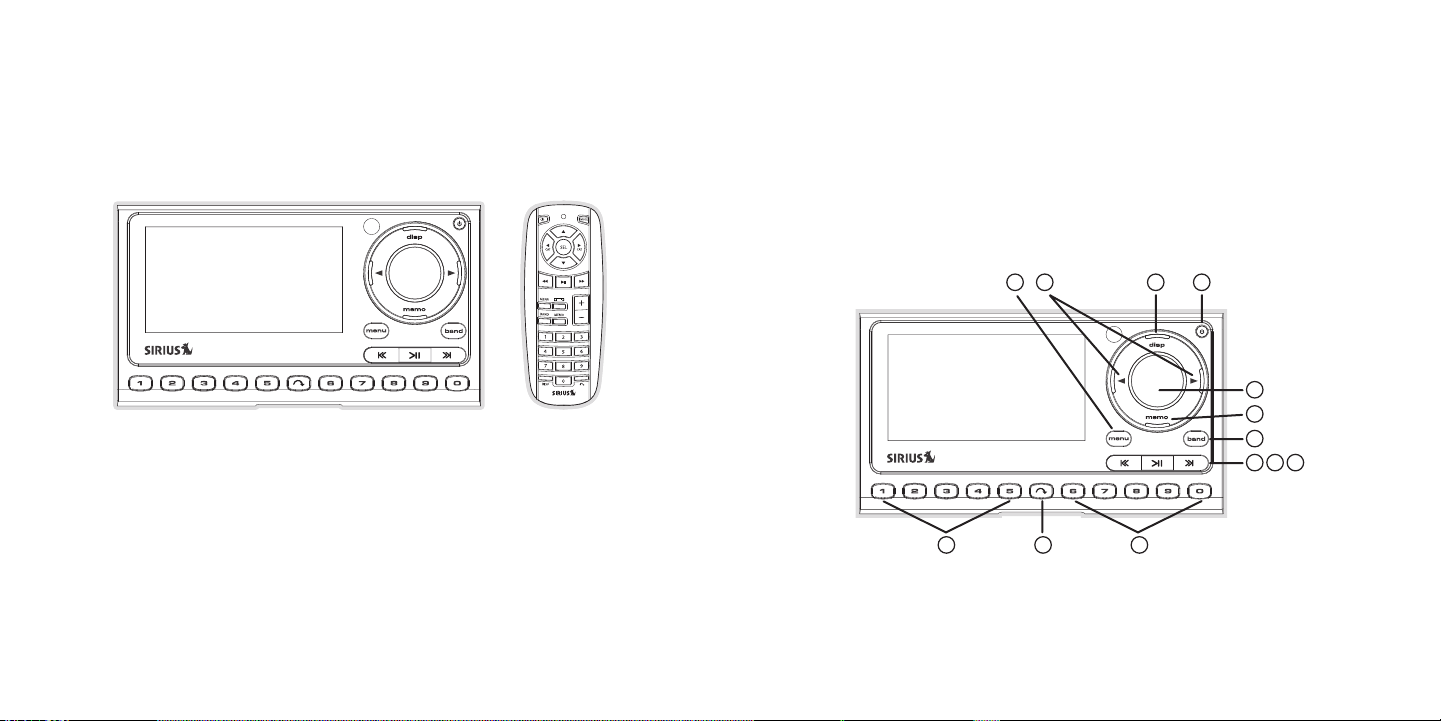
Controls
SIRIUS Sportster Reference Guide
Figure 1 and the section following identify and descri be the buttons and controls o f the
SIRIUS Sportster.
Sport ster S P4 Rece iverSport ster S P4 Rece iver
Unpack your SIRIUS Sports ter receiver carefully and ma ke sure that everything shown is present. If anything is missi ng or damaged, or if your SIR IUS Sportster receiver fails to operate,
notify your dealer immedi ately. It is recommended that you retain the original cart on and packing materials in case you need to ship your receiver i n the future.
[ Pac kag e Con ten ts ]
8
Remot e
Remot e
Contr ol
Contr ol
Menu Button: Used to acce ss the Menu Options to make s etup and feature changes.
1.
Pressing and holding the MENU button accesses the FM Transmitter setup menu to
change the frequency of t he FM transmitter.
[ Con tro ls ]
9

[ Con tro ls ]
10
[ Con tro ls ]
11
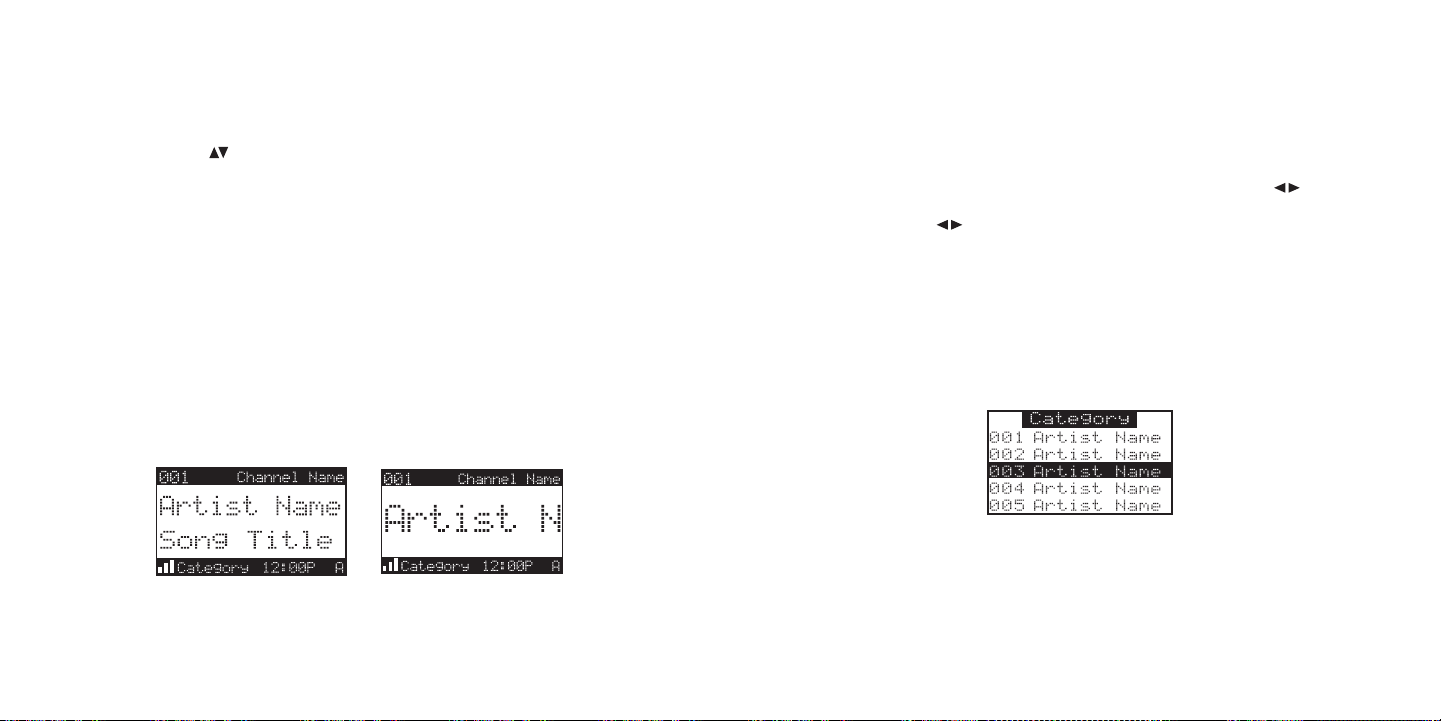
Cate gory Buttons: Navigat es through the category list screens which displays the
91
8
3
5
4
6
7
2
11 12 13
14
15
16
10
Figur e 2Figur e 2
2.
SIRIUS channel categories .
Disp lay (DISP) Button: Ch anges text size of artist nam es and song titles on the dis play
3.
screen. In list mode, it toggles between channel name, artist name and song title. Pressing and holding this butt on enters the channel list mo de, or will exit a list mode.
Powe r Button: Turns the r eceiver On and Off.
4.
Rota ry Knob & Select Butt on: Navigates through display screens and makes selections
5.
of items highlighted on t he display screen. Rotating c lockwise increases the channe l
number (down the list), a nd moves down when in a menu list. Rotating counterclockwi se
decreases the channel num ber (up the list), and moves up in when in a menu list. Pr essing the Rotary Knob selec ts a highlighted item.
Memo ry (MEMO) Button (S-S eek Function): Pressing and r eleasing this button saves
6.
artist names and song tit les. You can store up to 30 a rtist/song title combinations ,
including favorite teams and traffic channels. Pressin g and holding the MEMO button will
enter the recall mode, di splaying the stored artist/so ng titles.
Band Button (P.Tune): Pre ssing and releasing this butt on switches between the prese t
7.
banks A, B, and C, which hold 10 presets each for a to tal of 30. Pressing and holdi ng
this button enables the P reset Tune Mode, which allows for viewing and browsing of
stored presets with turn of the Rotary Knob.
Rewi nd Button: Used to re wind through content saved to Instant Replay. Pressing and
8.
releasing this button rew inds to the beginning of the song or program. Pressing and
holding rewinds by time t hrough the saved content.
Play /Pause Button: Pauses and replays live or time-shi fted content from the current ly
9.
tuned channel. Pressing a nd holding this button displa ys a list of songs in the sav ed
content.
Fast Forward Button: Used to fast forward through Inst ant Replay saved content.
10.
Pressing and releasing th is button fast-forwards to th e beginning of the next song or
program. Pressing and hol ding fast-forwards by time th rough the saved content.
Pres et Number Buttons (0– 9): Sets and selects preset c hannels.
11.
Jump Button: Jumps to a p reset favorite channel. Press ing the button again returns
12.
back to the original chan nel.
Remote Control Reference Guide
Figure 2 and the section following identify the button s of the remote control.
Powe r Button: Turns the r eceiver On and Off.
1.
Chan nel Buttons: Navigate s through channels and displa y screens.
2.
Cate gory Buttons: Navigat es through categories and dis play screens.
3.
FM F requency Button: Acce sses the FM Transmitter menu to change the frequency of
4.
the FM transmitter.

MENU Button: Used to acce ss the Menu Options to make s etup and feature changes.
5.
Pressing and holding the MENU button accesses the FM Transmitter setup menu to
change the frequency of t he FM transmitter.
BAND Button: Pressing and releasing this button switch es between the preset banks A ,
6.
B, and C, which hold 10 p resets each for a total of 30 . Pressing and holding this b utton
enables the Preset Tune M ode, which allows for viewing and browsing of stored prese ts.
Memo ry (MEMO) Button (S-S eek Function): Pressing and r eleasing this button saves
7.
artist names and song tit les. You can store up to 30 a rtist/song title combinations .
Pressing and holding will enter the recall mode, displ aying the stored artist/song titles.
Disp lay (DISP) Button: Ch anges text size of artist nam es and song titles on the dis play
8.
screen. In list mode, it toggles between channel name, artist name and song title. Pressing and holding the this button enters the channel lis t mode, or will exit a list m ode.
Mute Button: Mutes the au dio of the receiver.
9.
SELE CT Button: Selects it ems highlighted in a list; ho ld-down to jump to the previo usly-
10.
received channel. When no t in a menu or list, pressing the SELECT button selects th e
channel entered using the number buttons.
Rewi nd Button: Used to re wind through content saved to Instant Replay. Pressing and
11.
releasing this button rew inds to the beginning of the song or program. Pressing and
holding rewinds by time t hrough the saved content.
Play /Pause Button: Pauses and replays live or time-shi fted content from the current ly
12.
tuned channel. Pressing a nd holding this button displa ys a list of songs in the sav ed
content.
Fast Forward Button: Used to fast forward through Inst ant Replay saved content.
13.
Pressing and releasing th is button fast-forwards to th e beginning of the next song or
program. Pressing and hol ding fast-forwards by time th rough the saved content.
VOL+ / VOL– Buttons: Incre ases or decreases the audio v olume.
14.
Numb er Buttons (0–9): Sel ects channels directly and se lects presets.
15.
Jump Button: Jumps to a p reset favorite channel. Press ing the button again returns
16.
back to the original chan nel.
Remo te Co ntro l Battery Installa tion
To install the remote con trol battery, turn the remote control over and locate the battery cover
near the bottom edge. Ope n the battery compartment and place the battery in the com partment with the + side of t he battery facing up. Replace the battery cover on the rem ote control.
[ Con tro ls ]
12
Getting Started
SIRIUS suggests professio nal installation of this prod uct in your vehicle. Professi onal installation provides an experi enced technician to install t his product in your vehicle, advice for
selecting a suitable moun ting location, installation o f the antenna, and routing al l the necessary wires and cables. If the FM reception within your vehicle proves to be poor, a n installer
will have the necessary a ccessories to install an opti onal FM relay switch, or an a udio cable
to connect the audio outp ut of the SIRIUS Sportster di rectly to your vehicle’s audi o system.
Ask your SIRIUS retailer if they provide professional installation services, or can recommend a
professional installation service.
Selecting an FM Frequency
To listen to the audio fr om the SIRIUS Sportster, you will need to tune the FM radi o in your
vehicle or home and the F M transmitter in the SIRIUS S portster to the same FM frequ ency.
The FM transmitter in the SIRIUS Sportster defaults to 88.1 MHz, so you can begin b y tuning
your vehicle or home FM r adio to 88.1 MHz. If there is an FM station broadcasting o n that
frequency, you will have to search for a different FM frequency to use, and then ch ange the
FM frequency that the SIR IUS Sportster will use to tra nsmit.
The FM transmitter freque ncy of the SIRIUS Sportster m ay be changed using the Menu
Options, or by pressing a nd holding the MENU button to access the FM Transmitter me nu
option. Details for chang ing the FM frequency are foun d in the FM Transmitter secti on.
Subscribing to the SIRIUS Service
Before you can listen to the SIRIUS service, you need to subscribe to the SIRIUS Sa tellite
Radio service. To subscri be, do the following:
Be sure that the SIRIUS S portster is correctly install ed, is in the vehicle or home dock,
1.
and that the antenna is o riented to receive the SIRIUS signal.
[ Get tin g Sta rte d ]
13

Turn on the SIRIUS Sports ter. After the startup sequen ce, it will update the SIRIUS
3-Digit Channel Number Channel Name
Band/Preset Bank Number
8-Character
Category Name
Clock
A
uto Sizing/Scrolling Artist Name
Auto Sizing/Scrolling Song Title
SIRIUS Signal Strength Meter
Figur e 1Figur e 1
2.
channel line-up. Wait unt il the channel updates have c ompleted before pressing any
buttons.
Once the channels have be en updated, the display will change to
3.
Call 1-888-539-SIRIUS to Subscribe and will tune to ch annel 184. You will not be ab le
to listen to other channe ls until you activate your SI RIUS subscription.
Use the Rotary Dial to tu ne to channel 0 to display th e SIRIUS Sportster’s unique 1 2-
4.
digit SIRIUS ID Number (S ID). (Figure 1) You can also tune to channel 0 by using th e
remote control: Press the Sel ect button, then the 0 (z ero) button, and then the Sel ect
button again. The SID num ber is also available on the SIRIUS Sportster’s packaging,
and may also be accessed by pressing the MENU button a nd selecting Sirius ID. Write
the SID number down in th e space provided near the end of this guide.
Have your credit card han dy and contact SIRIUS on the Internet at:
5.
https://acti vate .siriusradio.com/
and follow the prompts to activate your subscription. You can also call SIRIUS toll -free
at: 1-888-539-SIRIUS (1-8 88-539-7474).
When you have successfull y subscribed to the SIRIUS se rvice, and the SIRIUS Sport-
6.
ster has been updated wit h your subscription informati on, an alert will be displaye d. To
continue, press the Rotar y Di al.
You are now ready to begi n enjoying SIRIUS Satellite R adio’s digital entertainment, and can
tune to other channels!
[ Get tin g Sta rte d ]
14
Operation
Display Screen Information
The display screen of the SIRIUS Sportster provides in formation about the operation of the
receiver, such as the cur rently tuned channel, song or show being played, artist na me, time
and other information. Th is screen is referred to as t he Default display screen in this manual.
Figure 1 identifies the i nformation displayed when lis tening to a typical broadcast .
[ Ope rat ion ]
15
[ Ope rat ion ]
16
[ Ope rat ion ]
17
Navigating Menus and Lists
Figur e 2Figur e 2
Figur e 3Figur e 3
Search Modes (Category, Channel, Artist, Song Title)
The menu and list structu res in the SIRIUS Sportster a re navigated by turning the R otar y
Knob to scroll through a menu or list to highlight you r choice, and then pressing t he R otary
Knob to select the choice . When using the remote contr ol, menus and lists are navig ated by
pressing the Channel buttons, and then pressi ng the Select button to selec t the choice.
Display (DISP) Button
Pressing and releasing th e DI SP button from the Default display screen toggles betw een the
artist name/song title an d large character displayed t ext. (Figure 2) The large cha racter format
will change the character size and cause the field to scroll from right to left. Th is feature is
useful when viewing the d isplay screen from a distance . Note that the displayed tex t will scroll
only if the length of the artist or title cannot be vi ewed in its entirety.
Pressing and holding the DISP button will enter the ch annel list mode and display t he channel
names, and allow you to s croll through the channels an d select another channel if d esired.
(Figure 4) If the DISP bu tton is pressed again while i n the channel list mode, the display will
list the song titles/show names for each channel. Pres sing the DISP button yet agai n will
display the artist names for each channel. To exit the channel list mode, press and hold the
DISP button.
The SIRIUS Sportster rece iver has four ways to search for and select music: by cate gory, by
channel, by artist, and b y song title. Each search met hod is discussed in the secti ons which
follow.
Sear ching Cat egories
If you want to browse dif ferent entertainment categori es, push either Category button to
activate the category sea rch screen. (Figure 3)
Use the Category but tons to scroll through the mu sic and entertainment categor ies.
1.
When the category you wan t is displayed (for example, Rock), use the Rotary Knob to
2.
browse the available chan nels within the category. Pre ssing the DISP button while i n the
category search mode will change between Channel Name, Artist Name, and Song Title
to enable you to preview what is playing on other chan nels before making a selectio n.
When the channel you want is highlighted, press the Ro tary Knob. The channel will b e
3.
selected and the display will revert to the Default sc reen for the selected channel .
To exit the category mode without changing to a new ch annel, press and hold the DIS P
4.
button for one second.
Sear ching Cha nnels (Ch annel Lis t Mode)
It is possible to search for a different channel while listening to your current ch annel. Be sure
that the display shows th e Default display screen prio r to the following steps:
Press and hold the DISP b utton for two seconds to acti vate the channel list mode. T he
1.
channel list screen be di splayed, showing all availabl e channels regardless of cate gory.

[ Ope rat ion ]
18
[ Ope rat ion ]
19
Enter Channel #
Figur e 5Figur e 5
Figur e 4Figur e 4
Pressing the DISP button while in the channel list mod e will change between channel
name, artist name, and so ng title. (Figure 4) You can use this feature to search fo r a
specific artist, song, or show that may be playing at the time.
Turn the Rotary Knob to l ocate the channel you want.
2.
Press and release the Rot ary Knob to select the channe l. To exit the channel list m ode
3.
without changing to a new channel, press and hold the DISP button for one second.
Press and hold the DISP b utton
to enter the channel list mode
Press the DISP button aga in to
display the artist’s name s
Press the DISP button aga in to
display the song titles
Press the DISP button aga in to
return to the channel lis t
Note : If you are in the c hannel list mode and viewing a sports category channel lis t (NFL®
Zone, NHL® Zone, NBA® Zone), pressing the DISP button will toggle between t he team
names and the current sco re of any live play-by-play g ame.
Direct Tuning
Channels can be directly accessed by pressing and rele asing the Rotary Knob and the n
using the 0–9 keys to ent er the desired channel number . (Figure 5) Once the desired number
has been entered, the cha nnel will change and the disp lay will revert to the defaul t screen
for the selected channel. The receiver will tune the channel immediately if three numbers are
entered (for example, “0” , ”0 ”, “7”), but if just one or two digits are entered, th e receiver will
tune to the new channel a fter three seconds.
Channel Presets
Channel presets allow you to store up to 30 of your fa vorite channels as presets fo r quick
access with the press of a button.
Sett ing C hann el Preset s
Presets are stored in thr ee banks, A, B, and C, each c ontaining 10 channel presets.
Press the BAND button to activate the preset bank you want. The selected bank is
1.
shown in the lower right corner of the Default display screen.
Select the channel you wa nt to preset.
2.
Press and hold for two se conds the numbered preset but ton (0–9) in which you want t o
3.
store the channel.
The selected preset numbe r will flash and then remain lit on the display to show th at it
4.
has been memorized.

[ Ope rat ion ]
20
[ Ope rat ion ]
21
If the preset button you selected already has a channe l stored in it, the preset wi ll be replaced
NYC Traffic
Figur e 6Figur e 6
Figur e 7Figur e 7
with the newly stored cha nnel.
Reca lling Cha nnel Pres ets
The 10 presets in the act ive bank (A, B, or C) can be selected by pressing the 0 th rough 9
buttons.
Press the BAND button to activate the preset bank you want. The selected bank is
1.
shown in the lower right corner of the default display screen.
Press the desired preset button 0–9 to recall the pres et. The channel will change a nd
2.
the display will revert t o the default display screen for the new channel, with the preset
shown in the lower right corner.
wait a few minutes for yo ur desired report.
Pressing the Jump button while the re ceiver is searching will canc el the search. Pressing
the Jump button after the receiver ha s tuned to your traffic repor t will return to the channel
to which you had been lis tening immediately prior to p ressing the Jump button.
If the jump button is set to JumpSet, pressing the Jum p button wil l immediately tune to the
programmed channel. Pres sing the Jump button again will return to the channel to which
you had been listening im mediately prior to pressing t he J ump button.
Note : The jump button set ting remains the same regardl ess of which preset bank is c urrently
selected.
Jump Button
The SIRIUS Sportster rece iver features a special butto n called Jump . This button can be
programmed to jump to a c hannel which is accessed freq uently and temporarily such a s traffic, weather, news, or sp orts. This button allows you to quickly tune to a specific channel and
then tune back to the ori ginal channel by pressing the button again. (Figure 6)
Refer to the Jump Setting s section in the Menu Options section for information on c onfiguring the Jump button.
If the jump button is set to Traffic, pressing the Jum p button wil l take you to your stored
traffic channel. If your traffic report is not immedia tely available, the band indi cator on the
display will change to th e jump icon to indicate a jum p is active. Once your local traffic report
is ready, the receiver wi ll automatically tune to your stored traffic channel. You may have to
Channel Presets (P.TUNE Mode)
Sear ching for a Channe l Preset
It is possible to quickly search through all of your p resets using the Rotary Knob:
Press and hold the BAND b utton to enter the preset tun e mode (P.TUNE).
1.
The bottom right portion of the display will change to highlight the current preset num-
2.
ber. (Figure 7)
Turn the Rotary Knob in e ither direction to move throu gh the presets. The selected
3.
preset channel will begin to play as soon as you stop turning the Rotary Knob.
Only stored presets will be displayed, regardless of w hat bank they are stored in. Presets will
be grouped and displayed by preset bank and number (fo r example, A-1, A-2...B-1, B -2...C1,C-2...) and rotate thro ugh all the presets and retur n back to the beginning prese t.
To exit the preset tune m ode and return to Default dis play screen, press and hold t he B AND
button.

[ Ope rat ion ]
22
[ Ope rat ion ]
23
A-1 Channel Name
A-2 Channel Name
A-3 Channel Name
A-4 Channel Name
A-5 Channel Name
A-6 Channel Name
A-1 Artist Name
A-2 Artist Name
A-3 Artist Name
A-4 Artist Name
A-5 Artist Name
A-6 Artist Name
A-1 Song Title
A-2 Song Title
A-3 Song Title
A-4 Song Title
A-5 Song Title
A-6 Song Title
Figur e 8Figur e 8
Store Artist?
Store Song?
Figur e 9Figur e 9
Pres et Tu ne L ist Mode
While in the preset tune mode, you can view your list of presets showing channel na me, artist
name, or song title, just like in the channel list mod e:
Press and hold the BAND b utton to enter the preset tun e mode (P.TUNE).
1.
Press the DISP button for two seconds which will bring up the preset tune mode dis-
2.
playing up to 6 preset ch annel names.
Pressing the DISP button again while in this mode will change between channel name,
3.
artist name, and song tit le list modes. (Figure 8) The name field will scroll only if the
length of the artist name or song title cannot be view ed in its entirety.
Use the Rotary Knob to se lect the desired preset.
4.
Press and release the Rot ary Knob to select the preset . The channel will change and
5.
the display will revert t o the P.TUNE display screen.
Press and hold the DISP b utton to
enter the preset tune mod e
Press the DISP button aga in to
display the artist’s name s
Press the DISP button aga in to
display the song titles
Press the DISP button aga in to
display the channel names
Memory (MEMO) and Song Seek (S-Seek) Functions
This feature allows you t o capture and store informati on about the programming (art ist, song,
sports team, or traffic c ity) on the currently tuned c hannel, up to a total of 30 i tems. The
receiver then continuousl y searches all the SIRIUS cha nnels and alerts you when a m atch to
a saved program is being played. When a sports team (o r teams) are stored in memory , at the
time the receiver is init ially powered on, you will be alerted when the sports team s are playing
in a game being broadcast . Also, while listening to yo ur SIRIUS receiver, should on e of the
teams begin to play a gam e, you will be alerted.
Stor ing A rtis t Names, Song Titl es, and S ports Tea ms to Mem ory
If you are listening to a song or other entertainment channel, or a sports team, an d wish to
save the artist, song, or sports team selection to mem ory for future S-Seek alerts, do the following:
For Artist Names or Song Titl es: If the currently tune d channel is a music or enter tainment channel, momentarily press and release the MEMO b utton. The receiver will disp lay a
menu to choose to store t he artist name or the song ti tle. (Figure 9)
If either the artist name or song title is not availab le to save, the choice will b e displayed
as unavailable. (Figure 1 0)
[ Ope rat ion ]
24
[ Ope rat ion ]
25
Store Artist?
Song Unavailable
Artist Unavailable
Store Song?
Turn the Rotary Knob to h ighlight Store Artist or Store Song (when available) and p ress
Artist Stored
Store Song?
Store Artist?
Song Stored
Store NYG?
Store DAL?
Figur e 10Figur e 10
Figur e 11Figur e 11
Figur e 12Figur e 12
Store NYG?
Team2 Unavailable
Initial Game Alert
All Score Updates
Alert Type
Figur e 13Figur e 13
Figur e 14Figur e 14
the Rotary Knob to save t he current selection to memor y.
If both the artist and so ng are available to save, you will be prompted again to sa ve which-
ever one you haven’t yet saved, song title or artist n ame. If you do not wish to sa ve, press
the MEMO button to exit. (Figure 11)
For Sports Games: If the current tuned channel is an N FL, NBA, NHL, or College play -byplay sports broadcast, mo mentarily press and release t he M EMO button. The receiver will
display a menu to choose which sports team should be s aved to memory. (Figure 12)
If either of the teams is not available to save, that team will be displayed as una vailable.
(Figure 13)
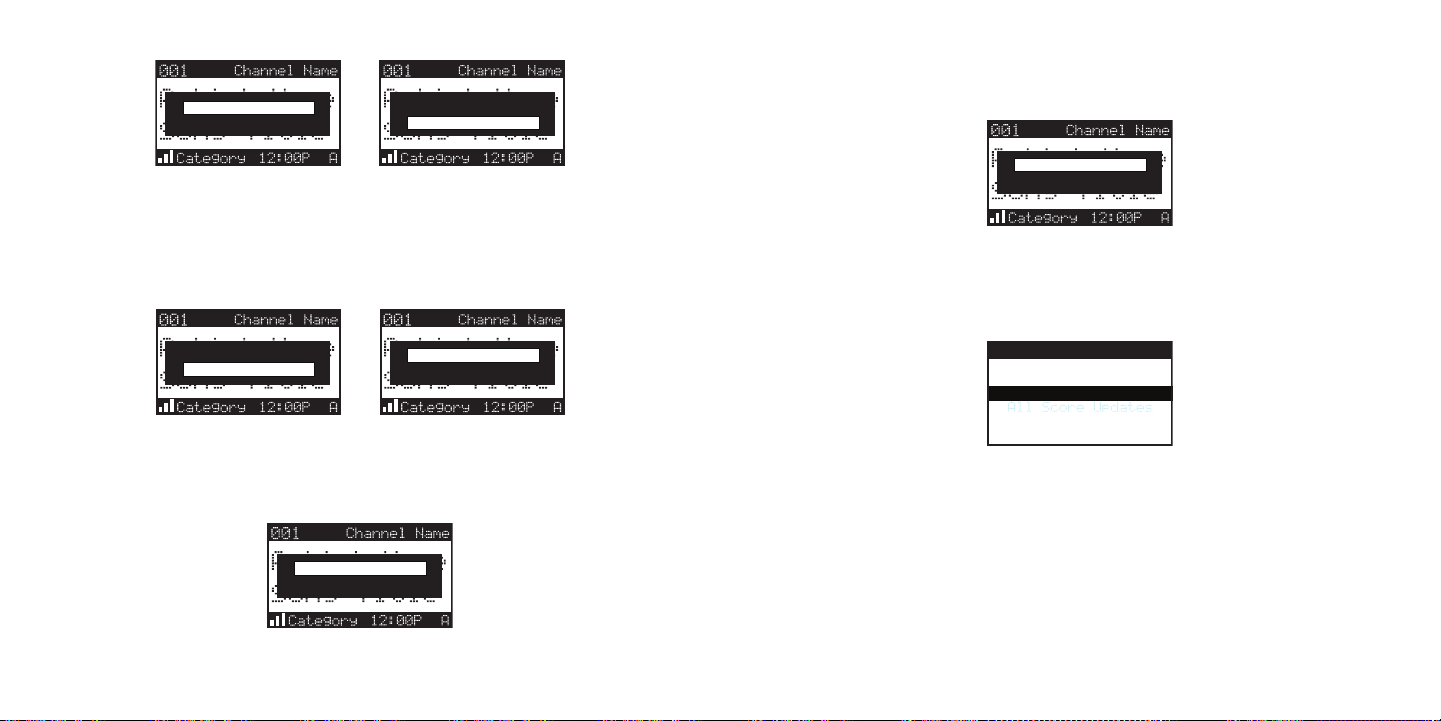
Turn the Rotary Knob to h ighlight the desired sports t eam (when available) and pres s the
Rota ry Knob to save the c urrent selection to memory. T he next screen will ask which kind
of alert you wish to have . (Figure 14)
Initial Game Alert will p rovide an alert when the team you have chosen is playing a game.
All Score Updates will pr ovide an alert when the team you have chosen is playing a game,
and also when the scores are updated for the team.
Turn the Rotary Knob to h ighlight the desired alert an d press the Rotary Knob to sa ve the
selection to memory. (Fig ure 15)
If both teams are availab le to save, you will be promp ted again to save the other team.
(Figure 15) If you wish t o save the team, follow the s ame procedure as when saving the
first team. If you do not wish to save, press the MEMO button to exit.

[ Ope rat ion ]
26
[ Ope rat ion ]
27
Store DAL?
NYG Stored
Store NYG?
DAL Stored
The receiver will then re vert to the last active displ ay mode.
Artist Stored X Used/Y Empty
Memory Full
Figur e 15Figur e 15
Figur e 16Figur e 16
Figur e 17Figur e 17
Replace
Cancel
Artist Name/Song Title
Artist Name
Sports Team
Artist Name/Song Title
Sports Team
Replace X/Y
Figur e 18Figur e 18
Figur e 19Figur e 19
If the new alert was succ essfully stored in memory, an Artist/Song/Game Stored pop- up
screen followed by an X Used/Y Empty screen will be di splayed for one and two secon ds
respectively. X is the to tal number of listings stored in memory, and Y is the tota l number of
memory listings still ava ilable for storage. (Figure 1 6)
A Replace–Cancel screen w ill then be displayed which w ill allow you to choose wheth er to replace an existing alert s tored in memory, or to cancel storing the alert to memory. (Figure 18)
Turn the Rotary Knob to s elect whether to replace an e xisting alert or cancel savin g the alert
to memory. If you choose to cancel saving the alert, t he receiver will revert to th e last active
display mode. If you have chosen to replace an existin g alert, a listing of all the alerts stored in
memory will be displayed. (Figure 19)
If the MEMO button is pre ssed, and all of the memory s paces are full, an Memory Full screen
will be displayed for one second. (Figure 17)
Turn the Rotary Knob to h ighlight the alert that you w ould like to replace and pres s the
Rota ry Knob to store the new alert. If the new alert w as successfully stored in mem ory, a
Artist/Song/Game Stored p op-up screen followed by an X Used/Y Empty screen will be
displayed for one and two seconds respectively. (Figur e 17) X is the total number o f listings
stored in memory, and Y i s the total number of memory listings still available for storage. The
receiver will revert to t he last active display mode.
View ing P rogr am Inform ation sto red in Me mory
To view the program infor mation stored in memory:
Press and hold the MEMO b utton for three seconds to en ter the S-Seek mode. The
1.
program information store d in memory will be displayed in one-at-a-time page format .

[ Ope rat ion ]
28
[ Ope rat ion ]
29
Memory 1/30 Memory 1/30
Artist Name
Song Title
League/College
Team
Seek On
Seek Off
Delete
Memory Recall
Yes
No
Delete
Figur e 20Figur e 20
Figur e 21Figur e 21
Figur e 22Figur e 22
Seek On
Seek Off
Delete
Memory Recall
Figur e 23Figur e 23
Use the Rotary Knob to sc roll through the listings. Th is function allows you to rev iew
2.
previously stored program information. The information will be displayed as sports
league or college/team na me or artist name/song title. (Figure 20)
Dele ting a So ng Title Stored in Memory
To delete a song title st ored in memory:
Press and release the Rot ary Knob while in S-Seek mode . A pop-up screen displaying
1.
three selectable options, Seek On, Seek Off and Delete will be displayed. (Figure 2 1)
Turn the Rotary Knob to h ighlight the Delete option.
2.
Press the Rotary Knob and a Delete confirmation screen will appear. (Figure 22)
3.
To permanently delete the program from your list, high light Yes using the Rotary Kn ob
4.
and press the Rotary Knob to confirm.
A Deleted popup screen fo llowed by an X Used/Y Empty s creen will be displayed for
5.
one and two seconds respe ctively. X is the total numbe r of listings stored in memor y,
and Y is the total number of memory listings still ava ilable for storage. The recei ver will
revert to the last active display mode.
Acti vatin g th e Song (S -Seek) Al ert
When S-Seek alerts are en abled, whenever the SIRIUS Sp ortster receiver is turned on , it automatically searches the channels to determine if a ma tch exists with the program i nformation
stored in receiver’s memo ry. If one or more matches ar e found, a pop-up screen mome ntarily
appears for two seconds w hich displays S-Seek Alert an d an audible beep tone will b e heard
indicating that a match w as found. The display then ch anges to the S-Seek Alert scr een
which displays the curren t matches. You can select the artist/song, title, or sport s game that
you wish to listen to. (N o stored match alert is provi ded for the currently tuned c hannel.) To
ensure that no duplicate entries are stored in memory, the receiver will check the stored data
to ensure the information about to be stored is not al ready in memory.
To turn on S-Seek alerts:
Press and hold the MEMO b utton for three seconds to en ter the S-Seek mode.
1.
Press and release the Rot ary Knob. A pop-up screen dis playing three selectable op-
2.
tions, Seek On, Seek Off and Delete , are displayed. ( Figure 23)
Use the Rotary Knob to hi ghlight the Seek On option.
3.
Press and release the Rot ary Knob to turn on S-Seek.
4.
When the S-Seek option is on, when ever the receiver i s turned on, it automatically searches
the incoming channels to determine if a match exists w ith the program information s tored in
the S-Seek memory. If one or more S-Seek matches are f ound, a list appears. (Figure 24) You

[ Ope rat ion ]
30
[ Ope rat ion ]
31
SIRIUS SEEK LIST
Artist Alert
MY GAME ZONE
Figur e 24Figur e 24
Figur e 25 Figur e 25
Playlist
<<LIVE>>
Artist
Artist
Artist
Artist
Playlist
<<LIVE>>
Title
TitleArtist
Title
Title
Figur e 26Figur e 26
can scroll through the li st and select a program using the Rotary Knob. Your select ion will be
tuned and the display wil l revert to the last active d isplay screen.
If a selection is not mad e within 10 seconds, the scre en will revert to the last ac tive display
screen and tuning mode.
Game Alert
The SIRIUS Sportster rece iver can automatically identi fy when your favorite team is playing.
When a game is found, Game Alert is displayed and the My Game Zone screen is displa yed
listing the sports games which are currently being pla yed. (Figure 25) Use the Rota ry K nob to
select and tune to the de sired game.
Refer to the Game Alert s ection in the Menu Options se ction for information on sett ing your
favorite sports team. You can also use the S-Seek feat ure to add game alerts for ad ditional
teams. Refer to the Stor ing Artis t Na mes, Song Titl es, and S port s Tea ms t o Mem ory section
within the Memory (MEMO) and Song See k (S-Seek) Functi ons section for more information.
Instant Replay
The SIRIUS Sportster rece iver is capable of storing th e audio of the channel to whi ch you
are listening for later p layback, approximately up to 44 minutes depending upon the channel
to which you are tuned. A s soon as you tune to a chann el, the receiver automaticall y begins
storing the audio, enabli ng you to rewind at any time to replay the audio again. If you are
unable to continue listen ing to a channel, but do not want to miss the broadcast, p ressing
the Play/Pause button will cause the re ceiver to mute the audio and mark the point in the
broadcast so you can resu me listening at a later time.
Paus e/Play but ton. When pressed, this p laces the receiver in the Ins tant Replay
•
pause mode which mutes th e audio.
Pressing and releasing th e Pl ay/Pause button again causes the receiv er to begin play-
ing the stored audio from the point at which the recei ver was paused. During playba ck, the
receiver will continue to store the live channel audio .
Pressing and holding the Play /Pause but ton changes the display to a listing of the
artist’s names in the sto red audio, from the most rece nt to the oldest, beginning w ith an
entry called “Live”. Pres sing the DISP button will tog gle the display between the a rtist
name list and the song/pr ogram title list. (Figure 26) Use the Rotary Knob to highl ight a
song to play and press th e Ro tary Knob to select. Live may be chosen which will ex it the
Instant Replay mode, and the receiver will resume play ing the live broadcast.
Fast Forward button. This fast f orwards you through the store d audio.
•
Pressing and releasing th e Fa st-Forward button forwards to the start of the next song
or program in the stored audio and playback automatica lly begins. Repeatedly pressi ng
and releasing the Fast-Fo rwar d b utton causes the receiver to continue to move forward
in the stored audio to th e start of each next song or program until the end of the stored
[ Ope rat ion ]
32
[ Ope rat ion ]
33
audio is reached. When th e end of the stored audio is reached, a beep will be heard (if
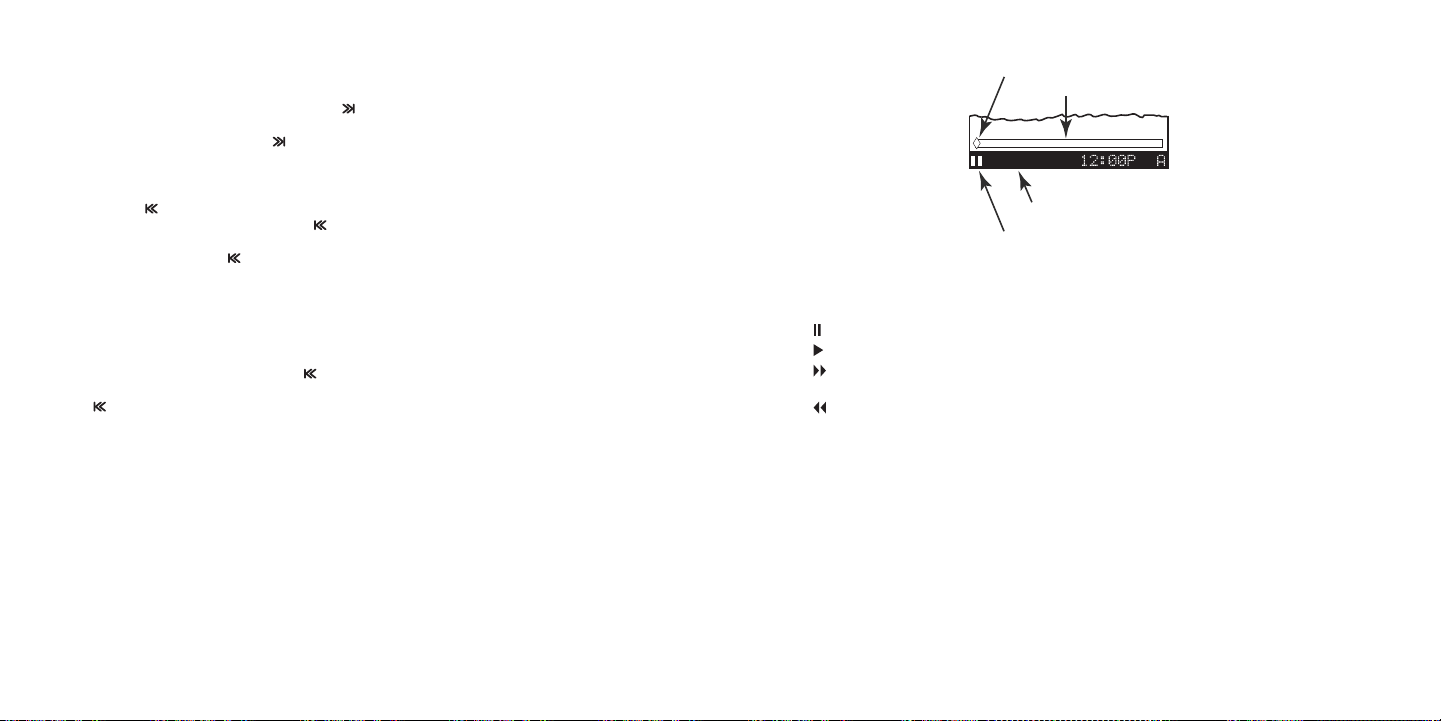
-0:00:01
Progress Bar
Play Position Indicator
Instant Replay Mode
Instant Replay Time Position
Figur e 27Figur e 27
the Confirmation Tone opt ion is enabled), the Instant Replay mode will be exited, a nd the
receiver will resume play ing the live broadcast.
Pressing and holding the Fast -Forward button for one second a dvances the playback
forward in 10 second int ervals, which increases to 15 and then 30 second intervals
the longer the Fast-Forwa rd button remains pressed. Playback begins immediately
when the button is releas ed. When the end of the store d audio is reached, a beep wi ll be
heard, the Instant Replay mode will be exited, and the receiver will resume playing the live
broadcast.
Rewi nd button. This rewinds (mov es you backwards) through the stored audio.
•
Pressing and releasing th e Re wind button rewinds to the start of the current song or
program in the stored aud io, and playback automaticall y begins. Repeatedly pressing and
releasing the Rewind button caus es the receiver to continue t o move backwards in
the stored audio to the s tart of each previous song or program until the beginning of the
stored audio is reached. If the beginning of the store d audio is reached, a beep wi ll be
heard (if the Confirmati on Tone option is enabled) an d playback will automatically begin.
Note : Depending upon wher e in a particular broadcast t he channel was selected, the start
of a song or program may not be available in memory. I f this occurs, the playback w ill start
from where the audio bega n to be stored.
Pressing and holding the Rewi nd button for one second rewinds playback in 10 sec-
ond intervals, which incr ease to 15 and then 30 second intervals the longer the Rew ind
button remains pressed. Playback begins immediately w hen the button is released. I f
the beginning of the stor ed audio is reached while rew inding, a beep will be heard and
playback will automatical ly begin.
Note : When the receiver i s tuned to another channel, a ll audio stored in the Instan t Replay
memory is erased and the tuned channel begins to play. Tuning to another channel ma y automatically occur if anothe r feature of the receiver has been programmed to do so.
Prog ress Bar. While playi ng from Instant Replay memory , status information is shown at
•
the bottom of the receive r’s display screen. (Figure 2 7)
The Instant Replay mode i con that is displayed at the bottom left of the screen ind icates the
current mode.
Pau se mode. This indicat es that the receiver is pause d and muted.
Pla y mode. This indicate s that you are in the playbac k mode, listening to stored a udio.
Fas t Forward mode. This indicates that you are fast f orwarding through the stored
audio.
Rew ind mode. This indica tes that you are rewinding, o r moving backwards, through t he
stored audio.
The Progress Bar is a vis ual indicator of the status o f the Instant Replay memory. (Figure 28)
As the memory fills, the Progress Bar begins to fill f rom the left side providing a visual indication of how much of the I nstant Replay memory is fille d. The end of the bar indicat es the end
of the stored audio, wher e the live broadcast begins. When all available memory has been
used, the bar will be com pletely filled.

[ Ope rat ion ]
34
[ Ope rat ion ]
35
-0:16:05
Progress Bar Showing
Amount of Memory Filled
End of Stored Audio
Beginning of Live Broadcast
A diamond-shaped Play Pos ition indicator is superimpos ed over the Progress Bar whic h pro-
-0:16:05
Play Position Indicator
-0:16:05
Play Position Indicator
Figur e 28Figur e 28
Figur e 29Figur e 29
Figur e 30Figur e 30
-0:02:40
Time Position of
Play Position Indicator
Play Position Indicator
Figur e 31Figur e 31
vides a visual indicator of the current playback posit ion in the Instant Replay mem ory. (Figure
29)
The Play Position indicat or shows your current listeni ng position in the stored aud io. When
you press the Play/Pause button to begi n playback of the stored audi o, this indicator will
begin to move to the righ t showing the progression of the playback through the Inst ant Replay
memory, provided that the memory is not full. (Figure 30)
The portion of the Progre ss Bar behind the Play Positi on indicator shows how much y ou can
rewind in the Instant Rep lay memory, while the filled portion ahead of the Play Pos ition indicator shows how much you ca n fast-forward in the memory.
While you are in the play back mode, the receiver conti nues to store the audio from the channel. Obviously, you will be unable to “catch up” to th e live broadcast during playb ack, as new
audio is being stored at the same rate at which you ar e playing back the stored aud io. You
can use the Fast-Forward bu tton to skip ahead or exi t the Instant Replay mode, an d begin
listening to the live bro adcast again.
Should you press the Play /Pau se button to pause the playback, the pl ay position indicator
will stop moving and cont inue to provide a visual indi cation of your current positi on in the
Instant Replay memory.
When paused, and the Inst ant Replay memory is 10 secon ds from becoming full, two be eps
will be heard (if the con firmation tone option is enab led). When the memory is full , the receiver
will automatically begin playback, and will continue t o store the channel audio, ov erwriting the
oldest portion of the aud io previously stored.
The Instant Replay Time P osition provides the exact am ount of time the Play Positio n indicator
is behind the live broadc ast, expressed as Hours:Minut es:Seconds, and displayed as a negative number. (Figure 31)
For example, if -02:40 is displayed, this would indica te that the Play Position ind icator is 2
minutes and 40 seconds be hind the live broadcast.

[ Men u O ption s ]
36
[ Men u O ption s ]
37
Menu Options
Sirius ID
FM Transmitter
Game Alert
Settings
Time Based Features
Figur e 1Figur e 1
Figur e 2Figur e 2
Menu Options
Menu options allows you t o set and/or change the vario us features and settings of t he SIRIUS
Sportster. To enter the m enu options, press and releas e the MENU button. The Menu Options
screen will be displayed. (Figure 1)
The menu options are navi gated by turning the Rotary K nob to highlight a selection in the
menu list and then press in the Rotary Knob to select the highlighted menu option. To exit a
menu, press the MENU butt on.
The following selections (shown in bold text) are avai lable from the Menu Options s creen, and
allow you to change the p arameters for the items liste d under the heading:
Siri us ID Time Base d Fe atures
FM T ransm itte r C lock
Game Aler t Alarm
Sett ings Program Alert
Jump Se ttings Auto Sh utdown
Display Options Sleep M ode
Memory Options Sign al In dica tor
Audio L evel Fact ory D efau lt
Confirm ation Ton e
Parenta l Control
Each of these menu option s are explained in the sectio ns which follow. Note that if a selection
is not made within 10 sec onds, the receiver will exit the Menu Options screen and r evert back
to the Default display sc reen.
Sirius ID
This menu option displays your 12 digit SIRIUS ID (SID ) number. (Figure 2) The SID is unique
to each SIRIUS Sportster receiver, and is required to activate your service. It is recommended
that you write this numbe r in the space provided near the end of this user guide. N o adjustments are allowed in this mode. To exit, press the Rot ary Knob or press the Menu bu tton.
FM Transmitter Options
The FM Transmitter menu o ption allows you to enable or disable the receiver’s built -in FM
transmitter, and select a n FM frequency.
Turn ing t he F M Transmi tter On/O ff
To turn the FM transmitte r on or off:
Select the FM Transmitter menu option.
1.
Select the FM On/Off menu option.
2.
Select On to enable the F M Transmitter, or Off to disa ble the FM transmitter.
3.
Press the MENU button to return to the previous menu.
Sele cting an FM Freque ncy
To select an FM frequency for the FM transmitter:
Select the FM Transmitter menu option.
1.
Select the FM Frequency m enu option.
2.
Use the Rotary Knob and C ateg ory buttons to adjust the FM frequency. The
3.

[ Men u O ption s ]
38
[ Men u O ption s ]
39
Rota ry Knob adjusts in 0. 1 MHz increments and the Cate gory buttons adjust in 1
FM Frequency
Figur e 3Figur e 3
NFL
NBA
NHL
College
Game Alert
None
Anaheim Mighty Ducks
Atlanta Thrashers
Boston Bruins
Buffalo Sabres
NHL COLLEGE
None
Alabama
Army
Auburn
Colorado
Initial Game Alert
All Score Updates
Alert Type
Figur e 4Figur e 4
Figur e 5Figur e 5
Figur e 6Figur e 6
MHz increments. (Figure 3 )
Press the Rotary Knob to set the selected FM frequency .
4.
To exit FM Transmitter, p ress the MENU button.
Note that the FM Frequency screen can be accessed dire ctly by pressing and holding the
MENU button, or by pressi ng the FM Frequency button on the remote con trol.
Select the league team na me or college team name you w ish to add. (Figure 5)
3.
Game Alert
Game Alert allows you to store your favorite sports te ams in memory. The SIRIUS Spo rtster
receiver will constantly scan the channels and will so und an alert when a sports te am you
stored in memory is playi ng a game, or when there is a score update for a team, dep ending
upon which option you hav e chosen for the sports team.
Sports teams which you ha ve selected and are currently playing will be displayed in a category called My Game Zone.
You may select one team f rom each sports league and th e college category, however,
more teams may be chosen by using the MEMORY (MEMO) fu nction. Refer to the Memory
(MEMO) and Song Seek (S-Seek) Functions section for mo re information to add additio nal
teams.
To choose teams to add to your stored game alerts:
Select Game Alert from th e menu options.
1.
Select the sports league or college category of the te am you wish to add. (Figure 4 )
2.
Note that for college tea ms, you will receive an alert for all teams playing for th at college. There are 30 colleg e teams currently licensed fo r broadcast by SIRIUS.
Select the type of alert you want for that team. (Figu re 6)
4.
Initial Game Alert: This option will sound an alert wh en the receiver is powered on and
the sports team is playin g, and when the sports team b egins playing a game.
All Score Updates: This o ption does the same but in ad dition sounds an alert when t he
scores are updated for th e sports team.
To exit the Game Alert me nu, press the MENU button.

[ Men u O ption s ]
40
[ Men u O ption s ]
41
Jump Settings
Figur e 7Figur e 7
NYC
LAX
BOS
ATL
CHI
Figur e 8Figur e 8
Settings
The Settings menu allows you access the Jump Settings, Display Options, Memory Options,
Audio Level, Confirmation Tone, and Parental Control m enu options, which are descri bed in
the sections following.
Jum p S et tin gS
You can access the Jump Settings menu by pressing and holding the Jump button for t wo
seconds or by pressing the MENU button to enter Menu Options, selecting Settings, and then
selecting Jump Settings.
There are two options ava ilable for jump button settin gs: Traffic and JumpSet. (Fig ure 7) The
currently selected option is indicated by the jump icon.
Sett ing t he J ump Butto n to Traf fic
To set the jump button to jump to traffic reports:
Select the Traffic menu o ption. (Figure 8)
1.
Select the city for which you would like to hear traff ic reports. (Figure 7) (Use t he M ENU
2.
button to exit this menu without changing your current city selection, if desired).
Note : If the channel list has not yet been downloaded from the SIRIUS data stream, an Updat-
ing City List notificatio n screen will be displayed. W ait 10 minutes and then try s electing a
city again.
Sett ing t he J ump Butto n to a Ch annel
To set the jump button to any channel other than a tra ffic channel:
Select the JumpSet menu o ption. (Figure 7)
1.
Press the MENU button to exit the menu options and ret urn to the Default display
2.
screen. The jump button c an now be programmed by tunin g to your desired channel
and pressing and holding the Jump button for two secon ds, as described in the Setting
Channel Presets section.
DiS play Opt iO nS
The brightness and contra st of the receiver’s display screen may be adjusted. To ad just these
settings:
Select the Display Options menu option.
1.
Select one of the followi ng two options:
2.
Brightness: You can set t he brightness for the LCD bac klight and keypad. Use the
Rota ry Knob to adjust the brightness up or down. The b ar graph at the bottom of the
display screen will move to indicate the change.
Contrast: This setting ad justs the relationship betwee n the background and the text on
the LCD display screen. U se the Rotary Knob to adjust the contrast up or down. The
bar graph at the bottom o f the display screen will mov e to indicate the change.
(Figure 9) Press the Rota ry K nob to select the setting .

[ Men u O ption s ]
42
[ Men u O ption s ]
43
To exit Display Options, press the MENU button.
Figur e 9Figur e 9
Figur e 10Figur e 10
COn fir m tOn e
The SIRIUS Sportster rece iver can sound an audio tone alert when the receiver power s On
and Off, as well as when an S-Seek Alert is activated. The default setting is On. T o change
the tone options:
Select the Confirm Tone m enu option.
1.
Select On to enable the c onfirmation tone, or Off to d isable the confirmation tone.
2.
To exit Confirm Tone, pre ss the MENU button.
mem Ory Op tiO nS
Memory Options provides f or turning the memory search function (S-Seek) On or Off. In addition, all 30 presets can be cleared.
To change the memory opti ons:
Select the Memory Options menu option.
1.
Select one of the followi ng menu options:
2.
Auto Memory Search: When this option is selected, you will be prompted to select On
or Off to turn the S-Seek function on or off.
Clear All Memory: Select this menu option to clear all presets. When selected, a Clear
All Memory confirmation s creen will be displayed. Sele ct Yes to clear all S-Seek pr esets
or No cancel.
To exit, press the MENU b utton.
auD iO le vel
The audio output level of the SIRIUS Sportster receive r can be adjusted to fine tun e the audio
level for best performanc e. This is important when usi ng either the optional Home D ocking
Station or the optional M obile Docking Station. The au dio level setting affects bot h the line
output and FM transmitter output audio levels.
To change the audio level :
Select the Audio Level me nu option.
1.
A horizontal bar graph is displayed with a – sign to t he left and a + sign to the r ight.
2.
(Figure 10) Use the Rotar y Kn ob to adjust to the desir ed audio output level.
To select the new setting and exit, press the Rotary K nob.
3.

[ Men u O ption s ]
44
[ Men u O ption s ]
45
pare ntal CO ntr Ol
Parental Control
Lock / Unlock
Figur e 11Figur e 11
Figur e 12Figur e 12
Enter Code
# _ _ _ _
Figur e 13Figur e 13
The SIRIUS Sportster rece iver has the ability to lock a channel (or channels) you d o not want
others to access without your permission. Like the Ski p channel feature, the locked channel
will not appear when brow sing channels with the Rotary Kno b. In addition, when the anyone
tries to access the locke d channel using the Direct Tu ning function, an Enter Code screen will
be displayed and the chan nel cannot be accessed until the correct code is entered.
Lock ing o r Un locking a Channel
To lock or unlock a chann el:
Select the Lock Options m enu option.
1.
Select the Lock/Unlock me nu option. (Figure 11) You wi ll need to enter the lock cod e to
2.
proceed. Refer to the fol lowing section for informatio n on how to set the lock code .
Select the channel you wi sh to lock or unlock from the channel list. (Figure 12) Pr essing
3.
the Rotary Knob will eith er add the text Lock next to the channel name to indicate that
the channel will be locke d, or unlock a locked channel by removing the text Lock.
Chan ging the Lock/Unlo ck Code
The first time the Lock/Unlock menu is accessed, you m ust enter the default lock co de. The
default lock code is 0000 . This code can be kept or ch anged. To change the lock cod e:
Select the Lock Options m enu option.
1.
Select the Edit Code menu option.
2.
Enter the default lock co de (0000 ) or the current lock code if you have changed it from
3.
the default code.
The Enter Code prompt wil l be displayed. (Figure 13) E nter your new four digit code
4.
using the 0–9 number butt ons. You will then be prompte d to enter the new code again
to confirm.
When the new lock code is confirmed, the lock code is changed.
5.
Note : You can use this sa me method to edit the lock co de again once it has been cha nged
from the default code.

[ Men u O ption s ]
46
[ Men u O ption s ]
47
Time-Based Features
The Time-Based Features m enu allows you access the Clock, Alarm, Program Alert, Auto
Shutdown, and Sleep Mode menu options, which are descr ibed in the sections followin g.
ClO Ck
The Clock menu option all ows you to setup the clock sh own on the Default display sc reen,
based on the format desir ed and the time zone in which you reside. The actual time is provided via the SIRIUS satelli te signal, and will automatic ally update based on the rece ived signal.
When the Clock menu optio n is selected, the following menu options are displayed:
Format: The clock format menu option allows for either 12-hour (default) or 24-hour display. Select the desired clock format.
Time Zone: Since the cloc k adjusts the time automatica lly, it is important to speci fy your
specific time zone. The f ollowing is a list of availab le time zones:
(GMT-9:00 ) Alaska Time Zone
(GMT-8:00 ) Pacific Time Zone
(GMT-7:00 ) Mountain Time Zone
(GMT-6:00 ) Central Time Zone
(GMT-5:00 ) Eastern Time Zone
(GMT-4:00 ) Atlantic Time Zone
(GMT-3:30 ) Newfoundland Time Zone
Select your particular ti me zone.
Daylight Savings Time: Yo u can activate this function if your area observes Dayligh t Sav-
ings Time. Select DST Observed (default) or DST Not Observed.
ala rm
The Alarm menu option all ows you to set the receiver t o turn on at a specific time. The last
selected channel prior to shutdown will be played when the receiver powers on.
When the Alarm menu optio n is selected, the following menu options are displayed:
Set Alarm: This menu opti on allows you to turn the ala rm feature on or off. Select On to
enable the alarm clock, o r Off to disable the alarm cl ock feature.
Alarm Time: This menu opt ion allows you to set the ala rm time. Use the Category
buttons and the Rotary Kn ob to select the time when yo u want the receiver to power on.
(Default time is 12:00 PM ). When the desired time is d isplayed, press the Rotary Kn ob.
prO gra m ale rt
The Program Alert menu op tion allows you to program th e receiver to switch to a sel ected
channel at a specific tim e. When this menu option is s elected, the following menu o ptions are
displayed:
Program Time/Day: This me nu option allows you to choos e the time and day for the
program alert feature.
If Time is selected, use the Category buttons and Rot ary Knob to set the hours
and minutes. AM or PM wil l change automatically when t he AM or PM threshold has
been exceeded. When the d esired time is displayed, pre ss the Rotary Knob.
If Day is selected, the s creen displays a default day of Monday, with choices of Mo nday through Sunday. Selec t the desired day.
Channel: This menu option selects the channel to be pl ayed. Select the channel desi red.
Program Alert On/Off (Def ault is Off): Select Program Alert On to enable the Progra m
Alert feature or Program Alert Off to disable the Prog ram Alert feature.
aut O S hu tDO wn
The Auto Shutdown menu op tion allows you to program th e receiver to automatically s hut off
after a one hour period w ithout any user intervention. After 59 minutes of inactivi ty, a beep
tone will sound and a Cancel Auto Shutdown display pro mpt appears on the screen to allow
you to delay the automati c shutdown. When the Auto Shutdown menu option is selected ,
select Enable to activate the auto shutdown, or Disable to cancel an auto shutdown.
When the Cancel Auto Shutdown screen is displayed afte r 59 seconds and the beep is
heard, if you want to res et the auto shutdown feature press the Rotary Knob. The au to shutdown sequence will then r eset to 1 hour.

[ Men u O ption s ]
48
[ Men u O ption s ]
49
Sle ep mO De
Signal Indicator
Figur e 14Figur e 14
Figur e 15Figur e 15
The Sleep Mode menu optio n allows you to program the r eceiver to shutdown after a s elected
period of time. When the Sleep Mode menu option is sel ected, the following menu opt ions are
displayed:
Off
15 Minute s
30 Minute s
45 Minute s
60 Minute s
Select the desired sleep time, or select Off to cancel a previously selected sleep time.
Signal Indicator
When using the optional H ome Docking Station or Boombo x indoors, it is important to aim the
antenna for maximum signa l reception. The Signal Indicator display screen visually shows the
strength of the signals b eing received. (Refer to the individual accessory installa tion guides
for more information.)
To view the SIRIUS signal strength:
Select the Signal Strength menu option.
1.
Two 10 segment horizontal bar graphs will be displayed (SAT and TER) with a – sign to
2.
the left and a + sign to the right. (Figure 14) SAT in dicates satellite signal stre ngth and
TER indicates terrestrial signal strength, if availabl e.
Adjust the antenna for ma ximum signal strength as desc ribed in the appropriate acce s-
3.
sory manual.
To exit, press the Rotary Kno b or press the MENU butto n.
Factory Default
The Factory Default optio n will restore all original f actory settings in your SIRIU S Sportster
receiver. Note that facto ry default will not reset the lock code if you have change d it from the
default lock code.
To perform a factory defa ult reset:
Select the Factory Default menu option.
1.
Select Yes to restore all factory settings or select No to cancel and return to the Menu
2.
Options screen. (Figure 1 5)

If Yes is chosen, the rec eiver reverts to the original factory settings for the fol lowing
parameters:
All prese ts revert to empty
•
Reset to Normal Tuning Mode
•
Reset to default screen (with 2-line PDT display)
•
Reset pre vious power state setting to: O ff
•
FM Freque ncy Setting: 88.1MHz
•
FM Transm itter: On
•
Game Aler t: Clear all favorite teams
•
Jump Sett ings: Clear jump setting
•
Display B rightness: 50%
•
Display C ontrast: 50%
•
Auto Memo ry Search: On
•
Clear all S-Seek stored entries
•
Audio Lev el: -3dB
•
Confirmat ion Tone: On
•
Clock For mat: 12 Hour
•
Clock Tim e Zone: Eastern Time Zone
•
Clock Day light Savings Time: Observed
•
Alarm: Of f
•
Alarm Tim e: Cleared (12:00pm)
•
Program A lert: Off
•
Program A lert Time: Cleared (12:00pm)
•
Program A lert Day: Cleared (Monday)
•
Program A lert Channel: Cleared (184)
•
Auto Shut down: Disabled
•
Sleep Mod e: Off
•
Troubleshooting
Symp tom Solu tion
SIRIUS Sportster
does not power on
SIRIUS Sportster
displays: Antenna Not
Detected
SIRIUS Sportster
displays: Acquiring
Signal
Audio static or loss of
clarity
No sound The audio cables are not connected, or the FM radio is set to the
Blown fuse, or the power cable is not properly connect ed.
Check for a bad fuse and check power cable connection
The satellite antenna is not connected to the receiver dock.
Check the satellite anten na connection to the dock.
No satellite signal is be ing received.
Check for obstacles over or around the satellite anten na.
Change the vehicle locati on to eliminate nearby obstac les
(bridges, overpasses, tre ss, buildings, etc.).
The FM frequency contains static.
Locate a quiet FM frequen cy on your vehicle radio and set the FM
transmitter frequency of the SIRIUS Sportster to match .
If using the AUX audio co nnector, check the cable conn ections.
wrong frequency. Check th e audio cables at the receive r and the
radio. Tune the FM radio to the same FM frequency the receiver
is tuned.
[ Men u O ption s ]
50
[ Tro ubl eshoo tin g ]
51

Optional Accessories
Specifications
The following optional ac cessories are available for p urchase from your SIRIUS reta iler to
maximize your SIRIUS expe rience:
SUBX 1 SIR IUS Plug and Play Univ ersal Boo mbox
The SUBX1 SIRIUS Plug and Play Universal Boombox is a portable docking station and audio
system for use with the S IRIUS Sportster receiver. Wit h the built-in amplifier and speakers,
the boombox delivers rich powerful sound indoors or ou tdoors, and features an auxil iary input
for other audio devices,
Included with the boombox is an adjustable indoor/outd oor windowsill antenna with 2 0’ of
cable and an AC adapter.
SUPH 1 SIR IUS Universal Plug and Play Hom e Kit
The SUPH1 SIRIUS Universa l Plug and Play Home Kit is a compact docking cradle that positions the receiver for ea sy viewing and operation. Designed for quick and easy self-installation,
it includes all necessary cabling to connect your SIRI US receiver to your home audi o system.
The kit includes a compac t tabletop/desktop docking cr adle with FM output for wirel ess
connectivity, an audio ca ble for connection to any ste reo bookshelf system, an adju stable
indoor/outdoor windowsill antenna with 20’ of cable, a nd an AC Adapter.
SUPV 1 SIR IUS Universal Plug and Play Veh icle Kit
The SUPV1 SIRIUS Universa l Plug and Play Vehicle Kit i s a compact docking cradle th at positions the receiver for ea sy wiring, viewing, and opera tion in a vehicle. Designed f or quick and
easy self-installation, i t provides several mounting o ptions and includes all neces sary cabling
to connect your SIRIUS re ceiver to your car audio syst em.
The SUPV1 SIRIUS Universa l Plug and Play Vehicle Kit w ill work with the Sportster 4 and
most new SIRIUS plug and play receivers.
The kit includes a mobile docking cradle, a suction cu p vehicle mount, a vent mount , a cigarette lighter adapter, an d a magnetic antenna with 21’ of cable.
[ Opt ion al Ac ces sorie s ]
52
Audio Output . . . . . . . . . . . . . . . . . . . . . . . . . . . . . . . . . . . . . . . . . . . . . . . . . . 1V (Peak-to-Peak)
Total Harmonic Distortion (THD) . . . . . . . . . . . . . . . . . . . . . . . . . . . . . . . . . . . . . . . . . . . . <0 .3%
Signal-to-noise (S/N) . . . . . . . . . . . . . . . . . . . . . . . . . . . . . . . . . . . . . . . . . . . Greater than 75dB
Power Requirements . . . . . . . . . . . . . . . . . . . . . . . . . . . . . . 4.9-5.6 Volts, Negative Ground, DC
Operation Temperature . . . . . . . . . . . . . . . . . . . . . . . . . . . . . . . -20° to +85° C (-4° to +185° F)
Receiver Dimensions . . . . . . . . . . . . . . . . . . . . . . . . . . 114.2mm(W) x 62.5mm(H) x 16.9mm(D)
(4.5” W x 2.5” H x 0.6” D )
Receiver Weight. . . . . . . . . . . . . . . . . . . . . . . . . . . . . . . . . . . . . . . . . . . . . . . . . . . 121g (4.2 oz.)
Remote Control Dimensions (Height x Width x Depth). . . . .41mm (W) x 105mm(H) x 18mm(D)
(1.6”W x 4.1”H x 0.7”D)
Remote Control Battery Re quirements . . . . . . . . . . . . . . . . . . . . . . . . . . . . . . . . . . . . . .CR2025
[ Spe cif icati ons ]
53

Warranty
SIRIUS ID
12 M onth Warr anty
SIRIUS Sa tellite Radio Inc. (the “Compan y”) warra nts to th e origina l retail purchaser of this product
that shou ld this product or any part the reof, und er normal use and condition s, be pro ven defec tive in
material or workmanship within 12 months from the date of original purchase, such def ect(s) wi ll be
repaired or replaced with new or recondi tioned pr oduct (at the Comp any’s opt ion) with out charg e for
parts and repair labor. To obtain repair or repla cement wi thin the terms of this Warr anty, the product
is to be delivered with proof of warrant y coverag e (e.g. d ated bill of sale) , specifi cation of defect(s ),
transport ation prepaid, to the location shown bel ow under WARRANTY RETURN.
This Warr anty does not extend to the eli mination of extern ally gene rated sta tic or no ise, to c orrection
of antenn a problems, to costs incurred f or instal lation, r emoval or reinstal lation of the prod uct, or t o
damage to tapes, compact discs, speakers , accesso ries, or vehicle e lectrical systems.
This Warr anty does not apply to any prod uct or pa rt thereo f which, in the op inion of the Compa ny,
has suffe red or been damaged through alt eration, improper installat ion, mish andling, misuse, n eglect,
accident, or by removal or defacement of the fact ory seria l number/ bar code label(s). THE EXTE NT
OF THE CO MPANY’S LIABILITY UNDER THIS WA RRANTY IS LIMITED TO THE RE PAIR OR
REPLACEME NT PROVIDED ABOVE AND, IN NO EV ENT, SHAL L THE COM PANY’S LI ABILITY
EXCEED TH E PURCHASE PRICE PAID BY PURCHA SER FOR T HE PRODUC T.
This Warr anty is in lieu of all other ex press war ranties o r liabili ties. ANY IMPLIED WARRANTIE S, INCLUDING A NY IMPLIED WARRANTY OF MERCHANT ABILITY, SHALL BE LIMITED T O THE DUR ATION OF T HIS WRITTEN WARRANTY. ANY ACTIO N FOR BRE ACH OF AN Y WARRANT Y HEREUNDER INC LUDING ANY IMPLIED WARRANTY OF MERCHANTA BILITY MU ST BE BRO UGHT
WITHIN A PERIOD OF 48 MONTHS FROM DATE O F ORIGINA L PURCHAS E. IN NO CASE SHAL L
THE COMPA NY BE LIABLE FOR ANY CONSEQUENT IAL OR IN CIDENTAL DAMAGES F OR
BREACH OF THIS OR ANY OTHER WARRANTY, EX PRESS OR IMPLIED, WHATSOEVE R. No
person or representative is authorized t o assume for the C ompany an y liabili ty other than expr essed
herein in connection with the sale of th is produc t. Some s tates do not allow limitati ons on ho w long
an implie d warranty lasts or the exclusi on or lim itation o f inciden tal or co nsequenti al damage so the
above lim itations or exclusions may not apply to you. This Warranty gives yo u specifi c legal r ights and
you may a lso have other rights which var y from st ate to st ate.
WARRANTY RETURN: To obtain repair or rep lacement within th e terms o f this Wa rranty, p lease return prod uct to an authorized retailer o r call Cu stomer Se rvice at 1-800-869 -5187; pr oof of pu rchase
and descr iption of defect are required. Products to be ret urned to an approv ed warran ty statio n must
be shippe d freight prepaid.
[ War ran ty ]
54
Write down the SIRIUS ID (SID) of your SIRIUS Sportste r in the space provided below .
SID:
[ SIR IUS ID ]
55

SIRI US Customer Service: 1-888-539-7474
customercare@sirius-radio .com
SIRI US Satellite Radio In c.
1221 Avenue of the Americ as
New York, NY 10020
1-888-539-7474
http://www.sirius.com

SI RI US Sa tel li te Ra dio I nc.
1221 Avenue of the Americas
New York, NY 10020
(800) 869-5590
http://sirius.com
SIRIUS Sportste r SP4-TK1 (040406a )
 Loading...