


Clarion Navigation
“N.I.C.E”
Draft manual
APR. 25, 2005
FCC Warning
TransitionDiagram.doc Page 1

THE MANUFACTURER IS NOT RESPONSIBLE FOR ANY RADIO OR TV INTERFERENCE CAUSED BY UNAUTHORIZED
MODIFICATIONS TO THIS EQUIPMENT. SUCH MODIFICATIONS COULD VOID THE USER'S AUTHORITY TO OPERATE THE
EQUIPMENT.
Note
This equipment has been tested and found to comply with Part 15 of the FCC Rules. These rules are designed to provide reasonable protection
against harmful interference. This equipment may cause harmful interference to radio communications if it is not installed and used in accordance
with these instructions. However, there is no guarantee that interference will not occur in a particular installation.
If this equipment does cause harmful interference to radio or television reception, which can be
determined by turning the equipment off and on, the user is encouraged to try to correct the interference by one of more of the following measures:
• Reorient or relocate the receiving antenna.
• Increase the separation between the equipment and Sirius Receiver.
• Connect the equipment into an outlet on a circuit different from that to which the Sirius Receiver is connected
• Consult the dealer or an experienced radio/TV technician for help.
Any Changes or modifications not expressly approved by the manufacturer could void the user’s authority to operate the equipment.
TransitionDiagram.doc Page 2

1. Turn On/ Off
Brief Operation Manual for
Clarion Transportable Navigation
TransitionDiagram.doc Page 3
Power On/Off

2. Main Menu
Please press screen button which you want to select.
TransitionDiagram.doc Page 4

3. Music mode
r
Press Music Player ICON on main menu
Keys on Touch Screen
Main
Play Device
Folde
Play Mode
Play /
Pause
TransitionDiagram.doc Page 5
Stop Previous
Music
Next
Music
Mute Volume
Up
Volume
Down
Previous
Screen
Next
Screen

1) Select Play Device
y
r
r
2) Select Folder
Hard Disk
USB Memor
<Music in Hard Disk> <Music in USB Memory>
Folde
Folde
<Before Folder Change> <After Folder Change>
TransitionDiagram.doc Page 6

3) Select Play Mode
<Play Musics one time> <Play a Music reapeatly>
Normal
Folder Repeat
Repeat
Random
<Play Musics in a Folder repeatly> <Play Musics randomly>
TransitionDiagram.doc Page 7

4. Sirius mode (Key Functions and Screen Description)
Press SIRIUS ICON on main menu
Keys on Touch Screen
Category
Up/ Down
Channel
Up/ Down
Menu
Display
Volume
Up/ Down
Number Key 1 ~ 0 (Preset recall, save, Direct Tune)
TransitionDiagram.doc Page 8
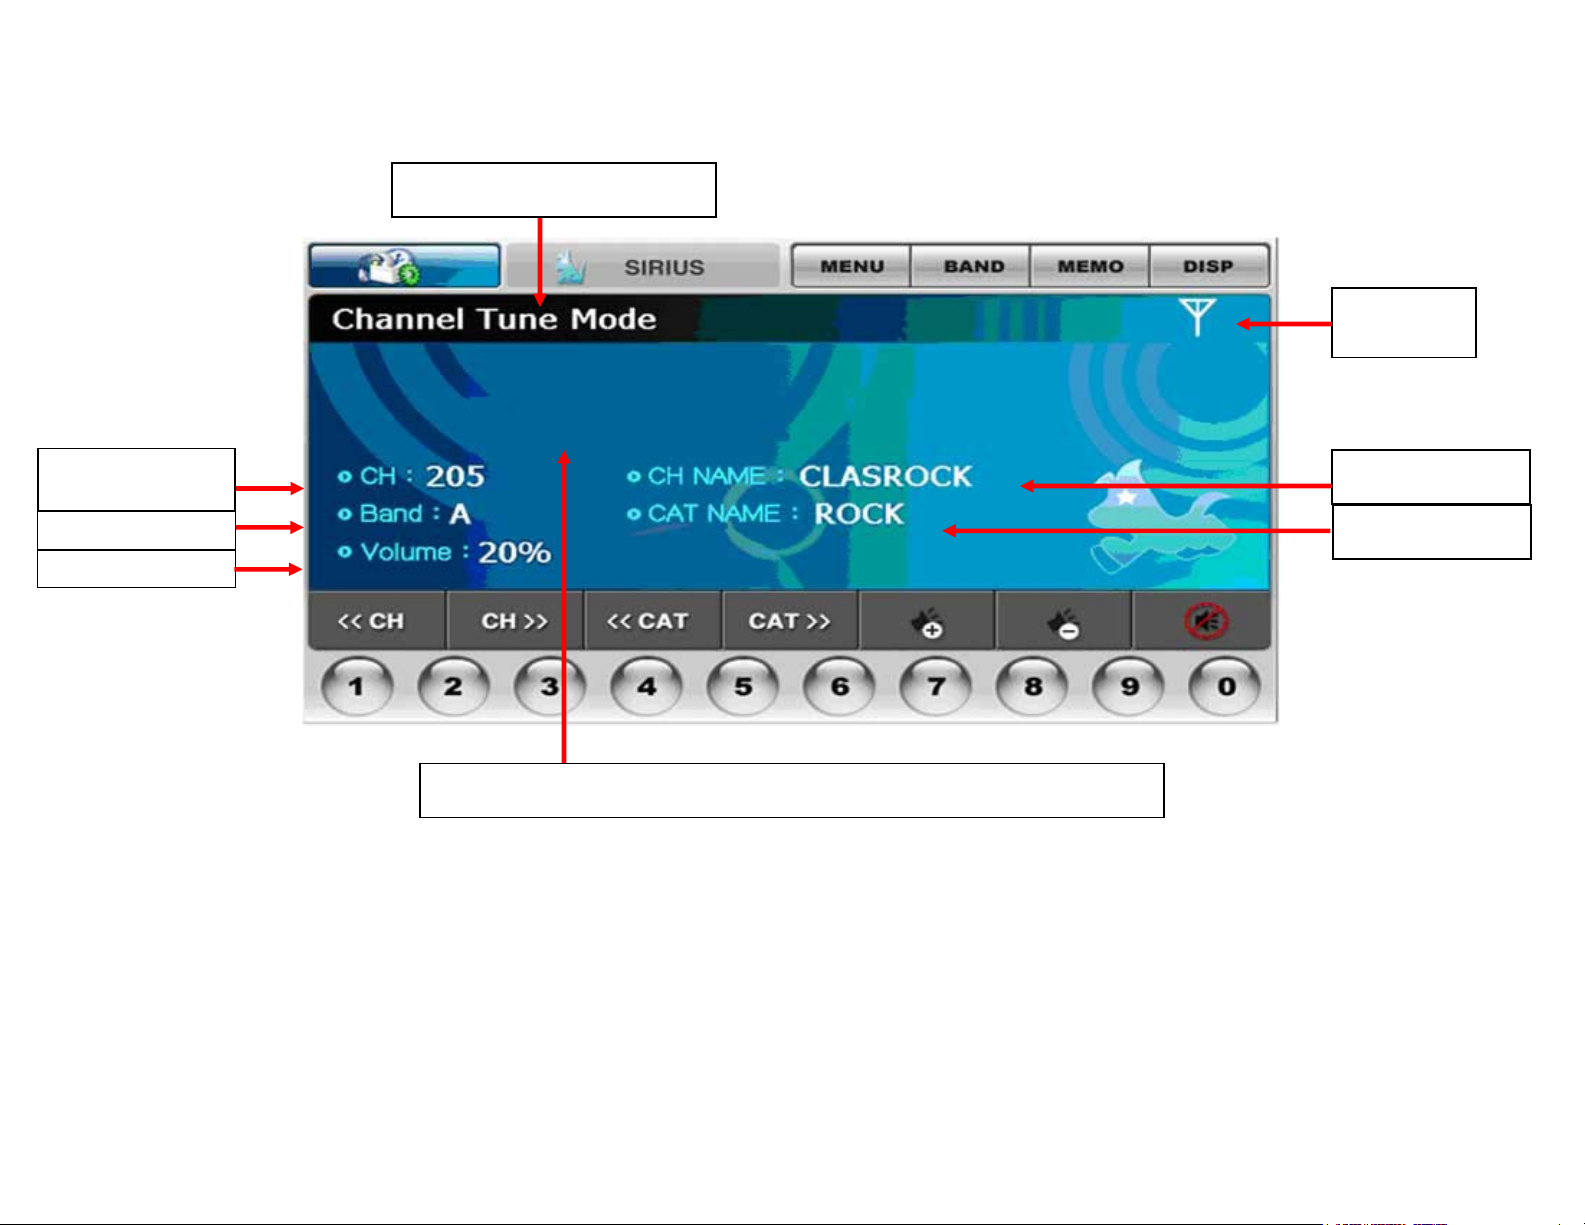
1) Default Mode – Channel Tune Mode
(
Tune Mode (Channel, Preset)
Antenna
Signal 0~3
Channel Number
1~223)
Band & Preset
Volume
Channel Name
Category Name
PDT (Artist, Composer and Song Title) will be displayed through two lines
TransitionDiagram.doc Page 9

Action Function
Press MENU Enters the user's setting menu
Press CH+ Channel up
Press CH- Channel down
Press CAT+
Press CAT-
Press Tune Mode Makes a direct tuning dialogue and confirms input to tune
Press Number 1~0 Jumps to a preset channel
Press-and-hold
Number 1~0
Press MENU Enters the user's setting menu
Press BAND Changes a preset band among A, B or C.
Press-and-hold BAND Enters the preset tuning mode.
Press DISP Toggles the LCD display (no changes in this product)
Press-and-hold DISP Enters the channel list mode
Press MEMO
Press-and-hold MEMO Enters the memo recall list mode
Enters the category list mode
Presets a current channel to the pressed number
Memorizes the artist name and song title of the current
channel.
2) Default Mode – Preset Tune Mode
Action Function
Press MENU Enters the user's setting menu
Press CH+ Preset channel up
Press CH- Preset channel down
Press-and-hold DISP Enters the preset channel list mode
TransitionDiagram.doc Page 10

3) Channel List Mode, Preset Channel List Mode, Category List Mode
Channel List
Items
<Channel List Mode>
Action Function
Press MENU Enters the user's setting menu
Press CH+ Scrolls channel up in the current category.
Press CH- Scrolls channel down in the current category.
Press ITEM Tunes to the selected channel.
Press DISP
Changes the way how to show channels among in channel name,
artist name or song-title.
TransitionDiagram.doc Page 11

4) Menu Mode (Main Menu Screen)
Items
Action Function
Press MENU Returns to default mode
Press ITEMS Enters each sub-menus.
TransitionDiagram.doc Page 12
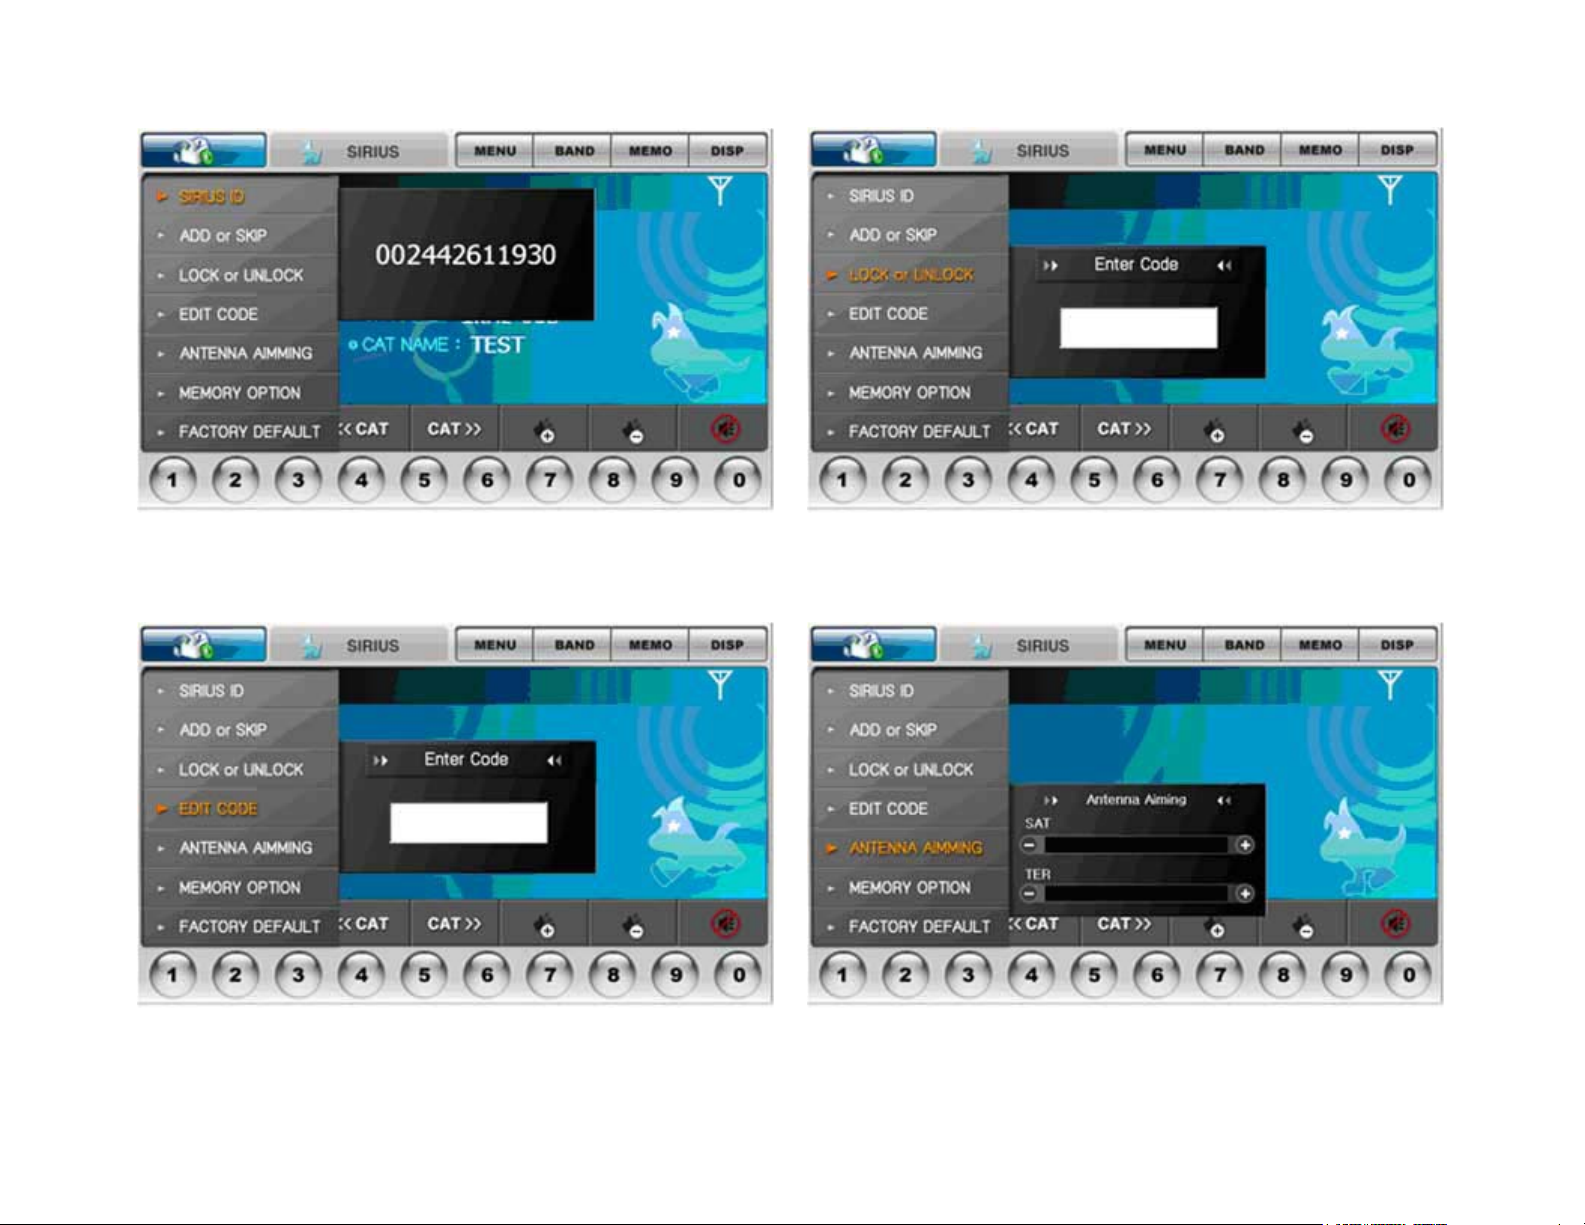
4-1 Sub Menu Screen
<SID – Sirius ID> <Lock or Unlock>
<Edit Code> <Antenna Aiming – satellite, terrestrial>
TransitionDiagram.doc Page 13

<Memory Option> <Factory Default>
TransitionDiagram.doc Page 14

4-2 Sub Menu Screen – Add or Skip List Mode
Items
Action Function
Press MENU Returns the user's setting menu
Press CH+ Scrolls channel up in the current category.
Press CH- Scrolls channel down in the current category.
Press ITEM Toggles a channel status to skip or lock
Press DISP
Changes the way how to show channels among in channel
name, artist name or song-title.
TransitionDiagram.doc Page 15
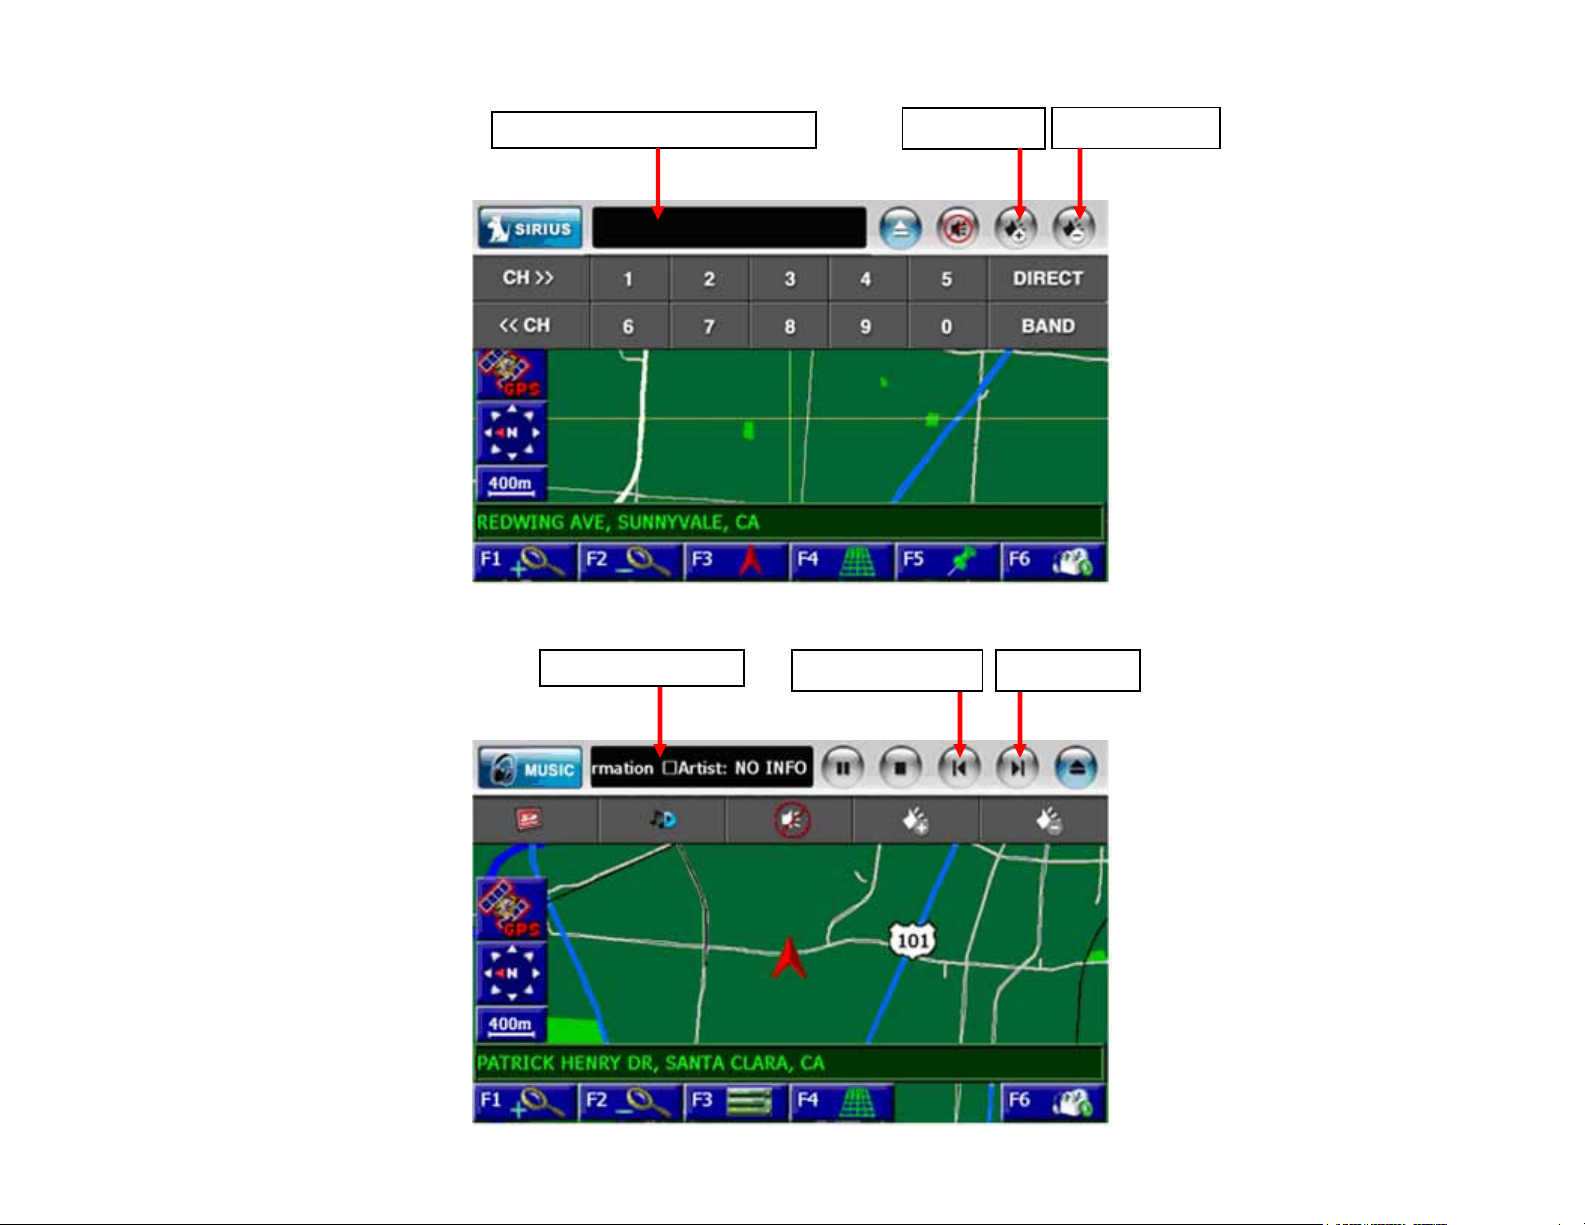
5. Navigation with Sirius Mode
S
6. Navigation with Music Mode
irius Channel Information
Volume Up
Previous Music Next Music Music Information
Volume Down
TransitionDiagram.doc Page 16

7. Photo Mode
Press Photo ICON on main menu
Keys on Touch Screen
Main
Display
Device
Full
Screen
Previous
Screen
Next
Screen
Slide
Screen
TransitionDiagram.doc Page 17

1) Select Display Device
y
2) Select Display Mode
Hard Disk
USB Memor
<Full Mode> <Slide Mode>
TransitionDiagram.doc Page 18

8. Rear View and A/V Mode
Press RearView ICON on main menu
Keys on Touch Screen
DVD or Other A/V Input
Rearview
Camera Input
TransitionDiagram.doc Page 19
Will be displayed DVD input or
rearview camera input

9. System Setup mode
Please do not adjust this set up mode.
Just press each icon and show.
Press Setup ICON on main menu
Keys on Touch Screen
Software Upgrade
LCD Brightness
FM Transmitter
TransitionDiagram.doc Page 20

EG)
< FM Transmitter Set-up> < LCD Brightness Set-up>
< Software Upgrading Set-up>
TransitionDiagram.doc Page 21

Transition Diagram
for
Windows CE Navigation
User Interface Menu
TransitionDiagram.doc Page 22

Start Menu
Fig. 1 – Start Menu
Page Down
SK1 SK2 SK3 SK4 SK5 SK6
SK1
SK2
SK3
SK4
SK5
SK6
Return to map mode
Page up
Return previous level
Page down
NA
Accept
Fig. 1, 1.1, 1.2 and 1.3 use this
soft key set.
Page Up
See Sections 1.1.1, 1.1.2,
1.1.3, 1.1.4 and 1.1.5.
Fig. 1.1 – Start Route Guidance
See Sections 1.2.1, 1.2.2,
1.2.3 and 1.2.4.
Fig. 1.2 – Edit Address Book
TransitionDiagram.doc Page 23

Page Down
Page Up
See Sections 1.3.1, 1.3.2, 1.3.3, 1.3.4,
1.3.4.1, 1.3.4.2, 1.3.4.3, 1.3.4.4, 1.3.4.5,
1.3.5, 1.3.5.1 and 1.3.5.2
Fig. 1.3 – Setup
TransitionDiagram.doc Page 24

Section 1.1.1 - Destination->Address/Intersection
SK1
SK2
SK3
SK4
SK5
SK6
Return to map mode
Page up
Return previous level
Page down
Spell
Accept
Fig. 1.1.1.1 – State/Province Name Fig. 1.1.1 – Address/Intersection
Fig. 1.1.1.2 – Postal Code Fig. 1.1.1.3 – City Name Fig. 1.1.1.4 – Street Name
See Fig. 1 for SK reference.
Fig. 1.1.1, 1.1.1.1, 1.1.1.3 and
1.1.1.4 use this soft key set.
TransitionDiagram.doc Page 25

Section 1.1.2 - Destination->Point of Interest
Page Down
Page Up
Fig. 1.1.2 – Point of Interest
SK1
SK2
SK3
SK4
SK5
SK6
See Fig. 1 for SK reference.
Fig. 1.1.2, 1.1.2.1 and 1.1.2.2
use this soft key set.
Return to map mode
Page up
Return previous level
Page down
Spell
Accept
Fig. 1.1.2.1 – State/Province Name Fig. 1.1.2.2 – By Category Fig. 1.1.2.3 – By Postal Code
Fig. 1.1.2.4 – By Phone Fig. 1.1.2.5 – By First Few Letters
TransitionDiagram.doc Page 26
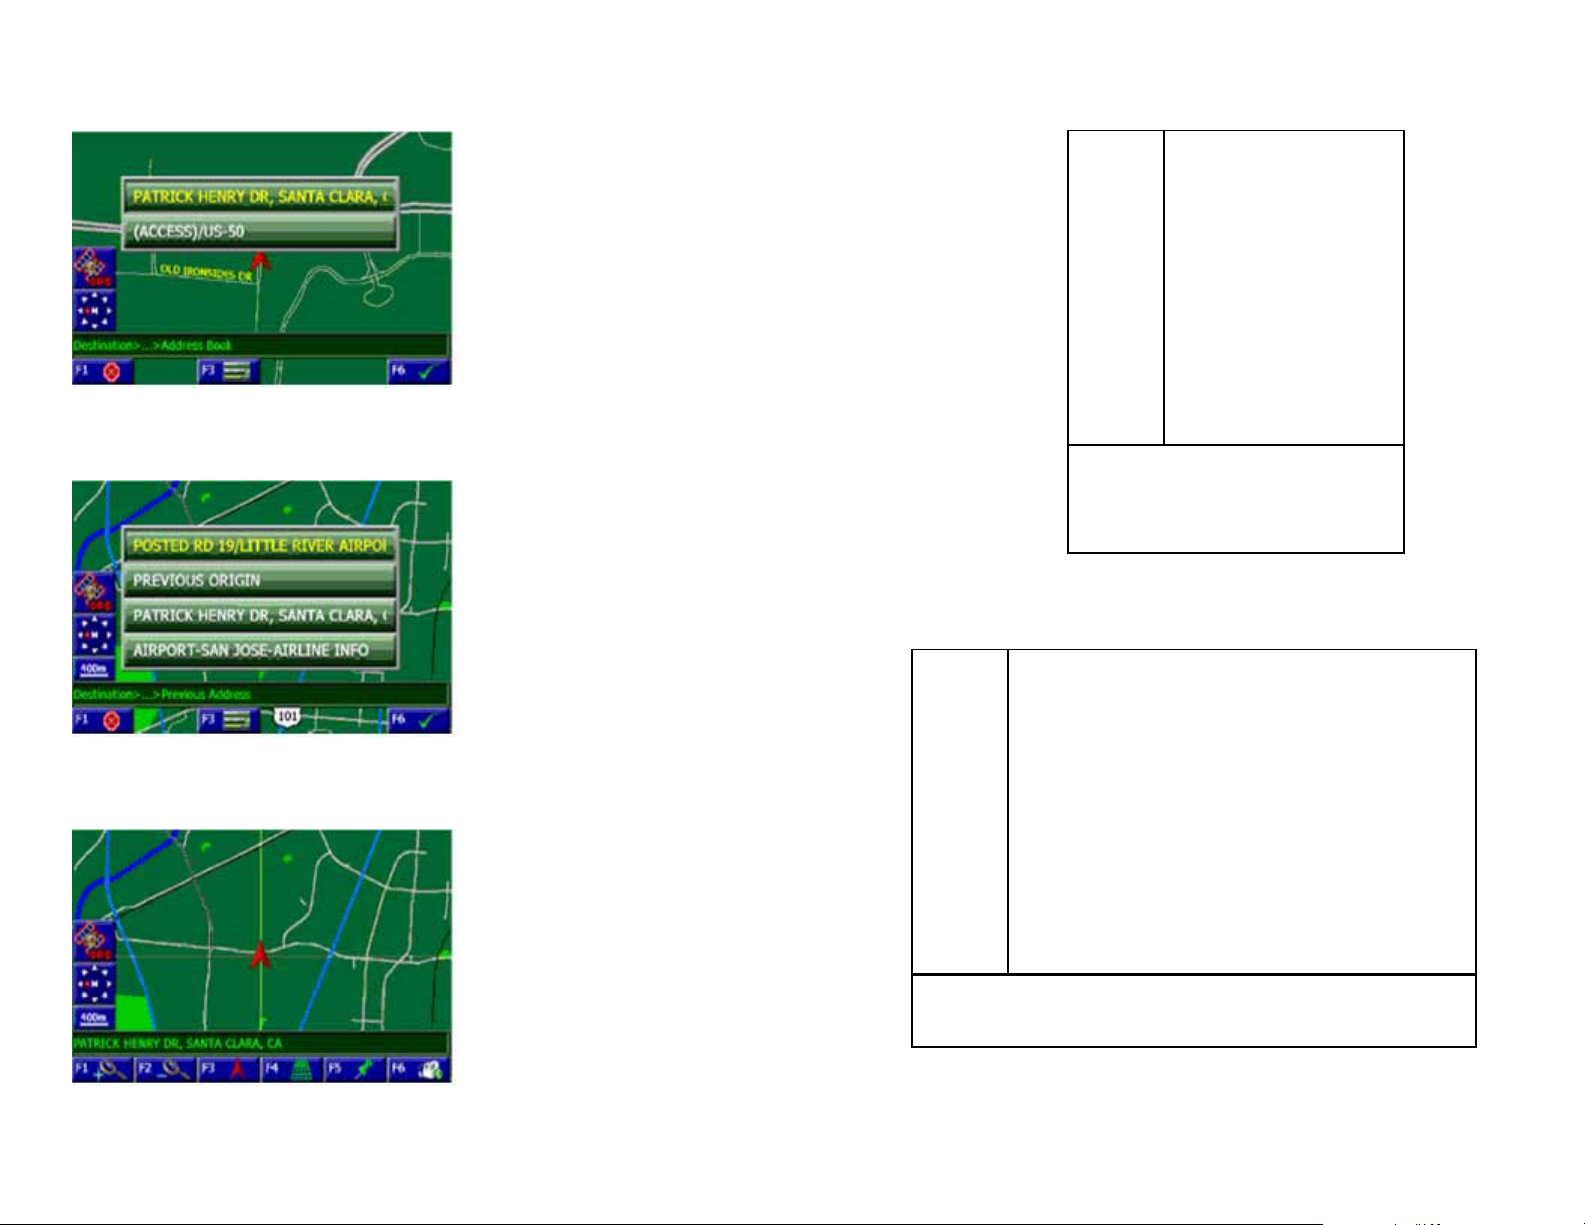
Section 1.1.3 - Destination->Address Book
Fig. 1.1.3
Section 1.1.4 - Destination ->Previous Destination (Most Recently Used Locations)
Fig. 1.1.4
Section 1.1.5 - Destination->Map
SK1
SK2
SK3
SK4
SK5
SK6
SK1
SK2
SK3
SK4
SK5
SK6
See Fig. 1 for SK reference.
Fig. 1.1.3 and 1.1.4 use the
same set of soft key.
Zoom In
Zoom Out
Return current vehicle position
2D, 2.5D and Split screen
Accept cross point as new vehicle position
Return current vehicle position
Return to map mode
Page up
Return previous level
Page down
NA
Accept
See Fig. 1 for SK reference.
Fig 1.1.5 uses this soft key set.
Fig. 1.1.5
TransitionDiagram.doc Page 27
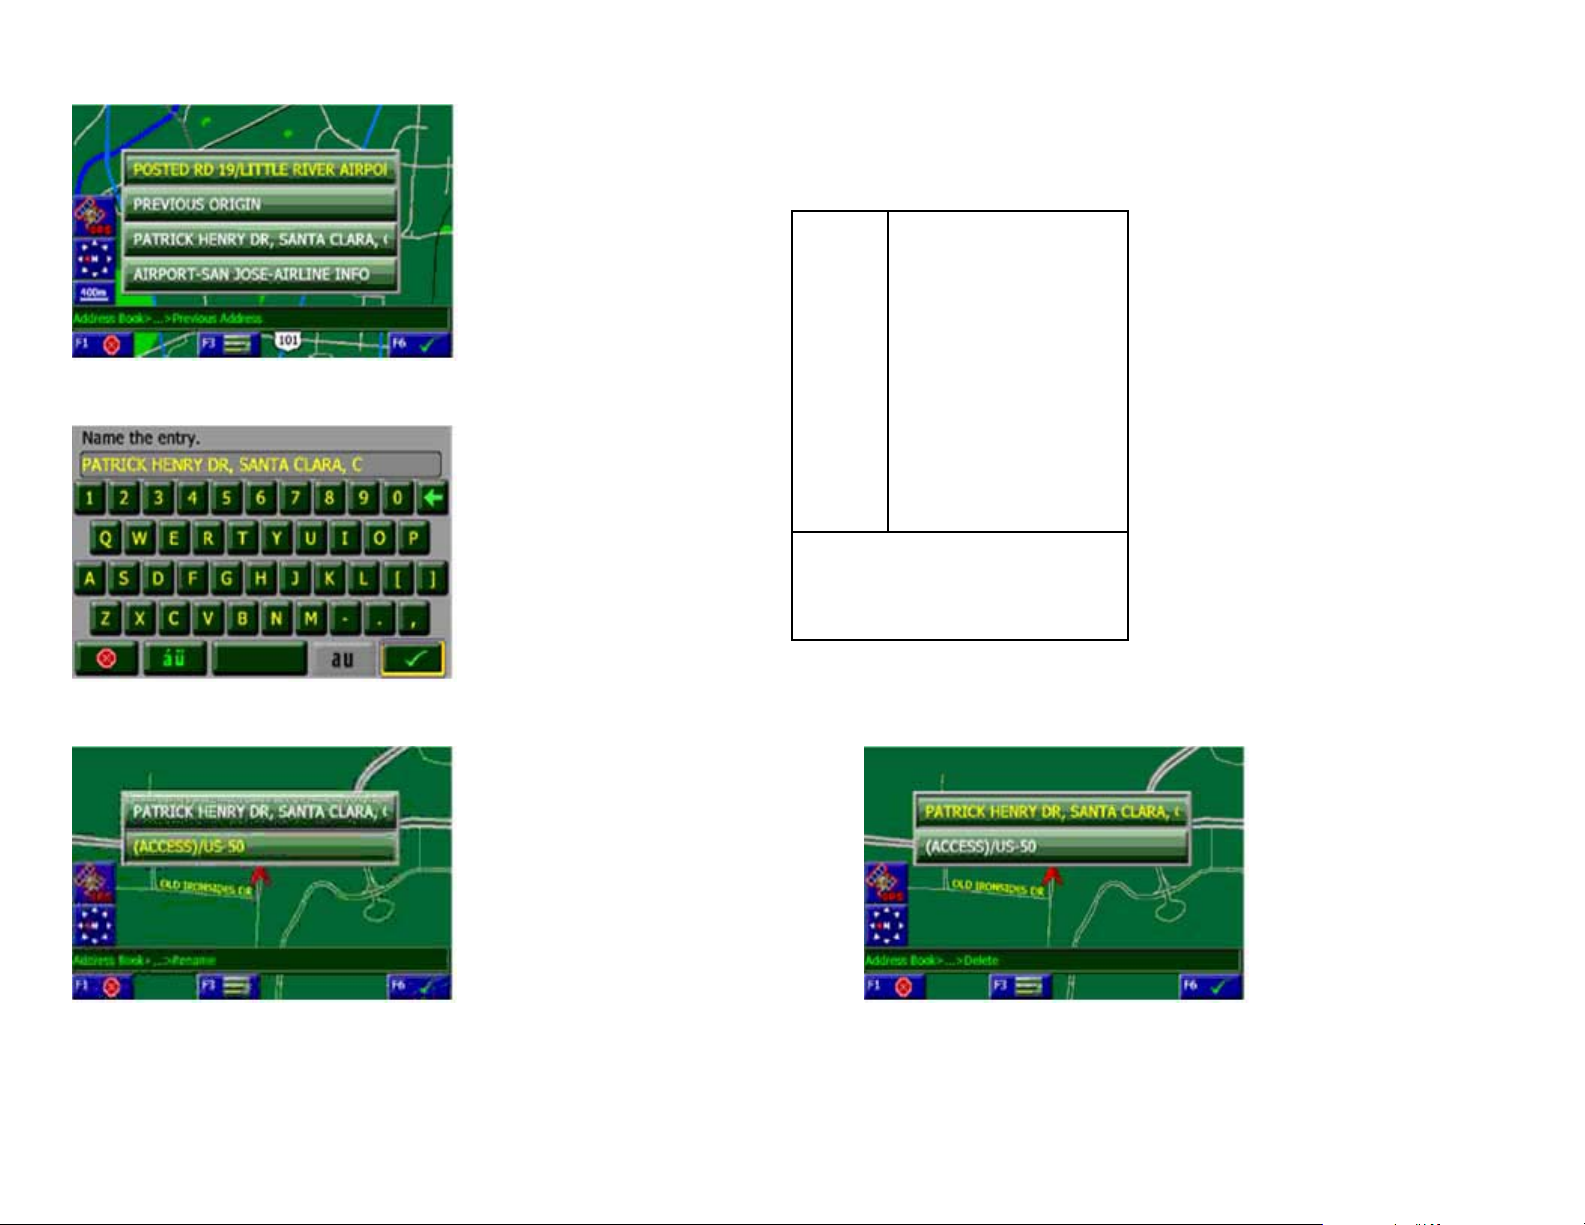
Section 1.2.1 - Edit Address Book->Add Previous Destination (Most Recently Used Locations)
Fig. 1.2.1
Section 1.2.2 - Edit Address Book->Add Current Location
Fig. 1.2.2
SK1
SK2
SK3
SK4
SK5
SK6
See Fig. 1 for SK reference.
Fig. 1.2.1, 1.2.3 and 1.2.4 use
this soft key set.
Return to map mode
Page up
Return previous level
Page down
NA
Accept
Section 1.2.3 - Edit Address Book->Edit Section 1.2.4 - Edit Address Book->Delete
Fig. 1.2.3 Fig.1.2.4
TransitionDiagram.doc Page 28

Section 1.3.1 - Setup->Navigation Preferences (Preferences)
Page Down
Page Up
Fig. 1.3.1
Section 1.3.2 - Setup->Display Options
Page Down
Page Up
Fig. 1.3.2
Section 1.3.3 - Setup->Set Distance Units (Units) Section 1.3.4 - Setup->Set Origin
SK1
SK2
SK3
SK4
SK5
SK6
See Fig. 1 for SK reference.
Fig. 1.3.1, 1.3.2, 1.3.3 and
1.3.4 use the same set of soft
key.
Return to map mode
Page up
Return previous level
Page down
NA
Accept
Page
Down
Page
Up
Fig. 1.3.3 Fig. 1.3.4
TransitionDiagram.doc Page 29

Section 1.3.4.1 - Setup->Set Origin->Address/Intersection
Fig. 1.3.4.1.1 – State/Province Name Fig. 1.3.4.1 – Setup->Set Origin->Address/Intersection
SK1
SK2
SK3
SK4
SK5
SK6
See Fig. 1 for SK reference.
Return to map mode
Page up
Return previous level
Page down
Spell
Accept
Fig. 1.3.4.1.2 – Postal Code Fig. 1.3.4.1.3 – City Name Fig. 1.3.4.1.4 – Street Name
TransitionDiagram.doc Page 30

Section 1.3.4.2 - Setup->Set Origin->Point of Interest
Page Down
Page Up
Fig. 1.3.4.2 – Setup->Set Origin->Point of Interest
SK1
SK2
SK3
SK4
SK5
SK6
See Fig. 1 for SK reference.
Return to map mode
Page up
Return previous level
Page down
Spell
Accept
Fig. 1.3.4.2.1 – State / Province Name Fig. 1.3.4.2.2 – By Category Fig. 1.3.4.2.3 – By Postal Code
Fig. 1.3.4.2.4 – By Phone Fig. 1.3.4.2.5 – By First Few Letters
TransitionDiagram.doc Page 31

Section 1.3.4.3 - Setup->Set Origin->Address Book
Fig. 1.3.4.3
Section 1.3.4.4 - Setup->Set Origin->Previous Destination (Most Recently Used Locations)
SK1
Fig. 1.3.4.4
Section 1.3.4.5 - Setup->Set Origin->Map
SK2
SK3
SK4
SK5
SK6
SK1
SK2
SK3
SK4
SK5
SK6
See Fig. 1 for SK reference.
Fig. 1.3.4.3 and 1.3.4.4 use this
soft key set.
Zoom In
Zoom Out
Return current VP
2D, 2.5D and Split screen
Accept cross point as new VP.
Return current VP
Return to map mode
Page up
Return previous level
Page down
NA
Accept
See Fig. 1 for SK reference.
Fig 1.3.4.5 uses this soft key set.
Fig. 1.3.4.5
TransitionDiagram.doc Page 32
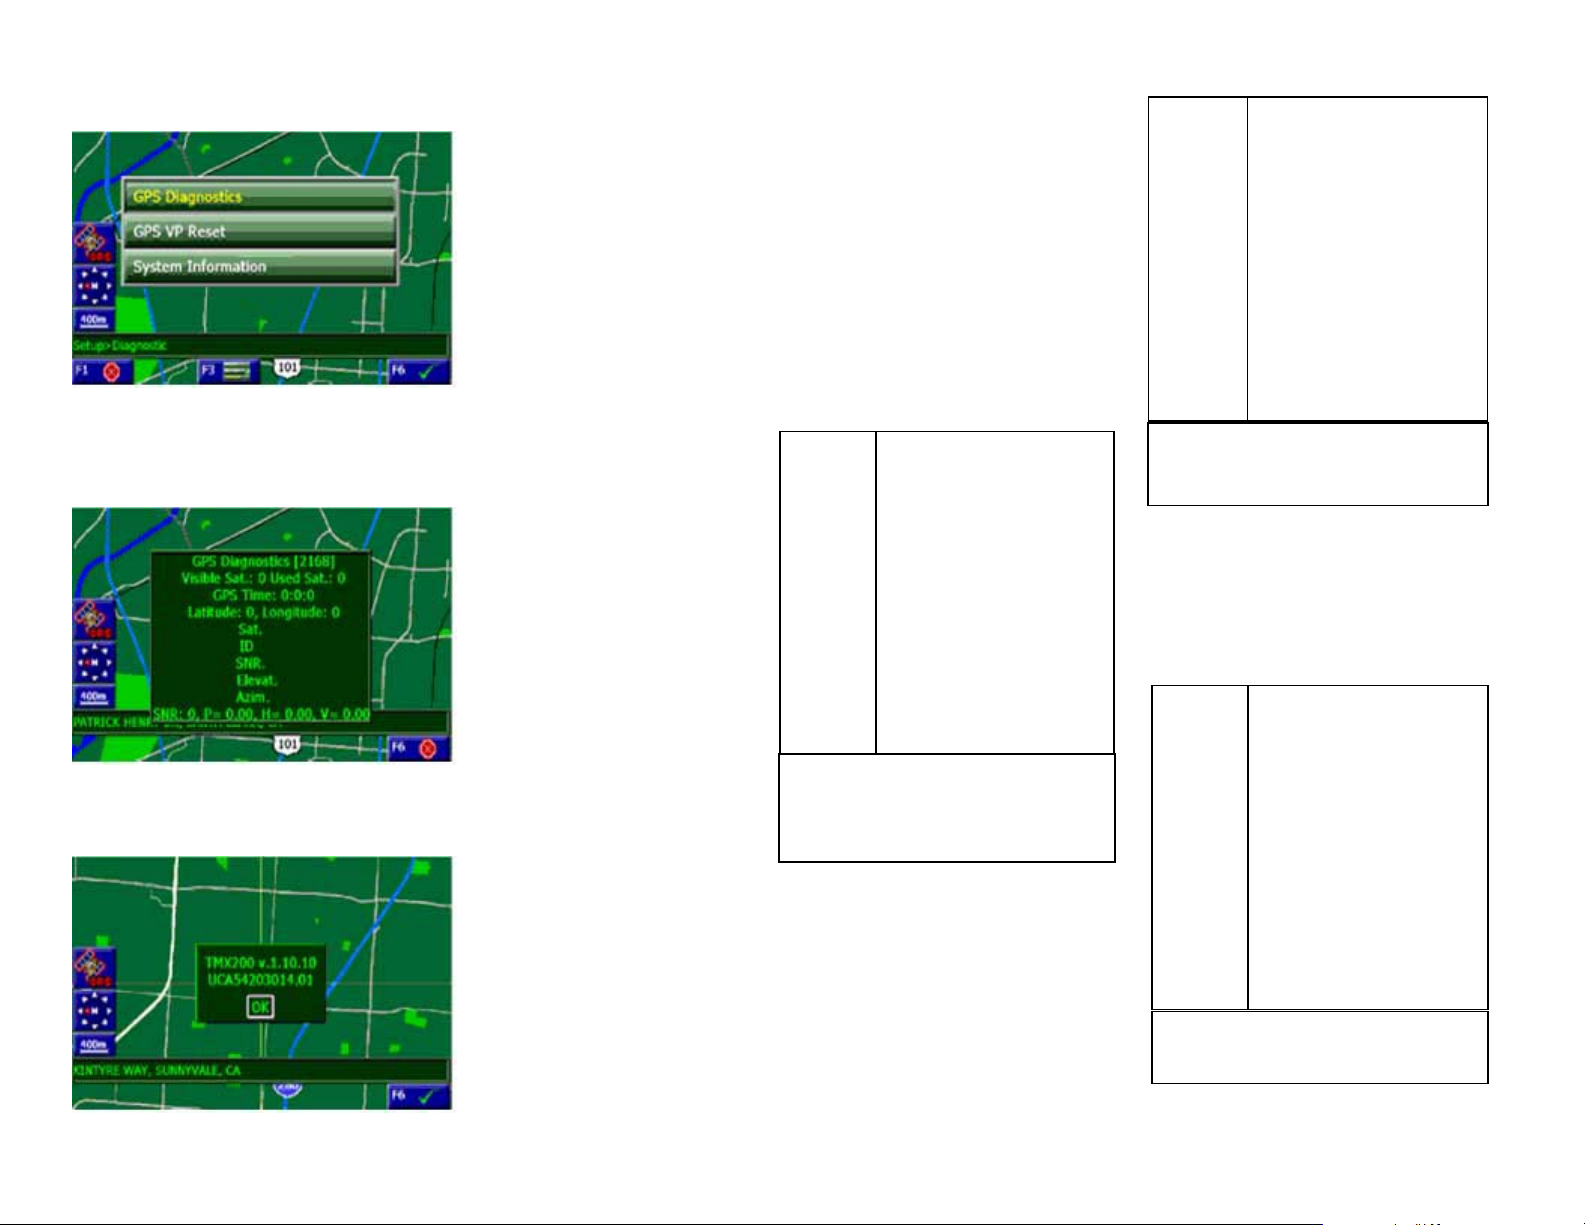
Section 1.3.5 - Setup->System Diagnostics (Diagnostic)
Fig. 1.3.5
Section 1.3.5.1 - Setup->System Diagnostics->GPS Diagnostics
Fig. 1.3.5.1
Section 1.3.5.2 - Setup->System Diagnostics-> System Information
SK1
SK2
SK3
SK4
SK5
SK6
See Fig. 1 for SK reference.
Fig. 1.3.5.1 uses this soft key
set.
NA
NA
NA
NA
NA
Return previous level
SK1
SK 1
SK2
SK2
SK3
SK3
SK4
SK4
SK5
SK5
SK6
SK6
See Fig. 1 for SK reference.
Fig. 1.3.5 uses this soft key set.
SK1
SK2
SK3
SK4
SK5
SK6
Return to map mode
NA
Return previous level
NA
NA
Accept
NA
NA
NA
NA
NA
Accept
See Fig. 1 for SK reference.
Fig 1.3.5.2 uses this soft key
Fig. 1.3.5.2
TransitionDiagram.doc Page 33
 Loading...