

Page 1
Omega
..
User
Instructions
Omega User Information
August 2011
Contents
1 Inlroduclion Io Ihe Omega chair
2 Omega Producl Informalion
2 Service and Mainlenance
Indicalor
2 Guidelines for Besl Praclice
3 The User Inslruclions
3 Questions and Concerns
General
Operation
of the Omega:
3 Back heighl adjustmenl
4 Back and seal angle recline
4 Slretching of Ihe cable
5 Seat Module
5 Wheel s
6 Legrest
7 Weighted Universal Headresl
7 Loose covers
7 Lap-belt
8 Headcap
7 Sliding Footrest
8 Care and Maintenance
8
Potential risks, cautions and warnings
9 Helpline
liiiit.f.[ffliil.l,it#liffij·J,,[J·61ijMft
What
is
the Omega?
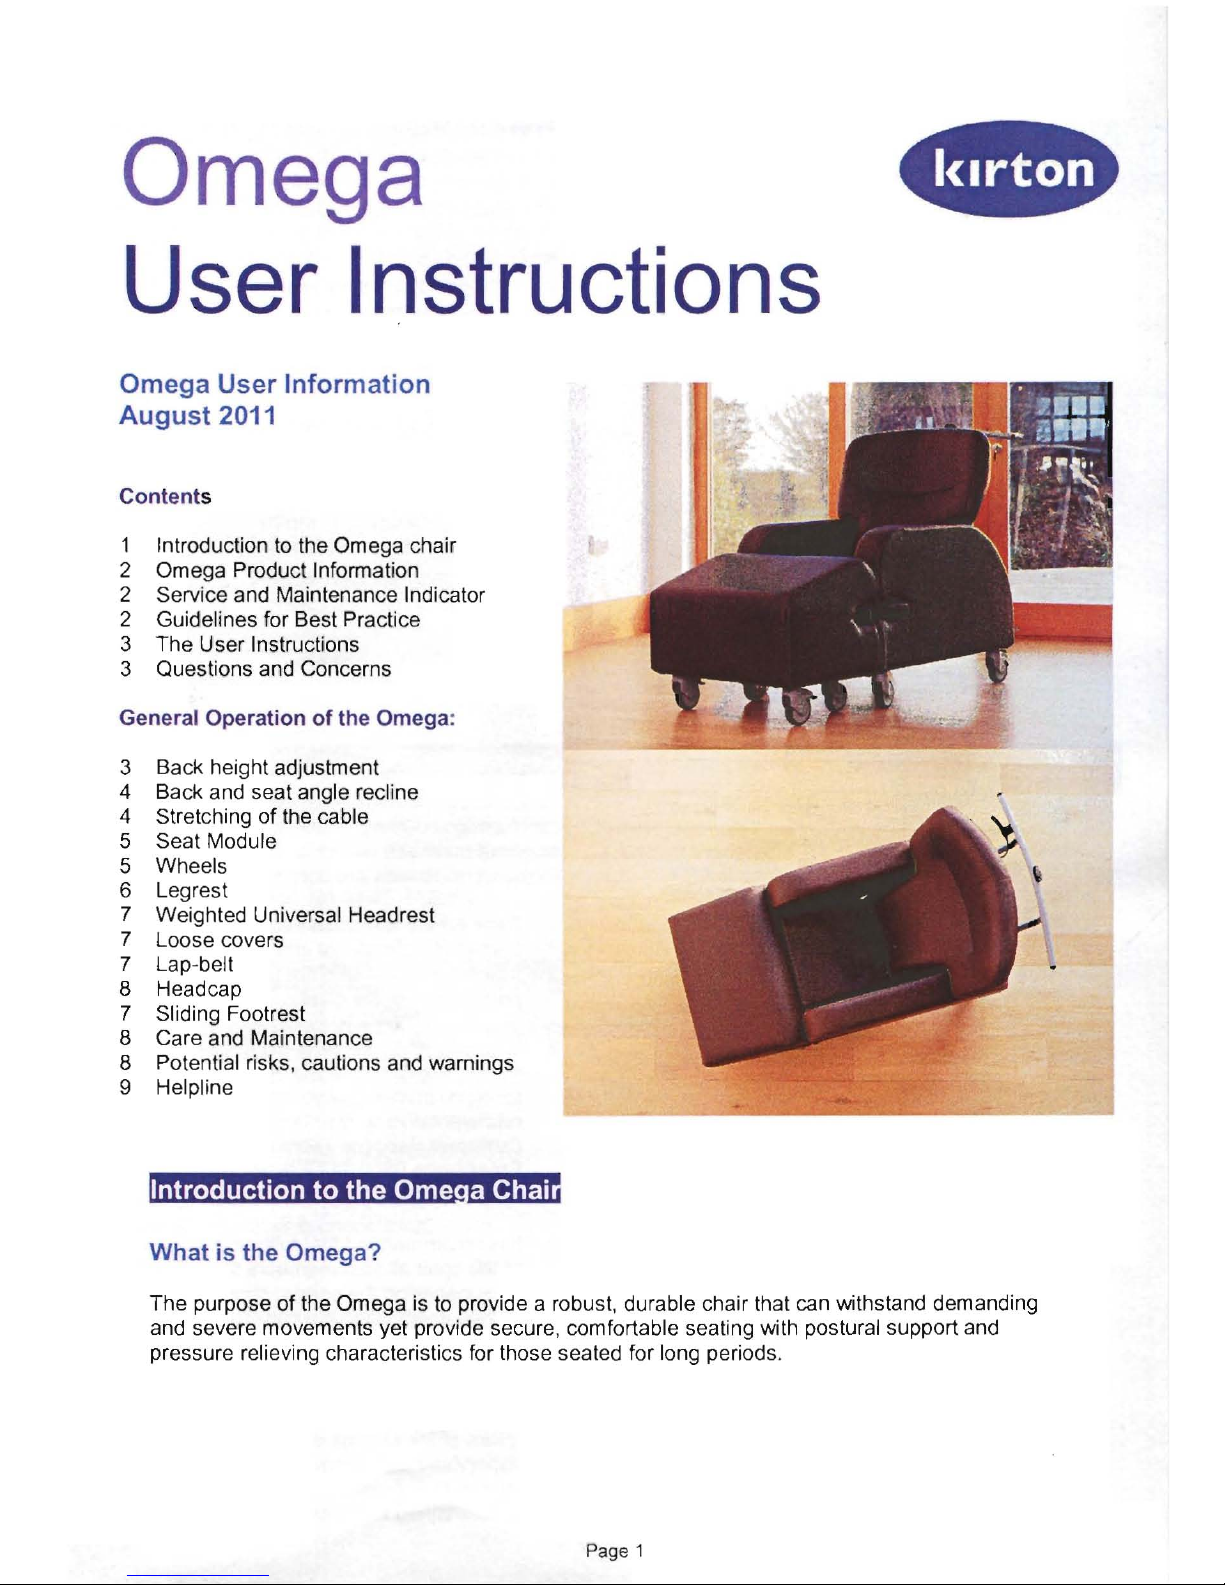
The purpose of Ihe Omega
is
Io provide a robust, durable chair that can withstand demanding
and severe movements yel provide secure, comfortable seating with postural support and
pressure relieving characteristics for those seated for long periods.
Pa
ge
1
Page 2
Why
is
there a need for this type
of
chair?
The Omega was originally designed for
those with Huntington's Disease and other
neurological conditions.
Over time the
Omega has become a recognised and
valued seating system for many other
caring environments.
The ability
of
a seated person
to
function
efficiently and perform activities depends on
their ability
to
adopt the appropriate
posture. All activity is posture dependent.
If
a person cannot move or has problems
adjusting their posture, it may be necessary
to
use seating
to
try to provide externally
what is limited internally.
Comfort and security underpins the Omega
aiming
to
provide a robust, durable chair
that can withstand demanding and severe
movements yet provide a safe and relaxed
seated position.
The Omega allows a good seated position
for relaxing
as
well as for activities such
as
eating. The unique sculpted, bucket style
back and seat offers more stability for the
user whilst enhancing midline positioning
and increasing comfort.
~
Who should cons ider using the
Omega ?
The Omega is for those with Huntington's
disease and other neurological conditions
as
well as for more general nursing care.
The Omega can be used within a variety of
different environments including domestic
homes, hospitals, hospices and nursing
homes.
Service and Maintenance Indicator
A service and maintenance indicator is
located on the push handle
of
the chair.
This indicator will flash after
11
months of
use
to
advise that the chair should be
serviced.
Annual servicing of the chair will extend the
warranty
of
the chair to 5 years if
maintained from new and increase the
chair's lifespan.
The annual maintenance service
is
chargeable per chair. Additional
components and parts will be quoted and
charged separately, if required.
l!Lilli!
61:tlffl
ml
m
hh
i
,@tmi
Pressure Relieving Seat Options
• Intelli-Gel Seat Module
Transflo Gel Seat Module
Reflexion™ Foam Seat Module
Accessories
Weighted Universal Headrest
Cushioned Headrest
•
Sliding footrest
Washable loose covers
Headcap
Lap-Belt
Pelvic Positioners
Options
Three different seat widths
(380m m/430m m/51
Om
m)
Three different seat lengths
(430mm/410mm/500mm)
Weight Limit
150kg/25.5 stone
Guidelines for Best Practice
To ensure good practice when considering
purchasing
an
Omega chair and effective
use post purchase we advise that the
foliowing guidelines are considered:
1.
Seek advice and input from a qualified
therapistiprofessional and/or Kirton
representative/distributor at the initial
prescription
of
the chair.
2.
If unsure when ordering the chair and
any accessories contact either the
therapist involved or your Kirton
representative or distributor or our
Customer Services Team
on
Freephone 0800 212709 or
+44
(O)
1440 705352
to
discuss further.
3.
It is recommended that folIowing receipt
of the chair
all
staff members that will
be
supervising the user(s) should be
trained in adjusting the chair
to
ensure
it
is
adjusted safely and correct
positioning is maintained for the benefit
of the user.
4.
Users of the Omega should be
supervised and checked regularly
to
ensure their most appropriate position
is maintained
in
the chair.
Page 2
Page 3
he User Instructions
The purpose of Ihe folIowing user
inslruclions
is
Io
provide a guide on how Io
ulilise,
adjusl and mainlain Ihe Omega
chair.
These inslruclions should be
read
by
all
Ihose involved wilh Ihe supervision of Ihe
user and/or Ihe care of Ihe chair before use.
The Omega
must
be adjusted in terms of
back heighl for each individual user
and
back angle recline
Io
ensure safe
and
comfortable use.
Please retain these instructions with the
Care and Maintenance card enclosed for
future reference.
Questions and Concerns
Should you experience any difficulties or
have any concerns regarding the initial
purchase or subsequently adjusting the
Omega chair or have any concerns
regarding its use or operation Ihen
immed
ia
lely contact either your Kirton
representative, distributor ar our Customer
Services Team an Freephone 0800
212709
ar
+44
(O)
1440 705352, they will
be delighted to help you .
004
.t461I.)
oMb\!
loj
.ioi"
n·).
Mo
El
It
is
recommended that the chair
is
adjusted
to
accommodate each user's specific
requirements in terms
af
back height and
back/seat angle recline.
Whilst adjusling Ihe back/seat angle recline
is
easily made with the user in the chair the
back height adjustment must be made
when the chair
is
unoccupied.
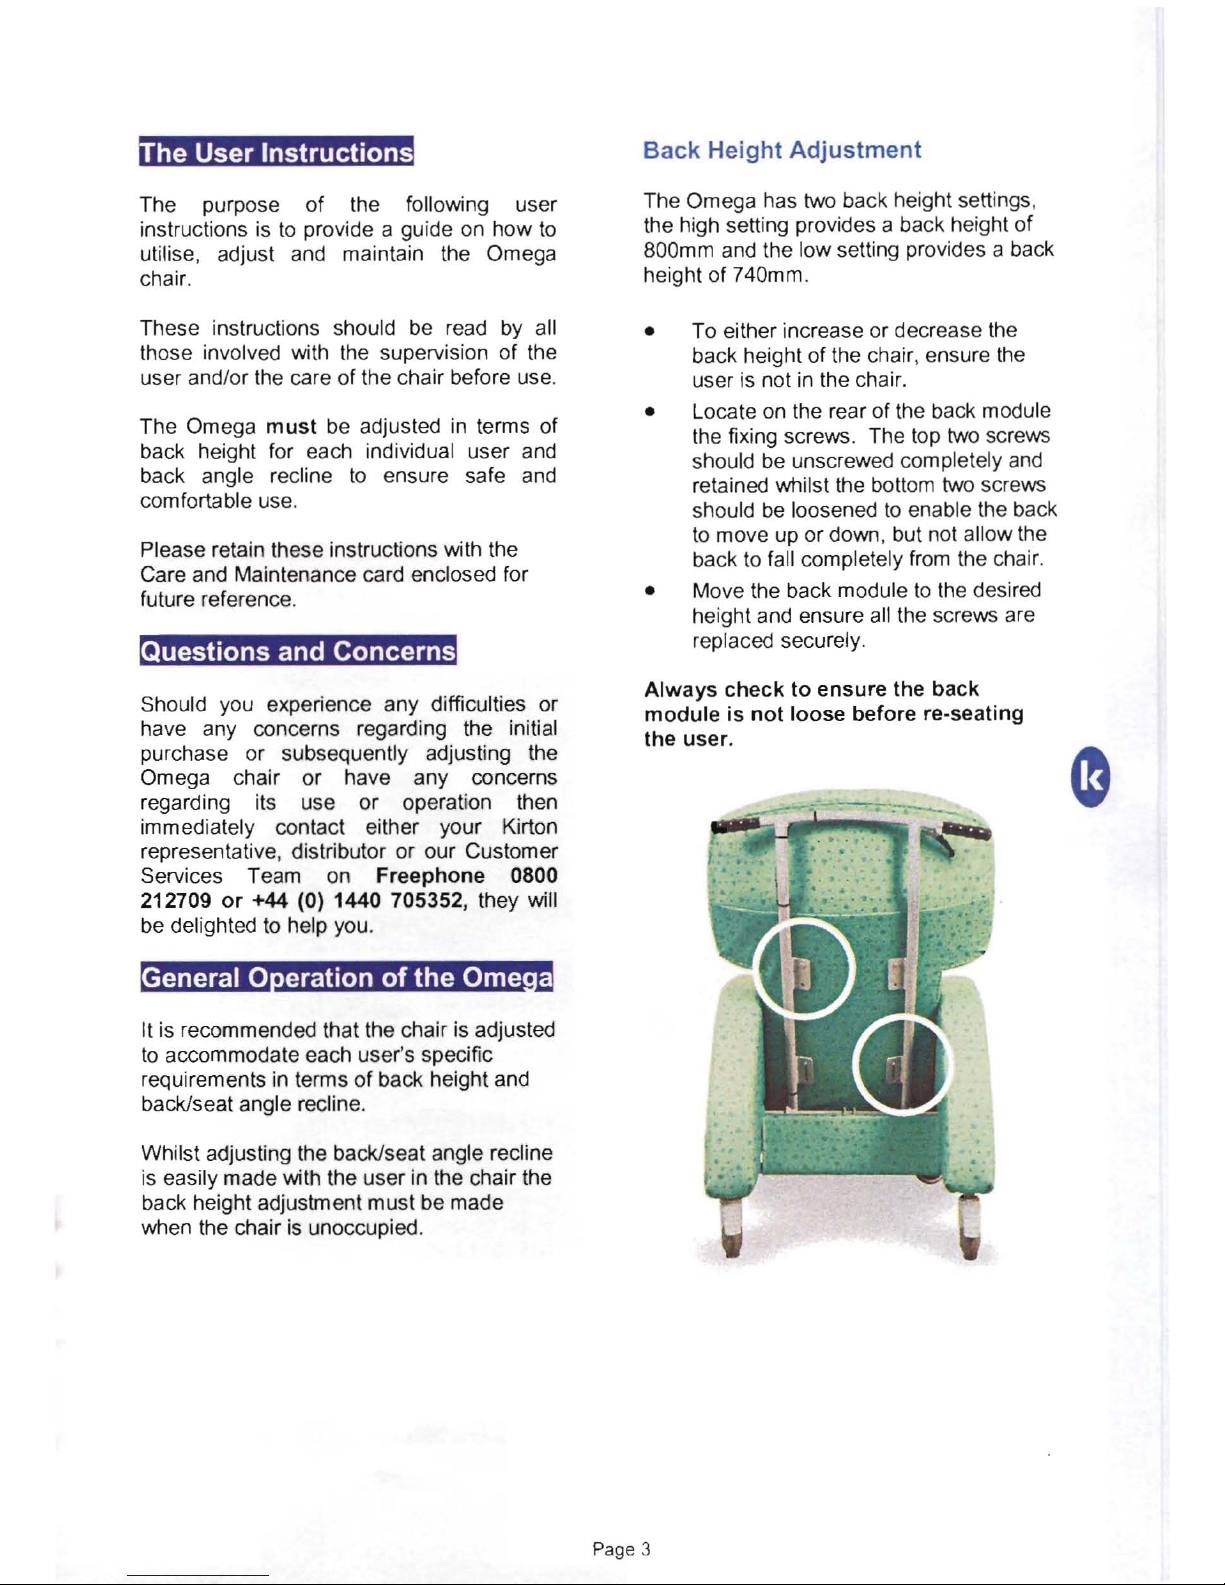
Back
Height
Adjustment
The Omega has
two
back height settings,
the high setting provides a back height
af
800mm and the low setting provides a back
height of 740mm.
• To either increase ar decrease Ihe
back height af the chair, ensure Ihe
user
is
not
in
the chair.
• Locate an the rear of the back module
Ihe fixing screws. The top
two
screws
should be unscrewed completely
and
retained whi l
sl
Ihe bottom
two
screws
should
be
loosened
Io
enable the back
to
mave up ar dawn, but not allow the
back to fall completely
from
Ihe chair.
• Mave the back module
Io
Ihe desired
he
ig
ht and ensure
all
the screws are
replaced securely.
Always
check
to
ensure the back
module
is
not
loose
before re-seating
the
user
.
G
Page
3
Page 4

Back and Seat Angle Recline
The back and seat angle
ean
be altered
by
utilising the gas action adjustment
mechanism. This mechanism
is
located on
the right hand side of the push handle at
the rear of the chair.
The linked back and seat recline enables
the seat angle
to
increase
as
the back
angle reelines
to
ensure
an
optimum seated
position.
To effect the recline of the back
and
seat modul
es,
squeeze the gas action
lever towards the push handle and
~
push downwards
on
the push handle
until the desired position
is
achieved.
•
To return the back
to
a more upright
position, squeeze the gas action
lever
towards the push handle and gently
guide the back
to
the desired position.
Always remember to check the
positioning of the user regularly to
ensure
an
appropriate position is
maintained.
Stretching
of
the cable
Af
ter significant usage the gas action may
become less effective and the lever loose
when squeezing indicating that the cable
has stretched. .
• To tighten the cable loosen the small
screw
on
the top of the lever and with
pliers pull the visible cable through the
lever slightly and retighten the screw.
Page 4
Page 5

~mIM*mffi
Tools required:
Cross headed screwdriver
The seat module
in
the Omega
is
fixed
securely. However, should an alternative
seat be required or
c1eaning
be necessary,
the seat module
ean
be removed.
•
To remove the seat module, turn the
chair over onto its side
so
the
underside of the chair
is
visible. Care
should be taken when attempting
Io
lift
or turn the chair not
to
strain or trap
fingers
as
well
as
damaging the chair.
It
is
advised that at least
two
people
undertake this task.
• Once the underneath of the chair
is
visible, loeate two cross-headed
screws
on
the underside of the seat
module and unscrew. The seat
module will gradually become loose
and once the screws are fully removed
the seat
ean
be removed entirely.
• To replace the seat module, place
the module
to
align the screw holes
with the metal holes in the
framework and ensure the screws
are tightened
securely. Always
double check that the screws are
secure and there
is
no movement
in
the seat module before re-seating
the user.
Mii4M1
Omega chairs are filted with 100mm
wheels
on
both the chair and the legrest.
At the rear of the chair the back
two
wheels are braked and at the front of the
legrest the front
two
wheels are braked.
To apply the brakes, press down
on
the front edge of the ridged
pad
on
each wheel. The brakes should
be
applied during all transfer
operations.
~
~
To unlock the brakes, push down
on
the top edge of the ridged pad until it
is
level with the rest of the wheel.
'!"
>-, ""
Always check that wheels are not
locked before moving the chair.
Page 5
Page 6

Mtml
The leg rest is a foam and wood
construclian
to
which the wheels have
been accurately aligned . The rear wheels
an the legrest have been inset
to
provide
improved mobilily and manoeuvrability.
The legrest
is
fixed
to
the chair by strong,
rubber buckle latches
to
ens ure the leg rest
maintains a firm fixing
to
the chair even
under extreme duress.
I
•
To fix the legrest buckle latches
to
the
chair, the plastic buckle fastener an
the legrest strap should be pulled over
the bracket fixing located
an
the chair.
•
The buckle latches should slot over
the bracket fixing and the buckle
should be pushed forwards until it
snaps shut against the chair. This
should provide a secure fixing
af
the
legrest
to
the chair .
To release the leg rest from the chair,
the buckle fastener should be lifted
open and the tension clasp will spring
open releasing the legrest. This can
be carried out
an
either side
af
the
chair ar indeed
an
both sides.
IOM,IN,MI,I,itil
1
itll4,tml
Af
ter a period af time and use the legrest
may become slack against the chair where
the foam has become depressed
and
this
may cause the legrest
to
be loas e against
the chair.
• The foam will compact over time and
the legrest fitting will become loose
against the chair; moving the legrest
buckle latches will assist closeness
af
the fit.
• The tension
af
legrest buckle latches
can be increased
to
ensure a snug fit
af
the legrest to the chair by moving
the bracket fixing over to the second
set af holes.
Ensure that the fixing point is securely
tightened and cannot be worked loose.
•
This should be completed
an
both
sides
af
the chair arms for the tension
to
be equal and effective.
Page 7

1!Æm15fflillmNJtii
l
:I$I·WMI
The Weighted Universal Headrest can be
attached
to
the Omega chair using a Velcro
strap.
It
is
available in either the chair's upholstery
fabric, Dartex fabric ar the unique Spacer
fabric .
Spacer Fabric
Integral to the Universal headrest
in
Spacer
Fabric
is
the antimicrobial and anti dustmite treatment built into the headrest at the
time af manufacture. The additive provides
protection against fungi, bacteria and dustmites as
well as providing odour prevention
and hygienic freshness importantly, it also
protects against MRSA.
Benefits
of
Spacer Fabric:
• Optimum temperature
• Outstanding air permeability
• Excellent drainage
af
maisture
• Passive ventilation
• Machine washable
• Positively affects the pressure
relieving qualities
af
the
foam
• 100% recyclable
I:
[ff./4iMfM4'U.JMJ
The headcap
is
a protective covering that
slides over the top af the chair to cover the
headresl area in arder Io protect the
upholstery from excessive wear and tear.
The headcap should be pulled dawn fully
over the lap
af
the chair Io avoid slipping ar
sliding.
Loose Covers accessor
The Omega can be fitted with washable
loose
covers for the back and seat
modules, arms and legrest.
At the time af manufacture all Omega
chairs have Velcro fitted
to
the underside
af
both Ihe chair and legrest
to
enable
retraspeclive fitting
af
loas e covers.
All loose covers
tit snugly
to
the chair and
need
to
be pulled firmly over their
respective modules and attached
an
the
underside with the Velcro. The left and
right arms are recognisable due
to
the
opening for the legrest attachment and
therefore only
fil their respective sides.
l!fl3ÆlllMMii1·J
Øl
The Lapbelt hel
ps
to
position the user
in
the
back
af
the chair. Ideally the fixings for the
Lapbelt itself will be fitted at time af
manufacture however, can be fitted
retrospectively by a trained representalive.
To use the Lapbelt effectively, undo
Ihe buckle joining the
two halves af the
strap by depressing the button
an
Ihe
central console and place the straps
over the arms ar
to
the side
af
the seat
befare transferring the user into the
chair.
When the user
is
seated, bring the
two
sides af the buckle together and
fasten.
Adjust the slrap
by
pulling
an
the
plastic loop Io give firm control bul take
care not
to
restrict user movement.
NOTE: Please refer
to
Lap-Belt
User
Instructions
enclosed
for
further
information.
®m
li
a.1
j.f.lUMIMMii1.J
Ml
The sliding footrest
is
designed
to
support
the user's feet whilst the chair
is
occupied.
• To use, pull the footrest forward fully in
a trombone effect.
To retract:
• Slide the footrest back fully, befare
trans ferring
to
ar from the chair.
Do
not
stand on the
Sliding
Footrest.
Always
use the
Sliding
Footrest
to
support
the
users
feet
during
transit.
Page 7
Page 8

Care and Maintenance
For recommended care, cleaning and
maintenance, please refer also
to
the care
and maintenance guidelines enclosed with
your chair and the care label fixed
to
your
chair.
• Wipe down framework with soapy
water and a soft cloth.
• Check castors regularly for bui
Id
up of
fluff and dirt particles
• Cleaning with scouring pads
is
not
advised.
titlfillIim
Should you have any concerns either pre ar
post purchase of the chair contact
our Customer Services Team on
Fr
eephone
0800 212709 or from outside
the UK +44
(O)
1440 705352
to
discuss
further. Alternatively,
if
you purchased your
chair from a Kirton distributor
in
the first
instance please contact your point of
reference there.
If your call concerns a specific seating
product
ar
item of furniture please have
ready your sales arder number before you
telephone. This can be located at the base
of
each chair and helps us identify your
detaiIs and dea
I with your enquiry
efficiently.
..
23
Rookwood
Way
HaverhiII
Suffolk
CB98PB
England
Telephone: +44
(O)
1440 705352
Facismile: +44
(O)
1440 706521
Freephone: 0800 212709
Email:
info@kirtonhealthcare.co.uk
www.kirton-healthcare.co.uk
111®1itRna.l,t4i,I.1
• The user
is
at ri
sk
if the Omega
is
not
specified and adjusted
to
their particular
requirements.
• Do
not
allow the legrest
to
be used as a
seat, nor allow the chair
to
be pushed along
by
It.
Damage or injury could result to the
chair or leg rest, the user or the person siUing
on the legrest
or
pushing the chair .
• Do
not
try moving the chair without first
ensuring that all wheels are unlocked.
• Do
not
sit
on
the arms as this can cause
damage
to
the covering and could make the
stability of the chair unsafe.
• Users should be
regularly
checked and
supervised when
in
the chair
to
mitigate the
user moving or sliding into an inappropriate
position .
• Users and carers should take care not
to
injure themselves
on
the legrest aUachment
catches during entry ar exit of the chair as
they will protrude from the legrest when not
affixed
to
the chair. The catches are
however, manufactured from rubber and will
bend
on
im
pact.
• Users and carers should take care not
to
trap
fingers down either the side of the chair
ar
between the back and the seat module.
Similarly, caution must be observed not to
trap hands between the legrest
and
the chair
when securing the legrest
to
the chair.
• If using any of the accessories such
as
a
Pelvic Positioner or Lap-bell. the user should
be regularly checked and supervised
to
ensure correct positioning
is
maintained .
••
E
 Loading...