

Kirstein DD505 Assembly Instructions Manual
Cymbal Pad
Cymbal Pad
Drum Module
Drum Pad
Drum Pad
Drum Pad
Hi-Hat control pedal Kick Trigger
Watch your fingers when adjusting clamps. They may become pinched resulting in injury.
Be careful around pipe ends, inside the pipe and screw ends. Metal shavings, etc. May injure your fingers.
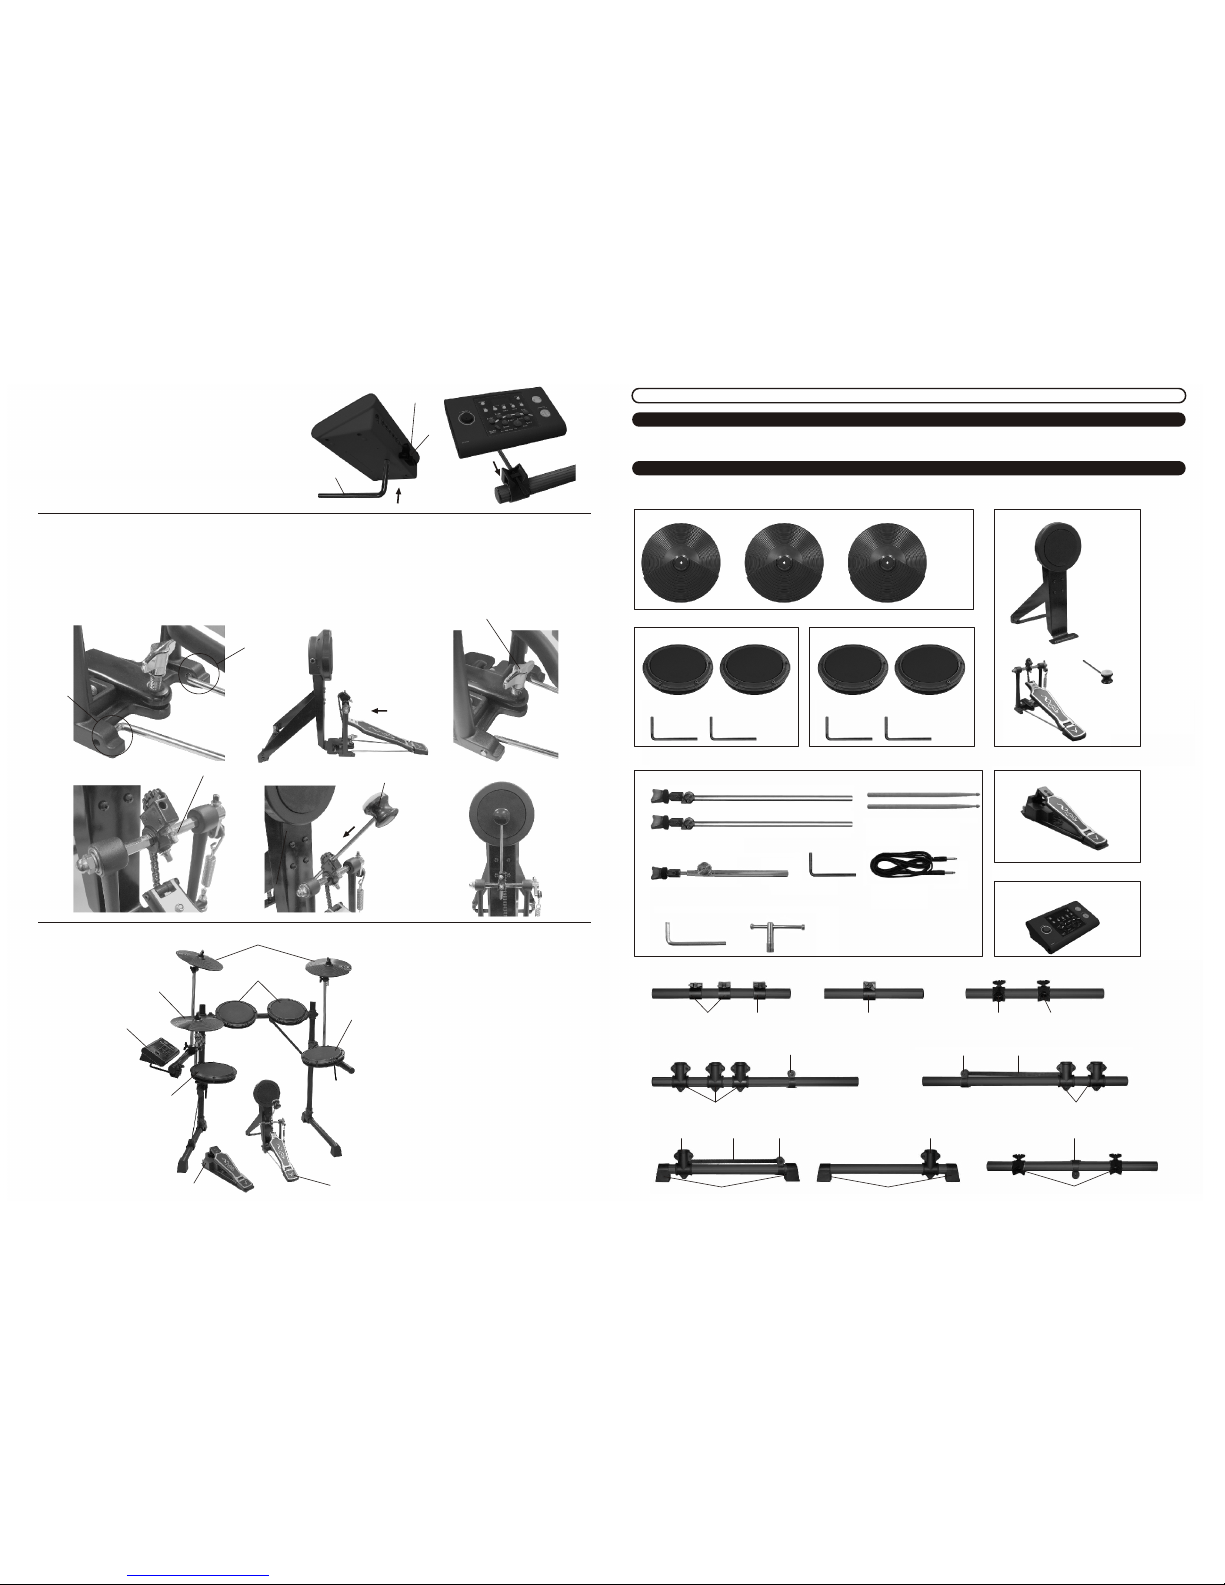
Before assembly, please make sure that all the items listed below are present.
[DRUM PADS] box
[BASS DRUM PEDAL] box
Drum Pad x 2
Kick Pad
Drum Key
Metal Rod x 2
Foot Pedal Beater
Drumstick x 2
AC Adaptor
Instruction Manual
Assembly Instructions
Connecting Cable x 9
Metal Rod
[HI-HAT PEDAL] box
[DRUM MODULE] box
Hi-Hat control pedal
Drum module
Leg (R) Center Pipe
Side Arm (R)Side Arm (L2)
Connector
Holder clamp Cymbal holder clampHolder clamp
Clamp
Holder clamp
Rubber Foots Holder clamp
Connector
Pillar (R)
Connector
Connector
Cross pipe
Clamp
ASSEMBLY INSTRUCTIONS
Caution !
Inside This Package
[CYMBAL 3PCS] box
[DRUM PADS] box
[ACCESSORIES] box
Cymbal Pad x 3
Drum Pad x 2
Metal Rod x 2
Hexagon Key (5mm)
Cymbal holder (L) x 2
Cymbal holder (S)
Side Arm (L1)
Pillar (L)
Leg (L)
Cymbal holder clamp
Clamp
Rubber Foots
Cross pipeClamp
5 Attaching the Kick Trigger
[1] Attach the Rod to the holders.
[2] Attach the Kick Pedal to the Kick Pad.
[3] Tighten the wing screw on the Kick Pedal.
[4] Loosen the screw.
[5] Attach the Beater to the Kick Pedal
[6] Position the Beater from the center of the pedal, tighten the screw
4 Attaching the Drum Module
[1] Attach the Metal Rod to the Drum Module.
[2] Tighten the wing screw securely on the Drum Module.
[3] Attach the Metal Rod to the Holder clamp on the
Side Arm (L1) and adjust the position.
[4] Tighten the wind nut on the Holder clamp.
[1]
Wing screw
Metal Rod
[2]
[3],[4]
6 Setup Example
DD505 V003
[1]
[1]
[2]
[4]
[9]
Beater
[5]
[6]
[3]
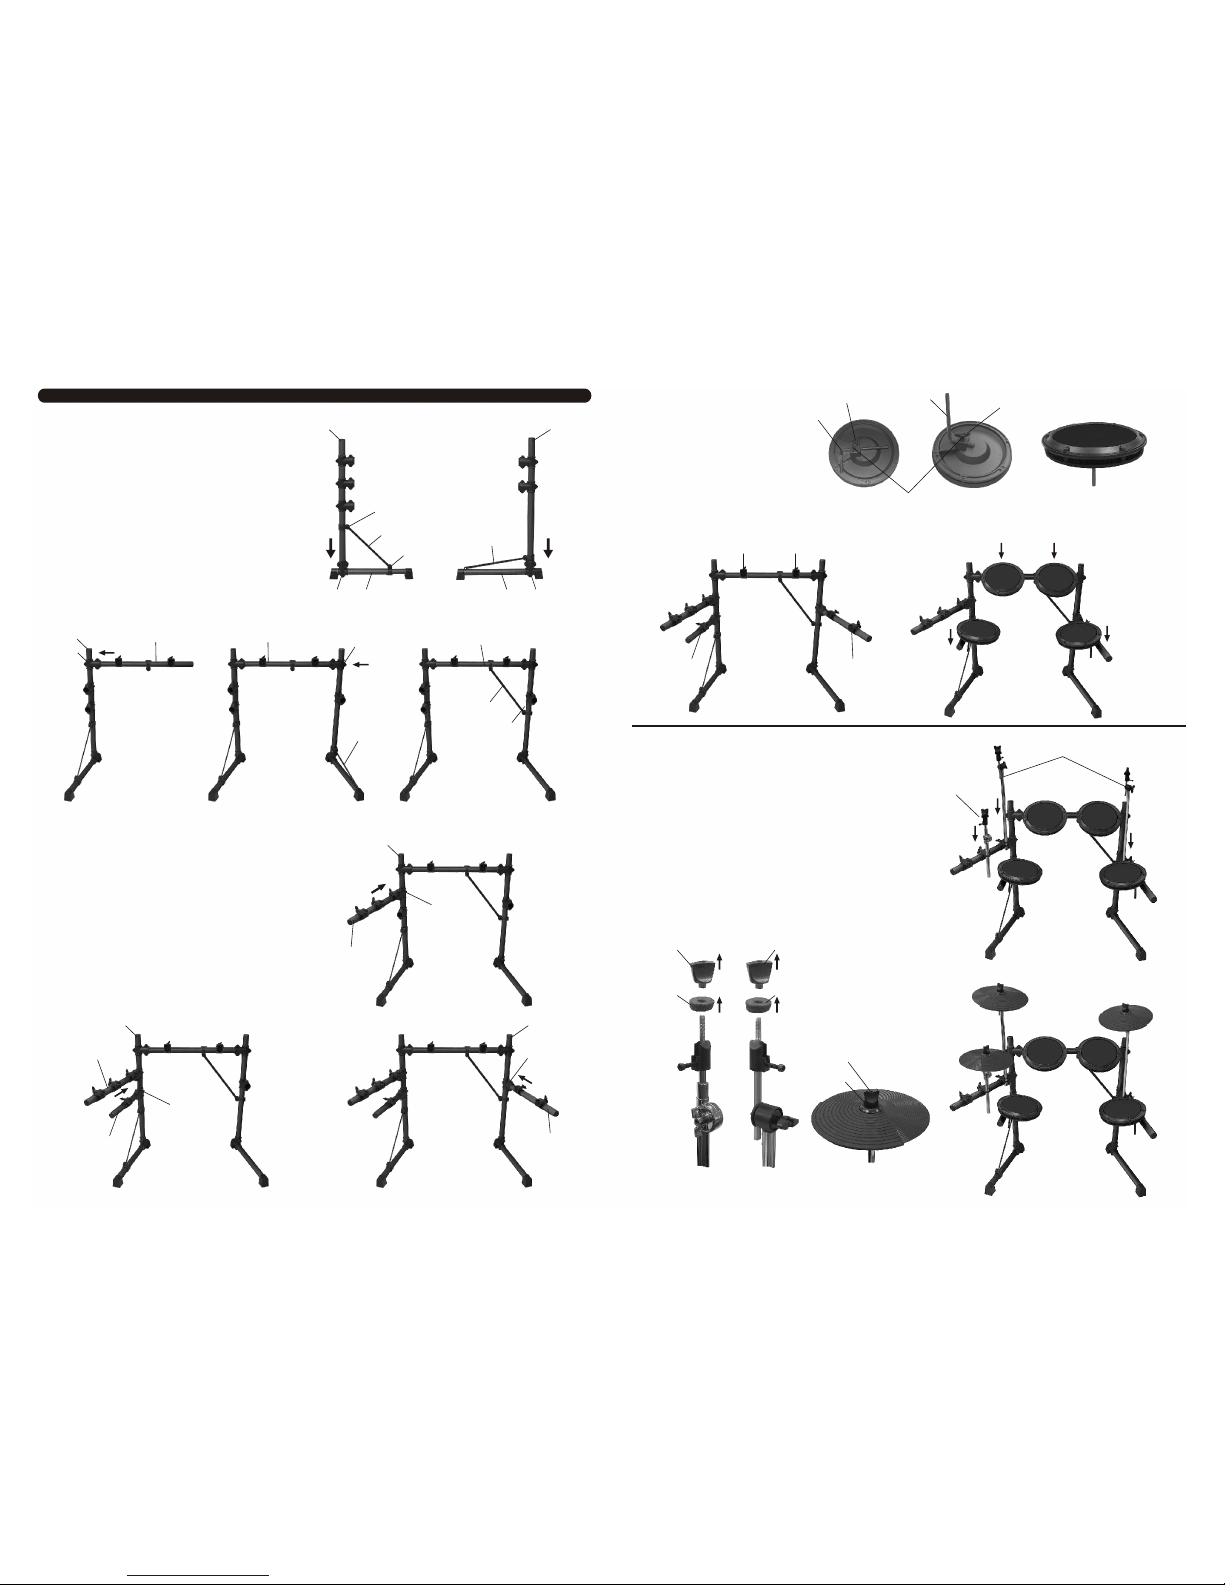
3 Attaching the cymbal pads
[1] Attach the Cymbal holders to the Holder clamps on the
Side Arms.
[2] Tighten the wing nuts on the Holder clamps.
[3] Remove the wing nut and the felt washer of each
Cymbal holders.
[4] Attach the Cymbal pads to the cymbal holders.
[5] Reattach the felt washer and wing nut,
tighten the wing nut of each cymbal holders.
[1]
[2]
[5] [5]
[3]
[4]
Drum Pad Assembly
Holder clamp
Holder clamp Holder clamp
Holder clamp
[5]
[5]
Wing nut
Cymbal holder (S)
Cymbal holder (L)
[1],[2]
[1],[2]
[1],[2]
2 Attaching the drum pads
[1] Loosen the wing nuts on the
drum pads .
[2] Remove the Metal Rods.
[3] Reattach the Metal Rods to
the drum pads.
[4] Tighten the wing nuts securely.
[5] Attach the drum pads assemblies to the holder clamps and adjust their position,
then tighten the wing nuts on the Holder clamps.
Assembly
1 Setting up the frame of the digital drum set
[1] Attach the Pillar (L) to the clamp on the Leg (L).
[2] Using the drum key, tighten the screws on the clamp.
[3] Remove the screw attached to the connector.
[4] Attach the cross pipe to the connector.
[5] Reattach the screw into the connector
[6] Tighten the screw on the connector.
[7] Attach the Pillar (R) to the clamp on the Leg (R).
[8] Tighten the screws on the clamp.
[9] Attach Center Pipe to the clamp on the Leg (L).
[10] Tighten the screws on the clamp.
[11] Attach the Right Leg Assembly to the Center Pipe.
[12] Tighten the screws on the clamp.
[13] Remove the screw attached to the connector
[14] Attach the cross pipe to the connector.
[15] Reattach the screw into the connector.
[16] Tighten the screw on the connector.
Pillar (L)
Leg (L)[2]
[1]
[3],[5],[6]
[4]
[6]
Left Leg Assembly
[10]
[9]
Center Pipe Center Pipe
[11]
[12]
[17] Attach the Side Arm (L1) to the clamp on the Pillar (L) .
[18] Tighten the screws on the clamp.
[19] Attach the Side Arm (L2) to the clamp on the Pillar (L).
[20] Tighten the screws on the clamp.
[21] Attach the Side Arm (R) to the clamp on the Pillar (R)
[22] Tighten the screws on the clamp.
Pillar (L)
[17]
Pillar (L)
[18]
[19]
Pillar (L)
[20]
Pillar (R)
Leg (R) [8]
[7]
Right Leg Assembly
[13],[15],[16]
[14]
[16]
[21]
Pillar (R)
[22]
Side Arm (L1)
Side Arm (L2)
Side Arm (R)
Side Arm (L1)
Cross pipe
Cross pipe
Wing nut Wing nut
Felt washer Felt washer
[3] [3]
[3] [3]
[4],[5]
Wing nut
Felt washer
Cymbal holder (L)Cymbal holder (S)
 Loading...