

Page 1

Kirisun C ommunic ations Co .,Ltd .
http://en.kirisun.com
INSTRUCTION MANUAL
PT6700
FM TRANSCEIVER
Page 2

NOTE:
INSTRUCTION MANUAL
PT6700
FM TRANSCEIVER
We are v ery gr ateful for y our pu rchasing
brand two-wa y r adios produc ed by Kirisu n Commun ica-
tions Co. ,Ltd.
We be li eve tw o- way r adio, which al ways
incorpora te s the latest tech nology, ca n br ing great
convenien ce t o your life and w ork.
We also be lieve that t he q ua lity a nd f un ction of two-
way radi o can m eet your demands for re liable c om muni-
cation.
26
7PIZ-72 10-E01A
Page 3

Notice to the User:
Before using this radio, read this operating instruction
carefully for safe and convenient usage. When you begin to
use it, we deem that you have read this manual.
Keep this manual in a safe place and make it available to other
operators in case the product is passed on to other people.
When purchasing our product, please fill in the WARRANTY
CARD with truth information, and ask for the valid proof of
purchase so as to protect your legal rights.
Kirisun and our authorized partners own the intellectual
property of all the parts of this product (include accessories).
Any design and materials may not be modified, copied,
extracted or translated without the authorization of Kirisun or
its authorized parities.
Due to the update or modification of the product, Kirisun owns
the right to change the specifications of software and
hardware described in this manual without further notice.
Specifications and information contained in this manual are for
reference only.
Kirisun reserves the right to interpret the mistakes and errors
occurring in this manual, though all the contents are checked
carefully.
Safety
◆
Before using this radio, read this operating instruction
carefully for safe and convenient usage.
This product can only be maintained by the professional
Page 4

technicians. Do not disassemble the radio by yourself.
To avoid of the pr obl ems cau sed by electroma gne tic
interference or electromagnetic compatibility, turn off the
radio in any facilities where posted notices instruct you to do
so, such as hospital and other health care facilities. And when
on board an aircraft, turn off the radio if instructed to do so
too.
In the vehicle with an air bag, do not place the radio in the
area over an air bag or in the air bag deployment area.
Turn off the radio before entering any area with a potentially
explosive atmosphere or blasting caps.
Do not operate the radio, disassemble or charge the battery in
the potentially flammable and explosive atmosphere (such as
gas station, coal gas station, etc.).
Do not place the radio under the direct sunlight or near the
area with heating devices.
Do not place the radio in the area with great dust, moisture or
drips, or on the unstable surface.
Contact us or your local dealer for help if you want to redevelop or modify the radio.
Do not use any portable radio that has a damaged antenna. If
a damaged antenna comes into contact with your skin, a
minor burn can result.
Make sure the antenna is correctly installed when using. The
radio without antenna may cause damage in the process of
transmission.
Keep the radio vertically and away from your mouth about
5cm in the process of transmission.
When worn on your body, make sure the antenna is at least
2.5cm away from your body in the process of transmission.
Battery
◆
All batteries can cause property damage and/or bodily injury,
such as burns, if a conductive material such as jewelry, keys,
or beaded chains touches exposed terminals. The conductive
material may complete an electrical circuit (short circuit) and
become quite hot. Excessive care in handling any charged
battery, particular when placing it inside a pocket, purse, or
other container with metal objects. To reduce the potentially
damage, do not expose the battery in the fire, or disassemble
and extrude the battery.
The maximum ambient temperature around the adapter or
transformer for the charger should not exceed 40℃ (104℉).
Turn off the radio when charging. If not, the battery’s capacity
will be affected.
Do not insert the battery pack into the charger when charging
is not necessary. The continuous charging will shorten the
battery’s lifetime. Do not use the charger as the pedestal for
the radio.
To realize the best performance of the battery, change the
battery once a year.
Kirisun Communications Co.,Ltd.
Page 5
CONTENT
Unpacking and Checking 1
Preparation 2
Charging the Battery 2
Installing/Removing the Battery 3
Installing the Antenna 4
Installing the External Speaker/Microphone 4
Installing the Belt Clip 5
Radio Overview 5
Basic Operation 7
Functions of Programmable Buttons 8
Auxiliary Functions 10
Wired Clone Mode 16
Troubleshooting 17
Specifications 19
FCC Notice 20
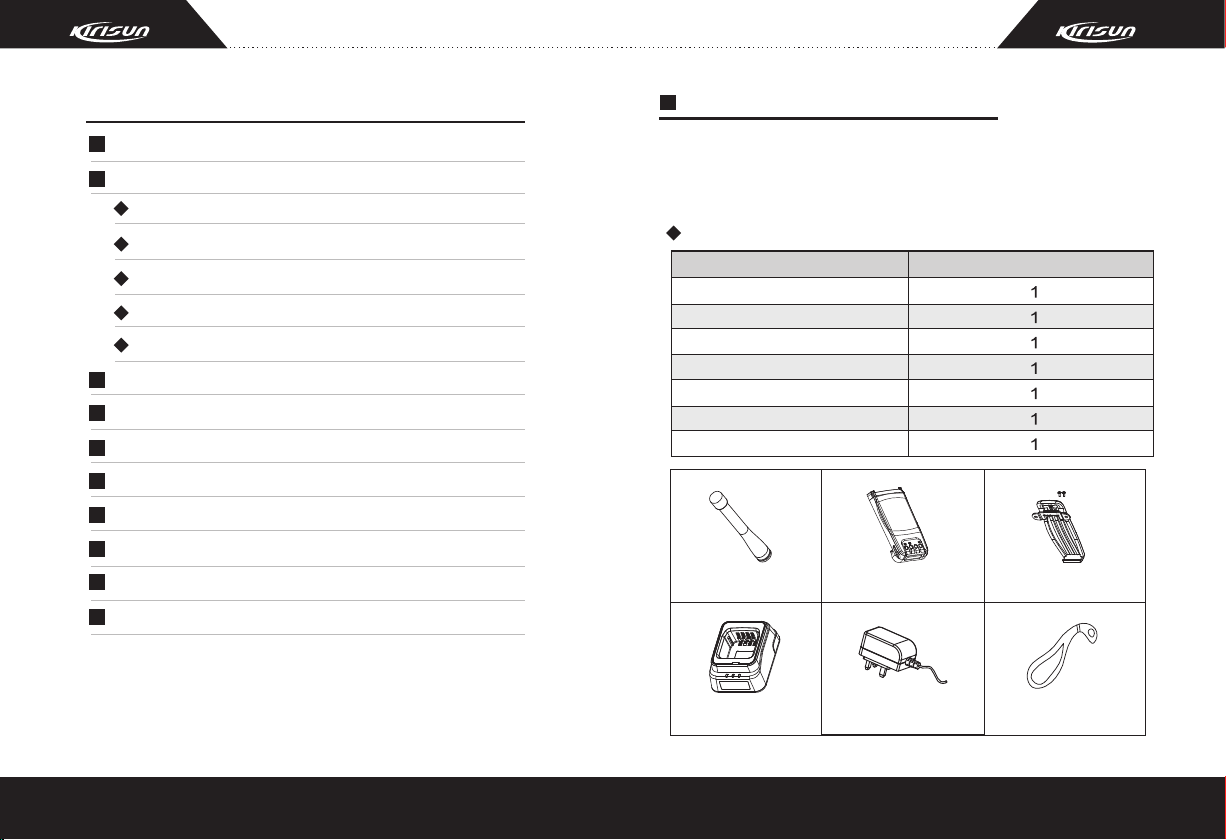
Unpacking and Checking
Unpack the radio carefully. We recommend that you check the
radio and the supplied accessories listed in the following table
before discarding the packing material. If any damage or loss has
occurred during shipment, please contact the dealer without delay.
Supplied Accessories
Item
Antenna
Battery
Belt Clip
Charger
Power Adapt er
Hand Stra p
Instruc tion Manu al
Antenna
Battery
Quant ity
Belt Clip
Charger
Power Adapt er
Hand Stra p
1
Page 6
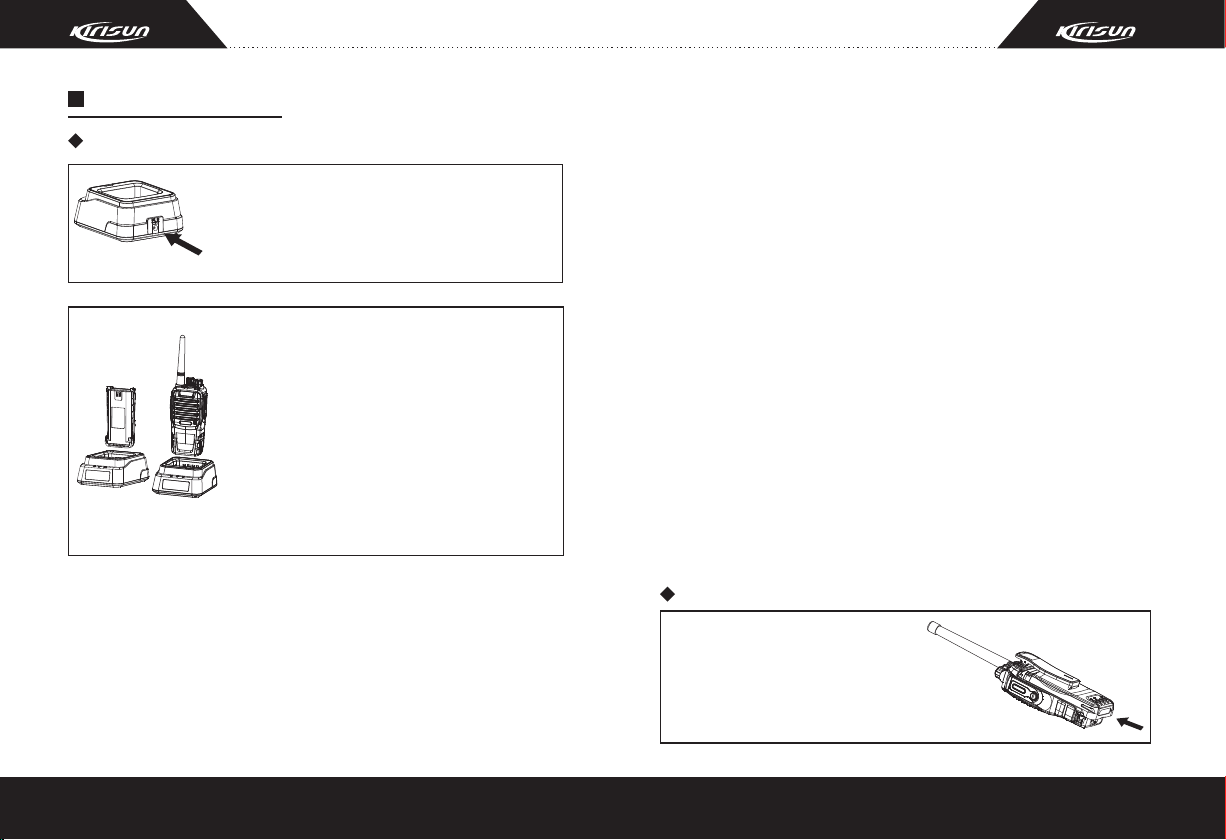
Preparation
Charging the Battery
Plug the adapter into an applicable AC
outlet and connect the power adapter to the
battery charger. Three LED indicators light
up for 1s and then green LED lights up.
Plug the battery or radio into the
charger slot, and make sure the radio has
been turned off.
Make sure the battery is well connected
with the charger. Then red LED lights up,
which indicates that the charging starts.
After about 5 hours of charging, red LED
lights off, and green LED lights up. This
indicates that the battery is fully charged.
Before taking out the battery, keep it in this state for 1~2 hours to
achieve its best performance. Then plug off the adapter from AC
outlet.
If the temperature or the circuit is abnormal, and the LED flashes
yellow, the charger enters protection mode. At this moment, do not
charge the battery by force. Please remove the battery and cut off
the power supply of the charger.
Note:
* The radio battery is not fully charged in the factory. Before the
initial use, please charge the new battery.
* KB-78B Li-poly battery of Kirisun is applicable to this radio.
* When charging the battery for the first time after purchase or longtime storage (over 2 months), please repeat charging several times
for the battery to achieve normal capacity. Meanwhile, please make
sure the battery is charged at least once every three months.
* Do not recharge the battery if it has been fully charged or the radio
is not in the low battery alarm state; otherwise, it will have bad
effects on the battery’s service life and performance. Remove the
battery from the charger after charging.
* When the radio is in the low battery alarm state, please recharge
the battery before use. Do not turn the radio power on by force;
otherwise, it will have bad effects on its service life and
performance.
* KB-78B has built-in protection circuit. When the battery voltage is
too low, the battery stops supplying power automatically. Plug the
battery into the charger, red LED lights up after 1~5 minutes, and
the charging begins.
Installing/Removing the Battery
Installing the Battery:
Press and hold the top of the belt clip;
match the battery with the two slots on
the radio and push forward until a click
is heard. Then the battery is fixed.
2
3
Page 7

Removing the battery
Press down the battery latch, and
push the battery pack downwards until
it separates from the radio.
Note:
* Do not short-circuit the battery terminals or dispose battery in fire.
* Do not disassemble the battery casing by yourself.
I n s t a l l i n g t h e B e l t C l i p
Match the two holes of the belt clip
with those on the rear of the radio,
and then fix the belt clip to the radio
with two 2.5*8.0 screws. Loose the
fixing screws to remove the belt clip.
Installing the Antenna
Hold the bottom of the antenna and
turn the antenna clockwise into the
connector on the top of the radio
until secure.
Install ing the Exter nal Speaker
/Microp hone
O p e n t he co v e r f o r e x t e r n a l
speaker/microphone jack, and then
i n s ert t h e e x t ern a l s pe a k er /
microphone plug into the jack on the
radio.
4
Radio Overview
5
4
6
3
7
2
1
8
5
Page 8

1
LED Indicator
Lights up red while transmitting; lights up green while receiving;
flashes red when the radio is in low voltage.
2
On/Off/Volume Control Knob
Turn clockwise until you hear a click to turn the radio power on.
Turn counterclockwise until you hear a click to turn it off.
Rotate it to adjust the volume after turning on the radio.
3
Channel Selector Knob
Rotate to select channel 1-16.
PTT (Push-To-Talk) Button
4
Press and hold the PTT button and speak into the microphone,
your voice can be sent to the recipient. Release the PTT button
to receive.
Side Button 1 (programmable button)
5
6
Side Button 2 (programmable button)
7
Top Button (programmable button)
8
External Speaker/Microphone Jack
External speaker/microphone can be connected to the radio
through this jack.
Basic Operation
Switch On
Switch on the radio by turning the On/Off/ Volume
control knob clockwise until a click is heard. If
programmed, a beep tone will be heard.
Adjust Volume
Press the programmed “Squelch Off” button to
he ar b ac kg round no ise. T he n ro ta te t he
On/Off/Volume control knob to adjust the volume.
Select a Channel
Rotate the channel selector knob to select the
required channel. You will hear voice from the
speaker while receiving valid signals.
Make a Call
To make a call, select the desired channel, press
and hold the PTT button, and speak to the
microphone in normal voice. Please keep your
mouth 5-10cm away from the microphone.
6
7
Page 9

Receive a Call
Release the PTT button to receive a call.
Your dealer can set QT/DQT signaling on your radio channels
by PC software. If you select a channel that has been preset
with the signaling, you will not hear other calls except those
from your own system.
Functions of Programmable Buttons
The dealer can assign one of the following auxiliary functions to
the top button, side button 1 or side button 2.
Function
No.
None
0
Voice
1
Annunciation
Talkaround
2
Lone Worker
3
Emergency
4
Alarm
Description
No function is assigned.
Press the preprogrammed “Voice Annunciation”
button to change the language and mode of voice
annunciation, meanwhile, the current channel
number can be heard.
When the preprogrammed “Talkaround” button is
pressed, the next transmission will be at the same
frequency as at which it is received.
Press the preprogrammed “Lone Worker” button to
start/stop lone working.
Press the preprogrammed “Emergency Alarm”
button to make an alarm tone according to the
setting of the programming software or send your ID
or background sound to your partner or the system.
Emergency
5
Alarm Off
Scan
6
Nuisance Delete
7
(temporary)
8
High/Low Power
Switch
9
Momentary
Monitor
Monitor
10
Momentary
11
Squelch Off
Squelch Off
12
L o n e W o r ker
13
Reset
Press the preprogrammed “Emergency Alarm
Off” button to quit the Emergency Alarm Mode.
Press the preprogrammed “Scan” button to
start/stop scanning.
If the radio stays at a noise channel while
scanning, press the preprogrammed “Nuisance
Delete” button to delete the noise channel
temporarily.
Press the preprogrammed “High/Low Power
Switch” button to switch between high and low
transmitting power of the radio.
Press and hold the preprogrammed “Momentary
Monitor” button to disable QT、DQT signaling,
and release the button to resume normal
operation.
Press the preprogrammed “Monitor” button to
disable QT、DQT signaling, and you can
receive signals that cannot be heard under
normal operation. Press it again to resume
normal operation.
Press and hold the preprogrammed “Momentary
Squelch Off” button to open squelch; release it
to resume normal operation.
Press the preprogrammed “Squelch Off ” button
to open squelch. Press it again to resume
operation.
Press the preprogrammed “Lone Worker Reset”
button while the radio is in Lone Worker Mode
to reset the lone worker timer, and the timer
starts again.
8
9
Page 10

Auxiliary Functions
TOT (Time-Out-Timer)
1) TOT Function
a) The time-out-timer can prevent the user from continuously talking
overlong and occupying one certain channel for an extended period
of time, and prevent the radio from heating due to continuous
transmitting.
b) The radio is set with a continuous transmitting limit. If the radio is
continuously transmitting longer than the time preset by the dealer,
the radio will make alarm and stop transmitting.
2) TOT Rekey Time
a) A period in which the radio is forbidden to transmit after its
overtime activity.
b) During the period, if the PTT button is pressed, an alert tone will
be sounded, and the transmission is forbidden.
3) TOT Pre-alert
a) The pre-alert will sound before the TOT action.
b) After the pre-alert tone, the timer will action when the transmitting
time has gone beyond the limit.
4) TOT Reset Time
a) The time delay from releasing the PTT button to the resetting of
the timer is limited.
b) The countdown will go on if the time after releasing the PTT key is
shorter than the reset time.
Battery Saving
The dealer can set the power saving mode by programming.
If this function is enabled, and the radio hasn’t receive any signal or
no operation is being acted for 10 seconds, the radio will enter
Battery Saving Mode. When a signal is received or any operation
occurs, it will exit the Battery Saving Mode automatically.
There are four types for battery saving: 1:1, 1:2, 1:4 and Off.
The au tomatic b attery saving f unction can reduce power
consumption of the radio.
Low Battery Warning
When the battery voltage drops too low, the LED will flash. When
the battery voltage drops too low while transmitting, the LED flashes
red and then the radio stops transmitting. You need to recharge or
change the battery.
Voice Annunciation
This function can be enabled or disabled by the dealer. There are
two languages available: Chinese and English. After selecting a
channel by turning the channel selector knob, the channel number
will be annunciated.
QT/DQT
The dealer can set QT/DQT tones on radio channels, which enables
10
11
Page 11

you to ignore (not hear) calls from other irrelevant parties who are
using the same channel. When you receive a signal that has a tone
different from the one set on your radio, you will not hear the signal.
Likewise, signals that you transmit will only be received by parties
whose QT/DQT tones are the same as yours.
Note:
* Using a QT/DQT channel doesn’t mean your calls are private. If
other parties’ QT/DQT tones are identical with yours, they can hear
your calls.
* Set the battery saving mode to be “Off” or “1:1” if the QT/DQT
decoding time is long.
Talkaround
You can expand the communication range of your network through a
repeater. If the radio is out of the communication range, you can
connect with other radios through “Talkaround” mode.
Press the preprogrammed “Talkaround” button to switch between
“Talkaround” mode and “Repeater” mode.
Scan Function
In order to receive calls from many different channels, the radio can
be programmed to scan these channels.
Starting/Stopping Scan
a) Press the button set as “Scan” to start scanning. While in
scanning, the radio checks every channel in the scan list and stops
on which a signal is detected until that signal disappears. If interval
between signal disappearing and continuing scanning has been
preset, the radio will remain on that channel.
b) Priority Scan:
One channel in the scan list can be set as the priority channel,
which enables it to have the highest priority during scanning. The
radio will scan a non-priority channel firstly, then the priority
channel, and then the next non-priority channel, and then the
priority channel again, and the scan goes on like this.
If the priority channel and the “lookback time” have been set for the
scan list, when the radio is receiving signals on a non-priority
channel, and the scanning is paused, the radio will check the
priority channel at the preset intervals. If there are signals in the
priority channel, it will stay at the priority channel; if there is no
signal, it will return to the original channel.
c) The revert channel (Tx channel) during the scan can be
designated by the dealer. There are following options available:
Selected Channel: When pressing the PTT button, the radio will
transmit from the first channel of the scan list.
Selected Channel + Currently Working Channel: When pressing
the PTT button during scanning, the radio will always transmit from
the first channel in the scan list. When pressing the PTT button
during the scanning pause, the radio will always transmit from the
currently working channel.
Priority Channel: The radio will transmit from the priority channel in
12
13
Page 12

the scan list when pressing the PTT button.
Priority Channel + Currently Working Channel: When pressing
the PTT button during scanning, the radio will always transmit from
the priority channel. When pressing the PTT button during the
scanning pause, the radio will transmit from the currently working
channel.
Last Called Channel: When pressing the PTT button, the radio will
transmit from the last channel that received a call.
Last Used + Currently Working Channel: When pressing the PTT
button during the scanning, the radio will transmit from the last
channel that transmits signals. When pressing the PTT button during
the scanning pause, the radio will transmit from the currently
working channel.
Nuisance Delete
During scanning, if a channel continually generates unwanted noise
or interference, you can press the preprogrammed “Nuisance
Delete” button to remove the channel from the scan list temporarily.
Note:
* The priority channel and the last channel in the scan list cannot be
deleted.
* Quit the scan mode and enter it again, the deleted channel will be
added to the scan list again.
Lone Worker
If lone worker function is enabled by PC software, you can press the
button set as lone worker to start lone working. This mode is to
ensure the safety of the user while using the radio separately. The
lone worker timer starts upon pressing the preprogrammed “Lone
Worker” button. If the preset lone worker time expires, the radio will
make an alert tone. If the preset remind time expires, the radio will
enter Emergency Mode and make alarm.
In the Lone Worker Mode, press the preprogrammed “Lone Worker”
button again to quit Lone Worker Mode.
In the Lone Worker Mode, press the preprogrammed “Lone Worker
Reset” button (if a button is designated as the lone worker timer
reset button) or any button (if any button is designated as the lone
worker timer reset button) to restart the lone worker timer.
Emergency Alarm
Press the preprogrammed “Emergency Alarm” button (the pressing
time should be longer than the debounce time of the emergency
alarm switch) to enter the Emergency Alarm Mode. You can give the
warning tone according to the programming software, or send the
background sound to your partner or the system.
Press the preprogrammed “Emergency Alarm Off” button to quit the
Emergency Alarm Mode, the radio stops the alert and resumes
normal operation.
14
15
Page 13

Wired Clone Mode
If the wired clone function is enabled by PC software, after entering
the Wired Clone Mode, the radio needs to be restart to return to user
mode.
The operating steps go as follows:
1. Press and hold side button 2 while turning the radio power on to
enter Clone Mode. If the wired clone function is disabled, the radio
will enter User Mode.
2. Connect the slave radio with the master radio by a clone cable.
Then switch on the slave radio.
3. Press side button 1 of the master radio, the cloning starts. During
the data transmission process, the Led indicator of master radio will
light red, and that of the slave radio will light green. When the
cloning is finished, the red LED of the master radio will be off, and
the slave radio will restart automatically.
4. You can continue to clone data according to step 3.
Note:
The wired clone function can be enabled or disabled by the PC
programming software. Once the wired clone function is disabled,
the radio cannot enter Wired Clone Mode.
Troubleshooting
No. Pro blem Caus es and Solu tions
The radio
1
cannot be
switched on or
no display
after being
switched on.
Phase lock
2
loop unlocked
(Beeping)
3
Cannot
transmit
A. The battery and the radio are not reliably
connected. Please reinstall the battery.
B. The fuse of the power supply is burnt out.
Please change it.
C. The power switch is in failure. Please change it.
D. The battery is out of power, please recharge it
or change it.
E. The CPU is broken, please change it.
A. The channel frequency setting is out of range,
please reset the channel data.
B. The crystal oscillator of phase lock loop is
broken, please change it.
C. The oscillating tube is broken, please change it.
D. The phase lock loop IC is broken, please
change it.
A. The frequencies of both users are not the
same. Please select the same frequency channel
again.
B. The QT/DQT signals of both users are not the
same. Please reset it.
C. The radio is out of effective communication
range.
16
17
Page 14

Specifications
No. Pro blem Caus es and Solu tions
4
No signal
A. The antenna is in poor contact. Please fasten
the antenna head.
B. The HF amplifier is broken, please change it.
C. The squelch level is so high that the squelch
cannot be opened. Please reset the squelch
level.
D. The mixer tube is broken, please change it.
E. The FM processing IC is broken, please
change it.
The transmi-
5
tting red light
is on, but no
voice is heard.
6
The receiving
green light is
on, but no
A. The power module is broken, so there is no
power output. Please change it.
B. The microphone is broken, please change it.
A. The speaker is broken, please change it.
B. The audio amplifier is broken, please change
it.
voice is heard.
General Specification
Frequency
Number of channels
Channel spacing
Dimension(H×W×D)
Weight
Operating temperature
Receiving sensitivity
Frequency stability
Tx power
Max. frequency deviation
Max. audio power
Power supply
PT6700
136~174 MHz, VHF
400~470 MHz, UHF
16
25kHz(W ) /12.5kH z(N)
122mm x54 mmx33mm
298g(in cluding b attery an d antenna )
-25℃ ~+55℃
≤0.28μV
±2.5ppm
4W(U HF),5W( VHF)
<2.5 KHz(W) /<5 KH z( N)
≥1000mW( 16Ω)
DC7.4V
18
19
Page 15

FCC Notice
Your KIRISUN radio generates RF electromagnetic
energy during transmit mode. This radio is designed
for and classified as “Occupational Use Only”,
meaning it must be used only during the course of
employment by individuals aware of the hazards, and
the ways to minimize such hazards. This radio is NOT intended for
use by the “General Population” in an uncontrolled environment.
This radio has been tested and complies with the FCC RF exposure
limits for “Occupational Use Only”. In addition, your KIRISUN radio
complies with the following Standards and Guidelines with regard to
RF energy and electromagnetic energy levels and evaluation of
such levels for exposure to humans:
FCC OET Bulletin 65 Edition 97-01 Supplement C, Evaluating
Compliance with FCC Guidelines for Human Exposure to Radio
Frequency Electromagnetic Fields.
American National Standards Institute (C95.1-1992), IEEE Standard
for Safety Levels with Respect to Human Exposure to Radio
Frequency Electromagnetic Fields, 3 kHz to 300 GHz. American
National Standards Institute (C95.3-1992), IEEE Recommended
Pr act ic e fo r th e Me asu re ment o f Po tenti al ly H azard ou s
Electromagnetic Fields– RF and Microwave.
The aforementioned accessories are authorized for use with this
product. Use of accessories other than those (listed in the
instruction) specified may result in RF exposure levels exceeding
the FCC requirements for wireless RF exposure.
To ensure that your expose to RF electromagnetic
energy is wit hin the FCC al low abl e limits for
occupational use, always adhere to the following
guidelines
DO NOT operate the radio without a proper antenna
attached, as this may damaged the radio and may also cause you to
exceed FCC RF exposure limits. A proper antenna is the antenna
supplied with this radio by the manufacturer or antenna specifically
authorized by the manufacturer for use with this radio.
DO NOT transmits for more than 50% of total radio use time
(“50%duty cycle”). Transmitting more than 50% of the time can
cause FCC RF exposure compliance requirements to be exceeded.
The radio is transmitting when the “TX indicator” lights red. You can
cause the radio to transmit by pressing the “PTT” switch.
ALWAYS keep the antenna at least 2.5 cm (1 inch) away from the
body when transmitting and only use the KIRISUN belt-clip which is
listed in instructions when attaching the radio to your belt, etc., to
ensure FCC RF exposure compliance requirements are not
exceeded. To provide the recipients of your transmission the best
sound quality, hold the antenna at least 5 cm (2 inches) from your
mouth, and slightly off to one side.
The information listed above provides the user with the information
needed to make him or her aware of RF exposure, and what to do to
assure that this radio operates with the FCC RF exposure limits of
this radio.
20
21
Page 16

Electromagnetic Interference/Compatibility During transmissions,
your KIRISUN radio generates RF energy that can possibly cause
interference with other devices or systems. To avoid such
interference, turn off the radio in areas where signs are posted to do
so. DO NOT operate the transmitter in areas that are sensitive to
electromagnetic radiation such as hospitals, aircraft, and blasting
sites.
Occupational/Controlled Use The radio transmitter is used in
situations in which persons are exposed as consequence of their
employment provided those persons are fully aware of the potential
for exposure and can exercise control over their exposure.
IMPORTANT
READ ALL INSTRUCTIONS carefully and completely before using
the transceiver
SAVE THIS INSTRUCTION MANUAL- This instruction manual
contains important operating instructions for the Two-Way Radio
EXPLICIT DEFINITIONS
WORD DE FINIT ION
WARNING
Personal injury, fire hazard or electric shock
may occur.
CAUTION
NOTE
Equipment damage may occur.
If disregarded, inconvenience only, No risk
of personal injury, fire or electric shock.
OPERATING NOTES
When transmitting with a portable radio, hold the radio in a vertical
position with its microphone 5 to 10 cm (2 to 4 inches) away from
your mouth. Keep the antenna at least 2.5 cm (1 inch) from your
head and body.
If you wear a portable two-way radio on your body, ensure that the
antenna is at least 2.5 centimeters (1 inch) from your body when
transmitting.
PRECAUTIONS WARNING!
NEVER hold the transceiver so that the antenna is very close to, or
touching exposed parts of the body, especially the face or eyes,
while transmitting. The transceiver will perform best if the
microphone is 5 to 10 cm (2 to 4 inches) away from the lips and the
transceiver is vertical.
WARNING!
NEVER operate the transceiver with a headset or other audio
accessories at high volume levels.
CAUTION!
NEVER short the terminals of the battery pack. NEVER connect
the transceiver to a power source other than the Battery listed
above. Such a connection will ruin the transceiver.
DO NOT push the PTT when not actually desiring to transmit.
AVOID using or placing the transceiver in direct sunlight or in areas
with temperatures below –30°C (–22°F) or above +60°C (+140°F).
DO NOT modify the transceiver for any reason.
22
23
Page 17

MAKE SURE the flexible antenna and battery pack are securely
attached to the transceiver, and that the antenna and battery pack
are dry before attachment. Exposing the inside of the transceiver to
water will result in serious damage to the transceiver.
FCC CAUTION: Changes or modifications to this device, not
expressly approved by KIRISUN, could void your authority to
operate this transceiver under FCC regulations.
NOTE:
24
25
 Loading...