

Page 1

PT3800(1)
FM HANDHELD TRANSCEIVER
INSTRUCTION MANUAL
Page 2

INSTRUCTION MANUAL
PT3800(1)
FM HANDHELD TRANSCEIVER
Greeting!
We are grateful for your purchase of this transceiver. We believe
the transceiver, which always incorporates the latest technology
can bring great convenience to your life and work; we also believe
that the quality and functions of the transceiver can meet your demands for reliable communication.
To make sure you can get familiar with the functions and proper
operating methods of the transceiver, please read this manual
carefully.
Caution:
Please read this manual carefully before using this transceiver.
Do not use the transceiver or charge the battery in a flammable,
explosive atmosphere or in the areas where transceiver is prohibited, such as gas station, hospital, or airport.
Do not use the transceiver in the areas where government
prohibits.
Do not expose the transceiver to direct sunlight for a long time, or
place it close to heating devices.
Do not place the transceiver in excessively dusty, moist, dabbling
places, or on unstable surface.
If an abnormal odor or smoke is detected coming from the transceiver, turn it off and remove the battery from the transceiver and
promptly contact your local dealer.
The maintaining of transceiver only can be done by professional
technician.
Page 3

Battery and Safety
1. Warranty Exclusions
The company will not be responsible for any failure or safety accident
generating by using the battery without following the Battery and
Safety Directions .
The company will not be responsible for any failure generating by
mismatching circuit which is caused by using no autonomous producing products, like battery pack, charger and transceiver.
The battery is guaranteed for service for 6 months after leaving the
factory. In this period, if there is any abnormal condition from the
battery, you are allowed to change a new one for free, but that is
based on using the battery in conformity with the directions.
2. Conditions and Environment
Using the special charger appointed by the company.
If the battery charging is full, do not charge it repeatedly in a short
time, or that will shorten battery's life or bring safety trouble to you.
Please stop charging, if the battery is charged overtime, but not full.
Do not place, charge or use the battery under strong sunlight for a
long time, or the battery may become heat, fire or fail to use.
The battery has a protecting system for the circuit, it is prohibited to
use the battery in the areas of heavy static (more than 100V) or high
magnetic field, or the protecting system will be damaged and bring
safety trouble.
The charging temperature is from -10 to 40 , please charge within
this range, or the charger may start automatic protection to stop
charging or the battery may be damaged.
If an abnormal odor, leak or any other abnormal situation is detected
coming from the battery, please do not use it, but return it to the
dealer.
Please keep the battery in the clean, dry and ventilated room with
the temperature of -5 35 and the relative humidity not more than
75%, avoid to contacting with any corrosive substance and keep
away from fire and heat.
If the extended storage is needed, please keep the battery in the
clean,dry environment without any corrosive substance in the
temperature of -5 25 . If the time is over three months, the
battery should have a charging. If keep the battery in the unventilated
environment with a temperature of over 40 , the battery may leak,
self-ignite or be damaged by reason of quickening the self discharge.
The battery kept under the temperature of 40 should be charged
once a month and the charging status should be 50% of the battery
capacity.
The battery life will be shortened if using under the maximum conditions, such as limiting temperature, deep charging and discharging
circulation and overcharging / over discharging.
In the extended storage, the battery may be write-off or the capacity
may reduce seriously without any charging and discharging maint-
enance.
3. Safety
To avoid the leaking, heating, firing or exploding of the battery, please
comply with the following protective measures.
Do not place the battery in the water; do not keep the battery in the
damp, unventilated environment with a high temperature for a long
time.
Do not burn or heat the battery; do not use, place or charge the
battery near fire or heat (over 70 ).
Do not reverse the power polarities; do not short-circuit the battery.
Do not connect the battery with battery socket or car battery directly.
Page 4
Do not keep or transit the battery with metals (like necklace).
Do not press or throw the battery; do not use obviously defective or
twisted battery.
Do not use nail or sharp materials to puncture the battery; do not beat
or trample on the battery.
Do not weld the battery directly.
To avoid damaging the safety system of the battery, do not destroy or
modify it; do not disassemble and assemble or remodel the battery.
Do not put the battery in a microwave oven or pressure cooker.
Do not use the battery together with the following batteries, such as
one-shot batteries (alkaline cell) or secondary batteries of different
capacities,brands, and standards or factories. A new battery can not
be used together with an old one.
If the battery sends out abnormal odor, becomes heat, discolours or
twists; or finding any abnormal while using, charging or keeping it,
please remove the battery from the equipment or the charger and stop
using it.
If the battery leaks or sends out abnormal odor, please remove it from
any open fire immediately, or the leaked electrolyte may fire and the
battery may explode.
Please keep children away from the battery, if children swallow the
battery, please see a doctor immediately.
If the battery leaks and the electrolyte goes into the eyes, do not rub
them, but clean them and see a doctor immediately, or that may hurt
your eyes.
Do not reverse charge or forcibly over discharge the battery.
Do not use the battery in other inappropriate equipments.
CONTENTS
1. Unpacking and Checking the Equipment
Supplied Accessories 1
2. Preparation 2
(1) Charging the Battery Pack 2
(2) Installing / Removing the Battery Pack 3
(3) Installing the Antenna 4
(4) Installing / Removing the Belt Clip 4
(5) Installing the Optional Speaker / Microphone 4
3. Getting Acquainted 5
(1) Exterior Figure 5
(2) LCD Display 7
4. Basic Operation 8
5. Menu Setting 11
Menu Description 11
Menu Items 11
6. Channel Memory 12
7. Scan
8. Auxiliary Functions
9. Specifications
10. Troubleshooting Guide
1
15
16
22
22
Page 5
1. Unpacking and Checking the Equipment
Carefully unpack the transceiver. We recommend that you identify the
items listed in the following table before discarding the packing mater-
ial. If any items are missing or have been damaged during shipment,
please contact the carrier or dealer immediately.
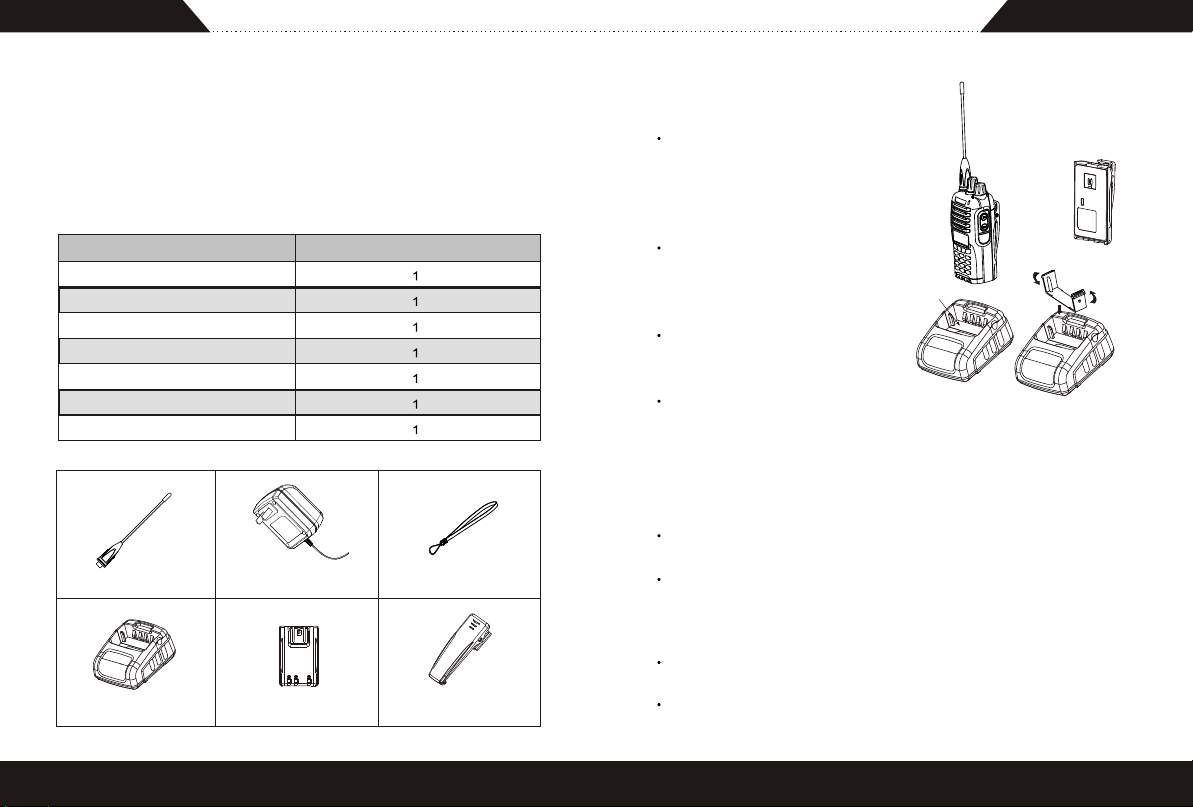
Supplied Accessories
ITEM
Antenna
Adapter
Wrist Loop
Desktop Charger
Battery
Belt Clip
Instruction Manual
Antenna
Desktop Charger
Adapter
Battery
QUANTITY
Wrist Loop
Belt Clip
2. Preparation
(1) Charging the Battery Pack
Plug the AC adapter cable into the
adapter jack located on the rear of
the charger; plug the AC adaptor
into power socket of 220V/50Hz,
and the indicator turns green.
Adjust the mounting bracket of the
charger and slide the battery pack
or the transceiver with the battery
pack into the charger.
Make sure the battery pack contacts
are in contact with the charging
terminals.
The charger LED turns red and charging
begins. The charging time depends on
the battery capacity. After full charging, the charger LED turns green
(Figure 1).
Move the mounting bracket
(Figure1)
Caution:
If the battery charging is full, do not charge it again. Overcharging will
shorten battery's life or damage it.
After purchasing or extended storage (more than 2 months), the
battery cannot reach its maximum capacity for the first time
recharging. After repeatedly charging and discharging the battery two
or three times, the capacity will reach its normal status.
The charger LED turns off when it detects that the battery has been
damaged within the first 10 minutes of charging.
The charger LED turns off when it is on the protecting status due to
Rotate 180 degrees
1
2
Page 6

over current or short circuit. Please cut off the power, and then turn on
again to continue charging.
If the charger tests out the temperature of the battery is too high
(over 60 ), it will stop charging, and the charger LED turns yellow.
After the temperature drops, remove the battery and re-put to
continue charging.
(2) Installing / Removing the Battery Pack
Match the two grooves of the battery pack
with the corresponding guides on the back of the
transceiver.
Slide the battery pack along the back of the
transceiver until the battery release latch on the
base of the transceiver locks.
To remove the battery pack, pull back on the
release latch and slide the pack away from the
transceiver ( Figure2).
(Figure2)
Caution:
Do not short-circuit the battery terminals or dispose the battery into
*
fire.
Never attempt to remove the casing from the battery pack.
*
Do not install the battery pack in the dangerous atmosphere, or
*
sparks will cause explosion.
To avoid explosion,please do not place the battery in the high
*
temperature areas.
(3) Installing the Antenna
Screw the antenna into the connector at the top of the
transceiver by holding the bottom of the antenna and
turn it clockwise until secure ( Figure3).
(Figure3)
(Figure4)
(4) Installing / Removing the Belt Clip
Match the belt clip with the corresponding grooves on the
battery,then press the belt clip downwards to lock it in place.
To remove the belt clip, slide up the belt clip by your nail or
tools (Figure4).
(5) Installing the Optional Speaker / Microphone
Remove the rubber cover and insert the speaker-microphone
plugs into the SP/MIC jacks.
3
4
Page 7

Getting Acquainted
3.
(1) Exterior Figure
B
C
A
D
E
F
A.LED Indicator
LED lights red while transmitting; flashes red while the power
appears low.
B.Channel Selector
Rotate to select channel or use with other keys to realize function
setting.
C.Power / Volume Switch
Turn clockwise to switch ON the transceiver; to switch OFF,turn
counterclockwise until a click is heard; rotate to adjust the volume
level.
D.PTT (Push-to-Talk)
To make a call, press and hold [PTT], then speak into the
microphone with normal voice. Release [PTT] to receive a call.
E.Monitor Button
Press to disable the squelch, and release to enable the squelch
H
G
again.
F.Lamp Button
Press to light the screen and release for 5 seconds, auto light off;
press again to turn off the light.
G.MIC-SP Jacks
For connecting external Microphone / Speaker.
H.Keypad
Numeric Key: input numbers and function selection.
Function Key [F]: use with numeric keys to realize shortcut operation
or function and parameter setting.
Menu Key [MENU]: press to enter the menu mode, use with the
Channel Selector and [OK] or [PTT] to realize function setting.
Confirm Key [OK]: press to confirm or switch between the full-
frequency display mode and the memory frequency mode.
Clear Key [CLR]: clear numbers or exit the menu.
5
6
Page 8

(2) LCD Display
Appear when [F] is pressed to enter the shortc ut function menu.
Appear when the transmitting output power is set low.
Appear when the Sound Control function is activated.
Appear when the CTCSS function is activated.
Appear when the DCS function is activated.
Appear when positive offset reverse frequency is set.
Appear when negative offset reverse frequency is set.
Appear when the Reverse Frequency function is act ivated.
Appear when the memory channel has contained data.
Appear when the channel number has been locked out.
Appear when the Battery Save function is activated.
Appear when the Auto Power Off function is activated.
S-meter (RX) and relative RF power meter (TX).
Display the channel number.
Appear when the keypad is locked.
Show the battery power.
Appear when the beep function is activated.
Appear when the scramble function is activated.
Appear when the ANI function is activated.
4. Basic Operation
Switch on
Rotate Power / Volume Switch clockwise to
turn on the transceiver. A du sounds and
the transceiver is in the operational state.
ICON
DESCRIPTION
VOX
CT
DCS
R
APO
Appear when offset reverse frequency is set.
Appear when offset reverse frequency is set.
Appear when the Auto Power off function is activated.
Display various alphanumeric information such as operating
frequency or menu selection.
Appear when the Beep function is activated.
Appear when the Scrambler function is activated.
7
7
Adjust the Volume
Press and hold the Monitor Button and
meanwhile rotate the Power / Volume
Switch to adjust the volume.
Select the Frequency / Channel
In the full- frequency display mode, rotate the Channel Selector to select the desired frequency;in
the memory frequency mode or the channel
mode,rotate the Channel Selector to select the
desired channel.
PTT Button
To make a call, press and hold [PTT], the LED
lights red, then speaks into the microphone in
your normal voice.
Note: Please keep your mouth away from
microphone 3cm-5cm.
8
Page 9

Adjusting the Squelch Level
The purpose of the squelch is to mute the speaker when no signals
are present.While opening the squelch, you will hear the background noise from the speaker; while closing the squelch, you will
not hear it.
The selected squelch level will determine how strong the signal
must be for openig and closing the squelch.If the selected squelch
level is too high, you will fail to receive weak signals; if the
selected squelch level is too low, you will open the squelch easily
and hear the background noise.
Adjusting the Squelch
1)Press [F], [1]
SQL and the current squelch level appear.
2)Rotate the Channel Selector to select the squelch level from 0 to 9.
Select the level at which the background noise is eliminated when
no signal is present.
3)Press [OK] or [PTT] to keep the setting; press [CLR] to exit and
quit the setting.
Monitor
It is useful for you to use [MONI] when you want to receive weak
signals or use with the Power/Volume Switch to adjust the volume
level.
Transmitting
To transmit, press and hold [PTT] and speak into the microphone.
1)Please keep the microphone about 3-5cm from your mouth, speak in
your normal voice to make sure that the receiver can get the best
tone.
2)When press [PTT], the status of the LED indicator at the top panel
lights red.
3)Release [PTT] to receive.
Receiving
When the channel is called, the LCD displays how strong the signal
is, and you will hear the call. If the signal is weak and you have set a
high squelch level, you may fail to hear the call.
If the CTCSS or DCS signaling has been programmed in your
transceiver, you can only hear the call from the transmitter who has
the same signaling. All the other calls will not be heard.
Display Mode Selection
The transceiver has three display modes: memory frequency mode,
full-frequency display mode and channel mode.
1)Turn off the transceiver, then press [MENU] and turn on the transceiver to switch between channel mode and memory frequency
mode.
2)In the frequency mode, press [OK] to switch between full-frequency
display mode and memory frequency mode.
Selecting Channel
In the memory frequency mode or channel mode, selecting channel is
available.Rotate the Channel Selector to select the desired channel.
Rotate clockwise to increase the channel number, rotate counterclockwise to decrease it.
You can input the channel number directly by the keypad.
Selecting Frequency
9
10
Page 10

In the full-frequency display mode, selecting frequency is available.
No. Function Option
1 SCAN (scan method) CO / TO / SE
2 TOT (time-out timer) OFF / 60 / 90 / 120 / 180
3 SAV (battery save setting) ON / OFF
4 BP (Beep) ON / OFF
5 KY (keypad lock) MANU / AUTO
6 ENC (the Channel Selector on / off) ON / OFF
7 APO (auto power off) OFF / 30 / 60 / 120 / 240
8 ANI (ide ntific ation display on / of f) ON / OFF
Rotate the Channel Selector to select the desired frequency. Rotate
clockwise to increase the frequency;rotate counterclockwise to decrease it, and then the selected frequency will appear on the screen(the
frequencies change according to the step frequency).
Note: Please select a step frequency before selecting frequencies.
For the setting of a step frequency, please refer to the step
directions.
In the full-frequency display mode, inputting frequencies by the keypad is available. You can use the numeric keys of the transceiver to
input frequencies directly. Press [CLR] to clear the wrong numbers.
5. Menu Setting
Menu Description
1)Press [MENU] to enter the menu mode, the menu items appear,
the blinking digits on the right side is the item numbers.
2)Rotate the Channel Selector to select the desired item.
3)Press [OK] or [PTT] to confirm.Then rotate the Channel Selector
to select function and parameter.
4) Press [OK] or [PTT] again to confirm.
5) Press [CLR] to exit the menu.
Menu Items
11
6. Channel Memory
Memory Frequency
In the memory frequency, frequency memory and other parameters
setting are avaliable. There are 99 channels in the transceiver.
1)Enter the full-frequency display mode to select the frequency
and other parameters (such as CTCSS, DCS, offset frequency,
power, etc).
2)Press [MEMO], the memory channel number appears.
3)Rotate the Channel Selector or input the desired memory channel number directly. appears to show that the channel has
contained data.
4)Press [OK] or [PTT] to keep the setting; press [CLR] to exit and
quit the setting.
CTCSS / DCS Setting
If the selected channel has been set CTCSS / DCS signaling, you
will only hear the call from the transceiver with the same signaling.
In the full-frequency display mode, changing CTCSS / DCS signaling is available.
Change the CTCSS / DCS Code for Channel Receiving:
1)Press [F], [7].
CTCSS / DCS code or OFF appear on the screen.
2)Press [MENU] to switch between CTCSS and DCS.
While selecting CTCSS, RC or DCS code appear. Rotate the
Channel Selector to select the desired CTCSS code, OFF means
no CTCSS / DCS signaling.
While selecting DCS, RD or DCS code appear. Rotate the
Channel Selector to select the desired DCS code, press [F] to
select the positive or negative code. OFF means no CTCSS / DCS
12
Page 11

signaling.
3)Press [OK] or [PTT] to keep the setting; press[CLR] to exit and
quit the setting.
4)If CTCSS has been set, CT appears on the LCD while receiv-
ing; If DCS has been set, DCS appears.
Change the CTCSS / DCS Code for Channel Transmitting:
1)Press [F], [8].
CTCSS / DCS code or OFF appear on the screen.
2)Press [MENU] to switch between CTCSS and DCS.
While selecting CTCSS, TC and CTCSS code appear. Rotate the
Channel Selector to select the desired CTCSS code, OFF means
no CTCSS / DCS signaling.
While selecting DCS, TD and DCS code appear. Rotate the Channel Selector to select the desired DCS code, press [F] to select the
positive or negative code. OFF means no CTCSS / DCS
signaling.
3)Press [OK] or [PTT] to keep the setting; press [CLR] to exit and
quit the setting.
4)If CTCSS has been set, CT appears on the LCD while transm-
itting; If DCS has been set, DCS appears.
appears; if OFF is selected, the frequency for transmitting
and receiving will be the same.
2)Press [OK] or [PTT] to keep the setting; press [CLR] to exit and
quit the setting.
3)Press [F], [5] and rotate the Channel Selector or input the offset
frequency directly by the keypad. The range 00.000
37.995MHz is available.
4)Press [OK] or [PTT] to keep the setting; press [CLR] to exit and
quit the setting.
Deleting Memory Channel
1)In the memory frequency mode, select the desired channel (the
channel is not locked out).
2)Press and hold [CLR] for 2 seconds, LCD display DEL-? .
3)Press [OK] or [PTT] again to delete the selected channel.
Deleting All the Memory Channels
1)Switch off power.
2)Press [CLR] and meanwhile rotate the Power/Volume Switch to
switch on power, LCD display AL.DEL? .
3)Press [OK] or [PTT] again to delete all the memory channels.
Offset Frequency Setting
In the full-frequency display mode, offset frequency setting is
available. Offset frequency setting makes the transmission
frequency higher(+) or lower(-) than the received frequency to
increase communication range by a repeater.
1)Press [F], [4]. Rotate the Channel Selector to select offset
frequency or OFF . If + offset frequency is selected, +
appears on the screen; if - offset frequency is selected, -
13
Channel Lockout
Channel Lockout is to avoid the channel being deleted or covered.
1)In the memory frequency mode, select the desired channel.
2)Press [F], [MENU], appears below the channel number to
show that the channel has been locked out.
3)To unlock, press [F], [MENU] again.
14
Page 12

7. Scan
Selecting Scan Resume Method
Before scanning, it is necessary to decide how to continue scanning after detecting a signal.
Time-operated Mode (TO)
The transceiver stops scanning when detecting a signal, remains
there for 5 seconds, and then continues to scan even if the signal is
still present.
Carrier-operated Mode (CO)
The transceiver stops scanning when detecting a signal until the
signal drops out. There is a 5 seconds delay between signal dropout and scan resumption unless the transceiver detects a new
signal during this time.
Search-operated Mode (SE)
The transceiver stops scanning when detecting a signal and pauses on
the channel, and remains there even if the signal has disappeared.
Please select the first item in the menu setting to set a scan
method.
Note:
The basic requirement for memory scanning: minimum need 2 or
more memory channels which have been set and not to be locked.
The squelch must be closed for scan to function.
Frequency Scan
In the full-frequency display mode, frequency scanning is available.
1)Press [SCN] to start scanning.
2)Scan starts at the frequency currently displayed and steadily incre-
ases according to the step .
3)To reverse the scan direction, rotate the Channel Selector clockwise
or counterclockwise.
4)To end the scan and return to the stand-by channel, press any key
other than [MONI], [PTT].
Press [PTT], the transceiver will work at the current frequency and
exit the scan.
Press [MONI], the transceiver will work at the current frequency, release
for 5 seconds, continue to scan.
Memory Scan
In the memory frequency mode or channel mode, memory scanning is
available.
1) Press [SCN] to start scanning.
2) Scan starts at the frequency currently displayed and increases.
3)To reverse the scan direction, rotate the Channel Selector clockwise
or counterclockwise.
4)To end the scan and return to the stand-by channel, press any key
other than [MONI]. Press and hold [MONI], the transceiver will work
on the current channel; release for 5 seconds, continue to scan.
15
8. Auxiliary Functions
Time-out Timer (TOT)
The purpose of the Time-out Timer is to prevent any single person from
using a channel for an extended period of time. If the continuously
transmission time overruns the limited time, the transceiver will stop
transmitting and give out a warning tone.
The limited time can be set by the second item in the menu setting
(unit: second)
.
16
Page 13

Battery Save Function (SAV)
This function is useful to reduce the battery consumption while the
transceiver is in the stand-by state. To set it ON or OFF, please
select the third item in the memu setting .
Beep Function (BP)
While pressing a key on the keypad, a tone will sound. This option
controls low battery warning tone, TOT tone, channel busy tone
and loss of lock tone. To set it ON or OFF, please select the fourth
item in the menu setting .
Keypad Lock Function (KY)
This function disables most of the keys to prevent you from
accidentally activating a function. To set the lock mode (manual or
automatic), please select the fifth item in the menu setting .
When the keypad is locked, appears.
To lock manually, press [F] for about 2 seconds; while
automatically lock has been set, if no operation is performed for
30 seconds, the keypad will be auto locked. To unlock, press [F]
for about 2 seconds.
Encoder (ENC)
To set the Encoder function ON or OFF while the keypad is locked,
please select the sixth item in the menu setting .
Auto Power off (APO)
When no operation is performed or no signal is received for the set
period, the transceiver will turn power OFF automatically. A
warning tone sounds and LCD displays POWOFF before
turning the power off. To set the time, please select the seventh item
in the menu setting . (unit: minute)
Automatic Number Identification (ANI)
This function is available in the transceiver. If a 3 digits ANI code
has been set and the ANI transmission function has been selected
by PC software, the LCD screen of the called transceiver will
display the ANI code. To set the ANI function ON or OFF, the called
transceiver can select the eighth item in the menu setting . While
it is ON, LCD displays ANI .
Busy Channel Lockout
While the funcion is activated. If not set up CTCSS / DCS, the
speaker switch on while receving signal,press [PTT] failing to
transmit. If set up CTCSS / DCS, the speaker switch off while
receiving the signal with incorrect CTCSS / DCS, press [PTT]
failing to transmit; if the CTCSS / DCS is correct, the speaker
switch on, press [PTT] to transmit.
Press [F], [MEMO] and rotate the Channel Selector to set the
function ON or OFF, then press [OK] or [PTT] to keep the setting.
High / Low Power
In a certain communciation range, if receive the signal clearly, to
reduce the battery consumption and prolong the service time, please
select low output power.
Press [F], [2] and rotate the Channel Selector to select high or low
power, then press [OK] or [PTT] to keep the setting. If select low
power, LCD display LO ; if select high power, LO disappear
from the screen.
17
18
Page 14

Scrambler Function
Built in voice security system to avoid being wiretapped.
Press [F],[3] and rotate the Channel Selector to select the
scrambler function ON or OFF, then press [OK] or [PTT] to keep the
setting. If select ON, LCD display
VOX Function
In the stand-by state, if the VOX function is activated, LCD display
VOX . If the voice higher than the default, the transceiver auto
switch to the transmitting state; if lower than the default, the
transceiver returns to the receiving mode within 2 seconds. In the
strong noise surroundings, It may result in mis-transmission, so please
set the VOX sensitivity in a suitable level.
Adjust VOX Sensitivity:
Press [F], [6], LCD display VOX and the current VOX sensitivity
level, rotate the Channel Selector to select the VOX sensitivity level
(0 9 or OFF), then press [OK] or [PTT] to keep the setting.
Note: This function will be more perfect with an earphone.
Reverse Frequency Function
While the Reverse Frequency is activated, the transmitting frequency
and receiving frequency are interchangeable, that's convenient for
you to manually check the signal strength from the station which
connects with the repeater.
Switch the Reverse Frequency Function:
Press [F], [0], LCD display R , the Reverse Frequency function is
ON; press [F], [0] again, R disappears, the function is OFF.
Note: while changing the channel or setting the Scan function on, the
Reverse Frequency function will be OFF automatically.
Lamp Function
You can set lamp function AUTO, ON or OFF.
AUTO: To light the screen, press [lamp] , this moment, press any key
other than [PTT] and [MONI], the light will be ON for about 5 seconds;
press [lamp] again to turn off the light immediately.
ON: press [F], [lamp], the light will remain ON until you press [F],
[lamp] again.
Step Size
In the full-frequency display mode, rotate the Channel Selector to
select the desired frequency, while scanning, the frequency will
steadily increase or decrease according to the step size you have
set.
Step Size Setting:
Press [F], [9] to enter the step size setting, rotate the Channel
Selector to select a step size (5, 6.25, 10, 12.5, 25, unit: KHz), then
press [OK] or [PTT] to keep the setting.
19
Alarm Function
Under the stand-by status, the transceiver will emit alert with high
decibel, and meanwhile emit alert to other transceivers with the same
frequency in the group and display its ANI code on them. Press [SCN]
again to stop it.
Wired Clone Function
This function is useful to clone data between transceivers.
1)Connect two transceivers by a data wire.
2)Turn on the sub-transceiver which will receive data and enter the
user mode.
20
Page 15

3)Press and hold [MONI] for 2 seconds to turn on the host transceiver
Frequency 400-470MHz
RF P ower High: 5 W / Low: 1.2 W
Channels 99
Transmitting Current
1.6 A
Wor king Temperature
-25 -- +55
Power Source DC7.4V (Li-ion Bat tery)
Dimension
56mm mm mm
Weight 223 g with battery and antenna
NO Probl em Solution
1
Can not switch on
The bat tery p ower is low, pl ease charge
or change it.
The bat tery i s not well c onnected, ju st
remove t he batt ery and reload it .
2
Standby time is
short after c hargi ng
Batt ery li fe is end ing, please change a
new one.
3
Unabl e to tal k wit h
others in th e same
group
It i s out of c ommunic ation r ange.
Use diff erent fr equenc y or CTC SS /
DCS, please res et it.
4
Hear oth er voic es
(not fr om th e same
group) in the
channel
Please change the fr equency or CTCSS
and make sure t o chang e the setting of
the transceivers in your group.
and enter the clone mode, LCD display CLONE? . Press [MONI]
again to start to clone. If the data is successfully transmitted, LCD
display SUCCES .
4)If the sub-transceiver has received the clone signal, LCD display
PROGRA .
5)If fail to transmit, LCD of the host transceiver display ERROR ,
this moment, turn off the two transceivers and then turn on again to
restart the clone.
Low Battery Power Warning
When the battery power appears low, the indicator flashes red for
every 10 seconds and giving a warning tone to stop transmitting.
9 Specifications
Specifications
10. Troubleshooting Guide
PT3800(1)
136-174MHz
W
60
0
117mmX56mmX39mm
50
1100mAh)
21
Standby time is short
after full charging
replace
22
 Loading...