

Page 1

2
°²È«ÐÔ£ºÊ¹ÓÃÕ߶ÔʹÓöԽ²»úµÄÒ»°ãΣÏÕÐÔµÄÁ˽âºÍÈÏʶÊǺÜÖØÒªµÄ¡£
We are grateful you have chosen for your
land mobile application. We believe this easy to use
transceiver will provide dependable communication
to keep personal operating at peak efficiency.
Transceiver incorporates the latest and
advanced technology, so you will be pleased with
this product quality and features .
MODELS COVERED BY THIS MANUAL
PT2208/3208
PRECAUTIONS
Please observe the following precautions to prevent
fire, personal injury, and transceiver damage.
Do not operate your transceiver while taking on fuel,
or not while parked.
Do not expose the transceiver for a long period to
direct sunlight, nor places the transceiver close to
heating appliances.
Do not place the transceiver in excessively dusty
areas, humid areas , not on unstable surfaces.
Do not modify this transceiver for any reason.
Refer service to qualified licensed or certificated
technician only.
Notice: this radio is intended for use in occupational
/controlled conditions , where users have full knowledge
of their exposure and can exercise control over their
exposure to meet FCC limits. This radio device is NOT
authorized for general population , consumer , or any
other use .
Page 2
1
1
1
1
1
1
1
ÌìÏß
³дµзµзФ´ККЕдЖч
CONTENTS
UNPACKING AND CHECKING EQUIPMENT
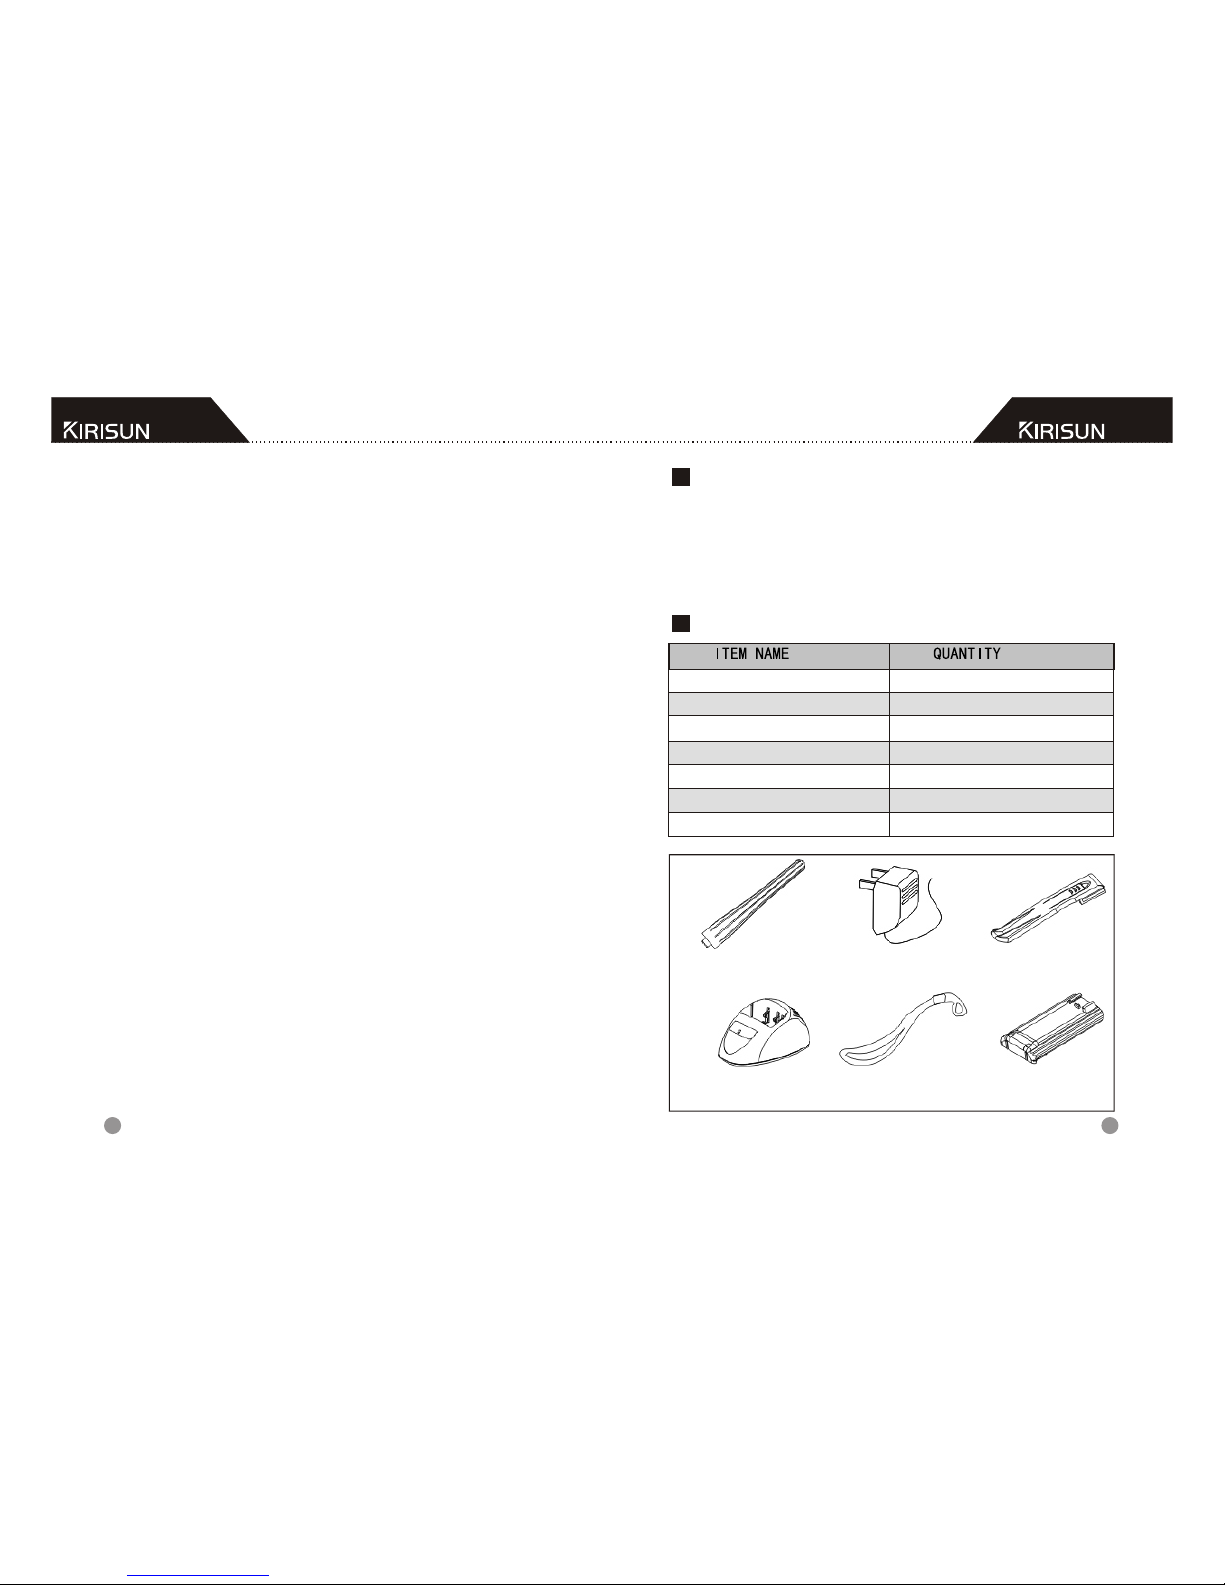
Carefully unpack the transceiver.We recommend
that you identify the items listed in the following
table before discarding the packing material. If
any damage has occurred during shipment, file a
claim with the carrier immediately .
SUPPLIED ACCESSORIES
Antenna
Wrist loop
Belt clip
Battery
Charger
Adaptor
Manual instruction
Antenna
Adaptor
Belt clip
Charger
Wrist loop
Battery
Unpacking and checking equipment.............
Supplied accessories........................................
Preparation
Charging the battery pack...........................
Installing /Removing the battery pack............
Installing the antenna .................................
Installing the optional Speaker/Microphone....
Installing /Removing the belt clip ....................
Getting Acquainted..........................
Basic operation ...........................................
Scan function .............................................
Start scan....................................................
End scan...........................................................
Auxiliary Function
Time-out Timer..............................................
Battery saving..............................................
Low battery warning .....................................
Monitor......................................................
QT & DQT.....................................................
Troubleshooting guide ................................
Frequency chart..............................................
3
3
4
5
6
7
7
8
9
10
10
10
13
13
13
14
14
15
16
22 23
Page 3

2
4
2
5
Don`t dispose exhausted batteries in the household
Waste. Bring back such batteries to your dealer or
bring the exhausted batteries to a special disposal
Service.
½«µç³ØµÄËĸö°¼²Û¶Ô×¼¶Ô½²»ú±³¿ÇÉϵÄ
ÏàÓ¦µ¼¹ì¡£
Plug the AC adaptor cable
into the adaptor jack located
on the rear of the charger;
Plug the AC adaptor into
an AC outlet.
Match the four grooves of
the battery pack with the
corresponding guides on
the back of the transceiver
Slide the battery pack along
the back of the transceiver
until the release latch on the
base of the transceiver locks
To remove the battery
pack , pull back on the
release latch and slide
the pack away from
the transceiver
PREPARATION
Slide the battery pack or
transceiver with a battery
pack into the charger.
Make sure the battery pack
contacts are in contact with
the charging terminals .
The charger LED turns red
and charging begins .
After charging the battery for 4 hours, the charger
LED light turns green, disconnect it from the charger.
Disconnect the adaptor from the AC outlet
CHARGE THE BATTERY INSTALLING /REMOVING THE
Page 4

2
6
2
7
°²×°Æ¤´ø¼Ð
°²×°Ê±£¬½«Æ¤´ø¼ÐÉϲ¿
¶Ô×¼µç³Ø±³ÃæµÄµ¼²Û£¬Êʵ±
УГБ¦ПтЙПНЖ½ш¼´¿Й£»Р¶Æ¤´ø
¼Ðʱ£¬ÓÃÖ¸¼×»ò¹¤¾ß²åÈëƤ
´ø¼ÐÉϲ¿µÄ°¼²Û£¬ÏòÉϲ¦¶¯
¿¨Ж¬£¬Н¬К±ПтПВУГБ¦НЖƤ´ø
¼Ð¼´¿ÉÈ¡Ï¡£
Screw the antenna into
the connector on the top
of the transceiver by holding
the antenna at its base and
turning it clockwise until
secure.
If you don`t use a speaker
/microphone, installing the
cover over the speaker /
microphone jacks with the
supplied 3x6mm screw.
Insert the speaker
/microphone plugs
into the Speaker
/Microphone jacks.
Attached the locking
bracket with the supplied 3x6mm screw.
If necessary, attach the
belt clip with the two
3x4mm screws from
the supplied screw set.
INSTALLING ANTENNA
INSTALLING THE OPTIONAL
SPEAKER /MICROPHONE
INSTALLING THE COVER
OVER THE SPEAKER
/MICROPHONE JACKS
INSTALLING /REMOVING
THE BELT CLIP
Page 5

2
8
2
9
»ù±¾²Ù×÷
°´Ë³Ê±Õë·½Ïòת¶¯µçÔ´/ÒôÁ¿¿ª¹Ø£¬´ò¿ª¶Ô½²»úµÄµçÔ´¡£
·¢³ö¡°àÖ¡±Òô£¬±íʾ¶Ô½²»ú´¦ÓÚ×¼±¸¹¤×÷״̬¡£
Switch on:
Switch on the transceiver by turning
the Power /Volume control clockwise
Till a click is heard, then the transceiver
will be in the state of stand by.
GETTING ACQUAINTED
Basic operation
LED INDICATOR
LED Lights red while
transmitting; lights
green while receiving
a signal; flashes red
when the battery
voltage is low while
transmitting.
CHANNEL SELECTOR
Rotate to select channel 1-16.
POWER /VOLUME SWITCH
Turn clockwise to switch ON the transceiver ;
To switch OFF the transceiver, turn
counterclockwise until a click sounds;
Rotate to adjust the volume level.
PTT (push-to -talk)
To make a call, press and hold the PTT button , then
speak into the microphone with normal voice.
Release the PTT to receive.
MONITOR BUTTON
Press the button for closing the SQUELCH, and
release for open.
MIC-SP JACKS
If desired, connect a speaker -microphone here.
Adjusting volume:
To adjust volume, turn the POWER
/VOL control, while using MONI to
listen to channel background noise.
Selecting channel :
Rotate the channel selector to select
channels.
Page 6

2
10
211
¸¨Öú¹¦ÄÜ
Transmitting:
To make a call, press PTT, and speak
in normal voice, please hold the
microphone 1.5 inches away from
your mouth.
Receiving :
Releasing PTT, and adjusting the volume properly,
you will hear the calling from the speaker.
SCAN FUNCTION
(This function may be prohibited by local dealer )
START SCAN
While switch to channel 16, the transceiver will
begin to scan , and pause after receiving signals.
END SCAN
While switch to channel 1-15, the scan will be stopped
Introduction :
1. Dealers can set the following two ways to restart
the scan after its pausing :
1) Time -control :
The transceiver will restart the scan after pausing
for some time while receiving signals. The pausing
time can be preset from 0.5 to 5 seconds.
2) Carrier wave control :
The transceiver will pause the scan after receiving
signals and will restart the scan 3 seconds later after
the pause disappears.
2. The working channel of the transceiver will
return to the following channels automatically
by pressing PTT during the scan. The dealer can
select one among the following four ways.
1) Selected channel
When pressing PTT during the scan, the transceiver
will always transmit from the first channel of the
scanning list.
2) Selected channel or currently working channel
If pressing PTT during scanning, the transceiver
will transmit from the first channel in the scanning
list. If pressing PTT during the scan pausing,
the transceiver will transmit from current channel.
3) Prior channel
The transceiver will always send signals from the prior
channel in the scan list when pressing PTT.
4) Prior channel +currently working channel
When the transceiver is scanning, it will send signals
from the prior channel in the scanning list,
by pressing PTT.
Page 7

REMARKS:
The above mentioned currently working channel
means the channel in which the transceiver holds
on under the following four conditions.
2) When receiving signals during scan, the
transceiver will pause and stay in current
channel for 3 seconds after the signals
disappear.
3) Transceiver will stay in current channel when
pressing PTT during scan.
4)The transmitting will end by releasing PTT,
Within the transmitting pause time preset by
local distributor ,the transceiver will stay in
current channel.
AUXILIARY FUNCTIONS
TIME-OUT- TIMER
The purpose of the Time -out -Timer is to prevent any single
person from using a channel to transmit for an extended
period of the time. If you continuously transmit for 10 minutes,
the transceiver will stop transmitting and a tone will be
heard. To stop the tone , release the PTT switch. You can
press the PTT again t o resume transmitting .
B ATTERY SAVING
The Battery- Saving function decreases the power
consumption when no signal being received or no
operations being performed (no keys are being pressed ,
and no switches are being turned .)
L OW BATTERY WARNING
Low battery warning alerts you, when the battery need s to
be recharged while transmitting. If the battery power goes
below a certain value , the LED light will blink red, and the
transceiver will stop transmitting .¡£
2
*
12
2
13
SELECTED CHANNEL :
The first channel in the scanning list set by
distributor.
PRIOR CHANNEL:
The prior channel in the scanning list set
by distributor.
*
1) Before restarting the scan after receiving the
signals, the transceiver still stay in current
channel.
Page 8

2
14
No power
Battery power
dies shortly
after charging
Can not talk to
or hear other
members in
your group
Make sure you are using the same
frequency and quiet talk tone as the
other members in your group.
Other group members may be too
far away . Make sure you are within
the range of the other transceivers.
NO.
PROBLEM
SOLUTION
MONITOR
When there is no signal received , the squelch
circuit on the transceiver automatically mutes
the speaker, so you will not hear background
noise. To manually deactivate the squelch,
press the Monitor key, which is useful when you
want to adjust the volume level or when you
need to receive a weak signal.
QUIET TALK (QT) & DIGITAL QUIET TALK (DQT)
1. Some channels may have pre-programmed
QT/DQT tones. A QT/DQT tone is a subaudible tone
which allows you to ignore(not hear)calls from
other parties who are using the same channel.
2. When you receive a signal that has a tone
different from the one set in your transceiver,
you will not hear the signal. Likewise, signals
that you transmit will only be received by parties
whose QT/DQT tones as the same as yours.
Note : Though you use a QT/DQT channel which can
prevent you from receiving unwanted signals,
it does not mean your calls will be private.
TROUBLESHOOTING GUIDE
1) The battery pack may be
dead. Recharge or replace
the battery pack .
2) The battery pack may not
be installed properly. Remove
the battery pack and instal l it
again .
The battery pack life is
finished .Replace the battery
pack with a new one .
Other voices
(besides group
members) are
on the channel.
Change the Quiet Talk tone.
Be sure to change the tone on
all transceivers in your group .
2
15
Page 9

1
2
3
4
5
6
7
8
9
10
11
12
13
14
15
16
2
16
SETTING CHANNELS
ÐŵÀÊý
16 (15+S)
5W
µç
DC 7.2V
ÖØ
FREQUENCY
(Mhz)
(1) 136-150
(2) 150-174
R F POWER
CHANNELS
DIMENSION
55mmX115mmX32mm
WEIGHT
240 g with battery and antenna
POWER SOURCE
CHANNEL
TRANSMITTING
FREQUENCY
RECEIVING
FREQUENCY
PT 2208
Ö÷Òª¼¼ÊõÖ¸±ê
STANDARD SPECIFICATION
4W
(1) 400-420
(2)450-470
(3)420-450
4W
PT 3208
PT 3208
Caution:
Any changes or modifications not expressly approved by
the party responsible for compliance could void the user's
authority to operate the equipment.
Note:
This equipment has been tested and found to comply with
the limits for a Class B digital device, pursuant to part 15 of
the FCC Rules. These limits are designed to provide
reasonable protection against harmful interference in a
residential installation.
This equipment generates, uses and can radiate radio
frequency energy and, if not installed and used in
accordance with the instructions, may cause harmful
interference to radio communications. However, there is
no guarantee that interference will not occur in a
particular installation. If this equipment does cause
harmful interference to radio or television reception,
which can be determined by turning the equipment off
and on, the user is encouraged to try to correct the
interference by one or more of the following measures:
--Reorient or relocate the receiving antenna.
--Increase the separation between the equipment and
receiver.
--Connect the equipment into an outlet on a circuit
different from that to which the receiver is connected.
--Consult the dealer or an experienced radio/TV
technician for help.
 Loading...