

Page 1

Instruction Manual
PT 260 Serial
FM Portable Two-Way Radio
We are very grateful for your purchasing brand two-way radios produced by
Shenzhen Kirisun Electronics Co., Ltd.
We believe two-way radio, which always incorporates the latest technology, can bring
great convenience to your life and work.
We also believe that the quality and function of two-way radio can meet your
demands for reliable communication.
Notice to the User:
- Illegal operation is subject to punishment by fine and/or imprisonment.
- Servicing is only allowed to be operated by the well-trained professional technicians.
Warning:
Turn off your radio before entering any area with a potentially explosive atmosphere (where the
air contains gas, dust and smog, etc.), such as while taking on fuel, or while parking at a gasoline
service station.
Attentions:
Please comply with the following attentions to avoid fire, personal injury and damage to the
radio.
* Long time transmitting or continuous working in high power mode will make the rear side of
the radio generate heat.
* Please do not expose the radio to direct sunlight for a long time; do not place the radio near
any heating device, either.
* Please do not put the radio in extremely dusty, moist or dabbling places; do not place it on any
unstable surface, either.
* If the radio emits smoke or strange odors, turn it off and remove the battery from the radio and
contact your local authorized Kirisun dealer without delay.
Page 2

Contents
Unpacking and Checking .................................................................................................................. 2
Preparation ....................................................................................................................................... 3
Charging the Battery ..................................................................................................................... 3
KBC-260 Charging State Indication ................................................................................................ 4
Installing/Removing the Battery ................................................................................................... 4
Installing the Antenna ................................................................................................................... 5
Installing the External Speaker/MIC .............................................................................................. 5
Installing/Removing the Belt Clip .................................................................................................. 6
Radio Overview ................................................................................................................................ 6
Basic Operation ................................................................................................................................ 7
Auxiliary Functions ......................................................................................................................... 10
Time-Out Timer (TOT) ................................................................................................................. 10
TOT Pre-alert ............................................................................................................................... 10
TOT Rekey Time ........................................................................................................................... 10
TOT Reset Time ........................................................................................................................... 10
Busy Channel Lockout (BCL) ........................................................................................................ 10
Battery Saving ............................................................................................................................. 10
Low Battery Warning ................................................................................................................... 11
Squelch Level ............................................................................................................................... 11
CTCSS/DSC ................................................................................................................................... 11
Voice Annunciation ..................................................................................................................... 11
Wired Clone ................................................................................................................................ 11
Troubleshooting .............................................................................................................................. 12
Major Specifications ....................................................................................................................... 12
Status Setting .................................................................................................................................. 13
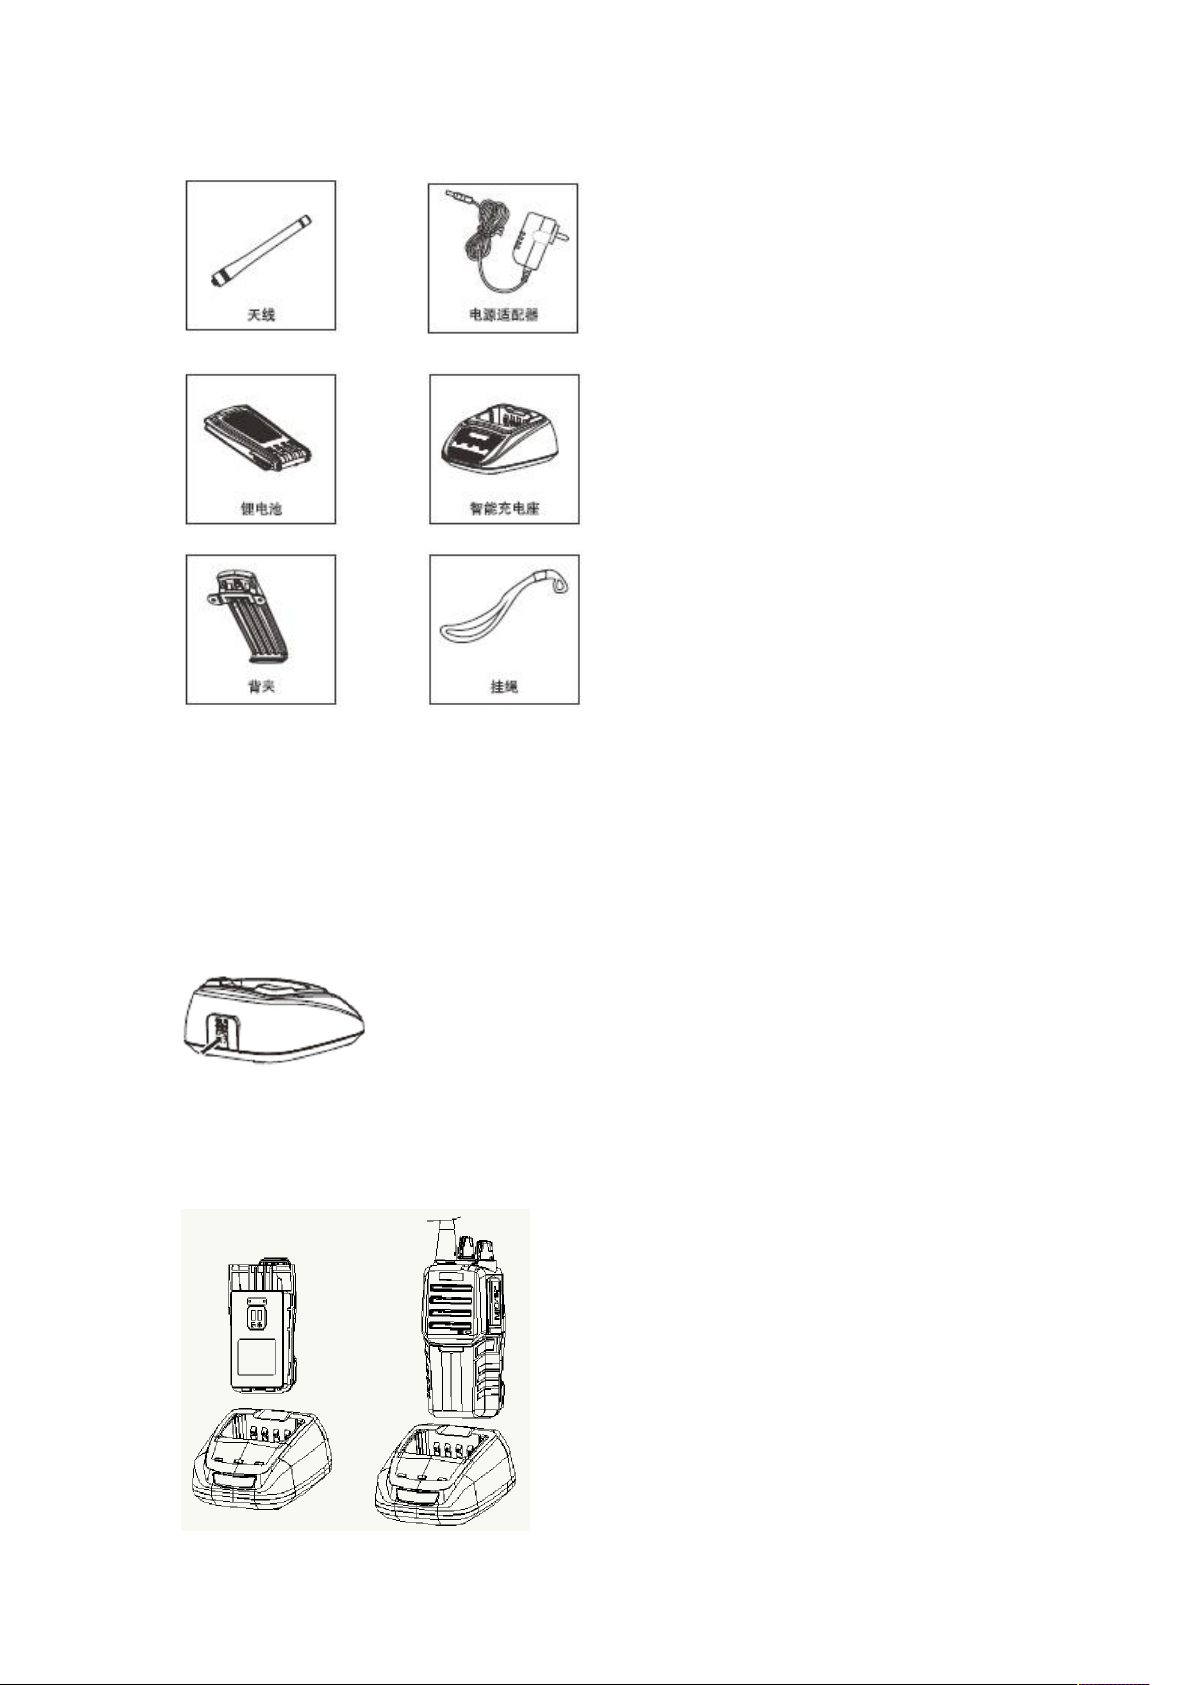
Unpacking and Checking
Unpack the radio carefully. We recommend that you check the radio and the supplied
accessories listed in the following table before discarding the packing material. If any damage or
loss has occurred during shipment, please contact the dealer without delay.
Item Quantity
Antenna 1
Li-ion Battery 1
Belt Clip 1
Intelligent Charger Base 1
Power Adapter 1
Hand Strap 1
Instruction Manual 1
Page 3
Preparation
Charging the Battery
Plug the power adapter into an applicable AC outlet and connect the power adapter to the
battery charger. Green LED lights.
Insert the battery to be charged or the radio with the battery into the charger slot.
Make sure the battery is well connected with the charger. Then Red LED lights, which indicates
that the charging starts; Green LED lights, indicating the charging is finished.
Page 4

Note:
* The radio battery is not fully charged before shipment. Before the initial use, please charge the
new battery.
* KB-260 Li-ion battery of Kirisun is applicable to this radio.
* There is a built-in protective circuit in KB-260. When the power is low, it will cut off the power
supply immediately. If you insert the battery on the charger, Red LED on the charger lights.
Pre-charging for 1~5 minutes, the battery begins to be charged.
* Do not reverse the battery pole or discard the battery in the fire.
* Do not disassemble the cover of the battery by yourself.
KBC-260 Charging State Indication
Indication
Operation state
No battery -- ON -- --
Pre-charging ON -- -- --
Quick-charging ON -- -- --
Full charging -- ON -- --
Short circuit protection -- --
High temperature
protection
High voltage protection -- -- ON
Low voltage protection -- -- ON
Red Green Yellow Note
Charging Power supply Abnormal --
It will be back to normal
ON
-- -- ON
when disabled short circuit
protection.
Recovered when power off.
Installing/Removing the Battery
Match the two bulges at the bottom of the battery pack with the corresponding slots at the rear
bottom of the radio.
Press the top part of the battery towards the radio to lock it in place until a click is heard.
Page 5
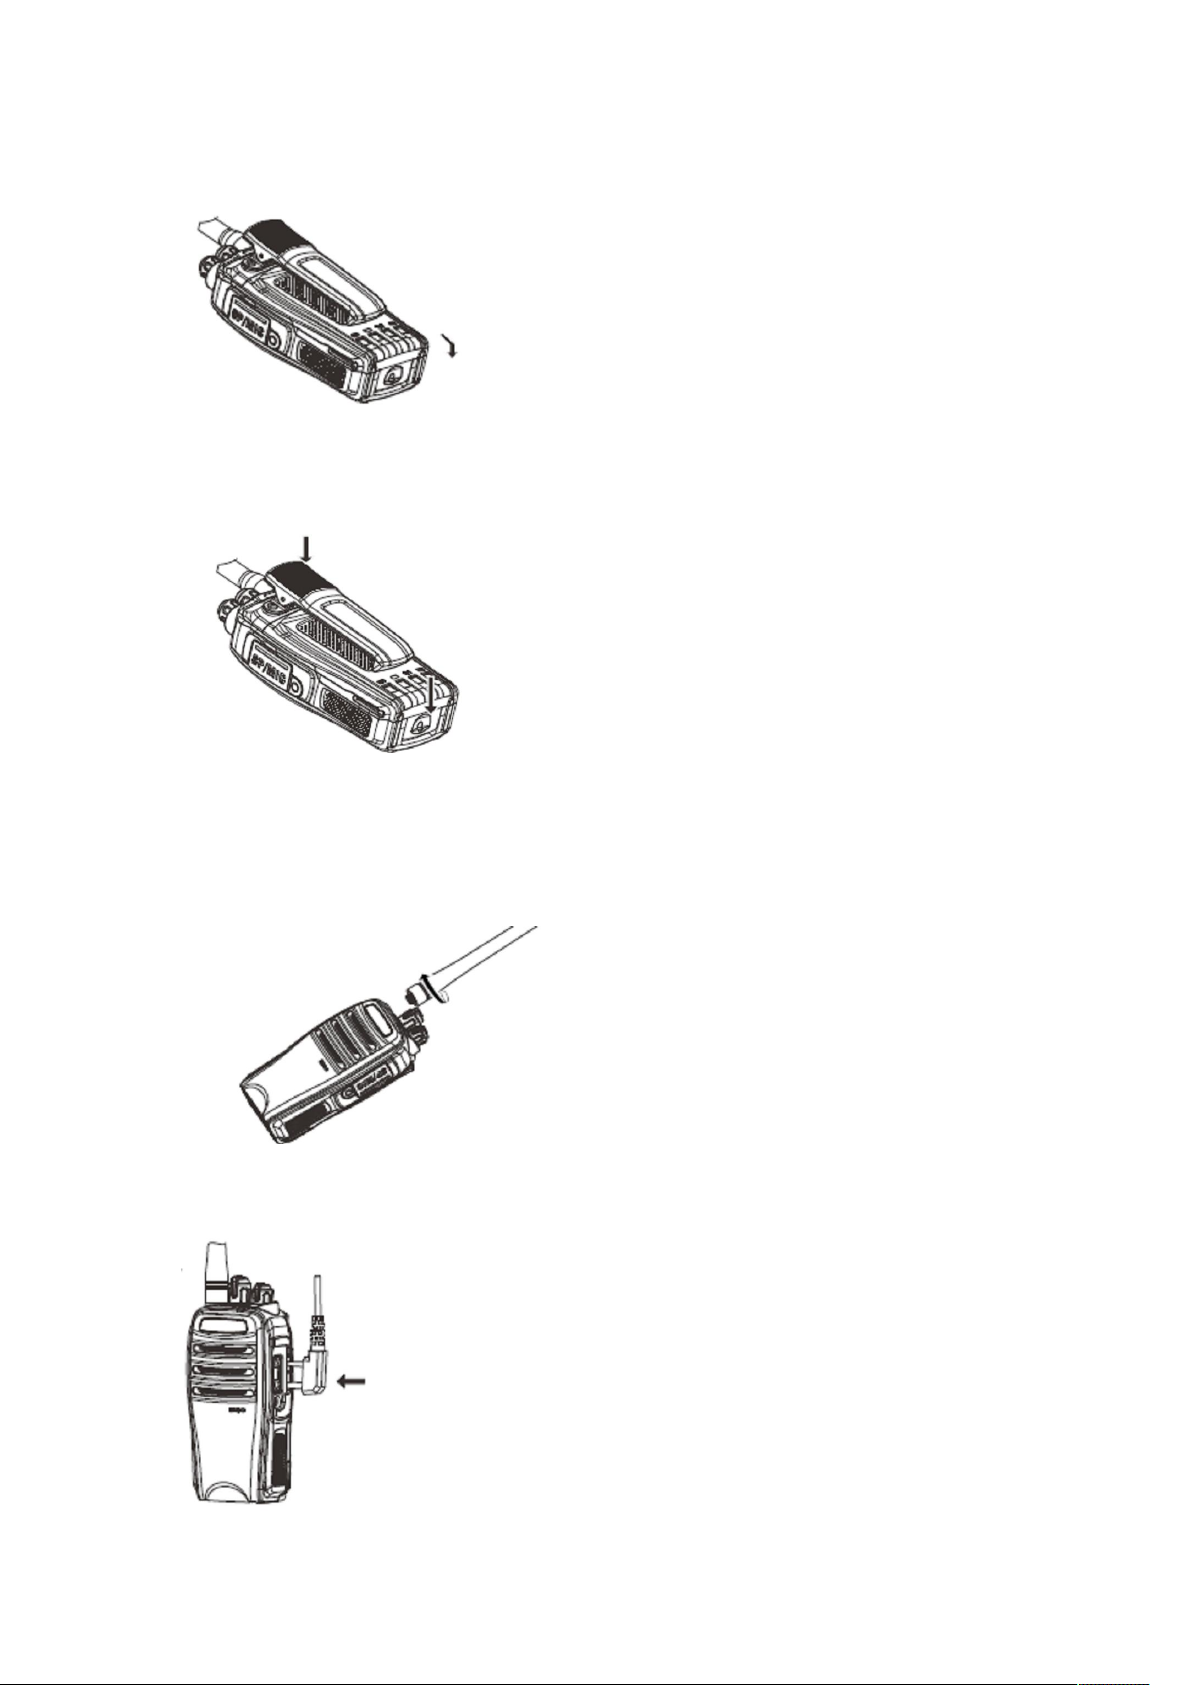
To remove the battery pack, press the battery latch backwards, and then remove the battery
away from the radio.
Installing the Antenna
Hold the base of the antenna and turn the antenna clockwise into the connector on the top
of the radio until secure.
Installing the External Speaker/MIC
Page 6

Open the cover for external speaker/MIC jacks, and then insert the external speaker/MIC plug
into the jacks on the radio.
Note: When using the external speaker/MIC, the radio will not be waterproof.
Installing/Removing the Belt Clip
When installing, match the two screw holes to the holes on the back of the radio, use screw to
fasten it; when removing, use screwdriver to remove these two screws, take off the belt clip.
Radio Overview
1. LED indicator
Red LED lights when transmitting; green LED lights when receiving. An alarm sound sends out
when the radio is in low power while transmitting.
2. Channel selector knob
Rotate it to select channel 1-16.
3. On/OFF/Volume knob
Rotate it clockwise to turn on the radio. Rotate it counterclockwise until a click sound is heard to
turn off the radio. Rotate it to adjust the volume.
Page 7

4. PTT button
Press and hold it and speak to the microphone to transmit; release it to receive.
5. Voice prompt
Press it to hear which channel the radio is in in stand-by state.
6. Monitor button
Press it to disable squelch circuit, and receive background noise. Release it to turn off the
background noise.
Note: If you want to check out whether there are interference in this channel, press this button.
Then rotate Volume knob to hear the noise.
7. Speaker/MIC jack
Connect the external speaker and MIC to the radio.
Basic Operation
Power On: Turn the On-Off/Volume Control Knob clockwise until a click is heard to turn on the
radio. The radio will make a sound of “Di…” If programmed, the current channel number will be
annunciated.
Adjusting the Volume
Press Monitor button to enter into the monitor state. Then rotate ON/OFF/Volume knob to adjust
the volume.
Selecting a Channel
Turn the channel selector knob to your desired channel. If voice annunciation has been set, the
radio will annunciate the current channel number. You will hear voice from the speaker while
Page 8

receiving valid signals.
Note: The 16th channel is the scan channel.
Sending a Call
To make a call, press and hold the PTT button and speak to the microphone in normal voice.
Please keep your mouth 3 - 5 cm away from the microphone to realize the best communication
quality. Release PTT button to receive.
Scan function
Scan ON
When rotated the channel selector to the 16th channel, the radio begins to scan. It stops when
the signal is received.
Note: When the radio is in 16th channel, the signal will be received later because of the scan.
Scan OFF
When rotated the channel selector to 1-15 channels, the radio stops to scan.
Explanations:
After scan pauses, there are two ways to resume scanning, which can be set in PC software:
1. Time operate: After pausing on an active channel, the radio will resume scanning after a
preprogrammed delay. The scan delay time can be preset from 0.5 to 5 seconds.
2. Carrier operate: After pausing on an active channel, the radio will resume scanning after a
preprogrammed delay after the channel becomes inactive. The scan delay time can be preset
from 0.5 to 5 seconds.
Revert channel: Press PTT to transmit during the scan. The transmitting channels used have the
following options:
Page 9

1. Last Rx channel
When pressing PTT button during scanning, the radio will transmit from the last channel that
received a call.
Note: After the last scan, the radio will stay at one channel. This channel is the last Rx channel.
2. Last Rx channel + Currently working channel
When pressing PTT button during scanning, the radio will transmit from the last channel that
received a call; when pressing PTT button in scan off state, the radio will transmit from the
currently working channel.
3. Selected channel
When pressing PTT button during scanning, the radio will transmit from the first channel in
the scan list.
4. Selected channel + Currently working channel
When pressing PTT button during scanning, the radio will transmit from the first channel in
the scan list.
When pressing PTT button in scan off state, the radio will transmit from the currently
working channel.
5. Priority channel
Press PTT button, the radio will transmit from the priority channel in the scan list.
6. Priority channel + Currently working channel
When pressing PTT button during scanning, the radio will transmit from the priority channel
in the scan list.
When pressing PTT button in scan off state, the radio will transmit from the currently
working channel.
Note:
Currently working channel refers to the channel described in the following conditions:
1. When the radio receives the signal, and does not start to scan, it stays at one channel. This
channel is currently working channel.
2. When the signal cannot be received, the radio will stay at one channel within the designated
times. This channel is currently working channel.
3. When pressing PTT button to transmit, the radio will stay at one channel. This channel is
currently working channel.
4. When releasing PTT button to finish transmitting, the radio will stay at one channel within
designated pause time. This channel is currently working channel.
Selected channel: the first channel in the scan list.
Page 10

Auxiliary Functions
Note: The relevant setting about TOT can be set by PC software.
Time-Out Timer (TOT)
The time-out-timer can prevent the user from continuously talking overlong and prevent the
radio from heating due to continuous transmitting.
If you continuously transmit longer than the preset TOT time, the radio will make an alert tone
and stop transmitting.
TOT Pre-alert
The radio will make an alert tone in advance before the TOT terminates the transmission. After
the alert tone, when the time of transmission exceeds the pre-set time, the TOT timer will act.
TOT Rekey Time
A period during when the radio is forbidden to transmit after its overtime activity.
During the period, if the PTT button is pressed, an alert tone will be sounded, and the
transmission is forbidden.
TOT Reset Time
The time delay from releasing the PTT button to the resetting of the timer is limited.
The countdown will go on if the time after releasing the PTT key is shorter than the reset
time.
Busy Channel Lockout (BCL)
If the channel on which a user attempts to transmit is being used by another party, BCL function
restricts the transmission in order to avoid interfering with the other parties' communication, and
the radio will make an alert tone, and returns to the receiving state.
Default setting: Disabled, i.e. the radio can transmit at any time.
Battery Saving
The battery saving function can reduce power consumption of the radio when no signal is
received and no operation is conducted (no button is pressed and no knob is turned).
If the radio hasn't receive any signal or no operation is being conducted for 16 seconds, the radio
Page 11

will enter Battery Saving Mode. When a signal is received or any operation occurs, the radio will
exit the Battery Saving Mode automatically.
Low Battery Warning
When the battery voltage drops to the pre-set value, low battery warning tone sounds every 10
seconds. And the radio turns off automatically in very low battery. You need to recharge or
change the battery.
Squelch Level
The squelch function is enabled to mute the speaker when there is no signal to be received.
Enable squelch, you can hear the background noise from the speaker. Disable squelch, the noise
cannot be heard.
The squelch level determines when the squelch function should be on. If the selected level is too
high, the weak signal cannot be heard; if the selected level is too low, the signal will be mixed
with the background noise. Squelch level can be set by PC software. Range: 0-9. The default
setting is 5.
CTCSS/DSC
CTCSS/DSC of PT260 can be programmed by PC software. The range of CTCSS/DSC signal tone can
be 67~254, 1/D023~D777 respectively.
CTCSS/DCS tones may have been pre-programmed on some radio channels. A CTCSS/DCS tone is
a sub-audible tone, which allows you to realize selected call and group call.
When you receive a signal that has a tone different from the one set on your radio, you will not
hear the signal. Likewise, signals that you transmit will only be received by parties whose
CTCSS/DCS tones are the same as yours.
Voice Annunciation
If voice notice is enable in standby state, press voice notice button to hear which channel the
radio stays.
Wired clone
Enable wired clone function. If the radio enters into this mode, it will not exit to the user mode
until you restart the radio. The steps of wired clone are as follows:
1. Press and hold Monitor button to turn on the radio. Red LED flashes after 2 seconds, and the
Page 12

radio enters into clone mode.
2. Press Monitor button, Red LED flashes, and start to clone the data. Red LED lights off when
finishing clone.
Note: You can enable or disable wired clone function by PC software. Once this function is
disabled, the radio cannot enter into wired clone mode.
The default setting: Disabled.
Troubleshooting
No. Problem Causes and Solutions
1 The radio cannot be switched
on or no display after being
switched on.
2 Cannot talk to or hear other
group members.
3 Other voices from non-group
members are heard on the
channel.
4 The communication range is
too short.
5 The battery power consumes
* The battery power may be insufficient. Please recharge
or replace the battery pack.
* The battery pack may not be installed properly. Please
remove the battery pack and install again.
* Make sure the CTCSS/DCS signal is the same as that of
your group members.
* The radio is out of effective communication range.
* Change the CTCSS/DCS signal, and make sure to change
the CTCSS/DCS signal of all radios in your group.
* Make sure the antenna is well connected.
* Make sure the antenna is the original supplied one.
* Check if the battery power is in normal state.
* Ask your local dealer to adjust the squelch level.
* The battery life is finished. Please replace it with a new
quickly after charging.
battery pack.
Major specifications
General Specifications
Frequency (MHz) 136– 174MHz 400–470MHz
RF power ≤5W ≤4W
No. of channel 16(15+S)
Frequency stability ± 2.5ppm
Power supply DC 7.4V
External dimension 60mm × 210mm × 34mm
Page 13

Weight 223g (with battery and antenna)
Intermodulation > 60dB
Tx Part
Tx clusters and harmonics < -70dB
Max. deviation ± 5K (W) / 2.5 (N)
Rated audio deviation ≤8%
Rx Part
Rx sensitivity ≤ 0.2μV(12dB SINAD)
Max. audio power ≥ 500mW
SINAD ≥45dB
Rated audio deviation ≤5%
Status setting (by the dealer)
Model: Serial No.:
1. Channel setting
Channel No. Tx frequency Rx frequency CTCSS/DCS
1
2
3
4
5
6
7
8
9
10
11
12
13
14
15
16
2. The way to resume scanning after its pause:
Page 14

Time Operate □ Carrier Operate □
3. Revert channel:
Selected Channel □ Selected Channel or Currently Working Channel □
Priority Channel □ Priority Channel or Currently Working Channel □
4. Squelch
ON □ OFF □
5. TOT
ON □ OFF □
6. Auto scan
ON □ OFF □
 Loading...