

Page 1

Add: 2/F Bldg. H-3 East Industrial Zone of Overseas Chinese
Town Nanshan Dist. Shenzhen, P.R.China
Postcode: 518053
Tel: +86-755-8609 6076
E-mail: export@kirisun.com
Website:http://www.kirsun.com
Fax:+86-755-8609 6130
Kirisun Electronics (Shenzhen) Co., Ltd
PT3300
FM HANDHELD TRANSCEIVER
USER S MANUAL
Page 2

USER S MANUAL
FM HANDHELD TRANSCEIVER
Greeting!
We are grateful for your purchase of this
BAOTONG transceiver. We believe BAOTONG
transceivers, which always incorporate the latest
technology can bring great convenience to your life
and work; we also believe that the quality and
functions of BAOTONG transceivers can meet your
demands for reliable communication.
To make sure you can get familiar with the
functions and proper operating methods of your
transceiver, please read this instruction manual
carefully.
This Manual is suitable for the PT-3300 FM
Transceiver.
Caution:
Please read this manual carefully before using this transceiver
Do not use the transceiver while taking on fuel or
while parking in a gasoline service station.
Do not use the transceiver in the area where
government prohibited.
Do not expose the transceiver to direct sunlight for
a long time, or place it close to heating appliances.
Do not place the transceiver in excessively dusty,
humid, and/or dabbing areas, nor on unstable
surface
If the transceiver emits smoke or strange odors,
turn it off and remove the battery from the
transceiver and promptly contact your local dealer
The maintaining of transceiver only can be done by
professional technician
Kirisun Electronics (Shenzhen) Co., Ltd
Page 3
CONTECTS
1. Unpacking and Checking Equipments 1
Supplied Accessories 1
2. Preparation 2
Charging the Battery Pack 2
Installing/Removing the Battery Pack 3
Installing the Antenna 3
Installing /Removing the Belt Clip 3
Installing the optional Speaker/Microphone 3
3. Getting Acquainted 4
Exterior figure 4
4. Basic operation 5
5. Auxiliary functions 6
6. Specification 9
7. Troubleshooting Guide 9
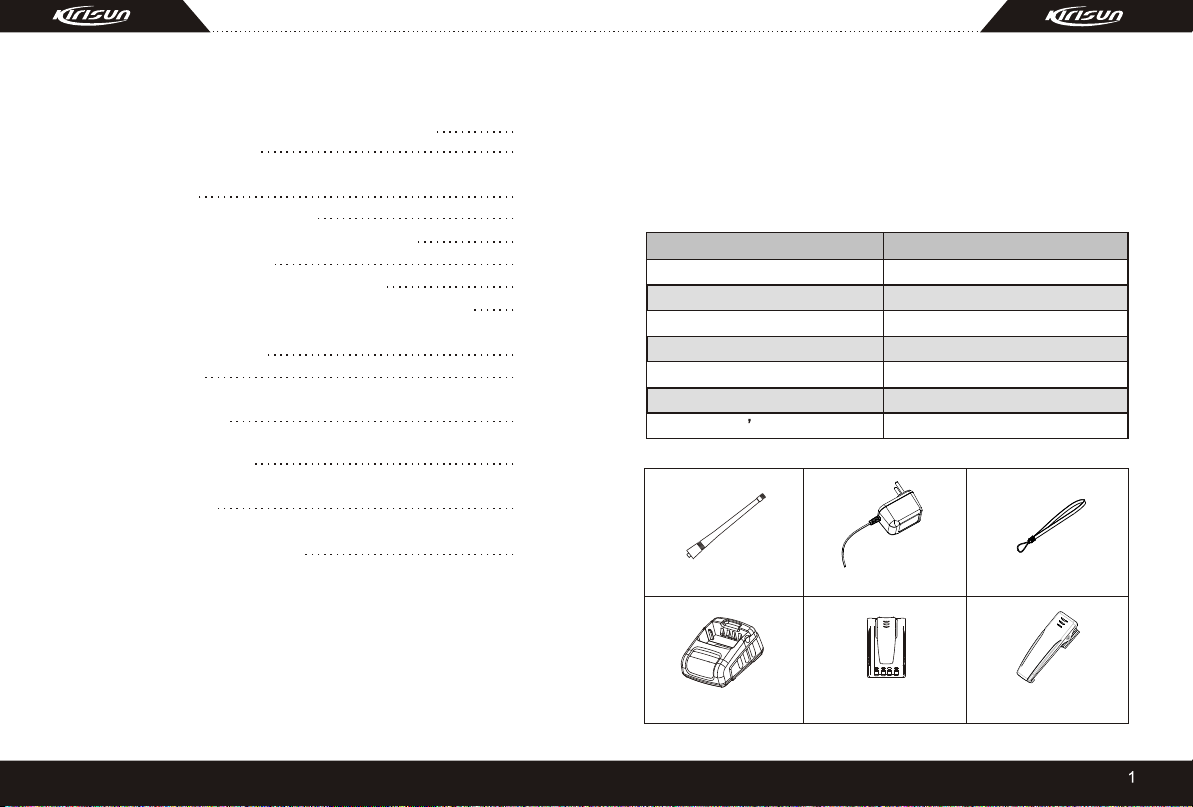
1. Unpacking and Checking Equipments
Carefully unpack the transceiver. We recommend that you
identify the items listed in the following table before
discarding the packing material. If any damage has occurred
during shipment, file a claim with the carrier immediately.
Supplied Accessories
DESCRIPTION QUANTITY
Antenna
Adaptor
Wrist Loop
Charger
Battery
Belt Clip
USER S Manual
Antenna
Adaptor
1
1
1
1
1
1
1
Wrist Loop
Charger
Battery
Belt Clip
Page 4

2. Preparation
(1)Charging the Battery Pack
Plug the AC adaptor cable into
the adaptor jack located on the
rear of the charger; plug the AC
adaptor into power socket of
220V/50Hz.
Slide the battery pack or the
transceiver with the battery
pack into the charger.
Make sure the battery pack
contacts are in contact with the
charging terminals.
The charger LED turns red and
charging begins. After charging
the battery for 8 hours, please
disconnect it from the charger.
CAUTION:
If the battery charging is full, do not charge it again
.overcharging will shorten battery's life or damage it.
After purchasing or extended storage (more than 2 months),
the battery cannot reach its maximum capacity for the first
time recharging. After repeating the charging/discharging
the battery two or three times, the capacity will reach its best
status.
The charge LCD will turn off when charge tests out the
battery has been damaged after the beginning of charging
10 minutes.
The charge LCD will turn off when the charge is on the
protecting status due to over current or short circuit. It
should turn off the power and then continue charging.
If the charge tests out the temperature of battery is too
high (over 60 ), it will stop charging, and the charge LCD
turn yellow. After the temperature of battery is drop, remove
the battery and re-put, then continue charging.
(Figure1)
(2)Installing/Removing the Battery Pack
Match the four grooves of the battery pack
with the corresponding guides on the back of
the transceiver.
Slide the battery pack along the back of the
transceiver until the release latch on the base
of the transceiver locks.
To remove the battery pack, pull back on the
release latch and slide the pack away from
the transceiver (refer to Figure 2).
CAUTION:
(Figure 2)
Do not short-circuit the battery terminals or
dispose the battery into fire.
Never attempt to remove the casing from the
battery pack.
(3)Installing the Antenna
Screw the antenna into the connector on the
top of the transceiver by holding the antenna
at its base and turn it clockwise until secure
(refer to Figure 3).
(Figure 3)
(4)Installing/removing the Belt Clip
Match the belt clip with the corresponding
grooves on the battery and slide down the belt
clip. To remove the belt clip, slide up the belt
(Figure 4)
clip using your nail or tools (refer to Figure 4).
(5)Installing the optional Speaker/Microphone
Remove the rubber cover and insert the speakermicrophone plugs into the SP/MIC jack.
PT-3300
Page 5

3. Getting Acquainted
(1)Exterior figure
LED Indicator: LED Lights red while transmitting; lights
A
green while receiving a signal; flashes red when the battery
voltage is low; lights orange while turning on the radio.
Channel Selector: Rotate to select channel 1-15.and CH16 is
B
scanning channel
C
Power/Volume Switch: Turn clockwise to switch ON the
transceiver; to switch OFF the transceiver, turn
counterclockwise until a click sounds; rotate to adjust the
volume level.
PTT (Push-to-Talk): To make a call, press and hold the PTT
D
button, then speak into the microphone with normal voice.
Release the PTT to receive.
Monitor Button: Press the button for closing the SQUELCH,
E
and release for open
Function key: press this key about 1 second, the transceiver
F
will emit alert with high decibel, press again stop the alert
MIC-SP JACKS: If desired, connect a speaker microphone or
G
ear piece here.
4. Basic Operation
Switch on
Switch on the transceiver by turning the
Power /Volume control clockwise till a click is
heard, then the transceiver will be in the state
of stand by time, and the orange LED light
flashes once and disappears.
Adjust the Volume
To increase volumes rotate the Power/Volume
Control knob clockwise.
Select the Channel
Rotate the Channel selector to select your
desired channel. If setting the channel selector
to CH16 will scan automatic
PTT Button
To make a call, press and hold the PTT button
then speak into the microphone in your normal
speaking voice.
Note: Please keep your mouth away from
microphone 3cm-8cm.
Page 6

5. Auxiliary Functions
Monitor
When there is no signal received, the squelch circuit on the
transceiver automatically mutes the speaker, so you will not
hear background noise. To manually deactivate the squelch,
press the Monitor key, which is useful when you want to
adjust the volume level or when you need to receive a weak
signal.
Alert
When meet sudden or emergent event, press function key
about 1 second, the transceiver will emit alert with high
decibel, press the key again or PTT, MONI or channel
selector to stop it.
High/Low power switch
Switch off the transceiver, and then keep pressing the PTT
key, in the meantime turn on the power and continue
pressing the PTT key 2 seconds. If heart one warning tone
and found the charge LCD turn red, means in high power
status. While if heart two warning tone and found the charge
LCD turn orange, means in low power status.
Phonic broadcast channel
There are 8 kinds of phonic broadcast channel which
including men, women and Chinese-English combination.
Firstly switch off the transceiver, and then keep pressing
function key, in the meantime turn on the power and
continue pressing function key 2 seconds, it will change to
another phonic channel.
Noted:
During switching the phonic broadcast channel, there is one
kind in mute, it means no sound phonic broadcast channel.
Scanning function
When the channel selector is on CH16, the transceiver will
automatically turn into scanning status. When the transceiver
receives the single, it will stick on the current channel, and
startup scanning after the channel disappeared 3 seconds.
Time-out Timer
The purpose of the Time-out Timer is to prevent any single
person from using a channel for an extended period of time. If
you continuously transmit more than limited time, the
transceiver will stop transmitting and a tone will sound. To
stop the tone, release the PTT button. You can press the PTT
button again to resume transmitting. Time limit can be
programmed by software by the dealer.
Battery Save
The Battery-Saving function decreases the power
consumption when no signal being received or no operations
being performed for more than 10 seconds (no keys are being
pressed, and no switches are being turned.)
Low battery Warning
Low battery warning alerts you, when the battery needs to be
recharged while transmitting. If the battery power goes below
a certain value, the LED light will blink red, and the transceiver
will stop transmitting.
Replace or recharge the battery pack when battery appears
low.
Meeting busy prohibits emitting function
When meeting busy, the prohibitive emitting function switch
on (PC program), if not set up CTCSS/DCS, when receive the
signal and the speaker switch on, press PTT button can't
emitting. If set up CTCSS/DCS, when receive the signal, but
CTCSS/DCS is incorrect and the speaker switch off, press
PTT button can't emitting. If receive the signal, and
CTCSS/DCS also correct and the speaker switch on, press
PTT button emitting.
Page 7

CTCSS/DCS
39 groups of optional standard CTCSS and 83 groups DCS are
available (PC programmable). Some channels may have preprogrammed with CTCSS/DCS tones. A CTCSS/DCS tone is a
sub-audio tone which allows you to ignore (not hear) calls from
other parties who are using the same channel.
When you receive a signal that has a tone different from the
one set up in your transceiver, you will not hear the signal.
Likewise, signal that you transmit will only be heard by parties
whose CTCSS/DCS tones match the tone set in your
transceiver.
Note:
Although using channels set with CTCSS/DCS tones relieves
you from listening to unwanted calls, it does not mean your
calls will be private.
6. Specification
Specification
Frequency
RF power
Channels
Power Source
Dimension
Weight
(1)400~420MHz (2)450~470MHz
High: 4W/ Low: 1W
15+1
DC 6.0V or DC 7.2V
117mm x 56mm x 39mm
225 g with battery and antenna
PT 3300
7. Troubleshooting Guide
Wired Clone
Connect two transceivers with specified copying cable, press
monitor and function button in the meantime to switch on, and
enter into the user mode , hold the Monitor key on the
sending transceiver and turn on the power at the same time,
the data will be copied from transmitting transceiver to
receiving transceiver. For transmitting transceiver, the LED
light will blink red during the data transmitting and will turn
green if the date transmitting is finished. The LED light will
blink green if receiving transceiver receives the data and the
green light will disappear if the data transmitting is finished. If
the data transmitting fails, the LED light of transmitting
transceiver will light red. To restart data cloning, both
transceivers need to be turned off and do the above
procedures again.
NO
1
2
3
4
Problem
Can not switch on
Standby time is
short after
charging
Unable to talk
with others in
the same group
Hear other
voices (not from
the same group)
in the channel
Solution
The battery power is low, and please
charge or change it.
The battery is not well connected, and
just remove the battery and reload it.
Battery life is ending, and please
change a new one.
It is out of communication range.
Please change the frequency and or
CTCSS tone and make sure to
change the tone on all the
transceivers in your group.
 Loading...