

Page 1

Owner’s Manual
Page 2

Congratulations
Dear Kirby Customer,
Congratulations on your purchase. You now own a superior,
complete home care system designed to help make your home and
furnishings look better and last longer. Most importantly, repeated
use of your Kirby® Sentria® system will give you the type of
clean in-home environment you want and deserve.
This use and care manual is designed to help you get the most out of
your Sentria home care system and enjoy its numerous benefits and
features. The Owner's DVD (where available) will give you step-by-
step instructions on your machine’s operation. Your local distributor
is available should you have any further questions.
The Kirby Company, the hallmark of innovation and quality for
over 90 years, sells through the in-home sales method in over 70
countries. We want you to know that every customer is important
to us and that we sincerely appreciate your business.
Please enjoy your Sentria home care system to its fullest!
This manual is written for use with both the Kirby® Sentria® home care system
and the Kirby® Sentria II™ home care system.
For assistance, contact your local authorized distributor.
The Kirby Company, 1920 West 114th Street, Cleveland, Ohio 44102, U.S.A.
USA Parts and Supplies (1-800-437-7170), imd@kirbywhq.com
USA Consumer Relations (1-800-494-8586), consumer@kirbywhq.com
www.kirby.com
Kirby, Micron Magic, Splitsecond, Splitsecond 2, Scuttle, Odorific, Tech Drive, Miracle Waxer, and Mini Em-Tor
are registered trademarks of The Scott Fetzer Company.
Sentria and Sentria II is a trademark of The Scott Fetzer Company.
1
Page 3

Important Safety Instructions
The Sentria™ Model G10D is Listed and Certified by Underwriters Laboratories Inc. to both US and
Canadian Standards Association as a double insulated appliance. The Model 2930** and 2950** Carpet
Shampoo System, Model 2931** and 2951** Floor Care System, Model 2935** Zippbrush and Model
2932** Turbo Accessory System are also Listed and Certified as Optional Accessories for use with this
Kirby® model. Outside North America, the 230/240 Volt model G10E, and the 100 Volt model G10J
products are approved by national test authorities as appropriate.
WHEN USING AN ELECTRICAL APPLIANCE, BASIC PRECAUTIONS
SHOULD ALWAYS BE FOLLOWED.
BE FAMILIAR WITH ALL THE IMPORTANT SAFETY INSTRUCTIONS
BEFORE USING YOUR
WARNING - To reduce the risk of fire, electric shock or injury:
• Donotleaveapplianceunattendedwhenrunningorpluggedin.Unplugfromoutletwhennotinuse
and before servicing.
• Donotuseoutdoors.UseonlyondrysurfacesorwiththeKirbyCarpetShampooSystem.
Do not expose to rain. Store indoors.
• Donotallowtobeusedasatoy.Closeattentionisnecessarywhenusedbyornearchildren.
Do not let children use the cleaner unattended.
• Thisapplianceisnotintendedforusebypersons(includingchildren)withreducedphysical,sensoryormental
capabilities, or lack of experience and knowledge, unless they have been given supervision or instruction
concerning use of the appliance by a person responsible for their safety.
• Useonlyasdescribedinthismanual.Useonlymanufacturer’srecommendedattachments.
• Donotusewithdamagedcordorplug.Ifapplianceisnotworkingasitshould,hasbeendropped,damaged,
left outdoors or dropped into water, return it to a factory authorized distributor or service center.
• Donotpullorcarrybycord,usecordasahandle,closedoorsoncord,orpullcordaroundsharpedges
or corners. Do not run appliance over cord. Keep cord away from heated surfaces.
• Donotunplugbypullingoncord.Tounplug,grasptheplug,notthecord.
• Donothandleplugorappliancewithwethands.
• Donotputanyobjectintoopenings.Donotusewithanyopeningblocked;keepopeningsfreeofdust,
lint, hair and anything that may reduce airflow.
• Keephair,looseclothing,fingersandallpartsofbodyawayfromopeningsandmovingparts.
• Keepmotorshaftfreefromlint,
• Donotusetopickupanythingthatisburning,smolderingorsmoking,suchascigarettes,matches, glowing
particles or hot ashes.
• Donotusetopickupcombustiblematerials.
• Donotusewithoutdustbagand/orfiltersinplace.
• TurnunitOFFbeforeunpluggingthecord.
• Useextracarewhencleaningonstairs.
• Donotusetopickupflammableorcombustibleliquids,suchasgasolineoruseinconfinedareaswhere
flammable or combustible vapors are present.
• WhenusingtheCarpetShampooSystem,donotuseflammableorcombustibleliquidstocleancarpetorfloor.
• WhenusingtheFloorCareSystem,useonlygenuineKirby® cleaning products or commercially available
floor cleaners or waxes intended for machine operation.
• Unplugthecordfromthewalloutletandletthemotorcometoacompletestopbeforeattemptingany
cleaning, service or changing accessories.
• ThisapplianceisprovidedwithDoubleInsulation.Itmustbeservicedbyafactoryauthorizeddistributoror
service center using genuine Kirby parts to maintain safety and to protect your warranty.
• KeepallKirbychemicalsoutofthereachofchildren.Thesechemicalsmaycauseirritationordiscomfort
if swallowed or placed in the eyes.
• DonotuseflammableorcombustiblefluidinthePortableSprayer.
• DonotusepesticidesorchemicalproductsinthePortableSprayerthatmayaffectordamage
the human respiratory system, eyes or skin.
• Alwaysusesafetyglasseswhenturbosanding.
Sentria HOME CARE SYSTEM.
hair,anddebrisbuild-up.
SAVE THESE INSTRUCTIONS
FOR HOUSEHOLD USE ONLY
2
Page 4

Table of Contents
Important Safety Instructions 2
About this Manual 4
Kirby® Micron Magic® HEPA Filtration 5
Part 1 — Getting Started 6
Moving Your System/Handle Tilt Latch Lock/Lifting the System 6
Toe-Touch Control/Adjust the Cleaning Height/Tech Drive® Power Assist 7
Installing/Changing Disposable Filter Bags 8
Bag Support Strap/Mini Em-Tor® Collector/The Belt Lifter 9
Part 2 — Upright & Portable Cleaner 11
Upright Cord Management 11
The Upright Cleaner 12
Straight Suction Cleaner 13
The Portable Cleaner 14
Part 3 — Canister Cleaner & Attachments 16
Converting to a Canister Cleaner 16
Installing the Attachment Hose/Extension Tubes 17
Surface Nozzle/Duster Brush/Upholstery Nozzle/Crevice Tool/Wall & Ceiling Brush 18
Utility Tool/Suction Control Grip 19
Using Your Sentria System as a Blower 19
The Portable Sprayer 21
The Portable Shampooer 23
Part 4 — Optional Accessories 25
The Carpet Shampoo System 25
The Miracle Waxer® - Floor Polisher 32
The Floor Care System - Floor Buffer 34
The Floor Care System - Carpet Fluffer 36
The Turbo Accessory System 37
The Zippbrush 39
Part 5 — Operating/Maintenance Tips 40
Changing the Power Nozzle Belt 40
Adjusting the Brush Roll Height 42
Miscellaneous Parts Replacement 43
Questions and Answers/Troubleshooting 44
Other Fine Kirby® Cleaning Products 48
Index 50
Expanded Illustration of the Sentria model & Accessories 52
If you have any questions regarding your purchase or the operation of your Kirby Home Care System,
please contact your local authorized distributorship:
___________________________________________________
___________________________________________________
___________________________________________________
OR
You may contact The Kirby Company’s Consumer Relations Department by:
e-mail consumer@kirbywhq.com mail Consumer Relations
telephone 1-800-494-8586 1920 West 114th Street
fax 216-529-6146 Cleveland, Ohio 44102
Our business hours are 8:00 a.m. to 5:00 p.m. Eastern Time, U.S.A. Monday through Friday.
3
Page 5
About This Manual
This Owner’s Manual was designed to be easy to read and follow. It has been organized in
sections based on the various ways you may use your Kirby® Sentria® system. Within each
section, simple step-by-step illustrations will help you easily visualize the steps required to
properly operate your Sentria system and its many attachments and optional accessories.
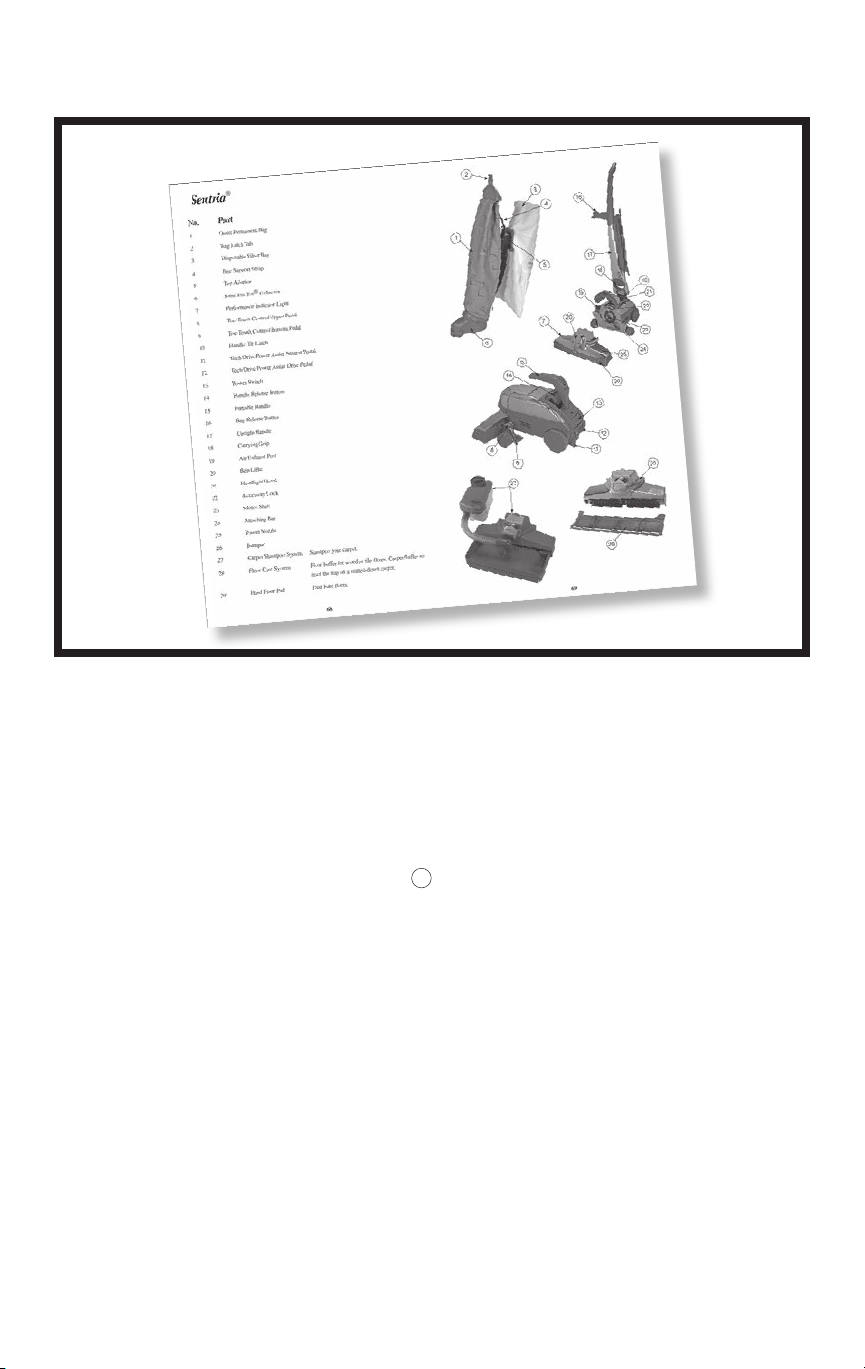
Please note: Illustrations and descriptions of each part of your Sentria home care
system can be found in the rear of the manual on page 52. Please refer to these
illustrations and corresponding numbers # as you read the manual.
In addition to the Table of Contents on page 3, you will also find an Index on page 50
that will refer you to the information you require.
We sincerely hope this Owner’s Manual will help you obtain years of satisfactory
world-class performance from the Sentria home care system by Kirby.
4
Page 6

With MicroAllergen Technology
Reorder genuine Kirby Micron Magic HEPA filter bags from
your local authorized Kirby Distributor.
The Carpet and Rug Institute (CRI) has
awarded the Kirby home care system its
Gold Level seal of approval for meeting
the organization's requirements for
soil removal, dust containment
and appearance retention.
Kirby
®
For those who appreciate Quality, Reliability and Performance
5
Page 7
Getting Started
PART ONE
This section outlines general information you will need as you begin
using your Sentria® system. It includes information on:
Moving and Carrying Your System
Using the Handle Tilt Latch Lock
The Toe-Touch Control
Adjust the Cleaning Height
Using Tech Drive® Power Assist
Installing/Changing Disposable Filter Bags
Emptying the Mini Em-Tor® Collector
Understanding the Belt Lifter
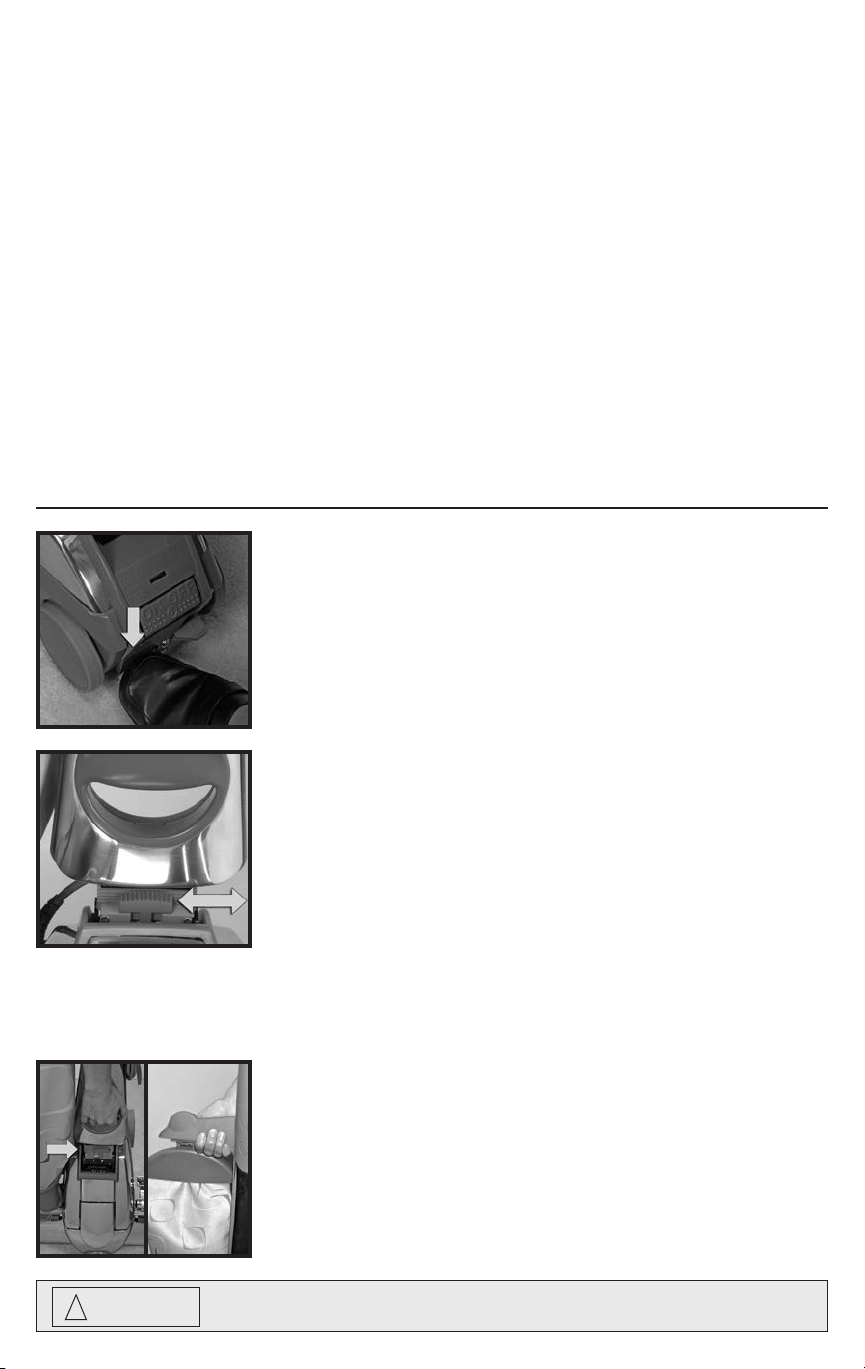
MOVING YOUR SYSTEM
Your Sentria system is equipped with Tech Drive® power assist. In order
to push your unit with the motor OFF, the Tech Drive Pedal ⑪ must be
turned OFF (disengaged).
Turn Tech Drive power assist OFF by pushing down on the gray “N” side
(marked “N” for Neutral) of the Tech Drive N/D Pedal. (See page 7 for
additional information.) ❏
!
CAUTION:
HANDLE TILT LATCH LOCK
The Handle Tilt Latch Lock ⑩ will allow you to lift the front of the
Sentria system over door thresholds or throw rugs. To do so, move the Tilt
Latch Lock towards the bag. By doing this, the handle will only lower part
way. This allows you to push down on the locked handle and lift the front
of the unit. ❏
LOCK THE UPRIGHT HANDLE
Move the Handle Tilt Latch Lever away from the bag. This will lock
the base in place when the unit is lifted off the floor. ❏
NOTE: The Handle Tilt Latch Lever should always be in the center
position when vacuuming.
LIFT THE SYSTEM
Use either the Lower Carrying Grip in the center of the handle, or the
Upper Carrying Grip above the bag to lift and carry the system. ❏
Never unlock the Handle Tilt Latch without holding on to the handle. The
handle is spring-loaded and could quickly pivot upward when unlatched.
6
Page 8
Getting Started
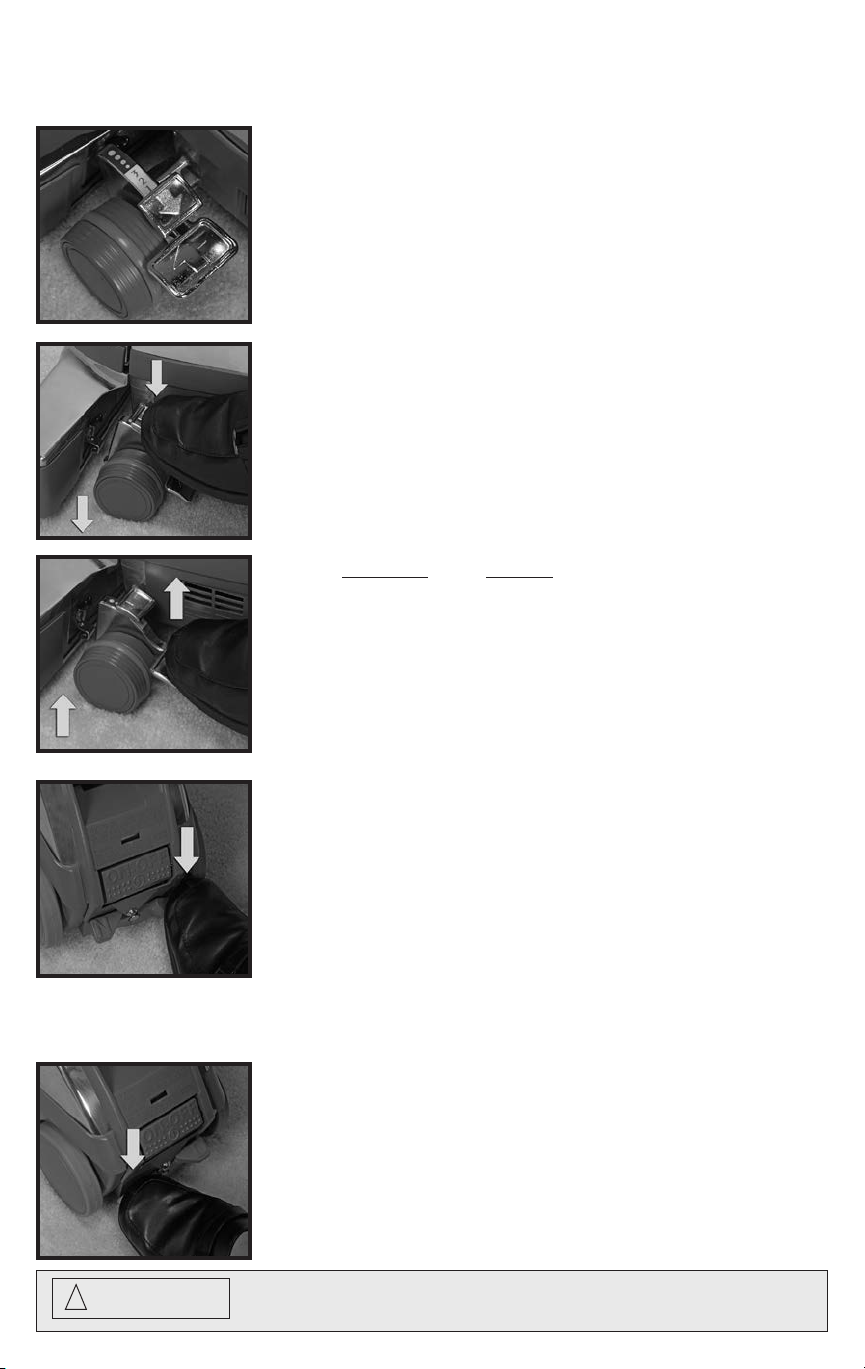
TOE-TOUCH CONTROL
The Toe-Touch Control ⑧, ⑨ located over the front wheel, raises and
lowers the front of the system, called the Power Nozzle. Step down on
the Toe-Touch Control Bottom Pedal ⑨ to raise the front. ❏
ADJUST THE CLEANING HEIGHT
Turn the unit on and select the proper cleaning height. Press the
Toe-Touch Control Upper Pedal ⑧, as often as necessary, until the
unit reaches its lowest setting.
Press the Toe-Touch Control Lower Pedal ⑨ one notch at a time to
raise the Power Nozzle to the desired height.
Listen for the click with each raised notch. Count the clicks to the
desired setting.
Raise Unit Purpose
Lowest position Recommended: Carpets and Bare Floor
1 Click up Optional: Deep Pile Carpeting
2 Clicks up Optional: Long Fiber Carpeting
3 Clicks up Recommended: Pet Hair Removal
4+ Clicks up Hose and Attachments ❏
TURNING TECH DRIVE POWER ASSIST ON (DRIVE)
Your Sentria system is equipped with Tech Drive power assist.
This innovative feature eliminates most of the effort required to
move your Sentria system back and forth. ❏
To engage Tech Drive power assist push down the red “D” side
(marked “D” for Drive) of the Tech Drive N/D Pedal ⑫ located just
below the Power Switch ⑬.
You may use your Sentria system without Tech Drive power assist if
desired. Simply put the Tech Drive pedal in Neutral. ❏
TURNING TECH DRIVE POWER ASSIST OFF
(NEUTRAL)
To move your Sentria® system with the motor OFF or to vacuum
without power assist, Tech Drive power assist must be put in Neutral.
To place Tech Drive power assist in Neutral, push down the gray “N”
side (marked “N” for Neutral) of the Tech Drive N/D Pedal ⑪. ❏
!
IMPORTANT:
finished non-carpeted floors, disengage the Tech Drive pedal.
To avoid possible damage to soft tiles or marking of waxed and
7
Page 9
Getting Started
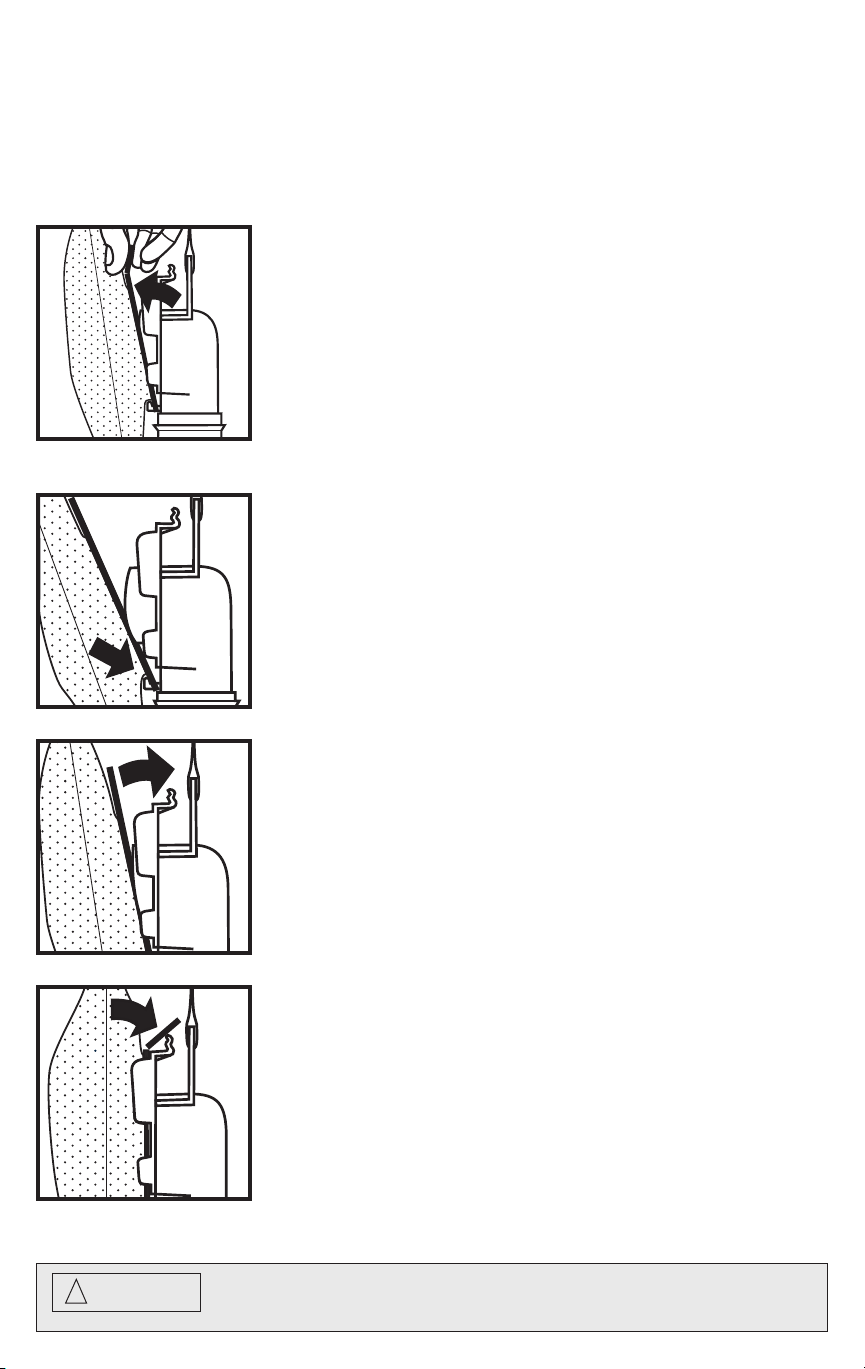
THIS SENTRIA® HOME CARE SYSTEM USES KIRBY’S
IMPROVED “STYLE F” DISPOSABLE FILTER BAGS.
Functional fit • Easy to install
To remove a used Disposable Filter Bag.
Unzip the Outer Permanent Bag and pull out the Disposable Filter Bag
along with the Top Adaptor.
Flip up the cardboard tabs that attach the Disposable Filter Bag to the
Top Adaptor. Holding the cardboard tabs, pull the cardboard faceplate
on the Disposable Bag away from the Top Adaptor.
To install a new Disposable Filter Bag.
With the Outer Permanent Bag unzipped and the Top Adaptor
pulled out, rest the base of the cardboard faceplate against the
1
bottom tab of the Top Adaptor.
Then, pivot the cardboard faceplate up against the flat surface
of the Top Adaptor.
2
Bend the cardboard tabs at the top of the
faceplate onto the holders at the top of the Top Adaptor.
3
Finally, insert the Top Adaptor and new Disposable Filter Bag into the
Outer Permanent Bag and close the zipper completely.
NOTE: A Disposable Filter Bag must be installed before vacuuming.
Always replace the Disposable Filter Bag when dirt reaches the FULL
line on the Disposable Filter Bag. Failure to do so will affect performance.
Use only genuine Kirby® “Style F” Disposable Filter Bags.
CAUTION:
!
the wall outlet and be sure that the motor and fan have stopped.
Before changing the Disposable Filter Bag, unplug the power cord from
8
Page 10
Getting Started
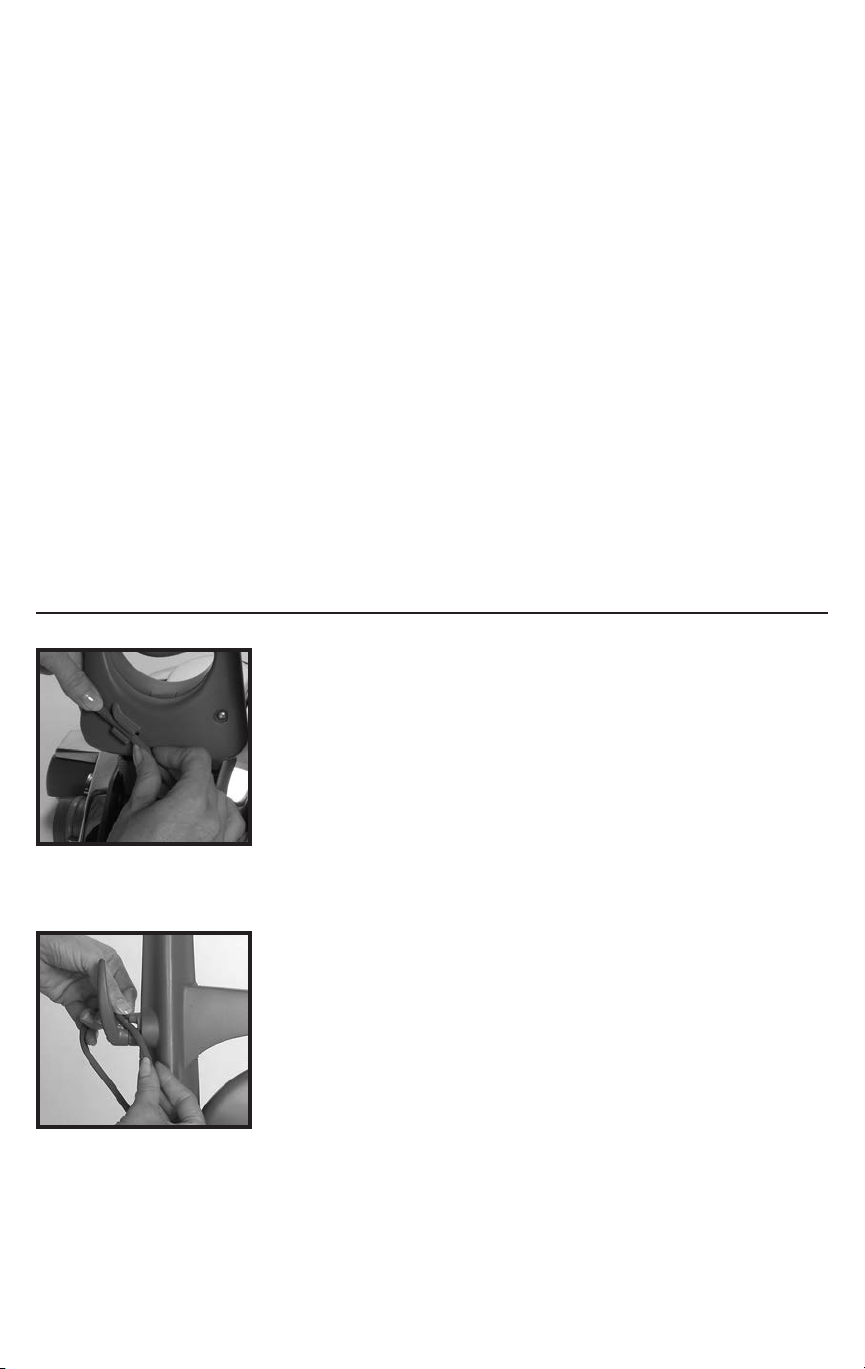
BAG SUPPORT STRAP
Check to make sure the Bag Support Strap ④ is connected to
the Top Adaptor ⑤. The Bag Support Strap provides the support
4
required for proper operation of the Disposable Filter Bag.
If it is not connected, thread the strap through the small hole of the Top
Adaptor. Then place the hole in the strap over the stud on the Top Adaptor.
Finally, insert the adaptor and new filter bag into the Outer Permanent
Bag ① and close the zipper completely for maximum performance.
NOTE: In order for the Filtration System to perform effectively, use only
Kirby® Micron Magic® HEPA Filtration Bags. If the outside bag is torn
or damaged, please replace immediately. ❏
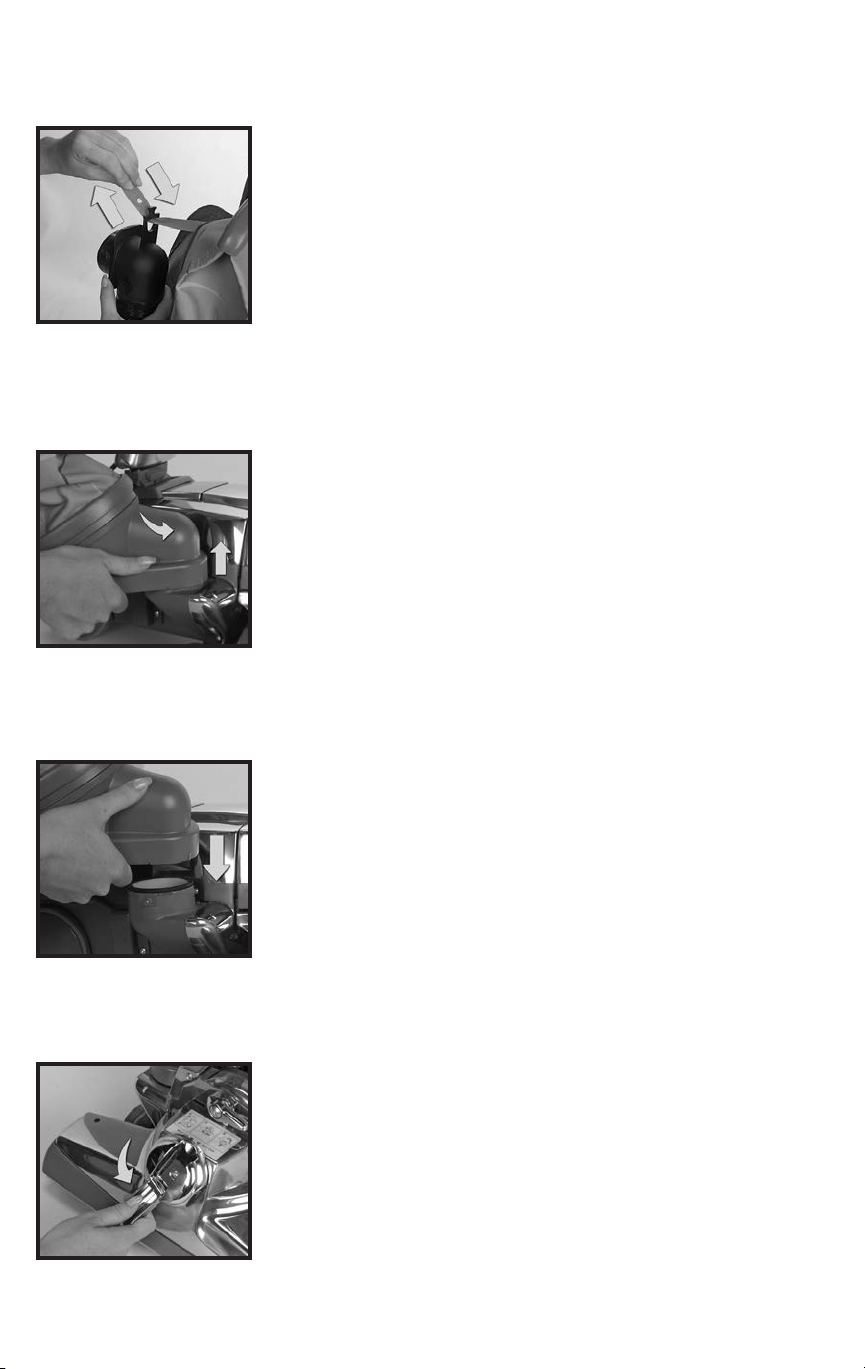
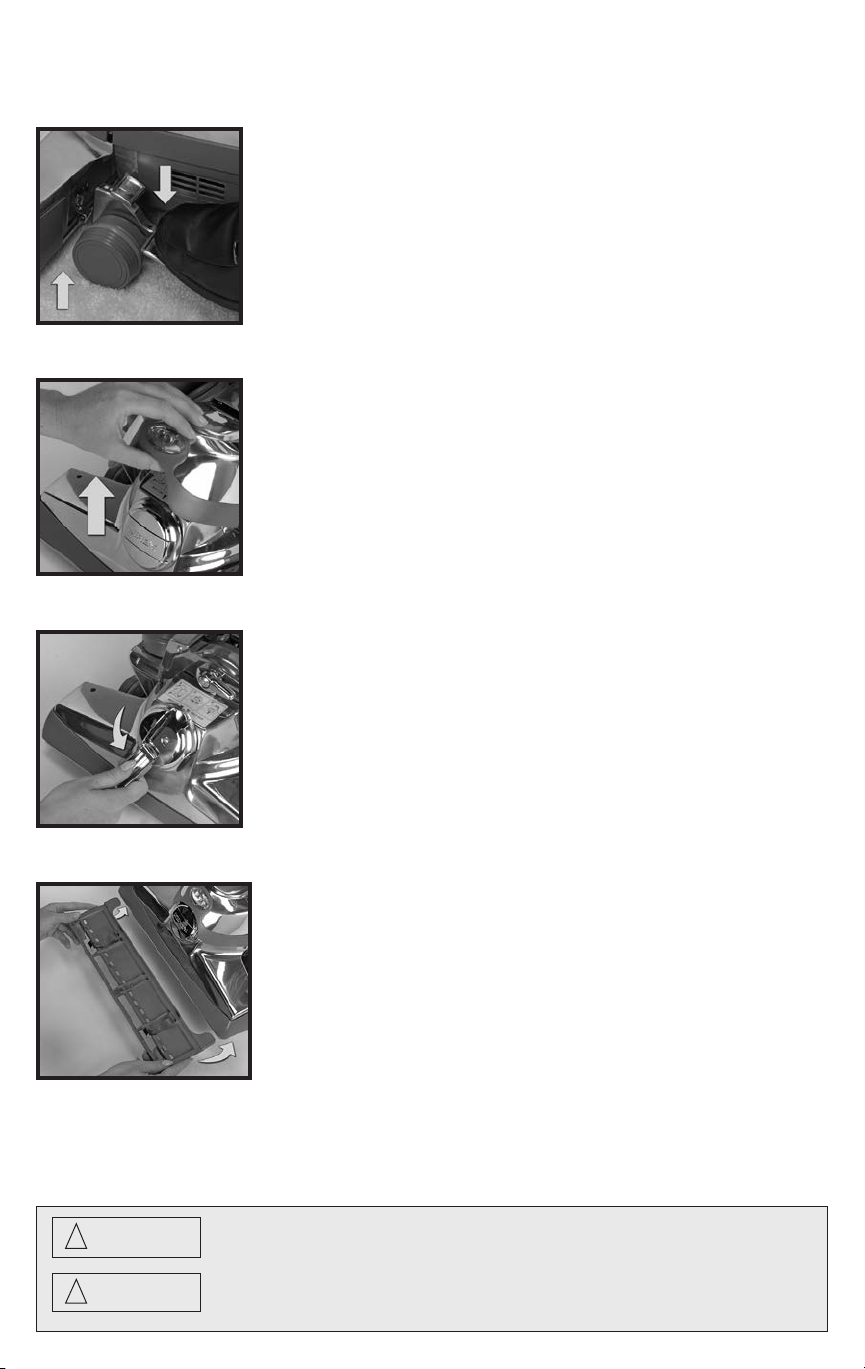
EMPTYING THE MINI EM-TOR® COLLECTOR
The Mini Em-Tor ⑥ collector is designed to collect large, heavy
particles which can be emptied by removing the Mini Em-Tor collector.
To remove, grasp the Mini Em-Tor collector in the handhold
provided and rotate it away from the body of the system as far
1
as it will go, then lift it off.
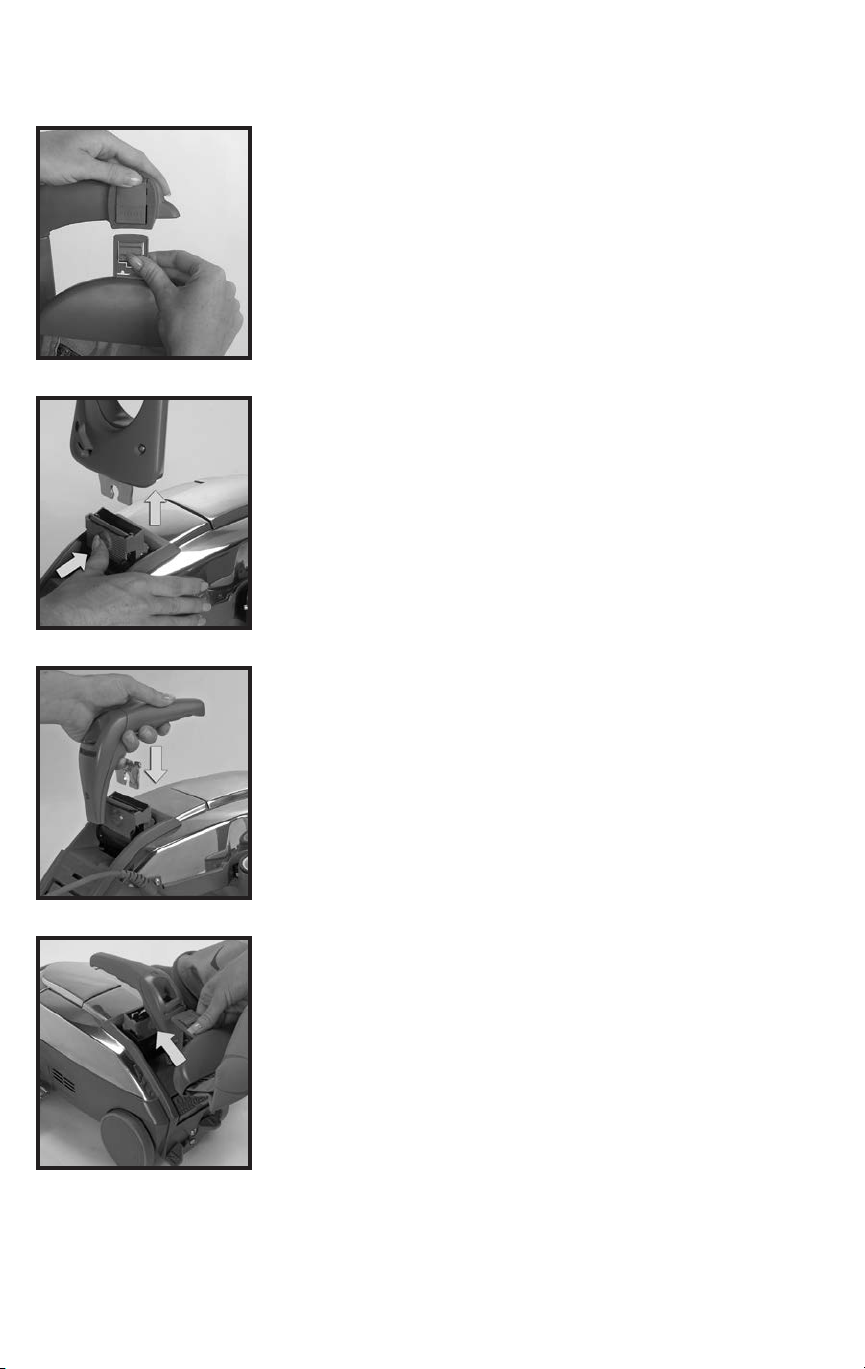
The top of the bag is released from the handle by pressing the Bag
Release Button ⑯. After removing the Mini Em-Tor collector and the
entire Bag Assembly, position the front opening of the Mini Em-Tor
collector over a newspaper and shake it to remove the particles. ➤
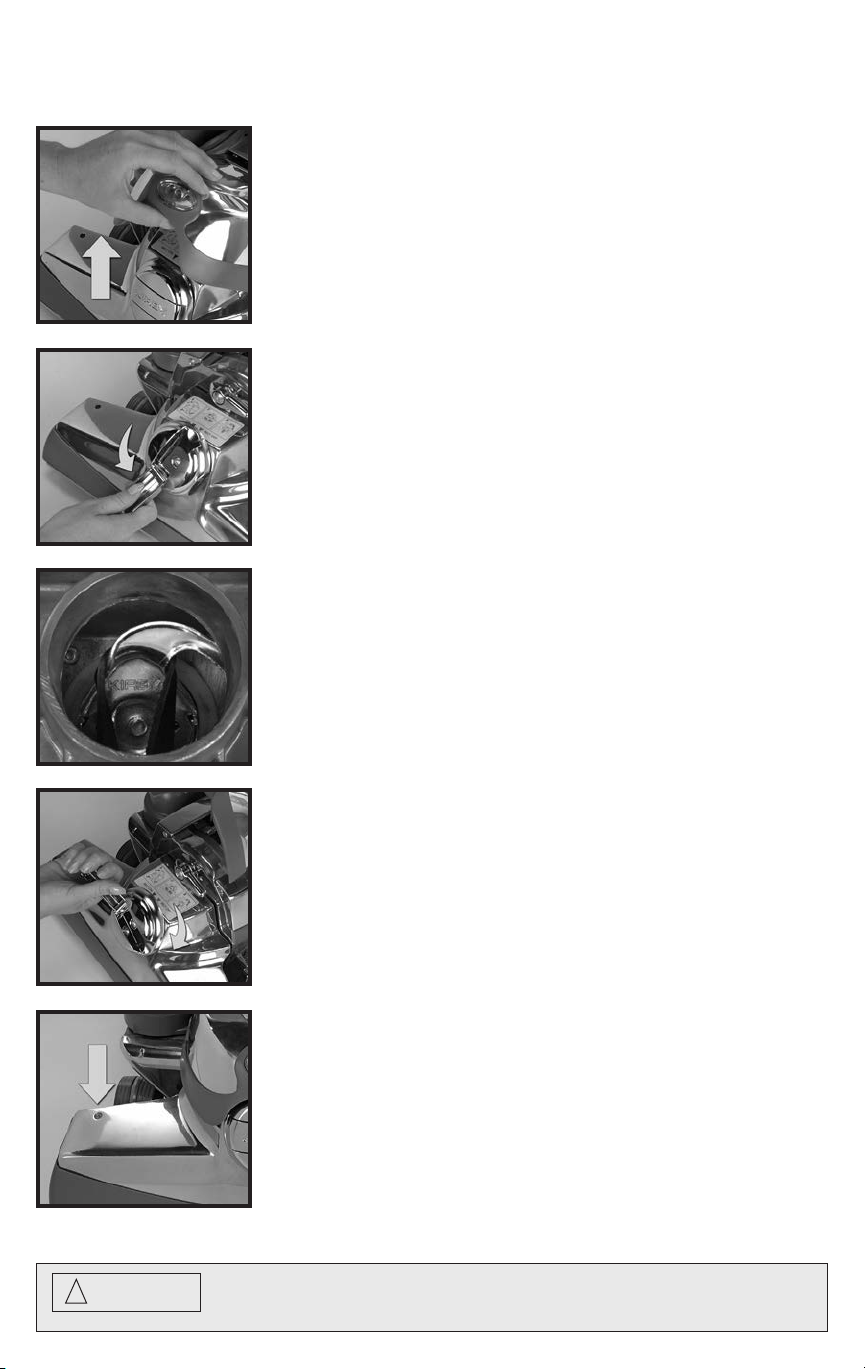
To replace the Mini Em-Tor collector, re-attach the entire Bag
Assembly by inserting the Bag Latch Tab ② at the top of the bag
2
into the slot under the Bag Release Button ⑯.
Finally, line up the raised indicator arrow of the Mini Em-Tor collector
with the indicator arrow on the Air Exhaust Port ⑲. Rotate the Mini
Em-Tor collector towards the Sentria® system and lock it in place.
NOTE: The Mini Em-Tor collector must be securely locked in place
or the unit will not operate. ❏
USING THE BELT LIFTER
The Belt Lifter ⑳ on your Sentria system is used for two purposes:
l) To engage or disengage the Brush Roll. When the Brush Roll is
disengaged, the Sentria system can be used as a straight suction
cleaner (page 13), and;
2) To allow removal of the Power Nozzle when converting your Sentria
system for use with various attachments and optional accessories.
To avoid damaging the belt, turn the Sentria system OFF before using
the Belt Lifter. ➤
9
Page 11
Getting Started
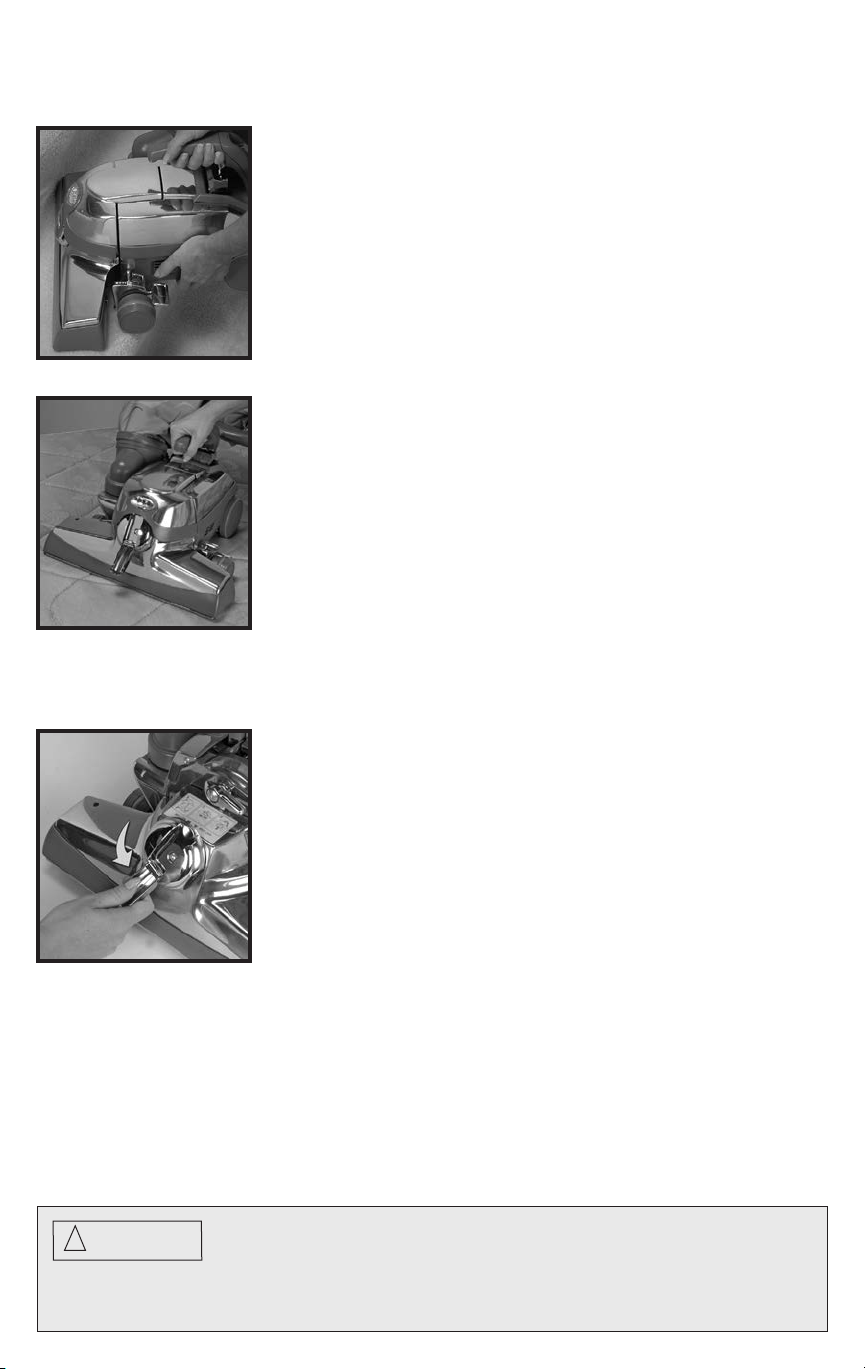
USING THE BELT LIFTER (cont)
To use the Belt Lifter, you must first raise the Headlight
Hood . ➤
1
Flip out the handle on the Belt Lifter . Use it to turn the Belt
Lifter fully to the left (counter-clockwise) until it stops and the
2
red arrows line up. This stretches the belt and lifts it off the motor
shaft. Return the handle on the Belt Lifter to its closed position.
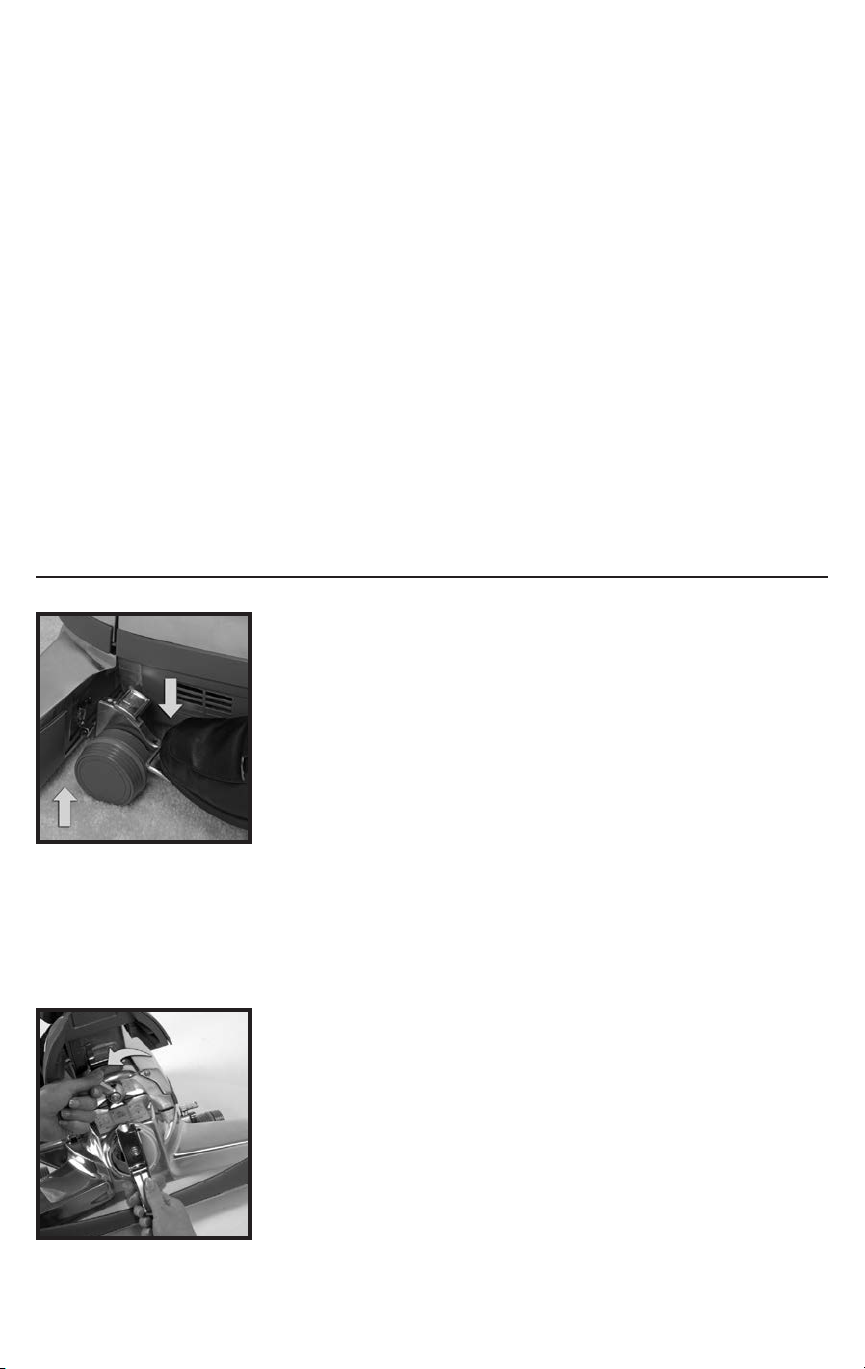
If you are using your Sentria® system as a straight suction cleaner,
simply lower the Headlight Hood. The Brush Roll is now disengaged
and will not rotate when the power switch is turned ON. ➤
The belt will be stretched to the top of the nozzle as shown. ➤
3
To re-engage the belt so the Brush Roll rotates, simply raise the
4
Headlight Hood and use the handle to turn the Belt Lifter fully
to the right (clockwise) until the green arrows line up. Then lower the
Headlight Hood.
The Brush Roll will now rotate when the Power Switch is turned ON.
NOTE: The belt should not be stretched when stored for an extended
period. Make sure the green arrows line up for storage. ➤
Your Sentria system is equipped with a Brush Roll Performance
Indicator Light ⑦, located on the top right side of the Power
5
Nozzle. The purpose of this light is to show if the Brush Roll is
rotating properly.
If the Brush Roll Indicator Light flashes intermittently or does not come
on when using the Power Nozzle, the Brush Roll Belt may not be working
properly. Either the Belt is not engaged or may need to be replaced.
To replace the Brush Roll Belt, also called the Power Nozzle Belt,
see Page 40. ❏
CAUTION:
!
objects. This may damage the fan.
Do not pick up heavy objects, such as coins, screws, rocks or similar
10
Page 12
Upright & Portable Cleaner
PART TWO
Your Sentria® home care system is extremely versatile.
In this section, we will discuss the following:
Upright Cord Management
Using your Sentria System as an
Upright Cleaner
Using your Upright as a Straight
Suction Cleaner
Cleaning Hard-Surface Floors
Using your Sentria System as a
Portable Cleaner
Cleaning Mattresses and Carpeted Stairs
UPRIGHT CORD MANAGEMENT
The Sentria system Upright handle incorporates a series of hooks and
fasteners to keep the cord off the floor and attached to the upright
handle for your convenience.
When using your Sentria system as an upright, snap the power
1
cord into the two cord holders located on the back of the handle. ➤
With the Upper Cord Hook in the up or 12 o’clock position,
2
route the cord toward the rear of the unit and slide the cord in
to the c-shaped holder on the Upper Cord Hook. The cord can now
be wrapped around the Upper and Lower Cord Hooks for storage. To
quick-release the cord for use, rotate the Upper Cord Hook down to the
6 o’clock position. The c-shaped holder is designed to hold the cord
securely in place and prevent the first loop from dropping to the floor.
NOTE: The cord can only be inserted or removed from the c-shaped
holder when the Upper Cord Hook is in the 12 o’clock position. ❏
11
Page 13
Upright & Portable Cleaner
THE UPRIGHT CLEANER
Before you begin vacuuming, it’s important to have the Power
Nozzle adjusted to the proper height setting. This gives you
the most efficient cleaning action.
The proper height setting can be achieved by doing the following: ➤
Turn the Sentria® system on by pressing the Power Switch. ➤
1
Press the Toe-Touch Control Upper Pedal ⑧ as often as
necessary to lower the nozzle to its lowest setting. ➤
2
Press the Toe-Touch Control Lower Pedal ⑨ one notch at a time to
raise the Power Nozzle to the desired height.
3
Listen for the click with each raised notch. Count the clicks to the
desired setting.
Raise Unit Purpose
Lowest position Recommended: Carpets and Bare Floor
1 Click up Optional: Deep Pile Carpeting
2 Clicks up Optional: Long Fiber Carpeting
3 Clicks up Recommended: Pet Hair Removal
4+ Clicks up Hose and Attachments ➤
If desired, engage Tech Drive® power assist by pushing down
the red “D” side (marked “D” for Drive) of the Tech Drive N/D
4
Pedal ⑫ located just below the Power Switch ⑬. ➤
12
Page 14
Upright & Portable Cleaner
To turn your Sentria® system OFF, press the Toe-Touch
Control Bottom Pedal ⑨ all the way down until nozzle is
5
fully raised.
Disengage Tech Drive power assist by stepping on the gray “N”
side (marked “N” for Neutral) of the Tech Drive N/D Pedal ⑪.
Turn the Sentria system OFF by pressing the Power Switch ⑬
and then unplugging. ❏
STRAIGHT SUCTION CLEANER
Straight Suction Cleaning allows you to vacuum hard floors,
throw rugs and delicate carpets without use of the Brush Roll.
NOTE: When using Straight Suction Cleaning without the Hard
Floor Pad, either on carpets or bare floors, lower the nozzle as
close as possible to the floor without touching the floor.
With the Sentria system turned OFF, raise the
1
Headlight Hood . ➤
Flip out the handle on the Belt Lifter ⑳. Use it to turn the
Belt Lifter all the way to the left (counter-clockwise) until
2
the red arrows line up (see page 9). Return the handle on
the Belt Lifter to its closed position.
Then lower the Headlight Hood.
The Brush Roll is now disengaged and your Sentria system
will operate as a Straight Suction Cleaner. ❏
THE HARD FLOOR PAD (optional)
By attaching the optional Hard Floor Pad to your Sentria® system
you may dust bare floors. While the unit is turned OFF, raise the Power
Nozzle as far as it will go by pressing the Toe-Touch Control Bottom
Pedal ⑨. Attach the Hard Floor Pad onto the nozzle opening using the
spring clips on the plate. Then lower the Power Nozzle by pressing the
Toe-Touch Control Upper Pedal ⑧ one notch at a time until the
bristles touch the floor.
NOTE: The Hard Floor Pad should only be used when the unit is
in the Straight Suction Cleaner mode. ❏
!
NOTICE:
!
CAUTION:
from the wall outlet and be sure the motor and nozzle brush have stopped.
Tech Drive pedal must be in neutral when using the cleaner on hard
surface floors.
Before installing the Hard Floor Pad, turn unit OFF, unplug the power cord
13
Page 15
Upright & Portable Cleaner
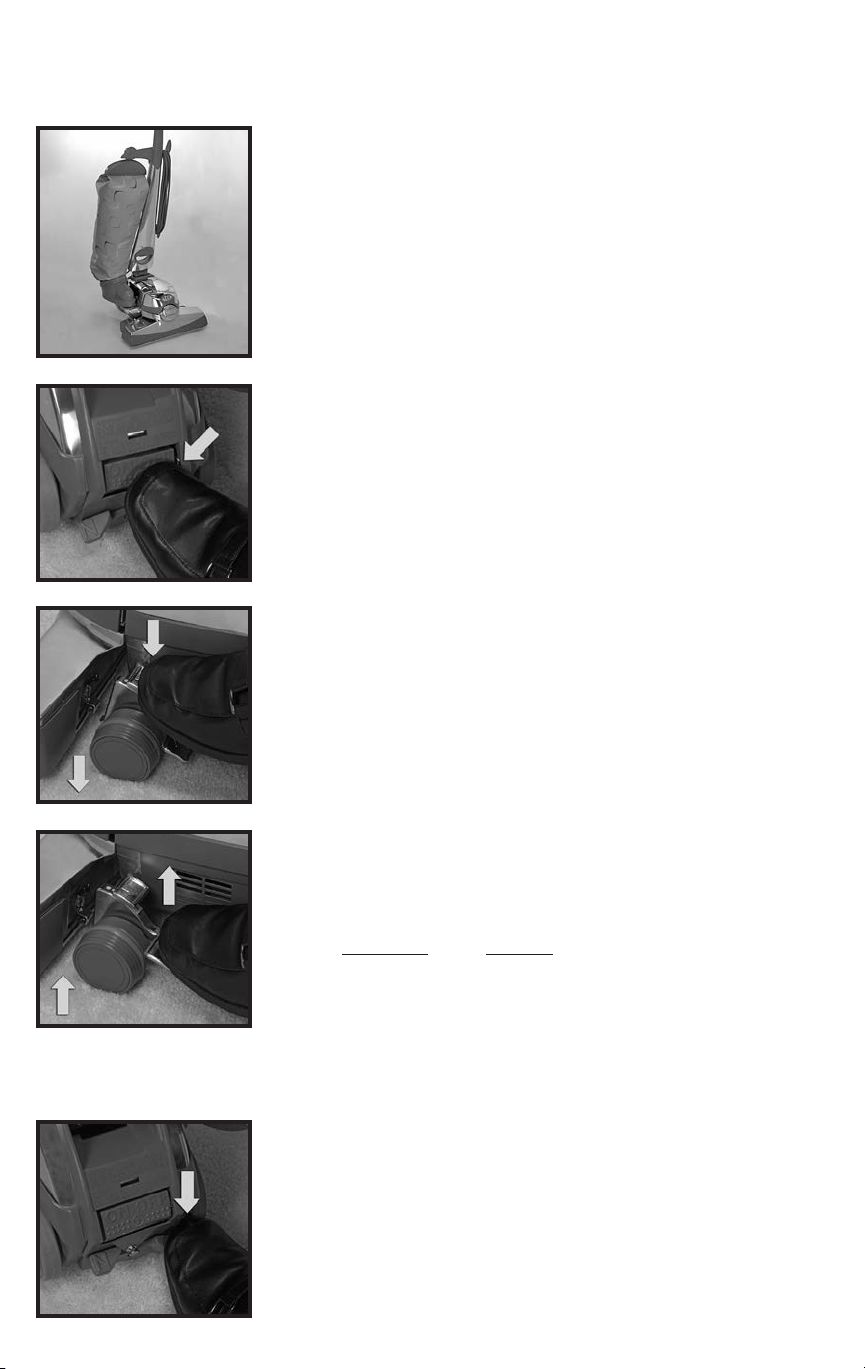
PORTABLE CLEANER SET-UP
Besides being a remarkable Upright Cleaner, the Sentria® system
can easily be converted into a portable cleaner for mattresses and
carpeted stairs.
To convert your Sentria system to a Portable Cleaner, make sure
the unit is turned OFF, unplugged, and the Tech Drive® pedal is
1
in neutral.
Then release the Outer Permanent Bag Top from the Bag Support by
pressing the Bag Release Button ⑯ and sliding the bag top off. ➤
Remove the cord from the handle. With the Upright Handle ⑰ in
the vertical position, push the Handle Release Button ⑭, located
2
at the base of the handle, and pull the handle straight up and out of
the slot. (Bag not shown for clarity.) ➤
Insert the Portable Handle ⑮ into the slot where the Upright
Handle was connected. Push the Portable Handle into the slot
3
until it snaps into place. ➤
Bend the Filtration Bag Assembly ① in half and insert the
Bag Latch Tab ② into the slot on the Portable Handle until it
4
snaps into place.
You are now ready for portable power cleaning. ❏
NOTE: Do not use portable mode on upholstered furniture.
14
Page 16
Upright & Portable Cleaner
CARPETED STAIRS
Place your Sentria® system on one of the carpeted steps, while supporting
the rear. Turn the unit on after it is in place and make sure the Tech Drive
pedal is in the Neutral position.
Roll the cleaner back and forth so that the Brush Roll agitates the
carpeting and loosens the dirt. ❏
MATTRESS CLEANING
Cleaning mattress surfaces is done the same as carpeted stairs, except
that you need to disengage the Brush Roll. (If your mattress has tufted
buttons on the surface, the Brush Roll could pull them loose.) Also,
to avoid potential snags in delicate mattress fabric, leave the sheet or
mattress cover on the bed when vacuuming.
NOTE: Do not carry the portable unit with the motor on. Place the unit
on the surface you wish to clean and then turn the unit on. Turn the unit
off to move it to a new location.
For straight suction cleaning, raise the Headlight Hood and flip out
the handle on the Belt Lifter ⑳. Use it to turn the Belt Lifter all the way
to the left (counter-clockwise) until the red arrows line up. This will
stop the Brush Roll from turning.
Return the handle on the Belt Lifter to its closed position and lower the
Headlight Hood. Use the Toe-Touch Control to adjust the Power Nozzle
to its lowest setting. ❏
®
CAUTION:
!
Also make sure Tech Drive® pedal is in the neutral position when vacuuming stairs and mattresses.
In addition, the Brush Roll should be disengaged when vacuuming mattresses.
To reduce risk of injury in the portable mode, keep hair and loose clothing
away from the
Sentria
system while in operation.
15
Page 17
Canister Cleaner & Attachments
PART THREE
Your Kirby® Sentria® system comes with a wide variety of
attachments for added versatility. In this section, we will
discuss the following:
Removing the Power Nozzle to Convert to a
Canister Cleaner
Using the Attachments
Using the Suction Control Grip
Using as a Blower Unit
Using the Portable Sprayer and the
Portable Shampooer
CONVERTING TO A CANISTER CLEANER/
INSTALLING THE ATTACHMENT HOSE
When using different cleaning attachments, the Attachment Hose is
connected to the front of the cleaner in place of the Power Nozzle .
NOTE: When connecting the Attachment Hose, you may choose
between the Upright Handle ⑰or the Portable Handle ⑰. To install
the Portable Handle, see page 14.
To install the Attachment Hose, you must first convert to a Canister
by removing the Power Nozzle. To do so, press the Toe-Touch
1
Control Bottom Pedal ⑨ all the way down until nozzle is fully
raised. Disengage Tech Drive® power assist by stepping on the gray
“N” side (marked “N” for Neutral) of the Tech Drive N/D Pedal ⑪.
Turn the Sentria® system OFF by pressing the Power Switch ⑬
and then unplugging. ➤
Raise the Headlight Hood and flip out the handle on the Belt
Lifter ⑳. Use it to turn the Belt Lifter all the way to the left
2
(counter-clockwise) until the red arrows line up.
Unlock the Power Nozzle by turning the Accessory Lock
all the way to the left (counter-clockwise). The Power Nozzle
3
should tip forward when it is released. Lift the nozzle away
from the Sentria system. ➤
16
Page 18

Canister Cleaner & Attachments
At the connector end of the Attachment Hose, you will notice two
hooks. Place the hooks over the ends of the Attaching Bar , then
4
push the opening of the hose up against the Sentria® system. ➤
Lock the Attachment Hose Connector in place by turning
the Accessory Lock all the way to the right (clockwise).
5
(Accessory Lock will clamp the Attachment Hose to the unit.)
Then lower the Headlight Hood.
With the Attachment Hose in place, the unit will automatically adjust
to high speed for hose operation.
NOTE: If the Sentria system will not run when the Power Switch
is ON, see page 44. ❏
!
CAUTION:
INSTALLING ATTACHMENTS ON THE
ATTACHMENT HOSE
To attach tools to the hose, push lightly while twisting the smaller
end of the hose into the tool. ❏
EXTENSION TUBES
One or two Extension Tubes can be attached to the end of the hose
to extend your reach and efficiently use various attachments. ❏
In normal operation, friction between the belt and the metal motor
shaft may cause the metal motor shaft to become hot to the touch.
!
CAUTION: Keep motor shaft free from lint, hair, and debris build-up.
17
Page 19

Canister Cleaner & Attachments
SURFACE NOZZLE UNDER LOW
FURNITURE/BARE FLOORS
The Surface Nozzle should be used on bare floors or for surface
cleaning carpets and under low furniture.
Rubber wheels on the nozzle allow it to glide silently on the surface of
hard floors without scratching and vacuum with maximum power. ❏
DUSTER BRUSH
The Duster Brush may be connected to the Attachment Hose or the
Extension Tubes to remove dust from any surface, including contoured
or irregular surfaces. ❏
UPHOLSTERY NOZZLE
The Upholstery Nozzle is used for cleaning upholstered furniture,
carpeted steps, and clothing. It can also be used to clean the inside
of cars. ❏
CREVICE TOOL WITH REMOVABLE BRUSH
Without the removable brush, the Crevice Tool can be used for cleaning
cracks, crevices, corners, grooves and narrow openings.
Install the removable brush in the end of the Crevice Tool to remove
dirt from corners, button tufts, between radiator coils and sliding
window tracks. ❏
WALL & CEILING BRUSH
To vacuum walls, ceilings, drapes and other surfaces, attach the Wall
& Ceiling Brush to the Suction Control Grip. Then attach the Suction
Control Grip to the Extension Tube(s) as shown. In addition to providing
suction relief, the Suction Control Grip provides the proper angle to
comfortably vacuum walls and ceilings.
TIP: To vacuum the top of door frames or ledges, or books on a
bookshelf, rotate the Wall & Ceiling Brush 180°. ❏
18
Page 20

Canister Cleaner & Attachments
UTILITY TOOL
Use to clean carpeting or the floors of cars. ❏
CONTROLLING AIRFLOW WITH THE SUCTION
CONTROL GRIP
Sometimes when using the attachments, vacuuming drapes or delicate
lamp shades, for example, you might wish to control the amount
of suction.
The Suction Control Grip features a valve to control the amount of
suction. Slide the control back and forth until the desired level of
suction is reached.
The Suction Control Grip can be used with or without the
Extension Tubes. ❏
SUCTION CONTROL GRIP PLACEMENT
The Suction Control Grip may be used at the end of the Extension
Tubes for reaching up or at the beginning of the Extension Tubes
for reaching down. ❏
BLOWER SET-UP
Your Sentria® system can also be used as a blower. To do so,
you must first remove the Power Nozzle .
NOTE: When using your Sentria system as a blower, you may choose
between the Upright Handle ⑰ or the Portable Handle ⑮.
Turn the power OFF, place the Tech Drive® power assist in
Neutral (see page 7 for details), unplug the unit from the wall
1
outlet and press the Toe-Touch Control Bottom Pedal ⑨ all
the way down until nozzle is fully raised. ➤
19
Page 21

Canister Cleaner & Attachments
BLOWER SET-UP (cont)
Raise the Headlight Hood and flip out the handle on the Belt
Lifter ⑳. Use it to turn the Belt Lifter all the way to the left
2
(counter-clockwise) until the red arrows line up. ➤
Unlock the Power Nozzle by turning the Accessory Lock
all the way to the left (counter-clockwise). The Power Nozzle
3
should tip forward when it is released. Lift nozzle away from
the Sentria system. ➤
When using the blower attachments, the Air Intake Guard
must be attached to the front of the unit.
4
Fasten the Air Intake Guard onto the Attaching Bar the same
way you would the Attachment Hose. Then lock it on by turning
the Accessory Lock all the way to the right (clockwise).
Than lower the Headlight Hood. ➤
To remove the entire Bag Assembly, grasp the Mini Em-Tor®
collector ⑥ in the hand-hold provided and rotate it out and away
5
from the Sentria® system as far as it will go. Then lift it off.
Release the Outer Permanent Bag Top from the Bag Support by pressing
the Bag Release Button ⑯ and sliding the bag top down. ➤
Place the large end of the Attachment Hose over the Air Exhaust
Port ⑲. Line up the Indicator Arrow on the Hose End with the
6
Indicator Arrow on the Air Exhaust Port and twist the Hose
Connector to the right (clockwise) to lock it in place.
If the Sentria system will not operate, see page 44. ❏
20
Page 22

Canister Cleaner & Attachments
USING AS A BLOWER
Your Sentria® system may now be used as a blower.
By attaching the Inflator/Deflator to the Attachment Hose, you can
inflate small toys, small air mattresses or any other low-pressure small
inflatable item up to 1 p.s.i. (pounds per square inch of air pressure). ➤
NOTICE Property Damage Risk. The intended use of the
Inflator/Deflator is for short durations only. Failure to follow
this instruction could cause damage to the unit including
overheating.
To deflate items, connect the Attachment Hose to the front of the unit
and connect the Inflator/Deflator Tool to the Attachment Hose. Then
connect the Bag Assembly to the Air Exhaust Port.
You may now use your Sentria system to deflate items. ❏
THE PORTABLE SPRAYER
The Portable Sprayer is used only in the Blower Mode. It is an excellent
tool to apply many different types of water-based liquids to any type of
surface. The spray can be adjusted ranging from very fine to coarse.
PORTABLE SPRAYER SET-UP
Unscrew the jar from the Portable Sprayer and fill ¾ full with
non-flammable liquid. Before reinstalling the jar, make sure the
1
portable sprayer dip tube is attached to the spray gun body. ➤
Screw the jar tightly on the Portable Sprayer and attach the Portable
2
Sprayer to the end of the Attachment Hose in the Blower Mode.
Make certain your Sentria® system is set up as a Blower Unit. The
Attachment Hose should be connected to the Air Exhaust Port . ❏
21
Page 23

Canister Cleaner & Attachments
USING THE PORTABLE SPRAYER
Holding the Portable Sprayer horizontally, aim it toward a sheet
of newspaper. Turn the Sentria® system ON and squeeze the
1
Portable Sprayer trigger, spraying your non-flammable solution
onto the newspaper to check spray pattern.
NOTE: If the Portable Sprayer must be tilted during usage, less
solution should be used in the jar. This will help avoid large droplets
in the spray. ➤
With the nozzle pointed away from you, adjust the spray by
turning the Spray Adjustment Control on the trigger of the
2
Portable Sprayer. ➤
Use slow, sweeping motions to spray the desired area with
solution. Always squeeze the trigger fully to permit maximum
3
flow. This will give you the best spray control. ❏
!
WARNING:
motor is open to the spray and could ignite flammable and volatile solvents.
Never use oil or solvent based paint of any kind in the Portable Sprayer. The
22
Page 24

Canister Cleaner & Attachments
CLEANING THE PORTABLE SPRAYER
Immediately after use, empty the Portable Sprayer jar and wash
with warm soapy water. ➤
1
The Portable Sprayer dip tube should also be removed and washed.
2
(Make sure to reinstall it after cleaning.) ➤
The spray opening on the front of the Sprayer also pulls out so
that the inside of the Sprayer and the nozzle jet can be cleaned.
3
To remove the nozzle jet, press on the two latches on the front of the
nozzle jet and pull it out. (The latches must be aligned with the holes
on the front of the Sprayer when returning the nozzle jet to the front
of the Sprayer.)
Then, fill the jar with water. Spray water until the spray becomes clear.
Reassemble the Sprayer after cleaning so none of the parts will be lost. ❏
PORTABLE SHAMPOOER SET-UP
The Portable Shampooer is used in the Blower Mode only. It is
designed for fast and easy cleaning of carpeted stairways and areas
that are difficult to reach with the Carpet Shampoo System.
To set up the Portable Shampooer, attach the Portable Shampooer
1
cap to the end of the Portable Sprayer. ➤
WARNING:
!
The motor is open to the spray and could ignite the spray.
Never clean the Portable Sprayer with flammable cleaning fluids.
23
Page 25

Canister Cleaner & Attachments
PORTABLE SHAMPOOER SET-UP (cont)
Remove the jar from the Portable Sprayer and fill the jar about
¾ full with Kirby® Carpet Shampoo mixture (Mix according
2
to the instructions on the bottle.) USE ONLY KIRBY CARPET
SHAMPOO for best results. ➤
Screw the jar tightly on the Portable Sprayer, then attach the
Sprayer to the Attachment Hose.
3
Make certain your Sentria® system is set up as a Blower Unit. The
Attachment Hose should be connected to the side Air Exhaust Port ⑲. ❏
USING THE PORTABLE SHAMPOOER
Before shampooing, vacuum surface thoroughly.
1
To make suds, turn the Sentria® system ON and pull the trigger
of the Portable Sprayer. A stream of suds will come out of the cap.
The suds can be sprayed directly onto the surface being cleaned or
on a plain paper bag or in a bowl and then applied to the surface
being cleaned. ➤
Adjust the Portable Sprayer for proper suds volume by turning
the Spray Adjustment Control located on the trigger. ➤
2
Work suds into the surface with a soft clean, white brush or sponge
3
until they disappear. Allow the surface to dry completely.
Then vacuum with the appropriate cleaning tool. This will remove
the dry residue which contains grime and loosened dirt. ❏
!
IMPORTANT:
such as silk, brocade and velvet. If in doubt, try a test patch. Let the test patch
dry and then check it before you shampoo further.
The Portable Shampooer is not recommended for use on upholstery or fabrics
24
Page 26

Optional Accessories
PART FOUR
Optional Kirby® Accessories greatly enhance the usefulness of your
Sentria® system. In this section, we will discuss the following:
Using the Carpet Shampoo System
Using the Floor Care System
Using the Turbo Accessory System
Using the Zippbrush
CARPET SHAMPOO SYSTEM SET-UP
Vacuum thoroughly before shampooing for maximum cleaning.
Then, remove the Outer Permanent Bag ① and the Power
Nozzle to prepare for shampooing.
By using the handle, turn the Carpet Shampoo System Nozzle Belt
Lifter to the right (clockwise) until the green arrows line up. ➤
1
Slide the slots on the side of the Carpet Shampoo System Nozzle
over the outer shoulders of the Carpet Shampoo System Tray. ➤
2
While pushing up on the belt with your finger, use the handle on
3
the Belt Lifter to turn it left (counter-clockwise looking at it from
the front) until the red arrows line up. (The Belt Lifter Hook will catch
and stretch the belt.) ➤
25
Page 27

Optional Accessories
CARPET SHAMPOO SYSTEM SET-UP (cont)
Press the Toe-Touch Control Bottom Pedal ⑨ all the way down to
raise the front of the Sentria® system. ➤
4
While sliding the Carpet Shampoo System Nozzle/Tray
Assembly toward the Sentria® system and over the Motor
5
Shaft , connect the hooks on the bottom rear of the nozzle
to the Attaching Bar . ➤
Push the nozzle up against the unit and turn the Accessory
Lock to the right (clockwise) to lock the nozzle in place. To
6
engage the belt, use the handle on the Belt Lifter to turn it all the
way to the right (clockwise) until the green arrows line up. Then lower
the Headlight Hood . ➤
The Shampoo Tank is removable and should be filled or
7
emptied at your sink.
NOTE: The Shampoo Tank is removed and re-attached in the
same way as the Mini Em-Tor® collector (see page 9 for details).
Unscrew the large cup from the top of the Shampoo Tank and turn
the Suds Control Valve fully to the left (counter-clockwise) to OFF.
Holding the Shampoo Tank level, fill it to the full line with warm
water (not hot).
Using the large cup from the top of the tank, pour three cupfuls of
®
Kirby
Carpet Shampoo into the Shampoo Tank. Do not use more,
as over-foaming will result.
NOTE: One tankful of solution will clean about a 10x12 foot carpet
(3x3.5m). Larger carpets will require refilling the Shampoo Tank.
Replace the large cup into the opening on top of the Shampoo Tank. ➤
26
Page 28

Optional Accessories
CARPET SHAMPOO SYSTEM SET-UP (cont)
Taking care to avoid spilling liquid on the Sentria® system or
8
the floor, place the opening in the bottom front of the Shampoo
Tank over the Air Exhaust Port on the unit. Angle the Shampoo
Tank outward from the unit until the arrows line up. Next, slide the
Shampoo Tank down over the locking pins on the Air Exhaust Port.
Rotate the Shampoo Tank toward the unit (clockwise) to lock it
in place. ➤
Push the round elbow of the small flexible hose into the hole in
the tray until it snaps into place. Firmly insert the other end over
9
the fitting at the bottom front of the Shampoo Tank. ❏
USING THE CARPET SHAMPOO SYSTEM
To set the nozzle to the proper height, step on the Toe-Touch
Control Upper Pedal ⑧ as often as necessary to lower the
1
nozzle to its lowest position. ➤
NOTE: Forcing the brushroll into the surface of the carpet decreases
its ability to thoroughly clean the carpet and could damage the belt
and brushroll.
Turn the Suds Control Valve all the way to the right (clockwise)
2
to the ON position. Turn the Sentria system ON and engage
Tech Drive® power assist (see page 7 for details). Suds flow
will begin immediately.
Turning the valve all the way to the left (counter-clockwise) to
the OFF position will stop the flow of suds completely.
Stopping the flow of suds allows you to thoroughly brush all the suds
into the carpet before applying more suds. This also lets you spot
scrub badly soiled areas. ➤
27
Page 29

Optional Accessories
USING THE CARPET SHAMPOO SYSTEM (cont)
As you move the Sentria® system back and forth, foam will be released
and the brush will work it into the carpet.
NOTE: Suds should be dispensed the full width of the tray when the
unit is pulled backward. If not, pull back more slowly or check and
clean the Shampoo Tank Filter, if necessary (see page 30).
After suds have been on the carpet at least five minutes, pick up the
foam by turning the Shampoo Tank to the OFF position. With the unit
at its lowest height level, move the Shampooer over the foam until
the foam is picked up. Some moisture will accumulate in the front
of the tray. Once the carpet is thoroughly dry, vacuum with the
Kirby® Upright. ❏
CLEANING THE CARPET SHAMPOO SYSTEM
Push the Toe-Touch Control Bottom Pedal ⑨ all the way down
to raise the nozzle and tray, then turn the Sentria system OFF
1
and unplug it. ➤
Turn the Suds Control Valve fully to the left (counter-clockwise)
2
to the OFF position.
Pull the Small Flexible Hose from the Shampoo Tank. ➤
Raise the Headlight Hood . Release the belt by turning the
Belt Lifter to the left (counter-clockwise) until the red arrows
3
line up. ➤
28
Page 30

Optional Accessories
CLEANING THE CARPET SHAMPOO SYSTEM (cont)
Turn the Accessory Lock to the left (counter-clockwise). The
Carpet Shampoo System Nozzle/Tray Assembly will tip forward.
4
Lift the Nozzle/Tray Assembly off the Sentria® system and carry it
to the sink. ➤
Remove the hose from the tray and rinse. ➤
5
By using the handle, turn the Belt Lifter to the right (clockwise)
until the green arrows line up. Pull the tray and nozzle apart.
6
Rinse tray. ➤
To clean the brush, push the thumb pads located at each end of the
7
plastic shield and rotate the shield up and away from the brush.
Disconnect the shield by gently pulling out the ends of the tray just
behind the Brush Roll.
Push the Brush Roll down out of the tray by simultaneously pushing
on both ends of the brush with both thumbs.
Rinse all areas of the shield tray and brush, and remove any lint
from brush tufts.
Shake excess water from the Brush Roll by brushing hand over
the bristles and then drying with a towel. ➤
29
Page 31

Optional Accessories
CLEANING THE CARPET SHAMPOO SYSTEM (cont)
To remove the Shampoo Tank from the Air Exhaust Port ,
rotate it away from the Sentria® system as far as it will go,
8
then lift it upwards. ➤
Remove and clean the Suds Screen Cap, Cup and Sponge Filter.
9
Rinse out the Shampoo Tank with cold water and replace the
Screen Cap, Cup and Sponge Filter.
NOTE: The belt should not be stretched for extended periods. Make
sure the green arrows on the nozzle line up for storage. (Remember
to align the red arrows before replacing the nozzle on the unit - see
Belt Lifter section on page 10.) ❏
30
Page 32

Optional Accessories
REPLACING A WORN CARPET SHAMPOO
SYSTEM NOZZLE BELT
To replace the Carpet Shampoo System Nozzle Belt, push the
thumb pads located at each end of the shield and rotate the shield
1
up and away from the brush. ➤
Push down carefully on the ends of the brush with your thumbs.
The brush will snap out and the belt can be replaced.
2
Be certain the belt is placed in the center of the brush.
NOTE: Use only approved Kirby® belts. ➤
Align the metal ends of the brush with the slots on the tray and
push the brush in until it snaps into place. The brush will only fit
3
the tray the correct way.
NOTE: The belt should not be stretched when stored for an extended
period. Make sure the green arrows line up for storage. ❏
31
Page 33

Optional Accessories
USING THE KIRBY MIRACLE WAXER
FLOOR POLISHER
To assemble the roller waxer applicator, attach the top half of the
roller waxer handle to the bottom half (if not already done). Adjust
1
the upper half until the spring-loaded pin in the lower half is seated
in the hole near the bottom of the upper half. ➤
With the wax roller bag facing the hooked end of the long roller
handle, push the wax roller over the connector on the bottom of
2
the handle until secure. ➤
Pull the roller bag off the wax roller and save the packing bag. Begin
waxing according to the directions in box on previous page. ➤
3
®
32
Page 34

Optional Accessories
USING THE MIRACLE WAXER
®
FLOOR POLISHER (cont)
To remove the wax roller from the long handle, hold the original
wax roller packing bag with the open end facing the roller.
4
Push the wax roller into the packing bag as far as it will go.
Avoid touching the wax with your hand. ➤
Grasp both the packing bag and roller firmly and pull them off the
long roller waxer handle. To do this, push the roller away from the
5
handle grip toward the bar to compress the retaining spring. This
will allow you to slide the roller over the end cap. Seal bag tightly to
prevent premature drying. Store in the provided packing tube and put
in a safe place away from children and pets until next use. ➤
If desired, prepare the long waxer roller handle for storage by
depressing the spring-loaded pin on the lower portion of the
6
handle while pushing the upper portion toward the hooked end.
IMPORTANT: Seal used roller in original packing bag and tube
after each use to prevent the wax from drying out. ❏
KIRBY MIRACLE WAX DIRECTIONS
For Hardwood, Vinyl, Cork and Linoleum Floors:
1. Clean surface thoroughly.
2. Attach Kirby Floor Care System Buffer Nozzle and
Brush according to the instructions on page 34,
under ‘‘Floor Buffer Set-Up.”
3. For best results, apply a very thin coat of Kirby
Miracle Wax using the roller applicator. It is not
necessary to completely cover the floor with wax at
this time, as the wax will be spread in the next step.
4. Using the Toe-Touch Control Upper Pedal to lower the
nozzle all the way down, spread the wax evenly over
the entire floor using the Kirby Floor Care System
Buffer Brush.
5. Let dry 5 minutes.
6. When dry, buff with the Kirby Floor Care System
Buffer Brush.
33
NOTE: For very worn areas, two coats may be re quired.
In this case, multiple thin coats will provide better
results than one thick coat.
For Marble Floors:
Apply a thin coat and spread as in the directions in #4.
However, buff immediately, avoiding any drying time.
Once you have completed the steps above, the floor
may be rebuffed, any time it becomes necessary, using
the Floor Care System Buffer Brush. Apply additional
wax ONLY when rebuffing does not produce
acceptable results.
IMPORTANT:
Do not use Kirby Miracle Wax on rubber
or asphalt tile. ❏
Page 35

Optional Accessories
FLOOR BUFFER SET-UP
Your Sentria® system can be used as an effective floor buffer for
wood or tile floors.
To use the Floor Buffer, you must first insert the Buffer Brush into
the Floor Buffer Nozzle.
Center the belt of the Buffer Brush in the middle area between
the tufts of the brush. ➤
1
Turn the Buffer Nozzle over and slide the ends of the Brush into
the slots at each end of the nozzle. The Buffer Brush will only fit
2
the correct way. ➤
Push the belt up against the Brush Roll with your finger. ➤
3
While holding the belt in place, use the handle on the Belt Lifter
to turn it left (counter-clockwise) until the red arrows line up.
4
The Belt Lifter hook will catch the belt and stretch it upward
into the nozzle. ➤
Place the hooks located on the rear of the nozzle over the Attaching
Bar and push the nozzle up against the Sentria® system.
5
Turn the Accessory Lock all the way to the right (clockwise) to
lock the nozzle in place. ➤
!
CAUTION:
Tech Drive pedal must be in the neutral position during polishing.
To avoid loss of control, do not stand unit on end for polishing. The
34
Page 36

Optional Accessories
FLOOR BUFFER SET-UP (cont)
To engage the drive belt and Buffer Brush, use the handle to turn
the Belt Lifter all the way to the right (clockwise) until the green
6
arrows line up. Lower the Headlight Hood . ➤
DO NOT USE Tech Drive® power assist with the Floor Buffer.
Place Tech Drive power assist in Neutral by stepping on the gray
“N” side (“N” for Neutral) of the Tech Drive N/D Pedal ⑪
7
. ➤
USING THE FLOOR BUFFER
Because the unit moves forward when the Floor Buffer Brush
touches the floor, make sure the Buffer Nozzle is on its highest
8
setting. Press the Toe-Touch Control Bottom Pedal ⑨ all the way
down to raise the Buffer Nozzle all the way up.
While holding onto the unit’s handle, turn the Sentria® system ON. ➤
Press the Toe-Touch Control Upper Pedal
one notch at a time. Lower the brush as far as the Toe-Touch
9
Control will allow.
With the Buffer running, move the Sentria® system over the floor
as though you were cleaning a carpet, using slow, steady strokes.
NOTE: The belt should not be stretched when stored for an extended
period. Make sure the green arrows line up for storage. ❏
CAUTION:
!
on to the handle before plugging the power cord into the wall outlet and before
turning the power switch ON. To avoid possible damage to soft tiles or marking
of waxed and finished non-carpeted floors, disengage the Tech Drive power
assist pedal.
To avoid losing control of the Buffer when brush is on the floor surface, hold
to lower the brush
⑧
35
Page 37

Optional Accessories
HARD FLOOR PAD
See page 13 for set-up and use of the Hard Floor Pad. ❏
USING THE CARPET FLUFFER
Your Kirby® Floor Buffer can also be used as a Carpet Fluffer to reset
the nap on a matted-down carpet.
Before fluffing the carpet, raise the nozzle all the way up by
pushing the Toe-Touch Control Bottom Pedal ⑨ all the way down.
1
Place the cleaner on the carpet to be fluffed. Plug in the Power Cord.
Disengage the Tech Drive® power assist by pressing on the gray “N”
side of the Tech Drive N/D Pedal ⑪. ➤
Holding onto the handle firmly, start the cleaner by pressing
the ON switch. ➤
2
Lower the Carpet Fluffer Nozzle one notch at a time by pushing
the Toe-Touch Control Upper Pedal ⑧. The instant the brush
3
contacts the carpet, stop lowering the brush. ➤
Then engage Tech Drive® power assist by pressing down on the
4
red “D” side of the “N/D” Pedal. You are now ready to fluff the
carpet by pushing the cleaner back and forth over the carpet.
NOTE: • Loweringthebrushtoofaroncableyarntypecarpetsmay
cause the carpet to fuzz. Do not fluff delicate carpets.
• Thebeltshouldnotbestretchedwhenstoredforanextended
period. Make sure the green arrows line up for storage. ❏
36
Page 38

Optional Accessories
TURBO ACCESSORY SET-UP
The Turbo Accessory System can be used for a wide variety of household
jobs. It’s a sander, a buffing unit and a scouring unit.
TURBO-SANDING
To set up the Turbo Accessory System as a sander, unsnap
the Sander Dust Shroud at the rear of the tool and lift off. ➤
1
Rotate the clamp levers on the side of the Turbo Accessory
2
upwards to open the clamps. ➤
Select the correct grade of sandpaper needed for the job. Use fine
3
paper for a smooth finish and coarse paper to clear rough surfaces
or remove paint.
Slide the sheet into the front clamp and lock the clamp lever.
NOTE: Three grades of sandpaper come with the Sander.
Each piece is a standard ¹/3 sheet. ➤
Tightly wrap the paper around the bottom of the Turbo Accessory
4
and tuck the end into the rear clamp. Lock the rear clamp. ➤
With the Turbo Accessory on a level surface, wrap the Sander
Dust Shroud around the Sander with the opening to the rear and
5
snap it closed. ➤
!
CAUTION:
surface. They can damage the sandpaper and the Turbo Accessory. They
may also cause sparks, which could ignite dust. Replace the disposable bag
after extended sanding because the dust is fine and will plug the bag pores.
Be sure no metal objects, such as tacks, nails, etc., are sticking up from the
37
Page 39

Optional Accessories
TURBO-SANDING SET-UP (cont)
Insert the Attachment Hose into the end of the Turbo Accessory.
6
Grip the Sander at the front and rear and turn the Sentria
system ON. Then press the ON button on the top of the Sander.
While applying light pressure, move it over the surface slowly.
Allow the Sander to do the work. Don’t force it or lean heavily on it.
The tool works best at high speed. ❏
TURBO POLISHING
Attach the synthetic lamb’s wool pad using the same procedure as
attaching sandpaper (see page 37). The Turbo Accessory now becomes
a polisher. Use it for polishing hard waxed surfaces, such as table tops,
paneling, and large flat surfaces. It can be used to polish cars.
The Dust Shroud is not used when polishing. ❏
®
TURBO SCOURING
Attach the webbed nylon scouring pad using the same procedure as
attaching sandpaper (see page 37). The Turbo Accessory now becomes a
scouring tool. Use it for scouring hard surfaces such as ceramic tile, etc.
(Do not use on painted surfaces.)
The Dust Shroud is not used when using the scouring pad. ❏
!
CAUTION:
Always wear safety glasses when turbo sanding.
38
Page 40

Optional Accessories
USING THE ZIPPBRUSH
When attached to the Attachment Hose, the Zippbrush can be used for
a wide variety of cleaning surfaces, including upholstery, and carpeted
steps. It can be used to clean automotive interiors.
For optimum results, do not press down heavily on the Zippbrush.
Allow the brush to rotate at maximum speed by gently moving it
side to side on the surface being cleaned.
CLEANING THE ZIPPBRUSH
To clean the Zippbrush, press the button on the front of the brush
to release the outer brush ring.
1
When pressing the release button, avoid placing pressure on the
outer ring brush. ➤
Lift the center Brush/Air Turbine out of the tool and remove any
particles or lint from the brush and turbine. Also remove any
2
particles left in the tool cavity. ➤
Place the Brush/Air Turbine back in the tool and turn it until the
tabs drop into the slots. Hook the tab on the rear of the brush ring
3
into the small opening of the tool and snap it back into place. ❏
CAUTION:
!
area or push the release button while the brush is in motion. Keep brush
flat against the surface being cleaned as the brush can throw particles
outward. Do not use on delicate fabrics.
While using the Zippbrush, do not insert fingers into the revolving brush
39
Page 41

Operating/Maintenance Tips
PART FIVE
Your Kirby® Sentria® system is a highly sophisticated home maintenance system. As with most modern appliances, it requires a modest
degree of routine maintenance to keep it operating efficiently. This section
of the Owner’s Manual presents tips on operating and maintaining your
Sentria system. In this section, we will discuss the following:
Changing the Power Nozzle Belt
Adjusting the Brush Roll for Optimum
Performance
Miscellaneous Parts Replacement
Service Tips
Helpful Answers to Questions/Troubleshooting
CHANGING THE POWER NOZZLE BELT
After extended use, the Power Nozzle Belt on your Sentria® system
may become stretched and worn causing the belt to slip. (See page
10 - Brush Roll Performance Indicator Light.) If this condition exists,
simply replace the old belt with a new one.
NOTE: Use only approved Kirby® belts.
To change the belt, remove the nozzle from the Sentria system.
Then release the belt tension by using the handle on the Belt
1
Lifter ⑳ to turn it all the way to the right (clockwise) until the
green arrows line up. ➤
Unlock the Rug Plate by unhooking the two latches on the
rear of the nozzle. ➤
2
Pull on the rear edge of the Rug Plate to remove from the nozzle.
Note the Brush Roll Bristle Height Adjustment setting (1, 2, or 3).
3
Lift out the belt and Brush Roll. ➤
40
Page 42

Operating/Maintenance Tips
CHANGING THE POWER NOZZLE BELT (cont)
Slide off the old belt and replace with a new one. ➤
4
Make sure the Brush Roll Bristle Height Adjustment setting
(1, 2, or 3) is the same on both ends as when the brush was
5
removed. See below for discussion of the Brush Roll Bristle
Height Adjustment (1, 2, or 3). Place the belt and Brush Roll back
into the nozzle. One of the plastic Brush Roll ends is larger than the
other, thus the Brush Roll will only fit in the nozzle one way.
Then center the belt on the Brush. ➤
Replace the Rug Plate by placing it on the front of the bumper
first and then pulling it over the bumper on the rear of the Power
6
Nozzle . Secure the Rug Plate using the two latches that hold
it in place. ➤
Using the handle on the Belt Lifter ⑳, turn it to the left (counter-
clockwise) until the red arrows line up. This will stretch the belt
7
in preparation for returning the nozzle to the Sentria® system.
Now you are ready to re-attach the Power Nozzle and re-engage
the belt. ❏
41
Page 43

Operating/Maintenance Tips
ADJUSTING THE BRUSH ROLL HEIGHT FOR
MAXIMUM CLEANABILITY
The Brush Roll bristles wear away after long periods of use.
This reduces cleaning efficiency.
However, the ends of the Brush Roll are adjustable, so you can extend
the bristles, allowing the brush to work like new again. ➤
Remove the Power Nozzle from the Sentria system. ➤
1
Release the belt tension by using the handle on the Belt Lifter ⑳
to turn it all the way to the right (clockwise) until the green
2
arrows line up.
Unlock the two latches on the rear of the Power Nozzle to remove
the Rug Plate .
Then lift the brush out of the nozzle. ➤
Rotate the plastic Brush Roll ends to the 1, 2 or 3-notch settings as
desired. The greater the number of notches, the farther the bristles
3
are extended.
When viewed from the top, rotate the plastic Brush Roll ends to the side
with the appropriate number of notches visible. Make sure both plastic
Brush Roll ends are set to the same number of notches. ➤
42
Page 44

Operating/Maintenance Tips
Questions and Answers/Troubleshooting
ADJUSTING THE BRUSH ROLL HEIGHT (cont)
Place the brush back into the nozzle making sure both plastic
Brush Roll ends are set to the same number of notches (1, 2, or 3).
4
Replace the Rug Plate by placing it on the front of the bumper first and
then pulling it over the bumper on rear of Power Nozzle . Secure the
Rug Plate using the two latches that hold it in place.
Using the handle, hook the belt onto the Belt Lifter ⑳ and turn the
Belt Lifter to the left (counter-clockwise) until the red arrows line up.
This will stretch the belt in preparation for returning the nozzle to the
Sentria® system. ❏
WHEEL WEAR/ REPLACEMENT
Kirby®wheels are made with a pliable tread that is designed to prevent
carpet wear and prevent damage to non-carpeted floors. After extended
periods of use, the tread on the wheels will wear out and the wheels will
need to be replaced.
Check wheel tread occasionally to determine if the wheels need to be
replaced. The tread material is lighter in color than the plastic wheel
itself. If any of the darker plastic wheel is showing through the tread,
the wheels need to be replaced. The wheels are not user-replaceable.
Contact your nearest authorized Kirby® Service Center for prompt,
courteous wheel replacement. ❏
CORD REPLACEMENT
If the electrical cord connecting the Sentria® system to the outlet
becomes cut or frayed over time, DO NOT USE THE UNIT. Contact
your authorized Kirby® Service Center immediately for replacement.
Avoid damage to your cord by being careful not to run over it with your
Sentria system. Also, unplug your unit by grasping the plug at the end
of the cord rather than pulling on the cord itself. ❏
HEADLIGHT REPLACEMENT
If one or more of the three LED lights in your Headlight Assembly
burn out, please contact your authorized Kirby® Distributor for
replacement. ❏
SERVICE TIP
Keep the entire Brush Roll and belt track clear of lint, string, hair and
other debris build-up. This will allow the Brush Roll to perform at its
fullest potential. ➤
Keep motor shaft free from lint, hair, and debris build-up. ❏
43
Page 45

Operating/Maintenance Tips
Questions and Answers/Troubleshooting
Q WHAT IS A DOUBLE-INSULATED MACHINE? (Servicing of double-insulated appliances)
A In a double-insulated appliance, two systems of insulation are provided instead of grounding. No
grounding means is necessary on a double-insulated appliance, nor should a means for grounding be added
to the appliance. A double-insulated appliance is marked with the words “DOUBLE-INSULATED”
(U.S.A. and Canada). The symbol ( square within a square) may also be marked on the appliance.
Servicing a double-insulated appliance requires extreme care and knowledge of the system and
should be done only by qualified service personnel.
Replacement parts for this double-insulated Sentria® model must be genuine Kirby® parts for
maintenance of safety and protection of warranty.
Q WHAT SHOULD I DO IF THE MOTOR DOES NOT RUN WHEN I TURN
THE Sentria SYSTEM ON?
A Many service calls are unnecessary. Checking a few simple things can save a lot of cost, time and
trouble. Whenever your Sentria system does not perform properly, make these checks first before
calling authorized service personnel.
IF THE MOTOR DOES NOT RUN WHEN THE MOTOR ON-OFF SWITCH IS PUSHED:
1. Make sure the Power Cord is plugged into an outlet and that the outlet has power.
(Check for a blown fuse, tripped circuit breaker or power company trouble.)
2. Make sure the cord plug is fully inserted into the unit.
3. Look for breaks in the Power Cord insulation. If the cord is damaged, get a new one.
DO NOT ATTEMPT TO REPAIR IT. Use only a genuine Kirby® Power Cord.
Do not use standard extension cords.
4. Make sure that an attachment or accessory is properly mounted on the front of the Power Plant.
The unit will not run without the Power Nozzle , Hose Coupling, Air Intake Guard or Accessory
Brush Nozzle in place.
5. The unit will not operate without either a Filtration Bag Assembly/ Mini Em-Tor® collector ⑥,
Attachment Hose or Carpet Shampoo Tank properly installed on the Air Exhaust Port ⑲.
6. The Filtration Bag Assembly/Mini Em-Tor collector, Attachment Hose or Carpet Shampoo Tank
must “click” firmly into place for the unit to operate. If the fitting is too tight and you have difficulty
installing the above, apply a small drop of water to the gasket to reduce friction and ease installation.
Q WHAT SHOULD I DO IF THE Sentria SYSTEM
OR DIRT ON THE CARPET?
DOES NOT PICK UP LINT
A l. Check to see if the Brush Roll is turning, when the Sentria system is running.
2. If the Brush Roll is not turning freely, the belt is slipping, broken or not on the Motor Shaft .
3. If the belt is not on the Motor Shaft , remove the nozzle and follow the instructions on page 16.
See page 42 for bristle extension.
4. If the belt is in good condition and the brush is running, check for bristle wear and replace
Brush Roll, if necessary.
To check for wear, turn the Power Nozzle over and place a ruler against the metal Rug Plate. If the
bristles are below or just touching the ruler, the Brush Roll should be adjusted. See page 42 for details.
5. Make sure that the nozzle height is adjusted to place the brush in contact with the carpet.
Use the Toe-Touch Control to adjust as appropriate. See page 7.
6. Check the bag to see if it is full.
7. Check the fill tube for clogging.
44
Page 46

Operating/Maintenance Tips
Questions and Answers/Troubleshooting
Q
I SMELL BURNING RUBBER WHEN I USE MY Sentria® SYSTEM
WHAT SHOULD I DO?
A 1. Check to see if the Brush Roll is turning when the Sentria system is running. If not, then
the Brush Roll may be stalled due to threads around the ends. Remove Brush Roll and
make sure it rotates freely at both ends.
2. The belt may not be fully engaged (or disengaged). Make sure the green arrows or red
arrows on the Belt Lifter ⑳ match up fully.
3. If a slipping belt has deposited a black residue on the Motor Shaft , remove it gently
using steel wool or sandpaper and replace the belt.
Q HOW DO I VACUUM MY MATTRESS?
A l. Leave sheet or mattress cover on bed to protect mattress from snags.
2. Convert your upright Sentria system to a Portable Cleaner. See “Portable Cleaning”
on page 14.
3. Place Portable Cleaner on the mattress.
4. Disengage Tech Drive® power assist by pressing the gray “N” side (marked “N” for Neutral)
of the N/D Pedal ⑪.
5. Disengage the Brush Roll.
6. Plug in your Sentria system and turn it ON.
7. Lower the Power Nozzle by pressing the Toe-Touch Control Upper Pedal ⑧ until
it is all the way down.
8. Begin vacuuming.
Q HOW DO I VACUUM MY CARPETED STAIRS?
A There are several different ways. You can use:
•thePortableCleaner.(Seepage15.)
•theZippbrush.(Seepage39.)
•ortheUpholsteryNozzle.(Seepage18.)
Q HOW DO I CLEAN UNDER MY BED?
A Your Sentria system can be used in the canister mode (see page 16) with the Surface Nozzle
to vacuum under the bed and other low furniture. When bending to vacuum under low
furniture, be sure to keep hair, loose clothing, fingers and all parts of body away from
unit openings and moving parts..
IMPORTANT: Always exercise caution when vacuuming stairways.
45
Page 47

Operating/Maintenance Tips
Questions and Answers/Troubleshooting
Q HOW DO I VACUUM MY UPHOLSTERED FURNITURE?
A 1.Convert to a canister. (See page 16.) (Do not use Power Nozzle on furniture.)
2. Use the Attachment Hose with or without the following attachments:
•theUpholsteryNozzle.
•theCreviceToolwiththebrushremoved.(Useinbetweenseatcushionsandincrevices.)
•theoptionalZippbrush.
The optional Zippbrush uses rotating brushes to agitate fibers and remove imbedded dirt and pet
hair from the fabric. When using the Zippbrush, move it slowly from side to side across surface.
Do not apply heavy pressure as it will slow the brush action. (If the brush becomes jammed and
stops turning, simply rotate the inner rotating brush clockwise to free it up and let go. It should
then resume turning.)
To clean hard-to-reach upholstery buttons, use narrow tip of the Zippbrush, located on the side
opposite the hose, to work the dirt loose. (For additional information on the use and maintenance
of the optional Zippbrush, see the Zippbrush section on page 39).
Q HOW DO I CLEAN MY WALLS AND CEILING?
A 1. Convert to a canister. (See page 16.)
2. Attach one or two Extension Tubes to the Attachment Hose by inserting the hose into the
Extension Tube opening and twisting to lock in place.
3. Attach the Suction Control Grip onto the end of the Extension Tube.
4. Attach the Wall & Ceiling Brush to the end of the Suction Control Grip. The Suction
Control Grip not only allows you to regulate airflow, it also allows you to adjust the Wall
& Ceiling Brush to the proper angles for mantles, window ledges, walls and ceilings.
Q HOW DO I CLEAN MY CAR?
A Your Sentria
In addition, you may also use the optional Zippbrush for vacuuming automobile upholstery,
carpeting, floor mats and trunks. (See Zippbrush section on page 39 for Zippbrush use and
maintenance information.)
1. Convert to a canister. (See page 16.)
2. You can use the end of the Attachment Hose for straight suction or attach any one of
a variety of tools.
3. We suggest using the Upholstery Nozzle (or optional Zippbrush) to clean the seats, areas
under the seats and the trunk.
4. Use the Crevice Tool (with or without the small Crevice Tool brush end) for small,
hard-to-reach areas, such as the area between the windshield and dash and the area
between the seats.
5. Use the Duster Brush to clean the instrument panel.
6. Use the Utility Tool to pick up gravel and heavy particles on floor mats and carpeting.
®
system comes equipped with a range of tools to help you clean your car.
46
Page 48

Operating/Maintenance Tips
Questions and Answers/Troubleshooting
Q HOW DO I CLEAN OTHER HOME FURNISHINGS?
A Books and Bookcases:
1. Convert to a canister. (See page 16.)
2. Attach the Duster Brush to the end of the Attachment Hose and “dust” the books and bookcase.
3. Other options include using an Extension Tube with the Duster Brush or the Wall &
Ceiling Brush to dust the bookcase top.
Lampshades and Pictures:
1. Convert to a canister. (See page 16.)
2. Attach the Duster Brush to the Suction Control Grip. Then connect the grip to the Attachment
Hose. Test the airflow by regulating the Suction Control Valve on the Suction Control Grip
before you dust your lampshades. Dust glass-covered artwork and picture frames.
Narrow Openings:
1. Convert to a canister. (See page 16.)
2. Attach the Duster Brush to the Suction Control Grip. Then connect the grip to the
Attachment Hose. Test the air-flow by regulating the Suction Control Valve on the Suction
Control Grip before you dust your home electronics.
3. Connect the Inflator/Deflator tool to the end of the Attachment Hose to dust hard-to-reach
small spaces.
Wicker Furniture and Baskets:
1. Convert to a canister. (See page 16.)
2. Attach the Duster Brush to the end of the Attachment Hose. Your Duster Brush works well
between cracks and crevices on wicker and other irregular surfaces.
Drapes and Blinds:
1. Convert to a canister. (See page 16.)
2. For drapes, attach one or two Extension Tubes to the Attachment Hose. Connect the Suction
Control Grip to the Extension Tube and then connect the Upholstery Nozzle (with the faceplate
attached). Test the air-flow by regulating the Suction Control Valve on the Suction Control Grip
before you dust your drapes and blinds.
The Suction Control Valve on the Suction Control Grip regulates airflow and prevents you from
pulling the drapes off the curtain rods.
For blinds, follow a similar procedure using the Duster Brush instead of the Upholstery Nozzle.
If using the Suction Control Grip, make sure to completely close the Suction Control Valve to
maintain maximum airflow.
Q WHAT SHOULD I DO IF MY FILTER BAG SMELLS?
A Change it. Replace the disposable bag when the dirt reaches the fill line. Do not overfill.
1. You may also purchase Odorific® II, an odorizer that leaves your room smelling clean and
fresh. Place a few drops on a cottonball and toss it in the Outer Permanent Bag. For a list of
other fine Kirby® products, (see page 48 and 49.)
47
Page 49

Kirby® Home Care Products
From Your Factory Authorized Distributors and Service Centers
ALLERGEN CONTROL PRODUCTS
MicroAllergen Filter Bags
Reduces common household dust, pollen, mites, and other particles.
Allergen Control Shampoo
Neutralizes dust mite particles. Reduces allergens caused by pollen. Cleans and brightens carpets.
Microfiber Cloth
Use when dusting. 30 times finer than cotton. Absorbs 4 times its weight in liquid,
dirt and grime. Washable.
CARPET SHAMPOO PRODUCT FAMILY
Carpet Shampoo
Highly effective product for deep-cleaning carpets and rugs. Carpet-safe and non-toxic.
Multi-Purpose Spot Remover
Ready-to-use formula for everyday stains. Just spray on stain and blot with a clean, white cloth.
Great for use prior to shampooing.
Pre-Treatment for Heavy Traffic Areas
Highly effective formula gives you a “head start” on shampooing. Just spray on heavily-soiled
walkways, entryways and traffic patterns a few minutes prior to shampooing.
STAIN REMOVER PRODUCT FAMILY
Kirby Foam
Effective on heavily-soiled carpeted stairs and other hard-to-reach places. Just spray and blot.
Great for auto and home floor mats!
Pet Stain & Odor Carpet Cleaner
Attacks nasty pet stains and odors with natural enzymes. Active ingredients get right to the core of
carpet’s fibers, ensuring that lingering odors are eliminated and that pets won’t return to the same spot.
Grease & Oil Stain Carpet Cleaner
Penetrates and removes the toughest stains... auto grease, garage and cooking oils and more.
Just spray and blot.
Food Stain Carpet Cleaner
Specially formulated cleaner with natural enzymes that work to break the chemical bonds
of tough food stains, grape juice, red wine, chocolate, ketchup and more.
48
Page 50

Kirby® Home Care Products
From Your Factory Authorized Distributors and Service Centers
HARD SURFACE PRODUCT FAMILY
Scuttle® Glass & Surface Cleaner
A traditional Kirby favorite; great for hard surfaces such as countertops, appliances
as well as windows, mirrors and more. Dries to a streak-free shine.
Citrus Scuttle
Heavy-duty cleaner for all types of indoor and outdoor surfaces. Great for ovens, grills,
machinery and work areas.
Lickity Split
All-purpose dissolver works better than any goo remover on the market. Use it to dissolve tape,
glue, gum, stickers, asphalt, lipstick, crayon, oil, tar, adhesives, permanent marker and more.
HOME FRAGRANCE PRODUCT FAMILY
HomeFresh Room and Carpet Freshener
Leaves carpets and rooms smelling pleasantly fresh while eliminating odors. Just sprinkle on
carpets and vacuum after a few minutes. Available in 5 fresh fragrances.
Odorific® II Deodorizer
All-purpose liquid deodorizer. Great for areas with foul odors like trash cans and damp corners.
A few drops is all you need. Also, a few drops are great for deodorizing your vacuum's outer
cloth bag. Fresh fragrance lingers for many hours.
OTHER FINE KIRBY PRODUCTS AND SUPPLIES
Extendable Crevice Tool
Clean under refrigerators, low furniture, and radiator vents. 5-piece tool set lets you continue
to add pieces until you reach the desired length.
Mini Attachments
This set includes a mini hose and 5 mini attachments that are great for small detail cleaning.
Get into cracks and crevices on computer keyboards, figurines, dashboards, and pianos.
Splitsecond 2® Automotive Vacuum
The twelve-volt automotive version of the popular Splitsecond portable hand vacuum plugs
into a standard cigarette lighter. Perfect for cars, boats, campers and recreational vehicles.
Contact Your Factory Authorized Location for these and other Kirby Home Care Products.
49
Page 51

Index
A
About this Manual ............4
Accessories ................25
Accessory Lock .............16
Air Intake Guard ............20
Attaching Bar...............17
Attachments ................16
Attachment Hose.........16
Crevice Tool ............18
Duster Brush ............18
Extension Tubes .........17
Inflator/Deflator .........21
Suction Control Grip ......19
Surface Nozzle ..........18
Upholstery Nozzle........ 18
Utility Tool .............19
Wall & Ceiling Brush .....18
B
Bag
Assembly-removal ........ 8
Bag Release Button .......14
Bag Support Strap ......... 9
Changing Bags ........... 8
Disposable Filter Bags ..... 8
Outer Permanent Bag ...... 9
Top Adaptor.............. 8
Belts
Changing Belts ..........41
Belt Lifter................... 9
Blower
set-up ..................19
using ..................21
Brush Roll
adjusting for optimum
performance.............42
height adjustment ........42
indicator light ...........10
C
Canister Cleaner............. 16
Carpet Fluffer............... 36
Carpet Shampoo System ......25
cleaning ................28
replacing the belt .........31
set-up ..................25
Suds Control Valve ....... 27
tray....................25
using ..................27
Cleaning products ...........48
Crevice Tool................17
D
Disposable Filter Bags ......... 8
Duster Brush ...............18
E
Extension Tubes............. 17
F
Floor Buffer . . . . . . . . . . . . . . . . 34
set-up ..................34
using .................. 35
G
Getting Started ...............6
H
Handle
Attaching Portable Handle . 14
Handle Tilt Latch.......... 6
Handle Release Button .... 14
removing Upright Handle .. 14
Hard Floor Pad..............13
Hose -installing .............16
I
Inflator/Deflator Tool.........21
K
Kirby® Carpet Shampoo ....26,48
L
Lift the System............... 6
Lock the Upright Handle .......6
M
Maintenance tips ............44
Mattress cleaning ............15
Micron Magic® filtration....... 5
Mini Em-Tor® collector ........ 9
Miracle Waxer® floor polisher .. 32
Miscellaneous Parts .......... 43
Replacement
Moving your machine ......... 6
O
Operating Tips ..............44
Optional Accessories .........25
Owner’s Manual-using.........4
P
Portable Cleaner............. 14
Portable Handle .............14
Portable Shampooer
set-up ..................23
using .................. 24
Portable Sprayer
adjusting spray .......... 22
cleaning ................23
Dip Tube ............... 21
Jar .................... 21
set-up ..................21
using .................. 22
Power Nozzle
changing the belt .........40
disengaging Brush Roll ....13
height setting ............. 7
lowering................. 7
raising .................. 7
removal ................ 16
Rug Plate ...............42
Brush Roll .............. 42
Power Switch ...............12
Q
Questions & Answers......... 46
R
Replacement Belts ...........41
S
Safety Instructions ............ 2
Stair Cleaning...............15
Straight Suction Cleaning .....13
Suction Control Grip .........19
Surface Nozzle ..............18
T
Tech Drive® Power Assist
description ............... 7
ON/OFF Pedal ............ 7
Turning off .............. 7
Turning on ............... 7
Tilt Latch Lock............... 6
Toe-Touch Control ............ 7
Turbo Accessory System ......37
clamp levers ............ 37
Dust Shroud .............37
polishing ............... 38
rear clamp .............. 37
sanding ................ 37
scouring ................38
set-up ..................37
U
Upholstery Nozzle ...........18
Upright Cleaner .............12
Upright Handle-removing .....14
W
Wall & Ceiling Brush ........18
Z
Zippbrush
Turbine ................ 39
cleaning ................39
Outer Brush Ring ........ 39
using .................. 39
50
Page 52

CE DECLARATION OF CONFORMITY
We, Kirby, declare under our sole responsibility that, where applicable,
the Kirby Model G10E Vacuum Cleaner is in conformity with the
following standards or standardized documents.
IEC 60335-1 (EN 60335-1), IEC 60335-2-2 (EN 60335-2-2),
EN 55014-1, EN 55014-2, EN 61000-3-2, EN 61000-3-3, EN 50366
and EN 62233 in accordance with the regulations including the
Low Voltage Directive 2006/95/EC and EMC Directive 2004/108/EC
CE 95
KIRBY
1920 West 114thStreet•Cleveland,OH44102•U.S.A.
Made under one or more of the following patents and design registrations,
other patents and design registrations pending.
United States
4947512
5007133
5086536
5115537
5573369
5713810
7794516
D600868
D672104
Australia
322271
334155
334156
661597
692116
2008207570
Austria
ATE142865
ATE18955T1
Belgium
0584961
0859567
Benelux
38610-00
Canada
127585
2101455
2229513
137881
2638641
China
ZL200830142963
ZL200930237374.5
ZL201130007059
ZL200910000791.7
Denmark
0584961
Finland
13965
France
902235
0584961
20106183
Germany
69304847
402010006532.8
69606774
Hong Kong
HK1010126
Italy
0584961
0859567
98401
98546
Japan
2011083
Luxembourg
0859567
Mexico
175879
Netherlands
0584961
0859567
New Zealand
411288
570620
Norway
70226
319902
Portugal
0584961
Russia
73673
2378973
81234
Singapore
69097
South Africa
A2008/01498
A2010/01540
Spain
2092232
Sweden
49181
0584961
Switzerland
0584961
0859567
United Kingdom
0433439
0584961
0859567
1090578
2006173
Patent List 2/13/2013
51
Page 53

Sentria
®
No. Part
1 Outer Permanent Bag
2 Bag Latch Tab
3 Disposable Filter Bag
4 Bag Support Strap
5 Top Adaptor
6 Mini Em-Tor® Collector
7 Performance Indicator Light
8 Toe-Touch Control Upper Pedal
9 Toe-Touch Control Bottom Pedal
10 Handle Tilt Latch
11 Tech Drive Power Assist Neutral Pedal
12 Tech Drive Power Assist Drive Pedal
13 Power Switch
14 Handle Release Button
15 Portable Handle
16 Bag Release Button
17 Upright Handle
18 Carrying Grip
19 Air Exhaust Port
20 Belt Lifter
21 Headlight Hood
22 Accessory Lock
23 Motor Shaft
24 Attaching Bar
25 Power Nozzle
26 Bumper
Accessories and Attachments
27 Carpet Shampoo System Shampoo your carpet.
28 Floor Care System Floor buffer for wood or tile floors. Carpet fluffer
to reset the nap on a matted-down carpet.
29 Hard Floor Pad Dust bare floors.
52
Page 54

53
Page 55

Accessories and Attachments
No. Part Recommended Uses
30 Kaddy Storage of accessories.
31 Portable Sprayer Attach onto attachment hose with unit in blower mode
only to apply water-based, non-flammable liquids.
32 Portable Handle To transform unit from upright to portable position by
removing upright handle and inserting portable handle.
Aids in cleaning of carpeted stairs and mattress cleaning.
33 Portable Shampooer Cap Attach onto portable sprayer with unit in blower mode
to apply Kirby® Carpet Shampoo for spot cleaning.
34 Utility Tool Clean the floors of cars.
35 Inflator/Deflator Tool With unit in blower mode, use to inflate toys, air
mattresses or other low-pressure inflatable items up to
1 p.s.i. With unit in canister mode, use to deflate objects.
36 Duster Brush With or without extension tubes on contoured or
irregular surfaces.
37 Upholstery Nozzle Upholstered furniture, carpeted stairs, clothing.
Vehicle interiors.
39 Wall and Ceiling Brush Walls, ceilings, drapes and other surfaces.
40 Suction Control Grip
41 Extension Tubes Extend reach and use with other tools.
42 Attachment Hose Convert from upright to canister or blower mode.
43 Replacement Belt Emergency back up supply.
44 Crevice Tool with Without brush, use on cracks, crevices, corners, grooves
Removable Brush and narrow openings. With brush use on corners, button
45 Surface Nozzle
46 Air Intake Guard Place on front of unit to convert unit into a blower.
47 Zippbrush Upholstery, carpeted stairs. Automotive interiors.
48 Turbo Accessory System Sander, Buffer, Scouring.
49 Miracle Waxer® For Hardwood, Vinyl, Cork and Linoleum floors.
Floor Polisher Apply with roller waxer applicator.
Use when needing to control amount of suction such as
drapes and delicate lampshades. Use with or without
extension tubes.
tufts, between radiator coils and sliding window tracks.
Bare floors, surface cleaning carpets and under low furniture.
54
Page 56

55
Page 57

Consumer Relations
Got a Question? Need Assistance?
Your local authorized distributorship is available to answer any questions regarding
your purchase or the operation of your
Sentria
The Kirby Company also has Consumer Relations Specialists available to answer
any questions you may have about the
with the name of your nearest Kirby distributor.
You can contact USA Consumer Relations by:
e-mail consumer@kirbywhq.com
telephone 1-800-494-8586
fax 216-529-6146
mail Consumer Relations
1920 West 114th Street
Cleveland, Ohio 44102
®
Home Care System.
Sentria Home Care System or provide you
Our office hours are 8:00 a.m. to 5:00 p.m. Eastern Time, U.S.A.
Monday through Friday.
IMPORTANT
The following information need only apply when changing plugs on Sentria® models
that are used in the U.K., Australia, South Africa and New Zealand.
The wires in the main lead are coloured in accordance with the following code:
Blue ...............................Neutral Brown...............................Live
As the colours of the wires in the mains lead of this appliance may not correspond with the coloured marking identifying
the terminals in your plug, proceed as follows:
WARNING: DO NOT connect either wire to the terminal marked “E” or with the earth symbol. No wire is
connected to this terminal. The wire which is coloured Blue must be connected to the terminal which is marked with the
letter N or coloured black. The wire which is coloured Brown must be connected to the terminal which is marked with the
letter L or coloured red. If a U.K.: 13A (BS 1363) plug is used, fit a 5A fuse. For any other type plug, protect with a 5A
fuse or fuse wire in the adaptor or distribution board. If the plug does not fit the sockets in the user’s house, it should be
cut off and safely disposed of and the correct plug fitted.
The Sentria® Model G10E is approved by the British Electrotechnical Approvals Board (BEAB).
Warning: There is a shock hazard if a plug that has been cut from
the supply cord is inserted in a 13A socket outlet. Any
replacement fuse in the plug must be an ASTA approved
BS1362 5A fuse in the U.K.
Warning: If the fuse cover is removable, never use the plug with the
fuse cover removed.
If supply cord is damaged and needs to be replaced, the replacement part number is: 890812-Australia/New Zealand;
890912-ContinentalEurope;890712-SouthAfrica;890612-UnitedKingdom;192012-U.S.A.;
P/N 260012 Rev. H - U.S., Canada and U.K. Printed in U.S.A. ©2013 The Scott Fetzer Company
56
Page 58

For assistance, contact your local Authorized Distributor.
The Kirby Company, a division of The Scott Fetzer Co.,
1920 West 114th Street, Cleveland, OH 44102, U.S.A.
U.S.A./Canada Parts and Supplies: 1-800-437-7170 imd@kirbywhq.com
Consumer Relations: 1-800-494-8586 consumer@kirbywhq.com
Australia 1800 781 556
Europe 00 800 547 292 72
Russia +81080054729272
South Africa 0800-203-222
UK 0800-328-1247
www.kirby.com
 Loading...