

Page 1

KIP Windows Driver
KIP Windows Driver Installation and User Guide
No part of this publication may be copied, reproduced or distributed in any form without express written permission
from KIP. 2015 KIP. v1
- 1 -
Page 2

Contents
1 Introduction ........................................................................................................................................................ 3
2 Installation and Setup (Automatic) ................................................................................................................. 4
3 Installation and Setup (Manual) ...................................................................................................................... 6
4 Uninstalling the KIP Windows Driver ............................................................................................................... 10
5 Printing Preferences ........................................................................................................................................ 14
5.1 Printing Preferences Main Screen ....................................................................................................... 15
6 Driver Use .......................................................................................................................................................... 22
6.1 Using The Driver from Adobe - Example ................................................................................................ 22
6.2 Using the Driver from AutoCAD - Example ............................................................................................. 24
Appendix 1 ............................................................................................................................................................. 26
Manually removing the Windows driver. ...................................................................................................... 26
KIP Windows Driver
No part of this publication may be copied, reproduced or distributed in any form without express written permission
from KIP. 2015 KIP. v1
- 2 -
Page 3
KIP Windows Driver
1 Introduction
The new generation KIP System K Windows Driver® is Microsoft WHQL certified, meeting exact
standards of reliability and quality. The functional and intuitive graphic user interface and expanded
features provides the user with a wide range of standard and special functions when printing from
Windows based applications
The KIP System K Windows Driver® can be used with the entire range of KIP Printers from any Windows
based application for both Color and B&W print applications.
2-way communication with KIP systems
Displays current media information and real time system status
64 & 32 Bit operating system compatibility
Label documents with user name, job number and data tracking information
Job accounting and data tracking information
Windows 7 Experience
1.1.1 Requirements:
The KIP Windows driver for KIP System K will be WHQL certified for
- 32 & 64 bit Windows Vista, Windows 7 & Windows 8
- 32 & 64 bit Windows 2003 Server
- 32 & 64 bit Windows 2008 Server
- Windows 2008 Server R2
- Windows Server 2012
- Windows Server 2012 R2
NOTE:
Microsoft .Net Framework 4 .5 is required on all operating syst ems to be included in the driver
package (distributable).
1.1.2 Supported Operating Systems
No part of this publication may be copied, reproduced or distributed in any form without express written permission
from KIP. 2015 KIP. v1
- 3 -
Page 4
Step
Action
Illustration
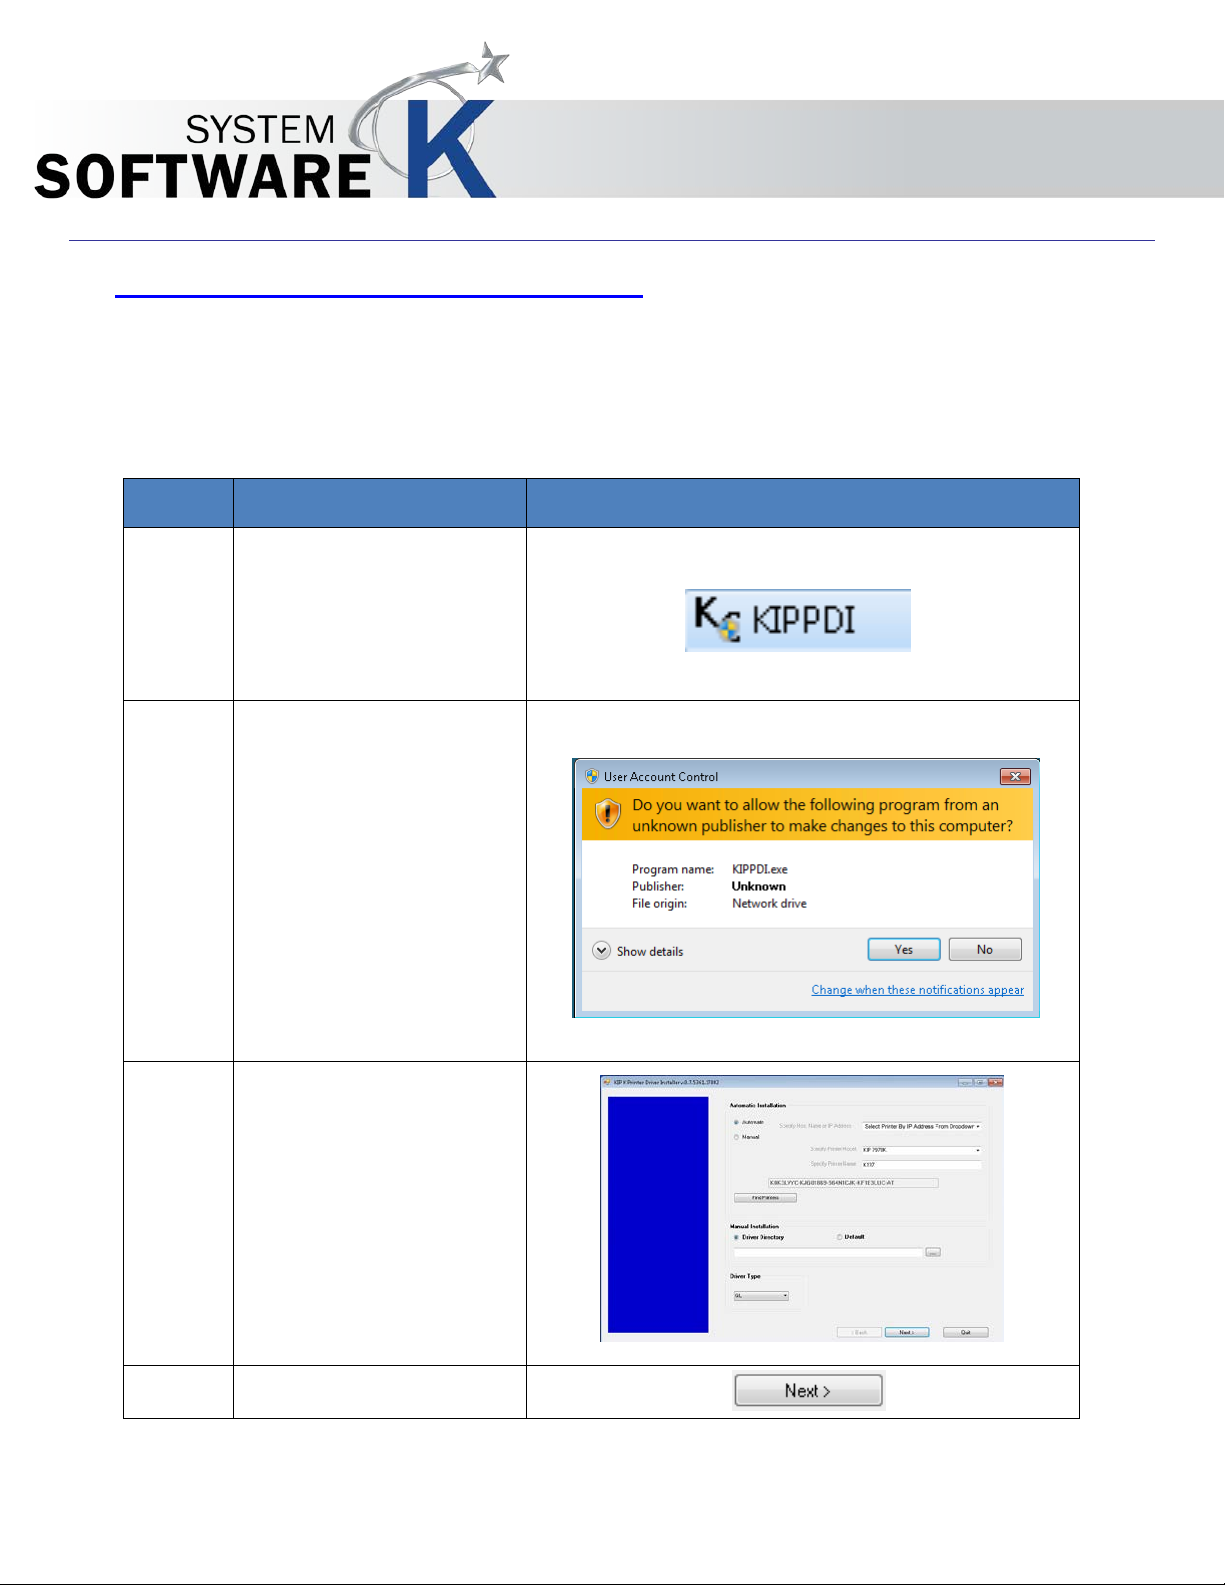
1.
Open the Windows Driver
2.
If asked to authorize
3.
If Automatic is selected
4.
Select Next to Continue
KIP Windows Driver
2 Installation and Setup (Automatic)
The Following section describes the Installation of the KIP System K Windows Driver® Please follow the
Step-by-step procedure for correct installation
folder and double click
the WPD Pro icon.
select “Yes”.
use the dropdown arrow
to select the desired
Printer.
Note: If Manual is
No part of this publication may be copied, reproduced or distributed in any form without express written permission
from KIP. 2015 KIP. v1
selected enter the IP
Address of the desired
Printer and Specify
Name.
- 4 -
Page 5
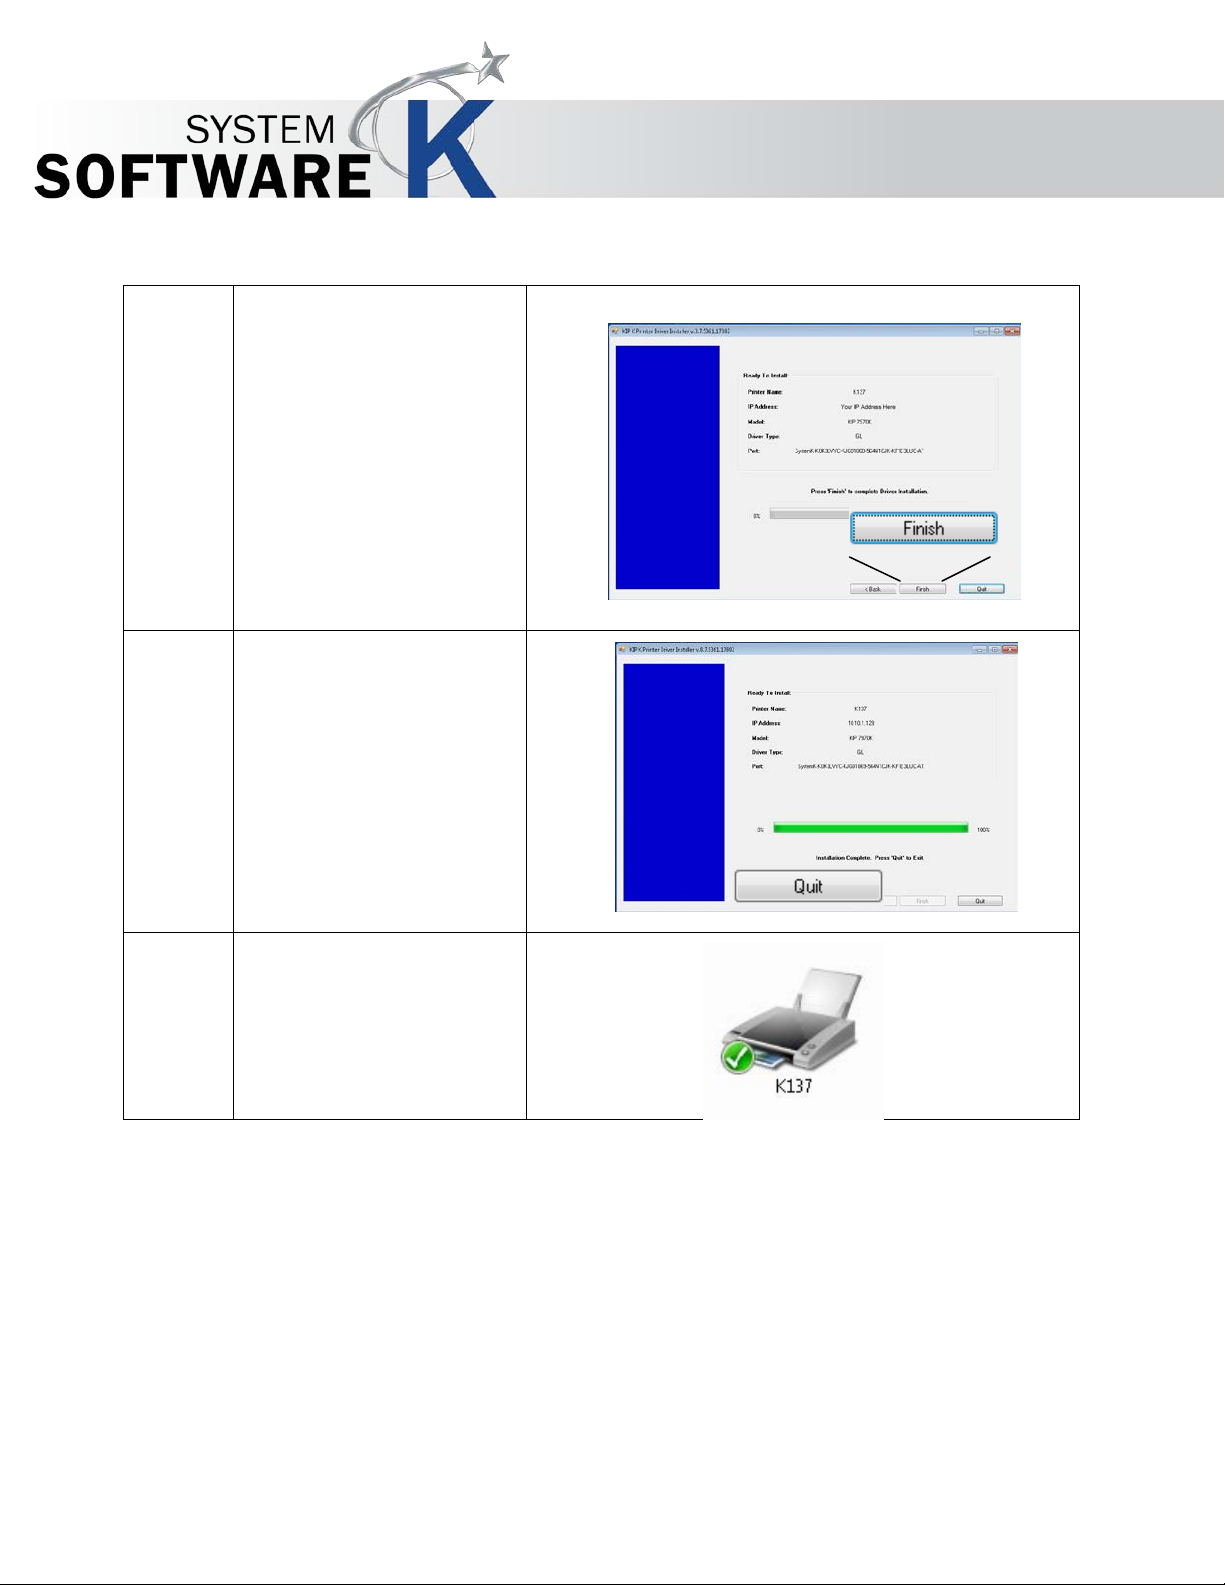
5.
The Next screen displays
6.
When Done Installing
7.
The Driver is now installed
KIP Windows Driver
the configured settings
Select Finish to Continue
select the “Quit” button
to Close the installation.
and should be present in
the Devices and Printers
folder.
No part of this publication may be copied, reproduced or distributed in any form without express written permission
from KIP. 2015 KIP. v1
- 5 -
Page 6
Step
Action
Illustration
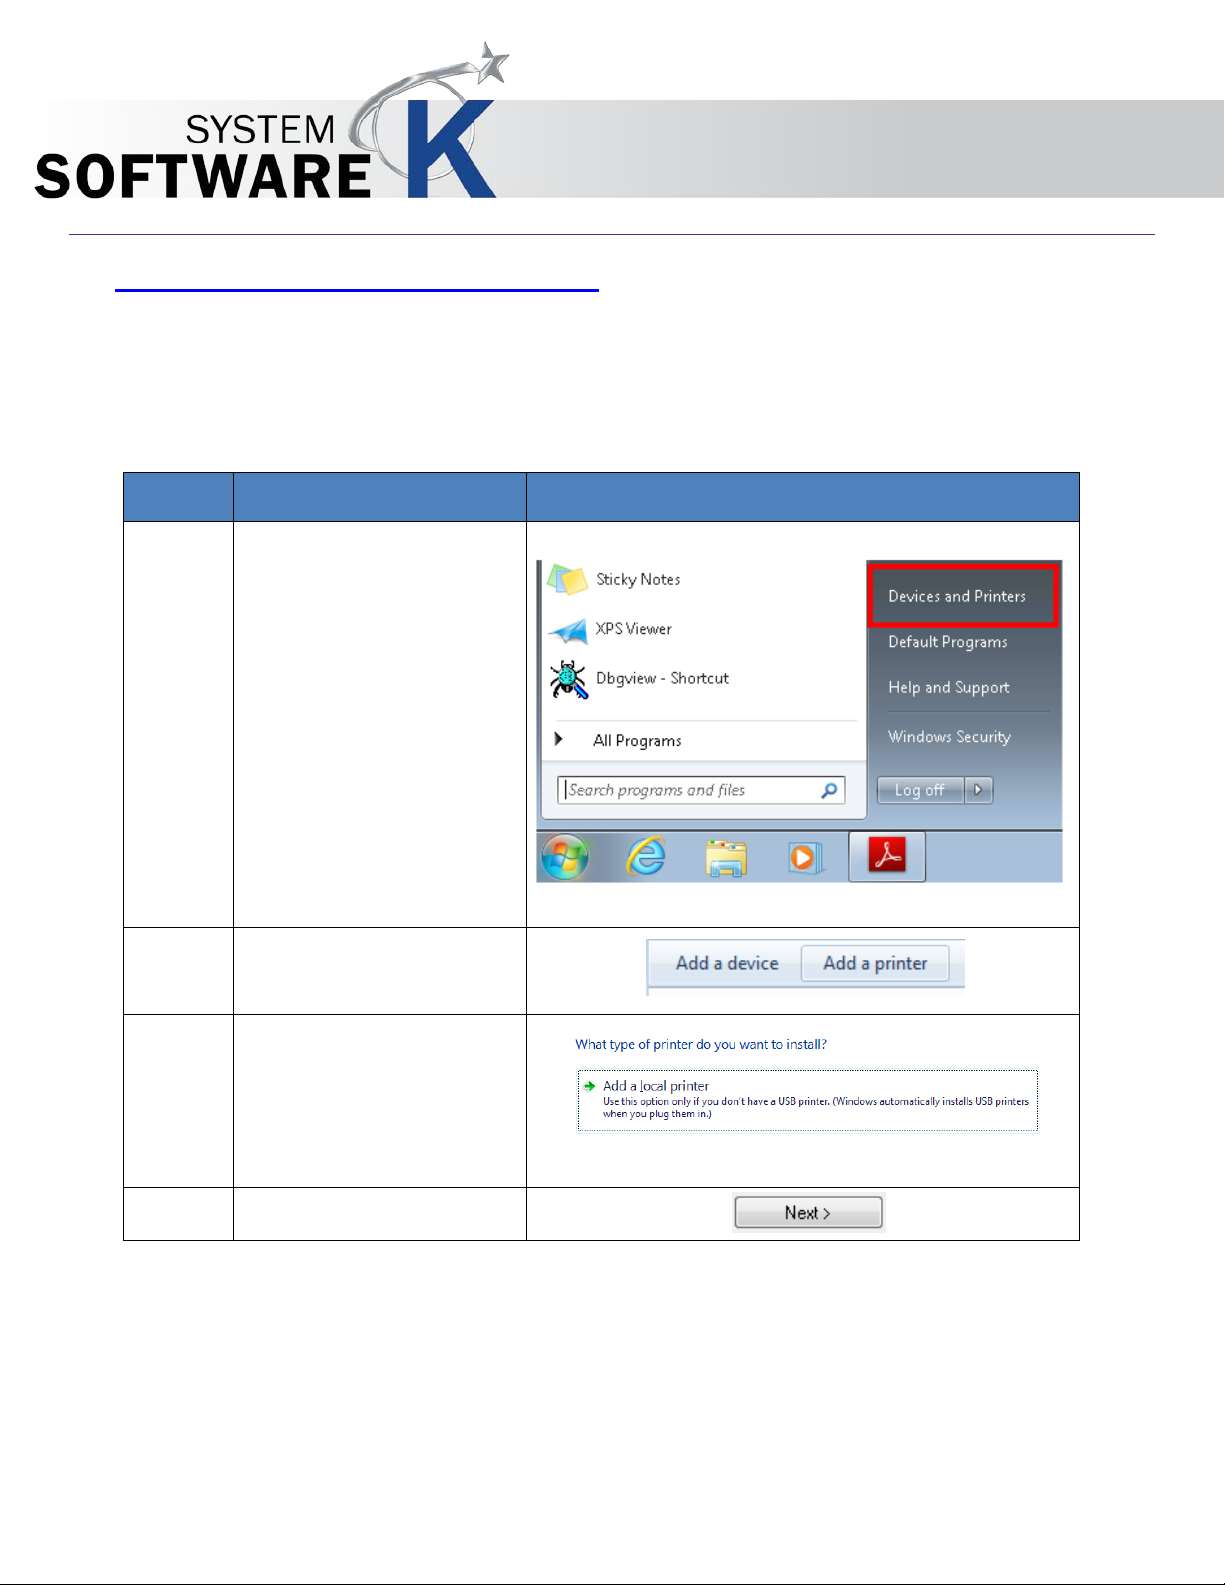
1.
Open Devices and
2.
Select “Add a printer”
3.
Select Add a local printer
4.
Select Next to Continue
KIP Windows Driver
3 Installation and Setup (Manual)
The Following section describes the Manu al I n s talla tion of the KIP System K Windows Driver® Please
follow the Ste p-by-step procedure for correct insta llation
Printers
No part of this publication may be copied, reproduced or distributed in any form without express written permission
from KIP. 2015 KIP. v1
- 6 -
Page 7

Step
Action
Illustration
5.
Select Create a new
6.
Select Next to Continue
7.
Enter the IP address of
8.
Select Next to Continue
9.
When the next window
KIP Windows Driver
port and select
“Standard TCP/IP Port”
from the dropdown list.
the KIP Printer to attach
to.
opens select Have Disk
and browse to the
location of the KIP
Driver.
If downloaded and
saved go to the save
location.
No part of this publication may be copied, reproduced or distributed in any form without express written permission
from KIP. 2015 KIP. v1
If using a KIP DVD
browse to the
Applications folder.
- 7 -
Page 8
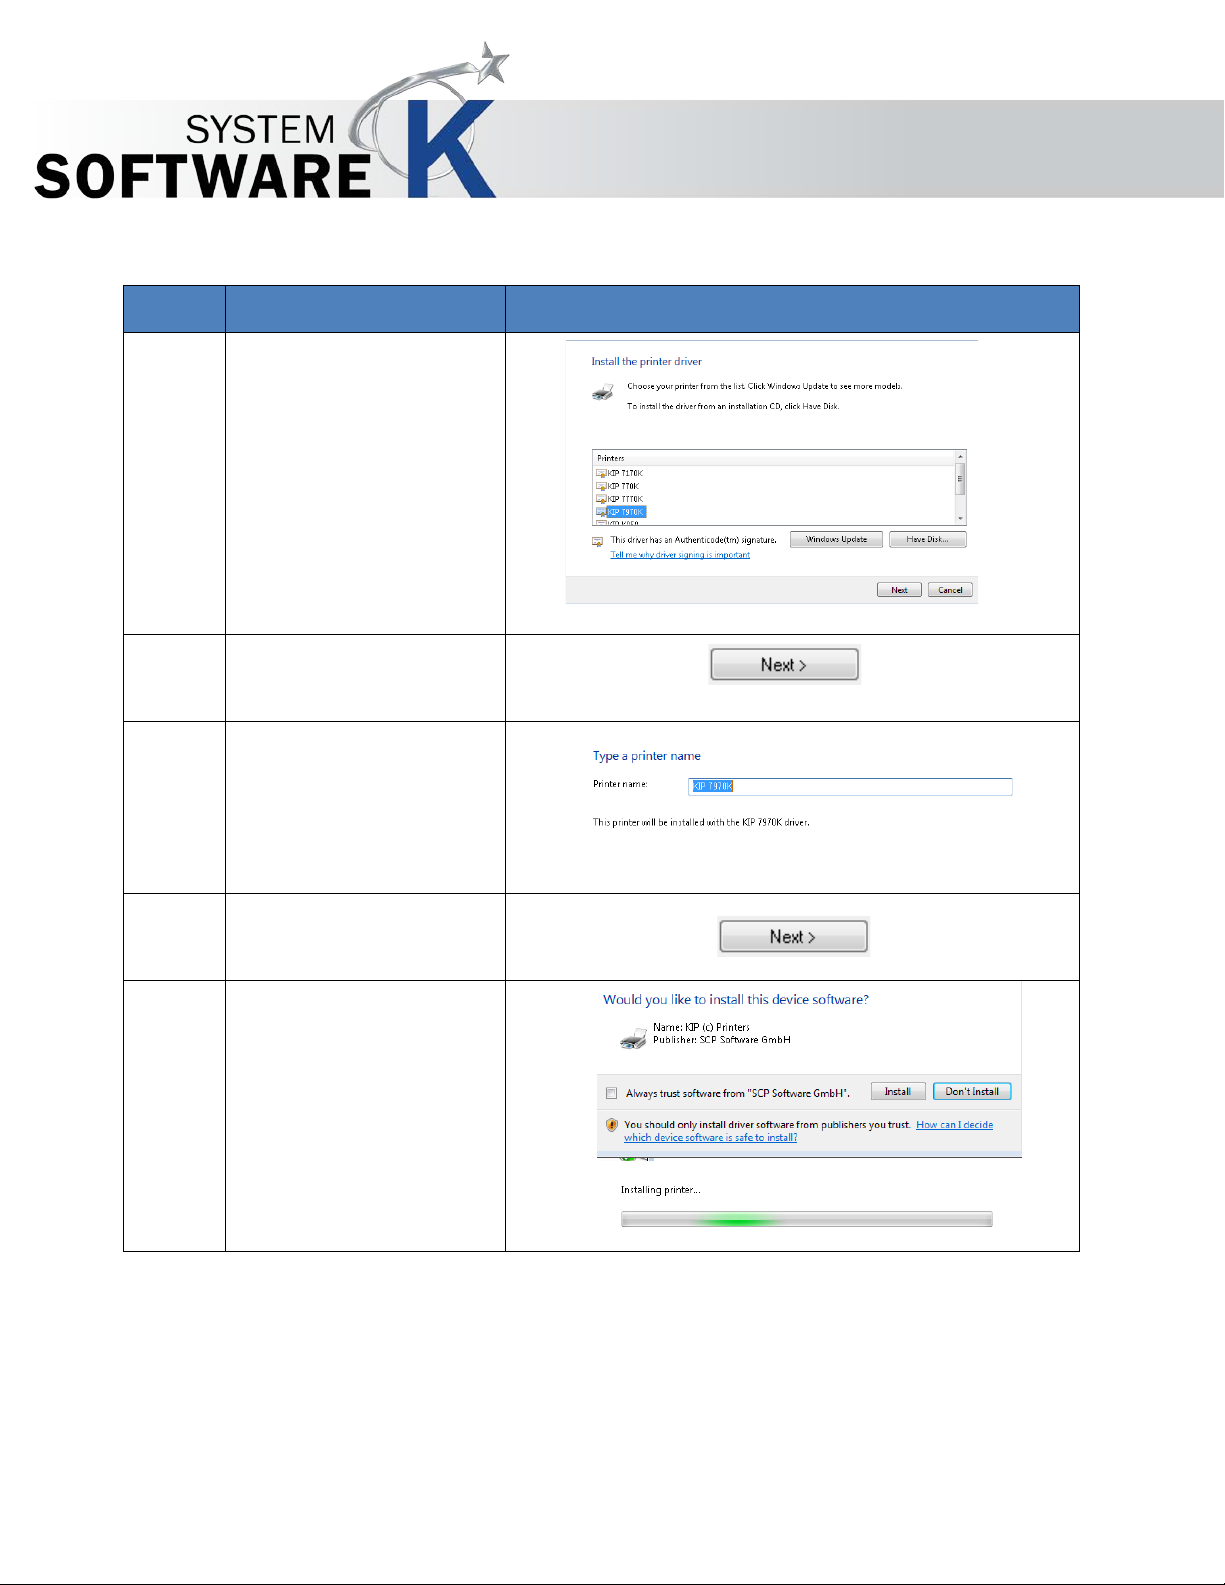
Step
Action
Illustration
10.
Select the Desired KIP
11.
Select Next to Continue
12.
Type the Prin ter name or
13.
Select Next to Continue
14.
When Asked if you
KIP Windows Driver
printer from the Printe rs
list.
accept the one that is
there.
would like to install this
device software click
“Install”.
Installation will begin.
No part of this publication may be copied, reproduced or distributed in any form without express written permission
from KIP. 2015 KIP. v1
- 8 -
Page 9

Step
Action
Illustration
15.
The next window is
16.
Select Next to Continue
17.
Once the Successful
KIP Windows Driver
Printer Sharing. Select
from:
• Do not share this
printer
• Share this printer
so others on your
network can find
and use it
installation window
opens print a test page
if necessary or click
Finish.
No part of this publication may be copied, reproduced or distributed in any form without express written permission
from KIP. 2015 KIP. v1
- 9 -
Page 10

Step
Action
Illustration
1.
Open Devices and Printers
2.
Select the device to be
KIP Windows Driver
4 Uninstalling the KIP Windows Driver
The Following section describes the Uninstallation of the KIP System K Windows Driver® Please follow
the Step-by-step procedure for correct installation
removed and then click
Remove Device.
Select “Yes” for the Remove
Device Screen.
No part of this publication may be copied, reproduced or distributed in any form without express written permission
from KIP. 2015 KIP. v1
- 10 -
Page 11

Step
Action
Illustration
3.
Stop the Spooler – Right click
4.
Browse to the following
5.
Open the “3” Folder
KIP Windows Driver
on the “My Computer” Icon
and select Manage.
• Select Services
• Select Print spooler
from the list of services
• Select “Stop”
location:
C:\Windows\System32\spool
\
drivers
• Open the w32x86
• Open the x64 folder (if
folder (if 32 bit)
64 bit)
No part of this publication may be copied, reproduced or distributed in any form without express written permission
from KIP. 2015 KIP. v1
- 11 -
Page 12

Step
Action
Illustration
6.
Remove all files That start with:
7.
Go to Start\Run and type
8.
Once open navigate to the
KIP Windows Driver
• Dart
• Gala
• Grdp
• Gvdp
• Microsoft
• Msvcp
• Msvcr
• SystemK
• Vccorlib
“Regedit”
following location:
HKEY_LOCAL_MACHINE\SYSTEM\
CurrentControlSet\Control\Print\
Environments\Windows NT x86\
Drivers\Version-3\KIP 7170K
Delete this folder.
No part of this publication may be copied, reproduced or distributed in any form without express written permission
from KIP. 2015 KIP. v1
Note: final folder name will vary
depending on the KIP Printer
installed.
- 12 -
Page 13

Step
Action
Illustration
9.
Next go to the following location:
10.
Start the Spooler – Right click on
11.
REBOOT
THIS STEP IS NECESSARY!
KIP Windows Driver
HKEY_LOCAL_MACHINE\SYSTEM\
CurrentControlSet\Control\Print\
Printers\KIP 7170K
Delete this folder.
Note: final folder name will vary
depending on the KIP Printer
installed.
the “My Computer” Icon and
select Manage.
• Select Services
• Select Print spooler from
the list of services
Select “Start”
No part of this publication may be copied, reproduced or distributed in any form without express written permission
from KIP. 2015 KIP. v1
- 13 -
Page 14

1 6 2 3 8
17
13
9 4 5
10
14
18
15
11
19
20
16
7
21
12
25
22
23
24
26
28
27
5 Printing Preferences
KIP Windows Driver
No part of this publication may be copied, reproduced or distributed in any form without express written permission
from KIP. 2015 KIP. v1
- 14 -
Page 15

Component
Function
1. Media
Allows for the selection of available media currently
2. Page Size
Allows for the selection of the original size of the
3. Copies
Allows for the selection of the number of copies to be
5.1 Printing Preferences Main Screen
loaded in the KIP Printer.
KIP Windows Driver
document to be printed.
No part of this publication may be copied, reproduced or distributed in any form without express written permission
from KIP. 2015 KIP. v1
printed.
- 15 -
Page 16

Component
Function
4. Quality
Allows for the selection of the quality of the output from
5. Accounting
For accounting purposes the User Name, Job Number
6. Finishing
Allows for the selection of available finishing options,
KIP Windows Driver
Draft, Normal or Quality.
and Description fields can be used to enter informati on
that will then be logge d.
No part of this publication may be copied, reproduced or distributed in any form without express written permission
from KIP. 2015 KIP. v1
Top, Rear, Fold (if a folder is attached)
- 16 -
Page 17

Component
Function
7. Paper Scale
Allows for the selection of Pre-Configured sizes or the
8. Collation
Allows for the collation of sets. Select from Default, Off,
9. Pens (GL)
Used for the setting of a specific .pen table to be
KIP Windows Driver
entry of a specific Percentage.
On, Reverse.
applied to HPGL\2 files.
No part of this publication may be copied, reproduced or distributed in any form without express written permission
from KIP. 2015 KIP. v1
- 17 -
Page 18

Component
Function
10. Secure Print
Allows for the entry of a code number (up to four digits)
11. Source
Select from Roll or Cut Sheet (if active and available)
12. Image Scale
Allows for the specific scaling of the output on the
13. Stamp
Allows for the selection of a specific stamp to be
KIP Windows Driver
to be entered. If used this code will be necessary to
release the files at the printer user interface.
selted sheet.
No part of this publication may be copied, reproduced or distributed in any form without express written permission
from KIP. 2015 KIP. v1
applied to all sheets printed in the job.
- 18 -
Page 19

Component
Function
14. Send To
Allows for the selection of how the files will be sent:
15. Remove Borders
Allows the user to enable the ability to remove any
16. Orientation
Choose from: Prtrait or Landscape
17. Mirror
Allows the user to Mirror the image on the output file.
18. Invert
Allwows the user to invert the image.
KIP Windows Driver
Default, Printer and On Hold
white borders.
No part of this publication may be copied, reproduced or distributed in any form without express written permission
from KIP. 2015 KIP. v1
- 19 -
Page 20

Component
Function
19. Trim at Image
Allows the user to Clip the image to size.
20. Alignment
Choose from: Left Right or Center
21. Printer Status
Displays realtime status of the KIP Printer.
22. Toner
Displays realtime status of the remaining Toner.
KIP Windows Driver
No part of this publication may be copied, reproduced or distributed in any form without express written permission
from KIP. 2015 KIP. v1
- 20 -
Page 21

Component
Function
23. Media
Displays real time status of the available media
24. Template
Allows the user to create templates that can be used at
25. Options
Displays available Options
26. Collaspe/Expand
Used to Collapse or expand the main properties
27. Cancel
Closes out of the screen
28. OK
Set changed settings.
KIP Windows Driver
currently loaded in the KIP Printer
anytime to load in specific configurations.
window of the Driver.
No part of this publication may be copied, reproduced or distributed in any form without express written permission
from KIP. 2015 KIP. v1
- 21 -
Page 22

Step
Action
Illustration
1.
Open the Adobe
2.
Go to File and then to
3.
Go to File and Select Print
4.
To use the available options
6 Driver Use
6.1 Using the Driver from Adobe - Example
In this example Adobe Pro X will be used.
KIP Windows Driver
Application
“Open” or select from the
“Open a Recent File”
selection.
and choose the KIP Printer.
select the Properties button.
No part of this publication may be copied, reproduced or distributed in any form without express written permission
from KIP. 2015 KIP. v1
- 22 -
Page 23

Step
Action
Illustration
5.
Once the Properties
6.
Select Expand for more
7.
Select OK
8.
Select Print to send
KIP Windows Driver
button opens make
desired changes.
options.
the File to the KIP
Printer.
Note: see the Above
section for descriptions of options.
No part of this publication may be copied, reproduced or distributed in any form without express written permission
from KIP. 2015 KIP. v1
- 23 -
Page 24

Step
Action
Illustration
1.
Open the AutoCAD
2.
Click on the “A” in the
3.
Select the KIP Printer
4.
To use the available
5.
Select the Custom
6.2 Using the Driver from AutoCAD - Example
For this exam pl e A u toCAD 2012 was use d .
KIP Windows Driver
Application
top Left corner. When the
Drop down window
opens select Print.
Driver From the available
printers list.
options select the
Properties button.
No part of this publication may be copied, reproduced or distributed in any form without express written permission
from KIP. 2015 KIP. v1
properties button
- 24 -
Page 25

Step
Action
Illustration
6.
Once the Properties
7.
Select Expand for more
8.
Select OK
9.
Select Print to send the
KIP Windows Driver
button opens make
desired changes.
options.
File to the KIP Printer.
Note: see the Above section for descriptions of
options.
No part of this publication may be copied, reproduced or distributed in any form without express written permission
from KIP. 2015 KIP. v1
- 25 -
Page 26

KIP Windows Driver
Appendix 1
Manually removing the Windows driver.
In some instances it may be ne ce ssary to manually remove the KIP Window s driver from the
Server/Workstation. The following steps will help ensure that all of the pieces have been successfully
removed.
Instructions for removing driver:
1)
Remove print queue in Devices and Printers
2)
Stop/start spooler
3)
Remove driver in Printer Server Properties
4)
Stop spooler
5)
Clear “C:\windows\system32\spool\drivers\(w32x86 or x64)\3\temp” directory
6)
Start spooler
Note: If there is a problem with either step 1 or 3 the following may also be necessary.
Go to Start\Run and type Regedit and browse to the following locations:
Win 7 32bit
HKEY_LOCAL_MACHINE\SYSTEM\CurrentControlSet\Control\print\Environments\Windows NT
x86\Drivers\Version-3\Remove KIP Printer folder here
HKEY_LOCAL_MACHINE\SYSTEM\CurrentControlSet\Control\print\Environments\Windows NT
x86\Printers\Remove KIP Printer folder here
Win 7 64bit
HKEY_LOCAL_MACHINE\SYSTEM\CurrentControlSet\Control\print\Environments\Windows
x64\Drivers\Version-3\Remove KIP Printer folder here
HKEY_LOCAL_MACHINE\SYSTEM\CurrentControlSet\Control\print\Environments\Windows
x64\Printers\Remove KIP Printer folder here
No part of this publication may be copied, reproduced or distributed in any form without express written permission
from KIP. 2015 KIP. v1
- 26 -
 Loading...