

Page 1

KIP PrintPro.Net User Guide
KIP PrintPro.Net User Guide
No part of this publication may be copied, reproduced or distributed in any form without express written permission
from KIP. 2015 KIP. v1
- 1 -
Page 2

KIP PrintPro.Net User Guide
No part of this publication may be copied, reproduced or distributed in any form without express written permission
from KIP. 2015 KIP. v1
- 2 -
Page 3

Contents
1 Introduction ........................................................................................................................................................ 4
Home Screen (Machine Status/System Information/Software and Drivers) .............................................. 5
2
2.1 Machine Status and System Information .................................................................................................. 5
2.2 Software and Drivers ................................................................................................................................... 9
Print Screen ...................................................................................................................................................... 10
3
3.1 Home Tab ................................................................................................................................................... 10
3.2 Basic Tab .................................................................................................................................................... 17
3.3 Sort Tab ....................................................................................................................................................... 22
Job Queue ....................................................................................................................................................... 26
4
History Queue .................................................................................................................................................. 28
5
Machine Settings – User Settings ................................................................................................................... 29
6
6.1 Media Handling .................................................................................................................................... 29
System Settings - Administrator .................................................................................................................. 32
7
7.1 System Setup .............................................................................................................................................. 32
7.2 System Preset Setup .................................................................................................................................. 49
7.2a Print Quality Presets ................................................................................................................................ 50
7.2b Scan Quality Presets ............................................................................................................................... 60
7.2c Stamp Presets .......................................................................................................................................... 68
7.2d Page Sizes ................................................................................................................................................ 72
7.2e Job Notification ....................................................................................................................................... 75
7.2f PS/PDF Presets ........................................................................................................................................... 77
7.2g Scaling Preset s ........................................................................................................................................ 79
7.2h Folding Presets ......................................................................................................................................... 82
7.2i HPGL Presets .............................................................................................................................................. 88
7.2j Machine Notification ............................................................................................................................... 91
7.2k Metered Notifi cat ion ............................................................................................................................... 93
7.2l Media Manager ........................................................................................................................................ 95
7.3 File Format settings .................................................................................................................................... 96
7.4 Color Printer Setup ..................................................................................................................................... 97
Service Settings – (Logged in as Service Tech) ........................................................................................ 98
8
KIP PrintPro.Net User Guide
No part of this publication may be copied, reproduced or distributed in any form without express written permission
from KIP. 2015 KIP. v1
- 3 -
Page 4

KIP PrintPro.Net User Guide
1 Introduction
KIP PrintPro.Net provides KIP color and B&W systems with the most feature rich browser based job
submission and syste m management application on the mark et .
Print Job Submission - Operators can perform jo b submission, access their KIP Printer mailbox and
manage their own print jobs using many of the same features as Windows based Print Pro bu t wi th out
the need to install any application software. Using only a web browser, operators can configure
single and multipage files with individual scaling preferences, stamps, folding presets, color
management controls and print stacking location. Start new print jobs quickly by accessing User
Templates that include operator preferences, job settings and the most common System Presets.
PrintPro.Net suppo rts building print jobs using colo r and B&W technical documents from stand ard
wide format digital files including Postscript, PDF, TIFF, JPG, Calcomp, and HPGL 1/2/RTL (and more).
KIP System Management - Based on defined us er access , adm i ni s trators can use virtuall y any web
browser to see a full overview of the system operation and have full control of the print queue.
Administrators have complete access to printer preferences, network connectivity settings, System
Presets, daily sleep timers, history queue size, exit tray defaults and auto rotation set tings.
KIP PrintPro.Net Key Features
Identical Features Across a Variety of Web Browsers | Multiple Copies or Collated Sets | WYSIWYG Image
Preview | Individual File Settings for Job Matrix Templates | Multi-page Settings | Color Adjustments and Filter
Selections | Email Notification Document Folding and Stamping | HPGL Pen Preset Selection | Transfer Files from
KIP Printer Mailbox | Customize System and Folder Presets | Manage Print Queue and User Settings | KIP Secure
Print | KIP Accounting Center Integration | KIP Cost Center Integration
No part of this publication may be copied, reproduced or distributed in any form without express written permission
from KIP. 2015 KIP. v1
- 4 -
Page 5
KIP PrintPro.Net User Guide
2 Home Screen (Machine Status/System Information/Software and
Drivers)
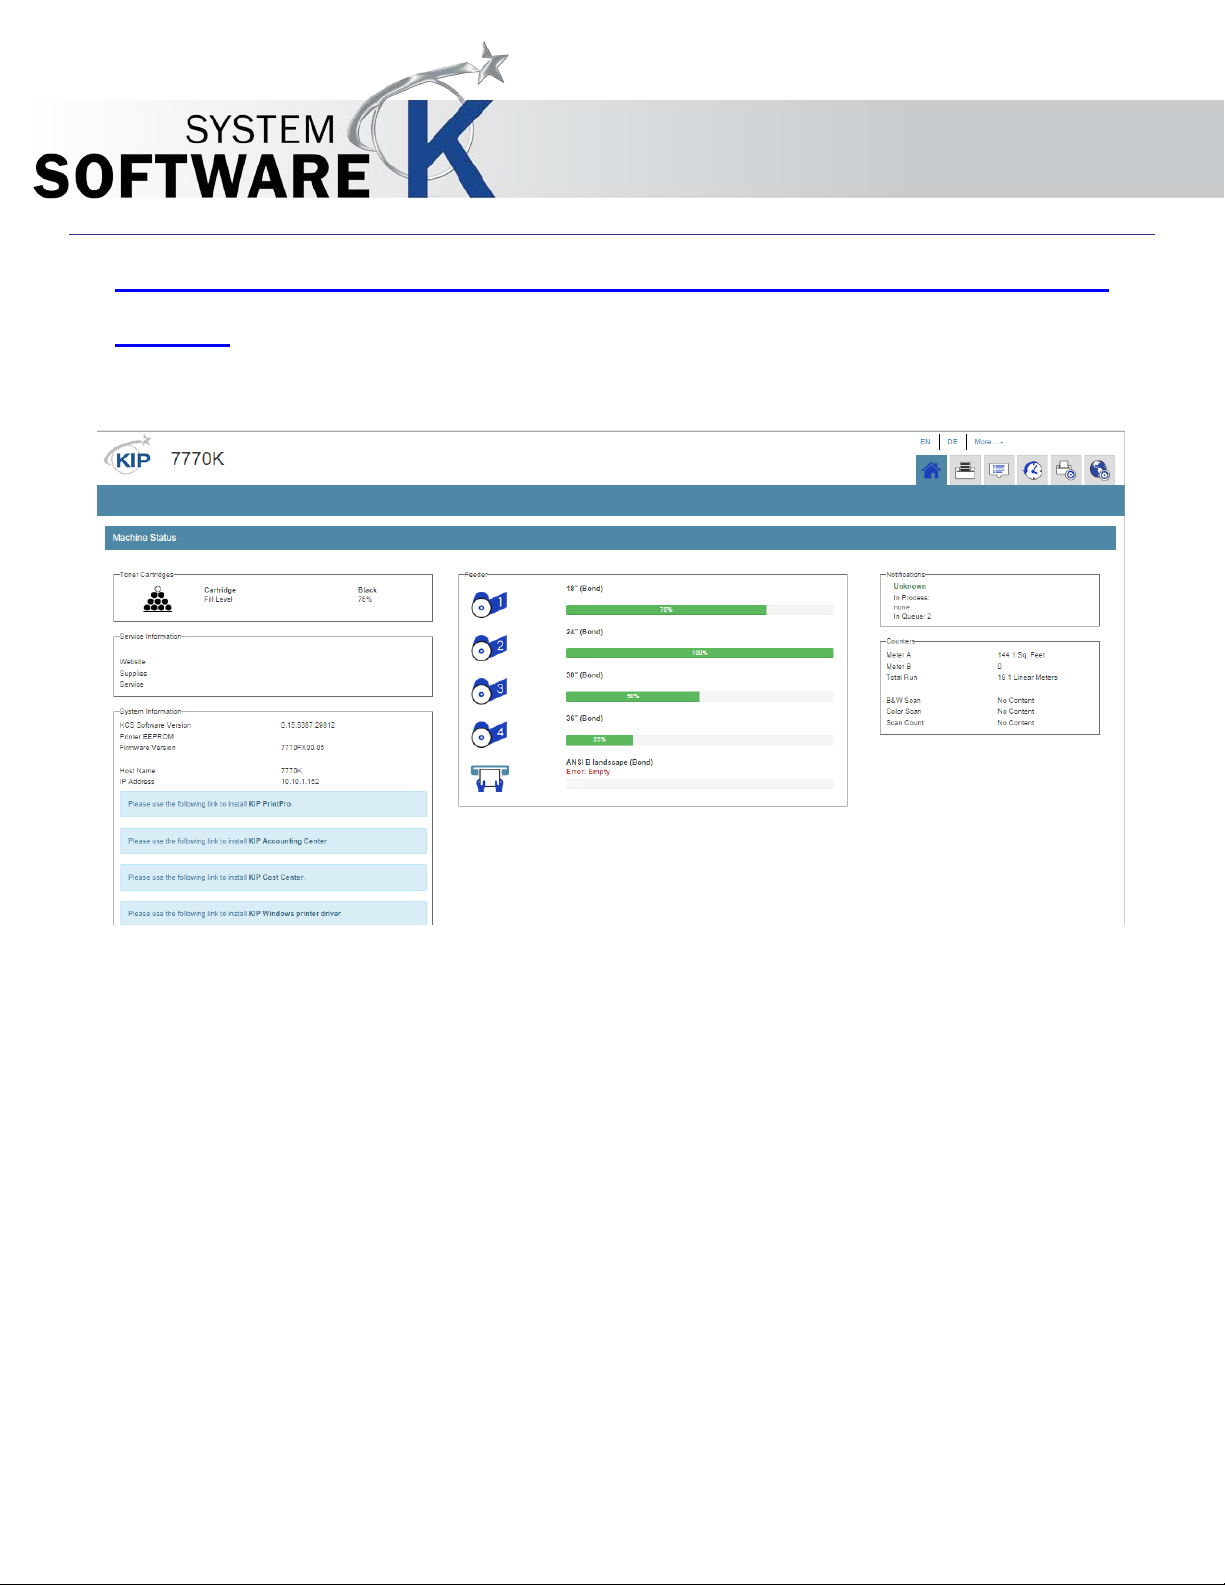
2.1 Machine Status and System Information
No part of this publication may be copied, reproduced or distributed in any form without express written permission
from KIP. 2015 KIP. v1
- 5 -
Page 6
Component
Function
1. Toner Status
Black and White Printer
Displays The Current Toner level in the printer in 25%
2. Service Information
When Dealer information i s added, this window will display
KIP PrintPro.Net User Guide
Color Printer
increments.
what was configured.
No part of this publication may be copied, reproduced or distributed in any form without express written permission
from KIP. 2015 KIP. v1
- 6 -
Page 7
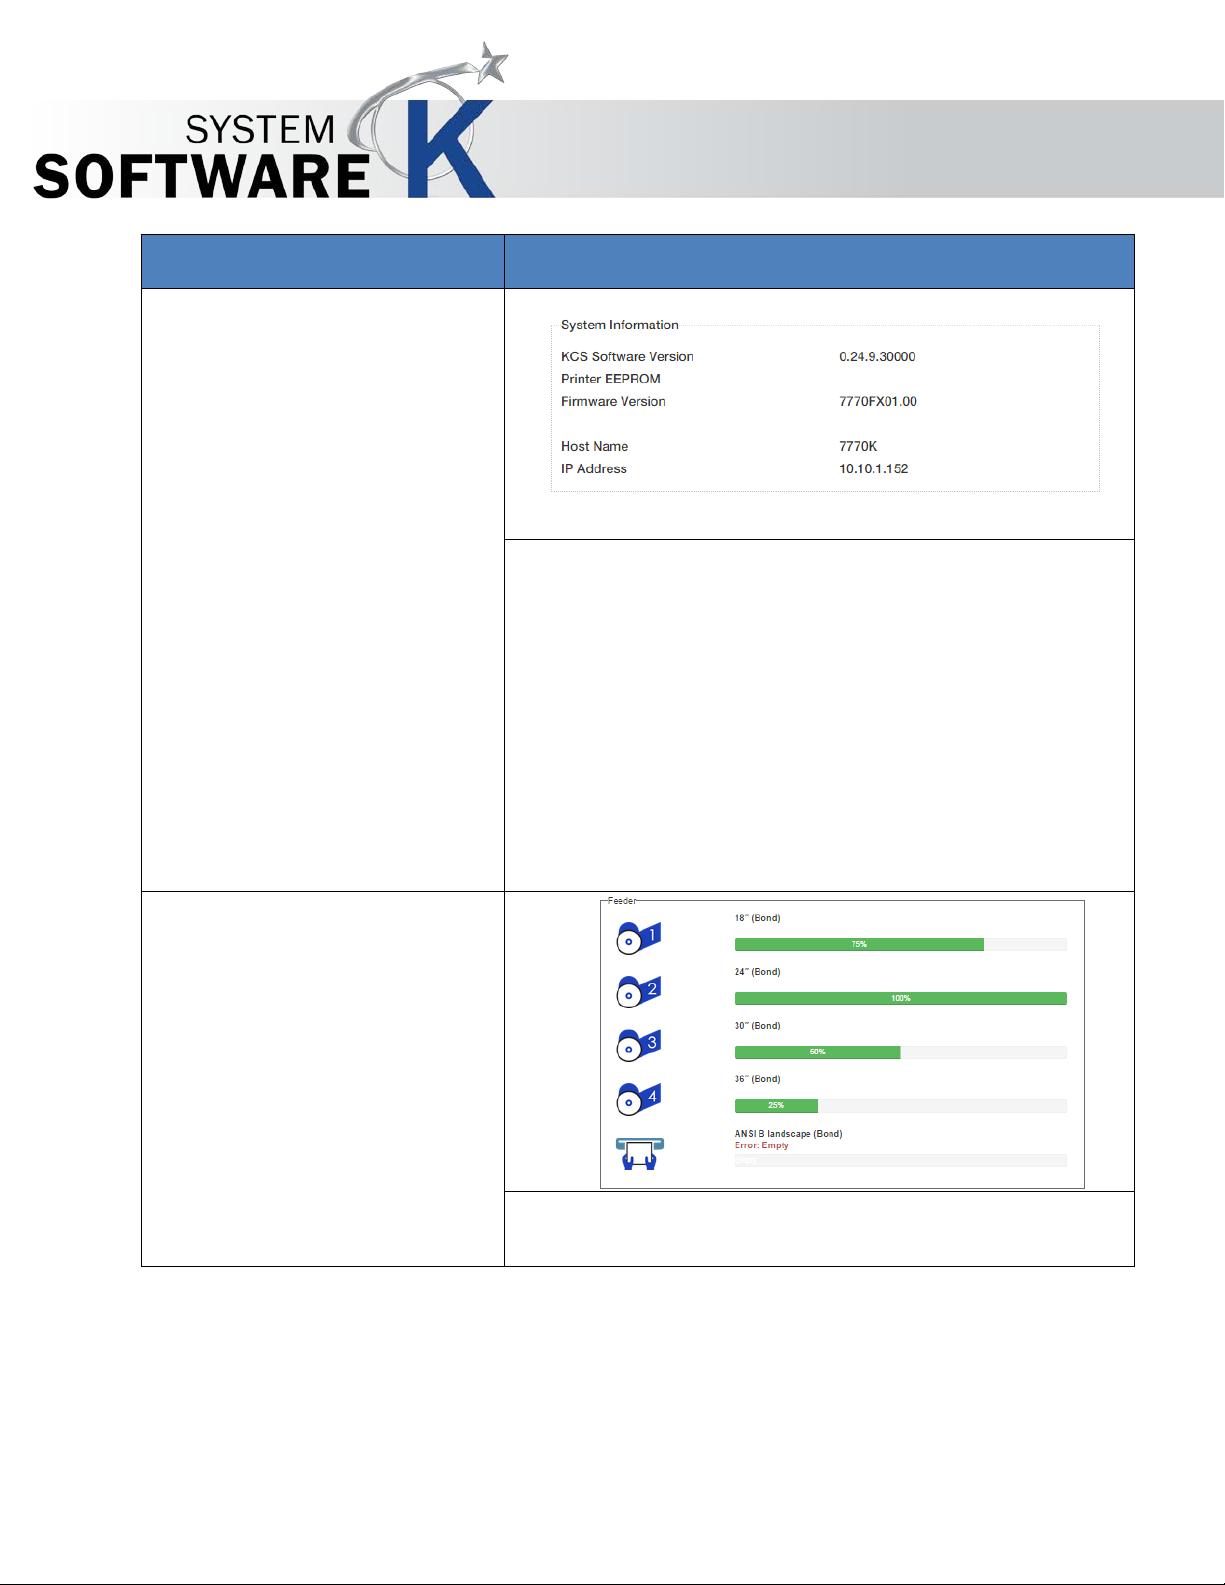
Component
Function
3. System Information
Displays the following Information:
4. Feeder
Displays the current roll information in the KIP Printer in
KIP PrintPro.Net User Guide
• KCS Software version – Current Software Version
will be displayed.
• Printer EPROM Version - Current Printer EPROM
Version will be displayed.
• Firmware Version - Current Firmware Version will
be displayed.
• Host Name – Displays Printer Name.
• IP Address – Displays Print er IP Address.
25% increments.
No part of this publication may be copied, reproduced or distributed in any form without express written permission
from KIP. 2015 KIP. v1
- 7 -
Page 8
Component
Function
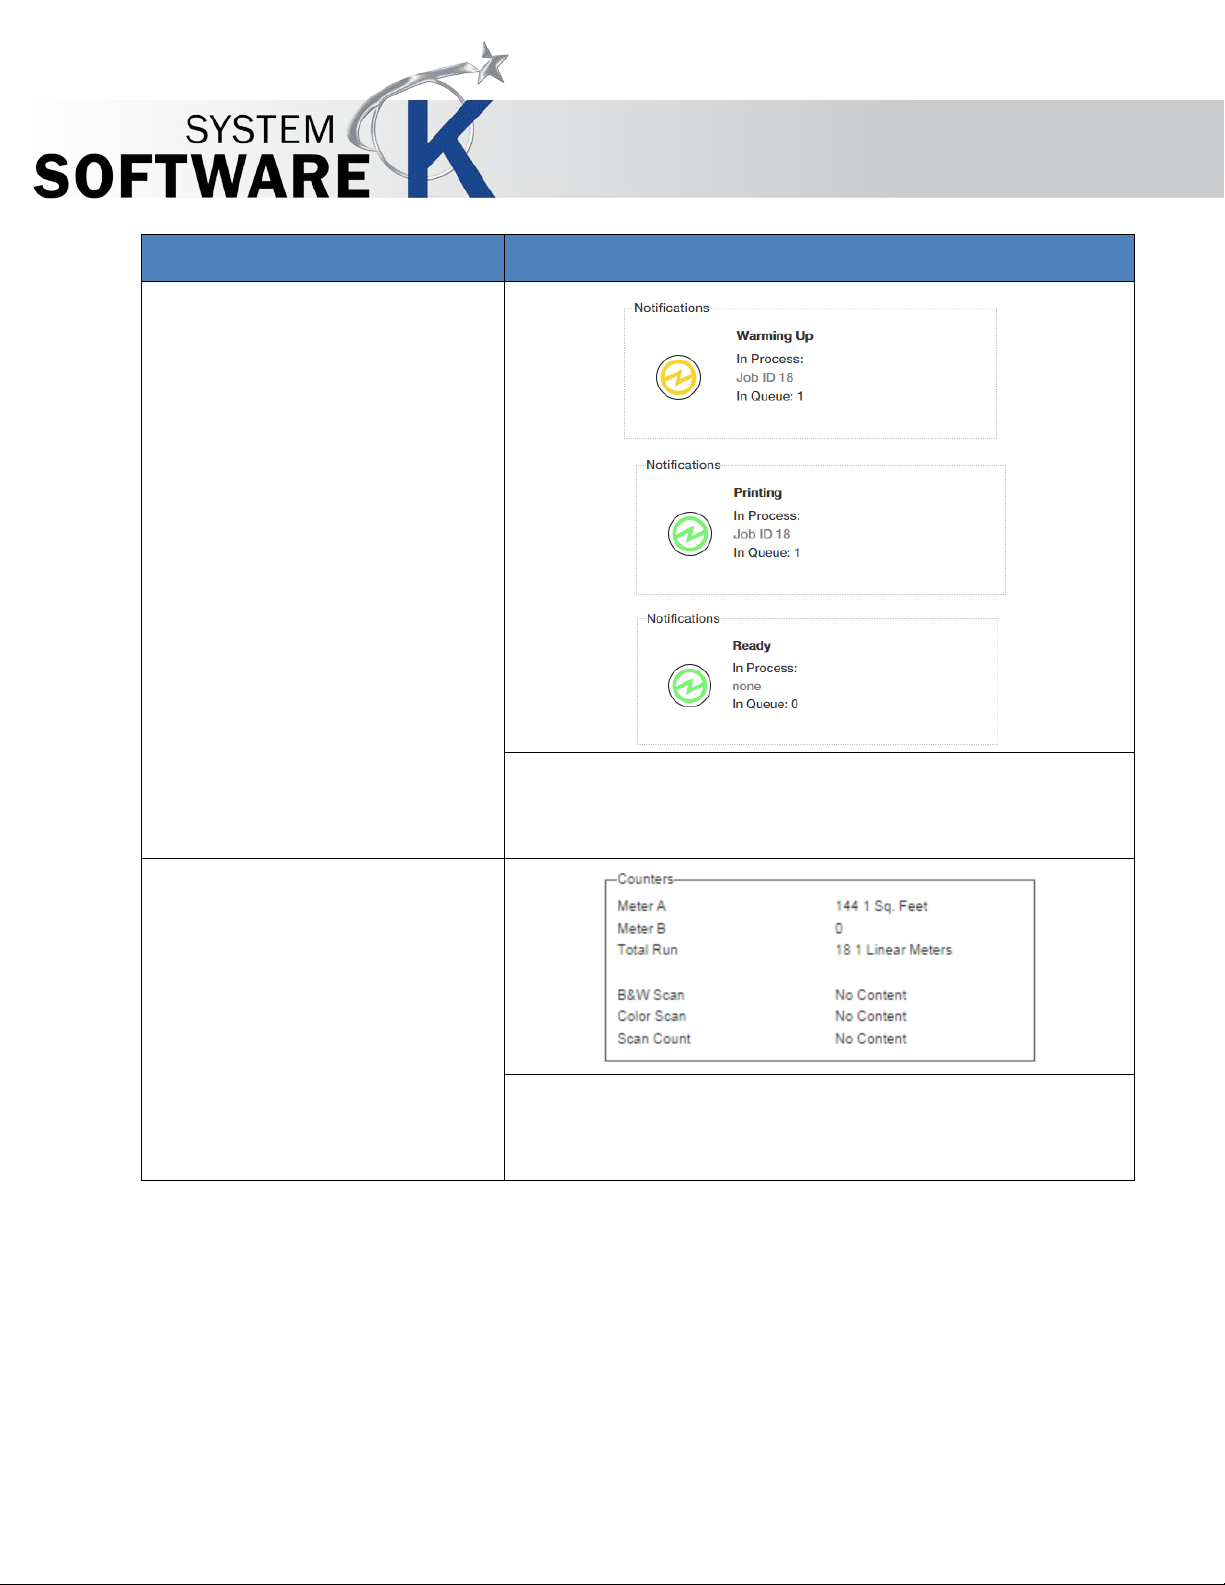
5. Notifications
Notifications in real time. The above show the pri nter
6. Counters
Displays the current counter information for Meter A,
KIP PrintPro.Net User Guide
waking from Sleep, Printing and then returning to a ready
state.
Meter B and Total Run. Also displays the current Counters
for B&W Scan, Color Scan and a Total Scan count.
No part of this publication may be copied, reproduced or distributed in any form without express written permission
from KIP. 2015 KIP. v1
- 8 -
Page 9
Component
Function
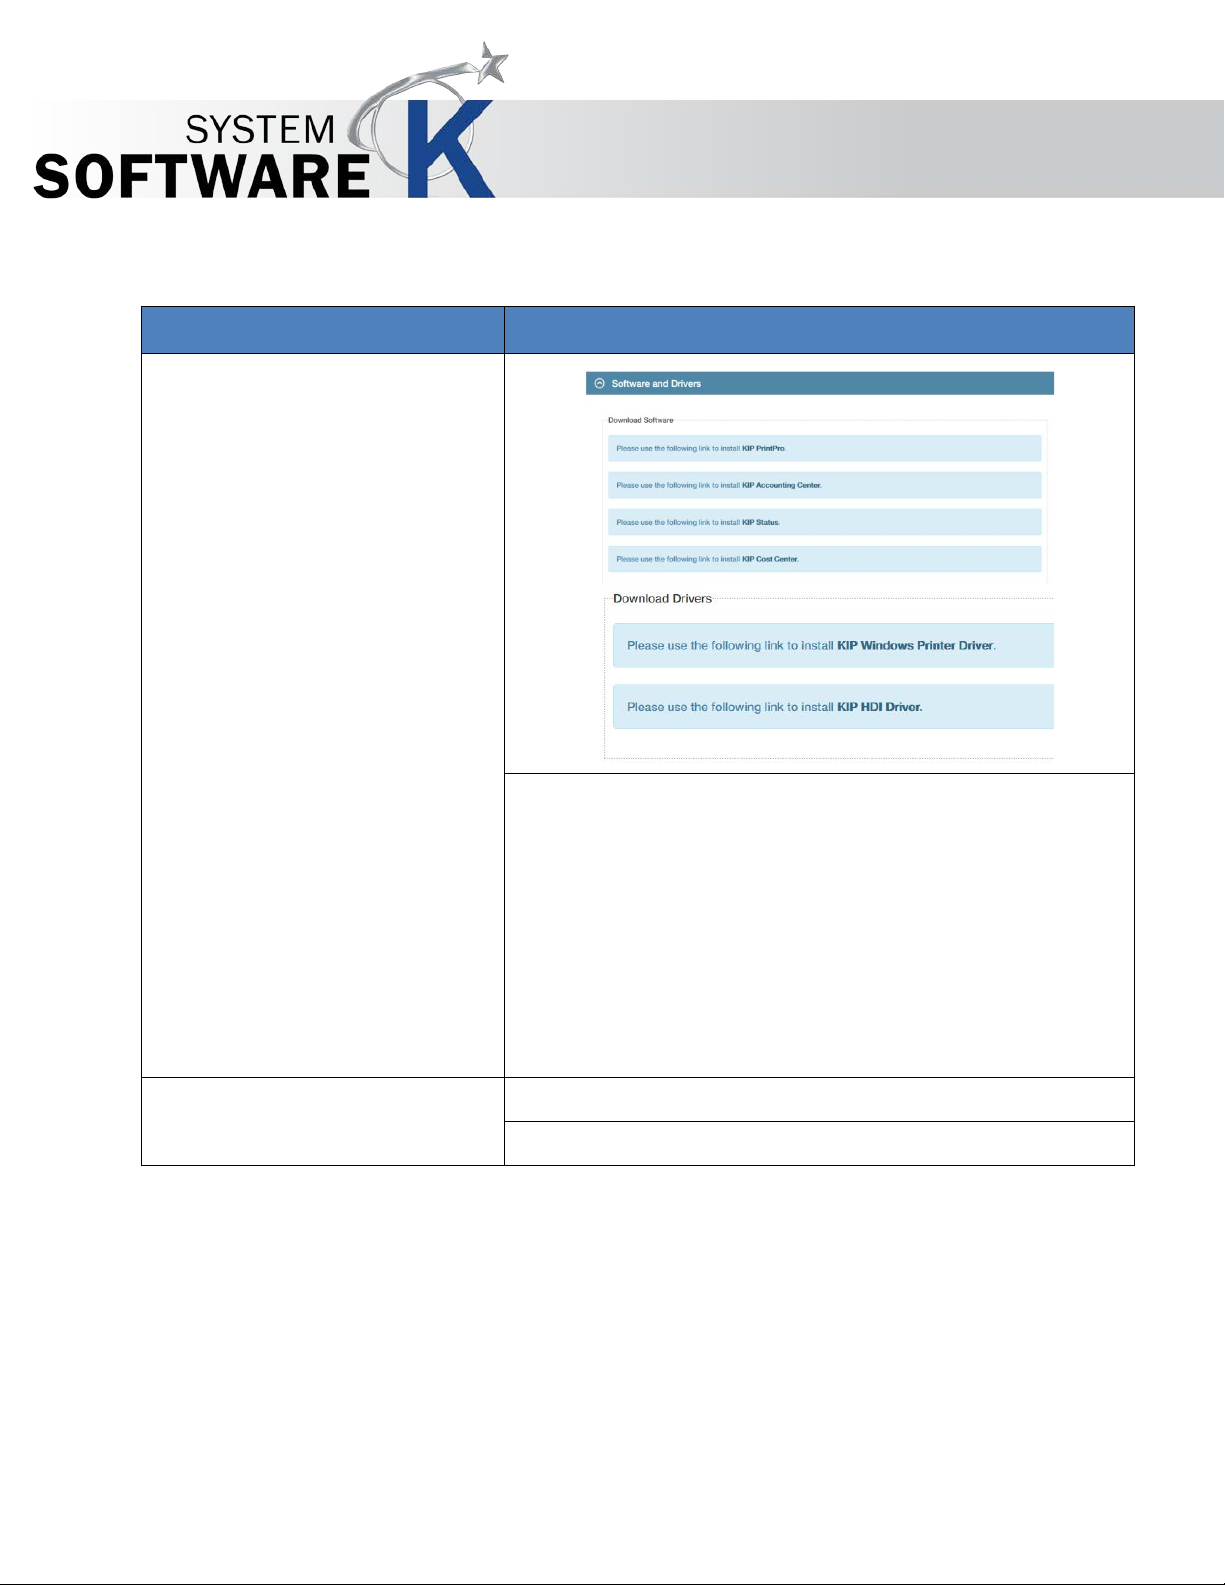
1. Software and Drivers
From this location is is possible to download the KIP
2.
2.2 Software and Drivers
KIP PrintPro.Net User Guide
Software including:
• KIP PrintPro – Click Once Auto Instal
• KIP Accounting Center – Click Once Auto Instal
• KIP Status – Clic k Once Auto Instal
• KIP Cost Center – Zipped Installer, Manual Instal
• KIP Windows Driver – Zipped Installer, Manual
Instal
• KIP HDI Driver – Zipped Installer, Manual Instal
No part of this publication may be copied, reproduced or distributed in any form without express written permission
from KIP. 2015 KIP. v1
- 9 -
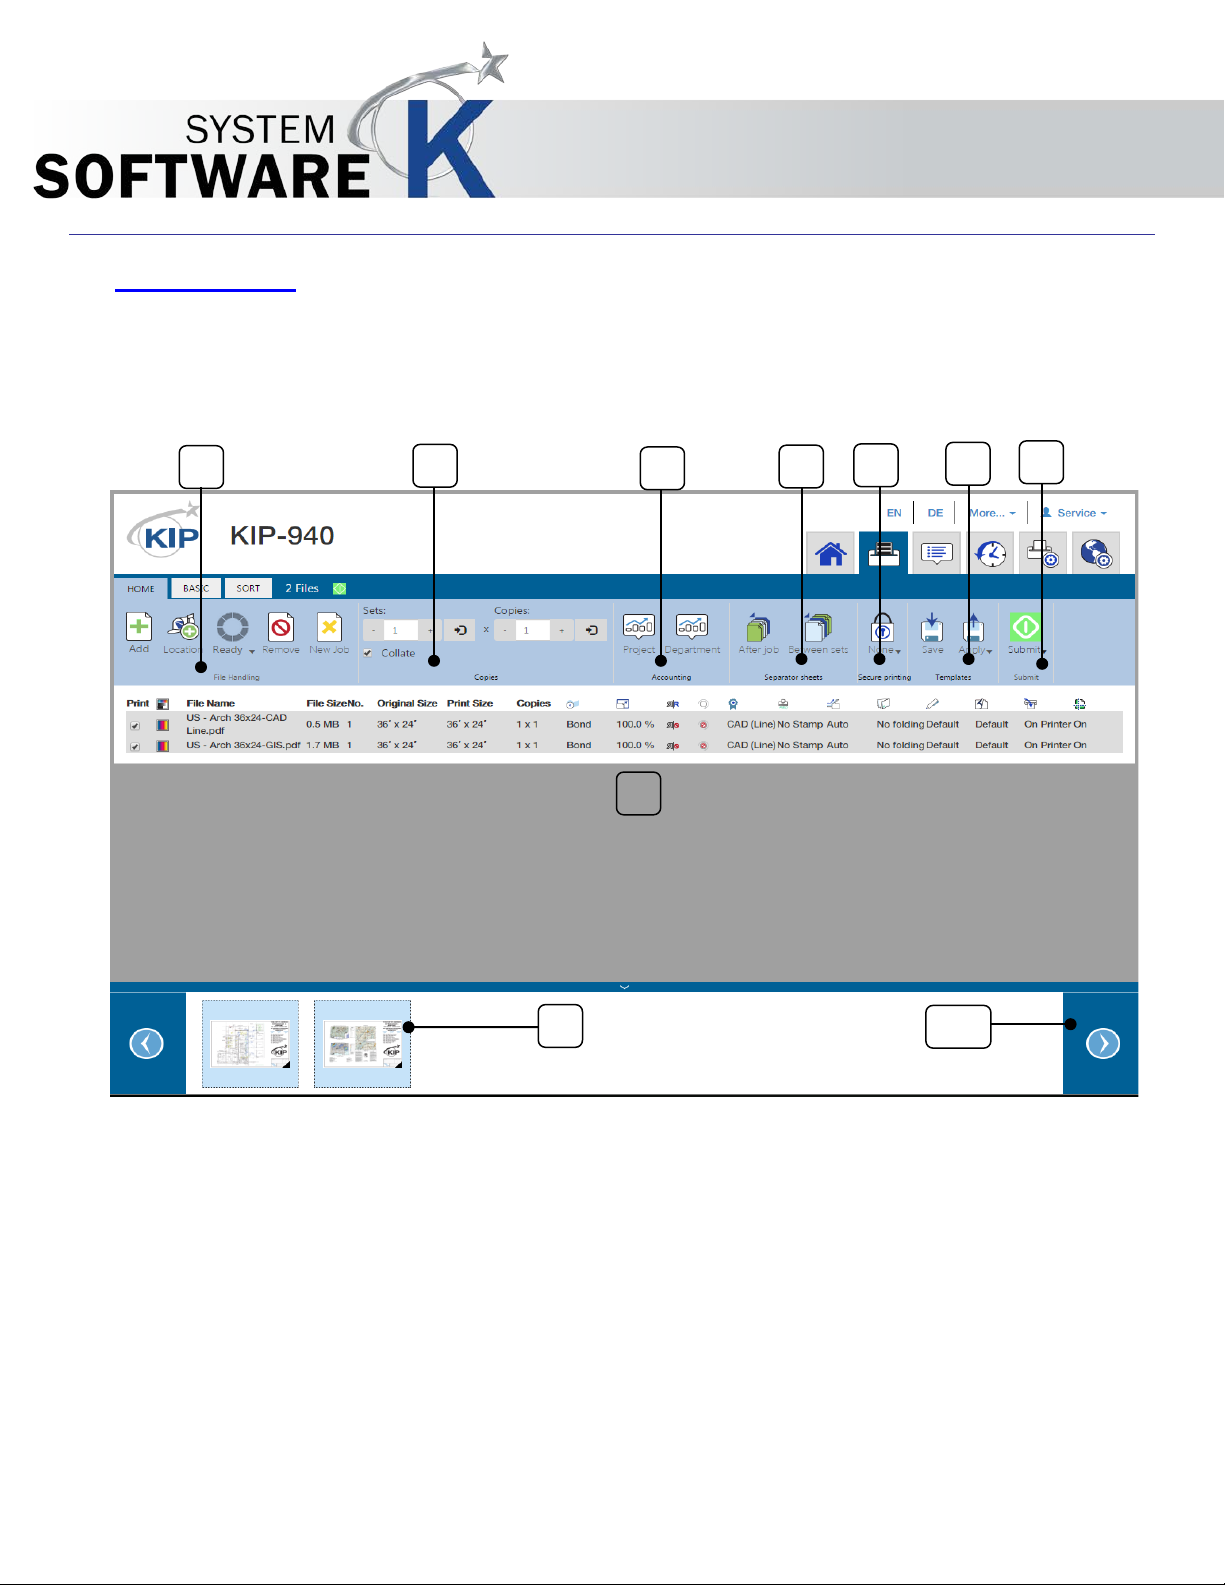
Page 10
8
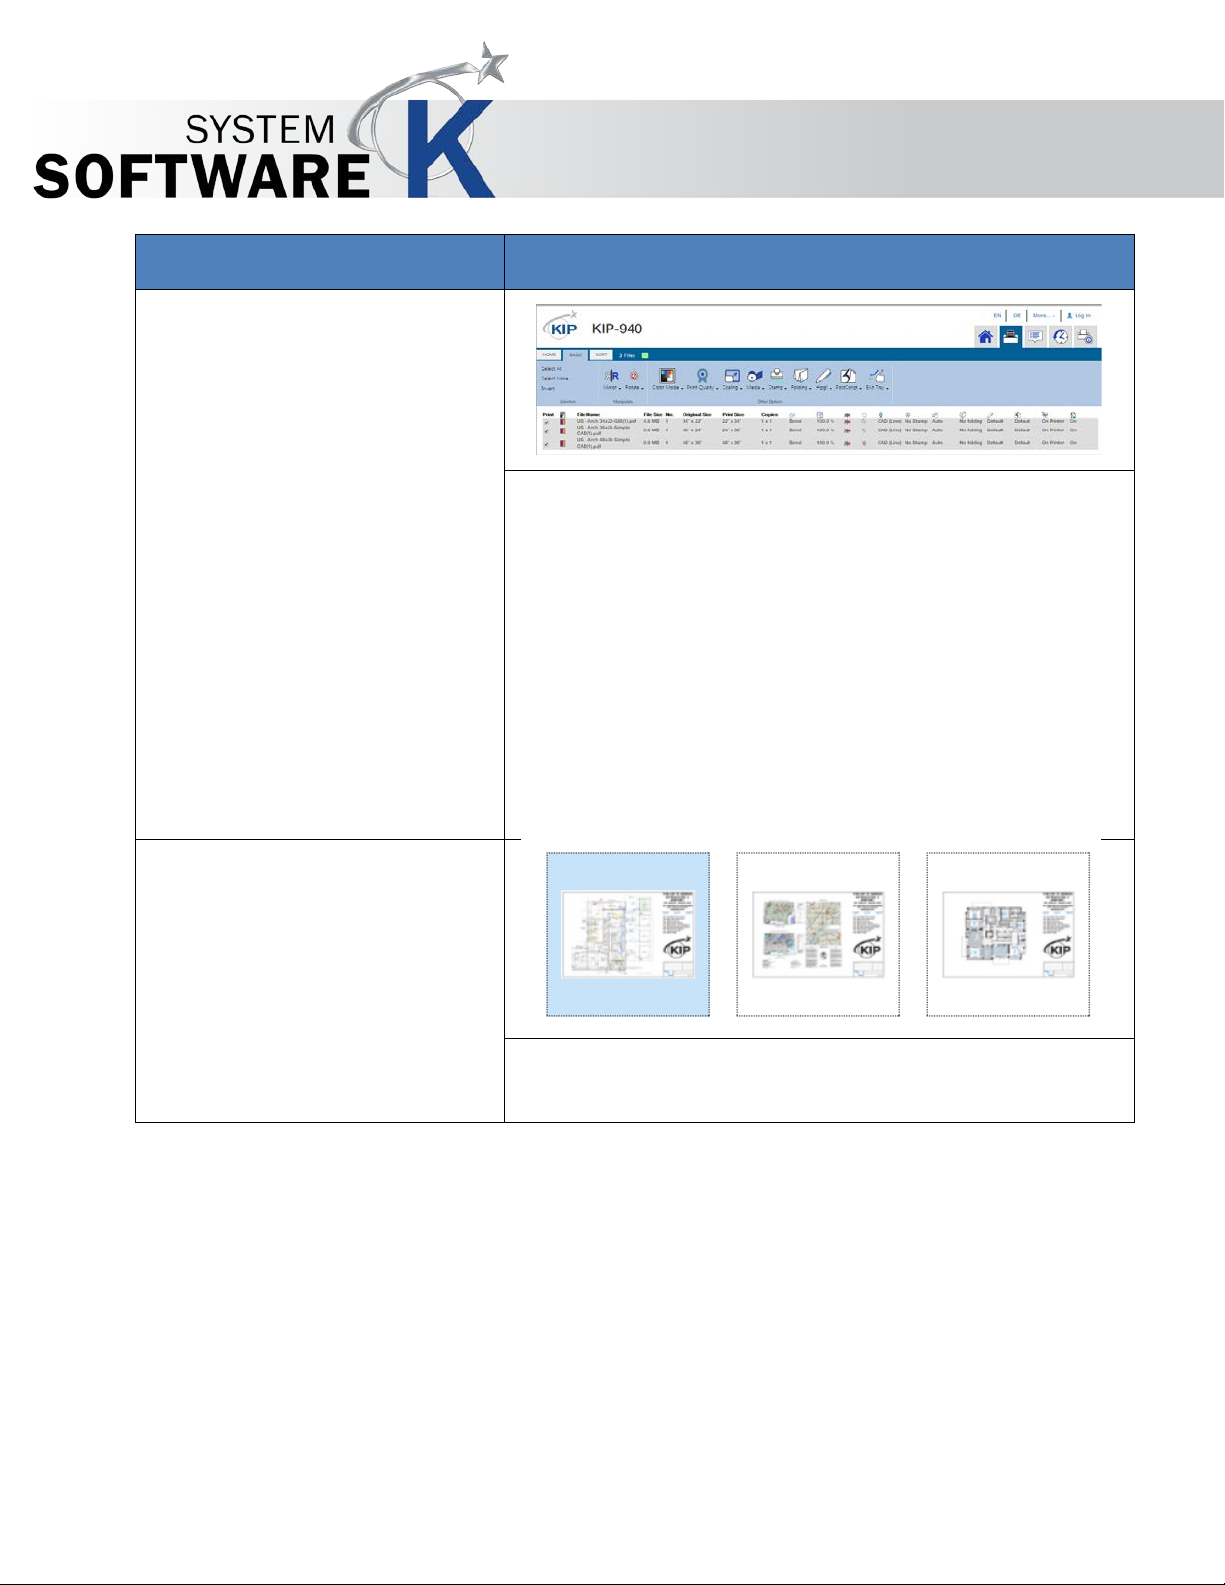
1 2 3 4 5 6 9
10
7
KIP PrintPro.Net User Guide
3 Print Screen
The Followi ng section describes the function of KIP PrintPro.Net.
3.1 Home Tab
No part of this publication may be copied, reproduced or distributed in any form without express written permission
from KIP. 2015 KIP. v1
- 10 -
Page 11
Component
Function
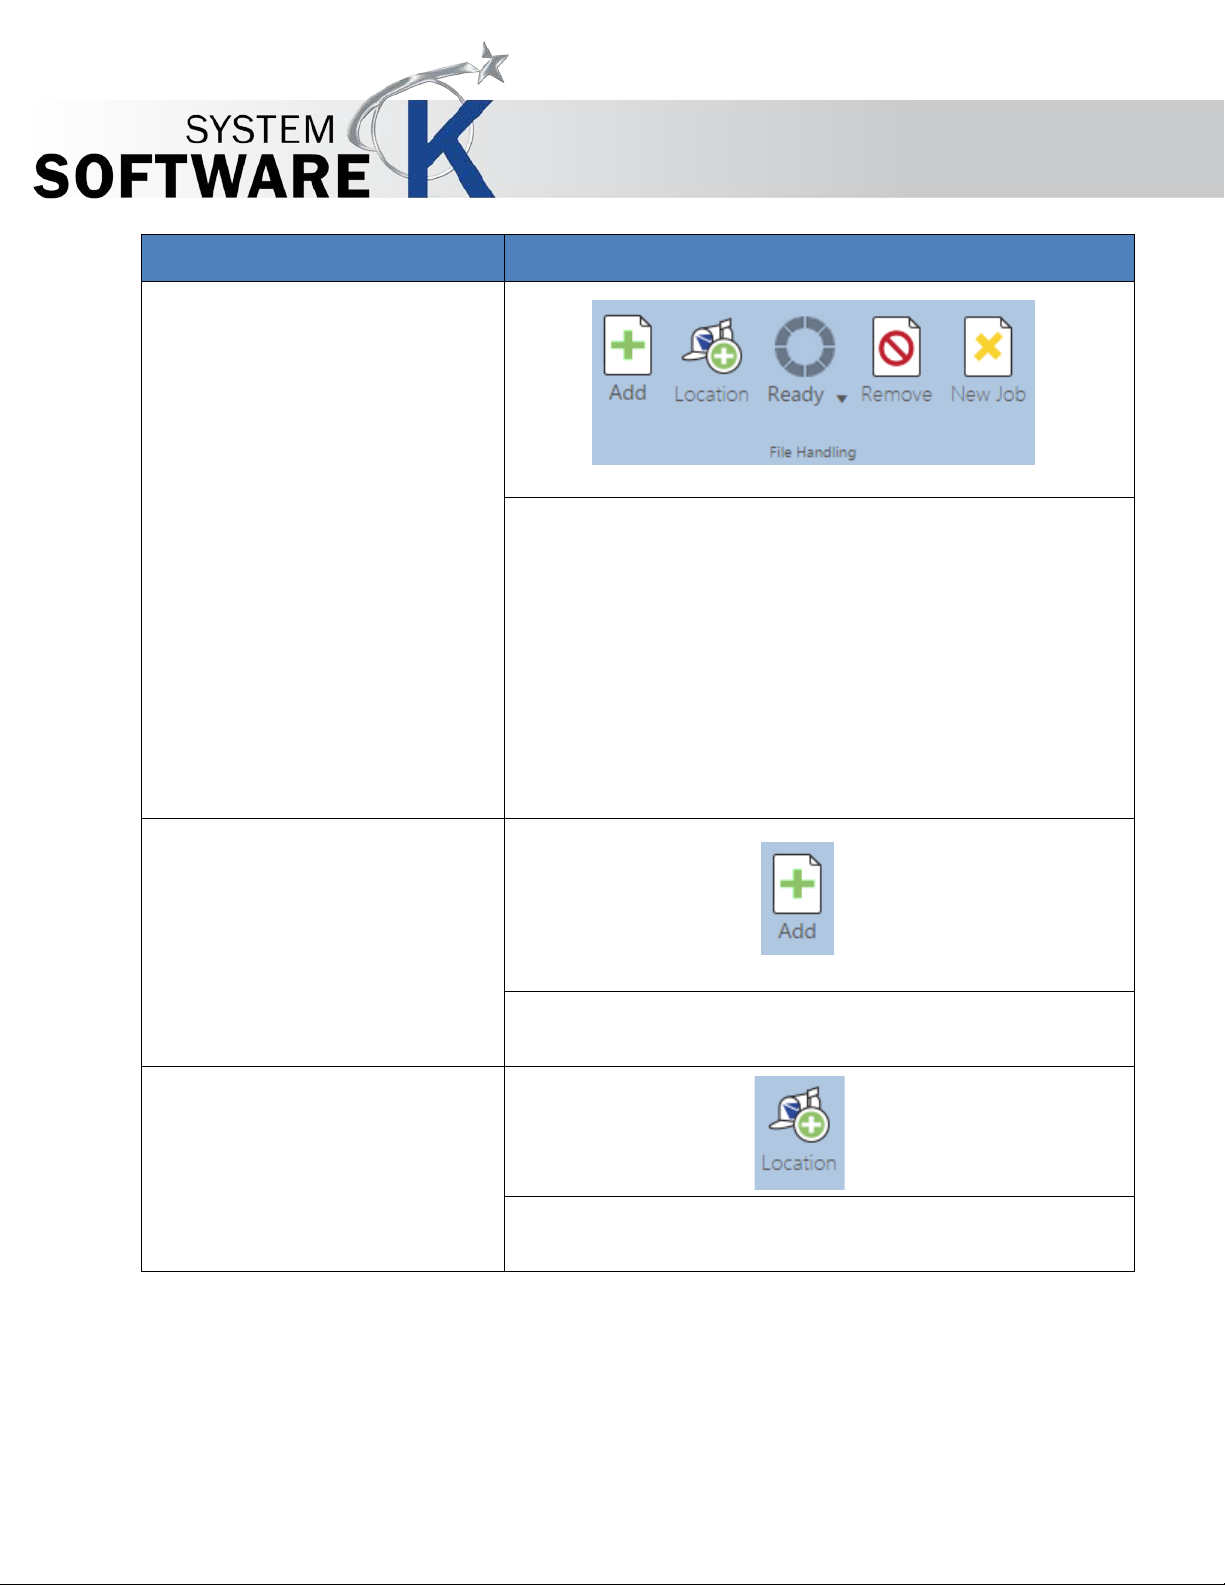
1. File Handling
Consists of the following:
• Add
Select the Add icon to then browse to all available
• Mailbox
Select the Mailbox icon to add files to the current job
KIP PrintPro.Net User Guide
• Add – Select this to browse for and add files to be
printed.
• Mailbox – Select files from available mailboxes.
• Ready – Displays the processed files that are
ready to print.
• Remove – Removes selected file(s ) fr om job.
• New Job - Clears all files and starts a new job.
locations and add files to be printed.
from available Mailboxes.
No part of this publication may be copied, reproduced or distributed in any form without express written permission
from KIP. 2015 KIP. v1
- 11 -
Page 12
Component
Function
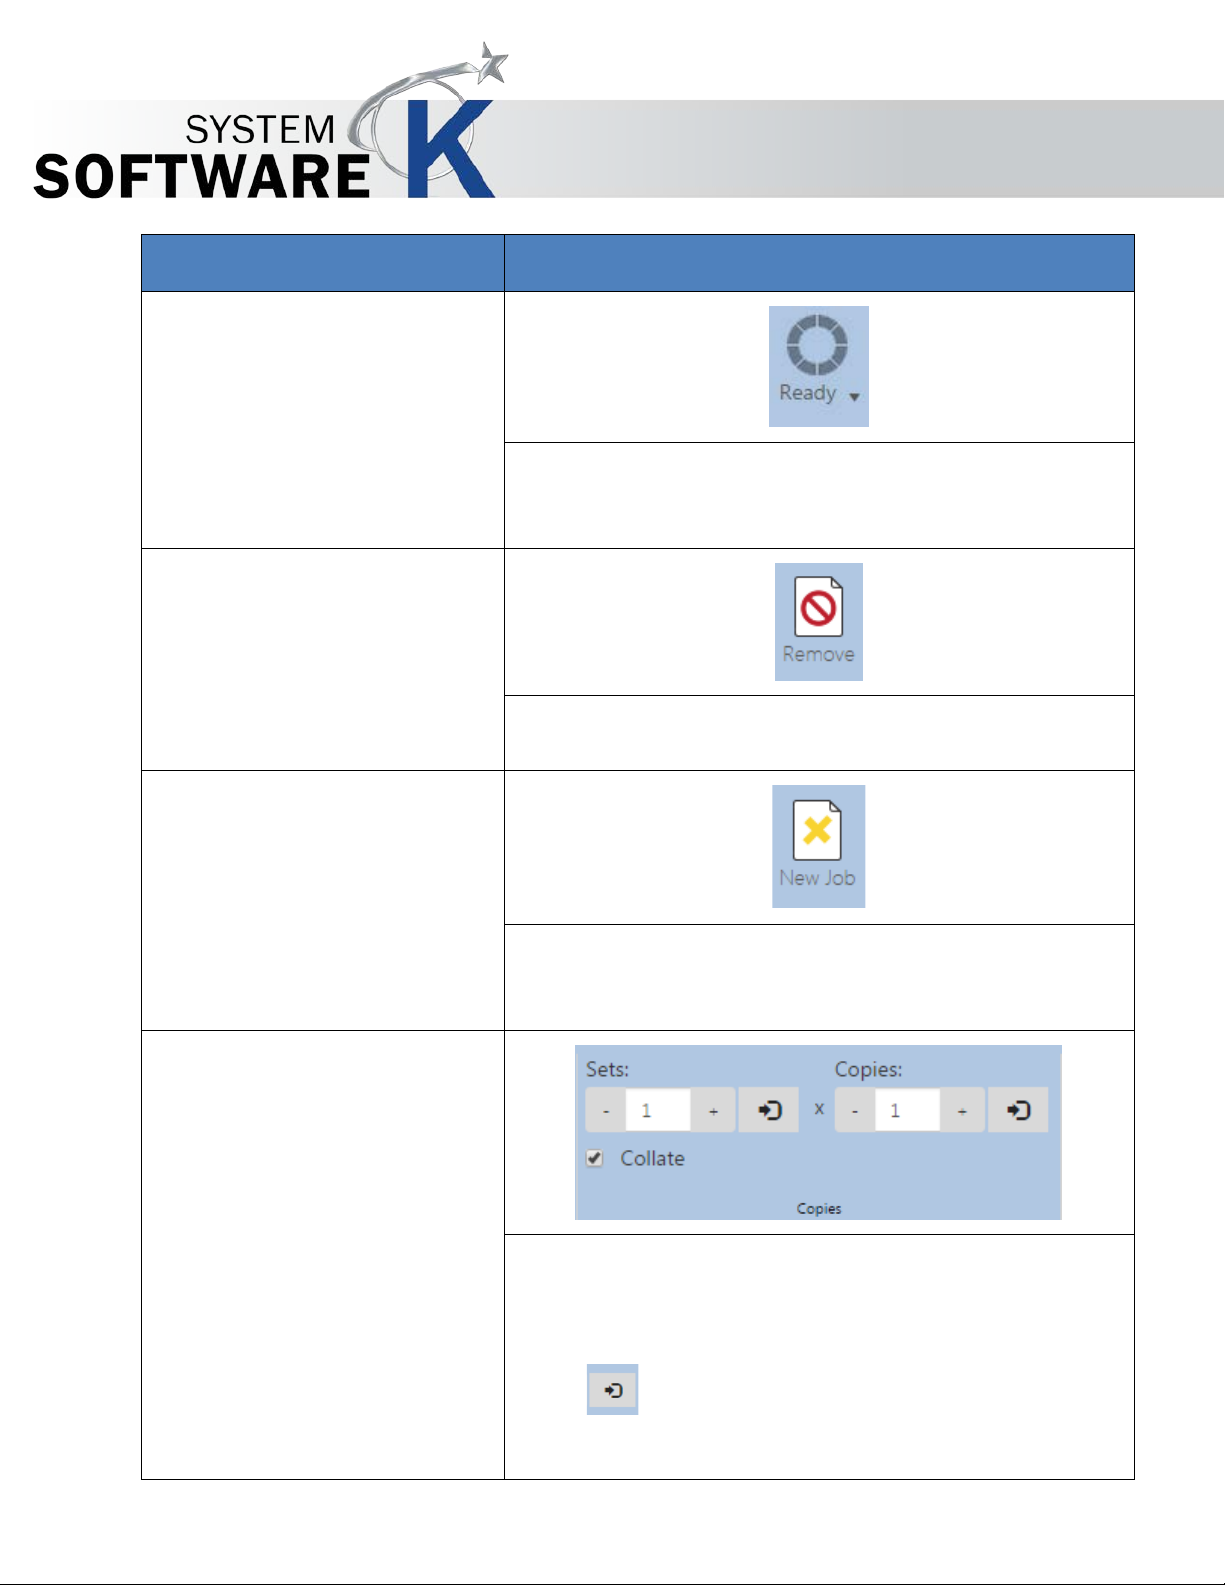
• Ready
When files are selected to be printed they are
• Remove
Select file(s) to be removed from the job and then select
• New Job
Selecting the New job icon will clear all files currently in
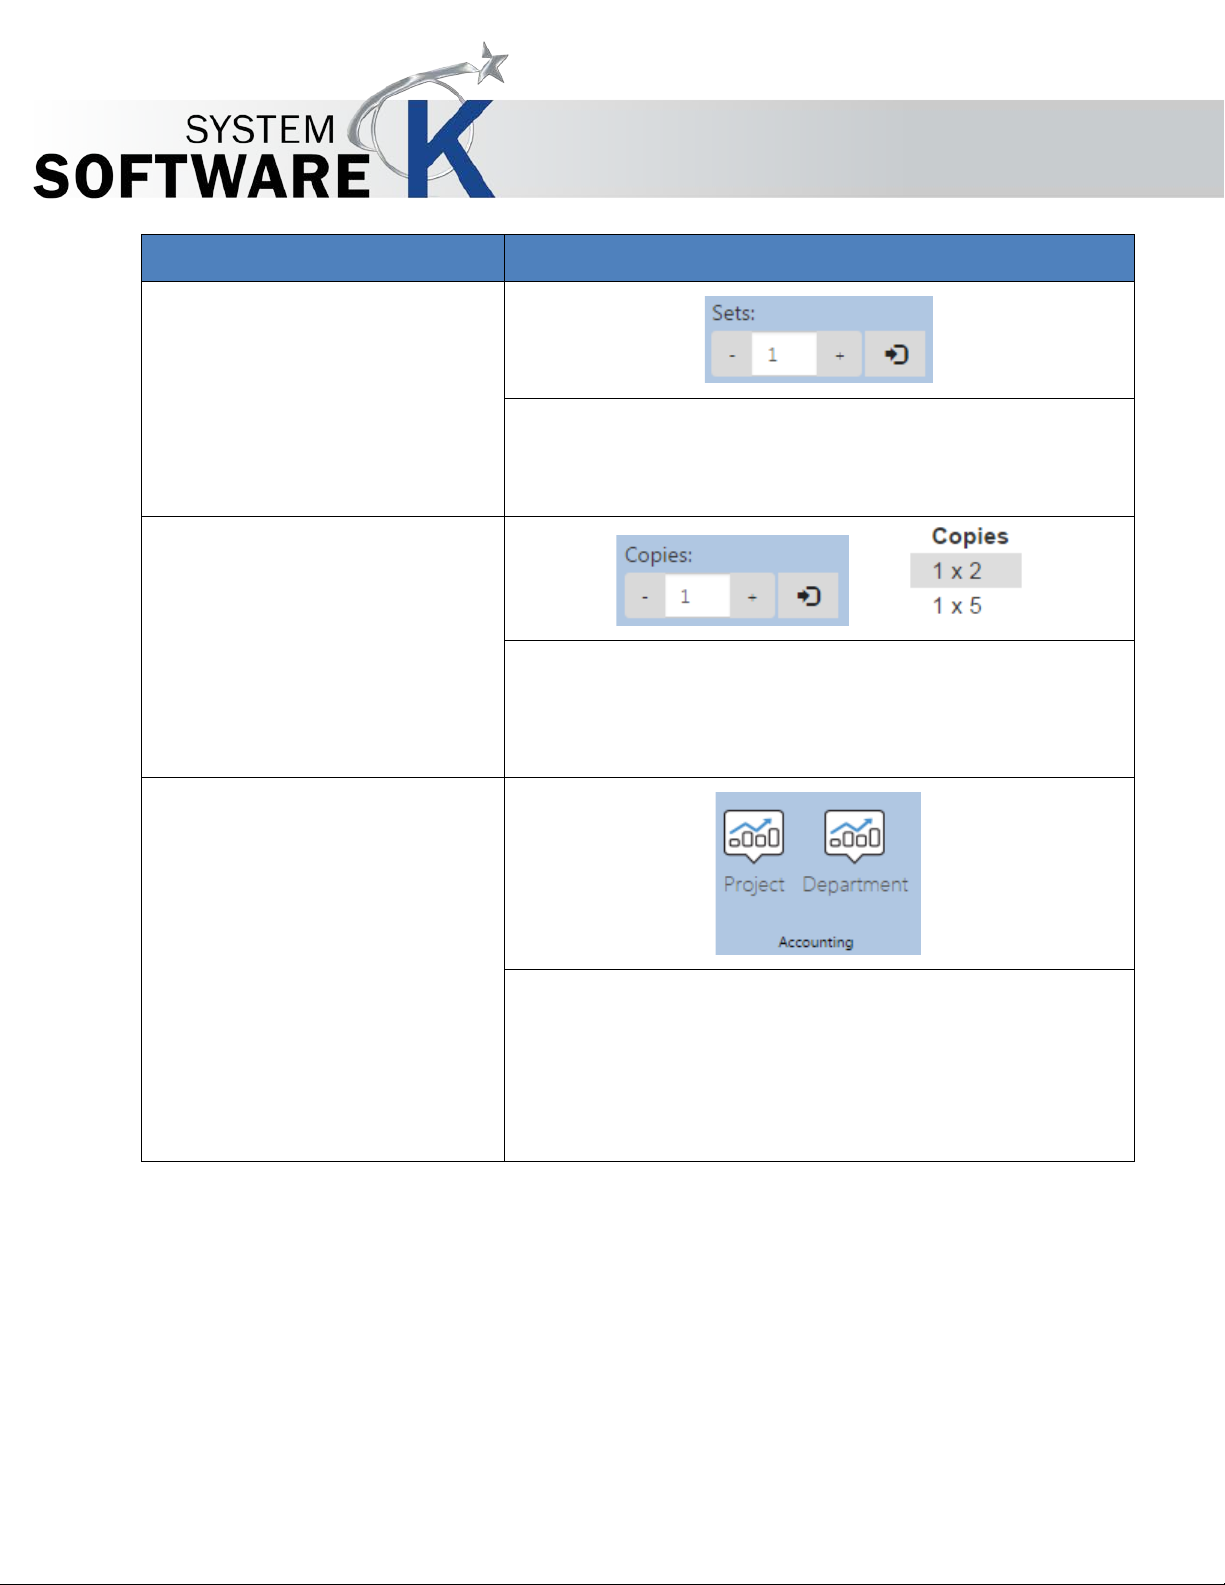
2. Copies
Consists of:
KIP PrintPro.Net User Guide
processed. The Ready icon will show all of the files that
have been processed under the Dropdown menu.
the Remove icon. This will remove the selected file(s).
the job matrix. This will then start a new job allowing new
files to be added.
• Sets – Controls how many sets are printed.
• Copies – Controls how many copies are printed.
• [Enter] – Sets the value en tered.
No part of this publication may be copied, reproduced or distributed in any form without express written permission
from KIP. 2015 KIP. v1
• Collate – Enables/ Disables collate.
- 12 -
Page 13
Component
Function
• Sets/Collate
The sets function allows for the entry of how many sets
• Copies
The Copies function allows for the entry of how many
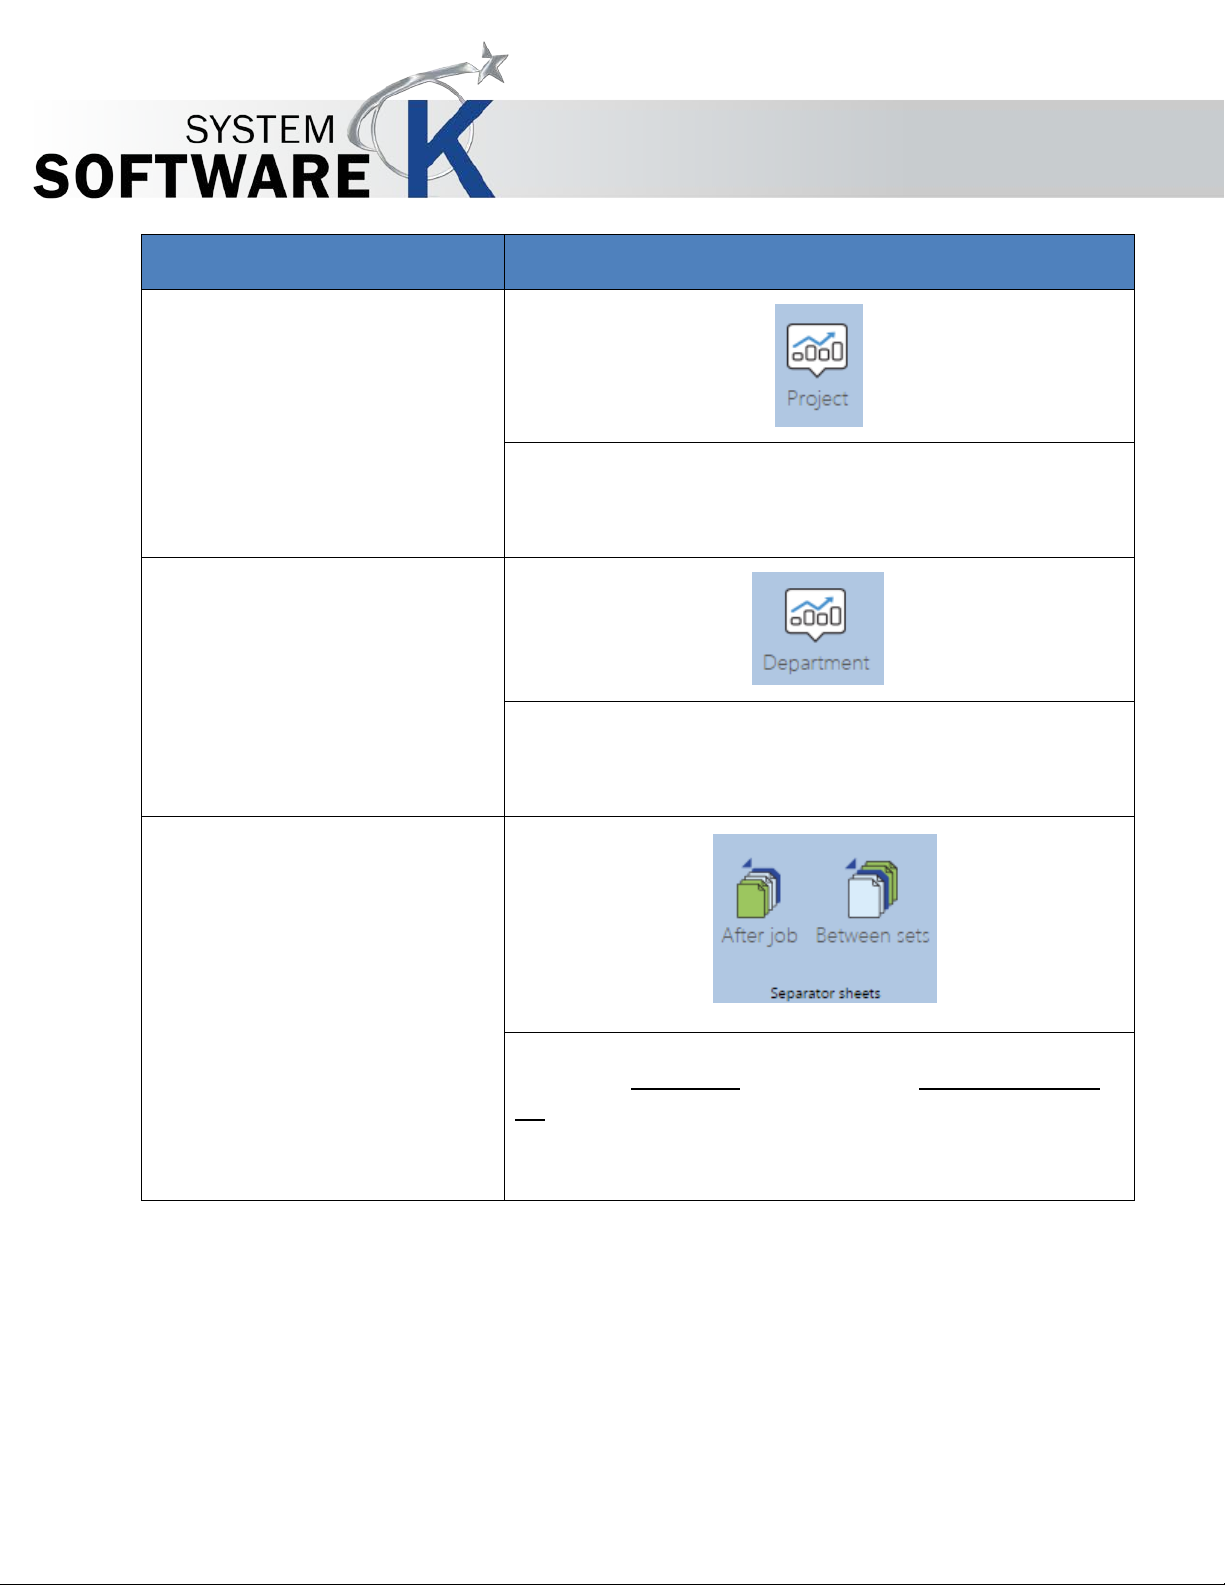
3. Accounting
Consists of:
KIP PrintPro.Net User Guide
will be printed.
Collate – If checked will collate the sets being printed.
copies will be printed. This can be set on a per file basis.
(above – first file 1 set, 2 copies/ second file 1 set, 5
copies).
• Project – If active Project numbers can be entered
or selected.
• Department - If active Department num ber s can
be entered or selected.
No part of this publication may be copied, reproduced or distributed in any form without express written permission
from KIP. 2015 KIP. v1
- 13 -
Page 14
Component
Function
Project
When Accounting is active this field may be
Department
When Accounting is active this field may be
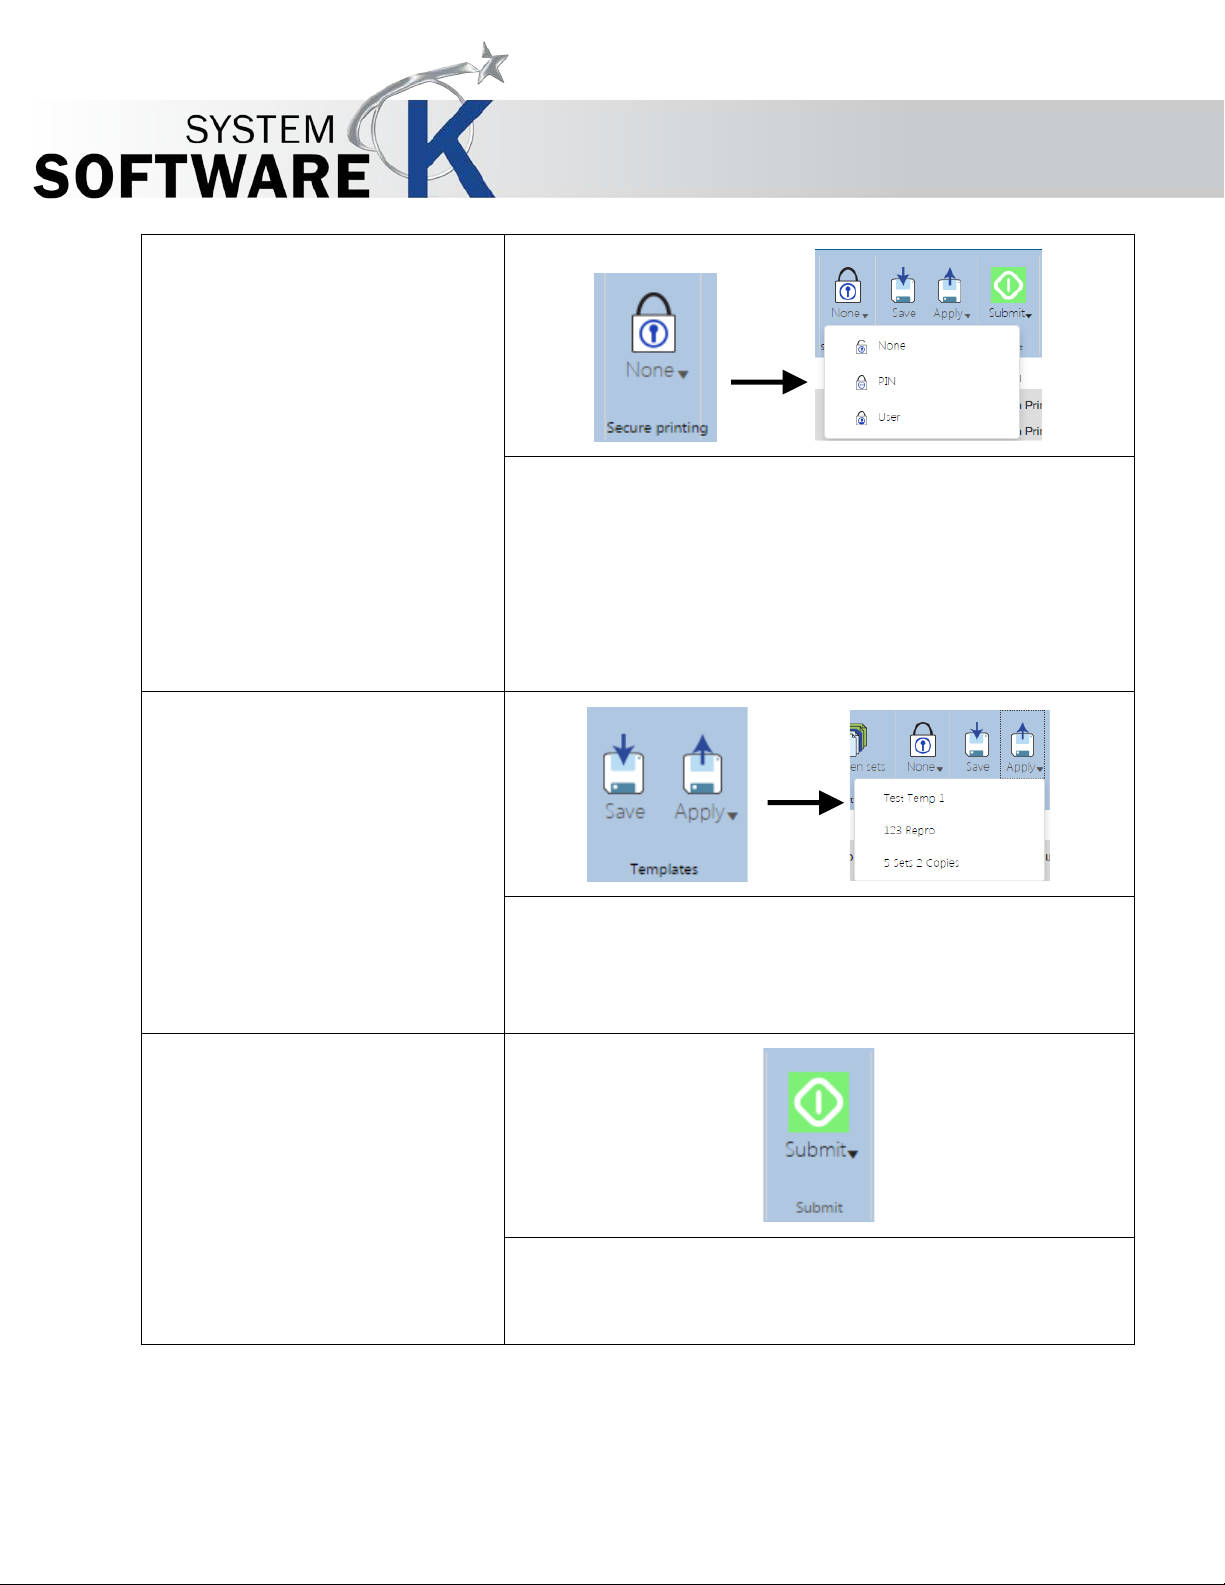
4. Separator Sheet
The Job Separator sheet is an output she et that can be
KIP PrintPro.Net User Guide
•
“required” for printing and can be either a pull
down or standard entry.
•
“required” for printing and can be either a pull
down or standard entry.
set to print after a job is completed o r in between each
set that is printe d. This sheet will consist of the job details
that were printed. The Separator sheet will print on the
smallest roll avala lbe in th e p ri n ter.
No part of this publication may be copied, reproduced or distributed in any form without express written permission
from KIP. 2015 KIP. v1
- 14 -
Page 15
5. Secure Printing
Secure printing has three available options :
6. Templates
Allows for the creation of a Template that can be used
7. Submit
Select the Submit Icon to send the job currently in the job
KIP PrintPro.Net User Guide
• None – This is the default setting.
• PIN – User can enter a PIN that will be required to
release the job to be printed.
• User - User can enter a user name that will be
required to release the job to be printed.
anytime and applied to any job. Once a template is
created and saved, select the Apply ic on to vi ew a list of
available templat e s .
matrix with al l of th e d e s i r e d settings to the KI P Pr i nt er for
printing.
No part of this publication may be copied, reproduced or distributed in any form without express written permission
from KIP. 2015 KIP. v1
- 15 -
Page 16
Component
Function
8. Job Matrix
When files are selected to be printed, they will load into
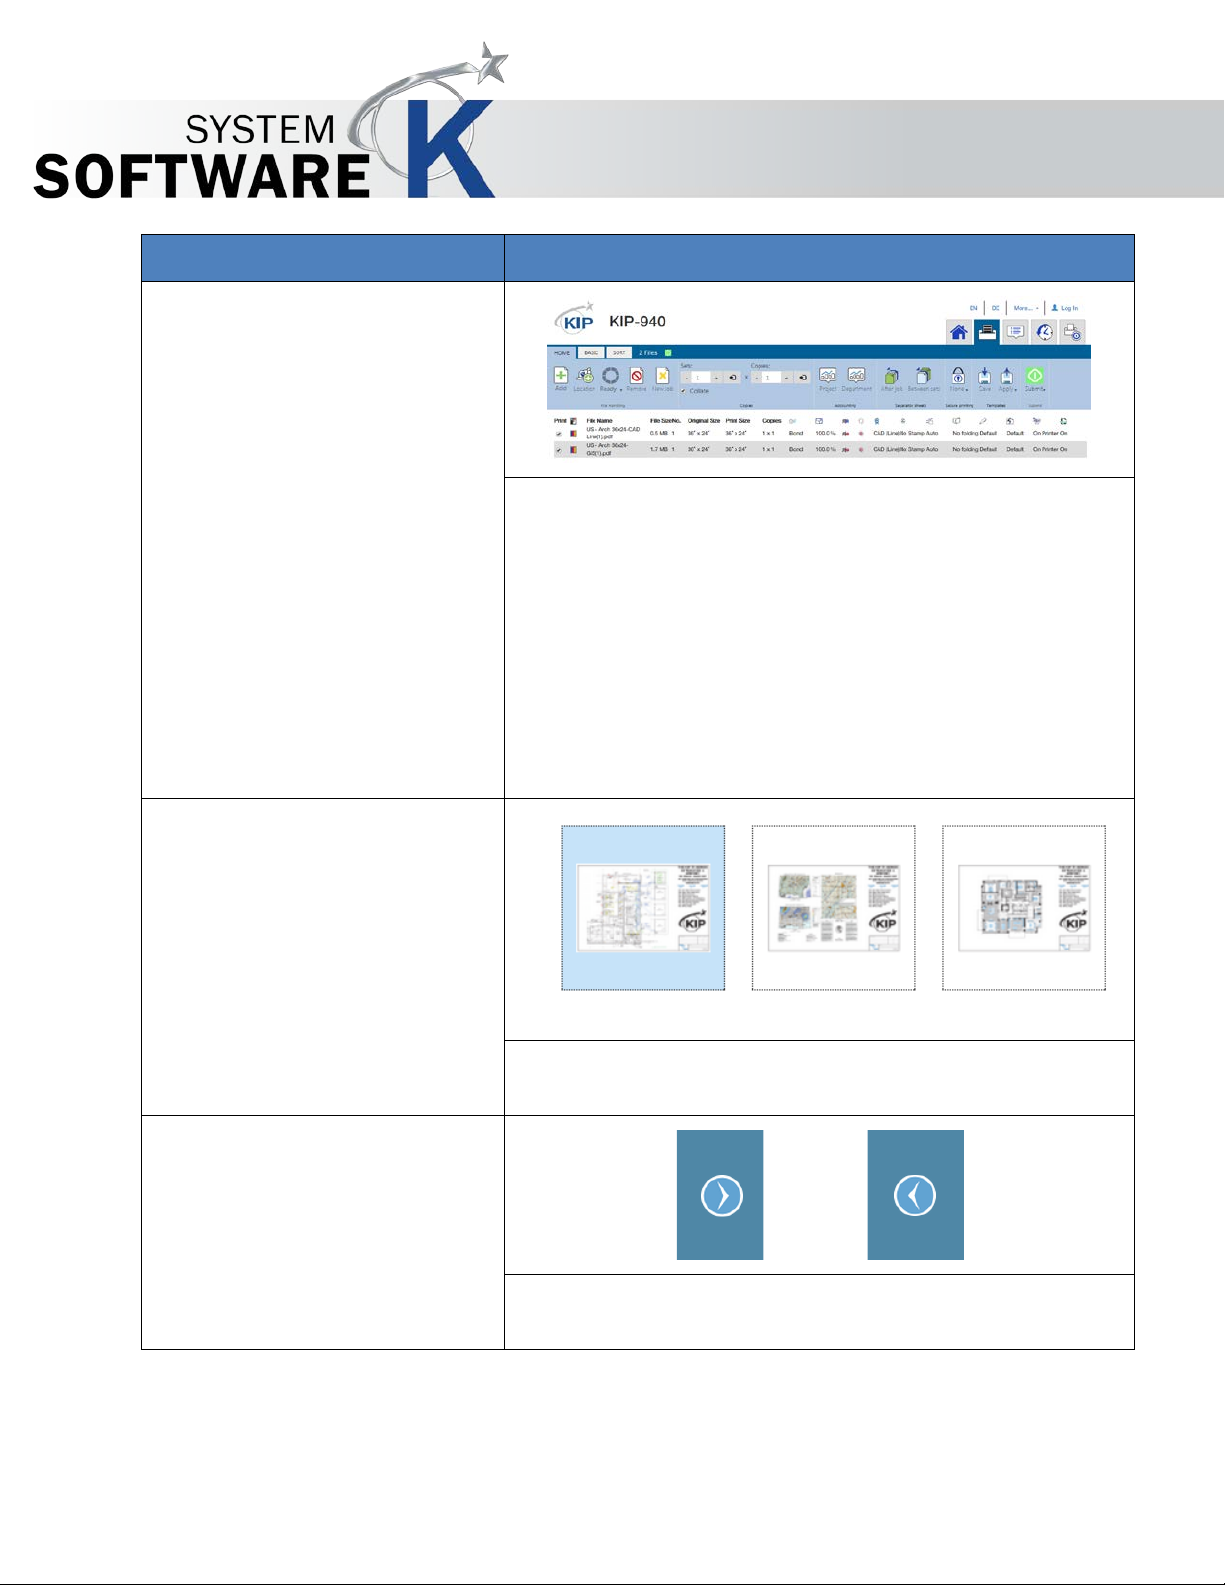
9. Preview Images
The Preview pane will display a small preview of each
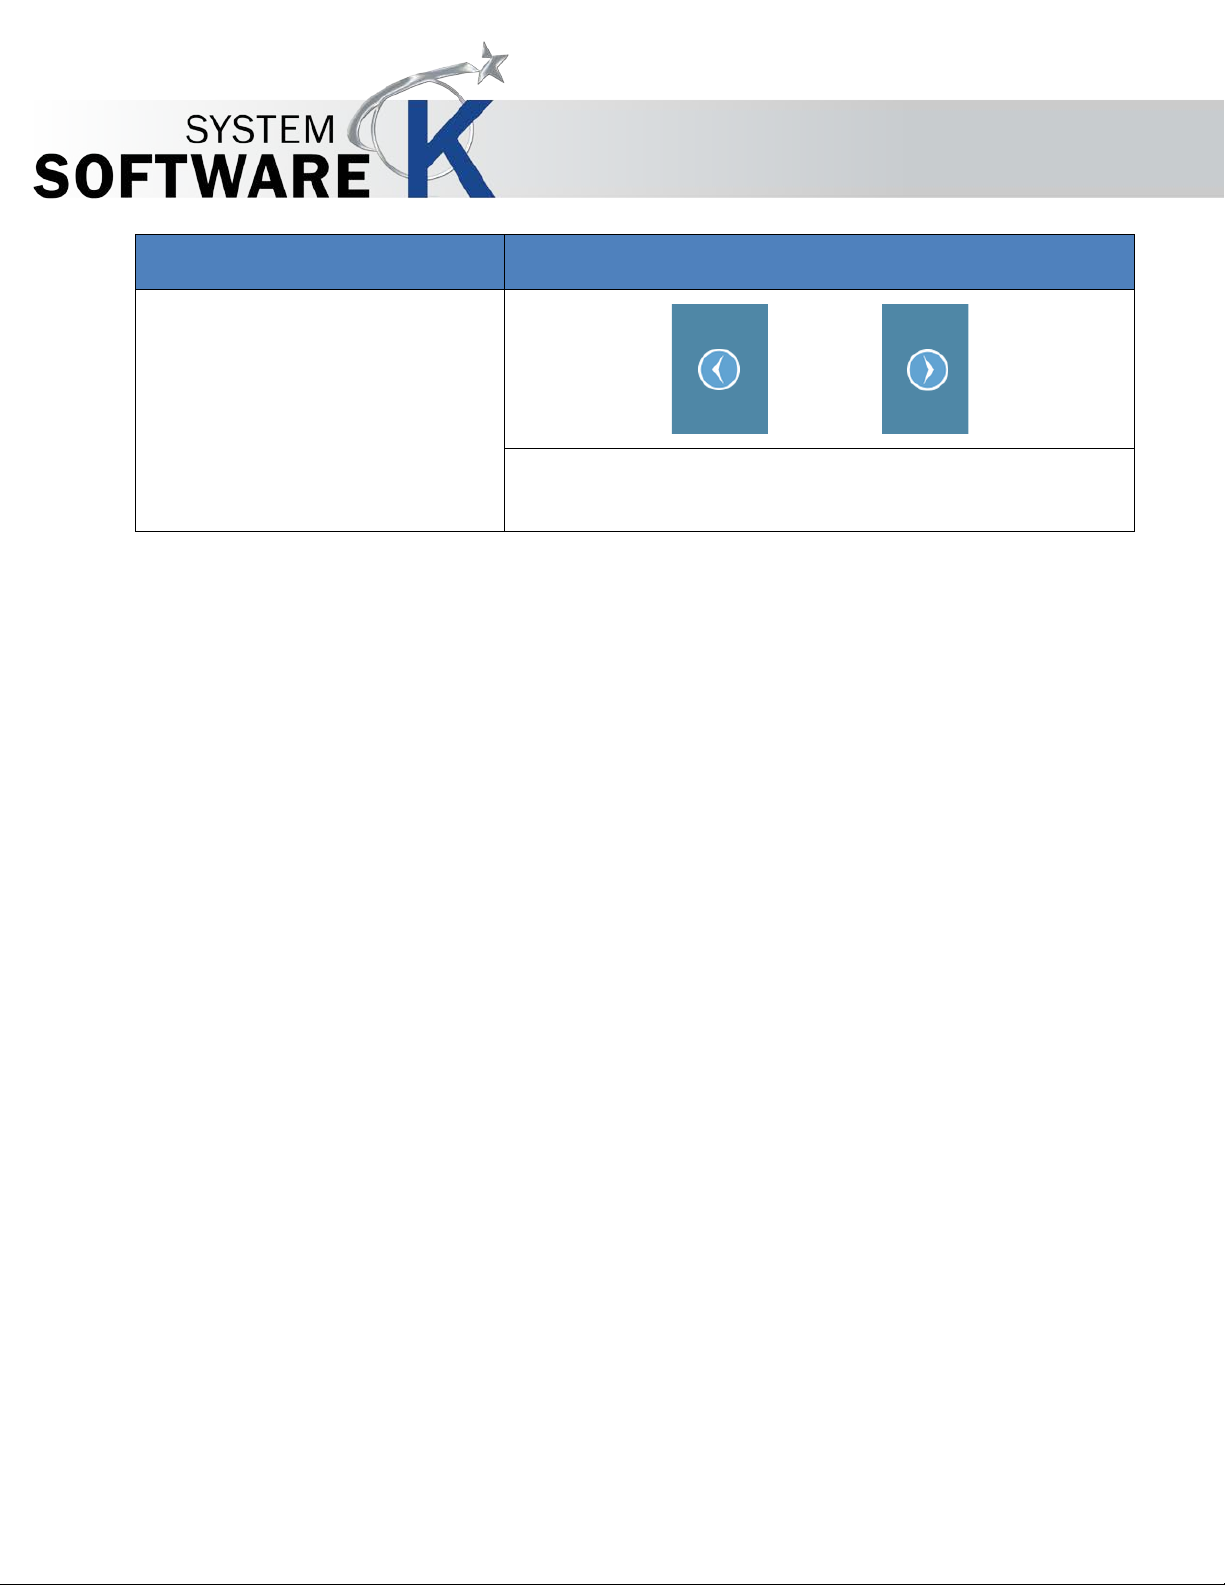
10. Scroll Images
The Left/Right arrows will allow for the scrolling of Preview
KIP PrintPro.Net User Guide
the Job Matrix. This section will display the following:
• File Name – Name of the selected File.
• Name – Page1, Page 2, Page 3.
• Number - Number of the page (6 page file would
show that specific Page number).
• Print Size – Size of the output.
• Copies – Number of copies to be printed.
file in the Job Matrix.
Images.
No part of this publication may be copied, reproduced or distributed in any form without express written permission
from KIP. 2015 KIP. v1
- 16 -
Page 17

Component
Function
1. Selection
Selection consists of:
1
2
3 4 5
6
3.2 Basic Tab
KIP PrintPro.Net User Guide
No part of this publication may be copied, reproduced or distributed in any form without express written permission
from KIP. 2015 KIP. v1
Select All – Selects all files in the Job Matrix so that setting
changes can be applied to all.
Select None – De-selects all selected files.
Invert – Used to invert the selected files in the Job Matrix. For
Example, if files 1 and 3 were selected “Invert” would deselect them and select file 2.
- 17 -
Page 18
Component
Function
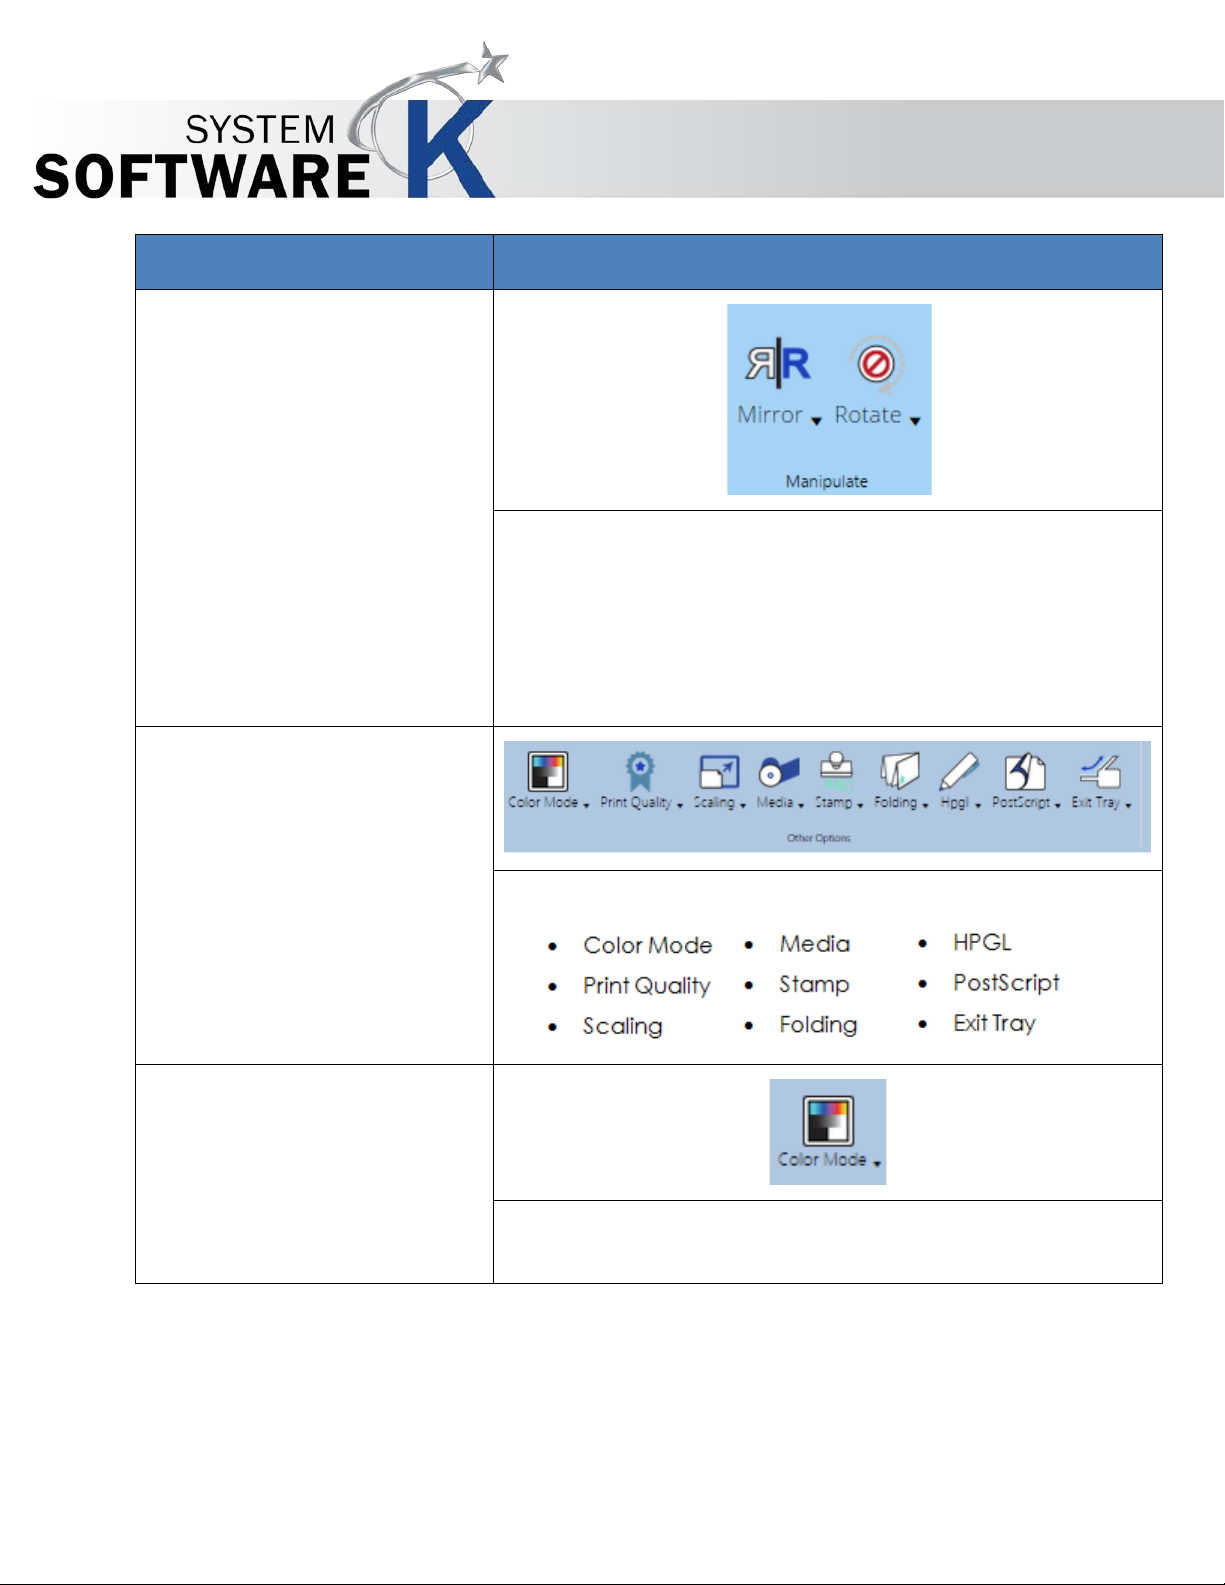
2. Manipulate
The Manipulate section consists of the following:
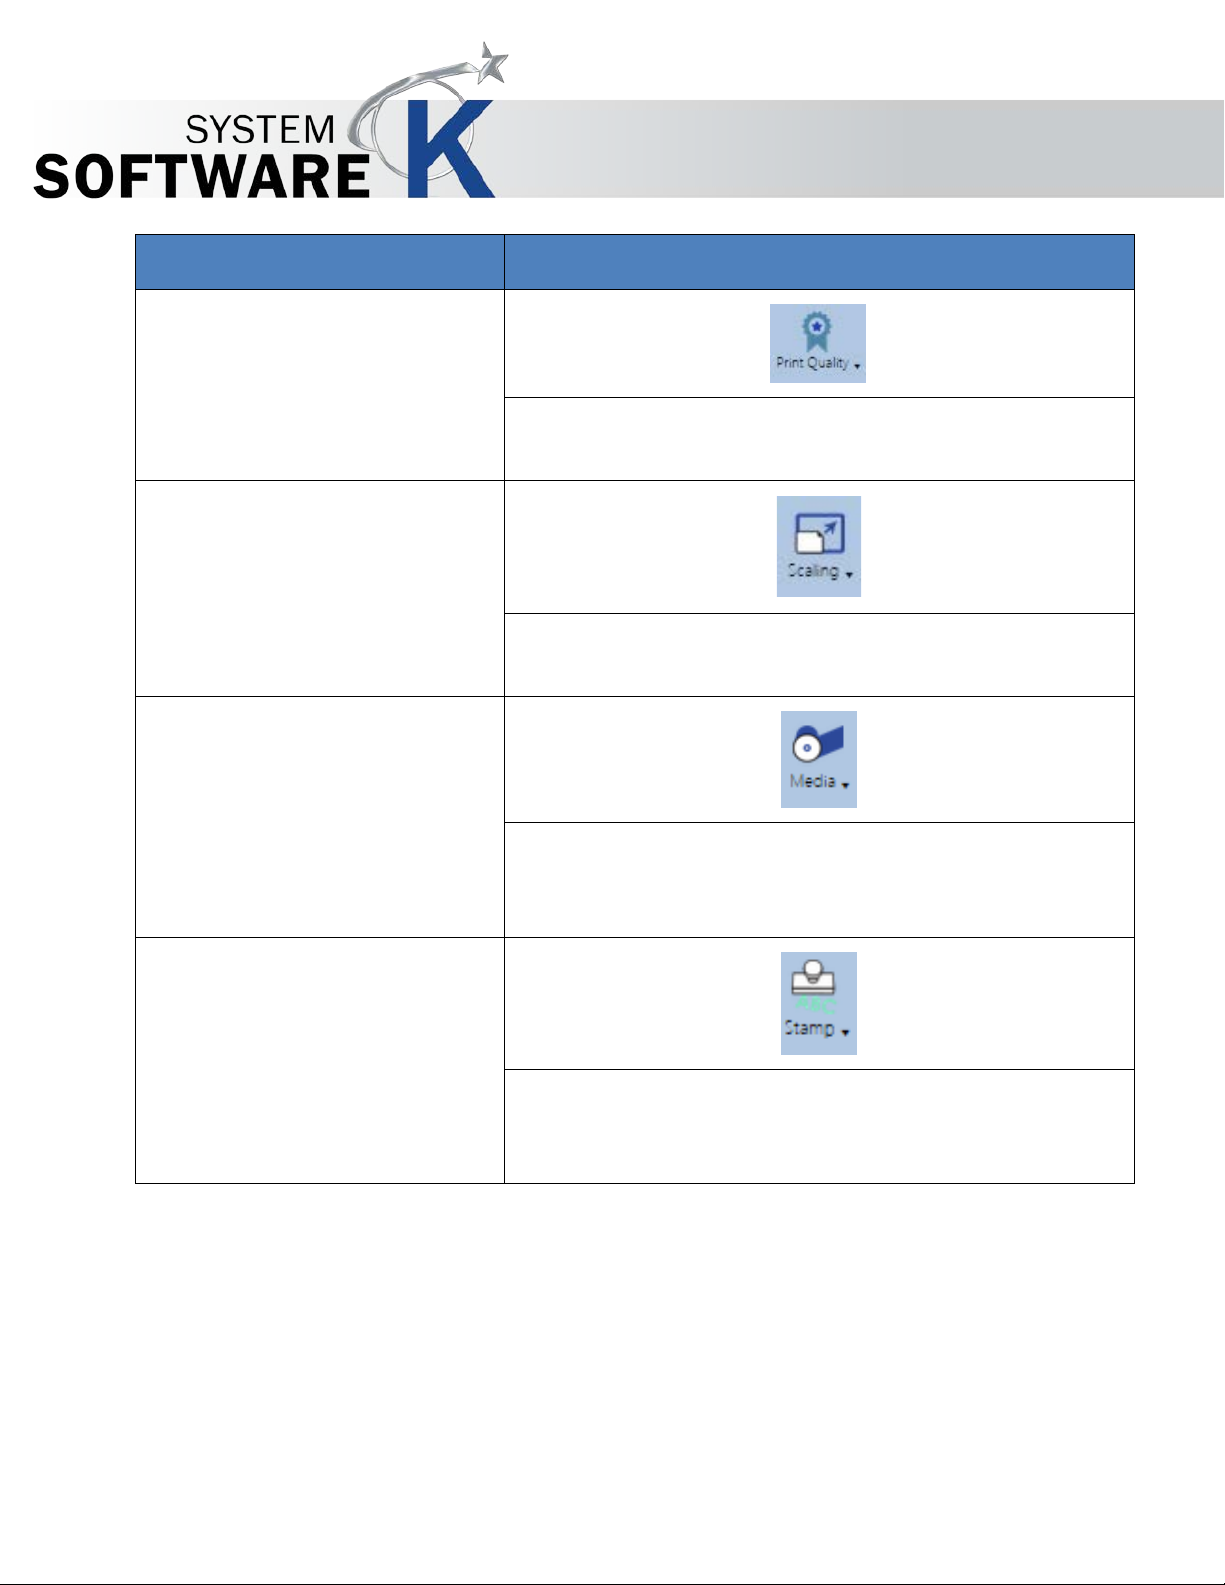
3. Other Options
The section Other Options consists of the following:
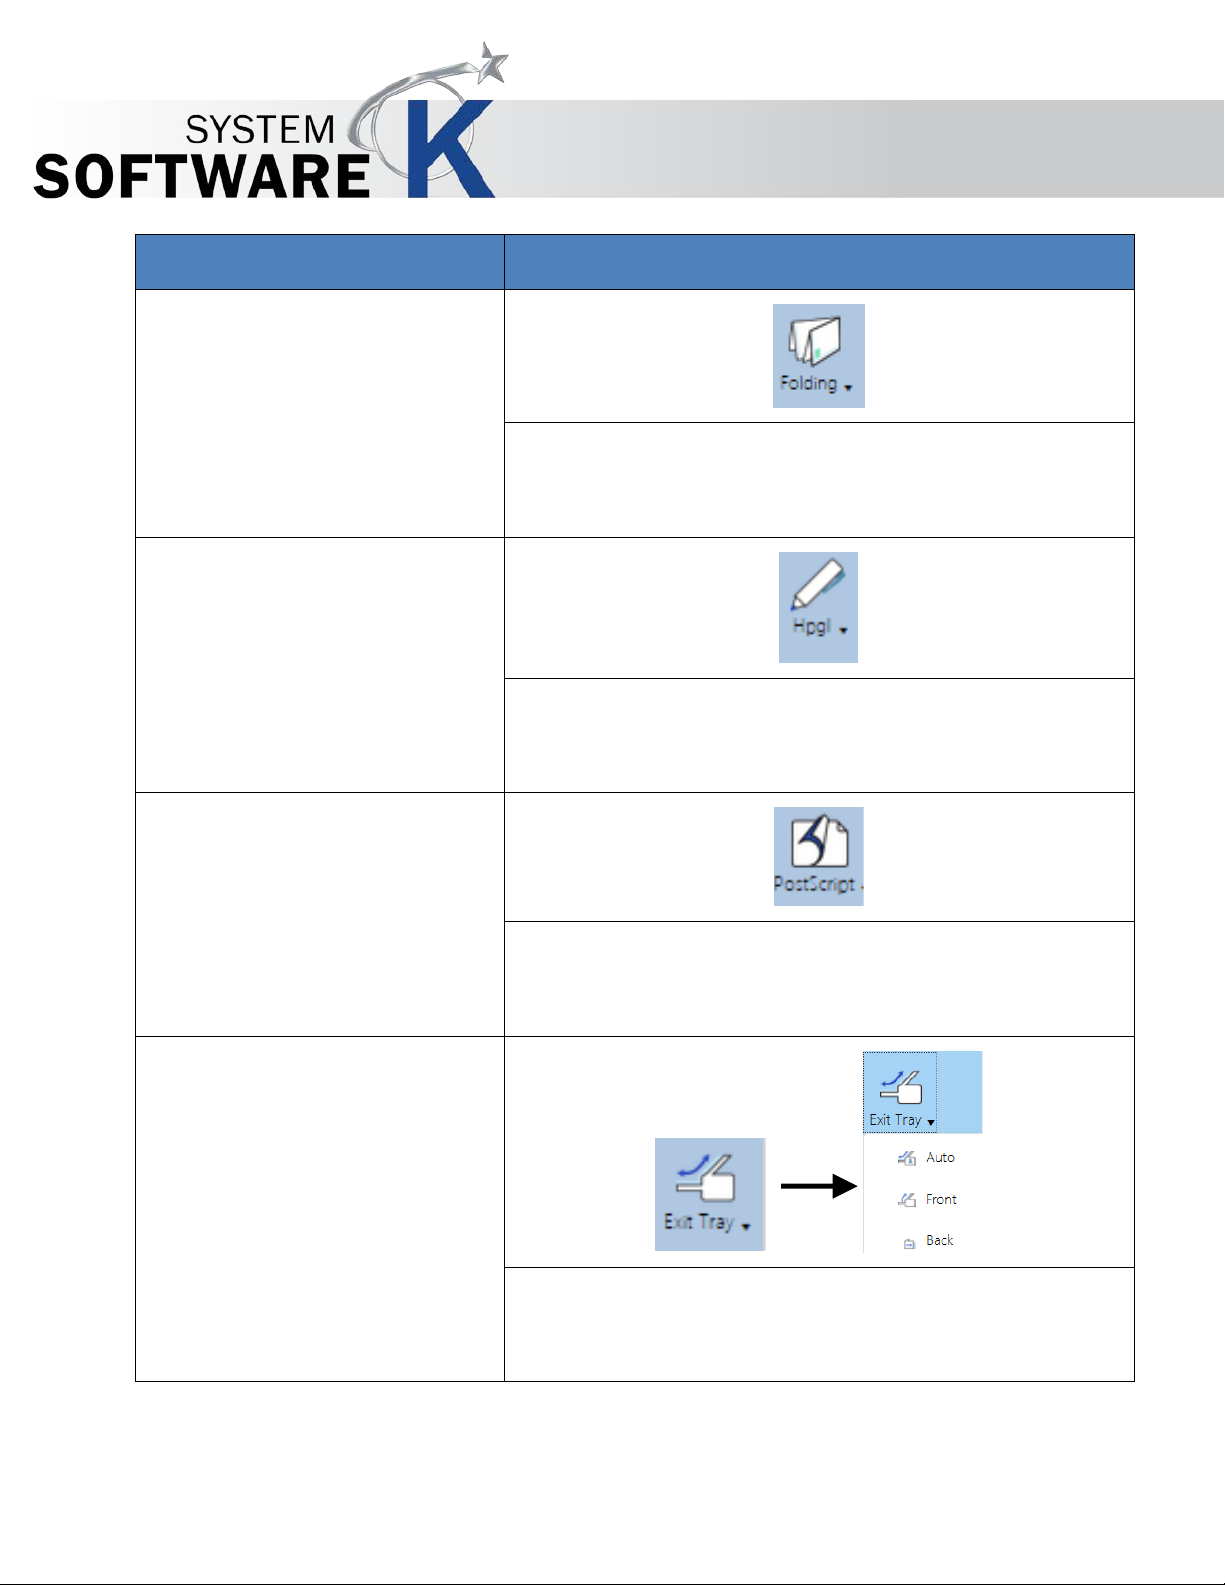
• Color Mode
When Connected to a Color Printer, selection s for differen t
KIP PrintPro.Net User Guide
• Mirror - This function will MIRROR the image in a left-
right position.
• Rotate – This option allows the user to pick a
clockwise rotation (90 °, 180 °, 270 ° and Auto).
Color Modes will be available.
No part of this publication may be copied, reproduced or distributed in any form without express written permission
from KIP. 2015 KIP. v1
- 18 -
Page 19
Component
Function
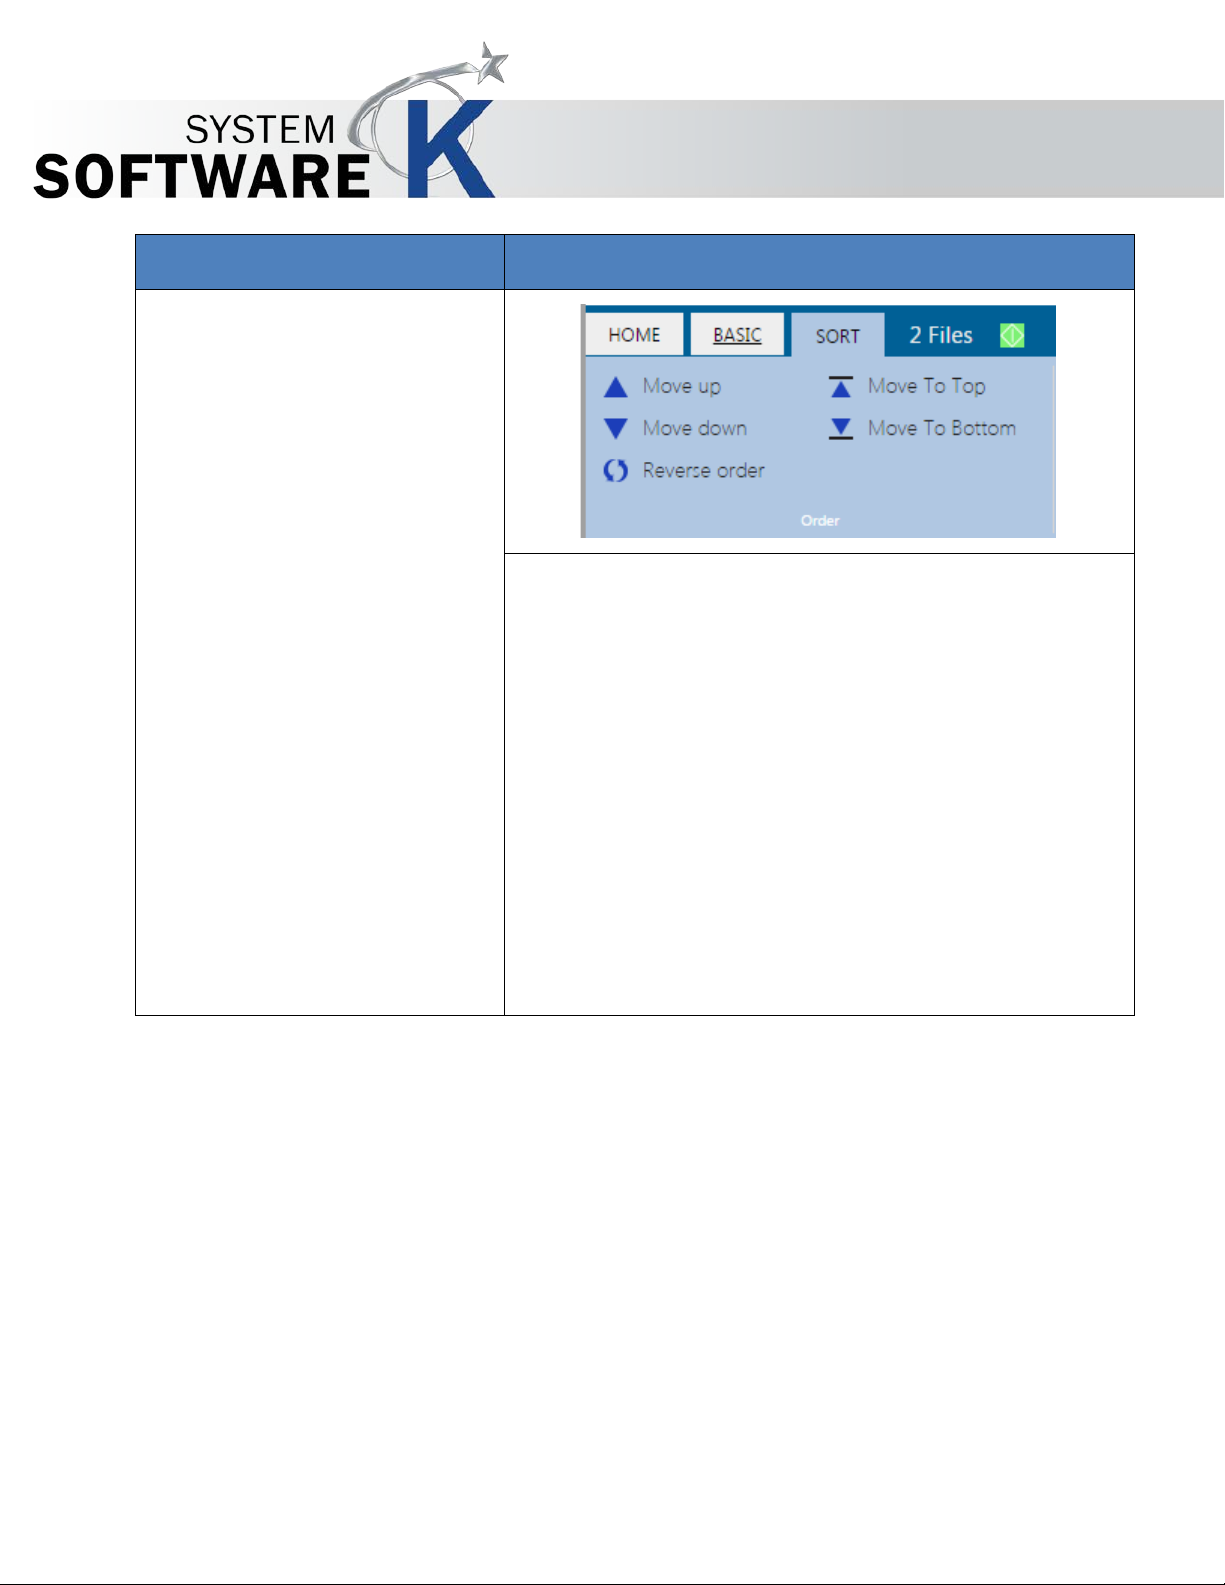
Print Quality
Print Quality displays the default quality settings as well
• Scaling
Scaling displays the default Scaling percentages as well
• Media
Selecting the Media icon will display all available
• Stamp
Selecting the Stamp icon will display all available
KIP PrintPro.Net User Guide
•
as any quality presets crea te d in KIP Print Pro.
as any Scaling presets created in KIP Print Pro.
medias that have been configured for use with the KIP
Printer.
Stamps that have been configured for use with the KIP
Printer.
No part of this publication may be copied, reproduced or distributed in any form without express written permission
from KIP. 2015 KIP. v1
- 19 -
Page 20
Component
Function
Folding
Selecting the Folding icon will display all available Fold
• HPGL
Selecting the HPGL icon will display all available HPGL
• PostScript
Selecting the PostScript icon will display all available
• Exit Tray
Selecting the Exit Tray icon allows for the selection of
KIP PrintPro.Net User Guide
•
Presets that have been configured for use with the KIP
Printer.
Presets that have been configured for use with the KIP
Printer.
PostScript Presets that have been configured for use with
the KIP Printer.
where the printed output will exit. Choose from Auto,
Front or Back depending on the printer configuration.
No part of this publication may be copied, reproduced or distributed in any form without express written permission
from KIP. 2015 KIP. v1
- 20 -
Page 21

Component
Function
4. Job Matrix
When files are selected to be printed, they will load into
5. Image Preview
The Preview pane will display a small preview of each
6. Scroll Images
The Left/Right arrows will allow for the scrolling of Preview
KIP PrintPro.Net User Guide
the Job Matrix. This section will display the following:
• File Name – Name of the selected File.
• Name – Page1, Page 2, Page 3.
• Number - Number of the page (6 page file would
show that specific Page number).
• Print Size – Size of the output.
• Copies – Number of copies to be printed.
file in the Job Matrix.
Images.
No part of this publication may be copied, reproduced or distributed in any form without express written permission
from KIP. 2015 KIP. v1
- 21 -
Page 22

1 2 3
4
3.3 Sort Tab
KIP PrintPro.Net User Guide
No part of this publication may be copied, reproduced or distributed in any form without express written permission
from KIP. 2015 KIP. v1
- 22 -
Page 23
Component
Function
1. Order
The Sort section consists of the following:
KIP PrintPro.Net User Guide
• Move up – Moves selected file(s) up one
space.
• Move Down – Moves the selected file(s) down
one space.
• Reverse Order – Reverses the file order of the
files in the Job Matrix.
• Move To Top – Moves selected file(s) to the top
of the Job Matrix.
• Move To Bottom – Moves selected file(s) to the
bottom of the Job Matrix.
No part of this publication may be copied, reproduced or distributed in any form without express written permission
from KIP. 2015 KIP. v1
- 23 -
Page 24
Component
Function
2. Job Matrix
When files are selected to be printed they will load into
3. Image Preview
The Preview pane will display a small preview of each
KIP PrintPro.Net User Guide
the Job Matrix. This section will display the following:
• File Name – Name of the selected File.
• Name – Page1, Page 2, Page 3.
• Number - Number of the page (6 page file would
show that specific Page number).
• Print Size – Size of the output.
• Copies – Number of copies to be printed.
file in the Job Matrix.
No part of this publication may be copied, reproduced or distributed in any form without express written permission
from KIP. 2015 KIP. v1
- 24 -
Page 25
Component
Function
4. Scroll Images
The Left/Right arrows will allow for the scrolling of Preview
KIP PrintPro.Net User Guide
Images.
No part of this publication may be copied, reproduced or distributed in any form without express written permission
from KIP. 2015 KIP. v1
- 25 -
Page 26
Component
Function
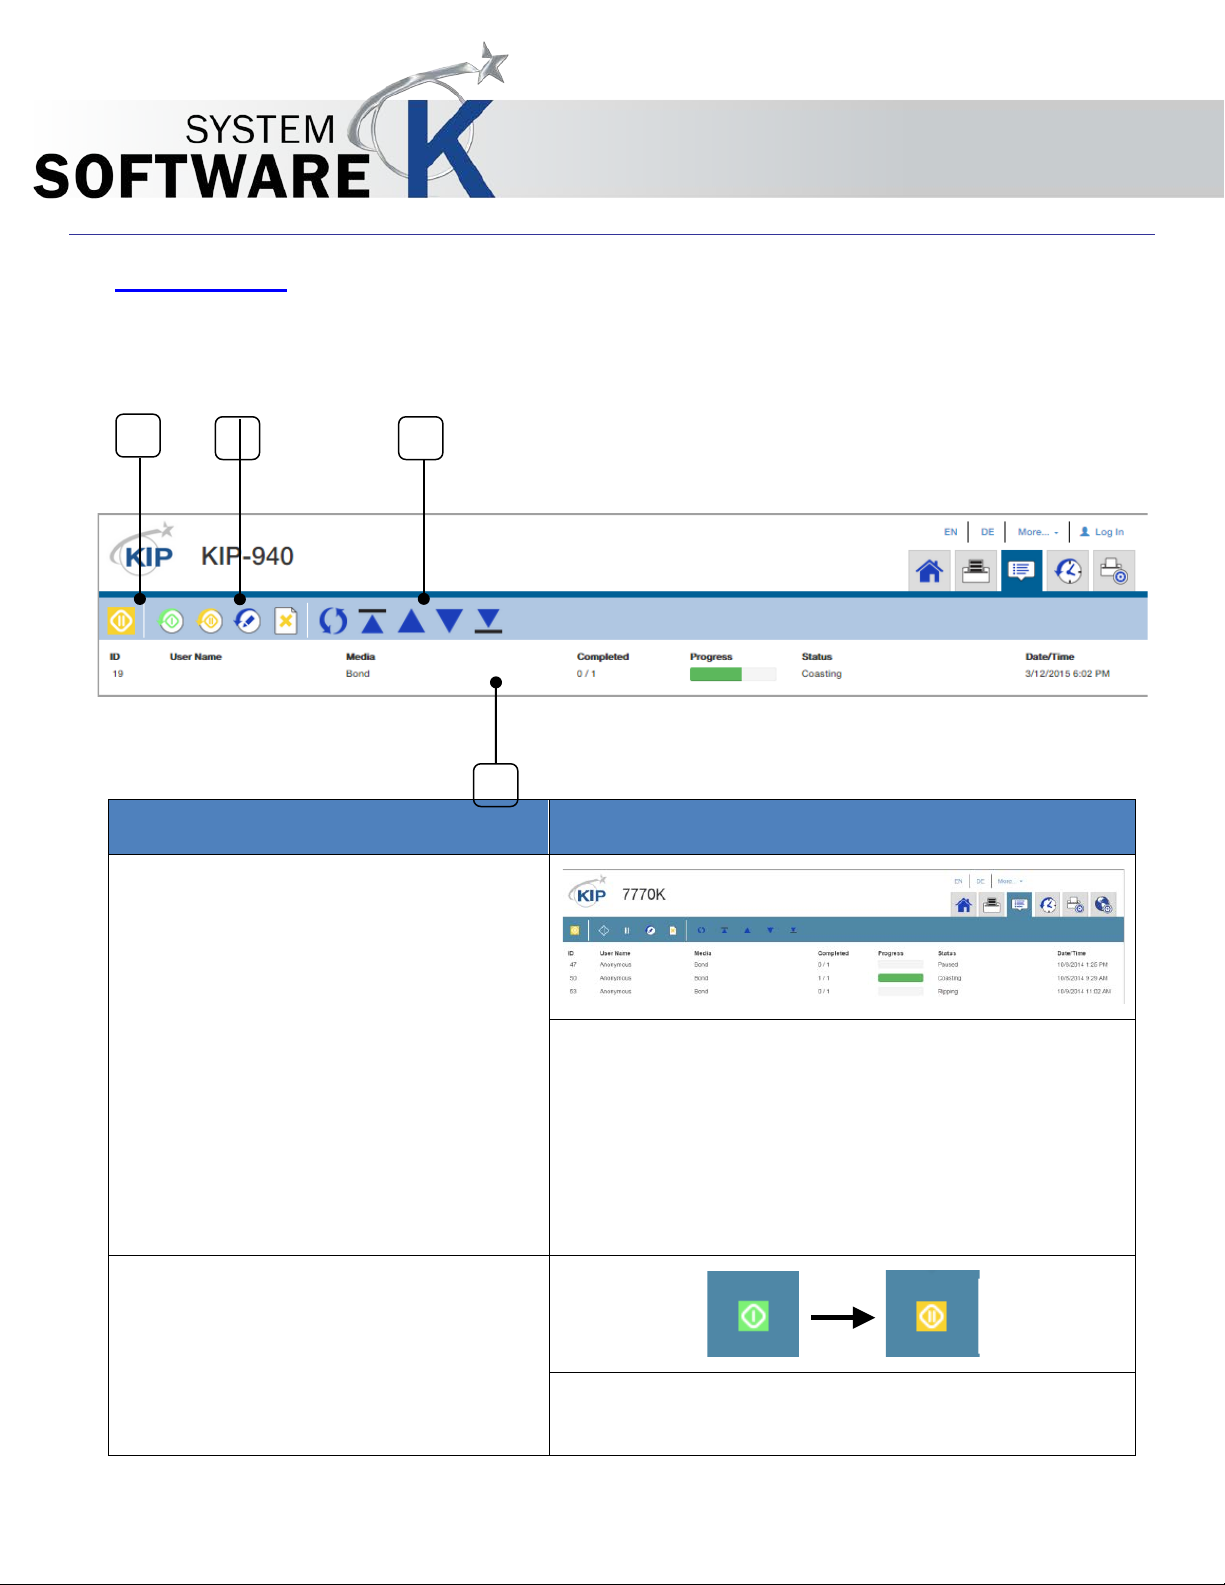
1. Job Queue
The Job Queue will show the jobs currently in the KIP
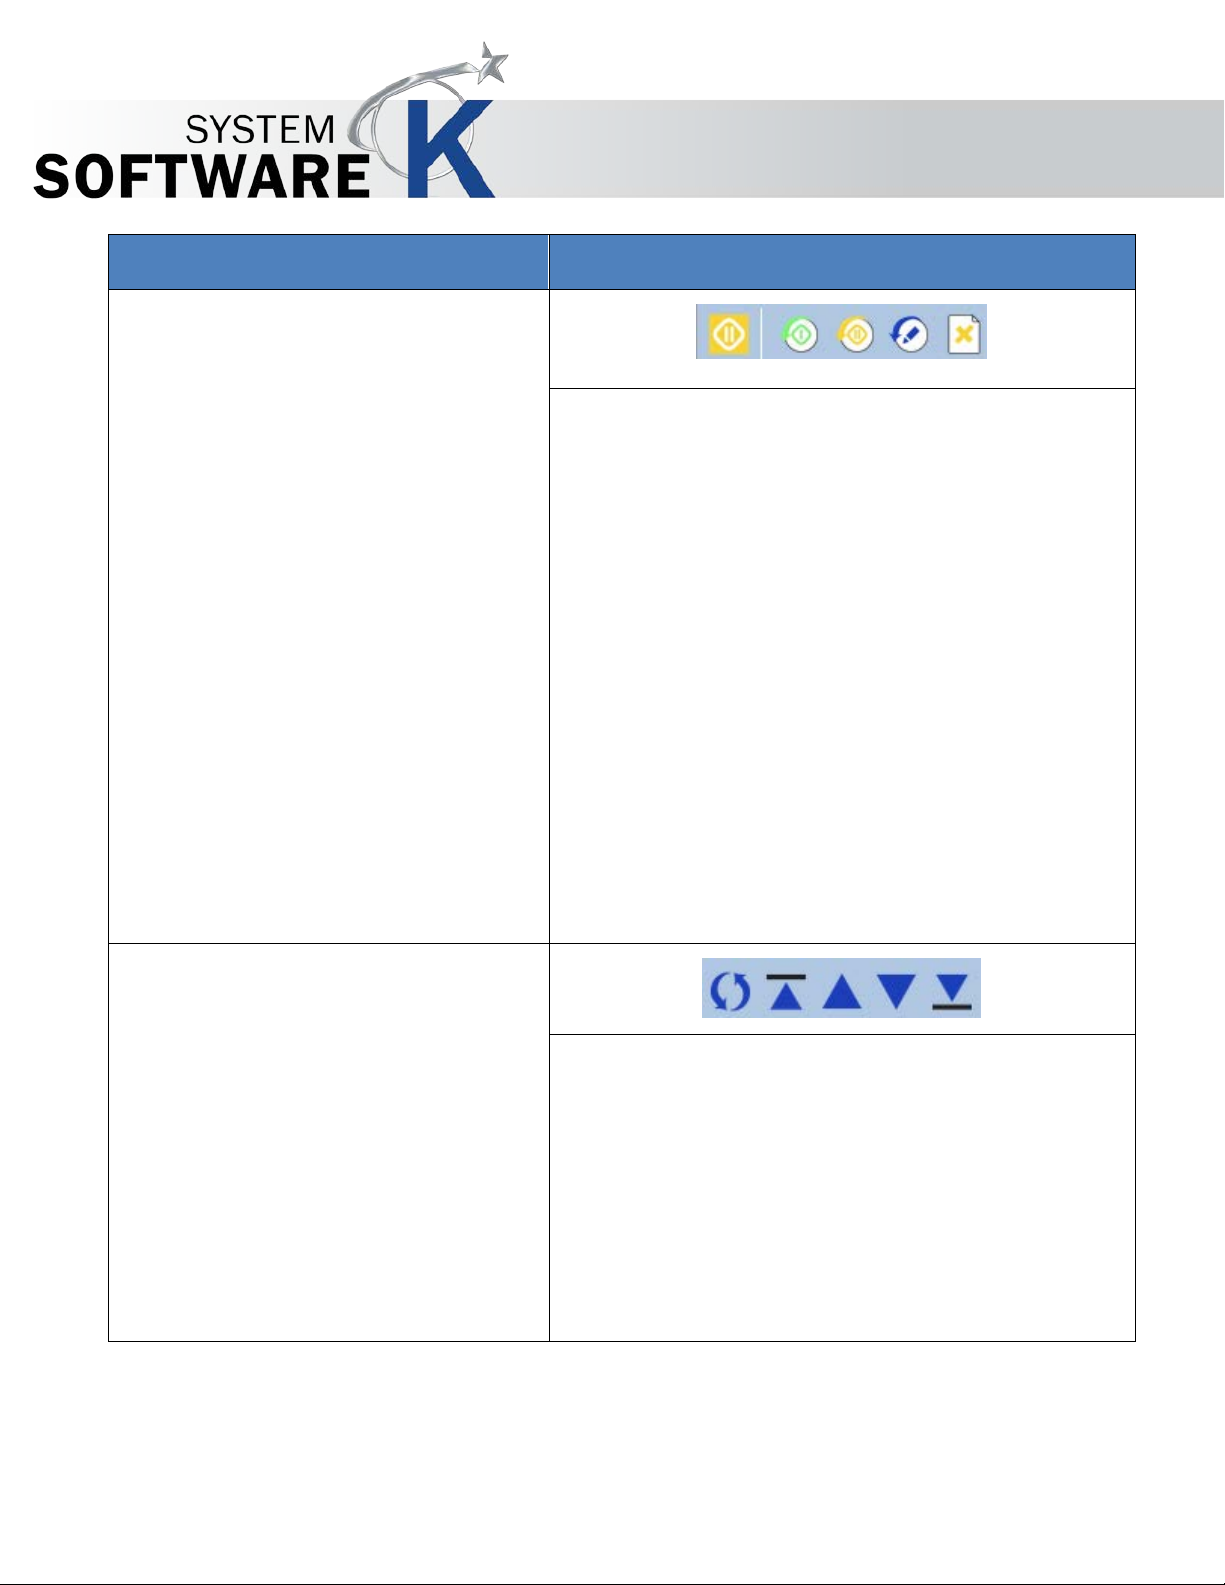
2. Pause Job Queue
Select this icon to Pause the entire job print queue.
1
2
3
4
KIP PrintPro.Net User Guide
4 Job Queue
The Job queue shows all of the files that are currently in the Job queue to be printe d allo win g the user
to see where there job is in relation to other jobs in the queue. An Ad m ini str ator can als o co ntr ol the
queue and manipulate the file order or delete unw anted jobs if necessary.
Printer. Here there are three jobs:
• First job is paused.
• Second job is printing.
• Third job is Ripping.
No part of this publication may be copied, reproduced or distributed in any form without express written permission
from KIP. 2015 KIP. v1
Select it again to Resume the queue.
- 26 -
Page 27
Component
Function
3. Queue Options
There are multiple function in this section, including:
4. Job Options
There are multiple function in this section, including:
KIP PrintPro.Net User Guide
• Pause Resume the Whole Job Queue – Pauses
or resumes all jobs currently in the job queue.
• Resume selected items – if a specific job has
been paused or the entire queue selecting
this icon will release the selected job.
• Pause selected items – Select a specific job
then select this icon to pause only that job
and not the entire queue.
• Edit selected items – Selecting Edit will reload
the job into the print queue and allow it to be
edited and then re-submitted.
• Delete selected items – Selecting this icon will
delete the selected job.
No part of this publication may be copied, reproduced or distributed in any form without express written permission
from KIP. 2015 KIP. v1
• Reverse the order of jobs in the queue.
• Move selected item(s) to the top.
• Move selected item(s) up.
• Move selected item(s) down.
• Move selected item(s) to the bottom .
- 27 -
Page 28
Component
Function
1. History Jobs
Jobs that have been printed will be listed in the History Queue
2. Reprint Options
There are multiple functions in this section, including:
1
2
KIP PrintPro.Net User Guide
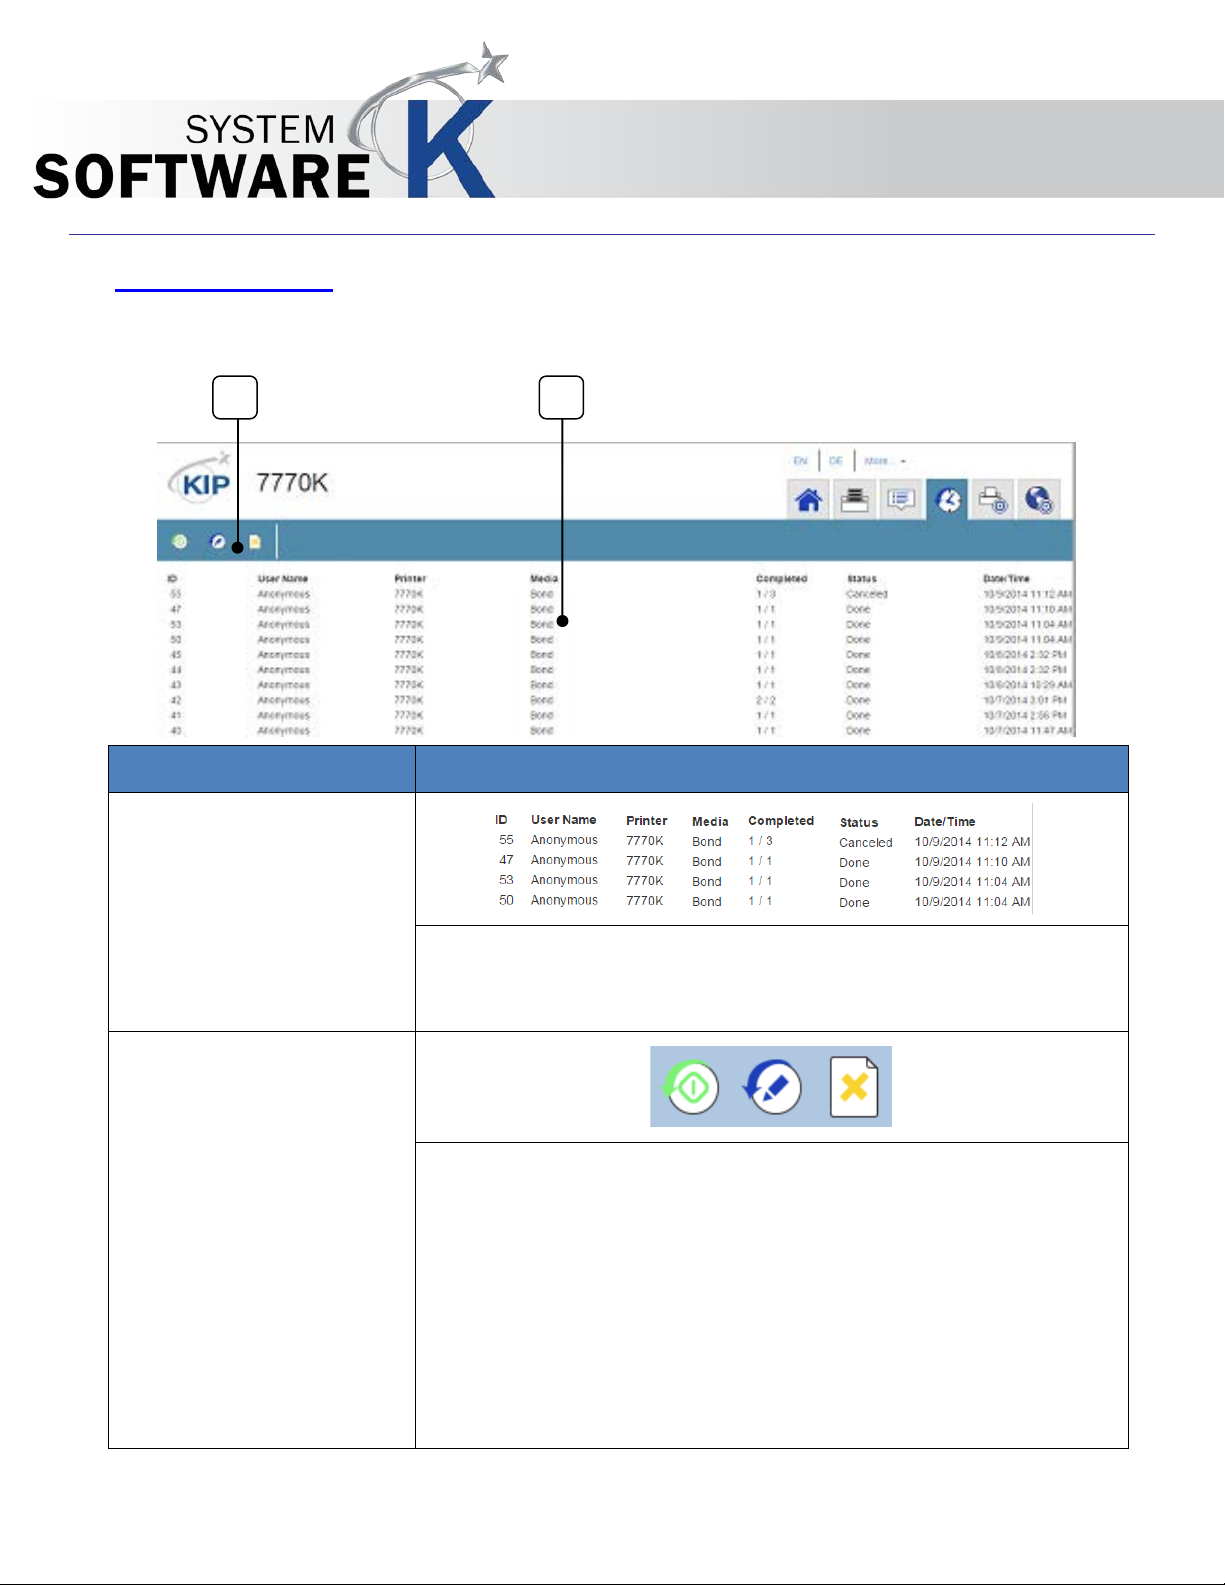
5 History Queue
The Historical Queue displays a list of jobs that have been printed in the past. Parameters for Historical
Queue are defined in PrintPro.Net System Settings Ta b.
(Only if history is active). These can then be edited if necessary
and reprinted.
• Reprint Selected Jobs – Once selected from the list the
selected job is sent to the printer to be reprinted.
• Edit Selected Jobs - Once selected from the list the
selected job will be loaded into the job queue so it can
be Edited.
• Delete Selected Jobs – Select desired jobs and then
delete them from the History Queue.
No part of this publication may be copied, reproduced or distributed in any form without express written permission
from KIP. 2015 KIP. v1
- 28 -
Page 29
Component
Function
1. Placement
Placement has many functions within this window. These are
6 Machine Settings – User Settings
6.1 Media Handling
KIP PrintPro.Net User Guide
explained individualy in this section.
No part of this publication may be copied, reproduced or distributed in any form without express written permission
from KIP. 2015 KIP. v1
- 29 -
Page 30
Component
Function
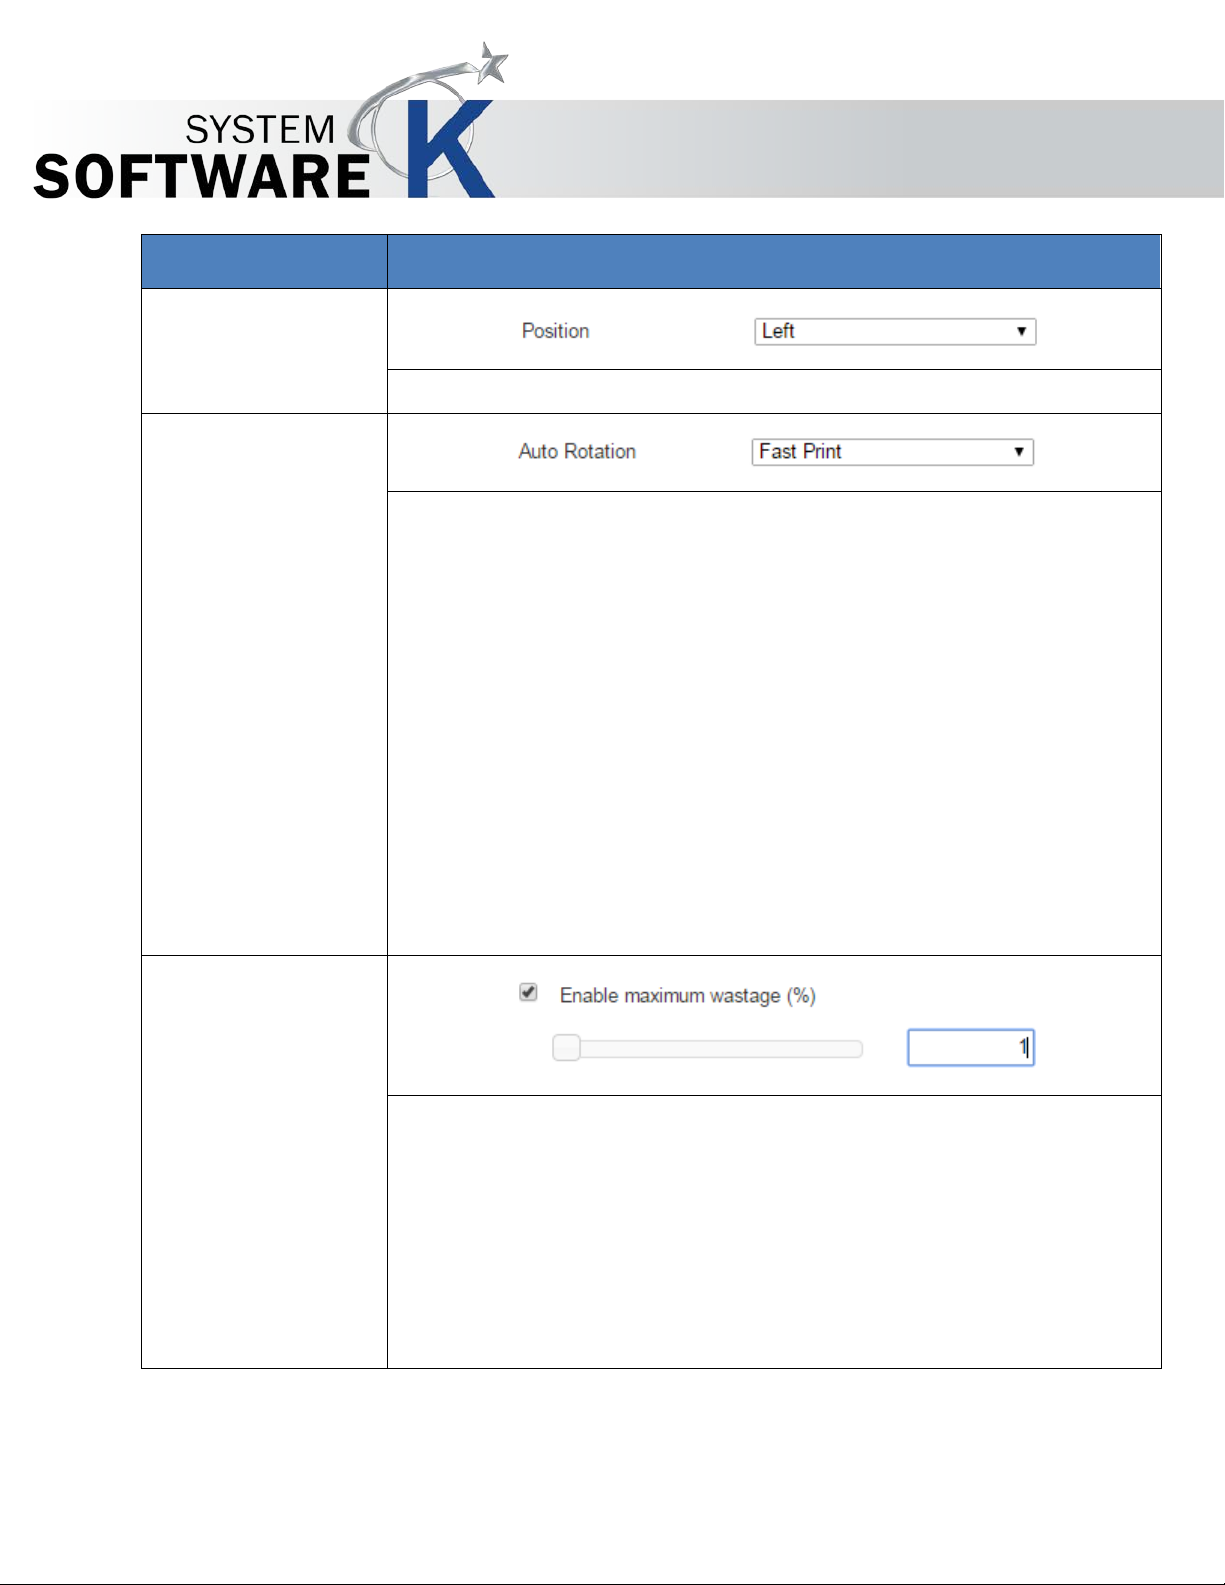
2. Position
Sets image position on page to Left, Center or Right edge.
3. Auto Rotation
These options are used when the Auto Rotation is initiated by various
landscape on any available media roll. Or a landscape image can be
ets rotation direction if the portrait image can
4. Enable
This mode sets the maximum allowable waste when printing small size
KIP PrintPro.Net User Guide
settings and media rol l sizes. The image size is not affected by this
setting.
Oversize - Will automatically rotate the image only if the landscape
image is larger than the media width selected. Smaller sized i mages
will maintain their orientation on the media selected.
Fast Print - Determines if the portrait image can be rotated to fit
rotated to fit on any available media roll.
Paper Save Clockwise - S
be rotated to fit landscape on any available media roll.
Paper Save Counter Clockwise - Sets rotation direction if the portrait
image can be rotated to fit landscape on any available media roll.
Maximum
Wastage
images on larger sheet sizes.
• This mode is used so that the least amount of waste is produced
when printing. This is done by preventing small images from
printing on the largest media roll sizes bas ed o n the was t age
percentage.
• When set to (1) the least amount of waste is allowed
• When set to (100) the maximum amount of waste is a ll owed.
No part of this publication may be copied, reproduced or distributed in any form without express written permission
from KIP. 2015 KIP. v1
- 30 -
Page 31

Component
Function
5. Enable Roll
When enabled, allows user to set a value (1-15) in millimeters using a
6. Toner Settings
Copy Levels (scanner attached) – Adjusts print density. Effects only
There may be the case that the print image looks so light (not so clear)
KIP PrintPro.Net User Guide
Width
Tollerance
slider or direct keyboard e n try. The default value is 3mm.
This adjustment considers the "Position" setting to determine which
edge (left, right or both) are digitally trimmed.
For instance, if "Right" position is selected then the image shifts to the
right side and the left side of image is trimmed by the amount entered
for Roll Width Tolerance.
When "Position" is set to " Ce n ter", both sides are equally trimmed to the
tolerance amount.
Note: Copy levels appear if a scanner is attached and enabled.
prints run in "Copy Mode"
Print Levels – Adjusts p rint de n sity. Effects all prints exce pt what is run in
"Copy Mode"
Enable Transfer Support - in some cases will increase the amount of
toner transferred to the media when enabled.
even though the density setting i s pro per or higher than required. This
No part of this publication may be copied, reproduced or distributed in any form without express written permission
from KIP. 2015 KIP. v1
kind of problem may occur when special media is used, because it is
difficult to transfer the toner image fully onto it.
Note: If available on your KIP Printer Model. If unsure please contact
technician.
- 31 -
Page 32

Component
Function
1. Basic Setup
Basic Setup has many functions within this section. These are
2. Printer Name
Displays the Printer name of the connected printer. Printe r N ame
3. Network
Used to set up IPv4 or IPv6 network communication.
7 System Settings - Administrator
7.1 System Setup
KIP PrintPro.Net User Guide
explained individually in this section.
Configuration
No part of this publication may be copied, reproduced or distributed in any form without express written permission
from KIP. 2015 KIP. v1
can be changed here. Select Update to change the Prin ter
Name.
- 32 -
Page 33

Component
Function
4. Sleep Settings -
Event Timer Ac tive - If checked will enable the system wake
5. Sleep Settings –
Idle Timer Activ e – If checked will enable the system sleep timer
KIP PrintPro.Net User Guide
Event Timer Ac tive
time and the time the printer e nt ers cold sleep. This can be set
on a per day basis by selecti ng the Configure Timer button.
• Warm Sleep
Mode Timer
• Cold Sleep
Mode Timer
for both warm and cold sleep. Example above is the default
• Suspend
Controller in
No part of this publication may be copied, reproduced or distributed in any form without express written permission
from KIP. 2015 KIP. v1
Cold sleep mode
setting of Warm Sleep of 15 min and Cold Sleep of 1hr 30 min.
Suspend Controller - When checked, initiates KCS sleep/standby
(S3 mode) after machine is idle for duration of designated time of Idle
Timer
- 33 -
Page 34

Component
Function
6. History Queue Size
By Default the History Queue is off (Value set to 0). By moving
7. Secure File
KIP’s Image Overwrite technology overwrites data immediately
original large format job data (e.g. your print, scan, or copy job)
KIP PrintPro.Net User Guide
the slider or entering a value (0 to 20 gb), a specific amount of
hard drive space can be al located for History. This wil l be
allocated as FIFO and when full the oldest will be replaced.
Shredding
after the job is processed with other information, so that the
is no longer available for recovery at all to ensure your data is
secure.
KIP’s Image Overwrite technology is DOD 5220.22-M compliant.
No part of this publication may be copied, reproduced or distributed in any form without express written permission
from KIP. 2015 KIP. v1
- 34 -
Page 35

Component
Function
8. Other Machine
Media Zoom: [Edit Button]
KIP PrintPro.Net User Guide
Settings
Media zoom allows the user to change the aspect ratio of the
print image by changing percentage of X and Y axis
independently.
• The user can adjust between 90% - 110% in units of 1%.
• Adjustment for individual media types
• Use this adjustment to compensate for environmental
changes made to the media.
• This adjustment effects both Copy and Print modes.
- Use transport security [che ck box]
• Checked = uses encryp t ed communication to and from
the device. (SSL certificate encryption)
• Unchecked= encryption not used
Note: Requi res proper DNS resolution for th i s op tion to
function.
No part of this publication may be copied, reproduced or distributed in any form without express written permission
from KIP. 2015 KIP. v1
- 35 -
Page 36

Component
Function
9. Image Expansion
Turn on Image Expansion [check box]
KIP PrintPro.Net User Guide
With "Image Expansion" enabled the trail and side edge margin
settings are ignored in the printer. This allows the LED to continue
imaging the drum up to the trail edge and sides of the print.
• The trail edge margin is set from factory to 5mm. (blank
space at trail edge is 5mm)
• When Enabled the productivity of the printer is reduced
because the inner copy gap is increased. This al lows the
drum to be cleaned between each print.
• This setting also affects the lead edge and the side
margins of the print, along with the trail edge margin.
No part of this publication may be copied, reproduced or distributed in any form without express written permission
from KIP. 2015 KIP. v1
- 36 -
Page 37

Component
Function
10. SMTP Settin gs
This section must be filled out for email notifications to be sent.
8. Test Connection button
KIP PrintPro.Net User Guide
Enter information
1. Server Name - SMTP server information is supplied by
customer’s network administrator.
2. Port
3. Sender Name (E mail Address)
4. Log In Name
5. Password
6. Save
7. Test Recipient email address
No part of this publication may be copied, reproduced or distributed in any form without express written permission
from KIP. 2015 KIP. v1
- 37 -
Page 38

Component
Function
11. Accounting Setup
Accounting Setup has many function s wi thin this section. These
• Edit Users
Allows for the editing by administrator of existing accounts.
• Allow Anonymous
• Clear Data After
When accounting is used checking this box will clear the
KIP PrintPro.Net User Guide
Use
Submit
are explained individually in this section.
Allow anonymous use checked, allows the printer to be used
anonymously with bypassing accounting.
Allow anonymous use unchecked makes the login mandatory to use
the KIP Printer.
accounting fields forcing the new entry of information prior to
use.
No part of this publication may be copied, reproduced or distributed in any form without express written permission
from KIP. 2015 KIP. v1
- 38 -
Page 39

Component
Function
• Accounting Fields
Accounting fields can be added or edited by an administrator.
KIP PrintPro.Net User Guide
The Mode can also be set here:
• None – No requirements for this field.
• Required – Entering some information into this field is
to print.
• Dropdown – Allows for the selection of data from a dropdown
window.
• Dropdown/Password Required – Requires a password in
conjunction with the dropdown selection.
required
No part of this publication may be copied, reproduced or distributed in any form without express written permission
from KIP. 2015 KIP. v1
- 39 -
Page 40

Component
Function
12. KCS Maintenance
KCS Maintenance has multiple functions within this section.
• Update KCS
Select the Update button to upload patches directly to the KIP KCS
• Reboot KCS
Selecting the Restart button will reboot the KCS controller
Font Upl oad
Select fonts to be uploaded and installed to t he loc al K IP .
To add fonts, select the Upload Font button and browse the local
KIP PrintPro.Net User Guide
These are explained individually in this section.
•
controller.
without having to power down.
workstation or server PC for .ttf (True Type Fonts). Select Open to
install the fon ts at the KIP. No further action is necessary at the
KIP.
No part of this publication may be copied, reproduced or distributed in any form without express written permission
from KIP. 2015 KIP. v1
- 40 -
Page 41

Component
Function
13. Media Han dli ng
The Madia Handling has many function within it. These will be
• Minimum Cutting
Minimum Cutting Length [slide bar]
KIP PrintPro.Net User Guide
Length
noted individually.
When setting minimum length consider the paper path, distance
between drive rollers.
• When folder is attached
• When stacker is attached
• Settings in (mm) or (") depending on PrintPro.Net page
language.
No part of this publication may be copied, reproduced or distributed in any form without express written permission
from KIP. 2015 KIP. v1
- 41 -
Page 42

Component
Function
• Maximum Image
Maximum Image Length [slide bar]
• Enable Bypass
Enable Bypass Feeder [check box]
• Roll Adjustments
Roll Adjustments [Edit button]:
KIP PrintPro.Net User Guide
Length
Maximum cut length should match the capabilities of the
printer.
• Settings in (mm) or (") depending on PrintPro.Net page
language.
• Set to printer max print length
Feeder
• Enables the cut sheet bypass on the printer
Adjustment moves the image left (-) or right (+) to center on the
media in case the media is offset on the paper core.
No part of this publication may be copied, reproduced or distributed in any form without express written permission
from KIP. 2015 KIP. v1
- 42 -
Page 43

• Master Lead
Master Lead Copy [slide bar]
KIP PrintPro.Net User Guide
Copy
• Master Trail Copy
• Master Lead Print
• Master Trail Print
This adjusts the image position on the print and can affect the
cut length.
• Positive adds blank image to the lead edge increasing
the print length. Trail edge is not affected
• Negative cuts the lead edge off reducin g the prin t length .
• Available on MFP systems
Master Trail Copy [slide bar]
This adjusts the positi o n of the imag e on the pr i nt an d can af fect
the cut length.
• Positive adds blank image to the trail edge increasing
the page length. Lead edge is not affected
• Negative cuts the trail edge off reducing the print length.
Lead edge is not affected.
• Available on MFP systems
Master Lead Print [slide ba r]
This adjusts the image position on the print and can affect the
cut length.
• Positive adds blank image to the lead edge increasing
the print length. Trail edge is not affected
• Negative cuts the lead edge off reducin g the prin t length .
Master Trail Print [slide bar]
This adjusts the positi o n of the imag e on the pr i nt an d can af fect
the cut length.
• Positive adds blank image to the trail edge increasing
the page length. Lead edge is not affected
• Negative cuts the tr ail edge off reducing the prin t len gth.
Lead edge is not affected.
No part of this publication may be copied, reproduced or distributed in any form without express written permission
from KIP. 2015 KIP. v1
- 43 -
Page 44

Component
Function
14. System Time
The System Time configuration is used to set the specific time
15. Touch Interface
Touch Interface Settings has many functions within this section.
• Language
Select from available languages to set the KIP printer in.
KIP PrintPro.Net User Guide
Configuration
and date where the KIP Printer is located.
Note: Defa u lt i s Eastern so it is very important to set this correctly
if not in the Eastern Time zone.
Settings
Selection
These are explained individually in this section.
No part of this publication may be copied, reproduced or distributed in any form without express written permission
from KIP. 2015 KIP. v1
- 44 -
Page 45

Component
Function
• Default Screen
Select the default screen that the system will open to when
• Interface Reset
Setting a valu e in the reset timer wi ll ret urn the KIP to def au lt
• Enable Network
Check the box to allow network interruption of the queue.
16. Separator Sheets
Separator sheets can be configured to print b etween eac h set
KIP PrintPro.Net User Guide
started or if the reset timer is b eing used.
Timer
Interrupt
settings when the timer is reached.
or after each job. Separator sheets contain information
No part of this publication may be copied, reproduced or distributed in any form without express written permission
from KIP. 2015 KIP. v1
regarding current pri n t job such as:
• Set Number
• Job Number
• Requester
• File Name
• Total Output
Note: The Separator sheet information can be edited by simply
dragging the unwanted tag to the Don’t Print window.
- 45 -
Page 46

Component
Function
17. Job Retrieval
Hot Folder [Edit butt on]
KIP PrintPro.Net User Guide
Note: please see the tutorial “Hotfolder Installation and Usage”
on the KIP Website for Step-by-Step i nstructions.
A folder location on the network that is monitored by the KCS for
jobs
• The setting includes assigning a Template to this location
so that any jobs dropped in this folder will take on the
template job settings.
Smart Printing [Edit button]
Setup email account to send print jobs by email, attached files
will print based on the s etup.
• Email Account Settings…
• Job Ticket Setup
• Delivery mode can be set to "Hold" in KCS mailbox or
print by creating a job ticket.
No part of this publication may be copied, reproduced or distributed in any form without express written permission
from KIP. 2015 KIP. v1
- 46 -
Page 47

Component
Function
18. Output Options
Exit tray settings [Edit button]
KIP PrintPro.Net User Guide
Allows user to set the output o pti on on printers equipped with
the front and back stacking
• Edit button gives option to Enable or Disable "Front" and
"Back" stacking.
Stacking (dropdown list)
Stacking sets the default output option, either Front or Back.
• User can alter the output option per job if needed in KIP
Print Pro.
• If a Folder is attached, the control is determined by the
job submitted.
• Folding uses Back and No Fold uses Front stacking.
Enable Folding [check box]
Enables communication between the Folder and Printer through
KCS
• Not availabl e on 770K
No part of this publication may be copied, reproduced or distributed in any form without express written permission
from KIP. 2015 KIP. v1
- 47 -
Page 48

Component
Function
19. Special Modes
Enable Low Temperature Mode [check box]
KIP PrintPro.Net User Guide
Enabling this mode will increase the inner copy gap allowing
the fuser to reach proper fuser temperature between each print
• This mode is availabl e on 7770K, 7970K, 770K and 7170K
Enable High Coverage Mode [ch eck bo x]
High Coverage Mode enabled allows more t oner to be
available on the Developer roller during high coverage printing.
• This Mode is available on 7770K and 7970K
Enable H/H Environment Mode [check box]
Enabling this mode will move the media wait position close to
the roll in decks 2 and 4
• This mode is available on 7770K, 7970K and 770K
No part of this publication may be copied, reproduced or distributed in any form without express written permission
from KIP. 2015 KIP. v1
- 48 -
Page 49

Component
Function
1. System Preset Setup
Template setup has many f u n ctions within this section. These are
7.2 System Preset Setup
KIP PrintPro.Net User Guide
explained individually here.
No part of this publication may be copied, reproduced or distributed in any form without express written permission
from KIP. 2015 KIP. v1
- 49 -
Page 50

Step
Action
Illustration
1.
Select the Print Quality Icon
2.
Once open this screen will
3.
Selecting the “New” icon will
4.
Name – This is the name that
5.
Image Quality – Choose from
7.2a Print Quality Presets
show all of the pre-configured
Print Quality modes as well as
allow for the creation of new
presets.
KIP PrintPro.Net User Guide
allow for the creation of a
new Print Quality preset.
Fill in the appropriate sections
and select “Save” to save the
Preset or Save (active) to
save the Preset and make it
active as well.
will be displayed in the Preset
list of names.
the Dropdown of available
settings.
No part of this publication may be copied, reproduced or distributed in any form without express written permission
from KIP. 2015 KIP. v1
- 50 -
Page 51

Step
Action
Illustration
6.
Color Space – There are multiple
KIP PrintPro.Net User Guide
color settings that can be applied
to the selected Color Space:
• Use RGB
o Use RGB allows for
the setting of
Black/White Point,
Gray Correction,
Gamma Correction
and Special Filters.
• Use CIELAB
o Use CIELAB allows fo r
• Use CMYK
o Use CMYK has no
the setting of
ICC/CIELAB Options,
Black/White Point,
Special Filter, Color
Adjust and Color
Exchange.
additional settings as
this uses the CMYK
setting in the file
created.
No part of this publication may be copied, reproduced or distributed in any form without express written permission
from KIP. 2015 KIP. v1
- 51 -
Page 52

Step
Action
Illustration
Color Settings – Continued
KIP PrintPro.Net User Guide
ICC/CIELAB Options
• RGB Profiles – Choose from
sRGB with Overwrite embedded
RGB profile on or off.
• CMYK Profiles – Choose from
SWOP and Euroscale with
Overwrite embedded CMYK
profile on or off.
• Rendering Intent – Choose from
o Perceptual
o Absolute
o Relative
o Saturation
No part of this publication may be copied, reproduced or distributed in any form without express written permission
from KIP. 2015 KIP. v1
- 52 -
Page 53

Step
Action
Illustration
Color Settings – Continued
Black/White Point
• Blackpoint – Control the
Lightness 0 to 100. 0. T he lower
the value the darker the output.
• Whitepoint – Control the
Lightness 100 to 0. The higher
the value the lighter the output.
• Green/Red - Control the green
to red value 0 to 127. The lower
the value the more green in the
output/the higher the value the
more red in the output.
KIP PrintPro.Net User Guide
• Yellow to Blue - Control the
yellow to blue value 0 to 127.
The lower the value the more
yellow in the output/the higher
the value the more blue in the
output.
• Color Saturation - Check the
box Preserve Color Saturation to
keep Color Saturation
unaffected by any ch a n ges to
Black and White Point.
No part of this publication may be copied, reproduced or distributed in any form without express written permission
from KIP. 2015 KIP. v1
- 53 -
Page 54

Step
Action
Illustration
Color Settings – Continued
Don’t Use Special Filter – Special filter is not used when this is selected
pictures become clearer. This setting increases the contrast between light and dark
KIP PrintPro.Net User Guide
Special Filter
Sharpening Mode – Used to make fuzzy picture clear. As outlines are enhanced,
pixels and enhances the edge sharpness of text and lines drastically. 0 no
sharpening 100 max sharpe n i n g. Default is 50.
Smoothing Mode - To reduce image noise and distortions, and affects the whole
picture contrast.
Adaptive Mode - Is made of two unique filters, both possessing the features of
SHARP and SMOOTH, whose intensity can be adjusted in the entry fields under LEVEL.
The upper entry field controls foreground objects that should be enhanced, such as
text, whereas the lower field is for image backgrounds needing smoothing. With
both filters, you will reach a maximum smoothing effect at 0 and a maximum
sharpening effec t at 100.
Filter Radius – The Filter Radius value will change the number of pixels that are
affected by the current filter.
No part of this publication may be copied, reproduced or distributed in any form without express written permission
from KIP. 2015 KIP. v1
- 54 -
Page 55

Step
Action
Illustration
Color Adjust – Allows a fine
The saturation channels are two half axis of the a- and b-channels. They can be
Color Settings – Continued
KIP PrintPro.Net User Guide
tuning of the colors in the LAB
color space.
modified either separately or all at once.
If you want to change them simultaneously, activate the chain link in the center.
To remove a Color tint you can use the Color A djustm ent values.
Gamma Correction - Allows the adjustment of color shifts in the Red/Green and
Yellow/Blue range to correct the brightness.
Color Exchange – To use enter
the Source color LAB values in
the first three spaces and the
Target color LAB values in th e
last three spaces.
No part of this publication may be copied, reproduced or distributed in any form without express written permission
from KIP. 2015 KIP. v1
- 55 -
Page 56

Step
Action
Illustration
7.
Greyscale Settings - There are
Blackpoint
KIP PrintPro.Net User Guide
multiple settings that can be
applied to this selection:
• Black/White Point
• Special Filter
• Advanced
• Adaptive (B P) - The adaptive values can not be edited; they are cal c u lated
for every file. This auto detects and sets the Blackpoint
• Custom Gray Value (B P) c an be adjusted from 0 to 255. Set tin g this to a
Whitepoint
• Adaptive (WP) - The adaptive values cannot be edited; they are
• Custom Gray Value (WP) can be adjusted from 0 to 255. Setting this to a
Black Enhancement
• The Black Enhancement enables you to edit black values. The lower the
Background Removal
• Used to tune background contrast (e.g. in order to further fine-tune text
higher value will produce darker text.
calculated for every file. This auto detects and sets the Whitepoint.
lower value will produce lighter text.
number the lighter the black. Clip will determine the new base black value
depending on the black value set in Black Enhancement.
visibility). You may additionally reduce or improve the white to greyvalues. T he higher the clipping value, the brighter and whiter the im age’s
most white elements will become.
No part of this publication may be copied, reproduced or distributed in any form without express written permission
from KIP. 2015 KIP. v1
- 56 -
Page 57

Step
Action
Illustration
Greyscale Settings -
Don’t Use Special Filter – Special Filter is not used when this is selected.
KIP PrintPro.Net User Guide
Continued
• Special Filter
Sharpening Mode – Used to make fuzzy picture clear. As outlines are enhanced,
pictures become clearer. This setting increases the contrast between light and
dark pixels and enhances the edge sharpness of text and lines drastically. 0 no
sharpening 100 max sharpening. Default is 50.
Smoothing Mode - To reduce image noise and distortions, and affects the whole
picture contrast.
Adaptive Mode - Is made of two unique filters, both possessing the features of
SHARP and SMOOTH, whose intensity can be adjusted in the entry fields under LEVEL.
The upper entry field controls foreground objects that should be enhanced, such
as text, whereas the lower field is for image backgrounds needing smoothing.
With both filte r s, you will reach a maximum smoothing effect at 0 and a maximum
sharpening effec t at 100.
No part of this publication may be copied, reproduced or distributed in any form without express written permission
from KIP. 2015 KIP. v1
- 57 -
Page 58

Step
Action
Illustration
Greyscale Settings
Used to controll the Area Adaptive Contrast with the following settings:
KIP PrintPro.Net User Guide
• Advanced
• Radius
• Brightness
• Contrast
• Max Line Blackening
• Max Background Removal
• Invert
No part of this publication may be copied, reproduced or distributed in any form without express written permission
from KIP. 2015 KIP. v1
- 58 -
Page 59

Step
Action
Illustration
8.
Black/White Settings - There
Despeckle - This option removes black pixels in black & white mode, for example
9.
Reset/Save/Save (activated)
KIP PrintPro.Net User Guide
are multiple settings that can
be applied to this selection:
from scans of murky originals. The filter searches for groups of black pixels and
converts them into white. Small-sized pixel groups, such as those formin g punctuation
dots, are kept.
All Pixel Neighbors - Pixels are connected neighbors when there is a series of 8
(instead of 4) adjacent pixels, i.e. additionally to pixels of the same row or column,
the diagonally-adjacent pixels are considered to be connected.
Filter Size – It corresponds to the maximum "diameter" of the pixel area which is to be
removed.
Hole Filling - This function makes it possibl e to remove single pixel-sized white holes
from black areas in b&w mode.
Invert – Chan ges black to white and white to blac k
–
Reset – Resets to default
settings
Save – Saves the new pre s et
but does not make it active
for use.
Save (activated) – Saves the
new preset activated and
ready for use.
No part of this publication may be copied, reproduced or distributed in any form without express written permission
from KIP. 2015 KIP. v1
- 59 -
Page 60

Step
Action
Illustration
1.
Select the Scan Quality
2.
Selecting the “New” icon will
3.
Name – This is the name that
7.2b Scan Quality Presets
Presets Icon
KIP PrintPro.Net User Guide
allow for the creation of a
new Scan Quality Preset.
Fill in the appropriate sections
and select “Save” to save the
Preset or Save (active) to
save the Preset and make it
active as well.
will be displayed in the Preset
list of names.
No part of this publication may be copied, reproduced or distributed in any form without express written permission
from KIP. 2015 KIP. v1
- 60 -
Page 61

Step
Action
Illustration
4.
Color Settings
5.
Blackpoint
KIP PrintPro.Net User Guide
• Adaptive (B P) - The adaptive valu es can not be edited; they are calculated
for every file. This auto detects and sets the Blackpoint.
• Custom Values – Control the values for the Red/Green/Blue settings.
Whitepoint
• Adaptive (WP) - The adaptive values cannot be edited; they are calculated
for every file. This auto detects and sets the Whitepoint .
• Custom Values - Control the values for the Red/Green/Blue settings.
No part of this publication may be copied, reproduced or distributed in any form without express written permission
from KIP. 2015 KIP. v1
- 61 -
Page 62

Step
Action
Illustration
Blackpoint – Continued
Gray Correction –
Black Enhancement/Clip - The
Black Enhancement enables
you to edit black values.
Setting the value lower will
cause a lighter black value,
whereas a higher value will
result in darker black.
Clip - Will determine the new
base black value depending
on the black value set in Black
Enhancement.
KIP PrintPro.Net User Guide
Background Removal/Clip You may additionally reduce
or improve the background
contrast: set the value higher
to set a brighter contrast, set
lower to determine a low key
contrast.
Clip - The higher the clipping
value, the more the images
grey-to-white-values will
become brighter and whiter.
Color Saturation – Check the
box Preserve Color Saturation
to keep Color Saturation
unaffected by any ch a n ges to
Blackpoint and Whitepoint.
No part of this publication may be copied, reproduced or distributed in any form without express written permission
from KIP. 2015 KIP. v1
Used to make simple gray
adjustments to the gray output.
Make adjustments to the
Red/Green/Blue by typing
values into the table.
- 62 -
Page 63

Step
Action
Illustration
Gamma Correction –
Special Filter
Don’t Use Special Filter – Special filter is not used when this is selected
KIP PrintPro.Net User Guide
• Gamma Correction -
Allows the adjustment of
color shifts in the middle
tone range and to
correct the brightness.
• CMY-Mode – Enables
the CMY functionality.
For CMYK files the values
will be directly given to
the printer.
• Snap to Gray - With Snap
to Gray
you can define
how far the RGB values
can differ. You may
combine the two
options.
Sharpening Mode – Used to make fuzzy picture clear. As outlines are enhanced,
pictures become clearer. This setting increases the contrast between light and dark
pixels and enhances the edge sharpness of text and lines drastically. 0 no
sharpening 100 max sharpening. Default is 50.
Smoothing Mode - To reduce image noise and distortions, and affects the whole
picture contrast.
Adaptive Mode - Is made of two unique filters, both possessing the features of
Sharp and Smooth, whose intensity can be adjusted in the entry fields under Level.
No part of this publication may be copied, reproduced or distributed in any form without express written permission
from KIP. 2015 KIP. v1
- 63 -
Page 64

The upper entry field controls foreground objects that should be enhanced, such as
6.
Grayscale Settings –
Blackpoint
KIP PrintPro.Net User Guide
text, whereas the lower field is for image backgrounds needing smoothing. With
both filters, you will reach a maximum smoothing effect at 0 and a maximum
sharpening effec t at 100.
Grayscale Settings consist of:
• Black/White Point
• Special Filter
• Advanced settings
• Adaptive (B P) - The adaptive values can not be edited; they are cal c u lated
for every file. This auto detects and sets the Blackpoint.
• Custom Gray Value (B P) c an be adjusted from 0 to 255. Set tin g this to a
higher value will produce darker text.
Whitepoint
• Adaptive (WP) - The adaptive values cannot be edited; they are calculated
for every file. This auto detects and sets the Whitepoint .
• Custom Gray Value (WP) can be adjusted from 0 to 255 . Set ti ng this to a
lower value will produce lighter text.
Black Enhancement
• The Black Enhancement enables you to edit black values. The lower the
number the lighter the black. Clip will determine the new base black value
depending on the black value set in Black Enhancement.
Background Removal
Used to tune background contrast (e.g. in order to further fine-tune text visibility)
you may additionally reduce or improve the white to grey-values. The higher the
clipping value, the brighter and whiter the im age’s m os t whit e ele m ents will
No part of this publication may be copied, reproduced or distributed in any form without express written permission
from KIP. 2015 KIP. v1
become.
- 64 -
Page 65

Step
Action
Illustration
Special Filter
Don’t Use Special Filter – Special Filter is not used when this is selected
Advanced
KIP PrintPro.Net User Guide
Sharpening Mode – Used to make fuzzy picture clear. As outlines are enhanced,
pictures become clearer. This setting increases the contrast between light and dark
pixels and enhances the edge sharpness of text and lines drastically. 0 no
sharpening 100 max sharpe n i n g. Default is 50.
Smoothing Mode - To reduce image noise and distortions, and affects the whole
picture contrast.
Adaptive Mode - Is made of two unique filters, both possessing the features of
SHARP and SMOOTH, whose intensity can be adjusted in the entry fields under LEVEL.
The upper entry field controls foreground objects that should be enhanced, such as
text, whereas the lower field is for image backgrounds needing smoothing. With
both filters, you will reach a maximum smoothing effect at 0 and a maximum
sharpening effect at 100.
Area Adaptive Contrast –
Allows for the control of:
Radius
Brightness
Max Line Blackening
Max Background
Removal
Invert – Changes light to
bark and dark to light.
No part of this publication may be copied, reproduced or distributed in any form without express written permission
from KIP. 2015 KIP. v1
- 65 -
Page 66

Step
Action
Illustration
7.
Black/White Settings –
Scanner Options
Original – Choose from Line, Line/Photo or Name
KIP PrintPro.Net User Guide
Black/White settings consist of:
• Scanner Options
• Postprocessing
Note: The Scanner options in
black and white mode are
scanner dependent. All settings
in this filter are transmitted to
the scanner, where they are
processed. The software is just
the front end. Therefore, some
settings may be not describe d;
some settings may not be
available.
No part of this publication may be copied, reproduced or distributed in any form without express written permission
from KIP. 2015 KIP. v1
Auto Threshold - When this option is activated, the scanner reads gray tones as
follows: gray tones under the threshold turn to 0 (black), while all other gray
tones turn to 1 (white). This mode suits lineart best. It should not be applied to
photographs.
We recommend an ink limit of 100% in this mode
Background Removal - Used to tune background contrast (e.g. in order to
further fine-tune text visibility) you may additionally reduce or improve the whi te
to grey-values. The higher the clipping value, the brighter and whiter the
image’s most white elements will become.
Sharpness – Used to sharpen the edge and enhance outlines. Use values from 0
to 4 with 4 being the most sharp.
Despeckle – Removes dots based on scanner hardware settings.
- 66 -
Page 67

Step
Action
Illustration
8.
Postprocessing
Despeckle - This option removes black pixels in black & white mode, for
KIP PrintPro.Net User Guide
Settings consist of:
Despeckle
Hole Filling
Invert
example from scans of murky originals. The fil ter searches for groups of black
pixels and converts them into white. Small-sized pixel groups, such as those
forming punctuati o n do ts, ar e ke pt .
o All Pixel Neighbors - Pixels are connected neighbors when there is a
series of 8 (instead of 4) adjacent pixels, i.e. additionally to pixels of the
same row or column, the diagonally-adjacent pixels are con s ide r e d to
be conne cted.
o Filter Size
which is to be removed .
– It corresponds to the maximum "diame ter" of the pixel area
o Rel. Area Size – This limits the proportion of t he actual maximum number
of pixels to the filter size. 0 represents the smallest possible surface
relatively to the selected filter size.
Hole Filling - This function makes it possibl e to remove single pixel-sized white
holes from black areas in b&w mode. Hole Filling works like Despeckling
of not removing black pixels but white
.
except
No part of this publication may be copied, reproduced or distributed in any form without express written permission
from KIP. 2015 KIP. v1
Invert – This changes black to white and white to black (produces a negative of
the image)
- 67 -
Page 68

Step
Action
Illustration
1.
Select the Stamp Presets Icon
2.
Once open this screen will
3.
Selecting the “New” icon will
KIP PrintPro.Net User Guide
7.2c Stamp Presets
The Stamp Presets settings are used to create a new stamp that can be used on printed output. Once
created the stamps will be chosen from the main KIP Print Pro job setup screens to be applied to the
desired output.
show all of the pre-configured
Stamps as well as allow for
the creation of new presets.
allow for the creation of a
new Stamp Preset.
Fill in the appropriate sections
and select “Save” to save the
Stamp Preset or Save (active)
to save the Stamp Preset and
make it active as well.
No part of this publication may be copied, reproduced or distributed in any form without express written permission
from KIP. 2015 KIP. v1
- 68 -
Page 69

Step
Action
Illustration
4.
Name – This is the name that
5.
Position – Choose from 9 radio
6.
Stamp Options – Merging
KIP PrintPro.Net User Guide
will be displayed in the Preset
list of names.
buttons to place the stamp in
the desired location.
If a corner radio button is
selected two values will
become active to allow for
better positioning.
Method
Opaque (selected in illustration) –
Displays the stamp on top of the
image. The background of the
stamp is white and will obscure
some image.
One
value
Two
values
Transparent - Overlays the
stamp on top of the image. The
background of the sta m p is
transparent.
Opacity – Used to control the
darkness of the stamp. 100%
being Black.
Angle –Used to control the
rotation of the stamp.
No part of this publication may be copied, reproduced or distributed in any form without express written permission
from KIP. 2015 KIP. v1
- 69 -
Page 70

Step
Action
Illustration
7.
Image/Text Placement –
8.
Text Options
9.
Image Options –
KIP PrintPro.Net User Guide
If using an image as well as
text, the position of both can
be configured using the
following:
Image Left
Image Right
Image Top
Image Bottom
The Spacing between the two
can also be set.
Font Settings – Select
from available installed
fonts, size and Color
(Color Printer Needed).
Stamp Text – A dd th e
Placeholders – Macros
No part of this publication may be copied, reproduced or distributed in any form without express written permission
from KIP. 2015 KIP. v1
Select Image – Browse to th e
location to the image to be
used.
Image Size – Control the width
and height of the image to be
used (unlock to control
independently).
text to be added.
that add specific
information (.ex. Current
Date).
- 70 -
Page 71

Step
Action
Illustration
10.
Save – Select “Save” to save
11.
Active Stamp – The Active
KIP PrintPro.Net User Guide
the Stamp Preset or Save
(active) to save the Stamp
Preset and make it active as
well or select Reset to start
over.
Stamp will now be available for
selection from the Basic screen
as well as other KIP
Applications.
Note: KIP Ame ri ca is the Stamp
just created.
No part of this publication may be copied, reproduced or distributed in any form without express written permission
from KIP. 2015 KIP. v1
- 71 -
Page 72

Step
Action
Illustration
1.
Page Sizes – Select the Page
2.
Preconfigured page sizes will
3.
Select New to create a new
Note: A new Page size does not always need to be created. It is possible to Copy an
7.2d Page Sizes
KIP PrintPro.Net User Guide
Sizes Icon from the Printe r
Information Screen.
be displayed on the left side of
the screen.
Note: If there are page sizes
that will not be used
unchecking these will remove
them from the list of available
sizes on the main Job Creator
page.
Page Size.
existing Page size and then edit it. Select the size to be copied (here
Arch B and then select the Copy Icon.
No part of this publication may be copied, reproduced or distributed in any form without express written permission
from KIP. 2015 KIP. v1
Original will be loaded
Make necessary changes
Save new page size.
- 72 -
Page 73

Step
Action
Illustration
4.
Name the new Page Size
5.
Define the Dimensions
6.
Create a Page Size Group. This
7.
The Preview Pane will display
8.
Save – Select “Save” to save
9.
The new Page Size is created
KIP PrintPro.Net User Guide
is a group that the new Page
size will be added to. For this
example “Custom Sizes” was
added here. More custom sizes
can be created and then
added here.
the new Pa ge Size.
the Page Size Preset or Save
(active) to save the Page Size
Preset and make it active as
well or select Reset to start
over.
No part of this publication may be copied, reproduced or distributed in any form without express written permission
from KIP. 2015 KIP. v1
- 73 -
Page 74

Step
Action
Illustration
10.
The New Custom size is now
KIP PrintPro.Net User Guide
available from KIP Print Pro
(and other KIP Applications)
No part of this publication may be copied, reproduced or distributed in any form without express written permission
from KIP. 2015 KIP. v1
- 74 -
Page 75

Step
Action
Illustration
1.
Job Notification – Sele ct the
2.
Select the “New” icon
3.
Name and Short Name – This is
4.
Select the Event Type that
5.
Set the Message Text Options
6.
Enter the Message that is to be
7.
Add the Recipients e-mail
KIP PrintPro.Net User Guide
7.2e Job Notification
A Job Notification allows the user that sent the job to the KIP to be able to get notified when their job
is being printed. A message can be created that will be sent out to all of the recipients on the list.
Job Notification Icon from the
Printer Information Screen.
the name that will be displayed
in the Preset list of names.
should trigger the sending of
the notification.
that will be the subject of the
message to be sent.
sent to the recipient(s).
Select the desired macros for
the message as well.
addresses.
No part of this publication may be copied, reproduced or distributed in any form without express written permission
from KIP. 2015 KIP. v1
- 75 -
Page 76

Step
Action
Illustration
8.
Save – Select “Save” to save
the Job Notification Preset or
Save (active) to save the Job
Notification Preset and make it
active as well or select Reset to
start over.
KIP PrintPro.Net User Guide
No part of this publication may be copied, reproduced or distributed in any form without express written permission
from KIP. 2015 KIP. v1
- 76 -
Page 77

Step
Action
Illustration
1.
Select the PS/ PD F Presets
2.
Select the New Button
3.
Name and Short Name – This is
4.
Select the desired PostScript
5.
Save – Select “Save” to save
KIP PrintPro.Net User Guide
7.2f PS/PDF Presets
PS/PDF Presets are used to crea te specific settings that can be applied to Postscript files. These
Postscript System Presets once created will work on PS/PDF files from KIP Print Pro and other KIP
applications.
button from the Printer
Information page.
the name that will be displayed
in the Preset list of names. The
Short name is what will be
displayed next to the PostScript
button.
options.
Here the Dither Mode is
changed to Line (Mixed).
No part of this publication may be copied, reproduced or distributed in any form without express written permission
from KIP. 2015 KIP. v1
the PostScript Preset or Save
(active) to save the PostScript
Preset and make it active as
well or select Reset to start
over.
- 77 -
Page 78

Step
Action
Illustration
6.
The new PS/PDF Pr eset will be
KIP PrintPro.Net User Guide
added to the list on the left of
the screen.
The New Custom size is now
available from the K IP Pri n t Pro
(and other KIP Applications)
No part of this publication may be copied, reproduced or distributed in any form without express written permission
from KIP. 2015 KIP. v1
- 78 -
Page 79

Step
Action
Illustration
1.
Select the Scaling Presets
2.
Select the New Button
3.
Name and Short Name – This is
4.
Scaling Options – Select from
7.2g Scaling Presets
button from the Printer
Information page.
the name that will be displayed
in the Preset list of names. The
Short name is what will be
displayed next to the Scaling
button.
KIP PrintPro.Net User Guide
the available selections:
Width – Set the desired Width
value.
Height– Set the desired height
value.
Short Edge– Set the desired
Short Edge value.
Long Edge– Set the desired
Long Edge value.
Percentage– Set the desired
Width.
Maximum – Maximum width for
selected roll or largest roll
available.
Note: You MUST click in the box
to activate the field.
No part of this publication may be copied, reproduced or distributed in any form without express written permission
from KIP. 2015 KIP. v1
- 79 -
Page 80

Step
Action
Illustration
5.
Placement Options
6.
On Page
KIP PrintPro.Net User Guide
On Printer
Automatic – Auto placement
based on page size.
Align Left – Aligns output left
based on page size.
Align Center - Aligns output
Center based on page size.
Align Right - Aligns output
Right based on page size.
Orientation – Select from the
following:
Automatic Even – Places the image
on the paper based on Short edge
Automatic Odd– Places the i mage
on the paper based on Long edge
Select Page – Select the desired
page size from the list.
Select Position – Select the position
to placer the image from the
available list.
No part of this publication may be copied, reproduced or distributed in any form without express written permission
from KIP. 2015 KIP. v1
Scaling Options
Fit Page – Fits the selected
image to the page size
selected.
Downscale On ly – Does not scale
images originally smaller than
selected settings.
- 80 -
Page 81

Step
Action
Illustration
7.
Borders – Apply Borders to the
8.
Offset – Allows for the addition
9.
Save – Select “Save” to save
KIP PrintPro.Net User Guide
output to be pri n ted. With the
Preview loaded this will show
the Borders being applied
of margins to the Top, Bottom,
Left and Right.
Note: Applying an Offset
margin will shift the image on
the page clipping off the
edged.
the Scaling Preset or Save
(activ e) to save the Scaling
Preset and make it active as
well or select Reset to start
over.
No part of this publication may be copied, reproduced or distributed in any form without express written permission
from KIP. 2015 KIP. v1
- 81 -
Page 82

Step
Action
Illustration
1.
Select the Folding Presets
2.
Select the New Button
3.
Name – This is the name
4.
Use Title Block Recognition
7.2h Folding Presets
KIP PrintPro.Net User Guide
button from the Printer
Information page.
that will be displayed in the
Preset list of names and will
be displayed on the mai n
screen.
– Checking this box
enables Auto Title Block
Recognition/Location.
No part of this publication may be copied, reproduced or distributed in any form without express written permission
from KIP. 2015 KIP. v1
- 82 -
Page 83

Step
Action
Illustration
5.
Folding Table – This area is
The Folding Table Icon Explained:
KIP PrintPro.Net User Guide
where all settings for the
Fold Parameters ar e m ade.
1. Media Width
2. Fold Packet
3. Title Block Location (Used when Title Block Recognition is checked)
4. Alignment – Used to shift the image Left, Center, Right when the image is smaller
than the paper size.
5. Rotation – For Portrait View
6. Rotation – For Landscape View
7. Minimum Width / Short Edge (see note)
8. Maximum Width / Short Edge (see note)
1. 2. 3. 4. 5. 6. 7. 8. 9. 10.
11. 12.
9. Minimum Length/ long Edge (see note)
10. Maximum Length / Long Edge (see note)
11. Snap to Cut Length – Add blank paper to the trai li ng edge of the copy.
12. Inter Copy Delay – in tenth of a second for fast printers or when tab applicator
Note: For #’s 7, 8 9, 10 – This configures the Minimum & Maximum for X&Y so that the
software knows what size th e d rawing is and what roll size/fold
packet/allignment/rotation/snap length/intercopy delay are applied.
No part of this publication may be copied, reproduced or distributed in any form without express written permission
from KIP. 2015 KIP. v1
option is used.
- 83 -
Page 84

Step
Action
Illustration
6.
Media Width – Select the
7.
Fold Packet – Allows for the
8.
Title Block Location – Allows for
9.
Alignment – Allows for the
KIP PrintPro.Net User Guide
desired Media Width t o be
used.
selection of the fold packet to
be used.
the selection of the title block
Location.
Note: when Use title block
No part of this publication may be copied, reproduced or distributed in any form without express written permission
from KIP. 2015 KIP. v1
recognition is selected it is
necessary to indicate where
you want the ti tle bl ock to be.
selection of Left, Right or Center
for alignment.
- 84 -
Page 85

Step
Action
Illustration
10.
Rotation for Por trait – allows for
11.
Rotation for Landscape – allows
12.
Minimum width or short edge
13.
Snap to Cut Length - Add blank
KIP PrintPro.Net User Guide
the setting of a rotation for
Portrait documents.
for the setting of a rotation for
Landscape documents.
Maximum width or short edge
Minimum Length or long edge
Maximum Length or long edge
Note: This configures the
Minimum & Maximum for X&Y so
that the software knows what
size the drawing is and what r oll
size/fold
packet/allignment/rotation/snap
length/intercopy delay are
applied.
paper to the trailing edge of the
copy.
Note: For this example this
setting is not used.
No part of this publication may be copied, reproduced or distributed in any form without express written permission
from KIP. 2015 KIP. v1
- 85 -
Page 86

14.
Inter Copy Delay - in tenth of a
15.
Reset, Save, Save (activated) –
16.
New Fold Preset – the new fold
17.
Folding from KIP PrintPro – Once
KIP PrintPro.Net User Guide
second for fast printers or when
tab applicator option is used.
Note: For this example this
setting is not used.
If the settings are not correc t
select “Reset” to start over.
Select “Save” to save the
settings.
Select “Save (activated)” to
save the settings and have them
be active and available for use.
Preset will now be displayed in
the left hand column under
Custom.
the Folding Preset has been
created and saved as active it
can be selected and applied to
jobs. Select the drop down arrow
in the Folding button and pick
the 9x12 No Border that was just
created.
No part of this publication may be copied, reproduced or distributed in any form without express written permission
from KIP. 2015 KIP. v1
- 86 -
Page 87

18.
Selected File – The folding
column will display the selected
Fold Pattern being ap plied.
KIP PrintPro.Net User Guide
No part of this publication may be copied, reproduced or distributed in any form without express written permission
from KIP. 2015 KIP. v1
- 87 -
Page 88

Step
Action
Illustration
19.
Select the HPGL Presets button
20.
Select the New Button
21.
Name and Short Name – This is
22.
Vector Options – Select from
Line Width Compensation - Allows addition and subtraction of pixels from the overall width of
7.2i HPGL Presets
KIP PrintPro.Net User Guide
from the Printer Information
page.
the name that will be displayed
in the Preset list of names. The
Short name is what will be
displayed next to the H PG L
button.
the available selections:
all vector lines. Users have the choice of selecting negative values (to compensate for thick
lines) to positive values (to compensate for thin lines)
Vector Line Raster - Users have 3 choices of dither output patterns. There is no ‘correct’ setting.
Set according to user preference.
Use Round End Capping – Forces end capping on lines in vector files to round ends.
Render Inked Area Only – Crops the file data to the start of image data.
Merge - This enables the user to merge lines of different shades. When not applied, the layers
within the plot file determine how lines merge on each other.
Snap to Solid – Used to create full tone colors for lines only.
No part of this publication may be copied, reproduced or distributed in any form without express written permission
from KIP. 2015 KIP. v1
- 88 -
Page 89

Step
Action
Illustration
23.
HP-RTL Raster Options –
24.
Additional Parameters – Allows
25.
Pen Table – This section all ows
26.
Save – Select “Save” to save
KIP PrintPro.Net User Guide
Raster Density – Used to modify
the density level of the
embedded raster image. The
scale range is from 0-100. The
higher the number on the
scale, the darker the image wi l l
be. A density level can also be
keyed into the text field.
Photo Raster - Users have 3
choices of raster dither output
patterns. There is no ‘correct’
setting. Set according to user
preference.
for the addition of specific
HPGL switches to be used.
for the manipulation of specific
pens if desired.
Pen Width by File – Uses the
pen table width p r ovided within
the file as it was created.
Pen Color by File – Us e s the pen
color provided within the file as
it was created.
Manual – Allows the user to
manually manipulate a
specific pen or pens by
entering the values for the Pen
Number, Pen Width and Pen
Color.
the HPGL Preset or Save
(active) to save the HPGL
No part of this publication may be copied, reproduced or distributed in any form without express written permission
from KIP. 2015 KIP. v1
- 89 -
Page 90

Preset and make it active as
Step
Action
Illustration
27.
New Pen will be displayed in
KIP PrintPro.Net User Guide
well or select Reset to start
over.
the left panel.
This Pen is now available within
the KIP Print Pro Application
and other KIP Applicat ions.
No part of this publication may be copied, reproduced or distributed in any form without express written permission
from KIP. 2015 KIP. v1
- 90 -
Page 91

Step
Action
Illustration
1.
Select the Machine Notification
2.
Select the New Button
3.
Name and Short Name – This is
4.
Event Types – Select from the
Media Empty - This will send a notification when a media runs out on the KIP Printer.
5.
Recipients – Enter the
7.2j Machine Notification
KIP PrintPro.Net User Guide
Presets button from the Printer
Information page.
the name that will be displayed
in the Preset list of names.
available event types that will
trigger a notification to be sent
to a recipient.
Paper Jam - This will send a notification when there is a paper jam on the KIP Printer.
Toner Empty - This will send a notification when Toner runs out on the KIP Printer.
Waste Full - This will send a notification when the waste toner box on the KIP Printer is full (7800
Only).
General Error - This will send a notification when a media runs out on the KIP Printer.
Recipient(s) e-mail address
that will be notified when this
error occurs.
No part of this publication may be copied, reproduced or distributed in any form without express written permission
from KIP. 2015 KIP. v1
- 91 -
Page 92

Step
Action
Illustration
6.
Message Text Options – Us e the
7.
Message Text - Use the default
8.
Save – Select “Save” to save
9.
New Notification will be
KIP PrintPro.Net User Guide
default or enter a new
message Subject.
or enter a new message text.
Additional macros can be
entered to modify the default
message simply by select ing
them from the bottom of the
message window
the Machine Notification Preset
or Save (active) to save the
Machine Notification Preset
and make it active as well or
select Reset to start over.
displayed in the left panel.
This is now configured on the
KIP System and a notification
No part of this publication may be copied, reproduced or distributed in any form without express written permission
from KIP. 2015 KIP. v1
will be sent when this action
occurs.
- 92 -
Page 93

Step
Action
Illustration
1.
Select the Metered Notification
2.
Select the New Button
3.
Name and Short Name – This is
4.
Event Types – select from the
Maintenance Report - This will send a notification out after the KIP Printer has run a
7.2k Metered Notification
KIP PrintPro.Net User Guide
Presets button from the Printer
Information page.
the name that will be displayed
in the Preset list of names.
available event types.
predetermined amount in either Sq. Ft/Meters.
Monthly Report - This will send a notification with all of the print data (determined by the
settings in Message Text) on a specific date at a specific time.
Weekly Report - This will send a notification with all of the print data (determined by the settings
in Message Text) on a specific day at a specific time.
Attach Raw Info - This will send an e-mail with all of the Raw Logs that can then be imported
and used in Excel.
No part of this publication may be copied, reproduced or distributed in any form without express written permission
from KIP. 2015 KIP. v1
- 93 -
Page 94

Step
Action
Illustration
5.
Recipients – Enter the
6.
Message Text Options – Us e the
7.
Message Text - Use the default
8.
Save – Select “Save” to save
9.
New Notification will be
KIP PrintPro.Net User Guide
recipient(s) e-mail address that
will receive the e-mail.
default or enter a new
message Subject.
or enter a new message text.
Additional macros can be
entered to modify the default
message simply by select ing
them from the bottom of the
message window
the Metered Notification Preset
or Save (active) to save the
Metered Notification Preset and
make it active as well or select
Reset to start over.
displayed in the left panel.
This is now configured on the
KIP System and a notification
will be sent when this action
occurs.
No part of this publication may be copied, reproduced or distributed in any form without express written permission
from KIP. 2015 KIP. v1
- 94 -
Page 95

Step
Action
Illustration
1.
Select the Media Manager
2.
Select the New Button
3.
Name – Enter a name for the
4.
Media Type – Using the Drop
Black and White Printer:
KIP PrintPro.Net User Guide
7.2l Media Manager
From the Media Manager screen, simply enter any media name then select a media group that closely
resembles the required media. The system will automatically use the correct printer settings (fuser
temperature, media tension, etc. assigned to that group) to achieve the best results.
button to add an unlimited
amount of new medias.
new media. This is the name
that will be displayed in the KIP
applications for selection.
down arrow select the media
that best represents the new
media being added.
Color Printer:
No part of this publication may be copied, reproduced or distributed in any form without express written permission
from KIP. 2015 KIP. v1
- 95 -
Page 96

Component
Function
1. HDI Options
When selected this will ignore borders tha t may be in by
2. File Exclusions
Used to determine which types of files will not be listed and
3. HPGL Options
Minimum line thickness that may be printed. If line specified is
4. JPEG Quality
This feature is off by default but when turned on wi ll app l y
7.3 File Format settings
KIP PrintPro.Net User Guide
default within the HDI (AC) driver.
appear in the system expl orer window.
thinner than configured setting, line thickness will be increased.
to all scanned color fil es and reduce the output file s ize.
Compression of 0 to 200 % is selectable, the larger the
compression the larger the file size created.
No part of this publication may be copied, reproduced or distributed in any form without express written permission
from KIP. 2015 KIP. v1
- 96 -
Page 97

Component
Function
1. Select the plus (+)
Color Printer Setup has many functions within this section. These
2. Guest Printer
The Followin g wi ndow will allow for the setup of th e Gue st Printer
KIP PrintPro.Net User Guide
7.4 Color Printer Setup
Color Printer Setup allows for the addition of Color Printer. This installed color printer will be used when
making a direct color copy or direct color prin t from the Multi-Touch screen of the KIP Printer
from the Color
Printer Setu p
section.
Information
are explained individually in this section.
(InkJet). Select the following settings:
Printer Name – The name to be displayed for the Guest Printer.
Manufacturer – Select from dropdown of available
Manufacturers of the Guest Printer list.
Printer Model – Select from the dropdown of available Printer
No part of this publication may be copied, reproduced or distributed in any form without express written permission
from KIP. 2015 KIP. v1
models.
IP Address – Enter the IP Address of the Guest Printer to connect
to.
Edit Feeders – Ent er the roll size that will be used.
Delete – Remove Gue st Printer.
- 97 -
Page 98

Component
Function
1. Dealer Information
This section allows the Dealer to enter their information. This will
2. Copy Level Values
This section allows for adjustments to be made to the Copy
KIP PrintPro.Net User Guide
8 Service Settings – (Logged in as Service Tech)
be displayed for the customer on the Multi-Touch screen.
levels of the printer. This sets the Copy levels for all copies
made.
No part of this publication may be copied, reproduced or distributed in any form without express written permission
from KIP. 2015 KIP. v1
- 98 -
Page 99

Component
Function
3. Print Level Values
This section allows fo r adjustments to be made to the Copy
4. Scanner Settings
There are several Scanner Settings within this section. These are
5. Selected Scanner
Allows user to select the scanner model connecte d to the KCS
6. Enable Start Button
The Start button on the top of the scanner unit can be enabled
KIP PrintPro.Net User Guide
levels of the printer. This sets the printer density for all Network
Print jobs
explained individually in this section.
controller.
No part of this publication may be copied, reproduced or distributed in any form without express written permission
from KIP. 2015 KIP. v1
- 99 -
Page 100

or disabled.
KIP PrintPro.Net User Guide
• Enable allows the start button on the scanner to function.
This button must be pressed t o st art the scan process.
Note: The Start button on the Touch Screen also
functions when this button is enabled.
• Disable (unchecked box) turns OFF this function. User
must press the Start button on the Touch Screen to start
the scan process.
• This option has no function if "Auto Start" is selected on
the touch screen.
No part of this publication may be copied, reproduced or distributed in any form without express written permission
from KIP. 2015 KIP. v1
- 100 -
 Loading...