

Page 1

KIP Print Pro User Guide
KIP Print Pro User Guide
No part of this publication may be copied, reproduced or distributed in any form without express written permission
from KIP. 2015 KIP. v1
- 1 -
Page 2

KIP Print Pro User Guide
No part of this publication may be copied, reproduced or distributed in any form without express written permission
from KIP. 2015 KIP. v1
- 2 -
Page 3

Contents
1 Introduction ........................................................................................................................................................ 4
1.1 Main Screen ............................................................................................................................................ 5
1.2 Home Tab .................................................................................................................................................... 5
1.3 Basic Tab ..................................................................................................................................................... 7
1.4 Advanced Tab ............................................................................................................................................ 9
1.5 Preferences Tab ......................................................................................................................................... 12
1.6 Sort Tab ....................................................................................................................................................... 13
1.7 Job Creator ........................................................................................................................................... 14
1.8 Job Queue ................................................................................................................................................. 15
1.9Job Histo r y ................................................................................................................................................... 16
2 Configuring the KIP Print Pro Screen .............................................................................................................. 17
2.1 Dockable .................................................................................................................................................... 18
2.2 Floating ....................................................................................................................................................... 19
2.3 Tabbed Document .................................................................................................................................... 20
2.4 Auto Hide .................................................................................................................................................... 21
2.5 Hide ............................................................................................................................................................. 23
2.6 Job Matrix Configuration .......................................................................................................................... 24
2.6 Quick Access Toolbar .............................................................................................................................. 27
3 System Presets/Notifications Setup ............................................................................................................... 28
3.1 Settings ................................................................................................................................................... 23
3.2 Help ........................................................................................................................................................ 23
3.3 Printer Installation and Setup ............................................................................................................... 24
3.4 Print Quality ........................................................................................................................................... 25
3.5 Scan Quality Presets ............................................................................................................................. 33
3.6 Stamp Presets ........................................................................................................................................ 42
3.7 Page Sizes .............................................................................................................................................. 46
3.8 Job Notification ..................................................................................................................................... 49
3.9 PS/PDF Presets ....................................................................................................................................... 51
3.10 Scaling Presets ...................................................................................................................................... 53
3.11 Folding Presets ...................................................................................................................................... 57
3.12 HPGL Presets .......................................................................................................................................... 62
3.13 Machine Notification ........................................................................................................................... 65
3.14 Metered Notification ............................................................................................................................ 67
4 Step by Step Instructions for using the system ............................................................................................. 69
4.1 Printing a Basic job from KIP Print Pro – Example 1 ........................................................................... 69
4.2 Printing an Ad va nced job from KIP Print Pro – E xample 2 ............................................................... 72
4.3 Printing an Ad va nced job from KIP Print Pro – E xample 3 ............................................................... 75
4.4 Creating a Custom Scaling Preset Example 4 .................................................................................. 78
4.5 Creating a Custom Scaling Preset For Scale to Page Size Example 5 ........................................... 82
4.6 Creating a Queue for use with LPR printing. ...................................................................................... 86
4.7 Creating and using a Hotfolder .......................................................................................................... 89
4.7 Using Secure Printing ............................................................................................................................ 93
KIP Print Pro User Guide
No part of this publication may be copied, reproduced or distributed in any form without express written permission
from KIP. 2015 KIP. v1
- 3 -
Page 4

KIP Print Pro User Guide
1 Introduction
Designed for Windows PC’s, KIP Print Pro is an intuitive system management and job submission application for
the complete range of KIP color and B&W systems.
Print Job Submission – KIP Print Pro is an interactive job building application used to create and manage print
jobs from the most common color and b&w wide format digital files including Postscript
Calcomp, and HPGL 1/2/RTL (and more). Configure single and multipage PDF files with individual scaling
preferences, stamps, folding presets, color management controls and print stacking location. Customize the
Quick Access Tool bar with your favorite features or use Auto Hide, Float, and Dock to maximize efficiency in
the Job Build Matrix. Operators can monitor print progress from start to finish with detailed device status and
queue management. Integrated Job Accounting and Data Tracking provide user and project activity reports
for both color and b&w printing from the KIP Cost Center application.
®, PDF, TIF, JPG,
System Management – KIP Print Pro allows administrators to create and enable User and System Presets for
scaling, stamps, page sizes and print quality. When Job Notifications are enabled, administrators and job
owners are notified as jobs are completed or if intervention is required. Total Print Queue management controls
permit adjustments to the print order or to add new files and settings to existing print jobs.
KIP PrintPro Key Features
Multiple Copies or Collated Sets | WYSIWYP Image Preview | Individual File Settings for Job Matrix Templates | Multi-page Settings |
Color Adjustments and Filter Selections | Email Notification | Customize Job Build Matrix Windows | Document Folding and Stamping |
HPGL Pen Preset Selection | Windows 7/8 and Vista Compatible (32 and 64 bit) | Customize System and Folder Presets | Manage
Print Queue | KIP Secure Print | KIP Accounting Center Integration | KIP Cost Center Integration
No part of this publication may be copied, reproduced or distributed in any form without express written permission
from KIP. 2015 KIP. v1
- 4 -
Page 5
5 6 7
4
10
1 3 2 8 9
11
12
13
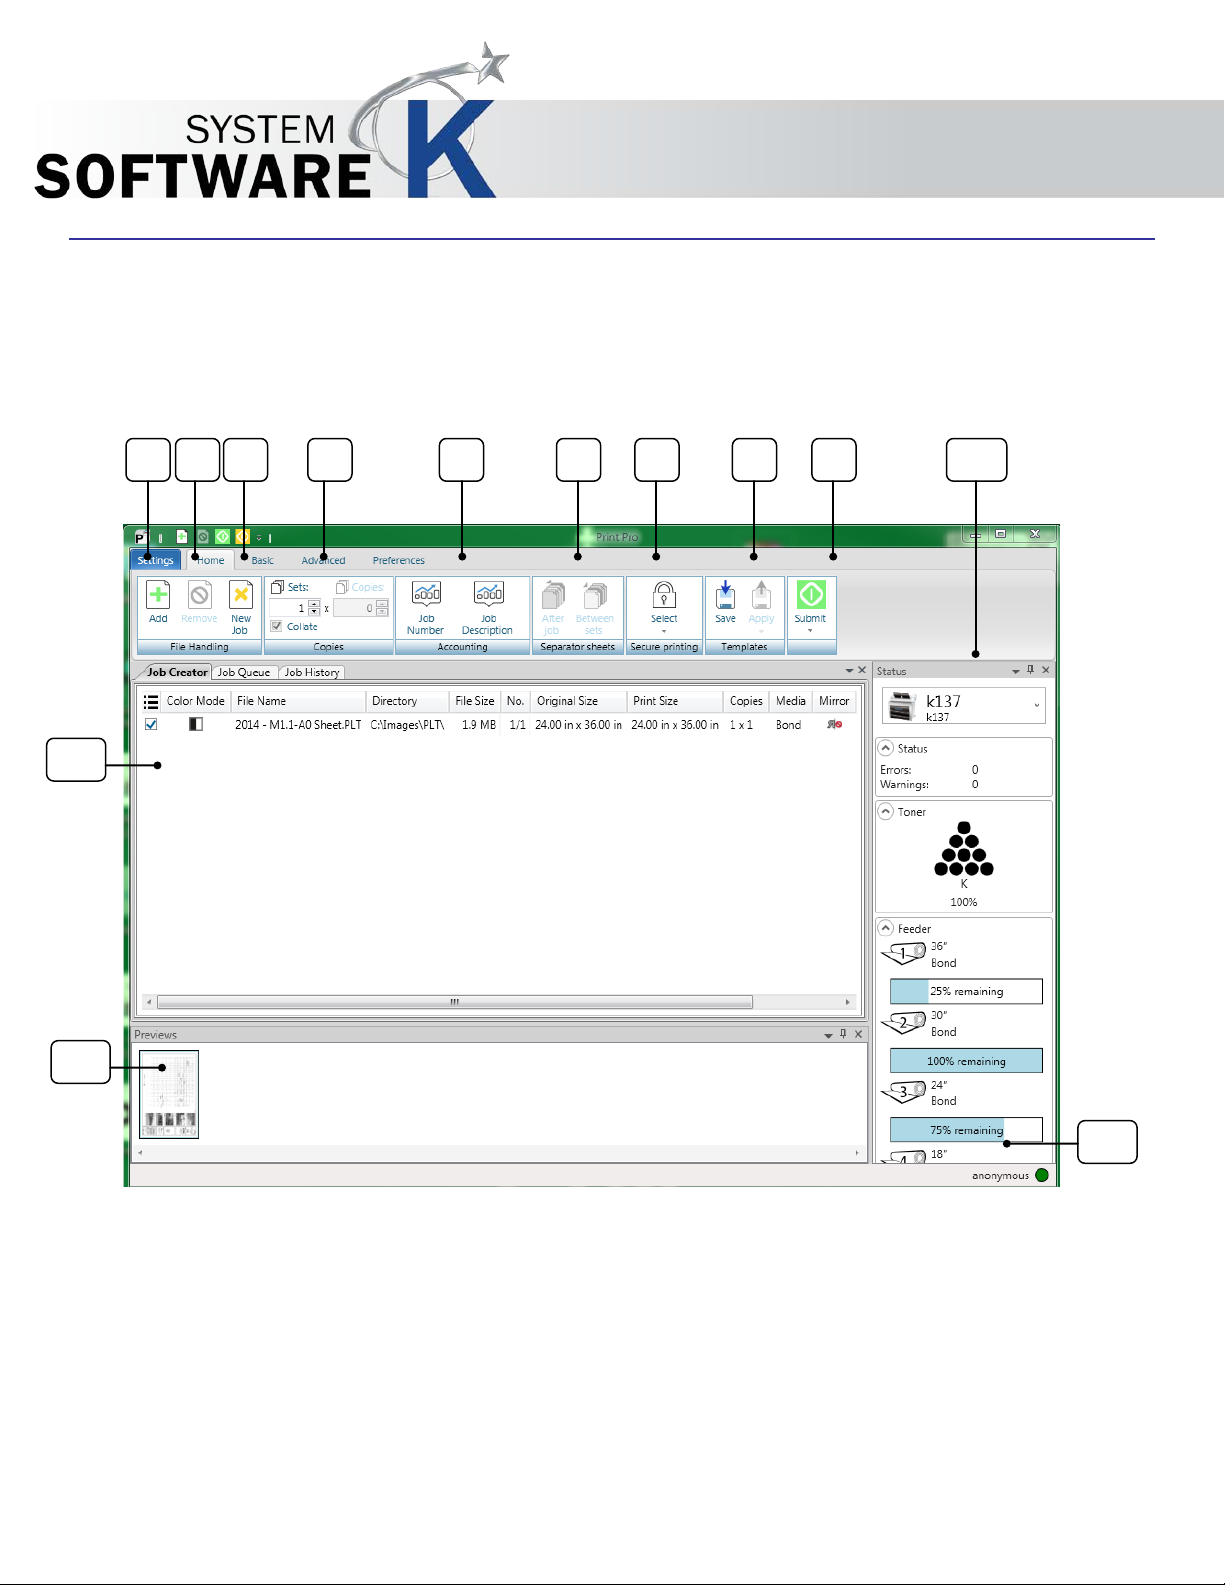
1.1 Main Screen
The Main Screen displays all of the available options for the active tab.
1.2 Home Tab
KIP Print Pro User Guide
No part of this publication may be copied, reproduced or distributed in any form without express written permission
from KIP. 2015 KIP. v1
- 5 -
Page 6

Component
Function
1. File Handling - Add
Used to add files and create a print job
2. File Handling -
Used to remove a file from the current print job.
3. File Handling - Reset
Clears all current files and start job new.
4. Copies
Used to set the number of copies as well as the number of sets
5. Accounting
If Accounting is being used these fields may need to be filled in,
6. Separator Sheets
Used to send a Separator Sheet after the Job or after the Set.
7. Secure Printing
Used to set a requirement that either a user name or a password
8. Templates
Used to save a Template that contains all of the selected settings
9. Submit
Used to Submit job to the KIP Printer
10. Status
Displays the current Status of the KIP Printer (Real-time errors,
11. Job Matrix
Displays the files that have been selected to print and various
12. Preview Window
Displays a Bitmap image of each selected file.
13. Currently Logged On
Displays who is currently logged in to the KIP Print Pro application.
KIP Print Pro User Guide
Remove
and if Collate will be on or off.
in order to submit job.
must be entered at the queue to allow the job to print.
so that it can be applied at a later time.
Toner Remaining and currently loaded media).
information about each file. Also what is in the Job Queue to be
printed and Job History.
No part of this publication may be copied, reproduced or distributed in any form without express written permission
from KIP. 2015 KIP. v1
- 6 -
Page 7
1 5 6 3 2 4 7 8 9
10
11
12
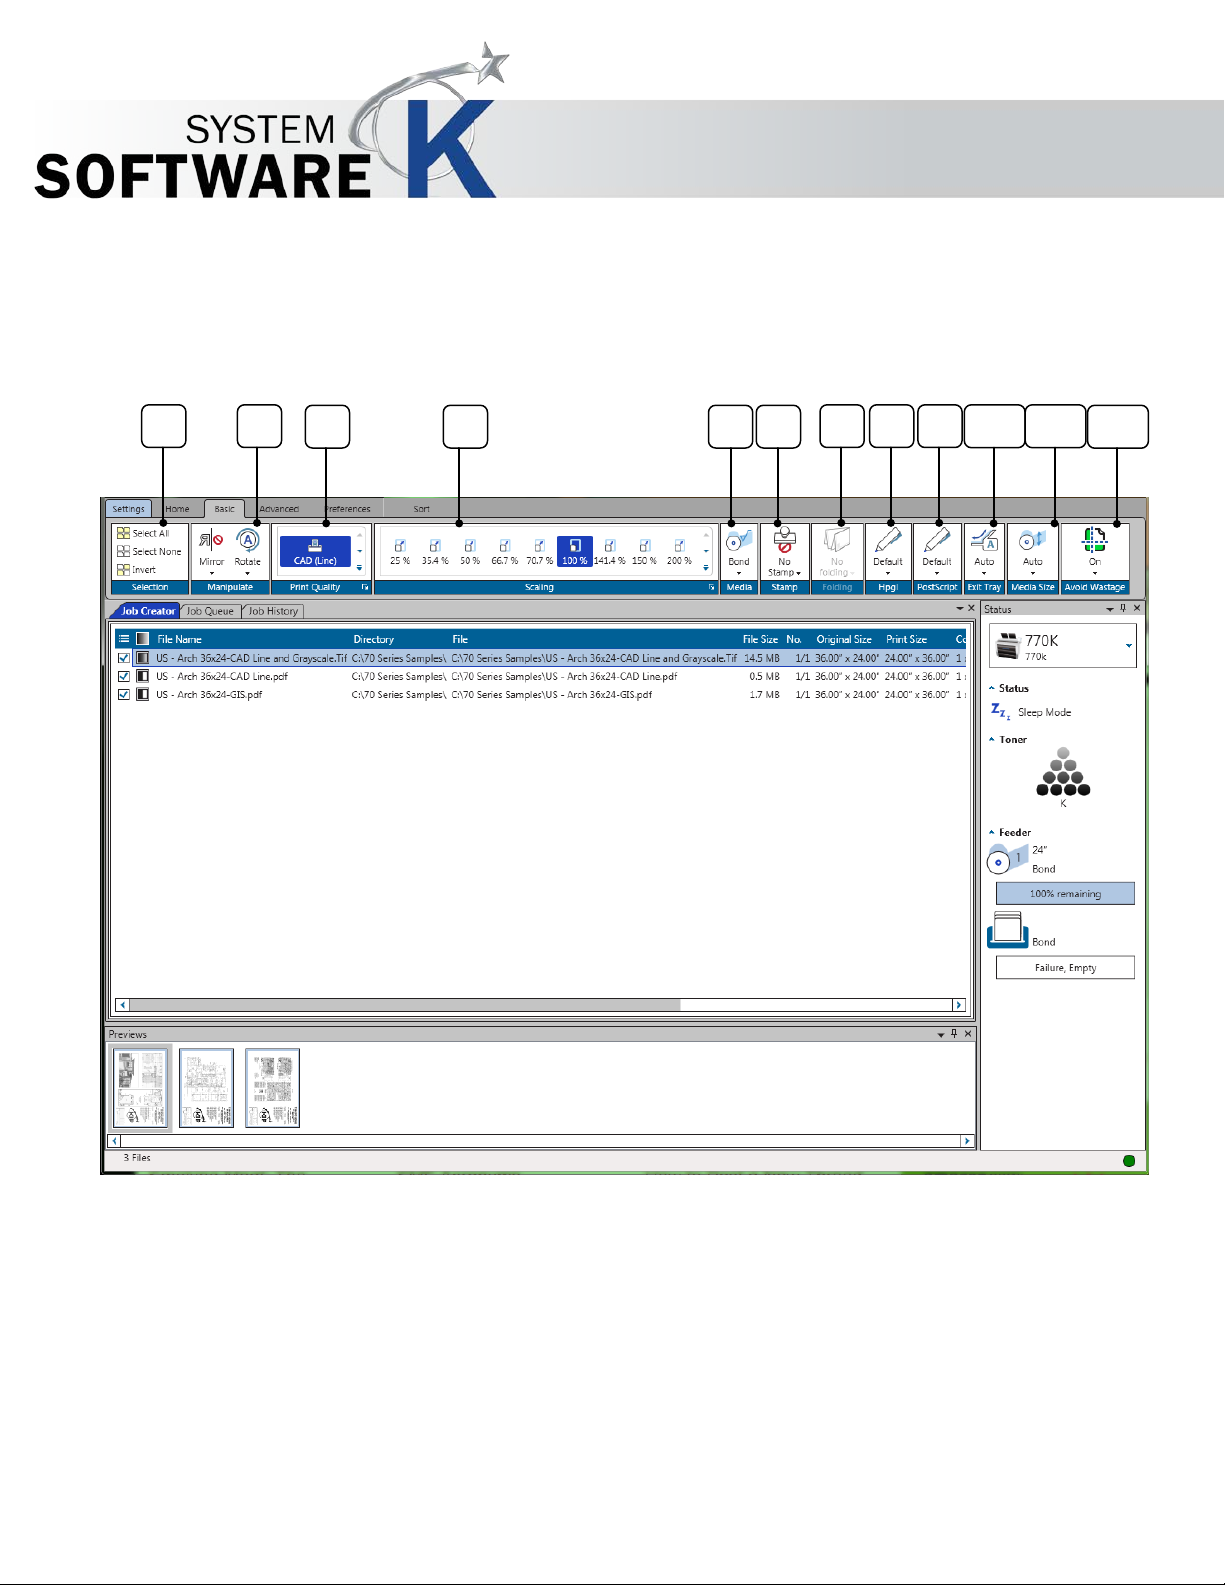
1.3 Basic Tab
KIP Print Pro User Guide
No part of this publication may be copied, reproduced or distributed in any form without express written permission
from KIP. 2015 KIP. v1
- 7 -
Page 8

Component
Function
1. Selection
Allows for the selection of the files to apply changes to including
2. Manipulate
Allows the selected file(s) to be Mirrored or Rotated.
3. Print Quality
Choose from different print qualities to control the final output.
4. Scaling
Used to set the Scaling of the output from 25% to 400%
5. Media
Used to select the desired output Media type.
6. Stamp
Allows for the creation/selection of a Stamp that can be applied
7. Folding
If a Folder is attached to the KIP this will allow for the selection of
8. HPGL
Allows for the manipulation of Pen tables associated with HPGL/2
9. Postscript
Allows for the manipulation of settings associated with Postscript
10. Exit Tray
If a folder is attached this function allows the media to be ejected
11. Media Size
Used to select a specific roll width to print on.
12. Avoid Wastage
Used to turn on/off the allowable waste when printing small size
KIP Print Pro User Guide
Select All, Select None and Invert.
to the file(s) being printed.
how the output is to be handled based on preset folding packets.
files.
files.
to the Exit Tray.
images on larger sheet sizes
No part of this publication may be copied, reproduced or distributed in any form without express written permission
from KIP. 2015 KIP. v1
- 8 -
Page 9

1 2 3
1.4 Advanced Tab
KIP Print Pro User Guide
No part of this publication may be copied, reproduced or distributed in any form without express written permission
from KIP. 2015 KIP. v1
- 9 -
Page 10
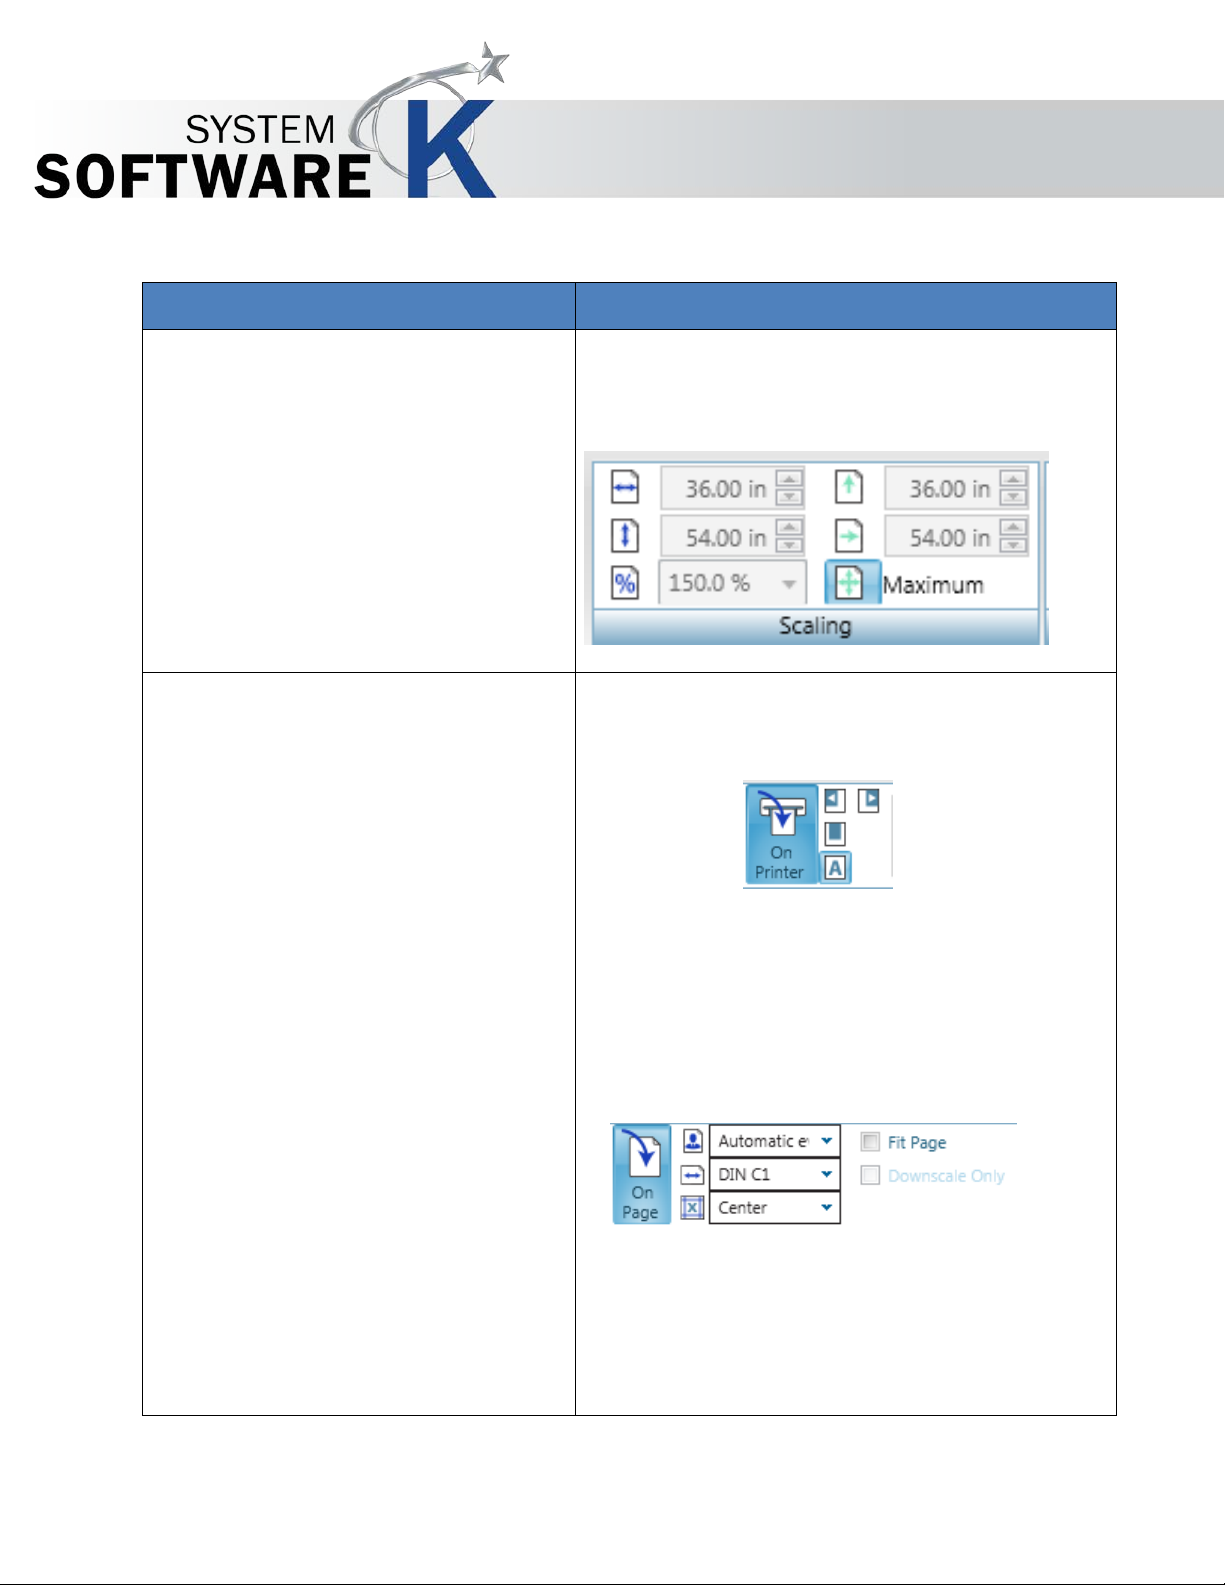
Component
Function
1. Scaling
Set Scaling parameters in English or metric mode.
2. Placement
Select from
KIP Print Pro User Guide
Including:
• Scale by Width
• Scale by Height
• Scale by Percentage
• Scale by Short Edge
• Scale by Long Edge
• Scale by Maximum Size
• On Printer
o Automatic Mode
o Align Left
o Align Right
o Center
• On Page
o Automatic Odd/Even
o Preset Sizes
o Multiple Preset
Locations
o Fit To Page
o Downscale Only
No part of this publication may be copied, reproduced or distributed in any form without express written permission
from KIP. 2015 KIP. v1
- 10 -
Page 11
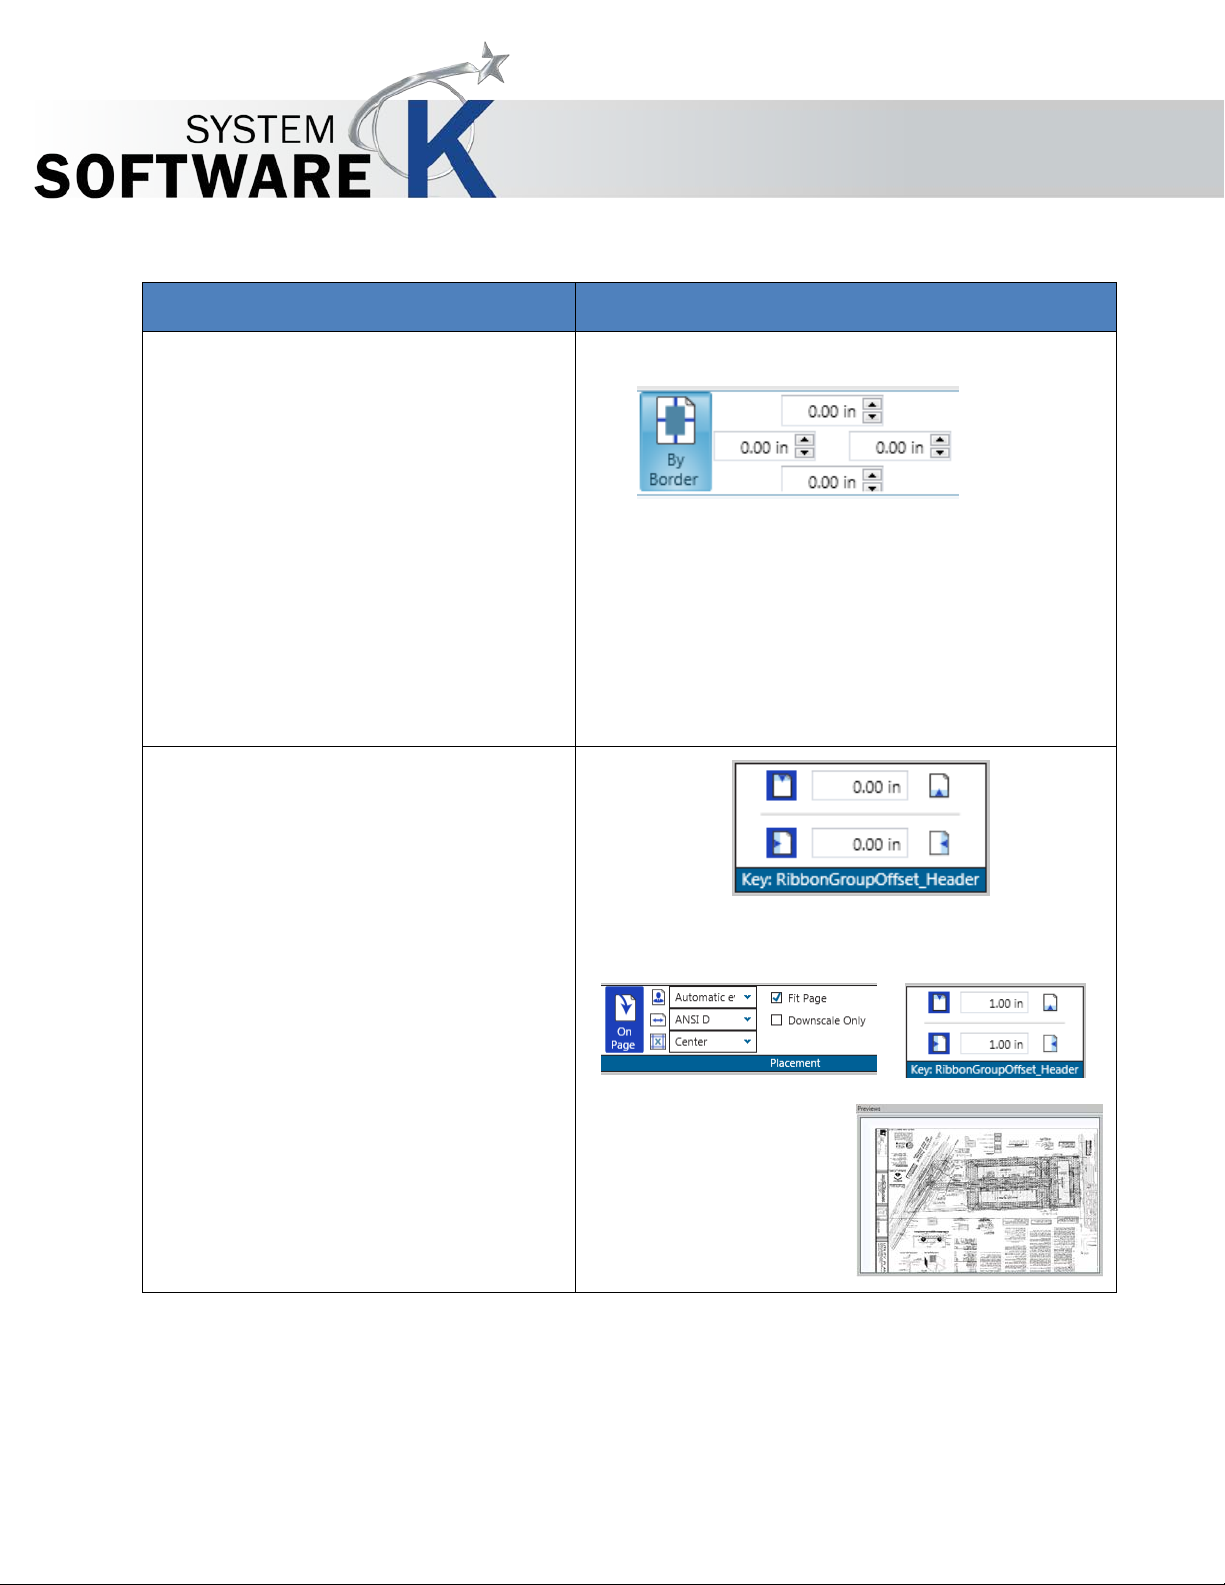
Component
Function
3. Offset – Used to add a lead, trail,
KIP Print Pro User Guide
• By Border
o Top
o Bottom
o Left
o Right
left or right margin. This will shift the
image on the specified page.
Example: File is being placed on an ANSI D, Fit to
page with a 1” margin on the top and left.
No part of this publication may be copied, reproduced or distributed in any form without express written permission
from KIP. 2015 KIP. v1
Note: The image is shifted
down and left off of the
page.
- 11 -
Page 12
Component
Function
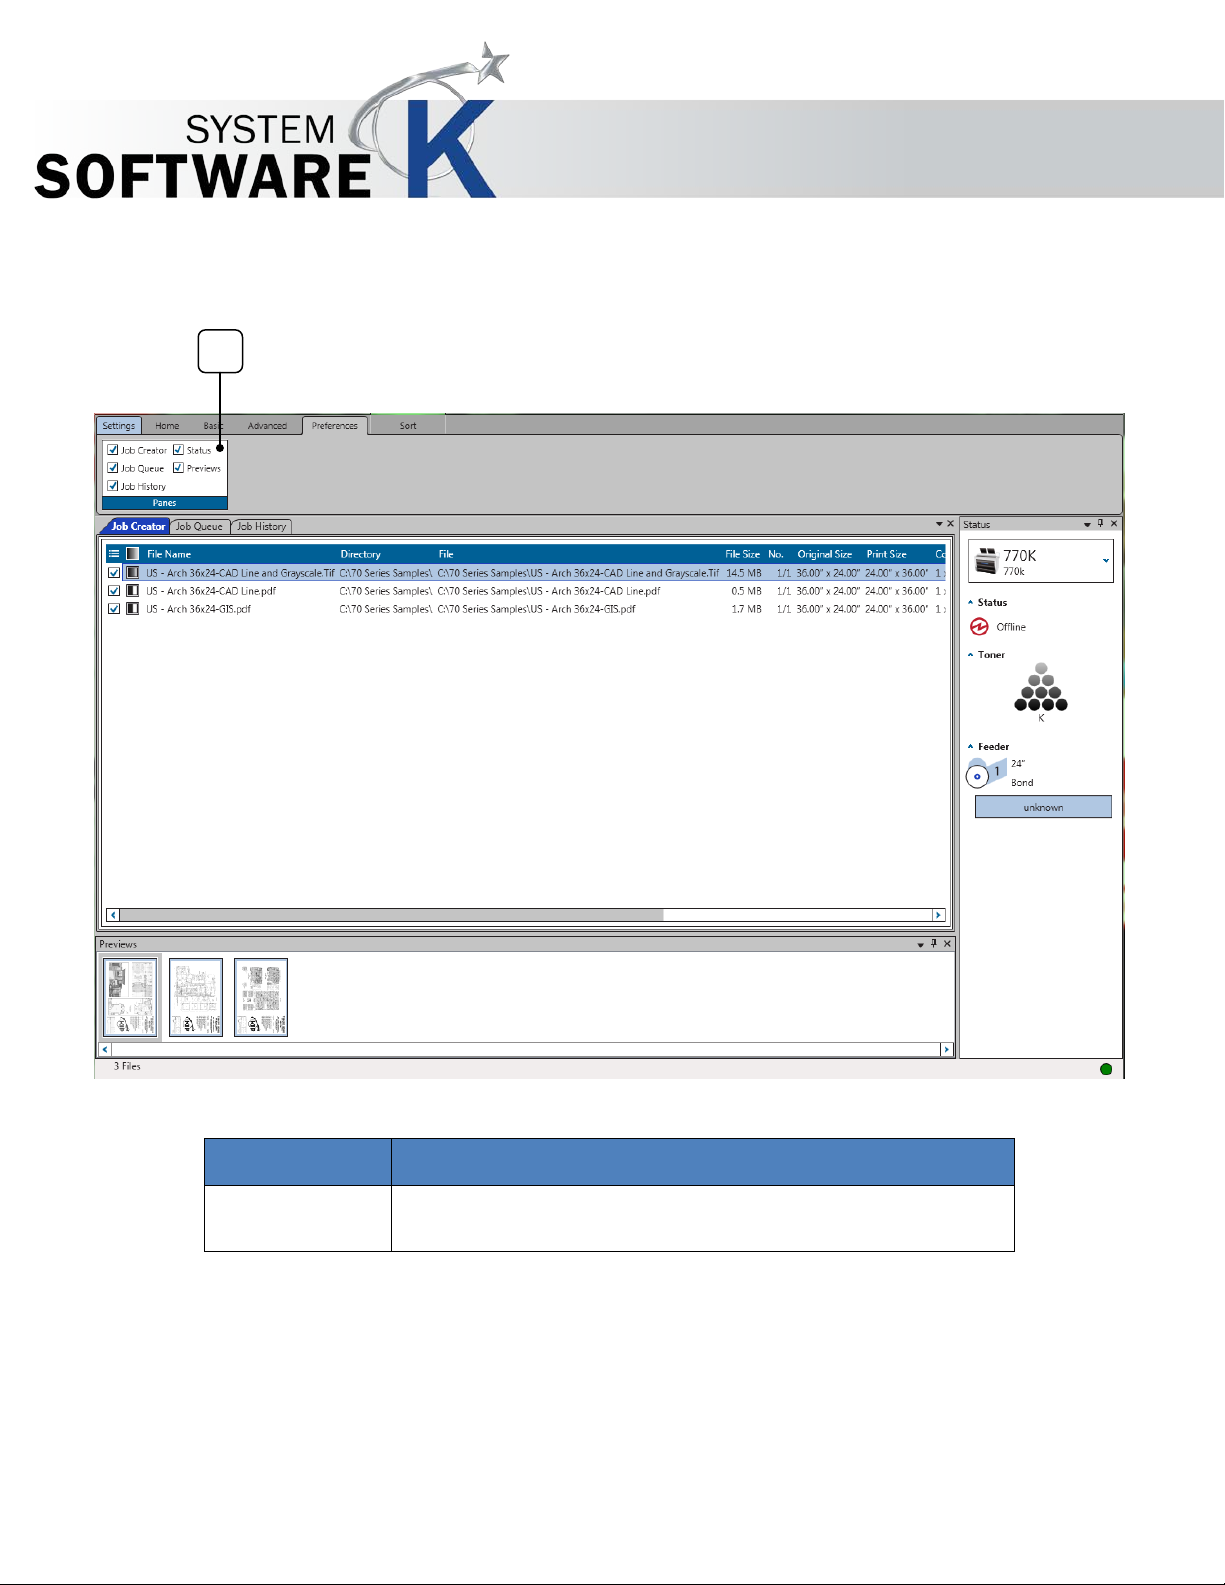
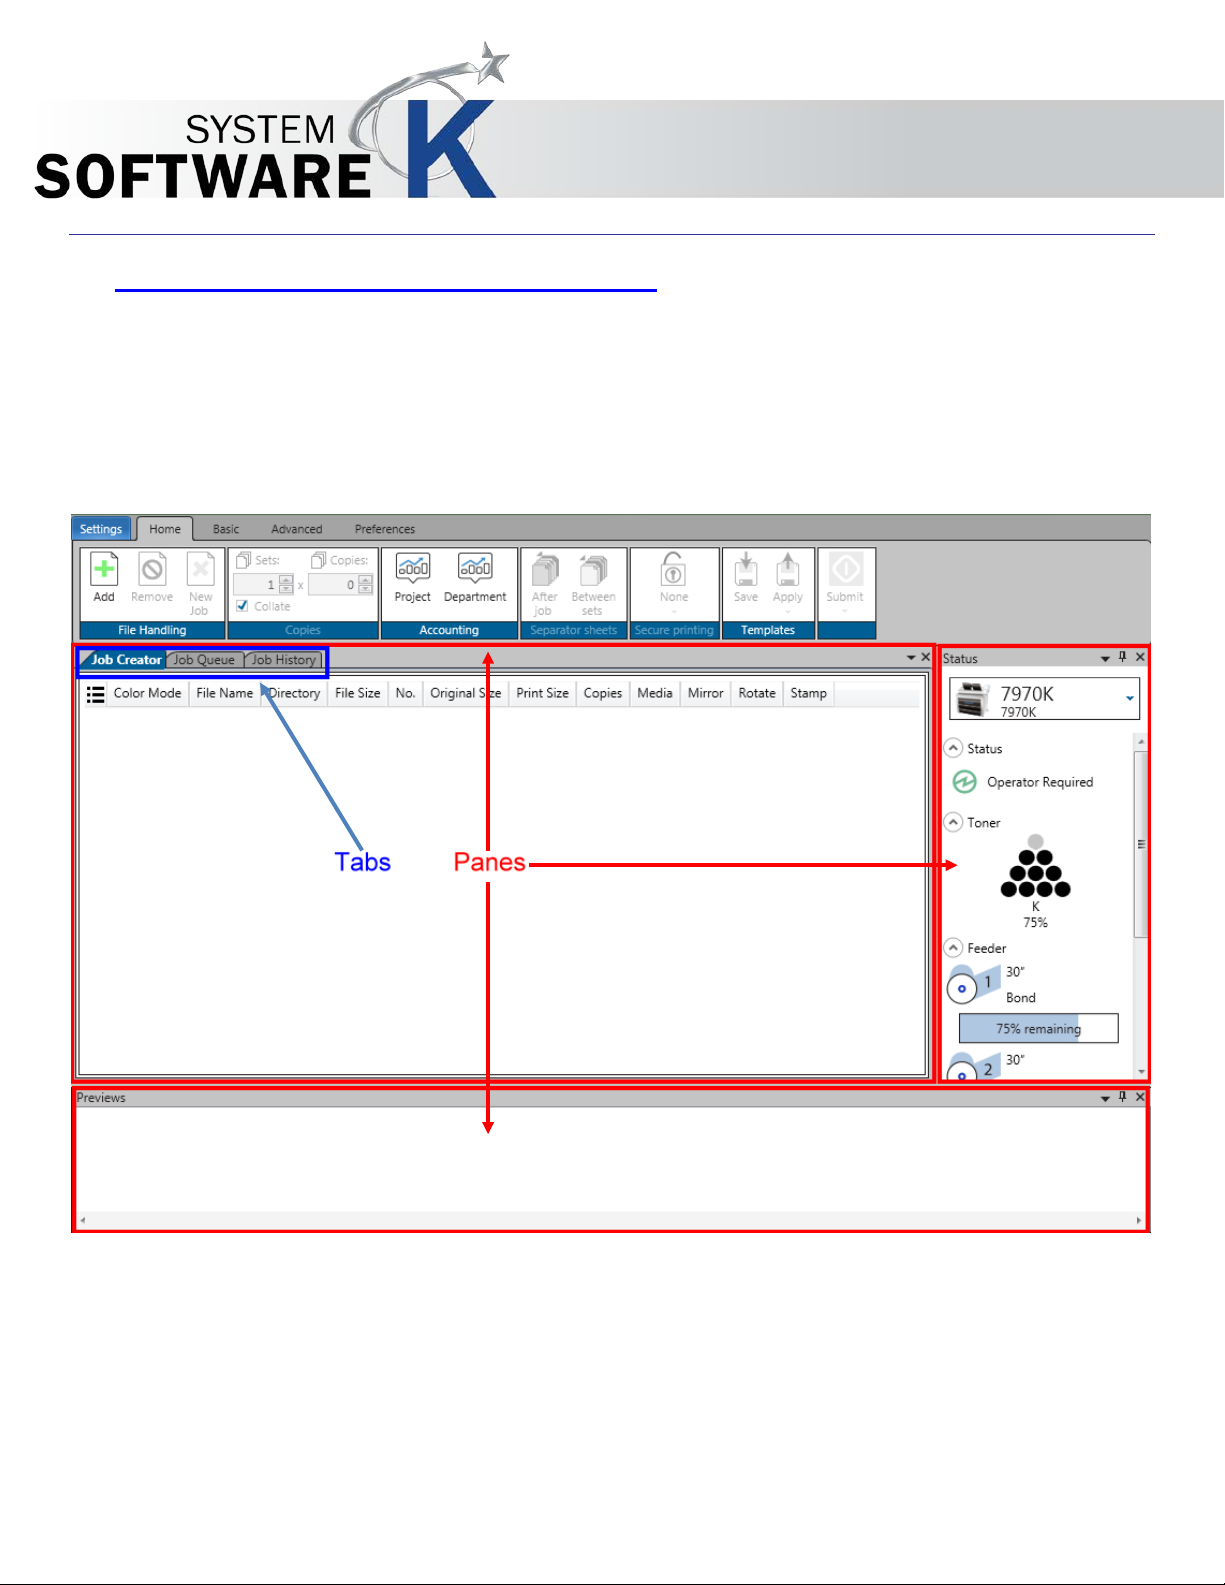
1. Panes
Enable or disable specific Panes so that they are visible or not.
1
1.5 Preferences Tab
KIP Print Pro User Guide
No part of this publication may be copied, reproduced or distributed in any form without express written permission
from KIP. 2015 KIP. v1
- 12 -
Page 13
Component
Function
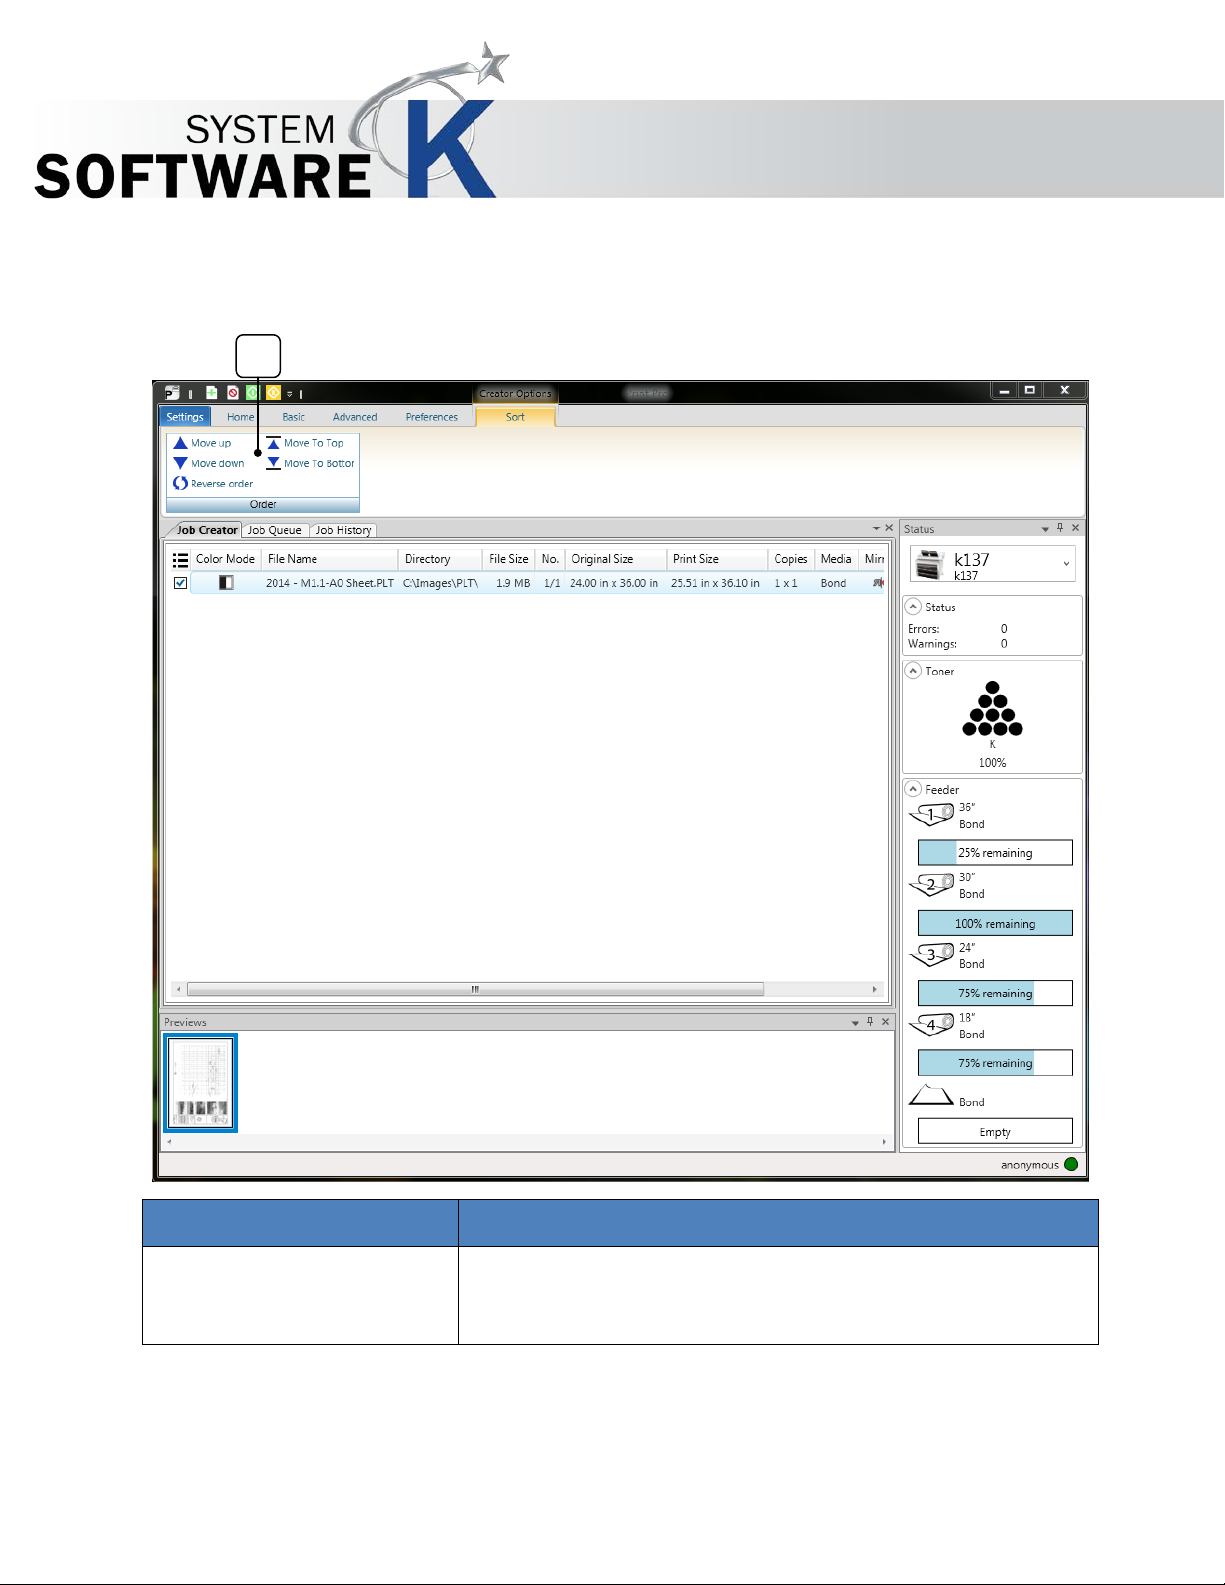
1. Order
Allows the user to arrange the files in the proper order by
1
1.6 Sort Tab
KIP Print Pro User Guide
manipulating each file up, down, to the top or to the bottom.
Also Reverse order can be selected.
No part of this publication may be copied, reproduced or distributed in any form without express written permission
from KIP. 2015 KIP. v1
- 13 -
Page 14
Component
Function
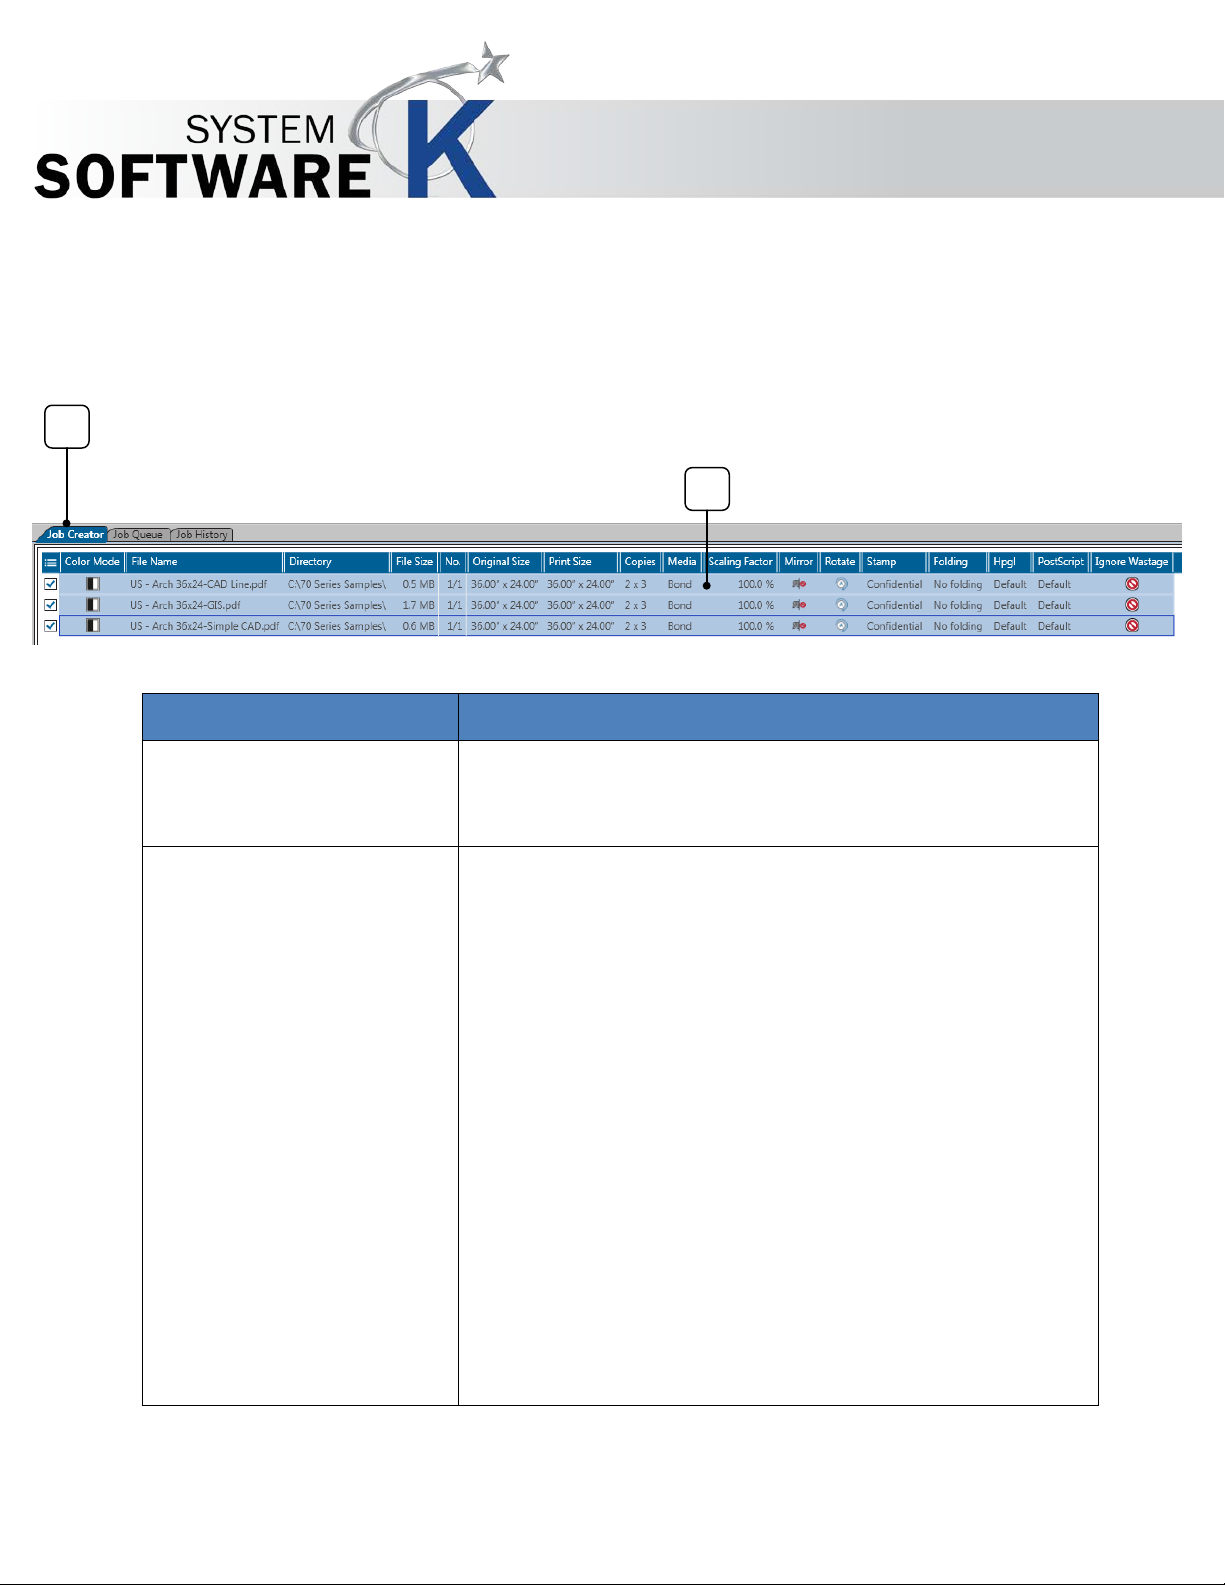
1. Job Creator Tab
The Job Creator Tab is general the first tab (unless rearranged
2. Job Matrix Area
This tab shows the files that have been added for printing as
1
2
1.7 Job Creator
The Job Creator Tab is the main tab within the Job Matrix area.
KIP Print Pro User Guide
by the user). This tab holds all of the files that have been added
to the current Job.
well as the settings that have been applied to them as a
complete job or settings specific to individual files.
By looking in this specific are we can see the following
information about this job:
• files (and their location)
• Original file size is 36x24
• Print size is 36x24
• There will be 2 sets and 3 copies
• Media is Bond
• Scaling is 100%
• Confidential stamp
No part of this publication may be copied, reproduced or distributed in any form without express written permission
from KIP. 2015 KIP. v1
- 14 -
Page 15
Component
Function
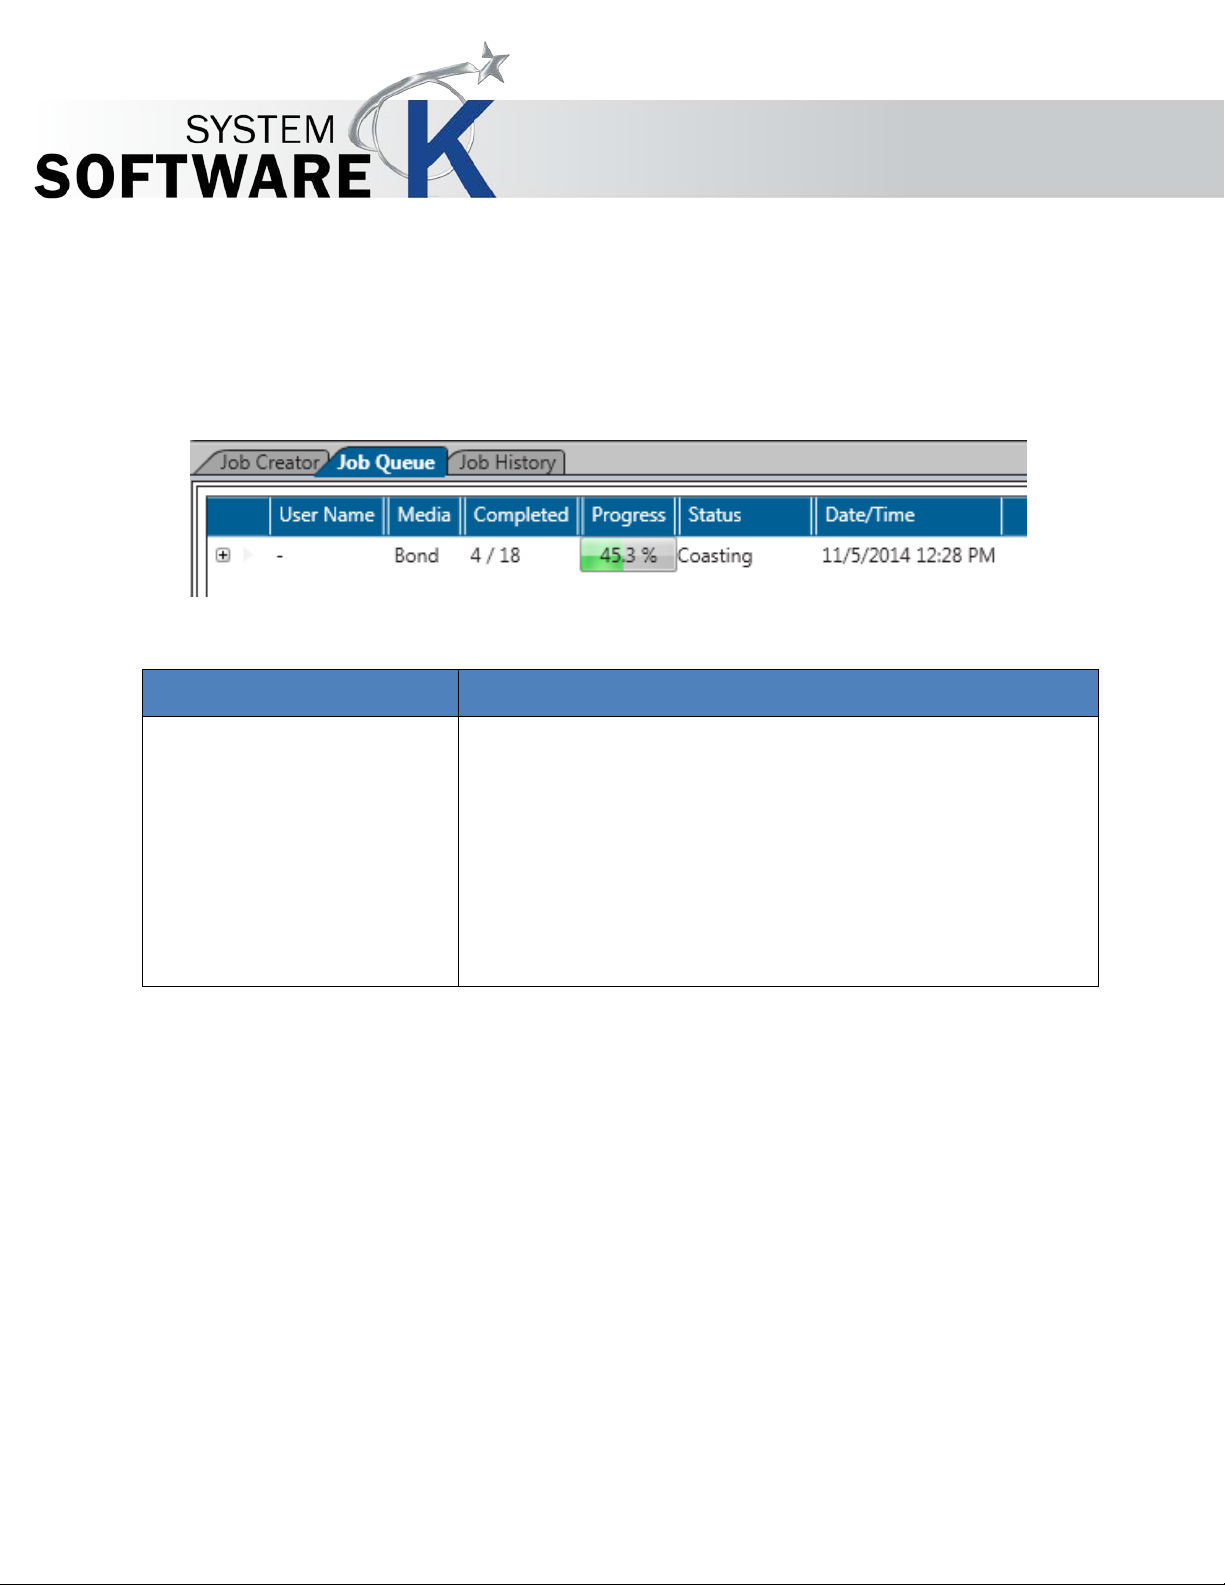
1. Job Queue
When the Job Queue tab is selected the user can see the
KIP Print Pro User Guide
1.8 Job Queue
Job Queue is the next tab in the Job Matrix area. This tab shows what is currently in the Print Queue of the
selected printer.
following:
• User Name (if entered)
• Media being printed on
• The progress of the job being printed
• The status
• The current date and time of the file being printed.
No part of this publication may be copied, reproduced or distributed in any form without express written permission
from KIP. 2015 KIP. v1
- 15 -
Page 16
Component
Function
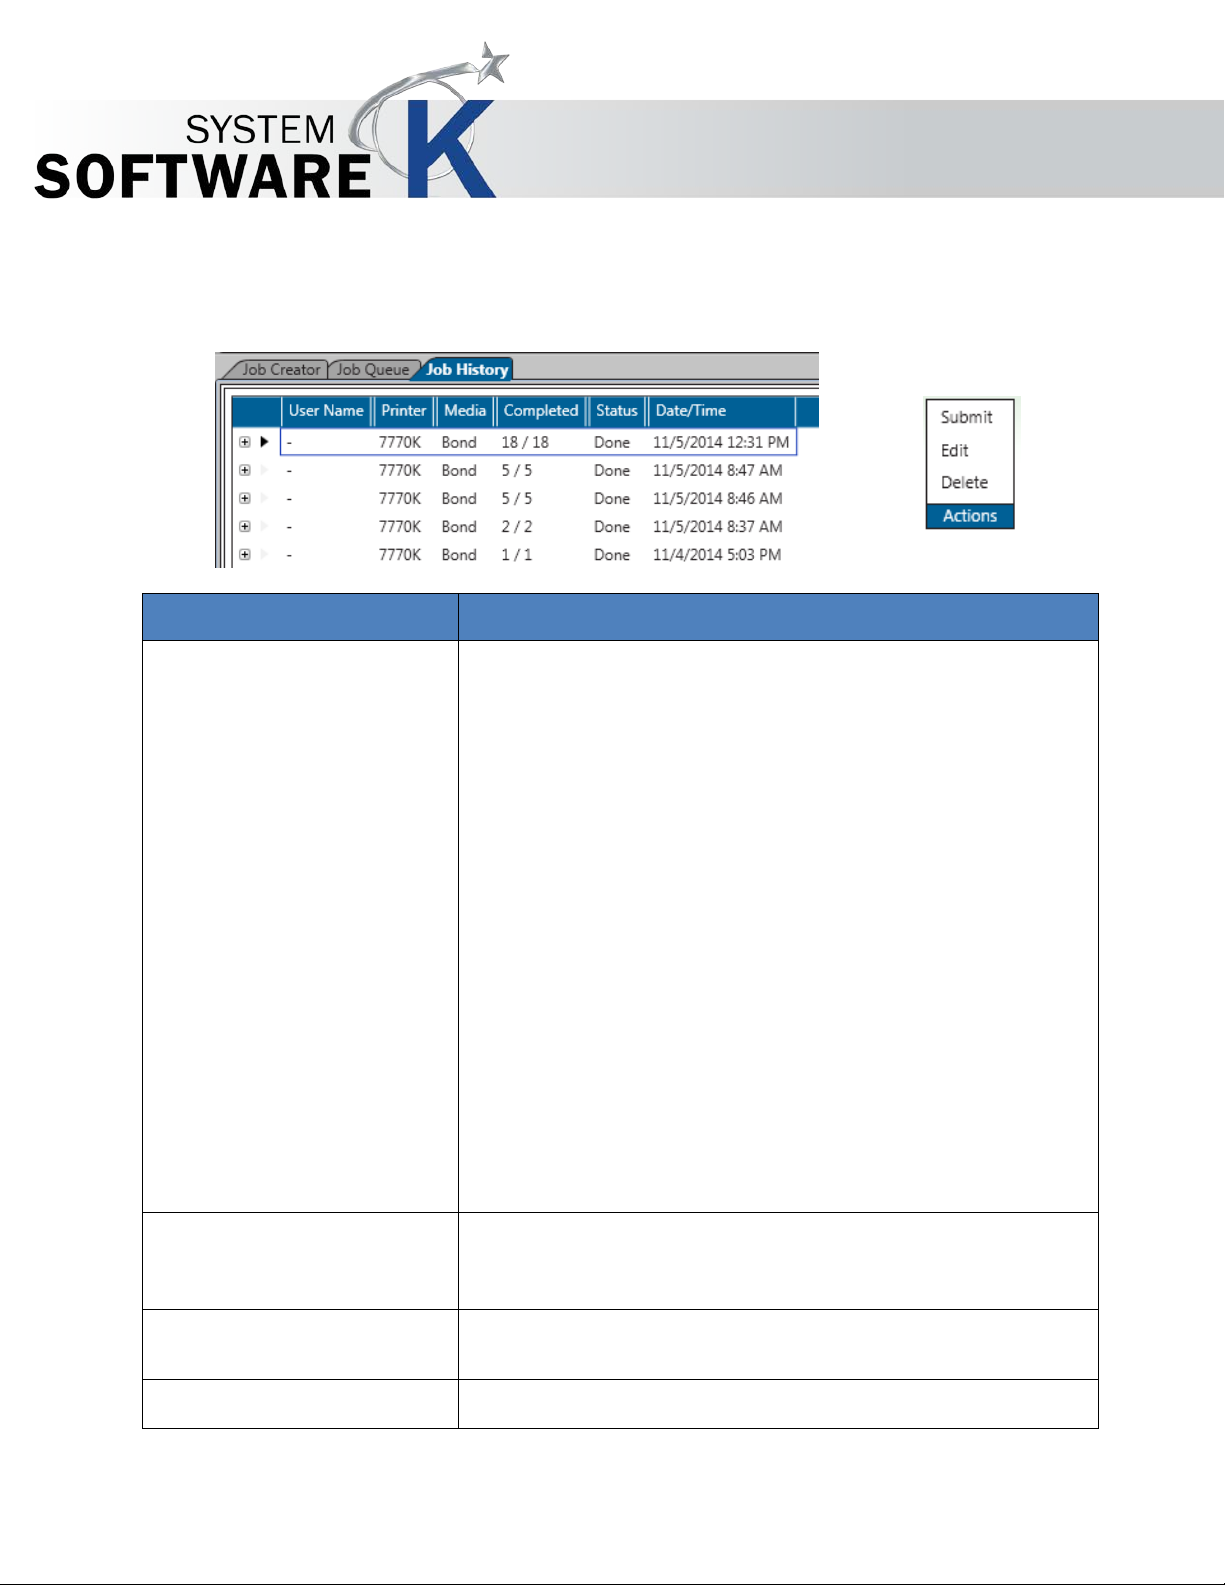
1. Job History
The Job History (if made active) will keep track of printed jobs.
2. Action - Submit
Send the job directly to the printer to be printed. This will show
3. Action - Edit
Loads the Job into the Job Creator tab allowing for editing of
4. Action Delete
Removes the job from History
KIP Print Pro User Guide
1.9Job History
Job history (if active) will allow a user to go back and print jobs from a History Queue.
The user can then use this history to re-print jobs again when
necessary.
The following information is displayed:
• User Name - If the accounting fields are used the user
name will be logged and then will appear in the “User
Name” column
• Printer type
• Media used
• Completion of the sent job
• Status of the job
• Date and time the job was printed
Note: The History queue is inactive by default and needs to be
activated through KIP PrintPro.net. In secure environments Job
History would not be used.
up in the Job Queue Tab and then when completed in the
History Queue again.
the job prior to submitting it again.
No part of this publication may be copied, reproduced or distributed in any form without express written permission
from KIP. 2015 KIP. v1
- 16 -
Page 17
KIP Print Pro User Guide
2 Configuring the KIP Print Pro Screen
There are many ways the user can configure the KIP Print Pro screen to suit their needs. The main screen consists
of Panes and Tabs. The Panes are the individual visible sections of the user interface (in RED) and the tabs are
the individual minimized sections of the user interface (in BLUE). However with customization the Panes can
become Tabs and the Tabs can become Panes.
Depending on how often a Tab or Pane is used, it can be hidden or displayed. The next section will explain how
these Panes and Tabs can be used.
No part of this publication may be copied, reproduced or distributed in any form without express written permission
from KIP. 2015 KIP. v1
- 17 -
Page 18
Step
Action
Illustration
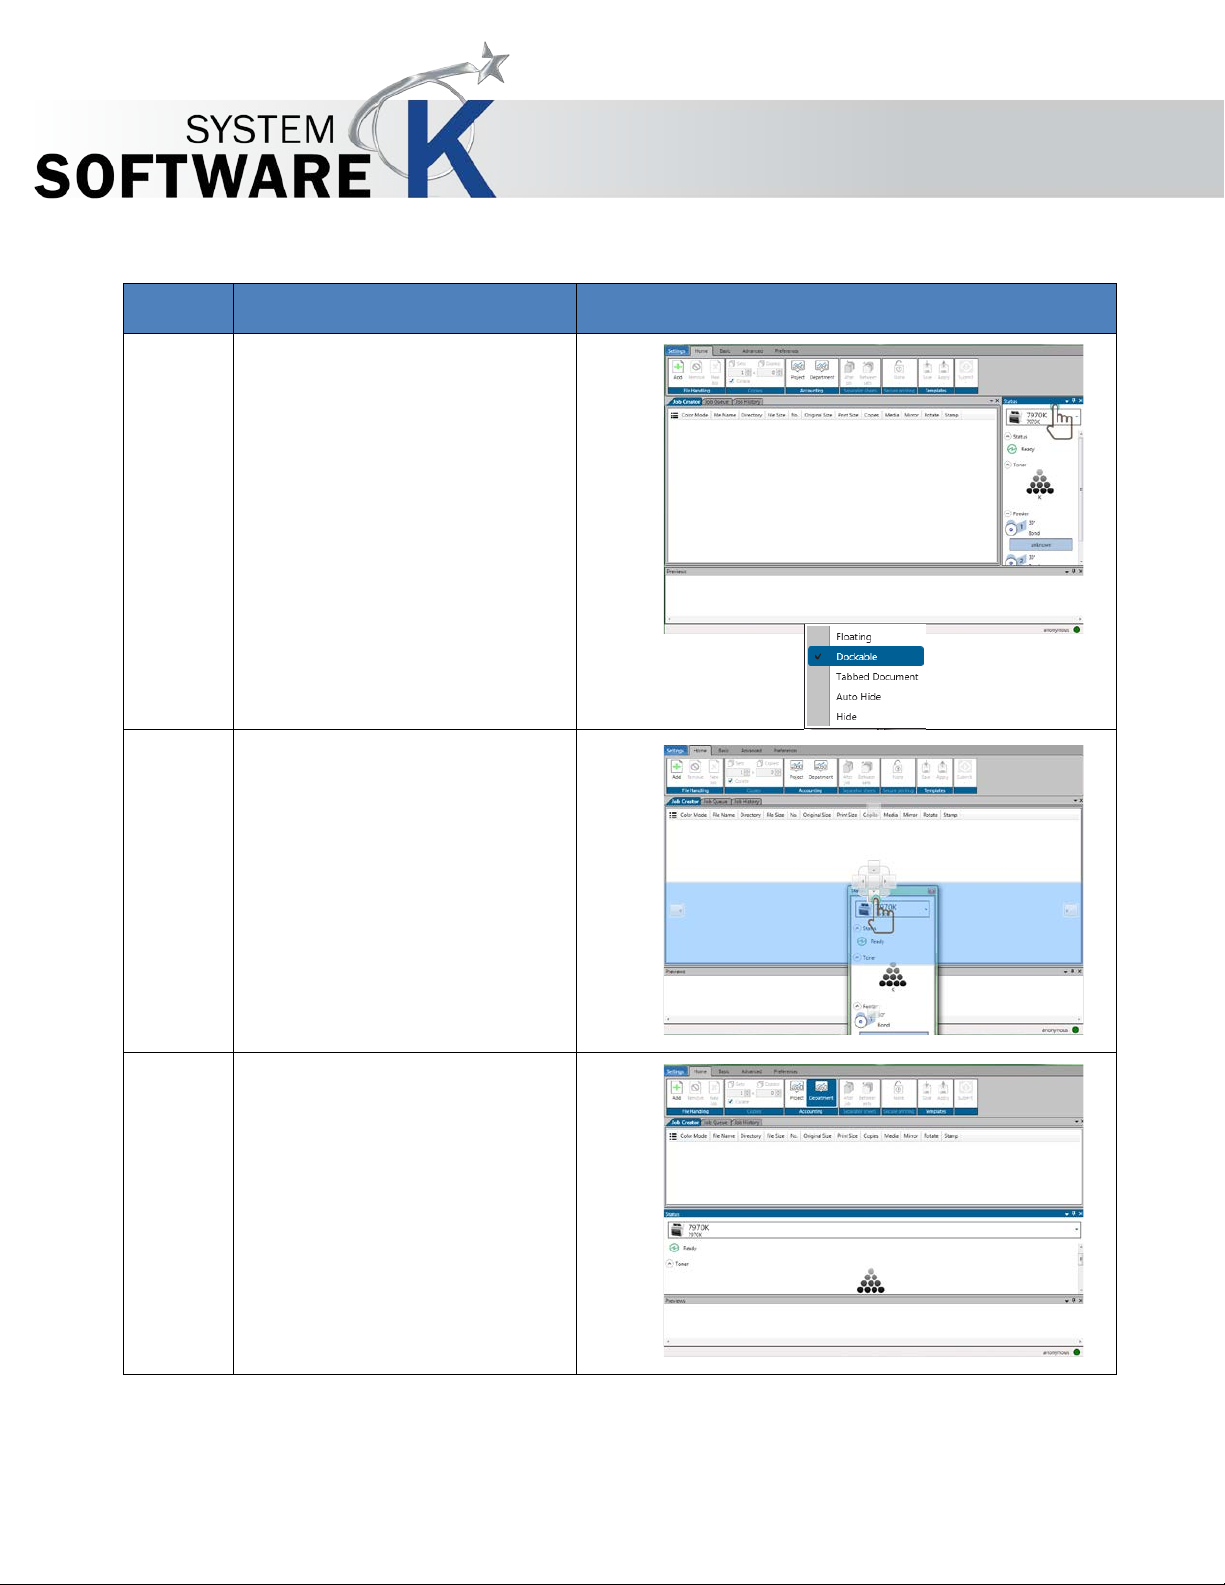
1.
Placement of Panes
2.
Move the pane to the desired
3.
Release the mouse button to
2.1 Dockable
KIP Print Pro User Guide
Dockable – Move pane within
screen
Using the mouse, click and hold
on the top bar of the pane to be
moved.
Then drag this pane outside the
KIP Print Pro Screen.
Note: It is also possible to right
click on the main bar and
choose from the list of functions.
position on the pad.
Note: The location where the
pane will be place will highlight
in blue.
place the pane in the new
position.
No part of this publication may be copied, reproduced or distributed in any form without express written permission
from KIP. 2015 KIP. v1
- 18 -
Page 19
Step
Action
Illustration
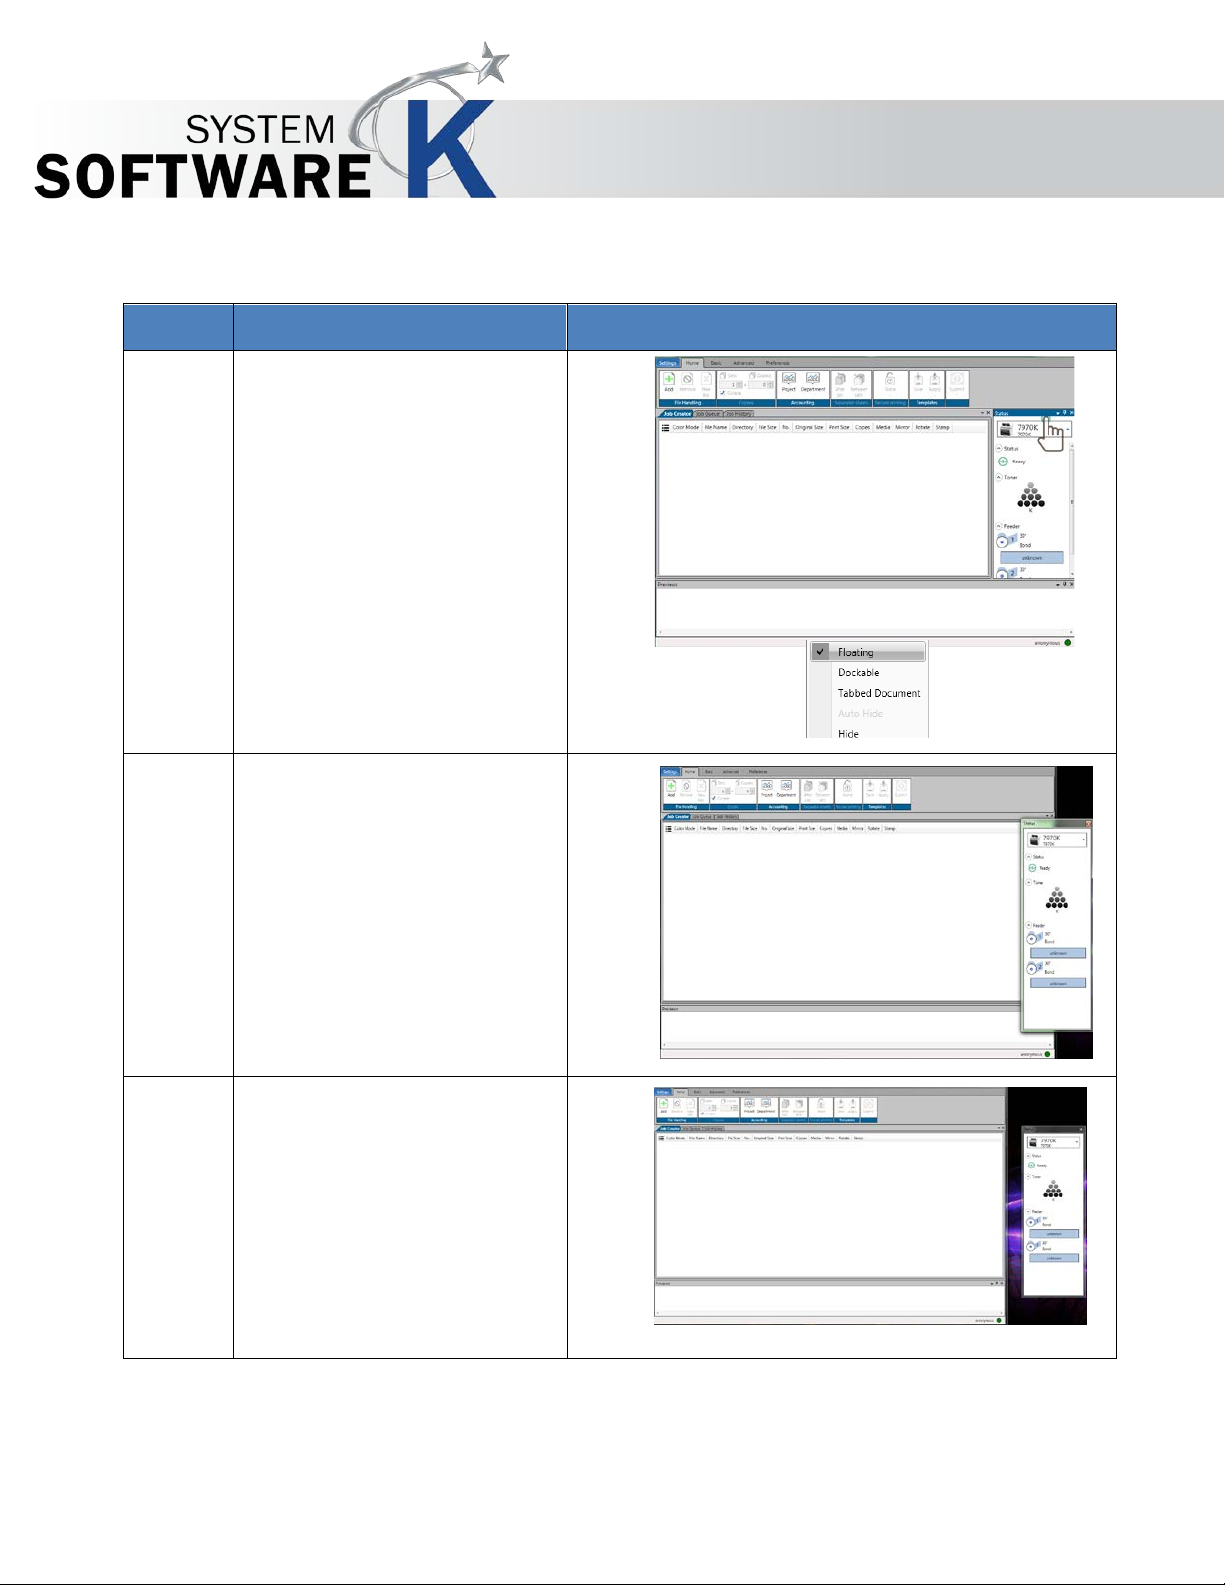
1.
Floating – Moves pane outside
2.
Move the pane to the desired
3.
Place the pane anywhere
2.2 Floating
KIP Print Pro User Guide
of screen
Using the mouse, click and hold
on the top bar of the pane to be
moved.
Note: It is also possible to right
click on the main bar and
choose from the list of functions.
position outside of the main KIP
Print Pro screen.
outside the main screen on your
available desktop.
No part of this publication may be copied, reproduced or distributed in any form without express written permission
from KIP. 2015 KIP. v1
Note: If multiple monitors are
used the pane can be placed
on a separate monitor as well.
- 19 -
Page 20
Step
Action
Illustration
1.
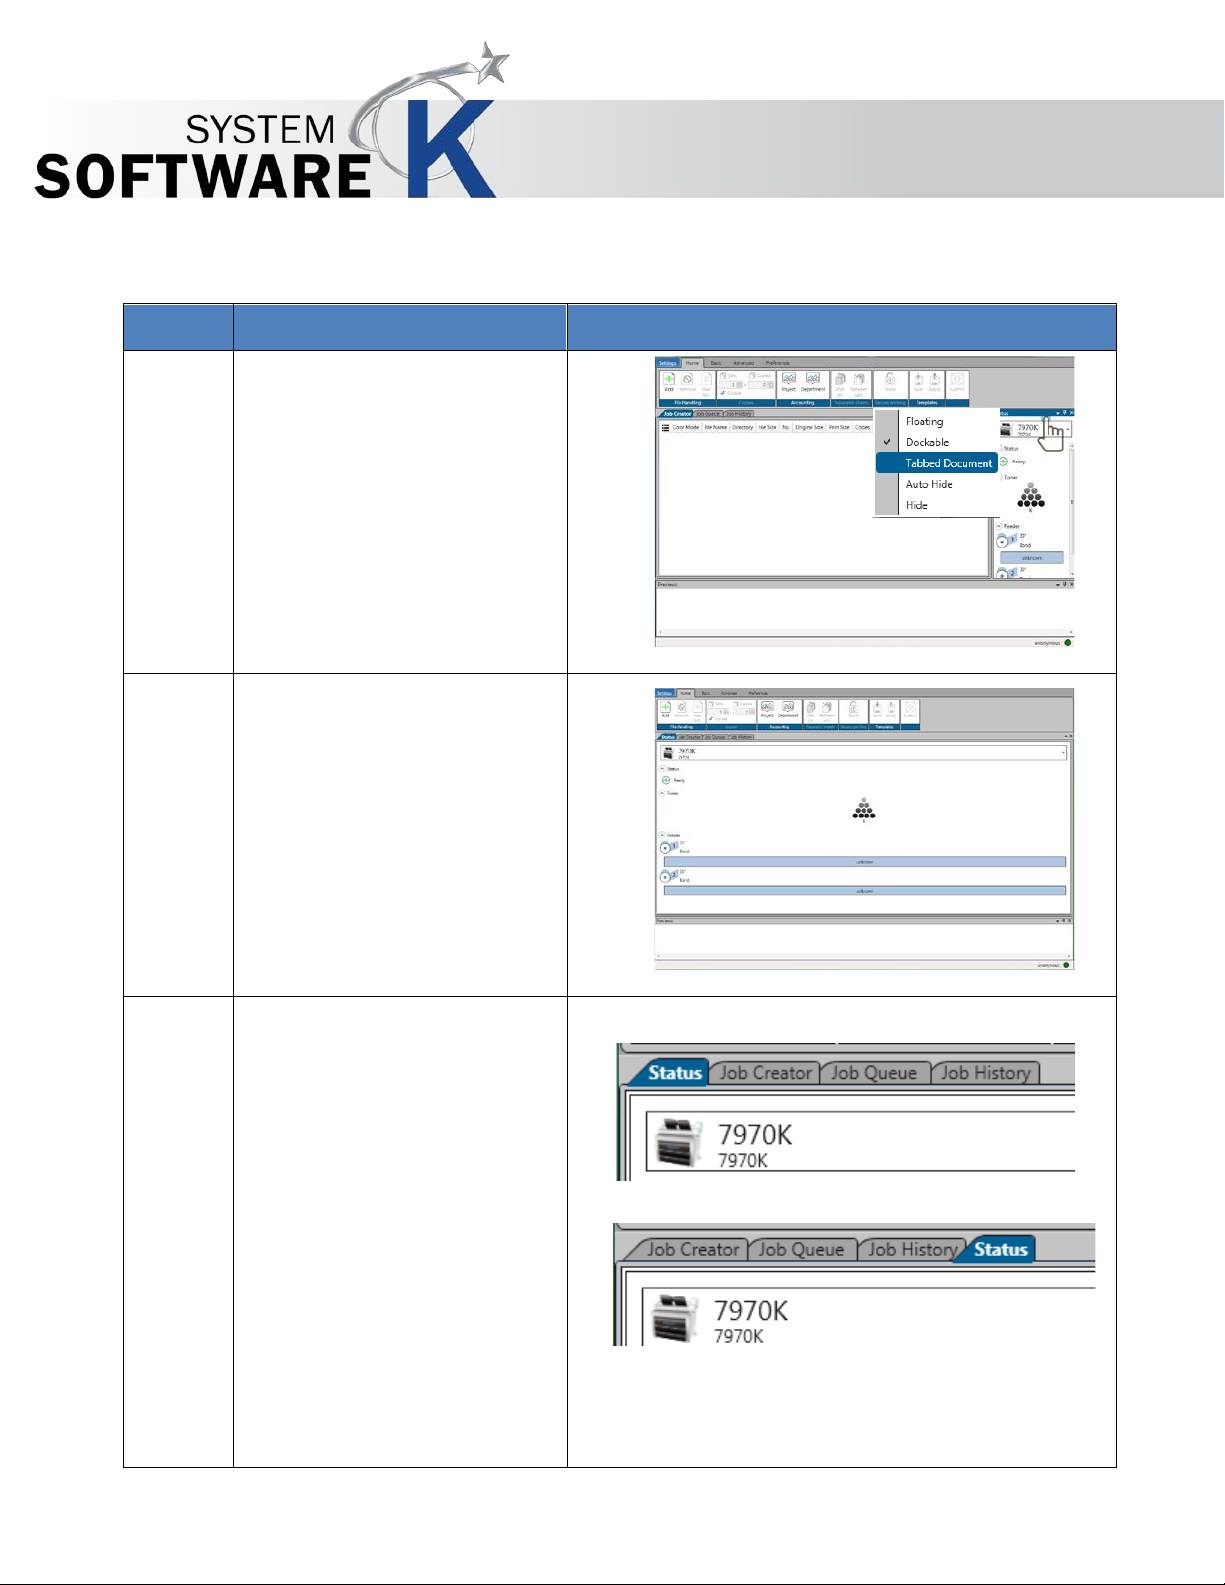
Tabbed Document – Move Pane
2.
The new tab will be created and
3.
To change the position of the
2.3 Tabbed Document
KIP Print Pro User Guide
to a tabbed position
Using the mouse right click the
top bar of the pane to be
moved.
Select the Tabbed Document
setting.
placed at the front of the
current tabs.
Note: Status is now the first and
current tab displayed on the
main screen.
Status tab click and hold the
active (blue) tab and drag into
the order desired.
No part of this publication may be copied, reproduced or distributed in any form without express written permission
from KIP. 2015 KIP. v1
Note: The Status tab is now the
last available tab.
- 20 -
Page 21
Step
Action
Illustration
1.
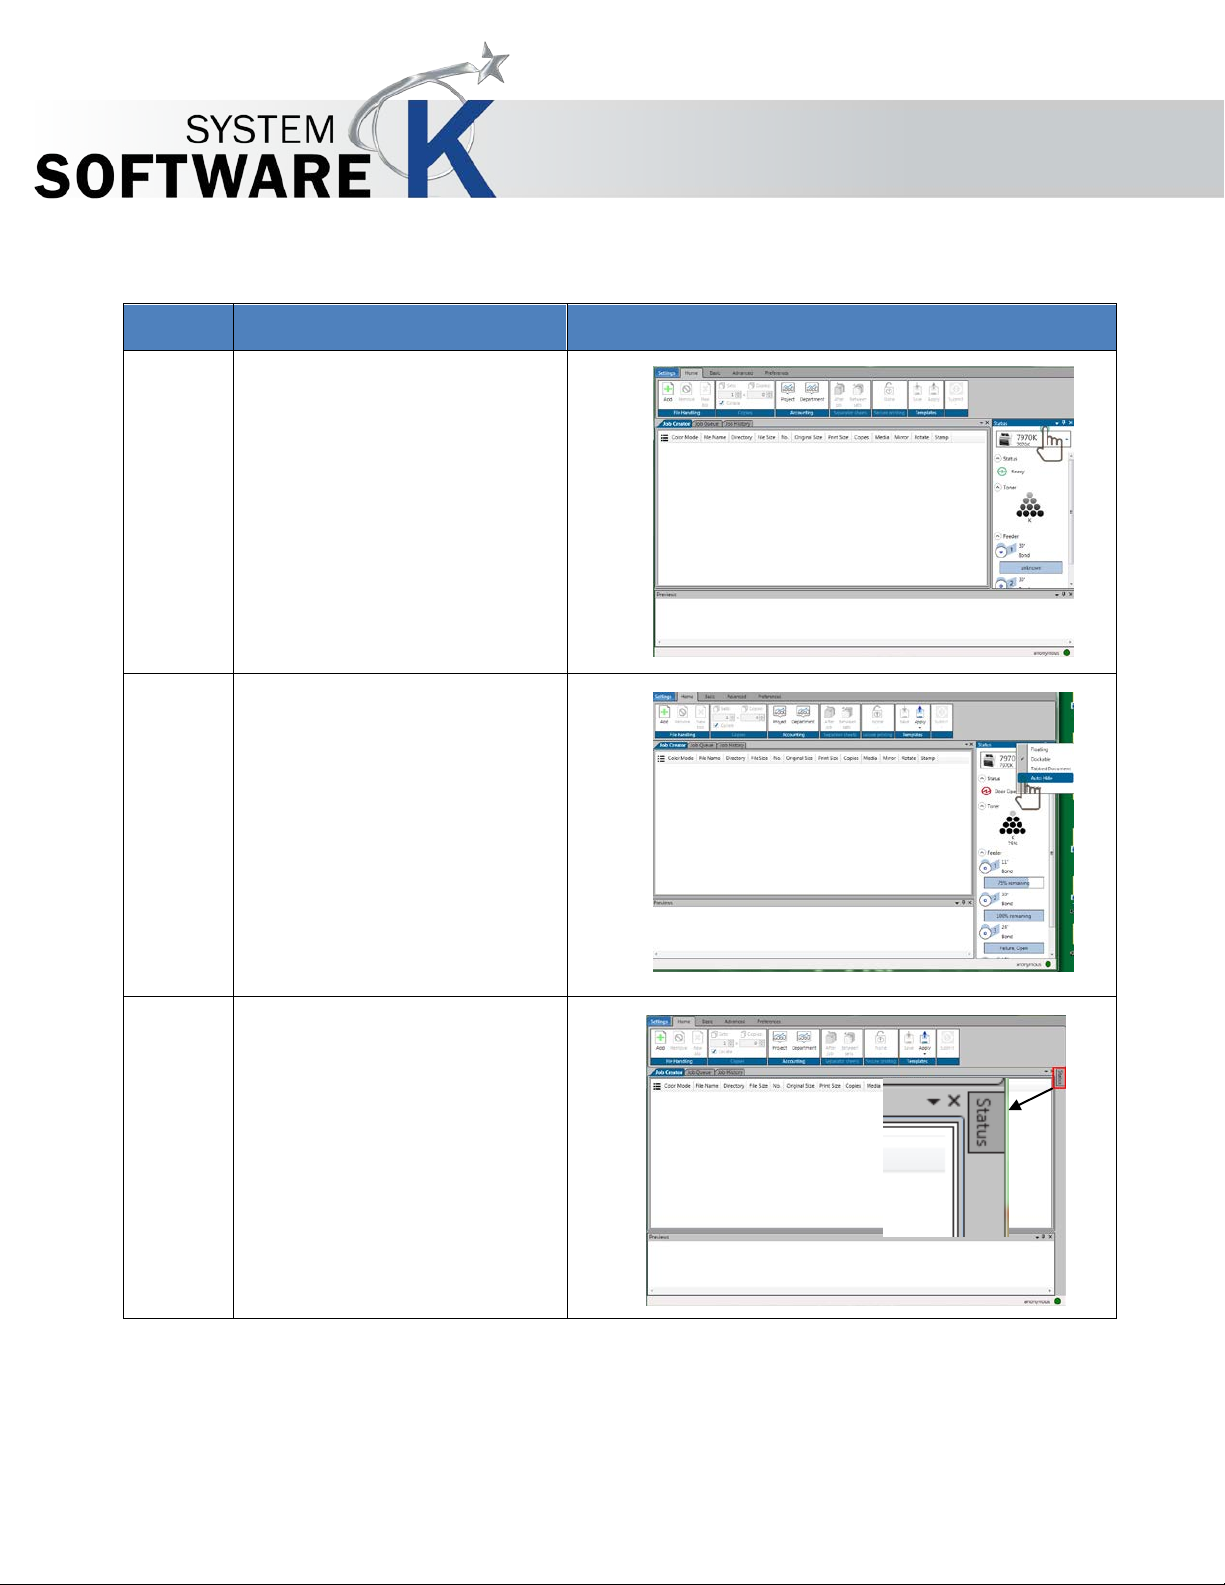
Auto Hide – Hides panes that
2.
When the drop down opens
3.
The Status Pane will now show
2.4 Auto Hide
KIP Print Pro User Guide
are not in use.
If a pane is used but not that
often it is possible to Auto Hide
this pane.
Right click on the top bar of the
pane.
select the Auto Hide function.
up on the right side of the
screen as a small tab.
No part of this publication may be copied, reproduced or distributed in any form without express written permission
from KIP. 2015 KIP. v1
- 21 -
Page 22
Step
Action
Illustration
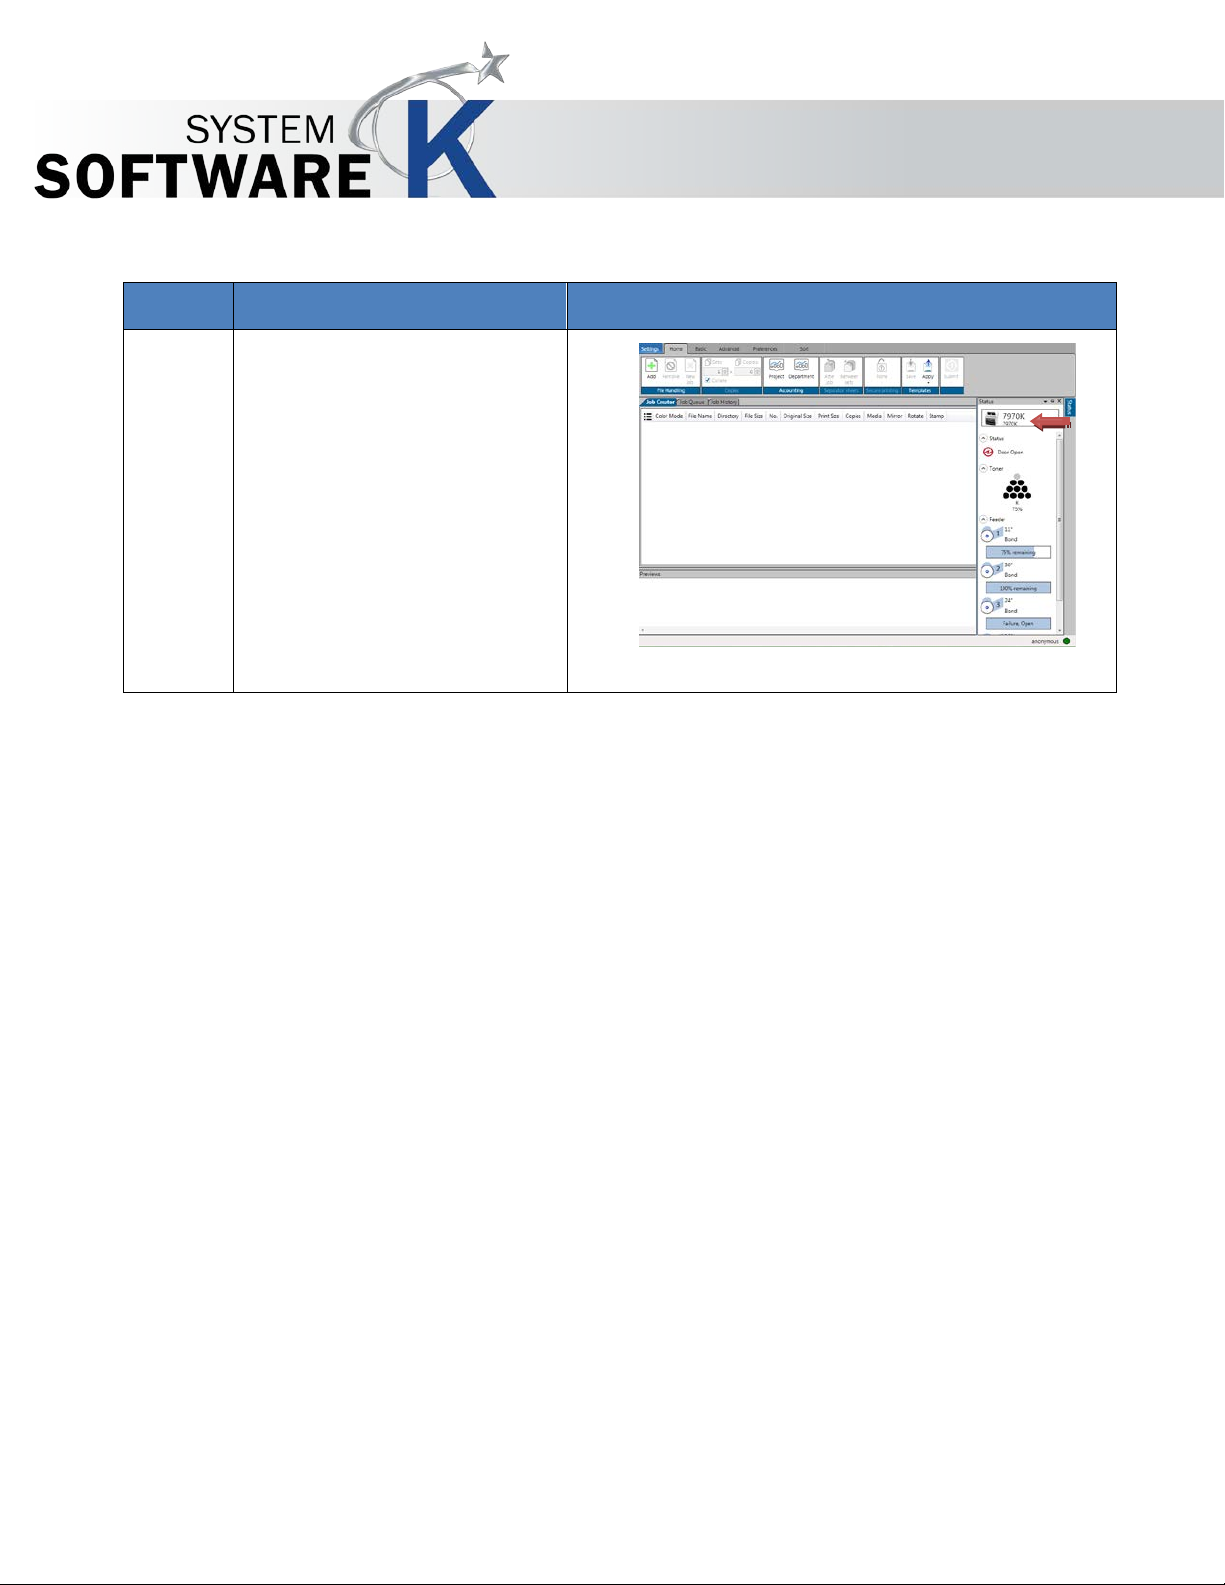
4.
Mouse over the tab and the
KIP Print Pro User Guide
Pane will pop out again and
then Auto Hide when not in use.
No part of this publication may be copied, reproduced or distributed in any form without express written permission
from KIP. 2015 KIP. v1
- 22 -
Page 23
Step
Action
Illustration
1.
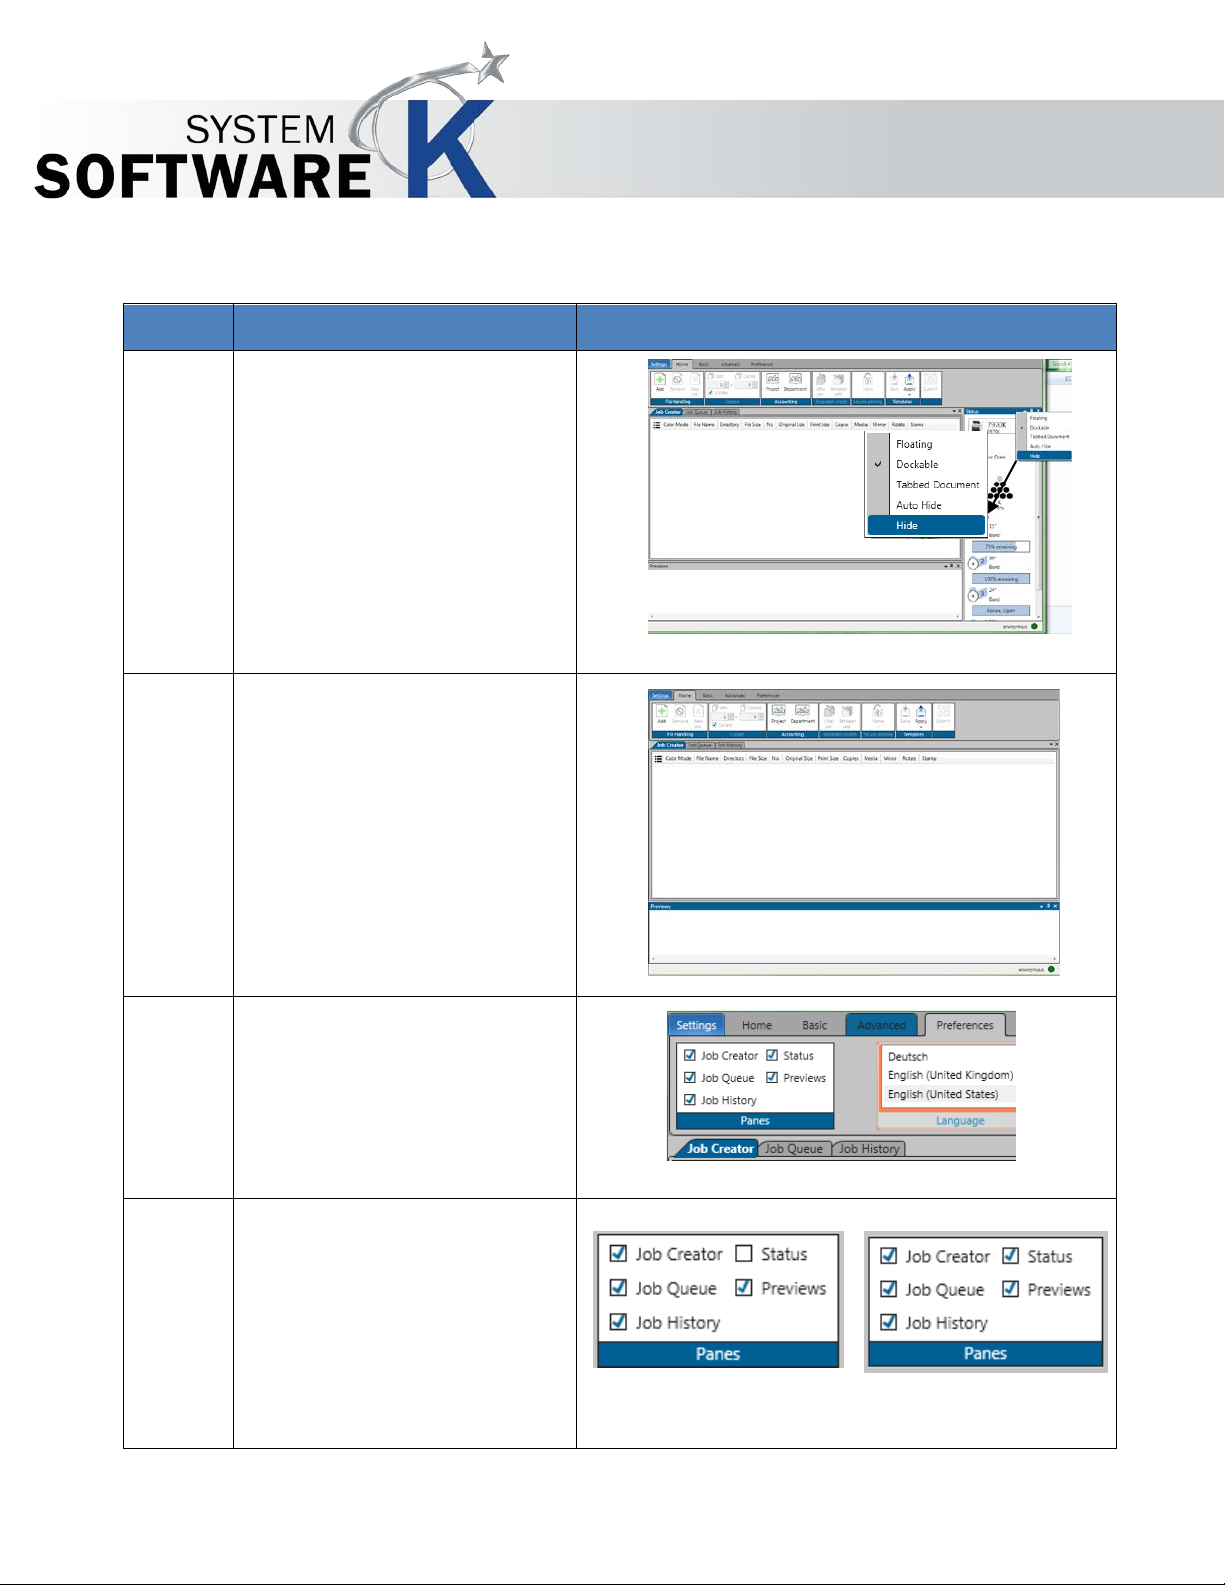
Hide – Remove Pane.
2.
Once Hide is selected the pane
3.
To return a pane that has been
4.
Un-select the Status check box
2.5 Hide
KIP Print Pro User Guide
If a pane is not going to be used
it is also possible to just Hide that
pane from sight.
Right Click on the top bar of the
pane to be hidden and then
select the Hide function.
will no longer be available.
Note: The right side no longer
has a Status pane.
Hidden (not Auto Hide)
Go to the Preferences tab.
and then Select it again.
No part of this publication may be copied, reproduced or distributed in any form without express written permission
from KIP. 2015 KIP. v1
This will add the Status Pane
back to the Main screen
- 23 -
Page 24
Step
Action
Illustration
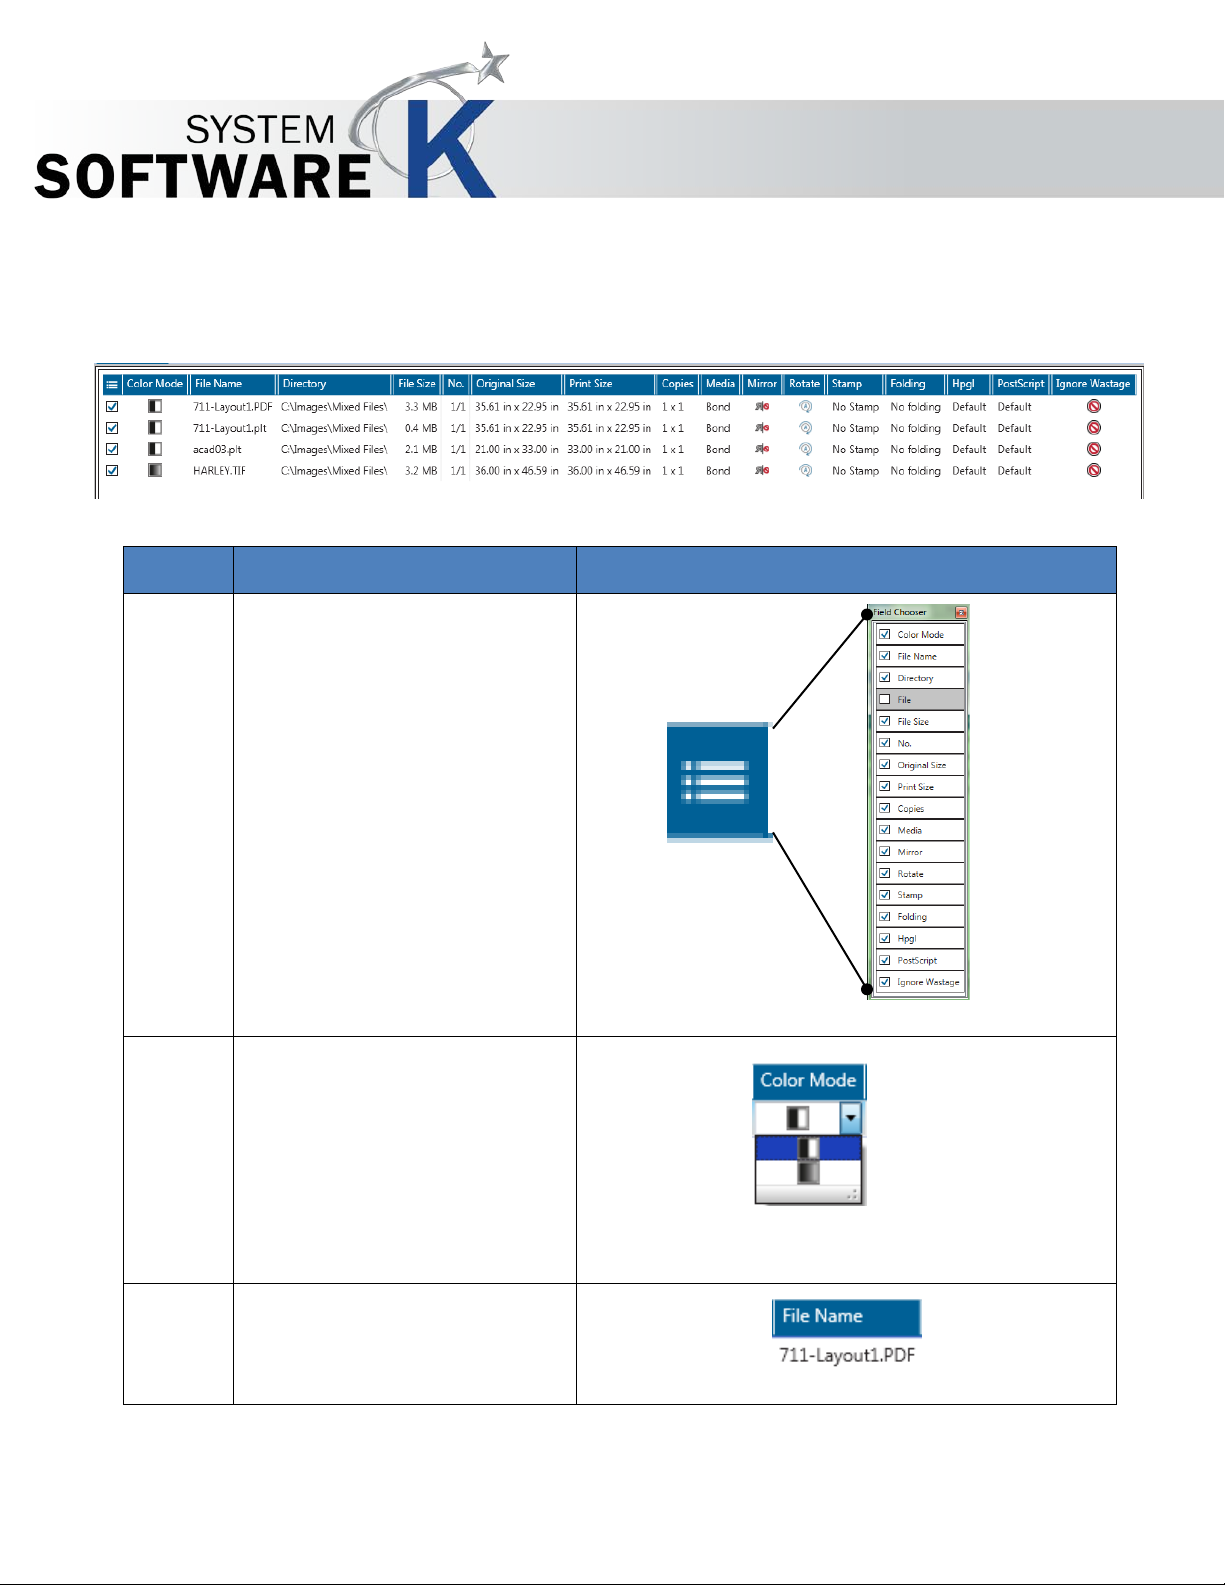
1.
Chooser – Selecting this icon will
2.
Color Mode – Select the
3.
File Name – Displays the name of
KIP Print Pro User Guide
2.6 Job Matrix Configuration
The Job Matrix section can be manipulated for the best work flow for the user as well as used to configure the
files in the current job.
allow for the turning on/off of
individual fields that may or may
not be used.
dropdown to select from
available color modes.
• B&W
• Greyscale
• Color (if attached to
a color printer)
the selected file.
No part of this publication may be copied, reproduced or distributed in any form without express written permission
from KIP. 2015 KIP. v1
- 24 -
Page 25
Step
Action
Illustration
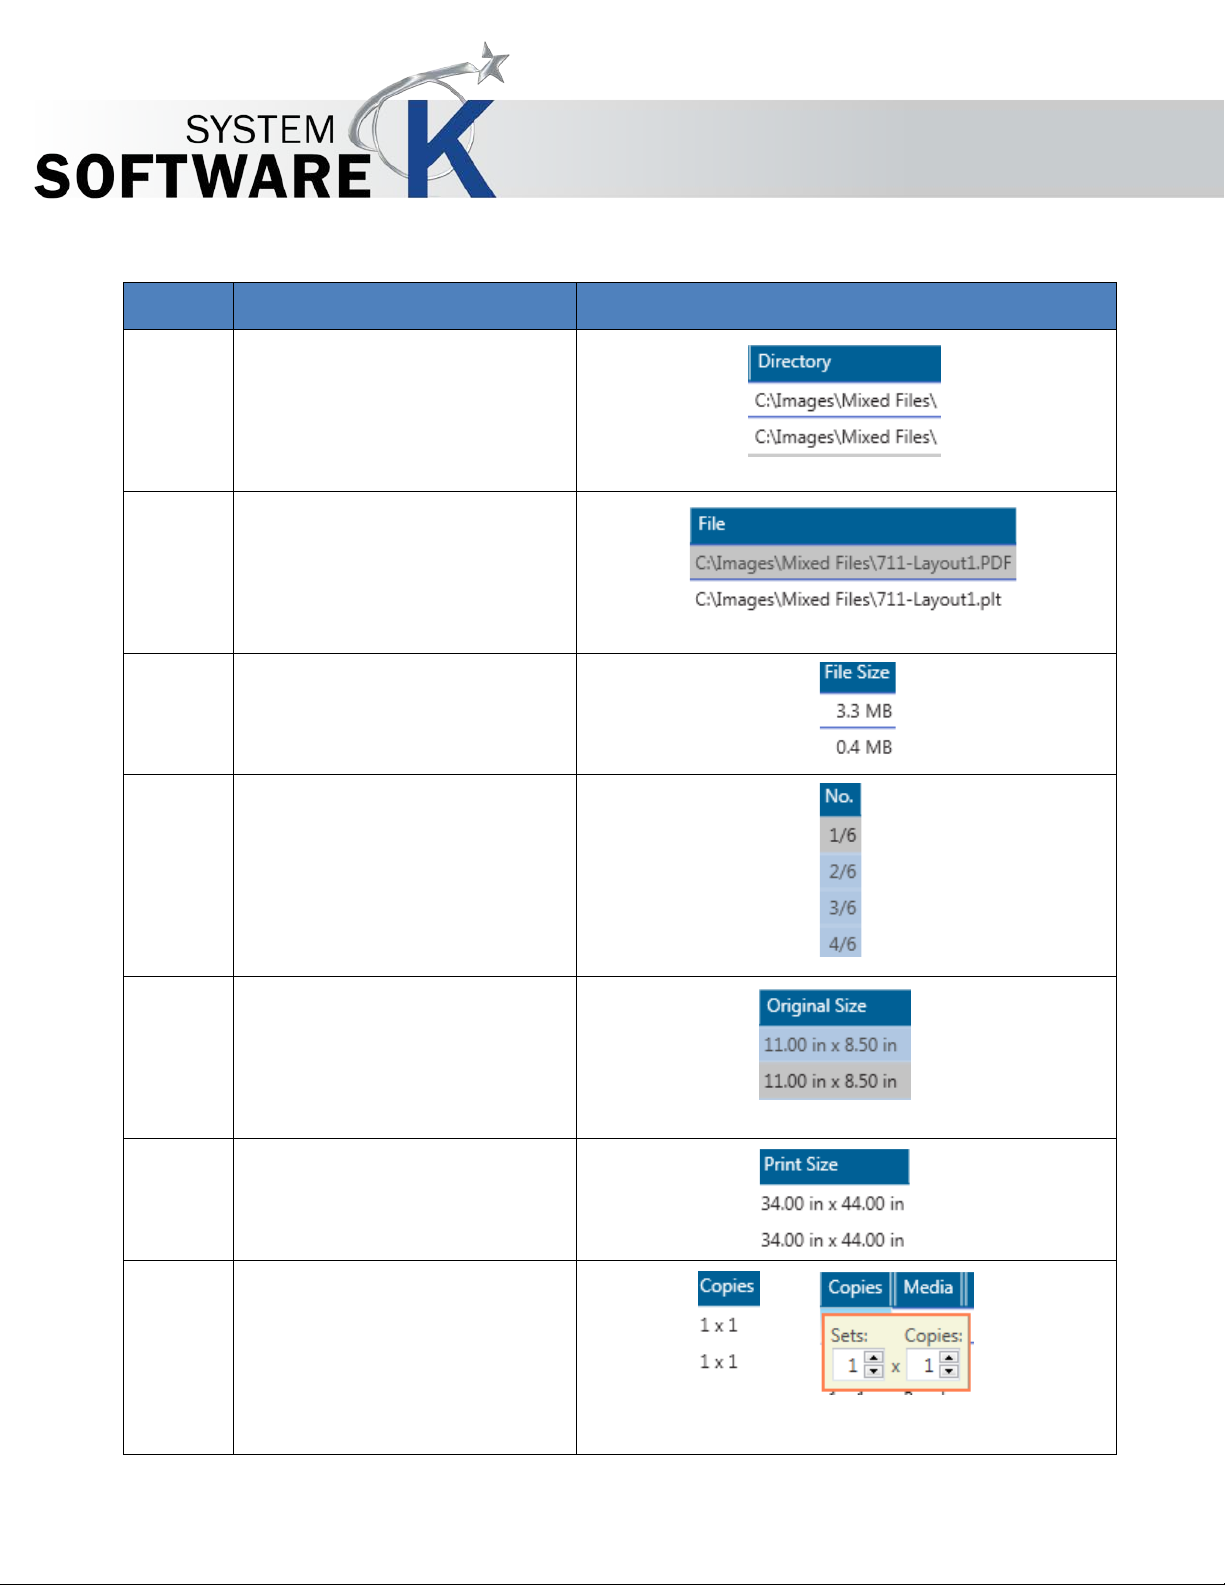
4.
Directory – Displays the location
5.
File – Displays both the file name
6.
File Size – Displays the actual File
7.
Number (NO.) – Displays the
8.
Original size – Displays the
9.
Print Size – Displays the output
10.
Copies – Displays the number of
KIP Print Pro User Guide
of the selected file.
and the file location.
size.
number of the file. If a multipage
is selected this would be noted
here.
original size of the file.
size of the selected file (s)
sets and copies to be printed.
Note: Double clicking in this field
will allow sets to be adjusted for
No part of this publication may be copied, reproduced or distributed in any form without express written permission
from KIP. 2015 KIP. v1
entire job as well as copies to be
adjusted for that specific file
- 25 -
Page 26
Step
Action
Illustration
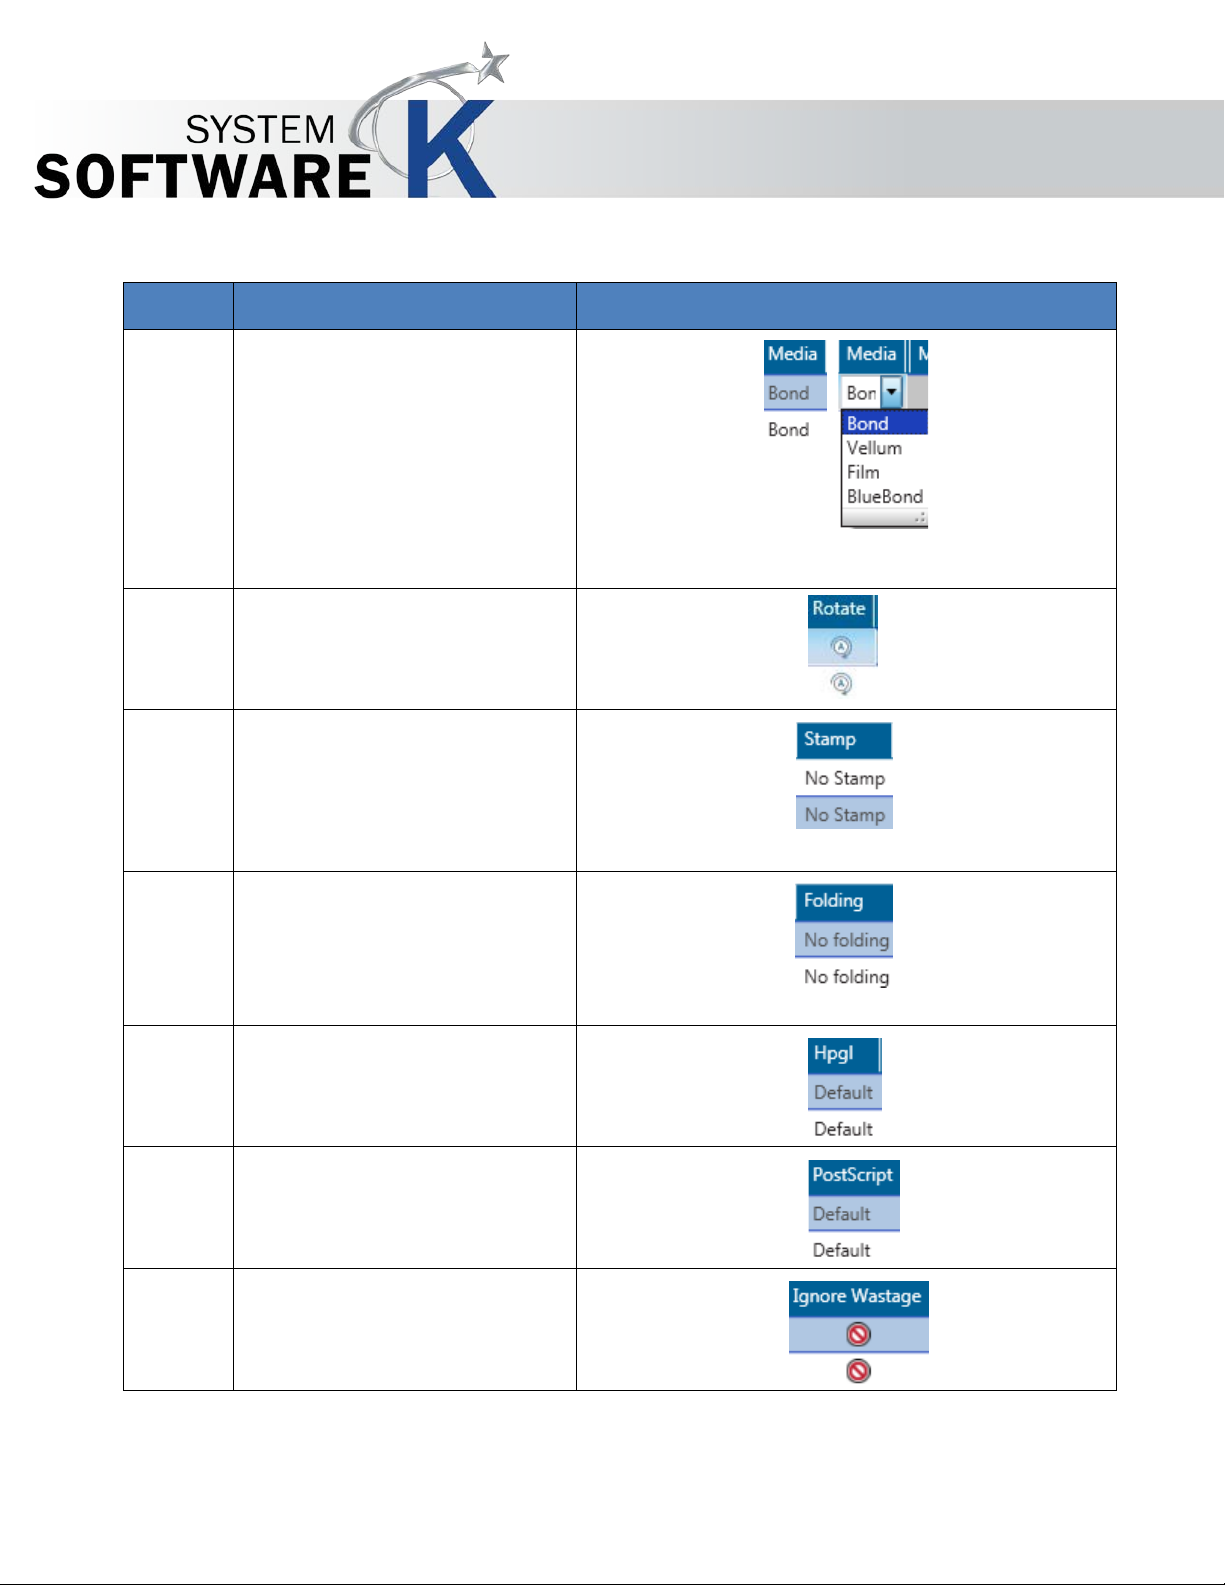
11.
Media – Select from Avai la bl e
12.
Rotate – Allows for the rotation of
13.
Stamp – Select available stamps
14.
Folding – if a folder is attached
`
15.
HPGL – Used to apply pre-
16.
Postscript - Used to apply pre-
17.
Ignore Wastage
KIP Print Pro User Guide
configured medias including:
• Bond
• Vellum
• Film
• Custom medias will show
here as well
the selected file(s).
to be applied to the final output.
the user can select from preconfigured folding packets or let
the Printer determine the fold
based on size.
configured HPGL templates.
configured Postscript templates.
No part of this publication may be copied, reproduced or distributed in any form without express written permission
from KIP. 2015 KIP. v1
- 26 -
Page 27
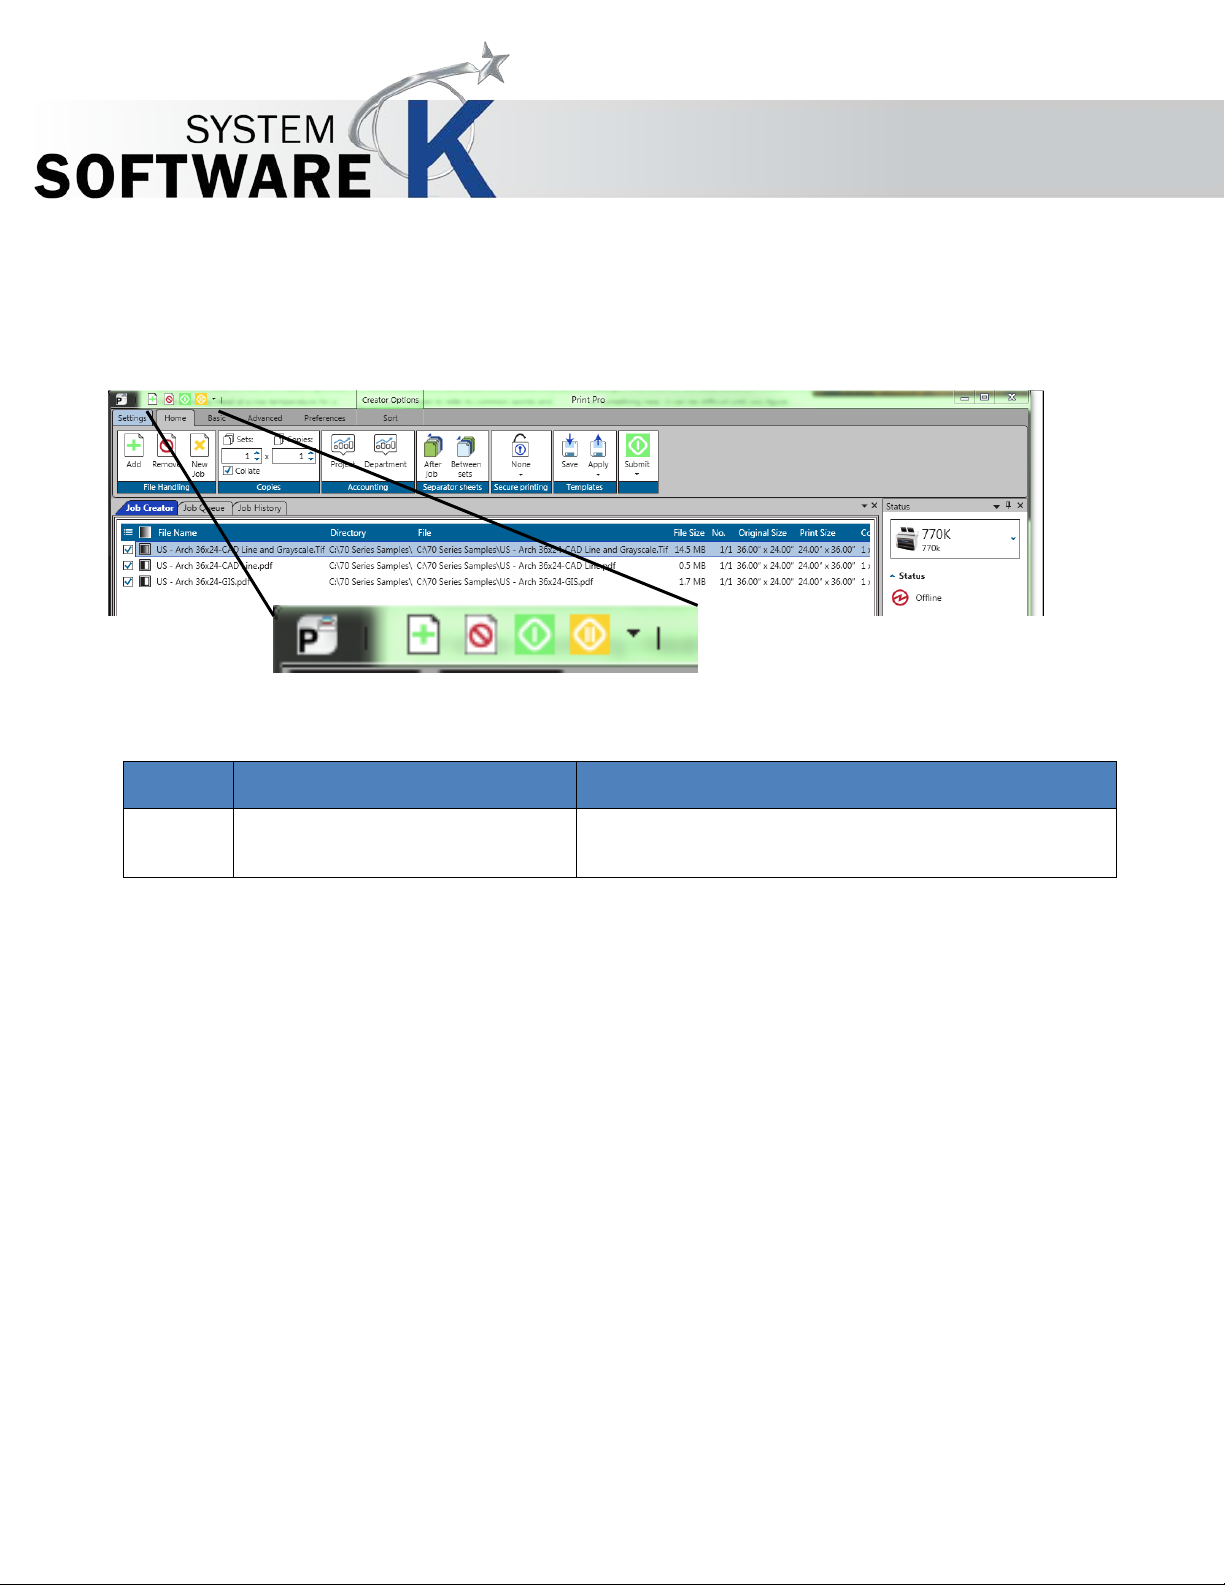
Step
Action
Illustration
1.
Quick access toolbar
This toolbar by default will be located at the
KIP Print Pro User Guide
2.6 Quick Access Toolbar
The Quick Access Toolbar allow for the customization of a toolbar for frequently used buttons making them
available on all pages. This reduces the need to go back to a specific tab to do a function such as Submit the
job from the Home tab.
can be loaded
top left of the screen. Ican be moved to below the
No part of this publication may be copied, reproduced or distributed in any form without express written permission
from KIP. 2015 KIP. v1
- 27 -
Page 28
2
3
4
5
6
7
9
12 1 8
10
11
KIP Print Pro User Guide
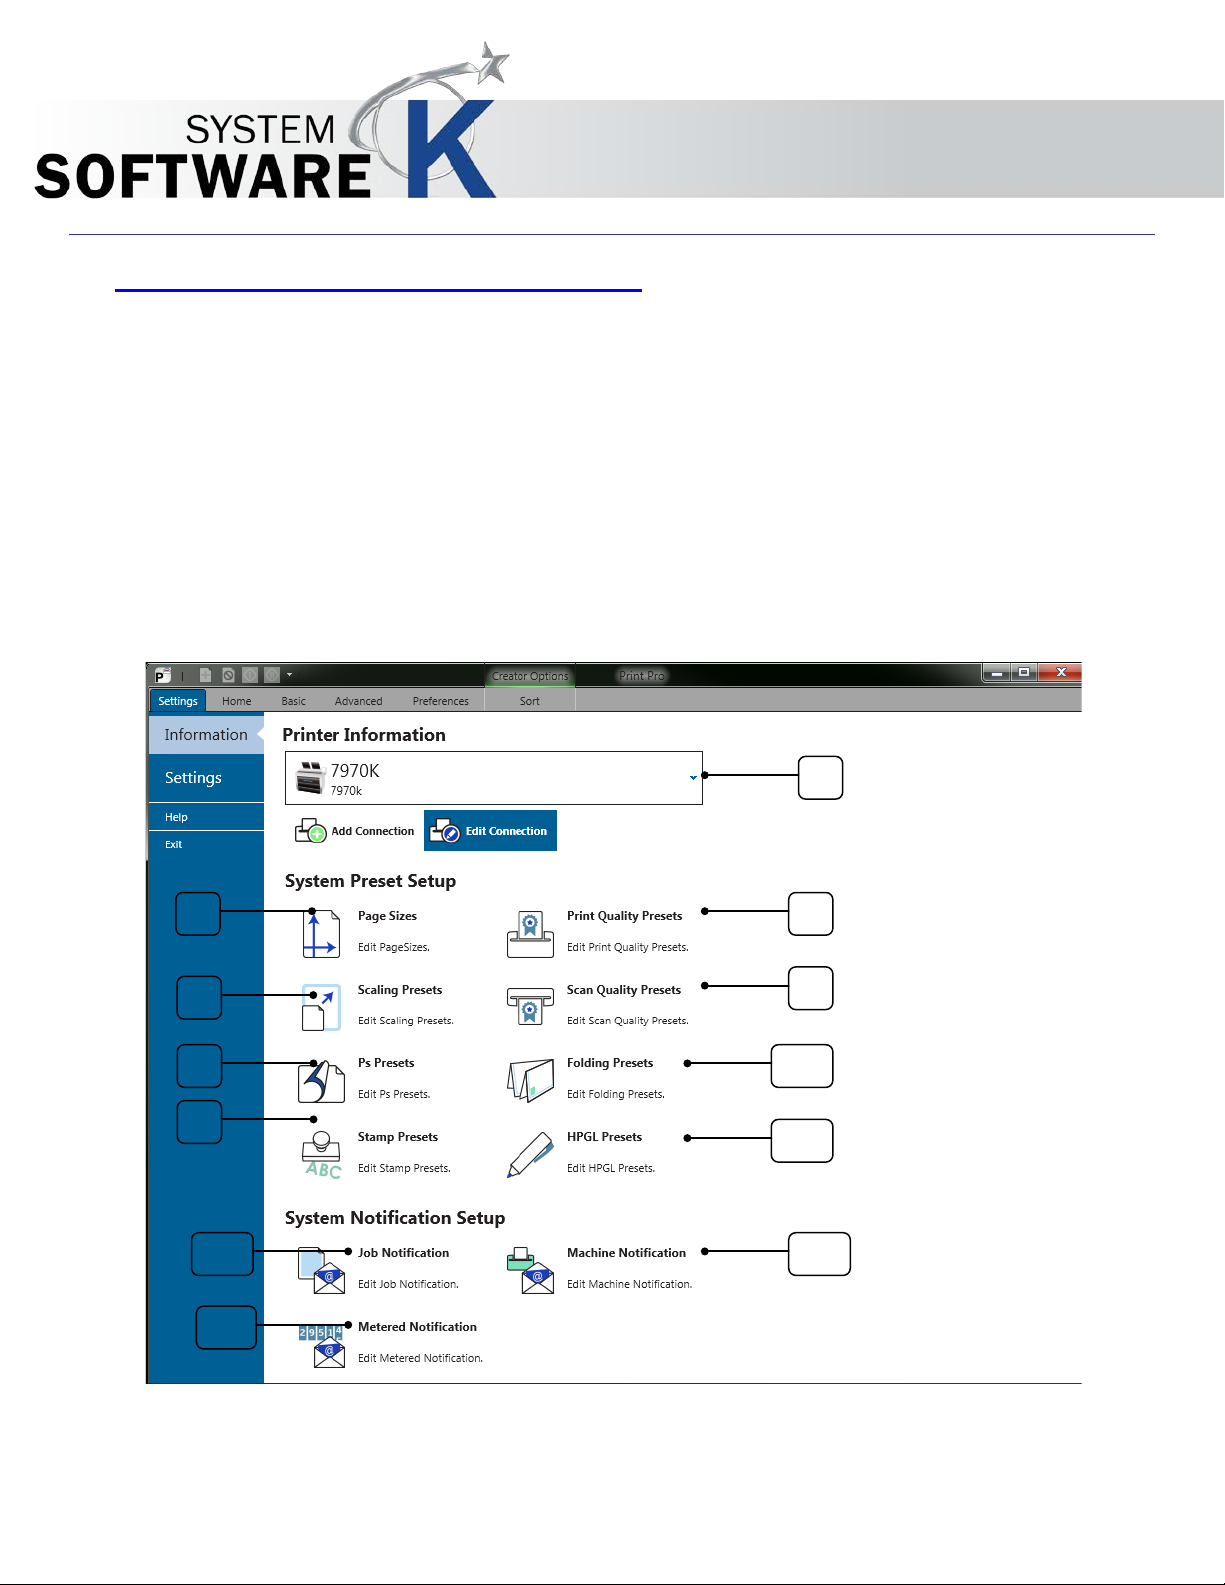
3 System Presets/Notifications Setup
System Presets are presets that are configured through KIP Print Pro that control the functions of specific items
associated with the KIP Printer. This section will describe how to configure the available presets from within KIP
Print Pro.
• Scan Quality Presets
• Stamp Presets
• Page Size
• Job Notifications
Please note: These same presets can also be configured through KIP PrintPro.Net.
• PS Presets
• Scaling Presets
• Folding Presets
• HPGL Presets
• Machine Notification
• Metered Notification
No part of this publication may be copied, reproduced or distributed in any form without express written permission
from KIP. 2015 KIP. v1
- 28 -
Page 29

Component
Function
1. Printer Information
Allows users to add new KIP Printers or edit existing KIP Printers
2. Page Sizes
Allows users to Edit Page Sizes
3. Scaling Presets
Allows users to Edit Scaling Presets
4. Postscript Presets
Allows for the adjustments of Postscript settings.
5. Stamp Presets
Allows users to Edit Stamp Presets
6. Print Quality Presets
Allows users to Edit Print Quality Presets
7. Scan Quality Presets
Allows users to Edit Scan Quality Presets
8. Folding Presets
Allows users to Edit Folding Presets
9. HPGL Presets
Allows users to Edi t HP G L Pr esets
10. Job Notification
Allows users to Edit Job Notifications
11. Metered Notification
Allows users to Edit Metered Notifications
12. Machine Notification
Allows users to Edit Machine Notifications
KIP Print Pro User Guide
No part of this publication may be copied, reproduced or distributed in any form without express written permission
from KIP. 2015 KIP. v1
- 22 -
Page 30
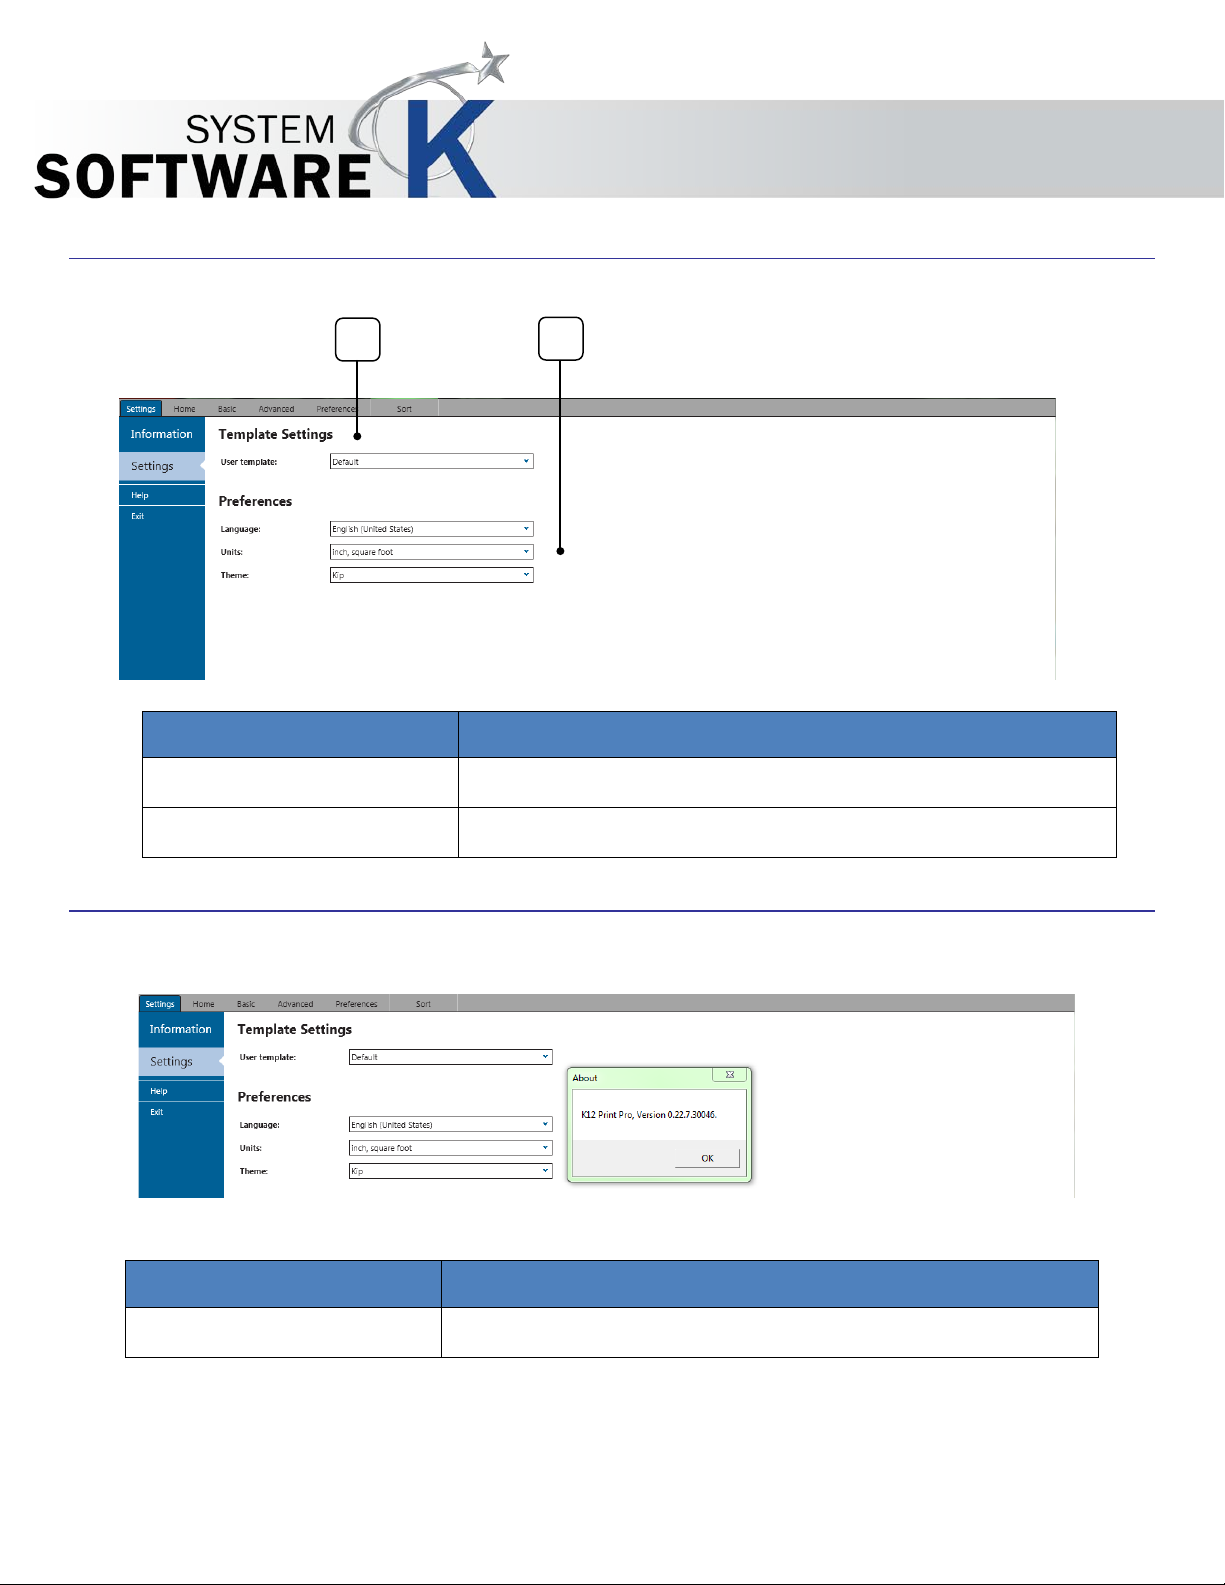
Component
Function
1. Settings
Allows users to select templates to be used with Jobs.
2. Preferences
Set default preferences for the Application.
Component
Function
1. Help
Selecting Help displays the Application version number..
1
2
3.1 Settings
KIP Print Pro User Guide
3.2 Help
No part of this publication may be copied, reproduced or distributed in any form without express written permission
from KIP. 2015 KIP. v1
- 23 -
Page 31

Step
Action
Illustration
1.
Select the Add Connection
2.
The Connection Setting Wind ow
3.
Printer is going to be set to the
4.
Save – Select Save to set the new
KIP Print Pro User Guide
3.3 Printer Installation and Setup
The first step is to add the KIP Printer. This has to be done to make the connection from the workstation to the KIP
Printer so that jobs can be sent to be printed.
KIP Print Pro can be installed using two different methods:
1. Standard Installation package (executable)
2. Installed by pulling the application from the KIP Printer via KIP Print Pro.Net
If the KIP Print Pro application is pulled from the KIP Printer, once installed it will already be connected to the KIP.
If however KIP Print Pro is installed via an install package, the following will be necessary.
button.
will open. This is where the
following information will be
entered:
Printer Name – The name given
to the KIP Printer during
installation.
Connection (IP/Hostname) – The
IP address or the Hostname set at
the Printer during Installation.
Port – Port Number that will be
used (default is 9888 )
No part of this publication may be copied, reproduced or distributed in any form without express written permission
from KIP. 2015 KIP. v1
Printer name given to the KIP
Printer during install.
connection. When connection is
made the Printer Information
screen becomes active.
- 24 -
Page 32

Step
Action
Illustration
1.
Select the Print Quality Icon
2.
Once open this screen will show
3.
Selecting the “New” icon will
4.
Name– This is the name that will
5.
Image Quality – Choose from the
3.4 Print Quality
KIP Print Pro User Guide
all of the pre-configured Print
Quality modes as well as allow
for the creation of new presets.
allow for the creation of a new
Print Quality preset.
Fill in the appropriate sections
and select “Save” to save the
Preset or Save (active) to save
the Preset and make it active as
well.
be displayed in the Preset list of
names and will be displayed on
the main screen.
Dropdown of available settings.
No part of this publication may be copied, reproduced or distributed in any form without express written permission
from KIP. 2015 KIP. v1
- 25 -
Page 33

Step
Action
Illustration
6.
Color Setting – There are multiple color
KIP Print Pro User Guide
settings that can be applied to the
selected Color Space:
• Use RGB
o Use RGB allows for the
setting of Black/White
Point, Gray Correction,
Gamma Correction and
Special Filters.
• Use CIELAB
o Use CIELAB allows for
the setting of
• Use CMYK
ICC/CIELAB Options,
Black/White Point,
Special Filter, Color
Adjust and Color
Exchange.
o Use CMYK has no
additional settings as
this uses the CMYK
setting in the file
created.
No part of this publication may be copied, reproduced or distributed in any form without express written permission
from KIP. 2015 KIP. v1
- 26 -
Page 34

Step
Action
Illustration
Color Settings – Continued
KIP Print Pro User Guide
ICC/CIELAB Options
• RGB Profiles – Choose from sRGB
with Overwrite embedded RGB
profile on or off.
• CMYK Profiles – Choose from SWOP
and Euroscale with Overwrite
embedded CMYK profile on or off.
• Rendering Intent – Choose from
o Perceptual
o Absolute
o Relative
o Saturation
No part of this publication may be copied, reproduced or distributed in any form without express written permission
from KIP. 2015 KIP. v1
- 27 -
Page 35

Step
Action
Illustration
Color Settings – Continued
Black/White Point
• Blackpoint – Control the Lightness 0
to 100. 0. The lower the value the
darker the output.
• Whitepoint – Control the Lightness
100 to 0. The higher the value the
lighter the output.
• Green/Red - Control the green to
red value 0 to 127. The lower the
value the more green in the
output/the higher the value the
more red in the output.
KIP Print Pro User Guide
• Yellow to Blue - Control the yellow
to blue value 0 to 127. The lower
the value the more yellow in the
output/the higher the value the
more blue in the output.
• Color Saturation - Check the box
Preserve Color Saturation to keep
Color Saturation unaffected by any
changes to Black and White Point.
No part of this publication may be copied, reproduced or distributed in any form without express written permission
from KIP. 2015 KIP. v1
- 28 -
Page 36

Color Settings – Continued
Don’t Use Special Filter – Special filter is not used when this is selected
Color Adjust – Allows a fine tuning
The saturation channels are two half axis of the a- and b-channels. They can be modified either
KIP Print Pro User Guide
Special Filter
Sharpening Mode – Used to make fuzzy picture clear. As outlines are enhanced, pictures
become clearer. This setting increases the contrast between light and dark pixels and
enhances the edge sharpness of text and lines drastically. 0 no sharpening 100 max
sharpening. Default is 50.
Smoothing Mode - To reduce image noise and distortions, and affects the whole picture
contrast.
Adaptive Mode - Is made of two unique filters, both possessing the features of S
MOOTH, whose intensity can be adjusted in the entry fields under LEVEL. The upper entry
S
field controls foreground objects that should be enhanced, such as text, whereas the lower
field is for image backgrounds needing smoothing. With both filters, you will reach a
maximum smoothing effect at 0 and a maximum sharpening effect at 100.
Filter Radius – The Filter Radius value will change the number of pixels that are affected by
the current filter.
of the colors in the LAB color
space.
HARP and
separately or all at once.
If you want to change them simultaneously, activate the chain link in the center.
No part of this publication may be copied, reproduced or distributed in any form without express written permission
from KIP. 2015 KIP. v1
To remove a Color tint you can use the Color Adjustment values.
Gamma Correction - Allows the adjustment of color shifts in the Red/Green and Yellow/Blue
range to correct the brightness.
- 29 -
Page 37

Step
Action
Illustration
Color Settings – Continued
7.
Greyscale Settings - There are
Blackpoint
KIP Print Pro User Guide
Color Exchange – To use enter
the Source color LAB values in
the first three spaces and the
Target color LAB values in the last
three spaces.
multiple settings that can be
applied to this selection:
• Black/White Point
• Special Filter
• Advanced
• Adaptive (BP) - The adaptive values cannot be edited; they are calculated for
every file. This auto detects and sets the Blackpoint
• Custom Gray Value (BP) can be adjusted from 0 to 255. Setting this to a higher
value will produce darker text.
Whitepoint
• Adaptive (WP) - The adaptive values cannot be edited; they are calculated for
every file. This auto detects and sets the Whitepoint.
• Custom Gray Value (WP) can be adjusted from 0 to 255. Setting this to a lower
value will produce lighter text.
Black Enhancement
• The Black Enhancement enables you to edit black values. The lower the number
the lighter the black. Clip will determine the new base black value depending on
the black value set in Black Enhancement.
Background Removal
No part of this publication may be copied, reproduced or distributed in any form without express written permission
from KIP. 2015 KIP. v1
• Used to tune background contrast (e.g. in order to further fine-tune text visibility).
You may additionally reduce or improve the white to grey-values. The higher the
clipping value, the brighter and whiter the image’s most white elements will
become.
- 30 -
Page 38

Step
Action
Illustration
Greyscale Settings - Continued
Don’t Use Special Filter – Special Filter is not used when this is selected.
Greyscale Settings
NEEDS INFO
KIP Print Pro User Guide
• Special Filter
Sharpening Mode – Used to make fuzzy picture clear. As outlines are enhanced, pictures
become clearer. This setting increases the contrast between light and dark pixels and
enhances the edge sharpness of text and lines drastically. 0 no sharpening 100 max
sharpening. Default is 50.
Smoothing Mode - To reduce image noise and distortions, and affects the whole picture
contrast.
Adaptive Mode - Is made of two unique filters, both possessing the features of S
MOOTH, whose intensity can be adjusted in the entry fields under LEVEL. The upper entry
S
field controls foreground objects that should be enhanced, such as text, whereas the
lower field is for image backgrounds needing smoothing. With both filters, you will reach a
maximum smoothing effect at 0 and a maximum sharpening effect at 100.
• Advanced
HARP and
No part of this publication may be copied, reproduced or distributed in any form without express written permission
from KIP. 2015 KIP. v1
- 31 -
Page 39

Step
Action
Illustration
8.
Black/White Settings - There are
Despeckle - This option removes black pixels in black & white mode, for example from scans
9.
Reset/Save/Save (activated) –
KIP Print Pro User Guide
multiple settings that can be
applied to this selection:
of murky originals. The filter searches for groups of black pixels and converts them into white.
Small-sized pixel groups, such as those forming punctuation dots, are kept.
All Pixel Neighbors - Pixels are connected neighbors when there is a series of 8 (instead of 4)
adjacent pixels, i.e. additionally to pixels of the same row or column, the diagonally-adjacent
pixels are considered to be connected.
Filter Size – It corresponds to the maximum "diameter" of the pixel area which is to be
removed.
Hole Filling - This function makes it possible to remove single pixel-sized white holes from
black areas in b&w mode.
Invert – Changes black to white and white to black
Reset – Resets to default s ettings
Save – Saves the new preset but
does not make it active for use.
Save (activated) – Saves the new
preset activated and ready for
use.
No part of this publication may be copied, reproduced or distributed in any form without express written permission
from KIP. 2015 KIP. v1
- 32 -
Page 40

Step
Action
Illustration
1.
Select the Scan Quality Presets
2.
Once open this screen will show
3.
Selecting the “New” icon will
4.
Name– This is the name that will
3.5 Scan Quality Presets
KIP Print Pro User Guide
Icon
all of the pre-configured Scan
Quality Preset modes as well as
allow for the creation of new
presets.
allow for the creation of a new
Scan Quality Preset.
Fill in the appropriate sections
and select “Save” to save the
Preset or Save (active) to save
the Preset and make it active as
well.
be displayed in the Preset list of
names and will be displayed on
the main screen.
No part of this publication may be copied, reproduced or distributed in any form without express written permission
from KIP. 2015 KIP. v1
- 33 -
Page 41

Step
Action
Illustration
5.
Color Space – Choose from:
6.
Color Settings
KIP Print Pro User Guide
Enable Color – Enables the color
settings
Enable – Enables the Grayscale
and B&W settings, select mode
with dropdown.
Note: Both boxes checked will
enable Color, Grayscale and B&W
Blackpoint
• Adaptive (BP) - The
adaptive values
cannot be edited; they
are calculated for
every file. This auto
detects and sets the
Blackpoint.
• Consider Chroma - The
adaptive values
cannot be edited; they
are calculated for
every file. If the black
values contain colors,
please check the box
Consider Chroma to
remove them.
No part of this publication may be copied, reproduced or distributed in any form without express written permission
from KIP. 2015 KIP. v1
• Custom Values –
Control the values for
the Red/Green/Blue
settings.
- 34 -
Page 42

KIP Print Pro User Guide
Whitepoint
• Adaptive (WP) - The
adaptive values
cannot be edited; they
are calculated for
every file. This auto
detects and sets the
Whitepoint.
• Consider Chroma - The
adaptive values
cannot be edited; they
are calculated for
every file. If the white
values contain colors,
please check the box
Consider Chroma to
remove them.
• Custom Values -
Control the values for
the Red/Green/Blue
settings.
No part of this publication may be copied, reproduced or distributed in any form without express written permission
from KIP. 2015 KIP. v1
- 35 -
Page 43

Step
Action
Illustration
Blackpoint – Continued
Gray Correction –
KIP Print Pro User Guide
Black Enhancement/Clip - The
Black Enhancement enables you
to edit black values. Setting the
value lower will cause a lighter
black value, whereas a higher
value will result in darker black.
Clip - Will determine the new base
black value depending on the
black value set in Black
Enhancement.
Background Removal/Cl i p - You
may additionally reduce or
improve the background contrast:
set the value higher to set a
brighter contrast, set lower to
determine a low key contrast.
Clip - The higher the clipping
value, the more the images greyto-white-values will become
brighter and whiter.
Color Saturation – Check the box
Preserve Color Saturation to keep
Color Saturation unaffected by
any changes to Blackpoint and
Whitepoint.
Used to make simple gray
adjustments to the gray output.
No part of this publication may be copied, reproduced or distributed in any form without express written permission
from KIP. 2015 KIP. v1
Make adjustments to the
Red/Green/Blue by typing values
into the table.
- 36 -
Page 44

Step
Action
Illustration
Gamma Correction –
Special Filter
Don’t Use Special Filter – Special filter is not used when this is selected
KIP Print Pro User Guide
• Gamma Correction -
Allows the adjustment of
color shifts in the middle
tone range and to correct
the brightness.
• CMY-Mode – Enables the
CMY functionality. For
CMYK files the values will
be directly given to the
printer.
• Snap to Gray - With Snap to
you can define how
Gray
far the RGB values can
differ. You may combine
the two options.
Sharpening Mode – Used to make fuzzy picture clear. As outlines are enhanced, pictures
become clearer. This setting increases the contrast between light and dark pixels and
enhances the edge sharpness of text and lines drastically. 0 no sharpening 100 max
sharpening. Default is 50.
Smoothing Mode - To reduce image noise and distortions, and affects the whole picture
contrast.
Adaptive Mode - Is made of two unique filters, both possessing the features of S
MOOTH, whose intensity can be adjusted in the entry fields under LEVEL. The upper entry
S
field controls foreground objects that should be enhanced, such as text, whereas the lower
field is for image backgrounds needing smoothing. With both filters, you will reach a
maximum smoothing effect at 0 and a maximum sharpening effect at 100.
No part of this publication may be copied, reproduced or distributed in any form without express written permission
from KIP. 2015 KIP. v1
- 37 -
HARP and
Page 45

Step
Action
Illustration
7.
Grayscale Settings –
Blackpoint
KIP Print Pro User Guide
Grayscale Settings consist of:
• Black/White Point
• Special Filter
• Advanced settings
• Adaptive (BP) - The adaptive values cannot be edited; they are calculated for every
file. This auto detects and sets the Blackpoint.
• Custom Gray Value (BP) can be adjusted from 0 to 255. Setting this to a higher value
will produce darker text.
Whitepoint
• Adaptive (WP) - The adaptive values cannot be edited; they are calculated for
every file. This auto detects and sets the Whitepoint.
• Custom Gray Value (WP) can be adjusted from 0 to 255. Setting this to a lower value
will produce lighter text.
Black Enhancement
• The Black Enhancement enables you to edit black values. The lower the number the
lighter the black. Clip will determine the new base black value depending on the
black value set in Black Enhancement.
Background Removal
Used to tune background contrast (e.g. in order to further fine-tune text visibility) you may
additionally reduce or improve the white to grey-values. The higher the clipping value, the
brighter and whiter the image’s most white elements will become.
No part of this publication may be copied, reproduced or distributed in any form without express written permission
from KIP. 2015 KIP. v1
- 38 -
Page 46

Step
Action
Illustration
Special Filter
Don’t Use Special Filter – Special Filter is not used when this is selected
Advanced
KIP Print Pro User Guide
Sharpening Mode – Used to make fuzzy picture clear. As outlines are enhanced, pictures
become clearer. This setting increases the contrast between light and dark pixels and
enhances the edge sharpness of text and lines drastically. 0 no sharpening 100 max
sharpening. Default is 50.
Smoothing Mode - To reduce image noise and distortions, and affects the whole picture
contrast.
Adaptive Mode - Is made of two unique filters, both possessing the features of S
MOOTH, whose intensity can be adjusted in the entry fields under LEVEL. The upper entry
S
field controls foreground objects that should be enhanced, such as text, whereas the lower
field is for image backgrounds needing smoothing. With both filters, you will reach a
maximum smoothing effect at 0 and a maximum sharpening effect at 100.
Area Adaptive Contrast – Allows
for the control of:
Radius
Brightness
Max Line Blackening
Max Background Removal
Invert – Changes light to
bark and dark to light.
HARP and
No part of this publication may be copied, reproduced or distributed in any form without express written permission
from KIP. 2015 KIP. v1
- 39 -
Page 47

Step
Action
Illustration
8.
Black/White Settings –
Scanner Options
Original – Choose from Line, Line/Photo or Name
KIP Print Pro User Guide
Black/White settings consist of:
• Scanner Options
• Postprocessing
Note: The Scanner options in black
and white mode are scanner
dependent. All settings in this filter
are transmitted to the scanner,
where they are processed. The
software is just the front end.
Therefore, some settings may be
not described; some settings may
not be available.
Auto Threshold - When this option is activated, the scanner reads gray tones as follows:
We recommend an ink limit of 100% in this mode
gray tones under the threshold turn to 0 (black), while all other gray tones turn to 1
(white). This mode suits lineart best. It should not be applied to photographs.
Background Removal - Used to tune background contrast (e.g. in order to further fine-
tune text visibility) you may additionally reduce or improve the white to grey-values. The
higher the clipping value, the brighter and whiter the image’s most white elements will
become.
Sharpness – Used to sharpen the edge and enhance outlines. Use values from 0 to 4 with
4 being the most sharp.
Despeckle – Removes dots based on scanner hardware settings.
No part of this publication may be copied, reproduced or distributed in any form without express written permission
from KIP. 2015 KIP. v1
- 40 -
Page 48

Step
Action
Illustration
9.
Postprocessing
Despeckle - This option removes black pixels in black & white mode, for example from
KIP Print Pro User Guide
Settings consist of:
Despeckle
Hole Filling
Invert
scans of murky originals. The filter searches for groups of black pixels and converts them
into white. Small-sized pixel groups, such as those forming punctuation dots, are kept.
o All Pixel Neighbors - Pixels are connected neighbors when there is a series of 8
(instead of 4) adjacent pixels, i.e. additionally to pixels of the same row or
column, the diagonally-adjacent pixels are considered to be connected.
o Filter Size
to be removed.
o Rel. Area Size – This limits the proportion of the actual maximum number of pixels
to the filter size. 0 represents the smallest possible surface relatively to the
selected filter size.
Hole Filling - This function makes it possible to remove single pixel-sized white holes from
black areas in b&w mode. Hole Filling works like Despeckling
black pixels but white
Invert – This changes black to white and white to black (produces a negative of the
image)
– It corresponds to the maximum "diameter" of the pixel area which is
.
except of not removing
No part of this publication may be copied, reproduced or distributed in any form without express written permission
from KIP. 2015 KIP. v1
- 41 -
Page 49

Step
Action
Illustration
1.
Select the Stamp Presets Icon
2.
Once open this screen will show
3.
Selecting the “New” icon will
4.
Name – This is the name that will
KIP Print Pro User Guide
3.6 Stamp Presets
The Stamp Presets settings are used to create a new stamp that can be used on printed output. Once created
the stamps will be chosen from the main KIP Print Pro job setup screens to be applied to the desired output.
all of the pre-configured Stamps
as well as allow for the creation
of new presets.
allow for the creation of a new
Stamp Preset.
Fill in the appropriate sections
and select “Save” to save the
Stamp Preset or Save (active) to
save the Stamp Preset and make
it active as well.
be displayed in the Preset list of
names and will be displayed on
the main screen.
No part of this publication may be copied, reproduced or distributed in any form without express written permission
from KIP. 2015 KIP. v1
- 42 -
Page 50

Step
Action
Illustration
5.
Position – Choose from 9 radio
6.
Stamp Options – Merging Method
KIP Print Pro User Guide
buttons to place the stamp in the
desired location.
If a corner radio button is selected
two values will become active to
allow for better positioning.
Opaque (selected in illustration) –
Displays the stamp on top of the
image. The background of the
stamp is white and will obscure
some image.
Transparent - Overlays the stamp
on top of the image. The
background of the stamp is
transparent.
One value Two values
No part of this publication may be copied, reproduced or distributed in any form without express written permission
from KIP. 2015 KIP. v1
Opacity – Used to control the
darkness of the stamp. 100% being
Black.
Angle –Used to control the rotation
of the stamp.
- 43 -
Page 51

Step
Action
Illustration
7.
Image/Text Placement –
8.
Text Options
9.
Image Options –
10.
Save – Select “Save” to save the
KIP Print Pro User Guide
If using an image as well as text,
the position of both can be
configured using the following:
Image Left
Image Right
Image Top
Image Bottom
The Spacing between the two can
also be set.
Font Settings – Select from
available installed fonts,
size and Color (Color
Printer Needed).
Stamp Text – Add the text
to be added.
Placeholders – Macros that
add specific information
(.ex. Current Dat e).
Select Image – Browse to the
location to the image to be used.
No part of this publication may be copied, reproduced or distributed in any form without express written permission
from KIP. 2015 KIP. v1
Image Size – Control the width and
height of the image to be used
(unlock to control independently).
Stamp Preset or Save (active) to
save the Stamp Preset and make it
active as well or select Reset to
start over.
- 44 -
Page 52

Step
Action
Illustration
11.
Active Stamp – The Active Stamp
KIP Print Pro User Guide
will now be available for selection
from the Basic screen as well as
other KIP Applications.
Note: KIP America is the Stamp just
created.
No part of this publication may be copied, reproduced or distributed in any form without express written permission
from KIP. 2015 KIP. v1
- 45 -
Page 53

Step
Action
Illustration
1.
Page Sizes – Select the Page Sizes
2.
Preconfigured page sizes will be
3.
Select New to create a new Page
Note: A new Page size does not always need to be created. It is possible to Copy an existing
3.7 Page Sizes
KIP Print Pro User Guide
Icon from the Printer Information
Screen.
displayed on the left side of the
screen.
Note: If there are page sizes that
will not be used unchecking these
will remove them from the list of
available sizes on the main Job
Creator page.
Size.
Page size and then edit it. Select the size to be copied (here Arch B and then select the Copy
Icon.
Original will be loaded
No part of this publication may be copied, reproduced or distributed in any form without express written permission
from KIP. 2015 KIP. v1
Make necessary changes
Save new page size.
- 46 -
Page 54

Step
Action
Illustration
4.
Name the new Page Size
5.
Define the Dimensions
6.
Create a Page Size Group. This is a
7.
The Preview Pane will display the
8.
Save – Select “Save” to save the
9.
The new Page Size is created
KIP Print Pro User Guide
group that the new Page size will
be added to. For this example
“Custom Sizes” was added here.
More custom sizes can be created
and then added here.
new Page Size.
Page Size Preset or Save (active)
to save the Page Size Preset and
make it active as well or select
Reset to start over.
No part of this publication may be copied, reproduced or distributed in any form without express written permission
from KIP. 2015 KIP. v1
- 47 -
Page 55

Step
Action
Illustration
10.
The New Custom size is now
KIP Print Pro User Guide
available fr o m KI P Print Pro (and
other KIP Applications)
No part of this publication may be copied, reproduced or distributed in any form without express written permission
from KIP. 2015 KIP. v1
- 48 -
Page 56

Step
Action
Illustration
1.
Job Notification – Select the Job
2.
Select the “New” icon
3.
Name – This is the name that will
4.
Select the Event Type that should
5.
Set the Message Text Options that
6.
Enter the Message that is to be
7.
Add the Recipients e-mail
KIP Print Pro User Guide
3.8 Job Notification
A Job Notification allows the user that sent the job to the KIP to be able to get notified when their job is being
printed. A message can be created that will be sent out to all of the recipients on the list.
Notification Icon from the Printer
Information Screen.
be displayed in the Preset list of
names and will be displayed on
the main screen.
trigger the sending of the
notification.
will be the subject of the message
to be sent.
sent to the recipient(s).
Select the desired macros for the
message as well.
addresses.
No part of this publication may be copied, reproduced or distributed in any form without express written permission
from KIP. 2015 KIP. v1
- 49 -
Page 57

Step
Action
Illustration
8.
Save – Select “Save” to save the
KIP Print Pro User Guide
Job Notification Preset or Save
(active) to save the Job
Notification Preset and make it
active as well or select Reset to
start over.
No part of this publication may be copied, reproduced or distributed in any form without express written permission
from KIP. 2015 KIP. v1
- 50 -
Page 58
Step
Action
Illustration
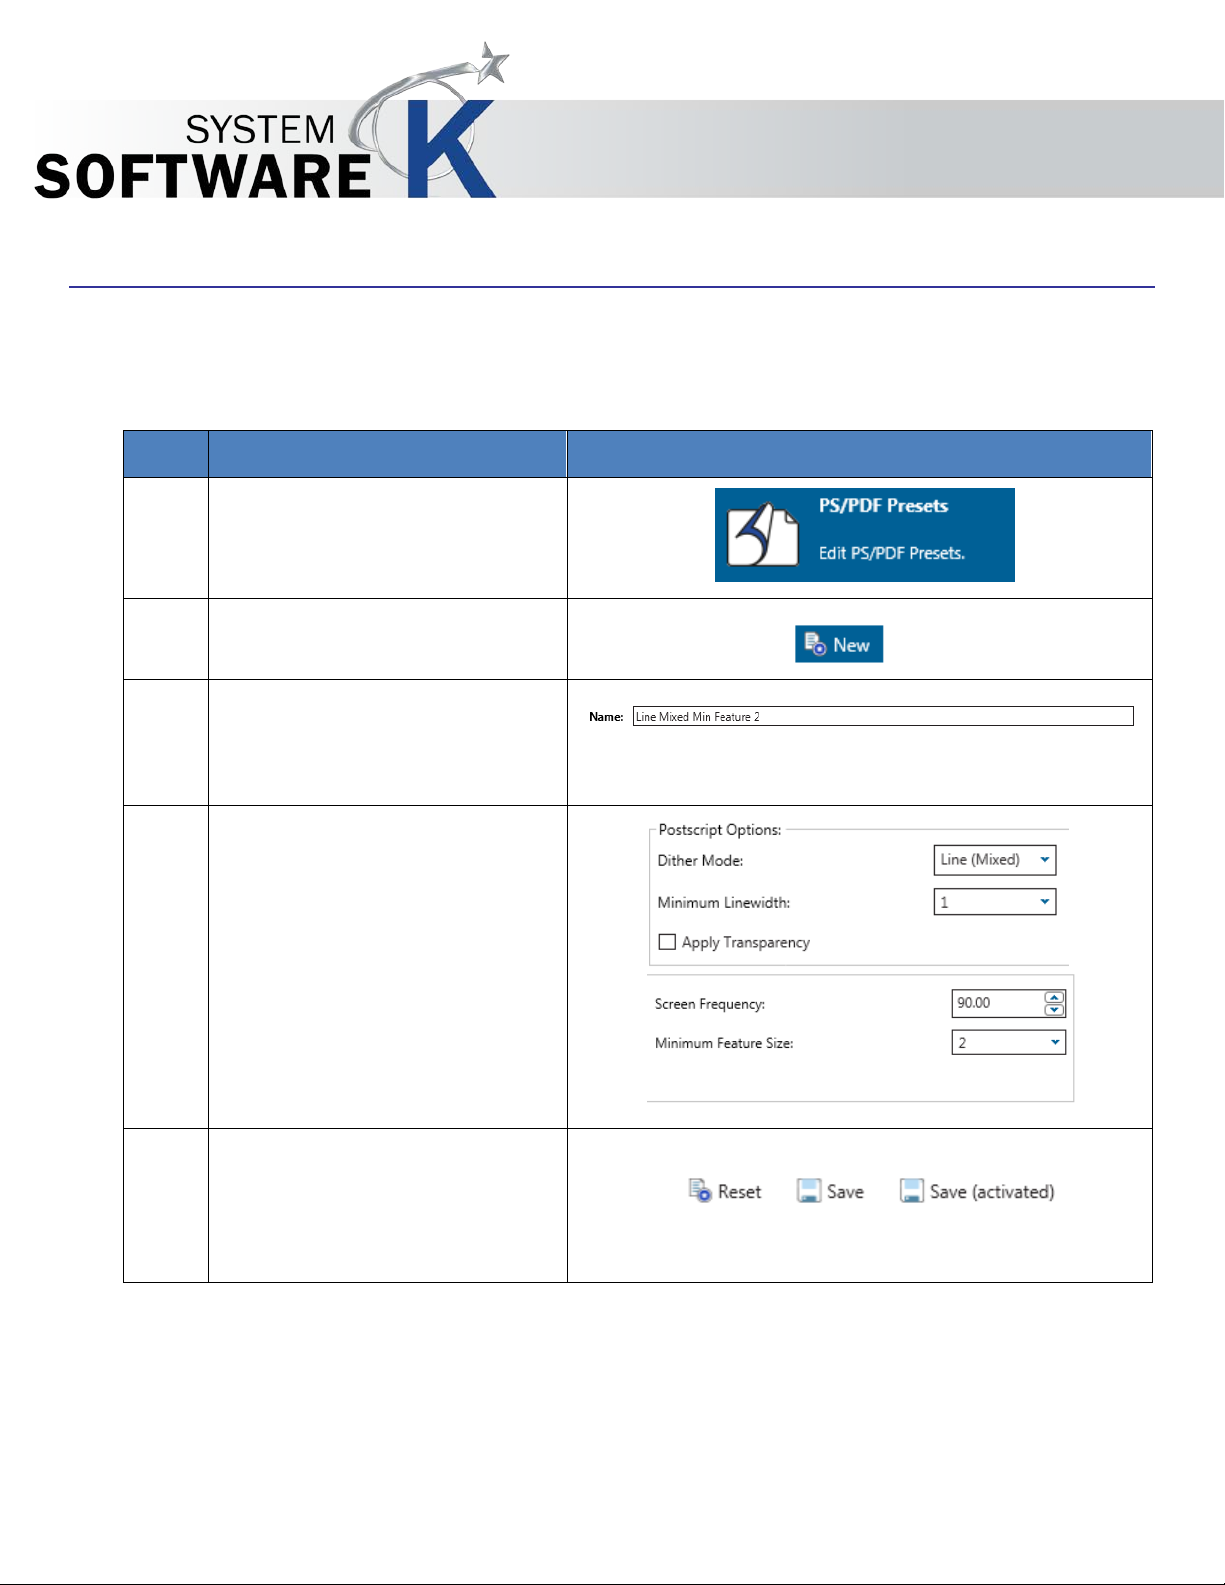
1.
Select the PS/PDF Presets bu tton
2.
Select the New Button
3.
Name – This is the name that will
4.
Select the desired PostScript
5.
Save – Select “Save” to save the
KIP Print Pro User Guide
3.9 PS/PDF Presets
PS/PDF Presets are used to create specific settings that can be applied to Postscript files. These Postscript
System Presets once created will work on PS/PDF files from KIP Print Pro and other KIP applications.
from the Printer Information page.
be displayed in the Preset list of
names and will be displayed on
the main screen.
options.
Here the Dither Mode is changed
to Line (Mixed).
PostScript Preset or Save (act ive)
to save the PostScript Preset and
make it active as well or select
Reset to start over.
No part of this publication may be copied, reproduced or distributed in any form without express written permission
from KIP. 2015 KIP. v1
- 51 -
Page 59

Step
Action
Illustration
6.
The new PS/PDF Preset will be
KIP Print Pro User Guide
added to the list on the left of the
screen.
The New Custom size is now
available from the KIP Print Pro
(and other KIP Applications)
No part of this publication may be copied, reproduced or distributed in any form without express written permission
from KIP. 2015 KIP. v1
- 52 -
Page 60

Step
Action
Illustration
1.
Select the Scaling Presets button
2.
Select the New Button
3.
Preview – Gives a preview of the
4.
Name – This is the name that will
3.10 Scaling Pres ets
KIP Print Pro User Guide
from the Printer Information page.
function being set.
Note: It is very helpful to load one
of the files in the job so that the
changes being made can be
seen.
be displayed in the Preset list of
names and will be displayed on
the main screen.
No part of this publication may be copied, reproduced or distributed in any form without express written permission
from KIP. 2015 KIP. v1
- 53 -
Page 61

Step
Action
Illustration
5.
Scaling Options – Select from the
6.
Placement Options –
KIP Print Pro User Guide
available selections:
Width – Set the desired
Width value.
Height– Set the desired
height value.
Short Edge– Set the desired
Short Edge value.
Long Edge– Set the desired
Long Edge value.
Percentage– Set the
desired Width.
Maximum – Maximum
width for selected roll or
largest roll available.
Note: You MUST click on the icon
to activate the field.
Automatic – Auto
placement based on page
size.
Align Left – Aligns output
left based on page size.
Align Center - Aligns
output Center based on
page size.
Align Right - Aligns output
Right based on page size.
No part of this publication may be copied, reproduced or distributed in any form without express written permission
from KIP. 2015 KIP. v1
- 54 -
Page 62

Step
Action
Illustration
7.
Orientation – Select from the
8.
Borders – Apply Borders to the
KIP Print Pro User Guide
following:
Automatic Even – Pla ces th e
image on the paper based on
Short edge
Automatic Odd– Places the image
on the paper based on Long edge
Select Page – Select the desired
page size from the list.
Select Position – Select the position
to placer the image from the
available list.
Scaling Options
Fit Page – Fits the selected
image to the page size
selected.
Downscale Only – Does not
scale images originally
smaller than selected
settings.
output to be printed. With the
Preview loaded this will show the
Borders being applied
No part of this publication may be copied, reproduced or distributed in any form without express written permission
from KIP. 2015 KIP. v1
- 55 -
Page 63

Step
Action
Illustration
9.
Offset – Allows for the addition of
10.
Save – Select “Save” to save the
KIP Print Pro User Guide
margins to the Top, Bottom, Left
and Right.
Note: Applying an Offset ma r gi n
will shift the image on the page
clipping off the edged.
Scaling Preset or Save (active) to
save the Scaling Preset and make
it active as well or select Reset to
start over.
No part of this publication may be copied, reproduced or distributed in any form without express written permission
from KIP. 2015 KIP. v1
- 56 -
Page 64

Step
Action
Illustration
1.
Select the Folding Presets
2.
Select the New Button
3.
Name – This is the name that
4.
Use Title Block Recognition –
KIP Print Pro User Guide
3.11 Folding Presets
Please See Technical Folder Manual for instructions. To create a folding Preset follow these steps.
button from the Printer
Information page.
will be displayed in the Preset
list of names and will be
displayed on the main screen.
Checking this box enables
Auto Title Block
Recognition/Location.
No part of this publication may be copied, reproduced or distributed in any form without express written permission
from KIP. 2015 KIP. v1
- 57 -
Page 65

Step
Action
Illustration
5.
Folding Table – This area is
The Folding Table Icon Explained:
KIP Print Pro User Guide
where all settings for the Fold
Parameters are made.
1. Media Width
2. Fold Packet
3. Title Block Location (Used when Title Block Recognition is checked)
4. Alignment – Used to shift the image Left, Center, Right when the image is smaller than
the paper size.
5. Rotation – For Portrait View
6. Rotation – For Landscape View
7. Minimum Width / Short Edge (see note)
8. Maximum Width / Short Edge (see note)
9. Minimum Length/ long Edge (see note)
10. Maximum Length / Long Edge (see note)
1. 2. 3. 4. 5. 6. 7. 8. 9. 10. 11. 12.
11. Snap to Cut Length – Add blank paper to the trailing edge of the copy.
12. Inter Copy Delay – in tenth of a second for fast printers or when tab applicator option is
Note: For #’s 7, 8 9, 10 – This configures the Minimum & Maximum for X&Y so that the software
knows what size the drawing is and what roll size/fold packet/allignment/rotation/snap
length/intercopy delay are applied.
No part of this publication may be copied, reproduced or distributed in any form without express written permission
from KIP. 2015 KIP. v1
used.
- 58 -
Page 66

Step
Action
Illustration
6.
Media Width – Select the desired
7.
Fold Packet – Allows for the
8.
Title Block Location – Allows for the
9.
Alignment – Allows for the
KIP Print Pro User Guide
Media Width to be used.
selection of the fold packet to be
used.
selection of the title block
Location.
Note: when Use title block
recognition is selected it is
No part of this publication may be copied, reproduced or distributed in any form without express written permission
from KIP. 2015 KIP. v1
necessary to indicate where you
want the title block to be.
selection of Left, Right or Center for
alignment.
- 59 -
Page 67

Step
Action
Illustration
10.
Rotation for Portrait – allows for the
11.
Rotation for Landscape – allows for
12.
Minimum width or short edge
13.
Snap to Cut Length - Add blank
14.
Inter Copy Delay - in tenth of a
KIP Print Pro User Guide
setting of a rotation for Portrait
documents.
the setting of a rotation for
Landscape documents.
Maximum width or short edge
Minimum Length or long edge
Maximum Length or long edge
Note: This configures the Minimum
& Maximum for X&Y so that the
software knows what size the
drawing is and what roll size/fold
packet/allignment/rotation/snap
length/intercopy delay are
applied.
No part of this publication may be copied, reproduced or distributed in any form without express written permission
from KIP. 2015 KIP. v1
paper to the trailing edge of the
copy.
Note: For this example this setting
is not used.
second for fast printers or when
tab applicator option is used.
Note: For this example this setting
is not used.
- 60 -
Page 68

15.
Reset, Save, Save (activa ted ) –
16.
New Fold Preset – the new fold
17.
Folding from KIP PrintPro – Once
18.
Selected File – The folding column
KIP Print Pro User Guide
If the settings are not correct
select “Reset” to start over.
Select “Save” to save the settings.
Select “Save (activated)” to save
the settings and have them be
active and available for use.
Preset will now be displayed in the
left hand column under Custom.
the Folding Preset has been
created and saved as active it
can be selected and applied to
jobs. Select the drop down arrow
in the Folding button and pick the
9x12 No Border that was just
created.
will display the selected Fold
Pattern being applied.
No part of this publication may be copied, reproduced or distributed in any form without express written permission
from KIP. 2015 KIP. v1
- 61 -
Page 69

Step
Action
Illustration
19.
Select the HPGL Presets button
20.
Select the New Button
21.
Name – This is the name that will
22.
Vector Options – Select from the
Line Width Compensation - Allows addition and subtraction of pixels from the overall width of
3.12 HPGL Presets
KIP Print Pro User Guide
from the Printer Information page.
be displayed in the Preset list of
names and will be displayed on
the main screen.
available selections:
all vector lines. Users have the choice of selecting negative values (to compensate for thick
lines) to positive values (to compensate for thin lines)
Vector Line Raster - Users have 3 choices of dither output patterns. There is no ‘correct’ setting.
Set according to user preference.
No part of this publication may be copied, reproduced or distributed in any form without express written permission
from KIP. 2015 KIP. v1
Use Round End Capping – Forces end capping on lines in vector files to round ends.
Render Inked Area Only -
Merge - This enables the user to merge lines of different shades. When not applied, the layers
within the plot file determine how lines merge on each other.
Snap to Solid -
- 62 -
Page 70

Step
Action
Illustration
23.
HP-RTL Raster Options –
24.
Additional Parameters – Allows for
25.
Pen Table – This section allows for
26.
Save – Select “Save” to save the
KIP Print Pro User Guide
Raster Density – Used to modify the
density level of the embedded
raster image. The scale range is
from 0-100. The higher the number
on the scale, the darker the image
will be. A density level can also
be keyed into the text field.
Photo Raster - Users have 3
choices of raster dither output
patterns. There is no ‘correct’
setting. Set according to user
preference.
the addition of specific HPGL
switches to be used.
the manipulation of specific pens
if desired.
Pen Width by File – Uses the pen
table width provided within the file
as it was created.
Pen Color by File – Uses the pen
color provided within the file as it
was created.
Manual – Allows the user to
manually manipulate a specific
pen or pens by entering the values
for the Pen Number, Pen Width
and Pen Color.
HPGL Preset or Save (active) to
save the HPGL Preset and make it
active as well or select Reset to
start over.
No part of this publication may be copied, reproduced or distributed in any form without express written permission
from KIP. 2015 KIP. v1
- 63 -
Page 71

Step
Action
Illustration
27.
New Pen will be displayed in the
KIP Print Pro User Guide
left panel.
This Pen is now available within the
KIP Print Pro Application and other
KIP Applications.
No part of this publication may be copied, reproduced or distributed in any form without express written permission
from KIP. 2015 KIP. v1
- 64 -
Page 72

Step
Action
Illustration
1.
Select the Machine Notification
2.
Select the New Button
3.
Name – This is the name that will
4.
Event Types – Select from the
Media Empty - This will send a notification when a media runs out on the KIP Printer.
5.
Recipients – Enter the Recipient(s)
3.13 Machine Notification
KIP Print Pro User Guide
Presets button from the Printer
Information page.
be displayed in the Preset list of
names and will be displayed on
the main screen.
available event types that will
trigger a notification to be sent to
a recipient.
Paper Jam - This will send a notification when there is a paper jam on the KIP Printer.
Toner Empty - This will send a notification when Toner runs out on the KIP Printer.
Waste Full - This will send a notification when the waste toner box on the KIP Pri nter is full (7800
No part of this publication may be copied, reproduced or distributed in any form without express written permission
from KIP. 2015 KIP. v1
Only).
General Error - This will send a notification when a media runs out on the KIP Printer.
e-mail address that will be notified
when this error occurs.
- 65 -
Page 73

Step
Action
Illustration
6.
Message Text Options – Use the
7.
Message Text - Use the default or
8.
Save – Select “Save” to save the
9.
New Notification will be displayed
KIP Print Pro User Guide
default or enter a new message
Subject.
enter a new message text.
Additional macros can be entered
to modify the default message
simply by selecting them from the
bottom of the message window
Machine Notification Pre s et or
Save (active) to save the Machine
Notification Preset and make it
active as well or select Reset to
start over.
in the left panel.
This is now configured on the KIP
System and a notification will be
sent when this action occurs.
No part of this publication may be copied, reproduced or distributed in any form without express written permission
from KIP. 2015 KIP. v1
- 66 -
Page 74

Step
Action
Illustration
1.
Select the Metered Noti fication
2.
Select the New Button
3.
Name – This is the name that will
4.
Event Types – select from the
Maintenance Report - This will send a notification out after the KIP Printer has run a
3.14 Metered Noti fica t i on
KIP Print Pro User Guide
Presets button from the Printer
Information page.
be displayed in the Preset list of
names and will be displayed on
the main screen.
available event types.
predetermined amount in either Sq. Ft/Meters.
Monthly Report - This will send a notification with all of the print data (determined by the
settings in Message Text) on a specific date at a specific time.
Weekly Report - This will send a notification with all of the print data (determined by the settings
in Message Text) on a specific day at a specific time.
Attach Raw Info - This will send an e-mail with all of the Raw Logs that can then be imported
No part of this publication may be copied, reproduced or distributed in any form without express written permission
from KIP. 2015 KIP. v1
and used in Excel.
- 67 -
Page 75

Step
Action
Illustration
5.
Recipients – Enter the recipient(s)
6.
Message Text Options – Use the
7.
Message Text - Use the default or
8.
Save – Select “Save” to save the
9.
New Notification will be displayed
KIP Print Pro User Guide
e-mail address that will receive
the e-mail.
default or enter a new message
Subject.
enter a new message text.
Additional macros can be entered
to modify the default message
simply by selecting them from the
bottom of the message window
Metered Notification Preset or
Save (active) to save the Metered
Notification Preset and make it
active as well or select Reset to
start over.
in the left panel.
This is now configured on the KIP
System and a notification will be
sent when this action occurs.
No part of this publication may be copied, reproduced or distributed in any form without express written permission
from KIP. 2015 KIP. v1
- 68 -
Page 76

Step
Action
Illustration
1.
Open KIP Print Pro by
2.
Once the application
3.
Select the “Add” button.
4.
Browse to a location where
KIP Print Pro User Guide
4 Step by Step Instructions for using the system
4.1 Printing a Basic job from KIP Print Pro – Example 1
The follow steps/actions will explain how to use the KIP Print Pro Software to create a job.
double clicking the KIP Print
Pro Icon.
opens this should be the
main screen.
files are stored.
No part of this publication may be copied, reproduced or distributed in any form without express written permission
from KIP. 2015 KIP. v1
- 69 -
Page 77

Step
Action
Illustration
5.
Select the files to be printed
6.
Files will be added to the
7.
Make Simple changes to
KIP Print Pro User Guide
and select “Open”
Note: Hold Control Key to
pick multiple individual files
and Shift Key to select a
block of files.
Job Creator to be printed.
Note: Select all files in the
Job Creator (or individual
files) that changes will
apply to.
the job prior to submitting it:
No part of this publication may be copied, reproduced or distributed in any form without express written permission
from KIP. 2015 KIP. v1
• Home Tab – Change
the number of
copies.
• Basic Tab – Choose
desired Media, and
apply a stamp.
- 70 -
Page 78

Step
Action
Illustration
8.
Note the changes made in
9.
Submit the job
KIP Print Pro User Guide
the Job Creator to the
specific columns “Copies
and “Stamp”
No part of this publication may be copied, reproduced or distributed in any form without express written permission
from KIP. 2015 KIP. v1
- 71 -
Page 79

Step
Action
Illustration
1.
Open KIP Print Pro by
2.
Once the application
3.
Select the “Add” button.
4.
Browse to a location where
KIP Print Pro User Guide
4.2 Printing an Advanced job from KIP Print Pro – Example 2
double clicking the KIP Print
Pro Icon.
opens this should be the
main screen.
files are stored.
No part of this publication may be copied, reproduced or distributed in any form without express written permission
from KIP. 2015 KIP. v1
- 72 -
Page 80

Step
Action
Illustration
5.
Select the files to be printed
6.
Files will be added to the
7.
Make Advanced chang es
KIP Print Pro User Guide
and select “Open”
Note: Hold Control Key to
pick multiple individual files
and Shift Key to select a
block of files.
Job Creator to be printed.
Note: Select all files in the
Job Creator (or individual
files) that changes will
apply to.
to the job prior to submitting
it:
No part of this publication may be copied, reproduced or distributed in any form without express written permission
from KIP. 2015 KIP. v1
• Home Tab – Change
the number of Sets
to 3.
• Basic Tab – Choose
50%
• Select file #2 and
change to 2 copies
- 73 -
Page 81

Step
Action
Illustration
8.
On the Basic tab select
9.
Note the changes made in
Output will be: Page 1, Page 2, Page 2, Page 3 then
10.
Submit the job
KIP Print Pro User Guide
Auto to let the printer
choose the roll width.
the Job Creator to the
specific columns “Copies”
and Print Size”
This job will print on
suitable roll with 3 collated
sets at 50%. The Second
sheet will have 2 copies in
each set.
Page 1, Page 2, Pa g e 2, Page 3 then Pa g e 1, Page 2,
Page 2, Page 3.
No part of this publication may be copied, reproduced or distributed in any form without express written permission
from KIP. 2015 KIP. v1
- 74 -
Page 82

Step
Action
Illustration
1.
Open KIP Print Pro by
2.
Once the application
3.
Select the “Add” button.
4.
Browse to a location where
KIP Print Pro User Guide
4.3 Printing an Advanced job from KIP Print Pro – Example 3
double clicking the KIP Print
Pro Icon.
opens this should be the
main screen.
files are stored.
No part of this publication may be copied, reproduced or distributed in any form without express written permission
from KIP. 2015 KIP. v1
- 75 -
Page 83

Step
Action
Illustration
5.
Select the files to be printed
6.
Files will be added to the
7.
Make Advanced chang es
KIP Print Pro User Guide
and select “Open”
Job Creator to be printed.
to the job prior to submitting
it:
No part of this publication may be copied, reproduced or distributed in any form without express written permission
from KIP. 2015 KIP. v1
• Home Tab – Change
the number of
copies.
• Basic Tab – Choose
desired Media, and
apply a stamp.
- 76 -
Page 84

Step
Action
Illustration
8.
On the Basic tab select a
9.
Select the Advanced Tab
10.
Note the changes made in
11.
Submit the job
KIP Print Pro User Guide
specific roll width from the
drop down menu.
and select one or all of the
selected files.
Note: Selected files will
highlighted.
Select “On Page”, a paper
size of Arch D and then “Fit
Page”
the Job Creator to the
specific columns “Copies”,
“Stamp”, “Print Size”
This job will print on a 36”
roll (if not loaded this will
not switch to a different
roll), with a stamp and all
sheets will be 36x24 sc a led
to fit and there will be two
of each sheet.
No part of this publication may be copied, reproduced or distributed in any form without express written permission
from KIP. 2015 KIP. v1
- 77 -
Page 85

Step
Action
Illustration
1.
Open KIP Print Pro by
2.
Once the application
3.
Select the “Add” button.
4.
Browse to a location where
KIP Print Pro User Guide
4.4 Creating a Custom Scaling Preset Example 4
The Following section will explain how to create a Custom Scaling Preset and how the different settings within
the Scaling Preset can be used.
double clicking the KIP Print
Pro Icon.
opens this should be the
main screen.
files are stored.
No part of this publication may be copied, reproduced or distributed in any form without express written permission
from KIP. 2015 KIP. v1
- 78 -
Page 86

Step
Action
Illustration
5.
Select the files to be printed
6.
Files will be added to the
7.
Select the Settings Tab
8.
Select the Scaling
9.
Select New
KIP Print Pro User Guide
and select “Open”
Job Creator to be printed.
No part of this publication may be copied, reproduced or distributed in any form without express written permission
from KIP. 2015 KIP. v1
Presets button
Note: It is also possible
to make a copy and
edit an existing System
Preset.
- 79 -
Page 87

10.
Name – This is the name that will
11.
The Preview will show the image
100 Percent
12.
Save – Select “Save” to save
KIP Print Pro User Guide
be displayed in the Preset list of
names and will be displayed on
the main screen.
Note: This example will create a
Custom Scaling Preset of 134%
and the size.
Select the % button and change
the value to 134.
the Scaling Preset or Save
(active) to save the Scaling
Preset and make it active as
well or select Reset to start over.
134 Percent
No part of this publication may be copied, reproduced or distributed in any form without express written permission
from KIP. 2015 KIP. v1
- 80 -
Page 88
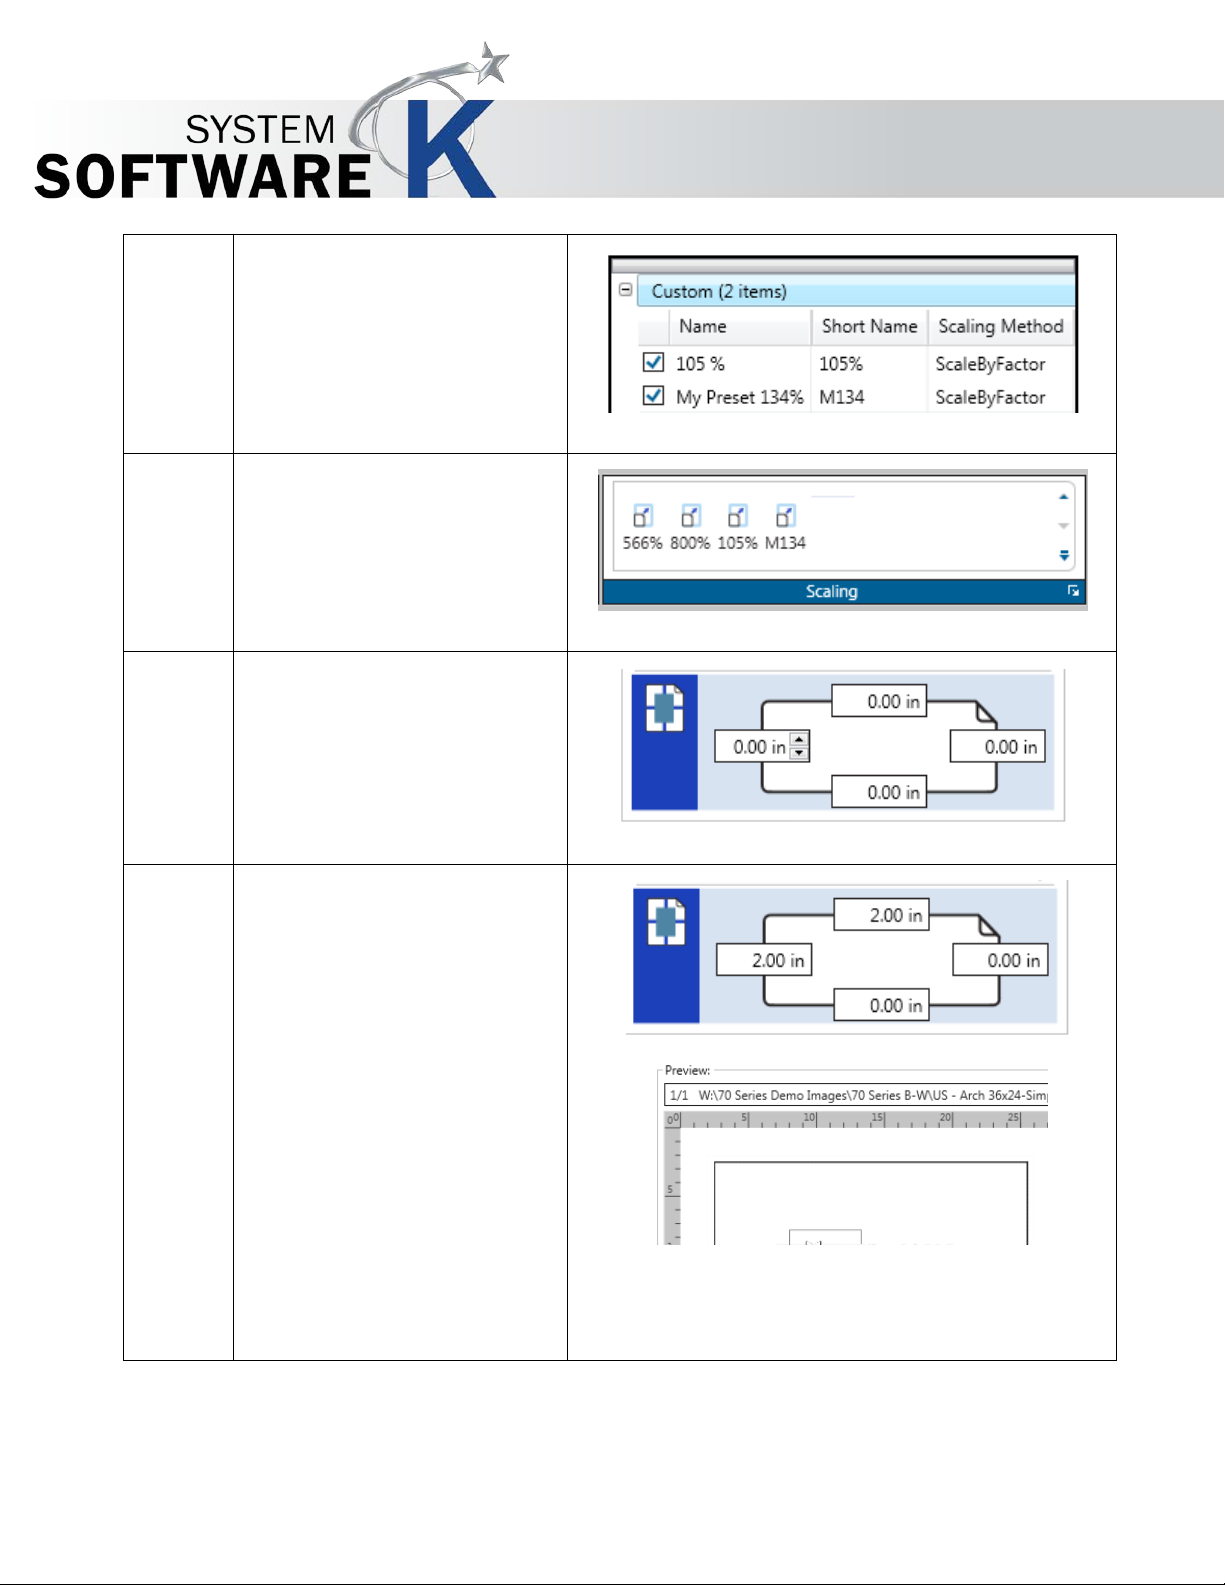
13.
This new Scaling Preset will be
14.
This is now usable fro m the KIP
15.
In addition to the previous
16.
Add the necessary borders and
KIP Print Pro User Guide
displayed on the left panel with
the other settings.
Print Pro application under the
Basic tab.
Note: This is now also available
in other KIP Applications as well.
settings if borders a r e necessary
select the Borders section.
this will be displayed in the
Preview window.
No part of this publication may be copied, reproduced or distributed in any form without express written permission
from KIP. 2015 KIP. v1
- 81 -
Page 89

Step
Action
Illustration
1.
Open KIP Print Pro by
2.
Once the application
3.
Select the “Add” button.
4.
Browse to a location where
KIP Print Pro User Guide
4.5 Creating a Custom Scaling Preset for Scale to Page Size Example 5
double clicking the KIP Print
Pro Icon.
opens this should be the
main screen.
files are stored.
No part of this publication may be copied, reproduced or distributed in any form without express written permission
from KIP. 2015 KIP. v1
- 82 -
Page 90

Step
Action
Illustration
5.
Select the files to be printed
6.
Files will be added to the
7.
Select the Settings Tab
8.
Select the Scaling
9.
Select New
KIP Print Pro User Guide
and select “Open”
Job Creator to be printed.
No part of this publication may be copied, reproduced or distributed in any form without express written permission
from KIP. 2015 KIP. v1
Presets button
Note: It is also possible
to make a copy and
edit an existing system
preset.
- 83 -
Page 91

Step
Action
Illustration
10.
Name – This is the name that will
11.
Select the desired settings for
Options for the Preset:
KIP Print Pro User Guide
be displayed in the Preset list of
names and will be displayed on
the main screen.
Note: This example will create a
Custom Scaling Preset for an
Arch D Scale to Fit.
the Preset being created.
Note: For this example an Arch
D Scale to Fit Preset will be
created.
Orientation
Select Position - Select the position to place the image from the available list.
Scaling Options
Automatic Even – Rotates the
image on the media based on
the Long Edge of the document.
Automatic Odd – Rotates the
image on the media based on
the Short Edge of the document.
Fit Page - Fits the selected image to the page size selected
Downscale Only – Does not scale images originally smaller than selected
settings.
No part of this publication may be copied, reproduced or distributed in any form without express written permission
from KIP. 2015 KIP. v1
- 84 -
Page 92

Step
Action
Illustration
12.
Offset – Allows for the addition
13.
Save – Select “Save” to save
14.
This new system Preset will be
15.
This is now usable fro m the KIP
KIP Print Pro User Guide
of Margins to the Top or Bottom,
Left or Right.
the Scaling Preset or Save
(active) to save the Scaling
Preset and make it active as
well or select Reset to start over.
displayed on the left panel with
No part of this publication may be copied, reproduced or distributed in any form without express written permission
from KIP. 2015 KIP. v1
the other settings.
Print Pro application under the
Basic tab.
Note: This is now also available
in other KIP Applications as well.
- 85 -
Page 93

Step
Action
Illustration
1.
Open KIP Print Pro by
2.
Once the application
3.
Select the “Add” button.
4.
Browse to a location where
KIP Print Pro User Guide
4.6 Creating a Queue for use with LPR printing.
It is sometimes necessary to set up a queue to be used for LPR Printing. This method of printing is necessary
when there is a Uxix, Macintosh or Custom Application. This is done by creating a Template within the KIP
PrintPro application. Follow these steps to create a LPR/Hot folder Queue.
double clicking the KIP Print
Pro Icon.
opens this should be the
main screen.
files are stored. And add a
file to the job matrix
Note: it is necessary to have
a file selected for all of the
features to become active.
No part of this publication may be copied, reproduced or distributed in any form without express written permission
from KIP. 2015 KIP. v1
- 86 -
Page 94

Step
Action
Illustration
5.
Select the desired settings
6.
Select the Save Icon in the
KIP Print Pro User Guide
that will be applied to the
LRP queue for all files that
are sent to it to be printed.
For this example this will be
kept simple. This will be
configured to print 2 copies.
Templates button.
This will prompt for a Input
name (this will be the
Queue Name)
Here the Queue Name is set
to IPS2.
When LPR is used to send
files to the KIP Printer
anything sent to IPS2 will
produce 2 sheets at 100%.
No part of this publication may be copied, reproduced or distributed in any form without express written permission
from KIP. 2015 KIP. v1
- 87 -
Page 95

Step
Action
Illustration
7.
Next send a file via LPR and
8.
Printed Output 2 Sheets
KIP Print Pro User Guide
this will then be sent directly
to the KIP Queue to be
printed.
No part of this publication may be copied, reproduced or distributed in any form without express written permission
from KIP. 2015 KIP. v1
- 88 -
Page 96

Step
Action
Illustration
1.
Open KIP Print Pro by double
2.
Once the application opens
3.
Select the “Add” button.
4.
Browse to a location where
4.7 Creating and using a Hotfolder
It is possible to set up hotfolders that can automatically be monitored for files. If a file is placed into the
hot Folder it will then be printed. It is also possible to create a template that can be applied to the
hotfolder so that specific settings can be applied to the output.
KIP Print Pro User Guide
clicking the KIP Print Pro Icon.
this should be the main
screen.
files are stored. And add a file
to the job matrix
Note: it is necessary to have a
file selected for all of the
features to become active.
No part of this publication may be copied, reproduced or distributed in any form without express written permission
from KIP. 2015 KIP. v1
- 89 -
Page 97

Step
Action
Illustration
5.
Select the desired settings that
6.
Select the Save Icon in the
KIP Print Pro User Guide
will be applied to the LRP
queue for all files that are sent
to it to be printed.
For this example this will be
kept simple. This will be
configured to print 2 copies.
Templates button.
This will prompt for a Input
name (this will be the Queue
Name)
Here the Queue Name is set to
IPS2.
When LPR is used to send files
to the KIP Printer anything sent
to IPS2 will produce 2 sheets at
100%.
No part of this publication may be copied, reproduced or distributed in any form without express written permission
from KIP. 2015 KIP. v1
- 90 -
Page 98

Step
Action
Illustration
Please note: At this point it is necessary to have a folder location created that will
7.
Next, open KIP
8.
On the System
9.
Select the Edit Button
10.
The Hotfolder setup
11.
Enter the correct
KIP Print Pro User Guide
be used as the hot folder. This Folder will need to have Read, Write, Modify and
Delete permissions. It may be necessary to have an IT Administrator available to
create this folder.
PrintPro.Net.
Open the browser
and type the IP
Address of the KIP
Printer. Once this
opens select the
System Settings tab.
Setting Page there is
a section for Job
Retrieval. This is
where Hotfolder set
up is done.
next to Hotfolder.
window will open.
Select the New
button to create a
new hotfolder.
information for the
location of the
hotfolder to be
monitored.
No part of this publication may be copied, reproduced or distributed in any form without express written permission
from KIP. 2015 KIP. v1
- 91 -
Page 99

Step
Action
Illustration
12.
From the Templates section,
13.
Select OK
14.
Select Save from the
15.
Files dropped into the newly
KIP Print Pro User Guide
select the desired Template
that will be applied to the
Hotfolder.
IPS2 (created when the LPR
Queue was set up) will print
2 copies of the file at 100%.
System Settings main page.
This will set the hotfolder
settings.
created Hotfolder will now
print two prints at 100%.
No part of this publication may be copied, reproduced or distributed in any form without express written permission
from KIP. 2015 KIP. v1
- 92 -
Page 100

Step
Action
Illustration
1.
Open KIP Print Pro by double
2.
Once the application opens
3.
Select the “Add” button.
4.
Browse to a location where
4.7 Using Secure Printing
It is possible to send files securely to the KIP Printer. This allows for jobs to be printed/released only when
wanted.
KIP Print Pro User Guide
clicking the KIP Print Pro Icon.
this should be the main
screen.
files are stored. And add a file
to the job matrix
Note: it is necessary to have a
file selected for all of the
No part of this publication may be copied, reproduced or distributed in any form without express written permission
from KIP. 2015 KIP. v1
features to become active.
- 93 -
 Loading...