

Page 1

Version A1
7.X Enterprise
Print Management Version
Page 2

7.X Enterprise
Print Management Version
This information is solely for use of Personnel and Authorized Dealers. No part of this publication may be copied, reproduced or
distributed in any form without express written permission from . 2011
PrintNET 7.X Enterprise Introduction
PrintNET Enterprise includes job building features found in PrintNet Client, plus provides a versatile
electronic work order tool that allows decentralized users to request prints from reprographic service
companies via internet or central print rooms via intranet.
Page 3

7.X Enterprise
Print Management Version
This information is solely for use of Personnel and Authorized Dealers. No part of this publication may be copied, reproduced or
distributed in any form without express written permission from . 2011
- 1 -
Contents
PrintNET 7.X Enterprise Introduction ............................................................................................................................. 1
Installation Requirements ........................................................................................................................................... 3
Server Installation ............................................................................................................................................................ 4
PrintNET Enterprise .......................................................................................................................................................... 8
Main Screen .................................................................................................................................................................... 8
Key Functions .................................................................................................................................................................. 9
User Login ................................................................................................................................................................... 9
Creating a Print Set for Submittal ....................................................................................................................... 10
New Job .................................................................................................................................................................. 10
Add Files .................................................................................................................................................................. 10
Image Viewing .............................................................................................................................................................. 11
Select specific pages from Multipage Files (.PDF/.DWF) ...................................................................................... 12
Job Defaults .................................................................................................................................................................. 13
Printing Properties ......................................................................................................................................................... 14
Individual Parameters .................................................................................................................................................. 15
Submitting the Job
.......................................................................................................................................... 16
Work Order .................................................................................................................................................................... 18
File Conversion .............................................................................................................................................................. 19
HPGL / HP-RTL Pen Settings and Image Adjustment ............................................................................................. 20
Modify Pens ............................................................................................................................................................ 20
Use Colors ........................................................................................................................................................... 20
Force Pens .......................................................................................................................................................... 20
Line Width Compensation ............................................................................................................................... 21
Vector Line Dither Pattern ............................................................................................................................... 21
HP-RTL Photo Mode ........................................................................................................................................... 21
HP-RTL Photo Mode Dither ............................................................................................................................... 21
HP-RTL Raster Density ........................................................................................................................................ 21
Clip to Image Size.............................................................................................................................................. 21
Line Merge .......................................................................................................................................................... 22
Use Round End Capping ................................................................................................................................. 22
Page 4

7.X Enterprise
Print Management Version
This information is solely for use of Personnel and Authorized Dealers. No part of this publication may be copied, reproduced or
distributed in any form without express written permission from . 2011
- 2 -
Border .................................................................................................................................................................. 22
Fold Parameter Selection ........................................................................................................................................... 22
Digital Image Stamp Selection .................................................................................................................................. 22
Modify Stamp ......................................................................................................................................................... 22
Stamp Schemes ................................................................................................................................................. 23
All Stamps must be saved prior to their use. ........................................................................................................... 24
Stamp Settings ................................................................................................................................................... 24
Units ...................................................................................................................................................................... 24
Allows for the choice between English or Metric ................................................................................................... 24
Text ....................................................................................................................................................................... 24
Graphic ............................................................................................................................................................... 24
Merge Type......................................................................................................................................................... 25
Screeni ng ............................................................................................................................................................ 25
Modify Output Size ....................................................................................................................................................... 25
Force Size ................................................................................................................................................................ 25
Enlarge / Reduce .................................................................................................................................................. 26
Image Size: Displays the image size of the digital file ........................................................................................... 26
Administration Features............................................................................................................................................... 27
Administration ............................................................................................................................................................... 28
Accounts Management ............................................................................................................................................. 29
New Account creation ............................................................................................................................................... 30
Editing Account Information ...................................................................................................................................... 31
WorkOrde rs .................................................................................................................................................................... 32
Page 5

7.X Enterprise
Print Management Version
This information is solely for use of Personnel and Authorized Dealers. No part of this publication may be copied, reproduced or
distributed in any form without express written permission from . 2011
- 3 -
Installation Requirements
Supported Operating Systems: Windows 2000 Server, Windows 2003 Server, Windows
2003 Server R2, Windows 2008 Server*, Windows 2008 R2 Server*
* Requires Installation of "Desktop Experience" Feature
Operating System Requirements: IIS (Internet Information Services) with Classic ASP
supporting components
MDAC (Microsoft Data Access Components) 2.7 or greater
Operating System Firewall (Windows Firewall)/ Network Firewall Requirements*: TCP
Inbound to port 80, TCP inbound from remote port 20 to any TCP port on hosting server
* Operating System Firewall (Windows Firewall) can be configured automatically during installation, or
manually configured by Network Administrator
Recommended Server Hardware Requirements: x86 PC with Intel Core 2 (2.0 GHz or
better) processor(s)
4GB DDR2 RAM or better
750GB available HD space for Database storage/ Image storage
10/100/1000 NIC (Network Interface Card).
Page 6

7.X Enterprise
Print Management Version
This information is solely for use of Personnel and Authorized Dealers. No part of this publication may be copied, reproduced or
distributed in any form without express written permission from . 2011
- 4 -
Server Installation
1. Ensure installer has local Administrative privileges
2. Insert the PrintNET Enterprise CD (this will Auto Launch)
3. Select the Install PrintNET Enterprise button
4. Once the installer runs it will check for installed printers.
If none are found the following message will appear
and installation with stop.
5. If a printer is found the Installation Wizard will open
select “Next” to continue.
6. The next screen is the License agreement, after reading
the agreement select “I accept the terms in the license
agreement” and select “Next”.
Page 7
7.X Enterprise
Print Management Version
This information is solely for use of Personnel and Authorized Dealers. No part of this publication may be copied, reproduced or
distributed in any form without express written permission from . 2011
- 5 -
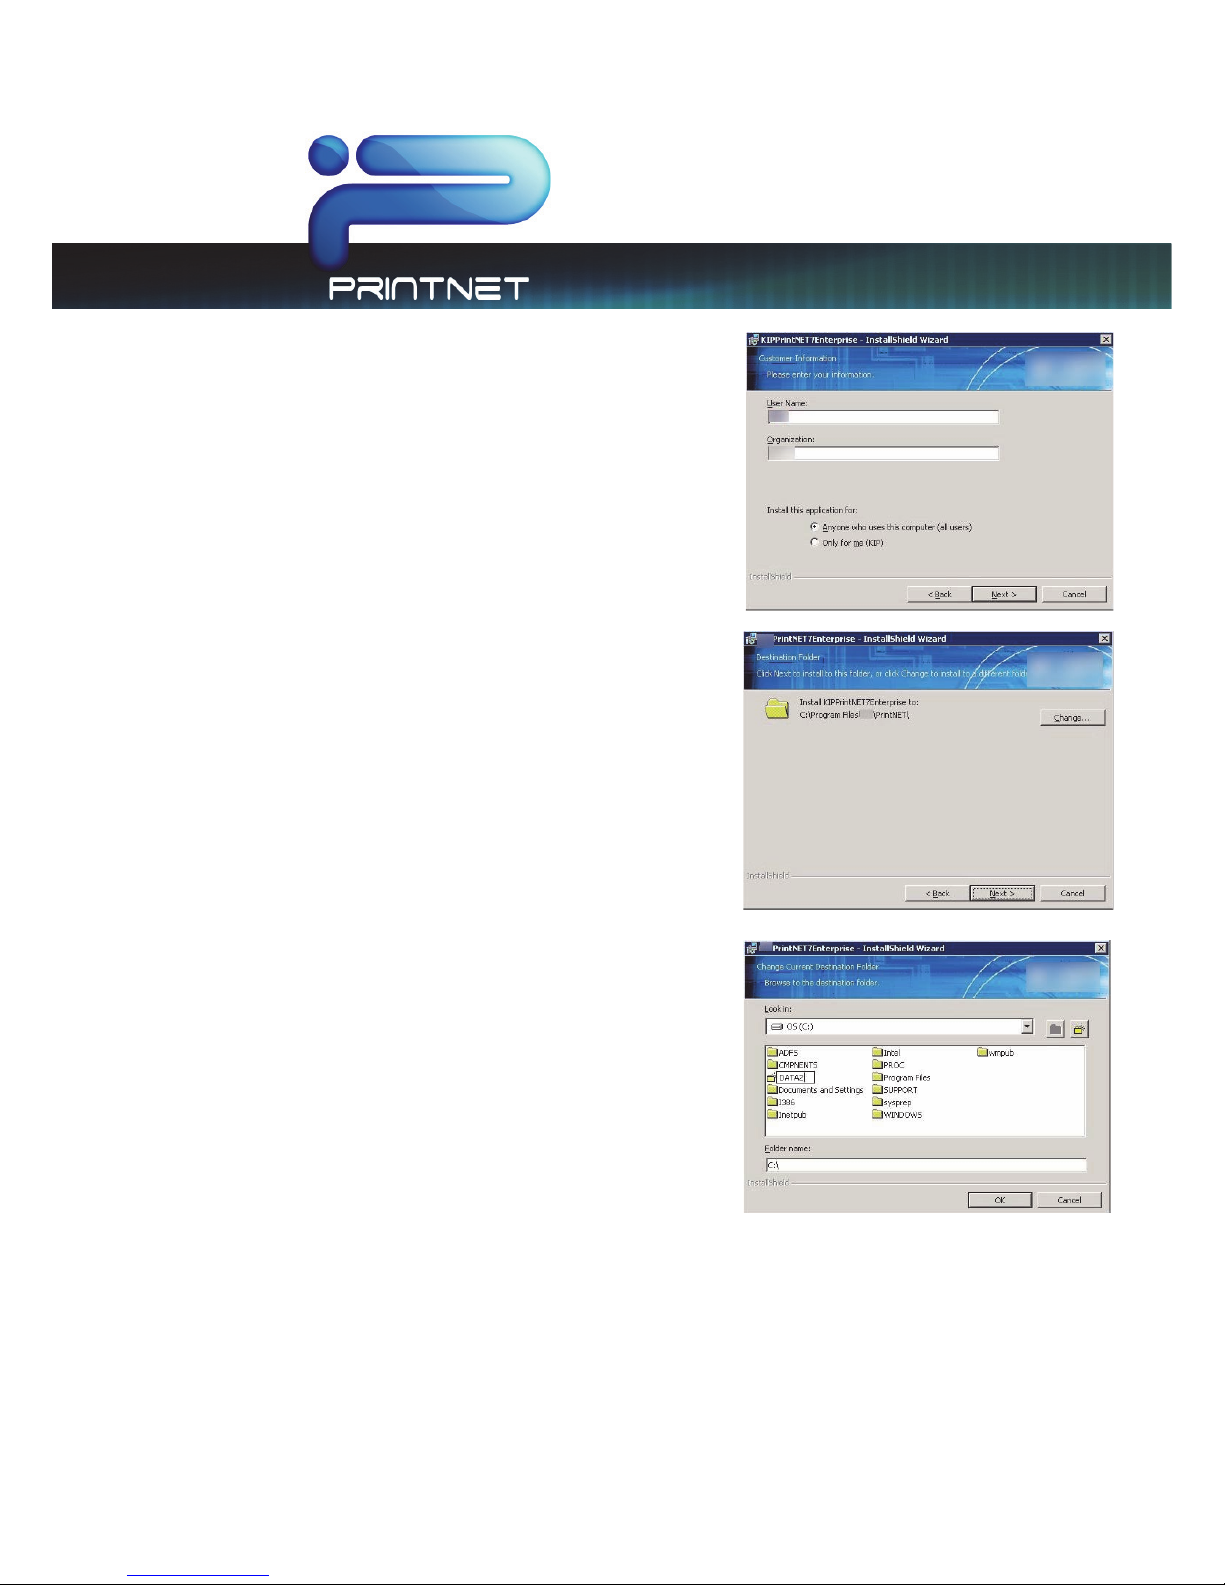
7. Fill in the appropriate information in the Customer
Information section.
8. The next step is selecting the destination folder.
Note: The destination location is the location where
the website files or content will be installed.
Note: The Destination folder location may be
changed and a new location set up. In this example
the location DATA2 was created as the new location.
Page 8

7.X Enterprise
Print Management Version
This information is solely for use of Personnel and Authorized Dealers. No part of this publication may be copied, reproduced or
distributed in any form without express written permission from . 2011
- 6 -
9. Next create the Database folder location.
Note: this is the actual database location for
uploaded files, customer information and all data
operations.
10. Next select from English or Metric settings along with
output services.
Note: at this point the Administrator will determine
whether the files being uploaded will be
Monochrome only or Monochrome and Color.
11. Next the Administrator can choose to either let the
installer configure the Windows Firewall or to do it
manually after the install is complete.
Note: Checking the Configure Windows Firewall box
will make the appropriate exceptions for PrintNET
Enterprise to work correctly. Uncheck to set firewall
manually. Any 3
rd
Party Firewall software or hardware
will also need to be configured.
Page 9

7.X Enterprise
Print Management Version
This information is solely for use of Personnel and Authorized Dealers. No part of this publication may be copied, reproduced or
distributed in any form without express written permission from . 2011
- 7 -
12. Begin Installation
13. When Installation is complete select “Finish”
14. Access PrintNET by keying in the appropriate URL: (HTTP://Localhost/PrintNET
) in a Web Browser.
15. User Name and Password will be: User = Admin, Password = 12345qwerty. The Admin password
may be changed after first launch.
Page 10

7.X Enterprise
Print Management Version
This information is solely for use of Personnel and Authorized Dealers. No part of this publication may be copied, reproduced or
distributed in any form without express written permission from . 2011
- 8 -
PrintNET Enterprise
Main Screen
NO. NAME FUNCTION
1 New Job Create a New Print Job
2 Add Files Add Files From Local PC or Network Resource
3 Job Defaults Print Job Preferences
4 HPGL Pen Table Settings Manage HPGL Pen Table Settings
5 Stamp Settings Create / Modify Digital Image Stamps
6 Force Size Settings Select or create a force size setting
7 Language Selection Select From One of 23 Languages
8 Change User Password Change the password associated with the current account
9 Logout Log out of the current user sessions
10 Number of Sets Set the Output Print Job Number of Copies
11 Job Setup Grid Display Print Job Images and Print Job Settings
12 Submit Print Dispatches Print Job to Selected Printer
Page 11
7.X Enterprise
Print Management Version
This information is solely for use of Personnel and Authorized Dealers. No part of this publication may be copied, reproduced or
distributed in any form without express written permission from . 2011
- 9 -
Key Functions
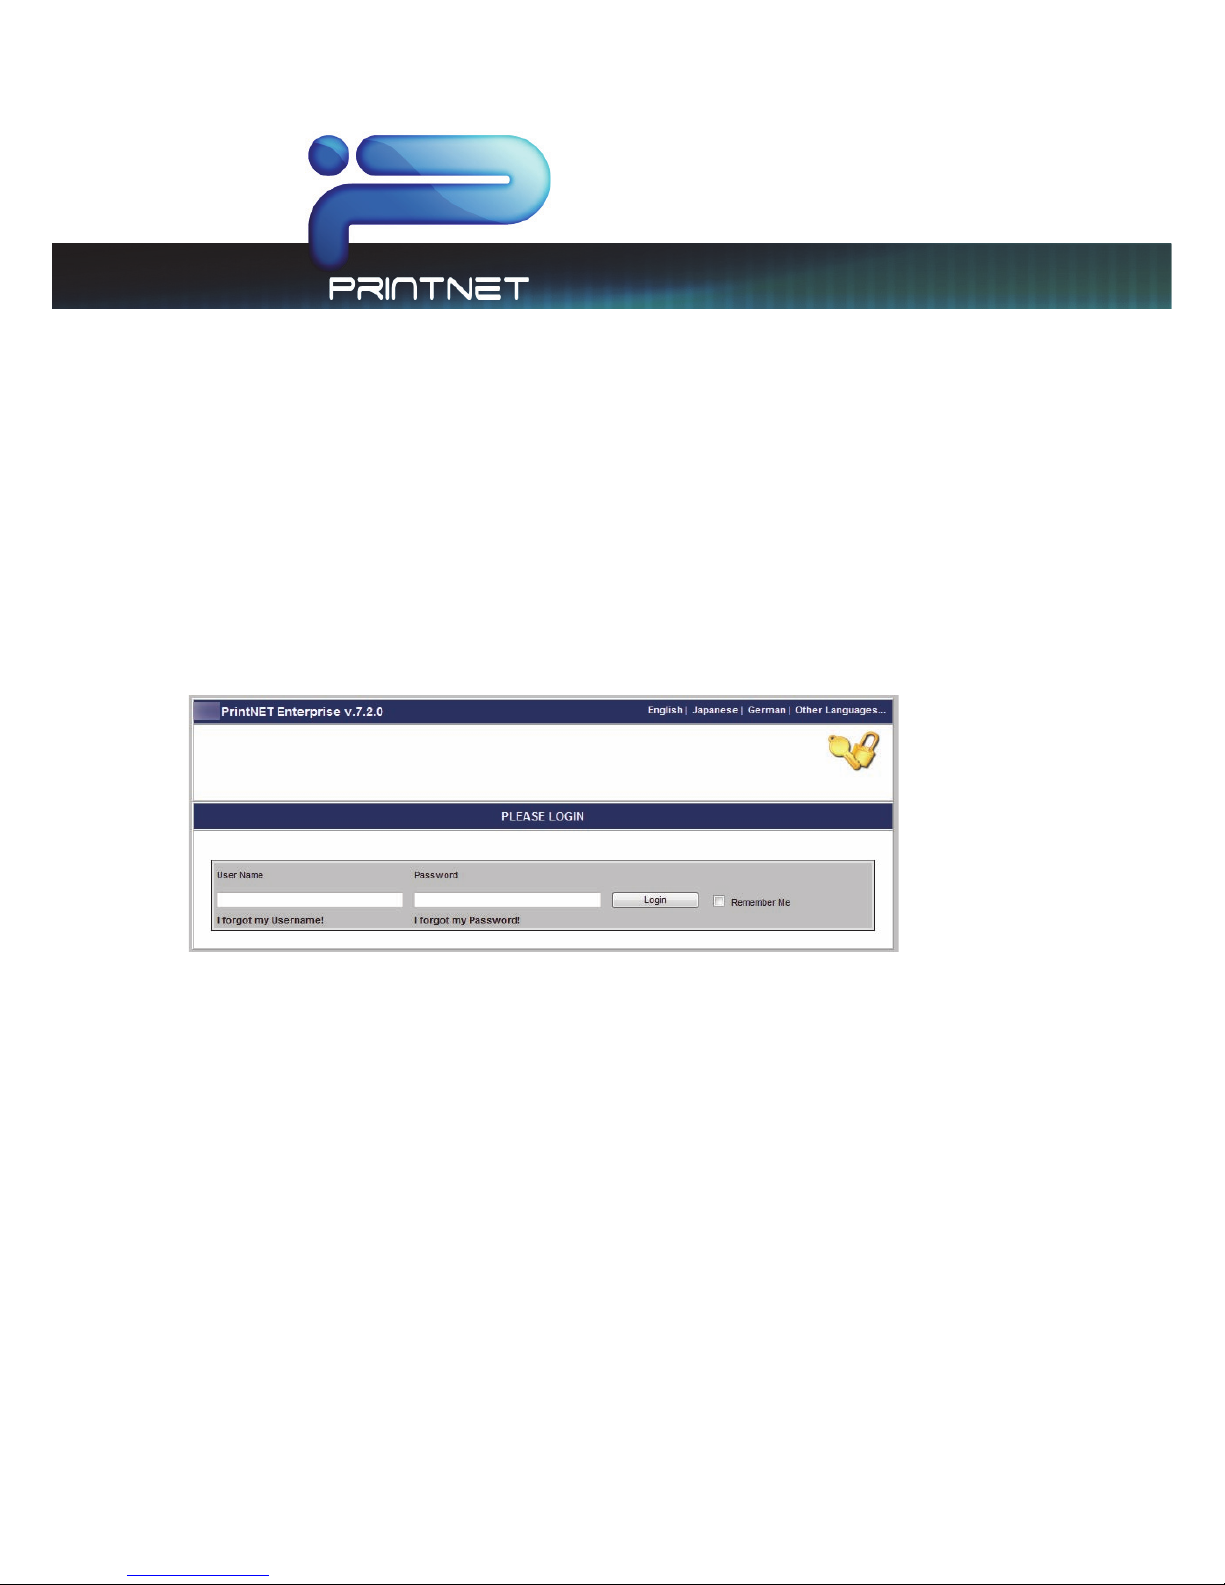
User Login
The Log in screen allows users the ability to log in to PrintNET with a valid assigned login or with the
default logins.
User login information is provided by the administrator of PrintNET Enterprise. Please see the PrintNET
Enterprise – Administrator documentation regarding setup of user accounts and company accounts to
provide access.
Page 12
7.X Enterprise
Print Management Version
This information is solely for use of Personnel and Authorized Dealers. No part of this publication may be copied, reproduced or
distributed in any form without express written permission from . 2011
- 10 -
Creating a Print Set for Submittal
Creating a print set for submittal is simple and fast.
1. The PrintNET Enterprise administrator will provide a link or IP address to access PrintNET Enterprise
Client. Type this information into your default browser’s address bar.
2. Log in with user credentials. If you are unsure of this, please see the system administrator.
3. If PrintNET Enterprise has been configured to print to both a Color device and a Monochrome
device, the user will be prompted with a default to select for the job build process. If color printing is
desired, please select ‘Color’ from the slide-in menu.
4. Add files to the set by browsing the local PC or network resource
5. Click printer icon to submit a print
New Job
To create a new Print job the user need only select the New Job Icon to get started.
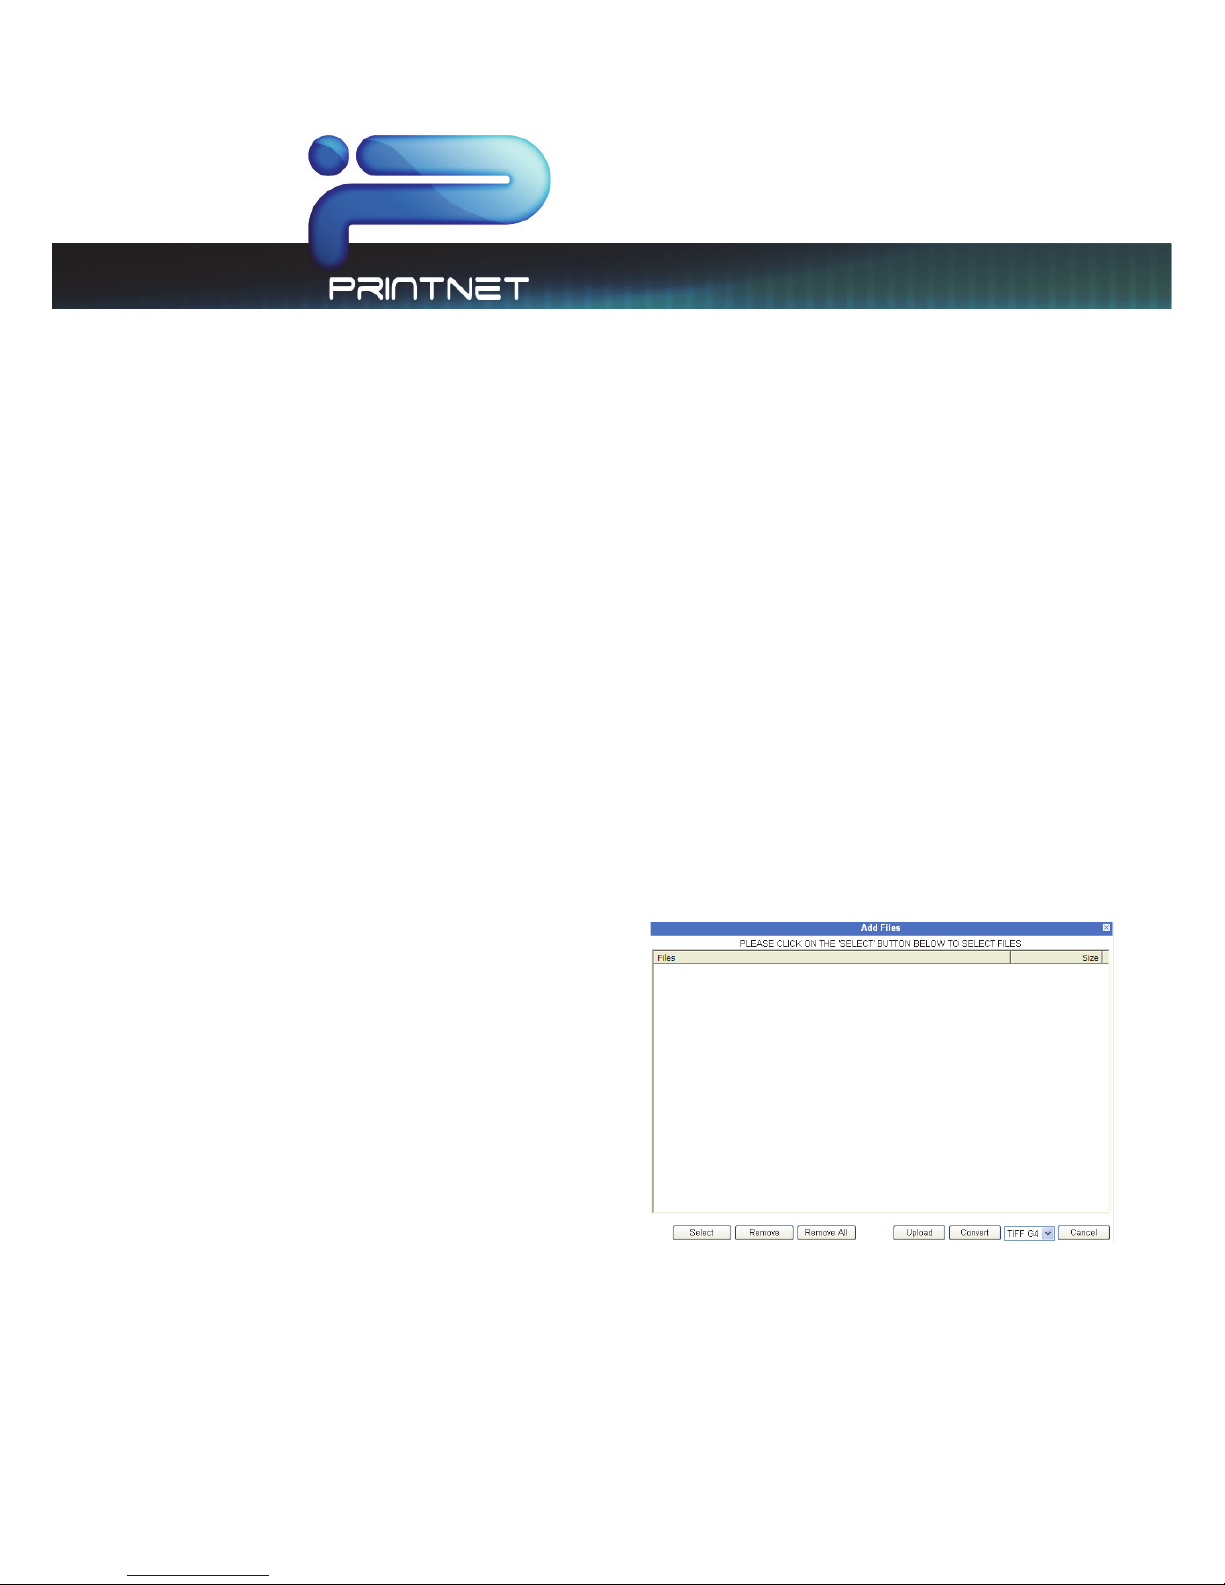
Add Files
Once logged in users may add files to the job by
selecting the Add Files button. This will allow a user
to browse available locations on the local PC,
network or removable media for files to print.
Note: A total file upload limitation of 2GB per
upload session. If more than 2GB of image data is
to be uploaded, simply select the ‘add files’
button to add more images. Non-Windows
Internet Explorer web browsers are limited to single
file selections and upload of 10 images and will
NOT see the screen at right.
Page 13

7.X Enterprise
Print Management Version
This information is solely for use of Personnel and Authorized Dealers. No part of this publication may be copied, reproduced or
distributed in any form without express written permission from . 2011
- 11 -
Image Viewing
Once the user has all of the necessary files selected and has loaded the files for printing they may also
view the selected files prior to printing them. This process is done by clicking on the view icon
next to the file to be viewed.
It is possible to use the left and right green arrows to
scroll through the available images in the job set.
Page 14

7.X Enterprise
Print Management Version
This information is solely for use of Personnel and Authorized Dealers. No part of this publication may be copied, reproduced or
distributed in any form without express written permission from . 2011
- 12 -
Select specific pages from Multipage Files (.PDF/.DWF)
PrintNET allows for the selection of a specific page or page range from multipage .pdf & .dwf files.
Operators select the desired files and
have the ability to print all pages or
specific pages by clicking on All
Pages. Multipage files are auto
detected
Select the desired
numbered pages to
be printed or if reverse
page order is desired.
Selected pages now show next to the file name in the list.
Page 15

7.X Enterprise
Print Management Version
This information is solely for use of Personnel and Authorized Dealers. No part of this publication may be copied, reproduced or
distributed in any form without express written permission from . 2011
- 13 -
Job Defaults
Job Defaults allows a user to configure print job parameters as files are selected and added to the print
job set. These preferences become the “defaults” uses when adding files for that print submission. It is
also possible to change printing preferences for files that are added to the print job set at a later time.
Page 16

7.X Enterprise
Print Management Version
This information is solely for use of Personnel and Authorized Dealers. No part of this publication may be copied, reproduced or
distributed in any form without express written permission from . 2011
- 14 -
Printing Properties
If multiple files are selected to be printed it is possible to make changes only to a specific file or to
multiple files all at one time. This is done by selecting the file (or files) desired and then right clicking and
choosing Properties. This will bring up the following window and the user is able to make changes
regarding the Pen Table, Stamps, Fold, Output Rotation and Force Size settings. These changes will then
be applied to those files in that job.
Page 17

7.X Enterprise
Print Management Version
This information is solely for use of Personnel and Authorized Dealers. No part of this publication may be copied, reproduced or
distributed in any form without express written permission from . 2011
- 15 -
Individual Parameters
Individual Parameters allows the user to the ability to create a custom job with complete control over
the preferences of each file to be printed. Users have the ability to change the Pen Table, Stamp, Fold
Parameters, Output Rotation, Force Size/Enlarge reduce settings and Number of copies for each file
selected in the print job independent of any setting on other files.
Page 18

7.X Enterprise
Print Management Version
This information is solely for use of Personnel and Authorized Dealers. No part of this publication may be copied, reproduced or
distributed in any form without express written permission from . 2011
- 16 -
Submitting the Job
After files have been uploaded and print job preferences have been set the user may submit the print
job to the PrintNET Enterprise Server.
If the user has selected Color for their print job output,
they will be prompted for “Color Options” after hitting
Submit button.
Users may choose one setting for the complete job
and select “Set Remaining” or apply individual
settings for each file by choosing the desired setting
and selecting “Submit”. The next file in the job will be
next to set the output option on.
Note: These settings allow the print room operator to
determine the best possible output.
Once the settings have been applied the user may
now send the job to be printed. Selecting the Submit
button will bring up a new menu with the following
selections
In this screen users have the ability to select from
available shipping addresses or add an additional
address.
The selections available in this for are:
Page 19

7.X Enterprise
Print Management Version
This information is solely for use of Personnel and Authorized Dealers. No part of this publication may be copied, reproduced or
distributed in any form without express written permission from . 2011
- 17 -
User Information
This section is not configurable by the user. User Information is configured by the Administrator. Please
see the PrintNET Enterprise Administrator documentation for further information.
Billing Information
This section is not configurable by the user. Billing Information is configured by the Administrator. Please
see the PrintNET Enterprise Administrator documentation for further information.
Shipping Information
This section is configurable by the user. Shipping Information can be preconfigured by the Administrator
and is determined by how the user logs on. However users can select the Additional Shipping Address
button and then create a new shipping address location.
Page 20

7.X Enterprise
Print Management Version
This information is solely for use of Personnel and Authorized Dealers. No part of this publication may be copied, reproduced or
distributed in any form without express written permission from . 2011
- 18 -
New location
New location will allow the user to add a new shipping location for one time use.
Work Order
Once the work order has been submitted the following information will appear at the bottom of the
screen the Work Order # and that it has been successfully submitted. Also a “Print Work Order” button
giving the user the ability to print the work order will appear.
Page 21

7.X Enterprise
Print Management Version
This information is solely for use of Personnel and Authorized Dealers. No part of this publication may be copied, reproduced or
distributed in any form without express written permission from . 2011
- 19 -
Sample Work Order
File Conversion
PrintNET has the built in ability to take a file of one format and convert it to another format. Follow the
same procedure as above in the “Add Files” section. There is a button at the bottom of the Add Files
menu that says “Convert”.
Selecting the convert button will convert the selected file(s) to the selected format. A browse window
will appear allowing the user to select the desired location to store the converted output. Users can
choose from Tiff G4 and PDF file formats to convert to.
Page 22

7.X Enterprise
Print Management Version
This information is solely for use of Personnel and Authorized Dealers. No part of this publication may be copied, reproduced or
distributed in any form without express written permission from . 2011
- 20 -
HPGL / HP-RTL Pen Settings and Image Adjustment
Pen type and styles can be created and applied to vector or hybrid (HP-RTL) files. They can include pen
widths, raster density, junctions, etc.
Modify Pens
This feature will allow a user the ability to Modify or Create new Pen tables to be used in the software.
The modification of the settings of a vector plot files pen table and screening information can be
changed. Plot File Setup also allows borders, modification of halftone settings, dither patterns and more.
The following is a list of the all the controls:
Use Colors
Uses an HPGL file’s native pen width information, and half toning information. Unless changes are being
made to a customer’s file “Use Colors” is the default setting. When “Use Colors” is active the “Force
Pens” area is inactive.
Force Pens
Allows editing pen widths and screening by pen number (with a range of Pen 0 to Pen 255.) of an HPGL
/ HP-RTL file. This forces the settings in the Pen Table to override the pen information originally
embedded in the file.
Page 23

7.X Enterprise
Print Management Version
This information is solely for use of Personnel and Authorized Dealers. No part of this publication may be copied, reproduced or
distributed in any form without express written permission from . 2011
- 21 -
Line Width Compensation
This allows addition and subtraction of pixels from the overall width of all vector lines. Selections are +/-
3.0
Vector Line Dither Pattern
Select from 0 – Fine to 4 – Medium dither patterns. Fine produces a smaller and tighter dot pattern while
Medium produces a larger and looser dot pattern. Both are ordered dot patterns.
HP-RTL Photo Mode
When a raster image has been embedded within a plot file, Raster Photo Mode should be used. Raster
Photo Mode uses the HP-RTL Photo Mode Dither pattern setting as outlined below. Raster Photo Mode
can be applied to all drawings, whether they contain raster images or not.
HP-RTL Photo Mode Dither
Select from 4 – Fine, 6 – Medium and 8 – Coarse dither patterns. Fine produces a smaller and tighter dot
pattern while Coarse produces a larger and looser dot pattern. All settings produce ordered dot
patterns.
HP-RTL Raster Density
Setting will modify the density level of the embedded raster image. The scale range is from 0-200. The
higher the number on the scale, the darker the image will be.
Clip to Image Size
Crops the printed file to the start of image data. Apply when the file designer has saved the entire
drawing area as part of the file. Example: the file designer created an image with a canvas or sheet
size of 36x48”, but only created data that is 8.5x11”. Printing this would create a piece of paper that is
36x48” with an image that is 8.5x11” and generate a tremendous waste of media. Clip to image will
ignore the 36x48” dimensions and only print a document that is 8.5x11”.
Page 24

7.X Enterprise
Print Management Version
This information is solely for use of Personnel and Authorized Dealers. No part of this publication may be copied, reproduced or
distributed in any form without express written permission from . 2011
- 22 -
Line Merge
This enables the user to merge lines of different shades. When not applied the layers within the plot file
determine how lines merge on each other.
Use Round End Capping
This will set end capping on lines in vector files to round ends instead of what has been specified in the
plot file’s Line Attribute command.
Border
This allows a border to be used in the file. A maximum border of five inches can be applied to each
edge
Fold Parameter Selection
Fold settings can be created and applied directly to the job when a Folder is present.
Digital Image Stamp Selection
Users can create and apply an available stamp scheme to printed documents.
Modify Stamp
This feature will allow a user the ability to Modify or Create new Stamp, Watermark or Overlay to be
used in the software. These stamps can be either Text, Graphics or both can be used.
Page 25

7.X Enterprise
Print Management Version
This information is solely for use of Personnel and Authorized Dealers. No part of this publication may be copied, reproduced or
distributed in any form without express written permission from . 2011
- 23 -
Stamp Schemes
Page 26

7.X Enterprise
Print Management Version
This information is solely for use of Personnel and Authorized Dealers. No part of this publication may be copied, reproduced or
distributed in any form without express written permission from . 2011
- 24 -
Custom Stamp settings are saved as schemes which can be used at different times or edited when
necessary. Stamps may be selected from the list of available stamps or “New Stamp” can be used to
create a new stamp.
All Stamps must be saved prior to their use.
Stamp Settings
This Window will show the placement of the current stamp settings
or where the stamp being created will be placed. There are 9
locations to choose from. Depending on the selected location the
value window may be utilized for more precise placement of
the stamp. If the value button is active a value up to 18” may
be entered.
Units
Allows for the choice between English or Metric
Text
By selecting the Use Text check box the user has the ability to
create a text based stamp with the desired information. Text
Rotation allows the user to rotate (counter clockwise) the text
portion of their stamp in 45° increments. “Font” will allow the
user to select from available fonts.
Graphic
By selecting the Use Graphic check box the user has the
ability to Upload an image that can be used to create a
Graphic based stamp. Graphic Rotation allows the user to
rotate (counter clockwise) the graphic portion of their stamp
in 45° increments. Graphic Placement determines the
Page 27

7.X Enterprise
Print Management Version
This information is solely for use of Personnel and Authorized Dealers. No part of this publication may be copied, reproduced or
distributed in any form without express written permission from . 2011
- 25 -
placement of the graphic in relation to the applied text. This is ignored if text is not applied. Graphic
Gap applies a separation of up to 5” between the Text and Graphic stamps
Merge Type
Opaque: This option displays the stamp on top of the
image. The background of the stamp is white and will
obscure some image.
Transparent: This option overlays the stamp on top of the image. The background of the stamp is
transparent.
Invert: This option displays the stamp on top of the image. Colors are inverted where the data intersects
Screening
This allows the user to define the screen level (shading)
of the stamp using pre-set screening percentages.
Modify Output Size
Force Size
This feature will allow a user the ability to Modify
or Create new Force Sizes to be used in the
software. All setting can be saved as a scheme
for later use.
Scheme: Save customized settings for use at a
later date
Units: Units to use for setting up Force Size
parameters.
Margins: Add margins to one or more sides for
image placement within the canvas. Uncheck
Automatic Placement to freely drag the image
within the virtual canvas.
Page 28

7.X Enterprise
Print Management Version
This information is solely for use of Personnel and Authorized Dealers. No part of this publication may be copied, reproduced or
distributed in any form without express written permission from . 2011
- 26 -
Image Scaling: Select from preset scaling percentages, scale to fit or type in a custom percentage
Other:
Ignore Settings if Image is Smaller Than Paper will, if checked, ignore enlargement / reduction
settings if a set contains an image that is smaller than other images. Used when a transmittal sheet is
inserted into the set and should not be scaled.
Paper Size: Configure output paper size. Width selection will force the job to print on the selected roll
size.
Original Image Size: Displays the image size of the digital file
Image Rotation: Rotate images from 0-270 degrees
When done setting up the desired scheme choose the
Save As
button and it will prompt you for a
scheme name. Select Submit and this new scheme
will be added to the list of available schemes to
choose from on the main page.
Enlarge / Reduce
Image Size: Displays the
image size of the digital file
Image Scaling: Select from
preset scaling percentages,
scale to fit or type in a
custom scaling percentage
Image Rotation: Rotate
images from 0-270 degrees
Page 29

7.X Enterprise
Print Management Version
This information is solely for use of Personnel and Authorized Dealers. No part of this publication may be copied, reproduced or
distributed in any form without express written permission from . 2011
- 27 -
Administration Features
PrintNET Enterprise 7.1 installed on a server allows for greater control of Electronic Order submittal.
Administrators have the ability to configure accounts that users utilizing the software can choose from.
When logged in as an Administrator the following options and features are available.
Note: default username is ‘admin’ with password ‘12345qwerty’.
Page 30

7.X Enterprise
Print Management Version
This information is solely for use of Personnel and Authorized Dealers. No part of this publication may be copied, reproduced or
distributed in any form without express written permission from . 2011
- 28 -
Administration
The administration area allows administrators the ability to add available printers, edit existing printers
and delete existing printers.
SMTP (e-mail) settings can also be set up by the administrator in this area allowing for a job ticket e-mail
(response) to be sent to the user notifying them that their job has been received.
Configure available Media Types are accessible to the user submitting print jobs. Media Types are only
used to allow an end user to “suggest” final print media. Final print media is selected by the print room
operator. It is possible to enter up to 20 different media types in this section.
Page 31

7.X Enterprise
Print Management Version
This information is solely for use of Personnel and Authorized Dealers. No part of this publication may be copied, reproduced or
distributed in any form without express written permission from . 2011
- 29 -
Accounts Management
Accounts management allows the administrator to create New Accounts, Modify Existing Accounts or
Delete Existing Accounts.
Available fields are (these fields are sortable):
x Account Name – Account name that will be displayed when logged in and on the WorkOrder
x Company Name –Company Name that will be displayed when logged in and on the WorkOrder
x E-Mail – E-mail Address of the main contact person
x Phone –Phone Number of the main contact person
x City – This is the city in which the Company resides
x State – State in which the company resides
x Zip –Zip code for the company
x Status – Indicates if the account is active or inactive. Configurable upon selecting Edit
x Action – Allows the administrator to Edit or Delete the selected account
Page 32

7.X Enterprise
Print Management Version
This information is solely for use of Personnel and Authorized Dealers. No part of this publication may be copied, reproduced or
distributed in any form without express written permission from . 2011
- 30 -
New Account creation
Allows an Administrator to create or Add a new account. By filling out all of the pertinent data the new
account can be saved so that users will have the ability to select it from their list of available accounts.
When successfully saved the following message will appear:
The New Account will be added to the list of accounts.
Page 33

7.X Enterprise
Print Management Version
This information is solely for use of Personnel and Authorized Dealers. No part of this publication may be copied, reproduced or
distributed in any form without express written permission from . 2011
- 31 -
Editing Account Information
Account Details – Allows the Administrator to
input the pertinent data necessary for billing.
Authorized Order Placers - Allows the
Administrator to create multiple users and
assign passwords to each. When the user
logs in they will have the accounts
associated with their log in available for use.
Delivery Address - Allows the Administrator to
input the pertinent data necessary shipping.
Including the ship to address, person’s name
to ship to, and the delivery method
Page 34

7.X Enterprise
Print Management Version
This information is solely for use of Personnel and Authorized Dealers. No part of this publication may be copied, reproduced or
distributed in any form without express written permission from . 2011
- 32 -
WorkOrders
Administrators have the ability to view all submitted WorkOrders and review them or print them again.
When a WorkOrder is selected the Administrator has the following options available:
Load WorkOrder
– Load any of the available WorkOrders in the list. This will load the WorkOrder with
all print job parameters set by the Authorized Order Placer. Additional files may be added to the
WorkOrder once it is loaded.
Page 35

7.X Enterprise
Print Management Version
This information is solely for use of Personnel and Authorized Dealers. No part of this publication may be copied, reproduced or
distributed in any form without express written permission from . 2011
- 33 -
View WorkOrder – Allows the Administrator to View the WorkOrder
and all of the information that was provided with it.
Print WorkOrder
- Allows the Administrator to Print the WorkOrder and
all of the information that was provided with it. By selecting Print the
available local printer’s window will appear.
Delete WorkOrder
- Allows the Administrator to Delete the WorkOrder and all of the information that
was provided with it. This also removes any uploaded image data as well as entries in the ODBC
database.
Page 36

7.X Enterprise
Print Management Version
This information is solely for use of Personnel and Authorized Dealers. No part of this publication may be copied, reproduced or
distributed in any form without express written permission from . 2011
- 34 -
Search – Search for a WorkOrder based on the following criteria.
x WorkOrder Status
o Not Printed: The uploaded WorkOrder has never been printed.
o Printed / Dispatched: The uploaded WorkOrder has previously been printed.
x WorkOrder Number – Enter a range or a single number in the From: and To: text fields.
x Date Range
o Order Date – Date the WorkOrder was uploaded successfully to the database
o Due Date – Date the user selected as their Due Date upon upload
o Print / Dispatch Data – Date the WorkOrder was printed
x User Name – Enter a user name to search for all WorkOrders created by the specified user.
x First Name - Enter a first name to search for all WorkOrders created by the specified first name.
x Last Name - Enter a last name to search for all WorkOrders created by the specified last name.
x Account Na me - Enter a account number to search for all WorkOrders created by the specified
account number.
x Company Name - Enter a company name to search for all WorkOrders created by the specified
company name.
Page 37

7.X Enterprise
Print Management Version
This information is solely for use of Personnel and Authorized Dealers. No part of this publication may be copied, reproduced or
distributed in any form without express written permission from . 2011
- 35 -
Account information/Company Name –Allows the administrator to quickly gather necessary account
information by clicking on the “Blue” text in the accounting column.
Authorized Order Placer (User) - Allows the administrator to quickly gather necessary information
regarding the user that placed the order.
 Loading...