

Page 1

KIP Multi-Touch User Guide
KIP Multi-Touch User Guide
No part of this publication may be copied, reproduced or distributed in any form without express written permission
from KIP. 2015 KIP. v1
- 1 -
Page 2

KIP Multi-Touch User Guide
No part of this publication may be copied, reproduced or distributed in any form without express written permission
from KIP. 2015 KIP. v1
- 2 -
Page 3

11 Contents
1 Introduction ........................................................................................................................................................... 4
2 KCS Multi-Touch Main Screen .......................................................................................................................... 5
3 B&W Copy ........................................................................................................................................................ 10
4 B&W Scan ......................................................................................................................................................... 19
5 B&W Print ........................................................................................................................................................... 25
6 Additional Buttons Common to All B&W Screens ........................................................................................ 30
7 Color Copy ....................................................................................................................................................... 32
8 Color Scan ........................................................................................................................................................ 38
9 Color Print ......................................................................................................................................................... 43
10 Additional Buttons Common to All Color Screens ................................................................................... 47
11 Job Info .......................................................................................................................................................... 49
11.2 11.1 Job Queue Screen ....................................................................................................................... 50
11.2 History Screen .......................................................................................................................................... 51
12 Accounting ................................................................................................................................................... 52
13 Guides/Help .................................................................................................................................................. 54
11.1 Viewing a guide. ..................................................................................................................................... 55
13.2 Help Screen ........................................................................................................................................... 56
12 Configuration Settings ................................................................................................................................. 59
13 How to setup a Mailbox .............................................................................................................................. 66
14 Creating a Cloud Mailbox .......................................................................................................................... 69
15 How to Setup/Configure an Inkjet Printer .................................................................................................. 72
16 How to Create/Save a template ................................................................................................................ 74
17 How to use a Saved Template .................................................................................................................... 75
18 How to save a Template as Default ........................................................................................................... 77
KIP Multi-Touch User Guide
No part of this publication may be copied, reproduced or distributed in any form without express written permission
from KIP. 2015 KIP. v1
- 3 -
Page 4

KIP Multi-Touch User Guide
1 Introduction
All system functions for the KIP 70 Series are performed through an integrated, 12.1” multi-touch tablet-like color
display to Copy, Print and Scan both color and b&w documents. Walk-up operator conveniences include autostart, access to unlimited presets, easy to understand touchscreen user guides and real-time on screen
previews. Multi-touch controls provide users with full color intuitive tablet-like controls with super view - swipe,
pinch, spread, rotate and tap.
Vivid image previews and on-screen controls allow for saving and printing the Area of Interest. Multi-touch
features allow operators to identify documents, adjust image quality and replace documents in collated sets.
The integrated color touch display provides a powerful combination of control plus convenience; you don’t
have to leave the printer to perform important tasks.
KIP Multi-Touch Touchscreen Features
Vivid 12.1” Color Multi-Touch Display | Intuitive Feature Selection for easy Operation | Fully Articulating Viewing
Angle |Centralized Access to all System Features | Print, Copy and Scan in B&W and Full Color* | Super View
for Swipe, Pinch, Spread and Rotate | Print directly from Removable Media, the Cloud and Local Mailboxes |
Full Color User Guides | Integrated Print Previews | On-screen Set Copy Editor | Concurrent Print and Scan-toFile | Manage Print and History Queue | Optional KIP Color Plus for Copy and Print in Full Color* | Integration
with KIP Job Accounting and Data Tracking | Integration with KIP
Cost Center Application
No part of this publication may be copied, reproduced or distributed in any form without express written permission
from KIP. 2015 KIP. v1
- 4 -
Page 5

1
6
2
3
8
9
4
5
10
11
7
KIP Multi-Touch User Guide
2 KCS Multi-Touch Main Screen
The following section describes the functionality of the KCS Multi-Touch screen, the function of each button and
how it is used.
No part of this publication may be copied, reproduced or distributed in any form without express written permission
from KIP. 2015 KIP. v1
- 5 -
Page 6
Component
Function
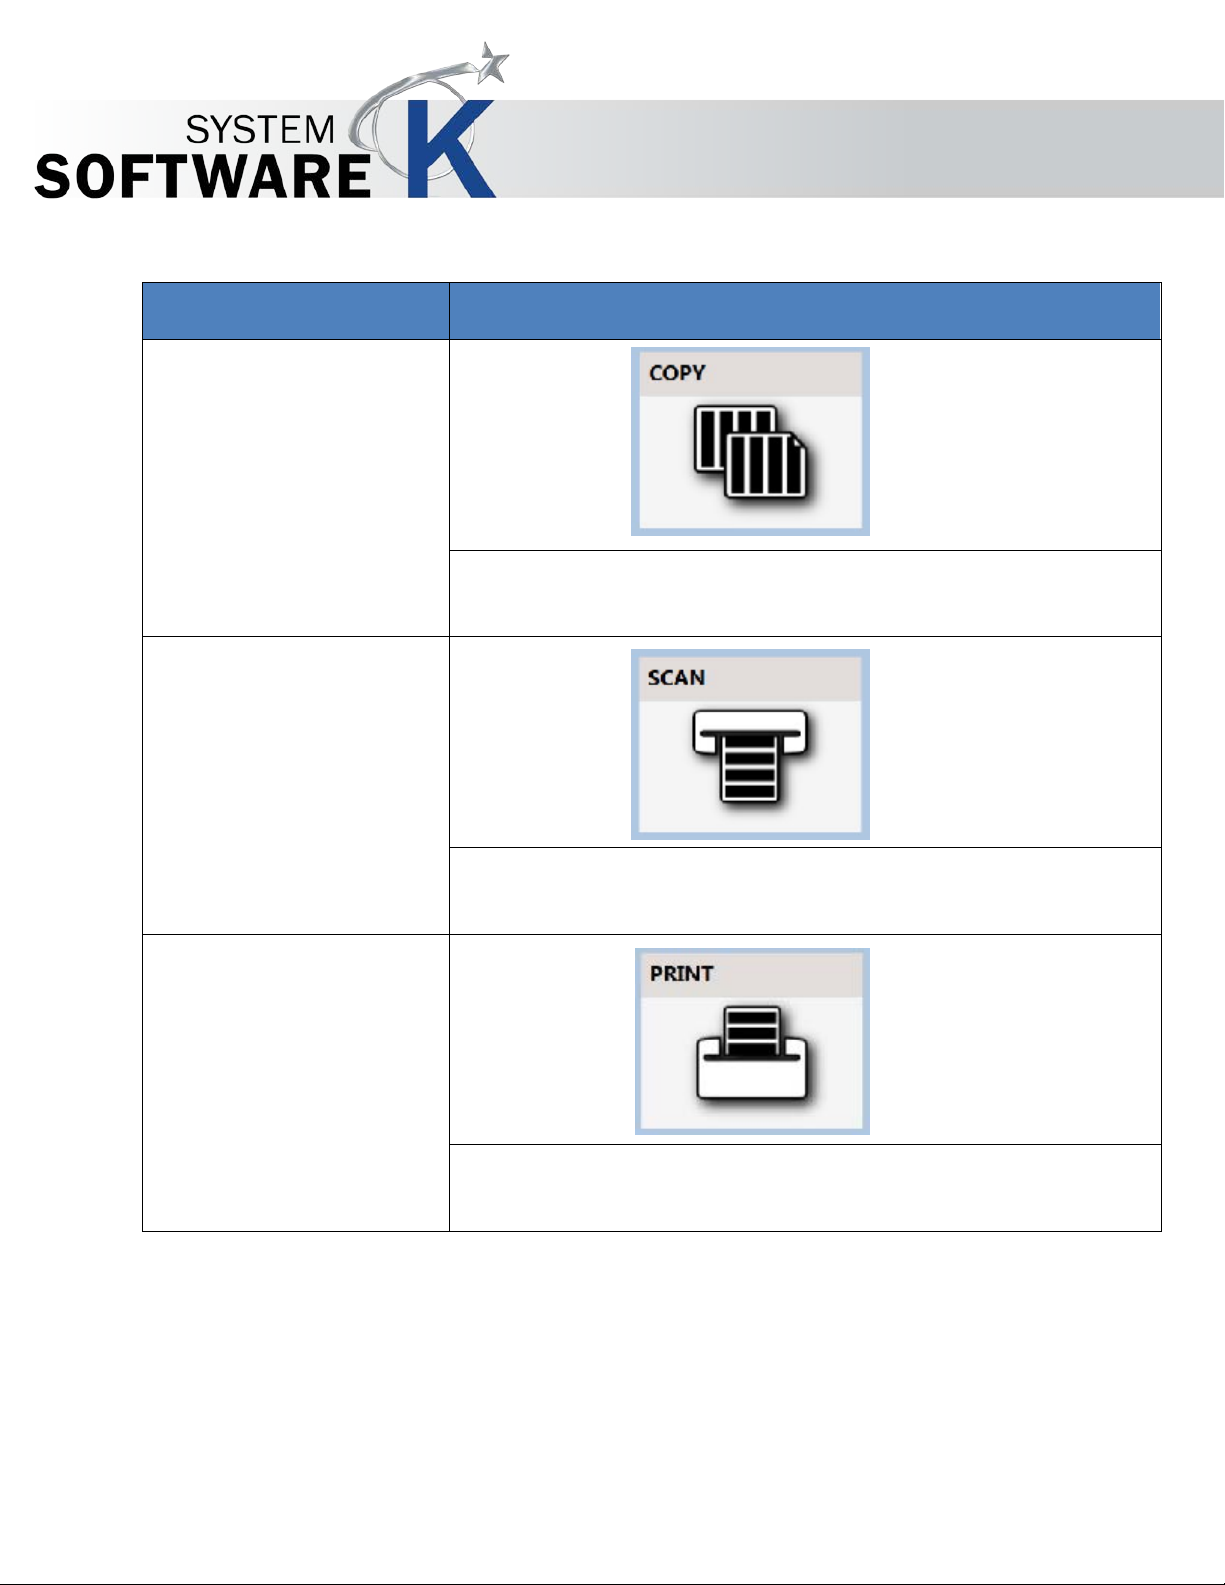
1. Copy (B&W)
When selected will allow the user to make B&W copies directly to the
2. Scan (B&W)
When selected will allow the user to make B&W Scans to available
3. Print (B&W)
When selected will allow the user to make B&W Prints directly to the KIP
KIP Multi-Touch User Guide
KIP Printer.
locations (Local, Network, USB, SMB and FTP).
Printer.
No part of this publication may be copied, reproduced or distributed in any form without express written permission
from KIP. 2015 KIP. v1
- 6 -
Page 7
Component
Function
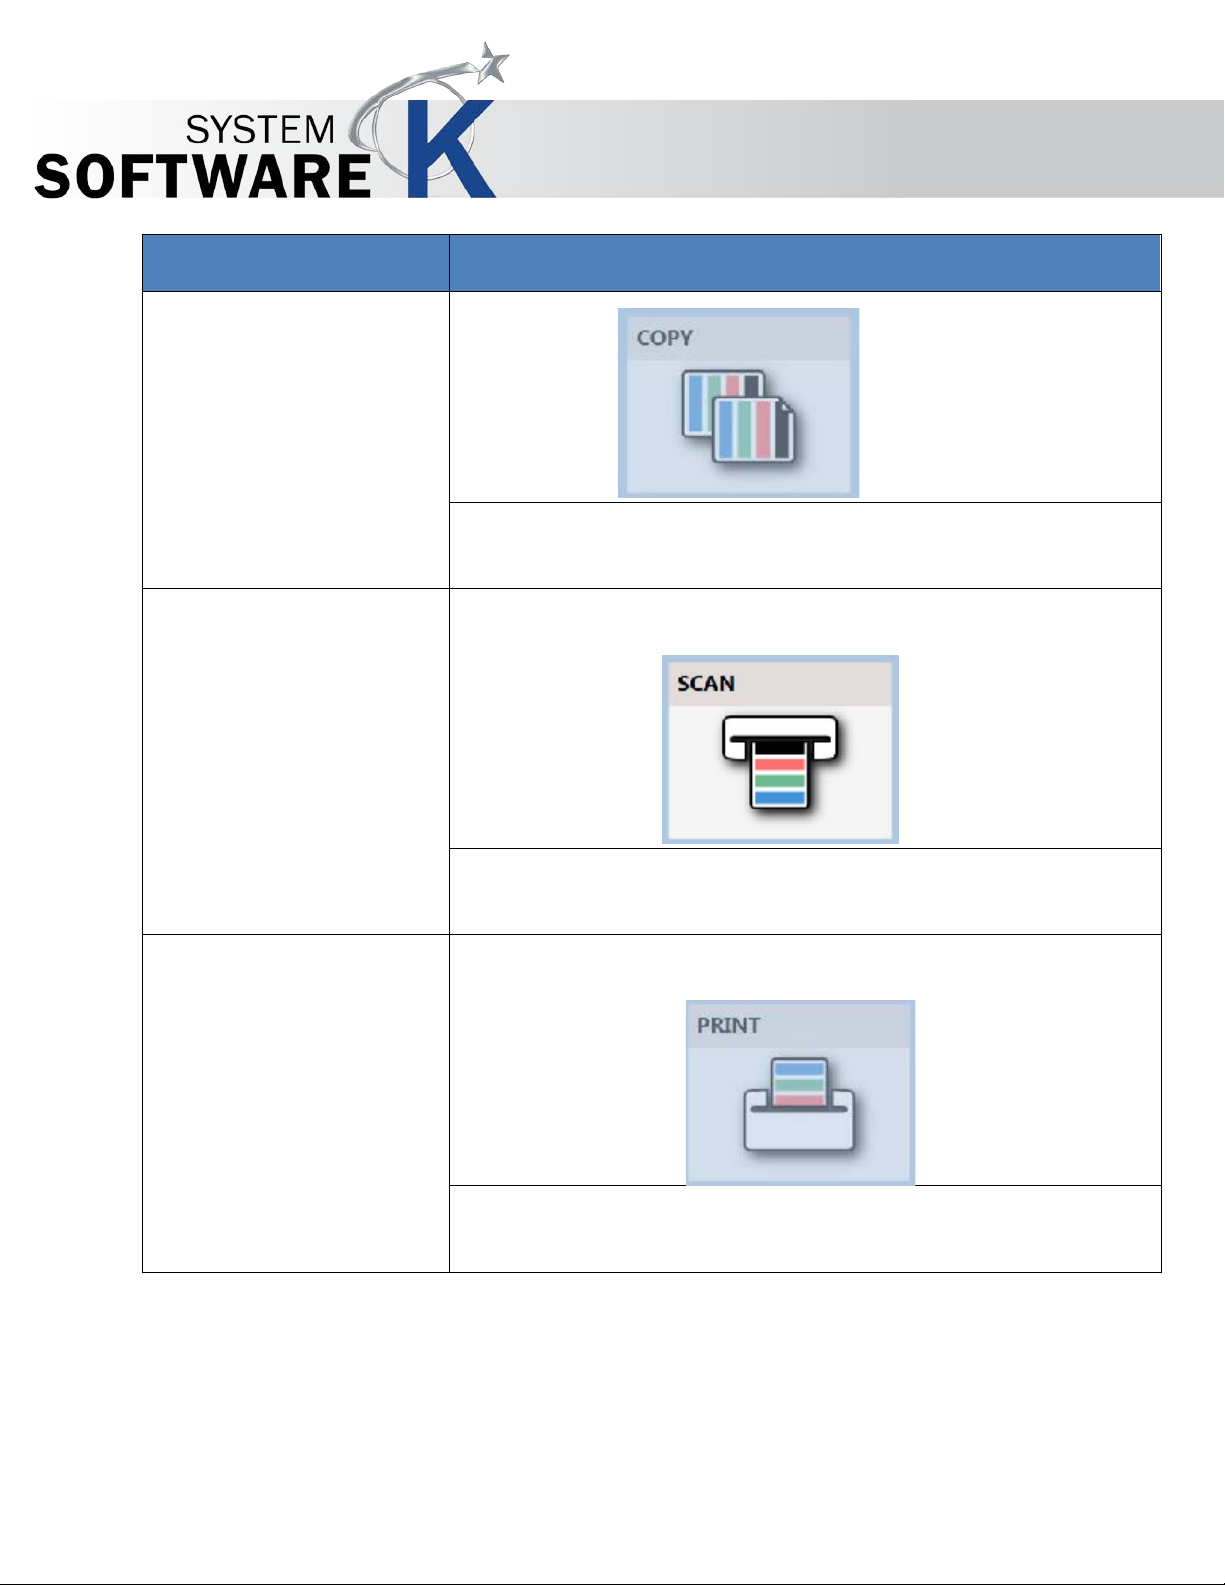
4. Copy (Color)
Launches the Color Copy functionality of the KIP Printer (see Color
5. Scan (Color)
Launches the Color Scan functionality of the KIP Printer (see Color Scan
6. Print (Color)
Launches the Color Print functionality of the KIP Printer (see Color Print
KIP Multi-Touch User Guide
Copy section for further details).
section for further details).
section for further details).
No part of this publication may be copied, reproduced or distributed in any form without express written permission
from KIP. 2015 KIP. v1
- 7 -
Page 8
Component
Function
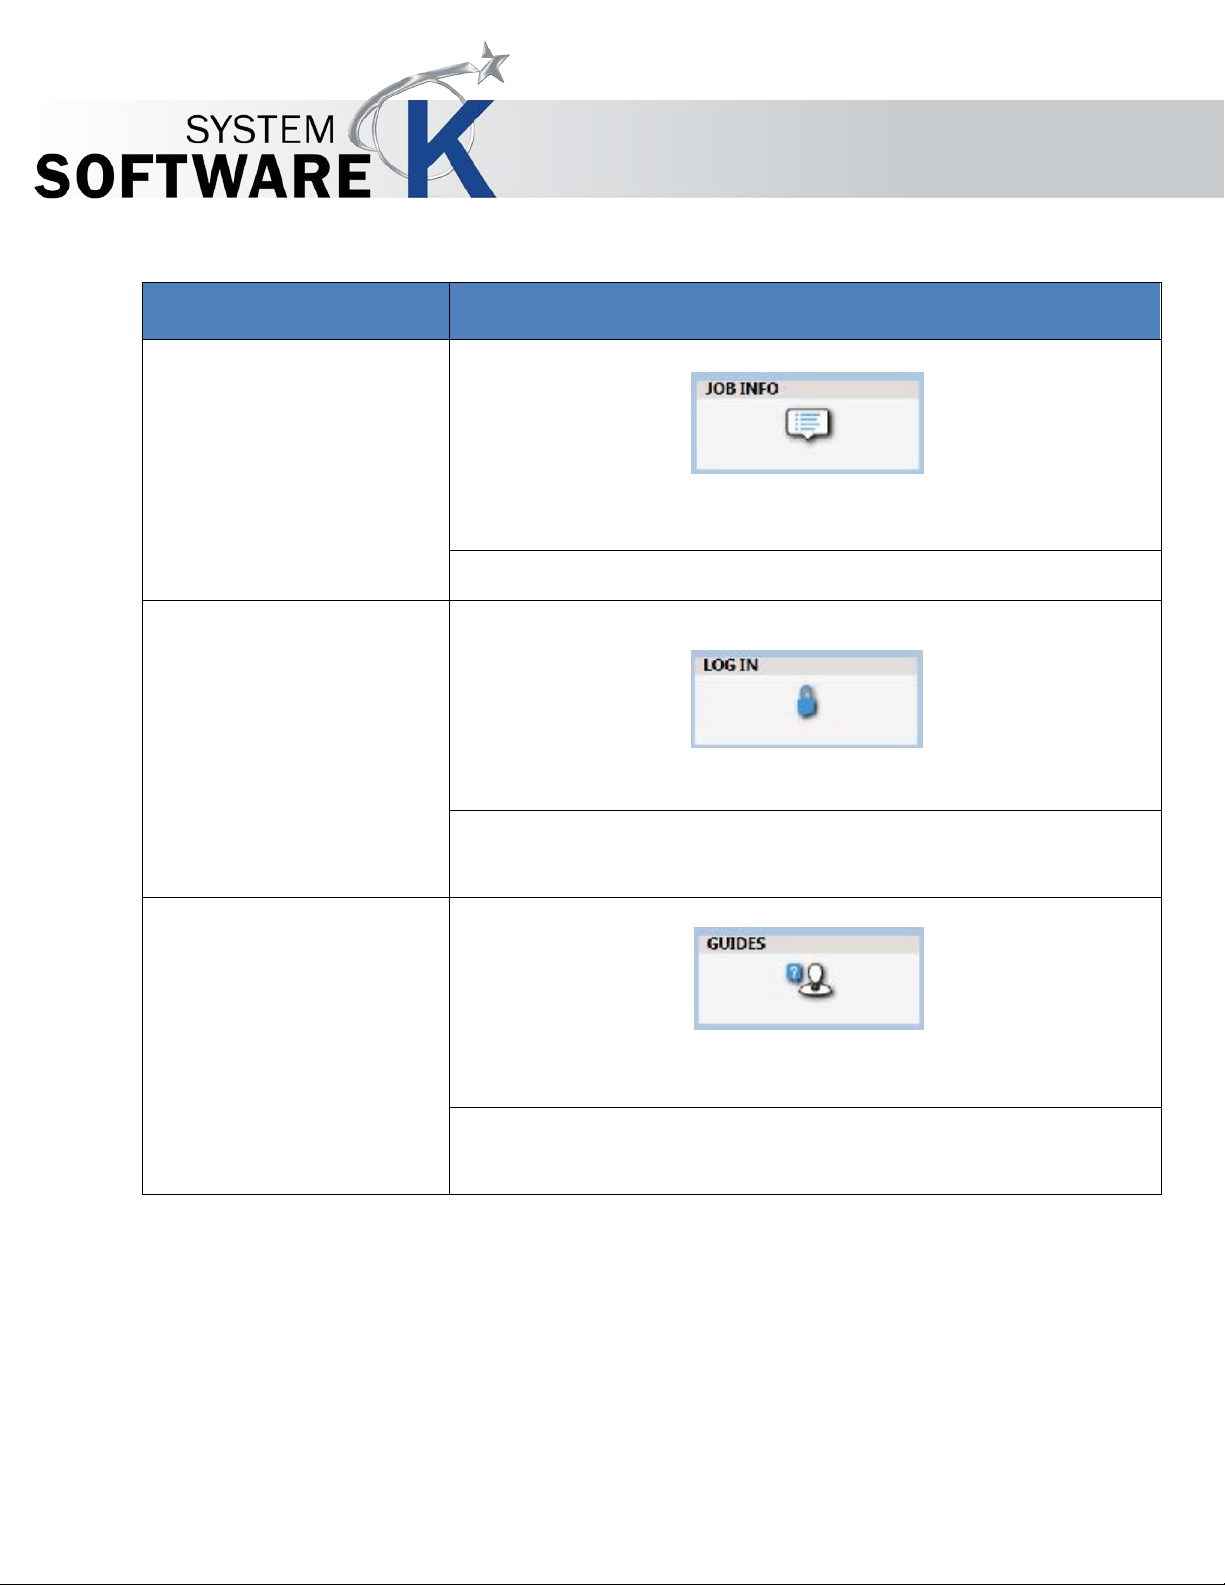
7. Job Info
Open the Print Queue screen, displaying jobs currently in the queue.
8. Log In
Allows users to login to the system for tracking of work done. This may
9. Guides
Opens a window displaying all of the available guides/manuals
KIP Multi-Touch User Guide
be a required field.
available on the KIP System.
No part of this publication may be copied, reproduced or distributed in any form without express written permission
from KIP. 2015 KIP. v1
- 8 -
Page 9
Component
Function
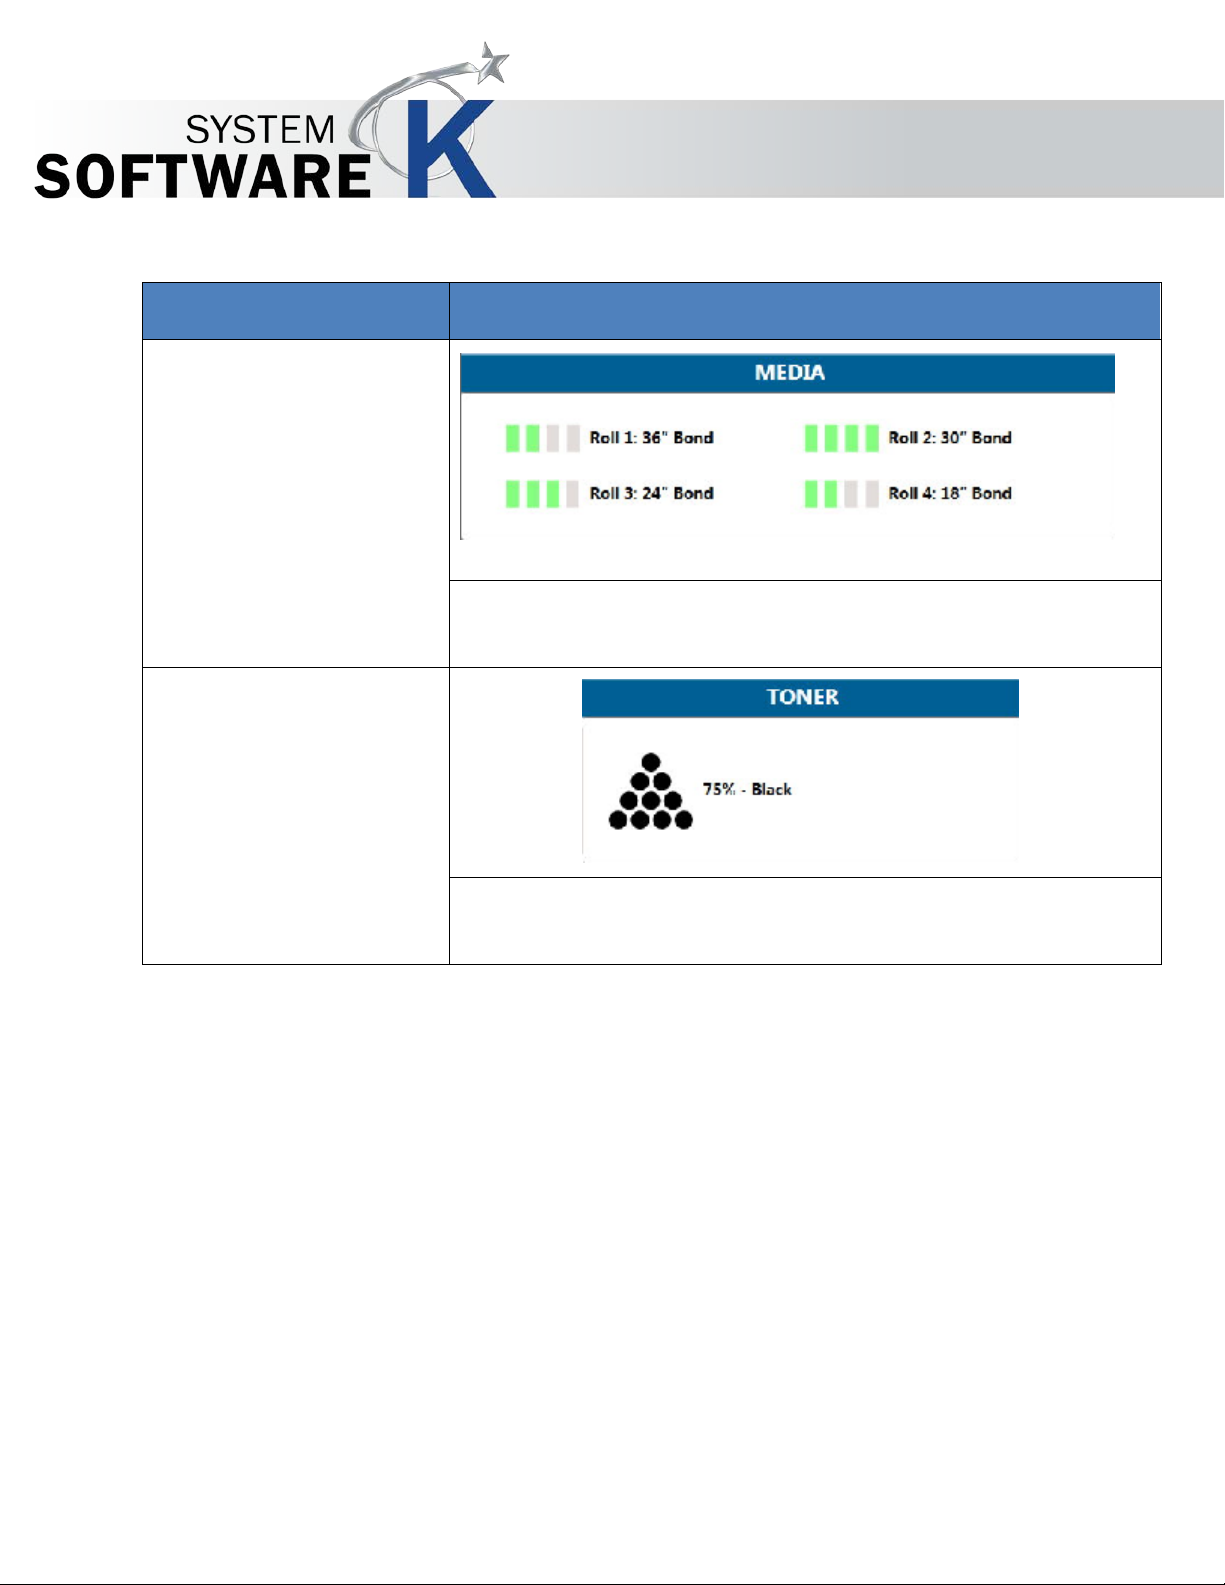
10. Media
Allows for the selection of available media currently loaded in the KIP
11. Toner
Displays the amount of toner remaining in the KIP System in 25%
KIP Multi-Touch User Guide
Printer.
increments.
No part of this publication may be copied, reproduced or distributed in any form without express written permission
from KIP. 2015 KIP. v1
- 9 -
Page 10
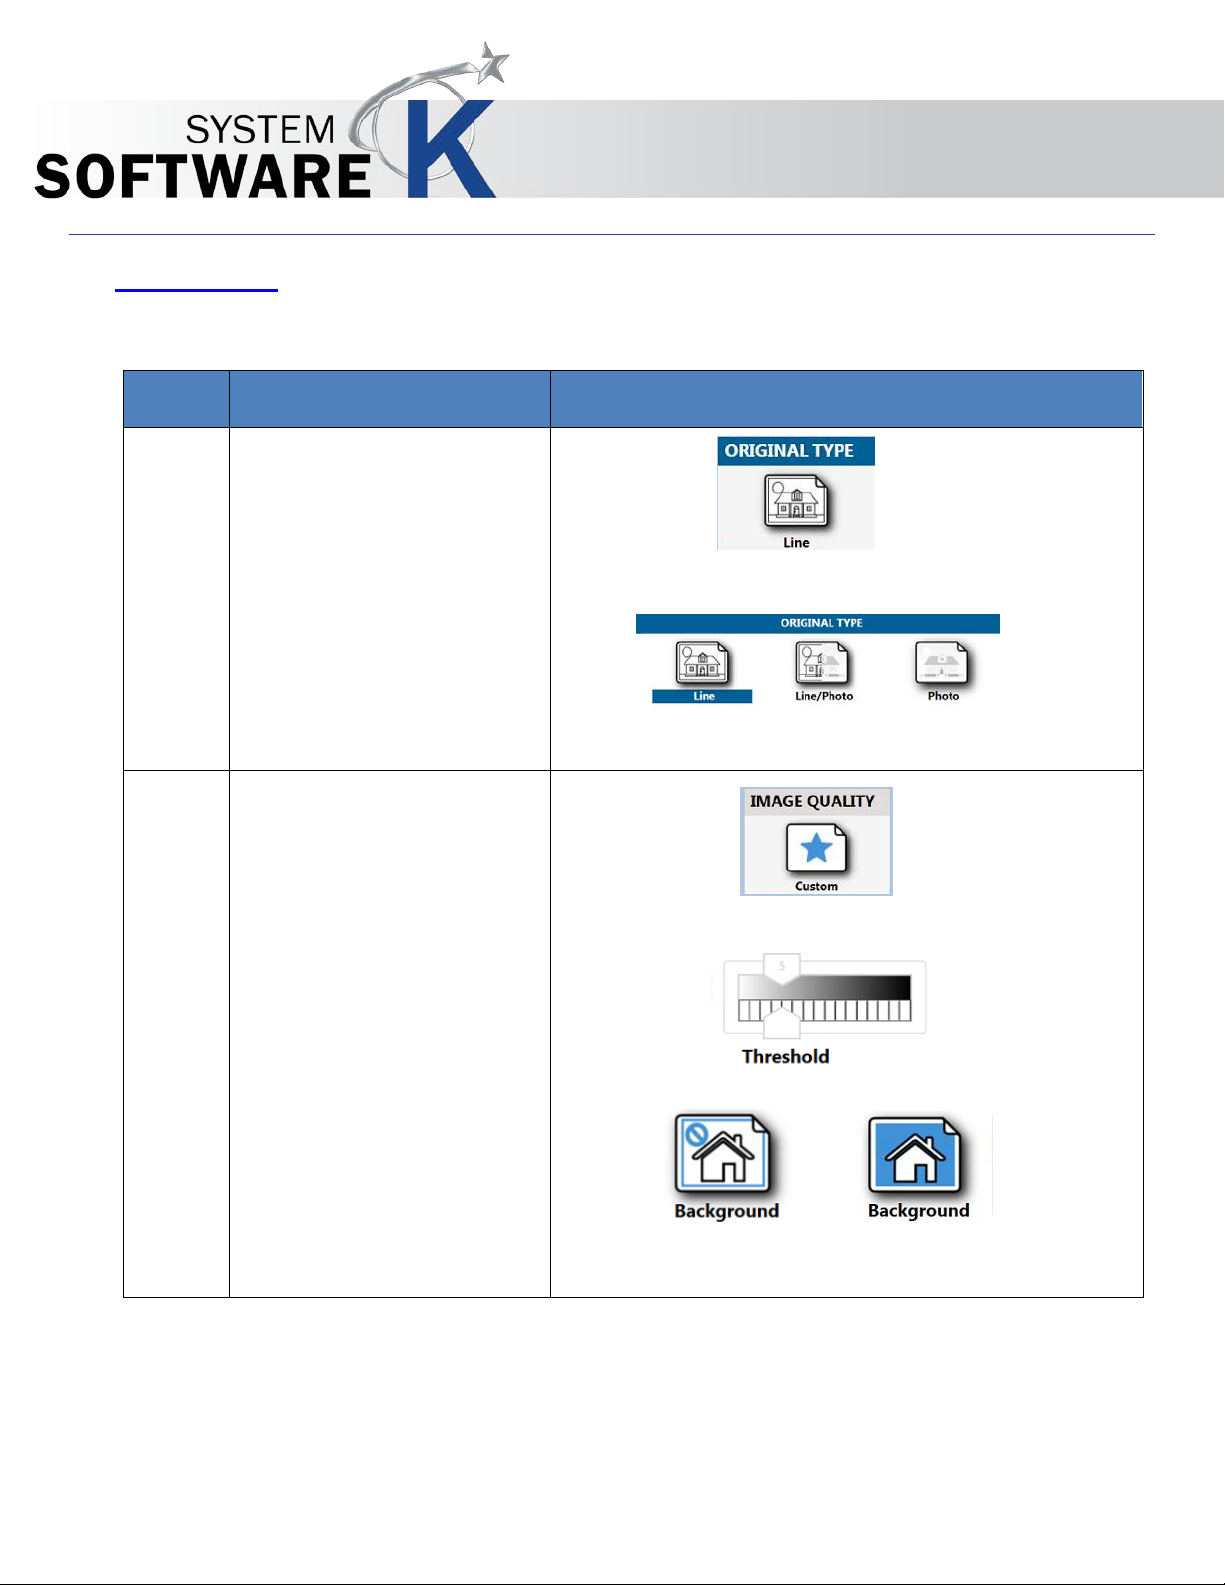
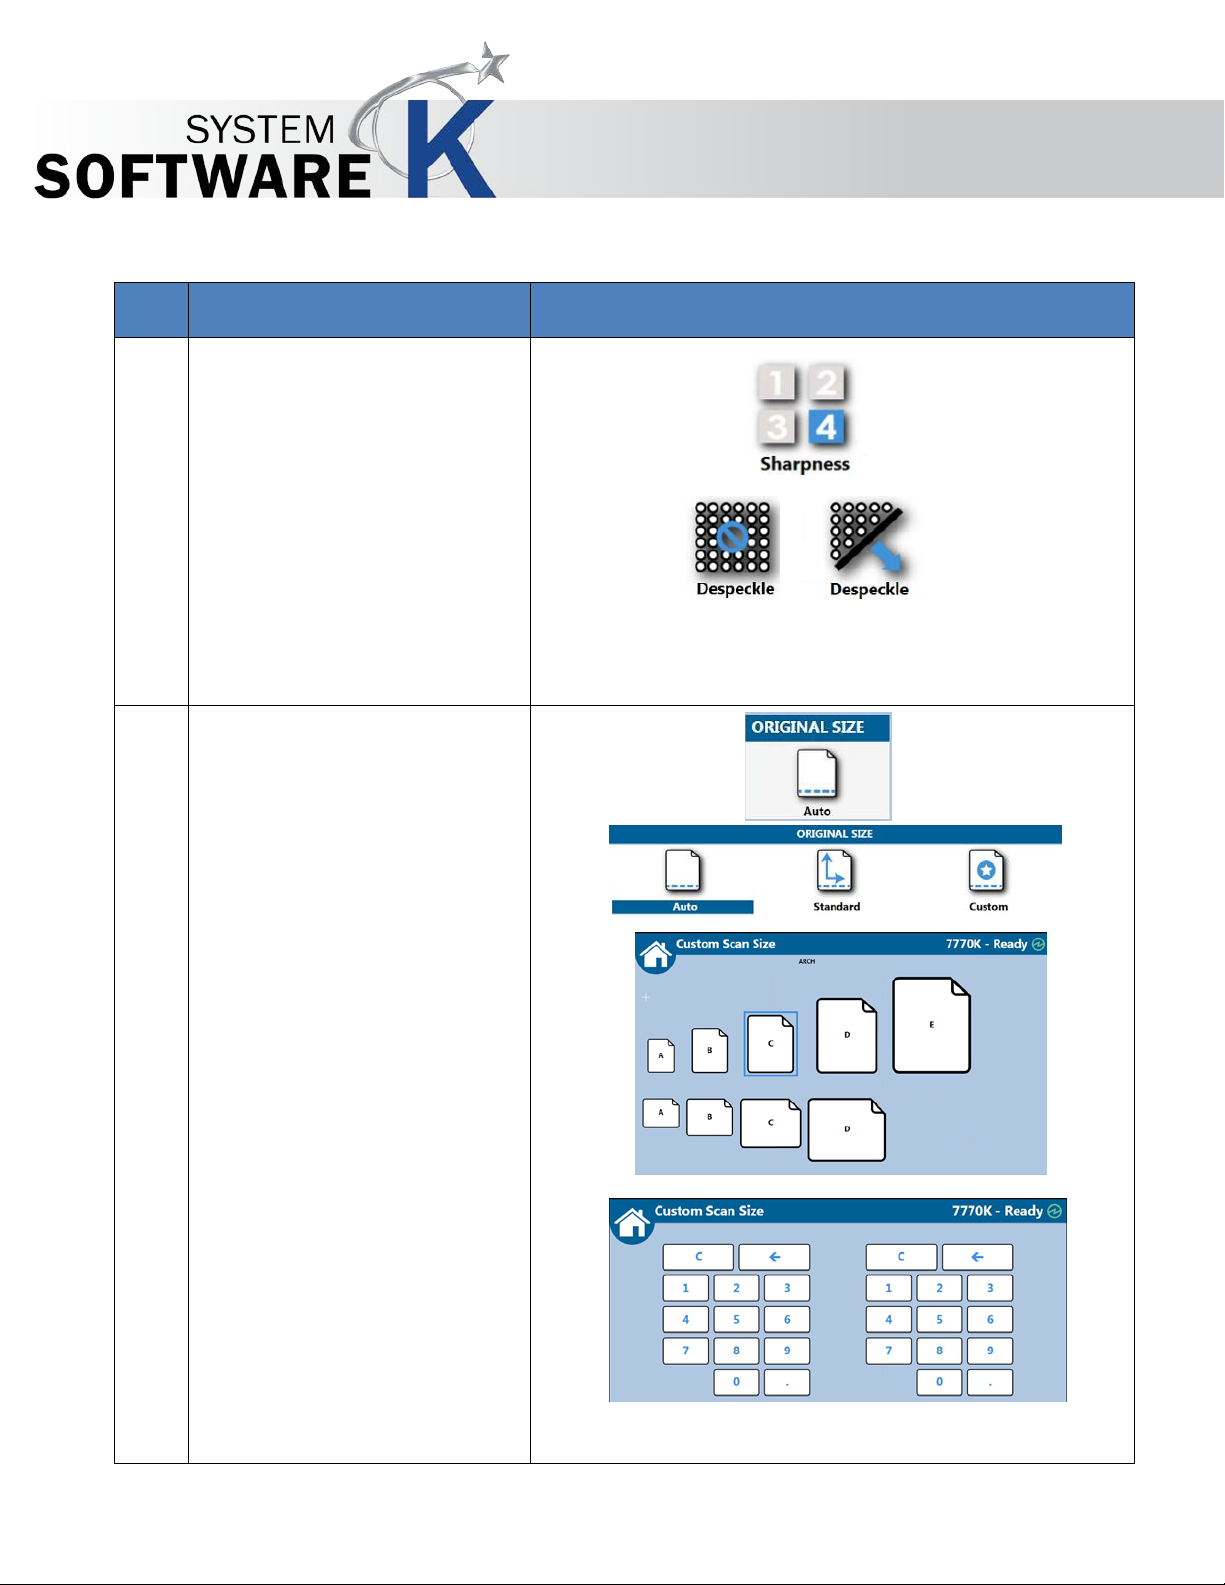
Step
Action
Illustration
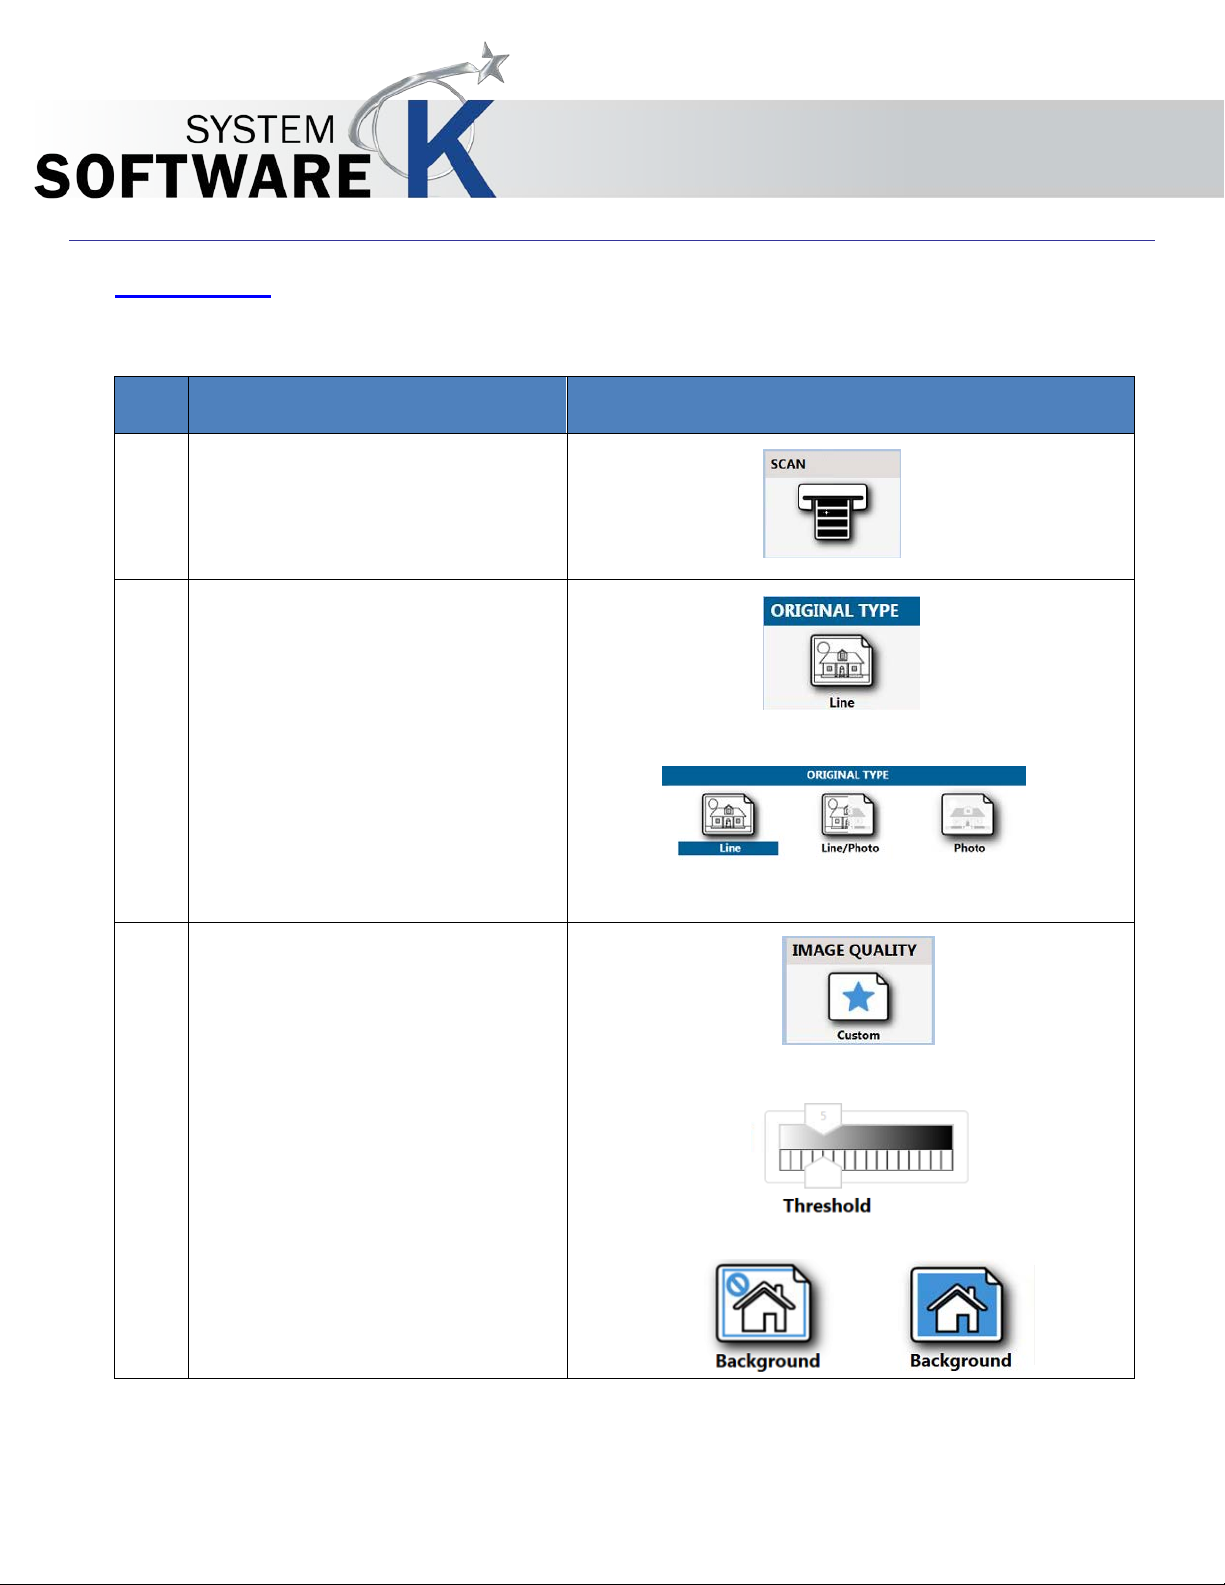
1.
Original Type –
2.
Image Quality – Allows for
KIP Multi-Touch User Guide
3 B&W Copy
The Following section describes the functionality of the B&W copy mode.
• Line- Used for simple
line documents.
• Line / Photo- Used for a
combination of lines &
photos documents.
adjustments to be made to the
image quality if Auto is not
used.
• Threshold – Adjusting the
• Background – Turning on
• Photo- Used for
photographic originals.
threshold will suppress or
enhance the lines and
images from the original.
Background helps to
remove any background
from the final output.
No part of this publication may be copied, reproduced or distributed in any form without express written permission
from KIP. 2015 KIP. v1
- 10 -
Page 11
Step
Action
Illustration
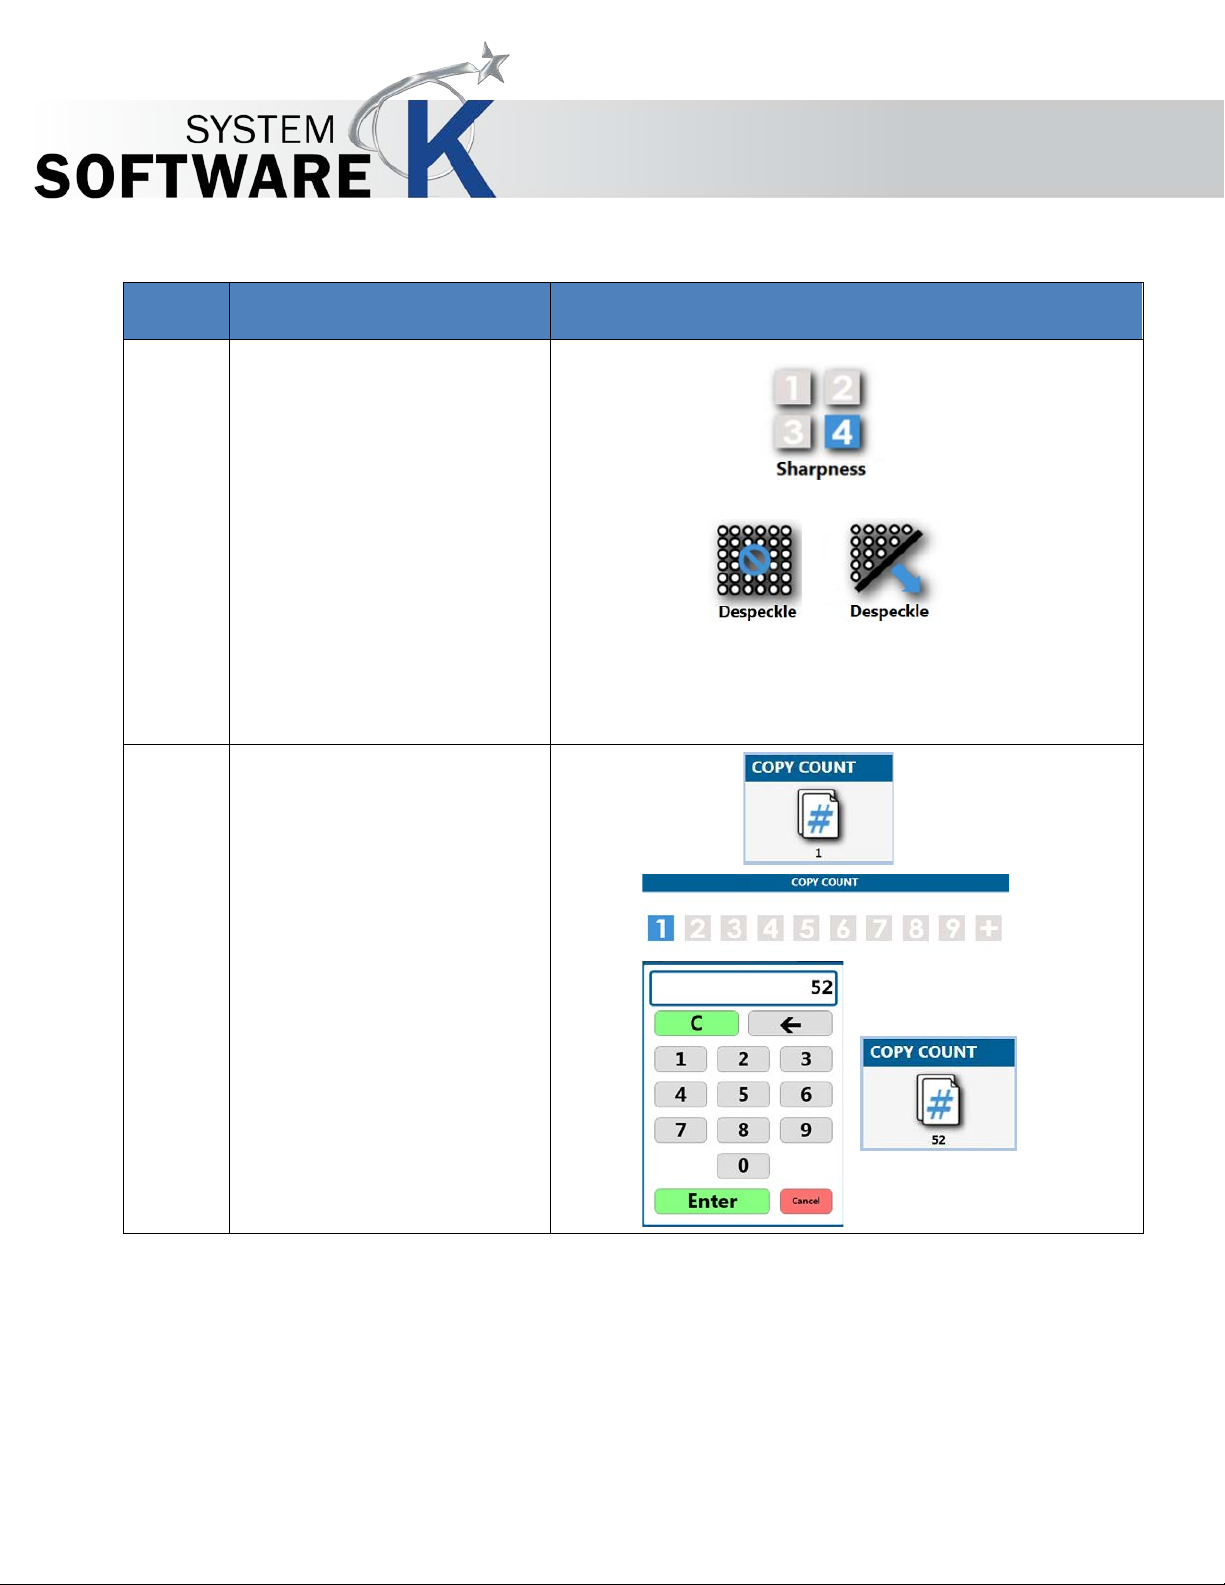
Image Quality – Continued
3.
Copy Count – Used to set the
KIP Multi-Touch User Guide
• Sharpness - Adjusts the line
sharpness to remove rough
lines or when photos are
copied to allow for
smoother graduations.
• Despeckle – Used to
remove background to
make the output look
cleaner.
number of copies to be made.
Note: Selecting the Plus (+) will
bring up a number pad for
No part of this publication may be copied, reproduced or distributed in any form without express written permission
from KIP. 2015 KIP. v1
entering larger quantities.
- 11 -
Page 12
Step
Action
Illustration
4.
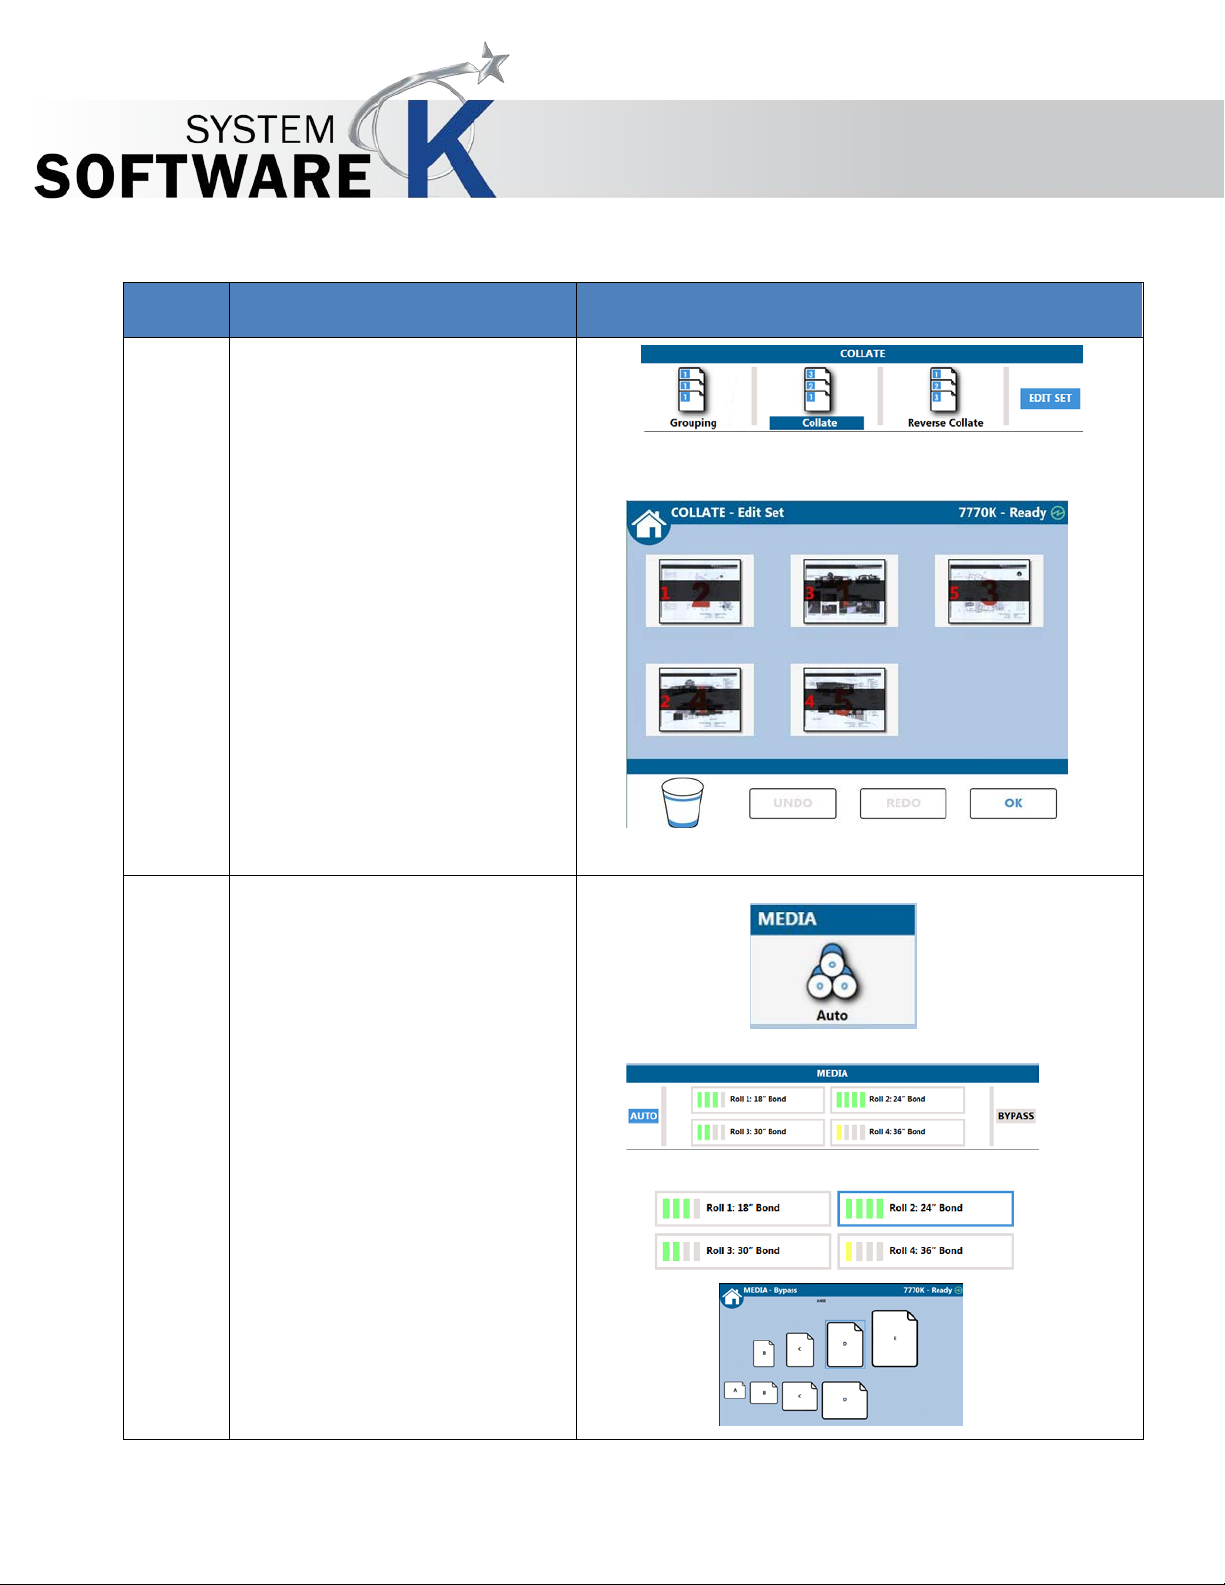
Collate – Used to set the order in
5.
Media – Displays what Media is
KIP Multi-Touch User Guide
which the output will be
generated.
1,1,1 or 3,2,1 or 1,2,3
Edit Set - Will allow for the
scanned files to be re-arranged
prior to sending to be printed.
Unwanted sheets may also be
removed by dragging them to
the trash can.
currently loaded in the KIP Printer
and allows for the setting of the
media size when new media is
Edit Set
No part of this publication may be copied, reproduced or distributed in any form without express written permission
from KIP. 2015 KIP. v1
added.
Auto – On by Default. Will select
the best media size for the output
being printed.
Manual Selection – Select a
specific roll for the output to be
printed on.
Bypass – Select the size of the
media that will be loaded into
the bypass tray.
- 12 -
Page 13
Step
Action
Illustration
6.
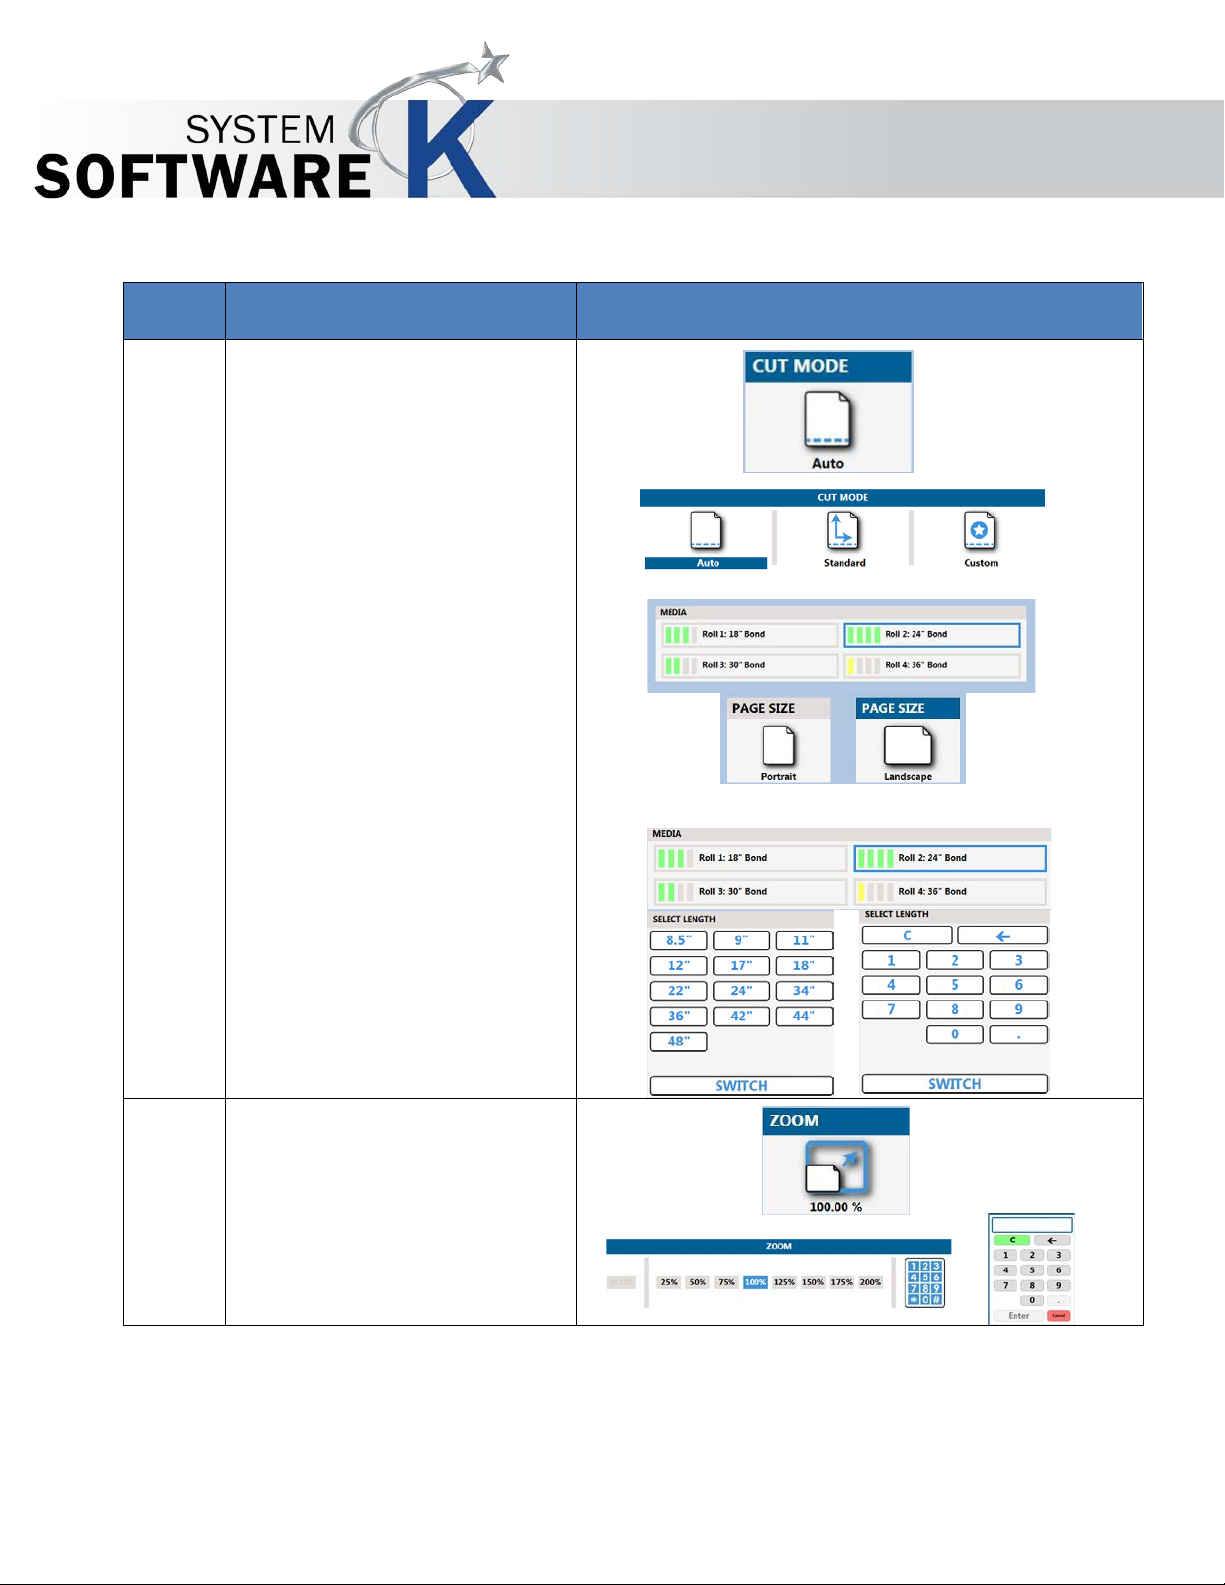
Cut Mode – Allows for the
7.
Zoom – Allows for the selection of
KIP Multi-Touch User Guide
selection of Auto mode for paper
size or the selection of Standard
or Custom cut lengths.
Auto - Select Auto for automatic
cut length (to the length of the
original).
Standard - Standard Cut for a
manual length. (A number pad
will request the desired length to
be entered).
Custom – Select the specific roll
and then the desired length for
the Custom size or select
“SWITCH” to enter a specific size.
specific zoom sizes as well as
setting a specific size with the
number pad.
No part of this publication may be copied, reproduced or distributed in any form without express written permission
from KIP. 2015 KIP. v1
- 13 -
Page 14
Step
Action
Illustration
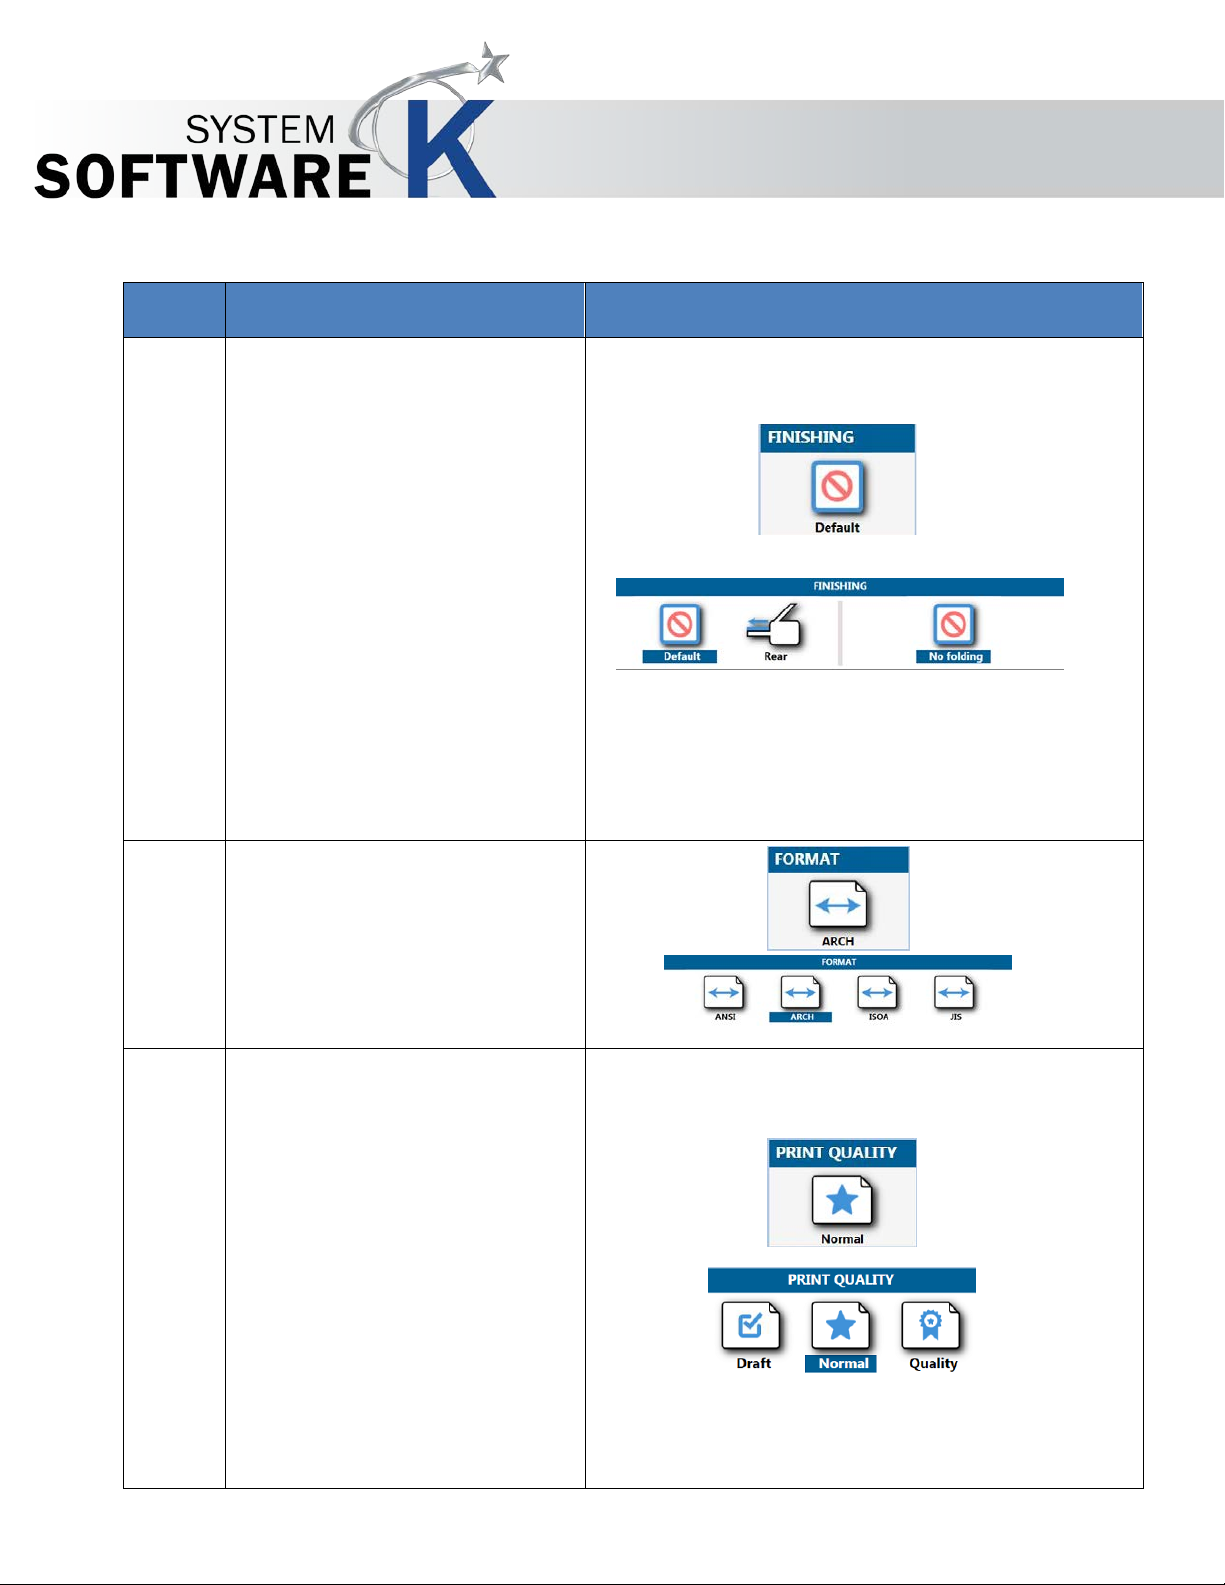
8.
Finishing – Select from available
9.
Format – Choose from the
10.
Print Quality - It is possible to
KIP Multi-Touch User Guide
finishing devices attached to the
KIP Printer.
Default - Output prints to the
default stacking device.
Rear – The output can be forced to
go to a rear stacker.
Top – The output can be forced to
go to the top stacker.
Folding/No Folding – If a folder is
attached, the output can be sent
to the folder.
available format for displayed
sizes.
Note: please see Format Size chart
at the end of this section.
No part of this publication may be copied, reproduced or distributed in any form without express written permission
from KIP. 2015 KIP. v1
select varying copy quality
settings:
• Draft mode will decrease the
scanner DPI while increasing
scanning speed.
• Normal mode will increase the
scanner DPI while decreasing
scanning speed.
• Quality mode will increase the
scanner DPI while decreasing
- 14 -
Page 15

scanning speed.
KIP Multi-Touch User Guide
No part of this publication may be copied, reproduced or distributed in any form without express written permission
from KIP. 2015 KIP. v1
- 15 -
Page 16
Step
Action
Illustration
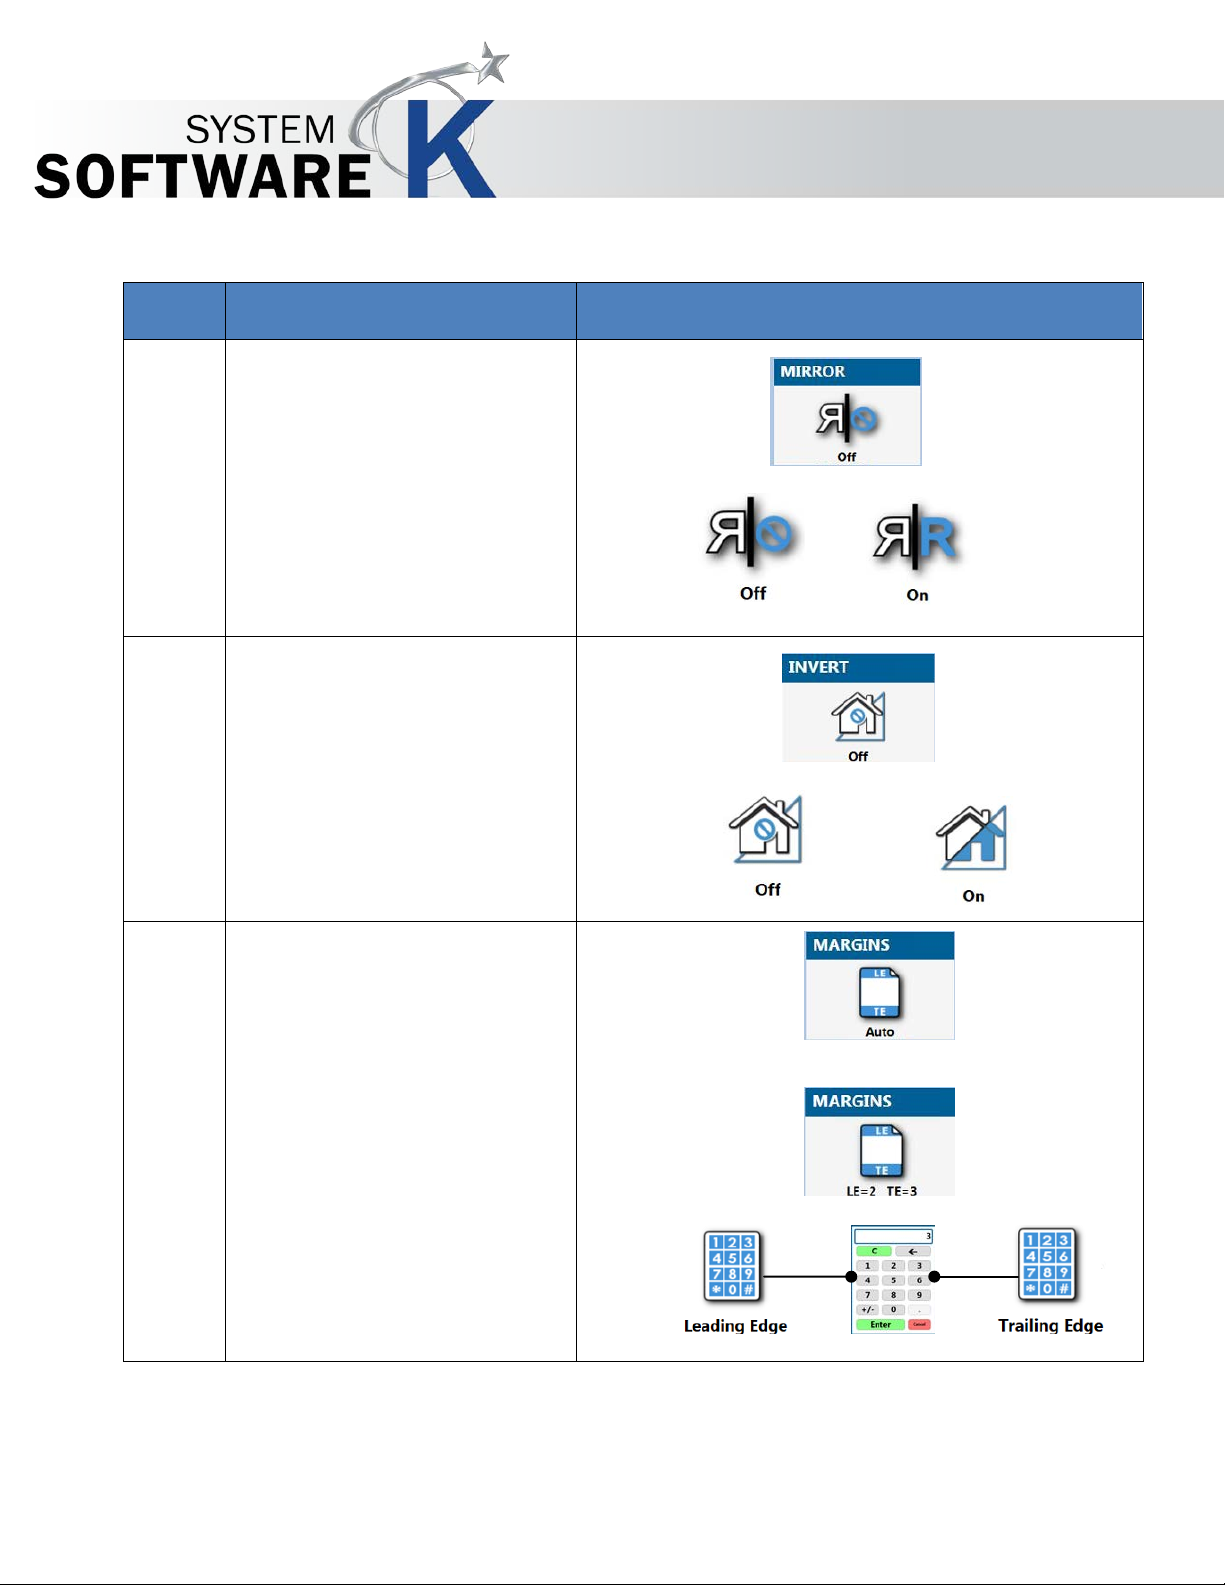
11.
Mirror – When selecting Mirror, the
12.
Invert - Select this button to
13.
Margins – Allows for the addition
KIP Multi-Touch User Guide
image will be printed with a
mirrored output.
change a region of white to
black and black to white of a
scanned document. This is
normally used for “negative”
documents or “blue prints”.
or subtraction of lead/trail
margins.
Selecting Lead/Trail edge will
open a number pad allowing for
the entry of the LE/TE value.
Margins button will display the
changes.
No part of this publication may be copied, reproduced or distributed in any form without express written permission
from KIP. 2015 KIP. v1
- 16 -
Page 17
Step
Action
Illustration
14.
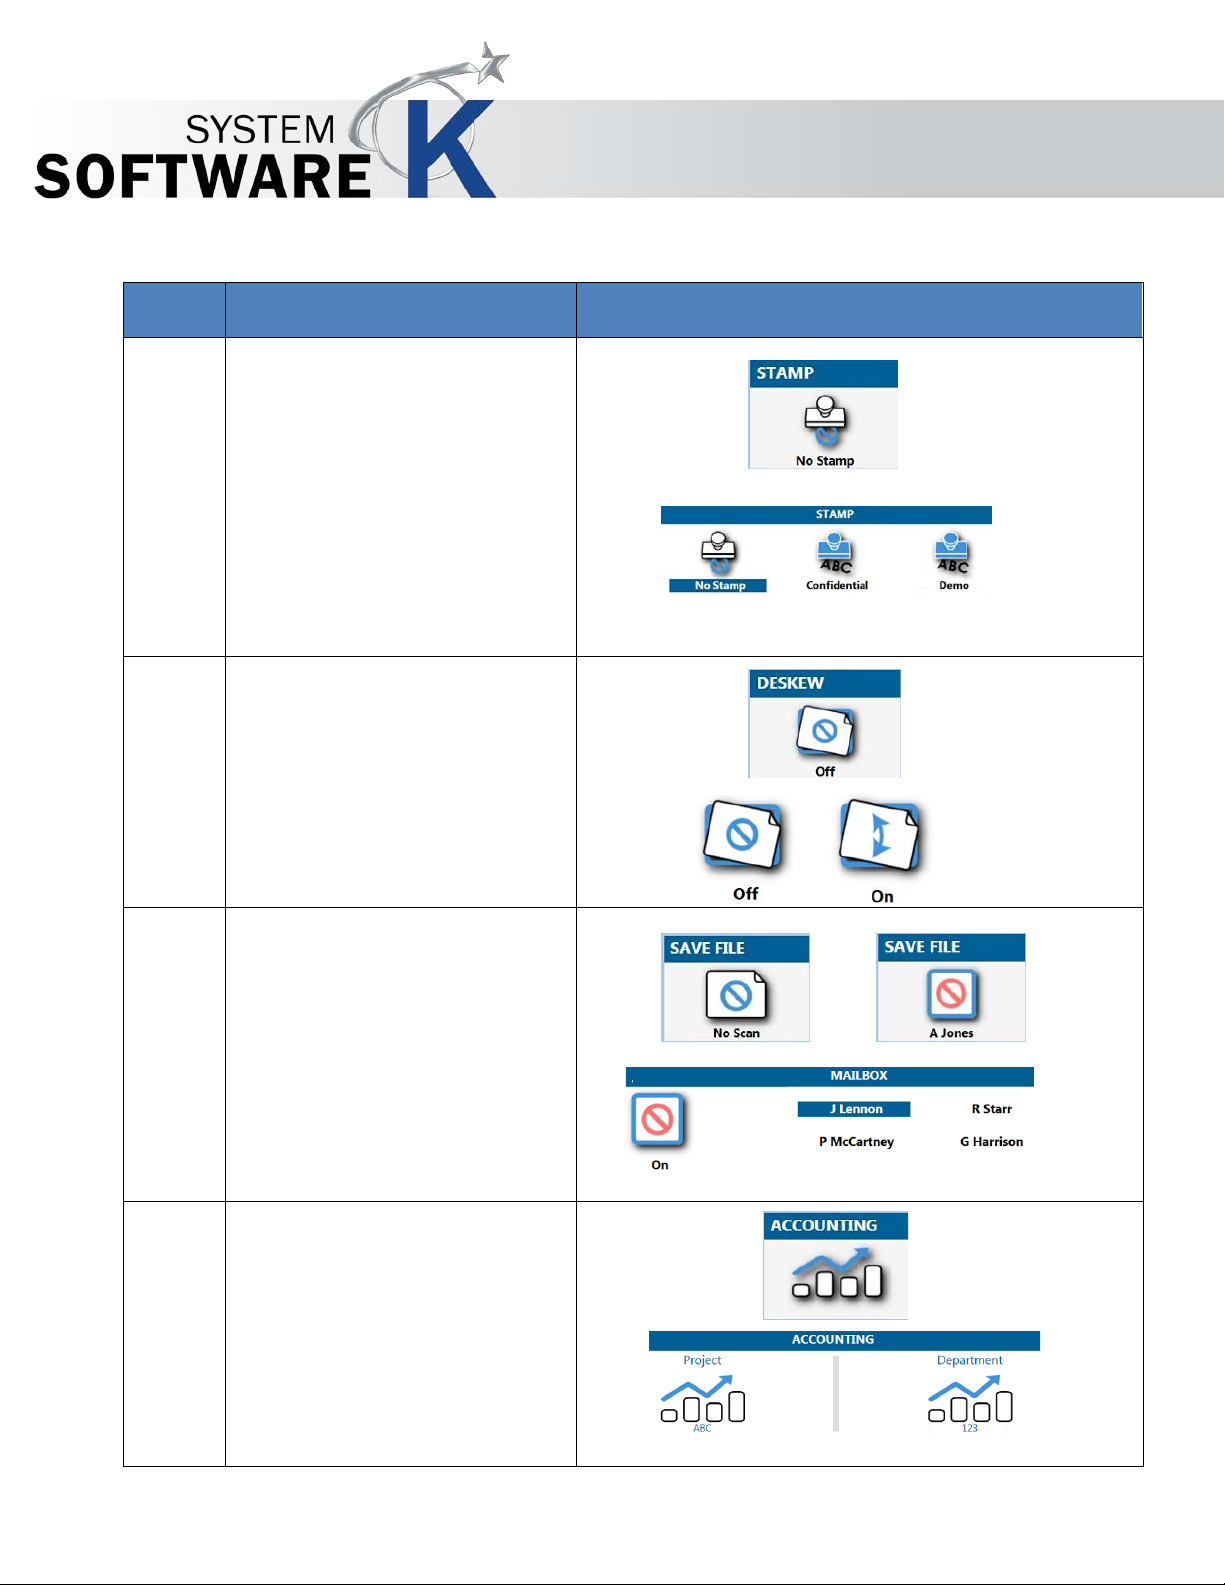
Stamp - Select “Stamp” to allow
15.
Deskew – Will automatically fix a
16.
Save File – Additionally saves a
17.
Accounting – If accounting fields
KIP Multi-Touch User Guide
the selection of a “Stamp” or
“Water Mark” to be placed on the
scanned image. It will be
embedded digitally into the
image.
Note: Creation of new stamps will
be done through KIP PrintPro.Net
slight skew in a scanned
document.
scanned image of the file being
copied.
Turn on Save File and select the
desired mailbox.
Note: Mailboxes will be created
in Configuration.
are being used, a user will need
No part of this publication may be copied, reproduced or distributed in any form without express written permission
from KIP. 2015 KIP. v1
to enter in relevant information
prior to being able to using the
KIP.
- 17 -
Page 18

FORMAT SIZE CHART
This chart shows the sizes for the different format groups by: Group, Name and Orientation
18.
Format Size Chart
Group
Page NameE
Landscape
Portrait
Widt
h
Length
Widt
h
Length
ANSI
Ansi E - -
34
44
Ansi D
34
22
22
34
Ansi C
22
17
17
22
Ansi B
17
11
11
17
Ansi A
11
8.5
8.5
11
ARCH
Arch E - -
36
48
Arch E1
- - 30
42
Arch D
36
24
24
36
Arch C
24
18
18
24
Arch B
18
12
12
18
Arch A
12 9 9
12
ISO A
ISO A0 - -
841
1189
ISO A1
841
594
594
841
ISO A2
594
420
420
594
ISO A3
420
297
297
420
ISO A4
297
210
210
297
JIS B
JIS B1 - -
728
1030
JIS B2
728
515
515
728
JIS B3
515
364
364
515
JIS B4
364
257 - -
CHN A
CHN A0
- - 880
1230
CHN A1
880
620
620
880
CHN A2
620
440
440
620
CHN A3
440
310
310
440
CHN A4
310
210 - -
Other 1
891 x 1189
- - 891
1189
891 x 594
891
594 - -
700 x 1000
- - 700
1000
700 x 500
700
500
Other 2
900 x 1189
- - 900
1189
900 x 594
900
594 - -
880 x 1250
- - 880
1250
880 x 625
880
625 - -
707 x 1000
- - 707
1000
Other 3
610 x 880
- - 610
880
610 x 440
610
440 - -
KIP Multi-Touch User Guide
Format
No part of this publication may be copied, reproduced or distributed in any form without express written permission
from KIP. 2015 KIP. v1
- 18 -
Page 19
Step
Action
Illustration
1.
Select the B&W Scan Icon
2.
Original Type –
3.
Image Quality – Allows for
KIP Multi-Touch User Guide
4 B&W Scan
The following section describes functionality of B&W Scan on the KIP Multi-Touch Screen.
• Line - Used for simple line
documents
• Line / Photo - Used for a
combination of line & photo
documents.
• Photo - Used for
photographic originals.
adjustments to be made to the
image quality if Auto is not used.
• Threshold – Adjusting the
threshold will suppress or enhance
the lines and images from the
original.
• Background – Turning on
Background helps to remove any
background from the final output.
No part of this publication may be copied, reproduced or distributed in any form without express written permission
from KIP. 2015 KIP. v1
- 19 -
Page 20
Step
Action
Illustration
Image Quality – Continued
4.
Original Scan
KIP Multi-Touch User Guide
• Sharpness - Adjusts the
line sharpness to remove rough
lines or when photos are copied
to allow for smoother
graduations
• Despeckle – Used to
remove background to make
the output look cleaner.
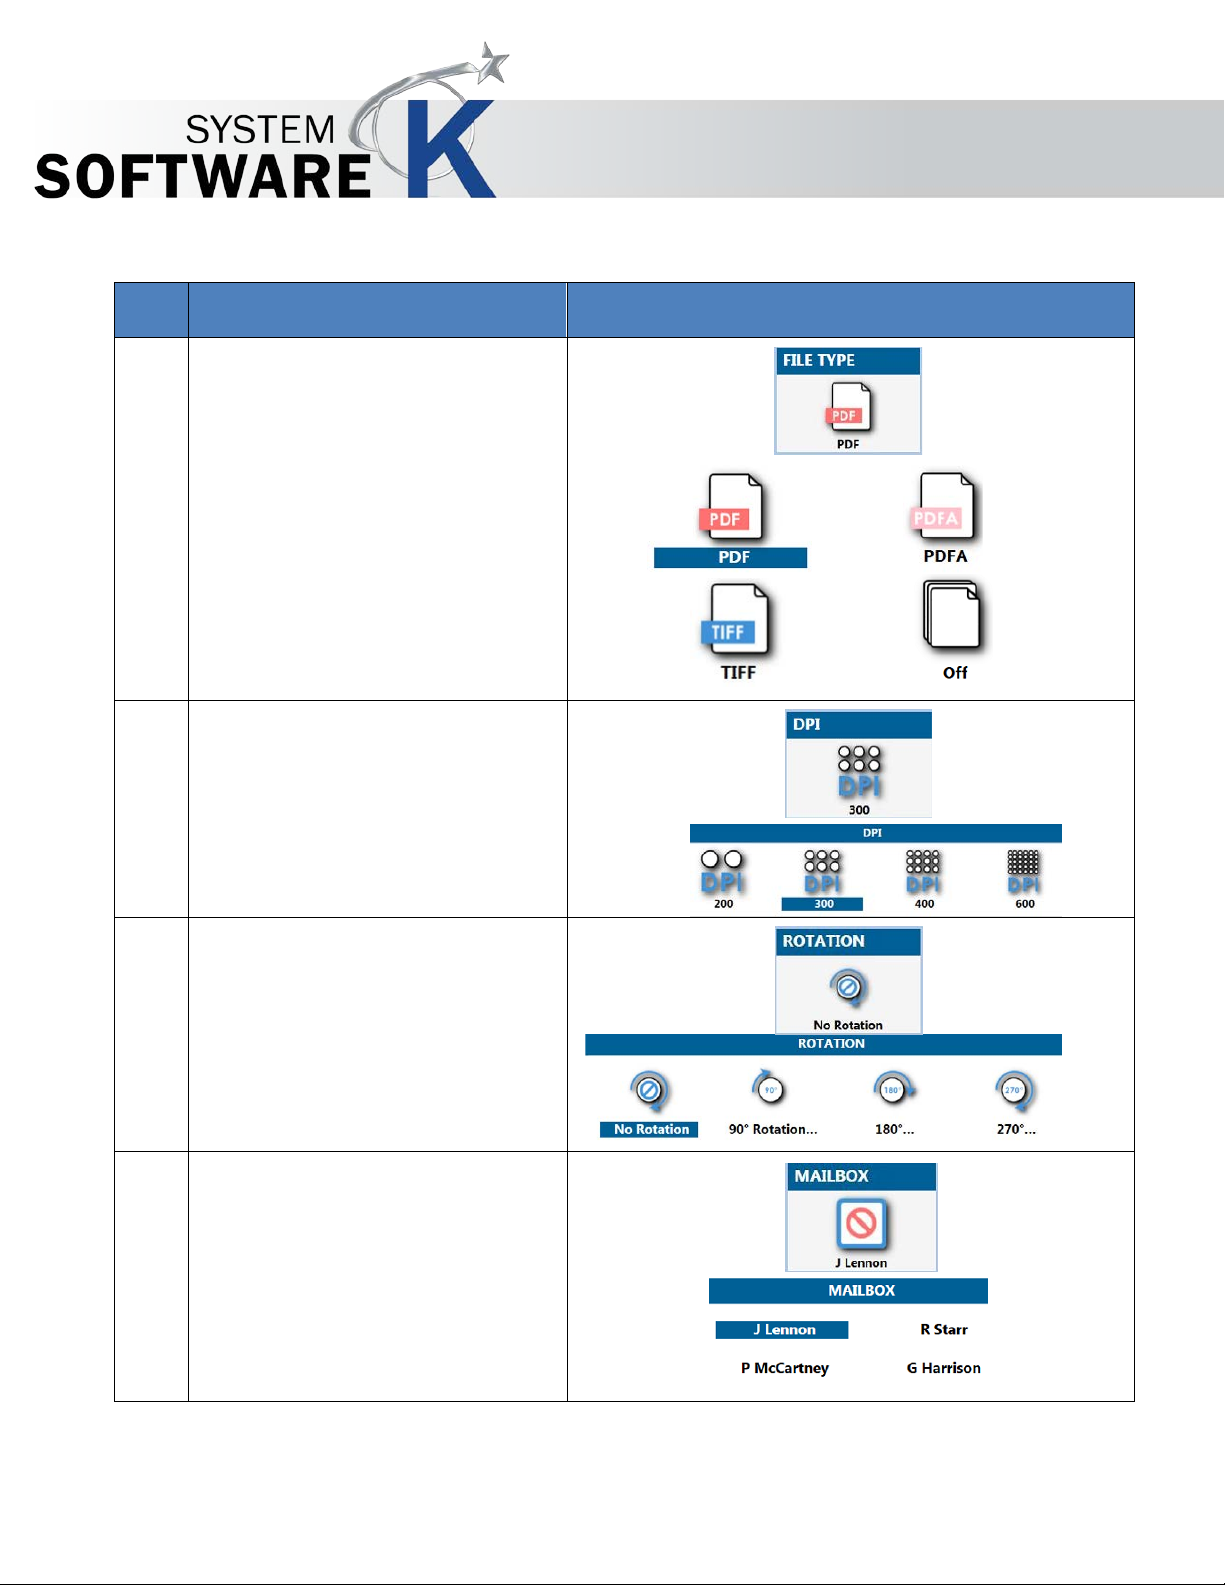
Auto - Will determine the original
size and length of the document
being scanned.
Standard – Select from Standard
sizes in portrait or landscape.
Custom – Enter desired values for
both Width and Height.
No part of this publication may be copied, reproduced or distributed in any form without express written permission
from KIP. 2015 KIP. v1
- 20 -
Page 21
Step
Action
Illustration
5.
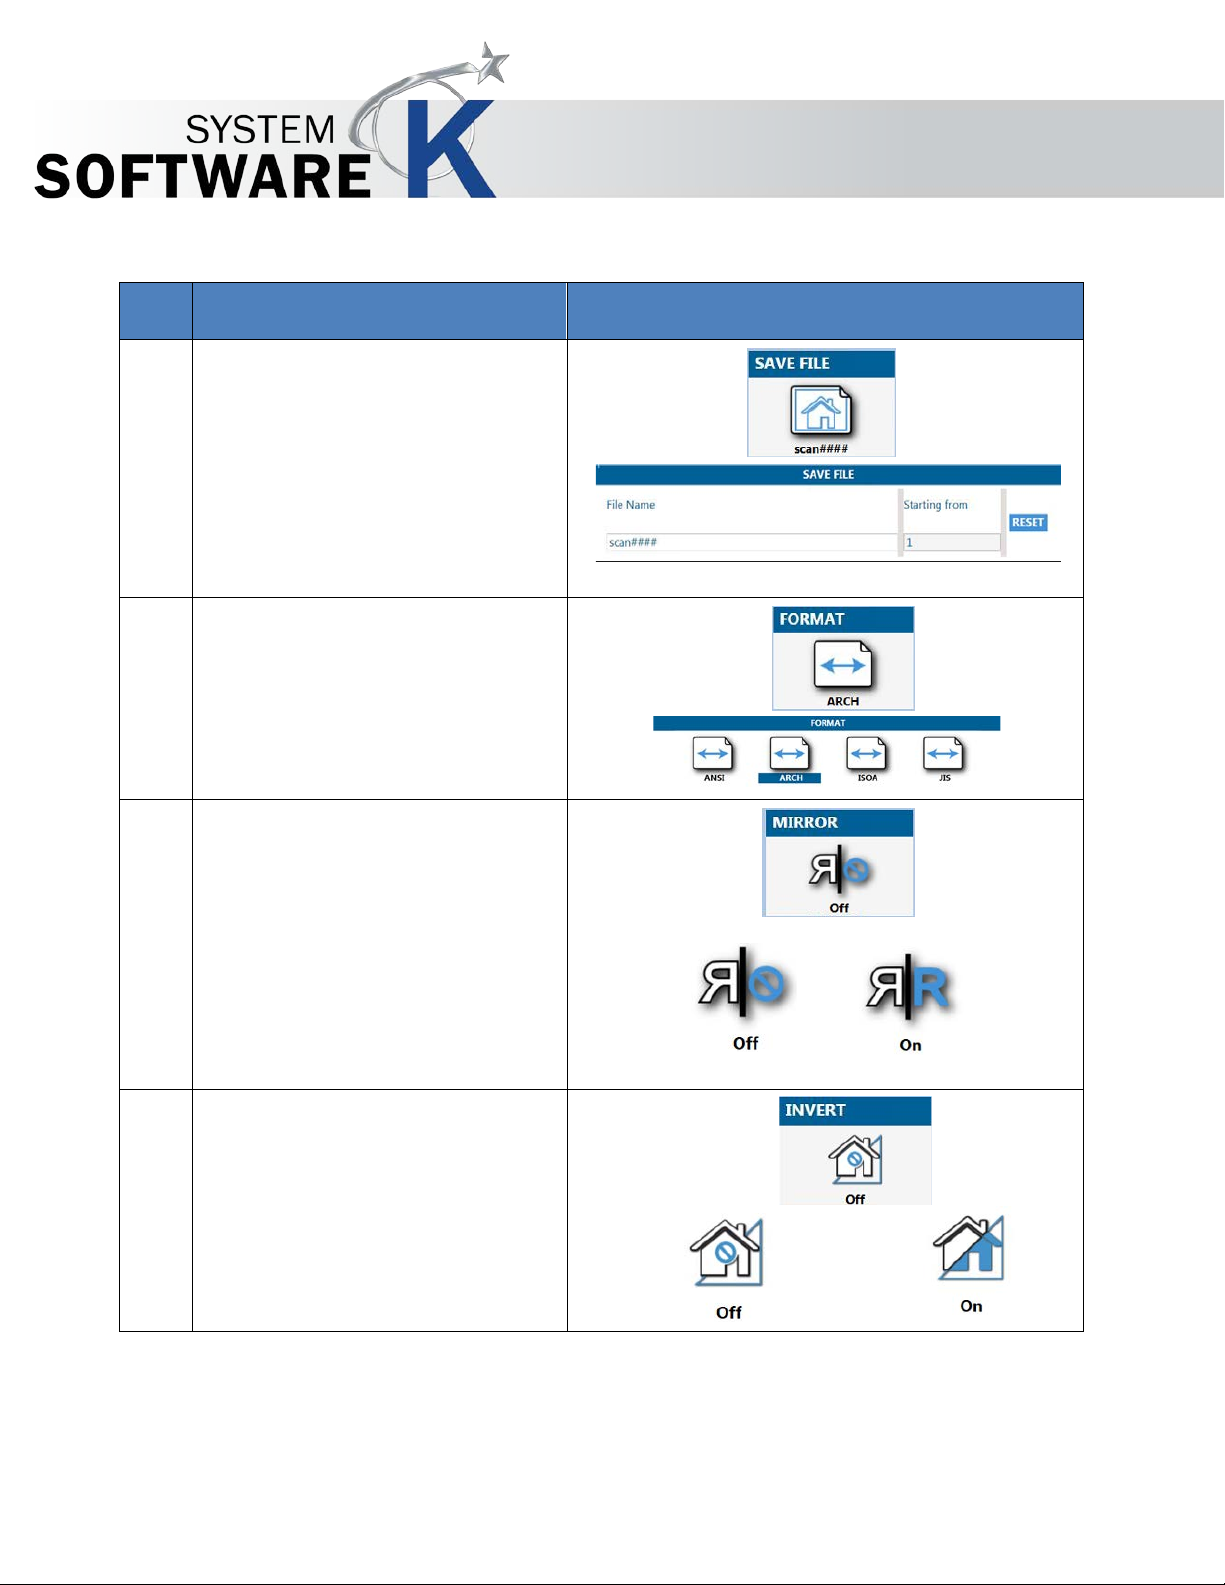
File Type – Allows for the s elec tion of
6.
DPI - Select the required scan
7.
Rotation – Files can be saved
8.
Mailbox – Displays the available
KIP Multi-Touch User Guide
the format the file(s) will be scanned
to.
• PDF – Standard PDF format
• PDF/A - Standard PDF/A
format
• TIFF Standard TIFF format
• Off – On/Off for Multi-page
scanning
resolution.
Choices are 200, 300 , 400 or 600 DPI.
rotated, from the actual feed
direction. This can be used to
reduce the scan time on certain
orientation of originals, when they
are archived.
mailboxes. The Mailbox button
displays the active mailbox.
Note: Mailboxes are setup under
Configuration.
No part of this publication may be copied, reproduced or distributed in any form without express written permission
from KIP. 2015 KIP. v1
- 21 -
Page 22
Step
Action
Illustration
9.
Save File – Allows for the setting of a
10.
Format – Choose from the available
11.
Mirror – When selecting Mirror the
12.
Invert - Select this button to change
KIP Multi-Touch User Guide
file name and number for the file to
be scanned.
By default the Files will be scanned
in as Scan0001.
Reset will clear the fields.
format for displayed sizes.
Note: please see Format Size chart
at the end of this section.
image will be printed with a
mirrored output.
a region of white to black and
black to white of a scanned
document. This is normally used for
“negative” documents or “blue
prints”.
No part of this publication may be copied, reproduced or distributed in any form without express written permission
from KIP. 2015 KIP. v1
- 22 -
Page 23
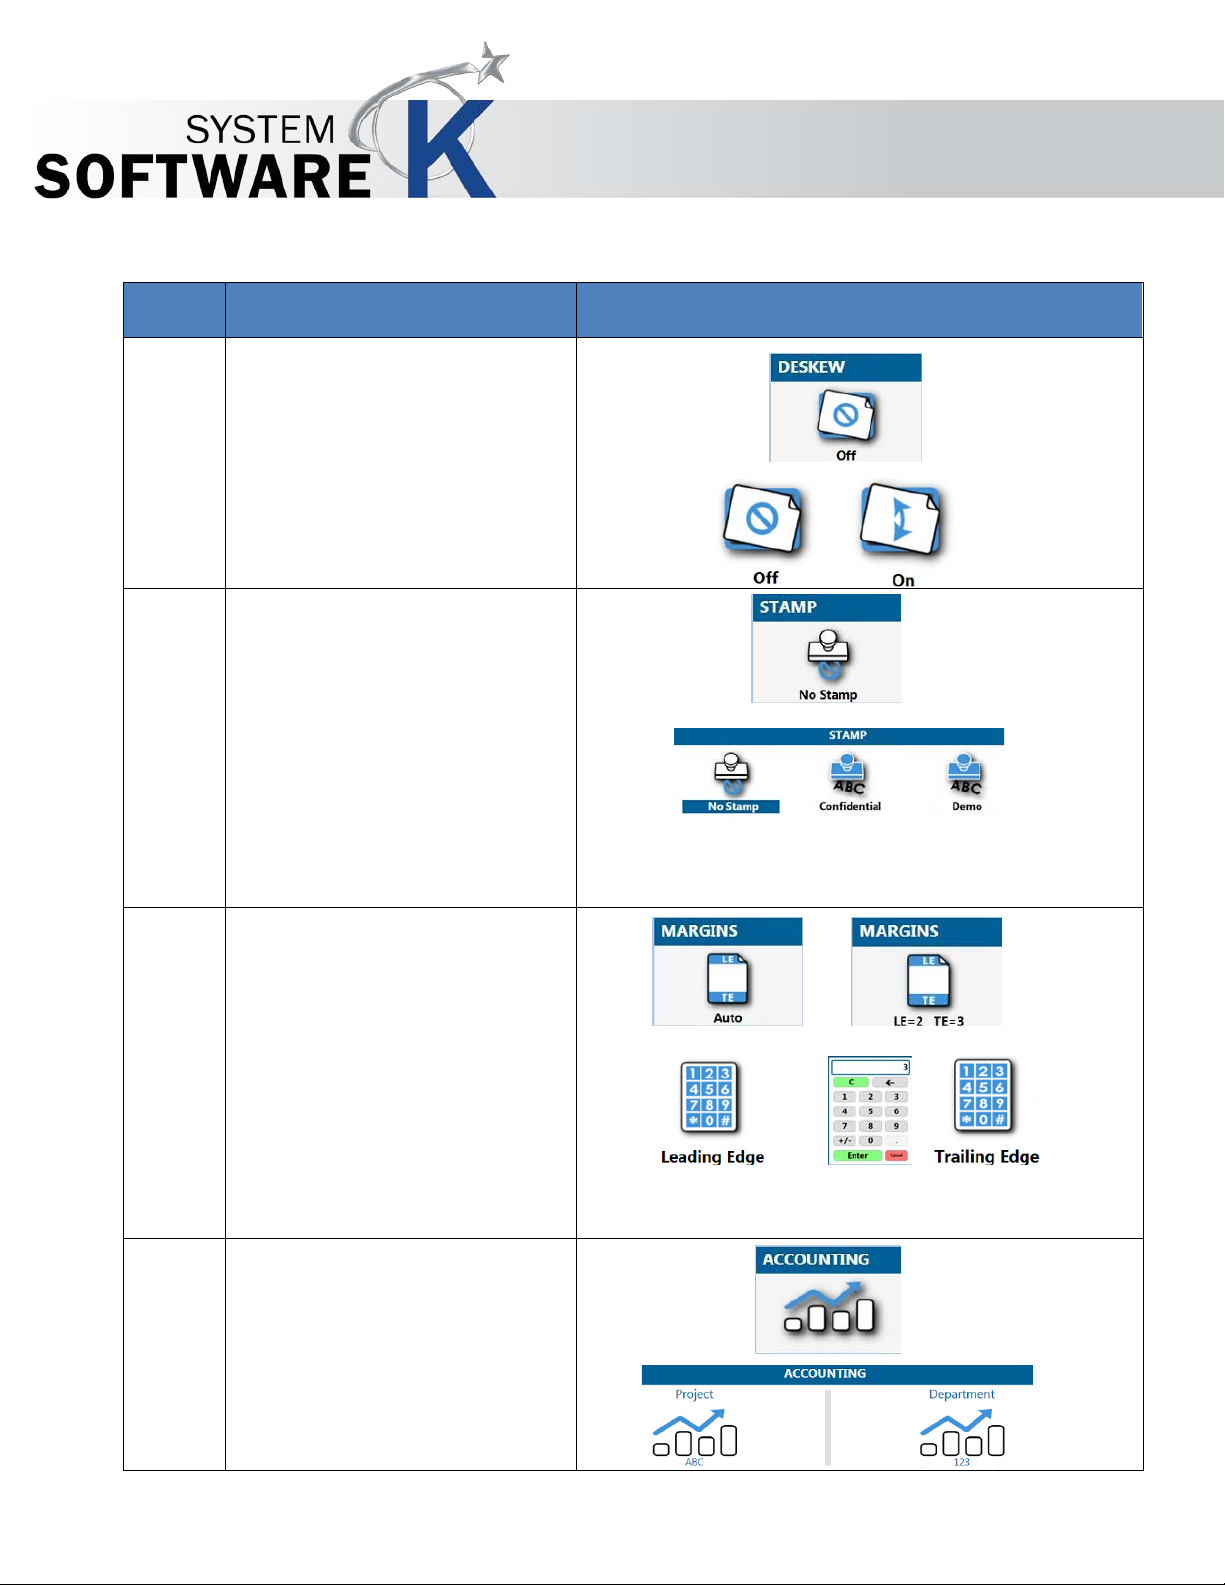
Step
Action
Illustration
13.
Deskew – Will automatically fix a
14.
Stamp - Select “Stamp” to allow
15.
Margins – Allows for the addition
16.
Accounting – If accounting fields
KIP Multi-Touch User Guide
slight skew in a scanned
document.
the selection of a “Stamp” or
“Water Mark” to be placed on the
scanned image. It will be
embedded digitally into the
image.
Note: Creation of new stamps will
be done through KIP PrintPro.Net
or subtraction of lead/trail
margins.
Selecting Lead/Trail edge will
open a number pad allowing for
the entry of the LE/TE value.
Margins button will display the
changes.
No part of this publication may be copied, reproduced or distributed in any form without express written permission
from KIP. 2015 KIP. v1
are being used, a user will need
to enter in relevant information
prior to being able to using the
KIP.
- 23 -
Page 24
FORMAT SIZE CHART
This chart shows the sizes for the different format groups by: Group, Name and Orientation
1.
Format Size Chart
Group
Page NameE
Landscape
Portrait
Width
Length
Width
Length
ANSI
Ansi E - -
34
44
Ansi D
34
22
22
34
Ansi C
22
17
17
22
Ansi B
17
11
11
17
Ansi A
11
8.5
8.5
11
ARCH
Arch E - -
36
48
Arch E1
- - 30
42
Arch D
36
24
24
36
Arch C
24
18
18
24
Arch B
18
12
12
18
Arch A
12 9 9
12
ISO A
ISO A0
- - 841
1189
ISO A1
841
594
594
841
ISO A2
594
420
420
594
ISO A3
420
297
297
420
ISO A4
297
210
210
297
JIS B
JIS B1 - -
728
1030
JIS B2
728
515
515
728
JIS B3
515
364
364
515
JIS B4
364
257 - -
CHN A
CHN A0
- - 880
1230
CHN A1
880
620
620
880
CHN A2
620
440
440
620
CHN A3
440
310
310
440
CHN A4
310
210 - -
Other 1
891 x 1189
- - 891
1189
891 x 594
891
594 - -
700 x 1000
- - 700
1000
700 x 500
700
500
Other 2
900 x 1189
- - 900
1189
900 x 594
900
594 - -
880 x 1250
- - 880
1250
880 x 625
880
625 - -
707 x 1000
- - 707
1000
Other 3
610 x 880
- - 610
880
610 x 440
610
440 - -
KIP Multi-Touch User Guide
Format
No part of this publication may be copied, reproduced or distributed in any form without express written permission
from KIP. 2015 KIP. v1
- 24 -
Page 25

Step
Action
Illustration
1.
Select the B&W Print Icon.
2.
Select the Add files button.
3.
Select the location were the files
4.
Select the file to be printed and
5.
A preview will be displayed.
KIP Multi-Touch User Guide
5 B&W Print
The Following section describes functionality of B&W Print on the KIP Multi-Touch Screen.
reside.
select Open.
Note: There is a slider that allows
for the adjustment of the Preview
No part of this publication may be copied, reproduced or distributed in any form without express written permission
from KIP. 2015 KIP. v1
Pane.
- 25 -
Page 26

Step
Action
Illustration
6.
Media – Displays what Media is
7.
Print Count – Used to set the
KIP Multi-Touch User Guide
currently loaded in the KIP
Printer and allows for the setting
of the media size when new
media is added.
Auto – On by Default. Will select
the best media size for the
output being printed.
Manual Selection – Select a
specific roll for the output to be
printed on.
Bypass – Select the size of the
media that will be loaded into
the bypass tray.
number of copies to be made.
No part of this publication may be copied, reproduced or distributed in any form without express written permission
from KIP. 2015 KIP. v1
Note: Selecting the Plus (+) will
open up a number pad for
entering larger quantities.
- 26 -
Page 27

Step
Action
Illustration
8.
Collate – Used to set the order in
9.
Zoom – Allows for the selection of
10.
Rotation – Files can be saved
KIP Multi-Touch User Guide
which the output will be
generated.
1,1,1 or 3,2,1 or 1,2,3
Edit Set - Will allow for the
scanned files to be re-arranged
prior to sending to be printed.
Unwanted sheets may also be
removed by dragging them to
the trash can.
specific zoom sizes as well as
setting a specific size with the
number pad.
rotated from the actual feed
direction. This can be used to
reduce the scan time on certain
orientation of originals when they
No part of this publication may be copied, reproduced or distributed in any form without express written permission
from KIP. 2015 KIP. v1
are archived.
- 27 -
Page 28
Step
Action
Illustration
11.
Finishing – Select from available
12.
Mirror – When selecting Mirror,
13.
Stamp - Select “Stamp” to allow
KIP Multi-Touch User Guide
finishing devices attached to the
KIP Printer.
Default - Output is sent to the
default stacking device.
Rear – The output can be forced
to go to a rear stacker.
Top – The output can be forced to
go to the top stacker.
Folding/No Folding – If a folder is
attached, the output can be sent
to the folder.
the image will be printed with a
mirrored output.
the selection of a “Stamp” or
“Water Mark” to be placed on
the scanned image. It will be
embedded digitally into the
image.
Note: Creation of new stamps will
be done through KIP PrintPro.Net
No part of this publication may be copied, reproduced or distributed in any form without express written permission
from KIP. 2015 KIP. v1
- 28 -
Page 29

Step
Action
Illustration
14.
Invert - Select this button to
KIP Multi-Touch User Guide
change a region of white to
black and black to white of a
scanned document. This is
normally used for “negative”
documents or “blue prints”.
No part of this publication may be copied, reproduced or distributed in any form without express written permission
from KIP. 2015 KIP. v1
- 29 -
Page 30

Step
Action
Illustration
1.
Start – Submits the job to be
2.
Reset - Resets back to
3.
Auto Start – Enable or
4.
Interrupt – Interrupts the
5.
Viewer – Launces the
KIP Multi-Touch User Guide
6 Additional Buttons Common to All B&W Screens
These buttons are common to all of the B&W modes; Copy, Scan and Print. Please note there are a few buttons
only available to the B&W Print mode and are marked accordingly.
printed.
default settings.
disable the Auto Start
function.
Print Queue and allows the
job sent to be printed next.
viewer. Viewer has further
functionality:
Area of Interest (AO I) –
Select a specific area to
print.
No part of this publication may be copied, reproduced or distributed in any form without express written permission
from KIP. 2015 KIP. v1
- 30 -
Page 31

Step
Action
Illustration
6.
Templates – Load saved
7.
Save Template – After
8.
Log Out – Logs Current User
9.
Print – (Used in B&W Print
10.
Add Files - (Used in B&W
11.
Remove Files - (Used in
12.
Select All/Clear Selection-
KIP Multi-Touch User Guide
templates and apply them
to the current job.
making desired setting
changes, this can be saved
as a template.
out.
Only) Select the Print button
to send the job to the
Printer.
Print Only) Select the Add
Files button and browse to
available locations to add
files to be printed.
B&W Print Only) Select the
Remove Files button to
remove unwanted files from
the current job prior to
printing.
No part of this publication may be copied, reproduced or distributed in any form without express written permission
from KIP. 2015 KIP. v1
(Used in B&W Print Only)
Used to select all files or
clear the selection of the
files in the current Job.
- 31 -
Page 32

Step
Action
Illustration
1.
Select the Color Copy button to
2.
Original Type –
3.
Image Quality – Image quality by
KIP Multi-Touch User Guide
7 Color Copy
The Following section describes functionality of Color Copy on the KIP Multi-Touch Screen.
enter the Color Scan Screens.
Line – Used when Copying color
documents that are made up of
only color lines.
Line/Photo - Used when Co pyin g
color documents that are made
up of a combination of color lines
and Photos.
Photo - Used when Copying color
documents that are made up of
color Photos.
default is set to Auto however the
following can be adjusted:
• Brightness – Adjust light to
dark with the slider bar.
No part of this publication may be copied, reproduced or distributed in any form without express written permission
from KIP. 2015 KIP. v1
• Green to Red Balance –
Adjust the green to red
balance with the slider
bar.
• Yellow to Blue Balance –
Adjust the yellow to blue
balance with the slider
bar.
- 32 -
Page 33

Step
Action
Illustration
4.
Copy Count – Used to control the
5.
Collate – Used to control the
6.
Media – Used to select the media
KIP Multi-Touch User Guide
number of copies being made.
Select from 1 to 9 or select the +
sign to bring up a number pad.
Enter in the desired number of
copies to be printed.
order of the copies being printed.
• Grouping - 1, 1, 1 /2, 2, 2
/3, 3, 3
• Collate – 1, 2, 3 /1, 2, 3 /1,
2, 3
• Reverse Collate – 3, 2, 1 /
3, 2, 1 / 3, 2, 1
the copies will be print on.
• Auto – Will select the best
roll for the output based
on the media available
No part of this publication may be copied, reproduced or distributed in any form without express written permission
from KIP. 2015 KIP. v1
and the size of the files
being printed.
• Manual – Select a specific
roll size to put the output
on.
• Bypass – Print directly to a
cut sheet inserted into the
bypass tray.
- 33 -
Page 34

Step
Action
Illustration
7.
Cut Mode – Used to set the cut
8.
Zoom – Allows for the selection of
9.
Finishing – Select how the output
KIP Multi-Touch User Guide
length of the data being printed.
• Auto – Cuts at end of
printed image
• Standard – User sets roll
and cut length using the
Custom screen that
opens.
• Custom – User sets roll and
can set a custom length
using a key pad to enter
desired length.
specific zoom sizes as well as
setting a specific size with the
number pad.
will be finished.
• Auto – Sent to the default
stacking of either Top
Stack or Rear Stack.
No part of this publication may be copied, reproduced or distributed in any form without express written permission
from KIP. 2015 KIP. v1
• Folded – If a folder is
attached to the KIP this
option may be selected.
- 34 -
Page 35

Step
Action
Illustration
10.
Rotation – Files can be saved
11.
Format – Choose from the
12.
Save File – Allows for the setting of
13.
Accounting – If accounting fields
KIP Multi-Touch User Guide
rotated, from the actual feed
direction. This can be used to
reduce the scan time on certain
orientation of originals when they
are archived.
available format for displayed
sizes.
a file name and number for the
file to be scanned.
By default the Files will be
scanned in as Scan0001.
Reset will clear the fields.
are being used, a user will need
to enter in relevant information
prior to being able to using the
KIP.
No part of this publication may be copied, reproduced or distributed in any form without express written permission
from KIP. 2015 KIP. v1
- 35 -
Page 36

Step
Action
Illustration
14.
Print Quality – Choose from
15.
Mirror – When selecting Mirror the
16.
Deskew – Will automatically fix a
KIP Multi-Touch User Guide
different print qualities depending
on the original being copied.
• Draft - will decrease the
scanner DPI while
increasing scanning
speed
• Normal - will increase the
scanner DPI while
decreasing scanning
speed
• Quality - will increase the
scanner DPI while
decreasing scanning
speed
No part of this publication may be copied, reproduced or distributed in any form without express written permission
from KIP. 2015 KIP. v1
image will be printed with a
mirrored output.
slight skew in a scanned
document.
- 36 -
Page 37

Step
Action
Illustration
17.
Margins – Allows for the addition
18.
Stamp - Select “Stamp” to allow
19.
Guest Printer – Displays the
KIP Multi-Touch User Guide
or subtraction of lead/trail
margins.
the selection of a “Stamp” or
“Water Mark” to be placed on the
scanned image. It will be
embedded digitally into the
image.
Note: Creation of new stamps will
be done through KIP PrintPro.Net.
current guest printer attached to
as well as all available Guest
Printer (if more than one is
available.
No part of this publication may be copied, reproduced or distributed in any form without express written permission
from KIP. 2015 KIP. v1
- 37 -
Page 38

Step
Action
Illustration
1.
Select the Color Scan button to
2.
Original Type –
3.
Image Quality – Image Quality by
KIP Multi-Touch User Guide
8 Color Scan
The following section describes functionality of Color Scan on the KIP Multi-Touch Screen.
enter the Color Scan screens.
Line – Used when Scanning color
documents that are made up of
only color lines.
Line/Photo - Used when Scanning
color documents that are made
up of a combination of color lines
and Photos.
Photo - Used when Scanning
color documents that are made
up of color Photos.
default is set to Auto however the
following can be adjusted:
• Brightness – Adjust light to
dark with the slider bar.
No part of this publication may be copied, reproduced or distributed in any form without express written permission
from KIP. 2015 KIP. v1
• Green to Red Balance –
Adjust the green to red
balance with the slider
bar.
• Yellow to Blue Balance –
Adjust the yellow to blue
balance with the slider
bar.
- 38 -
Page 39

Step
Action
Illustration
4.
Auto - Will determine the original
5.
File Type – Allows for the s elec tion
KIP Multi-Touch User Guide
size and length of the document
being scanned.
Standard – Select from Standard
sizes in portrait or landscape.
Custom – Enter desired values for
both Width and Height.
of the format the file(s) will be
scanned to.
• PDF – Standard PDF format
• PDF/A - Standard PDF/A
No part of this publication may be copied, reproduced or distributed in any form without express written permission
from KIP. 2015 KIP. v1
format
• TIFF Standard TIFF format
• Off – On/Off for Multi-
page scanning
- 39 -
Page 40

Step
Action
Illustration
6.
DPI - Select the required scan
7.
Rotation – Files can be saved
8.
Mailbox – Displays the available
9.
Save File – Allows for the setting of
KIP Multi-Touch User Guide
resolution.
Choices are 200, 300 , 400 or 600
DPI.
rotated, from the actual feed
direction. This can be used to
reduce the scan time on certain
orientation of originals when they
are archived.
mailboxes. The Mailbox button
displays the active mailbox.
Note: Mailboxes are setup under
Configuration.
a file name and number for the
file to be scanned.
By default the Files will be
scanned in as Scan0001.
Reset will clear the fields.
No part of this publication may be copied, reproduced or distributed in any form without express written permission
from KIP. 2015 KIP. v1
- 40 -
Page 41

Step
Action
Illustration
10.
Format – Choose from the
11.
Mirror – When selecting Mirror the
12.
Deskew – Will automatically fix a
13.
Margins – Allows for the addition
KIP Multi-Touch User Guide
available format for displayed
sizes.
image will be printed with a
mirrored output.
slight skew in a scanned
document.
or subtraction of lead/trail
margins.
No part of this publication may be copied, reproduced or distributed in any form without express written permission
from KIP. 2015 KIP. v1
Selecting Lead/Trail edge will
open a number pad allowing for
the entry of the LE/TE value.
Margins button will display the
changes.
- 41 -
Page 42

Step
Action
Illustration
14.
Accounting – If Accounting fields
15.
Stamp - Select “Stamp” to allow
KIP Multi-Touch User Guide
are being used, a user will need
to enter in relevant information
prior to being able to using the
KIP.
the selection of a “Stamp” or
“Water Mark” to be placed on the
scanned image. It will be
embedded digitally into the
image.
Note: Creation of new stamps will
be done through KIP PrintPro.Net
No part of this publication may be copied, reproduced or distributed in any form without express written permission
from KIP. 2015 KIP. v1
- 42 -
Page 43

Step
Action
Illustration
1.
Select the Color Print button to
2.
Original Type –
3.
Image Quality – Image quality by
KIP Multi-Touch User Guide
9 Color Print
The Following section describes functionality of Color Print on the KIP Multi-Touch Screen.
enter the Color Scan Screens.
Line – Used when printing color
documents that are made up of
only color lines.
Line/Photo - Used when printing
color documents that are made
up of a combination of color lines
and Photos.
Photo - Used when printing color
documents that are made up of
color Photos.
default is set to Auto however the
following can be adjusted:
No part of this publication may be copied, reproduced or distributed in any form without express written permission
from KIP. 2015 KIP. v1
• Brightness – Adjust light to
dark with the slider bar.
• Green to Red Balance –
Adjust the green to red
balance with the slider
bar.
• Yellow to Blue Balance –
Adjust the yellow to blue
balance with the slider
bar.
- 43 -
Page 44

Step
Action
Illustration
4.
Print Count - Used to control the
5.
Collate – Used to control the
6.
Media – Used to select the media
KIP Multi-Touch User Guide
number of copies being made.
Select from 1 to 9 or select the +
sign to bring up a number pad.
Enter in the desired number of
copies to be printed.
order of the copies being printed.
• Grouping - 1, 1, 1 /2, 2, 2
/3, 3, 3
• Collate – 1, 2, 3 /1, 2, 3 /1,
2, 3
• Reverse Collate – 3 , 2, 1 /
3, 2, 1 / 3, 2, 1
• Edit Set allows for the
arranging if the file order
prior to submitting the job.
the copies will be print on.
• Auto – Will select the best
No part of this publication may be copied, reproduced or distributed in any form without express written permission
from KIP. 2015 KIP. v1
roll for the output based
on the media available
and the size of the files
being printed.
• Manual – Select a specific
roll size to put the output
on.
• Bypass – Print directly to a
cut sheet inserted into the
bypass tray.
- 44 -
Page 45

Step
Action
Illustration
7.
Zoom - Allows for the selection of
8.
Rotation – Files can be saved
9.
Finishing – Select how the output
10.
Mirror – When selecting Mirror the
KIP Multi-Touch User Guide
specific zoom sizes as well as
setting a specific size with the
number pad.
rotated from the actual feed
direction. This can be used to
reduce the scan time on certain
orientation of originals when they
are archived.
will be finished.
• Auto – Sent to the default
stacking of either Top
Stack or Rear Stack.
• Folded – If a folder is
attached to the KIP this
option may be selected.
image will be printed with a
mirrored output.
No part of this publication may be copied, reproduced or distributed in any form without express written permission
from KIP. 2015 KIP. v1
- 45 -
Page 46

Step
Action
Illustration
11.
Accounting – If Accounting fields
12.
Stamp - Select “Stamp” to allow
13.
Guest Printer - Displays the
KIP Multi-Touch User Guide
are being used, a user will need
to enter in relevant information
prior to being able to using the
KIP.
the selection of a “Stamp” or
“Water Mark” to be placed on the
scanned image. It will be
embedded digitally into the
image.
Note: Creation of new stamps will
be done through KIP PrintPro.Net
current guest printer attached to
as well as all available Guest
Printer (if more than one is
available.
No part of this publication may be copied, reproduced or distributed in any form without express written permission
from KIP. 2015 KIP. v1
- 46 -
Page 47

Step
Action
Illustration
1.
Start – Submits the job to be printed.
2.
Reset - Resets back to default
3.
Auto Start – Enable or disable the
4.
Interrupt – Interrupts the Print Queue
5.
Viewer – Launces the viewer. Viewer
KIP Multi-Touch User Guide
10 Additional Buttons Common to All Color Screens
These buttons are common to all of the Color modes; Copy, Scan and Print. Please note there are a few buttons
only available to the Color Print mode and are marked accordingly.
settings.
Auto Start function. (Not Available in
Color Print)
and allows the job sent to be printed
next. (Not Available in Color Print)
has further functionality:
No part of this publication may be copied, reproduced or distributed in any form without express written permission
from KIP. 2015 KIP. v1
- 47 -
Page 48

6.
Templates – Load saved templates
7.
Save Template – After making desired
8.
Log Out – Logs Current User out.
9.
Print – (Used in Color Print Only) Select
10.
Add Files - (Used in Color Print Only)
11.
Remove Files - (Used in Color Print
12.
Select All/Clear Selection – (Used in
KIP Multi-Touch User Guide
and apply them to the current job.
setting changes, this can be saved as
a template.
the Print button to send the job to the
Printer.
Select the Add Files button and
browse to available locations to add
files to be printed.
Only) Select the Remove Files button
to remove unwanted files from the
current job prior to printing.
Color Print Only)
No part of this publication may be copied, reproduced or distributed in any form without express written permission
from KIP. 2015 KIP. v1
- 48 -
Page 49

KIP Multi-Touch User Guide
11 Job Info
The Job Info button will open the Print/History Queue screen allowing the user to see
where a job is in the queue to determine when it will be printed or to open the History
Queues to see what has previously been printed.
Print Queue
History Queue
Note: The Icon at the top middle of the screen indicates what mode they queue/History screen is in as well and
the designation in the top Left corner.
= Print Queue
= History Queue
No part of this publication may be copied, reproduced or distributed in any form without express written permission
from KIP. 2015 KIP. v1
- 49 -
Page 50

Step
Action
Illustration
Buttons used from the Job Queue Screen
1.
To the Top – Will move the selected
2.
Delete – Will delete the selected
3.
Pause Queue – Used to pause or
4.
Interrupt Network Printing –
5.
Enter Pin – Used when a job has
11.2 11.1 Job Queue Screen
file in the print queue to the top of
the queue to be printed next.
KIP Multi-Touch User Guide
job from the print queue.
resume the queue.
Interrupts network printing so that a
copy can be made and printed.
been sent with secure pin printing
being utilized. A PIN will be required
to release the job.
No part of this publication may be copied, reproduced or distributed in any form without express written permission
from KIP. 2015 KIP. v1
- 50 -
Page 51

Step
Action
Illustration
Buttons used from the Job History Screen
1.
Submit – Will submit the History job
2.
Edit – Allows the History job to be
3.
Delete – Will delete the selected
4.
Interrupt Network Printing –
5.
Enter Pin – Used when a job has
11.2 History Screen
KIP Multi-Touch User Guide
to the queue again for printing.
edited prior to printing again.
Editable fields:
Media/Zoom/Print Count/
Mirror/Collate/Stamp/Rotation/
Finishing/Invert
job from the print queue.
Interrupts network printing so that a
copy can be made and printed.
been sent with secure pin printing
being utilized. A PIN will be required
to release the job.
No part of this publication may be copied, reproduced or distributed in any form without express written permission
from KIP. 2015 KIP. v1
- 51 -
Page 52

Step
Action
Illustration
1.
Logging in – Select the Accounting
2.
Selecting Name – Click in the Box
3.
Adding Name - Type name in the
4.
Accounting Button – The
KIP Multi-Touch User Guide
12 Accounting
There is built in accounting in the KIP Multi-touch software (as well as the other KIP Applications). To use
Accounting follow these steps:
Note: Accounting may be set as Mandatory and will have to be entered in order for the Multi-Touch screen to
allow the user to use it.
button from the main screen.
and a dropdown arrow will appear.
box or pick from the available
names.
Note: a password may be
associated with the name in order
to use it.
Accounting button on the main
screen will now display the person
logged in.
No part of this publication may be copied, reproduced or distributed in any form without express written permission
from KIP. 2015 KIP. v1
- 52 -
Page 53

Step
Action
Illustration
5.
From Copy Screen (Mono/Color) –
6.
From Scan Screen (Mono/Color) –
7.
From Print Screen (Mono/Color) –
KIP Multi-Touch User Guide
The Accounting Button will display
the available selections.
Note: These may be required in
order to continue and submit the
job.
The Accounting Button will display
the available selections.
Note: These may be required in
order to continue and submit the
job.
The Accounting Button will display
the available selections.
Note: These may be required in
order to continue and submit the
job.
No part of this publication may be copied, reproduced or distributed in any form without express written permission
from KIP. 2015 KIP. v1
- 53 -
Page 54

KIP Multi-Touch User Guide
13 Guides/Help
The Guides screen displays the available How To manuals as well as the available Troubleshooting Guides.
These guides are stored on the KCS Controller and are easily accessible. Once open the manuals can be
viewed.
No part of this publication may be copied, reproduced or distributed in any form without express written permission
from KIP. 2015 KIP. v1
- 54 -
Page 55
Step
Action
Illustration
1.
Select the Guides Button.
2.
Select the Guide to be viewed.
3.
The Guide will open. Using your
4.
Once past page one (1) use your
5.
Select OK to exit the guide.
11.1 Viewing a guide.
KIP Multi-Touch User Guide
finger swipe to the left to change
the page.
finger to swipe left or right to
change the page.
No part of this publication may be copied, reproduced or distributed in any form without express written permission
from KIP. 2015 KIP. v1
- 55 -
Page 56

KIP Multi-Touch User Guide
13.2 Help Screen
The Help screen provides system information as well as allows for printer configuration.
No part of this publication may be copied, reproduced or distributed in any form without express written permission
from KIP. 2015 KIP. v1
- 56 -
Page 57

Component
Function
1. Dealer Information
This section can be set up by the Dealer to provide helpful information
2. System Information
The System Information section displays all of the pertinent information
KIP Multi-Touch User Guide
including:
• Dealer Name
• Supplies Number
• Service Number
• Website URL
regarding the KIP Printer. This information can also be printed (see Print
No part of this publication may be copied, reproduced or distributed in any form without express written permission
from KIP. 2015 KIP. v1
Information Button).
- 57 -
Page 58

Component
Function
3. Printer Information
When selected will print out a hard copy of all of the current KIP Printer
4. Configuration
Opens the Configuration settings for the KIP Printer. (See Section 12
5. Service
Launches the Service Software screen.
KIP Multi-Touch User Guide
settings.
Configuration Settings for an explanation of the Configuration settings).
Note: Please see Technical manual or contact servicing Dealer for
assistance.
No part of this publication may be copied, reproduced or distributed in any form without express written permission
from KIP. 2015 KIP. v1
- 58 -
Page 59

Step
Action
Illustration
1.
Copy Levels – Sets the Copy
2.
Print Levels - Sets the Print density
3.
Media Shift - Allows t he image to
types of rolls to have correct
KIP Multi-Touch User Guide
12 Configuration Settings
The KIP Touchscreen software has the ability to display information about the system and allow detailed
configuration or setting of the KIP System. This section will explain how the settings within the configuration
operate and what their function is.
density of all copies being made.
Used to darken or lighten copy
output.
of all prints being made. Used to
darken or lighten print output.
be shifted 5mm left or right. This
function may be used if a roll of
media is not cut precisely to the
specified width and allows these
image placement.
No part of this publication may be copied, reproduced or distributed in any form without express written permission
from KIP. 2015 KIP. v1
- 59 -
Page 60

Step
Action
Illustration
4.
Mailbox Setup – Allows for the
5.
Guest Printer – Allows for the
KIP Multi-Touch User Guide
setup of the following:
• Local Mailbox
• Google Drive
• DropBox
• OneDrive
Note: See How To Instructions
below.
setup/communication with an
Inkjet printer to be used with
Color Copy and Color Print
functionality of the KIP Printer
software.
Note: See How To Instructions
below.
No part of this publication may be copied, reproduced or distributed in any form without express written permission
from KIP. 2015 KIP. v1
- 60 -
Page 61

Step
Action
Illustration
6.
Template – Allows for the
7.
Scanner Speed - Has two settings,
KIP Multi-Touch User Guide
selection of a default template to
be applied to jobs for the
following:
• B&W Copy
• B&W Scan
• B&W Print
• Color Copy
• Color Scan
• Color Print
Note: See How To Instructions
below.
Normal and Slow. When scanning
old documents that may not be in
the best condition, it may be
necessary to slow down the
scanner. Selecting Slow as the
mode will scan the document at
the selected DPI but scan it
through at the slower 600 DPI
speed.
Note:
This function is available for the
720 scanner. There is a similar
function available for the KIP 2300
scanner but it is controlled by the
scanner firmware. Please contact
Dealer hardware technician for
assistance.
No part of this publication may be copied, reproduced or distributed in any form without express written permission
from KIP. 2015 KIP. v1
- 61 -
Page 62

Step
Action
Illustration
8.
White Balance - Performs a white
9.
Date & Time – Used to set the
KIP Multi-Touch User Guide
balance on the KIP scanner.
Original white balance target is
needed to perform this action.
current date and time for the
region the KIP printer resides.
No part of this publication may be copied, reproduced or distributed in any form without express written permission
from KIP. 2015 KIP. v1
- 62 -
Page 63

Step
Action
Illustration
10.
Language – Used to set the
11.
KeyCode – Used to enter the
KIP Multi-Touch User Guide
desired language for the KIP
printer to function with.
Keycode for the options
purchased with the KIP Printer.
This window will display in green
the active options and in red the
inactive options.
No part of this publication may be copied, reproduced or distributed in any form without express written permission
from KIP. 2015 KIP. v1
- 63 -
Page 64

Step
Action
Illustration
12.
Restart SYSK – Selecting this
13.
IPV4 Setup – Used to set up the
14.
IPV6 Setup - Used to set up the
KIP Multi-Touch User Guide
button will Reboot the KIP System
KCS controller (powering do wn
the printer not necessary).
IPV4 IP address.
• Automatic Setup – Used
when DHCP is present on
site.
• Manual Setup – Use to set
a static IP Address.
No part of this publication may be copied, reproduced or distributed in any form without express written permission
from KIP. 2015 KIP. v1
IPV6 IP address.
• Automatic Setup – Used
• Manual Setup – Use to set
when DHCP is present on
site.
a static IP Address.
- 64 -
Page 65

Step
Action
Illustration
15.
Printer Name – Used to set the
16.
Toner Supply - Used with the 770K,
17.
Factory Restore – Selecting the
KIP Multi-Touch User Guide
Printer name (Done during initial
setup).
7170K printer only. When turned
on this will level the toner in the
hopper. This can take up to 10
minutes
Factory Restore button will set the
KIP KCS controller back to factory
settings based on the current
image used to create the KCS
controller.
Note: This will delete all settings
and restore only factory settings.
No part of this publication may be copied, reproduced or distributed in any form without express written permission
from KIP. 2015 KIP. v1
- 65 -
Page 66

Step
Action
Illustration
1.
Select the Guides Button.
2.
Select Help.
3.
Select Configuration.
4.
Select Mailbox Setup.
5.
Select the Mailbox icon.
6.
Select the type of mailbox to be
KIP Multi-Touch User Guide
13 How to setup a Mailbox
Setting up a Mailbox for use with Scanning and Printing can be done by following these simple steps.
created:
• Local Mailbox
No part of this publication may be copied, reproduced or distributed in any form without express written permission
from KIP. 2015 KIP. v1
• SMB Mailbox
• FTP Mailbox
• Cloud Mailboxes
- 66 -
Page 67

Step
Action
Illustration
7.
For this example select Local
8.
Enter the required information.
9.
Select OK.
10.
To use this Mailbox, select the
11.
Select the Mailbox Button.
KIP Multi-Touch User Guide
Mailbox.
Scan button from the Home
screen.
No part of this publication may be copied, reproduced or distributed in any form without express written permission
from KIP. 2015 KIP. v1
- 67 -
Page 68

Step
Action
Illustration
12.
Select the newly created “A
13.
“A Jones” will now be displayed
KIP Multi-Touch User Guide
Jones” Mailbox.
on the Mailbox button as the
active Mailbox.
No part of this publication may be copied, reproduced or distributed in any form without express written permission
from KIP. 2015 KIP. v1
- 68 -
Page 69

Step
Action
Illustration
Once a Cloud acco u nt h a s be en s et up it is then p os si bl e to s ca n t o or Pr int from this location. In order to
1.
Select the Guides Button.
2.
Select Help.
3.
Select Settings.
14 Creatin g a Cloud Mailbo x
do this, follow these steps:
It is necessary to have:
1. An account
2. Know the e-mail associated with the account
3. Know the Password associated with the account
4. Know what the Display Name is going to be
KIP Multi-Touch User Guide
These screens show the different Cloud locations a nd the buttons display t he information that will
need to be entered into each.
No part of this publication may be copied, reproduced or distributed in any form without express written permission
from KIP. 2015 KIP. v1
- 69 -
Page 70

4.
Select Mailbox Setup.
5.
Select New Mailbox
6.
Select the Clod Location to
7.
This window will appear for:
Enter the required information.
KIP Multi-Touch User Guide
create.
• Google Drive
• Box.com
• DropBox
• One Drive
• Sharepoint
Mailbox Name – Mailbox display name
Naming Schema – Name to be given assigned to the files
(each # is a digit ex. Scan#### = Scan0001)
No part of this publication may be copied, reproduced or distributed in any form without express written permission
from KIP. 2015 KIP. v1
Counter – Value files will start at
Scan Target Folder – Location to scan to or print from
- 70 -
Page 71

8.
Once entered select the Connect
9.
When information is confirmed
10.
If connection is good the
11.
Select Ok
12.
Scan Location
13.
Print Location
KIP Multi-Touch User Guide
button this will launch the
Dropbox sign in page.
Enter the account information
and select Sigh In.
select Allow.
following will be displayed.
No part of this publication may be copied, reproduced or distributed in any form without express written permission
from KIP. 2015 KIP. v1
- 71 -
Page 72

Step
Action
Illustration
1.
Select the Guides Button.
2.
Select the Help Button.
3.
Select the Configuration Button.
4.
Select the Guest Printer Button
5.
Up to Three (3) printers can be
6.
Select the Model Of the Ink Jet
7.
Select the Edit Button
KIP Multi-Touch User Guide
15 How to Setup/Configure an Inkjet Printer
Setting up an Ink Jet printer for use with Direct Copy and Printing can be done by following these simple steps.
configured. Select an open spot
and select the manufacturer for
the Ink Jet printer from the
dropdown list.
Here HP is selected.
Printer.
No part of this publication may be copied, reproduced or distributed in any form without express written permission
from KIP. 2015 KIP. v1
- 72 -
Page 73

8.
On the Settings screen set the:
9.
More Instructions to come when
KIP Multi-Touch User Guide
• Printer Name
• IP Address
• Port Number
Available.
No part of this publication may be copied, reproduced or distributed in any form without express written permission
from KIP. 2015 KIP. v1
- 73 -
Page 74

Step
Action
Illustration
1.
Select the Copy Button
2.
Select the desired settings that
3.
Select Save Template
4.
Enter Template Name
5.
Select Folder to Save
KIP Multi-Touch User Guide
16 How to Create/Save a template
Templates can be created in the different functions of the Touchscreen software. B&W Copy, B&W Scan, B&W
Print, Color Copy, Color Scan and Color Print all have the ability to create and utilize saved templates. This step
by step will show how simple it is to create a template within B&W Copy and apply it to a copy job. Creating a
template in the other touchscreen functions will be done in the same manner.
will be saved in the Template
being created. For this example
the following will be selected:
• Original Type – Photo
• Copy Count - 2
• Grouping – Reverse
Collate
• Format – Arch
• Margin – LE 1”
No part of this publication may be copied, reproduced or distributed in any form without express written permission
from KIP. 2015 KIP. v1
- 74 -
Page 75

Step
Action
Illustration
1.
Select the Copy Button.
2.
The Default settings are loaded
3.
In Section 15 (above) a Template
4.
Select the Templates Button.
17 How to use a Saved Template
when the Copy screen opens.
KIP Multi-Touch User Guide
was created with the following
settings:
• Original Type – Photo
• Copy Count - 2
• Grouping – Reverse Collate
• Format – Arch
• Margin – LE 1”
No part of this publication may be copied, reproduced or distributed in any form without express written permission
from KIP. 2015 KIP. v1
- 75 -
Page 76

5.
The available Templates will be
6.
Select the 123 Repro… Icon
7.
All of the selected settings saved
KIP Multi-Touch User Guide
displayed at the bottom of the
screen.
(Template created in Section 15).
in this template will be loaded.
No part of this publication may be copied, reproduced or distributed in any form without express written permission
from KIP. 2015 KIP. v1
- 76 -
Page 77

Step
Action
Illustration
1.
Select the Guides Button.
2.
Select the Help Button.
3.
Select the Configuration Button.
4.
Select the Templates Bu tton.
5.
Select the Copy Button
KIP Multi-Touch User Guide
18 H ow to save a Template as Default
It is possible to create a new Template and then select this new template to be used as the default when the
selected Touchscreen function is used. The following steps build on the previous steps completed in Section 15
“How to Create/Save a Template”.
No part of this publication may be copied, reproduced or distributed in any form without express written permission
from KIP. 2015 KIP. v1
- 77 -
Page 78

Step
Action
Illustration
6.
Available Templates will be
7.
There will be a Check mark in the
8.
Select the Template to be the
KIP Multi-Touch User Guide
displayed at the bottom of the
screen.
upper right corner of the default
template.
new default.
This is now the new Default to be
used anytime the B&W Copy
Screen is opened.
No part of this publication may be copied, reproduced or distributed in any form without express written permission
from KIP. 2015 KIP. v1
- 78 -
 Loading...