

Page 1

KIP Fold 1000 – Offline
User Manual
Page 2
Safe
t
n
u
r
z
:
c
:
a
s
e
:
n
c
:
a
l
t
s
m
o
a
w
w
n
a
m
c
s
e
c
h
s
e
c
n
c
o
r
e
n
v
m
a
n
o
o
n
s
m
a
a
a
i
m
o
t
a
h
n
m
o
m
e
s
a
s
y
s
e
e
g
r
r
n
t
u
t
m
g
r
a
d
d
n
n
c
y Instr
ctions
In order to
out by trai
For your p
machine a
precaution
guarantee ha
ed personnel.
WARNING
CAUTION:
NOTE:
Indi
WARNING
the power sw
otection, plea
nd keep this
s and instructi
ard-free oper
Ignoring this
Ignoring this
ates additiona
Stop using th
itch and disco
e read these
anual for futur
ns on the ma
tions it is stro
arning could
arning could
l important inf
e machine if a
nect the supp
afety instructi
reference cl
hine or the on
gly recomme
- Symbol
ause serious
ause injury or
rmation.
- General
cover was da
ly line. Then c
ns and the m
se to the mac
es described i
ded that any
-
injury or even
damage to pr
-
aged or the
ll an authoriz
nual complet
ine. Carefully
n the operatin
aintenance o
death.
perty.
achine was d
d service part
ly before ope
observe all w
instructions.
repair work is
opped. Imme
er.
ating the
rnings,
only carried
iately turn off
CAUTION:
respective m
emitting unu
authorized s
WARNING
power cord a
NOTE:
WARNING
Make sure th
on an unstab
Set the adjus
Switch the ma
chine. Materi
ual sounds. I
rvice partner.
Move the ma
d other cable
Che
k the docume
t the machin
e or tilted ben
able feet on t
chine off befo
ls not approv
mediately tur
- Mo
hine carefully
before you
ntation for the
is placed on
h.
e ground whe
e opening any
d can cause f
off the power
ing the m
and slowly us
ove the machi
space require
-
Installati
level, horizon
the machine
cover. Alway
ults in your m
switch and di
chine -
ng two person
ne.
ents before
n -
tal surface of
is in the desir
use materials
achine. Do no
connect the s
s. Make sure
ou move the
ufficient stren
d position.
recommende
use the mach
pply line. The
hat you disco
achine.
th. Do not pla
for the
ine when it is
call a
nected the
e this machin
Page 3
NOTE:
n
:
c
k
:
o
p
x
:
m
v
n
y
o
u
e
e
o
c
d
c
n
a
m
e
e
P
e
s
.
o
m
-
a
u
e
h
e
a
o
e
t
u
l
n
m
r
e
w
O
t
b
t
r
y
k
m
s
m
o
t
e
w
h
u
d
n
h
a
w
o
w
n
e
a
t
WARNING
which could
avoid any ris
Do
ot place this
Do not remo
ause serious i
, only properl
achine in a lo
-
Maintena
e covers or p
jury. Do not
qualified and
ation that is s
ce and m
nels which ar
odify the mac
trained servic
bject to vibrat
odificatio
fixed to the
hine, because
technicians a
ions and shoc
s -
achine. The
this could cau
re allowed to
s.
achine contai
e electrical s
odify the mac
s moving part
ock or fire. To
hine.
CAUTION:
mentioned in
the machine.
WARNING
voltage netw
that is equip
machine. Do
not use an e
CAUTION:
marking label
NOTE:
WARNING
Do not carry
the user man
This machin
rk in which th
ed with a grou
not use a dam
tension lead t
Do not conne
.
If co
nnection to a
Do not break
ut maintenanc
al. Use maint
-
is not design
neutral wire i
nding terminal
ged power c
connect the
t the machine
ifferent mains
any mechanic
activities for
nance materi
ower sup
d for connecti
not connecte
Only use the
rd (e.g. expos
achine.
to a mains vol
voltage is req
Electrica
l security inte
other machine
ls for their int
ply -
n to an IT po
d to ground.
mains connec
d core wire,
age that diffe
ired, contact
s -
rlock switch.
components
nded purpose
er supply sys
nly connect th
or cable that
roken wire), t
s from the val
our authorize
r with other m
only. Do not p
em. An IT po
power cord t
as supplied
is could lead i
e stated on th
service partn
aterials than
lace liquids on
er system is
a wall socke
ith the
to a fire. Do
e power
r.
Page 4

Set Up
Installation
The folder should be set up by an engineer, who has been trained.
Environment
The room in which the folder is to be placed should be dry and dust free. Humidity should be about 20- 80% with room
temperature of 15° C to 35° C (59°- 95°F). The folder must stand horizontally aligned and very stable without shaking.
Make sure that the folder to place the folder in a way that does not block exits and allows an ergonomic workflow.
Page 5

Pow
e
n
PthDT T T Tbbto
n
n
T
o
A
TTT
T
y
l
u
l
p
h
o
a
r
a
h
D
e
s
e
W
Y
u
a
u
o
f
r
u
m
b
c
r
e
e
e
n
d
d
a
u
n
m
l
c
a
e
n
e
u
E
s
E
a
r & Switch O
lease use onl
e mains supp
o not use m
hese cords wi
he power sup
he main switc
the connectin
y voltage is id
lti plug exten
l not stand the
ly connection
is at the fold
g cable delive
ntical with yo
ion cords!
power consu
is at the right
r’s front side.
ed with the fol
r supply.
ption of a pri
ottom side of
der. Make sur
ter and the fo
the folder.
that
lder.
he display sh
riefly shown in
eep signal will
p of the displ
I
case an erro
i
the display.
he message c
t
p of the displ
fter clearing t
here are three
he green LED
he red LED is
he yellow LE
ws a short me
the display.
sound. At the
y illuminate.
is detected d
ntains error
y will be blinki
e jam press b
LEDs on top
indicates the
blinking in cas
indicates that
ssage as indi
hen the folde
same instanc
ou will see th
ring the self t
nd localizatio
ng. Refer to th
tton in or
f the folder's
older being re
e of any error.
the folder is b
ated. The Fir
has complete
, you will noti
folding progr
st phase, a m
code. Further
e .
er to restart th
isplay:
dy for safe a
usy folding.
ware versions
y started a do
e the green L
m last used di
ssage will be
more, a red L
e folder.
d normal oper
are
ble
D on
splayed.
shown
D on
tion.
Page 6
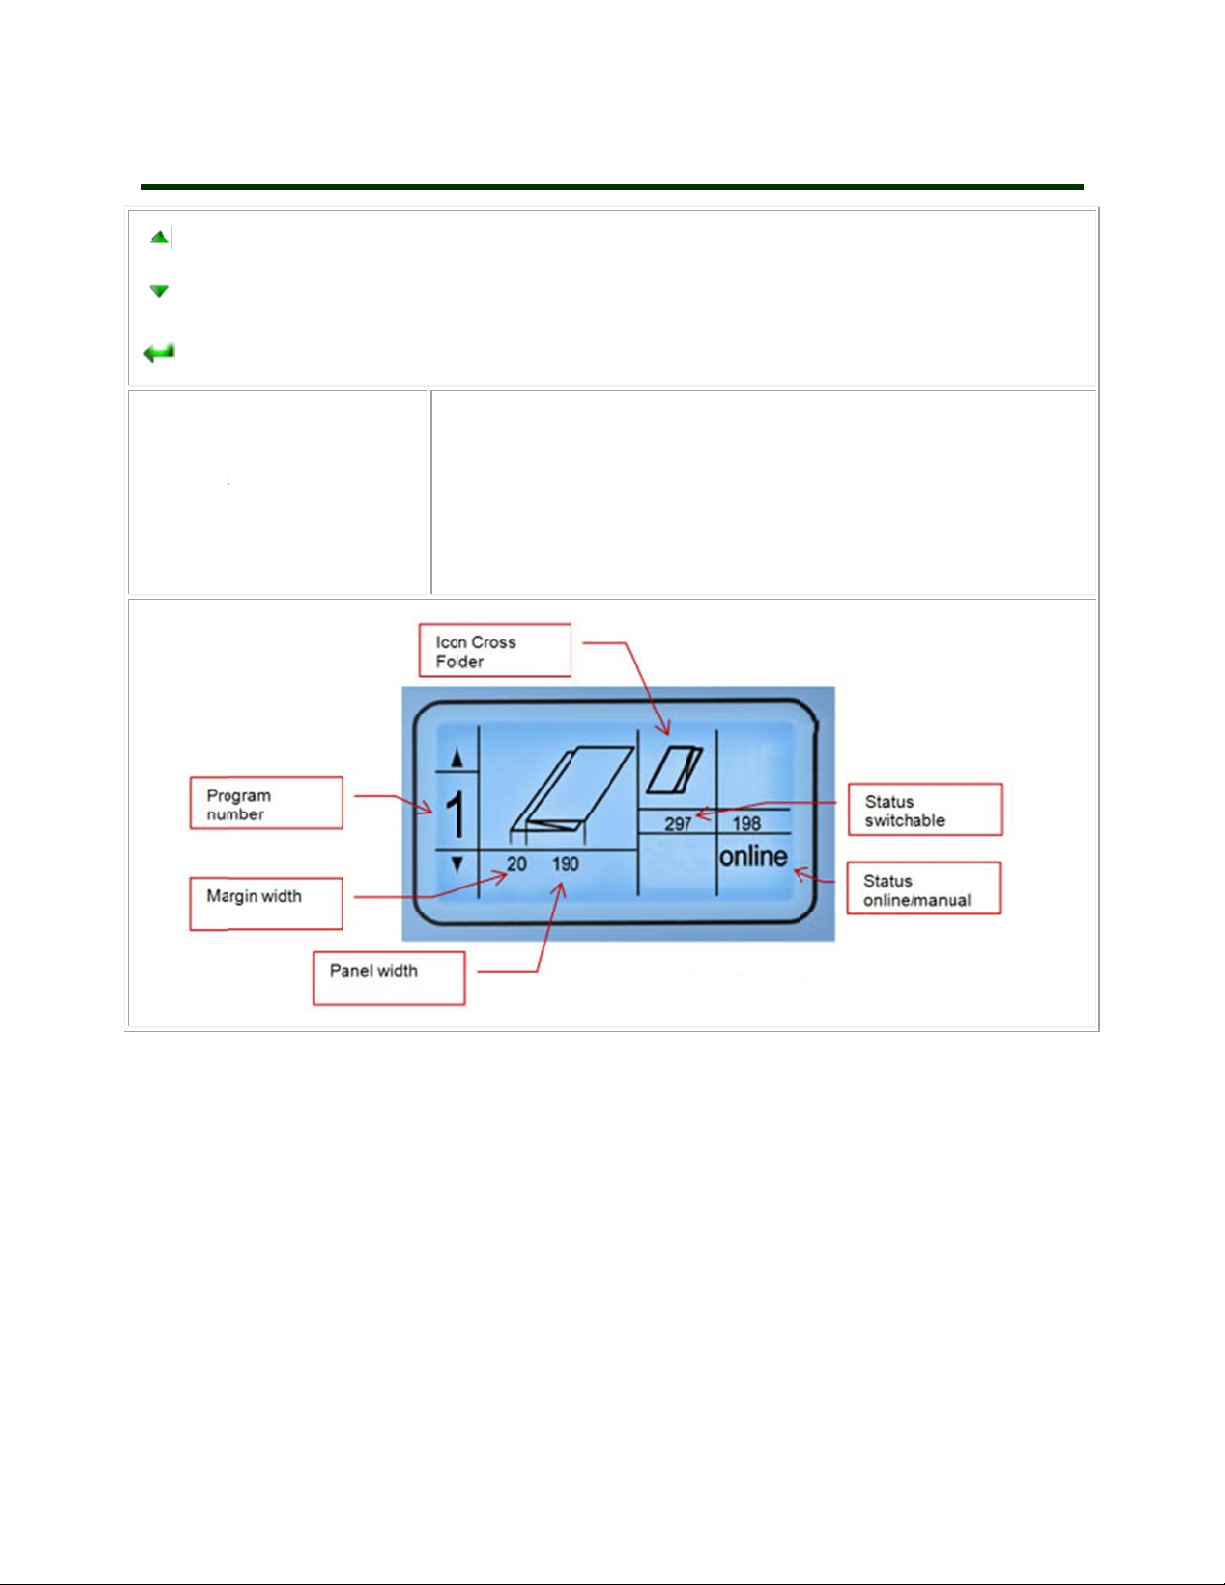
Displ
f
u
s
m
z
o
m
L
m
g
n
L
a
s
o
next
ay Info
olding progra
rmatio
previo
pres
1. Folding
2. Progra
3. Binding
4. Panel si
5. Cross f
6. Status (
7. Status
s folding pro
this button in
tyle
number
margin
e
ld panel size
achine type)
ED
ram
case the LED
is blinking red
ED
1
. green: re
2
. yellow: bu
3
. red: err
in order to get
dy
y
r
detailed information about the error.
Page 7

Medi
a
o
e
d
m
r
r
h
e
d
0
m
f
2
r
e
m
P
y
s
9
e
& Fo
mats
Fan F
All docum
copies will
Cross
All fan-fol
Reco
Best perfo
lder
nts with lengt
be folded in s
Fold
ed sheets unt
mende
mance with 2
from 420 m
gments of 28
l a length of 1
media
# or 75 - 90 g
NOTE:
Film
up to 28 folds
olds, to be fini
00mm can b
/m²
s, plastics or
(20# / 80 gr.
shed manuall
folded as cro
aterials with g
aper) and wid
.
s fold.
lossy / shiny s
th up to max.
urfaces are no
30 mm. Long
t suitable.
r
Page 8

Prog
r
8
e
r
o
c
p
a
h
t
c
a
t
u
r
m
s
u
e
g
s
m
c
B
k
h
c
e
n
m
e
p
o
u
x
o
h
ePre
e
cPre
1
v
u
n
d
n
g
k
i
o
g
a
u
r
f
w
d
w
n
ams
There are
The select
The cente
In Order t
Buttons
Selected i
Pressing b
Press agai
All folding
binding m
panel widt
Press
Selected i
folding progr
d program nu
of the display
change the st
and move
ons blink freq
uttons and
n within th
rograms can
rgin: 0-50 mm
: 160-210 m
he cursor will
ons blink freq
mber will app
shows an ima
atus of the cro
he cursor fro
ently.
ee seconds to
tart to blink.
ently.
ms available.
edit the blin
e edited in in
Through the
ar on the left
e of the sele
s folder or th
icon to icon.
king setting.
save the cha
rements of 1
uttons and
eys and
and side of th
ted fold style.
rotation unit
ges
m within the f
move the c
you select the
display.
ress the c
llowing range
rsor from ico
desired foldin
rsor will start
:
to icon.
program.
to blink.
Pressing b
uttons and
edit the blin
king settings.
E
ample:
Pr
gram 1 shoul
wit
a filing margi
Sel
ect folding pro
ss button
Pr
ss button u
pa
kage icon blin
ss buttons
to
85 mm
Mo
e the cursor f
the
margin width
process pack
n of 25 mm.
ram 1 with b
ntil the numbe
ks
in order to set
rward to the
ges 185 mm
tton or
r below the fol
the package
igure represe
ide
idth
ting
Page 9

t
d
j
o
e
e
Wit
e
r
a
e
a420PrePre
c
w
u
p
n
s
u
c
m
o
T
h buttons
ss button
Pr
sto
e the new val
hange the val
ithin three se
es
e to 25 mm
onds in order
to
Please no
range of a
ice that the ad
justment of th
ustable width
e margin is 0 -
f the packag
50 mm. Ther
must be at le
fore a packag
Ch
st 160 mm u
of 155/65 is
nge the cros
mm.
ss or to
ss
to a maximu
ot adjustable.
fold length fr
change the va
of 230 mm.
m 200mm to
lue
he
Page 10

Foldi
g
-
g
s
m
n
t
l
s
c
cmar
c
w
w
w
e
d
ng Styl
es
Foldin
Program 1
Foldin
Required
progra
4 are presets
styles
tyle
s
(noted below i
Icon a
metric)
the display
Se
lect the progra
De
cription
m by pressing
or
Pa
kage folding
Pa
kage folding
rgin
Pa
kage folding
ith intermedia
ith intermedia
ithout interm
te fold
te fold and bin
diate fold
ing
Page 11

Free
i
p
o
2
:
s
p
A
(
o
o
o
o
o
c
n
o
m
i
n
o
d
s
a
f
s
e
h
m
a
n
n
h
g
f
e
e
t
u
e
t
z
t
e
1
p
o
t
b
l
o
s
d
s
y
p
o
r
m
t
i
e
p
o
r
Style P
rogra
s A, B,
C & D
This new
layer com
size, so thi
Explanati
"100 to 4
"-" means
"<" mean
Exam
nnovation ope
letely free. Th
s program will
n of signs a
0" means: tw
the folding en
: one more fol
le
ns the potenti
s program will
not work for a
d numbers i
full panel of t
ds here – the l
– the last pa
l of the folder
not calculate t
other format.
the display:
e indicated si
ast page is to
e is to the left
o nearly all po
he folding, tha
e are folded.
he right upper
lower exit
In
Order to chan
bl
ink. Buttons
lected icons
S
th
e blinking setti
ssible folding
means: you
exit
ge values pre
and move
link frequentl
ngs.
tyles, since y
efine a progra
s - the cu
the cursor fro
. Pressing but
u can define
m for a given
sor will start t
icon to icon.
ons and
very
aper
edit
Program
of 30 mm
Select fold
Press butt
Press butt
Press butt
Press butt
Press butt
Move the
With butto
Press butt
The dyna
should proce
for A1 sized p
ing program A
n
n until the
ns or in
n until the
ns or in
ursor forward
s or sel
n within t
ic icon on the
s packages o
per).
with button
irst number b
order to set th
econd numb
order to set th
o the next fig
ct < (last pag
ree seconds
left shows the
135 mm and
or
side the fold
e package wid
r beside the f
e package wid
re
to the left)
folding style.
80mm wide –
ackage icon b
th to 135 mm.
ld package ic
th to 180 mm.
the rest of pa
links.
n blinks.
er will determ
ne a filing ma
gin
Page 12

Additional Examples
Page 13

S
n
First
Seco
tep
d Step
Page 14

Feed
i
e
d
c
h
a
d
e
nThe
m
t
d
e
d
o
s
e
t
h
p
o
t
l
l
g
a
a
a
e
n
n
a
t
t
b
e
t
d
n
d
d
ng Prints
Th
recommend
fee
ing the prints
Pla
ce the left han
the
print into the f
guide. Long,
rail
to t
he trailing edg
In
ny case the ti
lea
ing edge of t
(on
the right hand
d position is ri
with the left h
near to the r
lder, force it
mall prints ne
.
le block (lege
e document e
side of the le
ht from the ta
nd.
il guide and f
lso slightly to
d to be guide
d) has to be o
tering the fol
ding edge).
ble,
ed
he
up
n the
er
Th
fan folded co
the
n fed into the f
folder will au
It i
proves the fo
flat
ened by hand
Fol
ed copies wil
py must be tur
lder again.
omatically swi
ding quality if
before the cro
be laid out in
ned by 90° an
ch to cross fol
he copy is
ss fold.
the basket.
d.
Page 15

Trou
b
a
a
o
p
n
g
eRef
c
oRes
r
r
p
n
p
o
o
t
s
j
d
lesho
ting
The LED
bove the dis
lay is blinkin
red
Pr
ss in orde
er to the or re
In
ase of a jam i
aut
matically by
tart the folder
to get the err
ort the code t
the fan unit:
ressing
after a jam ha
r code
the support.
ry to clear the
been cleane
jam
Clearing
jam in the fa
folder
Tu
n rollers by ha
nd
Page 16

Over
v
r
iew
Senso
positions
Page 17

Dime
Metric
nsions
Page 18

Inch
Page 19

Error Codes
Code Description
21 Error on stepper control boards
21:01 Error on starting stepper control board
21:02 Error on stopping stepper control board
22 Sensor errors on start-up
22:00 Sensor LB0 cut
22:01 Sensor LB1 cut
22:02 Sensor LB2 cut
22:03 Sensor LB3 cut
22:04 Sensor LB4 cut
23 Sensor sends high level permanently
23:00 Sensor LB0
23:01 Sensor LB1
23:02 Sensor LB2
23:03 Sensor LB3
23:04 Sensor LB4
24 Processing errors on stepper control boards
24:01 Error while calculating the step
24:02 Error while counting the steps
25 hardware errors
25:01 Lack of 5 Volts external
25:02 Lack of 38 Volts in FF or CF door open
25:03 Cover open
26 Time out errors
26:01 No ready signal after paper cut
26:02 No paper at sensor LB1 after paper cut
26:03 No paper at sensor LB1 without cut signal
26:04 Jam between sensors LB0 and LB1
26:05 No trailing edge of the paper at sensor LB1
26:06 Too many folds, document is too long
26:07 No trailing edge of the paper at sensor LB0
26:08 Unexpected paper at sensor LB4 in Online-Mode
26:09 Unexpected paper at “no fold” switch LB5 in Online-Mode
Page 20

Code Description
10 Communication errors
10:01 No communication
10:02 Checksum error
10:03 Bad quality of the data stream
10:04 bad quality of bytes
11 Communication errors
11:01 No communication
11:02 Checksum error
11:03 Bad quality of the data stream
11:04 bad quality of bytes
 Loading...