

Page 1

KI P Auto CAD In stallati on and User Guide
KIP AutoCAD Installation and User Guide
No part of this publication may be copied, reproduced or distributed in any form without express written permission
from KIP. 2015 KIP. v1
- 1 -
Page 2

KI P Auto CAD In stallati on and User Guide
No part of this publication may be copied, reproduced or distributed in any form without express written permission
from KIP. 2015 KIP. v1
- 2 -
Page 3

Contents
1 Introduction ........................................................................................................................................................ 4
Recommended PC Specifications: ................................................................................................................. 5
2 Installation .......................................................................................................................................................... 6
3 AutoCAD Driver Functionality ........................................................................................................................ 13
4 Using the KIP Aut o CAD Driver ........................................................................................................................ 19
5 Appendix .......................................................................................................................................................... 21
KIP Track Features - Variables ....................................................................................................................... 21
KI P Auto CAD In stallati on and User Guide
No part of this publication may be copied, reproduced or distributed in any form without express written permission
from KIP. 2015 KIP. v1
- 3 -
Page 4

KI P Auto CAD In stallati on and User Guide
1 Introduction
The KIP certified AutoCAD Driver provides integrated printing from within AutoDesk software applications such
as AutoCAD, AutoCAD LT and DWG TrueView. The fully compatible, dedicated KIP HDI driver uses the Autodesk
backbone to streamline printing of AutoCAD files. KIP’s AutoCAD Driver includes unique data tracking by
username and two customizable fields. Two-way printer status allows users to review roll and media information.
Large files sizes and long length documents are easily generated by the KIP HDI driver and the HPGL/2 data is
transmitted to KIP’s System K controller for quick processing and printing.
KIP AutoCAD Driver Key Features
Fully Compatible with Current Versions of AutoCAD | True HDI AutoCAD Driver | 32 and 64 Bit Operating System
Compatibility | Real Time Media Status | Custom Media Size Configuration | Media Saving by Auto Rota ti on |
Advanced Color Mode Image Type Selection | Dither Pattern Control for B&W Lines vs B&W Aerial | Integration
with KIP Job Accounting and Data Tracking
| Integration with KIP Cost Review Application
No part of this publication may be copied, reproduced or distributed in any form without express written permission
from KIP. 2015 KIP. v1
- 4 -
Page 5

Recommended PC Specifications:
• Microsoft® Windows® 7 Enterprise, Ultimate, Professional, or Home Premium (compare Windows 7
versions); Microsoft® Windows Vista® Enterprise, Business, Ultimate, or Home Premium (SP1 or later)
(compare Windows Vi sta versions); or M icrosoft® Windows® XP Professional or Home edition (SP2 or
later)
• For Windows Vista or Windows 7: Intel® Pentium® 4 or AMD Athlon® dual-core proces sor, 3.0 GHz or
higher with SSE2 technol ogy; for Windo ws X P: Inte l Pentium 4 or AMD Athlon dual-core pr ocessor , 1.6
GHz or higher with SSE2 technology
• 2 GB RAM
• 1.8 GB free disk space for installation
KI P Auto CAD In stallati on and User Guide
• 1,280 x 1,024 true color video display adapter 128 MB or greater, Microsoft® Direct3D®-capable
workstation-class graphics card
• Microsoft® Inte rn et Explorer® 7.0 or later
The KIP HDI driver is compatible with the following versions of AutoCAD:
2010/2011/2012/2013/2014/2015
• KIP10.hif is used fo r 2010, 2011 and 2012
• KIP11.hif is used fo r 2013 and 2014
• KIP12.hif Is use d for 2015
No part of this publication may be copied, reproduced or distributed in any form without express written permission
from KIP. 2015 KIP. v1
- 5 -
Page 6
Step
Action
Illustration
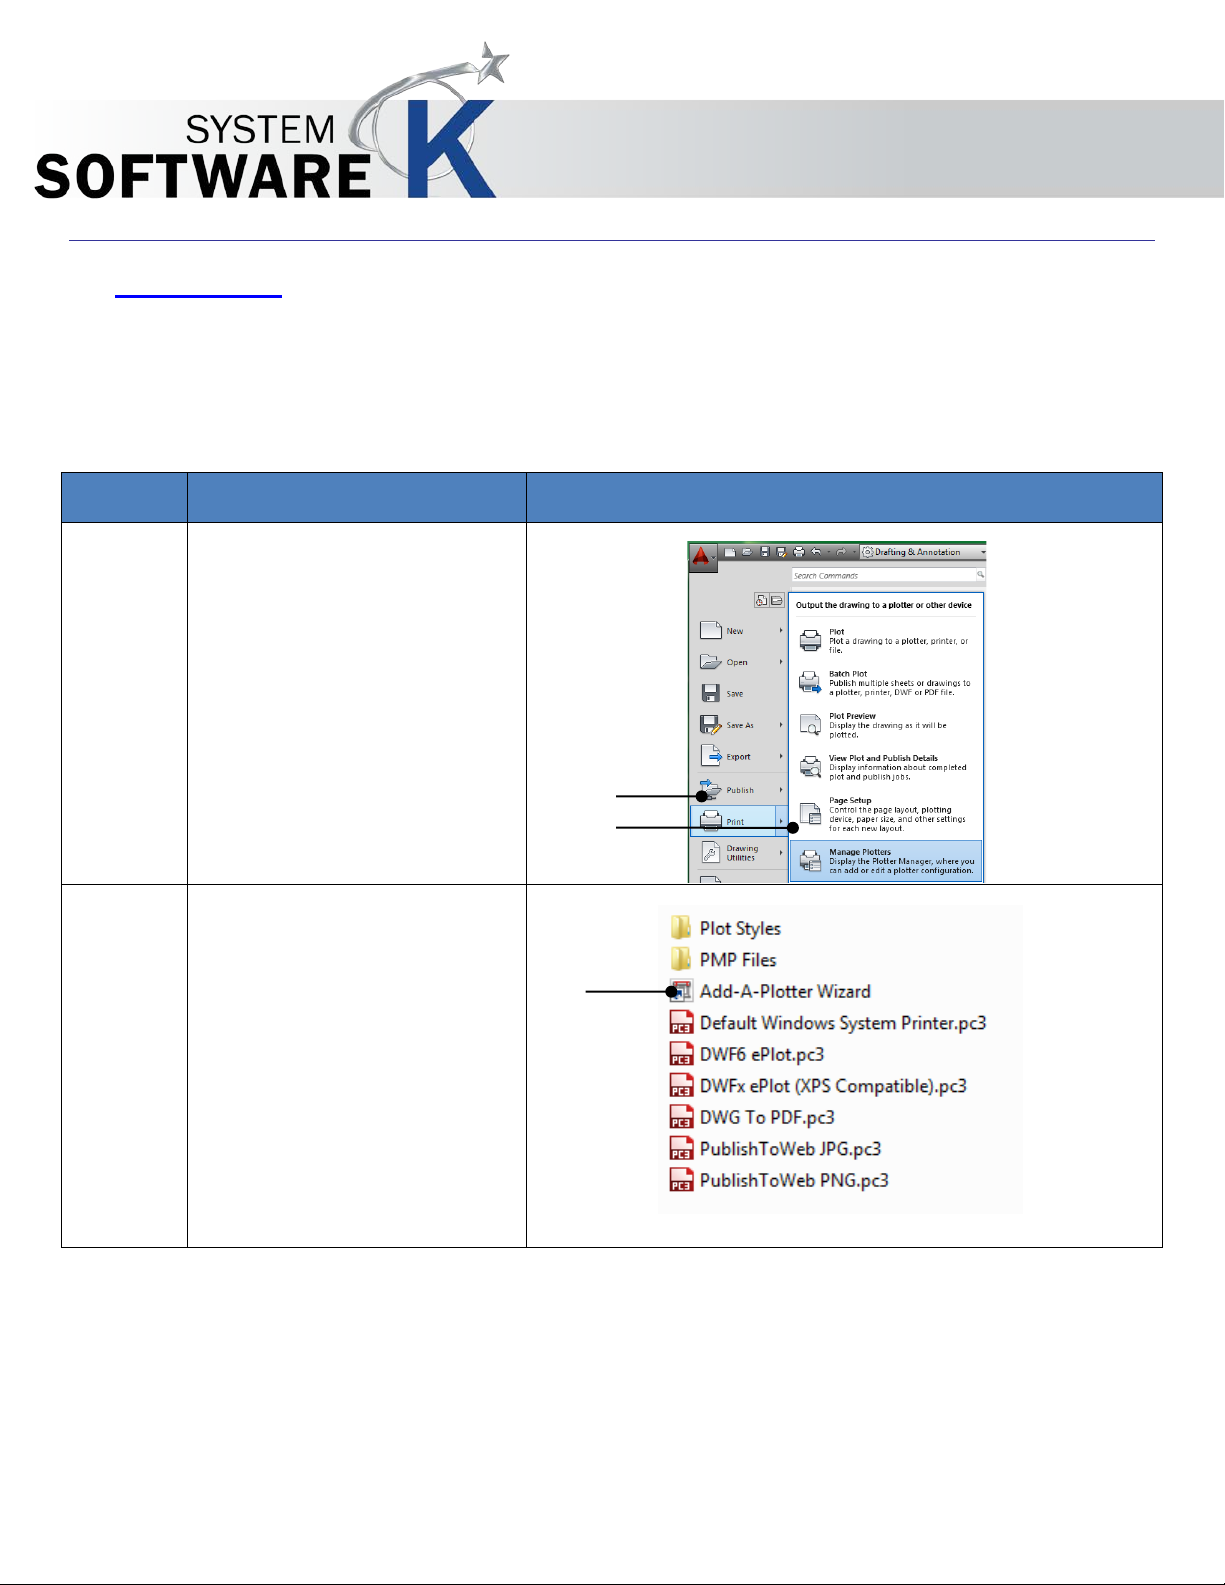
1.
Open the AutoCAD Application.
2.
The Plotter Manager window will
KI P Auto CAD In stallati on and User Guide
2 Installation
The Following section describes the Installation of the KIP System K AutoCAD Driver®. Please follow the Step-bystep procedure for correct installation.
Once open, select the red “A” in
the top left corner and then
mouse over “Print”. Select
“Manage Plotters”
open. Once open select Add-APlotter Wizard.
No part of this publication may be copied, reproduced or distributed in any form without express written permission
from KIP. 2015 KIP. v1
- 6 -
Page 7
Step
Action
Illustration
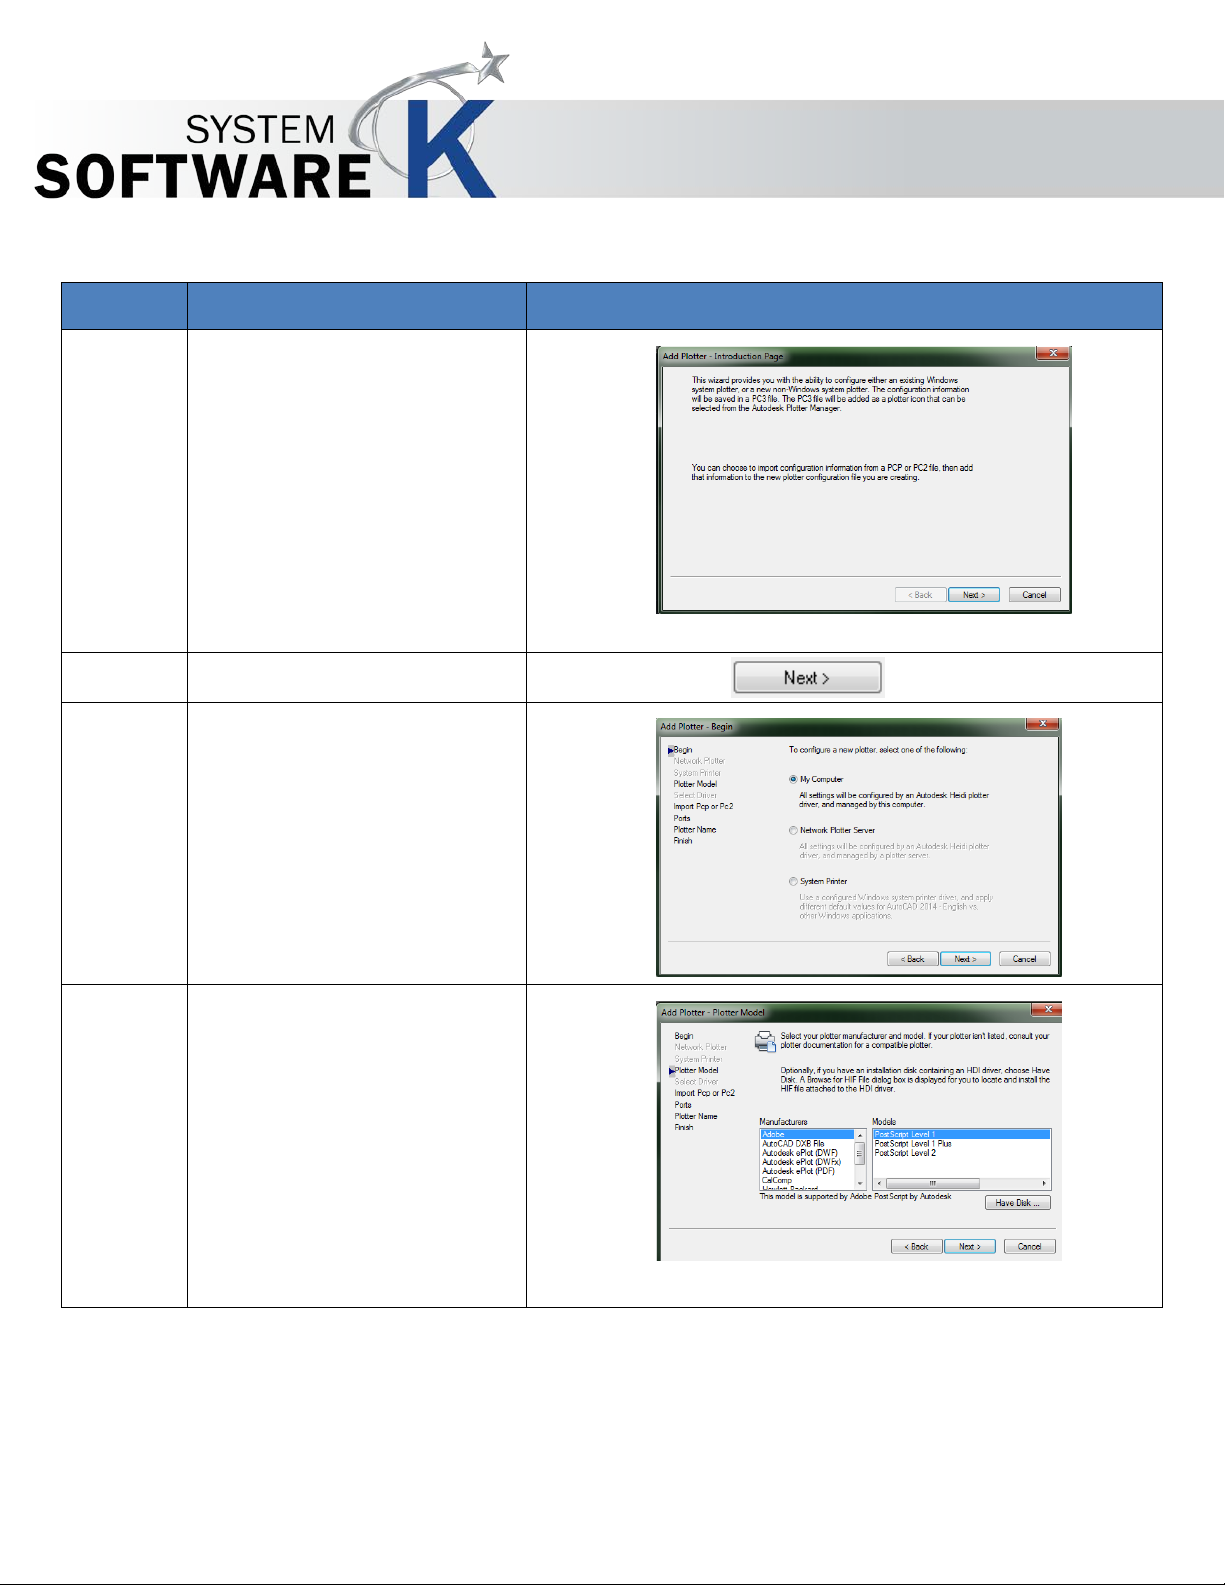
3.
The next window is the Driver
4.
Select Next to Continue.
5.
When the Add Plotter window
6.
The Next screen displays the
KI P Auto CAD In stallati on and User Guide
introduction page.
opens, select “My Computer”
and then “Next” to continue.
Plotter Manufacturers and
Models. Select the “Have Disk”
button to load the KIP AutoCAD
driver and add KIP to the
Manufacturers list.
No part of this publication may be copied, reproduced or distributed in any form without express written permission
from KIP. 2015 KIP. v1
- 7 -
Page 8

Step
Action
Illustration
7.
Browse to the location of the KIP
8.
When the folder opens, select
9.
Select the KIP Auto CAD Driver
10.
KIP has now been added to the
KI P Auto CAD In stallati on and User Guide
AutoCAD Driver install package.
Select the folder that contains
the correct version of AutoCAD.
Note: The Driver can be
downloaded from the KIP
Website, The KIP Software and
Operations Guide disc or from
the KIP Printer through KIP
PrintPro.Net.
the folder that contains the
proper language.
Note: For this example English US
will be selected.
file (kip11.hif) and select open.
Manufacturers list.
Select the KIP and then select
KIP System K Series.
Select the “Next” button.
No part of this publication may be copied, reproduced or distributed in any form without express written permission
from KIP. 2015 KIP. v1
- 8 -
Page 9

Step
Action
Illustration
11.
Nothing needs to be done on
12.
On the Ports page, choose
13.
On the Plotter name page, enter
KI P Auto CAD In stallati on and User Guide
this page.
Select “Next” to continue.
either the KIP Windows Driver
port or if you plan to print direct
to the KIP via IP Add r e s s, choose
LPT1. Later on in the Properties
menu, you will choose the IP
Address (Step #18)
Select “Next” to continue.
Note: If you plan to print direct
to the IP Address of the KIP is not
necessary to have the KIP
Windows Driver loaded at this
point for the HDI driver to
function.
a name that will easily be
recognized as the KIP AC Driver.
Select “Next” to continue.
No part of this publication may be copied, reproduced or distributed in any form without express written permission
from KIP. 2015 KIP. v1
- 9 -
Page 10

Step
Action
Illustration
14.
Nothing needs to be done on
15.
To link the AutoCAD driver to the
16.
The Plotter Manager window will
KI P Auto CAD In stallati on and User Guide
this final installation window.
Select “Finish” to continue.
KIP so that Accounting may be
used, select the red “A” in the
top left corner and then mouse
over “Print”. Select “Manage
Plotters”.
open. Once open, double-click
the newly added KIP System K
Series driver.
No part of this publication may be copied, reproduced or distributed in any form without express written permission
from KIP. 2015 KIP. v1
- 10 -
Page 11

Step
Action
Illustration
17.
When the Plotter Configuration
18.
This will search the Network and
19.
This will automatically make the
KI P Auto CAD In stallati on and User Guide
window opens select the
Custom Properties entry and
then the Custom Properties
button.
load all available KIP System K
Printers.
Select the desired printer
connection (IP Address) and
select “OK”.
connection to the KIP.
Note: Connection is established
as indicated by the Printer and
Roll information now being
displayed.
No part of this publication may be copied, reproduced or distributed in any form without express written permission
from KIP. 2015 KIP. v1
- 11 -
Page 12

Step
Action
Illustration
20.
Selecting More Options will
KI P Auto CAD In stallati on and User Guide
open a new window. Here there
are few more options.
• Prompt at plot time – Will
open a window allowing
adjustments to be made
prior to plotting.
• Disable media warnings
– If selected, the AC
driver will not report
media errors that may
occur during printing.
• Plot direct to printer’s IP
Address – When selected
will print directly to the
KIP Printer via IP Address.
• Plot to Windows printer
port – When selected will
use the KIP Windows
Driver Port for printing.
No part of this publication may be copied, reproduced or distributed in any form without express written permission
from KIP. 2015 KIP. v1
- 12 -
Page 13

Component
Function
1. Manage Plotters
Open the Manage Plotters window and Double Click the KIP AC driver
2. General Tab
Displays the Driver information, version and Port being used.
3. Ports
Displays the current port the KIP AC Driver is attached to.
KI P Auto CAD In stallati on and User Guide
3 AutoCAD Driver Functionality
The following section will explain the functionality of the KIP AutoCAD (HDI) Driver.
that has been installed.
No part of this publication may be copied, reproduced or distributed in any form without express written permission
from KIP. 2015 KIP. v1
- 13 -
Page 14

Component
Function
4. Device and Document
Select the Custom Properties designation and then the Custom properties
5. Printer Configuration
Displays the connected KIP Printer and gives a active status of the KIP
KI P Auto CAD In stallati on and User Guide
Settings
button to enter the settings window for the driver.
Printer including:
• Printer Connection
No part of this publication may be copied, reproduced or distributed in any form without express written permission
from KIP. 2015 KIP. v1
• Media installed
• Media Staus (in 25% increments)
• Displays printer er rors
Selecting the Printer button will open a window showing all printers on the
network.
- 14 -
Page 15

Component
Function
6. Plot Identification
Used in environments where job costing or department allocations are
KI P Auto CAD In stallati on and User Guide
required for prints on the KIP. They can also be useful for print
identification and print distribution as this information can be placed in a
header.
Fields that can be tracked:
• Username - This button allows the user to select a predetermined
User Name from a drop down list or manually type a name. This
field may be configured to be mandatory and password
protected.
• Project - This button allows the user to select a predetermined
Project Number from a drop down list or manually type the Project
Number. This field may be configured to be mandatory and
password protected.
• Department - This button allows the user to select a
predetermined Department from a drop down or manually type a
department. This field may be configured to be mandatory and
password protected.
No part of this publication may be copied, reproduced or distributed in any form without express written permission
from KIP. 2015 KIP. v1
- 15 -
Page 16

Component
Function
7. Media Options – Media
Control the Media type to be sent with the current job by selecting the
8. Media Options - Folder
Folds the print according to the fold patterns configured on the KIP.
9. Media Options – Exit Tray
Exit Tray allows for the selection of stacking to Default, Rear or Top.
KI P Auto CAD In stallati on and User Guide
Type
desired media. Click the Media Type button to get a list of available
medias.
Please note that the optional folder must be installed for this action to
occur.
Default - Prints to the top or rear as set up as the default exit tray (no
manual selection necessary).
No part of this publication may be copied, reproduced or distributed in any form without express written permission
from KIP. 2015 KIP. v1
Top - Top of the KIP Printer (on available models).
Rear - Ejects out the back of the printer.
- 16 -
Page 17

Component
Function
10. Adjustments – Quality
Allows for the selection of Quality Presets (setup through KIP PrintPro) to
11. Adjustments - HPGL Pr e set
Allows for the select ion of HPGL Presets (setup through KIP PrintPro) to be
12. Adjustments – Color
Allows the user to select between Simple and Advanced printing modes
KI P Auto CAD In stallati on and User Guide
Presets
be applied to the current job from AC.
applied to the current job from AC.
Adjustment
giving more or less options to choose from.
No part of this publication may be copied, reproduced or distributed in any form without express written permission
from KIP. 2015 KIP. v1
- 17 -
Page 18

Component
Function
13. Adjustments – More Options
Selecting More Options will open a new window here there are few more
14. Pin
Pin printing allows a user to enter a four digit pin into this location prior to
KI P Auto CAD In stallati on and User Guide
options.
• Prompt at plot time – Will open a window allowing adjustments to
be made prior to plotting.
• Disable media warnings – If selected the AC driver will not report
media errors that may occur during printing.
• Plot direct to printer’s IP Address – When selected will print directly
to the KIP Print er vi a IP Address.
• Plot to Windows printer port – When selected will use the KIP
Windows Driver Port fo r p r i nting.
printing. When this job arrives at the Print Queue it will be placed into a
hold pattern. This job cannot be printed or removed from the Queue
without entering the original PIN.
Note: This will not hold up the Print Queue as other jobs will move ahead
of this job until it is released. This gives greater security to jobs being
printed.
No part of this publication may be copied, reproduced or distributed in any form without express written permission
from KIP. 2015 KIP. v1
- 18 -
Page 19

Step
Action
Illustration
1.
Open the AutoCAD Application
2.
Click on the “A” in the top Left
3.
Select the KIP Printer Driver From
4.
To use the available options
KI P Auto CAD In stallati on and User Guide
4 Using the KIP AutoCAD Driver
The Following section describes using the KIP AutoCAD Driver® from the AutoCAD Application. Please follow the
Step-by-step procedure for correct usage.
For this example AutoCAD 2014 was used.
corner. When the Drop down
window opens select Print.
the available printers list.
select the Properties button.
No part of this publication may be copied, reproduced or distributed in any form without express written permission
from KIP. 2015 KIP. v1
- 19 -
Page 20

Step
Action
Illustration
6.
Select the Custom Properties
7.
If any changes need to be
8.
Select OK when finished
9.
Select “OK” to send the File to
KI P Auto CAD In stallati on and User Guide
designation and then the
Custom Properties Button.
made they can be made here.
Note: Under “More Options”
there is a selection for “Prompt
At Plot Time”.
If this setting is selected a
variation of this window will
automatically open prior to
printing. This eliminates the need
to go through this step here.
the KIP Printer.
No part of this publication may be copied, reproduced or distributed in any form without express written permission
from KIP. 2015 KIP. v1
- 20 -
Page 21

5 Appendix
KIP Track Features - Variables
Specialized names or m a s ks can be used for the KIP Trac k data fields in the Custom Properties of the KIP
AutoCAD Driver (User Name, Job Number, and Description)
Both the User Name and Job Number fields by default are recorded into the KIP Track log. The Job
Number field can then be th e key field used to quer y Production Reports d irectly from the KIP Unatt end
software. The KIP Controller log can also be imported into any program that can read ASCII data.
Specialized Mask Names and Rules
KI P Auto CAD In stallati on and User Guide
These customized names can be assigned to the mask elements using all normal methods.
Dwgname and dwgpath are the only two variables that can be set.
Example:
AutoCAD reports origin al file path of drawing named "R300-20.DWG" and the path that the file is stored in
as:
C:\Program Files\Aut oCAD 2006\drawings\R300-20.DWG
If mask item is set to:
Dwgname logged is “R300-20”
Dwgpath logged is ‘C:\Program Files\AutoCAD 2006\drawings\R300-20.DWG”
dwgpath=x\x\x\x\x where = sign and following is optional mask to select path elements.
x replaced by # includes that element of path to be used in accounting data.
dwgpath=x\#\x\x logged is ‘Program Files’
dwgpath=x\#\# logged is ”Program Files\AutoCAD 2006”
No part of this publication may be copied, reproduced or distributed in any form without express written permission
from KIP. 2015 KIP. v1
- 21 -
 Loading...