

Page 1

KIP Accounting
Center User Guide
Page 2

KIP Accounting Center User Guide
No part of this publication may be copied, reproduced or distributed in any form without express written permission
from KIP. 2015 KIP. v1
- 1 -
Page 3

KIP Accounting Center User Guide
Contents
1. Introduction ................................................................................................................................................................... 3
1.1 System Requirements ..................................................................................................................................................... 3
1.2 Installation ........................................................................................................................................................................ 4
1.3 Main Screen ............................................................................................................................................................... 5
1.4 Accounting by User Name ...................................................................................................................................... 6
1.5 Accounting by Project Number .............................................................................................................................. 7
1.6 Accounting by Department Number ..................................................................................................................... 8
2. Using KIP Accounting Center ...................................................................................................................................... 9
2.1 Connecting to KIP Printer(s) ........................................................................................................................................... 9
2.3 Configuring Accounting Information .......................................................................................................................... 11
3 How to use KIP Accounting Center Application ..................................................................................................... 16
3.1 KIP Accounting Center Usage ..................................................................................................................................... 16
3.2 Creating Us er s ............................................................................................................................................................... 17
3.3 Creating Project Numbers ........................................................................................................................................... 18
3.4 Creating Department Numbers................................................................................................................................... 19
No part of this publication may be copied, reproduced or distributed in any form without express written permission
from KIP. 2015 KIP. v1
- 2 -
Page 4

KIP Accounting Center User Guide
1. Introduction
The KIP Accounting Center consolidates control of user account data and printing rules for all copy
print and scan activities f or KIP color and b&w systems. Accoun t data is continuously accessed by
KIP Touchscreen copy & scan systems as well as the variety of KIP printing applications and print
drivers. Rules based prin ting and three customizable fields for password protected user acc ounts,
project numbers, and depa rtment codes help administrators and IT managers control print costs or
turn printing into billing revenue.
KIP Accounting Center Features
3 Customizable Fields | Import for User Data Using LDAP | Clear Fields After Each Job S u bmissi on |
ASCII Import/Export | Easily Update User, Project and Department Data | Automated Update Via
Scripting | Password Protect Any or Al l Da ta Entries | No Special Data Servers Required
1.1 System Requiremen ts
Recommended PC Specifications:
• 3.0 GHz processor speed
• 1 GB RAM
• H a rd d isk of 100 GB or more
• DVD-ROM
• USB-connection
• Windows XP/7/8
• 32/64 bit OS compatible
No part of this publication may be copied, reproduced or distributed in any form without express written permission
from KIP. 2015 KIP. v1
- 3 -
Page 5

1.2 Installation
Add Steps for Installa tion:
KIP Accounting Center User Guide
No part of this publication may be copied, reproduced or distributed in any form without express written permission
from KIP. 2015 KIP. v1
- 4 -
Page 6
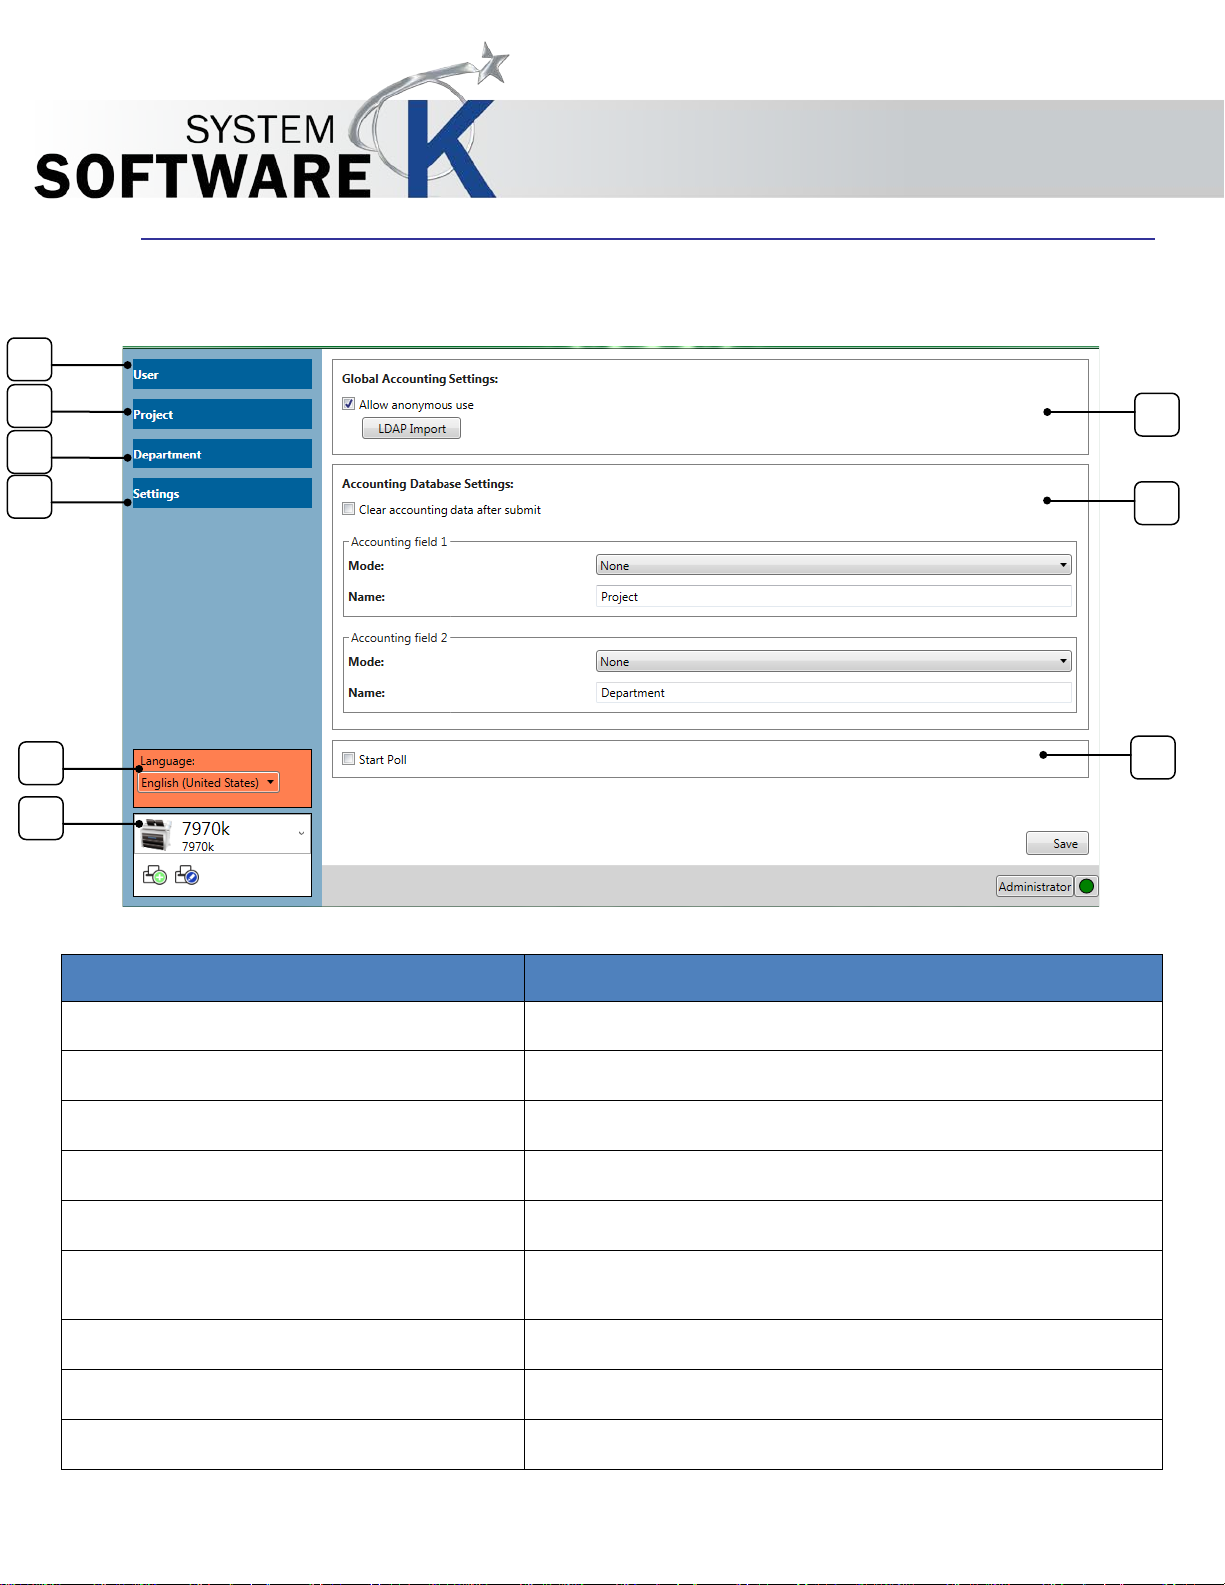
Component
Function
1. User
Opens the User Setup window.
2. Project
Opens the Project Number Setup wind o w.
3. Department
Opens the Department Setup window.
4. Settings
Opens the Settings Setup window.
5. Language
Allows for the selection of language
6. Printer Connections
Displays current printer connection (dropdown for selection of
7. Global Accounting Settings
Used to set up the login functionality.
8. Accounting Database Settings
Used to set requirements for the accounting fields.
9. Start Poll
Starts polling the data from the FeliCa Reader
6
2 3 4
5 1 7 8 9
KIP Accounting Center User Guide
1.3 Main Screen
Once Logged in the Setting Screen will be displayed.
others)
No part of this publication may be copied, reproduced or distributed in any form without express written permission
from KIP. 2015 KIP. v1
- 5 -
Page 7
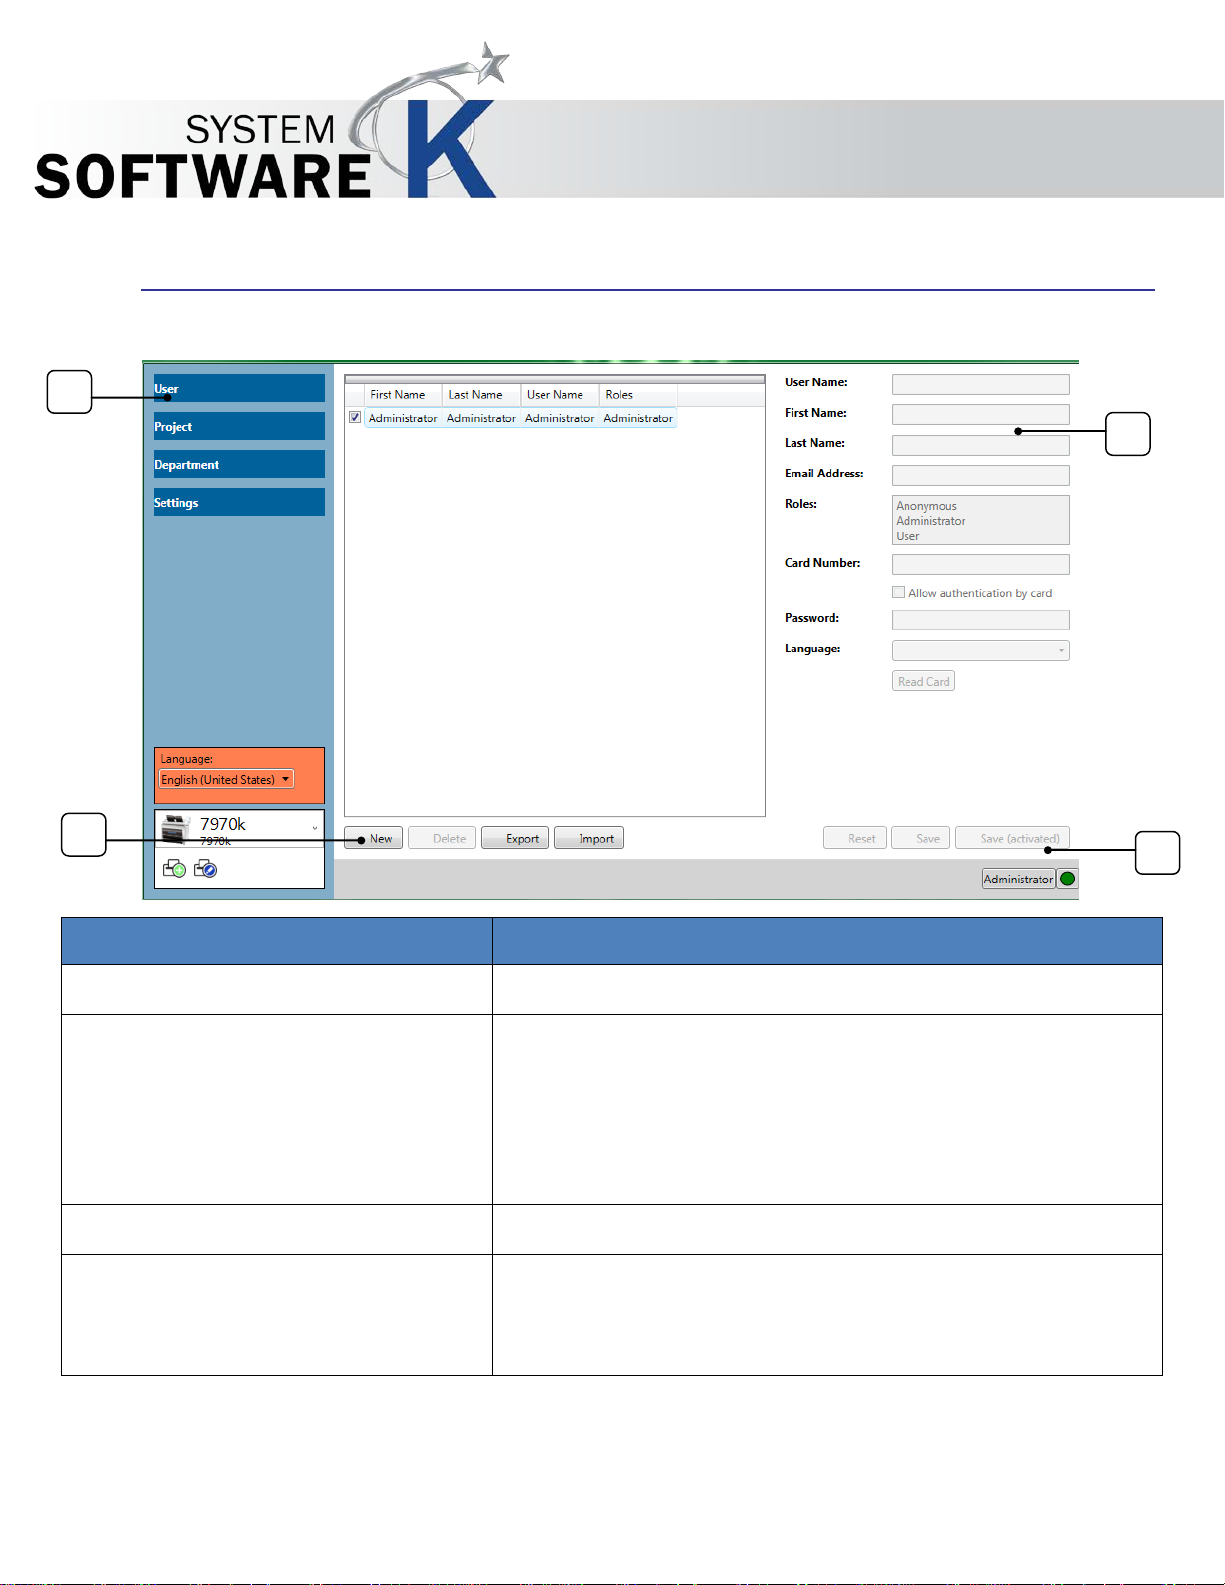
Component
Function
1. User
Opens the User Name Setup window.
2. New/Delete/Export/Import
Click “New” to create a new user account.
3. Data Entry area
Select to enter the details for the user account.
4. Reset/Save/Save (active)
Click “Reset” to reset the entered data.
4 1 3 2
KIP Accounting Center User Guide
1.4 Accounting by User Name
Click “Delete” to delete existing user accounts.
Click “Export” to export existing user accounts.
Click “Import” to import user accounts exported from a different
KIP Printer.
No part of this publication may be copied, reproduced or distributed in any form without express written permission
from KIP. 2015 KIP. v1
Click “Save” to save the user account.
Click “Save (activated)” to save the user account activated.
- 6 -
Page 8

Component
Function
1. Project
Opens the Project Setup window.
2. New/Delete/Export/Import
Click “New” to create a new Project.
3. Data Entry area
Select to enter the details for the Project.
4. Reset/Save/Save (active)
Click “Reset” to reset the entered data.
1 3 4
2
KIP Accounting Center User Guide
1.5 Accounting by Project Number
No part of this publication may be copied, reproduced or distributed in any form without express written permission
from KIP. 2015 KIP. v1
Click “Delete” to delete existing Project.
Click “Export” to export existing user accounts to a CVS file.
Click “Import” to import a CSV file of user accounts
Click “Save” to save the Project.
Click “Save (activated) to save the Proj ect activated.
- 7 -
Page 9

Component
Function
1. Department
Opens the Department Setup window.
2. New/Delete/Export/Import
Click “New” to create a new Department.
3. Data Entry area
Select to enter the details for the Department.
4. Reset/Save/Save (active)
Click “Reset” to reset the entered data.
1 3 4
2
KIP Accounting Center User Guide
1.6 Accounting by Department Number
Click “Delete” to delete existing Department.
Click “Export” to export existing Department.
Click “Import” to import Department exported from a different KIP
Printer.
No part of this publication may be copied, reproduced or distributed in any form without express written permission
from KIP. 2015 KIP. v1
Click “Save” to save the Department.
Click “Save (activated) to save the Department activated.
- 8 -
Page 10
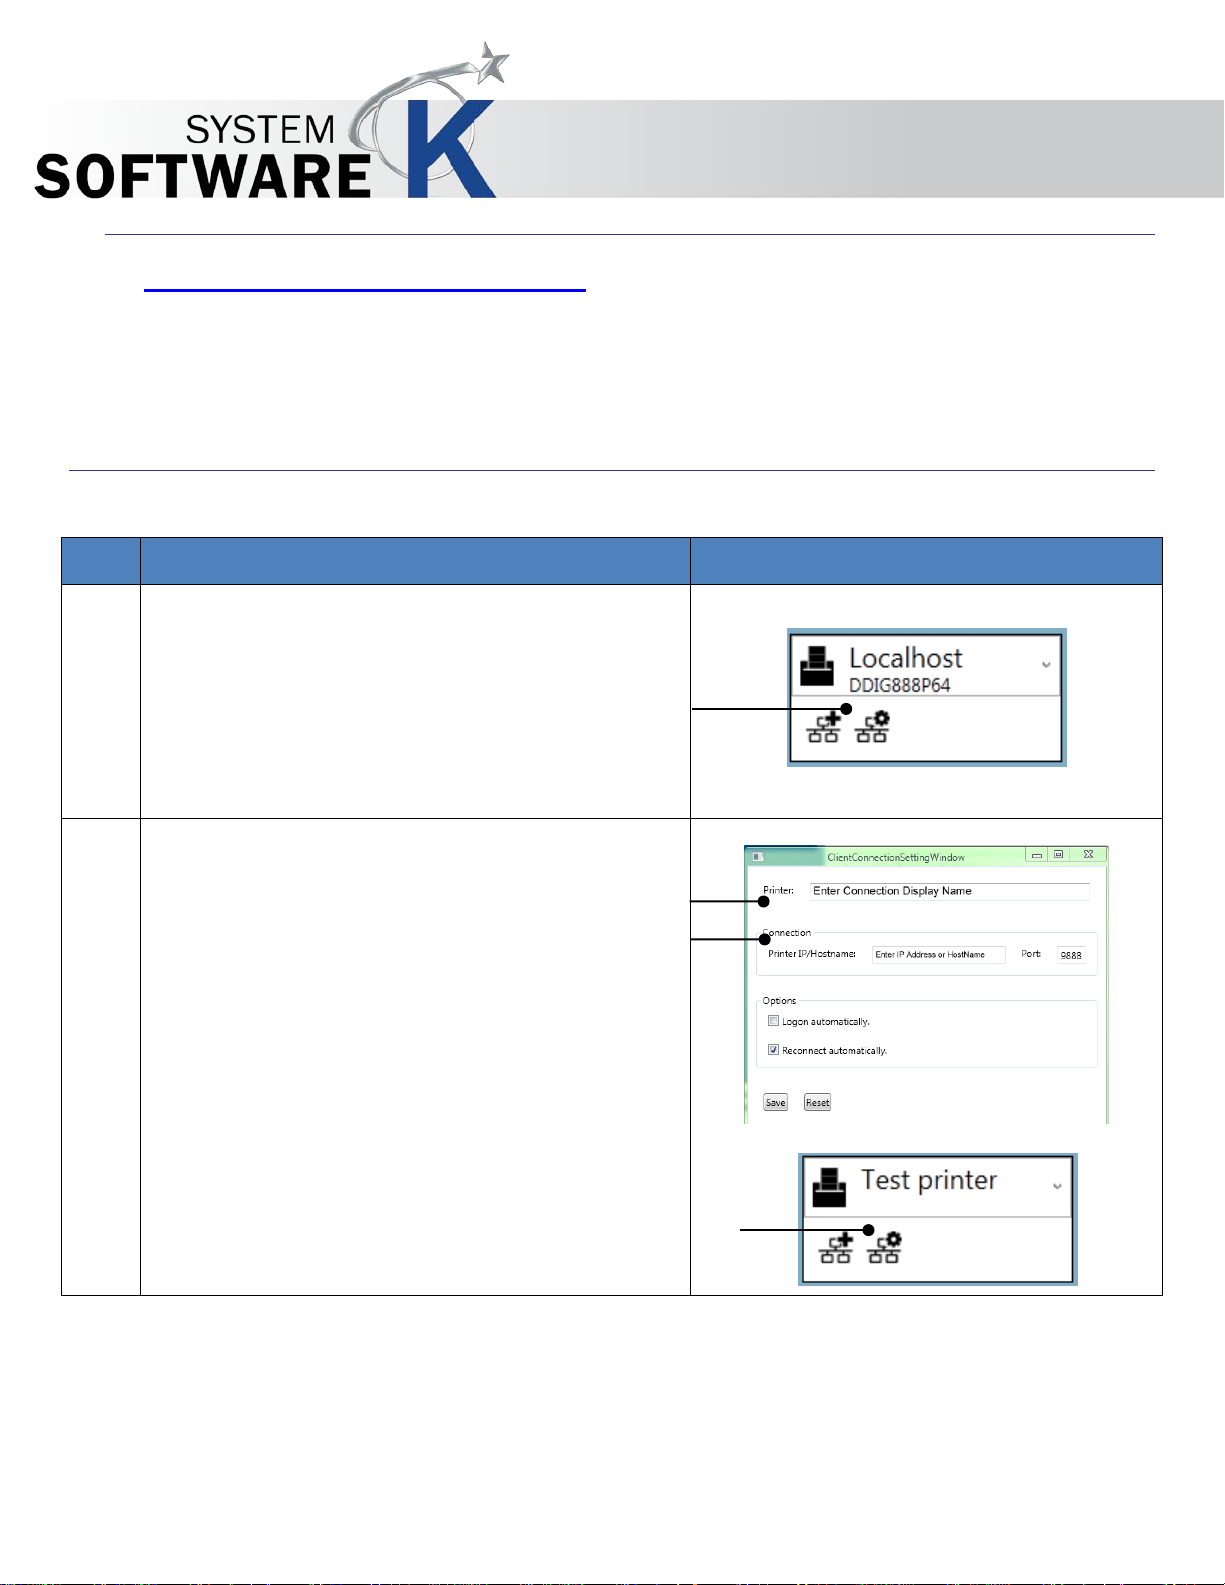
Step
Action
Illustration
1.
After initial installation it will be necessary to connect
2.
Fill in the following fields:
KIP Accounting Center User Guide
2. Using KIP Accounting Center
The KIP Accounting Center is used for entering in large amounts of accounting information in a quick and easy
manner. Additional information/changes are made immediately on the KIP Printer no other steps are necessary.
2.1 Connecting to KIP Printer(s)
to the KIP Printer the Accounting Information will be
pushed to.
To create a new connection, click the “Add
Connection” icon.
To edit an existing connection, click the “Edit
Connection” icon
• Printer – Enter the display Name for the
connection
• Connection – Enter the IP Addre ss or HostName
of the KIP Printer
Options :
• Logon Automatically – if selected will auto
logon when application is opened
• Reconnect automatically – if selected will
automatically reconnect to the KIP printer after
connection loss.
No part of this publication may be copied, reproduced or distributed in any form without express written permission
from KIP. 2015 KIP. v1
- 9 -
Page 11

Step
Action
Illustration
3.
Logging In:
4.
To login/change user click the button (current logged
KIP Accounting Center User Guide
The username of the currently logged on user is
displayed in the bottom right corner of the screen.
in name) and the User logon screen will be displayed.
No part of this publication may be copied, reproduced or distributed in any form without express written permission
from KIP. 2015 KIP. v1
- 10 -
Page 12
Action
Illustration
KIP Accounting Center User Guide
2.3 Configuring Accounting Information
The KIP Accounting Center is used by an administrator to add/remove accounting information on the
connected KIP Printer.
The following can be configured:
User:
By default there will be an Administrator Accou nt s et
up.
• Addi ng a use r – Click the New Button.
• The fields to the right will become active. Enter
the proper information for these fields.
• Card Num be r – This field shows the Number of
the FeliCa
• Read Card – This will read the number of the
FeliCa once
• Start Poll – Starts polling the data from the
FeliCa Reader so every time a card is placed
on the reader the number is read.
• Reset – clears fields
• Save – Saves entry
Note: to edit or remove the entry must not be active
(box unchecked)
• Save Activated – Saves and Activates entry
No part of this publication may be copied, reproduced or distributed in any form without express written permission
from KIP. 2015 KIP. v1
- 11 -
Page 13
Action
Illustration
KIP Accounting Center User Guide
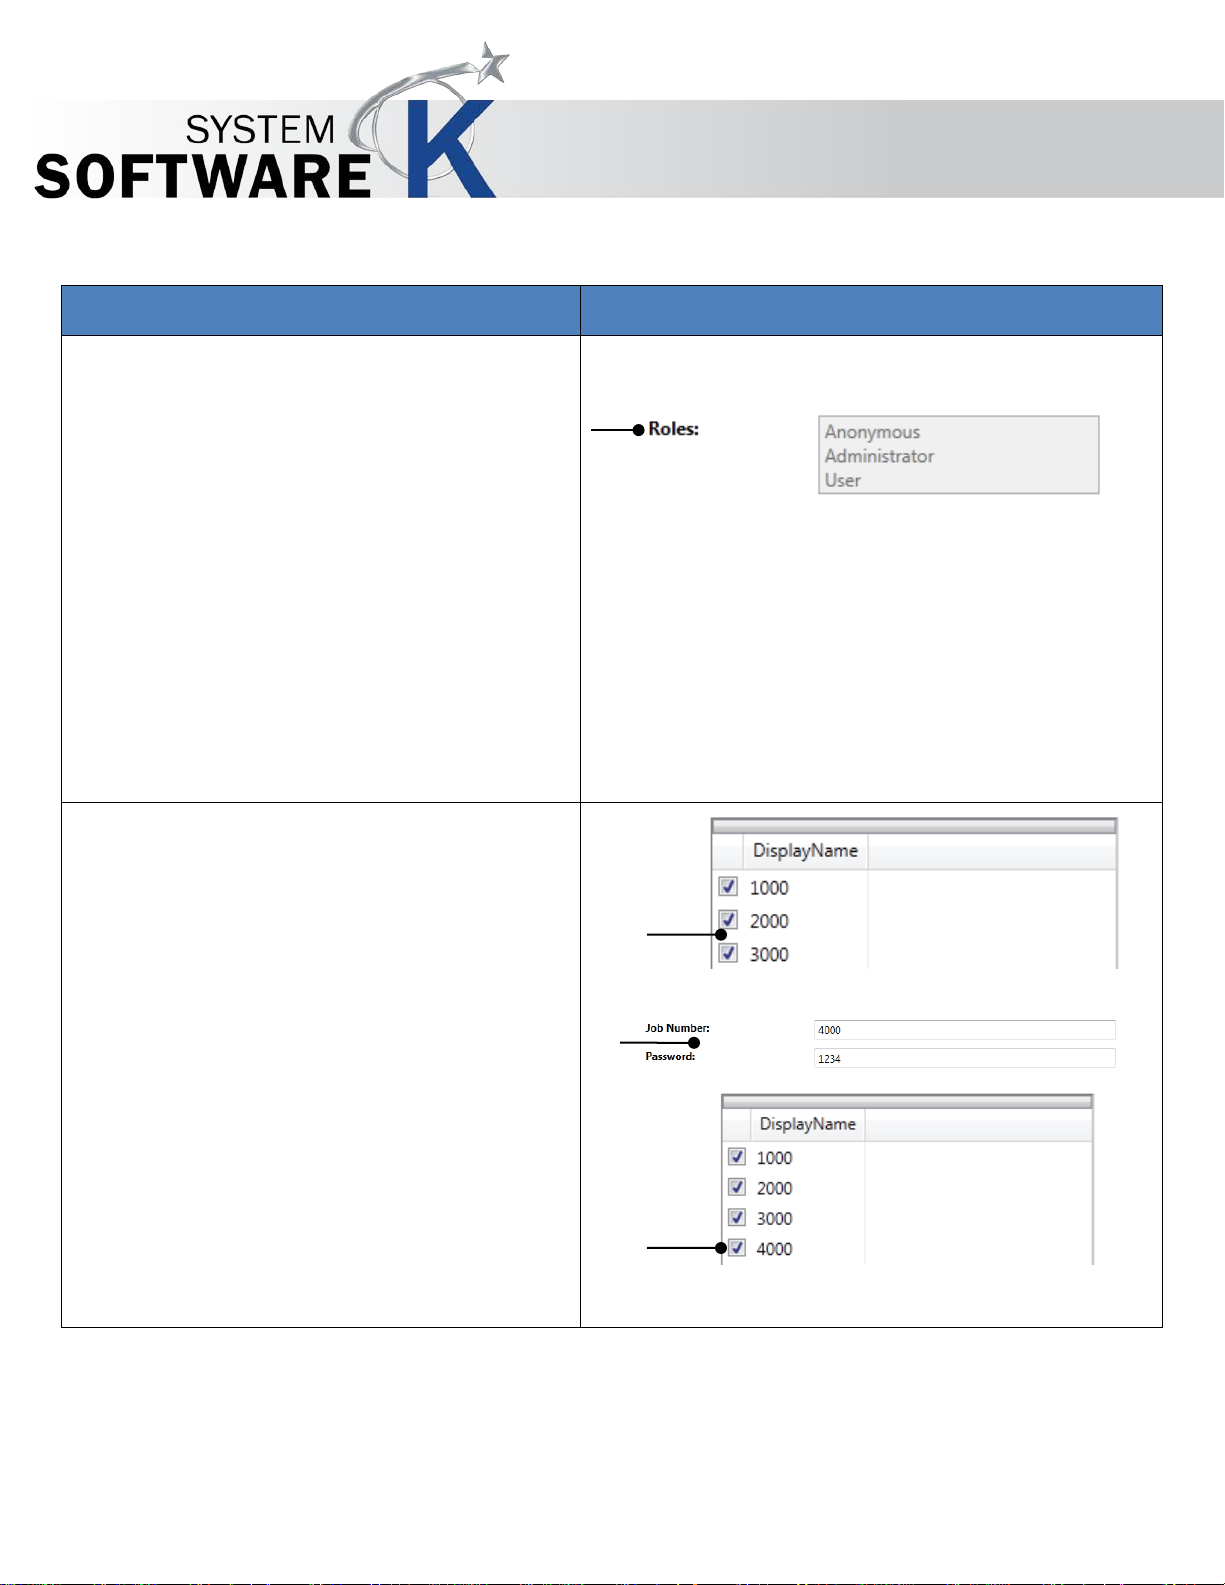
Roles:
Three levels of perm issions
• Anonymous – Every day operation of print,
copy, scan; creation of presets, job based
notifications
• Administrator – All permissions Set up of
Users, Meters, and Reports etc. However no
Hardware related setup.
• User - Every day operation of print, copy,
scan; creation of presets, job based
notifications
Job Number:
Allows the adding, editing or the removal of
Job Numbers
• Addi ng a Job Number – Click “New”
Note: To edit or remove, the entry must not be
active (box unchecked)
• The fields to the right will be-come active.
Enter the proper information for these fields
Click “Save” or “Save (activated)” to add
the entry.
No part of this publication may be copied, reproduced or distributed in any form without express written permission
from KIP. 2015 KIP. v1
- 12 -
Page 14

KIP Accounting Center User Guide
Action Illustration
Job Description:
Allows the adding, editing or the removal of
Job Description
• Addi ng a Job Description - Click
"New"
• The fields to the right will be-come
active. Enter the proper information for
these fields Click "Save" or "Save
(activated)" to add the entry.
Note: To edit or remove, the entry must not be
active (box unchecked)
Settings:
Allows the Administrator to configure the
accounting settings of the connected printer.
No part of this publication may be copied, reproduced or distributed in any form without express written permission
from KIP. 2015 KIP. v1
- 13 -
Page 15

Action
Illustration
Global Accounting Settings:
KIP Accounting Center User Guide
• “Allow anonymous use” checked,
allows the printer to be used
anonymously with bypassing
accounting.
• “Allow anonymous use” unchecked
makes the login mandatory to use the
KIP Printer.
•
LDAP allows for the selection of users
from a list gathered from the locally
connected PC. All selected users will
be added and activated with
permission level “User”.
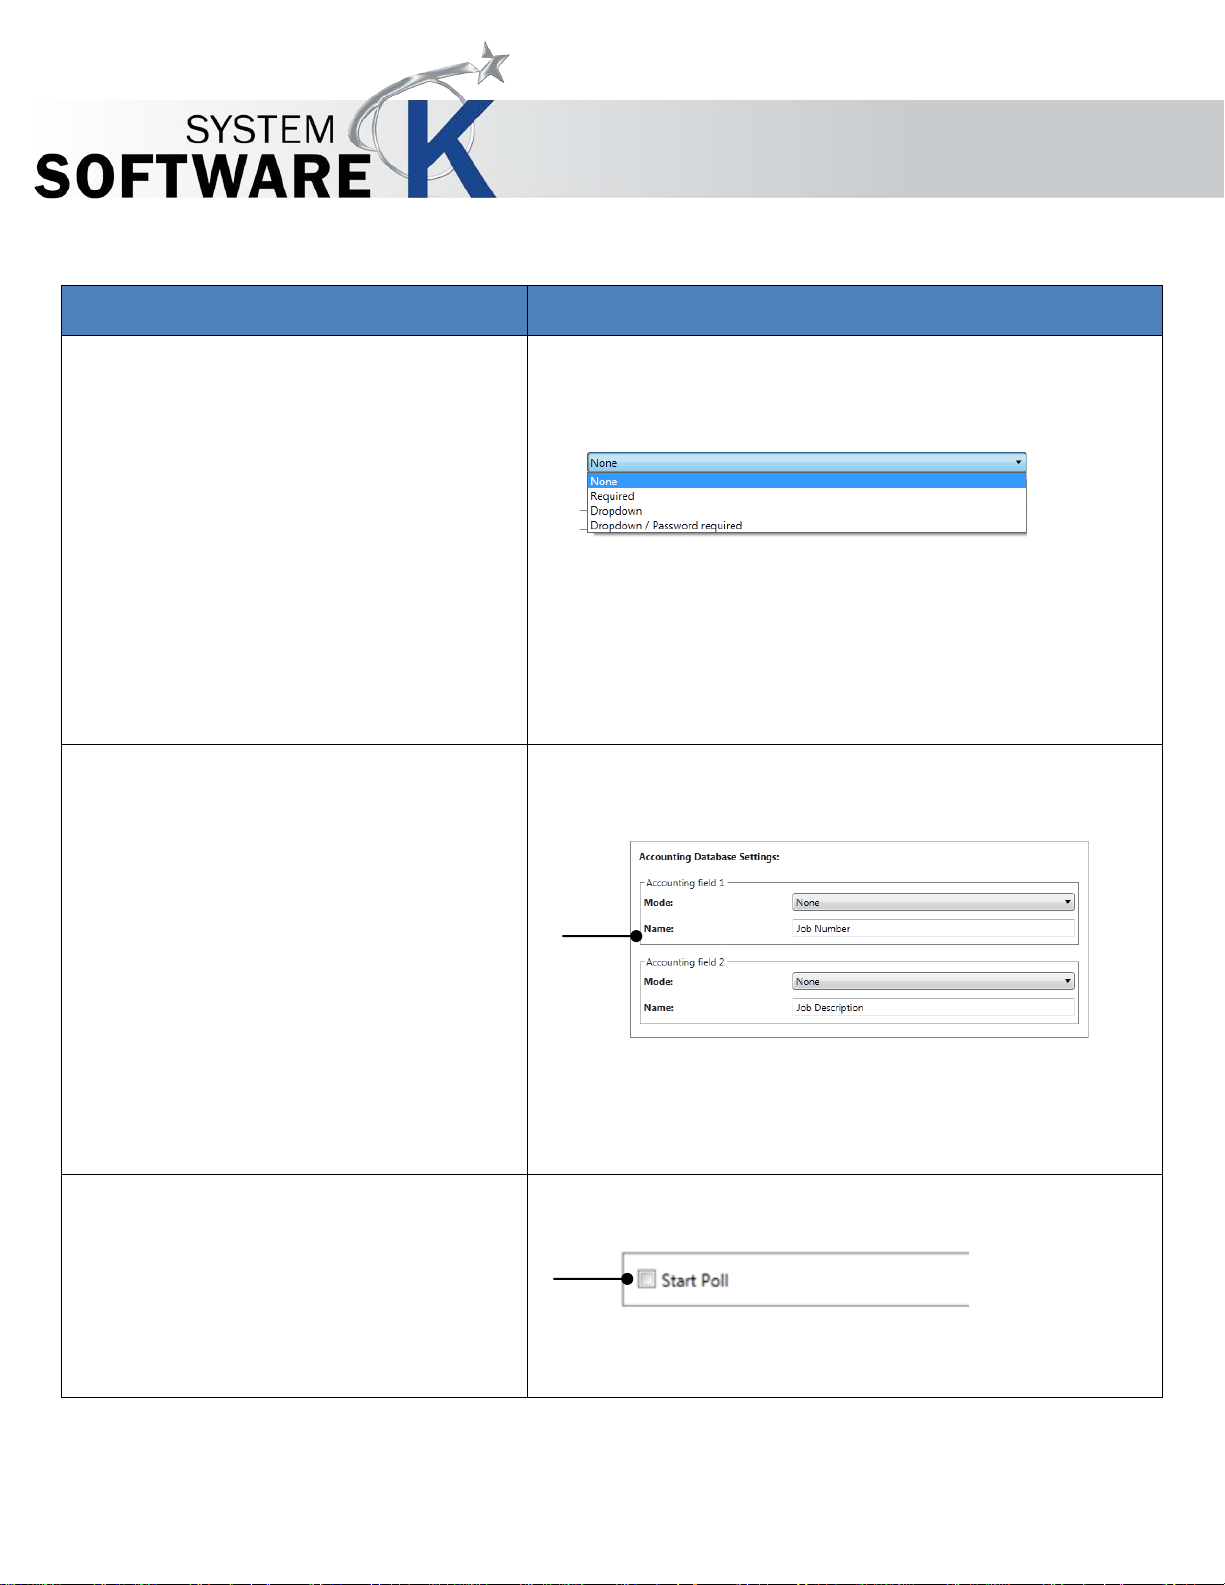
Accounting Database Settings:
• Accounting field 1
• Accounting field 2
No part of this publication may be copied, reproduced or distributed in any form without express written permission
from KIP. 2015 KIP. v1
- 14 -
Page 16
Action
Illustration
KIP Accounting Center User Guide
Setting the requirement (Mode):
• None – No requirements for this field.
• Required – Entering some information
into this field is
• Dropdown – Allows for the selection of
data from a dropdown window.
required to print.
• Dropdown/Password Required –
Requires a password in conjunction
with the dropdown selection.
Changing field designation (Name):
• This field can be re-named to
whatever the customer would like it to
say. Simply change this field to the
desired description. This will
Start Poll:
automatically/instantly change the
description/labels on the icons in all
the KIP applications (PrintPro,
PrintPro.NET, Windows Driver, AutoCAD
Driver and Touch Screen).
• Starts polling the data from the FeliCa
Reader. Every time a card is placed
on the reader, the number is read.
No part of this publication may be copied, reproduced or distributed in any form without express written permission
from KIP. 2015 KIP. v1
- 15 -
Page 17
KIP Accounting Center User Guide
3 How to use KIP Accounting Center Application
This section will show the basics for how to use the KIP Accounting Center application to set up Users, Job
Numbers and Job Descriptions. As well as how to use the Settings to set accounting requirements.
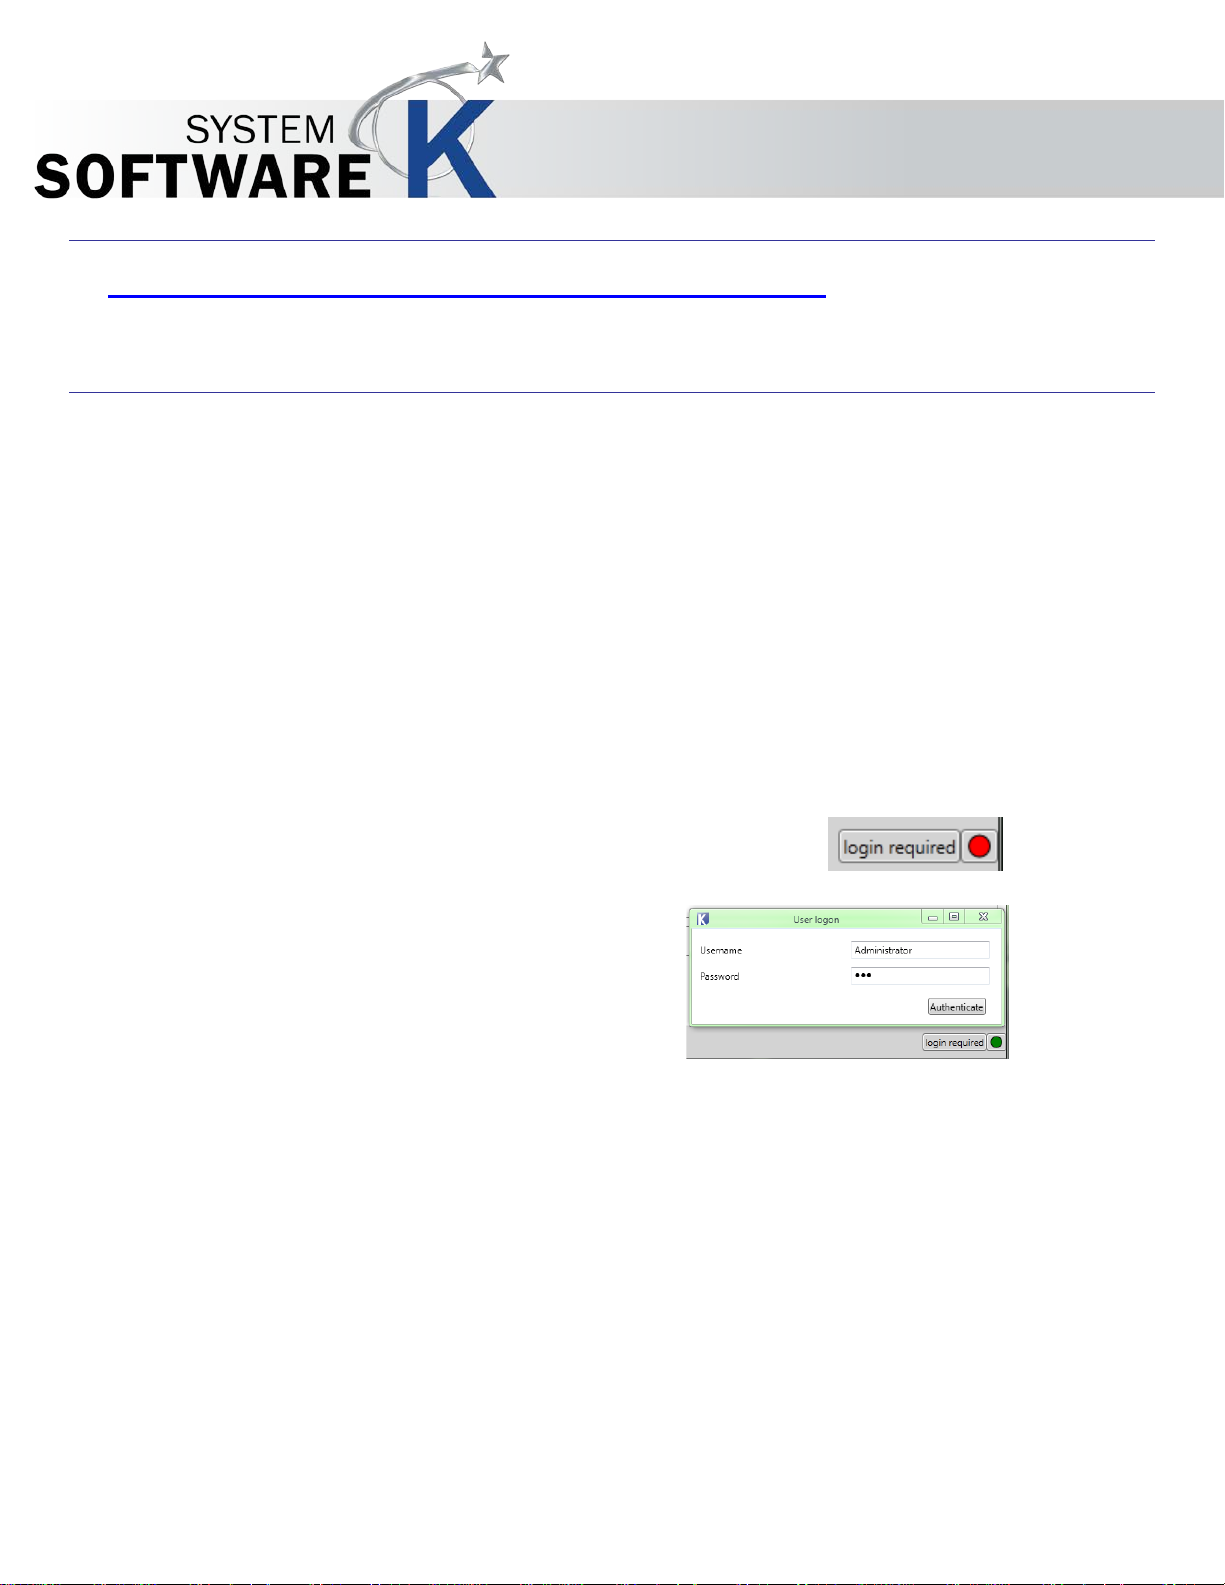
3.1 KIP Accounting Center Usage
The KIP Accounting Center Application is used to add multiple Users, Job Numbers and Job Descriptions to KIP
Printers for accounting purposes. This tool is used by Administrators and is Password protecte d .
• Launch the KIP Accounting Center The bottom right corner shows “Login Required”
• P r essing the red button in the bottom right corner will connect to the KIP Printer. The button will turn
green when the connection was established successfully and the login window is displayed.
• To login, enter a valid username and the corresponding password and click “Authenticate”.
• The KI P Track II appl ication starts and is ready to be configured (or used, depending on the
credentials used to login).
No part of this publication may be copied, reproduced or distributed in any form without express written permission
from KIP. 2015 KIP. v1
- 16 -
Page 18

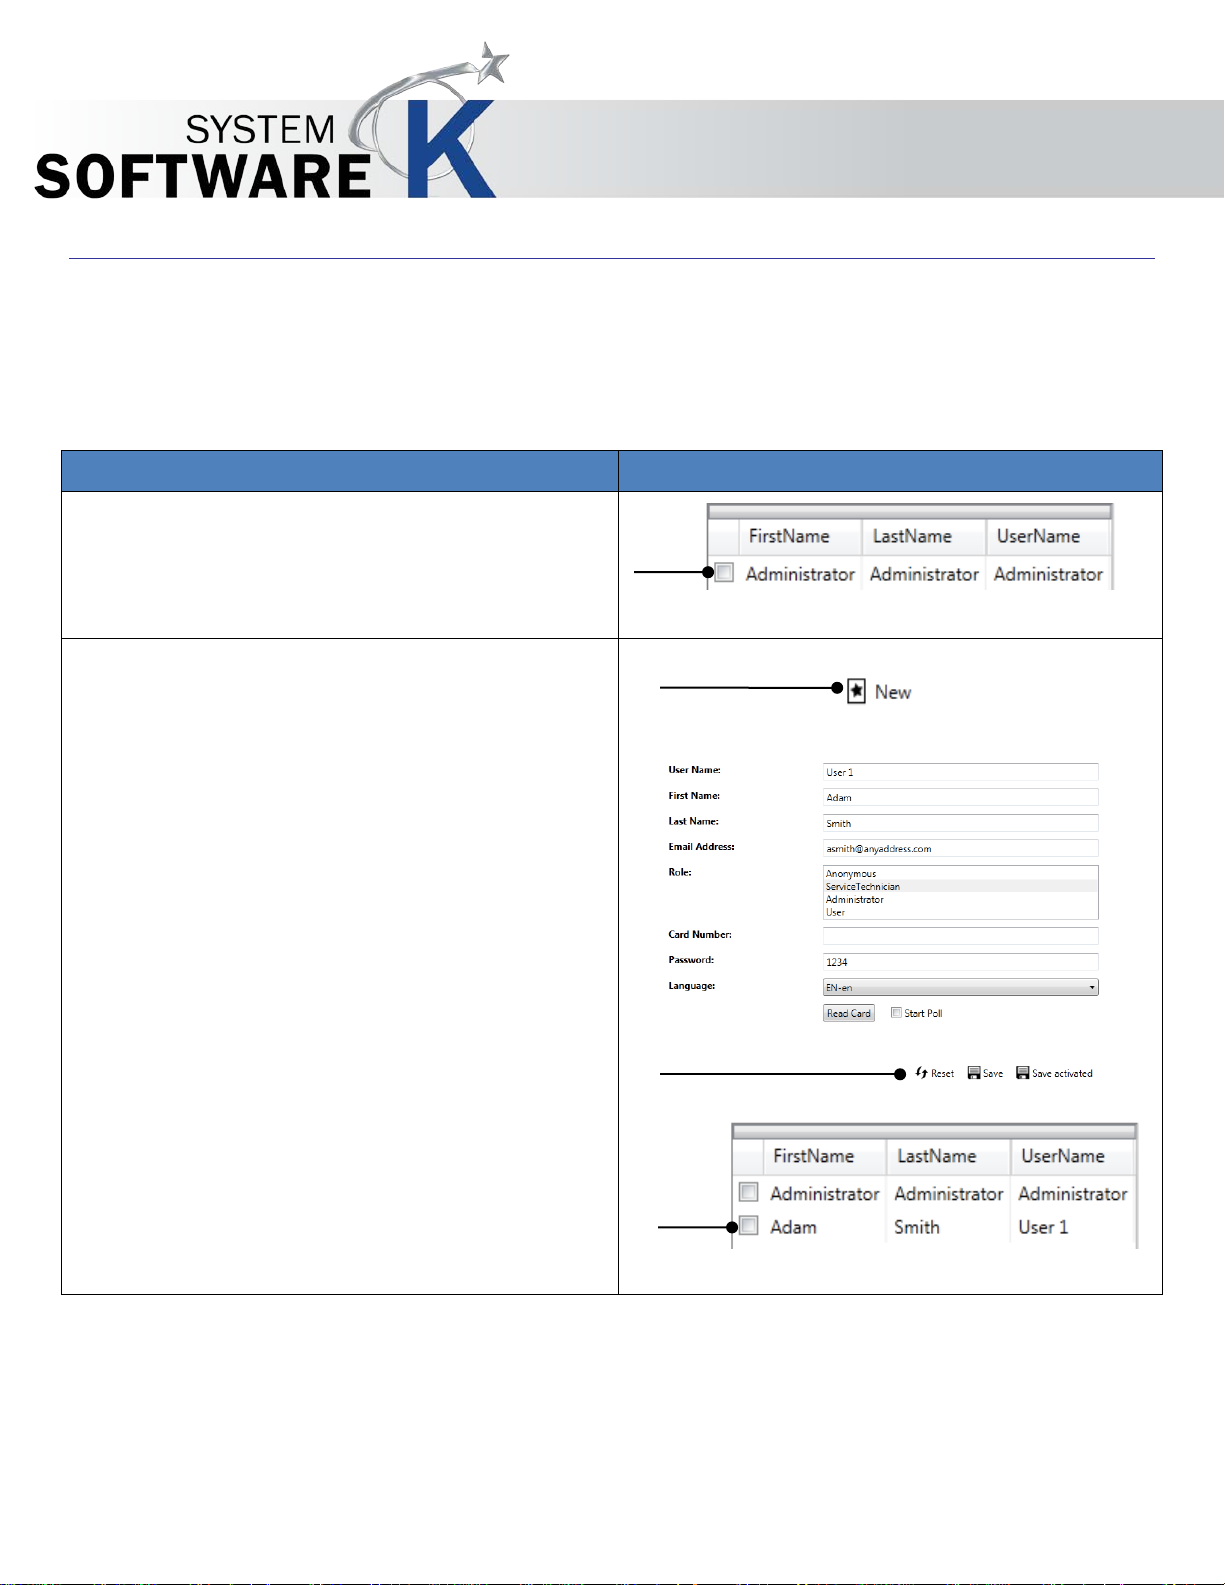
Action
Illustration
1. To add Users select the User Tab
2. Click New.
3.2 Creating Users
KIP Accounting Center User Guide
3. Enter the desired information to
be associated with the user
being added.
• Under Roles select the level
for this user (see pg. 12 for
descriptions).
o Anonymous
o Administrator
o User
4. Click “Save” or “Save
(activated) when finished.
5. User will be added as an active
account (if Save (activated)
was clicked).
No part of this publication may be copied, reproduced or distributed in any form without express written permission
from KIP. 2015 KIP. v1
- 17 -
Page 19

Action
Illustration
1. To add Project information select
6. Click New.
3.3 Creating Project Numbers
the Project Tab
7. Enter the Project Information to
KIP Accounting Center User Guide
be added with an associated
Password (optional).
8. Click “Save” or “Save
(activated) when finished.
9. Project Information will be
added as an active Project (if
“Save (activated) was clicked)
No part of this publication may be copied, reproduced or distributed in any form without express written permission
from KIP. 2015 KIP. v1
- 18 -
Page 20
Action
Illustration
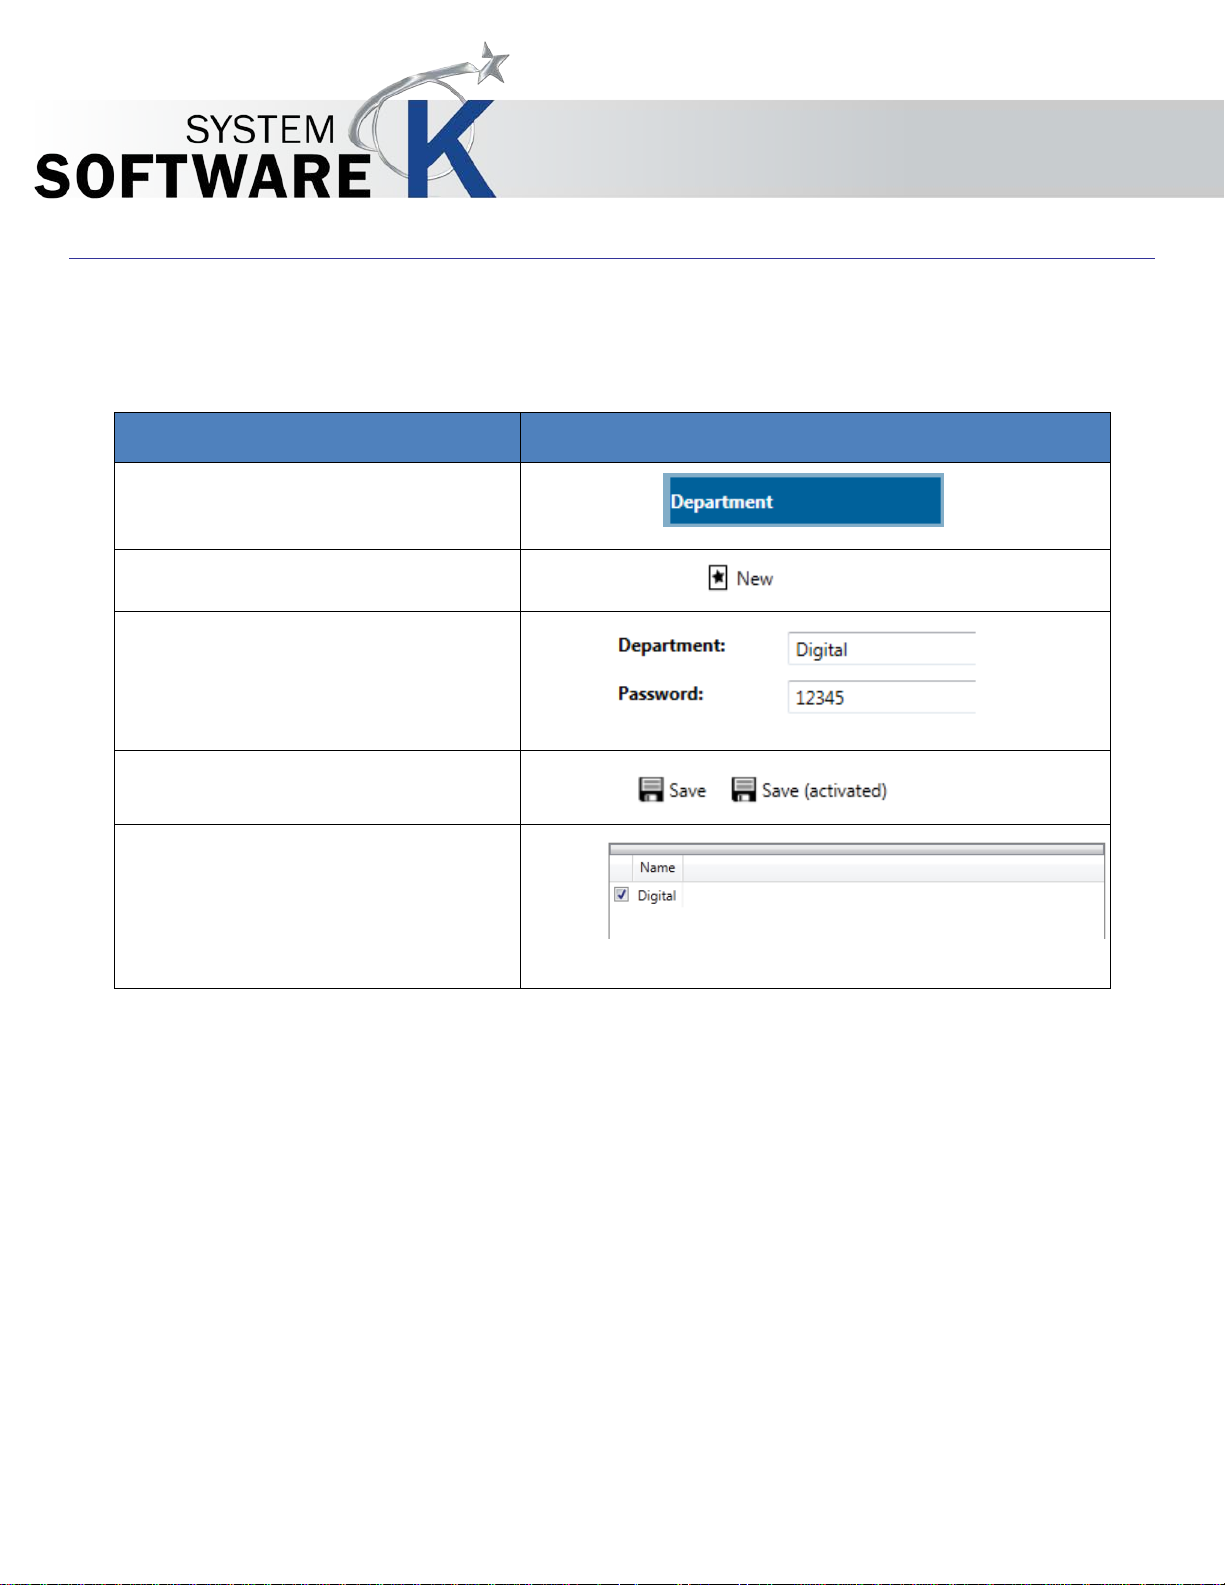
1. To add Department information
2. Click New.
3.4 Creating Department Numbers
select the Job Description Tab
3. Enter the Department information to
KIP Accounting Center User Guide
be added with an associated
Password (optional).
4. Click “Save” or “Save (activated)”
when finished.
5. Department information will be
added as an active Department (if
“Save (activated)” was clicked)
No part of this publication may be copied, reproduced or distributed in any form without express written permission
from KIP. 2015 KIP. v1
- 19 -
Page 21

3.5 Exporting Accounting information
KIP Accounting Center User Guide
No part of this publication may be copied, reproduced or distributed in any form without express written permission
from KIP. 2015 KIP. v1
- 20 -
 Loading...