

Kintech PC7088 User Manual

USER MANUAL
FCC ID: BRCPC7088
Content
1 Preface............................................................................................................................................ 3
1.1 Acknowledgements ............................................................................................................. 3
1.2 Notes ................................................................................................................................... 3
1.3 Safety Notices ..................................................................................................................... 4
2 MID Introduction ........................................................................................................................... 5
2.1 Ready to use ........................................................................................................................ 5
3 Quick Guides ................................................................................................................................. 6
Note: 1. Device without RESET key. Please press “Power” key and hold for 10 seconds to
restart the device if it crashed.................................................................................................... 7
2. Press “POWER”+“V—” at the same time for screen cut ..................................................... 7
3.4 Switch on/off ..................................................................................................................... 10
3.5 Power Saving Mode and Locked Mode: ........................................................................... 10
3.6 Operation of touch panel ................................................................................................... 11
3.7 Main Interface ................................................................................................................... 11
3.8 Apps .................................................................................................................................. 13
3.9 USB Connect..................................................................................................................... 13
3.10 Input Text ........................................................................................................................ 14
3.11 Use Skills ........................................................................................................................ 15
Widget interface ...................................................................................................................... 15
4 General Setup ............................................................................................................................... 15
4.1 SIM Card management, WIFI & Network ........................................................................ 15
4.2 Bluetooth ........................................................................................................................... 18
4.3 Data Usage ........................................................................................................................ 21
4.4 More... ............................................................................................................................... 21
4.5 Audio Profiles ................................................................................................................... 26
4.6 Display .............................................................................................................................. 28
4.7 Storage .............................................................................................................................. 31
4.8 Battery ............................................................................................................................... 33
4.9 Apps .................................................................................................................................. 33
4.10 Account ........................................................................................................................... 35
4.11 Location access ............................................................................................................... 36
4.12 Security ........................................................................................................................... 39
4.13 Language & input............................................................................................................ 41
4.14 Backup and reset ............................................................................................................. 42
4.15 Date and Time ................................................................................................................. 43
4.16 Scheduled power on off .................................................................................................. 44

4.17 Accessibility .................................................................................................................... 44
4.18 Developer options ........................................................................................................... 45
4.19 About MID ...................................................................................................................... 46
5. Multimedia .................................................................................................................................. 46
5.1 Music Player ..................................................................................................................... 46
5.2 Video ................................................................................................................................. 47
5.4 Camera .............................................................................................................................. 49
5.5 FM Radio .......................................................................................................................... 50
6 Communication function .............................................................................................................. 51
6.1 Phone......................................................................................................................................... 51
6.2 SMS................................................................................................................................... 52
6.3 Contacts............................................................................................................................. 52
7. Movil Teacher ............................................................................................................................. 53
7.1 Device setting .................................................................................................................... 53
7.2 USER’S INTERFACE ...................................................................................................... 56
7.3NAVEGACION ................................................................................................................. 56
8 Internet ......................................................................................................................................... 61
8.1 Browser ............................................................................................................................. 61
8.2 E-mail ................................................................................................................................ 62
9 GPS function ................................................................................................................................ 64
10 Other Applications ..................................................................................................................... 65
10.1 Clock ............................................................................................................................... 65
10.2 Calculator ........................................................................................................................ 66
10.3 Explorer........................................................................................................................... 66
10.4 Recorder .......................................................................................................................... 69
11 Application Installation .............................................................................................................. 70
11.1 Installation ............................................................................................................................... 70
11.2 Uninstall .......................................................................................................................... 70
12 Troubleshooting ......................................................................................................................... 71

1 Preface
1.1 Acknowledgements
Dear Customer,
Thank you for purchasing our products, the HD tablet pc in 7 inch.
With functions like build-in 2G, 3G, WIFI, BT, GPS, FM, Voice call etc, you
can achieve wireless communication or use wireless network easily, surfing
the internet whenever and wherever possible. And with high-accuracy build-in
GPS module, you can achieve navigation function just by installing the
mapping software. You can also go through the brand-new entertainment
through the functions of build-in multiple sensors, build-in mobile analog
television, image pickup etc. So are you ready to embrace the new era of
mobile internet entertainment in palm?
This manual will give you a general introduction about all kinds of
functions, use skills and notes, please read it before using the device. Thanks.
1.2 Notes
Maintenance
The device is not waterproof, please keep it dry. In order to avoid the
risk of electric shock, do not touch the cable power plug with wet
hands.
Please do not let the device fall onto, rub against or knock against
hard objects during use, because this may cause surface scratches
on the device, battery damage, data loss or other damage to the

hardware.
Over-voltage, power cable strain and bending or squeezing of the
power cable by heavy objects must be avoided to prevent the
possibility of overheating or fire.
Please do not knock, throw or prod on MID. Please avoid dropping,
knobbing or curving the device.
Only qualified maintenance personnel can install or repair the device.
Opening the device in any way will invalidate the warranty.
1.3 Safety Notices
Please read present section before using the device.
Please comply with any related restrictions and rules; do not use
the device during driving or where blasting operations are in
progress.
Please don’t turn on the device on in locations where wireless
equipment is forbidden or when the usage of the device will cause
interference and possible danger.
Please comply with any related restrictions and rules, wireless
equipment can influence the flight of the plane; please consult the
relevant airline company if you intend to use the device on a
plane.
All the wireless equipment is subject to external interference and
this can affect its performance.
Only qualified maintenance personnel can install or repair the
device. Opening the device in any way will invalidate the warranty.
Please keep the device away from strong magnetic fields in order
to avoid damage to the product.
Please don’t use the device in a petrol station, or near to fuel or
chemicals.
Please put the device out of reach of children, and please make
sure the device used by child only under supervise.
Some movies, music and pictures are under the protection of
copyright, unauthorized usage is deemed as an infringement to
the laws of copyright.
When connecting with other devices, please read the user manual
for detailed safety instructions. Don’t connect the device to
incompatible products.
Never clean the device with any chemicals or detergent, these will
damage the product surface and corrode the finish. Never let this
product be exposed to a humid environment or rain as the water
leaking into the device could disable it to the extent of being

beyond repair.
2 MID Introduction
2.1 Ready to use
Battery Charging
Charge the battery firstly before initial use.
2.1.1 Please charge the MID with our original power adapter.
Note: Please use the original accessories and battery provided with the
device, do not use the incompatible products in case of damage unexpected,
any damage of problem result from this could be beyond of our range of
maintanence.
6
Components
Quantity
MID Device
1
Power Adaptor
1
CD-ROM
1
USB Cable
1
HOST cable(optional )
1
Earphone(Optional)
1
User Manual
1
Warranty Card
1
HD Cable
1
3G USB Dongle(Optional)
1
RJ45 USB Dongle
1
Leather Case
1
Keyboard/Mouse
1
TF (Micro SD) Card
1
Symbol
Name
Description
A
Rear Camera
Static and dynamic camera
B
Speaker
For music or movie
C
Microphones
hole
Recording microphone
D
Front Camera
Static and dynamic camera
E
receiver
Telephone receiver
F
POWER
Short press this button to enter sleeping/wake up
mode, press long to switch ON/OFF
3 Quick Guides
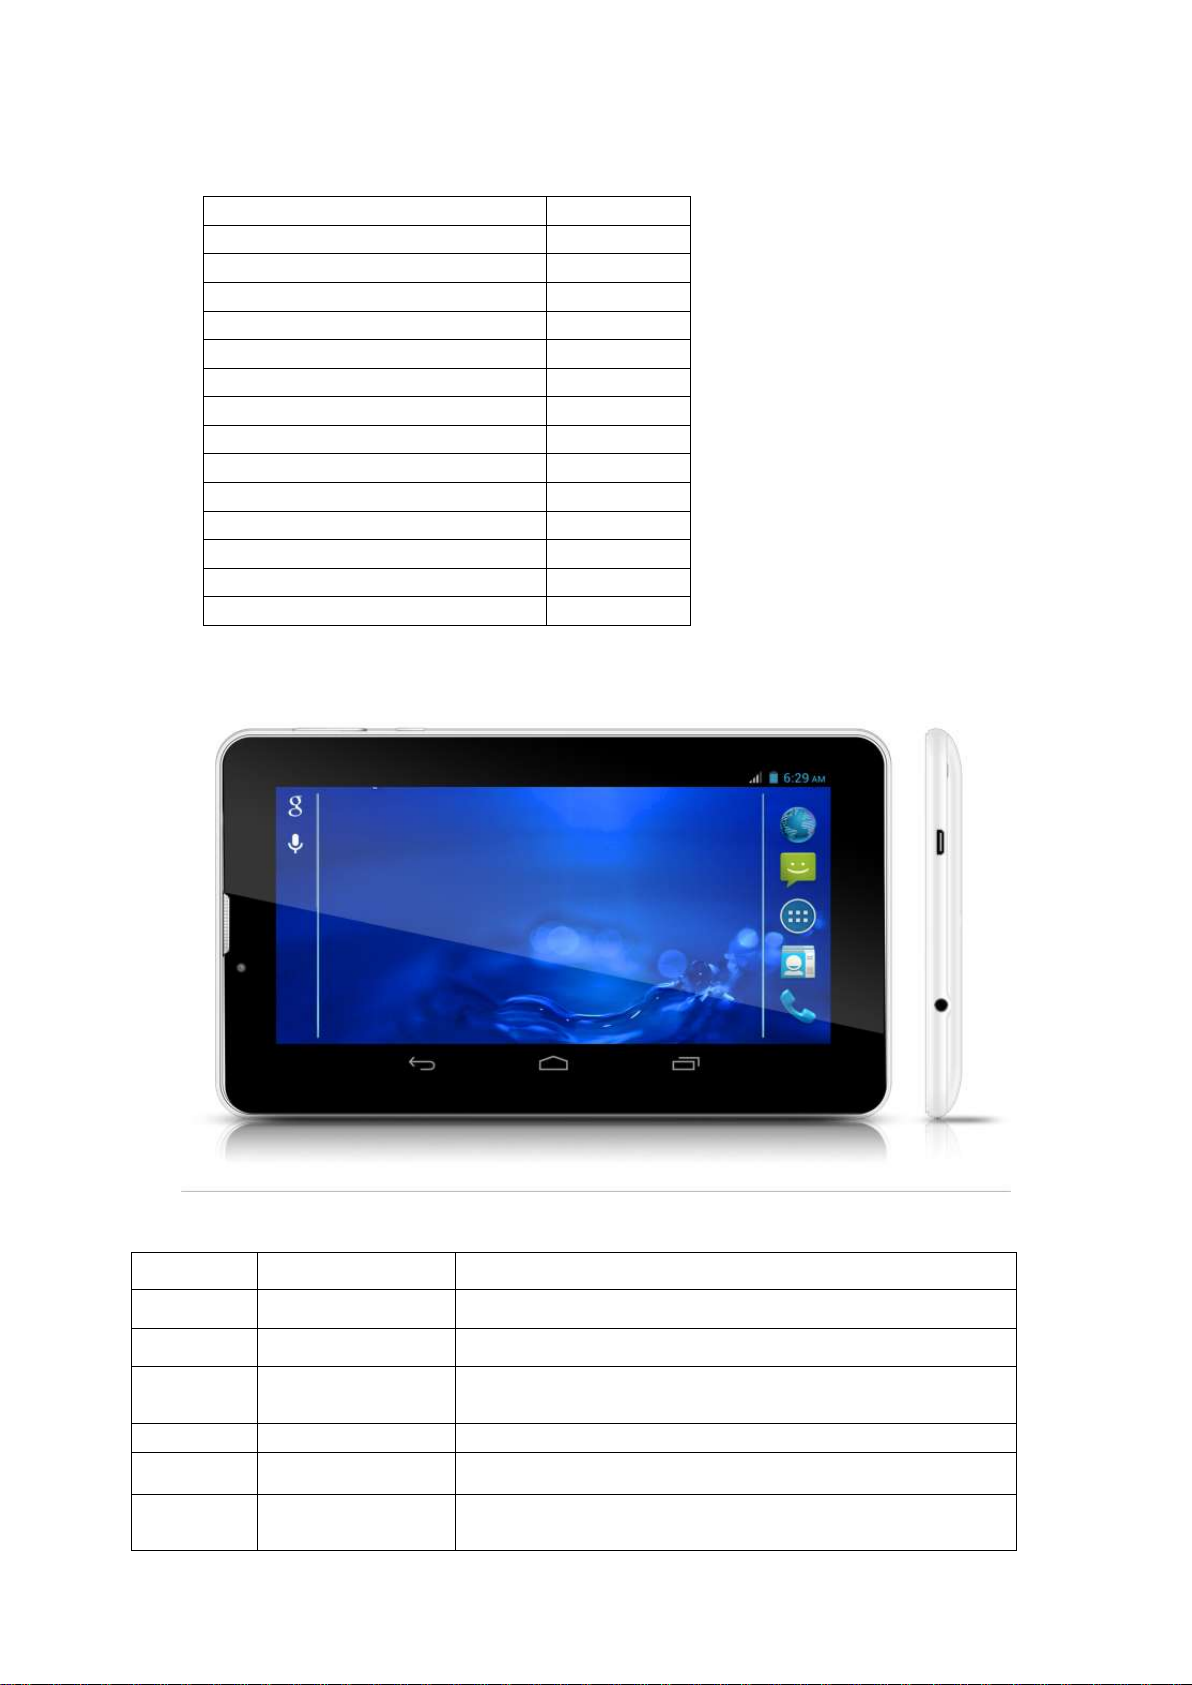
3.1 Packing List
3.2 Product appearance
3.3 Instructions on Keys

7
G
Volume -
Decrease volume
H
Volume+
Increase volume
I
Stereo
Earphone Jack
Stereo Earphone Jack
J
MIC USB port
MIC_5PIN USB Port
K
TF card Slot
TF (Micro SD) Card Slot
L
SIM Card slot
SIM Card slot
Panel
size
7 –inch LCD screen
Resolution
1024*600
Computer
port
MINI USB
CPU
MTK8312,Dual-core ARM® Cortex-A7 MPCore™up to
1.3G
Note: 1. Device without RESET key. Please press “Power” key and hold for 10
seconds to restart the device if it crashed.
2. Press “POWER”+“V—” at the same time for screen cut
Function instruction:
Adopt MTK8312 processor,Dual-core ARM® Cortex-A7 MPCore™up to 1.3G GPU:
Mali400-MP2 44.3M tri/sec and 832M pixel/sec @ 416MHz;support ANDROIED4.4
intelligent operation system
Support DDR3 512M/1GB(optional)
Support 4GB/8GB/16G(optional)built-in ROM Flash memort , External T-flash card
1G~32GB Memory
Support 7’ HD LCD screen 1024*600,multipoint capactive touch
Support video: mp4,3gp,AVI,MOV etc formats
Support JPG, PNG, BMP, GIF,etc picture formats,Support picture with 8000*8000
resolution
Support MP3, WAV etc video formats
Support E-book format TXT 、 LRC 、 PDF 、 EPUB etc , automatic
browsing,zoom,bookmarks,text,etc function.
Support built-In WIFI access to broadband wireless Internet access,colorful software
can operational in the ANDROIED 4.4 system, Some of the commonly used software
system preset: Internet Google browser (IE), video, books, etc
Support Microphone and speaker function ,support record and video function
Support built-in 3G(WCDMA 3G ),Wireless communication by USIM card,phone
receive/calling, message receive/Sending,email and contacts same as movile phone
Support USB HOST(Through Mini USB connection )
Support 0.3M Front Camera and 2.0 Back Camera
Support G-sensor and screen direction spinfunction
Support built-in Bluetooth 4.0
Support FM function
Support GPS navigation
Support stereo headphone and double trumpet output
Support multiple languages
USB mobile disk,WIN_2000 pack drive from the above systems
Specification:
8
Storage
Flash Memory :4GB/8GB/16G
Ram
ROM:DDRIII 1GB
Extend
storage
Support TF card, 1GB -32GB external T-Flash card
Power
supply
Built-in rechargeable Lithium polymer battery
(3.7V, 2500MAH),External power adaptor(output:DC5V@2A)
Music
Format
MP3, WAV etc format
Earphone
(L)5mW+( R)5mW(32Ohm)
MP3
8Kbps ~ 392 Kbps
WMA 、
WMV
5Kbps ~ 192 Kbps
Frequency
20Hz 至 20KHz
SNR
90dB
Distortion
<0.05%
Video
Format
mp4,3gp,AVI,MOV etc format
Maximum
resolution
1920*1088
Picture
Support JPG, PNG, BMP, GIF,
E-book
Format
TXT、LRC、PDF、EPUB etc format
Maximum
capacity
5M
GPS
Frequency
1.57542GHZ
Location
accuracy
3m,2D cep
Channels
for receive satellite
16 channels
Restarting
time
Cold boot:<35s(OPEN SKY)
Warm boot:32s
Warm start:<2s(OPEN SKY)
Rate
515m/s
Date
update rate for
location
1HZ
Maximum
height
18,000m
Antenna
Build in GPS antenna
WIFI
Speed
Max54Mbps
Range
Max100m
Wifi
System
802.11 b/g/n
Built-in
3G/2G function
formats
WCDMA/GSM
Network
protocols and
frequency
WCDMA 850/900/1900/2100
(850or900choosable)
GSM 850/900/1800/1900
Transmissi
on rate
HSDPA 7.2Mbps/HSUPA 5.76Mb
ps
record
format
WAV
FM
format
87.5MHZ-108MHZ
Operating
Win98/2000/2003/XP/Vista/Win7、Mac9.1 or above and
9
system
Linux2.4
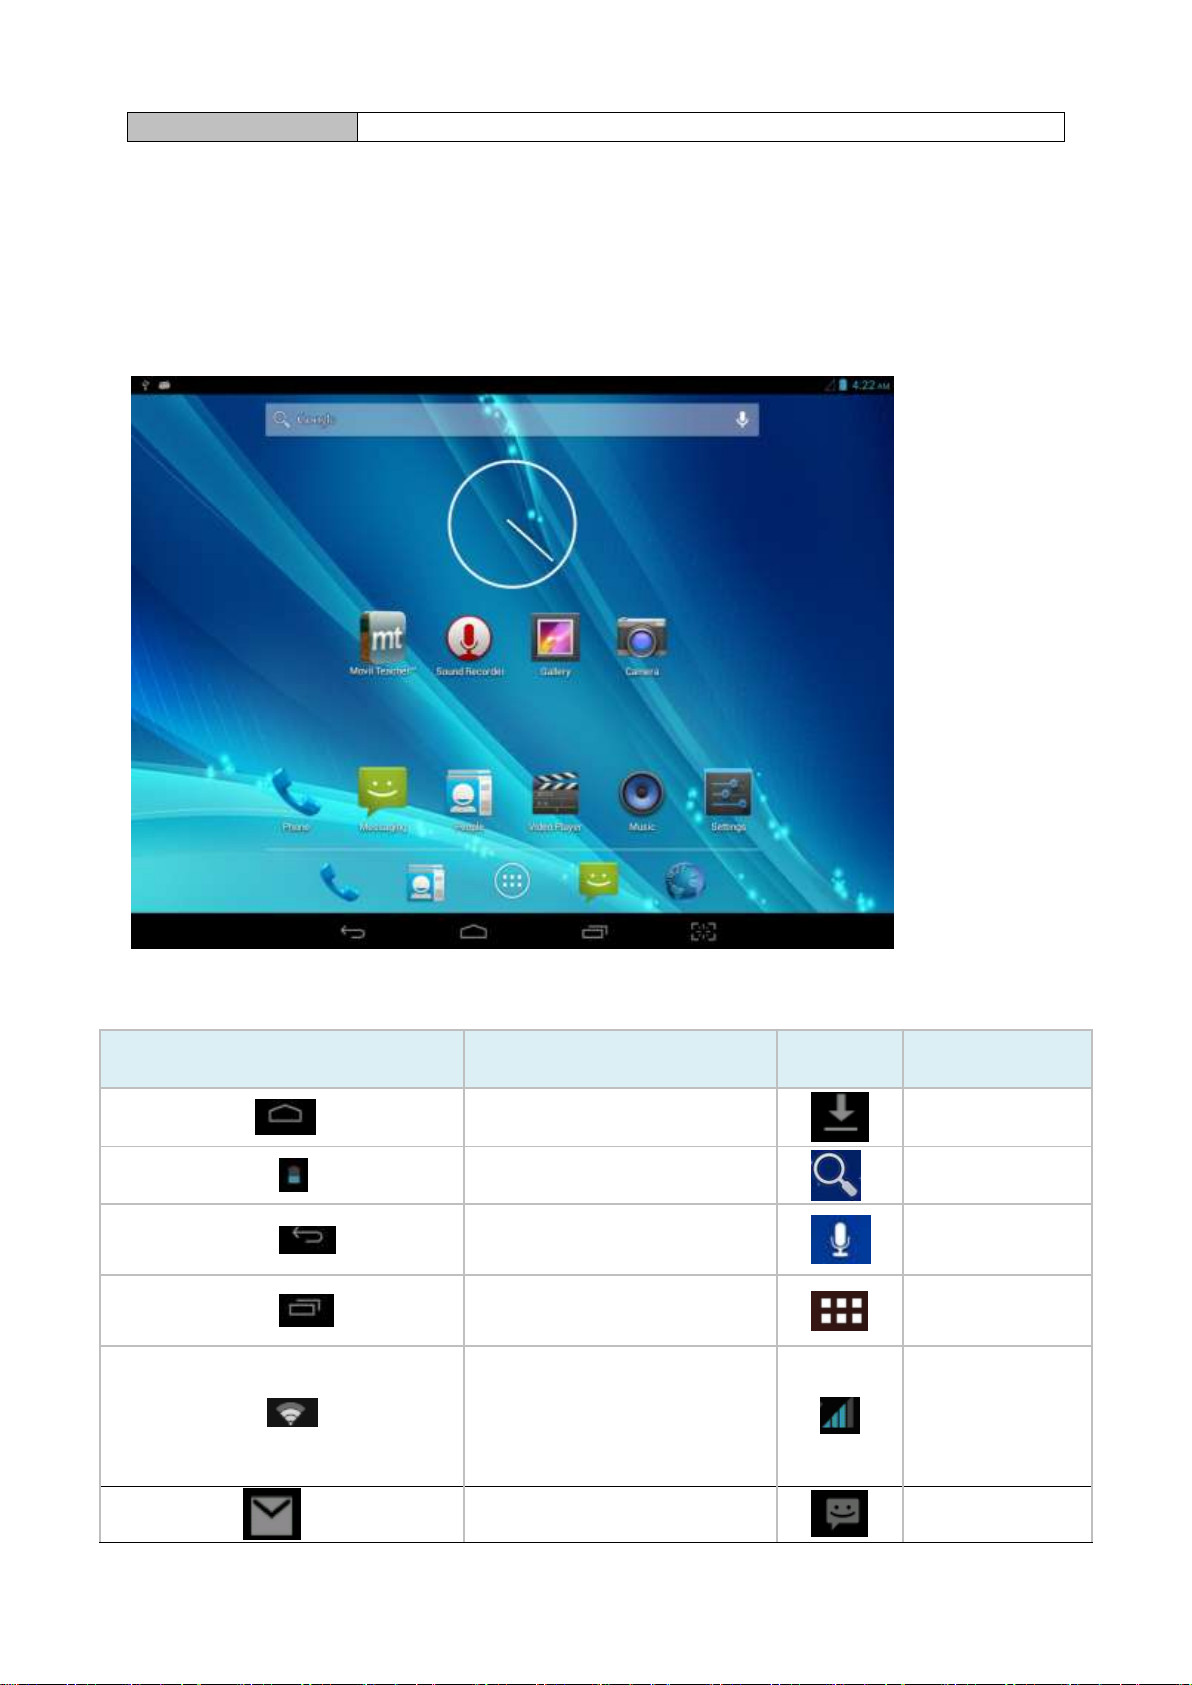
Icon
Description
Icon
Description
Back to main menu
downloading
Power status
Web search
Return
Language
search
Recently viewed
Functions
menu
WIFI Status (blue
indicates Wi-Fi connected)
Network status
(blue indicates
2G/3G network
connected)
New e-mail
New message
Icons guidline
Icons Description:
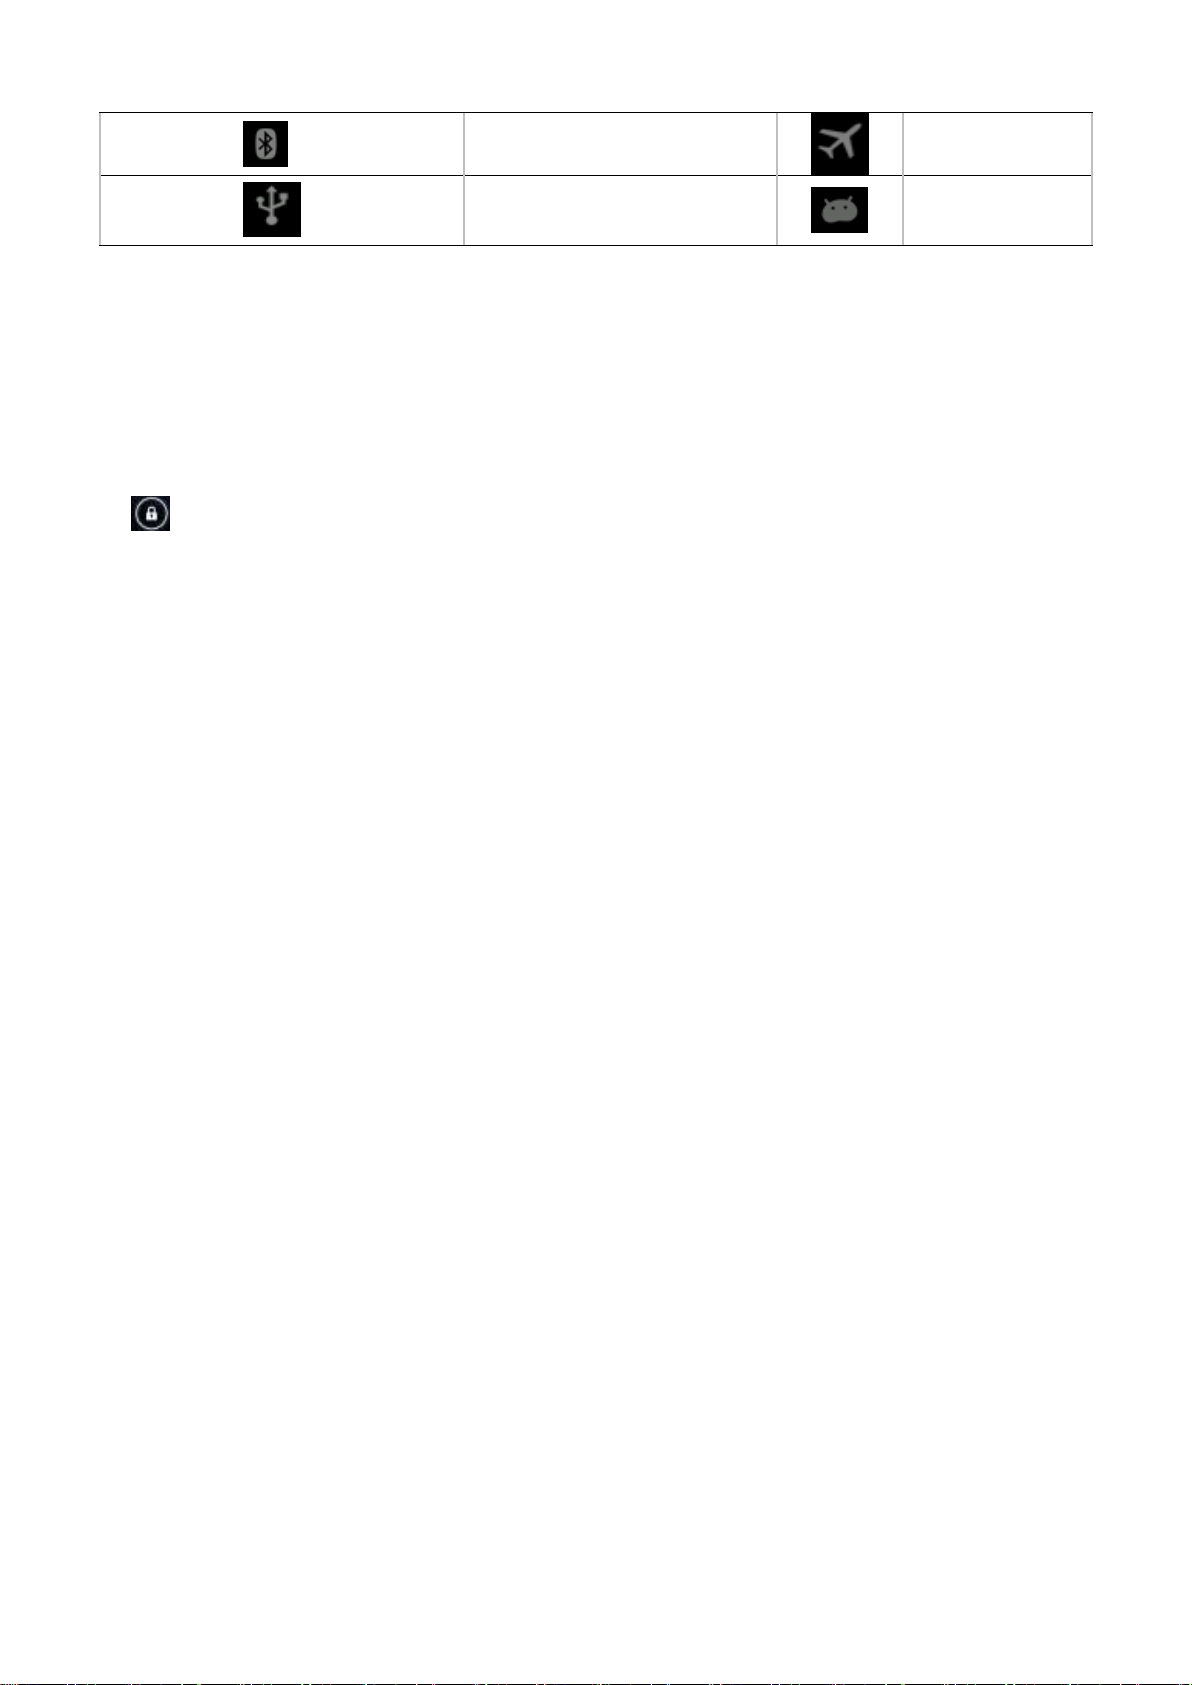
10
Bluetooth signal
Flight mode
Under USB connection
Under USB
debugging
3.4 Switch on/off
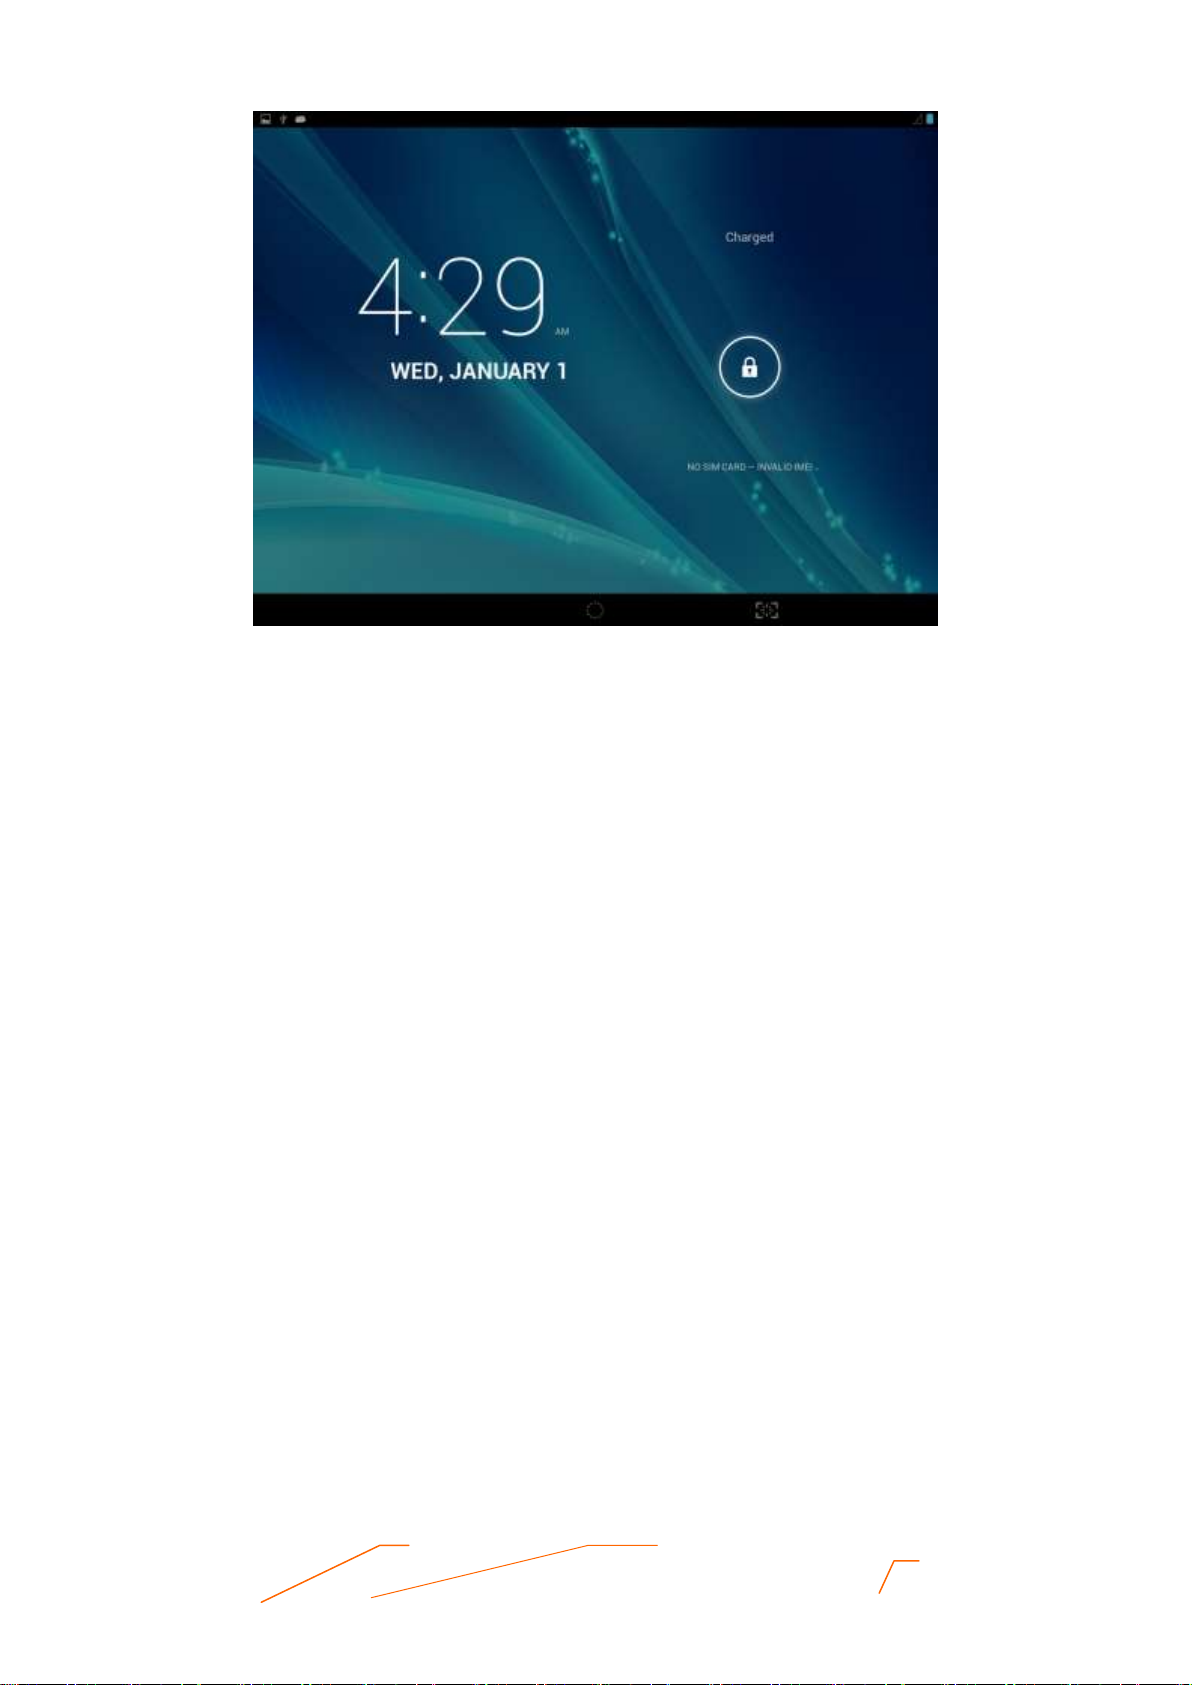
Switch on and unlocked:
When the devices is in powered OFF mode, press and hold the Power key for 3
seconds to enter the Android startup process. The device will take about 100 seconds to
enter the system desktop, with the display in locked mode, please press and move the
icon by the white circle, the display will unlock automatically, see the image below:
Switch off:
1.When the device is in use, press and hold the POWER key for 3 seconds, the
screen will display the power off interface, choose the power off option to
confirm your selection and the system will shut down automatically.
2.Note: When the device is running low on battery power, it will sound an alarm
and then shut down automatically if it isn’t plugged into a power source to start
charging. If the device cannot start up please check if the battery power is too
low by charging the device
3.5 Power Saving Mode and Locked Mode:
Display turn off automatically when the device is under no usage status
(1)Starting power saving mode, display will turn off automatically when device
not in using.
(2)Short press the “POWER” key when the device is in use will make the system
enter SLEEP power save and locked mode.
Turn on the screen under inactive state
Under the power saving mode, the display is just turned off and showing a black
screen. This means that music play, movies play etc. will still continue to run.
Short press the power key, the system will return to locked mode, unlock by pressing
and moving the icon as pic show.
11
Messag
Notification
Battery
Pic. 3.1
3.6 Operation of touch panel
How to operate?
You can browse over the user interface, main menu or applications by kinds of
ways:
Click:
Just touch and click, when you’re going to input or choose applications on the main
interface.
Press on:
Press on the icons or shortcut icons to open program you’d like, like textbox &
linkage.
Slide
To move quickly on screen vertically or horizontally with your finger
Drug
Press on with certain pressure before drugging, and then keep pressing until the
icon be drugged to the target place.
Rotate
To most interfaces, for example, the input text and music interface, the direction
can be changed easily just by swaying the device
3.7 Main Interface
Main interface as pic.3.2, press blank place for seconds, you can use the
interface of applications, shortcut icons or user-defined page as wallpaper.

12
Voice search
Time
Screen cut
Pic. 3.2
Extend out of main interface
Main interface can extend beyond of interface to provide more space for
new-added shortcuts or gadgets. Pressing the blank place of interface, slide to left
or to right quickly to extend to left or right of outsider interface of screen and there
are two extensible interfacs available, see pic.3.3.
13
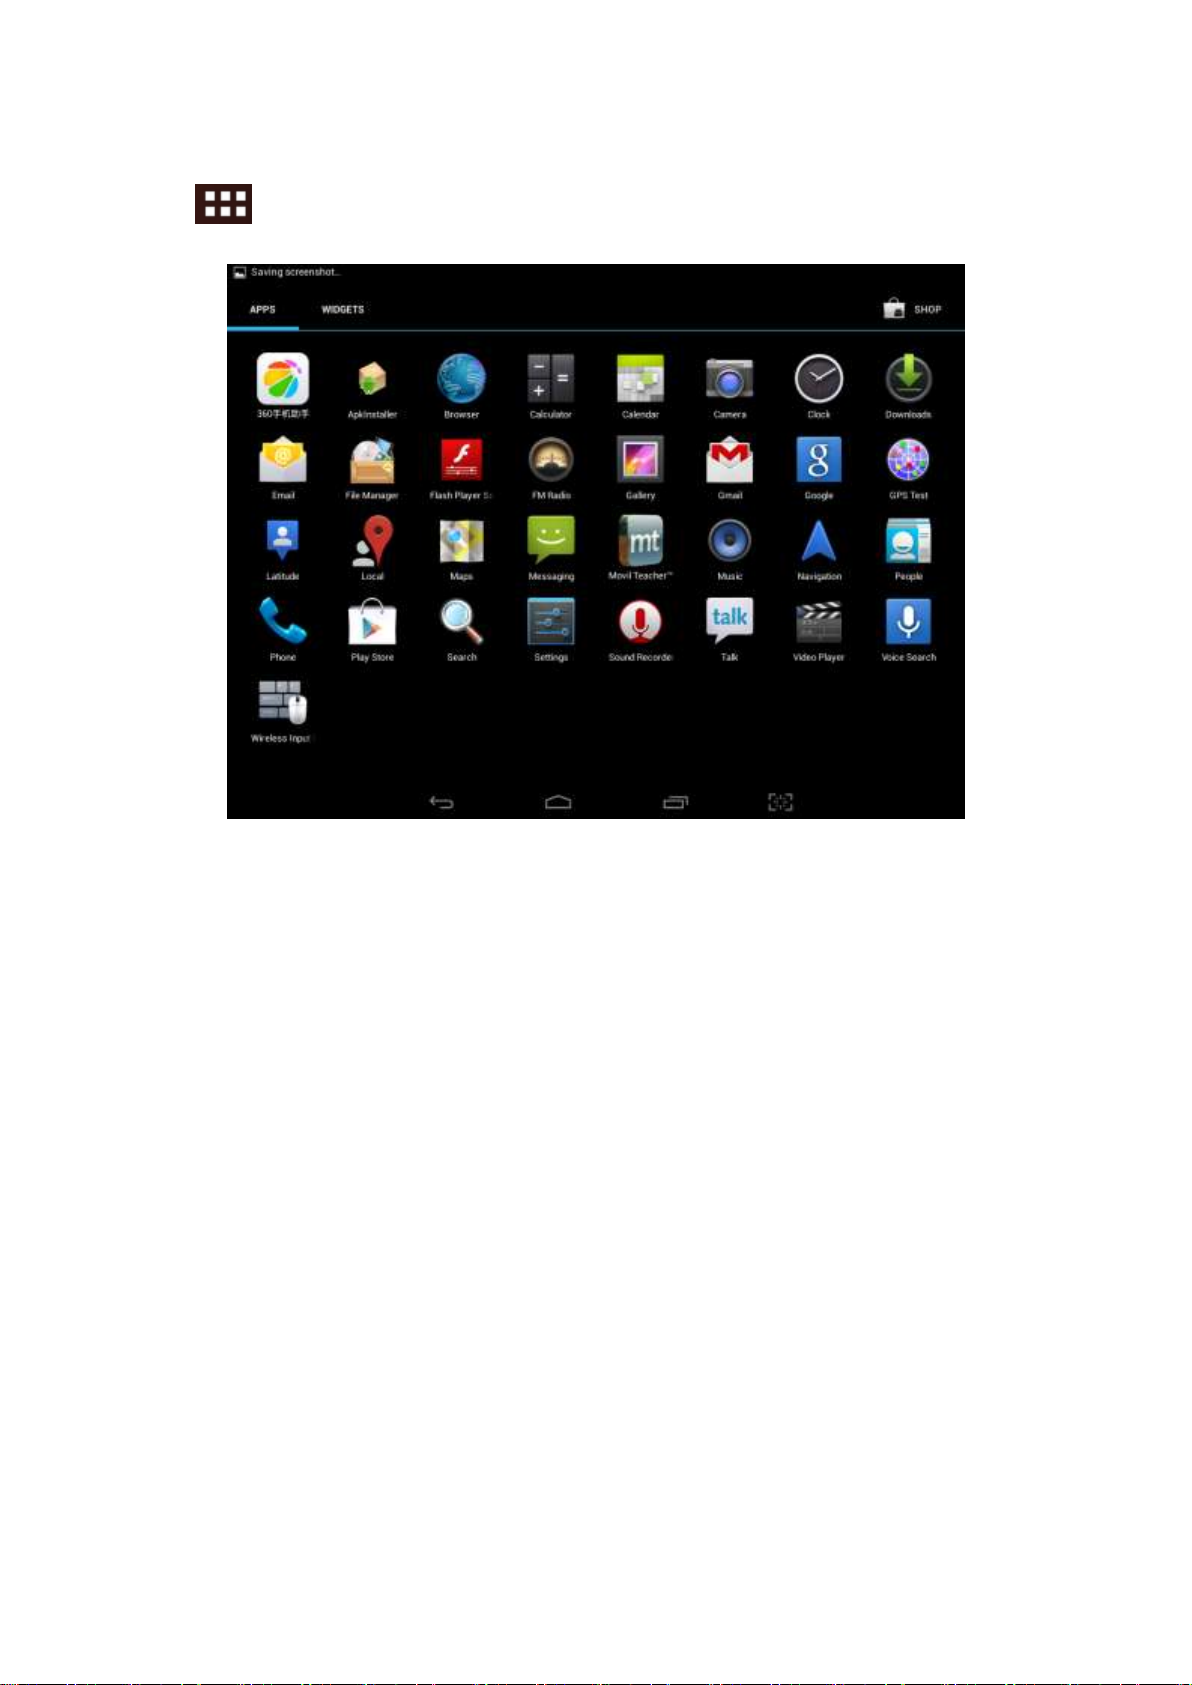
3.8 Apps
Click on the top right corner of the screen, see pic 3.2, then choose your target
app after entering into the main interface, see pic 3.6.
Pic 3.6
3.9 USB Connect
Storage setup
Set up the storage mode before transfer files. Connect MID and computer with USB
cable.
Open the notice interface, (refer to chapter 2.3- Condition and Status of MID).
Clicking USB Connected, open the icon of USB Storage, see pic.3.7.
USB connected successfully
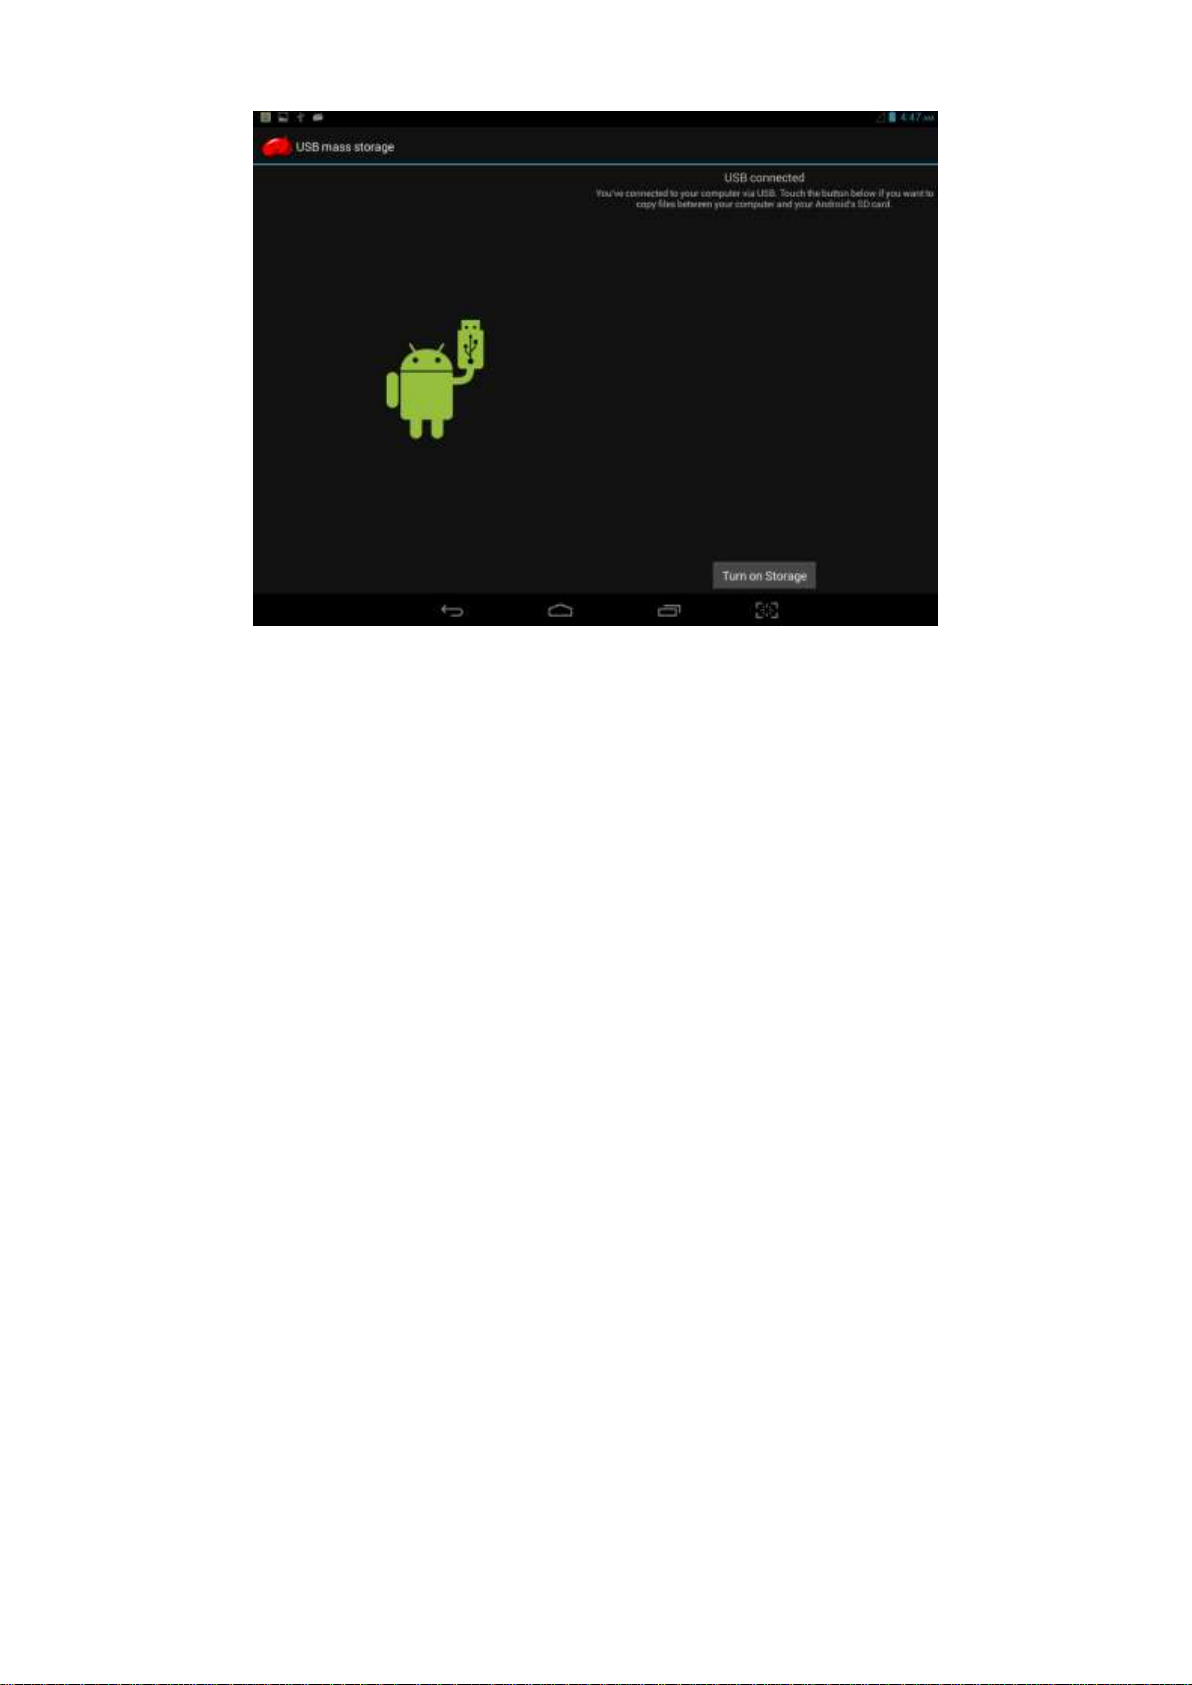
14
Pic 3.7
Copy files to memory card
Connect MID and computer with USB cable.
Set up storage mode.
Opening the icon of my computer, check removable disk(x).
Find out the target files and copy them to this removable disk(x).
Click “close USB Storage device” after copy finishes.
Note:You get no access to the memory card in MID when the MID is under USB
Connection, but it is workable once USB Connection be breaking.
3.10 Input Text
Screen Keyboard
When you need to input or edite , android keyboard will show up.
Choose input method
Open application setup。
Click Language and input
All input installed will list on text setup.
Choose your target input.
Input Method use and switch
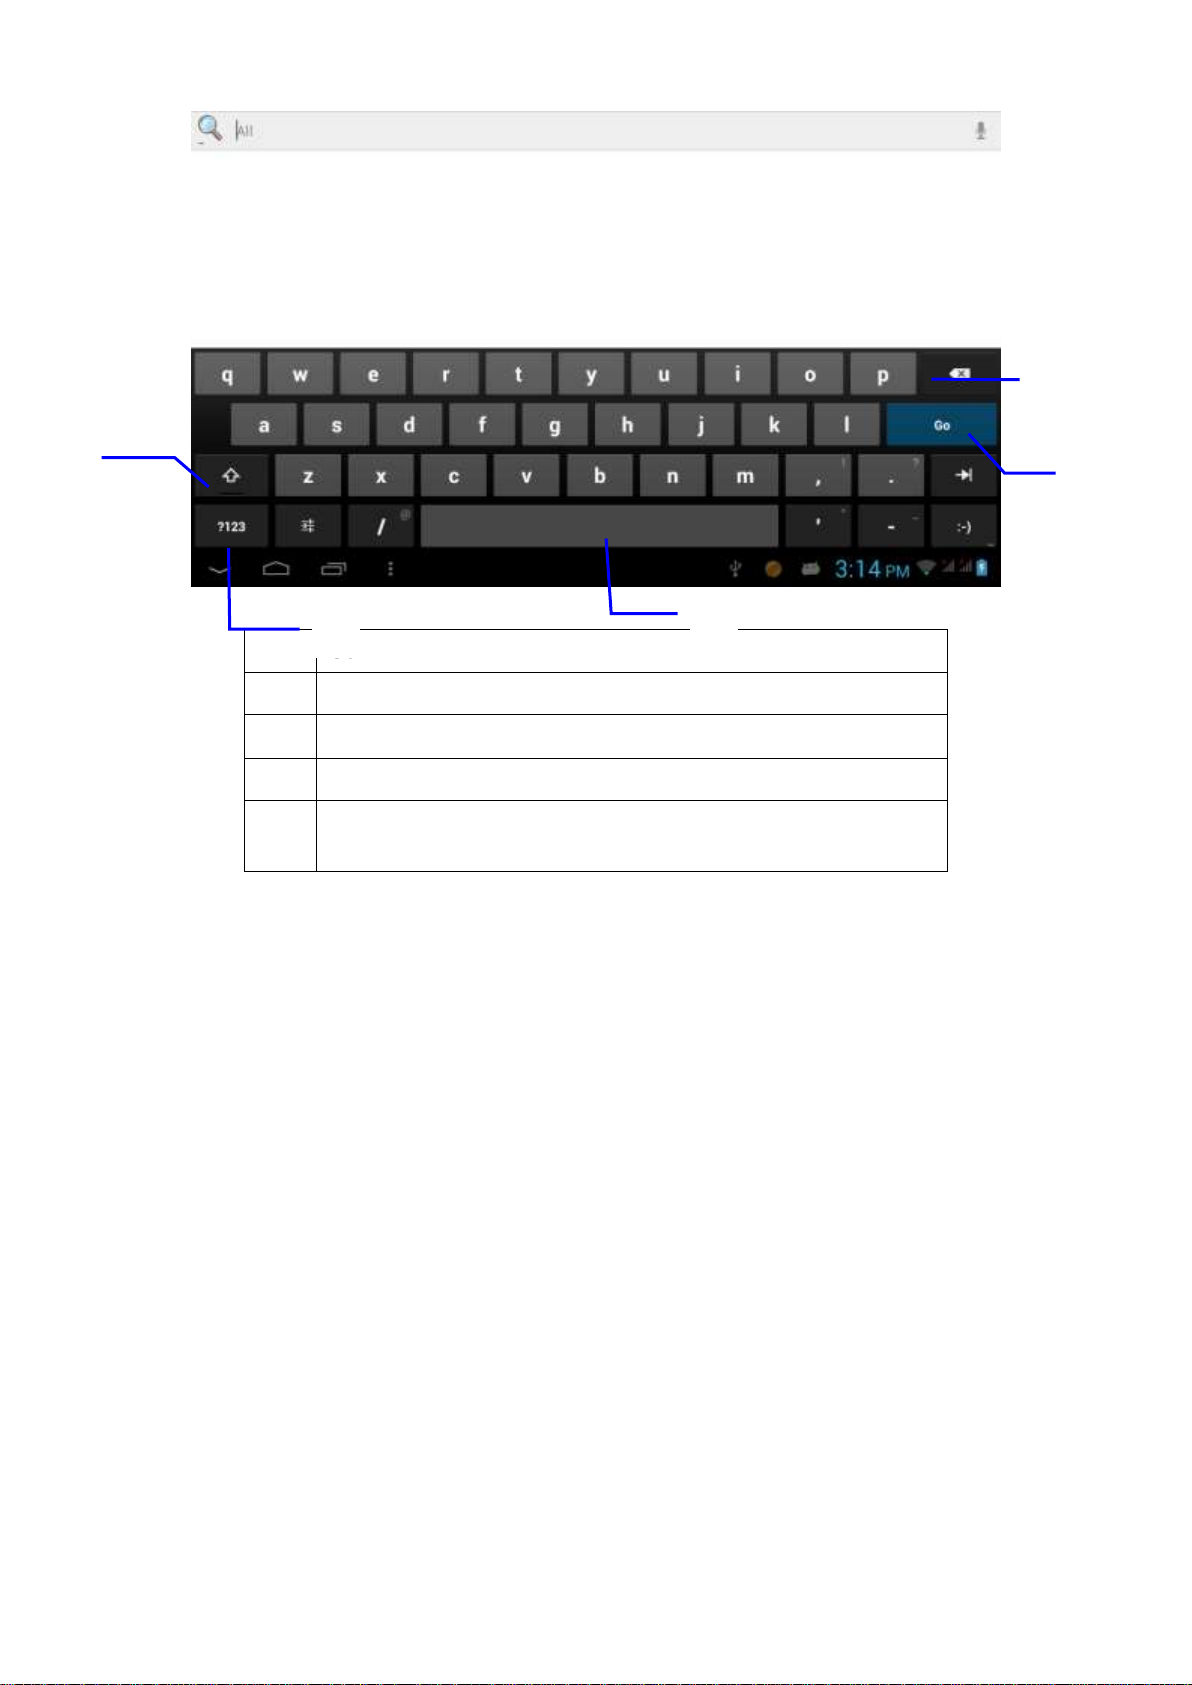
15
1
Capital and small letter
2
Digtal input
3
Insert whitespace
4
Execute
5
Delect character on the left of cursor and long press to
delect all.
①②③
⑤
④
Pic 3.8
3.11 Use Skills
Widget interface
Click “widget” or slide on the screen to left to enter into widger interface. Long press
the widget to creat a shortcut, and you can enter related app quickly just through the
shortcut icon on desktop.
Creat a shortcut icon on desktop
After enter into program interface or widget interface, longpress any icons, a
shortcut icon will be created on the desktop, or press on and drug the icon to
desktop.
Note:widget shortcut will not be created if there is no enough space left for
main interface.
4 General Setup
4.1 SIM Card management, WIFI & Network
SIM Card management

16
Through SIM management, SIM setup can achieve, for example, turn on/off SIM or
turn on/ off data connection. As pic 4.0
Pic 4.0
Connect WIFI
Choose setup application on main interface.
Turn on WLAN, MID will scan automatically available wifi network. See pic
4.1.
Choose target wifi network, inputting password if requested, click “connect”
Pic 4.1
Add Network
Click icon top right at screen, see pic4.2.
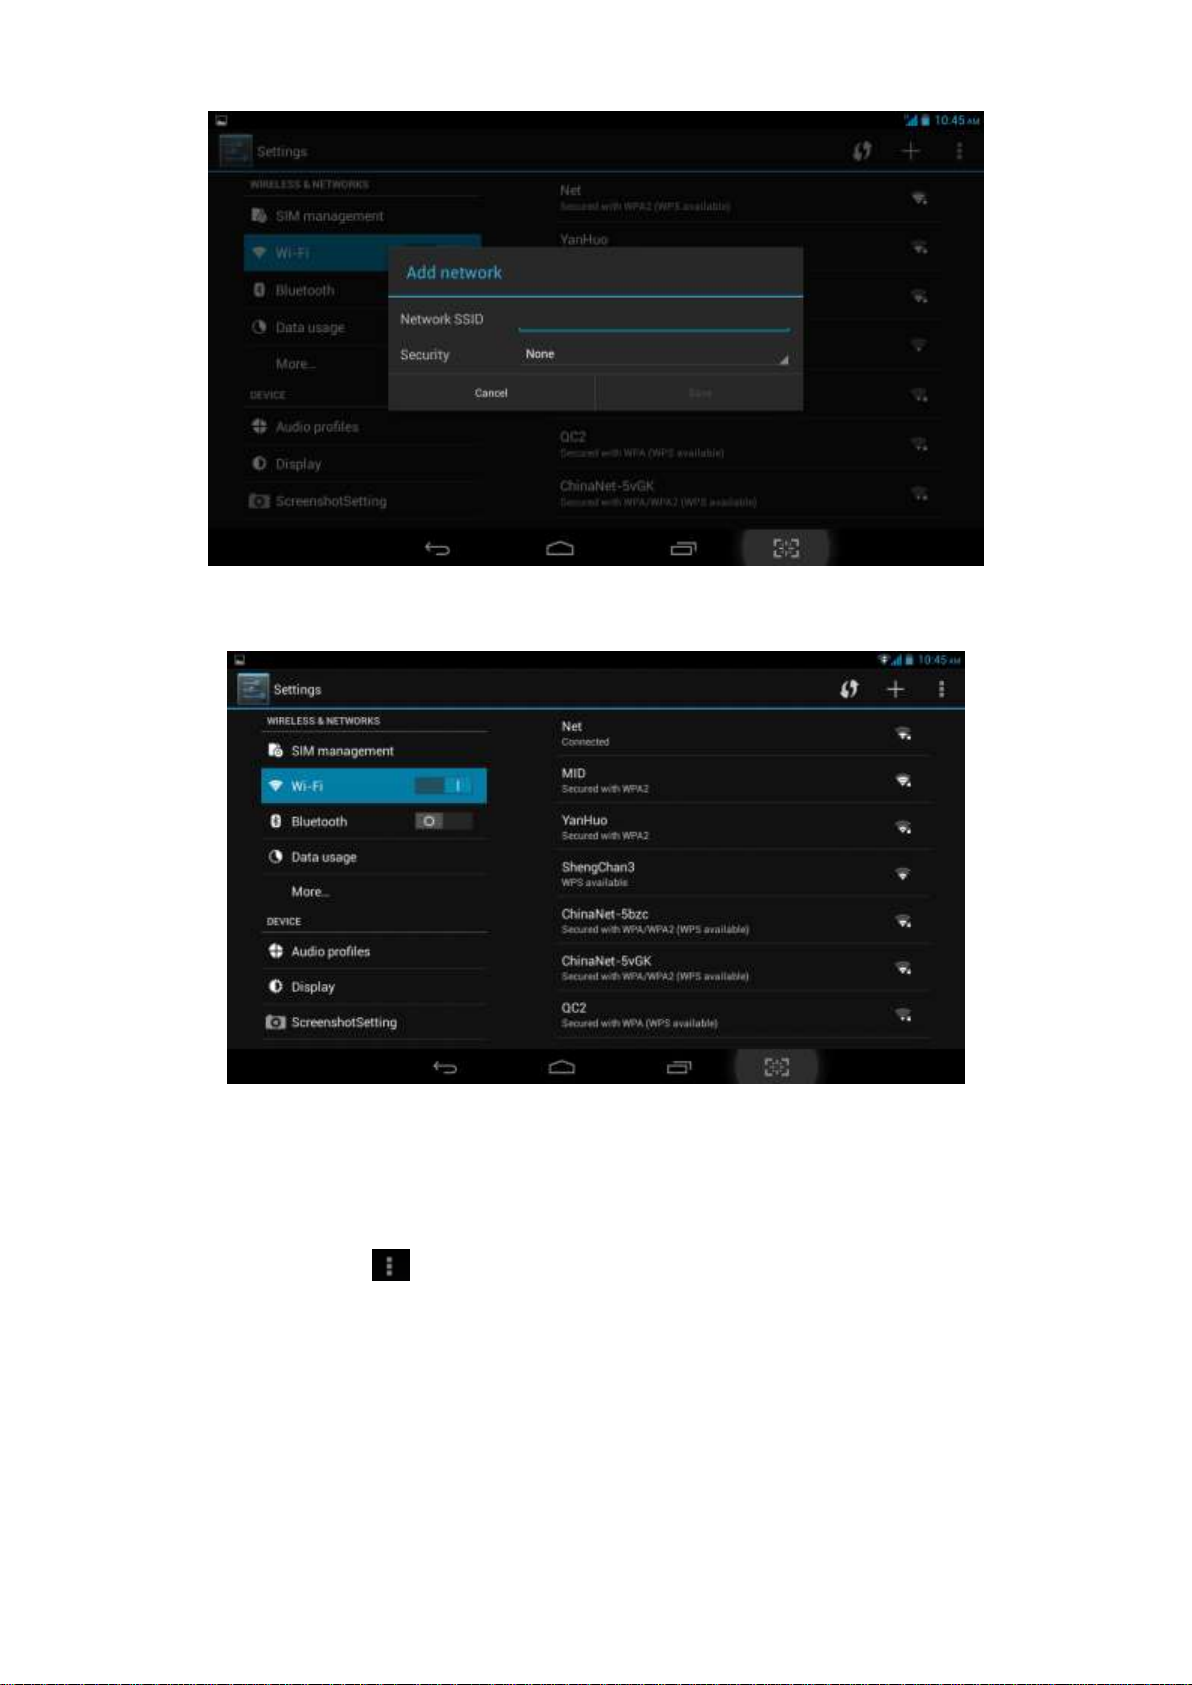
17
Pic 4.2
Input network SSID,name of target network, and click “save”.
Click user name saved and click “connect”. As pic 4.3
WIFI Status.
Under WIFI Status turned on, user can see the notice at bottom right corner
when WLAM network available.
Connect WLAN during sleep mode.
Click icon top right at screen, see pic4.3,and choose high class mode。
Click “keep Wi-Fi on during sleep” and choose accordingly the option
prefer to. See pic4.4.
Pic 4.3

18
Pic 4.4
4.2 Bluetooth
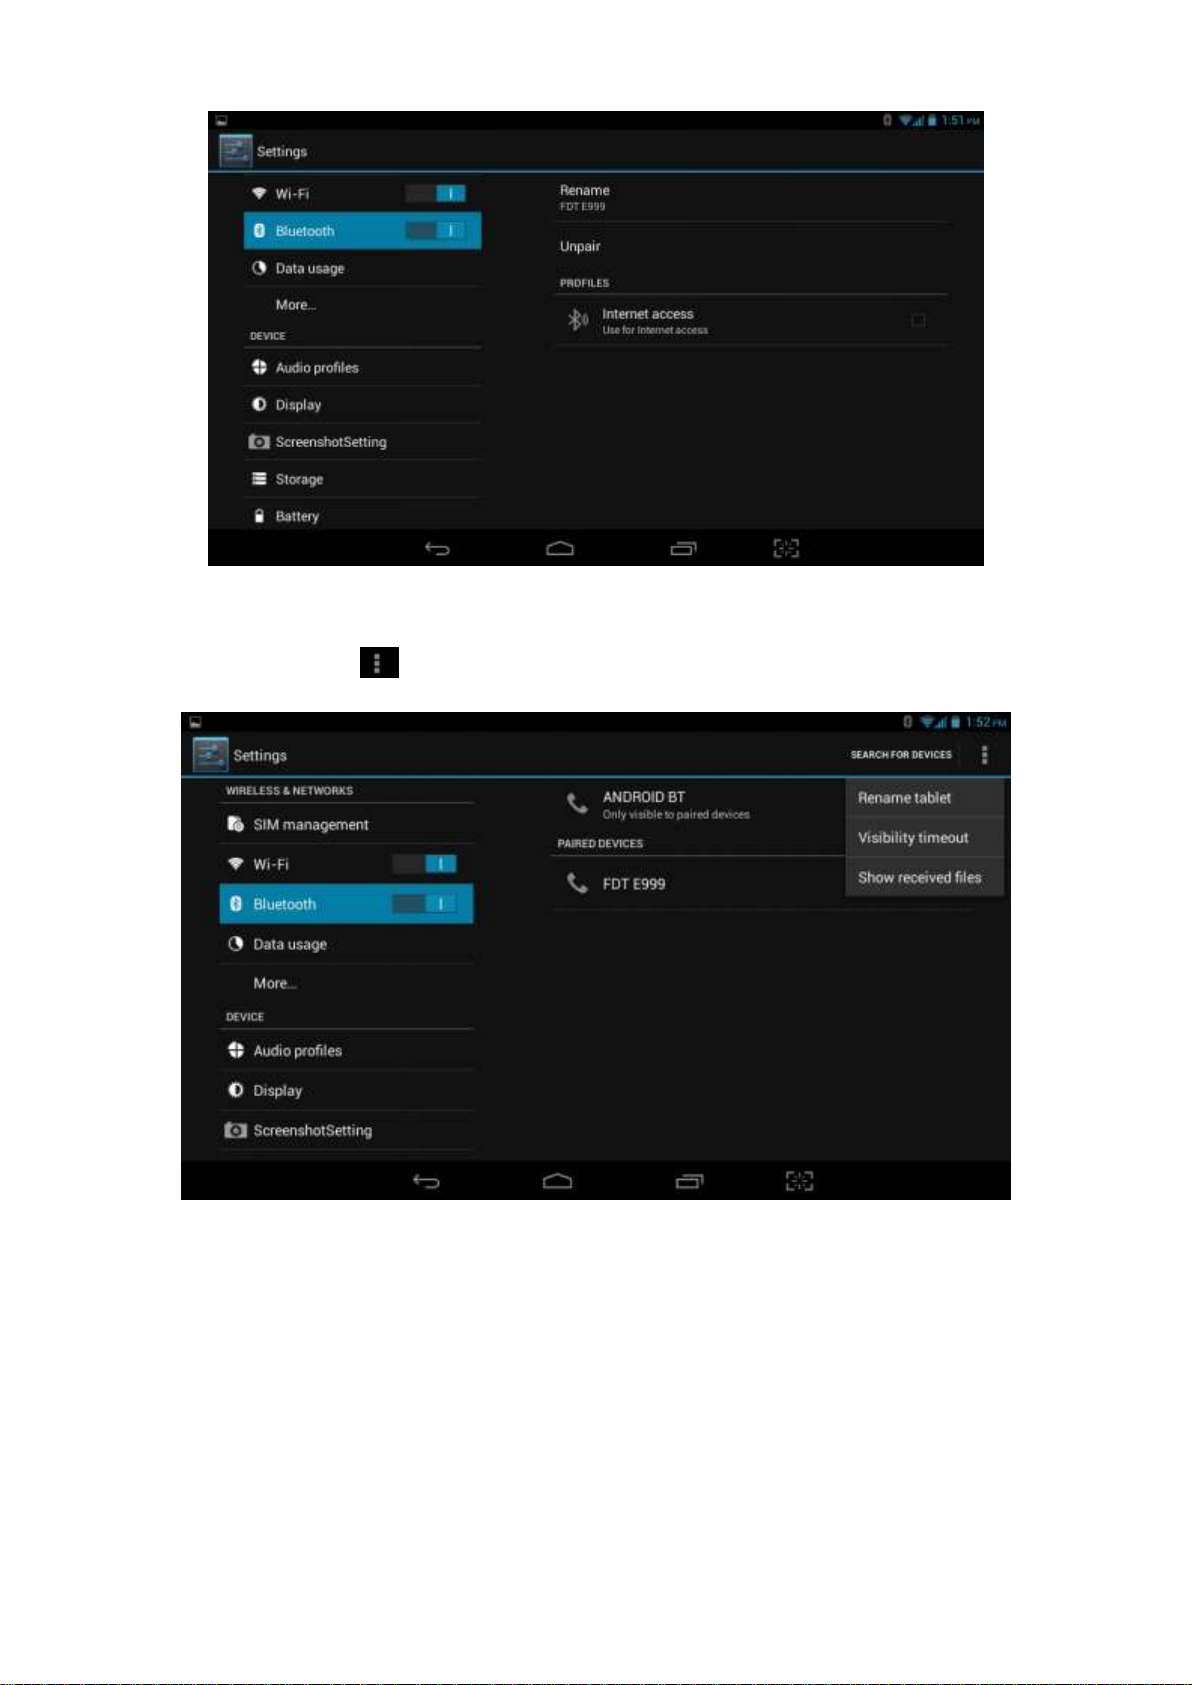
. Choose settings application on main interface.
Turn on Bluetooth as shown below.
The device will find the nearby device automatically when you click “search
for devices”. See pic. 4.5.
Pic 4.5
Click the target device name, input the password and choose “pair” for sure after
“Bluetooth pairing request” window pop up.
Click icon ,entering into the interface see pic4.6, and then you can operate
accordingly. Target device name can renamed if need.
19
4.2.1 Bluetooth setup
Rename
Pic 4.6
Click icon , as pic. 4.7 shown,choose “rename tablet” and change to the
name as what you want.
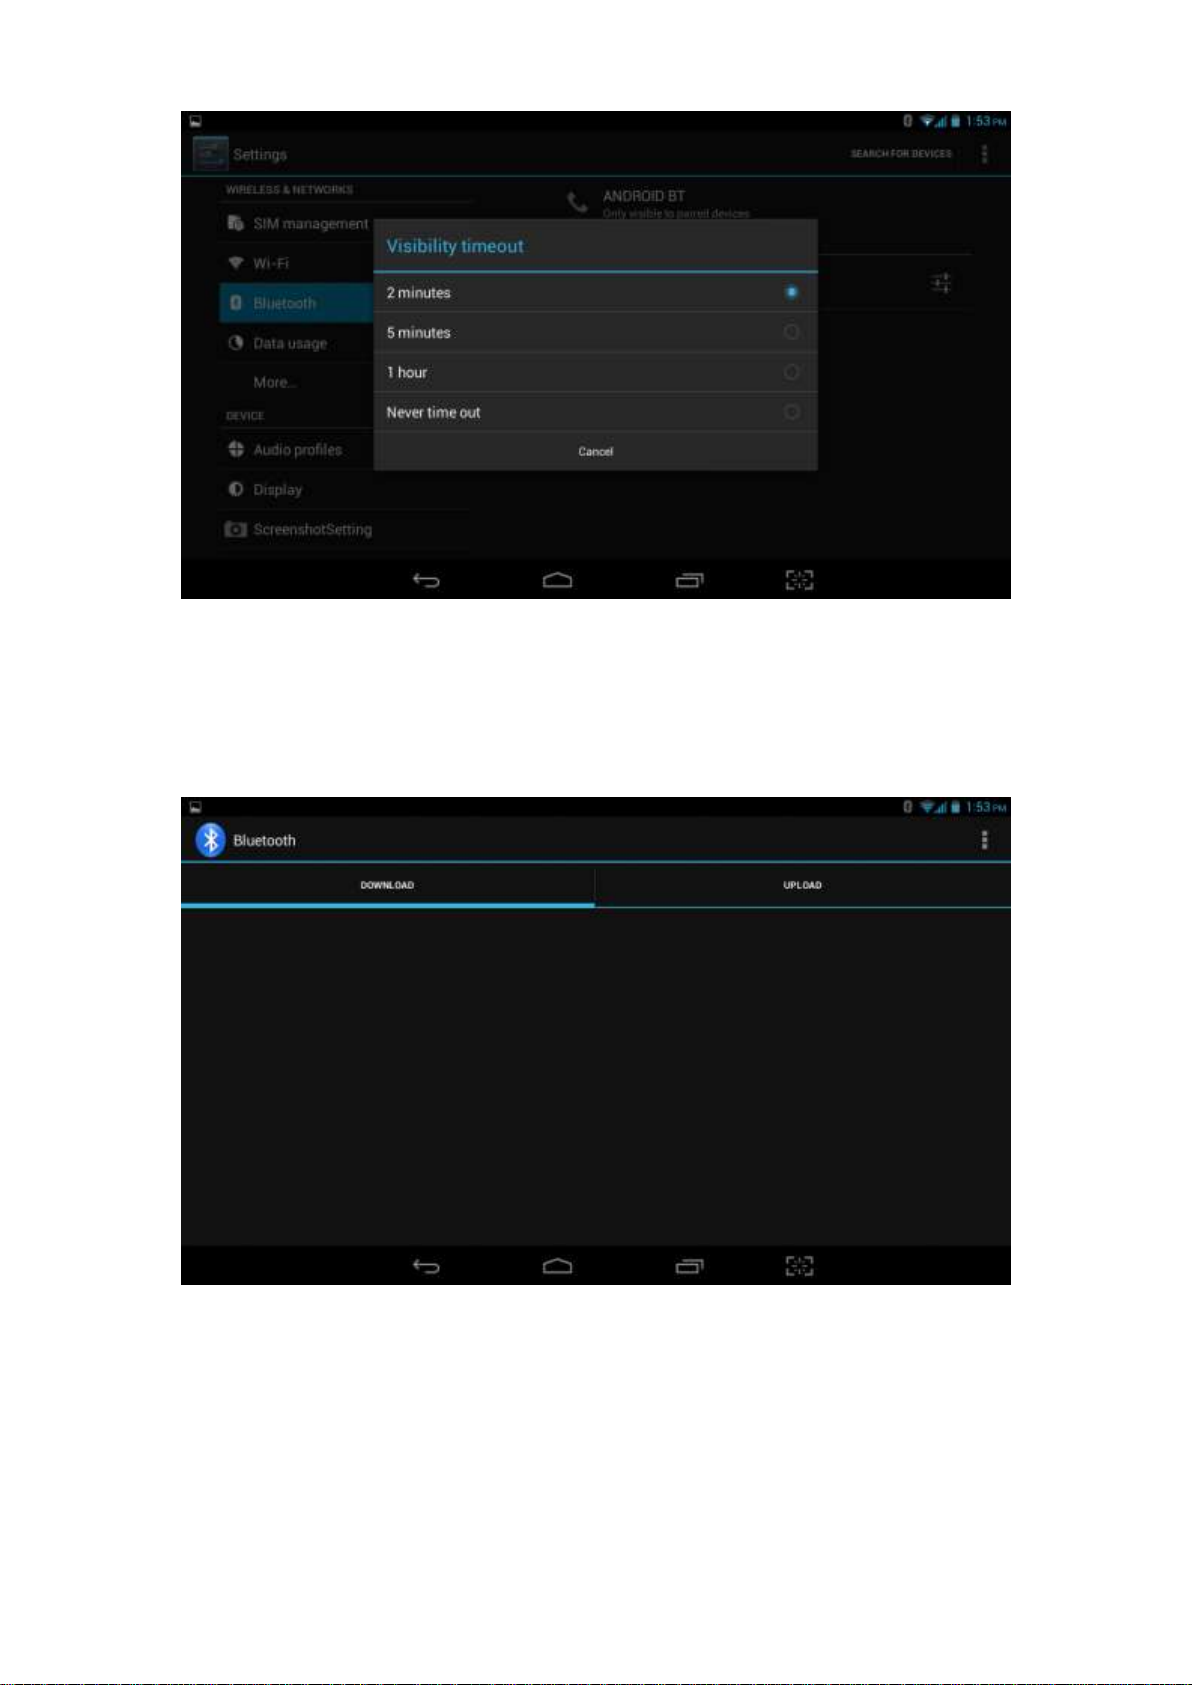
Visibility Timeout
As pic. 4.7 shown, click “visibility timeout” and choose time options
accordingly. See pic4.8.(Note:visibility timeout refers to the time setup of
device be visible.
Pic 4.7
20
Show received files
As pic. 4.7 shown,choose “show received files” and you can see all the files
download or upload.
Advanced setting.
As pic. 4.7 shown,choose “Advanced setting” and set up accordingly, as
pic4.9.
pic4.8
Pic 4.9
FTP Server
Turn on FTP Server means access to server-side files and
operation by client-side is allowed.
Proximity reporter
Under proximity reporter turn on, the device will prompt by make a
noise when distance between the two devices is too far away or when
disconnect.

21
4.3 Data Usage
SIM Card data usage, see pic.4.10
WIFI data usage
Click icon ,Choose “Show Wi-Fi usage”, see pic. 4.11.
pic4.10
Pic 4.11
4.4 More...
4.4-1 Airplane Mode
Airplane mode is function for quick turn off of WIFI & SIM Card. WIFI & SIM card
is out of reach under airplane mode, but it recovers once airplane mode turn off
4.4-2 VPN
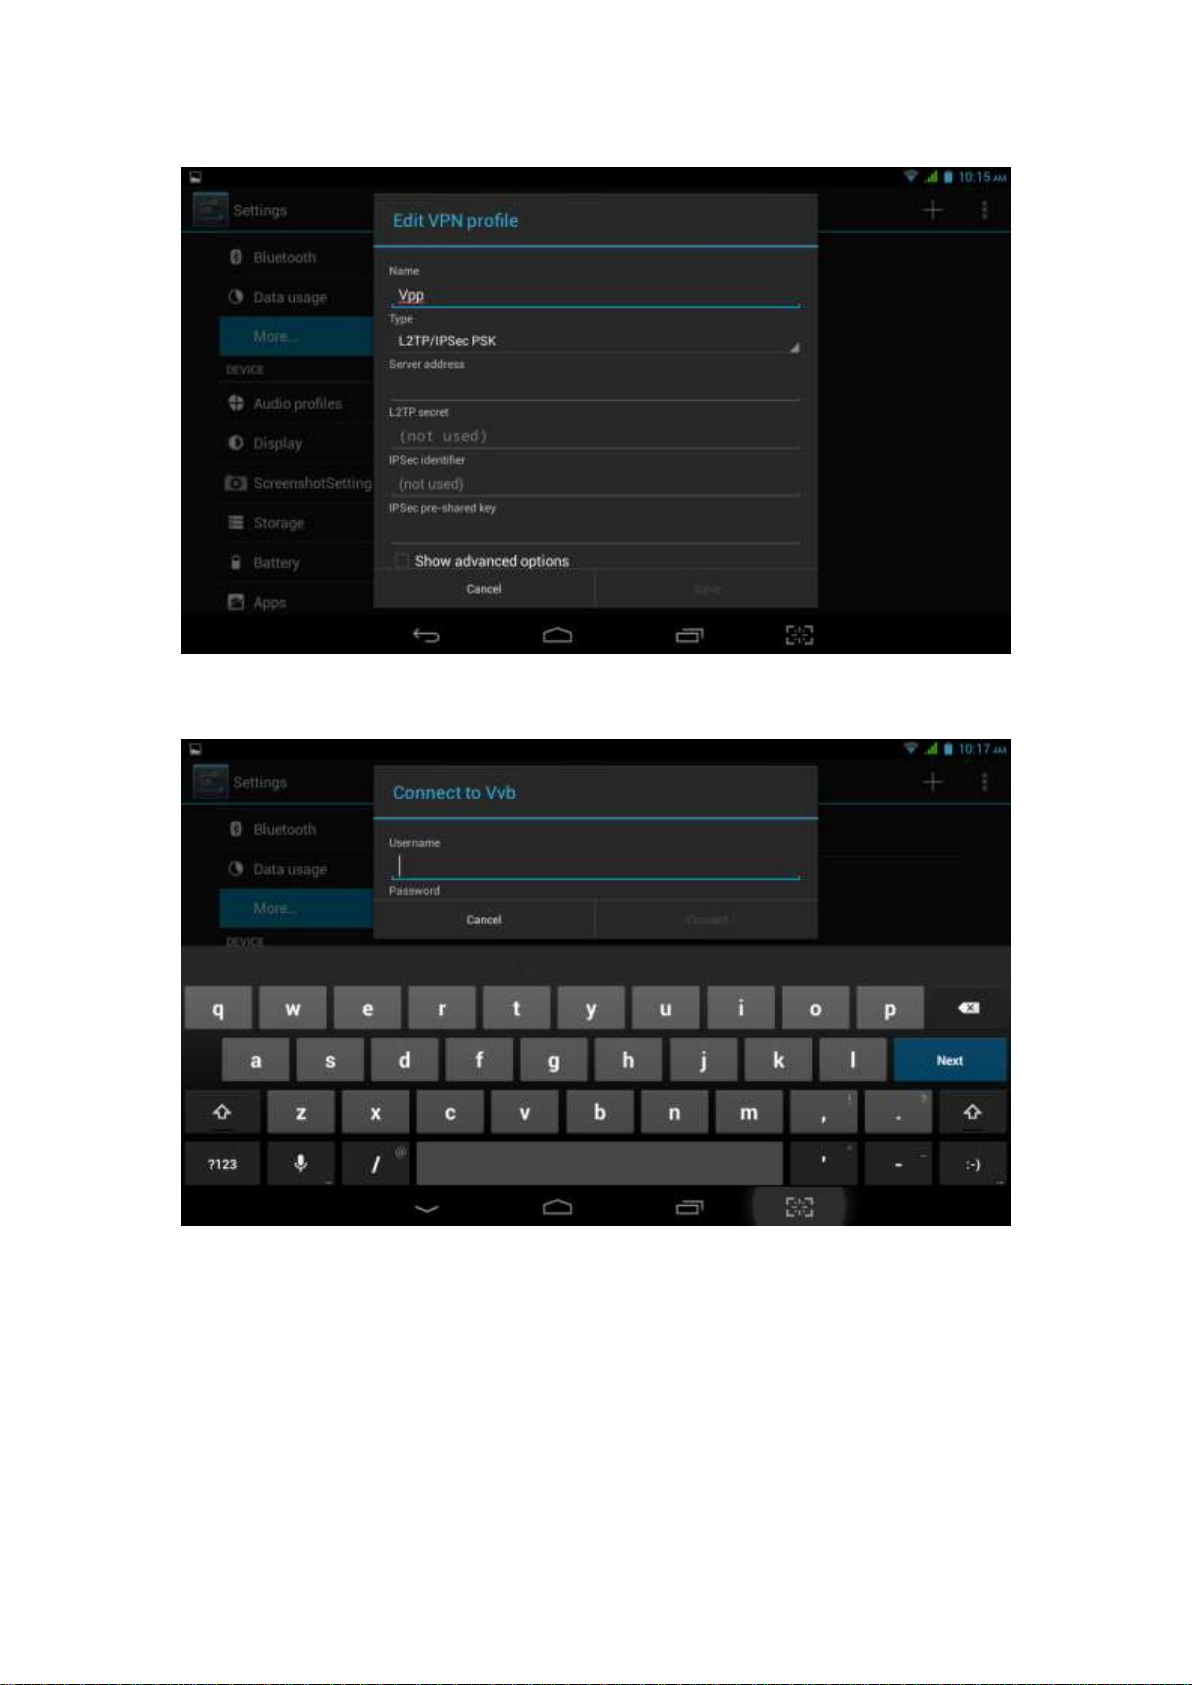
22
Open VPN and add VPN network, see pic. 4.12. Input network name and
related server address, and click “save” for sure.
Pic 4.12
Click VPN created,as pic.4.13 shows. Input VPN Account & password
accordingly, and click “connect” to finish.
Pic 4.13
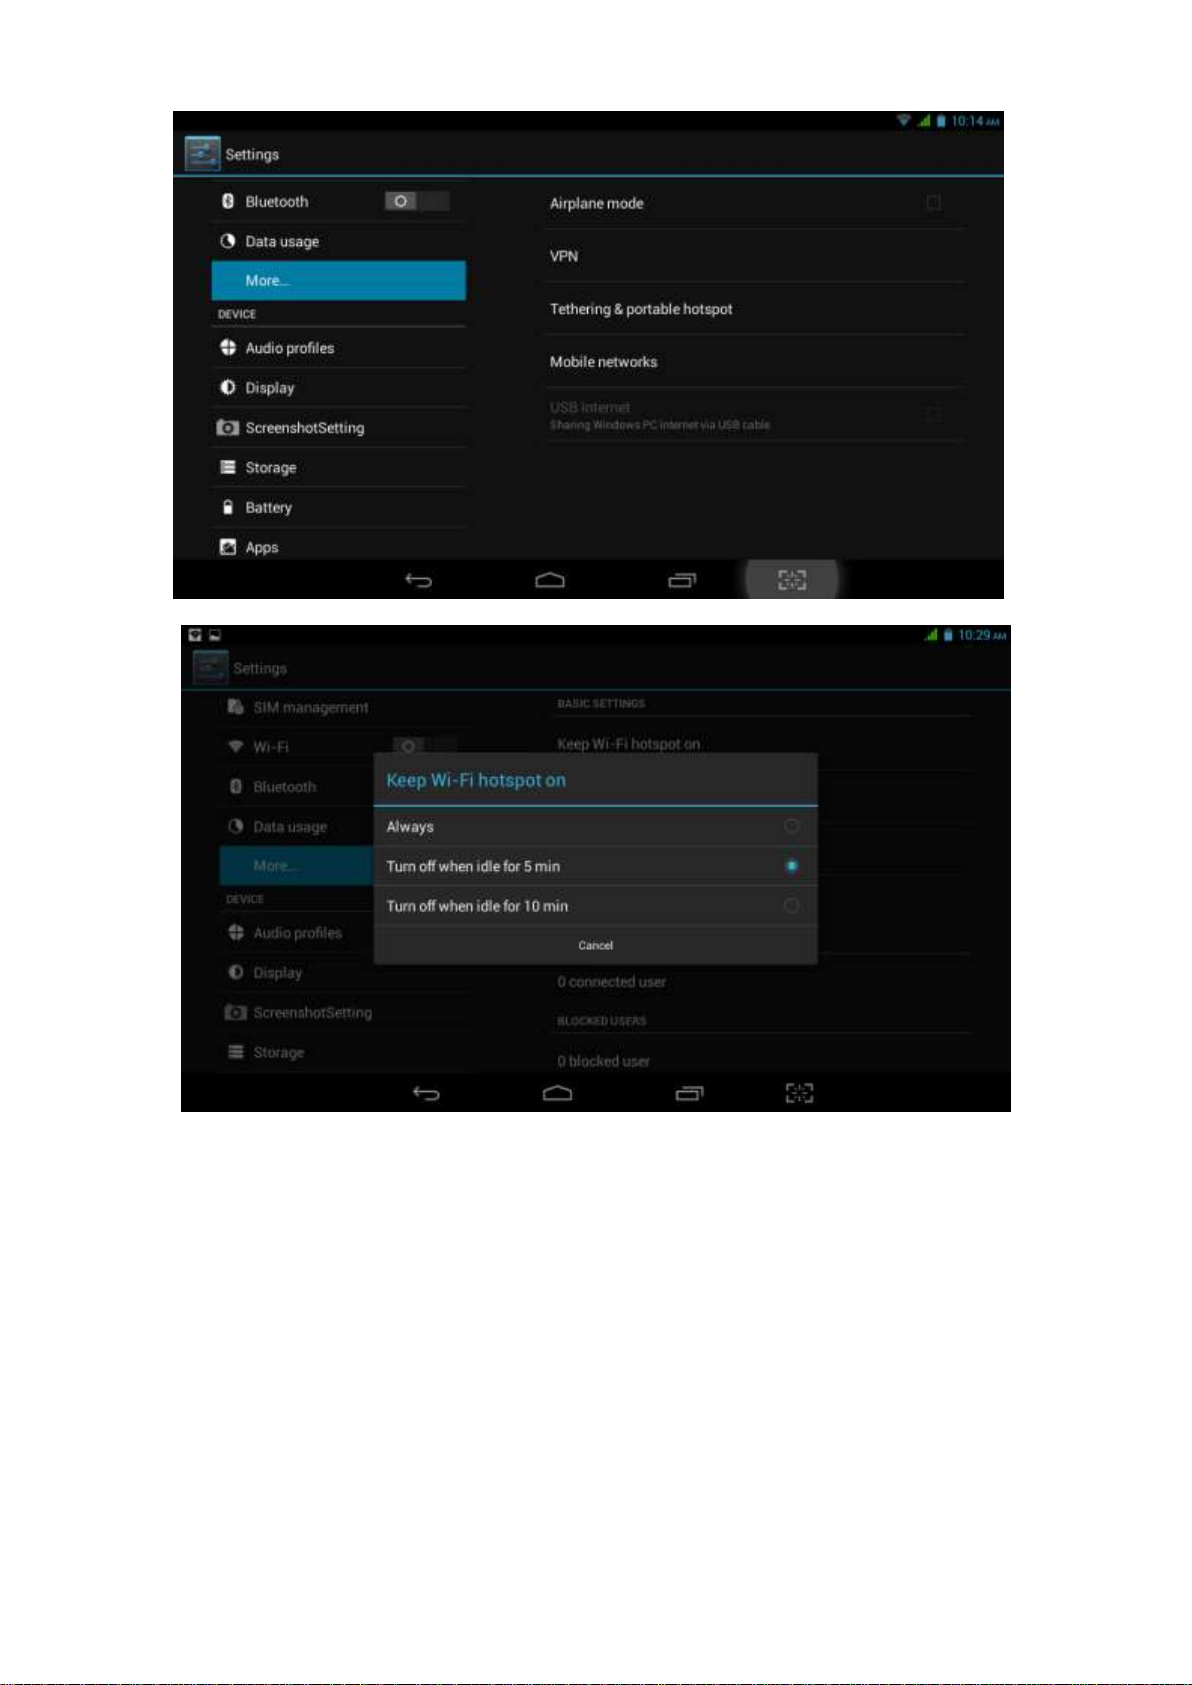
4.4-3 Tethering & portable hotspot
Tethering & portable hotspot
Click the app “settings” on menu interface.
Make sure the device is under wifi connected. Choose More… and click “Tethering
&portable hotspot”.
23
Pic. 4.14
Pic 4.15
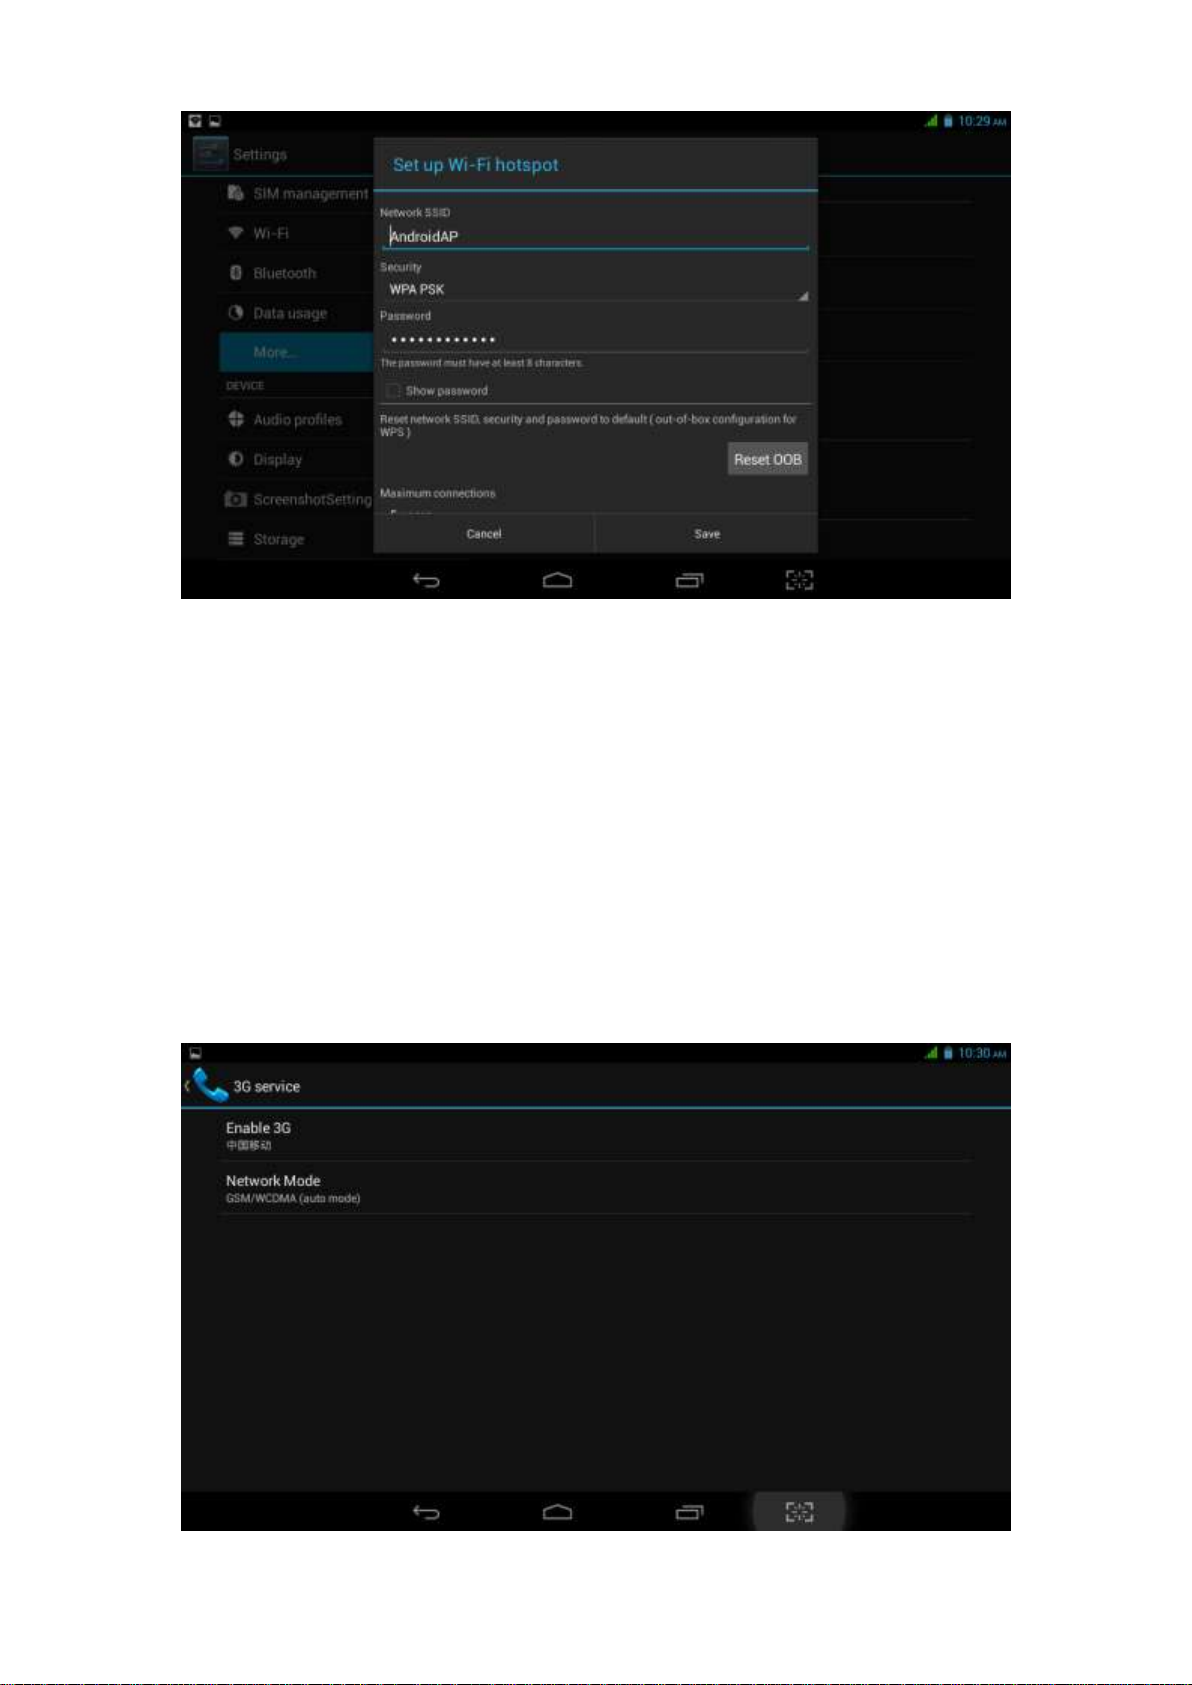
Clicks “keep Wi-Fi hotspot on” and choose suitable period.
Click icon “return” ,opening portable Wi-Fi hotspot and click “setup Wi-Fi
hotspot”.
24
Pic 4.16
Set up password for network encryption, and password should no less than 8
digits.
4.4-4 Mobile Networks
Data enabled
Under data enabled, you can use 2G/3G network through the SIM card.
Data roaming
Under data roaming, you can surf the internet by SIM card in the
situation of roaming.
This data roaming means roaming between operators, but not areas.
Network mode
Choose 2G/3Gfrequency channel. GSM means 2g network, this device
support GSM 850/900/1800/1900MHz and 3g WCDMA 2100MHz. 3g
frequency channel WCDMA 850MHz/900MHz/1900MHz is optional.
See pic 4.17.
Pic 4.17
 Loading...