


tablet pc
Brand Name: Titan
Model Name: PC7080ME
FCC ID: BRCPC7080ME

2
TITAN TABLET PC7080ME
USER MANUAL
1 Preface 3
2. Safety Notices 3
3.6 Function Icons 8
3.7 Switch on/off 8
3.8 Power Saving Mode and Locked Mode: 9
3.9 Operation of touch panel 9
3.10 Main Interface 10
3.11 Apps 12
3.12 USB Connect 13
3.13 Input Text 14
3.14 Use Skills 14
Widget interface 14
4 General Setup 15
4.1 SIM Card management, WIFI & Network 15
4.2 Bluetooth(Optional) 17
4.3 Data Usage 19
4.4 More... 20
4.5 Audio Profiles 25
4.6 Display 27
4.7 Storage 30
4.8 Battery 32
4.9 Apps 32
4.10 Account 33
4.11 Location access 35
4.12 Security 37
4.13 Language & input 39
4.14 Backup and reset 41
4.15 Date and Time 41
4.16 Scheduled power on off 42
4.17 Accessibility 42
4.18 Developer options 43
4.19 About MID 44
5. Multimedia 44
5.1 Music Player 44
5.2 Video 45
5.4 Camera 47
5.5 FM Radio (Optional functions) 47
6 Communication function 48
6.1 Phone 48
6.2 SMS 49
6.3 Contacts 49
7. Movil Teacher (Optional) 50
7.1 Device setting 50
7.2 USER’S INTERFACE 53
7.3NAVEGACION 53
8 Internet 57
8.1 Browser 57
8.2 E-mail 58
9 GPS function (optional feature) 59
10 Other Applications 61
10.1 Clock 61
10.2 Calculator 61
10.3 Explorer 62
10.4 Recorder 64
11 Application Installation 66
11.1 Installation 66
11.2 Uninstall 66

3
13 Troubleshooting and FAQ 73
1 Preface
Dear Customers,
Thanks very much for purchasing our product!
This Tablet PC is a built-in high performance Wi-Fi receiver module, supporting an external 3G
USB-DONGLE wireless network card, using broadband wireless networks, breaking through
the restraint of network cables; it will bring you into the portable media player world and fulfill
your entertainment needs. It also supports picture browsing, e-book reading, games, online
chat and other functions; various settings will fully show your individuality.
To operate this player easily, first, please read this User Manual included with the player. Then
you will have a better understanding of the operations. Before operating this player, please
carefully read all data we provide about the player, so that you will have a better understanding
of the product and its operations.
The Company will not be responsible for any loss of personal data and damage caused by
incorrect operation of the Software/Hardware, artificial damages, replacement of batteries or
any other accident. To avoid loss of your data, please backup your data to your computer at all
times.
Also, since we can not control any dispute from users’ misunderstanding or incorrect operation
against the manual, the Company will not take any relevant responsibility for any accidental
loss potentially occurring in the process of using this manual.
Due to constant product development, the information in this manual is subject to change
without any prior notice.
This manual is protected by copyright and no part is permitted to be copied or reproduced in
any way without prior written permission of the Company.
The Company reserves the final explanation right of this manual, warranty as well as its related
information.
(Note: When compiling this manual, we are very careful to provide you completely reliable
information. However, there is inevitably some error and oversight, please understand, and we
welcome your suggestions. If any problem occurs during your use of this product, please
immediately contact your local seller)
Thanks for your support and please pay attention to our other products。
2. Safety Notices
1) Please keep the Tablet PC away from strong magnetic fields in order to avoid damage to the
product.
2) Please do not let the Tablet PC fall onto, rub against or knock against hard objects during
use, because this may cause surface scratches on the Tablet PC, battery damage, data loss or
other damage to the hardware.
3) Never let this product be exposed to a humid environment or rain as the water leaking into
the Tablet PC could disable it to the extent of being beyond repair.
4) Never clean the Tablet PC with any chemicals or detergent, these will damage the product
surface and corrode the finish.
5) You are recommended not to use the headset with the volume at its highest settings, please

4
Components
Quantity
MID Device
1
Power Adaptor
1
CD-ROM
1
USB Cable
1
HOST cable(optional )
1
Earphone(Optional)
1
User Manual (Optional)
1
Warranty Card (Optional)
1
adjust the volume to an appropriate safe level and limit the amount of time you spend using
headphones to avoid possible damage to your hearing. Excessive volume will cause permanent
hearing damage.
6) Please do not cut off the power abruptly during software updates or downloading, because
this may cause data loss or system errors.
7) Over-voltage, power cable strain and bending or squeezing of the power cable by heavy
objects must be avoided to prevent the possibility of overheating or fire.
8) In order to eliminate the risk of electric shock, do not touch the cable power plug with wet
hands.
9) Some movies, music and pictures are under the protection of copyright, unauthorized usage
is deemed as an infringement to the laws of copyright.
10) Please don’t turn on the Tablet PC on in locations where wireless equipment is forbidden or
when the usage of the Tablet PC will cause interference and possible danger.
11) All the wireless equipment is subject to external interference and this can affect its
performance.
12) Please comply with any related restrictions and rules, wireless equipment can influence the
flight of the plane; please consult the relevant airline company if you intend to use the Tablet PC
on a plane.
13) Please don’t use the Tablet PC in a petrol station, or near to fuel or chemicals.
14) Please comply with any related restrictions and rules; do not use the Tablet PC where
blasting operations are in progress.
15) Only qualified maintenance personnel can install or repair the Tablet PC. Opening the
Tablet PC in any way will invalidate the warranty.
16) Please use the original accessories and battery provided with the Tablet PC, do not use the
incompatible products.
17) The Tablet PC is not waterproof, please keep it dry.
18) For the sake of data safety, please back up any important information on the Tablet PC, or
keep a handwritten record.
19) When the Tablet PC is connecting with other devices, please read the user manual for
detailed safety instructions. Don’t connect the Tablet PC to incompatible products.
20) Please upgrade device with enclosed optical disk when the device is set to operate in a
different way.
Note: Android4.0 system using the MTP protocol transfer files, rather than the original MSC
agreement (ordinary U disk), currently supports the MTP protocol only (10) in Windows Media
Player and Media Player, Windows Media Player 11) and older version. If there are no updates
to the above two versions of the Player, the computer will not recognize MID or existing file
cannot be copied down, etc., please correct in the computer, which is connected with the MID
above installed version of the Player, can be installed to the computer, do not need to run for
connection to the mids.
3. Ready to Use
3.1 Packing list
5
HD Cable (Optional)
1
3G USB Dongle(Optional)
1
RJ45 USB Dongle (Optional)
1
Leather Case (Optional)
1
Keyboard/Mouse (Optional)
1
tf (Micro sd) Card (Optional)
1
Symbol
Name
Description
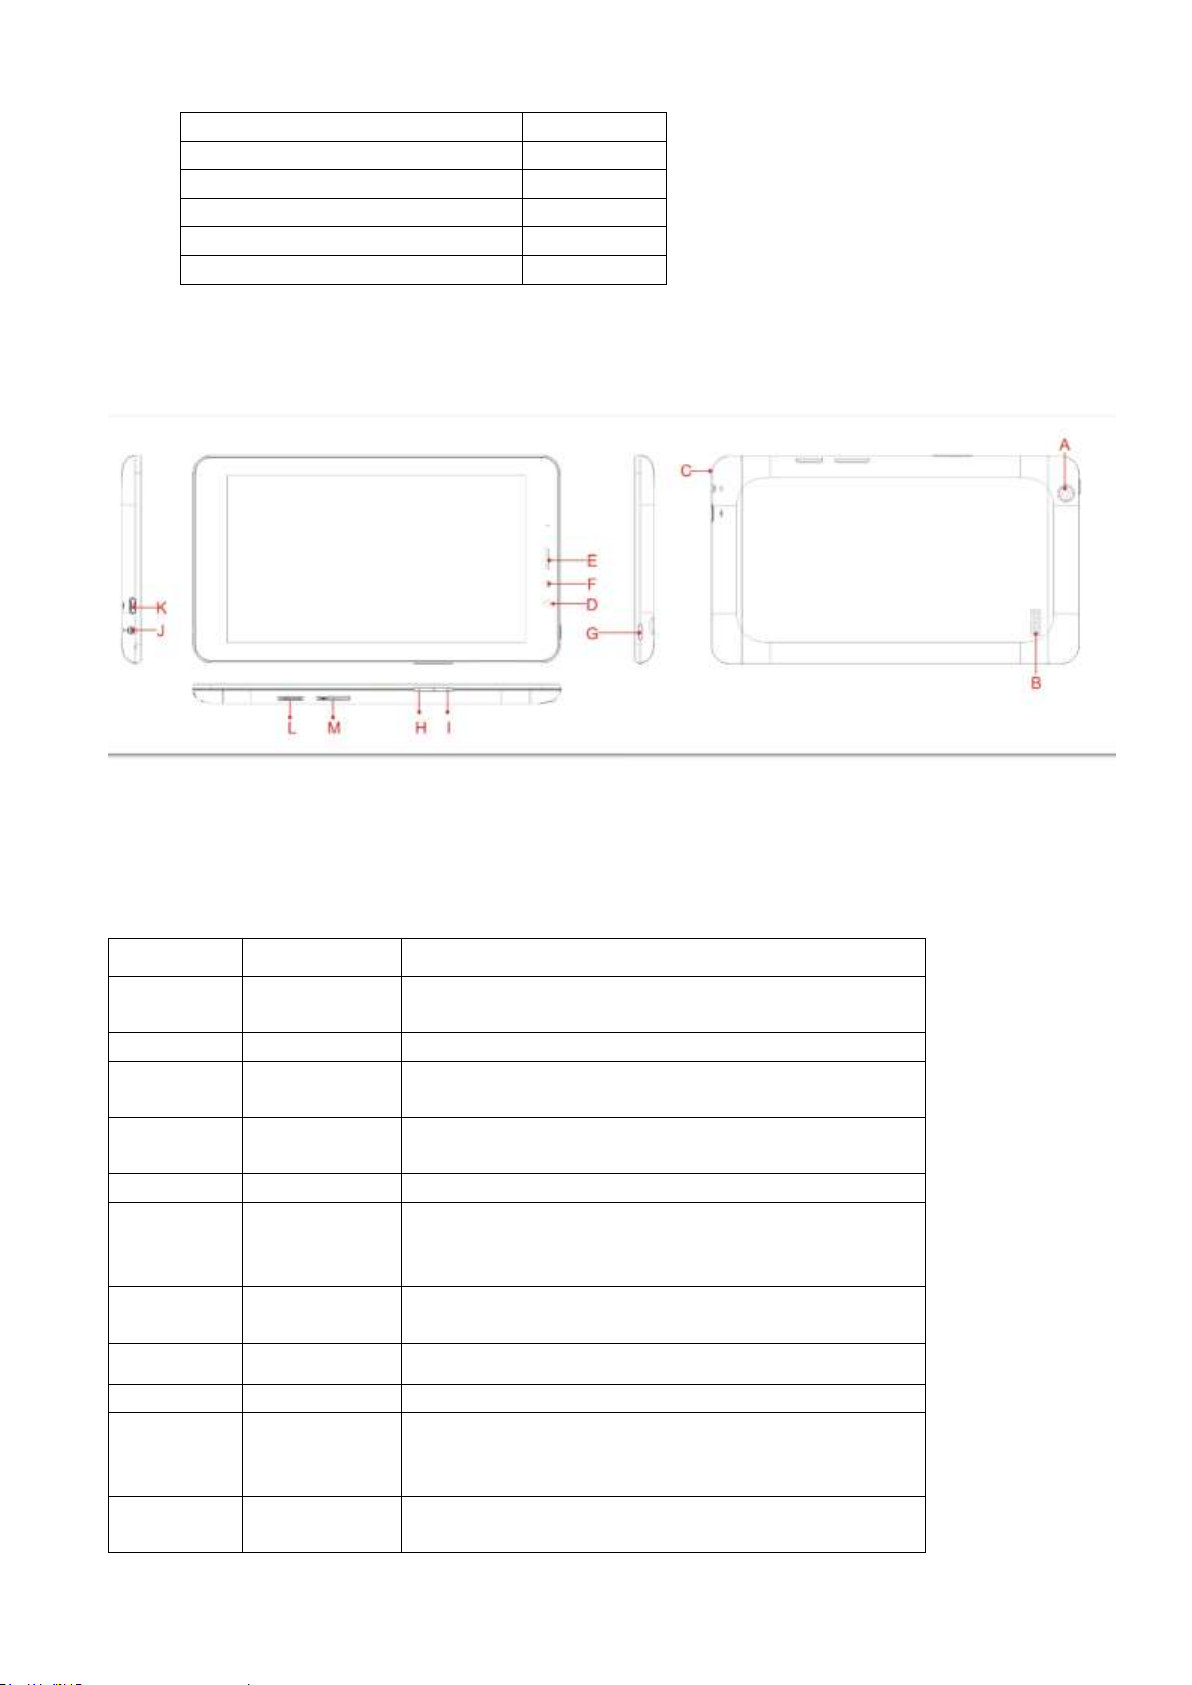
A
Rear
Camera
Static and dynamic camera
B
Speaker
For music or movie
C
Microphones
hole
Recording microphone
D
Front
Camera
Static and dynamic camera
E
receiver
Telephone receiver
F
Induction
hole
The light induced hole, in a variety of
applications such as call close to close the
screen
G
POWER
Short press this button to enter sleeping/wake
up mode, press long to switch ON/OFF
H
Volume -
Decrease volume
I
Volume+
Increase volume
J
Stereo
Earphone
Jack
Stereo Earphone Jack
K
MIC USB
port
MIC_5PIN USB Port
3.2 Product Appearance
3.3 Instructions on Keys

6
L
TF card Slot
TF (Micro SD) Card Slot
N
SIM Card
slot
SIM Card slot
Display
size
7inch TN
resolution
1024*600(optional)
Interface
USB port,USB OTG 2.0/USB Host2.0 (MIC 5PIN shift 4PIN
HOST)
Interface
MINI USB
CPU
MT8312,Dual-core ARM® Cortex-A7 MPCore™at 1.3G
Built-in Flash
Flash Memory : 16GB
Built-in RAM
ROM:DDRIII 1GB
Capacity Expansion
Support TF Card 1GB~32GB
Power Supply
Built-in 3.7V@2800mAH Lithium rechargeable battery; output:
5V/1.5A Adaptor
Note:
1. The machine does not have "RESET" button, when the machine crashed, long press
the "POWER" key around 10 s, can be forced to turn it off.Machines turned off if you
don't loosen "reset" button again to boot.
2. At the same time, press the "POWER" + "V -" button can realize screen function.
3.4 Features Overview
GPU:MT8312,Dual-core ARM® Cortex-A7 MPCore™at 1.3GHz processor Mali400-MP2
44.3M tri/sec and 832M pixel/sec @ 416MHz;support ANDROIED4.2 OS and FLASH Play11.1
support DDR3 1GB;
support 16G FLASH,external TF card 1G~32GB storage;
support 1024*600 HD 7’’ capacitive screen
Video playback: mp4,3gp,AVI, MKV,MOV etc video formats;
support JPG, PNG, BMP, GIF Format, such as image browsing, maximum support 8000 *
8000 resolution
support MP3, WAV video Forma.
Support Adobe® PDF, TXT、LRC、Html、Htm、EPUB etc formats
support built-in WIFI access to broadband wireless Internet access, working software on
ANDROIED4.2 operating system are colorful, some of the commonly used software system
preset: Google Internet browser (IE), MP3, online novels, online video, e-books, etc
support built-in microphone recording function, can realize and voice recording function.
support built-in 3 g (WCDMA (3 g), through the USIM card wireless communication function,
answering/call, send/receive messages, email, contacts, etc., have the same function as mobile
phone.
support USB HOST (through the Mini USB adapter)
Built-in font 30W and rear 200W two camera,
Support G-Sensor Screen direction function
Support FM function(optional);
Support GPS function(optional)
support stereo headphones and speakers sound output voice
support language: many languages
USB mobile disk, WIN_2000 drive system from above
3.5 Technical Specifications
7
Music Function
Play format
MP1、MP2、MP3、WMA、WAV、OGG、
OGA、APE、FLAC、AAC、M4A、3GPP
Headset max.
output
(L)5mW+(R)5mW(32Ohm)
MP3 Bit rate
8Kbps ~ 392 Kbps
WMA, WMV, Bit
rate
5Kbps ~ 192 Kbps
Frequency
response
20Hz ~ 20KHz
SN ratio
90dB
Distortion
<0.05%
Video Function
Play format
MPEG-1,MPEG-2,MPEG-4,H.263,
H.264, AVS, VC-1, RV,etc.
Max Resolution
1920*1080
Photo Browse
Support JPG, PNG, BMP, GIF,
E-book
Format
TXT、LRC、PDF、Html、Htm、EPUB etc
Max. capacity
5M
GPS
frequency
1.57542GHZ
positional accuracy
3m,2D cep
Receive the
satellite channel
number
16 ways
Re-turn on time
cold boot:<35s(OPEN SKY)
Ware boot:32s
Hot boot:<2s(OPEN SKY)
Max rate
515m/s
location data
update rate
1HZ
Maximum height
positioning
18,000m
antenna
Built-in GPS antenna
WIFI
Transmission rate
Max54Mbps
Transmission range
Max100m
Frequency
2.412-2.480GHZ
WI-FI agreement
802.11 b/g/n
Built-in 3G/2G function
format
WCDMA/GSM
network protocol
and frequency
WCDMA 8501900/2100MHZ
GSM 850/900/1800/1900MHZ
Transmission range
HSDPA 7.2Mbps/HSUPA 5.76Mbps
record
Support format
Support WAV record
FM
Frequency
88MHZ-108MHZ
Working temperature
-10 ~ 50 ℃
Supported OS
Win98/2000/2003/XP/Vista/Win7、Mac9.1 and Linux2.4

8
Icon
Description
Icon
Description
Back to main menu
downloading
Power status
Web search
Return
Language
search
Recently viewed
Functions
menu
WIFI Status (blue
indicates Wi-Fi connected)
Network status
(blue indicates
2G/3G network
connected)
New e-mail
New message
Bluetooth signal
Flight mode
Under USB connection
Under USB
debugging
3.6 Function Icons
Icons Description:
3.7 Switch on/off
Switch on and unlocked:
When the devices is in powered OFF mode, press and hold the Power key for 3 seconds to
enter the Android startup process. The device will take about 100 seconds to enter the system
desktop, with the display in locked mode, please press and move the icon by the white
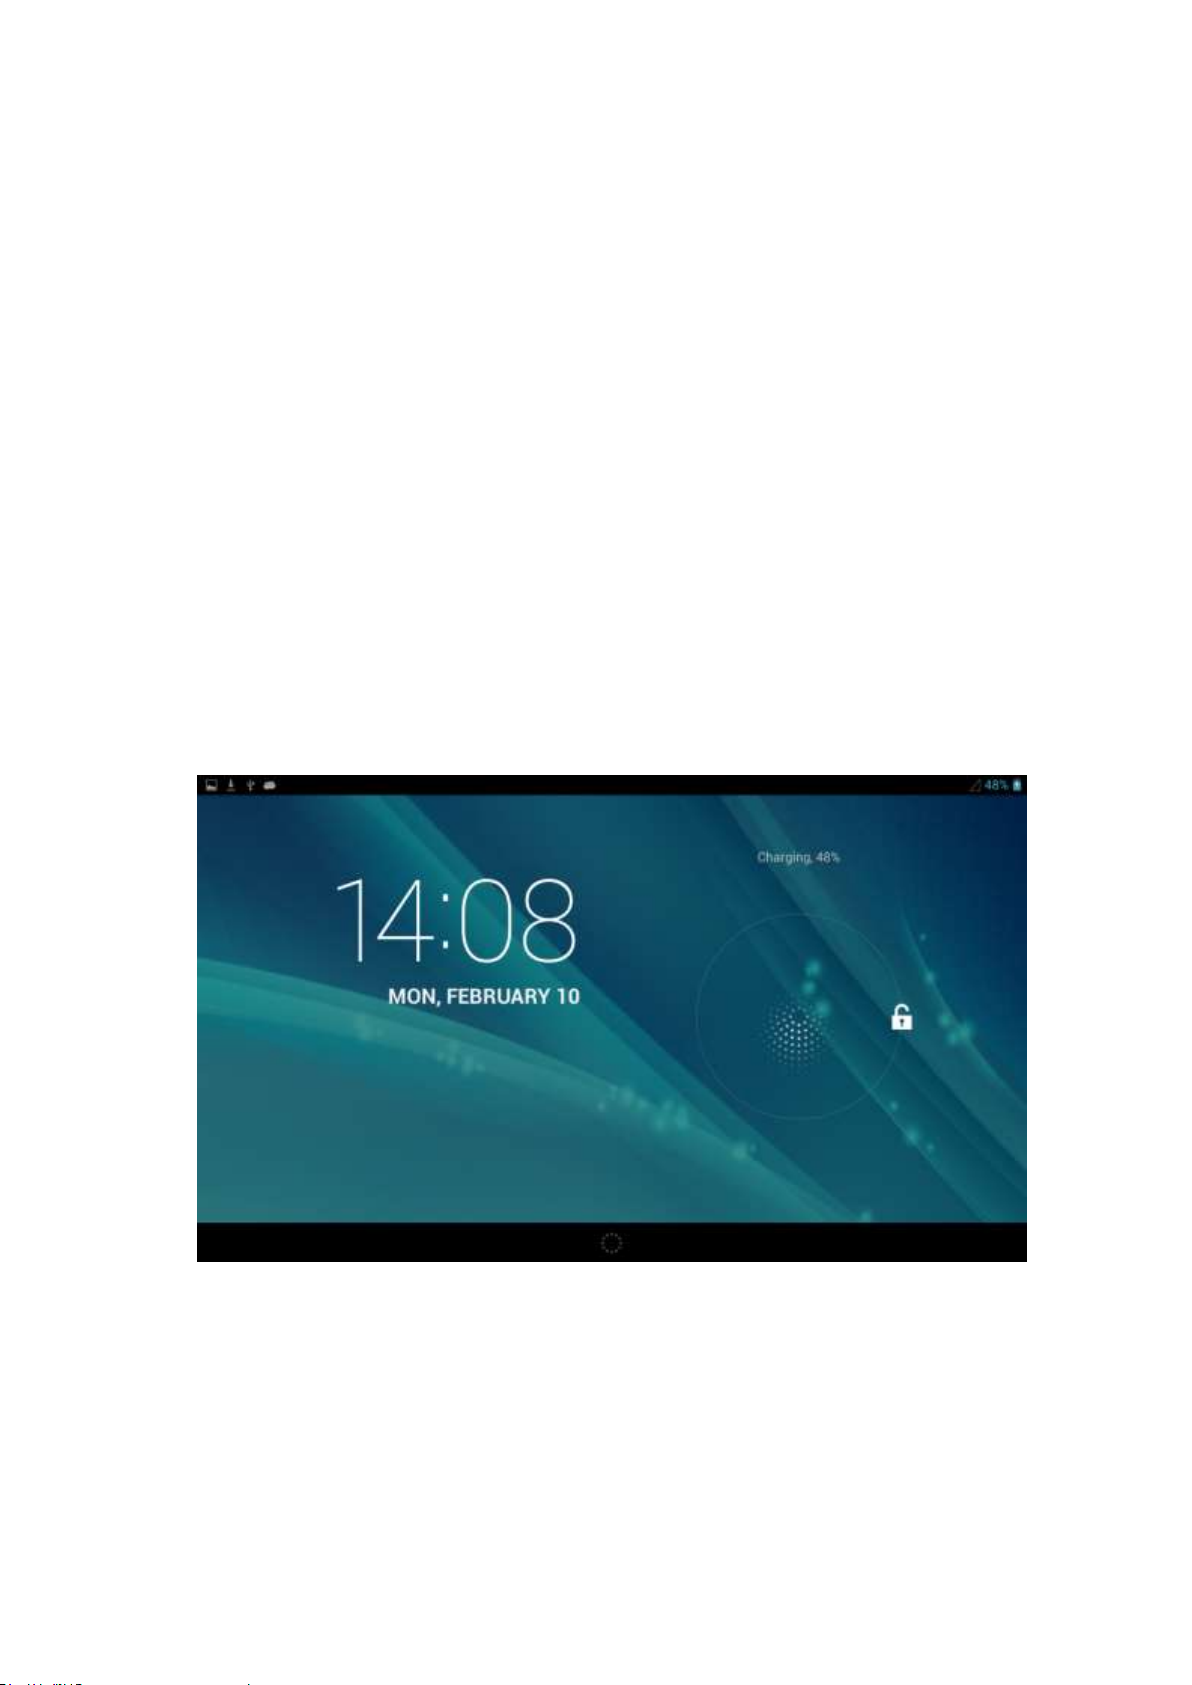
9
circle, the display will unlock automatically, see the image below:
Switch off:
1. When the device is in use, press and hold the POWER key for 3 seconds, the screen
will display the power off interface, choose the power off option to confirm your selection and
the system will shut down automatically.
2. Note: When the device is running low on battery power, it will sound an alarm and then
shut down automatically if it isn’t plugged into a power source to start charging. If the device
cannot start up please check if the battery power is too low by charging the device
3.8 Power Saving Mode and Locked Mode:
Display turn off automatically when the device is under no usage status
(1)Starting power saving mode, display will turn off automatically when device not in using.
(2)Short press the “POWER” key when the device is in use will make the system enter SLEEP
power save and locked mode.
Turn on the screen under inactive state
Under the power saving mode, the display is just turned off and showing a black screen. This
means that music play, movies play etc. will still continue to run.
Short press the power key, the system will return to locked mode, unlock by pressing and
moving the icon as show.
3.9 Operation of touch panel
How to operate?
You can browse over the user interface, main menu or applications by kinds of ways:
Click:
Just touch and click, when you’re going to input or choose applications on the main interface.
Press on:
10
Search
Voice
notification
time
Power
status
application
Screen shoot
Press on the icons or shortcut icons to open program you’d like, like textbox & linkage.
Slide
To move quickly on screen vertically or horizontally with your finger
Drug
Press on with certain pressure before drugging, and then keep pressing until the icon be
drugged to the target place.
Rotate
To most interfaces, for example, the input text and music interface, the direction can be
changed easily just by swaying the device
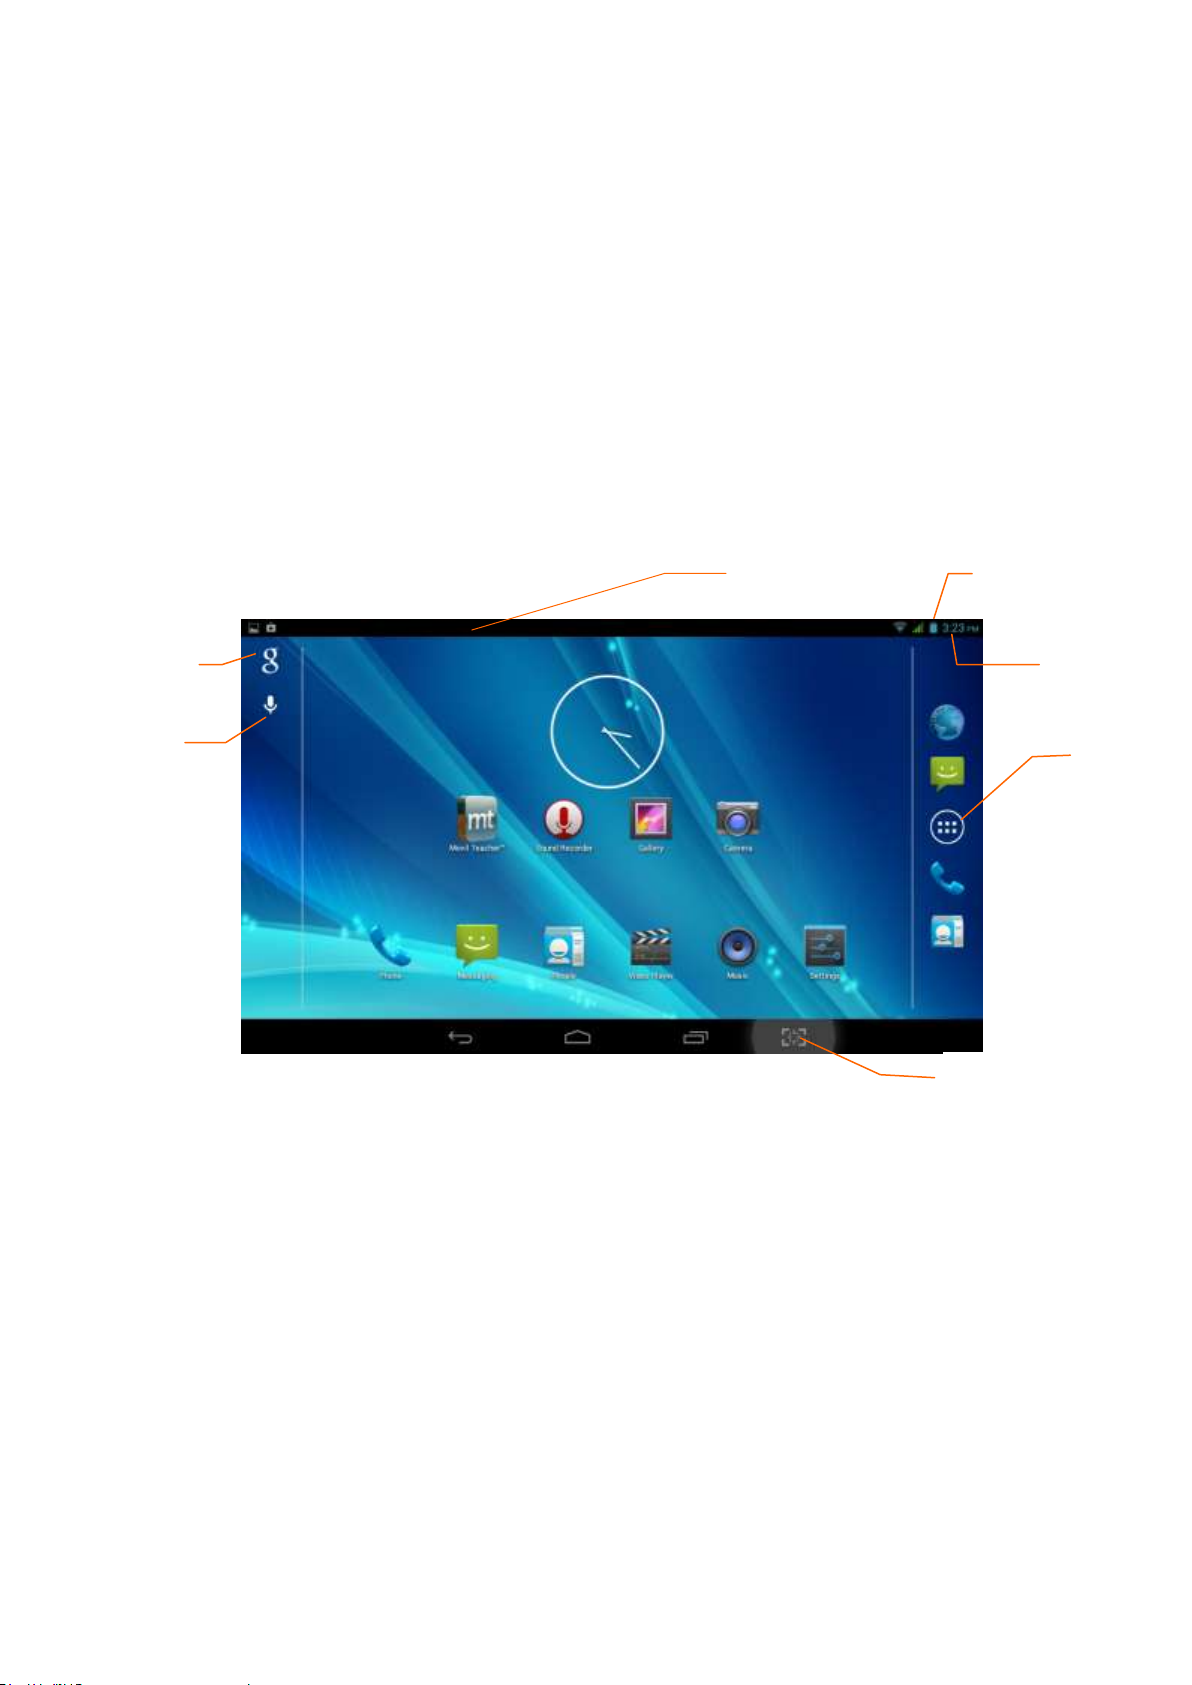
3.10 Main Interface
Main interface as below, press blank place for seconds, you can use the interface of
applications, shortcut icons or user-defined page as wallpaper.
Extend out of main interface
Main interface can extend beyond of interface to provide more space for new-added shortcuts
or gadgets. Pressing the blank place of interface, slide to left or to right quickly to extend to left
or right of outsider interface of screen and there are two extensible interfacs available, see
below:
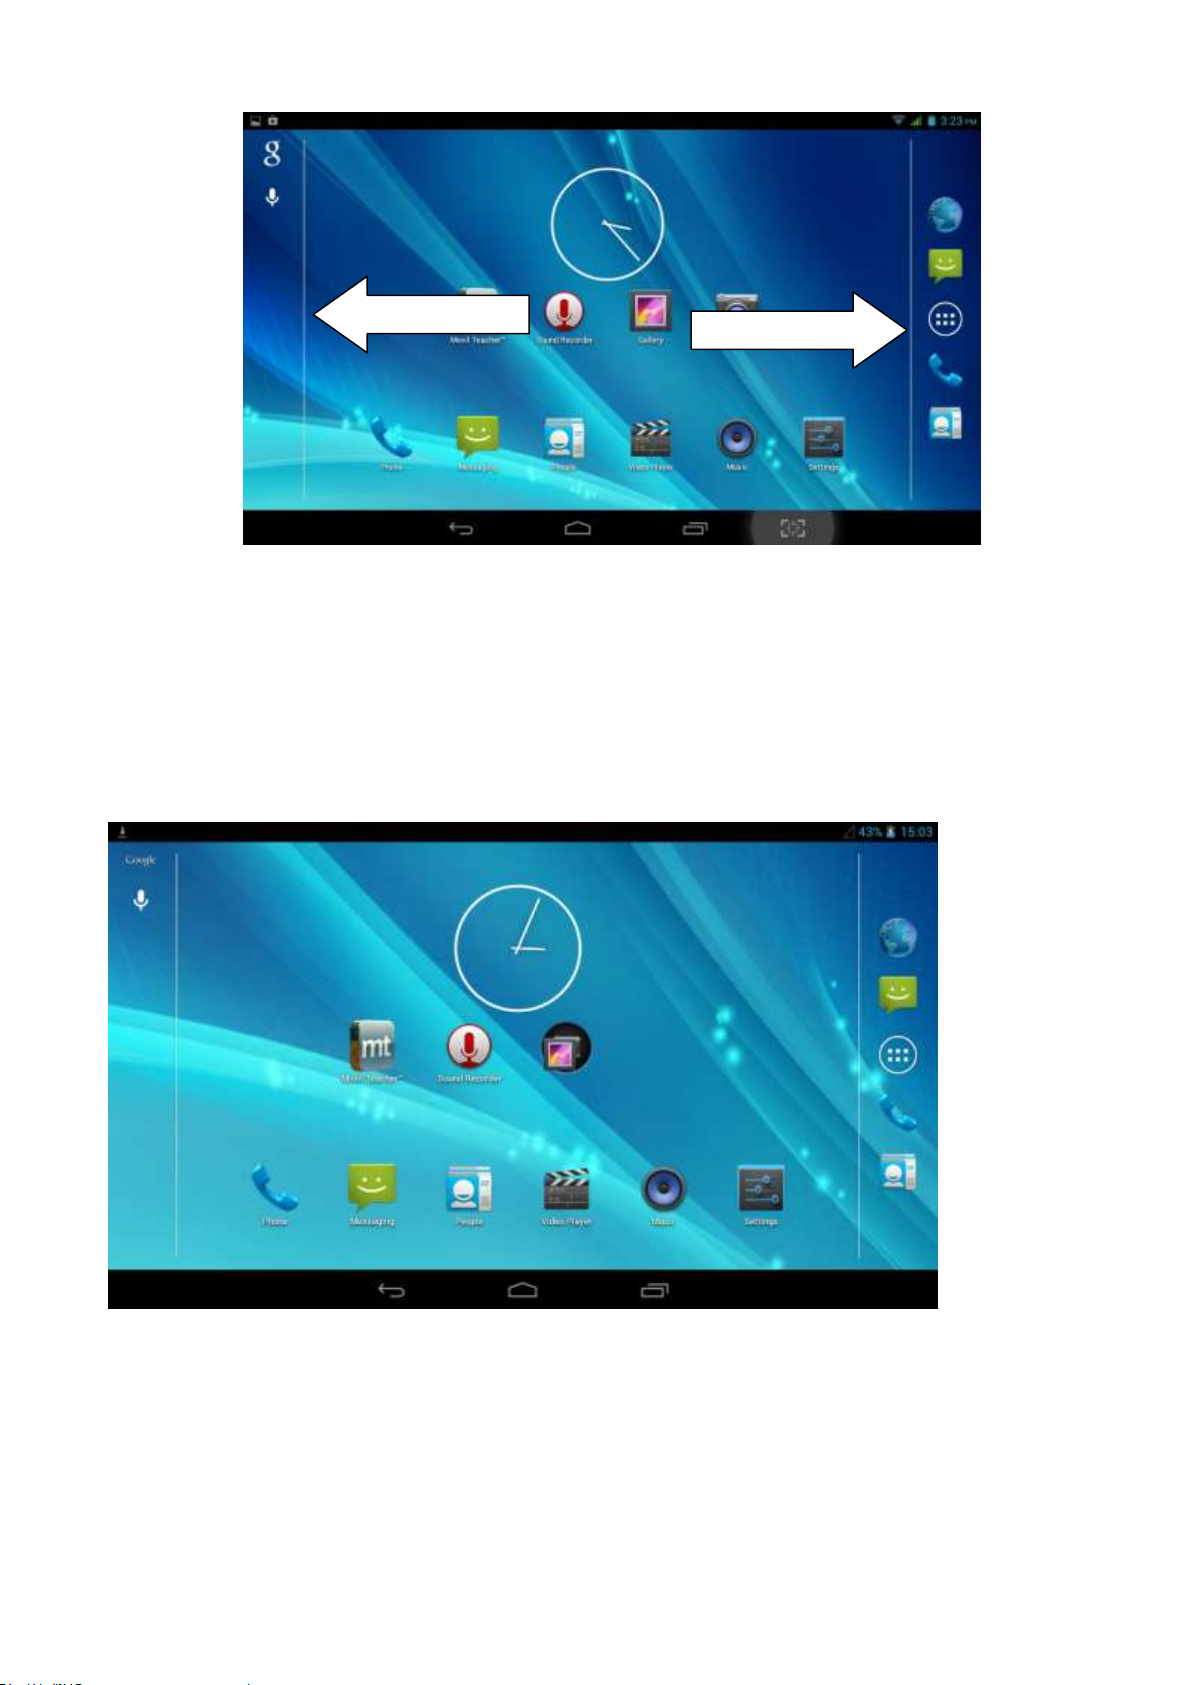
11
Shortcut Icons
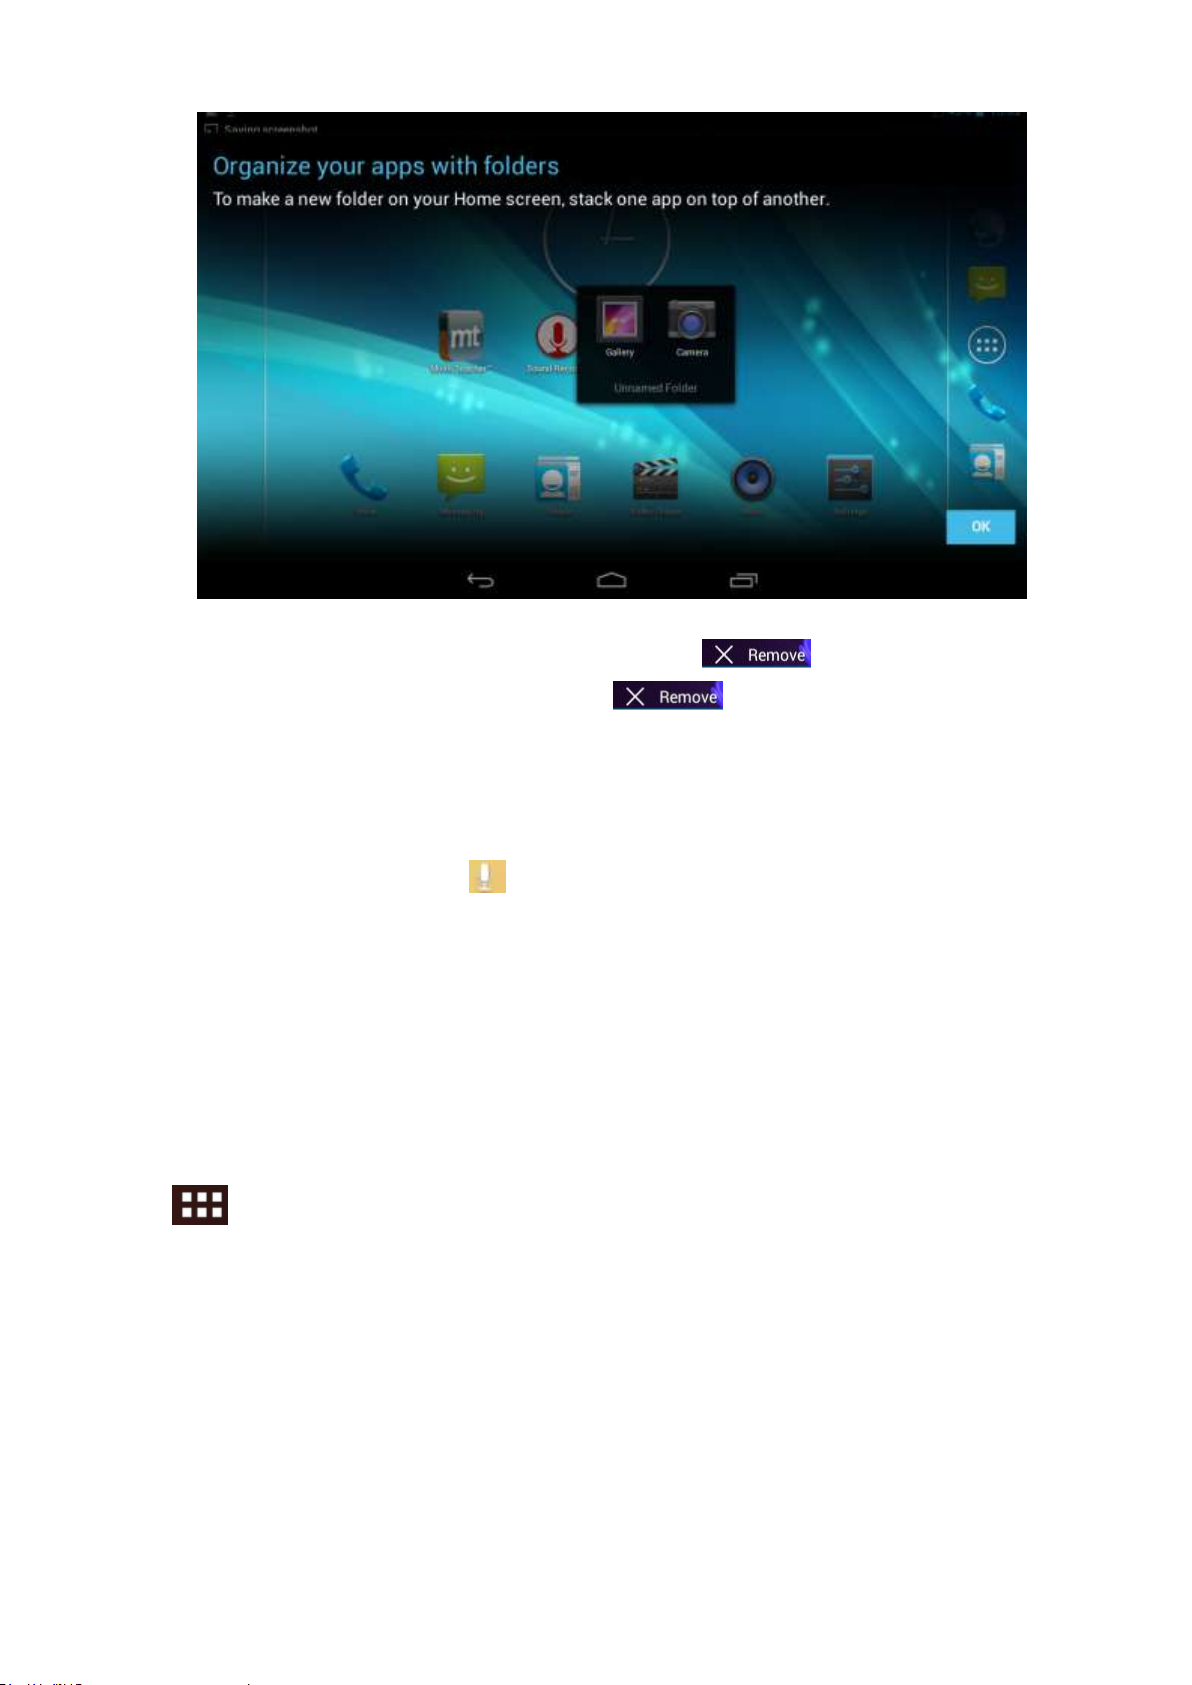
Build a folder on desktop
(1)Drug and overlie icons into one, see below:
(2)click the overlying icon, you’ll find all icons drugged inside it. See below:
Click the unnamed folder at lower edge of black pane, hidden keyboard shows up, and then you
can rename the folder. You can also change the place of icons inside by long pressing the
icons.
12
Delete icons on desktop
Long pressing the icon to delete, ,a icon will show up.
Drug the icon to right place above until the drugged icon is in red.,
Change desktop wallpaper
Long pressing the blank place of main interdace, a window pops up.
Click gallary or system defauldt wallpaper and choose the pic you want.
Voice search
Touch the icon 。
Operate accordingly the goggle options.
Set up your target languagea according to the prompting of pop-up window,
and confirm.
Speak out towards to the mic. what you need, and result list will show up.
Note: Please make sure your network is connected before search.
3.11 Apps
Click on the top right corner of the screen, see below:, then choose your target app
after entering into the main interface, see below:
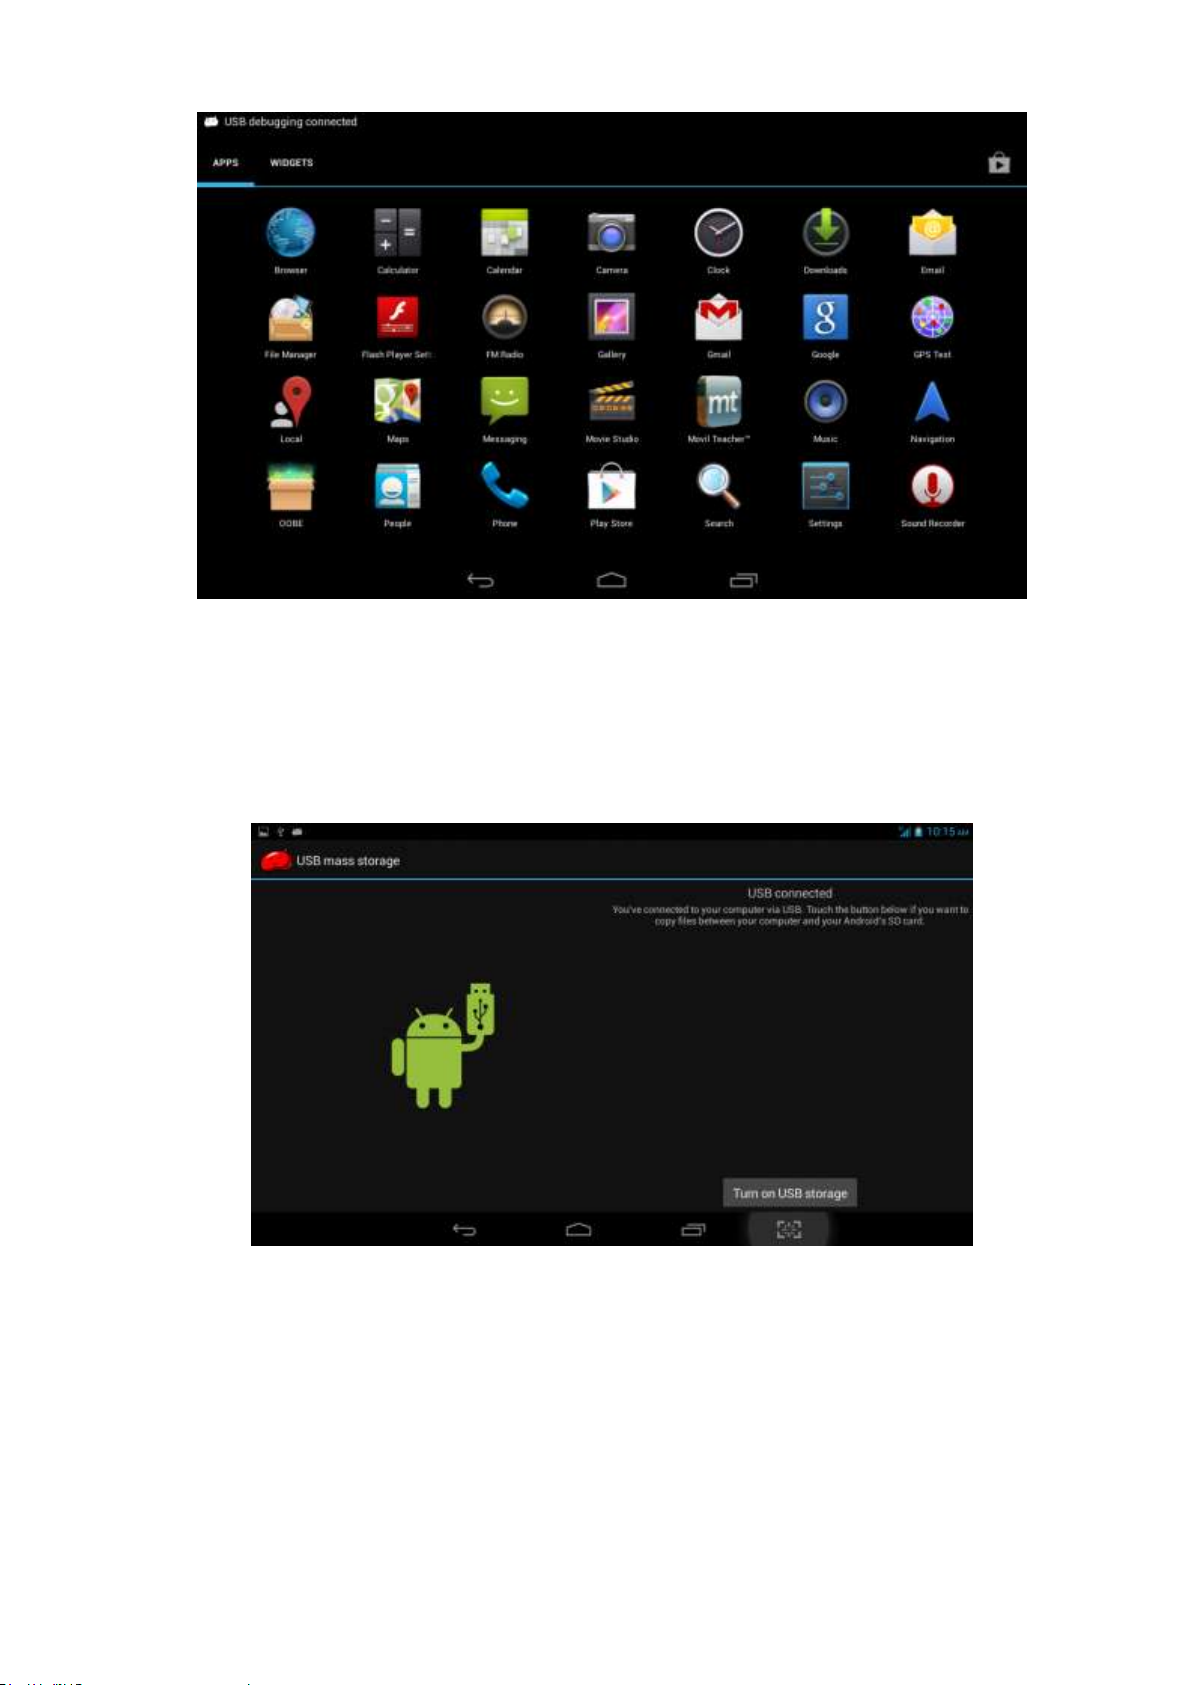
13
3.12 USB Connect
Storage setup
Set up the storage mode before transfer files. Connect MID and computer with USB cable.
Open the notice interface, (refer to chapter 2.3- Condition and Status of MID).
Clicking USB Connected, open the icon of USB Storage, see pic.3.7.
USB connected successfully
Copy file into SD
1. Use USB cable connect MID with computer.
2. According to the MID storage Settings, after successfully connected to the computer.
3. Open your computer in my computer, see the "removable disk (x)" in the content.
4. Find want to copy the file, copied to the removable disk (x).
5. Copy is completed, click on the "closed USB storage devices" uninstall it.
Note: when your MID connected on the USB cable, if you open the USB storage devices, you
will not be able to access memory through the MID, if you want to visit in the MID memory card,
as long as the disconnect USB connection.
14
1
Capital and small letter
2
Digtal input
3
Insert whitespace
4
Execute
5
Delect character on the left of cursor and long press to
delect all.
①
⑤④②
③
3.13 Input Text
Screen Keyboard
When you need to input or edite , android keyboard will show up.
Choose input method
Open application setup。
Click Language and input
All input installed will list on text setup.
Choose your target input.
Input Method use and switch
3.14 Use Skills
Widget interface
Click “widget” or slide on the screen to left to enter into widger interface. Long press the widget
to creat a shortcut, and you can enter related app quickly just through the shortcut icon on
desktop.
Creat a shortcut icon on desktop
After enter into program interface or widget interface, longpress any icons, a shortcut icon
will be created on the desktop, or press on and drug the icon to desktop.
Note:widget shortcut will not be created if there is no enough space left for
15
4 General Setup
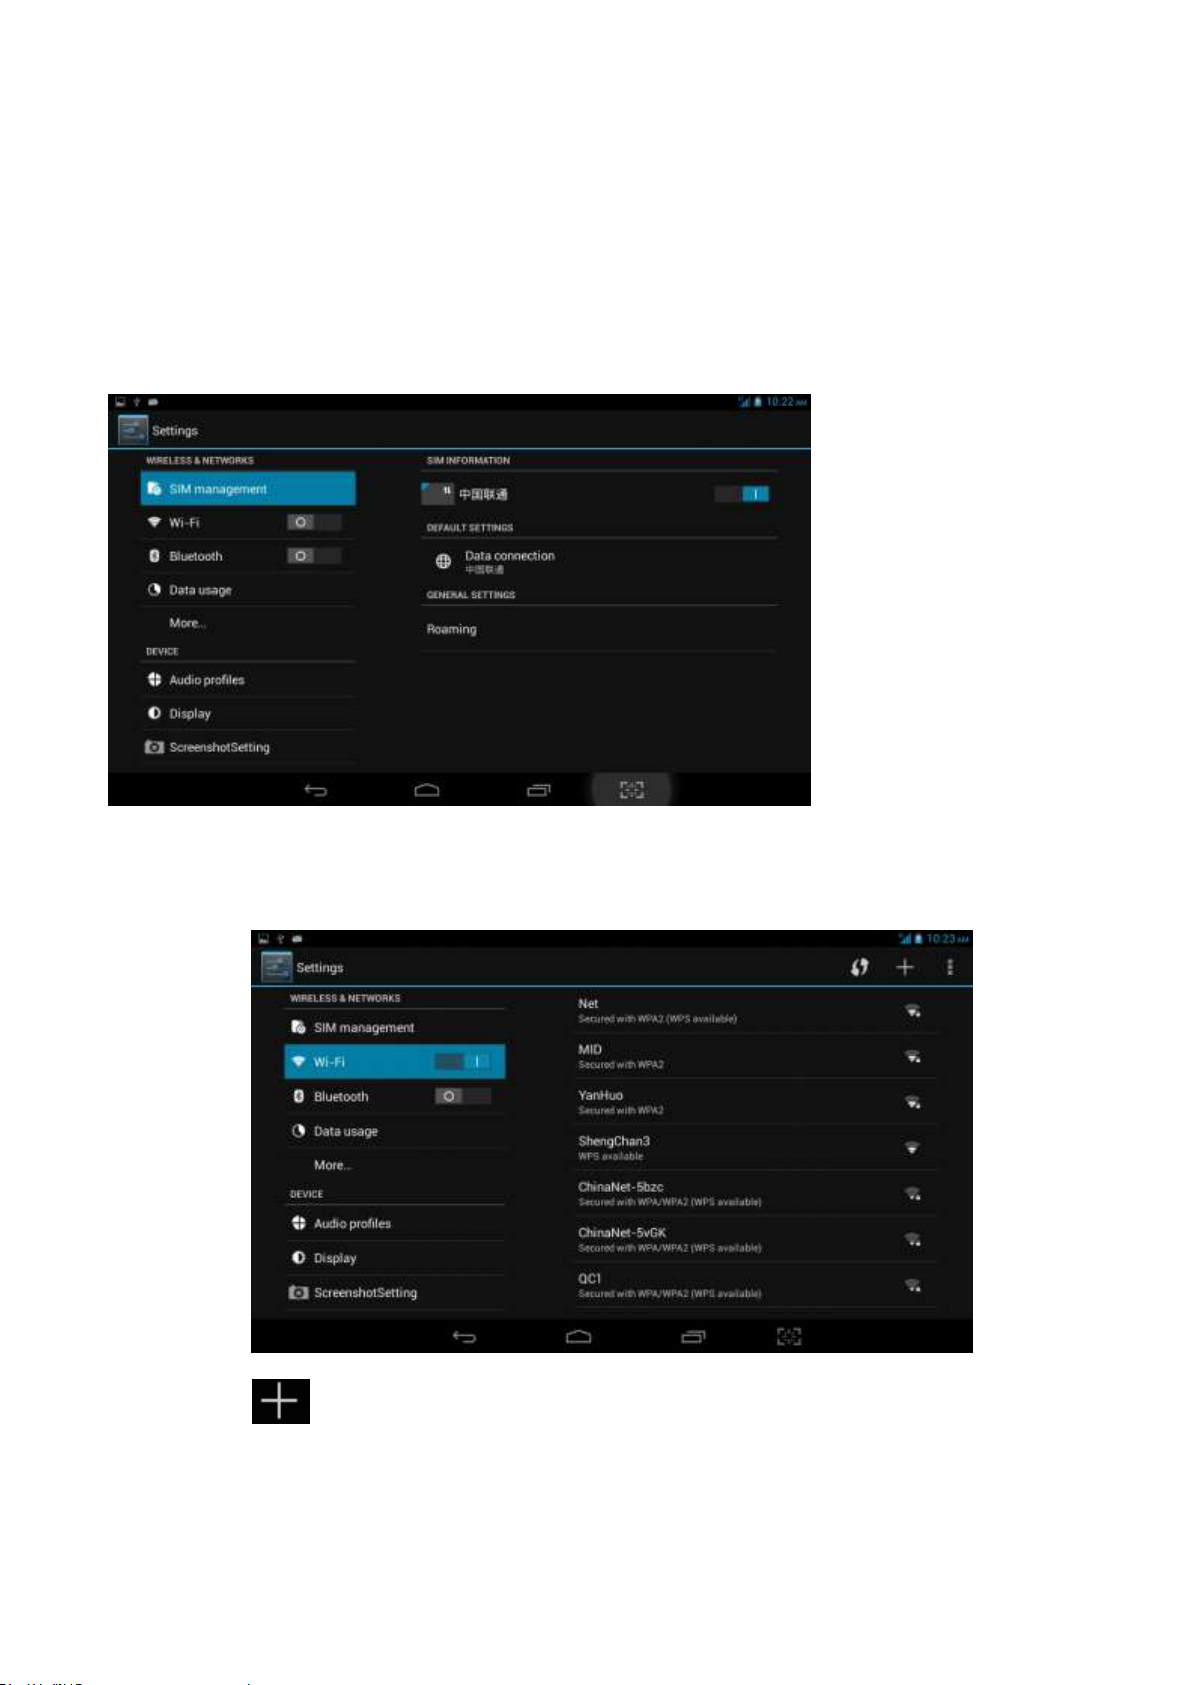
4.1 SIM Card management, WIFI & Network
SIM Card management
Through SIM management, SIM setup can achieve, for example, turn on/off SIM or turn on/ off
data connection.
Connect WIFI
Choose setup application on main interface.
Turn on WLAN, MID will scan automatically available wifi network.
Choose target wifi network, inputting password if requested, click “connect”
Add Network
Click icon top right at screen,
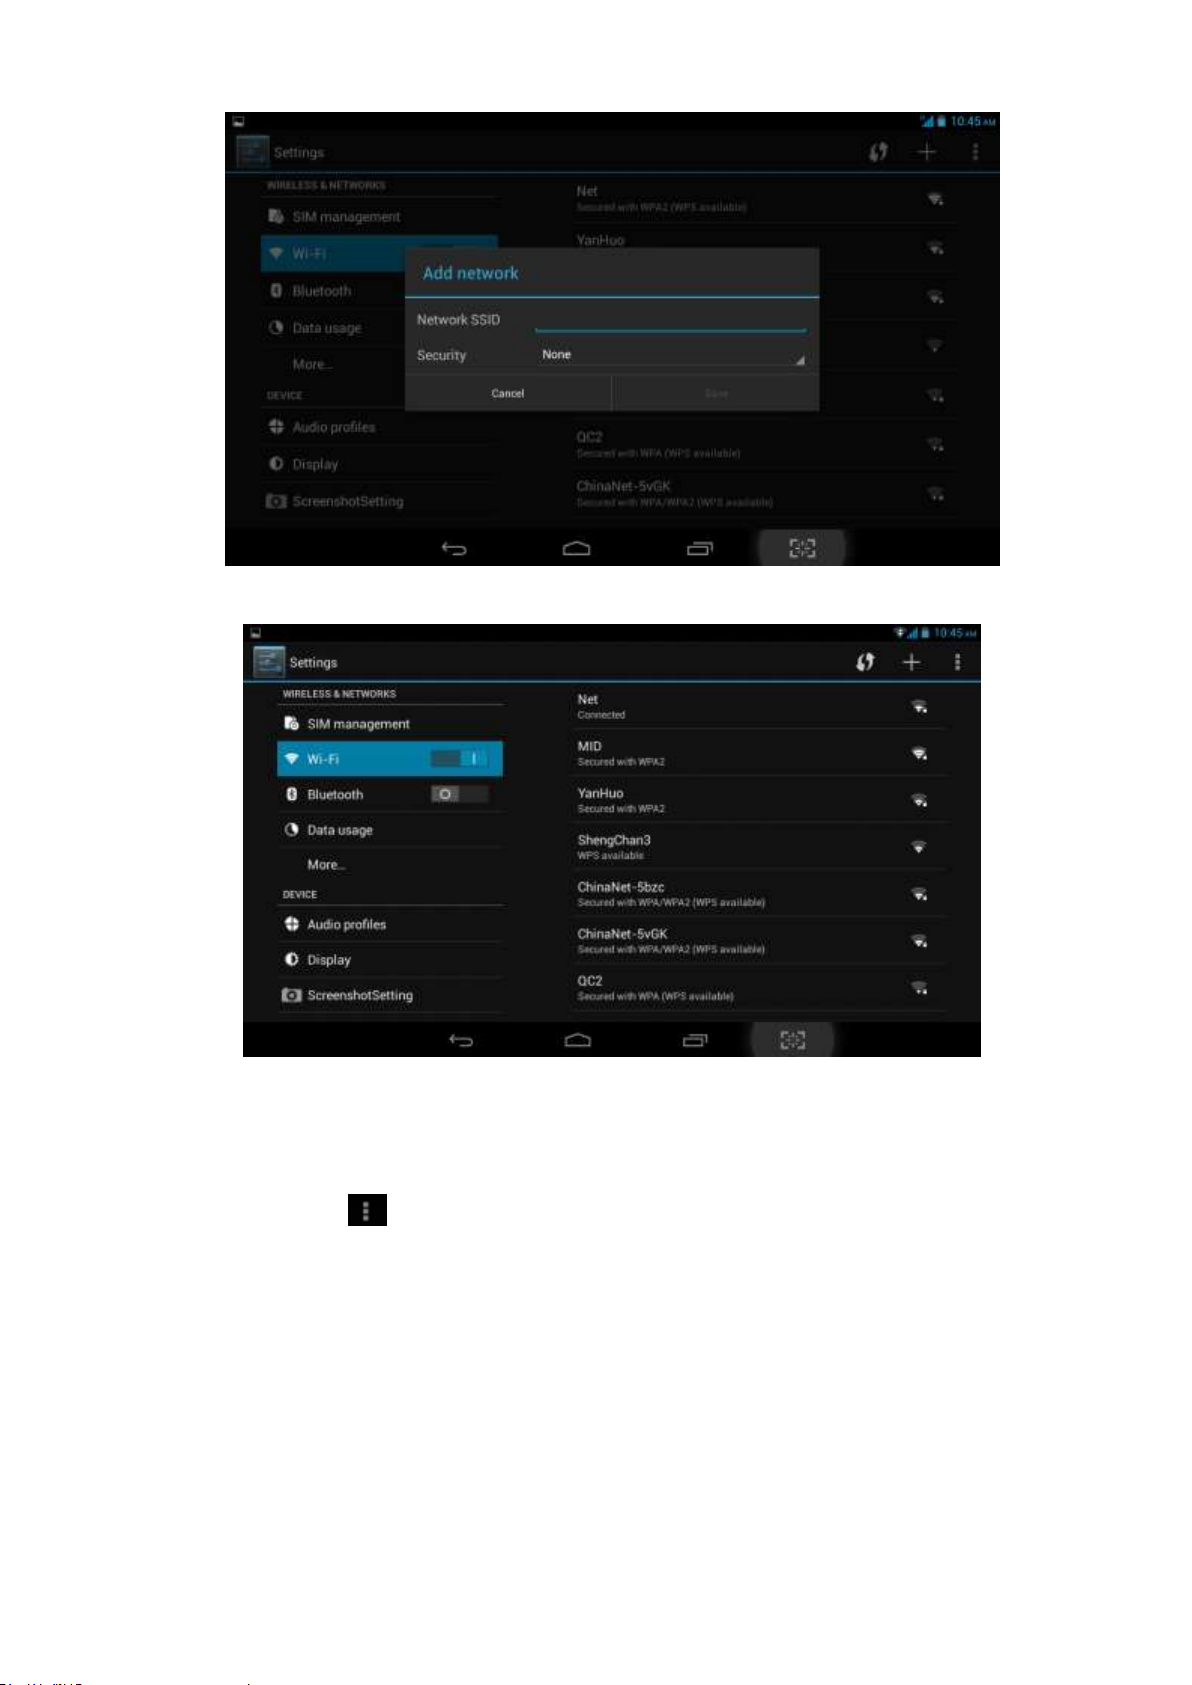
16
Input network SSID,name of target network, and click “save”.
Click user name saved and click “connect”.
WIFI Status.
Under WIFI Status turned on, user can see the notice at bottom right corner when WLAM
network available.
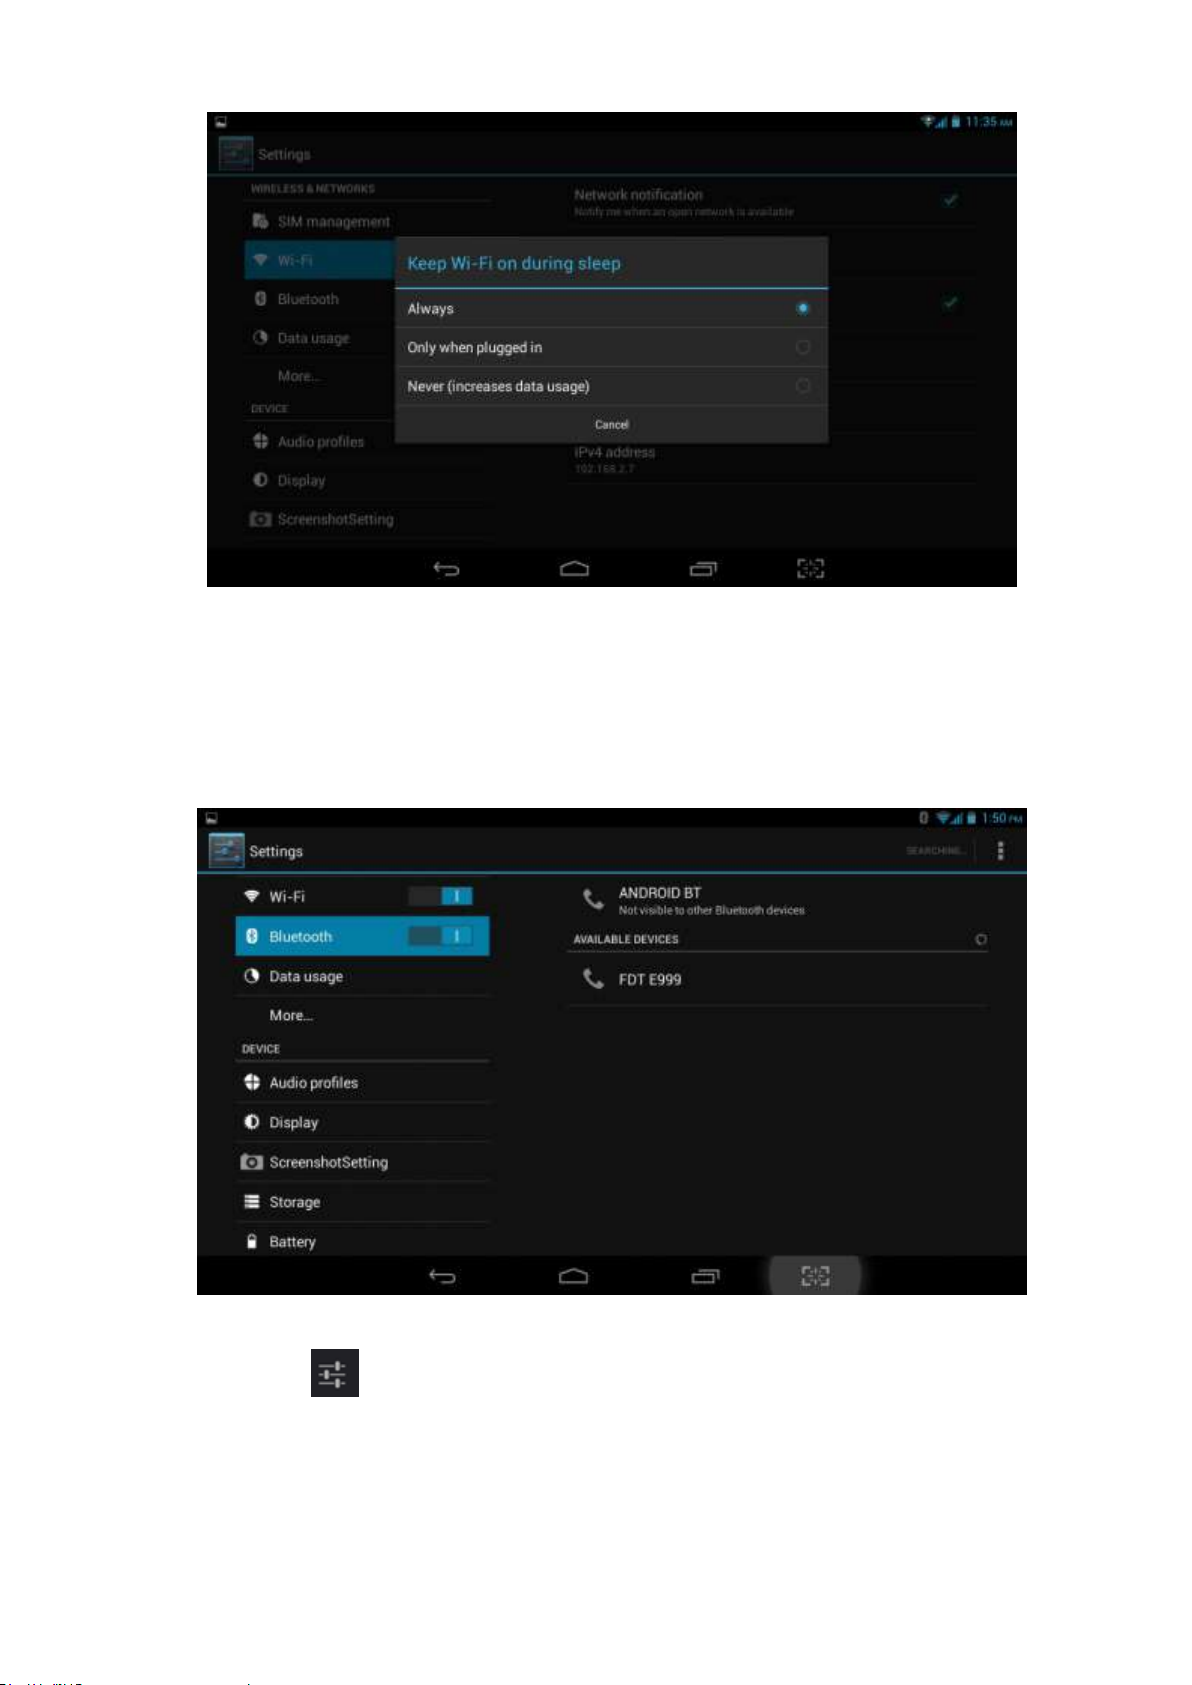
Connect WLAN during sleep mode.
Click icon top right at screen,and choose high class mode。
Click “keep Wi-Fi on during sleep” and choose accordingly the option prefer to.
17
4.2 Bluetooth
. Choose settings application on main interface.
Turn on Bluetooth as shown below.
The device will find the nearby device automatically when you click “search for
devices”.
Click the target device name, input the password and choose “pair” for sure after
“Bluetooth pairing request” window pop up.
Click icon ,entering into the interface, and then you can operate accordingly.
Target device name can renamed if need.

18
4.2.1 Bluetooth setup
Rename
Click icon ,,choose “rename tablet” and change to the name as what you want.
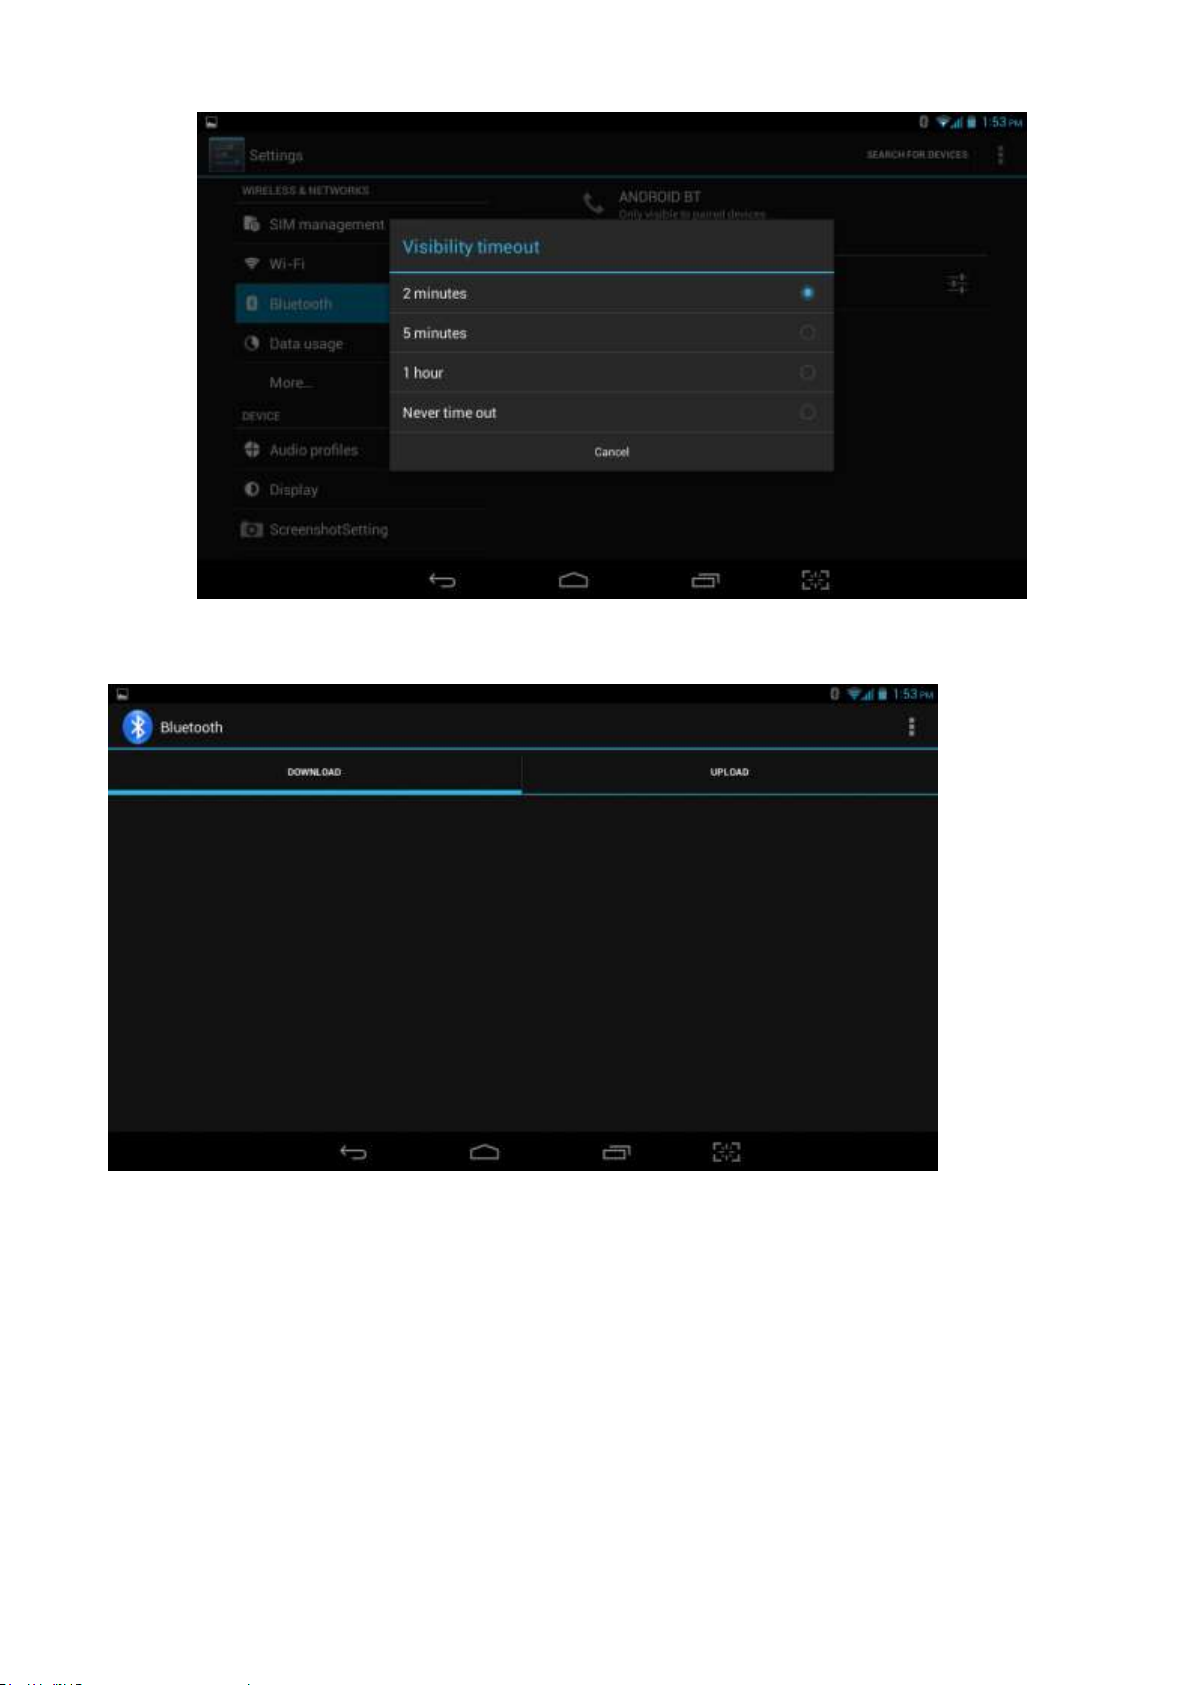
Visibility Timeout
click “visibility timeout” and choose time options accordingly.(Note:visibility timeout refers to the
time setup of device be visible.
19
Visibility Timeout
click “visibility timeout” and choose time options accordingly.(Note:visibility timeout refers to the
time setup of device be visible.
Show received files
1.Open a file transfer service, allowing support bluetooth FTP client connect bluetooth devices,
to achieve access to the server file and operations.
2. Bluetooth distance sensor
Turn on bluetooth distance sensor, when two bluetooth devices relatively far distance, or broken
links, a bluetooth device will make prompt sound
4.3 Data Usage
SIM Card data usage,

20
WIFI data usage
Click icon ,Choose “Show Wi-Fi usage”,
4.4 More...
4.4-1 Airplane Mode
Airplane mode is function for quick turn off of WIFI & SIM Card. WIFI & SIM card is out of reach
under airplane mode, but it recovers once airplane mode turn off
4.4-2 VPN
Open VPN and add VPN network, Input network name and related server address, and click
“save” for sure.
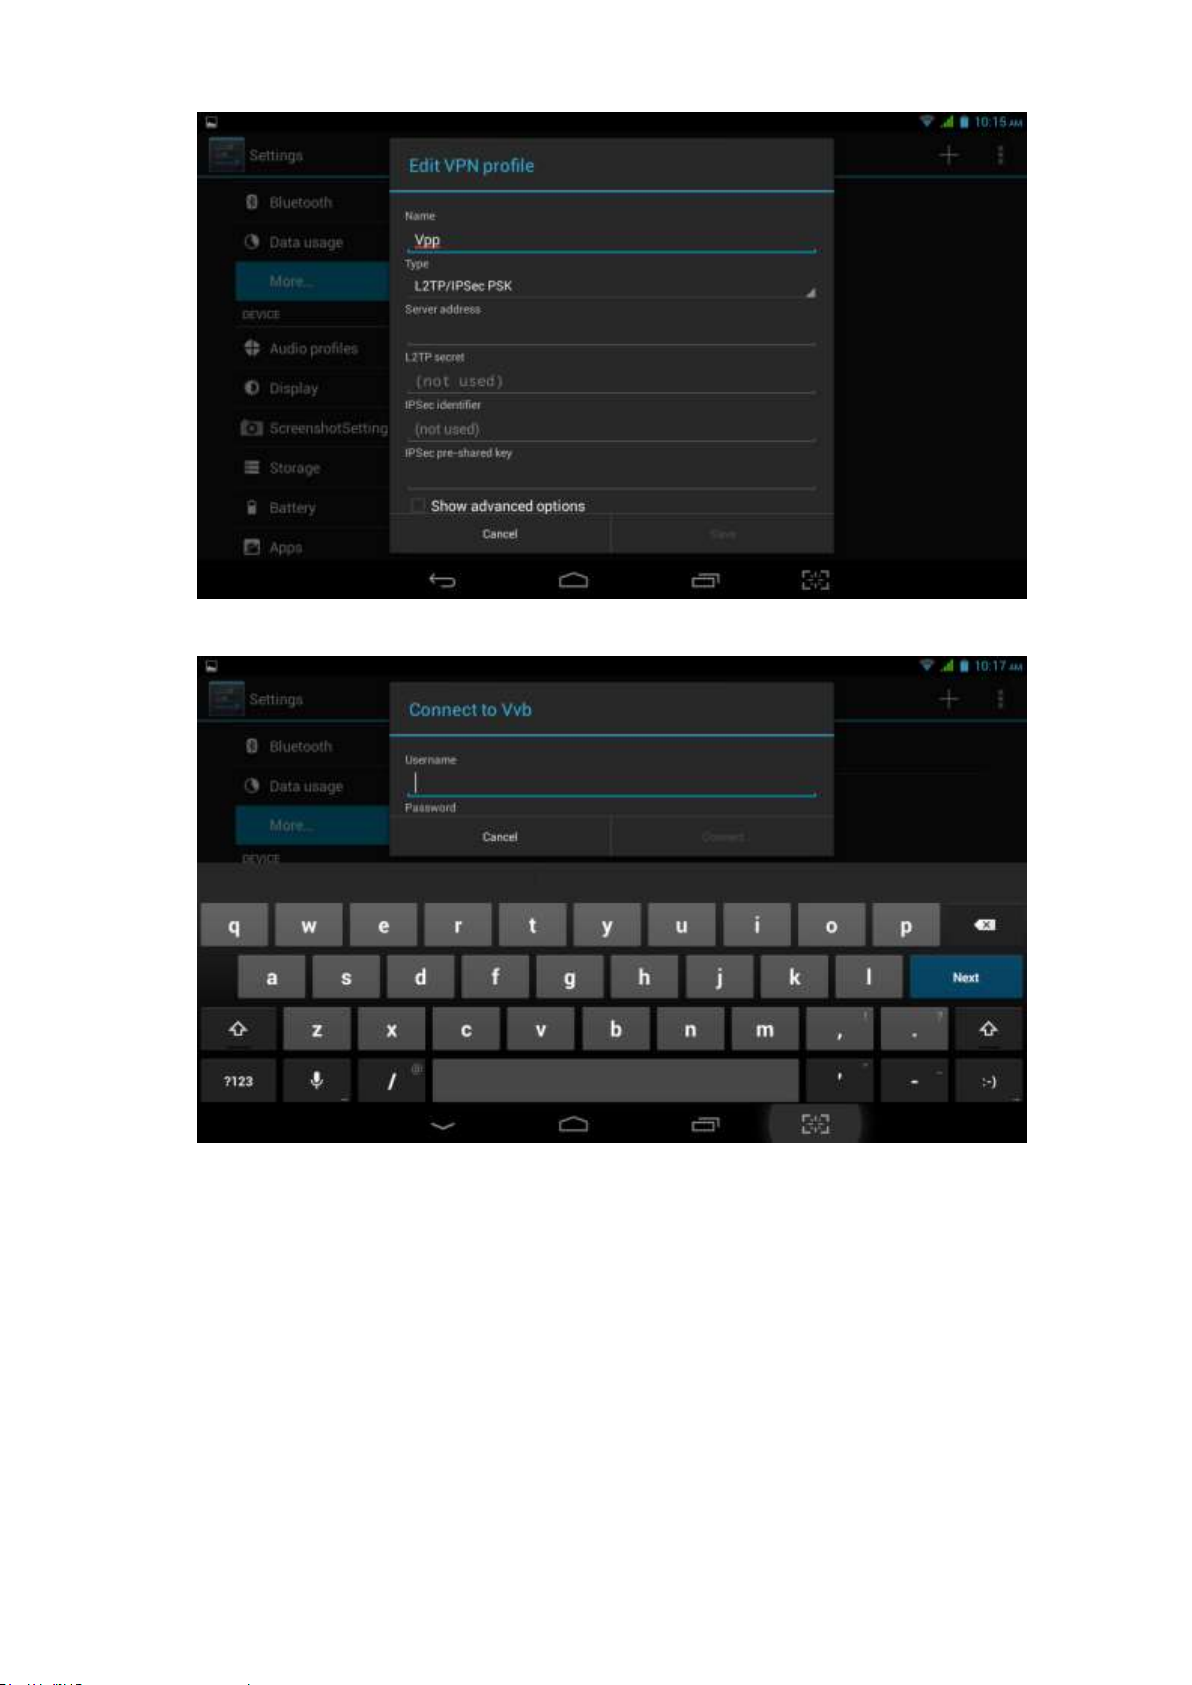
21
Click VPN created, Input VPN Account & password accordingly, and click “connect” to
finish.
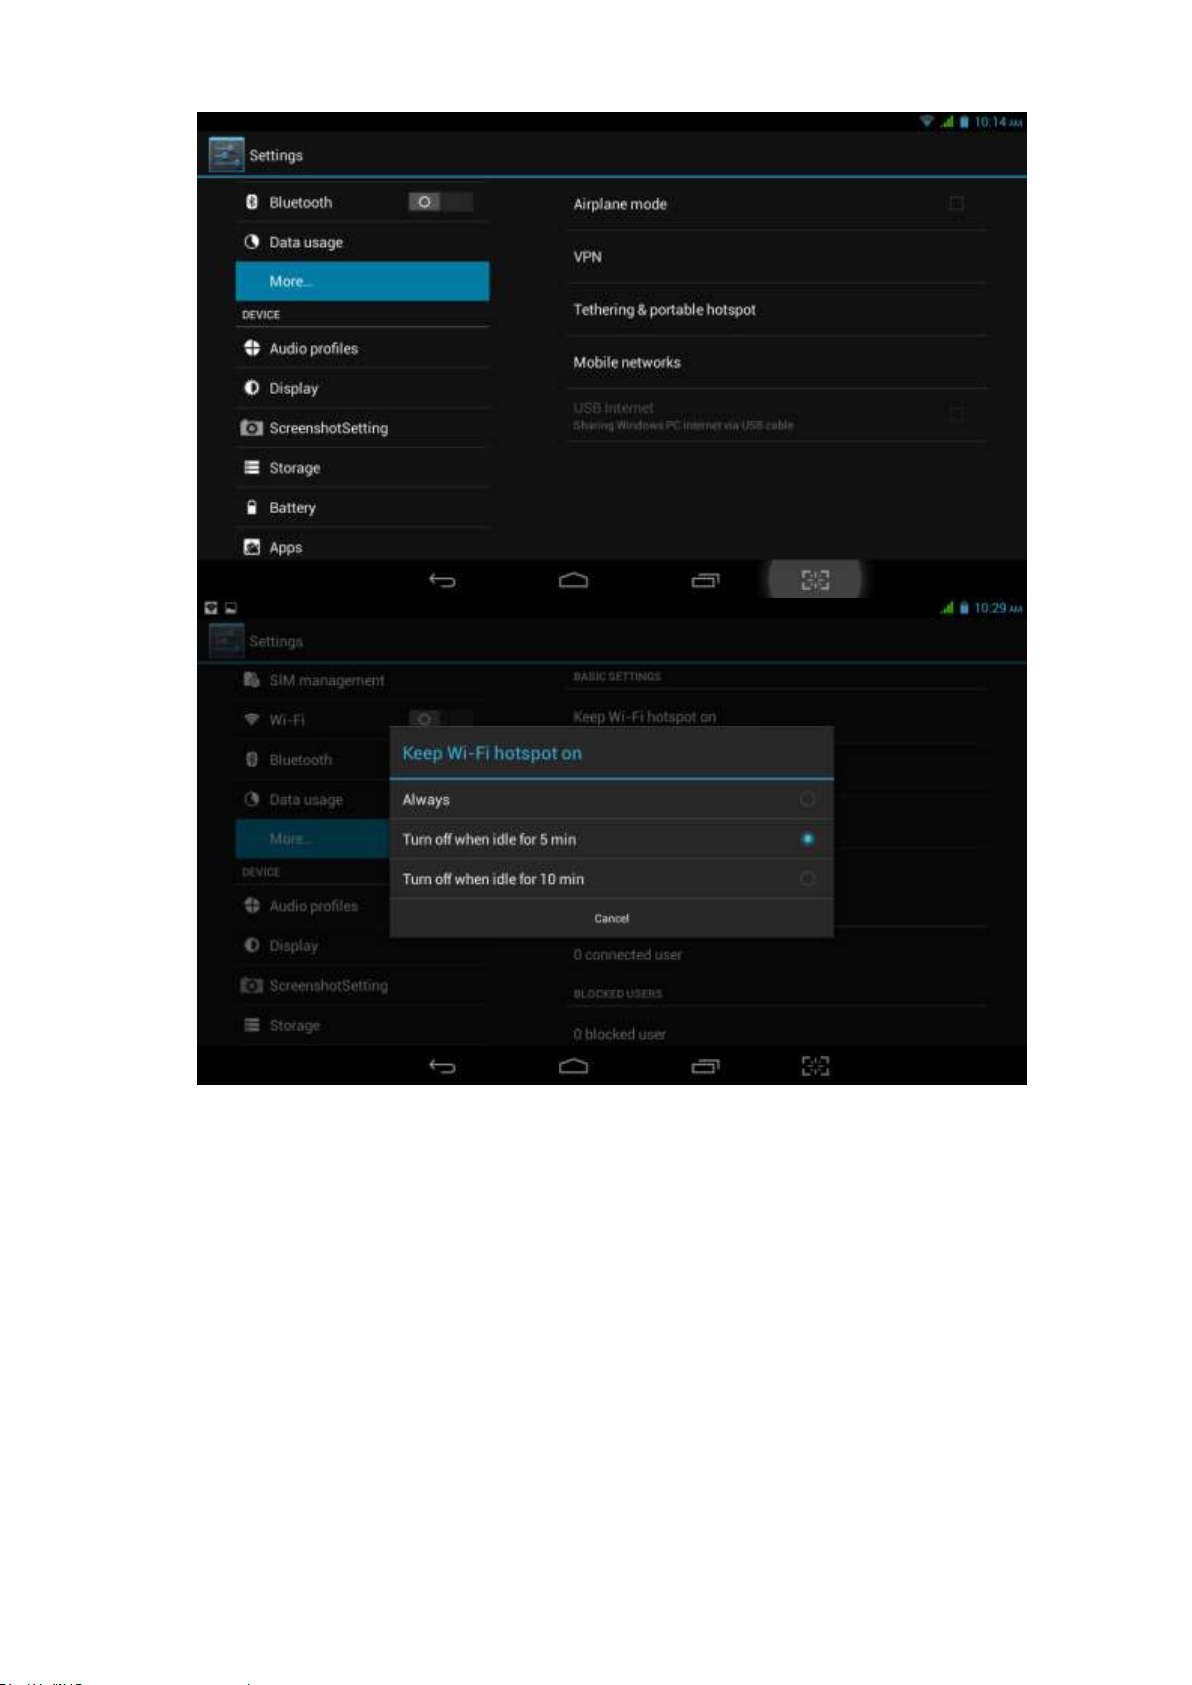
4.4-3 Tethering & portable hotspot
Tethering & portable hotspot
Click the app “settings” on menu interface.
Make sure the device is under wifi connected. Choose More… and click “Tethering &portable
22
Clicks “keep Wi-Fi hotspot on” and choose suitable period.
Click icon “return”,opening portable Wi-Fi hotspot and click “setup Wi-Fi hotspot”.

23
Set up password for network encryption, and password should no less than 8 digits.
4.4-4 Mobile Networks
Data enabled
Under data enabled, you can use 2G/3G network through the SIM card.
Data roaming
Under data roaming, you can surf the internet by SIM card in the situation of roaming.
This data roaming means roaming between operators, but not areas.
Network mode
Choose 2G/3Gfrequency channel. GSM means 2g network, this device support GSM
850/900/1800/1900MHz and 3g WCDMA 2100MHz. 3g frequency channel WCDMA
850MHz/900MHz/1900MHz is optional.
(1)Access Point Name(APN)
Click Mobile network settings, see as below picture

24
(2)Access point name (APN)
Choose the corresponding connection method see as below picture
Notes : (CMWAP transfers the date via GPRS, it can only visit wap webpage, but CMNET
supports www browser on mobile internet, it can log in the similar web page the same as we
surfing on the computer. Meanwhile, the charges for them are different.)
(3)Network operator
Click operator, tablet system will automatically search available networks GSM and WCDMA,
see as below picture

25
4.4-5 GPRS data priority mode
When open the GPRS date priority mode, it will give preference to your use of the telephone
network.
4.5 Audio Profiles
Open setting and choose Audio profiles and you can choose different mode for setting see as
below picture
Click General and access to setting see as below picture

26
Vibrate
Click Vibrate which can realize the vibration effect on MID when you dial phone call, see as
above picture:
Volumes
Click Volumes which can control the volumes of Ringtone & notifications、alarms, see as
below picture
Voice call ringtone
Click voice call ringtone and you can choose the different ringtone as you like, see as below
picture

27
Video call ringtone
Click video call ringtone and you can choose different mode of ringtones, see as below picture
System
It can be checked by ON/OFF, “Dial pad touch tones”, “Touch sound”, “Screen lock sound”,
“Vibrate on touch”.
(Notes: except standard, silent, meeting, outdoor mode can only be chosen but not be set.)
4.6 Display
4.6-1 Brightness
Click setting Apps
Click Display Brightness.
When pop-up brightness Settings panel, you can drag the brightness slider to adjust
degree between dark and bright. See as shown picture

28
Once you set up the brightness, click ok.
4.6-2 Wallpaper
Click Setting Apps
Click Displaywallpaper
You can choose the wallpaper as you like, such as live wallpaper - gallery (custom) -
wallpaper (system) - video wallpaper, as shown in picture
4.6-3 Automatic rotation
System as the default open, when closed, the system will not rely on gravity induction to shift
MID panel.
4.6-4 Sleep
Click Setting Apps
Click Display
Click Sleep
When pop-up the page of sleep time setting, you can choose the sleep time as you
like. See as below picture

29
4.6-5 Font Size
Click Font Size which can adjust font size of the MID, see as below picture
Screen shot setting
Screen shot:set up the time of screen shot, location of the picture and in the status bar whether
displayed on screen buttons, etc. Tick on display screen button, see as below picture

30
4.7 Storage
Open setting AppsStorageDEFAULT WRITE DISK, you can choose the preferred
installation space when you install new applications.
Check available space of SD Card and MID.
Check SD card and MID storage
Enter setting interface。
1. click storage to see the storage
2. INTERNAL STORAGE
System is stored as a MID space reserved for system files, see below picture,This space can't
see content.

31
(2) USB STORAGE
USB Storage is MID NAND memory. If want to check the storage content you can go to main
menufiles managements for checking.
2. SD Card
In the storage you can check the SD Card total space, available, unmount SD Card and Erase
SD Card, and see as below picture
Remove SD Card safely
Click setting Apps
Click storage
Click uninstall SD Card
Now you can remove the SD Card safely.

32
Notes: If you remove the SD Card correctly, it can effectively protect it and increse the usage
life of the SD Card.
4.8 Battery
Click settings battery and then to check the battery using status as shown below:
4.9 Apps
1. Please select setting in the application list.
2. Choose application and enter and then you can manage and delet the installed applications.
In the lower left corner you can check the syetem storage space, see as below picture
3. Check internal storage space; see as below picture

33
4. Check the running applications of their usage and available space see as below picture
4.10 Account
1. Click setting
2. Click Add account, see as picture

34
3. For example tap Google, see as picture
4. Once login successfully you can open synchronization function, see as picture

35
4.11 Location access
Click setting and choose location access, see as picture
1 Google Location
When you open Google location, you can fix MID position via WIFI
2 GPS satellites
Use GPS on your MID which can pinpoint your location
3 GPS EPO assistance
Use GPS assistance date (EPO) to speed up GPS positioning, but it need insert SIM Card and
generate lots of traffic.
4 EPO Setting
Tap EPO Setting to check EPO position date and whether it automatically downloads.

36
5 GPS
GPS can speed up the fixed time of location via internet when used
6 A GPS.
Tap A-GPS settings and you can see below picture
6.1 Disable after Reboot
Choose disable after reboot the A-GPS will automatically closed when you reboot MID.
6.2 Network Request
Use network request to get your location via internet
6.3 Network Used
Open network used you can choose the different mode of network, see as picture

37
6.4 Profile selector
Choose profile selector you can shift them as you like,see as below picture
7 Location and Google search
Use Location access and Google search, you can use your location information to improve
search result and other services.
4.12 Security
Set up screen lock
You can use password and unlock pattern to lock the touch panel and protect your MID.
Notes: Once you have set up the screen lock, every time when you reboot and unlock the touch
screen will request to enter your password.
Set up unlock pattern
1.
In the main menu page please click setting Application.
2.
Click the security
3.
Click the Screen lock
4.
In the pop-up text setting area, choose pattern.

38
5.
Click Next step as it mentioned.
6.
It will pop up unlock pattern screen which has 9 dots. Slide your finger to connect the
dots in any order on the next screen for creating a personal screen unlock pattern. You need to
connect at least 4 dots. See as picture
7.
Click Next
8.
When you see the notice and type again the unlock pattern and click OK.
Set up unlock PIN password
In main menu please tap settingsSecurityLock screenin the pop up text set area choose
PINtype new PIN password(finger) and tap Nexttype again new PIN password and tap OK.
Set up password
In main menu please tap settingsSecurityLock screenin the pop up text set area choose
Passwordtype new Password(alphanumeric) an
tap Nexttype again new Password and tap OK.
Unknown sources
In main menu tap Settings SecurityUnknown sources, see as shown picture

39
Notes: Click unknown sources and then you can install APK files by hand successfully.
4.13 Language & input
Tap settingLanguage & input. You can choose the language as you need. See as below
picture
Tap settingsLanguage & inputAndroid keyboard settingsinput language, see as below
picture

40
In the effective input method you can change the default language as you need. See as picture
Return to Language & input, tap default to choose input method as you need. See shown
picture

41
4.14 Backup and reset
Tap Backup my date after you have logged in Google account and connected Wifi the system
will automatically backup your date to Google server.
For some reasons you have to restore the factory settings, please tap restore the factory
settings.; If you want to format MID NAND, please click on Erase USB Storage and tap reset
tablet is ok. See as picture
4.15 Date and Time
As default setting, system will set the date and time automatically by using network-provided
values.
Set the date and time zone by hand
1.
Click settings
2.
scroll down the screen and click date and time.
3.
Close Automatic date & time
4.
Close Automatioc time zone
5.
Click Select time zone, and then choose time zone in the list. Scroll down the screen
you can check more time zones.
6.
Click set date and tap up and down button to select Day, Month and Year, thne tap
“set” to finish the setting.
7.
Tap set time, and tap up and down button to select hours , minutes, choose AM and
PM to set morning or afternoon(it will not support 24-hour format), and then tap “set” to finish
the setting.
8.
Click Use 24-hour format, you can shift between 12-hour and 24-hour format. And the
time format will applied in the alarm clock.
9.
Click choose date format and choose the date format which will show in your MID.

42
Click here to set
schedule power
on
Click here to set
schedule power off
Turn
on/off of
schedule
power off
Notes: If you use the time which network provided automatically, you are unable to set the date
and time zone.
4.16 Scheduled power on off
Tap settingsScheduled power on & off, see as below picture 4.58;
4.17 Accessibility
4.17-1. large text
Click Large text can make the system font become larger
4.17-2.Press Power button to end call
With this function, when you make a call and press “power” button, you phone call will
automatically hang up but will not turn to sleep
4.17-3.Touch & hold delay
Click Touch & hold delay can adjust the delay time, see as shown picture

43
4.17-4. Install web scripts
When you open it system will allow you install web scripts, but it will increase the security risk
when you browser website.
4.18 Developer options
4.18-1 USB Debugging
Once you open USB debugging, it can read the MID with some software. But when it opened
the USB storage need to manually bring up before us.
4.18-2 stays awake
When you open stay awake, MID screen will never sleep while charging.
4.18-3 Cursor position
When you open Cursor position, you can read the touching point operation’s transverse and
longitudinal axis coordinates of your MID
4.18-4 Display touching operation
When you open display touching operation, it will display your touching area of MID. And it will
more accurate and clear when used with cursor position
4.18-5 Display update
When display updates, it will flash in the corresponding place.
4.18-6 Display CPU usage
After opening display CPU usage, upper right corner of MID will display the CPU usage,

44
4.19 About MID
MID status
1Enter the settings application
2 Click About MID. Can view the status information, model No., Android version, version no.
and other information.
3 Click “status information”, Can view the battery status, battery, SIM status, IMEI No., IP
address, etc.
5. Multimedia
5.1 Music Player
In the application menu or on the desktop, click the icon to enter into the Music Player
interface, select a different way to find songs

45
Album
Cover
Stop /Play
Next song
Last
song
Artists
Song
Name
Shuffle
Loop
Playback
Drag the playback progress bar to adjust audio playback progress
Music player button operation is shown in pic 5.2
5.2 Video
In the application menu or on the desktop, tap the icon to enter into the video player
interface.
Video player buttons described in pic 5.3

46
Select
the
screen
mode
Adjust
video
playback
progress
Play/Stop
5.3 Gallery
Gallery application can automatically search for photos from the Micro SD card and video files,
And Gallery folder will classify these pictures and video files, You can use the Gallery
application to check and edit photos, check the photos and set it as a desktop picture
Check Photos
1 In the application menu or on the desktop, tap the Gallery application
2 Enter the gallery, tap the folder to check the included pictures
3 Tap the picture you want to view, the system will automatically view in full screen mode.
4 Photos can zoom in or zoom out by separate or fold two fingers. Double clicks can make it
too.
Tips: When browse pictures, you can swipe left or right picture to switch picture Browse
Edit and set picture
View images in full screen mode, press the Menu button to display the menu options, you can
select the options you want to edit and set the picture.
slideshow
1 Open a picture, click the menu button using the virtual keys to display the menu options
2 Tap the slideshow, it will automatically loop (or tap the icon in image folder)
Crop
1 Click on the menu button to display the menu options
2 Then tap Corp, drag the relevant regional election to adjust the cutter
3 Tap cutter, drag from center to outside to adjust the crop size.
4 Adjust the size you want, tap Crop
5 As abandon cropping, click Cancel to return to picture overview
Edit
1 Click on the menu button to display the menu options
2 Tap Edit

47
Switch front and
rear camera
Click shooting
Submenu
Panorama mode
Camera
mode
View photos
and videos
Slide the zoom
Settings
Panorama mode
Color effects
Back
High dynamic
range
Flash light
Adjust balance
3 In the pop-up options can be brightness, style, color, effect settings
4 Click Save
5 As abandon editing, click the Back key, in the pop-up dialog box, click NO back to picture
browsing
5.4 Camera
In the application menu or on the desktop, tap the icon to enter into the Camera interface
Camera operation button and Switching camera as shown in pic 5.4 and pic 5.5
Pic 5.4
Pic 5.5
5.5 FM Radio (Optional functions)
In the application menu or on the desktop, tap the icon to enter into the FM Radio

48
Open external audio
Enter into the channel list
Favorite’s
button
Last
channel
Next
channel
Current
frequen
cy
Menu
Play /Stop
interface
Connect Headphones
Select the top right corner button pic 5.6
Select the search, Then FM band can be found in
Favorites: Click the button on the main interface to add to Favorites
Note: Using FM Radio plug in your headphones as an antenna
If no antenna, you will not be able to search the MID band radio
6 Communication function
6.1 Phone
8 Select the dialing application
9 Operate according to Figure

49
Show number
Call
Input the
phone
number
directly
Add
recipients
Send
message
Dial-up area
Function keys
Hide dial pad
Call records
Contacts
6.2 SMS
6.2.1 In the application menu or on the desktop, tap the icon to enter into the SMS
interface
6.2.2 Select edit new message
6.3 Contacts
In the application menu or on the desktop, tap the icon to enter into the Contacts
interface

50
Search for contacts: Click the button to enter into the search function
Add contacts: Click the button to enter into the Add contact interface
7. Movil Teacher (Optional)
7.1 Device setting
Click the "Setting" icon to enter in the setting panel.
Pic 7.1
Locate and choose "Language and keyboard" and select "Voice Search"

51
Pic 7.2
Select "Language"
Pic 7.3
Select “English”

52
Under "Dialect" choose, select English(US)
Select "Keyboard and Language", and select "Output of Voice Text" on the right
Select “Language”
Select in the menu that appears "English (United States)"

53
7.2 USER’S INTERFACE
7.3NAVEGACION
The main screen contains the Main Menu of each chapter.
From here you can enter all of the chapters of course.
There are two methods of navigation between chapters.
You can move forwards and back from one chapter to another as shown in the following image.

54
Drag the tabs to navigate between chapters.
Drag lessons’ panels for details of that lesson
In compounds chapters touch tabs to access that section
Once you enter a letter or a word in the "search query" in the dictionary, you can scroll through
all the words in the dictionary, or choose the word that interests you to access more options

55
Once you choose a word from the list, you will see the dictionary.
From here you can:
• See the translation of the word.
• See the definition of the word.
• Practice writing.
• Listen to the pronunciation.
• Practice your pronunciation of the word.
Touch the panels to access the main menu of the lessons in this chapter

56
The main menu of the lessons allows access to each individual lesson and also displays
information about your score and progress in each lesson.
To unlock the padlock and enter the next lesson, you should get 50% or more in the previous
lesson
Once the lock is opened, you will see the blue button 'play' to begin the next lesson
As you progress through the chapter, you will have access to more lessons.
You can always go back and review the finished lesson to review topics or improve your score.
The lessons have several different types of activities, all complete with instructions and
guidance. In all the lessons you can find the same functionality and continuity of concepts of
user’s interface.

57
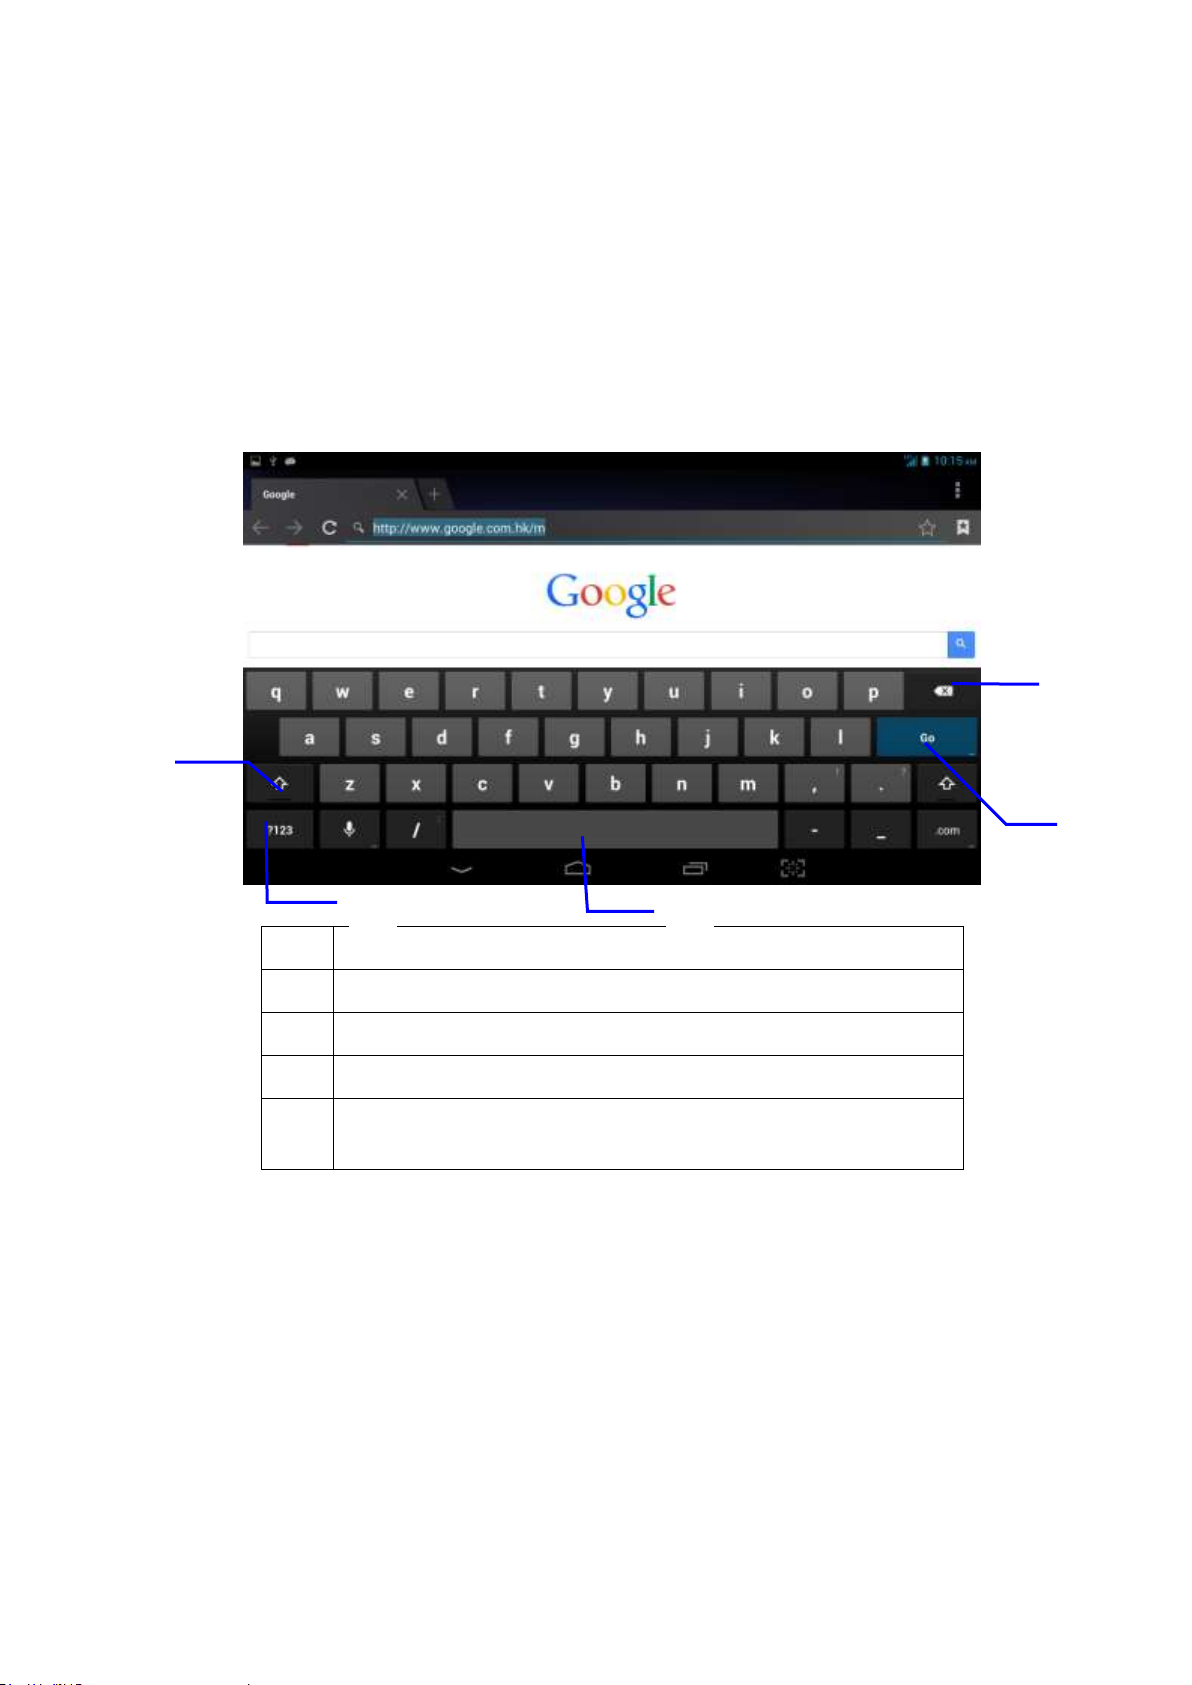
8 Internet
8.1 Browser
When wifi or net work is well connected, click to input IP address and can surf internet.
As pic 7.1
Pic8.1

58
8.2 E-mail
Email application with e-mail setup wizard, can add common Web e-mail service provider (Such
as Yahoo, Gmail and 163 other provider) external POP3 or IMAP e-mail account. Figure 7.2
Pic 8.2
A E-mail settings
1 After clicking the icon , E-mail setup wizard will appear to help you set up
2 Input your email address and password for the email account
3 Click the Next Step button to check the mail server is available transceivers
4 Input the account name and email name, then tap Done
5 If the mailbox is available, will automatically enter your inbox
B Delete mail account
You can delete the set up POP3 or IMAP email account from your MID
1 taps the icon
2 Enter into your inbox
3 Click the Menu key
4 Tap the Settings
5 Right down select Delete Account
6 Click OK to remove
C Send E-mail message
1 Tap to display your inbox
2 Click the e-mail inbox will automatically refresh, click to read

59
Add
Attachment
3 Click the Menu key to pop up the menu
4 Tap the top right corner ; enter into edit new mail interface
5 input the recipient's e-mail address
6 Input a subject and message content
7 Click Add Attachment
8 Select the attachment you want to send (such as pictures, video, etc.)
9 Click the Sending key to send an e-mail
Pic 8.3
9 GPS function (optional feature)
9.1 GPS positioning
1 MID built-in GPS precise positioning satellite signal receiver. But available map is provided by
third party.
2 Enter into the setting interface, click on the icon , enter in pic 9.1

60
Satellite No.
Satellite
value
Pic 9.1
After successfully positioned, blue part will be transformed into green. And display the latitude,
longitude and altitude, speed, position location time. pic 9.2.Satellite value represent
positioning signal of the intensity, Positioning time associated with the choice of setting time
zone range. If time does not match with positioning location time, please check your time zone
selection is correct
Pic9.2

61
Clock
Setting
10 Other Applications
10.1 Clock
In the application menu or on the desktop, tap the icon Clock to enter into the Clock interface,
Figure 9.1
Click the alarm settings, alarm clock can be set
pic 10.1
10.2 Calculator
1 Tap on the icon
2 Enter The calculator basic panel
3 Touch counter number on the panel or operator to calculate

62
pic 10.2
10.3 Explorer
Explorer with the TF card files or folders to copy, cut, delete, rename and other operations
can also share the file, install apk and other functions
In the application menu or on the desktop, tap the icon to enter into the Explorer interface,
Figure 9.3
Pic10.3

63
A. Some operationgs, such as copy, cut, delete, rename, etc. Select a folder or file, long press
a folder or file to enter into Figure 9.4 Interface.
pic 10.4
B. Paste the copied or cut file or folder: on the directory you want to paste, you can select the
icon in the upper right corner to
paste
Pic10.5
C .Share the file: Select a file and long press this file, In the top click on " " In the pop-up list,
select "Share" item. According to the pop-up list to select the way you want to share

64
Pic 10.6
D. Install apk file: select the suffix. Apk file on the Explorer, pop up the installation program,
follow the prompts to install third-party software
E. Create new folder: Select the folder you want to create the directory, Click the right
button , select the Creat New Folder, Follow the prompts to complete the Creat New Folder
10.4 Recorder
In the application menu or on the desktop, tap the icon to enter into the Recorder interface,
Click the Record button to start recording, click the Stop button to stop recording.
Just click the play button to play the recording, the system automatically prompts to use
this recording or to give up, please manually select.
Play recordings: Select to use audio player audio, in accordance with the Explorer select the
audio files, and click to play

65
Figure10.7

66
11 Application Installation
11.1 Installation
Install third-party applications
1 Tap on "Explorer" application, select the application you want to install
2 Press and hold the application you need to install
3 Pop-up installation options, click Install apk
4 Follow the installation wizard to complete then can be run.
Note: Applications only with APK suffix are compatible with system.
11.2 Uninstall
Uninstall application
1 On the Home screen, tap Settings bitmap
2 Tap the application that lists all the applications installed on the system list of programs
3 Tap the APK you want to uninstall, click Uninstall
4 Click OK to complete the uninstall
Tips: system pre-installed program manager can easily achieve uninstall, Open the Program
Manager, click on Uninstall tab, the system will list the installed application lis
12 Firmware upgrade
1. Press the “POWER button to turn off the device before updating (NOTE: Press and hold the
“POWER button for at least 10 seconds if the device can not be turned on normally).
Insert the Driver CD and copy the file named “MTK Android Upgrade Tool” to your computer
desktop (NOTE: The device can not be updated directly from CD).
Open file “SP_Flash_Tool_v3.1332.0.187”and double click shown as
below picture.

67
It shows as below picture after open the tool.
2. Click button“Scatter-loading”in the right, Choose file “Upgrade
file”-“MT6582_Android_scatter.txt”, then click “Open”,shown as below picture.

68
3. After
device has been turned off; connect the device to the PC by the USB cable supplied with the
device.
Choose “Install from a list or specific location (Advanced)”, and then click “Next” ,see the picture
below:
Choose“Include this location in the search”- “MTK Android Upgrade Tool” >
“Driver_Auto_Installer_v1.1236.00” > SmartPhoneDriver > “x86” > “Infs”, Click“OK”.
Shown as below picture.

69
Then click “NEXT”,The system will detect and install the driver automatically, finally click
“Finish”, see the pictures as
below:

70
The “Found New Hardware Wizard” window will pop up on the bottom right corner as shown
below.
4. Pull out USB cable,then click “Firmware->Upgrade”

71
5. The upgrade process begins, shown as below picture (please reconnect the tablet pc to
computer if it shows that it is being charged)
6. When the upgrading is 100% done ,“Download OK”pops up. The upgrading process is
done, and USB cable can be pulled out.

72
7. NOTE: Please don’t disconnect the USB cable during the updating process because this will
cause update failure or possible system failure of the device.

73
13 Troubleshooting and FAQ
13.1 Troubleshooting
1.1 Device can not connect to Wi-Fi
1) Ensure the wireless network is working by testing it using another wireless device.
2) Ensure the device and the wireless router is within the range of the wireless network to be
connected too. Walls or other obstructions will reduce the possible distances between wireless
devices.
3) Ensure the security password being used is correct.
1.2 Device doesn’t turn on
1) You cannot turn on the device when the battery charge is below the critical level, please
charge the battery.
2) Press the RESET button on the top of the device and check if it is restarting normally or not.
3) Check if the charger is connected correctly.
1.3 Heat Issues
When running multiple applications, using the screen on its brightest setting, or when being
charged, this device can get quite hot. This is normal and should not cause any inconvenience
when in use.
1.4 System has anomalies and doesn’t work correctly
Installing some third-party applications may cause the system to operate incorrectly. Press the
RESET button and perform a system reset to resolve this issue.
1.5 Cannot set E-mail Account or registration application
1) Ensure that the tablet is connected to a Wi-Fi network and can connect to the Internet.
2) Ensure your E-mail settings have been entered correctly for the account being accessed.
3) Make sure your system time and local time is correct.
1.6 Cannot record
Press the RESET button on the top of the device, and then check if the record function works
correctly.
1.7 The stand-by time of the device is too short
1) The duration of the lithium battery varies with environmental temperature changes and the
service conditions. If the environment temperature is too low or too high, the duration of the
battery will be affected. It is recommended to use this device at normal temperature.
2) Battery life is dependent on usage. High volume, WIFI, and the frequent use may cause the
battery to be drained at a higher rate.
1.8 No sound via earphone
1) Please check if the volume setting is 0.
2) Please check if audio file is broken, and try to play another audio file to confirm. If the audio
file is broken, it may cause severe noise or static.
1.9 The color distortion of video or picture display
Press the RESET button on the top of the device to resolve this issue.
1.10 Cannot copy files
1) Please check if the device is connected to the computer correctly.
2) Please check if the memory space is full.

74
3) Please check if the USB cable is broken.
1.11 No sound or no image via HD Output.
1) Please check if the device is connected to an HD cable correctly, and the TV settings of the
HD port is correct.
2) Please check if the HD cable is broken.
3) Press the RESET button on the top of the device, then check if the HD output function works
correctly.
1.12 Other troubles
Please follow up the steps as below to fix the other troubles before you return the MID/Tablet to
us:
1) Press the RESET button on the top of the device, and then check if the function works
correctly;
2) Upgrade the firmware from the CD and restart the device and then check if the function
works correctly.
13.2 Frequently Asked Questions
2.1 Will my existing eBooks be compatible with this device?
Most popular e-book formats that are not DRM protected are compatible as long as they are in
a supported format: TXT, LRC, PDF, HTM, EPUB, etc. If they are not compatible, an application
may be available on APKShare.com, which could assist you.
2.2 Will this device play High Definition video?
Yes, the maximum HD resolution is 1920x1080.
2.3 Can I add more storage?
Yes, there is a Micro SD card slot on the base of the unit, which supports up to 32GB of
additional memory.
2.4 Can I use an external keyboard?
No, but there are applications on APKShare.com which may make on screen typing easier for
you.
2.5 Can I run multiple applications at once?
Yes, if you plan on running several applications at the same time we recommend installing a
task manager for the unit to run most efficiently.
2.6 Does this device support 3G?
You must use an external 3G USB dongle from your mobile service provider.
(All information is subject to change without pre-notice.)
1.

FCC RF EXPOSURE INFORMATION:
WARNING!! Read this information before using your phone
In August 1986 the Federal Communications Commission (FCC) of the United States with its
action in Report and Outer FCC 96-326 adopted an updated safety standard for human exposure
to radio frequency (RF) electromagnetic energy emitted by FCC regulated transmitters. Those
guidelines are consistent with the safety standard previously set by both U.S. and international
standards bodies. The design of this phone complies with the FCC guidelines and these
international standards. Use only the supplied or an approved antenna. Unauthorized antennas
modifications, or attachments could impair call quality, damage the phone, or result in violation
of FCC regulations. Do not use the phone with a damaged antenna. If a damaged antenna comes
into contact with the skin, a minor burn may result. Please contact your local dealer for
replacement antenna.
BODY-WORN OPERATION:
This device was tested for typical body-worn operations with the back of the phone kept 0.5cm
from the body. To comply with FCC RF exposure requirements, a minimum separation distance
of 0.5cm must be maintained between the user's body and the back of the phone, including the
antenna, whether extended or retracted. Third-party belt-clips, holsters and similar accessories
containing metallic components shall not be used. Body-worn accessories
that cannot maintain 0.5cm separation distance between the user’s body and the back of the
phone, and have not been tested for typical body-worn operations may not comply with FCC RF
exposure limits and should be avoided.
For more information about RF exposure, please visit the FCC website at www.fcc.gov
Your wireless handheld portable telephone is a low power radio transmitter and receiver. When
it is ON, it receives and also sends out radio frequency (RF) signals. In August, 1996, the Federal
Communications Commissions (FCC) adopted RF exposure guidelines with safety levels for
hand-held wireless phones. Those guidelines are consistent with the safety standards previously
set by both U.S. and international standards bodies:
<ANSIC95.1> (1992) / <NCRP Report 86> (1986) / <ICIMIRP> (1996)
Those standards were based on comprehensive and periodic evaluations of the relevant
scientific literature. For example, over 120 scientists, engineers, and physicians from universities,
government health agencies, and industry reviewed the available body of research to develop
the ANSI Standard (C95.1). Nevertheless, we recommend that you use a hands-free kit with
your phone (such as an earpiece or headset) to avoid potential exposure to RF energy. The
design of your phone complies with the FCC guidelines (and those standards).
Use only the supplied or an approved replacement antenna. Unauthorized antennas,
modifications, or attachments could damage the phone and may violate FCC regulations.
NORMAL POSITION:
Hold the phone as you would any other telephone with the antenna pointed up and over your
shoulder.
TIPS ON EFFICIENT OPERATION:
For your phone to operate most efficiently:
• Extend your antenna fully.
• Do not touch the antenna unnecessarily when the phone is in use. Contact with the antenna
affects call quality and may cause the phone to operate at a higher power level than otherwise
needed.
RF Exposure Information:
This product is compliance to FCC RF Exposure requirements and refer to FCC website search for FCC
ID: BRCPC7080ME to gain further information include SAR Values.
This device complies with part 15 of the FCC rules. Operation is subject to the following two
conditions:
(1) this device may not cause harmful interference, and

(2) this device must accept any interference received, including interference that may
cause undesired operation.
NOTE: The manufacturer is not responsible for any radio or TV interference caused by
unauthorized modifications to this equipment. Such modifications could void the user’s
authority to operate the equipment.
NOTE: This equipment has been tested and found to comply with the limits for a Class B
digital device, pursuant to part 15 of the FCC Rules. These limits are designed to provide
reasonable protection against harmful interference in a residential installation. This equipment
generates uses and can radiate radio frequency energy and, if not installed and used in
accordance with the instructions, may cause harmful interference to radio communications.
However, there is no guarantee that interference will not occur in a particular installation. If
this equipment does cause harmful interference to radio or television reception, which can be
determined by turning the equipment off and on, the user is encouraged to try to correct the
interference by one or more of the following measures:
- Reorient or relocate the receiving antenna.
- Increase the separation between the equipment and receiver.
-Connect the equipment into an outlet on a circuit different from that to which the receiver is
connected.
-Consult the dealer or an experienced radio/TV technician for help
Do not use the device with the environment which below minimum -10℃ or over maximum
50℃, the device may not work.
Changes or modifications to this unit not expressly approved by the party responsible for
compliance could void the user’s authority to operate the equipment.
Ad Hoc function is supported but not able to operate on non-US frequencies.
 Loading...