

Kinpo SP70 User Manual

SP70 SMART PHONE
User Manual

i
Precautions
n Use only the AC adapter and battery supplied with the SMART PHONE , and keep them away
from high temperature and a humid environment. Using other AC adapters or batteries may cause
malfunction or danger.
n Should the battery becomes deformed, please do not use to avoid danger.
n Removing the battery incorrectly may cause danger.
n Use the battery according to the instructions in the document.
n Recycle used batteries. Dispose of used batteries according to the instructions.
n Do not disassemble the SMART PHONE by yourself. Only the authorized service personnel can do
that.
n Keep the SMART PHONE and its accessories in a dry place.
n Do not knock, shake, or toss the SMART PHONE ; otherwise it may cause leakage, overheating, or
fire.
n Do not touch or scratch the screen surface with hard objects.
n Do not use detergent on the screen surface. Use the special clean cloth to clean the screen surface.
n Avoid placing the SMART PHONE in a location subject to high humidity, extreme temperature or
heavy dust.
n Keep the SMART PHONE away from direct sunlight to avoid leakage, overheating, or fire.
n Heavy weight pressure or dropping of device may cause the damage of panel which is not covered by
the warranty.
This manual is created by professional service people with assistance from the engineering team. Its content is helpful
for rst-time users to understand the operations and details of the SMART PHONE . In addition to this manual, a Quick
Start Guide and other documentation are also provided for users of this products. Read these documents carefully and
following the instructions to use this SMART PHONE . You will enjoy using it.
This manual does not offer any warranty. The manufacturer is not liable for the printing errors, accuracy of the information
provided and improvement on the SMART PHONE . The manual content is subject to change without notice.

ii
Specications
Item Description
GSM 900/1800/1900 MHz, GPRS Class B / Multi-slot Class 10,
Network & Functions
Display 2.8” 262,144 colors LTPS TFT LCD, 240x320 Pixels
DSC/DV
CPU Freescale i.MX21
Operating System Microsoft Windows Mobile 5.0 SMART PHONE Edition
Memory 128MB Flash ROM, 64MB SDRAM
Size & Weight 109(L) x 55(W) x 21.5(H) mm, 140g (With battery)
Battery & Capacity
Input Method
Connectivity IrDA, USB, Bluetooth v1.2, WLAN 802.11 b
Expansion Slot miniSD
Ringtone
Support Java, SMS, MMS, E-mail
Audio Format MP3, WAV, SMAF, MIDI, AMR, AAC, AAC+, WMA, MMF, RMI
Video Format MPEG4, H.263, 3GP, ASF, WMV
Image Format JPEG, PNG, BMP, GIF
*Actual talk-time and standby time vary due to local network condition and usage behavior.
*Acutal specification are in accordance with the device, deviations may occur without notice.
Conference Call, Hands Free, Speed Dialing, Phone Recording,
Voice Dialing, Caller ID, Prole...
1.3 Mega Pixels Camera, up to 2.0 Mega Pixels via software
enhancement, pack 8x linear digital zoom-in/out, LED Flash,
supports 1600*1280, 1280*1024, 640*480, 320*240, 176*144.
Recording rate up to 30 frames per second
1300mAh Li-Polymer battery; Talk-time 5 hrs*, Standby 190 hrs
(max.)*
Stylus/Soft keyboard (supports Block Recognizer/Keyboard/Letter
Recognizer/Transcriber)
Supports up to 192 polyphony (Polyphonic, Monophonic, AMR
(Narrow Band .awb), MIDI (rmi, mmf, mid), MP3, WAV, WMA,
AAC, AAC+

iii
NOTE
Kinpo Electronics, Inc. (herein after referred to as “Kinpo”) is the sole owner of this product, including
its accessories, software and hardware. No imitation, copy, plagiarism or translation is allowed without
Kinpo’s permission.
All brand names, product names, and pictures used in this user manual are trademarks, registered trademarks,
or trade name of their respective holders.
©Copyright 2006 Kinpo Electronics, Inc. All rights reserved. No reproduction is allowed.

iv
Customer Service Information
Congratulations on purchasing KINPO SP70 SMART PHONE . You will enjoy a whole new experience
using it.
For further information on using SP70, please contact our customer service center:
e-mail: service@iDo-mobile.com
Website: www.iDo-mobile.com

v
Table of Contents
Precautions .................................................................................................................i
Specifications ............................................................................................................ ii
1 Getting Started .............................................................................. 1-1
1.1 Package Content .......................................................................................... 1-2
1.2 Views of SP70 .............................................................................................
1.3 Installing the SIM Card and Battery ............................................................
1.4 Charging the Battery
1.5 Turning the SMART PHONE On and Off .................................................
Initial Startup ...............................................................................................
Initializing and Calibrating the SMART PHONE ......................................
Turning Off ..................................................................................................
1.6 Expanding the SMART PHONE ................................................................
Using miniSD Cards ....................................................................................
2 Basic Operation............................................................................. 2-1
2.1 Using the Stylus........................................................................................... 2-2
2.2 Input Methods ..............................................................................................
2.3 Using the Navigation Keys ..........................................................................
2.4 Today Screen ...............................................................................................
2.5 Volume Adjustment .....................................................................................
2.6 Navigation Bar and Command Bar .............................................................
2.7 Status Icons ..................................................................................................
2.8 Using Programs ...........................................................................................
2.9 Shortcut Menus ............................................................................................ 2-6
2.10 Notifications ................................................................................................ 2-6
2.11 Entering Information ...................................................................................
Using the Input Panel ..................................................................................
Writing on the Screen ..................................................................................
Drawing on the Screen ................................................................................
Using My Text .............................................................................................
.................................................................................... 1-5
1-3
1-5
1-6
1-6
1-6
1-7
1-7
1-7
2-2
2-2
2-2
2-3
2-3
2-4
2-4
2-6
2-7
2-8
2-9
2-9
3 Using the Phone Feature .............................................................. 3-1
3.1 Making a Call .............................................................................................. 3-2
Using the On-Screen Phone Keypad ...........................................................
From Contacts .............................................................................................
From Call History ........................................................................................
Using Speed Dial .........................................................................................
3.2 Answering a Call .........................................................................................
3.3 Using the Speakerphone and Muting a Call ................................................
Speakerphone .............................................................................................. 3-4
Muting ......................................................................................................... 3-4
3.4 Taking Notes During a Call .........................................................................
3.5 Creating a Speed Dial Entry ........................................................................
3-2
3-2
3-3
3-3
3-3
3-4
3-5
3-6

vi
From Phone ................................................................................................. 3-6
From Contacts .............................................................................................
3.6 Call History ................................................................................................. 3-7
Changing the Call History View ..................................................................
Call Timers ..................................................................................................
3.7 Changing Phone Settings
Changing the Ring Type ..............................................................................
Changing the Ring Tone ..............................................................................
Changing the Keypad Tone .........................................................................
Securing Your Phone ...................................................................................
Changing Phone Service Settings ................................................................
Changing Phone Network Settings ............................................................
3.8 SIM Contacts .............................................................................................
3.9 Turning the Phone On and Off ..................................................................
............................................................................. 3-8
3-6
3-7
3-7
3-8
3-8
3-9
3-9
3-9
3-10
3-10
3-11
4 Contacts ........................................................................................ 4-1
4.1 Creating a Contact ....................................................................................... 4-2
For Microsoft Contacts ................................................................................
For SIM Card ...............................................................................................
4.2 Managing Contacts ......................................................................................
Editing a Contact .........................................................................................
Deleting a Contact .......................................................................................
4.3 View Modes .................................................................................................
4.4 Changing List View Settings .......................................................................
4-2
4-3
4-3
4-3
4-3
4-4
4-4
5 Recording Messages ....................................................................5-1
5.1 Recording Messages in Notes ..................................................................... 5-2
Creating a R
Recording Formats ......................................................................................
5.2 AMR Recorder ............................................................................................
ecording ................................................................................... 5-2
5-2
5-3
6 Customizing Personal Settings ..................................................... 6-1
6.1 Buttons......................................................................................................... 6-2
6.2 Input ............................................................................................................. 6-2
6.3 Lock ............................................................................................................. 6-3
6.4 Menus .......................................................................................................... 6-3
6.5 MSN Options ...............................................................................................
6.6 Owner Information ......................................................................................
6.7 Phone ........................................................................................................... 6-4
6.8 Sounds & Notifications ...............................................................................
6.9 Today ........................................................................................................... 6-5
6.10 Today Plus ...................................................................................................
6.11 Voice Commander .......................................................................................
6-3
6-4
6-4
6-5
6-5
7 Customizing System Settings .......................................................7-1
7.1 About ........................................................................................................... 7-2

vii
7.2 Backlight ..................................................................................................... 7-2
7.3 Certificates ................................................................................................... 7-2
7.4 Clock & Alarms ...........................................................................................
7.5 Contrast ....................................................................................................... 7-3
7.6 Error Reporting ............................................................................................
7.7 GPS .............................................................................................................. 7-4
7.8 Memory ....................................................................................................... 7-4
7.9 Microphone Environment ............................................................................
7.10 Power ........................................................................................................... 7-5
7.11 Regional Settings .........................................................................................
7.12 Remove Programs .......................................................................................
7.13 Screen .......................................................................................................... 7-6
7.14 System Information .....................................................................................
7.15 Wake Up Screen ..........................................................................................
7.16 SmartX ......................................................................................................... 7-8
7.17 Ring Tone ....................................................................................................
8 Getting Connected ........................................................................ 8-1
8.1 GPRS Auto Configuration ........................................................................... 8-2
8.2 Beam ............................................................................................................ 8-2
Sending Information ....................................................................................
Receiving Information .................................................................................
8.3 Bluetooth ..................................................................................................... 8-3
Turning on and off Bluetooth ......................................................................
Bluetooth Information Exchange ................................................................
Bonding with Other Devices .......................................................................
8.4 Connections ................................................................................................. 8-4
Connecting to the Internet ...........................................................................
Connecting to Work .....................................................................................
Setting up VPN Server Connections ...........................................................
Setting up Proxy Server Settings .................................................................
8.5 Wireless Manager ........................................................................................
7-3
7-4
7-5
7-5
7-6
7-6
7-8
7-8
8-2
8-3
8-3
8-3
8-4
8-5
8-5
8-6
8-6
8-7
9 Internet Explorer............................................................................ 9-1
9.1 Using Internet Explorer ............................................................................... 9-2
Sending a Link via Email ............................................................................
9.2 Viewing Favorites ........................................................................................
Synchronizing a Favorite Link ....................................................................
Synchronizing a Mobile Favorite ................................................................
9.3 Changing Settings
........................................................................................ 9-3
9-2
9-2
9-2
9-3
10 Microsoft Pocket Outlook ............................................................ 10-1
10.1 Calendar ..................................................................................................... 10-2
Creating an Appointment ...........................................................................
View Modes ...............................................................................................
10-2
10-2

viii
Using the Calendar Summary Screen ........................................................ 10-3
Sending Meeting Requests ........................................................................
10.2 Tasks .......................................................................................................... 10-4
Creating a Task ..........................................................................................
Using the Tasks Summary Screen .............................................................
10.3 Notes .......................................................................................................... 10-5
Creating a Note ..........................................................................................
Viewing Notes ...........................................................................................
10.4 Messaging (Outlook, SMS, MMS)
Synchronizing Outlook Email Messages ..................................................
Connecting to a Mail Server ......................................................................
Downloading Messages from the Server ...................................................
Reading and Responding to Messages ......................................................
Composing and Editing a Message ...........................................................
Message Folders ......................................................................................
10.5 MMS Messages .......................................................................................
............................................................ 10-5
10-3
10-4
10-4
10-5
10-5
10-6
10-6
10-7
10-8
10-9
10-11
10-13
11 Microsoft ActiveSync ................................................................... 11-1
11.1 Installing Microsoft ActiveSync ................................................................ 11-2
11.2 Connecting to Your Desktop Computer .....................................................
11.3 Synchronizing with Your Desktop Computer ............................................
11.4 Synchronizing Directly with Exchange Server .........................................
11.5 Changing the Synchronization Schedule ...................................................
11.6 Backup and Restore ...................................................................................
11-3
11-3
11-4
11-4
11-4
12 Today Plus................................................................................... 12-1
12.1 Programs .................................................................................................... 12-2
12.2 Media Content ...........................................................................................
12.3 Games ........................................................................................................ 12-2
12.4 Phone Records ...........................................................................................
12.5 Settings ...................................................................................................... 12-3
12-2
12-3
13 VideoCam ...................................................................................13-1
13.1 Using the Camera ...................................................................................... 13-2
Taking a Picture .........................................................................................
Taking Continuous Pictures .......................................................................
13.2 Using the DV .............................................................................................
13.3 Changing VideoCam Settings ....................................................................
Standard Settings .......................................................................................
Camera Settings .........................................................................................
Digital Video Settings ................................................................................
13-2
13-3
13-3
13-4
13-4
13-4
13-5
14 Using MyAlbum ........................................................................... 14-1
14.1 Starting MyAlbum ..................................................................................... 14-2
14.2 Opening a Picture or Video ....................................................................... 14-2
14.3 Editing Pictures .........................................................................................
14-3

ix
14.4 Using the FaceMagic Feature .................................................................... 14-3
14.5 Using Effects .............................................................................................
Painting ...................................................................................................... 14-4
Effect ......................................................................................................... 14-4
Frame ......................................................................................................... 14-4
Stamp ......................................................................................................... 14-5
Adjustment ................................................................................................ 14-5
Note ........................................................................................................... 14-5
14.6 Sending Files .............................................................................................
14.7 View Modes ...............................................................................................
15 More Programs ...........................................................................15-1
15.1 Word Mobile .............................................................................................. 15-2
Creating a Document .................................................................................
Opening an Existing Document ................................................................
15.2 Excel Mobile .............................................................................................
Creating a Workbook .................................................................................
Opening an Existing Workbook ................................................................
15.3 PowerPoint Mobile ....................................................................................
15.4 Windows Media Player .............................................................................
Starting Windows Media Player ................................................................
Screens and Menus ....................................................................................
Libraries ..................................................................................................... 15-5
Updating a Library ....................................................................................
Playback .................................................................................................... 15-6
Controls ..................................................................................................... 15-6
Playing an Item on a Network ...................................................................
Playlists ..................................................................................................... 15-7
Synchronization ......................................................................................... 15-7
Copying Files to Your SMART PHONE ..................................................
Licenses and Protected Files .....................................................................
Changing Windows Media Player Settings ...............................................
15.5 Pictures & Videos ......................................................................................
Viewing Pictures and Videos .....................................................................
Sending Pictures and Videos .....................................................................
Slideshow of Pictures ................................................................................
Setting a Picture as Background ..............................................................
15.6 Java .......................................................................................................... 15-10
15.7 File Explorer ............................................................................................
15.8 Calculator ................................................................................................ 15-10
15.9 Pocket MSN ............................................................................................
Sign in to Pocket MSN ............................................................................
MSN Messenger ......................................................................................
15.10 IE Favorites ..............................................................................................
15.11 Media Content .........................................................................................
Media Content Items ...............................................................................
14-4
14-6
14-6
15-2
15-2
15-2
15-2
15-3
15-3
15-3
15-3
15-4
15-5
15-7
15-7
15-8
15-8
15-9
15-9
15-9
15-9
15-10
15-10
15-11
15-11
15-11
15-12
15-12
15-13

x
15.12 SIM Contacts ........................................................................................... 15-14
15.13 Search ...................................................................................................... 15-15
15.14 Games ...................................................................................................... 15-15
Solitaire ................................................................................................... 15-15
Bubble Breaker ........................................................................................
15.15 Voice Commander ...................................................................................
15.16 Profiles ..................................................................................................... 15-17
15.17 SmartX ..................................................................................................... 15-18
15-16
15-17
16 Troubleshooting ..........................................................................16-1
16.1 Resetting the SMART PHONE ................................................................ 16-2
16.2 Restoring Factory Defaults ........................................................................
16.3 Power Problems .........................................................................................
16.4 Memory Problems .....................................................................................
16.5 Screen Problems ........................................................................................
16.6 Connection Problems ................................................................................
16.7 Hardware Problems ...................................................................................
16.8 Software Problems ....................................................................................
16.9 Other Problems ..........................................................................................
16-2
16-2
16-3
16-3
16-3
16-4
16-5
16-6
17 Appendix ..................................................................................... 17-1
17.1 European Declaration of Conformity .................................................... 17-2

Chapter 1
Getting Started
1.1 Package Content
1.2 Views of the Pocket PC Phone
1.3 Installing the SIM Card and Battery
1.4 Charging the Battery
1.5 Turning the Pocket PC Phone On and Off
1.6 Expanding the Pocket PC Phone

SP70 User Manual 1-2
1.1 Package Content
Congratulations on purchasing your Pocket PC Phone. Its powerful features and functions help you manage
effectively your most important business and personal information. You can also use the Pocket PC Phone
to make phone calls as well as send or receive emails.
Please verify that you have the items listed below as soon as you unpack your Pocket PC Phone box. If any
item is damaged or missing, notify your dealer immediately.
n SP70 Pocket PC Phone
n Battery
n Stylus (x2)
n USB cable plus USB connector
n AC charger
n Stereo earphone
n Strap
n Getting Started Disc
n Numeric Dummy Keypad
n User Manual and Quick Start Guide
Getting Started

1-3 SP70 User Manual
1.2 Views of SP70
Getting Started
GSM/Notication
Indicator
Indicates the GSM
signal status and
notifications.
Touch Panel
Start Menu
Button
Displays the Start
menu.
Slot Cover
With the cover removed, you
may install an optional numeric
dummy keypad.
AC Power Indicator
miniSD Slot
Insert a miniSD card
here.
Battery Switch
Slide the latch to
remove the battery.
Earphone Jack
Left Soft Key
Press to perform the
command shown
on the bottom-left
corner of the screen.
Call Button
Makes or answers a
phone call.
Navigation Keys
Includes five direction keys for
moving up, down, left or right, and
enter/confirm function. .
: Call Indicator : WLAN Indicator : DV Mode Indicator
: Voice Recording Indicator : Bluetooth Indicator
Right Soft Key
Press to perform the command shown on
the bottom-right corner of the screen.
Hook Button
Ends or rejects a call by using th key.
OK Button
Functions as “X” or “OK” located at the
top-right corner of the screen.
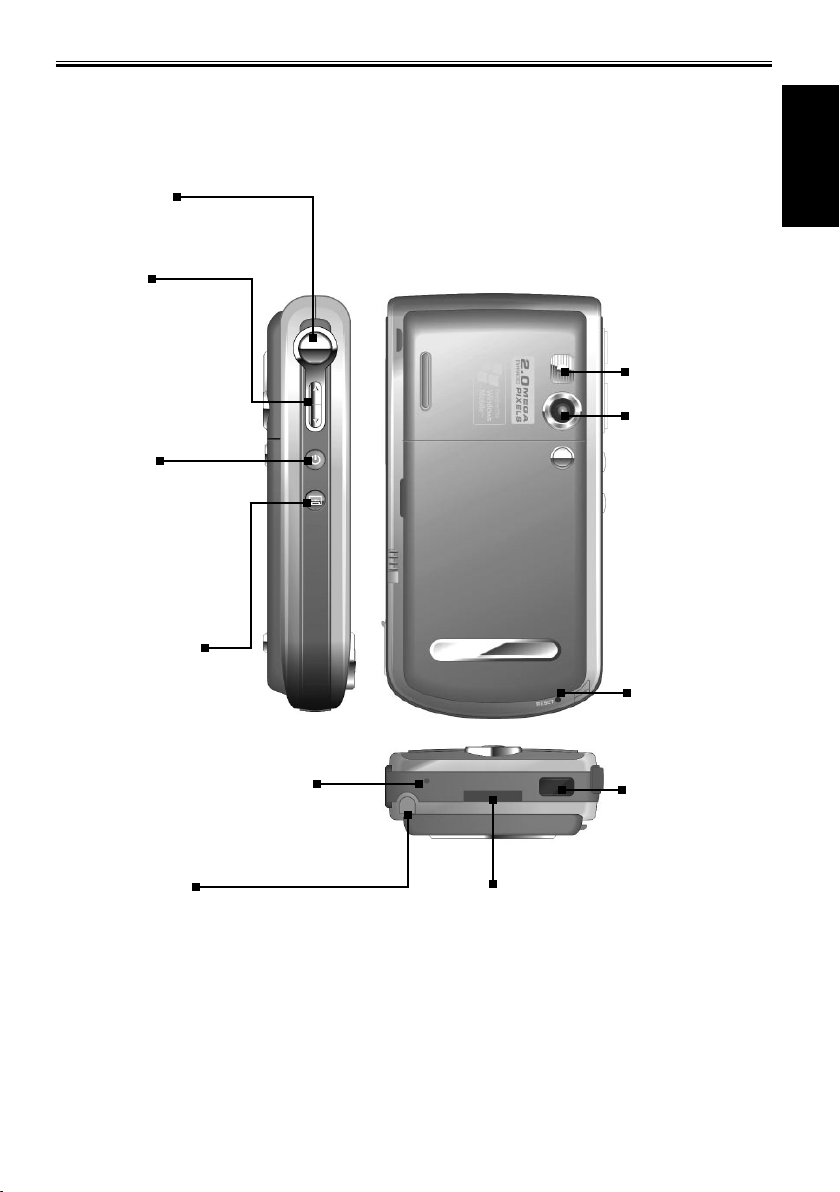
SP70 User Manual 1-4
Capture Key
Press to take pictures or
record videos.
Volume±/
Zoom in/out
Press to adjust the
volume in Standard
mode; or zoom in/out
in Camera mode.
Power Key
Press for 2 seconds
to turn GSM/WLAN
module off; or
press to wake up the
device from suspend/
sleep mode.
LED Photoash
Camera Lens
Getting Started
Voice Recording
Button
Press to start Notes
options; press
and hold to start
recording, and
release to stop
recording.
Stylus
Allows you to tap,
write or draw on the
touch panel.
Microphone
Serves as the phone
receiver. It also receives
sound for recording.
Reset Switch
Press to restart the
Pocket PC Phone.
IrDA Port
Transfers data with
other devices.
USB Port
Connects the AC charger
for charging or USB
cable for data transfer and
synchronization.
1-5 SP70 User Manual
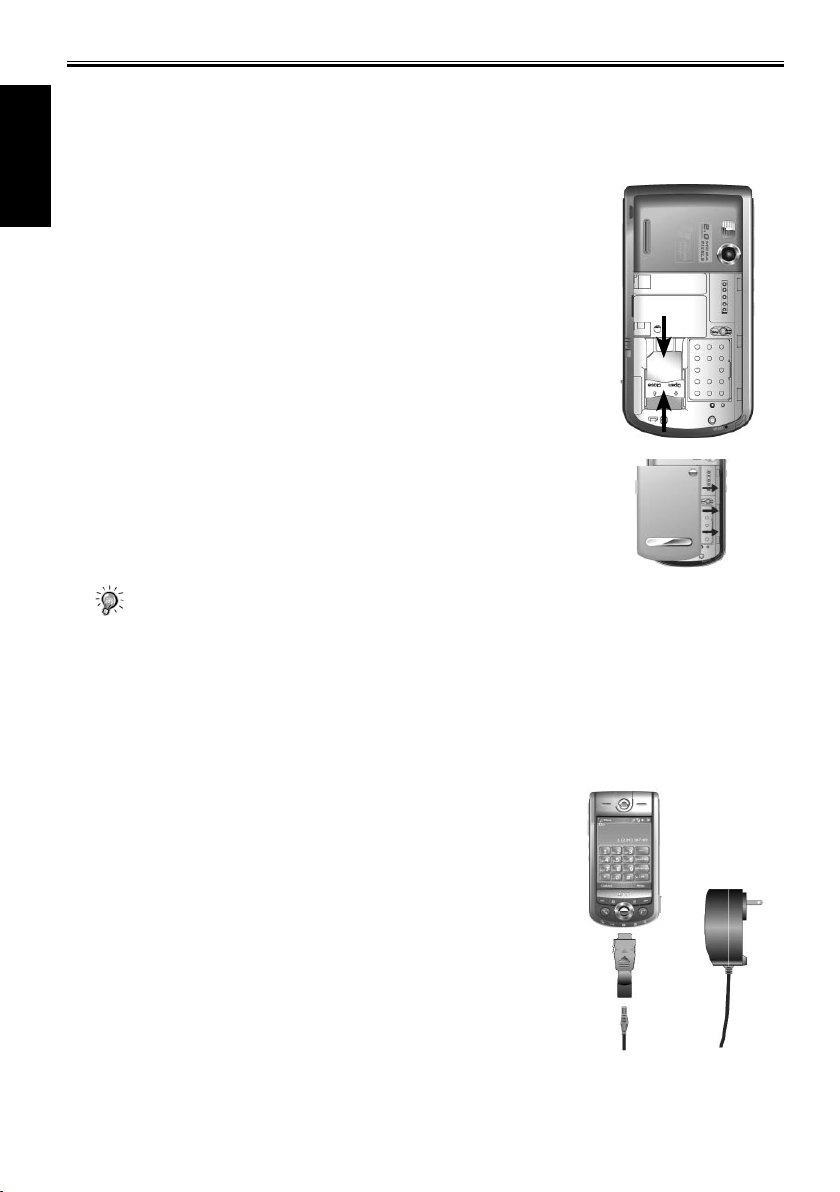
1.3 Installing the SIM Card and Battery
Apply for a Subscriber Identification Module (SIM) card from your mobile phone service provider. The SIM
card contains information of security certifications, and can store your contact data.
The Pocket PC Phone functions are only available when a SIM card is installed securely.
Getting Started
1. Insert the SIM card with the contact area facing inside of
the Pocket PC Phone and the angled corner in the upper-left
position, and then slide the SIM card towards the bottom into the
slot.
2. Press the SIM card and slide the SIM card lock towards top to
secure the SIM card.
3. Insert the three extruding parts on the battery into the holes in
the battery compartment, and then press to close the battery. A
click sound indicates that the battery is locked.
• Insert or remove the SIM card with great care. Do not bend the SIM card or scratch the contact
area.
• Do not disassemble, squeeze, or pierce the battery, or store the battery where the temperature is
over 60°C (140°F), or dispose of used batteries carelessly.
• Replace only with the same or equivalent type recommended by the manufacturer.
• Dispose of used batteries in accordance with local environmental regulations.
1.4 Charging the Battery
1. Connect the DC end of the AC charger to the converter.
2. Connect the coverter to the USB connector on the bottom of the
Pocket PC Phone, and the other end of the AC charger into a
wall outlet.
AC power indicator will light up when SP70 detects battery
charging by the AC Charger or USB. Please check the power
setting of the SP70 for the status of the battery.

SP70 User Manual 1-6
3. After the charging is complete, press on both sides of the
converter to detach it from the Pocket PC Phone.
• Charge the battery fully before turning on the Pocket PC Phone for use. When charging the
battery for the very first time, you should charge it for at least 10 hours.
• Fully charging a discharged battery takes about 2.5 hours. The actual charging time may vary
depending on the using conditions.
• A new battery will reach the optimal performance after several cycles of using and charging.
• Upon a warning of low power, turn off the Pocket PC Phone and recharge the battery at once.
• The estimated operating hours of the battery in different conditions are as follows:
Flight mode operation: 16 hours
Talk time: 5 hours
Standby time: 190 hours
• The actual talk time and standby time vary depending upon local network status and user
behavior.
• Recommend using AC charger instead of USB for accelerated charging time.
1.5 Turning the Pocket PC Phone On and Off
Initial Startup
The Pocket PC Phone automatically performs the initial startup after the installation of the battery.
It will start the initialization/calibration procedure.
1. The backlight of the keypad lights up, accompanied with the
Loading screen.
2. The
Windows Mobile screen appears after about 5 seconds.
Getting Started
Initializing and Calibrating the Pocket PC Phone
1. On the Windows Mobile screen, use the stylus to tap the screen
to enter the align screen screen.
2. Follow and tap the “+” positions. Then tap
3. On the
4. On the
5. On the pop-up menu that appears, tap
6. Tap and hold the “11” position on the next screen.
7. On the pop-up menu that appears, tap
8. You have scheduled an appoinment using pop-up menus
9. On the
10. On the
stylus screen, tap Next.
pop-up menus screen, tap and hold the “9” position.
successfully. Tap
location screen, select your time zone and then tap Next.
complete screen, tap anywhere on the screen to enter the
Today screen.
Next.
Finish.
Cut.
Paste.
1-7 SP70 User Manual
Turning Off
After the initial startup, press the power key to enter the standby mode. To turn off the Pocket PC Phone
(and enter the suspend mode), press and hold the power key for 2 seconds.
Getting Started
• By default, your Pocket PC Phone will automatically suspend after 1 minute (default setting) of
inactivity when operating on battery power. You can change the setting by tapping
> System > Power > Advanced.
→ Settings
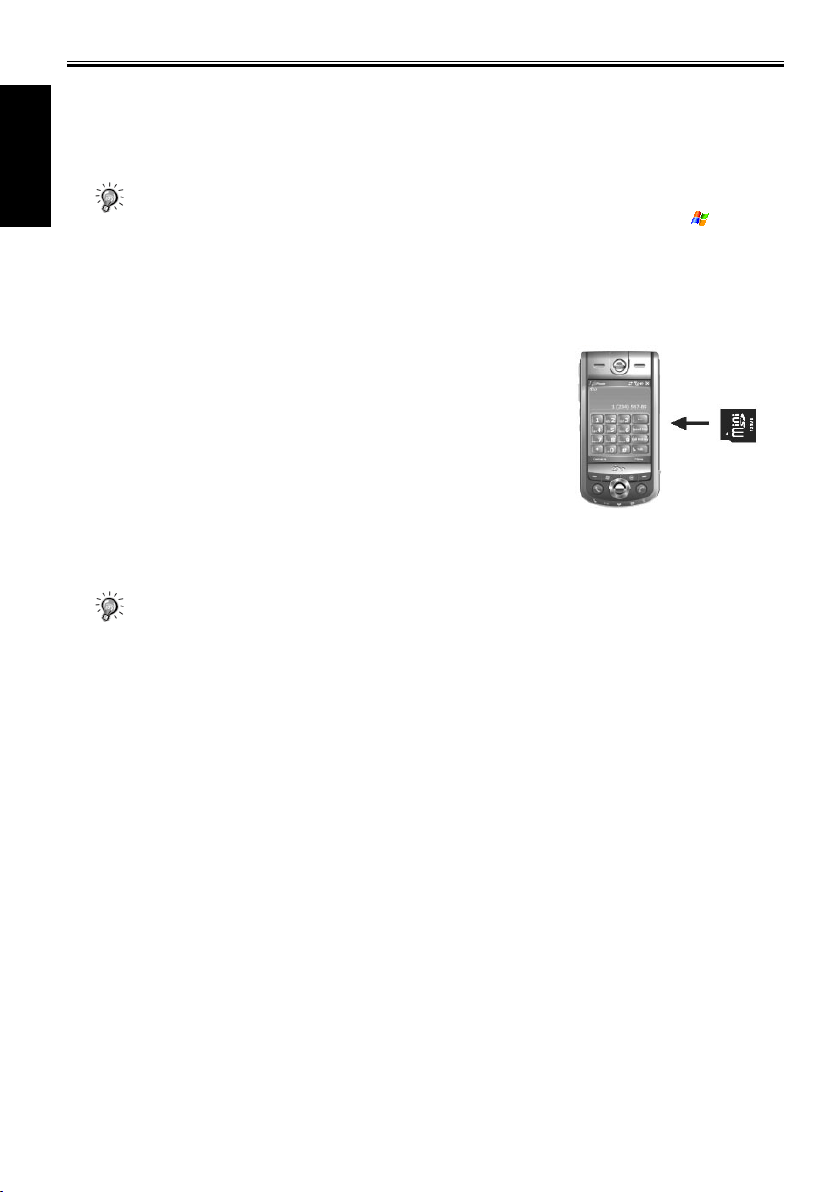
1.6 Expanding the Pocket PC Phone
Using miniSD Cards
You can use the miniSD card slot of the Pocket PC Phone to back up
or transfer files and data.
To insert a miniSD card, open the cover of the miniSD card slot first.
With the label of the miniSD card facing front and its connector
pointing to the slot, insert the card into the slot.
To remove the miniSD card, make sure that no application is accessing the card, slightly push the top edge
of the card to release it and then pull it out of the slot.
• Keep the miniSD card in a well-protected box or bag to avoid dust and humidity when you are
not using it.
• A miniSD card should be formatted before use.
• With File Explorer, you can save data to a miniSD card. For information on using File Explorer,
see section 15.8.

Chapter 2
Basic Operation
2.1 Using the Stylus
2.2 Input Methods
2.3 Using the Navigation Keys
2.4 Today Screen
2.5 Volume Adjustment
2.6 Navigation Bar and Command Bar
2.7 Status Icons
2.8 Using Programs
2.9 Shortcut Menus
2.10 Notifications
2.11 Entering Information
2-2 SP70 User Manual
Basic Operation
2.1 Using the Stylus
The stylus is a tool for you to communicate with your Pocket PC Phone. With the stylus, you can navigate
and select objects on the screen.
The stylus allows you to:
n Tap Touch the screen once with the stylus to open items and select options.
n Drag
n Tap and hold Tap and hold the stylus on an item to see a list of actions available for that item. On the
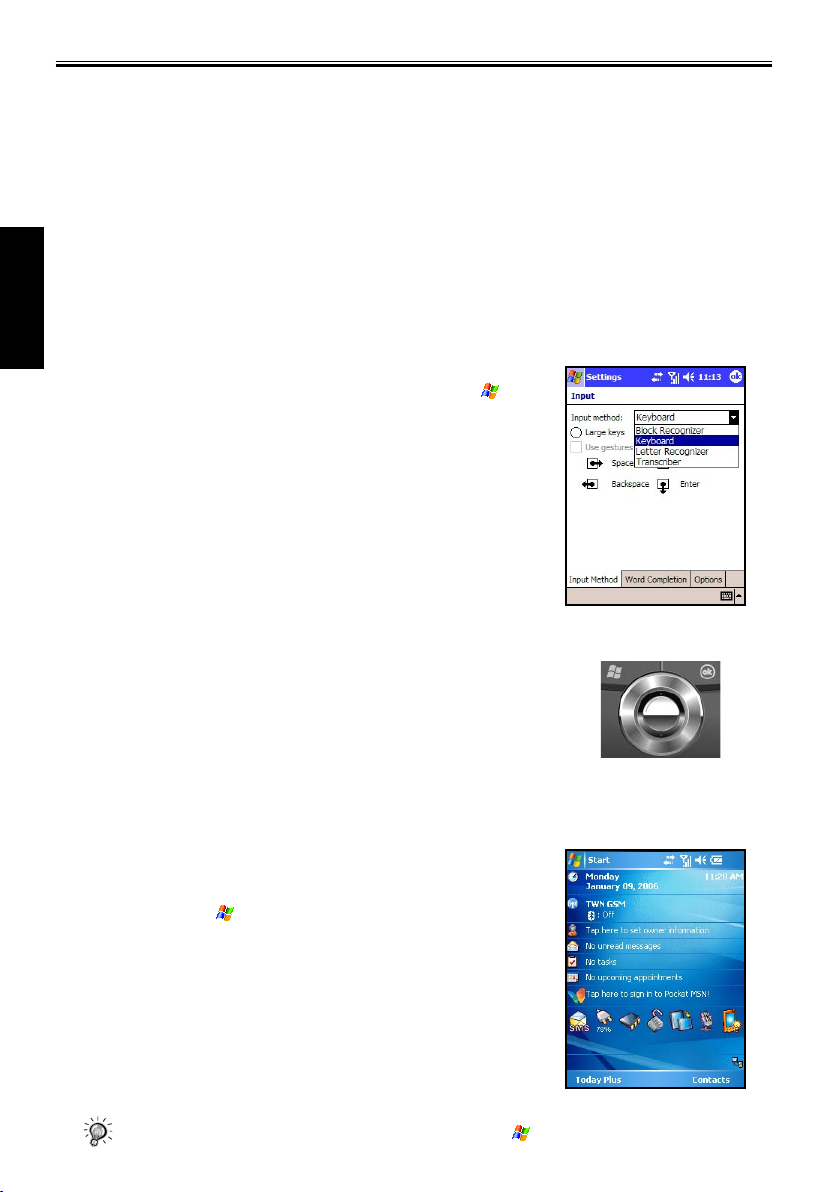
2.2 Input Methods
The Pocket PC Phone provides several input methods for your
selection. (See Section 2.11 for more information.) You can tap >
Settings > Personal > Input to select the most desired input method.
This way, you do not need to change the input method every time when
you enter information.
Hold the stylus on the screen and drag across the screen to select text and images. Drag in a list to
select multiple items.
shortcut menu that appears, tap the action you desire.
2.3 Using the Navigation Keys
The navigation keys includes five direction keys for moving up,
down, left or right, and enter/confirm function on the screen for
selection.
In a text field, use the navigation keys to move the cursor right or
left, character by character.
At the center of the navigation keys is the OK key for you to activate
the selected item.
2.4 Today Screen
When you turn on your Pocket PC Phone for the first time each day (or
after 3 hours of inactivity), you will see the Today screen. You can also
display it by tapping and then Today.
The Today screen displays important information, such as today’s
appointments and status icons for your device. Tap the information
listed on the Today screen to open the associated program.
You can also tap
See Chapter 12 for detailed information on Today Plus. Today Plus
allows you to achieve single-hand operation via the navigation keys
and OK button.
• To customize what is displayed on the Today screen, tap > Settings > Personal > Today.
Today Plus to quickly access more functionalities.
 Loading...