

Page 1
Pool FROG
Mineral HyBrid Operations Manual
IMPORTANT:
This manual must be given to the
homeowner to ensure warranty coverage.
Customer Service 800-222-0169
www.kingtechnology.com
Page 2

WARNING —SAFETY FIRST
When installing and using this electrical equipment, basic safety precautions
should always be followed, including the following:
• It is recommended that a licensed electrician or certified electrical contractor perform the electrical
connections.
• DO NOT OPEN THE GENERATOR CONTROL PANEL – NOT A SERVICABLE UNIT.
• READ AND FOLLOW ALL INSTRUCTIONS.
• Disconnect all AC power before installation.
• WARNING – To reduce the risk of injury, do not permit children to use this product.
• Always adhere to all local and national regulatory installation requirements.
• The control panel must be mounted vertically on a flat surface and a minimum of 5 ft (1.5m)
horizontal distance (or more, if local codes require) from the pool/spa.
• In Canada and some other regions, local codes require the unit be connected only to a circuit
that is protected by a ground-fault circuit-interrupter (GFCI). The installer should provide this
GFCI requirement. The GFCI should be tested on a regular basis by pushing the test button.
If the GFCI fails to operate correctly, there is ground current flowing indicating the possibility
of an electric shock. Do not use this unit. Disconnect unit and have a qualified professional
correct the problem before using.
• The power cable must be hardwired to the time clock so that the system cannot operate without
the pump.
• A build-up of flammable fumes can result in a hazardous condition if the cell is allowed to
operate without flow. This machine must be operated only with an approved in-line flow sensor.
®
• The flow sensor must be installed immediately before the POOL FROG
Hybrid Cycler followed by the POOL FROG
• When cleaning the cell or adjusting pH, ALWAYS ADD ACID TO WATER, NEVER WATER
TO ACID.
• SAVE THESE INSTRUCTIONS.
®
Mineral Hybrid Cell.
Mineral
Page 3

TABLE OF CONTENTS
Warning-Safety First 2
Introduction 4
Start-up 5
Adding Salt to the Pool 6
Inserting POOL FROG
®
Mineral Reservoir 7
Basic Operation 8
Controls 9
Easy Maintenance
POOL FROG
®
Mineral Hybrid Cell Cleaning 11
10
Winterizing 12
Troubleshooting 13-15
Saturation Index 16
Glossary 17
®
POOL FROG
Mineral Hybrid Cycler Parts List 18
Warranties 19-20
For information on King Technology’s entire product line,
visit our website at www.kingtechnology.com
3
Page 4
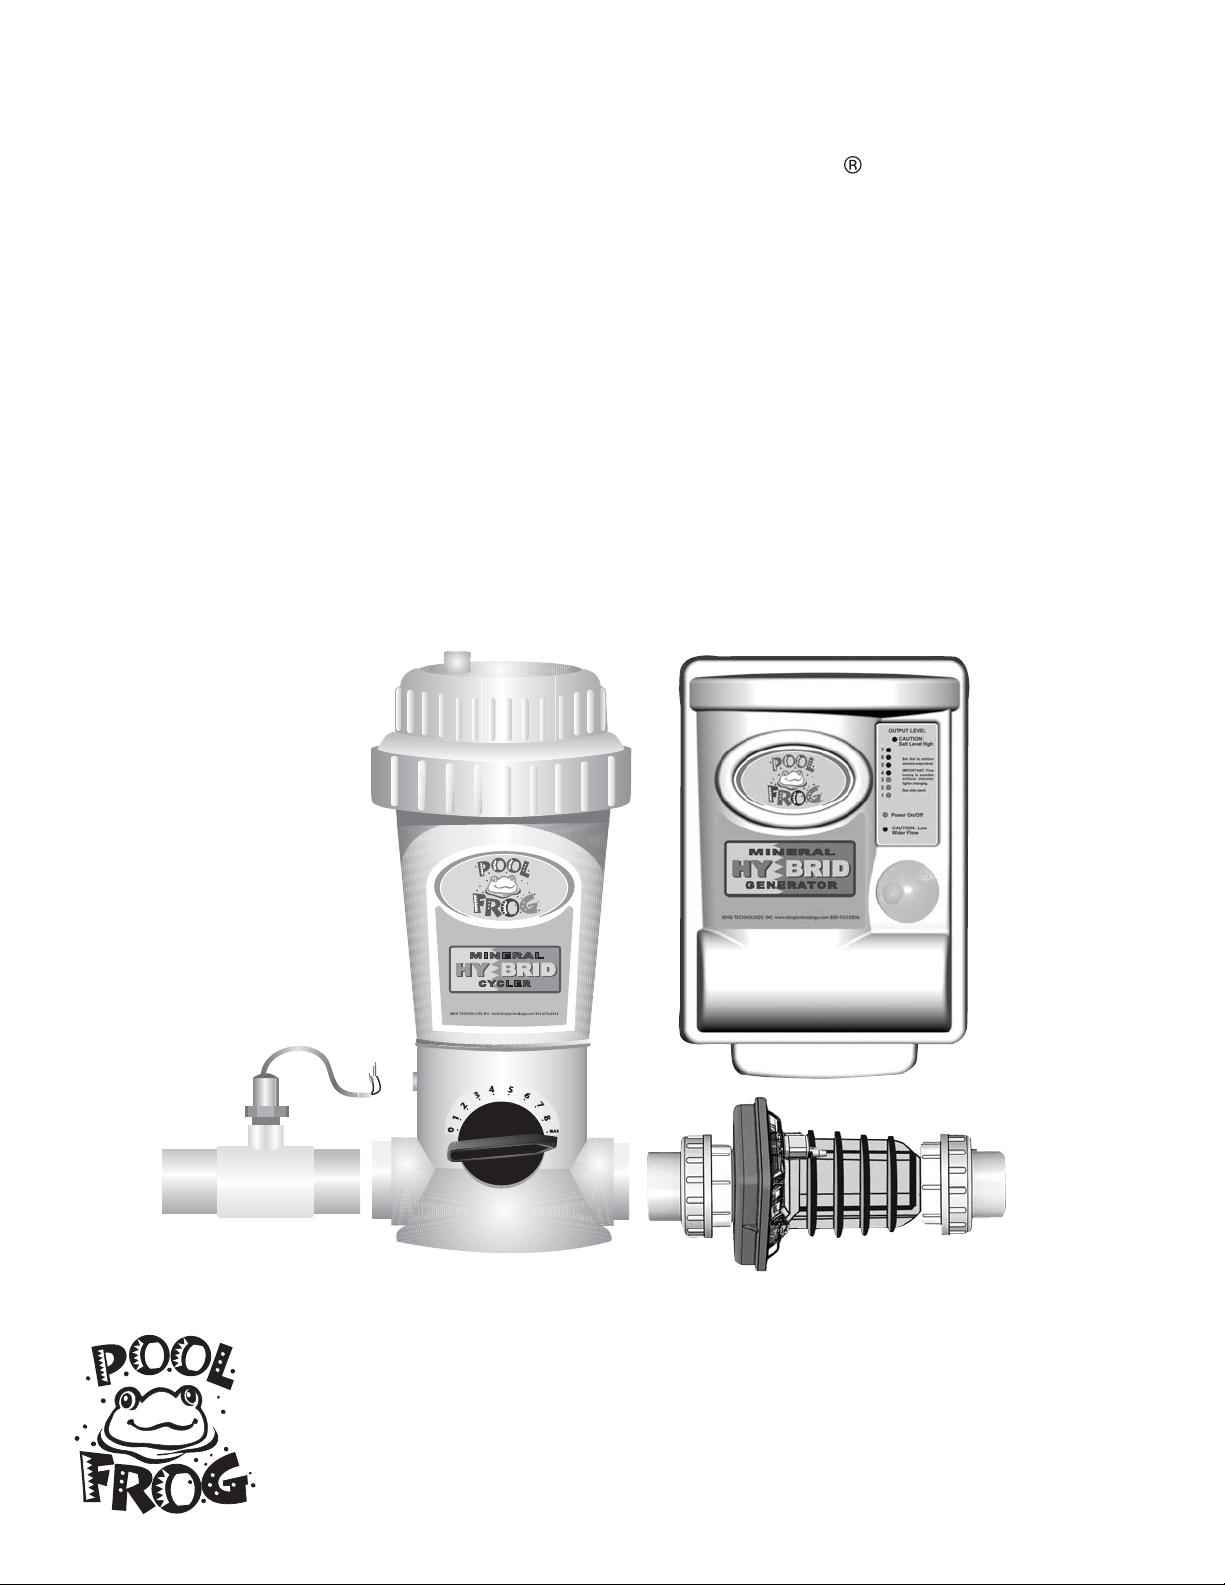
POOL
FROG
Welcome to easier pool care courtesy of POOL FROG
®
. With POOL FROG
®
Mineral Hybrid, your pool water will look and feel better without a lot of work or
a lot of chlorine.
This system controls bacteria using a combination of minerals
and reduced chlorine levels–up to 50%* less. There are 4 parts to the POOL
®
FROG
the POOL FROG
Mineral Hybrid: The In Ground POOL FROG
®
Mineral Reservoir, the POOL FROG
Control Panel and the POOL FROG
®
Mineral Hybrid Generator Cell.
®
Mineral Hybrid Cycler,
®
Mineral Hybrid Generator
Part 1
POOL FROG
Mineral Hybrid Cycler
The water treatment center that controls the flow of
water through the system.
For In Ground Pools
up to 40,000 gallons.
Part 3
POOL FROG
Mineral Hybrid Generator
Control Panel
Controls the generation of chlorine to maintain
a low 0.5 ppm.
Part 4
POOL FROG
Mineral Hybrid Generator Cell
Innovative technology with “Shake Plates” to prevent
calcium build up while being super charged with power
direct to every other plate. The result is fewer cell
cleanings are required than other products and the cell
lasts longer with a 7-year limited warranty.
Part 2
POOL FROG
Mineral Reservoir
Holds the minerals and fits inside the POOL
FROG® Mineral Hybrid Cycler, allowing you
to reduce your chlorine generated by up to
50%*
REMEMBER TO REPLACE POOL
FROG
EVERY 6 MONTHS OR AFTER ONE
POOL SEASON, WHICHEVER
IS SHORTER.
4
®
MINERAL RESERVOIR
*Compared to the minimum EPA recommended
chlorine level of 1.0 ppm for a stabilized swimming pool.
Page 5
Start-up
Do not turn generator power on until start-up is complete
and the proper amount of salt has been added to the pool
(see page 6).
1.
3.
• If your fill water is high in metals, use a sequestering agent
or metal out product at start-up only before using the POOL
®
FROG
on using these products and always follow manufacturers
directions carefully.
Mineral Reservoir. See your local dealer for details
• Make sure the pool has adequate circulation. The pool
water must completely circulate through the pump and
filter at least 1 1/2 to 2 times per day. Check with your
dealer for the proper circulation time for your pool.
2.
• Before beginning with any pool care program, you must
first balance your pool water. Take a water sample to your
local pool professional or use a complete test kit that will
test for the below important elements.
New pools especially may contain undesirable matter. These
pools need extra care to properly balance before using
POOL FROG® Mineral Hybrid.
WATER BALANCE GUIDELINES
4
5.
• Add a stabilizer or conditioner to
the pool at the beginning of the
season if the stabilizer level is below
40 ppm. This will prevent chlorine
burn off. Follow manufacturer’s
directions carefully.
• Shock the pool with chlorine to rid
the water of all contaminants before
beginning with POOL FROG
Hybrid. Follow manufacturer's
directions carefully.
• THIS STEP IS VERY IMPORTANT
TO START-UP.
USE CHLORINE SHOCK ONLY.
®
Mineral
Minimum Ideal Maximum
pH: 7.2 7.4 – 7.6 7.8
Total Alkalinity: 60 ppm 80 – 100 ppm 120 ppm
Calcium Hardness: 150 200 – 300 400
Total Dissolved Solids: <1500
Stabilizer: 20 ppm 40 – 60 ppm 80 ppm
Free Chlorine: 0.5 ppm 0.5 – 1.0 ppm 1.0 ppm
Use the Saturation Index on page 16 to ensure proper water balance.
5
Page 6
Adding Salt to the Pool
1. BEFORE ADDING THE SALT
• Measure existing salt in your pool:
use may cause the salt reading to be higher due to residual salt.
• New cement or gunite pools:
Wait at least 10-14 days or follow
Years of liquid chlorine
Biguanide Pools:
•
Before installing POOL FROG® Mineral
Hybrid on a pool using Biguanide sanitizers, all Biguanides must
be removed (see dealer for details).
your builder's instructions for plaster to cure before adding salt or
®
operating the POOL FROG
Mineral Hybrid Generator.
2. CALCULATING THE SIZE OF THE POOL
Gallons (dimensions are in feet) Liters (dimensions are in meters)
Rectangular Length x Width x Average Depth x 7.5 Length x Width x Average Depth x 1000
Round Diameter x Diameter x Average Depth x 5.9 Diameter x Diameter x Average Depth x 785
Oval Length x Width x Average Depth x 6.7 Length x Width x Average Depth x 893
3. ACCEPTABLE SALTS
GOOD BAD – do NOT use:
The best salt is an evaporated, granulated, food quality salt. Iodized salt.
Water softener salt pellets may be used but will take longer Salts with anti-caking agents of more than .1% (i.e. yellow
to dissolve. prussiate of soda or sodium ferrocyanide) because they
contain iron and will yellow the fittings.
“99.9%” pure salt. Rock salt because of the dirt mixed with the rock salt.
“Solar” salt. Calcium chloride; it is not a salt. Use only sodium chloride.
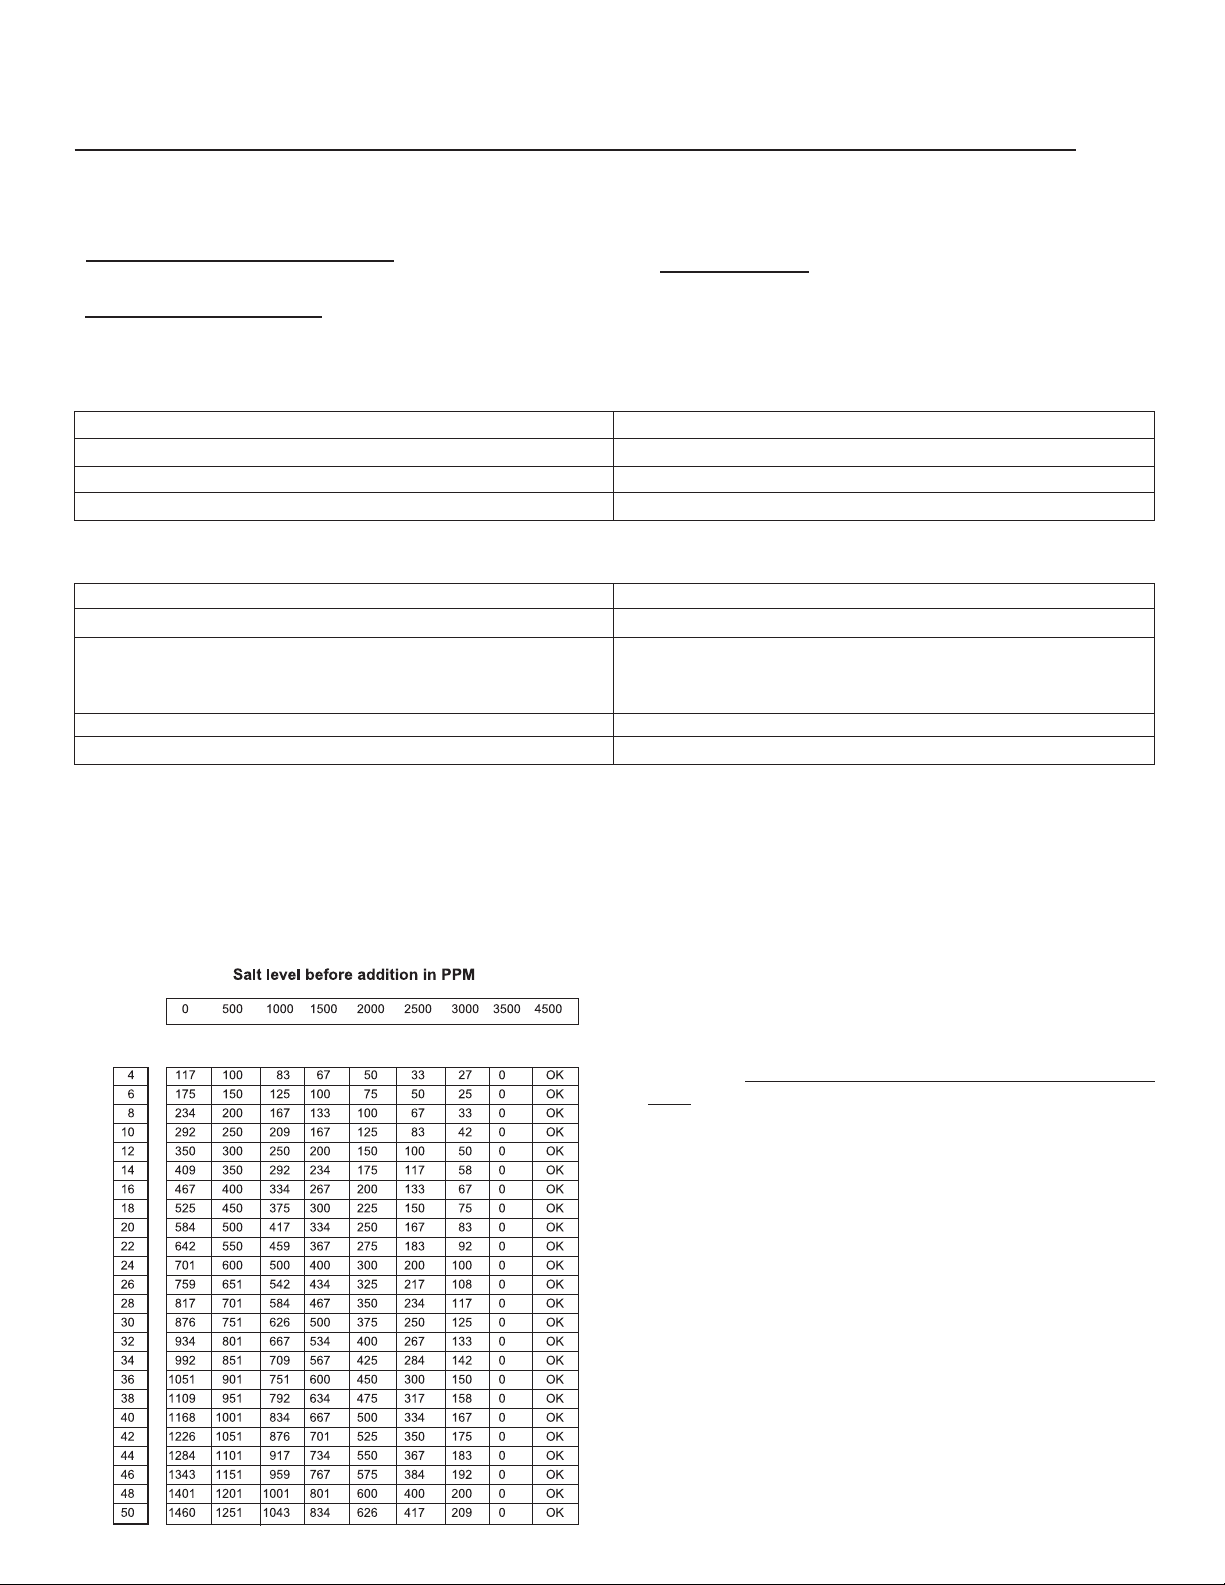
4. DETERMINE SALT AMOUNT
The table below is based on a salt concentration of 3500 ppm (approximately 1/3 of 1%). More may be added for larger
pools (e.g. 4000 ppm) and less for very small bodies of water. Locate the pool’s current salt concentration at the top of the chart
(e.g. 1000 ppm). Then locate the size of your pool on the left (e.g. 12,000 gallons). Run these figures down and across until they
meet. That number is the number of pounds of salt required for your pool.
SALINITY DEMAND TABLE (in lbs.)
5. ADDING THE SALT
A. Distribute the determined amount of salt evenly around the
How much salt to add – in pounds
pool. To avoid clogging the filter or damaging the control panel
and pump, do not add salt through the skimmer or surge
tank. Brushing the bottom helps dissolve the salt.
B. Keep the pump on to circulate the water.
C. The readout on the chlorine generator may fluctuate until
the salt is fully dissolved.
6. Maintain salt level of 3000 - 4500 ppm at all times. Check
salt level regularly by turning the control knob all the way to
HIGH. If all lights up to #7 are lit, salt level is in the right range.
It is also recommended to periodically test the salt level by a
professional.
Water volume in thousands of gallons
6
Page 7

Inserting POOL FROG
(
POOL FROG
®
Mineral Reservoirs MUST be Replaced Every Season)
®
Mineral Reservoir
When salt is dissolved and the Output Level reads #7
which means the salt requirement has been met (see
directions on side of control panel), insert POOL FROG
Mineral Reservoir into POOL FROG® Mineral Hybrid Cycler
following these directions.
IN GROUND SERIES 5400 (Order #01-12-5462)
NOW FITS THE FOLLOWING CYCLERS:
1.
POOL FROG Series 5400 or 5600
Prevail Series 5790
• Check the front of the box and back label of product to
make sure you have the correct POOL FROG® Mineral
Reservoir to fit your POOL FROG® Mineral Hybrid Cycler.
®
THE POOL FROG
REPLACED EVERY 6 MONTHS OR AFTER ONE POOL
SEASON WHICHEVER IS SHORTER.
MINERAL RESERVOIR MUST BE
7022906 05461
2.
Open the box and remove the POOL FROG
Reservoir.
®
Mineral
3.
CAUTION read carefully
4.
®
• Turn off pump.Turn dial to
0. This reduces the flow of
water into the unit when the
cap is open.
5.
6.
• Use the cap tool included
with POOL FROG
Hybrid Cycler to loosen cap
by hitting the handle with the
flat of your hand counter
clockwise.
SLOT IN POOL
®
FROG
MINERAL
RESERVOIR
FIN INSIDE
OF POOL
®
FROG
CYCLER
• Find slot on side of
POOL FROG® Mineral
Reservoir and line up
with fin inside the
POOL FROG® Mineral
Hybrid Cycler. Lower
POOL FROG® Mineral
Reservoir into POOL
FROG® Mineral Hybrid
Cycler until secure.
®
Mineral
• USE ONLY the factory recommended replacement POOL
®
FROG
needed. DO NOT USE any other pac or bulk chemical
tablets in the POOL FROG® Mineral Hybrid Cycler. Use of
any other product could result in damage to pool equipment
or surface, unsafe pool conditions, fire or explosion.
Warranty will be void if the correct POOL FROG® Mineral
Reservoir is not used.
Mineral Reservoir or POOL FROG® Bac Pac if
7.
8.
• Replace cap by hand only.
DO NOT OVER TIGHTEN.
• Turn control dial on POOL
®
FROG
Cycler to Maximum.
Mineral Hybrid
7
Page 8

Basic Operation
POOL FROG
throughout the summer. Simply replace the
®
Mineral Hybrid Cycler needs no adjusting
POOL FROG
®
Mineral Reservoir every six months or after one season
whichever is shorter.
POOL FROG
The
®
Mineral Hybrid Generator produces free
chlorine to sanitize and oxidize your pool water. Maintain a
minimum chlorine level of at least 0.5 ppm. Without a working
®
POOL FROG
Mineral Reservoir inside the Mineral Hybrid
Cycler, higher chlorine levels of 1-3 ppm would be required.
Chlorine levels can be tested using a standard test kit or by
your local pool store.
FINDING THE PROPER MAINTENANCE SETTING:
1. Turn knob initially to setting 3. For the first week test the
water for free chlorine every day and adjust the knob until at
least 0.5 ppm is maintained.
2. If after the first day, the chlorine reading is below 0.5 ppm,
turn control knob up by one tick mark. If the reading is above
1.0 ppm after one day, turn the control knob down by one tick
mark.
3. Continue this process each day until the reading stays
within the 0.5 to 1.0 ppm level.
Summer weather increases demand for chlorine.
TO DECREASE CHLORINE PRODUCTION:
1. Turn the control knob to a lower setting (1-7) to decrease
chlorine output.
2. Decrease run time as necessary.
3. Refrain from adding more stabilizer to allow excess chlorine
to be burned off.
®
TEMPORARY USE OF POOL FROG
BAC
PAC.
If a situation arises where the
POOL FROG
Mineral Hybrid Cell will be removed for an
extended period of time, a
POOL FROG
Pac may be used inside the
POOL FROG
®
Bac
®
Mineral Hybrid Cycler which will dispense a low
level of chlorine. A replacement pipe must be
installed in place of the cell in order to do this.
See your dealer or contact King Technology
for more information.
®
TO GENERATE MORE CHLORINE:
1. Turn the control knob to a higher setting (1-7) to increase
chlorine output.
2. Ensure sufficient run time
(at least 8 hours or 1 1/2 turnovers per day).
3. Ensure salt level is correct and the cell is clean (see
cell cleaning on page 11).
4. Ensure proper water balance including stabilizer levels
(see Start-up on page 5).
5. Point pool jets down and to the side.
Periodically test your water and always
maintain the following readings.
(Use Saturation Index on page 16 to ensure proper balance.)
Salt Level: 3000 - 4500 ppm
Chlorine Level: 0.5 - 1.0 ppm
pH: 7.2 - 7.8
IMPORTANT: At least once a month have a
professional test your water. Make sure there are
no Nitrates or Phosphates in the water as they
will deplete chlorine levels.
Shock the pool as needed to maintain water clarity. Always
follow shock manufacturer’s directions.
8
Page 9

Controls
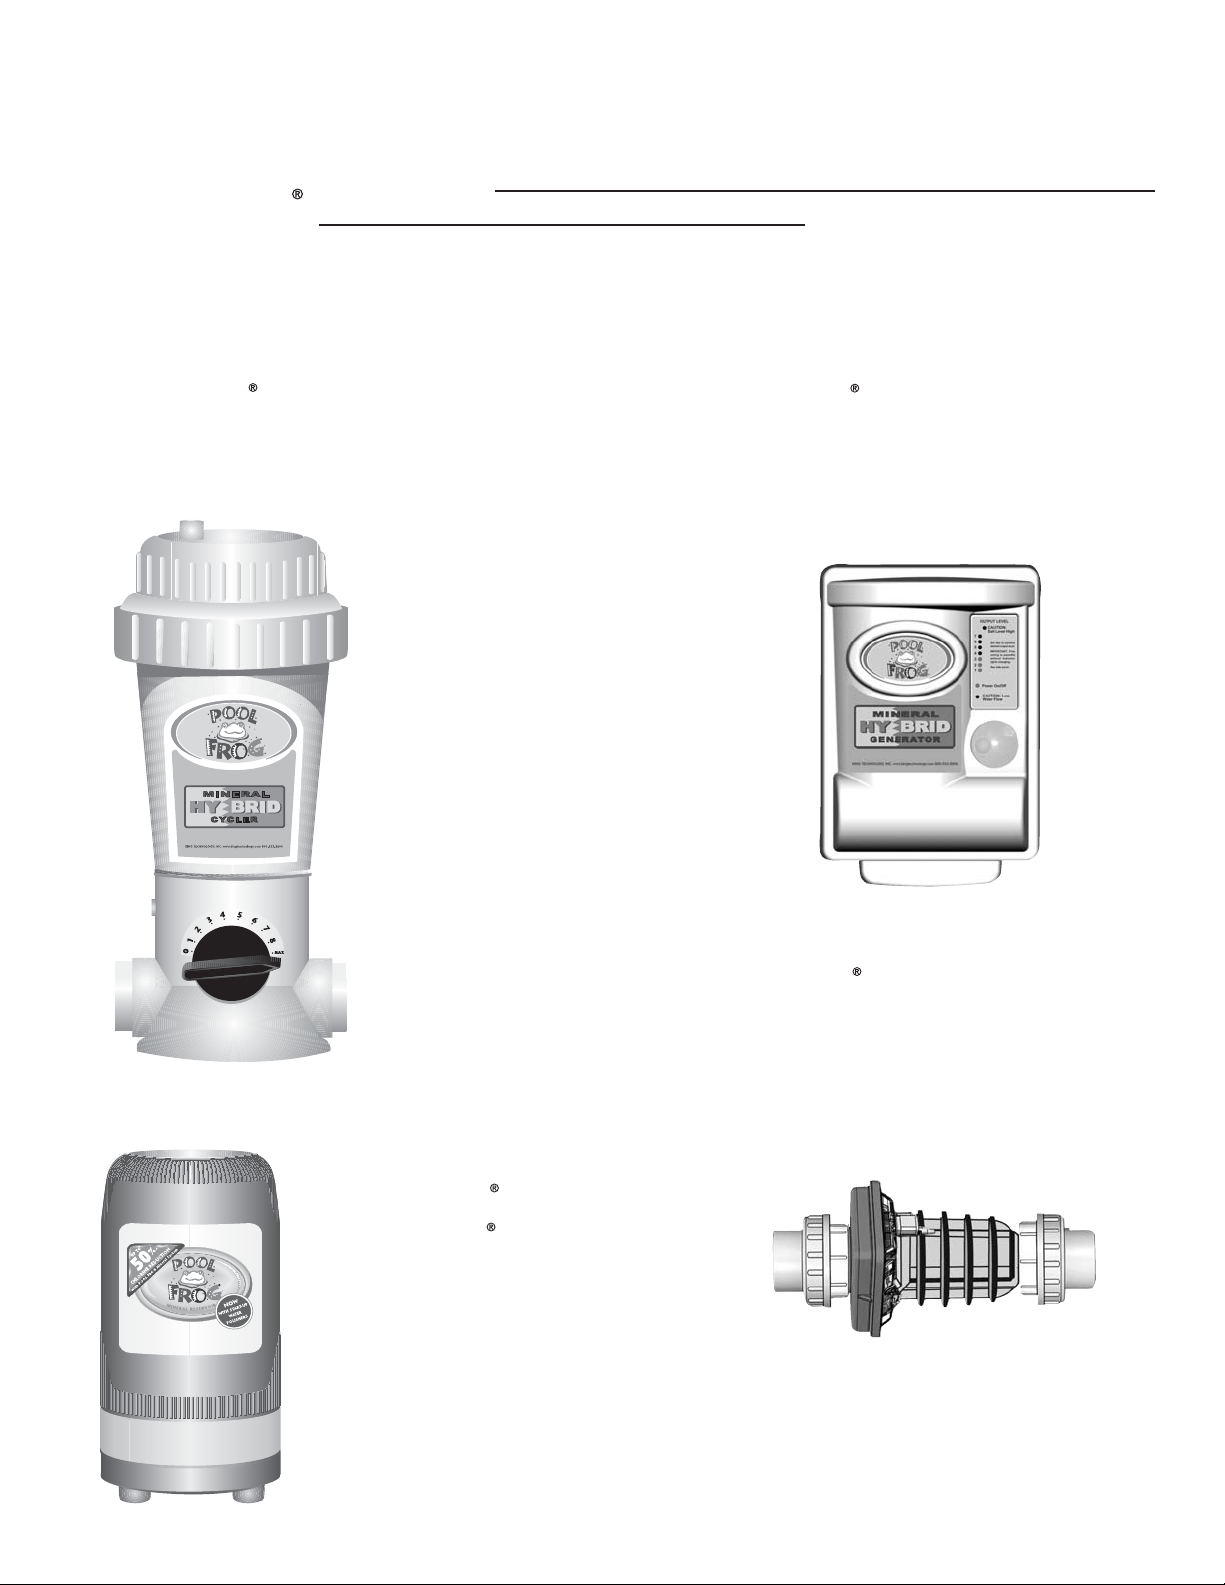
1. OUTPUT LEVEL—The lights marked 1-7 indicate the system’s chlorine output.
The higher number indicates higher chlorine production. Turning the control knob
clockwise increases chlorine production and should increase the chlorine output
reading. To turn system off, turn knob all the way counterclockwise until power
light turns off.
2. SALT LEVEL—The lights marked 1-7 also indicate adequate or inadequate
salt levels.
To check the salt level, turn the control knob all the way up (clockwise) and
check the light reading.
A) If light number 7 is lit, the salt level is sufficient. (Return the control
knob to the desired chlorine production setting.)
B) If any number less than 7 is lit, the salt level could be low or the cell is
worn or calcified. Check the cell to ensure the plates are in good condition
and not coated with calcium buildup (a white chalky coating on the plates
inside the cell). Cleaning the cell is recommended if it is calcified or if the
readout seems questionable (see page 11). Before adding salt, it is
advisable to have the salt level professionally checked by your dealer.
C) If lights 1-7 go up and down quickly or the salt-level high light is solid,
the salt level is extremely high and should be reduced immediately by
draining a significant amount of pool water and refilling the pool. (Please
check with your local pool professional prior to draining the pool.)
3. IF THE CAUTION: SALT-LEVEL HIGH LIGHT IS FLASHING—The salt level
in the pool is on the high side. This does not harm the POOL FROG
Hybrid Generator, but is provided as a cautionary notice to the user not to add
more salt to the pool. Operation at very high levels (i.e. above 5500 ppm) is not
recommended. Return the control knob to the desired chlorine production setting.
If this light is solid red, see 2C above.
®
Mineral
1&2
4
5
3
OUTPUT LEVEL
CAUTION:
Salt Level High
7
6
5
4
3
2
1
Set dial to achieve
desired output level.
IMPORTANT: Fine
tuning is possible
without indicator
lights changing.
See side panel or
manual for
additional
directions.
Power On/Off
CAUTION: Low
Water Flow
4. POWER LIGHT—When the system is turned on and the pump is operating,
the green power light should be illuminated indicating that power is reaching the
control panel.
5. CAUTION: LOW-WATER FLOW LIGHT—Red light should NOT be illuminated
during normal operation. When first turning on the circulation pump, the red light
may turn on and off until the air is pushed out of the pump lines and sufficient
water flow is achieved. This is normal and ensures that the generator automatically
shuts off if the pump fails to prime or a blockage occurs. See troubleshooting
section if red light remains on.
9
Page 10

Easy Maintenance
Replacing the Control Dial O-Rings Kit
1.
2.
3.
• Using a needle nose pliers,
find the snap ring tail located
at approximately the five o'clock
position under the control dial.
• Pull down and out of the
groove.
•
Using a large screwdriver,
loosen the control dial.
Carefully pry the dial until it
pulls out.
Replacing Cap O-Ring
1.
2.
• Hold cap in front of you
upside down with the o-ring
groove facing up. Place one
end of o-ring into cap groove
at the point closest to you.
Hold o-ring down with the
thumb and forefinger of one
hand.
• Take hold of the far end of
the o-ring with the thumb and
index finger of the other hand.
Roll o-ring slightly back
towards you as you stretch
the o-ring into the remainder
of the cap groove.
4.
5.
6.
•
Carefully replace the rubber
O
T
H
E
RCO
S
I
L
I
C
L
U
B
R
I
C
C
C
O
C
o-ring without stretching it.
?
Y
P
E
N
O
T
N
A
C
Apply silicone lubricant, that
came with your POOL FROG
O
P
Y
O
P
Y
P
Y
O
Y
P
Mineral Hybrid Cycler, on
o-ring. DO NOT USE
petroleum based lubricants.
• Push control dial completely
x
x
x
x
3.
®
x
S
L
E
I
N
C
O
L
U
T
B
N
R
A
I
C
C
Y
O
P
C
Y
O
P
C
O
Y
P
C
O
Y
P
• Lubricate o-ring often with
silicone lubricant that came
with your
POOL FROG
®
Mineral Hybrid. DO NOT USE
petroleum based lubricants.
Replacing Knob
into the housing and turn the
dial to setting 2.
• Replace knob in back of
POOL FROG
®
Mineral Hybrid
Cycler by unscrewing old one
• Insert the non-lipped end of
and screwing in new one.
snap ring into the groove
opening beginning at the 5
o'clock position and push it up
so that it threads itself around
the control dial.
7.
10
• Using a small screwdriver or
pointed tool to help guide it,
make sure the snap ring stays
in the groove as it is inserted.
Turn the dial back to MAX.
Page 11

Cleaning POOL FROG® Mineral Hybrid Cell
Our clear cell allows for easy regular inspections for calcium
build up. Visually check the cell periodically, and clean it as
necessary (1 to 2 times per year). Advanced self-cleaning with
shake plates helps the cell stay cleaner than other self-cleaning
cells, but minimal biannual cleanings are required.
Do not use metal or other hard objects to clean the cell
as this could scratch the precious coating on the plates and
void the warranty.
CAUTION: Always add acid to water, NOT water to acid.
Diluted muriatic acid solution = 10 parts water to 1 part acid.
Note: Follow the instructions of the acid manufacturer.
CAUTION: Always use protective eyewear and protective
clothing.
Cleaning With Optional Cleaning Cap:
1. Before removing cell, turn off power to pump and control
panel of generator. Make sure to note in which direction the
cell was installed so it can be replaced correctly.
2. Remove the cell from the line by undoing the electrical
connections from the cell and the barrel unions from the cell
ends.
3. Remove the black o-rings on
the ends of the cell.
4. Attach the cell Cleaning Cap
to one end of cell.
5. Put on rubber gloves and goggles.
6. Pour into cell, either undiluted white
distilled vinegar, or a solution of diluted
muriatic acid (10 parts water to 1 part
muriatic acid).
7. Wait for foaming to stop (5-10
minutes when using muratic acid –
vinegar takes longer).
Cleaning Without Optional Cleaning Cap:
1. Remove the cell from the line by undoing the electrical
connections from the cell and the barrel unions from the
cell ends.
2. Remove the black o-rings
on the ends of the cell.
3. Put on rubber gloves and
goggles.
4. Soak entire cell either in
undiluted white distilled
vinegar or in a solution of
diluted muriatic acid (10
parts water to 1 part
muriatic acid).
5. Wait for foaming to stop
(5-10 minutes when using
muratic acid – vinegar takes longer).
6. Safely dispose of muratic acid by pouring it into your pool
only. If using vinegar dispose of by pouring down your
kitchen drain.
7. Rinse cell with water hose. Avoid contact with skin or
clothes.
8. Put the o-rings back in place and re-install the cell in the
line making sure the water flows into the square blue end
of the cell first.
9. Reconnect the electrical wires, being sure to
screws on the electrical wires firmly. See cell wiring
diagram.
tighten the
8.
Safely dispose of muratic acid by
pouring it into your pool only. If using
vinegar dispose of by pouring down
your kitchen drain.
9. Rinse cell with water hose. Avoid
contact with skin or clothes.
10. Put the o-rings
back in place and
re-install the cell
in the line making
sure the water flows
into the square blue
end of the cell first.
11. Reconnect the
electrical wires,
being sure to
the screws on the electrical
wires firmly. See cell wiring
diagram.
tighten
CELL WIRING DIAGRAM
Optional
1.Lubricating the o-rings with the silicone lubricant that came
with your POOL FROG
seal of the fittings, but be sure not to use silicone glue,
petroleum jelly (such as Vaseline), or other agents that
could deteriorate the o-rings.
2. Smear the two electrical connections on the outside of the
cell with electrical lubricant.
Control Panel Maintenance
There is no regular maintenance required on the control panel
other than checking that the wiring running from the control
panel to the cell and flow sensor is securely in place. It is
beneficial to keep the control panel clean, dry and out of the
sun.
®
Mineral Hybrid helps improve the
11
Page 12

Winterizing
Just like the pool plumbing, freezing may damage the system’s
cell and flow sensor. If severe or extended periods of freezing
temperatures are possible, drain all water from the pump,
filter, and supply and return lines before any freezing conditions
occur. Remove the cell and store indoors. Then winterize the
POOL FROG
®
Mineral Hybrid Cycler as follows:
1.
2.
• Turn pump off and turn
dial to 0.
4.
5.
• Remove the POOL FROG
®
Mineral Reservoir and discard
in trash. Even if you hear spent
minerals inside, it is no longer
effective. Replace with a new
POOL FROG® Mineral
Reservoir in the spring.
3.
12
• Remove cap.
• Unscrew knob in the back
of POOL FROG
®
Mineral
Hybrid Cycler. Allow all
water to drain.
• Lubricate o-ring with the
silicone lubricant that came
with your
POOL FROG
®
Mineral Hybrid. DO NOT
x
x
x
x
x
S
L
I
C
L
U
B
R
USE petroleum based
E
N
O
lubricants. Replace the cap
T
N
A
I
C
loosely.
C
Y
O
P
C
Y
O
P
C
O
Y
P
C
Y
O
P
Page 13

Troubleshooting
Note: evaluating the possible causes for each problem from top to bottom (first to last) will avoid extra labor.
PROBLEM POSSIBLE CAUSES WHAT TO DO
System is turned off. Turn control knob to the desired setting.
Control knob is set too low in relation to
chlorination demand (e.g. higher number Turn control knob higher (clockwise) and/or
of bathers, warmer weather, increased increase pump operation time.
debris in pool).
1. Chlorine Level Low Low salt. Check the salt level. See “Adding Salt To The
Pump operation time too short. Run pump at least 8 hours per day (1.5
Low stabilizer (Cyanuric Acid). between 40-80 ppm. If low, add stabilizer. See
Chemical imbalance - could be Nitrates or
Phosphates are present in the pool. chart on page 5. Take your water to a dealer
System is turned off. Turn control knob clockwise to the desired
Main fuse blew. with a 6.3 AMP 250VAC 6x32mm Slow
2. Power Light is Off: the system.
No Power
Breaker tripped. Check the breaker leading to the pool control.
Check fuse and breaker.
Pool” page 6.
turnovers of all the pool water).
Check water chemistry; stabilizer should be
“Start-up” page 5.
Make sure water is balanced according to the
to check for Nitrates and Phosphates and
follow
dealer directions for removal.
setting.
Check the main fuse on the bottom of the
control panel and replace if necessary
Blow fuse. One extra fuse is supplied with
Power wires cut, disconnected, Check for correct wiring.
or incorrectly wired.
Very high salt levels in the pool have Drain part of the water and refill the pool.
shut down the generator. It will no longer It is also recommended to periodically
produce chlorine until the situation test the salt level by a professional. If above
is rectified. 5500 ppm, check with your dealer about
with fresh water.
Other malfunction in control panel. Contact warranty hotline.
3. CAUTION: Low Flow Light This is normal at initial start-up Wait a few minutes for air to clear. If continuous,
Turning On and Off or if air bubbles are in pipes. see troubleshooting section “Flow Light is Solid
Red” below.
Insufficient water flow from pump This is normal for a few minutes at initial
to flow sensor and cell. startup or if air is in the lines. Clean filters
4. CAUTION: Low Flow Light Obstruction or scale buildup in cell. Clean cell according to instructions on page 11.
is Solid Red
Flow sensor was not installed in the Turn flow sensor so arrow faces direction
correct direction. of water flow.
Flow sensor is not fully threaded into Fully thread the flow sensor into the T
the “T” connector. connector being careful not to damage the
Cut wires or insufficient wire connections. Check the connection to ensure proper
draining part of the pool water and refilling
and strainers. Check for closed valves,
faulty pump, etc.
wires or sensors.
wire contact.
Dirty filter causing insufficient flow. Clean or backwash the filter.
13
Page 14

PROBLEM POSSIBLE CAUSES WHAT TO DO
Check the cell to ensure the plates are in good
condition and not coated with calcium buildup.
Dirty cell. Cleaning the cell is recommended if it is
calcified or if the readout seems questionable.
See “Cell Cleaning” page 11.
5. Output Light #7 is
not lit when turning Loose connection with the cell’s Ensure the connectors are pushed completely
control knob all the connection pegs. over the pegs and tighten connections with a
way up. screwdriver. See cell-wiring diagram page 11.
page 6. It is also recommended to periodically
Add salt into the pool. See “Adding Salt” on
Not enough salt due to heavy rain, splash out, test the salt level by a professional and adjust
initial miscalculation, etc. according to the “Salinity Demand Table” on
page 6.
Worn cell. If none of the above resolutions worked, the
cell may be worn out and must be replaced.
6. Salt Level High This does no harm to the generator. Slowly
A. Red caution light is flashing. Salt level is on the high side. turn down the control knob to return to desired
output setting. It is also recommended to
periodically test the salt level by a professional.
B. Red caution light is solid or Salt level is very high. The generator could Drain part of the water and refill the pool.
output lights 1-7 go up completely turn off and no longer produce It is also recommended to periodically test
and down quickly. chlorine until the situation is rectified. the salt level by a professional. If above
5500 ppm, check with your dealer about drain ing the pool water and refilling with fresh water.
Control knob set too low. Turn control knob up (clockwise).
7. Output Level Lights
Not Responding, but
Power Light is On Improper salt level.The system automatically Check salt level using a test kit or your local
shuts down the output level when the salt pool professional. See Salt Level Low or Salt
level is extremely low or extremely high. Level High instructions above. Adjust accordingly.
Wires from control panel to cell are loose Check the connection. Wires should be slid
or the screws to the connectors are over the pegs on the cell and the screws
not tight. tightened firmly. See cell-wiring diagram page 11.
8. Scale Buildup Inside Cell Standard occurrence that needs to be Clean cell as instructed on page 11.
cleaned approximately twice per year.
Chemical imbalance. Balance chemicals. (Focus mostly on the
“Saturation Index” on page 16.)
9. White Flakes In Water Normal occurrence when cell cleans itself. Keeping the water well balanced reduces this.
(Focus mostly on the “Saturation
Index” on page 16.)
1.
Make sure your filtration system is working
properly (i.e. clean filter and/or skimmer).
2. Make sure circulation time is adequate –
10. Cloudy Water May be due to chemical imbalance increase pump time if not.
or low water flow. 3. Make sure total alkalinity is within 60-120
ppm. Adjust with acid if needed.
4. Shock the water to eliminate build up of any
organic matter.
5. Make sure pool has a free chlorine reading
of 0.5 to 1.0 ppm.
6. Check with your dealer for more information.
14
Page 15

PROBLEM POSSIBLE CAUSES WHAT TO DO
• Metals in the fill water may metals use a Metal Out or Sequestering
Have dealer test the pool water. If high in
11. Colored Water have been oxidized. product at start-up only.
Increase circulation time if needed and clean
• Algae may be trying to form. the filter.
• Chlorine level may be low. See “Chlorine Level Low” on page 13.
Check with your dealer for more information.
Have your water tested for chlorine levels,
pH, phosphates and nitrates.
12. Algae May be due to low chlorine levels Use a nonmetallic (polyquat) algaecide per
or a chemical imbalance. the directions on the bottle and brush the
sides of the pool often.
Clean the filter and shock the pool with chlorine
daily until water clarity returns.
See “Chlorine Level Low” on page 13.
Check with your dealer for more information.
Our contact information is found on the front cover of this manual. Please feel free to contact us with any questions or comments.
Our Customer Service Department is open from 8:00 AM to 5:00 PM Central Standard Time, Monday through Friday.
Please have the following information ready:
1. Model and serial # of all components.
2. Date of installation.
3. Installing company or dealer.
4. Current salt level, chlorine level and water balance data.
5. Proof of purchase (bill of sale, cancelled check or some other appropriate payment record).
15
Page 16

Saturation Index
Test the water for pH, Alkalinity, Calcium Hardness and Temperature, then follow the simple steps below:
1. Write your pool’s pH level here:
2. Find your Alkalinity level in the chart below, and write the
corresponding Alkalinity Factor here:
Pool Alkalinity 5 25 50 75 100 150 200 300 400
Factor 0.7 1.4 1.7 1.9 2.0 2.2 2.3 2.5 2.6
3. Find your Calcium level in the chart below, and write the
corresponding Calcium Factor here:
Pool Calcium
(CaCO
3) 5 25 50 75 100 150 200 300 400
Factor 0.3 1.0 1.3 1.5 1.6 1.8 1.9 2.1 2.2
4. Find your pool water temperature in the chart below, and write the
corresponding Temperature Factor here:
Pool Temp
Factor 0.0 0.1 0.2 0.3 0.4 0.5 0.6 0.7 0.8 0.9
(F)
32 37 46 53 60 66 76 84 94 105
pH: ________
Alkalinity Factor: ________
Calcium Factor: ________
Temperature Factor: ________
5. Add the results from steps 1 through 4 above and write the result here: Total of above: ________
- 12.2
6. Subtract 12.2 from step 5 and write the result here: Saturation Index = ____
If the Saturation Index above is between –0.3 and +0.3, the water is well balanced.
If the Index is more than 0.3, the water will tend to cause scaling or get cloudy. Alkalinity and pH
should be reduced accordingly, but maintained within recommended levels.
If the Index is less than -0.3, the water will tend to be aggressive toward the pool surface, equipment
and bathers. Alkalinity and pH should be increased accordingly, but maintained within recommended levels.
16
Page 17

Glossary
Salt: To ensure maximum benefits with the use of the system,
the ideal salt level is 4000 ppm (parts per million). A low
concentration of salt can hinder the generator’s effectiveness.
A concentration of salt above 5500 ppm may cause corrosion
damage to the pool fixtures. See Adding Salt on page 6.
Total Dissolved Solids (TDS) are different from the salt level
of the pool, although TDS levels rise with the addition of salt.
This does not harm the pool water chemistry or clarity. To
determine an accurate TDS, subtract the salt level from the
TDS reading.
Free Chlorine v. Combined Chlorine: The unpleasant smells
and side effects often associated with chlorine are actually
caused by combined chlorine (i.e. chloramines). Combined
chlorine is a chlorine molecule that has combined with a
contaminant and needs to be burned off with a shock treatment
to free up the chlorine again. With the POOL FROG
®
Mineral
Hybrid depending on pump-run time per day, the combined
chlorine is burned off at the point of the cell which reduces
the need to shock.The free chlorine level in the pool should
be maintained at 0.5 to 1.0 ppm.
pH is a measure of how acidic or basic a solution is. A scale
of 0 to 14 is used to measure pH. Pure water has a pH of 7
(neutral), acid solutions have a pH of less than 7, and basic
(alkali) solutions have a pH of more than 7. The recommended
range is 7.2 to 7.8; chlorine is more effective within this range
and the water is most comfortable for bathers. Water with very
high pH levels can cause scaling in the pool, on the walls and
in pipes. Low pH levels cause the water to be aggressive to
the pool walls, equipment and bathers.
Stabilizer (cyanuric acid) is necessary in most outdoor pools
to prevent chlorine reduction from the sun’s ultraviolet rays.
Chlorine stabilizer should be maintained at 40 ppm to offset
the harmful effect of the sun while maintaining the effectiveness
of the chlorine.
Nitrates and Phosphates, generally associated with fertilizer
thrown or sprayed on nearby grass, can put very high demands
on chlorine; most often nitrates and phosphates will bring the
chlorine level down to zero (0). You can have your water tested
for nitrates and phosphates by the local pool professional. No
nitrates or phosphates should be in your pool. To reduce
phosphate levels, use a phosphate remover from your local
pool professional. To reduce nitrate levels, the pool must be
partially or fully drained, but be sure to consult your local
professional before draining your pool.
Metals (certain metals) can cause loss of chlorine and can
stain your pool. If a water test reveals the presence of metals,
refer to your local pool professional for recommended methods
®
of removal prior to using the POOL FROG
Mineral Reservoir.
New Pool Water in recently filled or newly refinished pools
may contain undesirable matter. The ability of the POOL
®
FROG
Mineral Hybrid Generator to maintain your pool
sanitation could be hindered by this matter so it is best to
balance the pool water first.
Calcium Hardness, like pH and alkalinity, affects the water’s
tendency to be aggressive or scale forming. Lower levels of
calcium hardness improve the chlorine generator’s performance
and provide softer silkier water for the swimmers.
To lower pH, add muriatic acid or dry acid, and to raise pH,
add soda ash (sodium carbonate). Be sure to read and follow
the respective manufacturer’s instructions.
Total Alkalinity mitigates changes in pH. It is often referred
to as the “big brother of pH.” Keeping proper levels of total
alkalinity will help reduce unwanted fluctuations in pH levels.
Total alkalinity is also used to offset high or low levels of
calcium hardness (see Saturation Index on previous page).
Add muriatic acid or dry acid to lower total alkalinity and add
baking soda (sodium bicarbonate) to raise total alkalinity. Be
sure to read and follow the respective manufacturer’s
instructions.
Saturation Index determines whether the pool water is
balanced, aggressive or scale forming by comprehensively
taking into account all the relevant factors, including pH level,
alkalinity level, calcium hardness and temperature. These
factors should be tested then plugged into the worksheet on
the previous page to verify the proper balance of the pool and
make adjustments as necessary.
17
Page 18

POOL FROG® Mineral Hybrid Cycler Parts List
11
1
2
3
O
?
T
Y
H
P
E
RCO
S
I
E
L
I
N
C
O
L
U
T
B
N
R
A
I
C
C
Y
O
P
C
Y
O
P
C
O
Y
P
C
O
Y
P
12
6
7
4
9
8
5
10
DIAGRAM/PARTS LIST
REF. # PART No. DESCRIPTION QTY. REQ.
1 & 2 01-22-9412 Cap w/O-Ring 1
2 01-22-9920 Cap O-Ring 1
3 N/A Body 1
4 01-22-9480 Pressure Relief Valve 1
5, 6, 7 01-22-9440 Control Dial
with Assembly Kit 1
6 & 7 01-22-9450 Control Dial O-Ring Kit 1
8 & 9 01-22-9940 Knob with O-Ring 2
10 01-22-9490 2" Male Adapter 2
11 01-22-8870 Cap/Control Dial Tool 1
12 01-22-9971 Silicone Lubricant 1
18
Parts for the POOL FROG® Mineral Hybrid
Generator will be provided as needed by our
warranty
stations after a conversation with our
customer service department.
Page 19

POOL FROG Mineral Hybrid Cycler Two-Year Limited Warranty
King Technology, Inc. warrants to the original purchaser this unit will be free
from any defects in workmanship and/or material, for a period of two (2)
years from the date of original purchase. This warranty covers body, cap
and control dial, but specifically excludes o-rings. King Technology at its
option may replace any defective parts or the entire unit without charge
after it is determined what is needed to correct any deficiency. Replacement
parts with the exception of o-rings are warranted for the remainder of the
original warranty. To extend the limited warranty from two years to ten years,
simply complete the warranty card that came with your unit and return it to
King Technology within 30 days of purchase and installation.
1. To obtain warranty service, you must deliver the unit to King Technology
or its nearest authorized dealer. Shipping expenses are the purchaser's
responsibility. The name of the nearest authorized dealer can be obtained
by writing or calling King Technology at the address and telephone number
provided on back page. Proof of purchase is required when requesting
warranty service. Purchaser must present the sales receipt or other
documentation verifying proof of purchase.
2. This warranty does not cover defects caused by: Modification, alteration,
repair or service of the unit contrary to the accompanying instructions;
physical abuse to or misuse of the product or operation or installation in a
manner contrary to the accompanying instructions. This warranty also
excludes all costs arising from the installation, adjustment, removal or
replacement of defective units or parts. This warranty also excludes any
and all claims arising out of the chemicals used in the product or their
characteristics.
3. CAUTION - Read carefully – Failure to follow these instructions will
void the warranty. Do not add shock in or near skimmer.
A. This unit is not designed for shock treatment of pools. See your pool
dealer or distributor for further information concerning shock treatments.
®
B. Misuse or failure to use the proper POOL FROG
Mineral Reservoir
may cause damage to equipment or personal injury. This warranty will
be null and void, if this unit is not used with the recommended POOL
FROG® Mineral Reservoir.
4. This warranty is the exclusive warranty for the POOL FROG® Mineral
Hybrid Cycler. This warranty is not transferable. KING TECHNOLOGY
MAKES NO REPRESENTATION OR WARRANTY OF ANY KIND, EXPRESS
OR IMPLIED, AS TO MERCHANTABILITY, FITNESS FOR A PARTICULAR
PURPOSE OR ANY OTHER MATTER CONCERNING THE POOL FROG
MINERAL HYBRID CYCLER. Any express warranty not provided herein,
and any remedy for breach of contract but which for this provision might
arise by implication or operation of law is hereby excluded and disclaimed.
THE EXCLUSIVE REMEDY FOR ANY CUSTOMER IS THE REPAIR OR
REPLACEMENT OF THE UNIT, AND THE RECOVERY OF DAMAGES
WILL NOT EXCEED THE PURCHASE PRICE OF THE UNIT. IN NO EVENT
WILL KING TECHNOLOGY BE LIABLE FOR ANY INCIDENTAL,
CONSEQUENTIAL, SPECIAL OR PUNITIVE DAMAGES FROM ANY
CAUSE.
5. Under no circumstance shall King Technology be liable to purchaser or any
other person for any damage or loss incurred because of any chemicals used
in the product or their physical characteristics, or interruption of service of the
product, or any resulting special, incidental or consequential damages or losses.
Some states do not allow the exclusion or limitation of incidental consequential
damages, so the above limitation or exclusion may not apply to you.
®
19
Page 20

POOL FROG® Mineral Hybrid Generator Seven-Year Limited Warranty
This warranty applies to the chlorine generator and their factory-supplied
components (the generator) when purchased from an authorized dealer
and used for residential swimming pools or spas. King Technology, Inc.
warrant the generator to be free from defects in materials and workmanship
in the manufacturing process for a period of seven (7) years from the
purchase date, when properly installed and operated in accordance with
the relevant manuals. For three (3) years after the generator’s original
purchase date, should the generator exhibit a manufacturing defect, King
Technology, Inc. will install comparable replacement parts without charge
for parts or labor. For the subsequent 4 years, if a part with a manufacturing
defect is delivered freight prepaid to King Technology, Inc., a comparable
replacement part will be sent back for a charge of 60% of the latest list price
plus the cost of shipping.
EXCEPTIONS & LIABILITY LIMITATIONS
This warranty is the exclusive warranty for the generator. This warranty is
not transferable. KING TECHNOLOGY MAKES NO REPRESENTATION
OR WARRANTY OF ANY KIND, EXPRESS OR IMPLIED, AS TO
MERCHANTABILITY, FITNESS FOR A PARTICULAR PURPOSE OR ANY
OTHER MATTER CONCERNING THE GENERATOR. Any express warranty
not provided herein, and any remedy for breach of contract but which for
this provision might arise by implication or operation of law is hereby
excluded and disclaimed. YOUR EXCLUSIVE REMEDY IS THE REPAIR
OR REPLACEMENT OF THE UNIT, AND IN NO EVENT SHALL IT EXCEED
THE PURCHASE PRICE OF THE UNIT. IN NO EVENT WILL KING
TECHNOLOGY BE LIABLE FOR ANY INCIDENTAL, CONSEQUENTIAL,
SPECIAL OR PUNITIVE DAMAGES FROM ANY CAUSE.
5,076,315; 5,218,983; 6,190,547; 6,210,566; 6,217,892; 6,383,507; 6,544,415;
Manufactured by: KING TECHNOLOGY, INC.
530 11th Avenue South, Hopkins, MN 55343 U.S.A.
.
952-933-6118
800-222-0169 . FAX 952-933-2206 www.kingtechnology.com
Labor coverage is applicable only for installations within a 50-mile radius
of an authorized dealer. King Technology, Inc., and their suppliers, dealers,
and distributors SHALL NOT BE LIABLE FOR DAMAGE OF ANY SORT
OR NATURE RESULTING FROM ABUSE, MISUSE, NEGLIGENCE,
LIGHTNING, ABNORMAL WEATHER CONDITIONS, OR ACT OF GOD;
OR DAMAGE CAUSED BY IMPROPER OR UNAUTHORIZED
INSTALLATION OR REPAIR. This warranty applies only to components
supplied by the factory and only where such components have been
installed and maintained in compliance with the respective installation and
operation manuals and instructions and applicable ordinances and codes.
In no event shall the liability exceed the purchase price of the product. THE
CONSUMER SHALL BE LIABLE AT STANDARD RATES FOR ANY
SERVICE VISIT WHERE NO MANUFACTURING DEFECT WAS PRESENT
AND FOR ALL SERVICE VISITS REQUESTED AFTER THE THIRD YEAR
FOLLOWING THE ORIGINAL PURCHASE DATE.
PROOF OF PURCHASE
The consumer is responsible for establishing the original purchase date
and the purchaser’s identity for warranty purposes. We recommend that
a bill of sale, canceled check, or some other appropriate payment record
be kept for that purpose. The express warranty above constitutes the sole
and complete warranty and takes precedence over all other warranties,
whether expressed or implied, including a warranty for fitness for a particular
purpose. No sales representative, dealer, distributor, or other person is
authorized to give any warranty on behalf of King Technology, Inc.
Assembled from components made in the U.S.A. and Israel.
Covered by one or more of the following U.S. Patent Numbers: 4,662,387;
6,551,609; 6,652,871 and other U.S. and Foreign Patents Pending.
PN #20-48-0162
553090643R2N
Owner’s Registration Form
Owner’s Name_______________________________
Signature______________________________
Street Address______________________________________________________________________
City__________________________________________ State____________ Zip________________
Phone #____________________________ E-Mail_________________________________________
Authorized Dealer__________________________ Sales Rep________________________________
City_________________________________________ State__________ Zip___________________
Model FROG
(Check one - see label on blue end of cell) (Located on side of the control panel mounted to wall.)
®
6425 Model FROG® 6440 Control Panel Serial #_________________________
Cycler Serial #________________________ (Located on side of cycler above port opening.) Date Installed________
Comments________________________________________________________________________
IN ORDER TO ACTIVATE YOUR WARRANTY PLEASE RETURN THIS PORTION TO:
KING TECHNOLOGY, INC., 530 11th Avenue South, Hopkins, MN 55343
or fax to 952-646-4300 or register online at www.kingtechnology.com
 Loading...