

King Technology New Water Series, New Water 120, New Water 105C, New Water 400, New Water 430 Instruction Manual
...Page 1

NEW WATER® Cycler
Instruction Manual
Chlorine Pool-Care System
Model 400/430 for pools up to 40,000 gallons Model 120 for pools up to 25,000 gallons
WARNING
To minimize the risk of serious injury, death or
damage, before installing or first using this
equipment, read Instruction Manual and all safety
labels and follow all safety instructions and
precautions. Save manual for future reference.
Ver la versión en español de este manual en kingtechnology.com/brands/new-water
Customer Service 800-222-0169
kingtechnology.com
1
Page 2

TABLE OF CONTENTS
New Water Introduction 3
Notes and Safety Information 4
Safety Labels on Cycler 5
Installation Tips to Ensure Proper Performance 6
Filter Flex-Hose Installation Model 120 7
Base Flex-Hose Installation Model 120 8
Hard-Plumbed Installation Model 120 9
In-Line Installation Model 400 10
Off-Line Installation Model 430 11-12
Step 1: Preparing the Pool 13-14
Step 2: Putting the System to Work 15
Step 3: Setting the Control Dial 16
Step 4: Routine Pool Care 17
Winterizing 18
Troubleshooting 19
Parts List Model 120 20
Parts List Models 400/430 21
Maintenance - Replacing Control Dial O-Rings 22
Maintenance - Replacing Cap O-Rings and Knobs 23
Warranty 24
For information on King Technology’s entire product
line, visit our website at kingtechnology.com
2
Page 3

Thank you for choosing New Water. This system will maintain a clean,
clear swimming pool while you spend less time on maintenance and more
time having fun! There are three models to choose from:
New Water Cycler 400/430
The water treatment
center that controls the
ow of water to the New
Water Cycler Pac. For
pools 7,000 to 40,000
gallons. Uses the Cycler
Pac Model 407C. (Sold
separately).
Cycler Pac Model 407C
Pre lled with chlorine tablets
and ts inside the New Water
Cycler Models 400 and 430.
New Water Cycler 120
Model 400 In-Line
Product # 01-01-0400
Model 430 Off-Line
Product # 01-01-0430
The water treatment
center that controls the
ow of water to the New
Water Cycler Pac. For
pools 7,000 to 25,000
gallons. Uses the Cycler
Pac Model 105C. (Sold
separately).
Model 407C
Product # 01-03-4613
Cycler Pac Model 105C
Pre lled with chlorine tablets
and ts inside the New Water
Cycler Model 120.
Model 105C
Product # 01-03-1413
Model 120 In-Line
Product # 01-01-0120
3
Page 4

Notes and Safety Information
NOTICE
General Notes
These instructions contain information for the safe and proper op-
eration of this New Water Cycler. Observe the following principles:
• Ensure that everyone using this New Water Cycler
follows the instructions and safety precautions.
• Keep the instructions nearby and available for reference
throughout the service life of this New Water Cycler.
These instructions do not provide for every possible contingency
that might be encountered in connection with installation, opera-
tion or maintenance of this equipment. Should further informa-
tion be desired or should particular issues arise which are not
covered suf ciently in this manual, contact King Technology at
800-222-0169.
Explanation of the signal words
Signal words, which depict the probability and severity of harm, are used in these instructions. They are de ned as follows:
Signal Word
DANGER
WARNING
Meaning
Indicates an imminently hazardous situation which, if not avoided, will result in death, serious injury
or major property damage.
Indicates a hazardous situation which, if not avoided, could result in serious injury, death, or major
property damage.
NOTICE
Indicates special instructions that are important but not related to physical injury hazards.
Explanation of the safety pictographs
The following pictographs illustrate the type and source of
a hazard.
Pictograph Type of Danger
Safety Alert/General Hazard
Explosion Risk
Hazardous Pressure
Flammable Fire Hazard
Identi cation of warnings
Warnings are intended to help you recognize risks and avoid
death, injury or property damage. This is how warnings are identi ed:
Signal Word
Pictographs
Description of danger.
Consequences if ignored.
a The arrow signals a safety precaution to be taken to
eliminate or reduce the risk.
4
Page 5

NOTICE
Safety Label on Cycler
Review this label before installing or operating this Cycler. Contact King Technology at 800-222-0169 if this label is missing from your New Water Cycler.
Fire, explosion and high pressure hazards
To minimize the risk of serious injury, death or property damage while using the New Water Cycler:
a Read, understand and follow all instructions and safety precautions in the manual, and on this Cycler and on any label for
chemicals used with this Cycler including New Water Cycler Pacs.
DANGER
a Never use fast dissolving chlorine tablets, liquid bleach, or calcium hypochlorite in the New Water Cycler.
a Never mix Trichlor chlorine tablets with Calcium Hypochlorite, or with any other form of concentrated chlorine or other chemicals.
a Never add any other types of chlorine, pH adjusters, shock treatments or algaecides through the skimmer.
These products should be added directly into the pool if required.
Do not contaminate the New Water Cycler or New Water Cycler Pacs with dirt, organic matter, pool chemicals (such as calcium
a
hypochlorite or pool shocks), fertilizers or other household chemicals. Contact between any of these substances and the New Water Cycler or
New Water Cycler Pacs, will result in a chemical reaction with the generation of heat, liberation of hazardous gasses and re
or explosion.
WARNING
a Use only New Water Cycler Pacs in the New Water Cycler. Never use bulk chemicals.
a To prevent the build up of gas pressure in the New Water Cycler, be sure the pool return line valves are open –
except when opening or servicing the unit.
a Do not inhale fumes from the New Water Cycler or New Water Cycler Pacs.
a Avoid sparks, smoking, or any open ame near New Water Cycler or chemicals.
a Do not exceed maximum operating pressure of 50 psi or maximum temperature of 104º F.
a Do not remove the cap while under pressure. Always turn off pump and bleed off pressure before opening New Water Cycler.
a Do not install automatic or fast shut off valves downstream of New Water Cycler.
a Always install the New Water Cycler AFTER a heater (if applicable) on the return line.
a Always install any additional sanitizing equipment AFTER and NEVER BEFORE the New Water Cycler is installed on the return line.
a Do not permit children to use or climb on this product. This product must be positioned to prevent children from using it as a
means of access to the pool.
a Always stand clear of the New Water Cycler during pump start-up.
a Replace New Water Cycler if you see signs of cracks, damage or degradation to the Cycler body or cap.
NOTICE
a Prior to pressurizing, check with your dealer to ensure your plumbing connections meet building codes.
a Failure to properly winterize your New Water Cycler could result in freeze damage. (See page 18 for winterizing details.)
5
Page 6

Installation Tips to Ensure Proper Performance
Before installing, read all directions carefully and contact your dealer for installation support.
WARNING
• Do not exceed maximum operating pressure of 50 psi.
• Do not install automatic or fast shut off valves
downstream of feeder.
• Always install the New Water Cycler AFTER the
heater (if applicable) on the return line.
• Always install any additional sanitizing equipment
AFTER and NEVER BEFORE the New Water Cycler
is installed on the return line.
1) If using a multi-speed pump, run
pump for at least 6 hours per day at
high speed (at least 40 gpm).
If the pump will run on low speed 24
hours per day or less than 6 hours per
day on high speed, you must bleed the
air while the pump is on by unscrewing
either the cap knob or back knob until
water appears. Then screw the knob
back in. Repeat this process each time
the cap is removed for any reason.
2) Install Cycler with 4-8 psi back pressure.
Lower back pressures could result in under
chlorination. Change the eyeball ttings in
the return jets to a smaller size to increase
back pressure. Contact King Technology at
800-222-0169 for a specially designed
Cycler pressure gauge to determine back
pressure at pool start-up.
3) Special installation Requirements:
IMPORTANT: Over chlorination or damage to the New
Water Cycler or other equipment could result if special
installations A, B or C are not used in these situations:
• If water ow is higher than 80 gallons per minute (gpm),
see diagram A.
• If an in- oor cleaner is included with pool,
see diagram B, with two options. Preferred
installation is Option 1 with two separate lines.
PN #01-22-4000
A. With High Flow Rate (greater than 80 gpm) Install
T- ttings exactly as shown.
SUCTION
FROM
POOL/SPA
CHECK
VALVE
NEW WATER CYCLER
TO POOL
B. With In-Floor Cleaner - TWO OPTIONS
OPTION 1- A Two-Line Installation
The best option is to have two lines. One line with pump, lter, heater and
New Water Cycler and a second line with a separate pump for the in- oor
cleaning system ( lter optional).
Line 1
Flow
PUMP
HEATER
POOL WATER LEVEL
POOL WATER LEVEL
Line 2
Flow
PUMP
POOL WATER LEVEL
POOL WATER LEVEL
OPTION 2 - A 3-Way Valve Installation
3-way manual valve or 3-way motor valve plus controls
NEW WATER
CYCLER
9
9
POOL WATER LEVEL
PUMP
9
9
9
9
9
9
NEW WATER
CYCLER
POOL RETURN
IN-FLOOR
CLEANER VALVE
9
IN-FLOOR
CLEANER VALVE
• If set-up is a pool and spa combination with
common equipment, see diagram C.
Questions? Call Customer Service at 800-222-0169
Monday thru Friday, 8 am to 5 pm central standard time.
6
C. Pool and Spill-over Spa Combination
SUCTION
FROM
POOL/SPA
CHECK VALVE
PUMP
NEW WATER
CYCLER
3-WAY VALVE
TO POOL
TO SPA
Page 7

TOOLS NEEDED
Install
Screwdriver
Filter Flex-Hose Installation - Model 120
®
Pipe Wrench
MATERIALS NEEDED
Pipe Thread Tape
or Sealant
One 6” x 1½” TBE PVC
Nipple
One Hose Adapter
1½” x 1½” x 1¼”
One Section of
1½” or 1¼” Flex Hose
(provided with lter)
Apply pipe thread tape or sealant
to each threaded end of nipple.
Apply pipe thread tape or
4.
sealant to threaded end of
hose adapter.
2.1.
Screw one end of nipple
into the lter return.
Hand tighten. Finish tightening
by turning 1 to 2 revolutions
with a pipe wrench.
DO NOT OVER TIGHTEN.
Screw adapter into the other
5.
side of New Water Cycler.
Hand tighten. Finish
tightening by turning
1 to 2 revolutions
with a pipe wrench.
DO NOT OVER TIGHTEN.
3.
Screw either side of New
Water Cycler on to open
nipple end until upright and
secure.
®
One
Hose Clamp
RECOMMENDED
4-8 psi Back Pressure
To avoid over or under
chlorination, replace eyeball
ttings in the return jets to a
smaller or larger size to adjust
back pressure. For best results
use King Technology’s pressure
gauge, order part number
01-22-4000.
®
6.
Attach return section of hose to
the adapter with clamp. Tighten
clamp with screwdriver.
®
HOSE ADAPTER
7.
To prevent damage to heaters
or lters, see your dealer about
installing a corrosion resistant
check valve which will reduce the
back ow of chlorine gas when
the New Water Cycler is turned off.
7
Page 8

TOOLS NEEDED
Screwdriver
Base Flex-Hose Installation - Model 120
Pipe Wrench
MATERIALS NEEDED
Pipe Thread Tape
or Sealant
Two Hose Adapters
1½” X 1½” X 1¼”
Two Sections of 1½”
or 1¼” Flex Hose (one
provided with lter)
PUMP
FILTER
Apply pipe thread tape or sealant
1.
to the threaded end of both hose
adapters.
The New Water Cycler should always be installed
between the lter and pool (or between heater
®
and pool if applicable). Never install New Water
Cycler before the heater or damage to the
TO POOL
heater could occur.
®
Screw adapters into each end of New Water
2.
Cycler. Hand tighten. Finish tightening by
turning 1 to 2 revolutions with a pipe wrench.
DO NOT OVER TIGHTEN.
Two
Hose
Clamps
RECOMMENDED
4-8 psi Back Pressure
To avoid over or under
chlorination, replace eyeball
ttings in the return jets to a
smaller or larger size to adjust
back pressure. For best results
use King Technology’s pressure
gauge, order part number
01-22-4000.
Attach the lter section of ex hose to one hose adapter
3.
and the return section of ex hose to the other hose
adapter with clamps and tighten with screwdriver. Bi- ow
valve design allows installation in either ow direction.
HOSE
CLAMP
1 1/2" X 1 1/2" X 1 1/4"
HOSE ADAPTER
FILTER &
PUMP
1 1/2" OR 1 1/4"
FLEX HOSE
HOSE
ADAPTER
CHECK
VALVE
HOSE
CLAMP
To prevent damage to heaters or lters, see your dealer
4.
about installing a corrosion resistant check valve which
will reduce the back ow of chlorine gas when the Cycler
is turned off.
®
®
HOSE
ADAPTER
TO POOL
HOSE
CLAMP
For better stability, New Water Cycler may be mounted
5.
on a treated wood base using Phillips pan head
screws, one in front and two in back. If you have
questions about stability, please contact your dealer or
King Technology.
8
Page 9

TOOLS NEEDED
Install
Pipe Wrench
Hard-Plumbed Installation - Model 120
Hacksaw
Tape
Measure
MATERIALS NEEDED
Pipe Thread Tape
or Sealant, Primer and
PVC Cement
C
P
P
V
r
r
e
i
m
C
n
e
e
m
1½” Male Adapter
(slip x MPT)
or
2” Female
Adapter
(slip x FPT)
The New Water Cycler should always be installed between
the lter and pool (or between heater and pool if applicable).
Never install New Water Cycler before the heater or
damage to the heater could occur.
®
®
OR
Do NOT install New
Water Cycler Model
t
120 off-line.
1.
Screw adapters into each end of New Water Cycler following
directions for a male adapter or a female adapter. Hand
Bi- ow valve design allows
installation in either ow
direction.
tighten. Finish tightening by turning 1 to 2 revolutions with a
pipe wrench. DO NOT OVER TIGHTEN.
®
®
Do NOT install in copper pipe as
chemical corrosion may lead to pipe
failure.
Allow a minimum
®
®
of 12” above and
12"
on each side of
New Water Cycler to
ensure room for easy
®
replacement of New
Water Cycler Pac.
12" 12"
Measure the distance
2.
between the outside
adapters and cut out a
section of pipe 3” less
than that dimension.
®
®
SECURE CYCLER
For better stability,
New Water Cycler
may be mounted on
a treated wood base
using Phillips pan head
screws, one in front
and two in back. If you
have questions about
stability, please contact
your dealer or King
Technology.
1a.
If using male adapters, apply
pipe thread tape or sealant to the
threaded end of each adapter.
P
r
r
e
i
m
1b.
If using female adapters, apply
pipe thread tape or sealant to the
threaded end of each feeder port.
C
P
V
C
t
n
e
e
m
3.
Following primer directions, brush primer on the inside of the
adapters and to ends of pipe. Repeat this process with PVC
cement following directions on that product.
5.
®
®
4.
Insert PVC pipe into adapters with
a twisting action. Hold in place 5 to
10 seconds to bond.
To prevent damage to heaters or lters,
see your dealer about installing a
corrosion resistant check valve which
will reduce the back ow of chlorine gas
when the Cycler is turned off.
9
Page 10

TOOLS NEEDED
Pipe Wrench
Hacksaw
In-line Installation - Model 400
Tape Measure
MATERIALS NEEDED
Pipe Thread
Sealant
Primer and
C
P
PVC Cement
P
V
r
r
e
i
m
C
e
e
m
Two 2” Threaded
x 2” or 1½” Slip
male adapters
(not Included)
SECURE CYCLER
The New Water Cycler should always be installed
between the lter and pool (or between heater and
pool if applicable). Never install New Water Cycler
before the heater or damage to the heater could
occur.
®
Do NOT install New Water
Cycler Model 400 off-line.
W
C
M
e
t
t
n
1.
a
t
e
r
Y
C
L
E
R
e
r
e
d
P
o
o
l
r
P
e
i
u
f
i
r
Bi- ow valve design allows
installation in either ow
direction.
2.
Following pipe thread sealant
directions, brush sealant onto
New Water Cycler threads
in both ports and both male
adapters.
DO NOT USE
PIPE THREAD TAPE
OR
Screw a male adapter
into each port of New Water
Cycler. Hand tighten. Finish
tightening by turning
1 to 2 revolutions
with a pipe
wrench.
DO NOT OVER
TIGHTEN.
Do NOT install in copper pipe as
chemical corrosion may lead to pipe
failure.
12" to 15"
®
Allow a minimum
of 12” above and
on each side of
®
12" to
15"
New Water Cycler
to ensure room for
12" to
15"
easy replacement
of New Water
Cycler Pac.
3.
Measure the distance
between New Water Cycler
male adapters and cut out a
section of pipe 3” less than
that dimension.
For better stability, New
Water Cycler may be
mounted on a treated wood
base using Phillips pan
head screws, one in front
and one in back. If you have
questions about stability,
please contact your dealer
or King Technology.
10
P
r
r
e
i
m
C
P
V
C
t
n
e
e
m
4.
Following primer directions,
brush primer on the inside of the
male adapters and to ends of
pipe. Repeat this process with PVC
cement following manufacturer’s
directions on that product.
5.
Insert PVC pipe into male
adapters with a twisting
action. Hold in place
5 to 10 seconds to bond.
To prevent damage to
6.
heaters or lters, see your
dealer about installing a
corrosion resistant check
valve which will reduce the
back ow of chlorine gas
when the Cycler is turned off.
Page 11

TOOLS NEEDED
Off-line Installation - Model 430
Screwdriver
Pipe Wrench
Battery
Operated Drill
with 5/8” or 19/32”
Bit
MATERIALS NEEDED
Pipe Thread
Sealant
Primer and
PVC Cement
P
P
V
r
r
e
i
m
C
e
m
OFF-LINE KIT
Included with the
New Water Cycler
Two M a le
Adapters
The New Water Cycler should
SCOOPS
2” – 36” APART
®
always be installed between
the lter and pool (or between
heater and pool if applicable).
Never install New Water Cycler
before the heater or damage
to the heater could occur.
®
Do NOT install New Water Cycler
Bi- ow valve design allows installation in either ow direction.
®
OR
®
Model 430 in-line as this Cycler
C
t
n
e
is different than an in-line unit.
W
a
t
e
r
1.
C
Y
C
L
E
R
M
e
t
e
r
e
d
P
o
o
l
r
P
e
i
u
f
i
r
Following pipe thread sealant
directions, brush sealant onto
New Water Cycler threads in
2.
both ports and on both male
adapters.
Two Reducer
Bushings
Two 90
Degree Elbows
Four Hose
Clamps
6’ of Tubing
Two
Scoops
Two Scoop
Gaskets
Two Scoop Clamps
DO NOT USE PIPE THREAD
TAPE as the threads
on these units are
not suitable for
this use and
leaking or tting
failure could result.
Screw a male adapter
into each port of New Water
Cycler and hand tighten.
Completely tighten turning
1 to 2 revolutions with
a pipe wrench.
DO NOT
OVER
TIGHTEN.
P
r
r
e
i
m
C
P
V
C
t
n
e
e
m
3. 4. 5.
Following Primer directions,
brush Primer on reducer
bushings and inside of male
adapters. Repeat this process
with PVC cement following
manufacturer’s directions on
that product.
Insert reducer bushing
into male adapter on both sides
with a twisting action. Hold in
place 5 to 10 seconds to bond.
Following pipe thread sealant
directions, brush sealant onto
elbow threads.
11
Page 12

6. 7. 8. 9.
Cut tubing
to size for
each New
Water
Cycler
connection
and attach
one to each
elbow with
clamps.
Screw elbow into reducer
bushings on both sides.
Tighten clamps
with a screwdriver.
When pipe is
totally dry, drill two
19/32” or 5/8” holes,
between 2” - 36”
apart, on the return
line. Be careful not to
go through other side
of pipe.
10.
Attach a gasket to
each scoop.
13.
Tighten scoop clamps
with a screwdriver.
11. 12.
2” – 36” apart on straight pipe
Place scoops inside
holes so the inlet scoop
faces the water ow
and the outlet scoop
faces away from the
water ow. Scoop
arrows should be
facing each other when
correct.
14.
Arrows on scoops must face
each other.
Attach each hose to venturi
scoop male nipple with a
small clamp and tighten with
screwdriver.
15.
Attach scoop clamps
over the scoops and
around the pipe.
12
16.
SCOOPS
2” – 36” APART
®
For better stability, New Water
Cycler may be mounted on
a treated wood base using
Phillips pan head screws, one
in front and one in back. If you
have questions about stability,
please contact your dealer or
King Technology.
To prevent damage to heaters or lters, see your dealer
about installing a corrosion resistant check valve
which will reduce the back ow of chlorine gas when
the Cycler is turned off.
Page 13

Step 1: Preparing the Pool
Operate
1.
2.
Make sure the pool has adequate
circulation. The total volume of pool
water must completely circulate
through the pump and lter at least
1 to 2 times per day. This usually
requires 8 to 12 hours of circulation.
Check with your dealer for the
proper circulation time for your pool.
Check the pool’s lter gauge often
and periodically clean lter per
the manufacturer’s directions.
A dirty lter will slow the ow of
water which could hamper proper
circulation.
WARNING
Do not exceed maximum operating
pressure of 50 psi.
4.
5.
Check for metals in the pool such
Metal
Out
Before beginning with any pool care program, you
must rst balance your pool water. Take a water
sample to your local pool professional (or use a
complete test kit) to test for the important Water
Balance Guidelines.
IMPORTANT: Always follow printed instructions on
the balancing chemical packages. Add balancing
chemicals in small increments one at a time
with circulation running. For best results, wait
8-12 hours before testing again and adding any
additional balancing chemicals.
as iron or copper. Before attempting
water balance, these should be
removed. See your dealer for a metal
out or sequesterant and follow the
label directions carefully.
Check the Water Hardness of your ll water before
3.
adding to the pool. If calcium content is higher than
400 ppm, nd a soft water source to ll your pool
instead; otherwise water balance will be very dif cult.
Water Balance Guidelines
pH: 7.2 – 7.8
Total Alkalinity: 80 – 120 ppm
Calcium Hardness: 200 – 400
Total Dissolved Solids: <1500
Stabilizer: 20 – 80 ppm
Free Chlorine: 1.0 – 3.0 ppm
Continue...Step 1: Preparing the Pool - Page 14
13
Page 14
Continue... Step 1: Preparing the Pool
For best results in achieving water balance, follow
steps 5a through 5e in order.
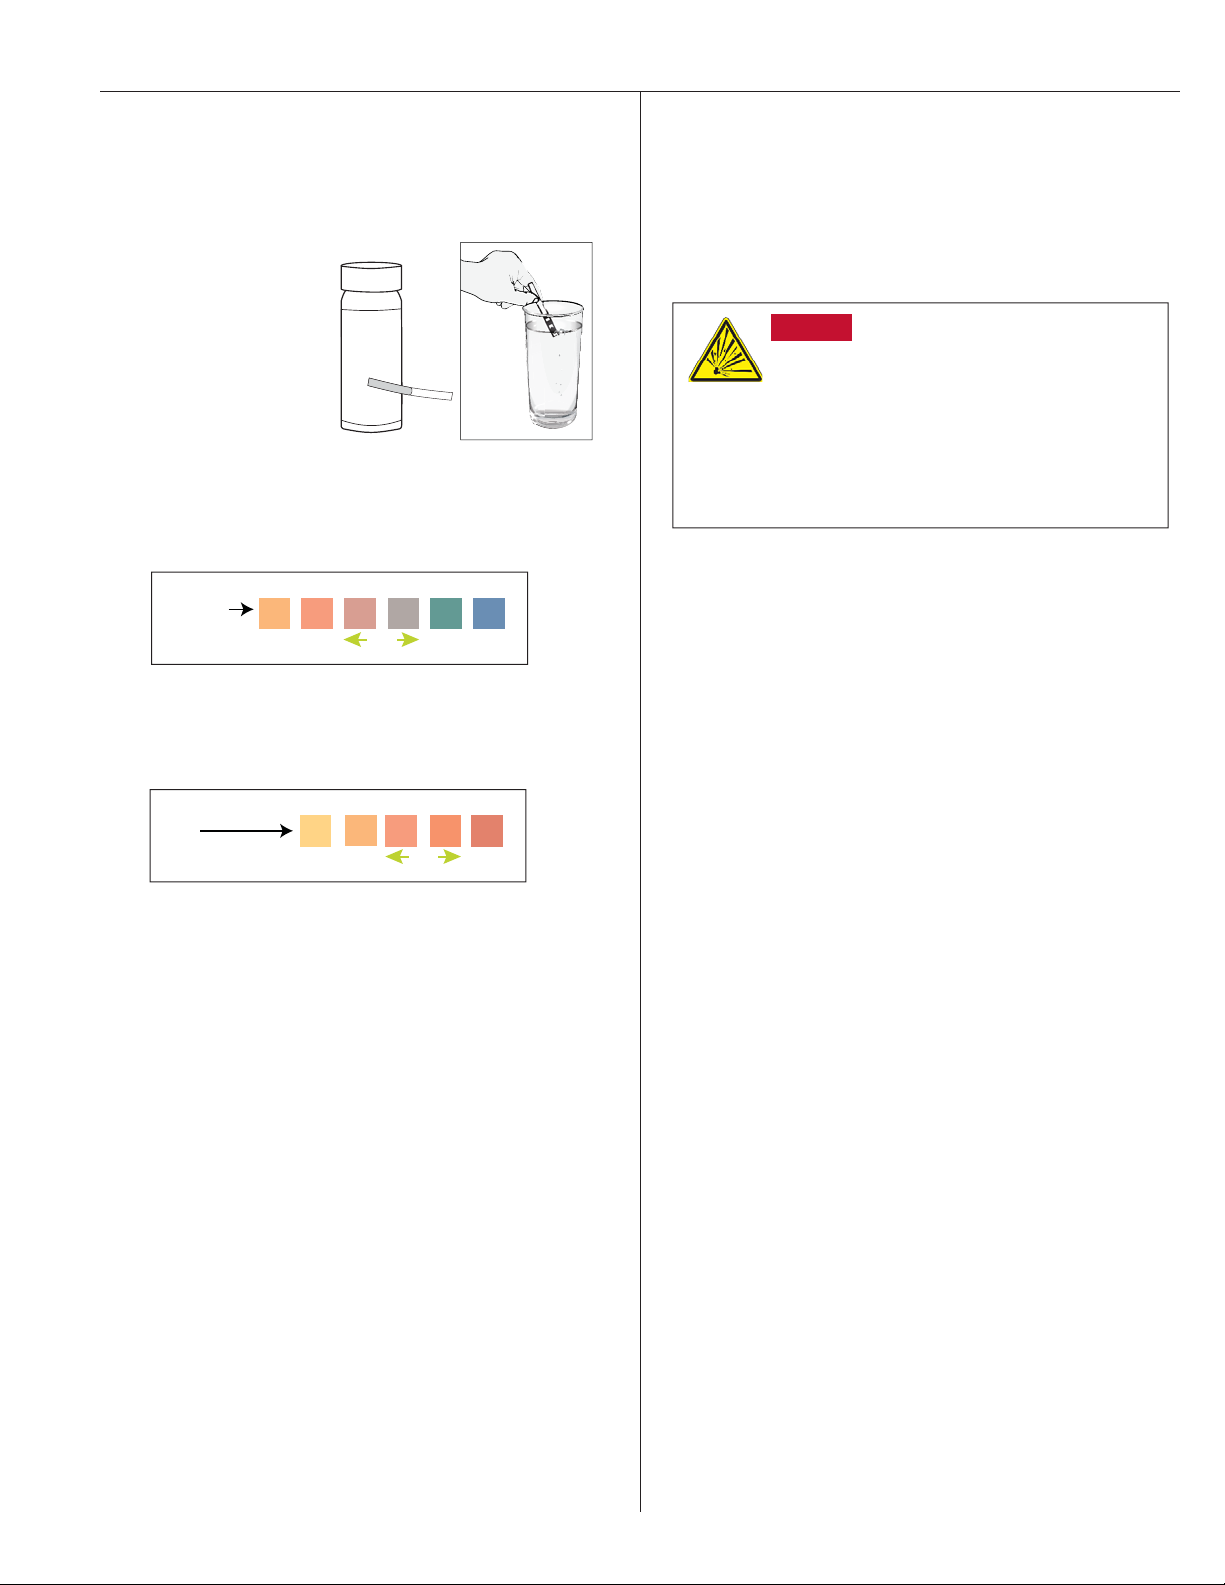
5a. Take a water sample
from the pool and dip a
Test Strip into it.
l
P
o
o
a
n
d
S
a
p
t
T
s
e
s
p
S
i
t
r
4EST 3TRIPS
5b. Look at the Total Alkalinity reading rst. Adjustments
should be made to bring the Total Alkalinity in the range of
80 – 120 ppm prior to making any adjustments to pH even if
it throws pH off further.
Total Alkalinity
(ppm)
Alcalinidad Total
(mg/L)
0 40 80 120 180 240
LOW
VERY LOW
MUY BAJO
IDEAL
BAJO
HIGH
ALTO
VERY HIGH
MUY ALTO
5c. After Total Alkalinity is in range, test for pH. It should be
between 7.2 and 7.8. If higher or lower, add a pH adjuster.
Initially shock the pool with chlorine shock only to rid
6.
the water of contaminants and establish a chlorine
residual. Always follow the manufacturer’s directions
carefully. See the DANGER box below for important
guidance on shocking.
DANGER
• Never add any other types of chlorine, pH adjusters,
shock treatments or algaecides through the skimmer.
These products should be added directly into the
pool if required.
• Never use fast dissolving chlorine tablets, liquid
bleach, or calcium hypochlorite in the New Water
Cycler.
6.2 6.8 7.2 7.8 8.4
pH
LOW
VERY LOW
MUY BAJO
IDEAL
BAJO
HIGH
ALTO
5d. Then test your Water Hardness again. If lower than 200
ppm, add Calcium Increaser. Always maintain 200-400 ppm.
5e. Lastly, test for stabilizer or conditioner levels. Add
conditioner if the level is below 20 ppm. This will prevent
chlorine burn off. If stabilizer level is above 80 ppm, partially
drain water and re- ll.
14
Page 15

Step 2: Putting the System to Work
WE R
DANGER
Never use fast dissolving chlorine tablets, liquid bleach,
or calcium hypochlorite in the New Water Cycler.
WARNING
Avoid sparks, smoking, or any open ame near
New Water Cycler or chemicals.
IMPORTANT: Read the label on the New Water Cycler Pac
carefully before using.
1.
MIN.
Model 120
Turn off pump. Turn dial to O or Minimum. This reduces the ow
of water into the unit when the cap is open.
Model 400/430
MAX
2.
Model 120
Open the cap. For Model 400/430 pools use the cap tool
included with New Water Cycler to loosen cap by hitting the
handle with the at of your hand counterclockwise. Stand back
to allow any chlorine fumes to dissipate.
3.
Cut handle from New Water Cycler Pac using a PVC
cutting tool (KEEP OUT OF REACH OF CHILDREN)
Model 400/430
3E. If openings are pinched
together, open with ngers or
re-cut closer to the colored
screens inside New Water
Cycler Pac. Leave at least 1/4”
of plastic to t into New Water
Cycler base.
4.
Pac
towers
Pac
towers
5.
6.
Avoid a
pinched
opening.
A correct
oval
opening
Invert New Water Cycler
Pac and shake slightly until
chlorine tablets fall into tower
areas.
Insert New Water Cycler Pac
into New Water Cycler, lining
up the openings in New
Water Cycler Pac with keys in
New Water Cycler.
NOTE: Openings are a
different shape than keys.
Replace cap by hand only.
DO NOT OVERTIGHTEN.
Indent in plastic
3A. Find
the indent in
the plastic.
3C.. Squeeze the handles
together. Repeat for other side.
PVC cutting tool
available at local
hardware stores.
3B. Place curved section of
tool around the narrow end
of one pac tower and line up
blade on indent
Finished cut ends
3D.. Make sure the blade
comes straight across on the
indent line for a clean cut.
Model 120 Model 400/430
7.
WE RECYCLE
ECYCLE
8.
DO NOT USE CAP TOOL TO
TIGHTEN CAP.
FOR REMOVAL ONLY.
The New Water Cycler Pacs
are made of HDPE plastic.
Non-re llable container. Do not
reuse or re ll this container.
Offer for recycling if available.
Rinse thoroughly before
recycling or discarding in trash.
Mark your calendar ahead for
the approximate replacement
times for the New Water Cycler
Pac.
15
Page 16

Step 3: Setting Control Dial
This system is designed to work effectively with a variety of pool equipment as long as the following procedures are followed.
1.
Set control dial on New Water Cycler by matching up the parameters of your pool on the chart below. THIS IS A STARTING POINT
ONLY and may need to be adjusted to t your individual pool needs. See #2 below for adjusting directions.
IMPORTANT: If using a multi-speed pump, pump-run times of at least 6 hours per day at high speed are recommended for proper
performance. If running the pump at low speed only or on high speed less than 6 hours, please follow the 24 hour low-
speed directions below.
MODEL 120
POOL SIZE
Gallons Diameter
7,000 (18’) 4.5
9,000 (21’) 5.0
12,000 (24’) 5.5
18,000 NR
20,000 NR
25,000 NR
1/2 hp 3/4 hp 1 hp 1 1/2 hp
8 HOUR PUMP RUN TIME
PUMP SIZE
1/2 hp 3/4 hp 1 hp 1 1/2 hp
12 HOUR PUMP RUN TIME
PUMP SIZE
1/2 hp 3/4 hp 1 hp 1 1/2 hp
4.0 3.5 3.0 2.5 2.0 1.0 3.0^ 1.5 1.0 1.0 2.0^
4.5 4.0 3.5 3.0 2.5 2.0 3.5^ 2.0 1.5 1.0 2.5^
5.0 4.5 4.0 3.5 3.0 2.5 2.0 2.5 2.0 1.5 3.0^
5.5 5.0 4.5 4.0 3.5 3.0 2.5 3.0 2.5 2.0 1.5
NR 5.5 5.0 4.5 4.0 3.5 3.0 3.5 3.0 2.5 2.0
NR 6.0 5.5 5.0 4.5 4.0 3.5 4.0 3.5 3.0 2.5
24 HOUR PUMP RUN TIME
PUMP SIZE
MODEL 400
POOL SIZE
Gallons
7,000 3.5
9,000 4.0
12,000 4.5
18,000 NR
25,000 NR
30,000 NR
^Bypass installation recommended. See “Installation Tips” on page 6 NR- This pump size is not recommended for this size pool.
3/4 hp 1 hp 1 1/2 hp 2 hp
6 HOUR PUMP RUN TIME
PUMP SIZE
3.0 2.5 2.5^ 2.5 2.0 3.5^ 3.0^ 1.0 3.0^ 2.5^ 2.0^
3.5 3.0 2.5 3.0 2.5 2.0 3.5^ 2.0 3.5^ 3.0^ 2.5^
4.0 3.5 3.0 3.5 3.0 2.5 2.0 2.5 2.0 1.0 3.0^
4.5 4.0 3.5 4.5 3.5 3.0 2.5 3.0 2.5 2.0 1.5
NR 4.5 3.5 NR 4.5 3.5 3.0 3.5 3.0 2.5 2.0
NR 5.5 4.5 NR 5.0 4.5 3.5 NR 3.5 3.0 2.5
24 HOUR, LOW-SPEED PUMP RUN TIME
SINGLE-SPEED PUMP OR HIGH-SPEED PUMP RUN TIME
12 HOUR PUMP RUN TIME
3/4 hp 1 hp 1 1/2 hp 2 hp
PUMP SIZE
EXAMPLE
MODEL 400
In order to ensure proper performance when running the pump on
low speed for 24 hours per day or high speed less than 6 hours
per day, bleed the air while the pump is on by unscrewing the cap
or back knob until water appears. Then screw the knob back in.
Repeat this process each time the cap is removed for any reason.
Set the control dial at 6 and follow the adjustment directions in
Step 2 to determine the correct setting for your pool.
Find your starting dial setting by matching up the parameters of your pool on
the above chart. An above ground pool with approximately 12,000 gallons,
with a 1 1/2 horsepower pump running 12 hours a day, would require a
starting setting of 2.5.
POOL SIZE
Gallons
7,000
9,000
12,000
18,000
25,000
30,000
24 HOUR PUMP RUN TIME
PUMP SIZE
3/4 hp 1 hp 1 1/2 hp 2 hp
12 HOUR PUMP RUN TIME
3/4 hp 1 hp 1 1/2 hp 2 hp
2.5 2.0 3.5^ 3.0^
3.0 2.5 2.0 3.5^
3.5 3.0 2.5 2.0
4.5 3.5 3.0 2.5
NR 4.5 3.5 3.0
NR 5.0 4.5 3.5
PUMP SIZE
16
2.
l
P
o
o
a
n
d
S
a
p
t
T
s
e
s
p
S
i
t
r
4EST 3TRIPS
For the rst week, test the pool water
daily for free chlorine to ensure correct
dial setting. Continue to test weekly
throughout the season.
After each testing, adjust the dial up
by 1/2 increment if the free chlorine
reading has dropped or down by
1/2 increment if the reading has
risen. Continue this process each
day until the reading stabilizes at
your desired level between 1.0- 3.0
ppm. Remember to adjust dial by 1/2
increments only.
IMPORTANT: Control dial settings in excess of these
recommendations could result in excess trichlor levels being
discharged into the pool. This can result in bleaching or
discoloration of areas around the pool inlet or in some cases
bleaching or discoloration of the entire pool liner or paint. In
addition, excess trichlor in the pool can create health hazards
to bathers.
Use the handle end of cap tool if the
dial is hard to turn.
Page 17

Step 4: Routine Pool Care
Operate
1.
2.
Run ltration system enough hours
to circulate all water 1 to 2 times per
day. More than that could result in
over chlorination.
WARNING
To prevent the build up of gas pressure in the New Water
System, be sure the pool return line valves are open except
when opening or servicing the unit.
Regularly test water with to maintain
pH and Total Alkalinity.
l
P
o
o
a
n
d
S
a
p
t
T
s
e
s
p
S
i
t
r
NOTE: Water balance is affected
by bather load, chemical usage,
evaporation and the makeup of
source water, so maintaining water
balance regularly is important.
4EST 3TRIPS
4.
Shock the pool every week or as
needed with a non-chlorine or
chlorine shock.
DANGER
• Never add any other types of chlorine, pH adjusters,
shock treatments or algaecides through the skimmer.
These products should be added directly into the
pool if required.
• Never use fast dissolving chlorine tablets, liquid
bleach, or calcium hypochlorite in the New Water
Cycler.
3.
Maintain 1.0 - 3.0 ppm free chlorine
level at all times.
DANGER
Do not contaminate the New Water Cycler or New Water
Cycler Pacs with dirt, organic matter, pool chemicals
(such as calcium hypochlorite or pool shocks), fertilizers
or other household chemicals. Contact between any
of these substances and the New Water Cycler or New
Water Cycler Pacs will result in a chemical reaction
with the generation of heat, liberation of hazardous
gasses and re or explosion.
17
Page 18

Winterizing (Model 120 or Model 400/430)
1.
2.
Turn p u mp of f.
Turn dial to 0 OR Turn dial to minimum
MIN
Model 120
Remove cap.
.
Model 400/430
MA
X
4.
Remove Pac.
®
Model 120
®
Model 400/430
If New Water Cycler Pac still
contains chlorine, wrap in
plastic bag and store in shed
or cool, dry, well-ventilated
location away from children,
pets, cars, motorcycles or
anything metal that can rust,
pit, etc.
3.
Model 120
Unscrew knob from New Water Cycler. Allow all water
to drain.
Model 120 Model 400/430
Model 400/430
WARNING
Avoid sparks, smoking, or any open ame near
New Water Cycler or chemicals.
Replace the cap and knobs loosely.
5.
Model 120
If empty, rinse and recycle.
Model 400/430
18
Page 19

Troubleshooting
Troubleshoot
For help in troubleshooting, call King Technology at 800-222-0169.
Problem Remedy
What do I do
1.
if the water looks
cloudy?
What do I do
2.
if the water turns
color?
What do I do
3.
if algae forms in or
on my pool?
What do I do
4.
if I am under
chlorinating with
the New Water
Cycler Pac?
1. Make sure your ltration
system is working properly (i.e.
clean lter, skimmer and pump
basket).
2. Make sure circulation time
is adequate – increase pump
time if not.
1. Algae may be trying to form
– shock the pool, increase
circulation time if needed and
clean the lter.
1. Use an algaecide per the
directions on the bottle and
brush the sides of the pool
often.
1. If you are unable to maintain
at least 1.0 ppm, rst make sure
there are chlorine tablets in the
tower areas of the New Water
Cycler Pac and it is installed
properly. If a correction was
made, test the water in 24 hours.
2. If still low, turn the dial up one
setting and test the water again
in 24 hours. Continue raising the
setting by one increment each
day until the proper reading is
achieved.
3. Make sure the pool is
properly balanced
4. Shock the water to eliminate
build up of any organic matter.
2. Metals in the ll water may
have been oxidized. Have the
pool tested. See pool dealer
if a metal control product is
required.
2. Clean the lter and shock
the pool with chlorine daily
until water clarity returns
3. Shock the pool if the reading
has been lower than 1.0 ppm
for more than one day.
4. Make sure pump run time is
at least 6 hours on high speed
(40 gpm or higher) or if not,
bleed the air from the cap or
back knob each time cap is
open.
5. Contact your dealer to have
your back pressure tested. If
under 4 psi consider a smaller
eye-ball tting in the return jet.
(see page 13).
5. Make sure pool has a
free chlorine reading of
1.0 to 3.0 ppm.
6. Check with your dealer
for more information.
3. Check with your dealer for
more information.
3. Check with your dealer for
more information.
6. Check for a suction side leak
by looking for air bubbles in your
pump basket or at the return
jet. Contact dealer for help in
correcting this situation.
7. Contact King Technology’s
Customer Service Department
at 800-222-0169.
What do I do
5.
if I am over
chlorinating with
the New Water
Cycler Pac?
1. If the chlorine reading is
over 3.0 ppm, remove the New
Water Cycler Pac from the
New Water Cycler and test the
water daily until the reading is
down to 1.0 ppm.
2. Reinsert the New Water
Cycler Pac, lower the dial
one setting and test the
water again in 24 hours. If
the reading has risen, lower
the dial one setting again.
Continue this process until
proper reading is achieved.
3. If over-chlorinating at
the lowest possible setting,
consider decreasing the
circulation time. Depending
on your pump size, you may
be circulating the water more
than is necessary.
4. Contact your dealer to have
your back pressure tested. If
over 8 psi consider a larger
eye-ball tting in the return jet.
5. Check to see if the pressure
relief valve is loose or missing
and replace. It is a clear plastic
piece approximately 1” long
installed inside near the base. If
loose or missing, it can provide
another avenue for water to
reach the chlorine.
6. Contact King Technology’s
Customer Service Department
at 800-222-0169.
19
Page 20

Parts List • Model 120
S
I
L
E
C
I
O
N
L
U
T
B
N
I
C
R
A
12
1
2
14
15
13
6
9 & 10
3
4
7
8
11
5
Included with New Water 120
REF. # DESCRIPTION QTY. INCLUDED
1 & 2 Cap w/O-Ring 1
3 Body 1
4 Pressure Relief Valve 1
5, 6, 7, 8 Control Dial with O-Rings,
Locking Pin and Number Plate 1
9 & 10 Knob with O-Ring 2
11 Mounting Base 1
12 Silicone Lubricant 1
20
10
9
Replacement Parts for New Water 120
REF. # PART NO. DESCRIPTION
1 & 2 01-22-1410 Cap w/O-Ring
2 01-22-1926 Cap O-Ring
4 01-22-9486 Pressure Relief Valve
5, 6, 7, 8 01-22-1446 Control Dial with O-Rings
Locking Pin and Number Plate
6 01-22-1456 Control Dial O-Ring Set
9 & 10 01-22-9946 Knob with O-Ring
11 01-22-1485 Mounting Base
12 01-22-9970 Silicone Lubricant
13 01-22-1710 Nipple Kit
14 01-22-4000 Pressure Gauge
15 01-22-1470 25k Tune-Up Kit
Page 21

Parts List • Models 400 and 430
Troubleshoot
INCLUDED WITH • Model 400 and 430
REF. # DESCRIPTION QTY. INCLUDED
1 & 2 Cap w/O-Ring 1
3 Body 1
4 Pressure Relief Valve 1
5, 6, 7 Control Dial with O-Rings 1
8 & 9 Knob with O-Ring 2
18 Cap/Control Dial Tool 1
19 Silicone Lubricant 1
REPLACEMENT PARTS • Model 400 and 430
REF. # PART NUMBER DESCRIPTION
1 & 2 01-22-9418 Cap w/O-Ring
2 01-22-9926 Cap O-Ring
4 01-22-9486 Pressure Relief Valve
5, 6, 7 01-22-9446 Control Dial with O-Rings
6 & 7 01-22-9456 Control Dial O-Ring Kit
8 & 9 01-22-9946 Knob with O-Ring
18 01-22-8870 Cap/Control Dial Tool
19 01-22-9970 Silicone Lubricant
20 01-22-4000 Pressure Gauge
21 01-22-9950 40k Tune-Up Kit
8
18
S
I
L
E
ICO
N
L
U
T
B
N
I
C
R
A
19
9
1
2
20
21
3
4
7
6
9
8
5
Off-line installation parts included with model 430
Replacement part 10 not
10
available. See your dealer.
11
INCLUDED WITH OFF-LINE Model 430
REF. # DESCRIPTION QTY. INCLUDED
12
10 2” Male Adapter 2
11 2” X 1/2” Bushing 2
12 90 Degree Elbow 2
13 Small Clamp 4
14 6’ PVC Tubing 1
13
13
14
15 Scoop Gasket 2
16 Venturi Scoop 2
17 Scoop Clamp 2
2” to 36” apart on straight pipe
REPLACEMENT PARTS • Model 430
REF. # PART NUMBER DESCRIPTION
11 01-22-8620 2” X 1/2” Bushing
12 01-22-7800 90-Degree Elbow
13 01-22-7690 Small Clamp
14 01-22-7700 6’ PVC Tubing
15 01-22-7850 Scoop Gasket
16 01-22-7790 Venturi Scoop
15
16
17
OUTLET
After lter
and
heater
INLET
Between
pump
and lter
17 01-22-7910 Scoop Clamp
21
Page 22

Cycler Maintenance
Replacing Control Dial O-Rings
• Model 120 • Models 400/430
Center of locking pin
1. 1.
Cycler depress center of
locking pin with a nger and
pull pin out of dial.
In the back of the New Water
2.
Turn control dial back and
forth as you pull it out of the
2.
housing.
3.
3.
Back
o-ring
S
I
L
U
Product #
01-22-9970
Replace both O-rings. Apply
silicone lubricant that came
L
E
C
I
O
N
with your New Water Cycler on
T
B
N
I
C
R
A
O-rings.
4.
Carefully insert control dial
4.
back into housing.
S
I
L
E
C
I
O
N
L
U
T
B
N
I
C
R
A
Product #
01-22-9970
Using a needle nose pliers,
nd the snap ring tail located
at approximately the 5 o’clock
position under the control dial.
Pull down and out of the groove.
Using a large screwdriver, loosen
the control dial. Carefully pry the
dial until it pulls out.
Carefully replace the rubber O-ring
without stretching it. Apply silicone
lubricant that came with your New
Water Cycler on O-ring.
22
5.
Replace locking pin by
pushing it through the slots
on the dial until it locks into
place.
5.
6.
7.
Push control dial completely into
the housing and turn the dial to
setting 2.
Insert the non-lipped end of snap
ring into the groove opening
beginning at the 5 o’clock position
and push it up so that it threads
itself around the control dial.
Using a small screwdriver or
pointed tool to help guide it, make
sure the snap ring stays in the
groove as it is inserted.
Page 23

continued... Cycler Maintenance
Troubleshoot
Replacing the Cap O-Ring
Model 120 Models 400/430
Remove old O-ring.
1.
1.
Remove old O-ring.
2.
Bottom half
of groove.
3.
4.
Top half of
groove.
O-ring in top
of groove
Place new O-ring in bottom
half of groove.
Place your thumbs on each
side of the cap over the
O-ring in the groove.
Roll your thumbs back and
forth over the O-ring while
pushing upward until the
O-ring falls into the top of
the groove.
2.
3.
Top half of
groove
Place new O-ring in bottom
half of groove.
Bottom half
of groove
Place your thumbs on
each side of the cap over
the O-ring in the groove.
Roll your thumbs back and
forth over the O-ring while
pushing upward until the
O-ring falls into the top of
the groove.
S
I
L
E
C
I
O
N
L
U
T
B
N
I
C
R
Product # 01-22-9970
A
Lubricate O-ring every couple of months with silicone lubricant that came with your New Water
Cycler. DO NOT USE petroleum based lubricants.
Replacing Cycler Knobs To replace, simply unscrew old knob and replace with the new one.
Front of Model 120 Back of Model 120 Back of
Model 400/430
Cap of
Model 400/430
23
Page 24

Limited One-Year Warranty
King Technology, Inc. will warrant this unit with a complete replacement for the original purchaser, should it prove defective by reason
of improper workmanship and/or material for a period of one (1)
years from the date of original purchase/installation. This warranty
covers body, cap and control dial excluding O-rings. King Technology
holds the option of replacing any defective part without charge if it
is determined to be all that is needed to correct any situation. Parts
used for replacement, with the exception of O-rings, are warranted
for the remainder of the original warranty.
1. To obtain warranty service, you must deliver product to King Technology or its nearest authorized dealer. Shipping expenses are the
purchaser’s responsibility. The name of the nearest authorized dealer can be obtained at frogproducts.com/ nd-a-dealer or by calling
King Technology at 1-800-222-0169. Proof of purchase is required
when requesting warranty service. Purchaser must present the sales
receipt or other document which establishes proof of purchase.
2. This warranty does not cover defects caused by: modi cation,
alteration, repair or service of the product contrary to the accompanying instructions; physical abuse to or misuse of the product or
operation or installation in a manner contrary to the accompanying
instructions. This warranty also excludes all costs arising from the
installation, adjustment, removal or replacement of defective units
or parts. This warranty also excludes any and all claims arising out
of the chemicals used in the product or their characteristics.
3. Any express warranty not provided for herein, and any remedy for
breach of warranty or breach of contract which, but for this provision,
might arise by implication or operation of law, is hereby expressly
excluded and disclaimed. The implied warranties of merchantability
and of tness for any particular purpose are expressly limited to a
term of one year. Some states do not allow limitation on how long an
implied warranty lasts, so the above limitation may not apply to you.
4. Under no circumstance shall King Technology be liable to purchaser or any other person for any damage or loss incurred because
of any chemicals used in the product or their physical characteristics, or interruption of service of the product, or any special, incidental or consequential damages or losses, whether arising out of
breach of warranty, breach of contract or otherwise. Some states
do not allow the exclusion or limitation of incidental consequential
damages, so the above limitation or exclusion may not apply to you.
5. Misuse or failure to use the proper New Water Cycler Pac may
cause damage to equipment or personal injury. All warranty null and
void if this product is not used with the recommended New Water
Cycler Pac.
Register your warranty at kingtechnology.com/product-registration.
MANUFACTURED BY
530 11th AVENUE SOUTH
HOPKINS, MINNESOTA 55343
952-933-6118 • 800-222-0169
kingtechnology.com
New Water is a registered trademark of King Technology, Inc.
24
Made in the USA
Patents: kingtechnology.com/IP
20-48-0149E
55311183R6N
 Loading...