

Page 1

INGSTON TECHNOLOGY
K
URBOCHIP
T
ROCESSOR UPGRADE
P
SER’S
U
ODEL
M
366
UIDE
G
:
TC366
Page 2

Kingston Technology’s
TurboChip
®
366
366MHz AMD-K6® -2 Processor Upgrade
with 3DNow!
AMD-K5®, AMD-K6
For
™
Technology
®
and Pentium
®
Desktop and Minitower Computers
User’s Guide
Part No. 4460080-001.A00
Kingston Technology Company
17600 Newhope Street
Fountain Valley, CA 92708
(714) 435-2600
http://www.kingston.com
TurboChip 366 User’s Guide - Rev. A00 Kingston Technology Company
Page 3

Table Of Contents
Introduction......................................................................................1
Special Features.........................................................................2
Package Contents.......................................................................2
Before You Begin.............................................................................3
Pin 1 Orientation.........................................................................3
Installing the TurboChip...................................................................4
Step 1. Opening the Computer ...................................................4
Step 2. Locating the CPU............................................................4
Step 3. Removing the CPU Chip.................................................5
Step 4. Orienting the TurboChip
Step 5. Inserting the TurboChip
Step 6. Plugging in the DC Power Cable ....................................8
Step 7. Completing the Installation .............................................9
................................................6
................................................7
Appendices....................................................................................10
Appendix A Specifications.......................................................11
Appendix B Troubleshooting...................................................12
Computer Does Not Start.....................................................12
Cannot Access Diskette or Hard Disk Drive.........................13
Older System BIOS..............................................................13
Appendix C Windows
TurboChip 366 User’s Guide – Rev. A00 Kingston Technology Company
95 Issue..............................................14
Page 4

Appendix D WinBench 99 CD-ROM..................................... 15
Installing WinBench
99...................................................... 15
WinBench 99 Processor Tests.......................................... 15
Appendix E Warranties and Notices....................................... 16
Limited Warranty Statement................................................ 16
Duration of Warranty ........................................................... 16
Free Technical Support ....................................................... 17
Disclaimers.......................................................................... 17
F.C.C. Certification.............................................................. 18
CE Notice............................................................................ 18
C-Tick Certification.............................................................. 18
TurboChip 366 User’s Guide - Rev. A00 Kingston Technology Company
Page 5

Introduction 1
Introduction
Congratulations on the purchase of your Kingston TurboChip 366 processor
upgrade designed for Pentium
®
75MHz or higher computers. The TurboChip
model TC366 incorporates the AMD-K6® -2 processor to combine the power
of 366MHz processing with graphics-enhancing 3DNow! Technology to equip
your system with the necessary tools for today’s exciting media-intensive
graphics, sound, and video software applications.
TurboChip
366 features 64KB of internal Level 1 cache, integrated cooling
unit, and onboard voltage regulator to interface the processor with the voltage
requirements of your system motherboard automatically. TurboChip 366 is a
convenient, high-performance solution to increase your computer’s CPU speed
up to 250% over its current processor providing a perfect fit for 16-bit or 32-bit
operating systems such as Microsoft Windows
Windows NT
.
®
95, Windows 98, and
TurboChip 366 is a chip-for-chip processor upgrade that installs directly into
your existing Socket 5 or Socket 7 ZIF (zero-insertion-force) socket. Most
desktop computers use ZIF sockets with a swing lever to make removing the
CPU chip quick and easy. There are no software drivers to install or hardware
jumpers to set. The TurboChip
and fan cooling unit to control the operating temperature of the TurboChip
package also includes an integrated heat sink
for
years of reliable service.
D
3
TurboChip® TC366
366MHz Processor Upgrade
TurboChip 366 User’s Guide - Rev. A00 Kingston Technology Company
Page 6

2 Special Features
Special Features
Your Kingston TurboChip 366 includes these important features:
•
Powerful 366 MHz AMD-K6-2 processor with 3DNow! Technology.
•
Ideal processor upgrade for AMD-K5
®
, AMD-K6® and Pentium
®
based systems.
•
64KB Level One (L1) Cache.
•
Designed with independent voltage management. No voltage settings
are required.
•
System clock-multiplier equipped for 366 MHz of processing power.
•
Compatible with existing system hardware and software
configurations.
•
Integrated heat sink and fan cooling unit.
•
Convenient male/female pass-through DC power cable.
•
Supports socket 5 or socket 7 ZIF socket.
•
Supports 3D and MMX technology enhancements.
•
“Plug and Play” installation. No software drivers to install.
Package Contents
The TurboChip package should contain the following items:
•
TC366 processor upgrade
•
User’s Guide
•
WinBench
99 CD ROM
If any of the items are missing or damaged, please contact your Kingston
dealer for a replacement. Remove the Processor Upgrade from its special antistatic foam pad only when you are at the point of installing it into your
computer. Remember to ground yourself first to avoid static electricity
discharge. Do this by applying both hands to a neutral metal surface like the
rear of the computer or the power supply metal housing. Remove the
protective foam pad from the
take care not
to damage the pins when installing the upgrade. Retain all the
TurboChip connector pins very carefully, and
protective packaging for future use.
Kingston Technology Company TurboChip
366
User’s Guide - Rev. A00
Page 7

Before You Begin 3
Before You Begin
The TurboChip installation should take less than 15 minutes to complete.
Before you begin, however, there is one very important point to be aware of.
First, notice the location of Pin 1 on the TurboChip upgrade denoted by a
white triangle on the bottom of the unit. This corner of the upgrade must match
Pin 1 on the processor socket (See figures below). Your computer should be
using either a Socket 5 or Socket 7 type processor socket. Pin 1 orientation is
standard for both socket types. Take a few moments to read the section below
before beginning the installation process.
Pin 1 Orientation
The location of Pin 1 on the TurboChip must be oriented to match Pin 1 on
the processor socket. The TurboChip
into the CPU socket. If the pins are aligned, the TurboChip
upgrade is keyed to fit only one way
should easily slide
into the socket. Refer to the figures below for proper orientation:
320 Pins
D
3
366MHz
Pin 1
Socket 5
Figure 2: Empty Socket 5
Pin 1
Figure 1: TurboChip Top View
Pin 1
321 Pins
Socket 7
Figure 3: Empty Socket 7
TurboChip 366 User’s Guide - Rev. A00 Kingston Technology Company
Page 8

4 Hardware Installation
Installing the TurboChip
The TurboChip 366 processor upgrade is designed to work with AMD-K5®,
AMD-K6
sockets. The installation procedure will differ slightly according to the
location of your processor socket. Follow the steps below to install
TurboChip
®
and Pentium
into your computer.
®
based systems that support Socket 5 or Socket 7 ZIF
Step 1. Opening the Computer
1. Set the power switch on the system unit to OFF.
2. Set all external power switches OFF (i.e. display, printer, etc.).
3. Disconnect all power cords and cables from the rear of the computer.
4. Remove the cover from your computer as described in your owner’s
manual. Make sure you have room to work. If necessary, place the
computer on a desktop surface that is easily accessible with plenty of
area to work.
Step 2. Locating the CPU
1. Locate the CPU chip on your system board or CPU expansion card.
The CPU chip will most likely have a large metal heatsink attached
on top (See Figure 4 on the next page to view a standard heatsink).
some system manufacturers also include a cooling fan on top
Note:
of the heatsink.
2. Make sure the CPU chip is accessible. If the CPU socket is located
under an expansion card, move any full-length adapter cards to other
expansion slots. If no slots are available, place a half-length card in
the slot nearest the CPU socket so that the CPU socket is
unobstructed. If the CPU socket is located under
(e.g., IBM ValuePoint
drive bay for easier installation.
™
), loosen the retaining screws and remove the
the floppy drive
Kingston Technology Company TurboChip
366
User’s Guide - Rev. A00
Page 9

Hardware Installation 5
Step 3. Removing the CPU Chip
1.
Remove the Heatsink Retaining Clip:
If your CPU has a heatsink
similar to the illustration below, it is most likely secured with a
retaining clip. Before removing the CPU chip from its socket, you
must first unlatch the retaining clip by pressing down on the retaining
clip
(See Figure 4) and releasing the
tab
. Try not to touch the
latch
motherboard or any other components near the socket. With the
retaining clip completely removed from the heatsink, you are ready
to remove the CPU chip.
The retaining clip is not needed for the TurboChip
Note:
2.
Unlock the Socket:
Socket 7 and Socket 5 ZIF (zero insertion force)
upgrade.
sockets use a side bar lever to lock and unlock the socket. Unlatch
the side lever and lift upward to unlock the processor chip.
3. Once the socket is in the unlocked position, remove the CPU by
grasping the sides of the chip with your fingers.
you may use the TurboChip’s protective foam packaging to store
Note:
your original CPU chip.
Unlocked
Socket 7
Retaining Clip
Tab
Latch
Locked
Figure 4: Removing the CPU Chip
TurboChip 366 User’s Guide - Rev. A00 Kingston Technology Company
Page 10

6 Hardware Installation
Step 4. Orienting the TurboChip
When installing the TurboChip, the orientation of Pin 1 (See Figure 1 on page
3) must match Pin 1 on the processor socket (See Figures 2 and 3 on page 3).
The orientation of the processor socket will vary depending on the make and
model of your particular computer. Follow the steps below to determine the
correct orientation of TurboChip
in your computer.
1. Look at the TurboChip carefully to verify which corner is Pin 1.
Refer to Figure 1 on page 3 for help in locating Pin 1 on the
TurboChip.
2. With the TurboChip
positioned so that the beveled corner on the
upgrade matches the beveled corner on the processor socket, you are
ready to insert TurboChip into the empty CPU socket.
Warning:
The processor pins are keyed to fit into the socket one way only. If
the processor upgrade is not installed correctly (Pin 1 to Pin 1), it may result in
damage to the computer, the processor upgrade, or both. Please orient Pin 1 on
the TurboChip
upgrade to match Pin 1 on your CPU socket. Refer to Figure 5
below.
D
3
Socket 7
Pin 1
Figure 5: Orienting the TurboChip
Kingston Technology Company TurboChip
366
User’s Guide - Rev. A00
Page 11
Hardware Installation 7
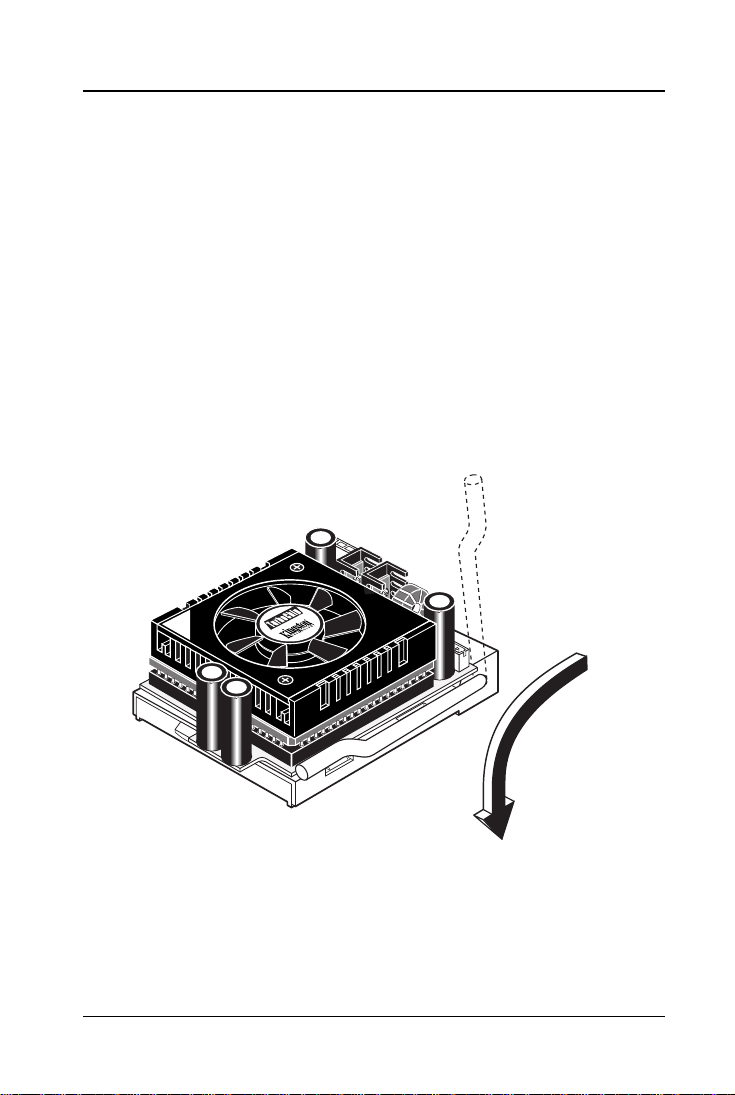
Step 5. Inserting the TurboChip
To insert the processor upgrade correctly, you need to have the pins on the
TurboChip
adapter exactly lined up with the corresponding holes on the CPU
socket.
1. While the socket is unlocked or in the open position, align the pins
on the TurboChip into the holes on the ZIF socket.
TurboChip
into the socket without using any force.
Place the
Apply
gentle pressure, only if needed, to make sure the processor is
completely inserted, but be careful not to press down on the fan unit.
Instead, grasp the sides of the unit for handling.
2. Lower the sidebar to close the socket back to a locked position.
Refer to Figure 6 below.
Unlocked
Socket 7
D
3
Locked
Figure 6: Securing the ZIF Socket
TurboChip 366 User’s Guide - Rev. A00 Kingston Technology Company
Page 12

8 Hardware Installation
Step 6. Plugging in the DC Power Cable
The TurboChip uses a standard 4-Pin power connector, which attaches to any
available power connector coming from the computer’s power supply. The
power supply in your computer should have several power connectors available
for adding hard drives, CD-ROMs, and other devices.
Find any available power connector that is not currently in use and attach it to
the 4-Pin male connector from the TurboChip
power connectors are available, the TurboChip
connector, which allows the upgrade to connect into an existing power line.
Simply disconnect any non-primary power cable (e.g., floppy disk). Attach the
male connector to the power source. Then reattach the other end of the cable to
the in-line female connector on the TurboChip
4-Pin Male
Connector
In-Line Female
Connector
(See Figure 7 below). If no
also has an in-line female
cable.
D
3
Figure 7: Attaching the Power Cable
Kingston Technology Company TurboChip
Socket 7
366
User’s Guide - Rev. A00
Page 13

Hardware Installation 9
Step 7. Completing the Installation
1. Replace any adapters removed earlier.
2. The TurboChip
management. Therefore, there are no special voltage settings required
on the motherboard or the TurboChip 366.
3. The TurboChip
run at 366MHz of processing power regardless of a lower external
clock frequency. The TurboChip 366 is a simple plug-and-play
upgrade. Depending on the clock frequency of your original
processor, the external bus frequency may have a variety of settings.
It would be recommended to use the 66MHz Local Bus Frequency
for full performance. (Note: some systems may require a lower bus
frequency (e.g. 60MHz) to operate correctly.
4. Reconnect any cables, power cord, keyboard, mouse, etc…
5. Check that your computer starts correctly. It should begin a memory
count and run its POST (Power-On-Self-Test). If it does not boot,
turn to “Appendix B Troubleshooting” in the back of this manual for
help.
6. If the computer starts correctly then replace the cover.
366 is designed with independent voltage
366 is equipped with an internal clock multiplier to
Congratulations!
The installation is now complete. Because TurboChip
requires no device drivers, there is no software installation to perform. If you
experience any problems, refer to “Appendix B Troubleshooting”. If your
problem is beyond the scope of this manual or you have questions regarding
this product, call Kingston Technical Support (refer to “Appendix E Warranties
and Notices” for information on how to reach us).
TurboChip 366 User’s Guide - Rev. A00 Kingston Technology Company
Page 14

ML
Appendices
Kingston Technology Company TurboChip
366
User’s Guide - Rev. A00
Page 15

Appendix A – Specifications 11
Appendix A Specifications
TurboChip 366 Processor Upgrade
Processor:
Internal Cache: 64KB Level one (L1) cache (32KB dual-ported
Systems Supported:
ZIF Socket Supported: Socket 5 or Socket 7
Internal Clock Multiplier: 5.5x
DC Power Cable: 4-pin male connector and 4-pin in-line female
366 MHz AMD-K6
data cache, 32KB instruction cache)
AMD-K5
systems
connector
®
Environmental:
Operating Temperature:
Storage Temperature:
Relative Humidity: 10% to 90% non-condensing
0°C to 70°C (32°F to 158°F)
-10°C to 70°C (14° to 158°F)
Electrical:
Power Consumption: 27.5 watts maximum
Physical:
Dimension (HxWxD): 0.88” x 1.98” x 3.03”
Weight: 0.33 lbs. (0.15 kg)
(22.4mm x 50.3m m x 77.0mm)
-2 with 3DNow! Technology
, AMD-K6® and Pentium® based
Certification:
EMI Standards: FCC Class B, CE CISPR B, C-Tick
EMC Standards: EN55022, IEC801-2, IEC801-3, IEC801-4
TurboChip 366 User’s Guide - Rev. A00 Kingston Technology Company
Page 16

12 Appendix B - Troubleshooting
Appendix B Troubleshooting
This section describes problems you may encounter when installing the
TurboChip
processor upgrade. If you experience any problems, do the
following:
1. Read this section carefully and Appendix C if using Windows
95, to
see if your problem is described. Try the suggested actions.
2. If still encountering problems, call Kingston Technical Support (refer
“Appendix E Warranties and Notices”
to
for information on how to
reach us). However, before you call, please write down the following
information:
•
Your computer make and model.
•
The exact wording of any error messages associated with
your problem.
•
The contents of your CONFIG.SYS and AUTOEXEC.BAT
files.
•
The version numbers of your software applications and
operating system.
Computer Does Not Start
If there is no display on the screen when you turn the power on:
1. Check the fan on the TurboChip unit. It should be spinning. Also
check the 4-pin power cable which leads from the TurboChip
Verify the power cable is plugged into the system power supply.
Ensure that all the external cables are correctly plugged in and power
is ON. There should be a light on your system unit and on your
monitor indicating that they have power.
2. Turn off your computer and disconnect the power cable. Remove the
cover from the system unit and check the seating and orientation of
the processor upgrade. The best method for checking the seating of
the TurboChip
is to remove the processor upgrade and carefully
reinstall it. Then verify that the sidebar lever is down in the locked
position after reinserting the unit.
unit.
Kingston Technology Company TurboChip
366
User’s Guide - Rev. A00
Page 17

Appendix B – Troubleshooting 13
3. Check that all other adapters are firmly seated in their sockets.
Reconnect the power cable and turn the power on again.
4. If it still does not boot, remove the TurboChip
from your computer
and replace it with the original Pentium processor. Try the power
again. If the computer now starts, the processor upgrade may be
incompatible with your computer. Contact Kingston Technical
Support for help in diagnosing any problems.
Cannot Access Diskette or Hard Disk Drive
You may have dislodged the connection between the diskette or the hard disk
drive and its controller card when you installed the processor upgrade. Please
check this connection again.
Older System BIOS
Some earlier systems do not support the faster CPU technology. In some cases,
the computers have an older system BIOS that may be upgraded to support the
TurboChip 366 processor. The older incompatible BIOS may cause the
system to lockup or not boot up at all.
This problem can sometimes be resolved by upgrading the BIOS version of
your computer, either with a software update or by replacing the chips. First
check with your computer manufacturer or visit their website for a software
utility to update your existing BIOS. If your system does not support flash
ROM software updates, the next option is to replace the BIOS chips.
BIOS chipsets are relatively inexpensive and can be purchased at your local
computer store, or contact
Unicore Software, Inc.
at 1-800-800-BIOS (2467)
to order a BIOS upgrade. Unicore supports all the major brands of BIOS
chipsets, including AMI, Award, Phoenix, MR BIOS, and others. Unicore
Software, Inc. can be contacted at:
Unicore Software, Inc.
1538 Turnpike Street
North Andover, MA 01845
(800) 800-BIOS
(800) 800-2467
(978) 686-6468
(978) 683-1630 Fax
TurboChip 366 User’s Guide - Rev. A00 Kingston Technology Company
Page 18

14 Appendix C - Windows 95 Issue
Appendix C Windows 95 Issue
Problem:
When running Windows
processor running at speeds of 350 MHz or above, you may receive one of the
following errors:
•
Device IOS failed to initialize.
•
Windows Protection Error. You must reboot your computer.
The first error is a result of a divide exception in IOS.VXD, the second
Cause:
is due to a similar error within ESDI_506.PDR or SCSIPORT.PDR.
95 on a computer with an AMD-K6-2
Certain Windows
initialization timing loops that do not execute properly on the AMD-K6
95 files need to be updated because they contain
processor at speeds of 350 MHz or higher. This problem is due to limitations of
the software algorithms and is not a problem with the processor itself.
Microsoft has confirmed this to be a problem in Microsoft Windows
95 and
OEM Service Release versions 2, 2.1 and 2.5.
This issue does not occur in Microsoft Windows
.
NT
Resolution:
An update is available from Microsoft for Windows 95 OEM
98 or Microsoft Windows
Service Release versions 2 or higher. The update will not work in the retail
version of Windows 95. For further information and to download the update,
please go to the following URL:
http://support.microsoft.com/support/kb/articles/q192/8/41.asp?FR=0
-2
Kingston Technology Company TurboChip
366
User’s Guide - Rev. A00
Page 19

Appendix D – WinBench 99 CD-ROM 15
Appendix D WinBench 99 CD-ROM
The TurboChip 366 package includes the Ziff-Davis WinBench 99 CDROM. WinBench
Windows based PC environment. The WinBench
a Windows
99 is a benchmark utility that measures performance in a
95, Windows 98 or Windows NT system.
99 utility can only be run on
Installing WinBench 99
To install WinBench 99, insert the WinBench 99 CD-ROM and the
installation screen will come up automatically with AutoPlay enabled (For
systems without AutoPlay enabled, run install from your CD-ROM). Choose
WinBench
99 from the installation screen. Setup will guide you through the
installation.
Note: Users without CD-ROM access can download WinBench
99 at:
http://www.zdbop.com/zdbop/winbench/winbench.html
WinBench 99 Processor Tests
WinBench 99 contains CPUmark 99 and the FPU WinMark 99 benchmarks
that can be used to compare the performance of your original processor to that
of your TurboChip TC366 processor upgrade. All applications must be closed
before running either test. To start a test, scroll down to the chosen test and
select it, then click on run. These tests may take several minutes. The results of
the tests are not measured in a standard unit. Higher numbers indicate better
performance.
For additional information on WinBench
the latest version of the software, please visit: http://www.zdbop.com
99 performance tests or to download
TurboChip 366 User’s Guide - Rev. A00 Kingston Technology Company
Page 20

16 Appendix E – Warranties and Notices
Appendix E Warranties and Notices
Limited Warranty Statement
KINGSTON TECHNOLOGY COMPANY ("Kingston") warrants that this product is free
from defects in material and workmanship. Subject to the conditions and limitations set
forth below, Kingston will, at its option, either repair or replace any part of this product
which proves defective by reason of improper workmanship or materials. Repair parts or
replacement products will be provided by Kingston on an exchange basis, and will either
be new or refurbished to be functionally equivalent to new.
Duration of Warranty
Lifetime Warranty: The following Kingston products are covered by this warranty for
life: solid state memory (e.g., memory modules and boards), networking adapters,
networking hubs without cooling fans (excluding the power supply), solid state PC Card
(PCMCIA) adapters, and microprocessor upgrade products.
Seven Year Warranty: The following Kingston products are covered by this warranty for
a period of seven years from the date of original retail purchase: all core storage
enclosures (including the power supply), cables, terminators, and related accessories.
Under certain agreements where core products are slightly modified (e.g. paint, handle,
etc.) by Kingston at the customer’s request, the product will be covered for a period of
seven years for repair only. Storage products that are custom designed and /or incorporate
component-level modification by Kingston in order to meet specific customer requests,
will be negotiated with the applicable customer on a case-by-case basis.
Five Year Warranty: The following Kingston products are covered by this warranty for
a period of five years from the date of original retail purchase: the power supply in
networking hubs without cooling fans; and all other Kingston products (other than those
products covered by a three-year, two-year, or one-year warranty , as provided below).
Three Year Warranty: The following Kingston products are covered by this warranty for
a period of three years from the date of original retail purchase: networking hubs with
cooling fans (including the power supply).
Two Year Warranty: The following Kingston products are covered by this warranty for a
period of two years from the date of original retail purchase: Solid State Floppy Disk
Cards (SSFDC), and Winchester hard disk drives in a 2.5 inch, 3.5 inch or 5.25 inch form
factor.
One Year Warranty: The following Kingston products are covered by this warranty for a
period of one year from the date of original retail purchase: Winchester hard disk drives
in a 1.8 inch form factor, optical storage products,
and magnetic tape storage products.
Rev. 11/98
Kingston Technology Company TurboChip
366
User’s Guide - Rev. A00
Page 21

Appendix E – Warranties and Notices 17
Warranty Claim Requirements
To obtain warranty service, return the defective product, freight prepaid and
insured, to your local authorized Kingston dealer or distributor, or to the Kingston
factory service center located at 17600 Newhope Street, Fountain Valley, California
92708, U.S.A. You must include the product serial number (if applicable) and a
detailed description of the problem you are experiencing. You must also include
proof of the date of original retail purchase as evidence that the product is within the
applicable warranty period. If you return the product directly to the Kingston
factory, you must first obtain a Return Materia l Authoriz ation ("R MA") numb er
by call ing Kingsto n Customer Se rvice at (714) 438-1810, and include the RMA
number prominently displayed on the outside of your package. Products must be
properly packaged to prevent damage in transit.
Free Technical Support
Kingston provides free technical support. If you experience any difficulty during
the installation or subsequent use of a Kingston product, please contact Kingston’s
Technical Support department prior to servicing your system.
Kingston Technical Support can be reached in the U.S. at (714) 435-2639 or tollfree at (800) 435-0640 (U.S. and Canada only). Kingston European Technical
Support can be reached from within the U.K. at 01932 738858. Kingston provides
other service numbers when calling from Germany 0130 115 639 or fax 0130 860
599, from Austria 0660 5569 or fax 06 607 434, from Switzerland 0800 557 748 or
fax 0800 552 182, from France 0800 905 701 or fax 0800 900 910, or from Belgium
0800 72763.
This warranty covers only repair or replacement of defective Kingston products, as
provided above. Kingston is not liable for, and does not cover under warranty, any
costs associated with servicing and/or the installation of Kingston products.
Disclaimers
The foregoing is the complete warranty for Kingston products and supersedes all other
warranties and representations, whether oral or written. Except as expressly set forth above,
no other warranties are made with respect to Kingston products and Kingston expressly
disclaims all warranties not stated herein, including, to the extent permitted by applicable law,
any implied warranty of merchantability or fitness for a particular purpose. In no event will
Kingston be liable to the purchaser, or to any user of the Kingston product, for any damages,
expenses, lost revenues, lost savings, lost profits, or any other incidental or consequential
damages arising from the purchase, use or inability to use the Kingston product, even if
Kingston has been advised of the possibility of such damages.
Copyright © 1999 Kingston Technology Company. All rights reserved. Printed in the U.S.A. Kingston Technology
and the Kingston logo are trademarks of Kingston Technology Company.
®
is a registered trademark of Kingston Technology Company. Pentium® is a registered trademark of Intel
TurboChip
Corporation. AMD-K6® -2 is a registered trademark and 3DNow! is a trademark of Advanced Micro Devices, Inc. All
other trademarks and registered trademarks are the property of their respective owners.
TurboChip 366 User’s Guide - Rev. A00 Kingston Technology Company
Rev. 10/97
Page 22

18 Appendix E – Warranties and Notices
F.C.C. Certification
This device has been tested and found to comply with limits for Class B digital device,
pursuant to Part 15 of the FCC Rules. Operation is subject to the following conditions:
(1) This device may not cause harmful interference, and
(2) This device must accept any interference received; including
interference that may cause undesired operation.
CE Notice
The official CE symbol indicates compliance of this Kingston Technology product to the
EMC directive of the European Community. The CE symbol found here or elsewhere
indicates that this product meets or exceeds the following standards:
EN50081-1
❑
EN55022:
EN50082-1
❑
IEC 801-2:
IEC 801-3:
IEC 801-4:
Declaration of CE Conformity
❑
made and is on file at Kingston Technology.
“Electromagnetic Compatibility-generic emissions standard”
“Limits and methods of measurement of radio
interference characteristics.”
“Electromagnetic Compatibility-generic immunity standard”
“Electrostatic discharge requirements”
“Radiated immunity requirements”
“Electrical fast transient requirements”
in accordance with the above standards has been
C-Tick Certification
AS/NZS 3548
‰
Declaration of C-Tick Conformity
‰
been made and is on file at Kingston Technology.
“Information Technology Equipment”
in accordance with the above standards has
N1298
Kingston Technology Company TurboChip
366
User’s Guide - Rev. A00
 Loading...