

Page 1

User Guide
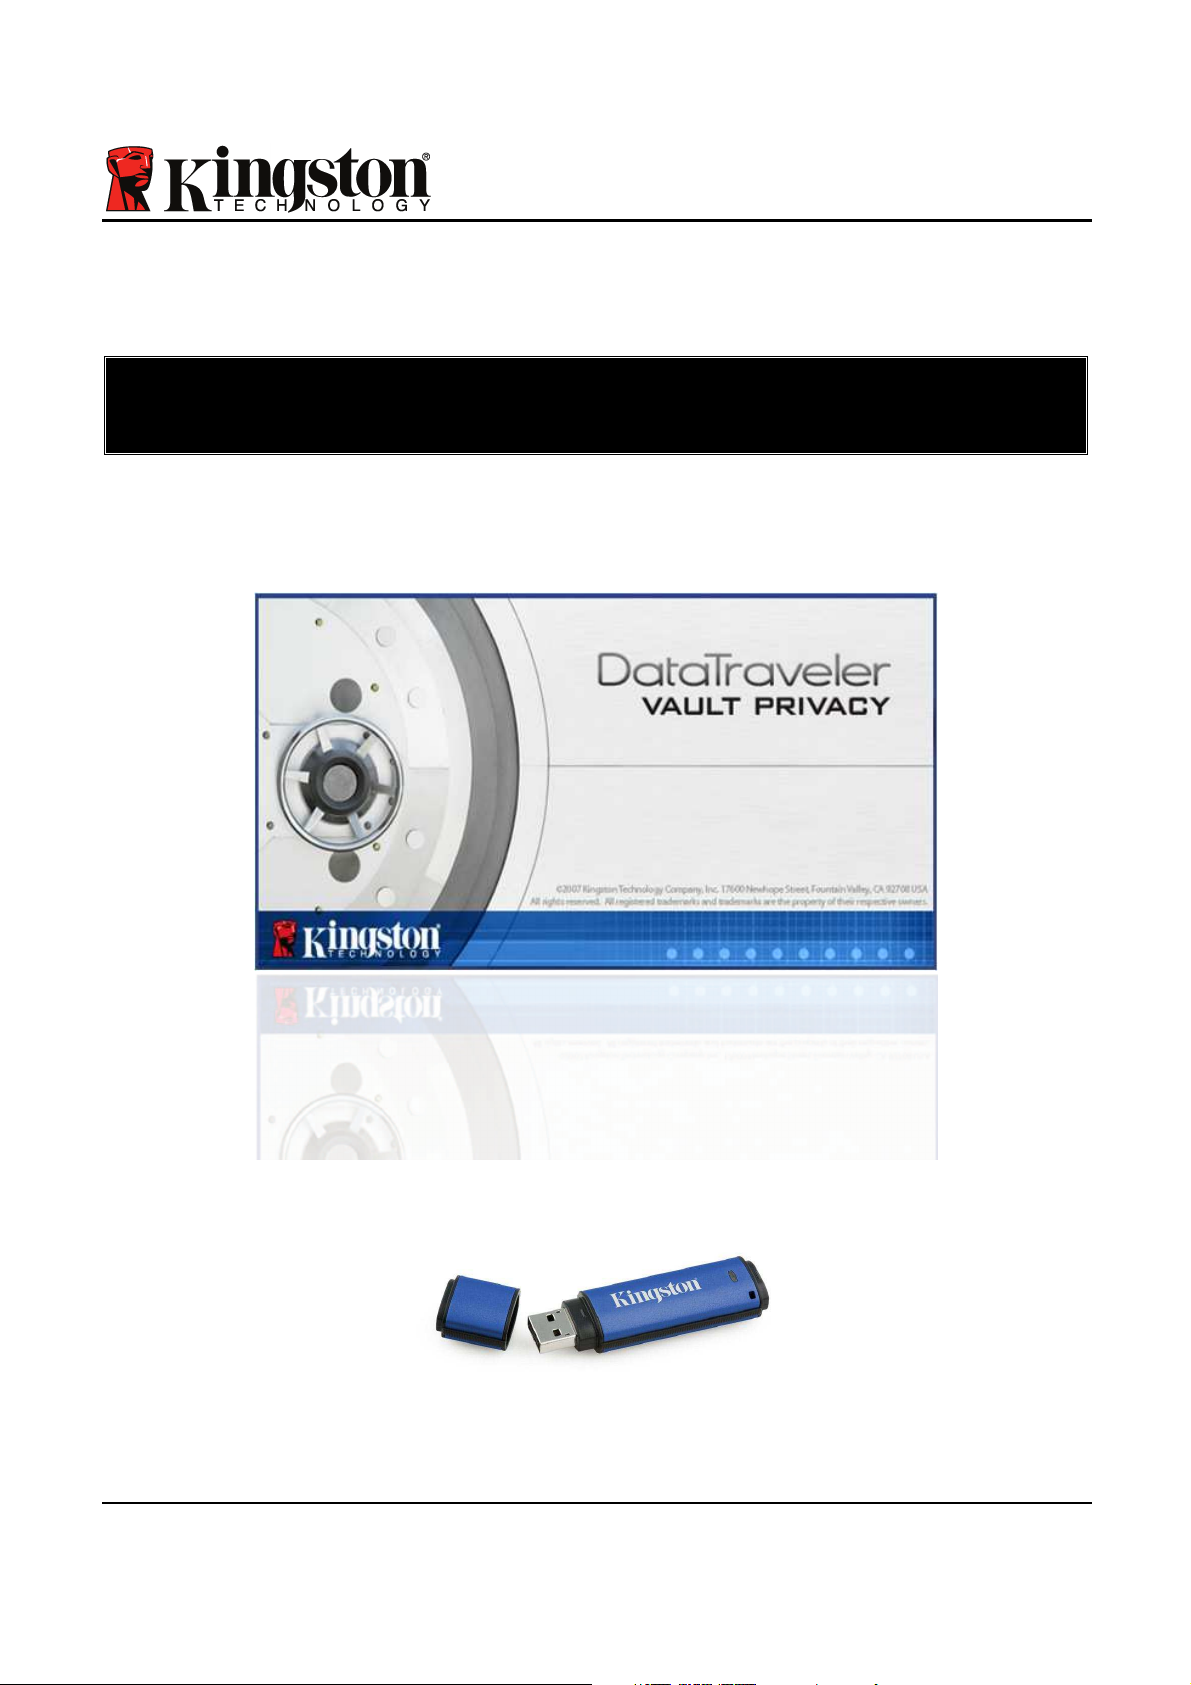
DataTraveler Vault Privacy
Find the language and latest documentation for your Kingston® DataTraveler Vault Privacy here.
DataTraveler Vault Privacy User Guide
Simplied Chinese . . . . .
Traditional Chinese . . . .
. . . . . . . . . . . . For instructions in English
. . . . . . . . . . . . . . . . . . Para instrucciones en español
. . . . . . . . . Für Anleitungen in Deutsch
. . . . . . . . . . . . . . . . . . Pour des instructions en français
. . . . . . . . . . . . . . . . . . Per le istruzioni in italiano
. . . . . . . . . . . . . . . . . . Japanese
. . . . . . . . . . . . . . . . . . Thai
Page 2
Document No. 48000012-001.A02
DataTraveler®Vault - Privacy
Page 1 of 29
DataTraveler®Vault - Privacy User Manual
Page 3

Document No. 48000012-001.A02
DataTraveler®Vault - Privacy
Page 2 of 29
Table of Contents
About This Manual.....................................................................................................................3
System Requirements ............................................................................................................... 3
Recommendations..................................................................................................................... 4
Setup (Windows Environment).................................................................................................5
Device Initialization (Windows Environment) ......................................................................... 6
Device Usage (Windows Environment) ................................................................................. 10
Device Options (Windows Environment)...............................................................................11
Setup (Mac Environment)........................................................................................................13
Device Initialization (Mac Environment) ................................................................................ 14
Device Usage (Mac Environment) .......................................................................................... 18
Device Options (Mac Environment) ....................................................................................... 19
Device Initialization (Linux Environment) .............................................................................22
Device Usage (Linux Environment) ......................................................................................24
Help and Troubleshooting ...................................................................................................... 25
Device Lockout........................................................................................................................25
Forgot Password (Windows and Mac) .................................................................................. 26
Drive Letter Conflict (Windows Operating Systems) ........................................................... 27
Error Messages ....................................................................................................................... 28
DTVP Linux Commands.......................................................................................................... 29
Page 4
Document No. 48000012-001.A02
DataTraveler®Vault - Privacy
Page 3 of 29
About This Manual
This user manual covers the DataTraveler®Vault - Privacy (referred to simply as DTVP from
this point forward) based on the factory image with no implemented customizations.
System Requirements
PC Platform
• Pentium III Processor or equivalent (or
faster)
• 15MB free disk space
• USB 2.0
• Two available consecutive drive letters
after the last physical drive*
PC Operating System Support
• Windows 7
• Windows Vista®SP1, SP2
• Windows XP SP2, SP3
Mac Platform
• 15MB free disk space
• USB 2.0
Operating System Support
• Mac OS X 10.5.x
• Mac OS X 10.6.x
Linux Platform
• 5MB free disk space
• USB 2.0
Operating System Support
• Linux v2.6 kernel
Certain distributions of Linux will require super-user (root) privileges in order to execute the
DTVP commands properly in the terminal application window.
Figure 1.1 – USB 2.0 Ports, Type A
Figure 1.2 – DTVP
*Note: See ‘Drive Letter Conflict’ on page 27.
Page 5
Document No. 48000012-001.A02
DataTraveler®Vault - Privacy
Page 4 of 29
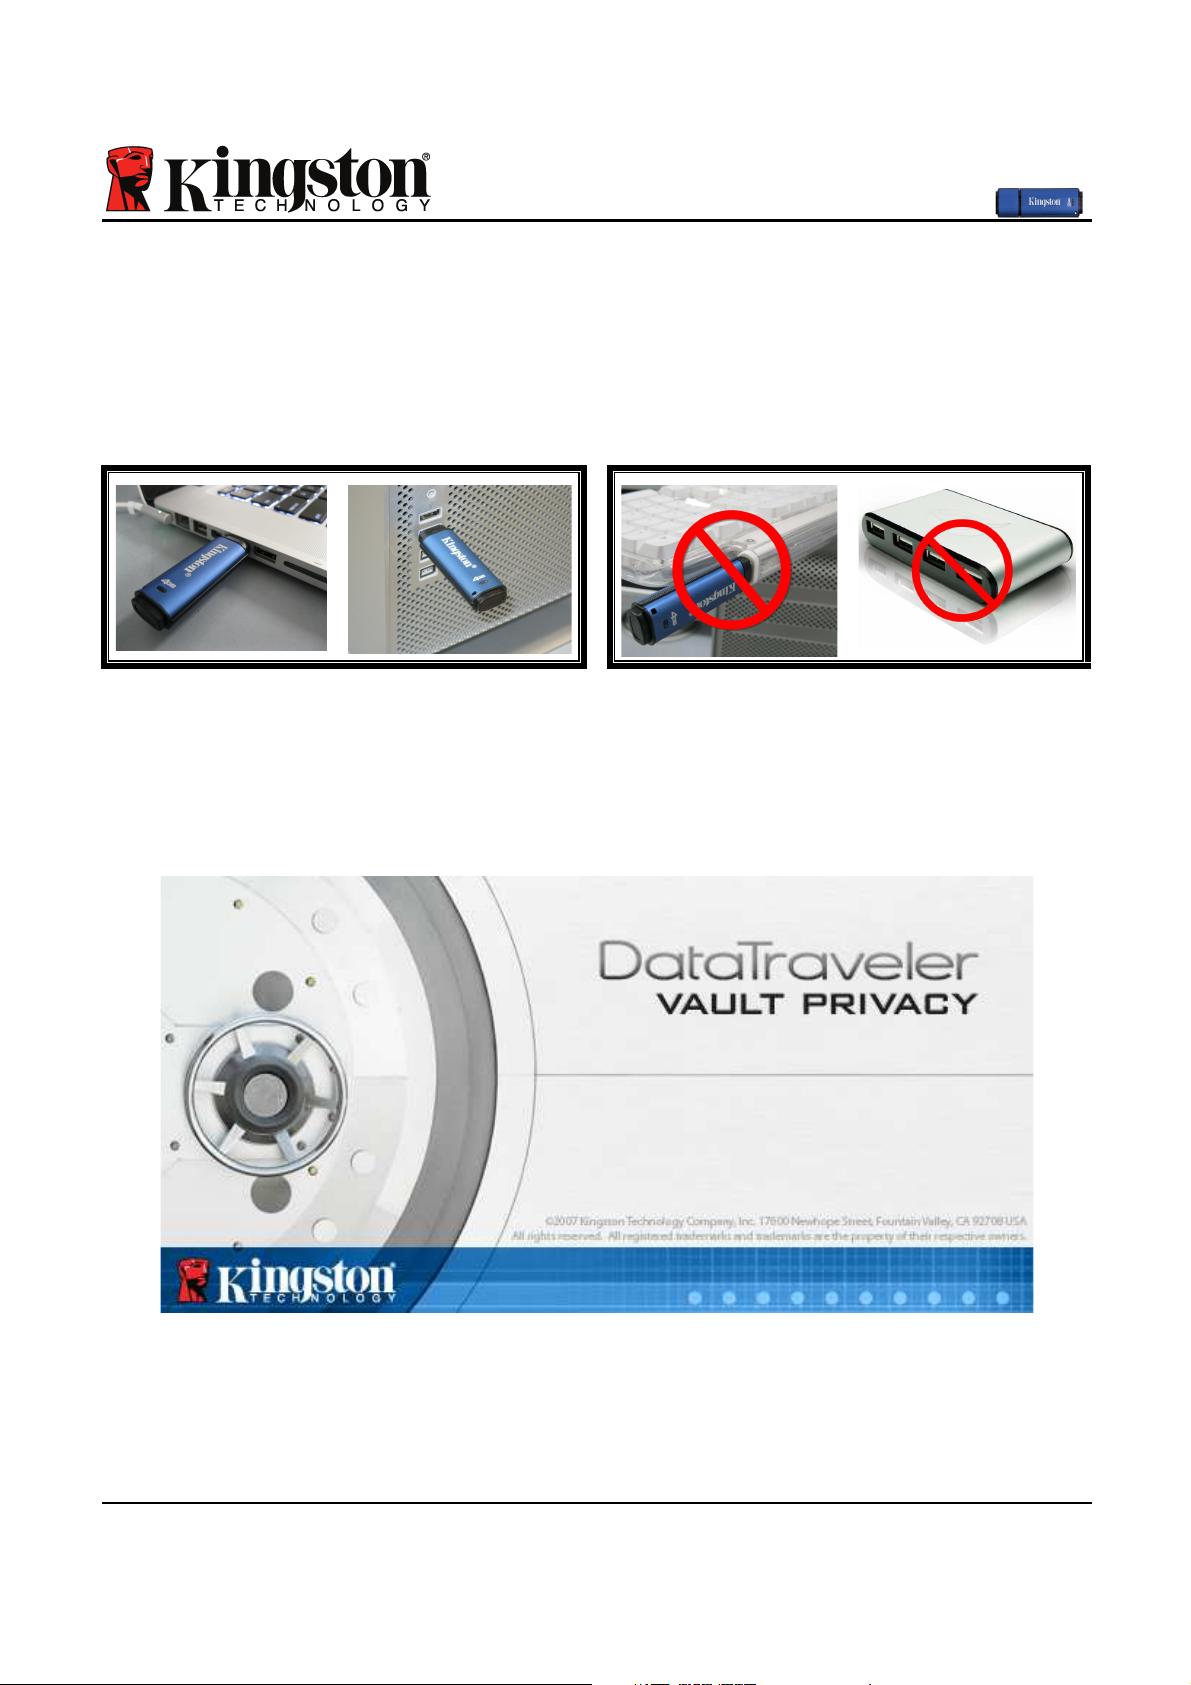
Recommendations
To ensure there is ample power provided to the DTVP device, insert it directly into a USB port
on your notebook or desktop, as seen in Figure 1.3. Avoid connecting the DTVP to any
peripheral device(s) that may feature a USB port, such as a keyboard or USB-powered hub, as
seen in Figure 1.4.
Figure 1.3 – Recommended Usage
Figure 1.4 – Not Recommended
Page 6
Document No. 48000012-001.A02
DataTraveler®Vault - Privacy
Page 5 of 29
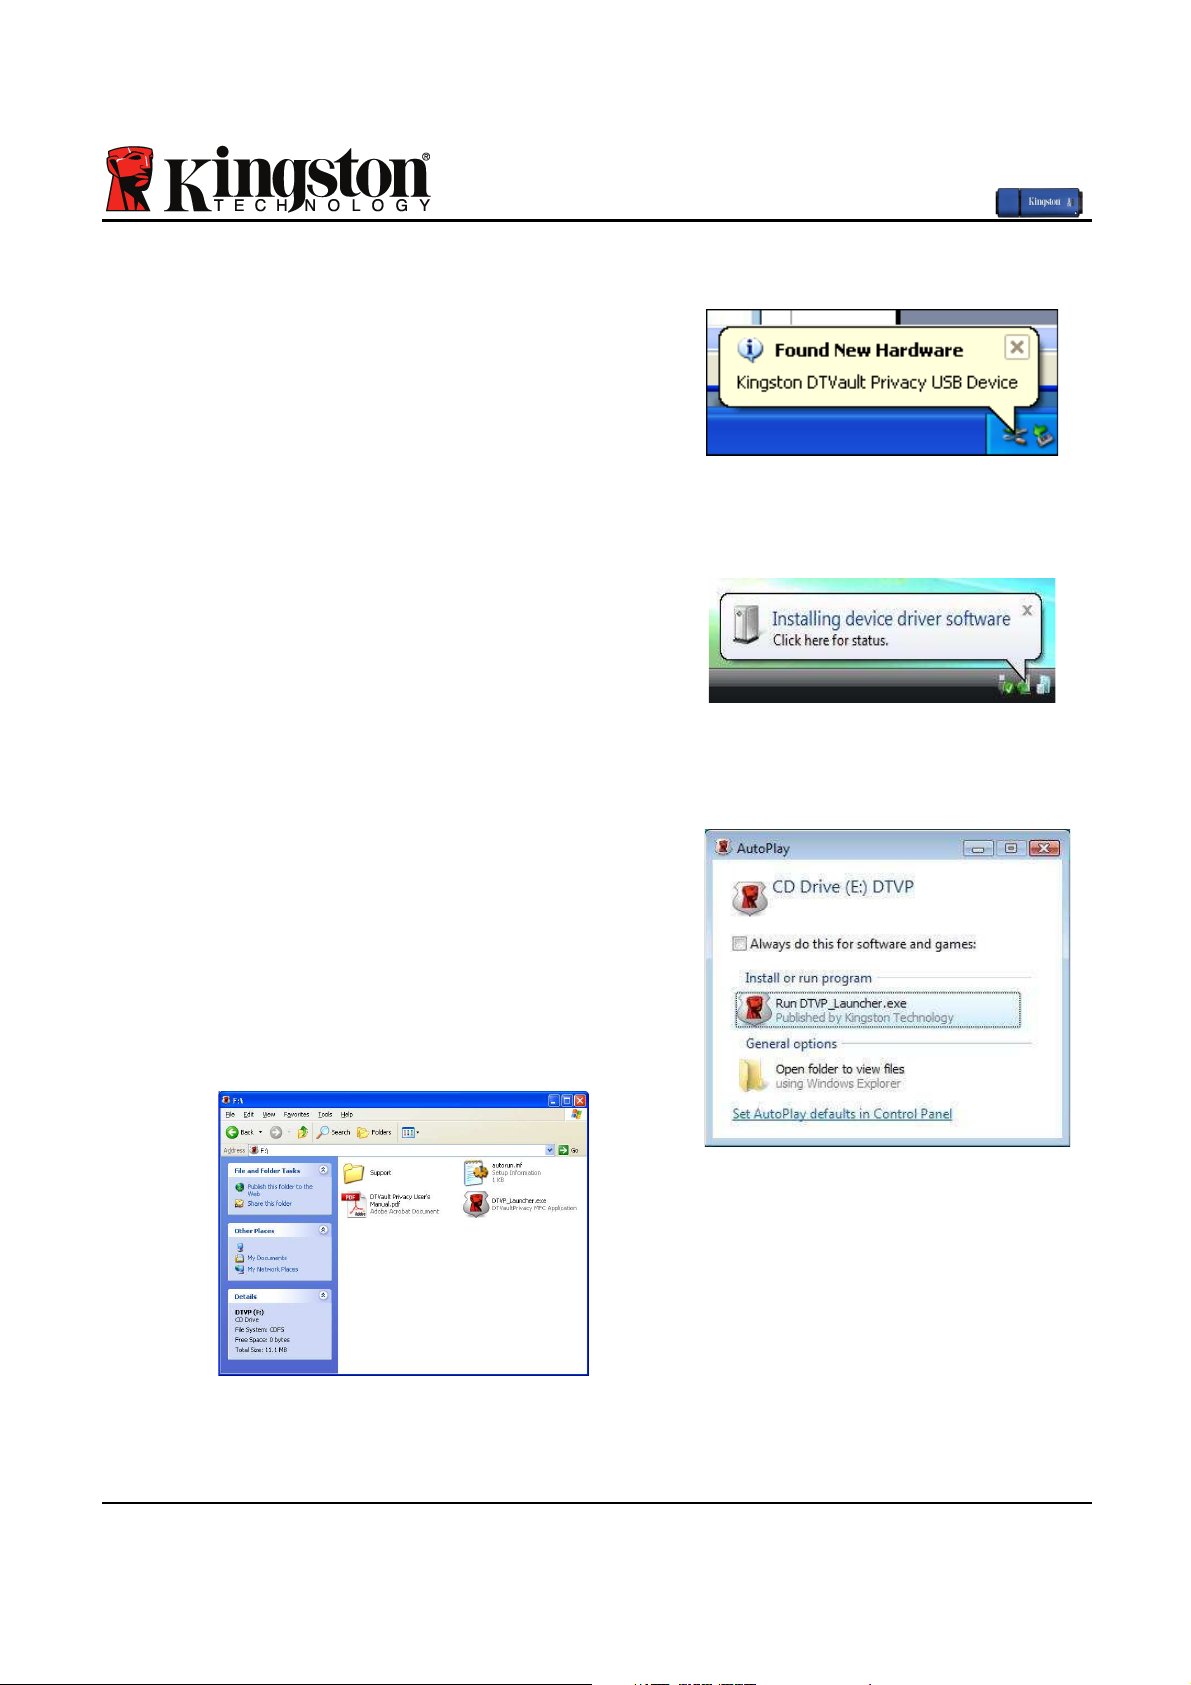
Setup (Windows Environment)
1. Insert the DTVP into an available USB port on
your notebook or desktop and wait for Windows
to detect it.
• Windows XP users will receive a ‘Found New
Hardware’ notification as seen in Figure 2.1.
• Windows Vista/7 users will receive a device
driver notification as seen in Figure 2.2.
Once the new hardware detection is complete,
Windows will prompt you to begin the initialization
process.
• Windows XP users can skip step 2 and go to
page 6 – Device Initialization.
• Windows Vista/7 users will see an AutoPlay
window similar to the one in Figure 2.3.
2. Select the option ‘Run DTVP_Launcher.exe’.
If Windows does not AutoPlay, you can browse to
the CD-ROM partition (Figure 2.4) and manually
execute the DTVP_Launcher program. This will also
start the initialization process.
Figure 2.4 – DTVP Contents
Figure 2.1 – Found New Hardware
(Windows XP)
Figure 2.2 – Device Driver Installation
(Windows Vista/7)
Figure 2.3 – AutoPlay Window
(Windows Vista/7)
(Note: Menu options in the AutoPlay
window may vary depending on what
programs are currently installed on
your computer. AutoRun will start the
initialization process automatically.)
Page 7

Document No. 48000012-001.A02
DataTraveler®Vault - Privacy
Page 6 of 29
Device Initialization (Windows Environment)
1. Select your language preference from the drop-down menu and click ‘Next’ (Figure 3.1.)
Figure 3.1 – Language Selection
2. Review the license agreement and click ‘Next’ (Figure 3.2.) (Note: You must accept the
license agreement before continuing; otherwise the ‘Next’ button will remain disabled.)
Figure 3.2 – License Agreement
Page 8

Document No. 48000012-001.A02
DataTraveler®Vault - Privacy
Page 7 of 29
3. Create a password to protect your data on the DTVP. Enter it in the ‘Password’ field, then
re-enter it in the ‘Password Confirmation’ field, as seen below in Figure 3.3. The password
you create must meet the following criteria before the initialization process will allow you to
continue:
1. Passwords must contain 6 characters or more (up to 16 characters.)
2. Passwords must contain three (3) of the following criteria options:
- UPPER CASE, lower case, numeric, and/or special characters (!, $, etc.)
You may also enter a password hint, but it is not a mandatory field. The hint field can be
useful in providing a clue as to what the password is, should the password ever be
forgotten. (Note: The hint CANNOT be an exact match to the password.)
Figure 3.3 – Password Setup
Page 9
Document No. 48000012-001.A02
DataTraveler®Vault - Privacy
Page 8 of 29
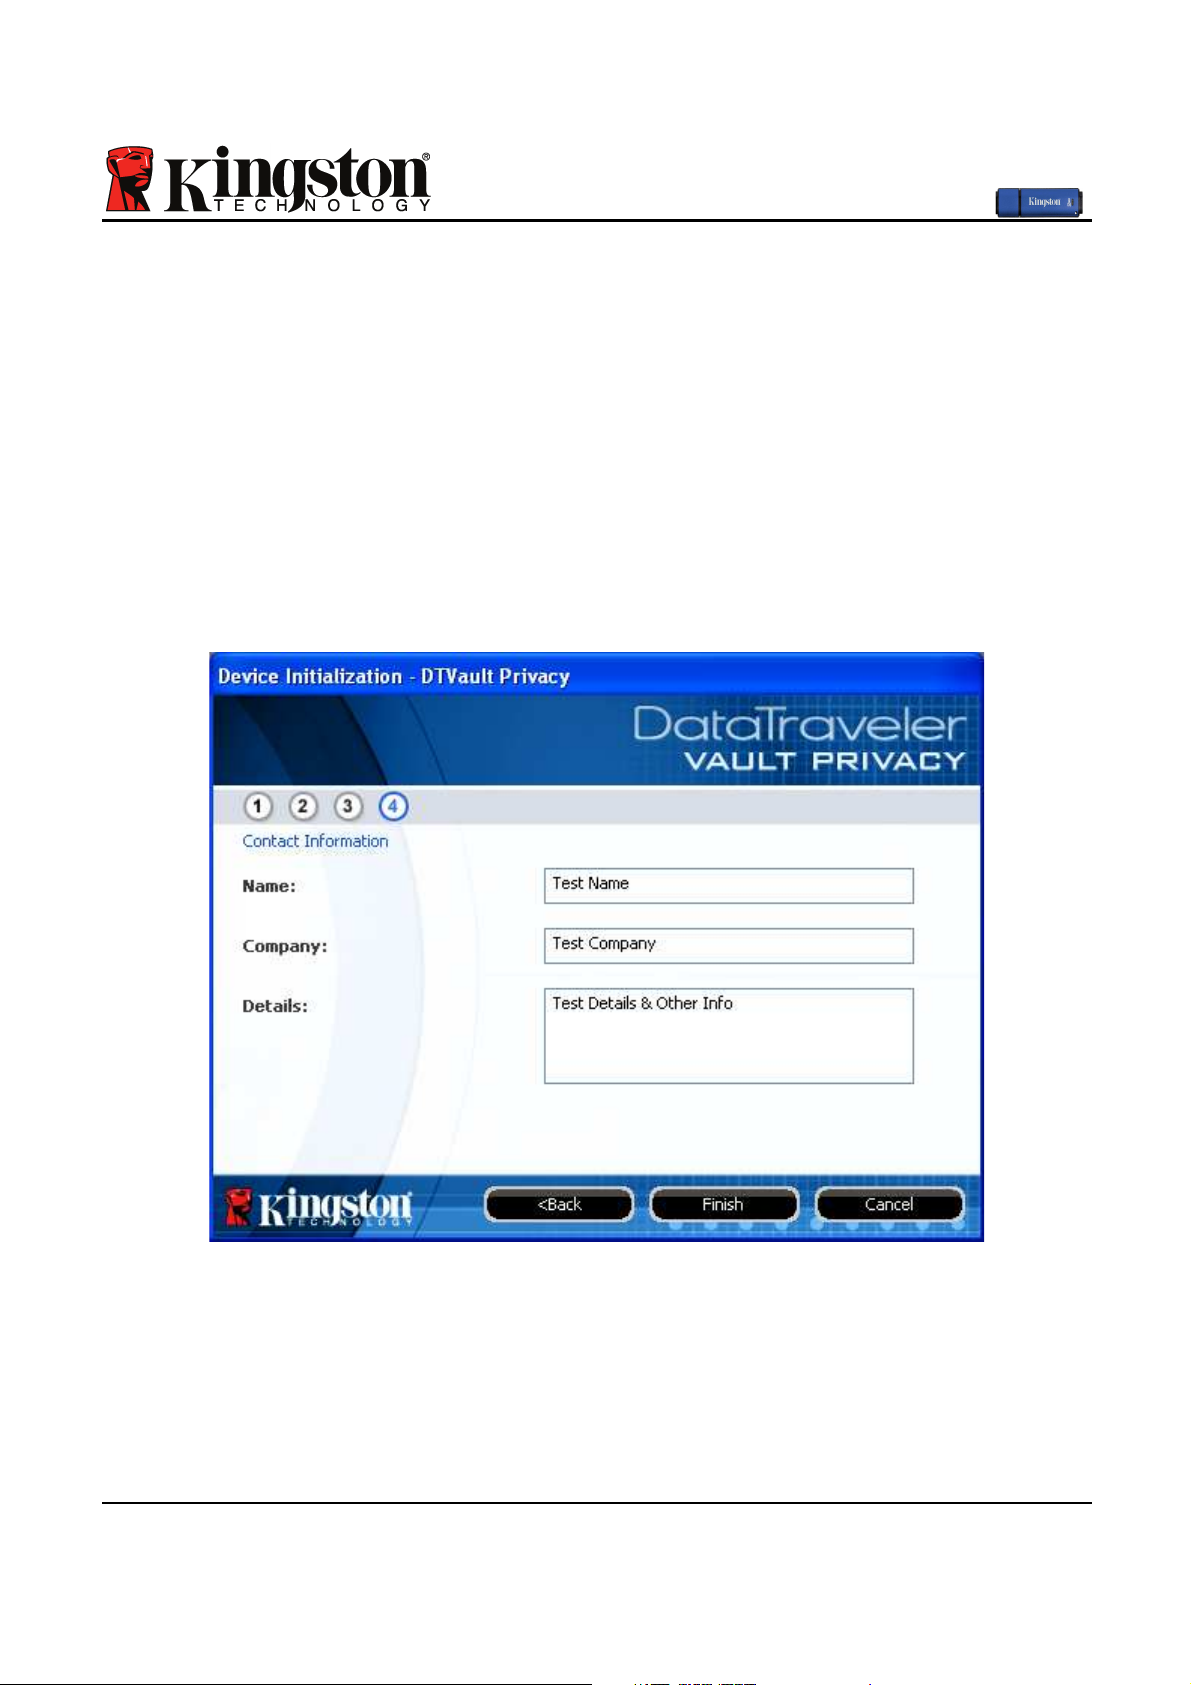
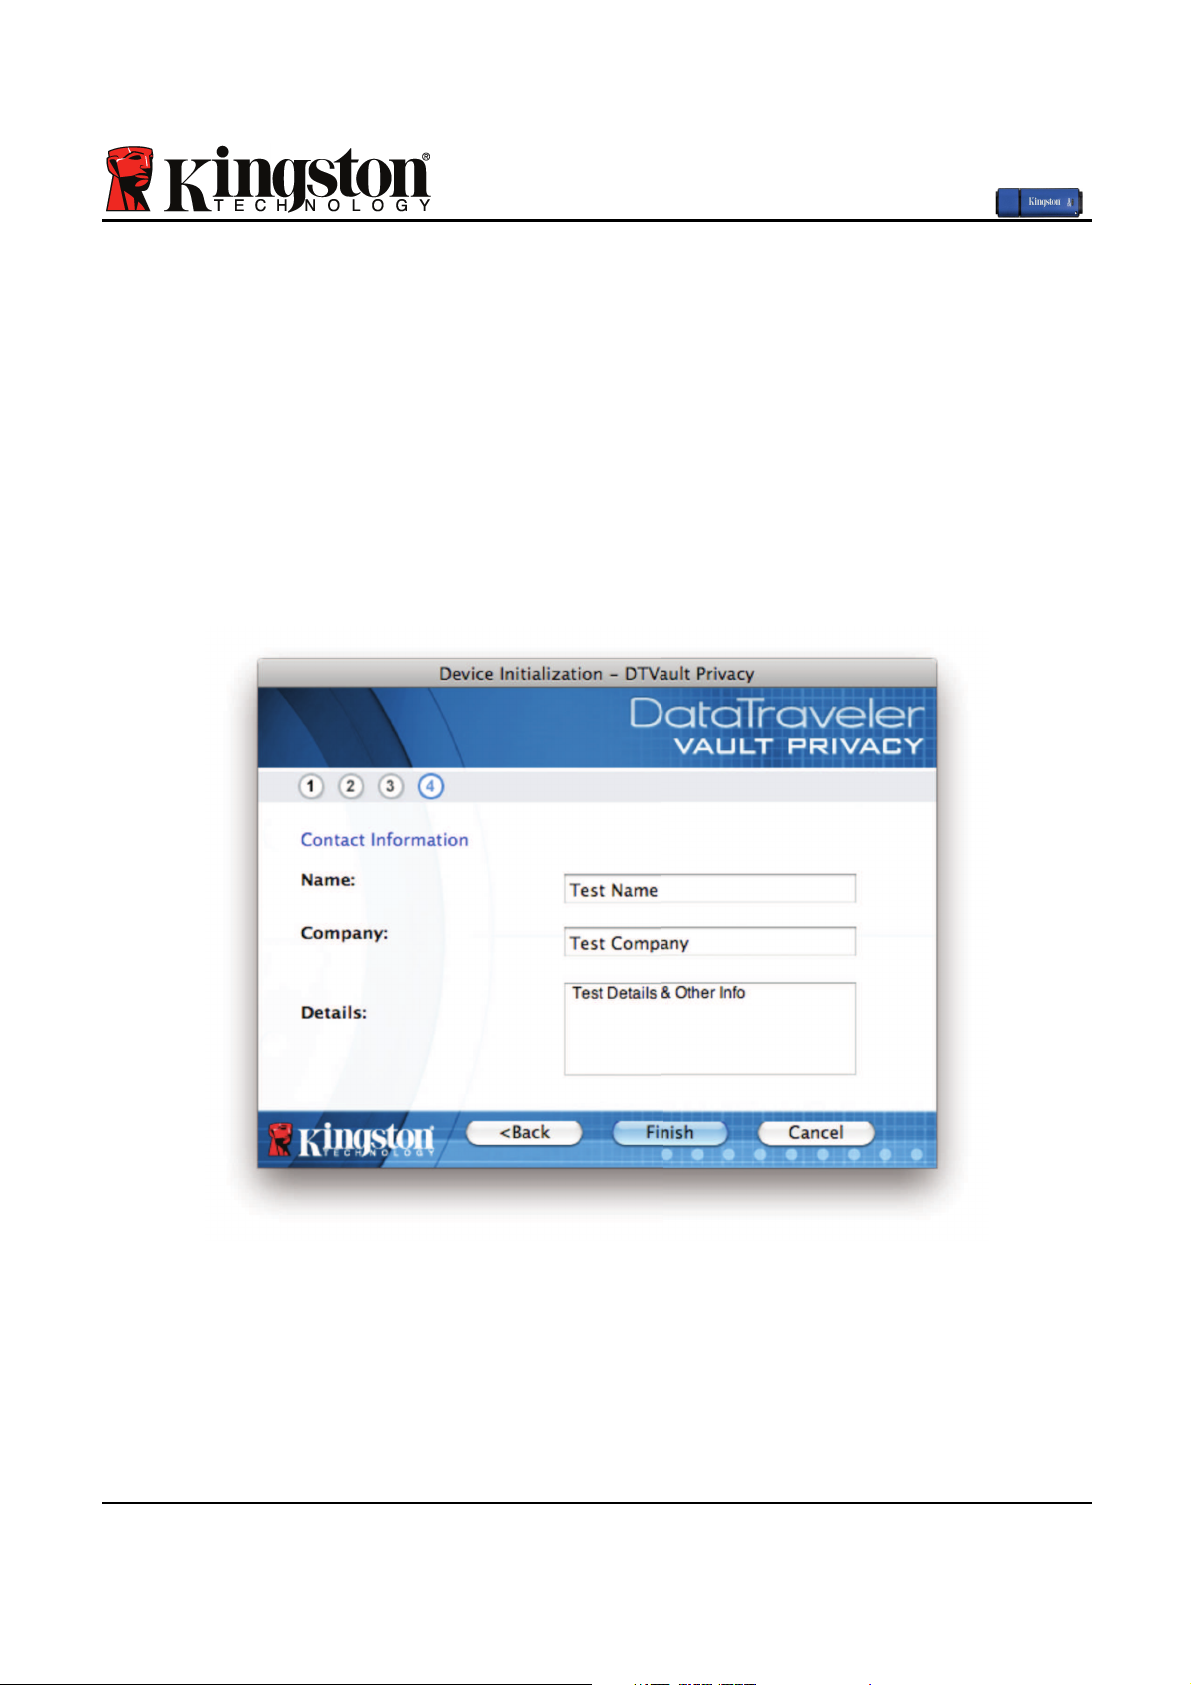
4. Enter your contact information into the text boxes provided (see Figure 3.4) (Note: The
information you enter in these fields may NOT contain the password string you created in
Step 3. However, these fields are optional and can be left blank, if so desired.)
• The ‘Name’ field may contain up to 32 characters, but cannot contain the
exact password.
• The ‘Company’ field may contain up to 32 characters, but cannot contain
the exact password.
• The ‘Details’ field may contain up to 156 characters, but cannot contain the
exact password.
Figure 3.4 – Contact Information
5. Click ‘Finish’ to complete the device initialization process.
Page 10
Document No. 48000012-001.A02
DataTraveler®Vault - Privacy
Page 9 of 29
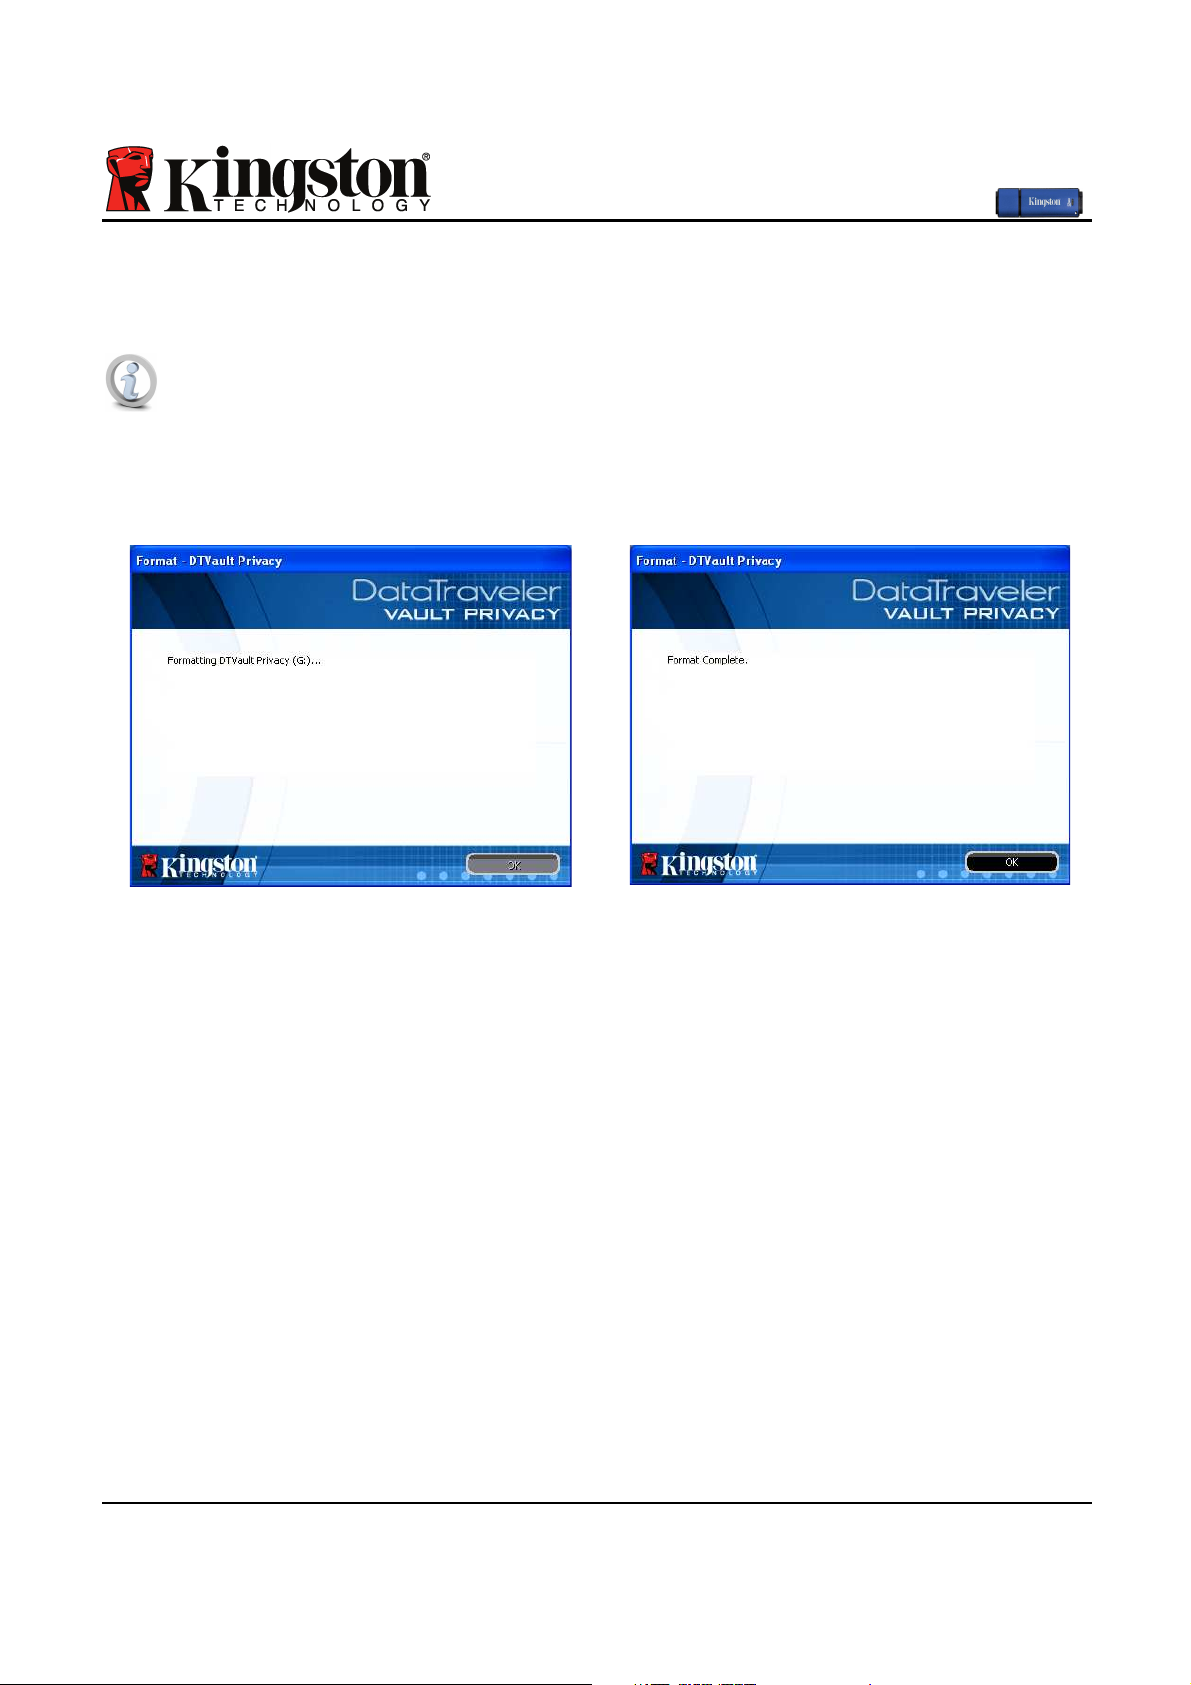
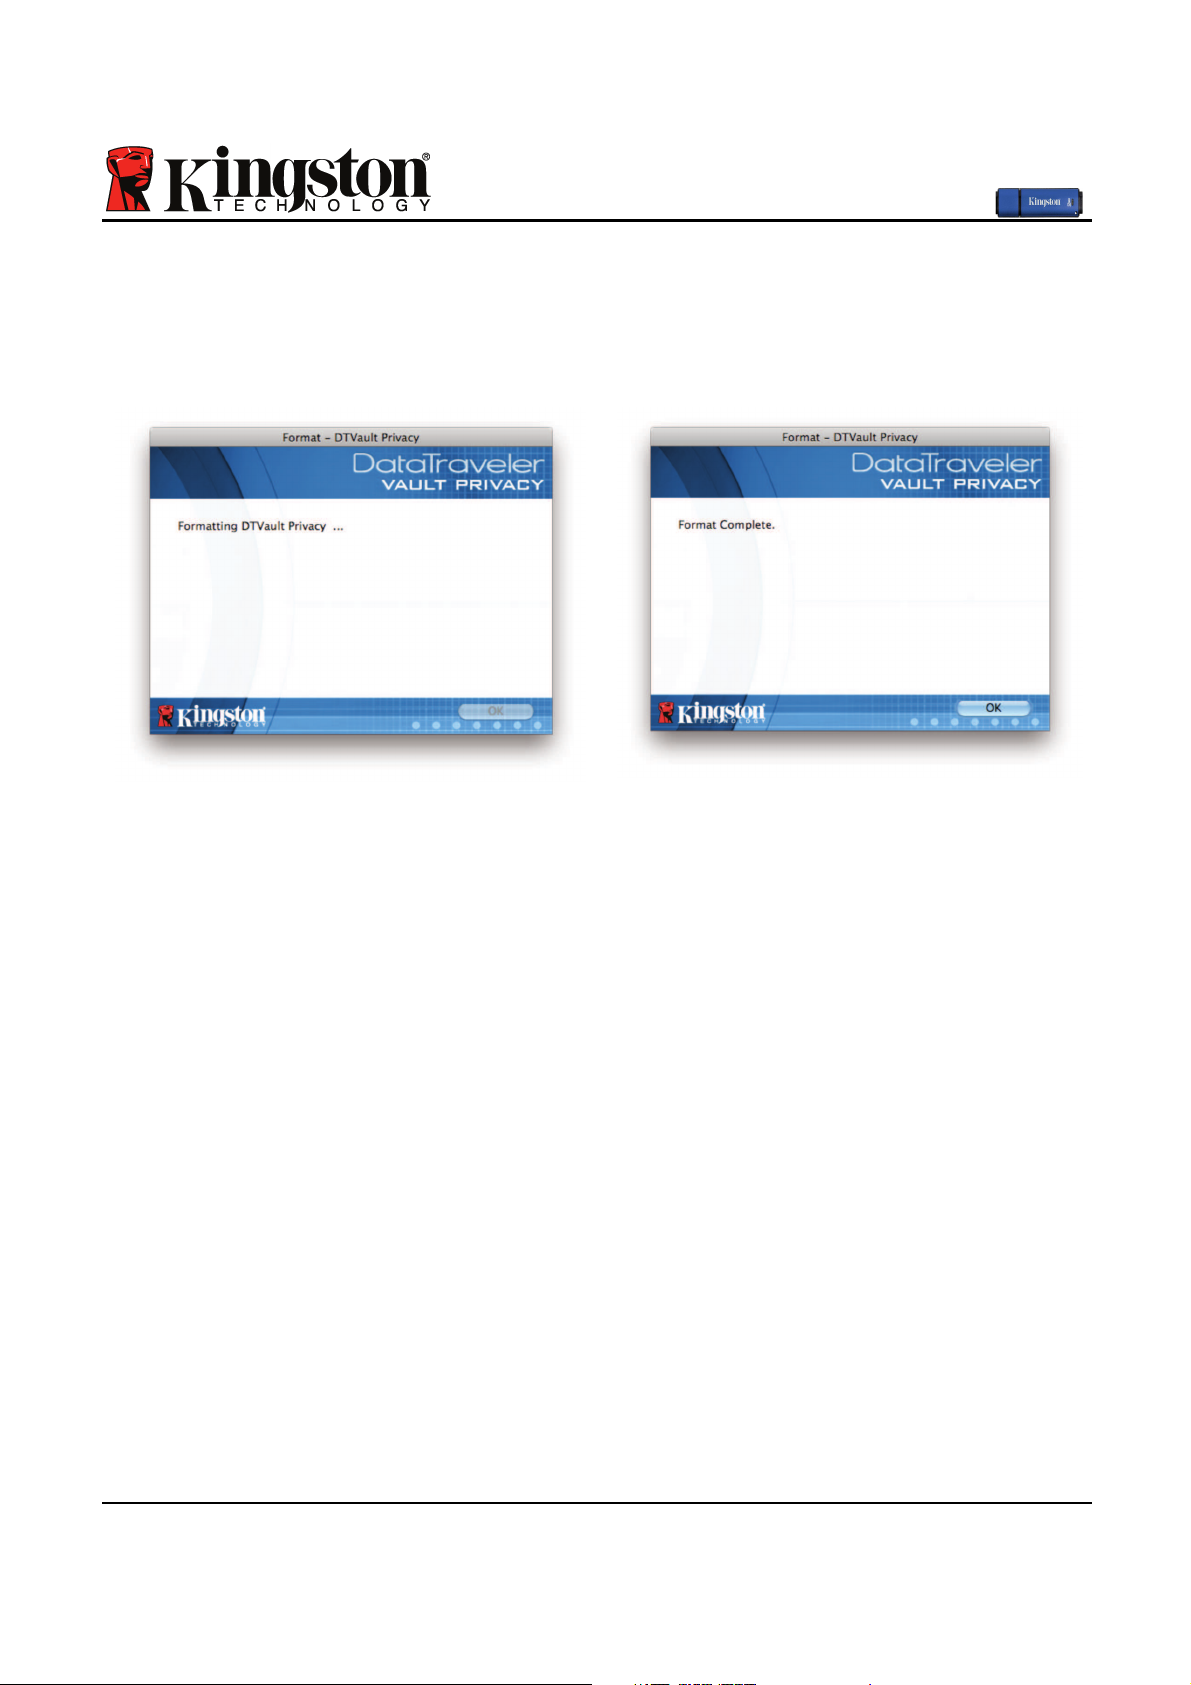
The DTVP will now format the secure data partition (Figure 3.5) and notify you when it is
complete (Figure 3.6.)
Note: If operating under Windows XP in Non-Admin mode, the ‘Format’ routine
can take up to a minute.*
6. Click ‘OK’ to continue.
Figure 3.5 – Formatting DTVP
Figure 3.6 – Format Complete
Initialization complete.
*Note: Times may vary based on system hardware and the capacity of the DTVP drive.
Page 11
Document No. 48000012-001.A02
DataTraveler®Vault - Privacy
Page 10 of 29
Device Usage (Windows Environment)
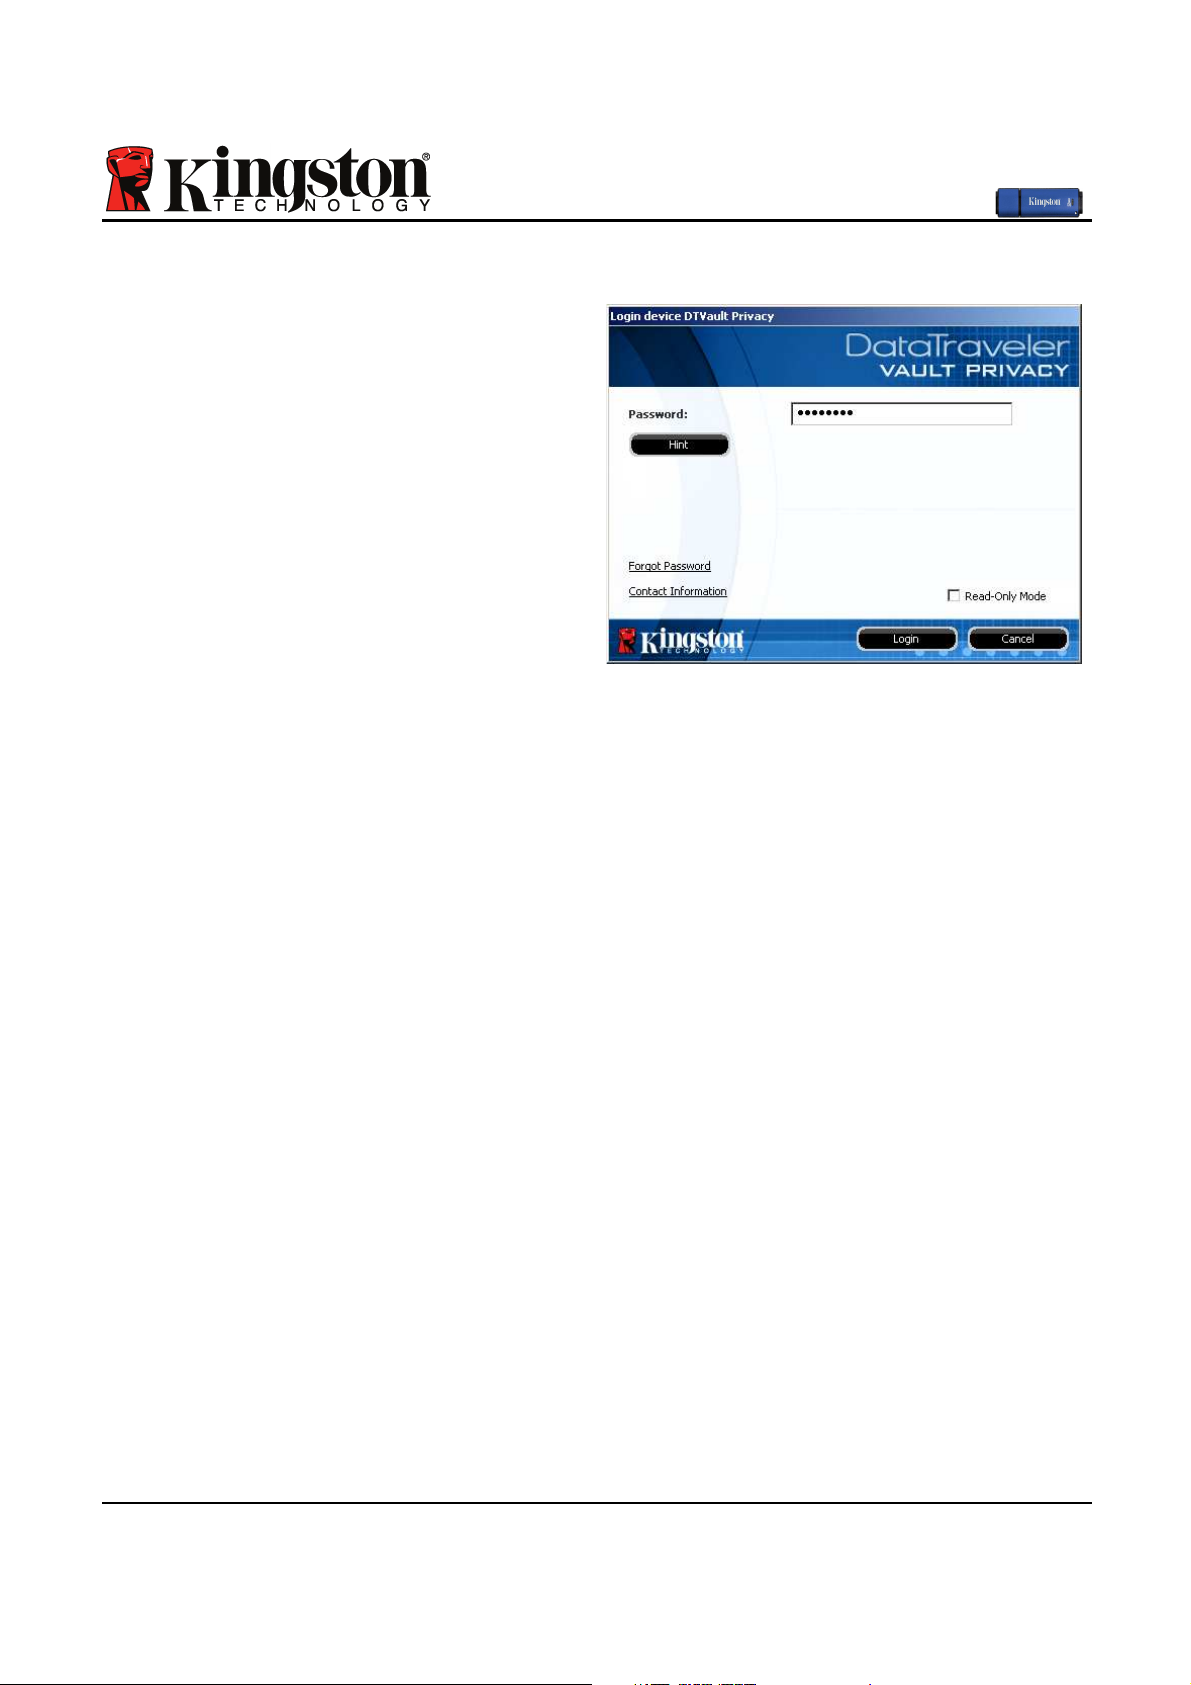
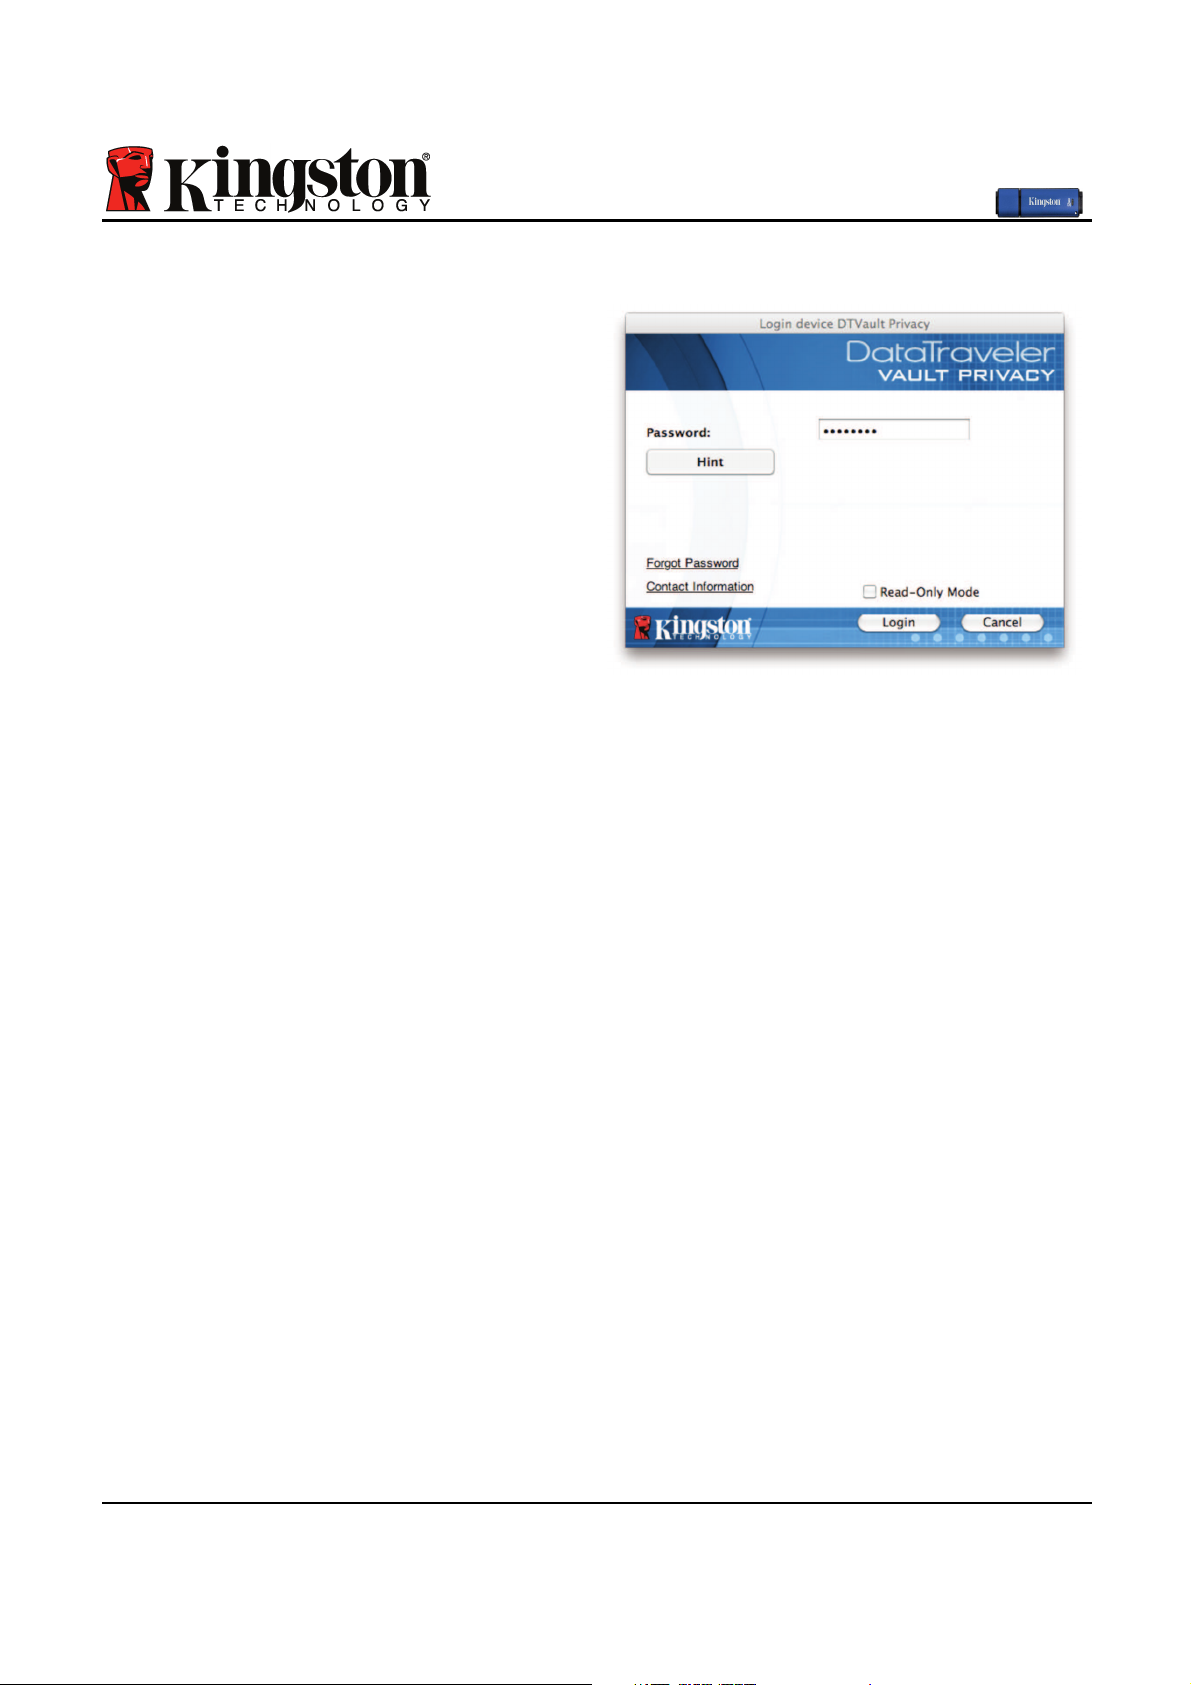
Once the DTVP has been initialized, you can
access the secure data partition and utilize the
device options by logging into the device with
your password. To do so, follow these steps:
1. Insert the DTVP into a USB port on your
notebook or desktop and enter your password (see Figure 4.1.)
2. Once you’ve typed your password, click the
‘Login’ button to continue.
• If the correct password is entered, the
DTVP will unlock and you can begin
using the device.
Figure 4.1 – Login Window
• If an incorrect password is entered, an error message will appear just below the ‘Hint’
field, indicating a login failure.
(NOTE: During the login process, if a bad password is entered, you will be given another
opportunity to enter the correct password; however, there is a built-in security feature that
tracks the number of failed login attempts*. If this number reaches the pre-configured value of
10 failed attempts, the DTVP will lock and require a device format of the secure data partition
prior to next use. THIS MEANS THAT ALL DATA STORED ON THE DTVP WILL BE
ERASED. For more details on this feature, see ‘Device Lockout’ on page 20.)
3. You may unlock the secure data partition in read-only mode, sometimes referred to as
“write-protect mode”, by selecting the checkbox labeled ‘Read-Only Mode’ prior to logging
into the device. Once authenticated under read-only, you will be allowed to open or view
content on the DTVP, but not update, change, or erase content while in this mode. (Note:
Read-only mode will also prevent the format option from appearing in the DTVP menu that
later appears on page 11.)
If you are currently logged in under read-only mode and wish to unlock the device with full
read/write access to the secure data partition, you must shutdown DTVP (see page 12) and log
back in, leaving the ‘Read-Only Mode’ checkbox unchecked during authentication.
*Note: Once you authenticate to the device successfully, the failed login counter will reset.
Page 12

Document No. 48000012-001.A02
DataTraveler®Vault - Privacy
Page 11 of 29
Device Options (Windows Environment)
While you are logged into the device, there will be a ‘DTVP’ icon located in the right-hand
corner of the Windows taskbar (Figure 5.1.) (Note: Windows 7 users will need to click on the
up-arrow button in the taskbar in order to access the ‘DTVP’ icon (Figure 5.2.)
Clicking once on the DTVP icon will display the following menu:
Figure 5.1 – DTVP icon in taskbar
Figure 5.2 – DTVP icon in taskbar
(Windows 7 users)
DTVault Privacy Settings
• Allows you to change your password and/or hint (Figure 5.3)
• Allows you to add/view/change your contact information (Figure 5.4)
• Allows you to change your current language selection (Figure 5.5)
(Note: For security purposes, your current DTVP password is required to update and/or modify
any of these settings.)
Figure 5.3
Change Password
Figure 5.4
Contact Information
Figure 5.5
Select Language
Page 13
Document No. 48000012-001.A02
DataTraveler®Vault - Privacy
Page 12 of 29
Browse DTVault Privacy
• Allows you to browse the contents of the secure data partition while you are logged in
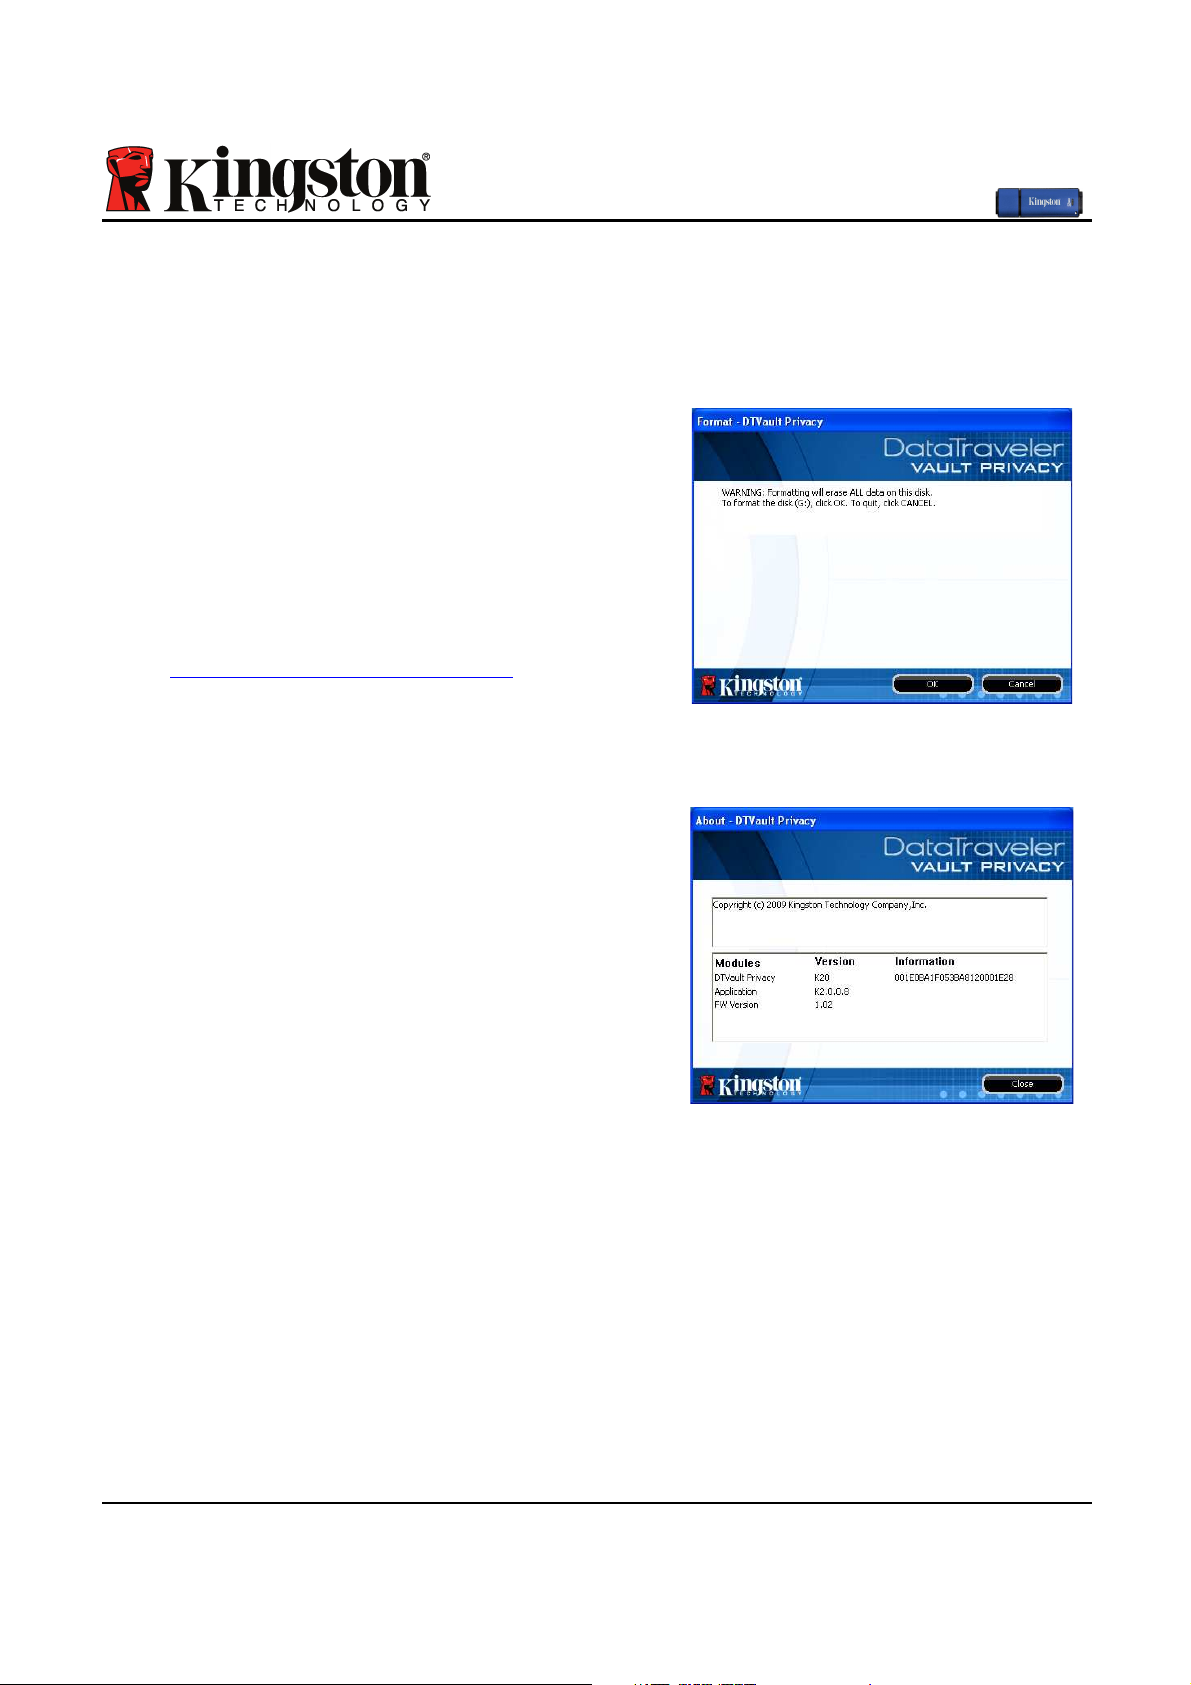
Format DTVault Privacy*
• Allows you to format the secure data partition
(Warning: All data will be erased.) (Figure 5.6)
Online Support (Requires Internet access)
• Opens your Internet browser and navigates to
http://www.kingston.com/support/ where you
can access additional support information
Figure 5.6 – Format Warning
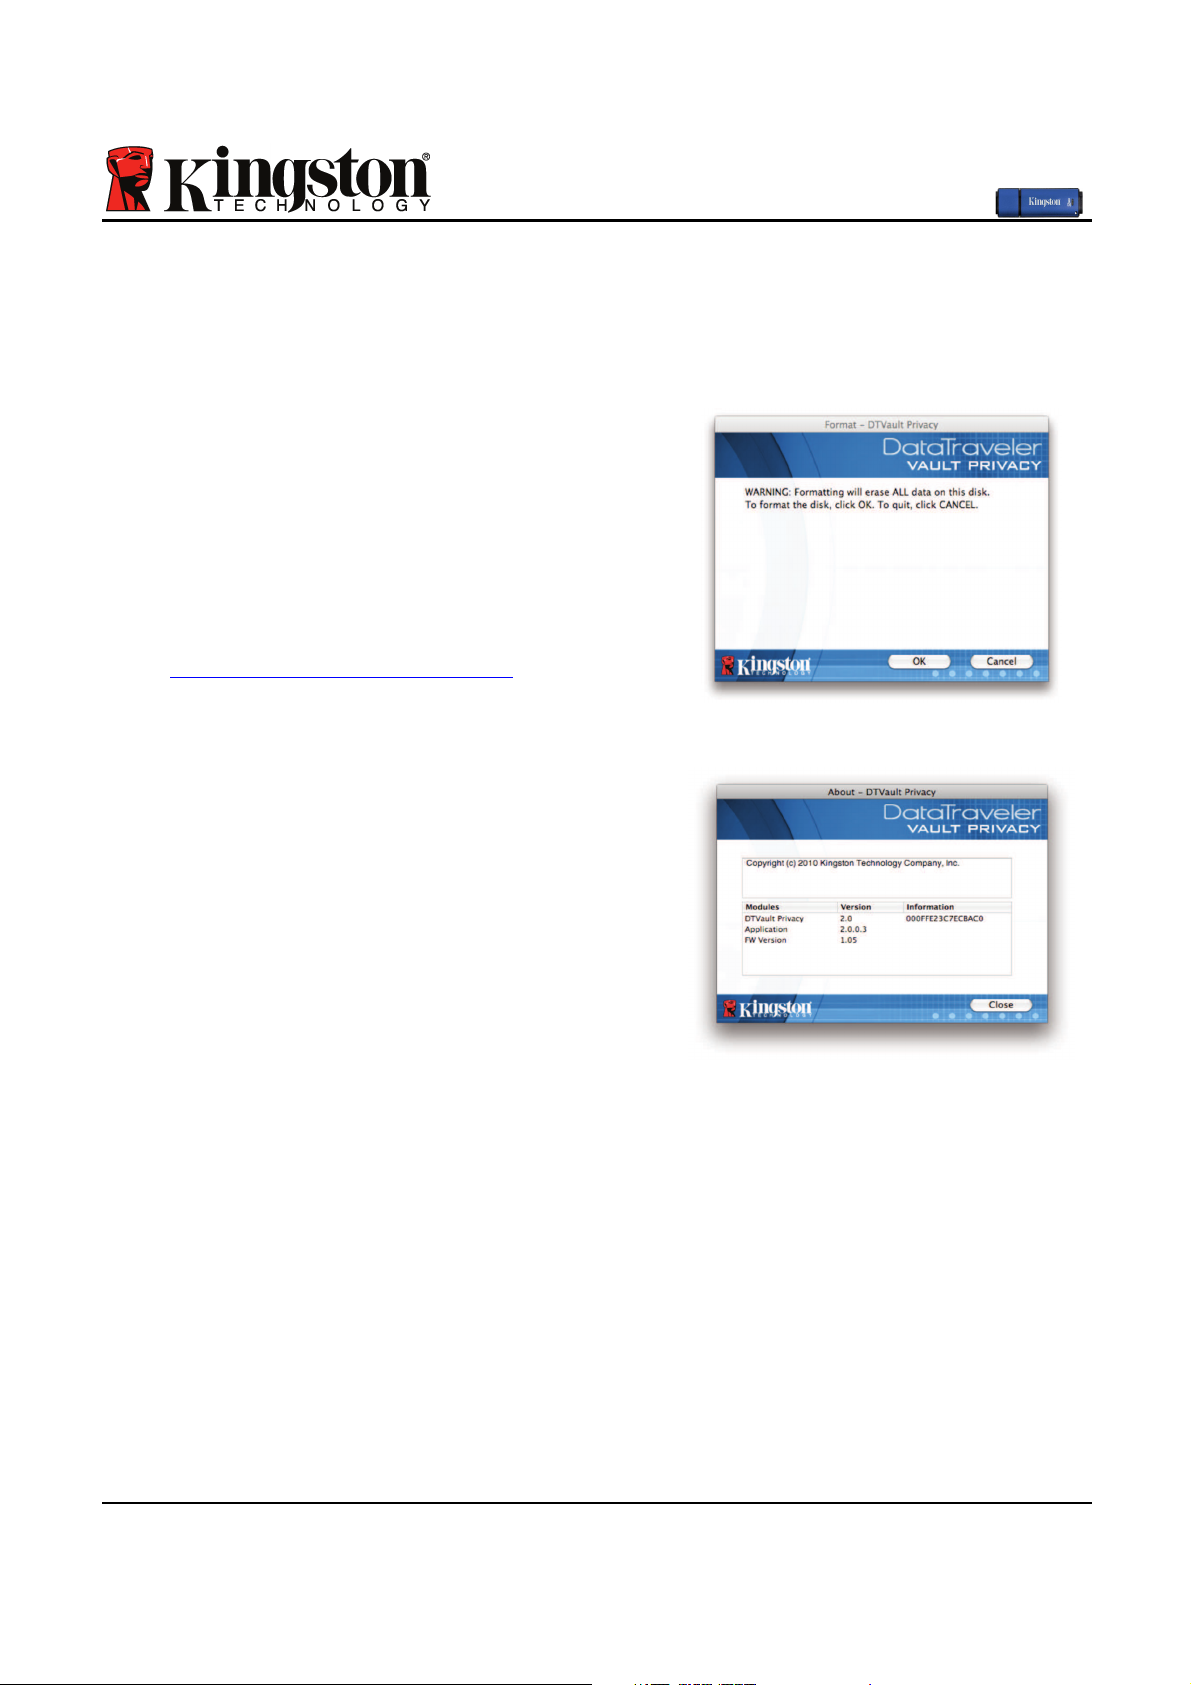
About DTVault Privacy
• Provides specific details about the DTVP,
including Application and Firmware version
information (Figure 5.7)
Shutdown DTVault Privacy
• Properly shuts down the DTVP, allowing you to
safely remove it from your system
Figure 5.7 – About DTVP
*Note: Your current DTVP password is required in Windows Vista and Windows 7
-Windows Section Complete-
Page 14
Document No. 48000012-001.A02
DataTraveler®Vault - Privacy
Page 13 of 29
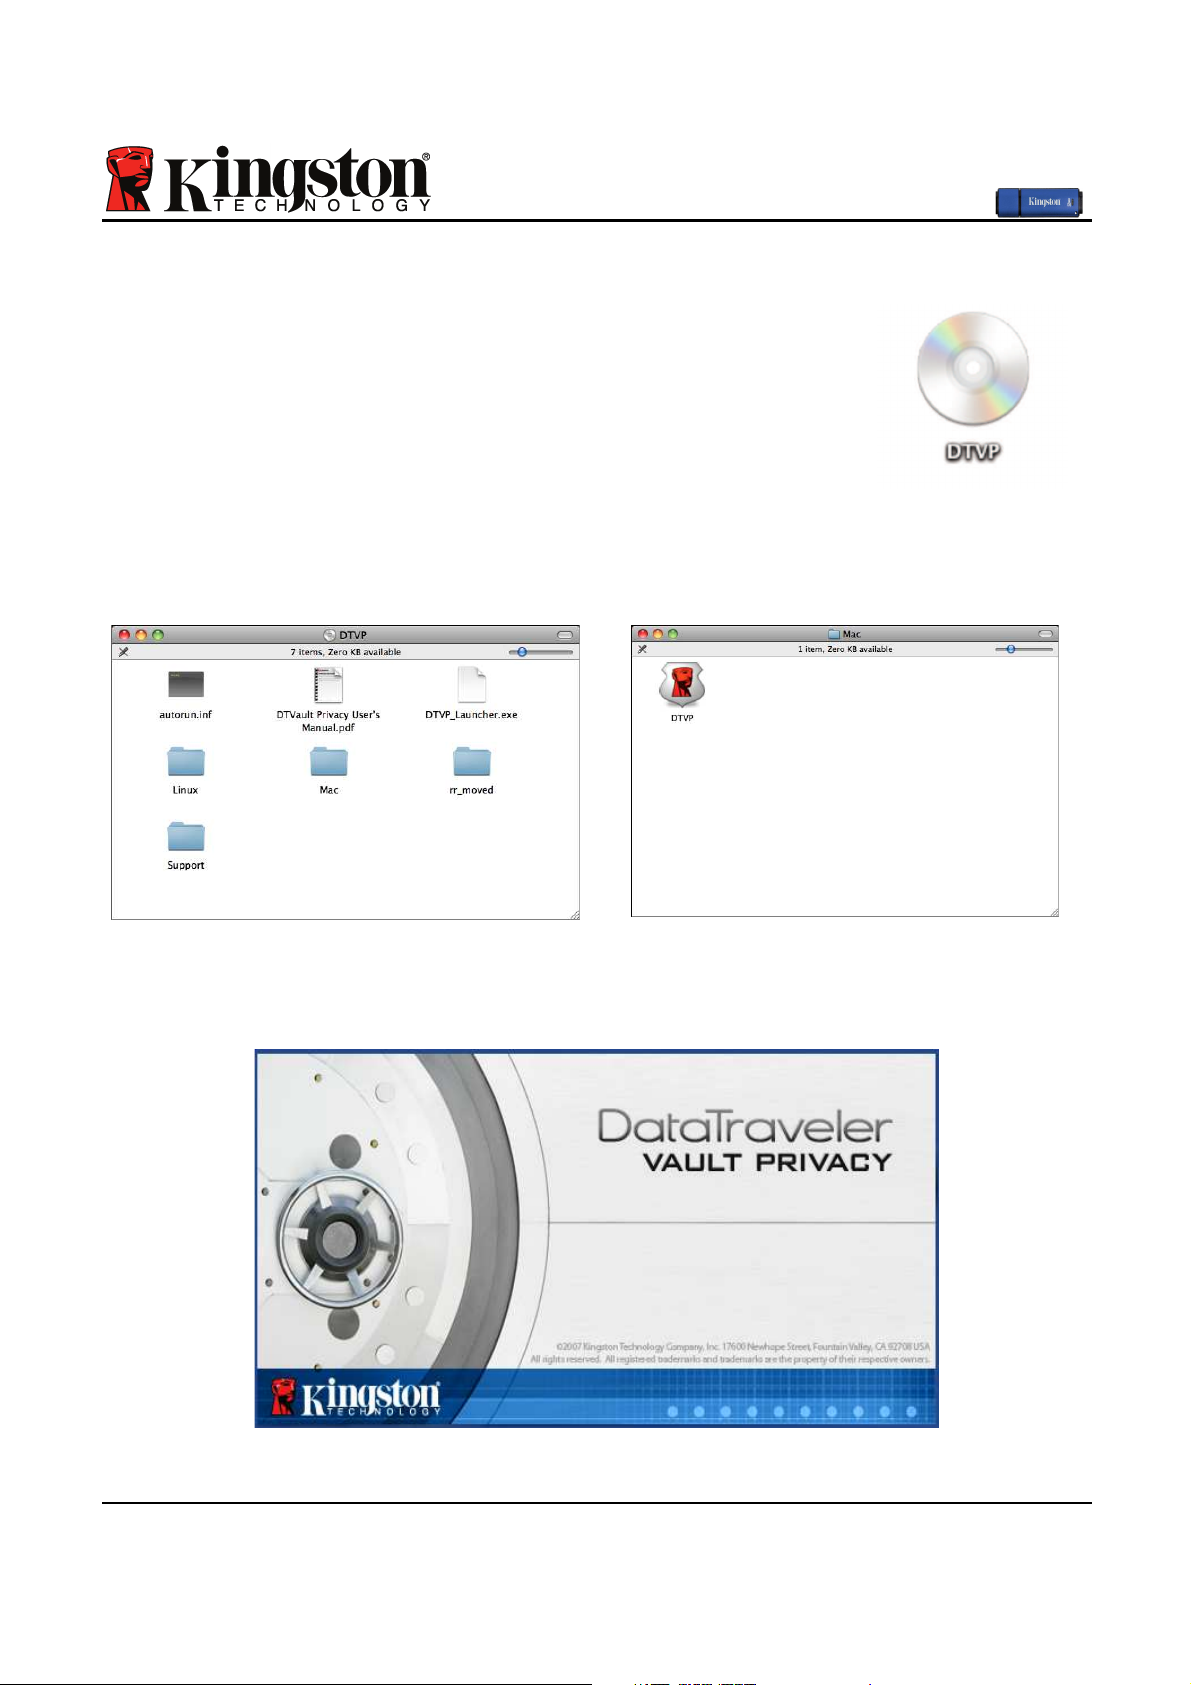
Setup (Mac Environment)
Insert the DTVP into an available USB port on your notebook or
desktop and wait for the Mac operating system to detect it. When it
does, you will see a DTVP volume appear on the desktop, as seen in
Figure 6.1.
1. Double-click the DTVP CD-ROM icon.
2. Double-click the Mac folder found in the window displayed in
Figure 6.2.
Figure 6.1 – DTVP
3. Double-click the DTVP application icon found in the window
displayed in Figure 6.3. This will start the initialization process.
Figure 6.2 – DTVP Contents
Figure 6.3 – DTVP Application
Page 15

Document No. 48000012-001.A02
DataTraveler®Vault - Privacy
Page 14 of 29
Device Initialization (Mac Environment)
1. Select your language preference from the drop-down menu and click ‘Next’ (Figure 7.1.)
Figure 7.1 – Language Selection
2. Review the license agreement and click ‘Next’ (Figure 7.2.) (Note: You must accept the
license agreement before continuing; otherwise the ‘Next’ button will remain disabled.)
Figure 7.2 – License Agreement
Page 16

Document No. 48000012-001.A02
DataTraveler®Vault - Privacy
Page 15 of 29
3. Create a password to protect your data on the DTVP. Enter it in the ‘Password’ field, then
re-enter it in the ‘Password Confirmation’ field, as seen below in Figure 7.3. The password
you create must meet the following criteria before the initialization process will allow you to
continue:
1. Passwords must contain 6 characters or more (up to 16 characters.)
2. Passwords must contain three (3) of the following criteria options:
- UPPER CASE, lower case, numeric, and/or special characters (!, $, etc.)
You may also enter a password hint, but it is not a mandatory field. The hint field can be
useful in providing a clue as to what the password is, should the password ever be
forgotten. (Note: The hint CANNOT be an exact match to the password.)
Figure 7.3 – Password Setup
Page 17
Document No. 48000012-001.A02
DataTraveler®Vault - Privacy
Page 16 of 29
4. Enter your contact information into the text boxes provided (see Figure 7.4) (Note: The
information you enter in these fields may NOT contain the password string you created in
Step 3. However, these fields are optional and can be left blank, if so desired.)
• The ‘Name’ field may contain up to 32 characters, but cannot contain the
exact password.
• The ‘Company’ field may contain up to 32 characters, but cannot contain
the exact password.
• The ‘Details’ field may contain up to 156 characters, but cannot contain the
exact password.
Figure 7.4 – Contact Information
5. Click ‘Finish’ to complete the device initialization process.
Page 18
Document No. 48000012-001.A02
DataTraveler®Vault - Privacy
Page 17 of 29
The DTVP will now format the secure data partition (Figure 7.5) and notify you when it is
complete (Figure 7.6.)
6. Click ‘OK’ to continue.
Figure 7.5 – Formatting DTVP
Figure 7.6 – Format Complete
Initialization complete.
Page 19
Document No. 48000012-001.A02
DataTraveler®Vault - Privacy
Page 18 of 29
Device Usage (Mac Environment)
Once the DTVP has been initialized, you can
access the secure data partition and utilize the
device options by logging into the device with
your password. To do so, follow these steps:
1. Insert the DTVP into a USB port on your
notebook or desktop and enter your password (see Figure 8.1.)
2. Once you’ve typed your password, click the
‘Login’ button to continue.
• If the correct password is entered, the
DTVP will unlock and you can begin
using the device.
Figure 8.1 – Login Window
• If an incorrect password is entered, an error message will appear just below the ‘Hint’
field, indicating a login failure.
(NOTE: During the login process, if a bad password is entered, you will be given another
opportunity to enter the correct password; however, there is a built-in security feature that
tracks the number of failed login attempts*. If this number reaches the pre-configured value of
10 failed attempts, the DTVP will lock and require a device format of the secure data partition
prior to next use. THIS MEANS THAT ALL DATA STORED ON THE DTVP WILL BE
ERASED. For more details on this feature, see ‘Device Lockout’ on page 20.)
4. You may unlock the secure data partition in read-only mode, sometimes referred to as
“write-protect mode”, by selecting the checkbox labeled ‘Read-Only Mode’ prior to logging
into the device. Once authenticated under read-only, you will be allowed to open or view
content on the DTVP, but not update, change, or erase content while in this mode. (Note:
Read-only mode will also prevent the format option from appearing in the DTVP menu that
appears on page 19.)
If you are currently logged in under read-only mode and wish to unlock the device with full
read/write access to the secure data partition, you must shutdown DTVP and log back in,
leaving the ‘Read-Only Mode’ checkbox unchecked prior to login.
* Once you authenticate to the device successfully, the failed login counter will reset.
Page 20

Document No. 48000012-001.A02
DataTraveler®Vault - Privacy
Page 19 of 29
Device Options (Mac Environment)
While you are logged into the device, there will be a ‘DTVP_Launcher’ icon located in the Mac
OS X Dock as seen in Figure 9.1 below:
Figure 9.1 – DTVP Icon In Mac OS X Dock
Holding down the ‘control’ key on your keyboard and clicking once
on the ‘DTVP_Launcher’ icon will display the menu shown in
Figure 9.2 to the right.
DTVP Settings
• Allows you to change your password and/or hint (Figure
9.3)
• Allows you to add/view/change your contact information
(Figure 9.4)
• Allows you to change your language preference (Figure 9.5)
Figure 9.2
DTVP Options
Figure 9.3
Change Password
Figure 9.4
Contact Information
Figure 9.5
Select Language
(Note: For security purposes, your current DTVP password is required to update and/or modify
any of these settings.)
Page 21
Document No. 48000012-001.A02
DataTraveler®Vault - Privacy
Page 20 of 29
Browse DTVP
• Allows you to browse the contents of the secure data partition while you are logged in
Format DTVP
• Allows you to format the secure data partition
(Warning: All data will be erased.) (Figure 9.6)
Online Support (Requires Internet access)
• Opens your Internet browser and navigates to
http://www.kingston.com/support/ where you
can access additional support information
Figure 9.6 – Format Warning
About DTVP
• Provides specific details about the DTVP,
including Application and Firmware version
information (Figure 9.7)
Shutdown DTVP
• Properly shuts down the DTVP, allowing you to
safely remove it from your system
Figure 9.7 – About DTVP
-Mac Section Complete-
Page 22

Document No. 48000012-001.A02
DataTraveler®Vault - Privacy
Page 21 of 29
Setup (Linux Environment)
(NOTE: With the various distributions of Linux available today, the ‘look and feel’ of their
interfaces may vary from one version to the next. However, the general command set used in
the terminal application is very similar and can be referenced in the Linux instructions that
follow. The screenshot examples in this section were created in a Linux Ubuntu v10.x
environment.)
Certain distributions of Linux will require super-user (root) privileges in order to
execute the DTVP commands properly in the terminal application window.
Insert the DTVP into an available USB port on your
notebook or desktop and wait for the Linux operating
system to detect it. When it does, a DTVP volume icon will
appear* on the desktop, as seen in Figure 10.1.
The DTVP comes with 5 commands that can be used
in Linux:
Figure 10.1 – DTVP Volume
dtvp_about, dtvp_forgotpassword, dtvp_initialize, dtvp_login, and dtvp_logout
(Note: To execute these commands, you must open a “Terminal” application window and
navigate to the folder where each of the files exist. Each command must be preceded by the
following two characters: ‘
./’ (a period and a forward slash.)
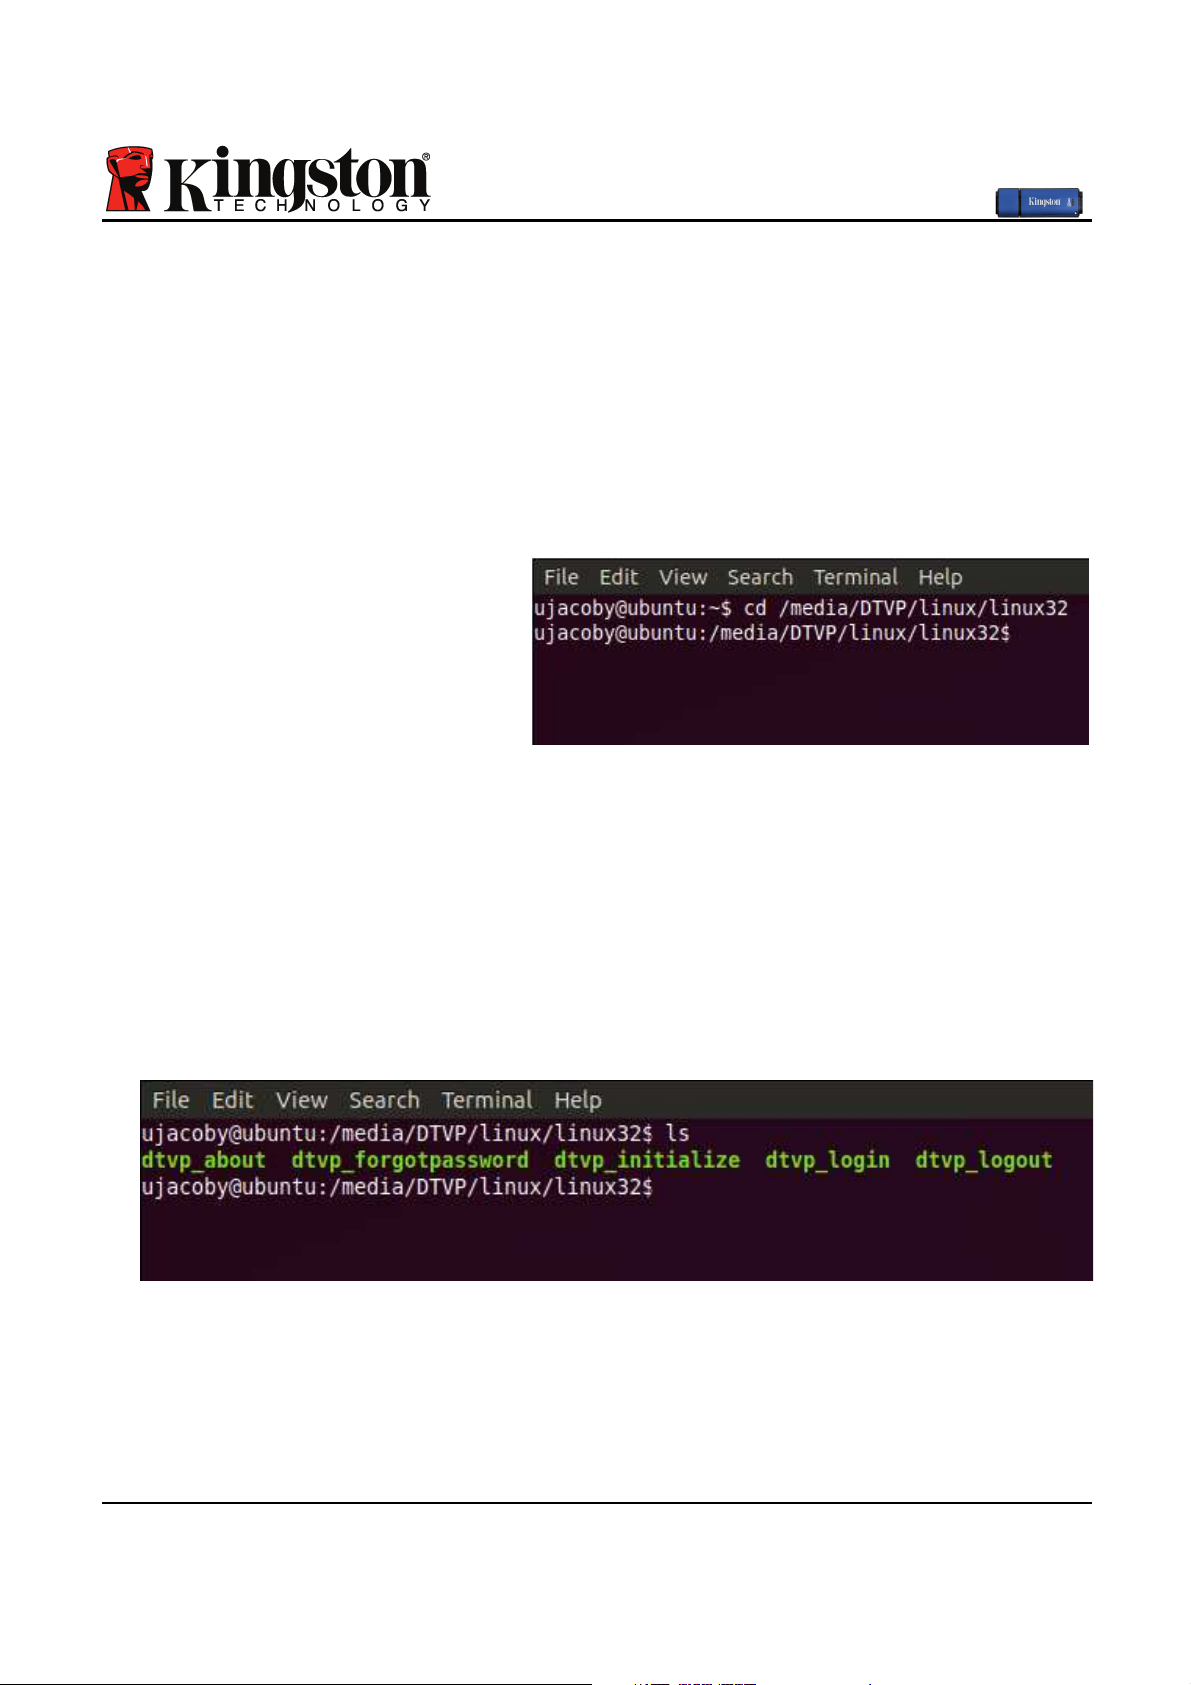
For 32-bit users, open a “Terminal” application window and change the current directory to
/media/DTVP/linux/linux32$ by typing the following command at the prompt:
cd /media/DTVP/linux/linux32 (and then press ENTER.)
For 64-bit users, open a “Terminal” application window and change the current directory to
/media/DTVP/linux/linux64$ by typing the following command at the prompt:
cd /media/DTVP/linux/linux64 (and then press ENTER.)
*Note: If the DTVP volume is not loaded automatically by the operating system, you will need to
load the volume manually in a terminal window using the Linux ‘mount’ command. Please refer
to the Linux documentation for your specific OS distribution or favorite on-line support site for
proper syntax and command options.
Page 23
Document No. 48000012-001.A02
DataTraveler®Vault - Privacy
Page 22 of 29
Device Initialization (Linux Environment)
Once the DTVP is connected to your computer and recognized by the operating system, the
device will need to be initialized prior to first use. To do so, open the ‘Terminal’ application (or
command-line window) and follow these steps:
(Note: The screenshots and instructions in this section utilize the
linux32 folder (signifying 32-
bit) for purposes of demonstrating use of the DTVP device in the Linux OS. Keep in mind if you
are using the 64-bit version of Linux, simply navigate to and use the respective 64-bit folder in
place of the 32-bit folder, i.e.
linux64 rather than linux32.)
1. Change directory to the DTVP
volume by typing the following
command at the terminal prompt
(as seen in Figure 10.2.):
cd /media/DTVP/linux/linux32
(Note: Commands and folder
(directory) names are casesensitive, i.e. ‘linux32’ is NOT the
same as ‘Linux32.’ Syntax must
also be typed exactly as shown.)
Figure 10.2 – Command-Line Navigation
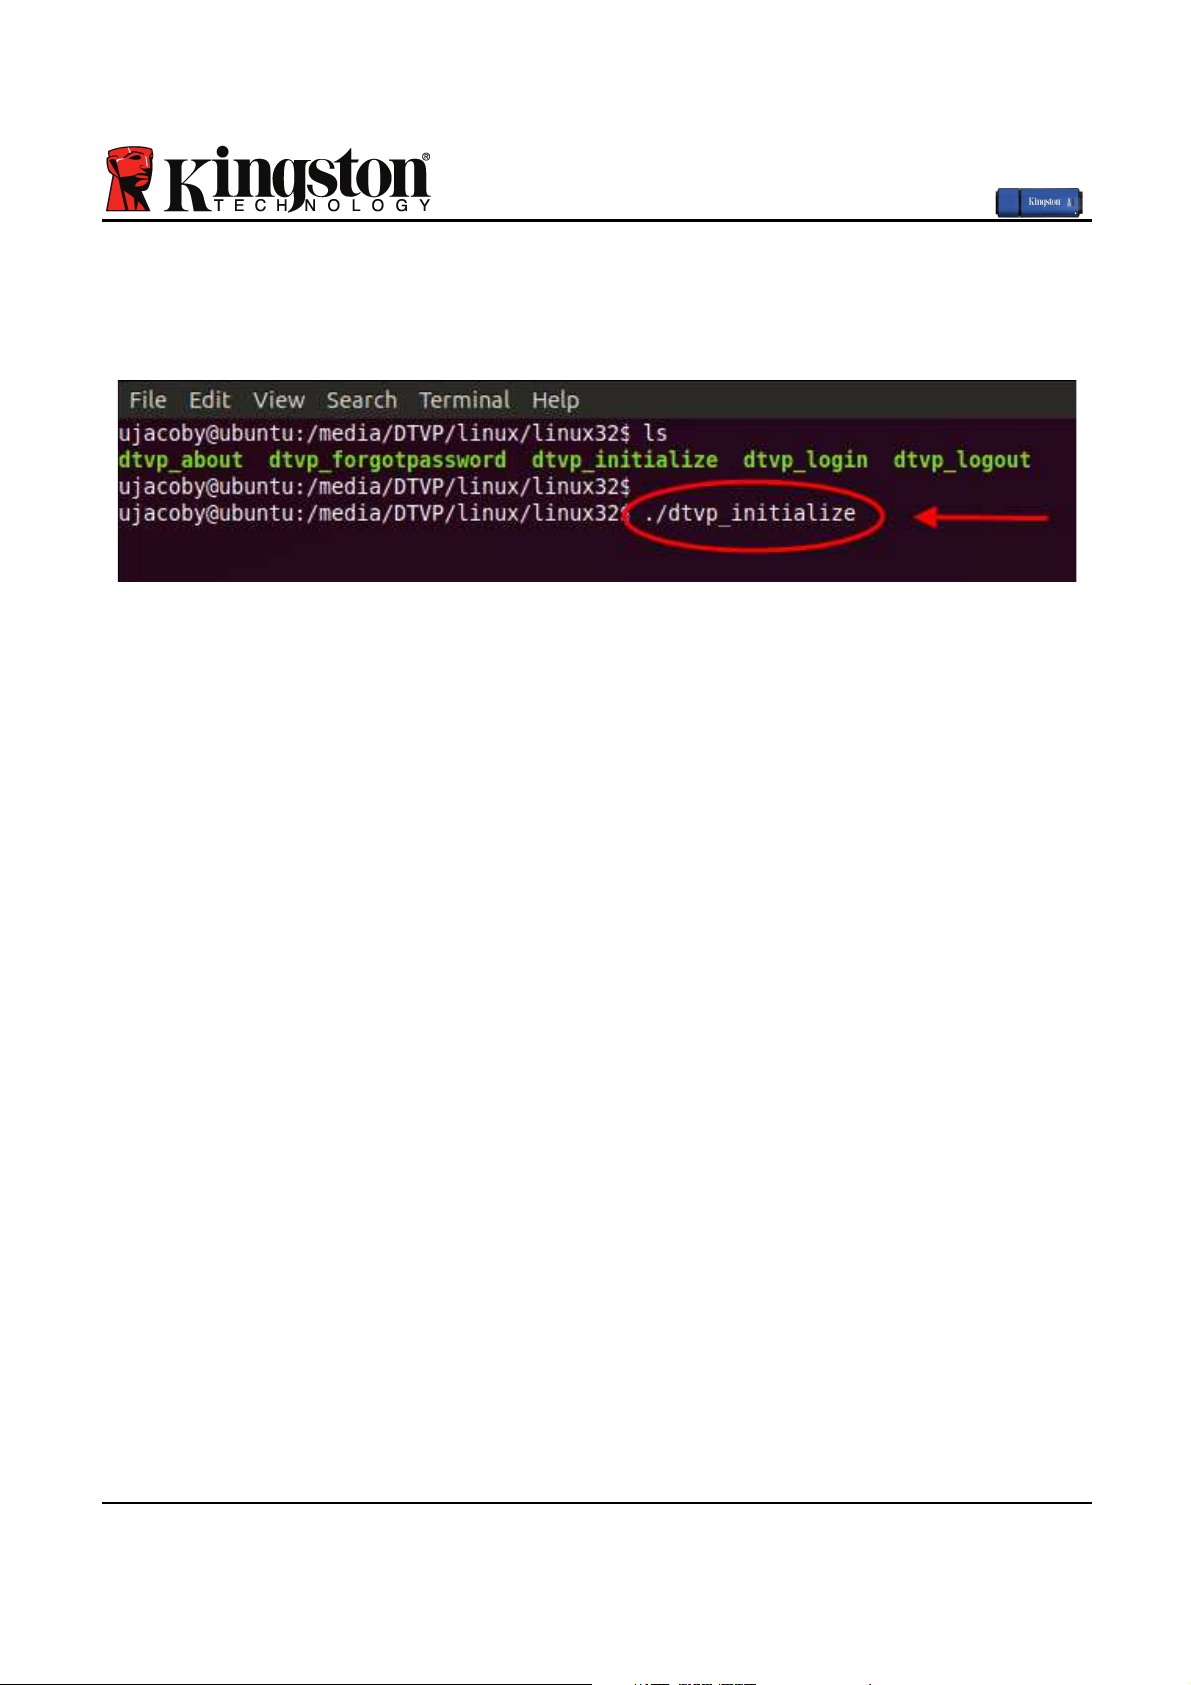
2. Type ls (as in list) at the current prompt and press ENTER. This will provide you with a list
of files and/or folders in the /media/DTVP/linux/linux32 (or linux64) folder. You will see
the five DTVP commands listed,
dtvp_about, dtvp_forgotpassword, dtvp_initialize,
dtvp_login, and dtvp_logout as seen in Figure 10.3.
Figure 10.3 – List of DTVP Commands
– The Linux section in this manual is based off of the 32-bit version of Ubuntu 10.x –
Page 24
Document No. 48000012-001.A02
DataTraveler®Vault - Privacy
Page 23 of 29
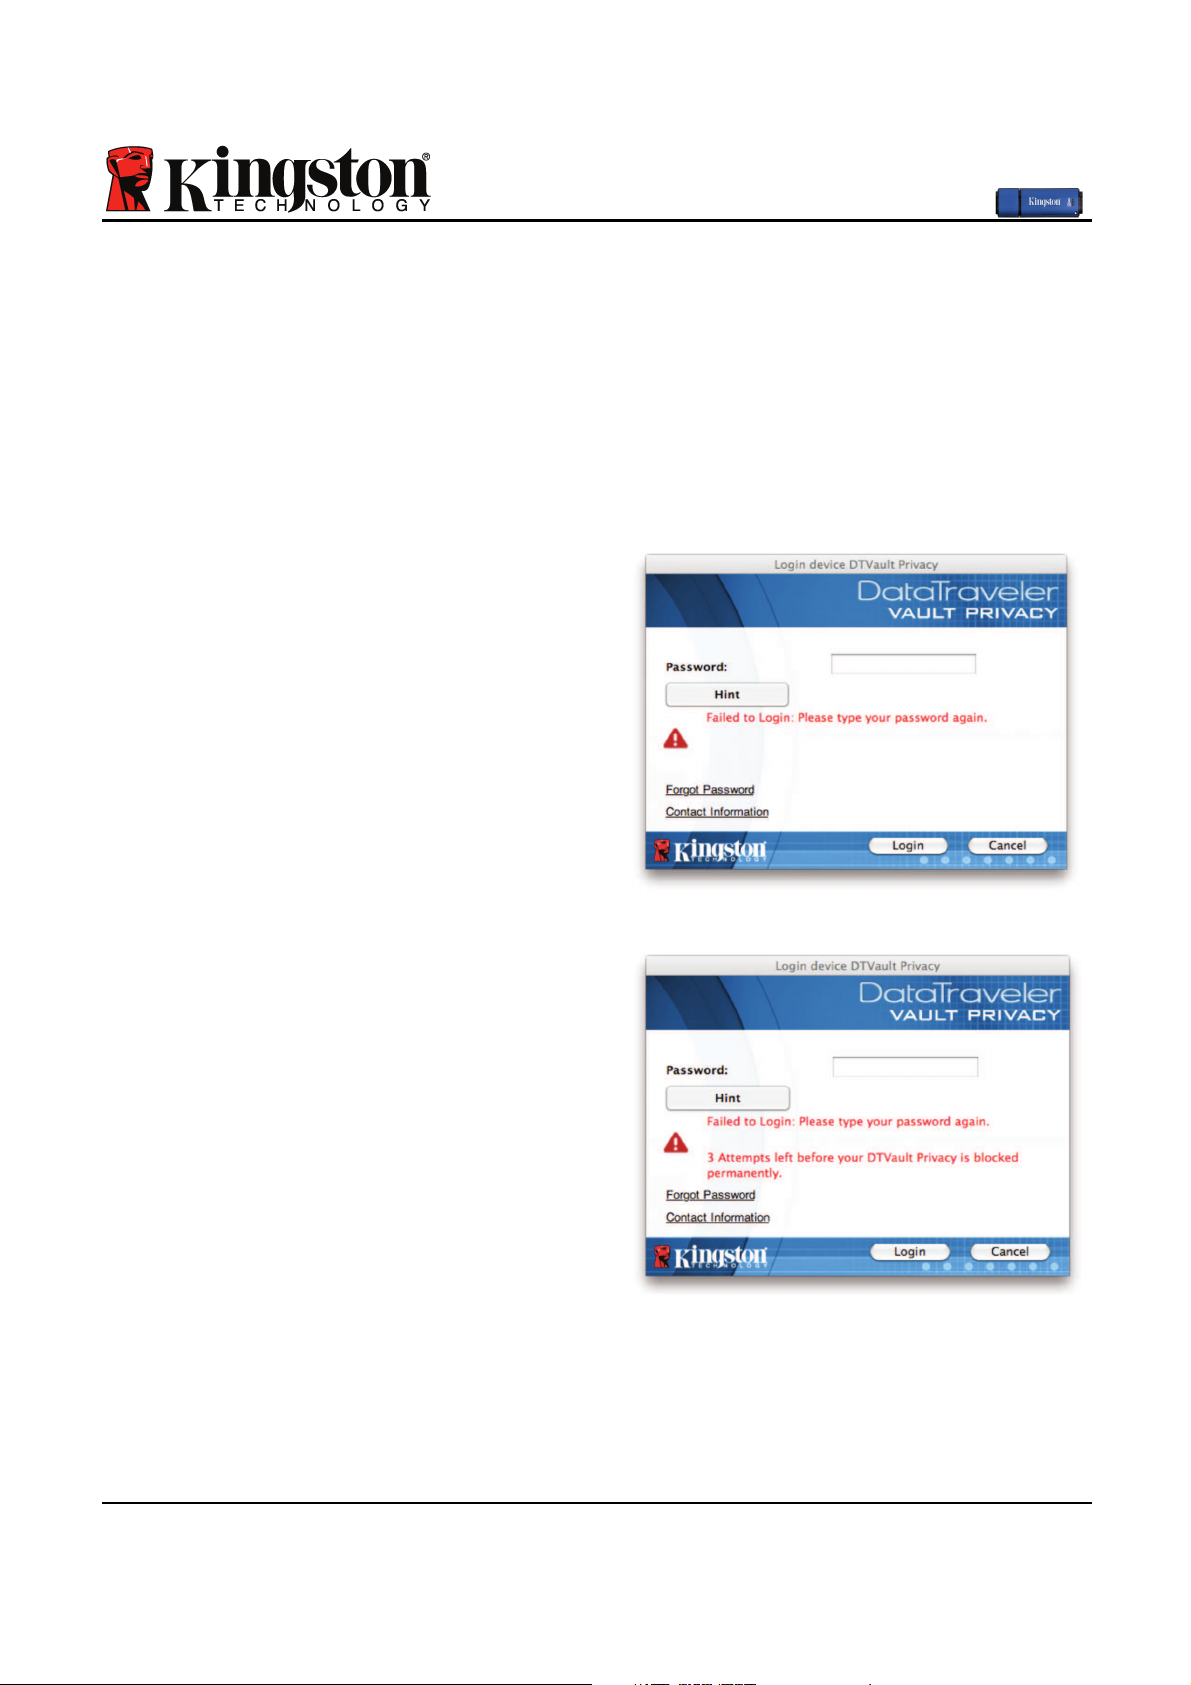
3. To initialize the DTVP, type the following command at the terminal prompt and press
ENTER: ./dtvp_initialize* (Remember, commands are case-sensitive.) See Figure 10.4.
Figure 10.4 – Executing a DTVP Command
4. After pressing ENTER, the license agreement will display in the terminal window. Press ‘Y’
to accept the license agreement and continue. (Note: If you press ‘N’ and do not accept the
license agreement, you will be returned to the terminal prompt and unable to continue the
initialization process until you repeat step 3 and press ‘Y’.)
5. After you accept the license agreement, you will be prompted to input (create) a password,
which will be used to protect the files stored on the secure data partition. The password you
create must meet the following criteria before the initialization process will allow you to
continue:
a. Passwords must contain 6 characters or more (up to 16 characters.)
b. Passwords must contain three (3) of the following criteria options:
- UPPER CASE, lower case, numeric, and/or special characters (!, $, etc.)
6. Confirm your password by re-entering it on the command line when prompted to input it
again and press ENTER. If the passwords match, you will be notified that the DTVP has
been initialized successfully. If the passwords do not match, you will receive a message
indicating that you still need to confirm the password correctly. To do so, repeat steps 3
through 6 until they do.
After creating your password, a secure data volume (partition) will appear on the desktop. This
indicates that the initialization process was successful and is now complete. You may begin
using the DTVP.
*Note: Certain distributions of Linux will require super-user (root) privileges in order to execute
the DTVP commands properly in the terminal application window.
Page 25

Document No. 48000012-001.A02
DataTraveler®Vault - Privacy
Page 24 of 29
Device Usage (Linux Environment)
Once the DTVP has been initialized, you can access the secure data partition by logging into
the device using the DTVP password you created on page 23. To do so, follow these steps:
1. Open a ‘Terminal’ application window.
2. Type the following command at the terminal prompt: cd /media/DTVP/linux/linux32
3. With the command prompt now at /media/DTVP/linux/linux32$, type the following
command to login to the device: ./dtvp_login* and press ENTER. (Note: Commands
and folder names are case-sensitive and syntax must be exact.)
4. Enter for your DTVP password and press ENTER. After a successful login, the secure
data volume will open on your desktop and you can proceed to use the DTVP.
During the login process, if a bad password is entered, you will be given another opportunity to
enter the correct password by repeating step 3; however, there is a built-in security feature that
tracks the number of failed login attempts. If this number reaches the pre-configured value of 10
failed attempts, the DTVP will lock and require you to initialize the device by executing the
dtvp_forgotpassword command, prior to next use. This process will allow you to create a new
password, but in order to protect the privacy of your data, the DTVP will format the secure data
partition. This means that all of your data will be lost.
Once the dtvp_forgotpassword process is complete and you have successfully set up a new
password, the built-in security counter that tracks failed login attempts will be reset (Note: A
successful login prior to reaching the maximum number of attempts (MaxNoA, for short) will
also reset the failed-login counter.)
When you are finished using the DTVP, log out of the device and secure your data. To do so,
follow these steps:
1. Open a ‘Terminal’ application window.
2. Type the following command at the terminal prompt: cd /media/DTVP/linux/linux32
3. With the command prompt now at /media/DTVP/linux/linux32$, type the following
command to logout of the device properly: ./dtvp_logout* and press ENTER. (Note:
Commands and folder names are case-sensitive and syntax must be exact.)
4. Remove the DTVP from your system and store in a safe place.
*Note: Certain distributions of Linux will require super-user (root) privileges in order to execute
the DTVP commands properly in the terminal application window.
-Linux Section Complete-
Page 26
Document No. 48000012-001.A02
DataTraveler®Vault - Privacy
Page 25 of 29
Help and Troubleshooting
Device Lockout
The DTVP includes a security feature that prevents unauthorized access to the data partition
once a maximum number of consecutive failed login attempts (MaxNoA for short) has been
made; the default “out-of-box” configuration has a pre-configured value of 10 (no. of attempts.)
The ‘lock-out’ counter tracks each failed login and gets reset one of two ways: 1) A successful
login prior to reaching MaxNoA or 2) reaching MaxNoA and performing a device format.*
If an incorrect password is entered, an error
message will appear just below the ‘Hint’ field,
indicating a login failure. See Figure 11.1.
If and when a 7thfailed attempt is made, you will
see an additional error message indicating you
have 3 attempts left before reaching MaxNoA
(which is set to 10 by default.) See Figure 11.2.
After a 10thfailed login attempt, the DTVP will
permanently block the data partition and require
a device format prior to next use. This means
that all data stored on the DTVP will be lost
and you will need to create a new password.
Figure 11.1 – Login Failure
This security measure limits someone (who
does not have your password) from attempting
countless login attempts and gaining access to
your sensitive data.
If you are the owner of the DTVP and have
forgotten your password, the same security
measures will be enforced, including a device
format.*
For more on this feature, see ‘Forgot Password’
on page 26.
Figure 11.2 – 7thLogin Failure
*Note: A device format will erase ALL of the information stored on the DTVP’s secure data
partition.
Page 27
Document No. 48000012-001.A02
DataTraveler®Vault - Privacy
Page 26 of 29
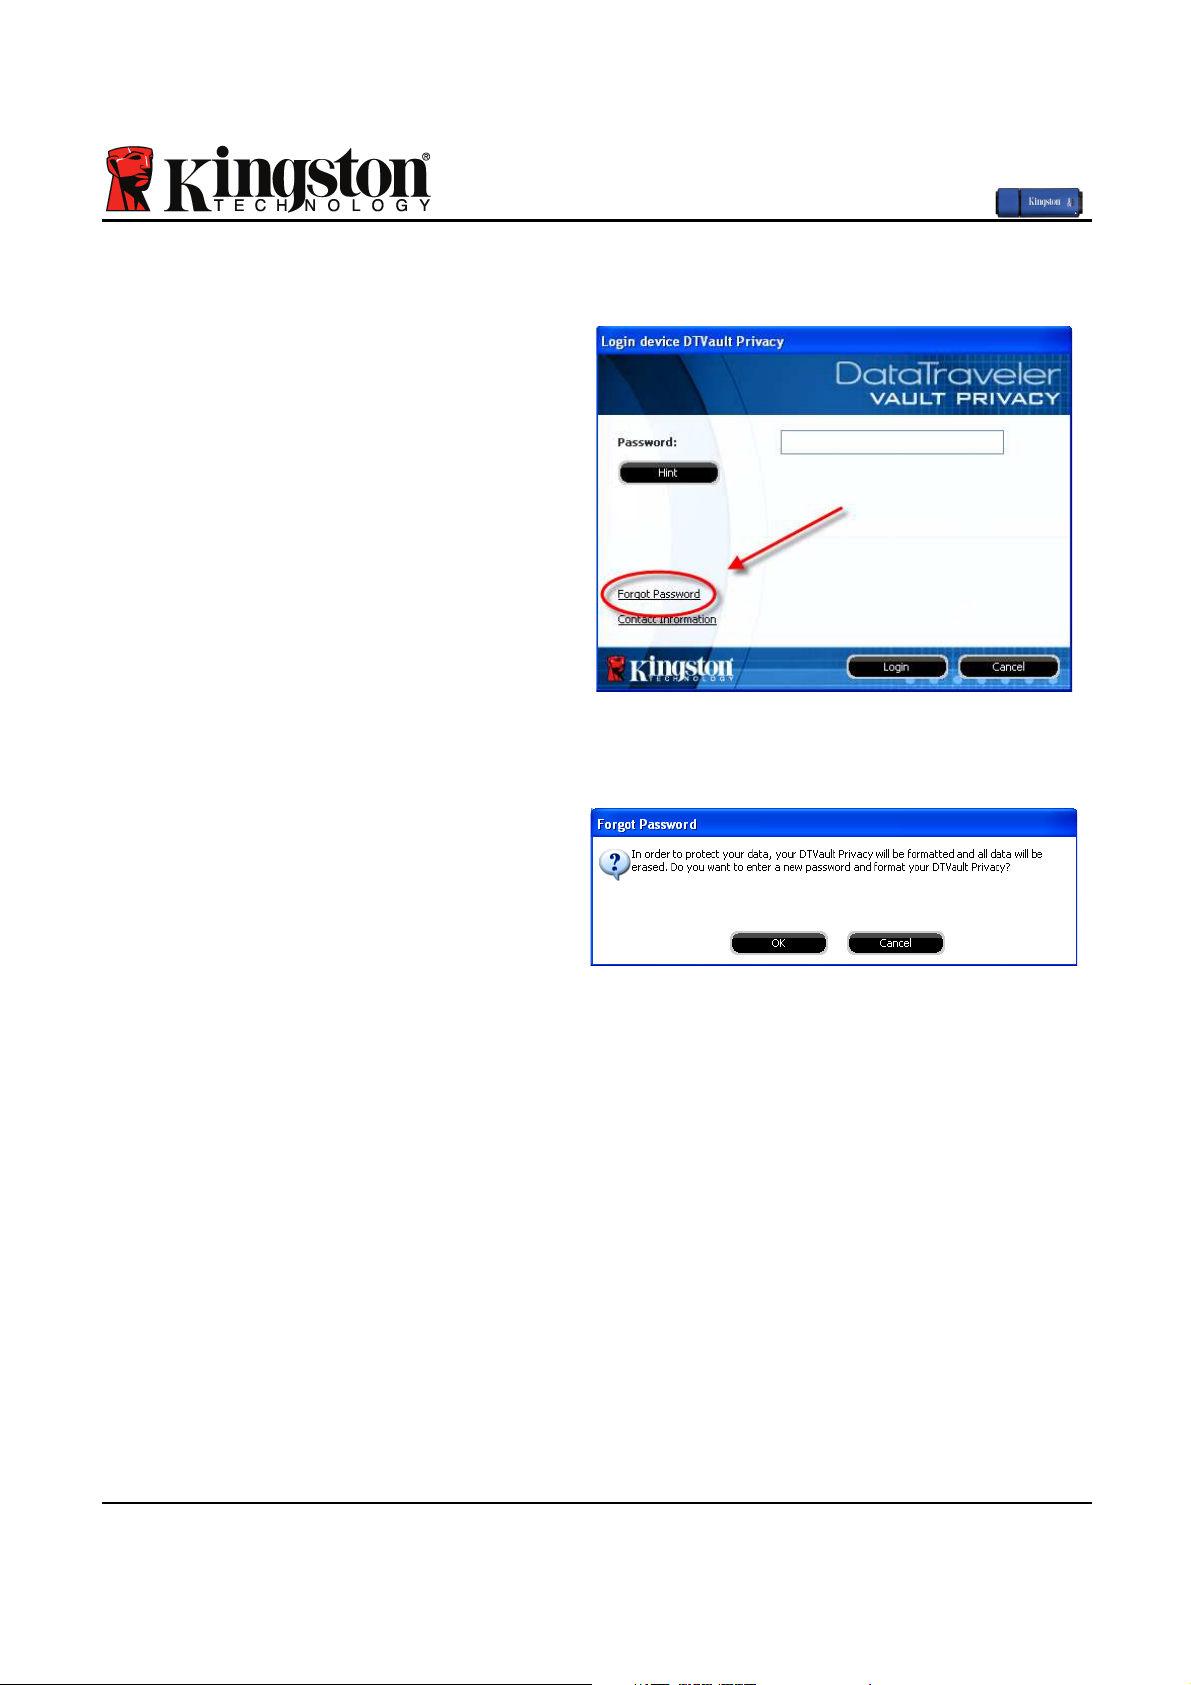
Forgot Password (Windows and Mac)
If you forget your password, you can click
on the ‘Forgot Password’ link that appears
in the login window when DTVP_Launcher
is executed (see Figure 11.3.)
This option will allow you to create a new
password, but in order to protect the privacy
of your data, the DTVP will be formatted.
This means that all of the data stored on the
secure area will be erased in the process.*
When you do click on ‘Forgot Password’, a
message box (Figure 11.4) will appear and
ask if you want to enter a new password
prior to executing the format. At this point,
you can either 1) click ‘OK’ to confirm or 2)
click ‘Cancel’ to return to the login window.
Figure 11.3 – Forgot Password
If you opt to continue, you will be prompted
to create a new complex password and a
new hint. The hint is not a mandatory field,
but it can be useful in providing a clue as to
what the password is, should the password
ever be forgotten.
(Note: The hint CANNOT be an exact match
to the DTVP password.)
Figure 11.4 – Prompt Before Format
Forgot Password (Linux)
If you forget your password, you can execute the dtvp_forgotpassword command from the
/media/DTVP/linux/linux32$ prompt in the “Terminal” application window. This option will
allow you to create a new password, but in order to protect the privacy of your data, the DTVP
will be formatted. This means that all data stored on the secure data partition will be erased in
the process.
*Note: A device format will erase ALL of the information stored on the DTVP’s secure data
partition.
Page 28
Document No. 48000012-001.A02
DataTraveler®Vault - Privacy
Page 27 of 29
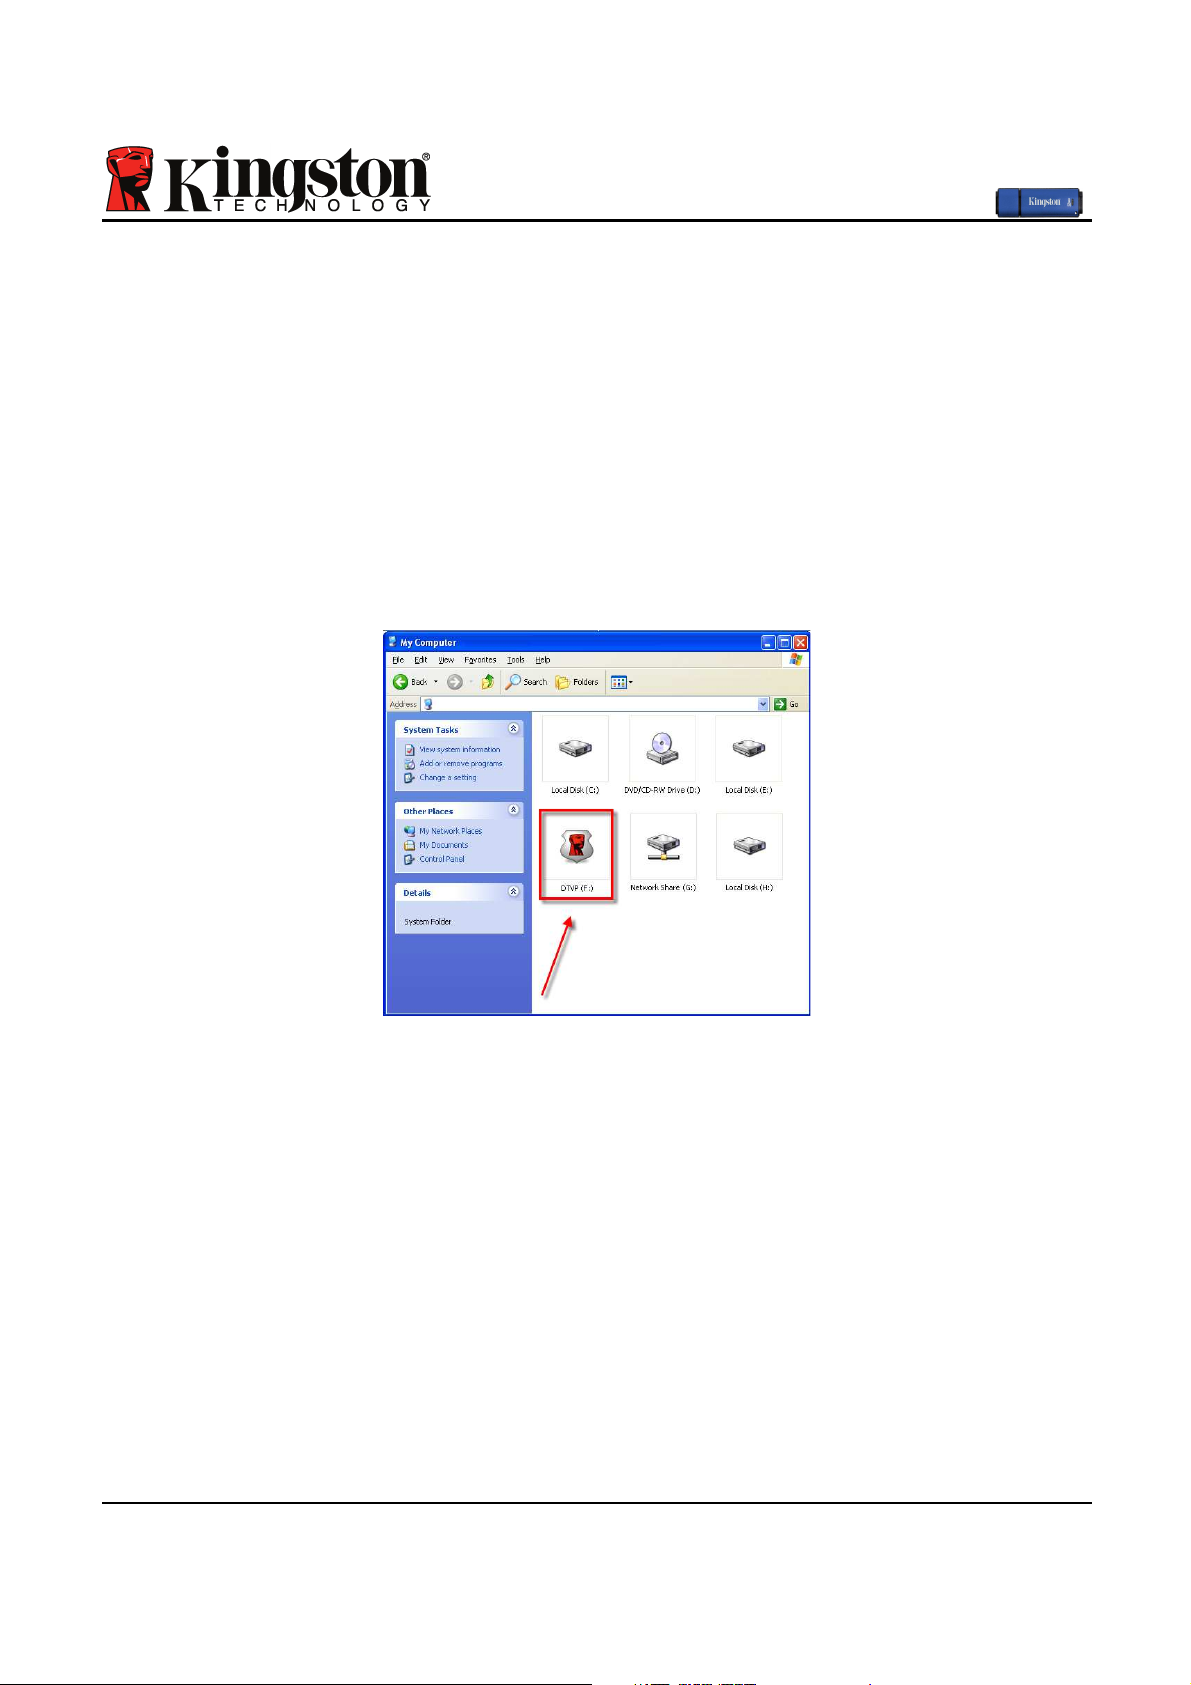
Drive Letter Conflict (Windows Operating Systems)
As mentioned in the ‘System Requirements’ section of this manual (on page 3), the DTVP
requires two consecutive drive letters AFTER the last physical disk that appears before the
‘gap’ in drive letter assignments (see Figure 11.5.) This does NOT pertain to network shares
because they are specific to user-profiles and not the system hardware profile itself, thus
appearing available to the OS.
What this means is, Windows may assign the DTVP a drive letter that’s already in use by a
network share or Universal Naming Convention (UNC) path, causing a drive letter conflict. If
this happens, please consult your administrator or helpdesk department on changing drive
letter assignments in Windows Disk Management (administrator privileges required.)
Figure 11.5 – My Computer
In this example, the DTVP uses drive F:, which is the first available drive letter after drive E:
(the last physical disk before the drive letter gap.) Because letter G: is a network share and not
part of the hardware profile, the DTVP may attempt to use it as its second drive letter, causing
a conflict.
If there are no network shares on your system and the DTVP still won’t load, it is possible that a
card reader, removable disk, or other previously-installed device is holding on to a drive-letter
assignment and still causing a conflict.
Please note that Drive Letter Management, or DLM, has improved significantly in Windows XP
SP3, Vista, and 7, so you may not come across this issue, but if you are unable to resolve the
conflict, please contact Kingston’s Technical Support Department for further assistance.
Page 29
Document No. 48000012-001.A02
DataTraveler®Vault - Privacy
Page 28 of 29
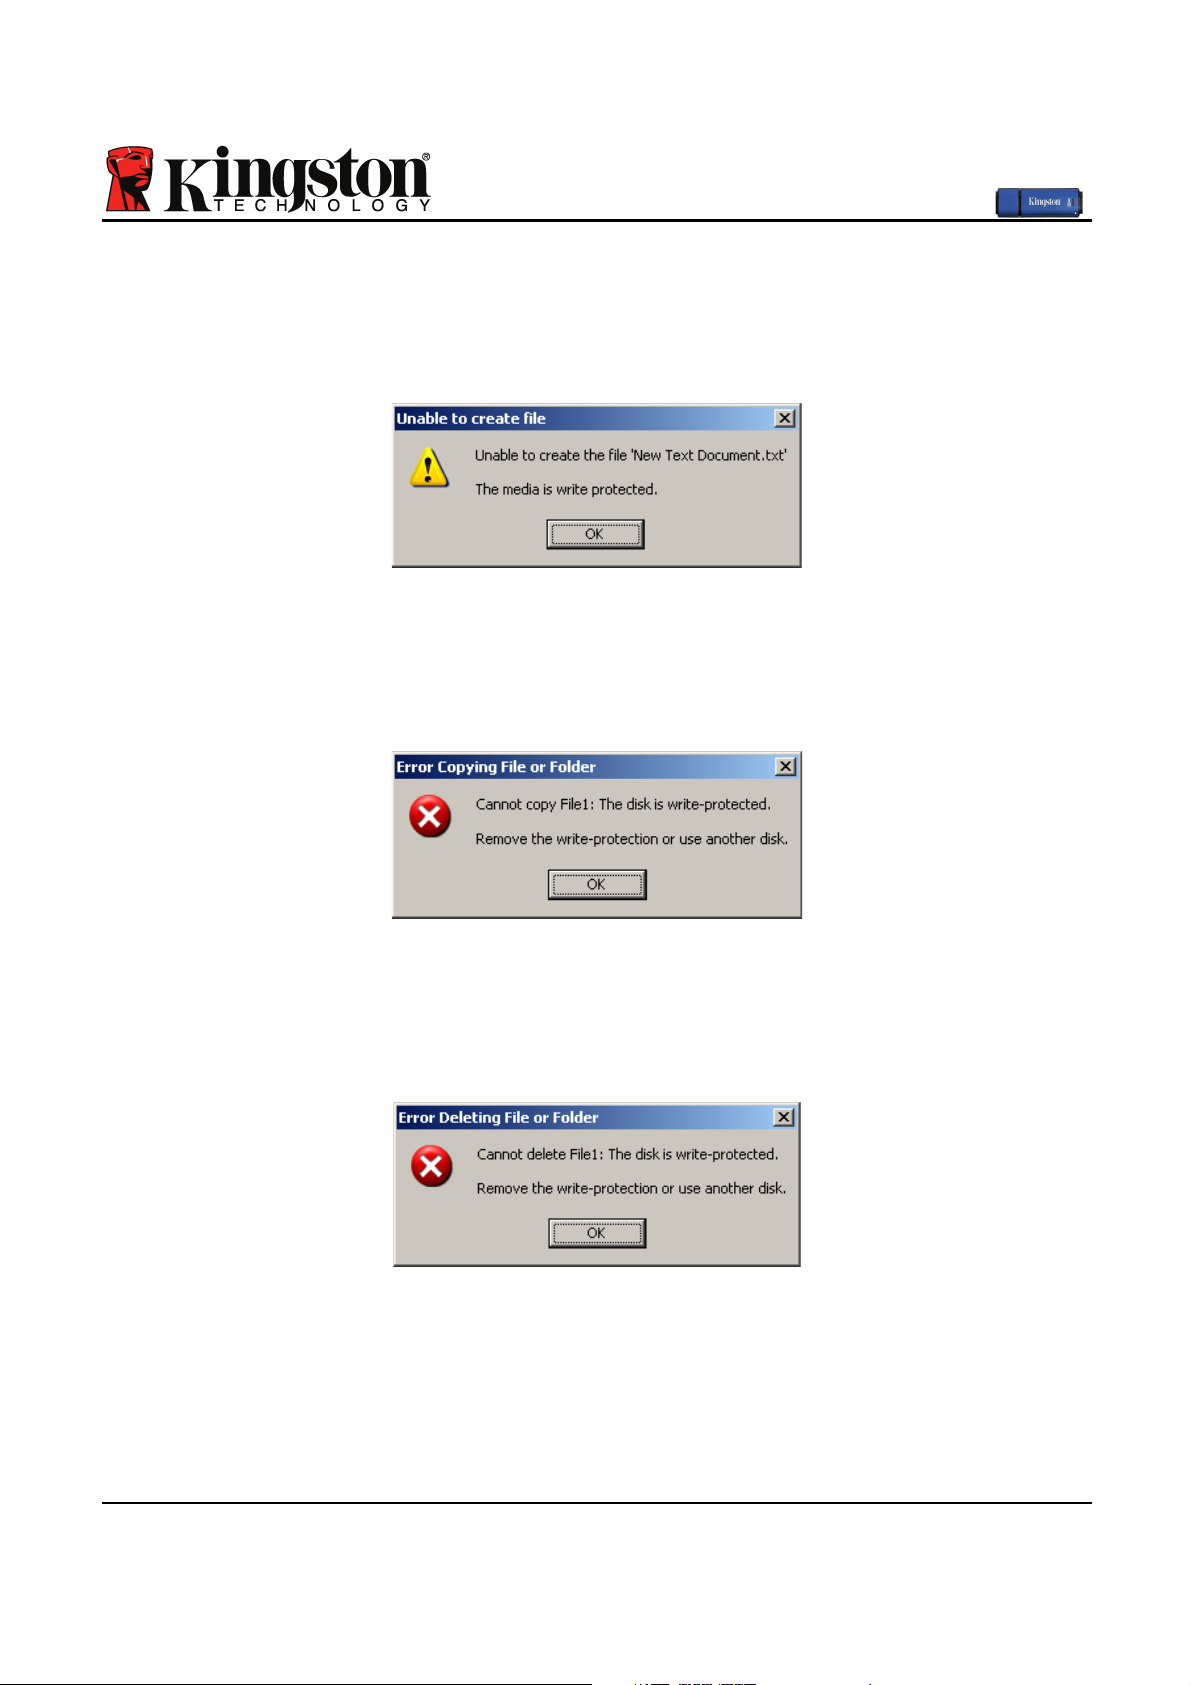
Error Messages
Unable to create file – This error message will appear when attempting to CREATE a file or
folder ON the secure data partition while logged in under read-only mode.
Figure 12.1 – Unable to Create File Error
Error Copying File or Folder – This error message will appear when attempting to COPY a file
or folder TO the secure data partition while logged in under read-only mode.
Figure 12.2 – Error Copying File or Folder Error
Error Deleting File or Folder – This error message will appear when attempting to DELETE a
file or folder FROM the secure data partition while logged in under read-only mode.
Figure 12.3 – Error Deleting File or Folder Error
If you are ever logged in under read-only mode and wish to unlock the device with full read/write
access to the secure data partition, you must shutdown DTVP and log back in, leaving the
‘Read-Only Mode’ checkbox unchecked prior to login.
Page 30

Document No. 48000012-001.A02
DataTraveler®Vault - Privacy
Page 29 of 29
DTVP Linux Commands
Command
Syntax*
Description
dtvp_about
./dtvp_about
Displays serial no., firmware, and application version of
DTVP
Can be executed whether user is logged into the DTVP
or not
dtvp_forgotpassword
./dtvp_forgotpassword
Resets the DTVP and allows you to create a new
password
Can be executed only when user is NOT logged into the
DTVP device
(All data stored on the secure data partition will be lost)
dtvp_initialize
./dtvp_initialize
Initializes the DTVP and prepares device for first use
Executed prior to first use only
dtvp_login
./dtvp_login
Prompts for DTVP password to log user into secure data
partition
Can be executed only when user is NOT logged into the
DTVP device and only AFTER the device has been
initialized
dtvp_logout
./dtvp_logout
Logs user out of DTVP and closes secure data partition
Can be executed only when user is logged into the DTVP
device
*Note: To execute the DTVP Linux commands, you must open a “Terminal” application window
and navigate to the folder where each of the files exist. Each command must be preceded by
the following two characters: ‘
./’ (a period and a forward slash as indicated in the table above.)
Page 31

Documento No. 48000012-001.A02 DataTraveler® Vault - Privacy Página 1 de 29
DataTraveler® Vault - Privacy Manual del Usuario
Page 32

Documento No. 48000012-001.A02 DataTraveler® Vault - Privacy Página 2 de 29
Índice
Acerca de este manual............................................................................................................. 3
Requisitos del sistema............................................................................................................. 3
Recomendaciones.................................................................................................................... 4
Configuración (entorno de Windows)..................................................................................... 5
Inicio del dispositivo (entorno de Windows).......................................................................... 6
Utilización del dispositivo (entorno de Windows) ............................................................... 10
Opciones del dispositivo(entorno de Windows).................................................................. 11
Configuración (entorno de Mac) ........................................................................................... 13
Utilización del dispositivo(entorno de MAC)........................................................................ 18
Opciones del dispositivo (entorno de MAC) ........................................................................ 19
Inicialización del dispositivo (entorno Linux) ...................................................................... 22
Uso del dispositivo (entorno Linux)...................................................................................... 24
Ayuda y solución de problemas............................................................................................ 25
Bloqueo del dispositivo..............................................................................................................25
Olvidó su contraseña (Windows y Mac) ...................................................................................26
Conflicto de letras de dispositivo (sistema operativo Windows)...........................................27
Mensajes de error .......................................................................................................................28
Comandos Linux del DTVP ........................................................................................................29
Page 33

Documento No. 48000012-001.A02 DataTraveler® Vault - Privacy Página 3 de 29
Acerca de este manual
Este manual del usuario cubre el DataTraveler® Vault - Privacy (denominado en adelante
simplemente como DTVP) sobre la base de la imagen de fábrica, sin haberse realizado
personalizaciones.
Requisitos del sistema
Plataforma de PC
• Procesador Pentium III o equivalente
(o más rápido)
• 15MB de espacio libre en disco
• USB 2.0
• Dos letras de dispositivo consecutivas
después del último dispositivo físico*
Soporte para sistema operativo de PC
• Windows 7
• Windows Vista® SP1, SP2
• Windows XP SP2, SP3
Plataforma Mac
• 15MB de espacio libre en disco
• USB 2.0
Soporte para sistema operativo
• Mac OS X 10.5.x
• Mac OS X 10.6.x
Plataforma Linux
• 5MB de espacio libre en disco
• USB 2.0
Soporte para sistema operativo
• Linux v2.6 kernel
Algunas versiones de Linux requieren privilegios de súper usuario (root) para la ejecución correcta
de los comandos de los dispositivos DTVP en la ventana de la aplicación de la terminal.
Figura 1.1 – Puertos USB 2.0, Tipo R
Figura 1.2 – DTVP
*Nota: Ver "Conflicto de letras de dispositivo" en la página 27.
Page 34

Documento No. 48000012-001.A02 DataTraveler® Vault - Privacy Página 4 de 29
Recomendaciones
Para asegurarse que disponga de la conexion de energía adecuada para el dispositivo DTVP,
insértelo directamente en el puerto USB de su notebook o computadora de escritorio, como se
ve en la Figura 1.3. Evite conectar el DTVP a cual(es)quier dispositivo(s) periférico(s) que
pueda contar con un puerto USB, tal como un teclado o un concentrador alimentado por USB,
como se ve en la Figura 1.4.
Figura 1.3 - Uso recomendado Figura 1.4 - No se recomienda
Page 35

Documento No. 48000012-001.A02 DataTraveler® Vault - Privacy Página 5 de 29
Configuración (entorno de Windows)
1. Inserte el DTVP a un puerto USB disponible en
su notebook o computadora de escritorio, y
espere a que Windows lo detecte.
• Los usuarios de Windows XP recibirán una
notificación sobre "Nuevo hardware
encontrado" tal como se ve en la Figura 2.1.
• Los usuarios de Windows Vista/7 recibirán
una notificación sobre controlador de
dispositivo tal como se ve en la Figura 2.2..
Una vez que la detección de nuevo hardware se
haya terminado, Windows comenzará con el
proceso de inicialización.
• Los usuarios de Windows XPpueden omitir el
paso 2 y pasar a la página 6 – Inicio del
dispositivo.
• Los usuarios de Windows Vista/7 verán una
ventana de Reproducción automática similar a
la de la Figura 2.3.
2. Seleccione la opción "Run DTVP_Launcher.exe".
Si Windows no lo ejecuta automáticamente,
simplemente vaya a la partición del CD-ROM
(Figura 2.4), y ejecute manualmente el programa
DTVP_Launcher. Esto también dará comienzo al
proceso de inicio.
Figura 2.4 – Contenidos del DTVP
Figura 2.1 – Nuevo hardware encontrado
(Windows XP)
Figura 2.2 – Instalación de controlador del
dispositivo
(Windows Vista/7)
Figura 2.3 – Ventana de Reproducción
automática
(Windows Vista/7)
(Nota: Las Opciones de menú en la
ventana de Reproducción automática
pueden variar dependiendo qué
programas están actualmente
instalados en la computadora. La
Ejecución automática dará comienzo
al proceso de inicio de forma
automática.
)
Page 36

Documento No. 48000012-001.A02 DataTraveler® Vault - Privacy Página 6 de 29
Inicio del dispositivo (entorno de Windows)
1. Seleccione su preferencia de idioma en el menú desplegable y haga clic en "Siguiente"
(Figura 3.1).
Figura 3.1 – Selección de idioma
2. Revise el acuerdo de licencia y haga clic en "Siguiente" (Figura 3.2.) (Nota: Usted debe
aceptar el acuerdo de licencia antes de continuar; de lo contrario el botón "Siguiente"
permanecerá desactivado).
Figura 3.2 – Acuerdo de licencia
Page 37

Documento No. 48000012-001.A02 DataTraveler® Vault - Privacy Página 7 de 29
3. Cree una contraseña para proteger sus datos en el DTVP. Introdúzcala en el campo
"Contraseña", a continuación vuelva a ingresarla en el campo "Confirmación de la
contraseña", como se ve abajo en la Figura 3.3. La contraseña que usted crea debe cumplir
con los siguientes criterios antes que el proceso de inicio le permita continuar:
1. Las contraseñas deben contener 6 caracteres o más (hasta 16 caracteres).
2. Las contraseñas deben contener tres (3) de las siguientes opciones de criterios:
- MAYÚSCULAS, minúsculas, numéricos y/o caracteres especiales (!, $, etc.)
Usted también puede ingresar una idea para la contraseña, pero no es un campo
obligatorio. El campo de la pista puede ser útil para proporcionar una idea acerca de cuál es
la contraseña, en caso de que se olvidara la contraseña. (Nota: La pista NO PUEDE
coincidir exactamente con la contraseña.)
Figura 3.3 – Establecimiento de contraseña
Page 38

Documento No. 48000012-001.A02 DataTraveler® Vault - Privacy Página 8 de 29
4. Ingrese su información de contacto en los cuadros de texto previstos (ver la Figura 3.4)
(Nota: La información que usted ingrese en estos campos NO puede contener la cadena de
la contraseña que creó en el Paso 3. Sin embargo, estos campos son opcionales y pueden
dejarse en blanco, si así se desea.)
• El campo "Nombre" puede contener hasta 32 caracteres, pero no puede
contener la contraseña exacta.
• El campo "Compañía" puede contener hasta 32 caracteres, pero no puede
contener la contraseña exacta.
• El campo "Detalles" puede contener hasta 156 caracteres, pero no puede
contener la contraseña exacta.
Figura 3.4 – Información de contacto
5. Haga clic en "Finalizar" para completar el proceso de inicio del dispositivo.
Page 39

Documento No. 48000012-001.A02 DataTraveler® Vault - Privacy Página 9 de 29
Ahora el DTVP formateará la partición de datos segura (Figura 3.5) y le notificará cuando esto
termine (Figura 3.6.)
Nota: Cuando se opera bajo Windows XP en el modo que no es de
Administrador, la rutina "Formatear" puede demorarse hasta un minuto.*
6. Haga clic en "Aceptar" para continuar.
Figura 3.5 – Formateando el DTVP Figura 3.6 – Formateo completo
Inicio completo.
*Nota: Los tiempos pueden variar en función del hardware del sistema y la capacidad del
dispositivo DTVP.
Page 40

Documento No. 48000012-001.A02 DataTraveler® Vault - Privacy Página 10 de 29
Utilización del dispositivo (entorno de Windows)
Una vez que se haya iniciado el DTVP, puede
acceder a la partición de datos segura y
utilizar las opciones del dispositivo, iniciando
sesión en el dispositivo con su contraseña.
Para ello siga estos pasos:
1. Inserte el DTVP en un puerto USB en su
notebook o computadora de escritorio, e
ingrese su contraseña (ver Figura 4.1.)
2. Una vez haya tipeado su contraseña, haga
clic en el botón "Iniciar sesión" para continuar.
• Si se ingresa la contraseña correcta, el
DTVP se desbloqueará y usted puede
empezar a utilizar el dispositivo.
Figura 4.1 – Ventana de inicio de sesión
• Si se ingresa una contraseña incorrecta, aparecerá un mensaje de error justo debajo del
campo "Sugerencia", lo que indica un error de inicio de sesión.
(Nota: Durante el proceso de inicio de sesión, si se introduce una contraseña incorrecta, se le dará
otra oportunidad de introducir la contraseña correcta; sin embargo, existe una característica de
seguridad integrada que controla el número de intentos fallidos de inicio de sesión*. Si este número
alcanza el valor pre-configurado de 10 intentos fallidos, el DTVP se bloqueará y requerirá el
formatear el dispositivo para la partición de datos segura antes de la próxima utilización. ESTO
SIGNIFICA QUE SE VAN A PERDER TODOS LOS DATOS ALMACENADOS EN EL DTVP. Para
obtener más detalles sobre esta función, ver "Bloqueo del dispositivo" en la página 20.)
3. Usted puede desbloquear la partición de datos segura en modo de sólo lectura, a lo cual se
denomina como “modo de escritura-protegida”, seleccionando la casilla denominada ‘Modo de
sólo lectura’ antes de iniciar sesión en el dispositivo. Una vez autenticado bajo el modo de sólo
lectura, se le permitirá abrir o visualizar el contenido en el DTVP pero no podrá actualizarlo,
cambiarlo o borrarlo mientras permanezca en dicho modo. (Nota: El modo de sólo lectura
también impedirá la aparición de la opción de formateo en el menú del DTVP, la cual aparecerá
más adelante en la página 11.)
Si inició sesión en el modo de sólo lectura y quiere desbloquear el dispositivo para tener acceso
completo de lectura y escritura a la partición de datos segura, debe desactivar el DTVP (ver página
12) y volver a iniciar sesión, sin marcar la casilla Modo de sólo lectura durante la autenticación.
*Nota: Una vez que se haya autentificado con éxito ante el dispositivo, el contador de inicios de
sesión fallidos se reiniciará.
Page 41

Documento No. 48000012-001.A02 DataTraveler® Vault - Privacy Página 11 de 29
Opciones del dispositivo(entorno de Windows)
Mientras esté con sesión iniciada en el dispositivo, habrá un icono "DTVP" situado en la
esquina derecha de la barra de tareas de Windows (Figura 5.1.) (Nota: Los usuarios de
Windows 7 tendrán que hacer clic en el botón de flecha hacia arriba en la barra de tareas con
el fin de tener acceso al icono "DTVP" (Figura 5.2.)
Al hacer clic una vez en el icono de DTVP aparecerá el menú siguiente:
Figura 5.1 – icono DTVP en la barra de tareas Figura 5.2 – icono DTVP en la barra de tareas
(usuarios de Windows 7)
Ajustes de DTVault Privacy
• Le permite cambiar su contraseña y/o sugerencia (Figura 5.3)
• Le permite agregar/visualizar/cambiar su información de contacto (Figura 5.4)
• Le permite cambiar su preferencia actual de idioma (Figura 5.5)
(Nota: Por razones de seguridad, es necesaria su contraseña actual del DTVP para actualizar
y/o modificar cualquiera de estos ajustes.)
Figura 5.3
Cambiar contraseña
Figura 5.4
INFORMACIÓN DE CONTACTO
Figura 5.5
Seleccione el idioma
Page 42

Documento No. 48000012-001.A02 DataTraveler® Vault - Privacy Página 12 de 29
Explorar DT Vault Privacy
• Le permite navegar por el contenido de la partición de datos segura, mientras esté con
sesión iniciada
Formatear DTVault Privacy*
• Le permite formatear la partición de datos
segura (Advertencia: Se borrarán todos los
datos). (Figura 5.6)
Soporte en línea (se requiere acceso a Internet)
• Abre su navegador Web y se desplaza a
http://www.kingston.com/support/, donde
puede tener acceso a información de soporte
adicional
Figura 5.6 – Advertencia para formatear
Acerca de DT Vault Privacy
• Proporciona detalles específicos acerca del
DTVP, incluida la información sobre la
aplicación y la versión del firmware (Figura
5.7)
Apagado del DTVault Privacy
• Apaga en forma apropiada el DTVP, lo cual le
permite retirarlo de forma segura de su sistema
Figura 5.7 – Acerca del DTVP
*Nota: En Windows Vista y Windows 7 se requiere su contraseña actual para el DTVP
-Terminada la sección para Windows-
Page 43

Documento No. 48000012-001.A02 DataTraveler® Vault - Privacy Página 13 de 29
Configuración (entorno de Mac)
Inserte el DTVP en un puerto USB disponible en su notebook o
computadora de escritorio, y espere a que el sistema operativo Mac lo
detecte. Cuando lo haga, verá que el volumen del DTVP aparece en el
escritorio, como se ve en la Figura 6.1.
1. Haga doble clic en el icono del CD-ROM del DTVP.
2. Haga doble clic en la carpeta de Mac ubicada en la ventana
mostrada en la Figura 6.2.
Figura 6.1 – DTVP
3. Haga doble clic en el icono de la aplicación DTVP ubicado en
la ventana mostrada en la Figura 6.3. Esto dará comienzo al
proceso de inicialización.
Figura 6.2 – Contenidos del DTVP
Figure 6.3 – Aplicación del DTVP
Page 44

Documento No. 48000012-001.A02 DataTraveler® Vault - Privacy Página 14 de 29
1. Seleccione sus preferencia de idioma en el menú desplegable y haga clic en "Siguiente"
(Figura 7.1).
Figura 7.1 – Selección de idioma
2. Revise el acuerdo de licencia y haga clic en "Siguiente" (Figura 7.2.) (Nota: Usted debe
aceptar el acuerdo de licencia antes de continuar; de lo contrario el botón "Siguiente"
permanecerá desactivado).
Figura 7.2 – Acuerdo de licencia
Page 45

Documento No. 48000012-001.A02 DataTraveler® Vault - Privacy Página 15 de 29
3. Cree una contraseña para proteger sus datos en el DTVP. Introdúzcala en el campo
"Contraseña", a continuación vuelva a ingresarla en el campo "Confirmación de la
contraseña", como se ve abajo en la Figura 7.3. La contraseña que usted crea debe cumplir
con los siguientes criterios antes que el proceso de inicio le permita continuar:
1. Las contraseñas deben contener 6 caracteres o más (hasta 16 caracteres).
2. Las contraseñas deben contener tres (3) de las siguientes opciones de criterios:
- MAYÚSCULAS, minúsculas, numéricos y/o caracteres especiales (!, $, etc.)
Usted también puede ingresar una pista para la contraseña, pero no es un campo
obligatorio. El campo de la pista puede ser útil para proporcionar una idea acerca de cuál es
la contraseña, en caso de que se olvidara la contraseña. (Nota: La pista NO PUEDE
coincidir exactamente con la contraseña.)
Figura 7.3 – Establecimiento de contraseña
Page 46

Documento No. 48000012-001.A02 DataTraveler® Vault - Privacy Página 16 de 29
4.Ingrese su información de contacto en los cuadros de texto previstos (ver la Figura 7.4)
(Nota: La información que usted ingrese en estos campos NO puede contener la cadena de
la contraseña que creó en el Paso 3. Sin embargo, estos campos son opcionales y pueden
dejarse en blanco, si así se desea.)
• El campo "Nombre" puede contener hasta 32 caracteres, pero no puede
contener la contraseña exacta.
• El campo "Compañía" puede contener hasta 32 caracteres, pero no puede
contener la contraseña exacta.
• El campo "Detalles" puede contener hasta 156 caracteres, pero no puede
contener la contraseña exacta.
Figura 7.4 – Información de contacto
5.Haga clic en "Finalizar" para completar el proceso de inicio del dispositivo.
Page 47

Documento No. 48000012-001.A02 DataTraveler® Vault - Privacy Página 17 de 29
Ahora el DTVP formateará la partición de datos segura (Figura 7.5) y le notificará cuando esto
termine (Figura 7.6.)
6. Haga clic en "Aceptar" para continuar.
Figure 7.5 – Formateando el DTVP Figura 7.6 – Formateo completo
Inicio completo.
Page 48

Documento No. 48000012-001.A02 DataTraveler® Vault - Privacy Página 18 de 29
Utilización del dispositivo(entorno de MAC)
Una vez que se haya iniciado el DTVP, puede acceder
a la partición de datos segura y utilizar las opciones del
dispositivo, iniciando sesión en el dispositivo con su
contraseña. Para ello siga estos pasos:
1. Inserte el DTVP en un puerto USB en su
notebook o computadora de escritorio, e
ingrese su contraseña (ver Figura 8.1.)
2. Una vez que haya tipeado su contraseña, haga
clic en el botón "Iniciar sesión" para continuar.
• Si se ingresa la contraseña correcta, el
DTVP se desbloqueará y usted puede
empezar a utilizar el dispositivo.
Figura 8.1 – Ventana de inicio de sesión
• Si se ingresa una contraseña incorrecta, aparecerá un mensaje de error justo debajo del
campo "Sugerencia", lo que indica un error de inicio de sesión.
(Nota: Durante el proceso de inicio de sesión, si se introduce una contraseña incorrecta, se le
dará otra oportunidad de introducir la contraseña correcta; sin embargo, existe una
característica de seguridad integrada que controla el número de intentos fallidos de inicio de
sesión*. Si este número alcanza el valor pre-configurado de 10 intentos fallidos, el DTVP se
bloqueará y se requerirá el formatear el dispositivo para la partición de datos segura antes de
la próxima utilización. ESTO SIGNIFICA QUE SE VAN A PERDER TODOS LOS DATOS
ALMACENADOS EN EL DTVP. Para obtener más detalles sobre esta función, ver "Bloqueo
del dispositivo" en la página 20.)
4. En el modo de sólo lectura usted puede desbloquear la partición de datos segura,
denominado en ocasiones como “modo de protección de escritura”, seleccionando la casilla
‘modo de sólo lectura’ antes de iniciar sesión en el dispositivo. Una vez autenticado bajo el
modo de sólo lectura, se le permitirá abrir o visualizar el contenido en el DTVP pero no
podrá actualizarlo, cambiarlo o borrarlo mientras permanezca en dicho modo. (Nota: El
modo de sólo lectura impedirá que aparezca la opción formateo en el menú del DTVP que
aparece en la página 19.)
Si inició sesión bajo el modo de sólo lectura y quiere desbloquear el dispositivo para tener
acceso completo de lectura y escritura a la partición de datos segura, debe apagar el DTVP y
volver a iniciar sesión, sin marcar la casilla ‘Modo de sólo lectura’.
* Una vez que se haya autentificado con éxito ante el dispositivo, el contador de inicios de
sesión fallidos se reiniciará.
Page 49

Documento No. 48000012-001.A02 DataTraveler® Vault - Privacy Página 19 de 29
Opciones del dispositivo (entorno de MAC)
Mientras esté con sesión iniciada en el dispositivo, habrá un icono "DTVP_Launcher" situado
en el Dock de Mac OS X como se muestra en la Figura 9.1 a continuación:
Figura 9.1 – Icono DTVP en el "Dock" de Mac OS X
Si mantiene presionada la tecla ‘control’ en su teclado y hace clic
una vez sobre el icono "DTVP_Launcher" aparecerá el menú que
se muestra en la Figura 9.2 a la derecha.
Ajustes del DTVP
• Le permite cambiar su contraseña y/o sugerencia (Figura
9.3)
• Le permite agregar/visualizar/cambiar su información de
contacto (Figura 9.4)
• Le permite cambiar su preferencia de idioma (Figura 9.5)
Figura 9.2
Opciones del DTVP
Figura 9.3
Cambiar contraseña
Figura 9.4
INFORMACIÓN DE CONTACTO
Figura 9.5
Seleccione el idioma
(Nota: Por razones de seguridad, es necesaria su contraseña actual del DTVP para actualizar
y/o modificar cualquiera de estos ajustes.)
Page 50

Documento No. 48000012-001.A02 DataTraveler® Vault - Privacy Página 20 de 29
Explorar DTVP
• Le permite navegar por el contenido de la partición de datos segura, mientras que esté
en sesión.
Formateo del DTVP
• Le permite formatear la partición de datos
segura (Advertencia: Se borrarán todos los
datos). (Figura 9.6)
Soporte en línea (se requiere acceso a Internet)
• Abre su navegador Web y se desplaza a
http://www.kingston.com/support/, donde
puede tener acceso a información de soporte
adicional
Figura 9.6 – Advertencia para formatear
Acerca del DTVP
• Proporciona detalles específicos acerca del
DTVP, incluida la información sobre la
aplicación y la versión del firmware (Figura
9.7)
Apagado del DTVP
• Apague en forma apropiada el DTVP, lo cual le
permitirá retirarlo de forma segura de su
sistema
Figura 9.7 – Acerca del DTVP
-Sección para Mac completa-
Page 51

Documento No. 48000012-001.A02 DataTraveler® Vault - Privacy Página 21 de 29
Instalación (entorno Linux)
(NOTA: Con las diferentes distribuciones de Linux disponibles hoy en día, la ‘apariencia y
funcionalidad’ de sus interfaces pueden variar de una versión a otra. Sin embargo, el conjunto
de comandos generales usados en la aplicación de la terminal es muy similar y puede
consultarse en las instrucciones Linux incluidas a continuación. Los ejemplos de pantallas
incluidos en esta sección fueron creados en un entorno Linux Ubuntu v10.x .)
Algunas versiones de Linux requieren privilegios de súper usuario (root) para la
ejecución correcta de los comandos de los dispositivos DTVP en la ventana de la
aplicación de la terminal.
Inserte el DTVP en un puerto USB disponible en su
notebook o computadora de escritorio, y espere a que el
sistema operativo Linux lo detecte. Cuando lo haga,
aparecerá un icono de volumen del DTVP en el escritorio,
tal como se ilustra en la Figura 10.1.
El DTVP viene con 5 comandos que pueden ser
usados en Linux:
Figura 10.1 – Volumen del DTVP
dtvp_about, dtvp_forgotpassword, dtvp_initialize, dtvp_login, and dtvp_logout
(Nota: Para ejecutar estos comandos, debe abrir la ventana de la aplicación de la “Terminal” y
navegar hacia la carpeta donde se encuentren los archivos. Cada comando debe estar
precedido de los siguientes dos caracteres: ‘./’ (un punto y una barra diagonal.)
Los usuarios de 32 bits deben abrir la ventana de la aplicación de la “Terminal” y cambiar el
directorio actual por/media/DTVP/linux/linux32$ usando el siguiente comando tras la solicitud:
cd /media/DTVP/linux/linux32(y luego presione ENTER.)
Los usuarios de 64 bits deben abrir la ventana de la aplicación de la “Terminal” y cambiar el
directorio actual por /media/DTVP/linux/linux64$ usando el siguiente comando tras la solicitud:
cd /media/DTVP/linux/linux64(y luego presione ENTER.)
*Nota: Si el sistema operativo no carga automáticamente el volumen del DTVP , necesitará
cargarlo en forma manual en la ventana de la terminal usando el comando ‘mount’ de Linux.
Por favor consultar la documentación Linux para su SO específico o bien su sitio favorito de
soporte en línea para verificar la sintaxis y las opciones de los comandos.
Page 52

Documento No. 48000012-001.A02 DataTraveler® Vault - Privacy Página 22 de 29
Inicialización del dispositivo (entorno Linux)
Una vez conectado el DTVP a su computadora y reconocido por el sistema operativo, el
dispositivo deberá inicializarse antes de ser utilizado por primera vez. Para hacerlo, abra la
aplicación de la ‘Terminal’ (o la ventana de línea del comando) y siga los pasos siguientes:
(Nota: Las capturas de pantalla e instrucciones de esta sección utilizan la carpeta
linux32
(indicando 32 bits) para dar ejemplos del uso del dispositivo DTVP bajo el SO Linux. Recuerde
que si está usando la versión de 64 bits de Linux, solo debe navegar y usar la carpeta
correspondiente a 64 bits en lugar de la 32 bits, es decir,
linux64 en vez de linux32.)
1. Cambie el directorio del volumen
DTVP escribiendo el siguiente
comando cuando se lo solicite la
terminal (tal como se ilustra en la
Figura 10.2.):
cd /media/DTVP/linux/linux32
(Nota: Los nombres de los
comandos y de las carpetas
(directorio) distinguen entre
mayúsculas y minúsculas, es decir,
‘linux32’ NO es lo mismo que
‘Linux32.’ La sintaxis debe
escribirse tal como se indica).
Figura 10.2 – Navegación en Línea del Comando
2. Escriba ls (como en lista) en la solicitud actual y presione ENTER. Aparecerá la lista de
archivos y/o carpetas de la carpeta /media/DTVP/linux/linux32 (o linux64). Podrá ver
listados los cinco comandos del DTVP,
dtvp_about, dtvp_forgotpassword,
dtvp_initialize, dtvp_login y dtvp_logout, tal como se ilustran en la Figura 10.3.
Figura 10.3 – Lista de comandos del DTVP
– La sección Linux de este manual está basada en la versión de 32-bits del Ubuntu 10.x –
Page 53

Documento No. 48000012-001.A02 DataTraveler® Vault - Privacy Página 23 de 29
3. Para inicializar el DTVP, ingrese el siguiente comando cuando la terminal se lo solicite y
presione ENTER: ./dtvp_initialize* (Recuerde que los comandos distinguen entre
mayúsculas y minúsculas.) Ver la Figura 10.4.
Figura 10.4 – Ejecución de un comando del DTVP
4. Después de presionarENTER, aparecerá el acuerdo de licencia en la ventana de la terminal.
Presione ‘S’ para aceptar el acuerdo de licencia y continúe. (Nota: Si presiona ‘N’ y no
acepta el acuerdo de licencia, regresará a la solicitud de la terminal y no podrá continuar
con el proceso de inicialización hasta que no repita el paso 3 y presione ‘S’.)
5. Una vez que usted acepte el acuerdo de licencia, se le solicitará que ingrese (cree) una
contraseña, la cual será usada para proteger los archivos almacenados en la partición de
datos seguros. La contraseña que usted cree debe cumplir con los siguientes criterios antes
de que el proceso de inicialización le permita continuar:
a. Las contraseñas deben contener 6 caracteres o más (hasta 16 caracteres).
- MAYÚSCULAS, minúsculas, numéricos y/o caracteres especiales (!, $, etc.)
6. Confirme su contraseña volviéndola a escribir en la línea del comando cuando se le solicite
y presione ENTER. Si la contraseña coincide, se le notificará que el DTVP ha sido iniciado
con éxito. Si la contraseña no coincide, recibirá un mensaje donde se le indicará que debe
confirmar nuevamente su contraseña. Para hacerlo, repita los pasos 3 a 6 hasta lograrlo.
Una vez creada la contraseña, aparecerá un volumen de datos seguro (partición) en el
escritorio. Esto indica que el proceso de inicio fue exitoso, está completo y ha terminado.
Puede empezar a usar el DTVP.
*Nota: Algunas versiones de Linux requieren privilegios de súper usuario (root) para la
ejecución correcta de los comandos de los dispositivos DTVP en la ventana de la aplicación de
la terminal.
Page 54

Documento No. 48000012-001.A02 DataTraveler® Vault - Privacy Página 24 de 29
Uso del dispositivo (entorno Linux)
Una vez iniciado el DTVP puede acceder a la partición de datos segura, iniciando sesión y
usando la contraseña que creó en la página 23. Para ello siga estos pasos:
1. Abra una ventana de la aplicación de la ‘Terminal’.
2. Escriba el siguiente comando cuando se le indique: cd /media/DTVP/linux/linux32
3. A la solicitud del comando ahora en/media/DTVP/linux/linux32$, ingrese el siguiente
comando para iniciar sesión en el dispositivo: ./dtvp_login* y presione ENTER. (Nota: Los
nombres de los comandos y de las carpetas distinguen entre mayúsculas y minúsculas
por lo tanto la sintaxis debe ser exacta.)
4. Ingrese su contraseña del DTVP y presione ENTER. Una vez iniciada la sesión en forma exitosa,
se abrirá el volumen de datos seguro en su escritorio y puede proceder a utilizar el DTVP.
Durante el proceso de inicio de sesión, si se introduce una contraseña incorrecta, se le dará otra
oportunidad de introducir la contraseña correcta repitiendo el paso 3; sin embargo, existe una
característica de seguridad integrada que controla el número de intentos fallidos de inicio de sesión. Si
este número alcanza el valor predeterminado de 10 intentos fallidos, el DTVP se bloquerá y le pedirá
que lo reinicie ejecutando el comando dtvp_forgotpassword, antes del siguiente uso. Este proceso le
permitirá crear una nueva contraseña, pero para proteger la privacidad de sus datos, el DTVP
formateará la partición de datos segura. Lo cual implica que sus datos se perderán.
Una vez completado el proceso dtvp_forgotpassword y si usted ha logrado crear una nueva
contraseña exitosamente,el contador incorporado de intentos fallidos se reiniciará (Nota: Un
inicio de sesión exitoso antes de alcanzar el número máximo de intentos (abreviado, MaxNoA),
también reiniciará dicho contador.)
Cuando termine de utilizar el DTVP, cierre la sesión y salga del dispositivo asegurando sus
datos. Para ello siga estos pasos:
1. Abra la ventana de la aplicación de la ‘Terminal’.
2. Escriba el siguiente comando cuando la terminal se lo solicite: cd
/media/DTVP/linux/linux32
3. A la solicitud del comando ahora en/media/DTVP/linux/linux32$, ingrese el siguiente
comando para cerrar adecuadamente la sesión en el dispositivo: ./dtvp_logout* y
presione ENTER. (Nota: Los nombres de los comandos y las carpetas distinguen entre
mayúsculas y minúsculas por lo tanto la sintaxis debe ser exacta.)
4. Retire el DTVP de su sistema y guárdelo en un sitio seguro.
*Nota: Algunas versiones de Linux requieren privilegios de súper usuario (root) para la ejecución
correcta de los comandos de los dispositivos DTVP en la ventana de la aplicación de la terminal.
-Sección Linux completa-
Page 55

Documento No. 48000012-001.A02 DataTraveler® Vault - Privacy Página 25 de 29
Ayuda y solución de problemas
Bloqueo del dispositivo
El DTVP incluye una característica de seguridad que impide el acceso no autorizado a la
partición de datos, una vez que se ha hecho un número máximo de intentos de inicio de sesión
fallidos consecutivos (MaxNoA, para abreviar); la configuración predeterminada "lista para
usar" tiene un valor pre-configurado de 10 (No. de intentos).
El contador de "bloqueo" hace el seguimiento de cada inicio de sesión fallido y se restablece
de una de dos maneras: 1) Un inicio de sesión exitoso antes de llegar a MaxNoA o 2) llegar a
MaxNoA y formatear el dispositivo.*
Si se ingresa una contraseña incorrecta,
aparecerá un mensaje de error justo debajo del
campo "Sugerencia", lo que indica un error de
inicio de sesión. Ver la Figura 11.1.
Cuando se haya realizado el intento fallido No
7o, verá un mensaje de error adicional que
indica que le quedan 3 intentos antes de llegar a
MaxNoA (10 intentos están establecidos de
forma predeterminada). Ver la Figura 11.2.
Después del intento No 10ode inicio de sesión,
el DTVP bloqueará permanentemente la
partición de datos y solicitará formatear el
dispositivo antes de poder usarlo nuevamente.
Esto significa que se van a perder todos los
datos almacenados en el DTVP, y que tendrá
que crear una nueva contraseña.
Figura 11.1 – Error de inicio de sesión
Esta medida de seguridad evita que alguien (que
no tenga la contraseña) realice innumerables
intentos de inicio de sesión y obtenga acceso a su
información confidencial.
Si usted es el propietario del DTVP y ha olvidado
su contraseña, aplican las mismas medidas de
seguridad, incluyendo el formatear el dispositivo.*
Para obtener más información sobre esta función,
ver "Olvidó su contraseña" en la página 26.
Figura 11.2 – 7o Error de inicio de sesión
*Nota: El formatear un dispositivo borrará TODA la información almacenada en la partición de
datos segura del DTVP.
Page 56

Documento No. 48000012-001.A02 DataTraveler® Vault - Privacy Página 26 de 29
Olvidó su contraseña (Windows y Mac)
Si usted olvida su contraseña, puede hacer
clic en el vínculo "Olvidó su contraseña" que
aparece en la ventana de inicio de sesión
del dispositivo cuando se ejecuta
DTVP_Launcher (ver la Figura 11.3).
Esta opción le permitirá crear una nueva
contraseña, pero el DTVP será formateado
con el fin de proteger la privacidad de sus
datos. Esto significa que todos los datos
almacenados en el área de seguridad serán
borrados en el proceso.*
Cuando haga clic en "Olvidó su
contraseña", aparecerá un cuadro de
mensaje (Figura 11.4) y le preguntará si
desea introducir una nueva contraseña
antes de ejecutar el formateo. En este
punto, podrá: 1) hacer clic en "Aceptar" para
confirmar, o 2) hacer clic en "Cancelar" para
volver a la ventana de inicio de sesión.
Figura 11.3 – Olvidó su contraseña
Si opta por continuar, se le pedirá que cree
una nueva contraseña compleja y una
nueva sugerencia. El campo de sugerencia
no es obligatorio, pero puede ser útil para
proporcionar una pista acerca de cuál es la
contraseña, en caso de que se olvidara la
contraseña.
(Nota: La sugerencia NO PUEDE coincidir
exactamente con la contraseña del
dispositivo DTVP.)
Figura 11.4 – Mensaje guía antes de formatear
Olvidó su contraseña (Linux)
Si usted olvidó su contraseña, puede ejecutar el comando dtvp_forgotpasswordde la guía
/media/DTVP/linux/linux32$ en la ventana de la aplicación de la “Terminal”. Esta opción le
permitirá crear una nueva contraseña, pero el DTVP será formateado con el fin de proteger la
privacidad de sus datos. Esto significa que todos los datos almacenados en la partición de
datos segura se borrarán en el proceso.
*Nota: El formatear un dispositivo borrará TODA la información almacenada en la partición de
datos segura del DTVP.
Page 57

Documento No. 48000012-001.A02 DataTraveler® Vault - Privacy Página 27 de 29
Conflicto de letras de dispositivo (sistema operativo Windows)
Como se ha mencionado en la sección "Requerimientos del sistema" de este manual (en la
página 3), el DTVP requiere dos letras consecutivas de dispositivo DESPUÉS del último disco
físico que aparece antes de la "brecha" en las asignaciones de letras de dispositivo (ver Figura
11.5.) Lo anterior NO se refiere a los recursos compartidos de red, dado que son específicos
de los perfiles de usuario y no del perfil del hardware del sistema mismo, por lo cual ante el
sistema operativo se muestran como disponibles.
Lo anterior significa que Windows podría asignar al DTVP una o dos letras de dispositivo que
ya estén en uso por uno o varios recursos compartidos de red o en una ruta UNC (Convención
de Nomenclatura Universal), lo que causa un conflicto en las letras del dispositivo. Si eso
ocurre, pida asistencia al administrador de su sistema o al departamento de soporte técnico
respecto al cambio de las asignaciones de letras de unidad en la utilidad "Administración de
discos" de Windows (se requieren privilegios administrativos)
Figura 11.5 – Mi PC
En este ejemplo, el DTVP utiliza la unidad F:, que es la primera letra de unidad disponible después
de la unidad E: (el último disco físico antes de la brecha en las letras de unidad). Dado que la letra
G: está asignada a un recurso compartido de red y no forma parte del perfil del hardware, el intentar
asignar dicha letra al DTVP como su segunda letra de unidad, causaría un conflicto.
Si en su sistema no hay recursos compartidos de red y el DTVP no carga todavía, es posible
que haya un dispositivo previamente instalado, como un lector de tarjetas o un disco extraíble,
que retenga la asignación de letra de la unidad y cause un conflicto.
Tenga en cuenta que la administración DLM de letras de dispositivo ha mejorado en gran
medida en Windows XP SP3, Vista y 7, de modo que es posible que usted no tenga problema
alguno, pero si no puede solucionar el conflicto, comuníquese con el departamento de soporte
técnico de Kingston para recibir asistencia adicional.
Page 58

Documento No. 48000012-001.A02 DataTraveler® Vault - Privacy Página 28 de 29
Mensajes de error
Incapacidad para crear un archivo – Este mensaje de error aparecerá cuando se
intenteCREAR un archivo o carpeta EN la partición de datos segura cuando se haya iniciado
sesión bajo el modo de sólo lectura.
Figura 12.1 – Error de Incapacidad para crear un archivo
Error al copiar un archivo o carpeta – Este mensaje de error aparecerá cuando se
intenteCOPIAR un archivo o carpeta EN la partición de datos segura cuando se haya iniciado
sesión bajo el modo de sólo lectura.
Figura 12.2 – Error al copiar un archivo o carpeta
Error al borrar un archivo o carpeta – Este mensaje de error aparecerá cuando se
intenteBORRAR un archivo o carpeta DESDE la partición de datos segura cuando se haya
iniciado sesión bajo el modo de sólo lectura.
Figura 12.3 – Error al borrar un archivo o carpeta
Si inició sesión en el modo de sólo lectura y quiere desbloquear el dispositivo para tener
acceso completo de lectura y escritura a la partición de datos segura, debe apagar el DTVP y
volver a iniciar sesión, sin marcar la casilla de Modo de sólo lectura.
Page 59

Documento No. 48000012-001.A02 DataTraveler® Vault - Privacy Página 29 de 29
Comandos Linux del DTVP
Comando Sintaxis* Descripción
dtvp_about
./dtvp_about
Indica el No. serial y la versión del firmware y de la
aplicación del DTVP
Puede ser ejecutado habiendo o no iniciado sesión en el
DTVP
dtvp_forgotpassword
./dtvp_forgotpassword
Reinicia el DTVP y le permite crear una nueva
contraseña
Puede ser ejecutado sólo cuando el usuario NO ha
iniciado sesión en el DTVP
(Todos los datos almacenados en la partición de datos
segura se perderán)
dtvp_initialize
./dtvp_initialize
Se inicia el DTVP y se prepara para ser usado por
primera vez
Se ejecuta sólo antes del primer uso
dtvp_login
./dtvp_login
Se solicita la contraseña del DTVP para iniciar sesión del
usuario en la partición de datos segura
Puede ejecutarse sólo cuando el usuario NO ha iniciado
sesión en el DTVP y sólo DESPUÉS que haya sido
iniciado
dtvp_logout
./dtvp_logout
Cierra la sesión del DTVP y la partición de datos segura
Puede ejecutarse sólo cuando el usuario haya iniciado
sesión en el DTVP
*Nota: Para ejecutar los comandos Linux del DTVP, debe abrir la ventana de la aplicación de la
“Terminal” y navegar hacia la carpeta donde se encuentren los archivos. Cada comando debe
estar precedido de los siguientes dos caracteres: ‘./’ (un punto y una barra diagonal tal como
se indicó en la tabla anterior.)
Page 60

Dokument Nr. 48000012-001.A02 DataTraveler® Vault - Privacy Seite 1 von 29
DataTraveler® Vault - Privacy Benutzerhandbuch
Page 61

Dokument Nr. 48000012-001.A02 DataTraveler® Vault - Privacy Seite 2 von 29
Inhaltsverzeichnis
Über dieses Handbuch............................................................................................................. 3
Systemvoraussetzungen ......................................................................................................... 3
Empfehlungen........................................................................................................................... 4
Installation & Einrichtung (Windows Umgebung).................................................................. 5
Geräteinstallation (Windows Umgebung)............................................................................... 6
Verwendung des Geräts (Windows Umgebung).................................................................. 10
Geräteoptionen (Windows Umgebung) ................................................................................ 11
Installation & Einrichtung (Mac Umgebung) ........................................................................ 13
Installationseinrichtung (Mac Umgebung) ........................................................................... 14
Verwendung des Geräts (Mac Umgebung)........................................................................... 18
Geräteoptionen (Mac Umgebung) ......................................................................................... 19
Installationseinrichtung (Linux Umgebung)......................................................................... 21
Verwendung des Geräts (Linux Umgebung)........................................................................ 24
Hilfe und Fehlerbehebung ..................................................................................................... 25
Sperrfunktion.............................................................................................................................25
Passwort vergessen (Windows und Mac)...............................................................................26
Konflikt von Laufwerksbuchstaben (Windows Betriebssystem)..........................................27
Fehlermeldungen ......................................................................................................................28
DTVP Linux Befehle ..................................................................................................................29
Page 62

Dokument Nr. 48000012-001.A02 DataTraveler® Vault - Privacy Seite 3 von 29
Über dieses Handbuch
Dieses Benutzerhandbuch bezieht sich auf den DataTraveler® Vault - Privacy (im Folgenden
als DTVP bezeichnet) auf Basis des Factory Image ohne kundenspezifische Einstellungen.
Systemvoraussetzungen
PC-Plattform
• Pentium III Prozessor oder äquivalent
(oder schneller)
• 15MB freier Speicher
• USB 2.0
• Zwei freie, aufeinanderfolgende
Laufwerksbuchstaben nach dem
letzten physischen Speicher*
Unterstützte PC-Betriebssysteme
• Windows 7
• Windows Vista® SP1, SP2
• Windows XP SP2, SP3
Mac Plattform
• 15MB freier Speicher
• USB 2.0
Unterstützte Betriebssysteme
• Mac OS X 10.5.x
• Mac OS X 10.6.x
Linux Plattform
• 5MB freier Speicher
• USB 2.0
Unterstütztes Betriebssystem
• Linux v2.6 kernel
In einigen Linux-Distributionen sind Superuser-Rechte (Root) erforderlich, um die DTVPBefehle im Fenster der Terminalanwendung korrekt ausführen zu können.
Abb. 1.1 – USB 2.0-Anschlüsse, Typ A
Abb. 1.2 – DTVP
*Hinweis: Siehe 'Laufwerksbuchstabenkonflikt' auf Seite 27.
Page 63

Dokument Nr. 48000012-001.A02 DataTraveler® Vault - Privacy Seite 4 von 29
Empfehlungen
Um eine ausreichende Stromversorgung des DTVP sicherzustellen, stecken Sie ihn direkt in
einen USB-Anschluss Ihres Notebooks oder PCs, siehe Abb. 1.3. Vermeiden Sie den
Anschluss des DTVP in Peripheriegeräte mit einem USB-Anschluss wie eine Tastatur oder ein
USB-Hub, siehe Abb. 1.4.
Abb. 1.3 – Empfohlener Anschluss Abb. 1.4 – Nicht empfehlenswert
Page 64

Dokument Nr. 48000012-001.A02 DataTraveler® Vault - Privacy Seite 5 von 29
Installation & Einrichtung (Windows Umgebung)
1. Stecken Sie den DTVP in einen freien USBAnschluss Ihres Notebooks oder PCs und warten
Sie, bis Windows ihn erkannt hat.
• Windows XP Anwendern wird die Meldung
‘Neue Hardware gefunden’ angezeigt, siehe
Abb. 2.1.
• Windows Vista/7 Anwendern wird eine
Gerätetreiber-Meldung angezeigt, siehe Abb. 2.2.
Nach Abschluss der Hardwareerkennung fordert
Windows Sie auf, den Installationsprozess zu beginnen.
• Windows XP Anwender können den 2. Schritt
übergehen und weitergehen zu Seite 6 –
Geräteinstallation.
• Windows Vista/7 Anwendern wird ein
AutoPlay-Fenster angezeigt, ähnlich wie in
Abb. 2.3 abgebildet.
2. Wählen Sie die Option ‘Run DTVP_Launcher.exe’.
Wenn Windows AutoPlay nicht startet, rufen Sie die
CD-ROM-Partition (Abb. 2.4) auf und starten Sie das
DTVP_Launcher-Programm manuell. Dadurch wird
der Installationsprozess gestartet.
Abb. 2.4 – DTVP Inhalt
Abb. 2.1 – Neue Hardware gefunden
(Windows XP)
Abb. 2.2 – Installation des Gerätetreibers
(Windows Vista/7)
Abb. 2.3 – Fenster AutoPlay
(Windows Vista/7)
(Hinweis: Die Menüoptionen im
Fenster AutoPlay können je nach
den aktuell auf Ihrem Computer
installierten Programmen
unterschiedlich sein. AutoRun
startet den Installationsprozess
automatisch.
)
Page 65

Dokument Nr. 48000012-001.A02 DataTraveler® Vault - Privacy Seite 6 von 29
Geräteinstallation (Windows Umgebung)
1. Wählen Sie die von Ihnen gewünschte Sprache aus dem Drop-Down-Menü und klicken Sie
auf ‘Weiter’ (Abb. 3.1.)
Abb. 3.1 – Sprachauswahl
2. Lesen und akzeptieren Sie die Lizenzvereinbarung und klicken Sie auf ‘Weiter’ (Abb. 3.2.)
(Hinweis: Die Schaltfläche ‘Weiter’ wird erst aktiviert, nachdem Sie die Lizenzvereinbarung
akzeptiert haben.)
Abb. 3.2– Lizenzvereinbarung
Page 66

Dokument Nr. 48000012-001.A02 DataTraveler® Vault - Privacy Seite 7 von 29
3. Erstellen Sie ein Passwort, um Ihre Daten auf dem DTVP zu schützen. Geben Sie es im
Feld ‘Passwort’ ein und erneut im Feld ‘Passwortbestätigung’ siehe Abb. 3.3. Bevor Sie mit
der Installationseinrichtung fortfahren können, müssen Sie ein Passwort nach folgenden
Kriterien eingeben:
1. Das Passwort muss mindestens 6 Zeichen lang sein (bis zu 16 Zeichen.)
2. Das Passwort muss 3 (drei) der folgenden Kriterien enthalten:
- GROSSBUCHSTABE, Kleinbuchstabe, Ziffer und/oder Sonderzeichen (!, $ usw.)
Sie können auch einen Passwort-Hinweis eingeben, es ist jedoch kein Pflichtfeld. Der
Passwort-Hinweis kann eine nützliche Hilfestellung zur Erinnerung an das Passwort sein,
wenn Sie es vergessen haben sollten. (Hinweis: Der Hinweis und das Passwort dürfen
NICHT identisch sein.)
Abb. 3.3 – Passworteinrichtung
Page 67

Dokument Nr. 48000012-001.A02 DataTraveler® Vault - Privacy Seite 8 von 29
4. Geben Sie Ihre Kontaktdaten in den angezeigten Textfeldern ein (siehe Abb. 3.4) (Hinweis:
Die in diesen Feldern eingegebenen Daten dürfen NICHT die in Schritt 3 eingegebene
Passwort-Zeichenfolge enthalten. Das Ausfüllen dieser Felder ist optional und sie können
auch leer belassen werden.)
• Im Feld ‘Name’ können bis zu 32 Zeichen eingegeben werden, das
genaue Passwort darf jedoch nicht darin enthalten sein.
• Im Feld ‘Firma’ können bis zu 32 Zeichen eingegeben werden, das
genaue Passwort darf jedoch nicht darin enthalten sein.
• Im Feld ‘Adresse’ können bis zu 156 Zeichen eingegeben werden, das
genaue Passwort darf jedoch nicht darin enthalten sein.
Abb. 3.4 – Kontaktdaten
5. Klicken Sie zum Abschließen des Installationsprozesses für das Gerät auf ‘Fertigstellen’.
Page 68

Dokument Nr. 48000012-001.A02 DataTraveler® Vault - Privacy Seite 9 von 29
Der DTVP wird jetzt die sichere Datenpartition formatieren (Abb. 3.5) und anzeigen, wenn
dieser Vorgang abgeschlossen ist (Abb. 3.6.)
Hinweis: Unter Windows XP im Nicht-Administrator-Modus kann die
Formatierung bis zu einer Minute dauern.*
6. Klicken Sie zum Fortfahren auf ‘OK’.
Abb. 3.5 – DTVP wird formatiert Abb. 3.6 – Formatierung fertiggestellt
Der Installationsprozess ist abgeschlossen.
*Hinweis: Die erforderliche Zeit hängt von der Systemhardware und der Speicherkapazität des
DTVP Laufwerks ab.
Page 69

Dokument Nr. 48000012-001.A02 DataTraveler® Vault - Privacy Seite 10 von 29
Verwendung des Geräts (Windows Umgebung)
Nach Abschluss des Installationsprozesses
des DTVP können Sie sich mit Ihrem Passwort
im Gerät einloggen, haben Zugriff auf die
sichere Datenpartition und können mit dem
Stick arbeiten. Führen Sie dazu folgende
Schritte aus:
1. Stecken Sie den DTVP in einen USBAnschluss Ihres Notebooks oder Desktops
ein und geben Sie Ihr Passwort ein (siehe
Abb. 4.1.)
2. Geben Sie Ihr Passwort ein und klicken Sie
zum Fortfahren auf ‘Login’.
• Wenn das eingegebene Passwort
korrekt ist, wird der DTVP freigegeben
und Sie können ihn benutzen.
Abb. 4.1 – Anmeldefenster
• Wenn ein falsches Passwort eingegeben wurde, wird mit einer Fehlernachricht unter
dem Feld ‘Hinweis’ angezeigt, dass das Einloggen fehlgeschlagen ist.
(HINWEIS: Wenn das Passwort zum Einloggen falsch war, haben Sie die Möglichkeit, es
erneut einzugeben. Das integrierte Sicherheitsmodul registriert jedoch alle fehlgeschlagenen
Loginversuche*. Wenn die voreingestellte Anzahl von 10 fehlgeschlagenen Loginversuchen
erreicht wurde, wird der DTVP gesperrt und die sichere Datenpartition muss vor der weiteren
Benutzung neu formatiert werden. DIES BEDEUTET, DASS ALLE AUF DEM DTVP
GESPEICHERTEN DATEN GELÖSCHT WERDEN. Weitere Einzelheiten zu dieser Funktion
siehe ‘Sperrfunktion’ auf Seite 20.)
3. Sie können die sichere Datenpartition im schreibgeschützten Modus, manchmal auch als
"Nur-Lesen"bezeichnet, öffnen, indem Sie vor dem Einloggen in das Gerät das Kästchen
‘Read-Only Mode’ markieren. Wenn Sie im schreibgeschützten Modus eingeloggt sind,
können Sie Inhalt im DTVP öffnen oder ansehen, jedoch nicht aktualisieren, ändern oder
löschen. (Hinweis: Im schreibgeschützten Modus können Sie auch nicht auf die Option
Formatierung im DTVP zugreifen, auf die auf Seite 11 Bezug genommen wird.)
Wenn Sie im schreibgeschützten Modus eingeloggt sind und das Gerät entsperren möchten,
um vollen Lese-/Schreibzugriff auf die sichere Datenpartition zu erhalten, müssen Sie den
DTVP (siehe Seite 12) herunterfahren und sich neu anmelden, wobei das Kontrollkästchen
„Read-Only Mode“ nicht markiert sein darf.
*Hinweis: Der Zähler für fehlgeschlagene Loginversuche wird nach Eingabe des korrekten
Passworts zurückgesetzt.
Page 70

Dokument Nr. 48000012-001.A02 DataTraveler® Vault - Privacy Seite 11 von 29
Geräteoptionen (Windows Umgebung)
Solange Sie im Gerät eingeloggt sind, wird das Symbol ‘DTVP’ in der rechten Ecke der
Windows Taskleiste angezeigt (Abb. 5.1.) (Hinweis: Windows 7 Anwender müssen zum
Aufrufen des ‘DTVP’ Symbols in der Taskleiste auf den Pfeil nach oben klicken (Abb. 5.2.)
Nach einmaligem Klicken auf das DTVP Symbol wird folgendes Menü angezeigt:
Abb. 5.1 – DTVP Symbol in Taskleiste
Abb. 5.2 – DTVP Symbol in Taskleiste
(Windows 7 Anwender)
DTVault Datenschutzeinstellungen
• Sie können Ihr Passwort bzw. Ihren Hinweis ändern (Abb. 5.3)
• Sie können Kontaktdaten hinzufügen, ansehen oder ändern (Abb. 5.4)
• Sie können die gewählte Sprache ändern (Abb. 5.5)
(Hinweis: Aus Sicherheitsgründen müssen Sie zum Aktualisieren bzw. Modifizieren dieser
Einstellungen jeweils Ihr aktuelles DTVP Passwort eingeben.)
Abbildung 5.3
Passwort ändern
Abbildung 5.4
Kontaktinformationen
Abbildung 5.5
Sprache wählen
Page 71

Dokument Nr. 48000012-001.A02 DataTraveler® Vault - Privacy Seite 12 von 29
DTVault Privacy Datenbereich durchsuchen
• Wenn Sie eingeloggt sind, können Sie mit dieser Funktion den Inhalt der sicheren
Datenpartition durchsuchen.
DTVault Privacy Datenbereich formatieren*
• Mit dieser Funktion können Sie die sichere
Datenpartition formatieren (Achtung: Hierbei
werden alle Daten gelöscht.) (Abb. 5.6)
Online Support (Erfordert Internetanschluss)
• Öffnet Ihren Internet-Browser und navigiert
Sie zu
http://www.kingston.com/support/, wo
Sie Zugang zu weiteren SupportInformationen haben.
Abb. 5.6 – Warnung bei Formatierung
Über DTVault Privacy Datenbereich
• Enthält spezifische Angaben über den DTVP,
einschließlich Versionsangaben über die
Anwendung und die Firmware (Abb. 5.7)
DTVault Privacy Datenbereich herunterfahren
• Fährt den DTVP ordnungsgemäß herunter,
damit Sie ihn sicher aus Ihrem System
entfernen können
Abb. 5.7 – Über den DTVP
*Hinweis: In Windows Vista und in Windows 7 müssen Sie Ihr aktuelles DTVP Passwort
eingeben
- Abschnitt Windows abgeschlossen -
Page 72

Dokument Nr. 48000012-001.A02 DataTraveler® Vault - Privacy Seite 13 von 29
Installation & Einrichtung (Mac Umgebung)
Stecken Sie den DTVP in einen freien USB-Anschluss Ihres Notebooks
oder PCs ein und warten Sie, bis das Mac Betriebssystem ihn erkannt
hat. Dies wird durch das DTVP Volumensymbol am Desktop angezeigt,
siehe Abb. 6.1.
1. Doppelklicken Sie auf das CD-ROM-Symbol des DTVP.
2. Doppelklicken Sie auf die im Fenster angezeigte Mac Datei,
siehe Abb. 6.2.
Abb. 6.1 – DTVP
3. Doppelklicken Sie auf die im Fenster angezeigte DTVP
Anwendung, siehe Abb. 6.3. Dadurch wird der
Installationsprozess gestartet.
Abb. 6.2 – DTVP Inhaltsverzeichnis
Abb. 6.3 – DTVP Anwendung
Page 73

Dokument Nr. 48000012-001.A02 DataTraveler® Vault - Privacy Seite 14 von 29
Installationseinrichtung (Mac Umgebung)
1. Wählen Sie die von Ihnen gewünschte Sprache aus dem Drop-Down-Menü und klicken Sie
auf ‘Weiter’ (Abb. 7.1.)
Abb. 7.1 – Sprachauswahl
2. Lesen und akzeptieren Sie die Lizenzvereinbarung und klicken Sie auf ‘Weiter’ (Abb. 7.2.)
(Hinweis: Die Schaltfläche ‘Weiter’ wird erst aktiviert, nachdem Sie die Lizenzvereinbarung
akzeptiert haben.)
Abb. 7.2 – Lizenzvereinbarung
Page 74

Dokument Nr. 48000012-001.A02 DataTraveler® Vault - Privacy Seite 15 von 29
3. Erstellen Sie ein Passwort, um Ihre Daten auf dem DTVP zu schützen. Geben Sie es im
Feld ‘Passwort’ ein und erneut im Feld ‘Passwortbestätigung’ siehe Abb. 7.3. Bevor Sie mit
der Installationseinrichtung fortfahren können, müssen Sie ein Passwort nach folgenden
Kriterien eingeben:
1. Das Passwort muss mindestens 6 Zeichen lang sein (bis zu 16 Zeichen.)
2. Das Passwort muss 3 (drei) der folgenden Kriterien enthalten:
- GROSSBUCHSTABE, Kleinbuchstabe, Ziffer und/oder Sonderzeichen (!, $
usw.)
Sie können auch einen Passwort-Hinweis eingeben, es ist jedoch kein Pflichtfeld. Der
Passwort-Hinweis kann eine nützliche Hilfestellung zur Erinnerung an das Passwort sein,
wenn Sie es vergessen haben sollten. (Hinweis: Der Hinweis und das Passwort dürfen
NICHT identisch sein.)
Abb. 7.3 – Passworteinrichtung
Page 75

Dokument Nr. 48000012-001.A02 DataTraveler® Vault - Privacy Seite 16 von 29
4. Geben Sie Ihre Kontaktdaten in den angezeigten Textfeldern ein (siehe Abb. 7.4) (Hinweis:
Die in diesen Feldern eingegebenen Daten dürfen NICHT die in Schritt 3 eingegebene
Passwort-Zeichenfolge enthalten. Das Ausfüllen dieser Felder ist optional und sie können
auch leer belassen werden.)
• Im Feld ‘Name’ können bis zu 32 Zeichen eingegeben werden, das
genaue Passwort darf jedoch nicht darin enthalten sein.
• Im Feld ‘Firma’ können bis zu 32 Zeichen eingegeben werden, das
genaue Passwort darf jedoch nicht darin enthalten sein.
• Im Feld ‘Adresse’ können bis zu 156 Zeichen eingegeben werden, das
genaue Passwort darf jedoch nicht darin enthalten sein.
Abb. 7.4 – Kontaktdaten
5. Klicken Sie zum Abschließen des Installationsprozesses für das Gerät auf ‘Fertigstellen’.
Page 76

Dokument Nr. 48000012-001.A02 DataTraveler® Vault - Privacy Seite 17 von 29
Der DTVP wird jetzt die sichere Datenpartition formatieren (Abb. 7.5) und anzeigen, wenn
dieser Vorgang abgeschlossen ist (Abb. 7.6.)
6. Klicken Sie zum Fortfahren auf ‘OK’.
Abb. 7.5 – DTVP wird formatiert Abb. 7.6 – Formatierung fertiggestellt
Der Installationsprozess ist abgeschlossen.
Page 77

Dokument Nr. 48000012-001.A02 DataTraveler® Vault - Privacy Seite 18 von 29
Verwendung des Geräts (Mac Umgebung)
Nach Abschluss des Installationsprozesses des
DTVP können Sie sich mit Ihrem Passwort im
Gerät einloggen, haben Zugriff auf die sichere
Datenpartition und können mit dem Stick
arbeiten. Führen Sie dazu folgende Schritte aus:
1. Stecken Sie den DTVP in einen USBAnschluss Ihres Notebooks oder PCs ein und
geben Sie Ihr Passwort ein (siehe Abb. 8.1.)
2. Geben Sie Ihr Passwort ein und klicken Sie
zum Fortfahren auf ‘Login’.
• Wenn das eingegebene Passwort
korrekt ist, wird der DTVP freigegeben
und Sie können ihn benutzen.
Abb. 8.1 – Anmeldefenster
• Wenn ein falsches Passwort eingegeben wurde, wird mit einer Fehlernachricht unter
dem Feld ‘Hinweis’ angezeigt, dass das Einloggen fehlgeschlagen ist.
(HINWEIS: Wenn das Passwort zum Einloggen falsch war, haben Sie die Möglichkeit, es
erneut einzugeben. Das integrierte Sicherheitsmodul registriert jedoch alle fehlgeschlagenen
Loginversuche*. Wenn die voreingestellte Anzahl von 10 fehlgeschlagenen Loginversuchen
erreicht wurde, wird der DTVP gesperrt und die sichere Datenpartition muss vor der weiteren
Benutzung neu formatiert werden. DIES BEDEUTET, DASS ALLE AUF DEM DTVP
GESPEICHERTEN DATEN GELÖSCHT WERDEN. Weitere Einzelheiten zu dieser Funktion
siehe ‘Sperrfunktion’ auf Seite 20.)
4. Sie können die sichere Datenpartition im schreibgeschützten Modus, manchmal auch als
"Nur-Lesen"bezeichnet, öffnen, indem Sie vor dem Einloggen in das Gerät das Kästchen
‘Read-Only Mode’ markieren. Wenn Sie im schreibgeschützten Modus eingeloggt sind,
können Sie Inhalt im DTVP öffnen oder ansehen, jedoch nicht aktualisieren, ändern oder
löschen. (Hinweis: Im schreibgeschützten Modus können Sie auch nicht auf die Option
Formatierung im DTVP zugreifen, auf die auf Seite 19 Bezug genommen wird.)
Wenn Sie im schreibgeschützten Modus eingeloggt sind und das Gerät entsperren möchten,
um vollen Lese-/Schreibzugriff auf die sichere Datenpartition zu erhalten, müssen Sie den
DTVP herunterfahren und sich erneut anmelden, wobei das Kontrollkästchen „Read-Only
Mode“ nicht markiert sein darf.
* Der Zähler für fehlgeschlagene Loginversuche wird nach Eingabe des korrekten Passworts
zurückgesetzt.
Page 78

Dokument Nr. 48000012-001.A02 DataTraveler® Vault - Privacy Seite 19 von 29
Geräteoptionen (Mac Umgebung)
Wenn Sie im Gerät eingeloggt sind, wird im Mac OS X Dock das Symbol ‘DTVP_Launcher’
angezeigt, siehe nachstehende Abb. 9.1:
Abb. 9.1 – DTVP Symbol in Mac OS X Dock
Halten Sie die ‘Strg’ Taste Ihrer Tastatur gedrückt und klicken Sie
einmal auf das Symbol ‘DTVP_Launcher’; das in Abb. 9.2
abgebildete Menü wird rechts angezeigt.
DTVP Einstellungen
• Sie können Ihr Passwort bzw. Ihren Hinweis ändern (Abb. 9.3)
• Sie können Kontaktdaten hinzufügen, ansehen oder ändern
(Abb. 9.4)
• Sie können die gewünschte Sprache ändern (Abb. 9.5)
Abb. 9.2
DTVP Optionen
Abb. 9.3
Passwort ändern
Abb. 9.4
Kontaktinformationen
Abb. 9.5
Sprache wählen
(Hinweis: Aus Sicherheitsgründen müssen Sie zum Aktualisieren bzw. Modifizieren dieser
Einstellungen jeweils Ihr aktuelles DTVP Passwort eingeben.)
Page 79

Dokument Nr. 48000012-001.A02 DataTraveler® Vault - Privacy Seite 20 von 29
DTVP durchsuchen
• Wenn Sie eingeloggt sind, können Sie mit dieser Funktion den Inhalt der sicheren
Datenpartition durchsuchen.
DTVP formatieren
• Mit dieser Funktion können Sie die sichere
Datenpartition formatieren (Achtung: Hierbei
werden alle Daten gelöscht.) (Abb. 9.6)
Online Support (Erfordert Internetanschluss)
• Öffnet Ihren Internet-Browser und navigiert
Sie zu
http://www.kingston.com/support/, wo
Sie Zugang zu weiteren SupportInformationen haben.
Abb. 9.6 – Warnung bei Formatierung
Über den DTVP
• Enthält spezifische Angaben über den DTVP,
einschließlich Versionsangaben über die
Anwendung und die Firmware (Abb. 9.7)
DTVP herunterfahren
• Fährt den DTVP ordnungsgemäß herunter,
damit Sie ihn sicher aus Ihrem System
entfernen können
Abb. 9.7 – Über den DTVP
- Abschnitt Mac abgeschlossen -
Page 80

Dokument Nr. 48000012-001.A02 DataTraveler® Vault - Privacy Seite 21 von 29
Installation & Einrichtung (Linux Umgebung)
(HINWEIS: Aufgrund der unterschiedlichen Linux-Distributionen im Markt kann das Aussehen
der Schnittstellen in den einzelnen Versionen unterschiedlich sein. Jedoch sind die in der
Terminalanwendung verwendeten allgemeinen Befehle einander ähnlich und dienen als
Referenz für die nachstehende Anleitung für Linux. Die Screenshot-Beispiele wurden in
einer Linux Ubuntu v10.x Umgebung erstellt.)
In einigen Linux-Distributionen sind Superuser-Rechte (Root) erforderlich, um die
DTVP-Befehle im Fenster der Terminalanwendung korrekt ausführen zu können.
Stecken Sie den DTVP in einen freien USB-Anschluss Ihres
Notebooks oder PCs ein und warten Sie, bis das Linux
Betriebssystem ihn erkannt hat. Dies wird durch das DTVP
Volumensymbol am Desktop angezeigt*, siehe Abb. 10.1.
Der DTVP ist mit 5 Befehlen ausgestattet, die für Linux
verwendet werden können:
Abb. 10.1 – DTVP Volumen
dtvp_about, dtvp_forgotpassword, dtvp_initialize, dtvp_login, und dtvp_logout
(Hinweis: Zur Ausführung dieser Befehle müssen Sie ein Anwendungsfenster "Terminal" öffnen
und zu dem Ordner navigieren, der alle fünf Dateien enthält. Jedem Befehl müssen die beiden
folgenden Zeichen vorangestellt werden: ‘./’ (ein Punkt und ein Schrägstrich.)
Benutzer mit einer 32-Bit Version müssen ein Anwendungsfenster “Terminal” öffnen und das
aktuelle Verzeichnis durch Eingabe des nachstehenden Befehls in der Eingabeaufforderung
auf /media/DTVP/linux/linux32$ ändern:
cd /media/DTVP/linux/linux32 (und dann mit EINGABE bestätigen.)
Benutzer mit einer 64-Bit Version müssen ein Anwendungsfenster “Terminal” öffnen und das
aktuelle Verzeichnis durch Eingabe des nachstehenden Befehls in der Eingabeaufforderung
auf /media/DTVP/linux/linux64$ ändern:
cd /media/DTVP/linux/linux64 (und dann mit EINGABE bestätigen.)
*Hinweis: Wenn DTVP Volume nicht automatisch vom Betriebssystem geladen wird, müssen
Sie das Volumen manuell mit dem Linux-Befehl ‘mount’ in einem Terminalfenster laden.
Entnehmen Sie Ihre spezielle BS-Distribution bitte Ihrer Linux Dokumentation oder Ihrer
bevorzugten Online-Supportseite für die richtigen Syntax- und Befehlsoptionen.
Installationseinrichtung (Linux Umgebung)
Page 81

Dokument Nr. 48000012-001.A02 DataTraveler® Vault - Privacy Seite 22 von 29
Nachdem der DTVP an Ihrem Computer angeschlossen und vom Betriebssystem erkannt
wurde, muss das Gerät noch vor der ersten Verwendung eingerichtet werden. Öffnen Sie dazu
die Anwendung "Terminal" (oder das Fenster Befehlszeile) und befolgen Sie diese Schritte:
(Hinweis: Die in diesem Abschnitt enthaltenen Screenshots und Anweisungen verwenden den
Ordner linux32 (für 32-Bit) für die Darstellung der Verwendung des DTVP im Linux BS. Wenn
Sie mit einer 64-Bit-Version von Linux arbeiten, müssen Sie nur den 64-Bit-Ordner anstatt des
32-Bit-Ordners aufrufen, d. h.
linux64 anstatt von linux32.)
1. Sie können das Verzeichnis für das
DTVP Volumen durch Eingabe des
nachstehenden Befehls in der
Terminal-Aufforderung ändern
(siehe Abb. 10.2.):
cd /media/DTVP/linux/linux32
(Hinweis: Beachten Sie die Großund Kleinschreibung bei der
Eingabe von Befehlen und
Ordnernamen (Verzeichnis). D. h.
"linux32" und "Linux32" sind NICHT
dasselbe. Auch die Schreibweise
muss genauso sein wie abgebildet.)
Abb. 10.2 – Navigation in Befehlszeile
2. Schreiben Sie lst (als lst) in der Eingabeaufforderung und drücken Sie auf EINGABE.
Daraufhin wird Ihnen im Ordner /media/DTVP/linux/linux32 (oder linux64) eine Liste von
Dateien bzw. Ordnern angezeigt. Die fünf DTVP Befehle
dtvp_about,
dtvp_forgotpassword, dtvp_initialize, dtvp_login und dtvp_logout werden angezeigt,
wie in Abb. 10.3 abgebildet.
Abb. 10.3 – Liste der DTVP Befehle
– Der Abschnitt Linux bezieht sich auf die 32-Bit Version von Ubuntu 10.x –
Page 82

Dokument Nr. 48000012-001.A02 DataTraveler® Vault - Privacy Seite 23 von 29
3. Geben Sie zum Starten der DTVP folgenden Befehl im Terminal Aufforderung ein und
drücken Sie auf EINGABE: ./dtvp_initialize* (Beachten Sie bei der Befehlseingabe bitte die
Groß- und Kleinschreibung.) Siehe Abb. 10.4.
Abb. 10.4 – Ausführen eines DTVP Befehls
4. Nach dem Drücken von EINGABE wird die Lizenzvereinbarung im Terminal-Fenster
angezeigt. Zum Akzeptieren der Lizenzvereinbarung und Fortfahren drücken Sie auf ‘J’.
(Hinweis: Wenn Sie auf ‘N’ klicken und die Lizenzvereinbarung nicht aktzeptiern, gelangen
Sie zur Terminal-Eingabeaufforderung zurück und können den Installationsprozess erst
nach Wiederholung des 3. Schrittes und Klicken auf ‘J’fortsetzen.)
5. Nach dem Akzeptieren der Lizenzvereinbarung werden Sie zur Eingabe eines Passworts
aufgefordert, das zum Schutz der in der sicheren Datenpartition gespeicherten Daten dient.
Bevor Sie mit der Installationseinrichtung fortfahren können, müssen Sie ein Passwort nach
folgenden Kriterien eingeben:
a. Das Passwort muss mindestens 6 Zeichen lang sein (bis zu 16 Zeichen.)
b. Das Passwort muss 3 (drei) der folgenden Kriterien enthalten:
- GROSSBUCHSTABE, Kleinbuchstabe, Ziffer und/oder Sonderzeichen (!, $ usw.)
6. Bestätigen Sie Ihr Passwort durch erneute Eingabe in der Befehlszeile nachdem Sie dazu
aufgefordert wurden und drücken Sie auf EINGABE. Bei Übereinstimmung der Passwörter
wird die Nachricht angezeigt, dass die Installation erfolgreich beendet wurde. Wenn die
Passwörter nicht übereinstimmen wird eine Nachricht angezeigt, dass Sie das Passwort
noch bestätigen müssen. Wiederholen Sie in diesem Fall die Schritte 3 bis 6.
Nach dem Einrichten Ihres Passworts wird ein sicheres Datenvolumen (Partition) am Desktop
angezeigt. Damit wird angezeigt, dass der Einrichtungsprozess erfolgreich abgeschlossen
wurde. Sie können Ihren DTVP jetzt benutzen.
*Hinweis: In einigen Linux-Distributionen sind Superuser-Rechte (Root) erforderlich, um die
DTVP-Befehle im Fenster der Terminalanwendung korrekt ausführen zu können.
Page 83

Dokument Nr. 48000012-001.A02 DataTraveler® Vault - Privacy Seite 24 von 29
Verwendung des Geräts (Linux Umgebung)
Nach der Installation des DTVP können Sie durch Einloggen in das Gerät mit dem auf Seite 23
erstellten DTVP Passwort auf die sichere Datenpartition zugreifen. Befolgen Sie dazu folgende Schritte:
1. Öffnen Sie das Fenster der Anwendung "Terminal".
2. Geben Sie in der Terminal-Aufforderung folgenden Befehl ein: cd
/media/DTVP/linux/linux32
3. Geben Sie in der Eingabeaufforderung /media/DTVP/linux/linux32$folgenden Befehl zum
Einloggen in das Gerät ein: ./dtvp_login* und drücken Sie auf EINGABE. (Hinweis: Bei
Befehlen und Ordnereingaben muss die Groß- und Kleinschreibung beachtet werden und
die Schreibweise muss genau eingehalten werden.)
4. Geben Sie Ihr DTVP Passwort ein und drücken Sie auf EINGABE. Nach dem erfolgreichen
Einloggen wird das sichere Datenvolumen auf Ihrem Computer geöffnet und Sie können
Ihren DTVP verwenden.
Wenn das Passwort zum Einloggen falsch war, haben Sie die Möglichkeit, es erneut durch
Wiederholung des 3. Schrittes einzugeben. Das integrierte Sicherheitsmodul registriert jedoch alle
fehlgeschlagenen Loginversuche. Wenn die voreingestellte Anzahl von 10 fehlgeschlagenen
Loginversuchen erreicht wurde, wird der DTVP gesperrt und vor der weiteren Benutzung muss
das Gerät über den Befehl dtvp_forgotpassword erneut eingerichtet werden. Mit dieser
Verfahrensweise können Sie ein neues Passwort erstellen, jedoch wird der DTVP zum Schutz
Ihrer Daten formatiert. Dies bedeutet, dass Ihre gesamten Daten gelöscht werden.
Nach Durchführung des dtvp_forgotpassword Verfahrens und erfolgreich abgeschlossener Eingabe
eines neuen Passworts wird der Zähler für fehlgeschlagene Loginversuche zurückgesetzt (Hinweis: Der
Zähler für fehlgeschlagene Loginversuche wird auch nach dem erfolgreichem Einloggen vor dem
Erreichen der maximalen Versuchsanzahl (MaxNoA in Kurzform) zurückgesetzt..)
Wenn Sie Ihren DTVP nicht mehr verwenden, sichern Sie Ihre Daten und loggen Sie sich aus.
Führen Sie dazu folgende Schritte aus:
1. Öffnen Sie das Fenster der Anwendung "Terminal".
2. Geben Sie in der Terminal-Aufforderung folgenden Befehl ein: cd /media/DTVP/linux/linux32
3. Geben Sie in der Eingabeaufforderung /media/DTVP/linux/linux32$folgenden Befehl zum
Ausloggen aus dem Gerät ein: ./dtvp_logout* und drücken Sie auf EINGABE. (Hinweis:
Bei Befehlen und Ordnereingaben muss die Groß- und Kleinschreibung beachtet werden
und die Schreibweise muss genau eingehalten werden.)
4. Entfernen Sie den DTVP aus Ihrem System und bewahren Sie ihn an einem sicheren Ort auf.
*Hinweis: In einigen Linux-Distributionen sind Superuser-Rechte (Root) erforderlich, um die
DTVP-Befehle im Fenster der Terminalanwendung korrekt ausführen zu können.
- Abschnitt Linux abgeschlossen -
Page 84

Dokument Nr. 48000012-001.A02 DataTraveler® Vault - Privacy Seite 25 von 29
Hilfe und Fehlerbehebung
Sperrfunktion
Der DTVP enthält eine Sicherheitsfunktion, die den unbefugten Zugriff auf die Datenpartition
verhindert, wenn die maximale Anzahl aufeinanderfolgender fehlgeschlagener Loginversuche
(Kurzform MaxNoA) erreicht wurde; standardmäßig ist die “Out-of-Box” Konfiguration auf einen
Wert von 10 (Anzahl der Versuche) festgelegt.
Der 'Sperrzähler' registriert jeden fehlgeschlagenen Loginversuch und kann auf zwei Wegen
zurückgesetzt werden: 1) Durch erfolgreiches Einloggen vor Erreichen des MaxNoA, oder 2)
Erreichen des MaxNoA und Durchführung einer Geräteformatierung.*
Wenn ein falsches Passwort eingegeben wurde,
wird mit einer Fehlernachricht unter dem Feld
‘Hinweis’ angezeigt, dass das Einloggen
fehlgeschlagen ist. Siehe Abb. 11.1.
Wenn der Anmeldeversuch zum 7. Mal
fehlgeschlagen ist, wird eine weitere
Fehlernachricht mit der Mitteilung angezeigt, dass
Ihnen noch 3 Versuche bis zum Erreichen des
MaxNoA bleiben (der standardmäßig auf 10
eingestellt ist.) Siehe Abb. 11.2.
Nach dem10. fehlgeschlagenen Anmeldeversuch
wird der DTVP die Datenpartition dauerhaft sperren
und vor der nächsten Benutzung muss eine
Geräteformatierung durchgeführt werden. Dies
bedeutet, dass alle auf dem DTVP gespeicherten
Daten verlorengehen und Sie ein neues Passwort
erstellen müssen.
Abb. 11.1 – Fehlgeschlagene Anmeldung
Diese Sicherheitsmaßnahme begrenzt die
Möglichkeit von Unbefugten, unzählige
Loginversuche durchzuführen, um Zugang zu
Ihren sensiblen Daten zu erhalten.
Auch wenn Sie der Besitzer des DTVP sind und
Ihr Passwort vergessen haben, werden
dieselben Sicherheitsmaßnahmen ausgeführt,
einschließlich der Geräteformatierung.*
Weitere Einzelheiten zu dieser Funktion siehe
‘Sperrfunktion’ auf Seite 26.
Abb. 11.2 – 7. Fehlgeschlagene Anmeldung
*Hinweis: Bei einer Geräteformatierung werden ALLE in der sicheren Datenpartition des DTVP
gespeicherten Daten gelöscht.
Page 85

Dokument Nr. 48000012-001.A02 DataTraveler® Vault - Privacy Seite 26 von 29
Passwort vergessen (Windows und Mac)
Wenn Sie Ihr Passwort vergessen haben,
können Sie auf den Link ‘Passwort
vergessen’ klicken, der beim Starten des
DTVP_Launcher im Anmeldefenster
angezeigt wird (siehe Abb. 11.3.)
Mit dieser Option können Sie ein neues
Passwort erstellen, jedoch wird der DTVP
zum Schutz Ihrer Daten formatiert. Im Laufe
dieses Prozesses werden alle im sicheren
Bereich gespeicherten Daten gelöscht.*
Wenn Sie auf ‘Passwort zurücksetzen’
klicken, wird eine Nachricht (Abb. 11.4) mit
der Frage angezeigt, ob Sie vor dem
Durchführen der Formatierung ein neues
Passwort eingeben möchten. Sie haben
jetzt die Wahl 1) dies durch Klicken auf ‘OK’
zu bestätigen oder 2) durch Klicken auf
‘Abbrechen’ abzubrechen und zum
Anmeldefenster zurückzukehren.
Abb. 11.3 – Passwort vergessen
Wenn Sie Fortfahren gewählt haben,
werden Sie aufgefordert, ein neues
vollständiges Passwort und einen neuen
Hinweis einzugeben. Der Hinweis ist kein
Pflichtfeld, kann jedoch eine nützliche
Hilfestellung zur Erinnerung an das
Passwort sein, wenn Sie es vergessen
haben sollten.
(Hinweis: Der Hinweis und das DTVP
Passwort dürfen NICHT identisch sein.)
Abb. 11.4 – Abfrage vor Formatierung
Passwort vergessen (Linux)
Wenn Sie Ihr Passwort vergessen haben können Sie den Befehl dtvp_forgotpasswordin der
/media/DTVP/linux/linux32$-Aufforderung eingeben und im Fenster "Terminal” Anwendung
ausführen. Mit dieser Option können Sie ein neues Passwort erstellen, jedoch wird der DTVP
zum Schutz Ihrer Daten formatiert. Im Laufe dieses Prozesses werden alle im sicheren Bereich
gespeicherten Daten gelöscht.
*Hinweis: Bei einer Geräteformatierung werden ALLE in der sicheren Datenpartition des DTVP
gespeicherten Daten gelöscht.
Page 86

Dokument Nr. 48000012-001.A02 DataTraveler® Vault - Privacy Seite 27 von 29
Konflikt von Laufwerksbuchstaben (Windows Betriebssystem)
Wie im Abschnitt ‘Systemanforderungen’ dieses Handbuchs (auf Seite 3) erwähnt, benötigt der
DTVP zwei freie, aufeinanderfolgende Laufwerksbuchstaben NACH dem letzten physischen
Speicher, der vor der ‘Lücke’ in in den Laufwerksbuchstabenzuweisungen erscheint (siehe
Abb. 11.5.) Dies bezieht sich NICHT auf Netzwerkfreigaben, da diese speziell für
Benutzerprofile sind und sich nicht auf das System-Hardwareprofil selbst beziehen und daher
im Betriebssystem als verfügbar erscheinen.
Dies bedeutet, dass Windows dem DTVP einen Laufwerksbuchstaben zuordnen kann, der
bereits durch eine Netzwerkfreigabe oder einen Universal Naming Convention (UNC) Pfad
verwendet wird, wodurch ein Laufwerksbuchstabenkonflikt entsteht. Sollte dies eingetreten
sein, wenden Sie sich für die Änderung von Laufwerkbuchstabenzuweisungen in Windows Disk
Management (Administratorrechte erforderlich) bitte an Ihren Administrator oder an die
Helpdesk-Abteilung.
Abb. 11.5 – Mein Computer
In diesem Beispiel verwendet der DataTraveler Laufwerk F:. Es ist das erste verfügbare
Laufwerk nach Laufwerk E: (dem letzten physikalischen Laufwerk vor der
Laufwerksbuchstaben-Lücke). Da der Buchstabe G: eine Netzwerkfreigabe und kein Teil des
Hardware-Profils ist, versucht der DTVP möglicherweise, ihn als zweiten Laufwerksbuchstaben
zu verwenden, was zu einem Konflikt führen würde.
Wenn es in Ihrem System keine Netzwerkfreigaben gibt und der DTVP dennoch nicht lädt, ist
es möglich, dass ein Kartenleser, ein Wechselmedium oder ein vorher installiertes Gerät die
Laufwerksbuchstabenzuordnung festhält und noch immer einen Konflikt verursacht.
Beachten Sie bitte, dass sich das Drive Letter Management (DLM) in Windows XP SP3, Vista
und 7 erheblich verbessert hat, so dass dieser Fehler möglicherweise nicht auftritt. Wenn Sie
den Konflikt nicht lösen können, wenden Sie sich für weitere Unterstützung bitte an die
Abteilung für technischen Support bei Kingston.
Page 87

Dokument Nr. 48000012-001.A02 DataTraveler® Vault - Privacy Seite 28 von 29
Fehlermeldungen
Datei kann nicht erstellt werden – Diese Fehlermeldung wird angezeigt, wenn Sie versuchen,
eine Datei oder einen Ordner zu IN einer sicheren Datenpartition zu ERSTELLEN wenn Sie im
schreibgeschützten Modus eingeloggt sind.
Abb. 12.1 – Fehlermeldung Datei kann nicht erstellt werden
Datei oder Ordner kann nicht kopiert werden – Diese Fehlermeldung wird angezeigt, wenn Sie
versuchen, eine Datei oder einen Ordner zu IN DIE sichere Datenpartition zu KOPIEREN wenn
Sie im schreibgeschützten Modus eingeloggt sind.
Abb. 12.2 – Fehlermeldung Datei oder Ordner kopieren nicht möglich
Datei oder Ordner kann nicht bearbeitet werden – Diese Fehlermeldung wird angezeigt, wenn
Sie versuchen, eine Datei oder einen Ordner zu IN DER sichere Datenpartition zu
BEARBEITEN wenn Sie im schreibgeschützten Modus eingeloggt sind.
Abb. 12.3 – Fehlermeldung Datei oder Ordner Bearbeiten nicht möglich
Wenn Sie im schreibgeschützten Modus eingeloggt sind und das Gerät entsperren möchten,
um vollen Lese-/Schreibzugriff auf die sichere Datenpartition zu erhalten, müssen Sie den
DTVP herunterfahren und sich erneut anmelden, wobei das Kontrollkästchen „Read-Only
Mode“ nicht markiert sein darf.
Page 88

Dokument Nr. 48000012-001.A02 DataTraveler® Vault - Privacy Seite 29 von 29
DTVP Linux Befehle
Befehl Schreibweise* Bezeichnung
dtvp_about
./dtvp_about
Zeigt die Seriennummer, Firmware- und
Anwendungsversion des DTVP an
Kann auch ausgeführt werden, wenn der Benutzer nicht
im DTVP eingeloggt ist
dtvp_forgotpassword
./dtvp_forgotpassword
Setzt den DTVP zurück und ermöglicht Ihnen, ein neues
Passwort zu erstellen
Kann nur ausgeführt werden, wenn der Benutzer NICHT
im DTVP-Gerät eingeloggt ist
(Alle in der sicheren Datenpartition gespeicherten Daten
gehen verloren)
dtvp_initialize
./dtvp_initialize
Installiert den DTVP und bereitet das Gerät für die
erstmalige Benutzung vor
Wird nur vor der erstmaligen Benutzung durchgeführt
dtvp_login
./dtvp_login
Fordert zur Eingabe des DTVP Passworts zum
Einloggen des Benutzers in die sichere Datenpartition
auf
Kann nur ausgeführt werden, wenn der Benutzer NICHT
in das DTVP Gerät eingeloggt ist und NACHDEM das
Gerät installiert wurde
dtvp_logout
./dtvp_logout
Loggt den Benutzer aus dem DTVP aus und schließt die
sichere Datenpartition
Kann nur ausgeführt werden, wenn der Benutzer im
DTVP-Gerät eingeloggt ist
*Hinweis: Zur Ausführung der DTVP Linux-Befehle müssen Sie ein Anwendungsfenster
"Terminal" öffnen und zu dem Ordner navigieren, der alle fünf Dateien enthält. Jedem Befehl
müssen die beiden folgenden Zeichen vorangestellt werden: ‘./’ (ein Punkt und ein Schrägstrich
wie in vorstehender Tabelle angezeigt.)
Page 89

Document Nº 48000012-001.A02 DataTraveler® Vault - Privacy Page 1 sur 29
DataTraveler® Vault - Privacy Manuel d'utilisation
Page 90

Document Nº 48000012-001.A02 DataTraveler® Vault - Privacy Page 2 sur 29
Table des Matières
À propos de ce manuel ............................................................................................................ 3
Configuration système............................................................................................................. 3
Recommandations ................................................................................................................... 4
Configuration (Environnement Windows) ............................................................................. 5
Initialisation du périphérique (Environnement Windows)..................................................... 6
Utilisation du périphérique (Environnement Windows) ...................................................... 10
Options du périphérique (Environnement Windows).......................................................... 11
Configuration (Environnement Mac)..................................................................................... 13
Initialisation du périphérique (Environnement Mac) ........................................................... 14
Utilisation du périphérique (Environnement Mac)............................................................... 18
Options du périphérique (Environnement Mac)................................................................... 19
Initialisation du périphérique (Environnement Linux)......................................................... 22
Initialisation du périphérique (Environnement Linux)......................................................... 24
Aide et dépannage.................................................................................................................. 25
Verrouillage du périphérique .....................................................................................................25
Mot de passe oublié (Windows et Mac) ....................................................................................26
Conflit de lettres de lecteur (Environnement Windows) .........................................................27
Messages d'erreur ......................................................................................................................28
Commandes Linux DTVP ...........................................................................................................29
Page 91

Document Nº 48000012-001.A02 DataTraveler® Vault - Privacy Page 3 sur 29
À propos de ce manuel
Ce manuel d'utilisation est destiné à la clé USB DataTraveler® Vault - Privacy (ou DTVP dans
ce document) basée sur la version en sortie d'usine, sans personnalisation.
Configuration système
Plateforme PC
• Processeur Pentium III ou équivalent
(ou plus rapide)
• 15Mo d'espace disque libre
• USB 2.0
• Deux lettres de lecteur disponibles et
consécutives après le dernier disque
physique*
Systèmes d'exploitation supportés
• Windows 7
• Windows Vista® SP1, SP2
• Windows XP SP2, SP3
Plateforme Mac
• 15Mo d'espace disque libre
• USB 2.0
Prise en charge des systèmes
d'exploitation
• Mac OS X 10.5.x
• Mac OS X 10.6.x
Plateforme Linux
• 5MO d'espace disque libre
• USB 2.0
Prise en charge des systèmes
d'exploitation
• Kernel Linux v2.6
Certaines versions de Linux nécessitent des privilèges de super utilisateur (ou utilisateur racine)
pour exécuter correctement les commandes de la DTVP dans la fenêtre de l'application Terminal.
Figure 1.1 – Ports USB 2.0, Type A
Figure 1.2 – DTVP
*Remarque : Voir la section "Conflit de lettres de lecteur" page 27.
Page 92

Document Nº 48000012-001.A02 DataTraveler® Vault - Privacy Page 4 sur 29
Recommandations
Pour que la DTVP bénéficie d'une alimentation suffisante, elle doit être insérée directement sur
un port USB d'un ordinateur portable ou de bureau, comme indiqué dans la Figure 1.3. Évitez
de brancher la DTVP sur un périphérique équipé d'un port USB, par exemple un clavier ou un
concentrateur USB alimenté, comme indiqué dans la Figure 1.4.
Figure 1.3 – Utilisation conseillée Figure 1.4 – Déconseillé
Page 93

Document Nº 48000012-001.A02 DataTraveler® Vault - Privacy Page 5 sur 29
Configuration (Environnement Windows)
1. Connectez la DTVP à un port USB disponible de
votre ordinateur de bureau ou portable et
attendez que Windows la détecte.
• Les utilisateurs de Windows XP verront
s'afficher une notification Nouveau matériel
détecté, comme indiquée à la Figure 2.1.
• Les utilisateurs de Windows Vista/ 7 verront
s'afficher une notification de pilote de
périphérique, comme indiquée à la Figure 2.2.
Lorsque la détection du nouveau matériel est
terminée, Windows vous demande de lancer le
processus d'initialisation.
• Les utilisateurs Windows XP peuvent ignorer
l'étape 2 et passer à la page 6 – Initialisation
du périphérique.
• Windows Vista/7 affiche une fenêtre AutoPlay,
similaire à celle indiquée à la Figure 2.3.
2. Sélectionnez l'option Exécuter
DTVP_Launcher.exe.
Si la fonction AutoPlay de Windows ne démarre pas,
naviguez sur le CD-ROM (Figure 2.4) et lancez
manuellement le programme DTVP_Launcher. Le
processus d’installation démarrera.
Figure 2.4 – Contenu de la DTVP
Figure 2.1 – Nouveau matériel détecté
(Windows XP)
Figure 2.2 – Installation du pilote de
périphérique
(Windows Vista/7)
Figure 2.3 – Fenêtre AutoPlay
(Windows Vista/7)
Remarque : Les options du Menu
affiché dans la fenêtre AutoPlay
peuvent varier selon les programmes
installés sur votre ordinateur.
L'exécution automatique (AutoRun)
lancera automatiquement le
processus d'initialisation
.
Page 94

Document Nº 48000012-001.A02 DataTraveler® Vault - Privacy Page 6 sur 29
Initialisation du périphérique (Environnement Windows)
1. Sélectionnez votre langue préférée dans le menu déroulant, puis cliquez sur Suivant (Figure 3.1).
Figure 3.1 – Sélection de la langue
2. Lisez l'accord de licence et cliquez sur Suivant (Figure 3.2). Remarque : Vous devez
accepter l'accord de licence pour continuer. Sinon, le bouton "Suivant" reste désactivé.
Figure 3.2 – Accord de licence
Page 95

Document Nº 48000012-001.A02 DataTraveler® Vault - Privacy Page 7 sur 29
3. Créez un mot de passe pour protéger les données sur votre DTVP. Saisissez-le dans le
champ Mot de passe, puis répétez-le dans le champ Confirmation du mot de passe, comme
indiqué à la Figure 3.3. Le mot de passe doit respecter les critères suivants pour que le
processus d'initialisation vous autorise à continuer :
1. Le mot de passe doit contenir entre 6 et 16 caractères.
2. Le mot de passe doit respecter trois (3) des critères suivants :
- Des lettres MAJUSCULES, minuscules, des caractères numériques et/ou des
caractères spéciaux (!, $, etc.)
Vous pouvez aussi utiliser l'indice du mot passe, mais ce champ n'est pas obligatoire.
L'indice pourra vous aider à vous souvenir du mot de passe oublié. Remarque : L'indice NE
DOIT PAS être une copie exacte du mot de passe.
Figure 3.3 – Configuration du mot de passe
Page 96

Document Nº 48000012-001.A02 DataTraveler® Vault - Privacy Page 8 sur 29
4. Saisissez vos informations personnelles dans les champs de texte affichés (voir la Figure
3.4) Remarque : Les informations saisies dans ces champs NE DOIVENT PAS contenir la
chaîne des caractères du mot de passe, tel que saisi à l'étape 3. Ces champs sont
optionnels et peuvent être vides, si vous le souhaitez.
• Le champ Nom peut contenir jusqu'à 32 caractères, mais ne doit pas
contenir le mot de passe exact.
• Le champ Entreprise peut contenir jusqu'à 32 caractères, mais ne doit pas
contenir le mot de passe exact.
• Le champ Détails peut contenir jusqu'à 156 caractères, mais ne doit pas
contenir le mot de passe exact.
Figure 3.4 – Informations personnelles
5. Cliquez sur Terminer pour terminer le processus d'initialisation du périphérique.
Page 97

Document Nº 48000012-001.A02 DataTraveler® Vault - Privacy Page 9 sur 29
La DTVP formate ensuite la partition des données sécurisées (Figure 3.5) et vous avertit
lorsque cette opération est terminée (Figure 3.6).
Remarque : Si vous utilisez Windows XP en mode Non-Admin, le programme de
formatage peut durer une minute au maximum.*
6. Cliquez sur OK pour continuer.
Figure 3.5 – Formatage de la DTVP Figure 3.6 – Formatage terminé
Initialisation terminée.
*Remarque : La durée du formatage peut varier selon l'ordinateur et la capacité de la DTVP.
Page 98

Document Nº 48000012-001.A02 DataTraveler® Vault - Privacy Page 10 sur 29
Utilisation du périphérique (Environnement Windows)
Lorsque l'initialisation de la DTVP est
terminée, vous pouvez accéder avec votre mot
de passe à la partition des données
sécurisées et utiliser ses fonctions. Pour cela,
suivez les instructions ci-dessous.
1. Insérez la DTVP dans un port USB, sur un
ordinateur portable ou de bureau, puis
saisissez votre mot de passe (voir la Figure
4.1).
2. Après avoir saisi le mot de passe, cliquez
sur le bouton Connexion pour continuer.
• Si le mot de passe est correct, l'accès
est autorisé et vous pouvez utiliser la
DTVP.
Figure 4.1 – Fenêtre de connexion
• Si le mot de passe est erroné, un message d'erreur s'affiche sous le champ Indice,
indiquant un échec de la connexion.
Remarque : Pendant la procédure d'accès, si un mot de passe erroné est saisi, vous pouvez
immédiatement ressayer. Mais une fonction de sécurité intégrée gère le nombre de tentatives
d'accès*. Après 10 tentatives d'accès erronées, la DTVP se verrouille et ne pourra être utilisée
qu'après un formatage de la partition des données sécurisées. PAR CONSÉQUENT, TOUTES
LES DONNÉES QUE LA DTVP CONTIENT SERONT DÉTRUITES. Pour en savoir plus sur
cette fonction, consultez la section Verrouillage du périphérique à la page 20.
3. Vous pouvez déverrouiller le mode "Lecture uniquement" de la partition de données
sécurisées, aussi appelé "Mode de protection en écriture" en décochant la case Mode
Lecture uniquement avant le processus d'accès. Lorsque vous accédez à la clé USB en
mode Lecture seulement, vous pouvez uniquement ouvrir ou voir les contenus de la DTVP,
mais vous ne pouvez pas actualiser, modifier ou effacer aucun des contenus. Remarque :
Le mode Lecture uniquement n'affiche pas l'option Formatage dans le menu de la DTVP, tel
qu'il est présenté à la page 11.
Lorsque vous accédez à la clé USB en mode Lecture uniquement et que vous souhaitez la
déverrouiller pour bénéficier d'un accès complet en écriture et en lecture à la partition
sécurisée, vous devez fermer la DTVP (voir page 12), puis rétablir la connexion après avoir
décoché la case "Mode Lecture uniquement" pendant le processus d'accès.
*Remarque : Lorsque la connexion entre l'ordinateur et la clé USB est établie, le compteur de
tentatives d'accès est remis à zéro.
Page 99

Document Nº 48000012-001.A02 DataTraveler® Vault - Privacy Page 11 sur 29
Options du périphérique (Environnement Windows)
Tant que vous êtes connecté au périphérique, une icône DTVP est affichée dans le coin
supérieur droit de la barre des tâches Windows (Figure 5.1). Remarque : Les utilisateurs
Windows 7 doivent cliquer sur le bouton Flèche haute dans la barre des tâches pour accéder à
l'icône DTVP (Figure 5.2).
Cliquez une fois sur l'icône DTVP pour afficher le menu suivant :
Figure 5.1 – Icône DTVP dans la barre des tâches Figure 5.2 – Icône DTVP dans la barre des tâches
(Utilisateurs Windows 7)
Paramètres de la DTVault Privacy
• Vous pouvez modifier votre mot de passe et/ou l'indice (Figure 5.3)
• Vous pouvez ajouter/ afficher/ modifier vos informations personnelles (Figure 5.4)
• Vous pouvez modifier la langue sélectionnée (Figure 5.5)
Remarque : Pour des raisons de sécurité, le mot de passe actuel de votre DTVP vous sera
demandé lorsque vous souhaitez actualiser ou modifier ces paramètres.
Figure 5.3
Modifier le mot de passe
Figure 5.4
Informations personnelles.
Figure 5.5
Sélectionnez la langue
Page 100

Document Nº 48000012-001.A02 DataTraveler® Vault - Privacy Page 12 sur 29
Parcourir la DTVault Privacy
• Vous pouvez parcourir le contenu de la partition des données sécurisées pendant que
vous êtes connecté.
Formater la DTVault Privacy*
• Vous pouvez formater la partition des
données sécurisées (Avertissement : Toutes
les données seront détruites). (Figure 5.6)
Assistance en ligne (nécessite une connexion
internet)
• Cette fonction ouvre votre navigateur internet
et affiche la page
http://www.kingston.com/support/ pour vous
permettre de consulter les informations
supplémentaires de l'assistance.
Figure 5.6 – Avertissement avant
formatage
À propos de la DTVault Privacy
• Cette section affiche des informations
spécifiques à la DTVP, incluant les données
des versions de l'application et du firmware
(Figure 5.7)
Fermer la DTVault Privacy
• Permet de fermer correctement la DTVP avant
de la déconnecter physiquement du système et
en toute sécurité.
Figure 5.7 – À propos de la DTVP
*Remarque : Le mot de passe actuel de votre DTVP est nécessaire sous Windows Vista et
Windows 7.
- Fin de la section Windows -
 Loading...