

Kingsman ZVFCV39, ZVFCV47, ZVFCV42 Owner's Operation And Installation Manual
INSTALLER: Leave this manual with the appliance.
CONSUMER: Retain this manual for future reference.
2340 Logan Ave., Winnipeg, MB, Canada, Phone: (204) 632-1962 Printed in Canada April 16, 2015 Pant # 39ZVFCV-MAN
This appliance must be
installed by a licensed
plumber or gas fitter in
the Commonwealth of
Massachusetts and meet
the requirements of 527
CMR 30 and 248 CMR.
⚠ -WARNING-
FOR USE ONLY WITH
A LISTED GAS-FIRED
UNVENTED
DECORATIVE ROOM
HEATER
NOT TO EXCEED
40,000 BTU/H.
DO NOT BUILD A WOOD
FIRE.
⚠ -WARNING-
Carefully review the instructions
supplied with the decorative
type unvented room heater for
the minimum fireplace size
requirement.
DO NOT INSTALL AN
APPLIANCE IN
THIS FIREBOX UNLESS THIS
FIREBOX
MEETS THE MINIMUM
DIMENSIONS REQUIRED
FOR THE INSTALLATION.
⚠ -WARNING-
WARNING: If the information in this manual is not followed
exactly, a fire or explosion may result causing property
damage, personal injury or loss of life.
– Do not store or use gasoline or other flammable vapors and liquids in the vicinity
of this or any other appliance.
– WHAT TO DO IF YOU SMELL GAS
• Do not try to light any appliance.
• Do not touch any electrical switch; do not use any phone in your building.
• Immediately call your gas supplier from a neighbor’s phone. Follow the gas
supplier’s instructions.
• If you cannot reach your gas supplier, call the fire department.
– Installation and service must be performed by a qualified installer, service
agency, or the gas supplier.
⚠ -WARNING-
Improper installation,
adjustment, alteration, service,
or maintenance can cause injury
or property damage. Refer to
this manual for correct
installation and operational
procedures. For assistance or
additional information consult a
qualified installer, service
agency, or the gas supplier.
⚠ -WARNING-
This Firebox is to be used only
with certain vent-free gas log
heaters (refer to table). Do not
burn wood or other materials in
this firebox.
⚠ -WARNING-
This is an unvented gas-fired heater. It uses air (oxygen) from the room in which
installed. Provisions for adequate combustion and ventilation must be provided.
⚠ -WARNING-
If the information in this
manual is not followed
exactly, a fire or
explosion may result
causing property
damage, personal injury
or loss of life.
Owner’s Operation and Installation Manual
Models ZVFCV39, ZVFCV42, ZVFCV47
Certified to: ANSI Z21.91-2007
Listed Certified for USA
Ventless Firebox Enclosures For Gas-Fired Unvented Decorative Room Heaters
Table of Contents
Table of Contents…………………………………………………………………………………………………….
2
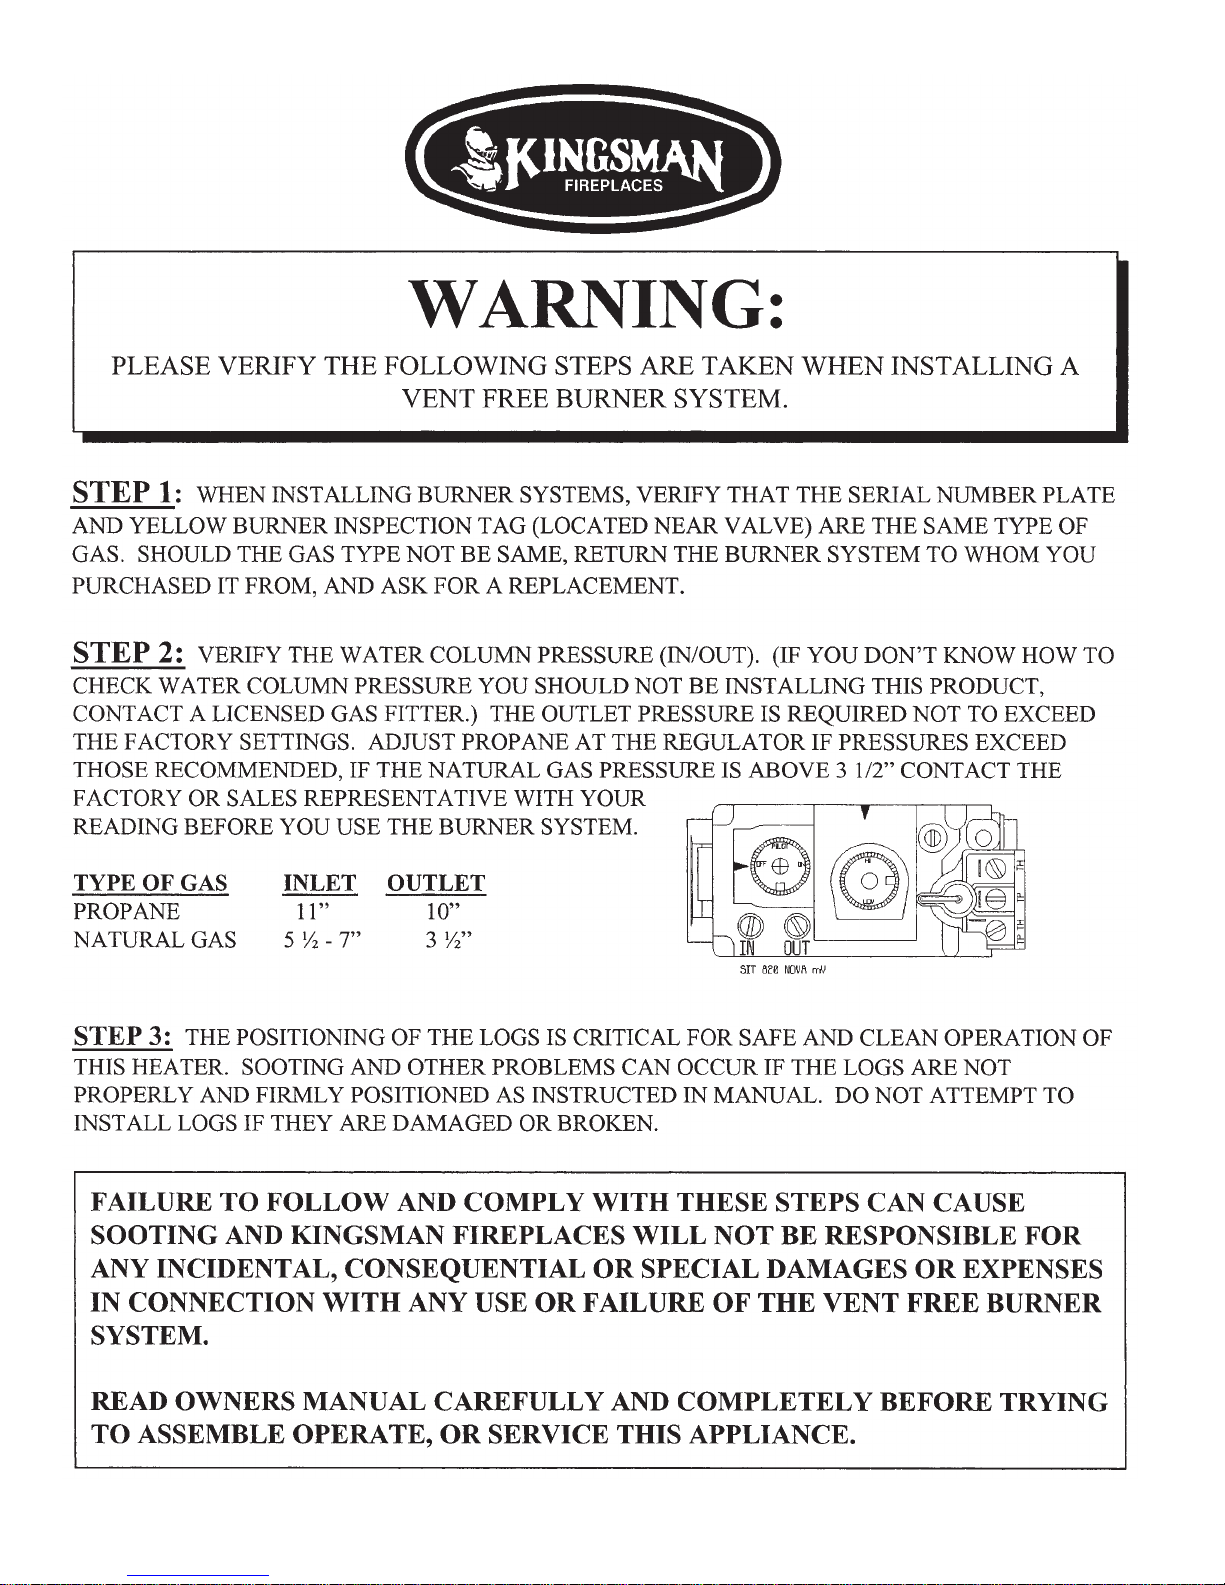
Warning: Please Verify The Following Steps Are Taken When Installing A Vent Free Burner System……
3
Pre-installation Questions and Answers / Operating Instructions………………………………………………
4
Burner System Options………………………………………………………………………………………………
5
Safety Information and Warnings…………………………………………………………………………………...
6-7
Universal Firebox Information……………………………………………………………………………………….
8
Recommendations for Finishing of Clean View Installations…………………………………………………….
9
Framing- Nailing Tab Guide…………………………………………………………………………………………
10
Fireplace Framing…………………………………………………………………………………………………….
11
39ZVFCV Fireplace and Framing Dimensions……………………………………………………………………
12
42ZVFCV Fireplace and Framing Dimensions……………………………………………………………………
13
47ZVFCV Fireplace and Framing Dimensions……………………………………………………………………
14
Installation Clearances – 39 / 42 / 47 ZVFCV……………………………………………………………………..
15
39 / 42 / 47 ZVFCV Facing Requirements…………………………………………………………………………
16
Basic Finishing 1: No Surround…………………………………………………………………………………...
17
Basic Finishing 2: S1 or S1PF Surround…………………………………………………………………………
18
Basic Finishing 3: Concrete Board Behind S2PF Surround (3/4” Maximum Total Thickness)…………….
19
Basic Finishing 4: Stone or Brick Around S2PF Surround……………………………………………………..
20
Basic Finishing 5: Tile Border Behind S2PF Surround (3/4” Maximum Total Thickness)…………………..
21
39ZVFCV Mantel Clearances……………………………………………………………………………………….
22
42ZVFCV Mantel Clearances……………………………………………………………………………………….
23
47ZVFCV Mantel Clearances……………………………………………………………………………………….
24
Air For Combustion And Ventilation………………………………………………………………………………..
25-28
ZVFCV 39 / 42 / 47 Z46FK Optional Fan Kit Installation…………………………………………………………
29
Split Receptacle- Switch Control Outside of Fireplace…………………………………………………………...
30
ULK2 Universal Light Kit -Optional Accent Lighting Kit- ZVFCV39 / 42 / 47…………………………………..
31
Brick Liner Installation………………………………………………………………………………………………..
32
Gas Line Installation………………………………………………………………………………………………….
33-34
Installing Burner Systems……………………………………………………………………………………………
35
Installing Log Grate…………………………………………………………………………………………………..
36
Log Placement for LOGF18 (GLVF24)…………………………………………………………………………….
37-38
Log Placement for LOGF24 (GLVF24)…………………………………………………………………………….
39-40
Log Placement for LOGF30 (GLVF24)…………………………………………………………………………….
41-43
Millivolt System, Lighting, and Burner Control…………………………………………………………………….
44
Hood Installation / Pull Screen Removal…………………………………………………………………………..
45
S1 / S1PF Surround Installation…………………………………………………………………………………….
46
S2PF Surrounds Installation………………………………………………………………………………………...
47
Troubleshooting……………………………………………………………………………………………………….
48-49
ZVFCV39 Parts List…………………………………………………………………………………………………..
50
ZVFCV42 Parts List…………………………………………………………………………………………………..
51
ZVFCV47 Parts List…………………………………………………………………………………………………..
52
Lifetime Limited Warranty……………………………………………………………………………………………
53
2
3

Pre-installation Questions and Answers
Operating Instructions
1. Be sure to read and understand all the instructions in this manual before operation of appliance.
2. Ensure all wiring is correct and properly enclosed to prevent possible shock.
3. Check for gas leaks.
4. Make sure the glass door is properly installed before operation. Never operate the appliance with the glass door
removed.
5. Make sure venting and termination cap are installed and unobstructed.
6. If brick or porcelain liners are used, ensure they are installed.
7. Verify that the pilot can be seen when lighting the appliance. If not, the log or rock placement is incorrect.
8. If the unit is turned off, you must wait a minimum of 60 seconds before re-lighting it.
4
About curing of the paint
Your stove or fireplace has been painted with the highest quality silicone stove paint. This paint dries quickly in 15-20
minutes when first applied at the factory. However, due to the high temperature silicone components, the paint will cure
when heat is applied to the appliance as it is first used. The following information applies to the curing process to get the
paint fully hard and durable.
Fire the appliance four successive times for 10 minutes each firing and a 5 minute cool down between each. Be aware
during log and firebox paint curing that a white deposit may be developing on the inside of the glass doors. It is important
to remove this white deposit from the glass doors using a fireplace glass cleaner.
Babies, small children, pregnant women and pets should leave the area during the cure phase.
Ventilate well, open doors and windows.
Do not touch during curing.
Why does my fireplace or stove give off odour?
It is normal for your fireplace to give off some odor at first. This is due to the curing of the paint, adhesives, silicones and
any undetected oil from the manufacturing process as well as the finishing materials used with the installations (e.g.
marble, tile and the adhesives used to adhere this product to the walls can react with heat and cause odours).
It is recommended that you burn your gas fireplace or stove for a minimum of four hours at a time with the fan off (if a fan
is present) after the curing of the paint has been completed. These odours can last upward to 40 hours of burn time; keep
burning at a minimum of four hours per use until odours dissipate.
Noise coming from the fireplace?
Noise is caused by the expansion and contraction of metal as the appliance heats up and cools down. This is normal and
is similar to the sounds produced by a furnace or heating duct. This noise does not affect the operation or longevity of
your fireplace.
It is also normal for the fan to make some noise when it comes on. This noise can be reduced somewhat by turning down
the speed of the fan with the variable speed control. Be aware, however, that this will reduce the volume of heated air
circulated into the room by the fan.
Note to the Installer:
Be sure appliance is working properly and its operation (including remote control operation, if included) is fully explained
to and understood by the customer.
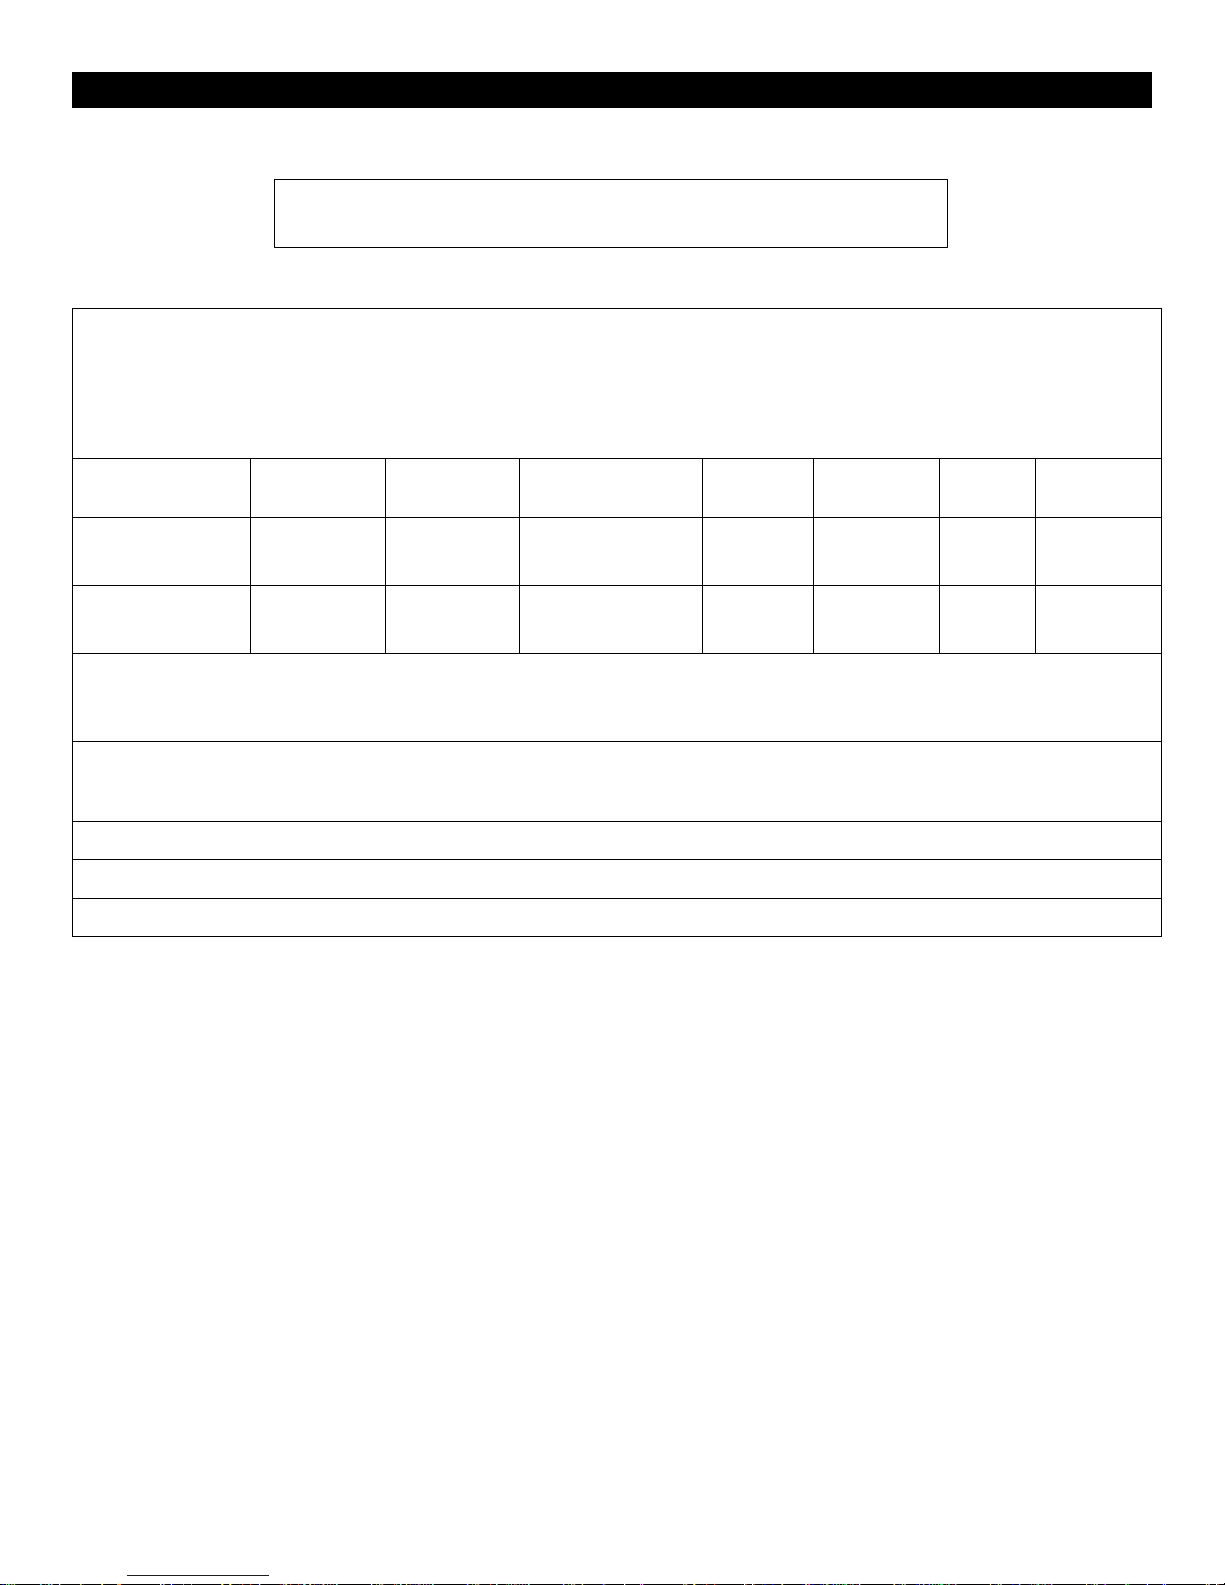
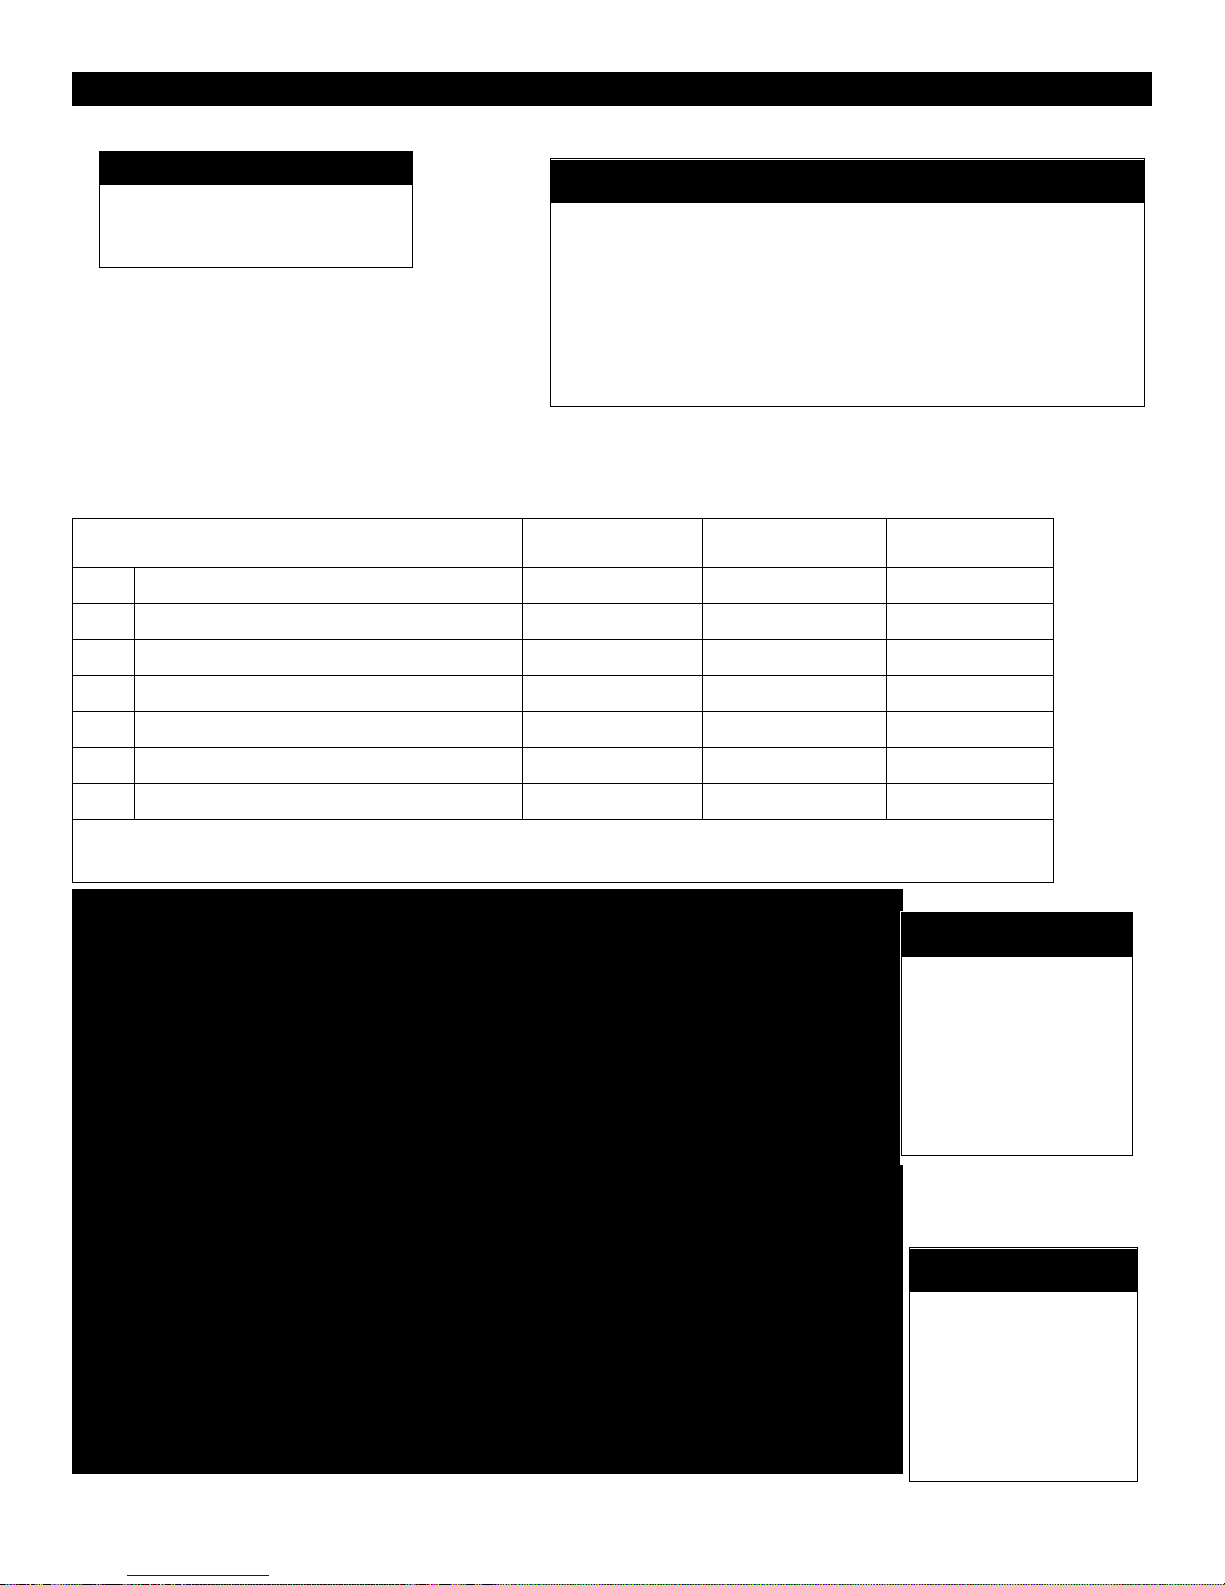
Burner System Options
GLVF24 Log Grate Burner System
Controls are located underneath log grate inside firebox.
Burner Model
Valve Type
Fuel Type
BTU - Input
Min/Max
Inlet
Manifold
Pressure
Orifice
Size
Primary
Air
GLVF24MVN
Millivolt
Natural
Gas
25,500 – 38,250
5.5”/10”
1.6-3.5”
32
.218”
GLVF24MVP
Millivolt
Liquid
Propane
29,000 – 38,000
11/13”
6.3-10”
49
Full Open
The GL series of gas log sets can be used in ZVFCV39U, ZVFCV42U and ZVFCV47 Universal Fireboxes
Fibre Log Set – Required for burners above
LOGF18 Fibre Log Set 18” (ZVFCV39 / ZVFCV42 / ZVFCV47)
LOGF24 Fibre Log Set 24” (ZVFCV39 / ZVFCV42 / ZVFCV47)
LOGF30 Fibre Log Set 30” (ZVFCV47 Only)
This appliance is equipped for (Natural or Propane) Gas.
Field conversion is not permitted.
5
See chart below for required burner system:
39ZVFCV, 42ZVFCV, and 47ZVFCV are approved as Universal Vent Free Boxes.
SAFETY INFORMATION WARNINGS
NOTE: It is recommended that a Carbon Monoxide (CO)
Detector be installed in or near bedrooms and on all levels
of your home. Place a detector about 15 feet (4.5 meters)
outside the room that houses your gas appliance.
6
DANGER
CARBON MONOXIDE POISONING
MAY LEAD TO DEATH!
WARNINGS
Important: Read this owner’s manual carefully and
completely before trying to assemble, operate, or service this
firebox. Improper use of this firebox can cause serious injury
or death from burns, fire, explosion, electrical shock, and
carbon monoxide poisoning.
Early signs of carbon monoxide poisoning resemble the
flu, with headaches, dizziness, and / or nausea. If you have
these signs, the heater may not be working properly. Get
fresh air at once! Turn off gas appliance. Have appliance
serviced. Some people (such as pregnant women, persons
with heart or lung disease, persons with anemia and those at
high altitudes) are more affected by carbon monoxide than
others. Make certain you read and understand all warnings.
Warning: Failure to position parts in accordance with
these diagrams or failure to use only part specifically
approved with this heater may result in property
damages or personal injury.
1. Use correct gas type for your appliance. Do not convert
from one gas type to another.
2. If this appliance is for use with Propane gas, do not
place propane supply tank(s) inside any structure.
Locate propane supply tank(s) outdoors.
3. If you smell gas:
– Shut off gas supply.
– Do not try to light any appliance.
– Do not touch any electrical switch; do not use any
phone in your building.
– Immediately call your gas supplier from a neighbor’s
phone. Follow the gas supplier’s instructions.
– If you cannot reach your gas supplier, call the fire
department.
4. Do not use this appliance for burning trash or cooking.
Never place matches, paper, garbage, or any other
material on top of logs or logs into flame.
5. Warning: Always operate appliance with front fireplace
screens closed.
6. Make sure any safety screen or guard removed for
servicing is in place before running appliance.
7. Never run appliance in a small, closed room. Open the
door into next room to help ventilate.
8. If appliance shuts off, do not relight until you provide
fresh outside air. If appliance keeps shutting off, have it
serviced.
9. Do not run appliance:
– where flammable liquids or vapors are used or stored.
– under dusty conditions.
10. Surface of appliance becomes very hot when operating.
Keep children and adults away from hot surface.
Appliance will remain hot for some time after shutdown.
Allow surface to cool before touching.
11. Do not use this appliance if any part has been
submerged under water. Immediately call a qualified
technician to inspect the appliance and to replace any
part of the control system and gas control which has
been under water.
12. The installation must conform with local codes or, in the
absence of local codes, with the National Fuel Gas
Code, ANSI Z223.1.
13. Never install the appliance:
– in a bedroom, bathroom, mobile home, or recreational
vehicle.
– where curtains, furniture, clothing, or other flammable
objects are less than forty-two inches (42”) from the
front
of the appliance.
– in high traffic areas.
– in windy or drafty areas.
14. Disconnect the appliance and its individual shut off
valve from the gas supply piping system during any
pressure testing of that system at test pressures in excess
of 1/2 psig, (3.5kPa).
15. Isolate the appliance from the gas supply piping system
by closing its individual manual shut off valve during
any
pressure testing of the the gas supply piping system at
test pressure equal or less than 1/2 psig.
16. Do not use any type of after-market blower that fits
inside the fireplace. Drafts created by these type of
blowers may cause sooting.
This appliance is equipped for (Natural or
Propane) Gas. Field conversion is not permitted.
6
SAFETY INFORMATION WARNINGS Cont.
LOCAL CODES
Install and use fireplace with care. Follow all local codes. In
the absence of local codes, use the latest edition of The
National Fuel Gas Code ANSI Z223.1, also known as NFPA
54*. Firebox must be electrically grounded in accordance
with the National Electrical Code, ANSI/NFPA 70 (latest
edition).
*Available from:
American National Standards Institute, Inc. National Fire Protection Association, Inc.
1430 Broadway BatterymarchPark
New York, NY 10018 Quincy, MA 02260
FOR YOUR SAFETY READ BEFORE LIGHTING
A. This appliance has a pilot which must be lighted by hand. When lighting the pilot, follow these instructions exactly.
B. Before lighting, smell all around the appliance area for gas. Be sure to smell next to the floor because some gas is
heavier than air and will settle on the floor.
What to do if you smell gas
• Do not try to light any appliance.
• Do not touch any electric switch; do not use any phone in your building.
• Immediately call your gas supplier from a neighbor’s phone. Follow the gas supplier’s instructions.
• If you cannot reach your gas supplier, call the fire department.
C. Use only your hand to push in or turn the gas control knob. Never use tools. If the knob will not push in or turn by hand,
don’t try to repair it, call a qualified service technician or gas supplier. Force or attempted repair may result in a fire or
explosion.
D. Do not use this appliance if any part has been under water. Immediately call a qualified service technician to inspect the
appliance and to replace any part of the control system and any gas control which has been under water.
WARNING
If you do not follow these instructions exactly, a fire or
explosion may result causing property damage, personal
injury or loss of life.
17. Turn off appliance and let cool before servicing. Only a
qualified service person should install, service and repair
appliance.
18. Inspect the appliance before use and at least annually by
a professional service person. Frequent cleaning may be
required due to excessive lint from carpeting, bedding
material, etc. It is important that control compartment,
burner and circulating air passage of the appliance be
kept open.
19. When operated for the first time, there will be some
smell from the appliance. This will diminish and
disappear after a few hours of operation.
20. Warning: Do not allow fans to blow directly into the
fireplace. Avoid any drafts that alter flame patterns.
21. Warning: Do not use a blower insert, heat exchanger
insert or other accessory not approved for use with this
heater.
22. The firebox canopy must not be replaced with a canopy
which may be provided with the decorative type
UNVENTED room heater.
23. Warning: Do not operate ceiling fans in same room as
the vent free appliance.
24. Must be installed by a licensed gasfitter in the
Commonwealth of Massachusetts. Complies to code
527CMR.
25. Unvented gas fired appliances may be used only for
supplemental heat and/or decorative purposes and under
no circumstances shall they provide a primary heat
source.
7
Universal Firebox
Model
Firebox Height
Firebox Width Front
Firebox Width Back
Firebox Depth
Firebox Max BTU
ZVFCV39
26”
29.75”
22.5”
15.5”
40,000
ZVFCV42
29.125”
33.875”
26.375”
15.5”
40,000
ZVFCV47
34.125”
39.75”
29.75”
17.25”
40,000
The fireplace hood is packaged on top of the firebox from the factory. It must be installed on the firebox
before operation of the appliance.
The firebox hood must not be modified or replaced with a hood which may be provided with the decorative
type unvented room heater.
USE ONLY KINGSMAN DECORATIVE COMPONENT AND REPLACEMENT PARTS.
Hood
Pull Screen
Pull Screen
Access Cover
8
The ZVFCV39, ZVFCV42, and ZVFCV47 are approved as Zero Clearance Universal Fireboxes.
When installing another manufacturer’s log and burner system, follow the manufacturer’s assembly
instructions.
For Framing, refer to appropriate Framing Specifications section in this manual.
Follow all Clearances to Combustibles in this manual.
When using the optional blower kit (Z46FK) the Thermodisc can be discarded. The two leads from the
blower must be attached directly to the variable speed switch. See Fan Installation section for wiring.
Recommendations for Finishing of Clean View Linear Products
9
When finishing the wall around the fireplace, it is critical that the wall covering be fastened properly. It is acceptable to
pre-drill holes and use self-tapping screws which may be used to fasten a backer for tile, marble, etc. Screws being
installed through non-combustible board should be self-tapping type with a maximum length of 2 inches. Wall covering
fasteners, such as screws or nails, are not permitted in some locations. Do not drill or install longer screws which may
penetrate into the lower cover panel area as this may damage internal components.
Only non-combustible materials may be used over the face of the appliance.
We recommend that DUROCK (non-combustible material) be tied in to the entire perimeter of the fireplace for durability.
Finishing Recommendations (Obtained from professional construction contractors and finishers):
Frame unit with metal studs (minimum 20 gauge).Wooden studs may be used, but may cause drywall screws to pop
or pull due to wood studs drying out.
Minimum of 1/2” DUROCK cement board (this non-combustible panel is ULC listed as a wall shield/floor protector) and
fasten to the entire perimeter framing.
Use fiberglass (mesh) tape for all joints in area of the fireplace.
Use Yellow joint mud (contains high amounts of glue) – two coats, finishing with one coat of green topping mud, sand
and prep for painting.
If not using a surround, a metal “L” Trim may be used to finish perimeter of DUROCK.
Refer to the following website for more information on using DUROCK Cement Board: www.cgcinc.com
OTHER NOTES:
-A full single sheet of non-combustible board (no joints) above the unit is recommended if possible.
-It is preferred to attach the non-combustible board to framing only and not directly to the unit to allow for expansion and
contraction during normal operation.
-Lighter colored painted surfaces may discolor due to heat exposure.
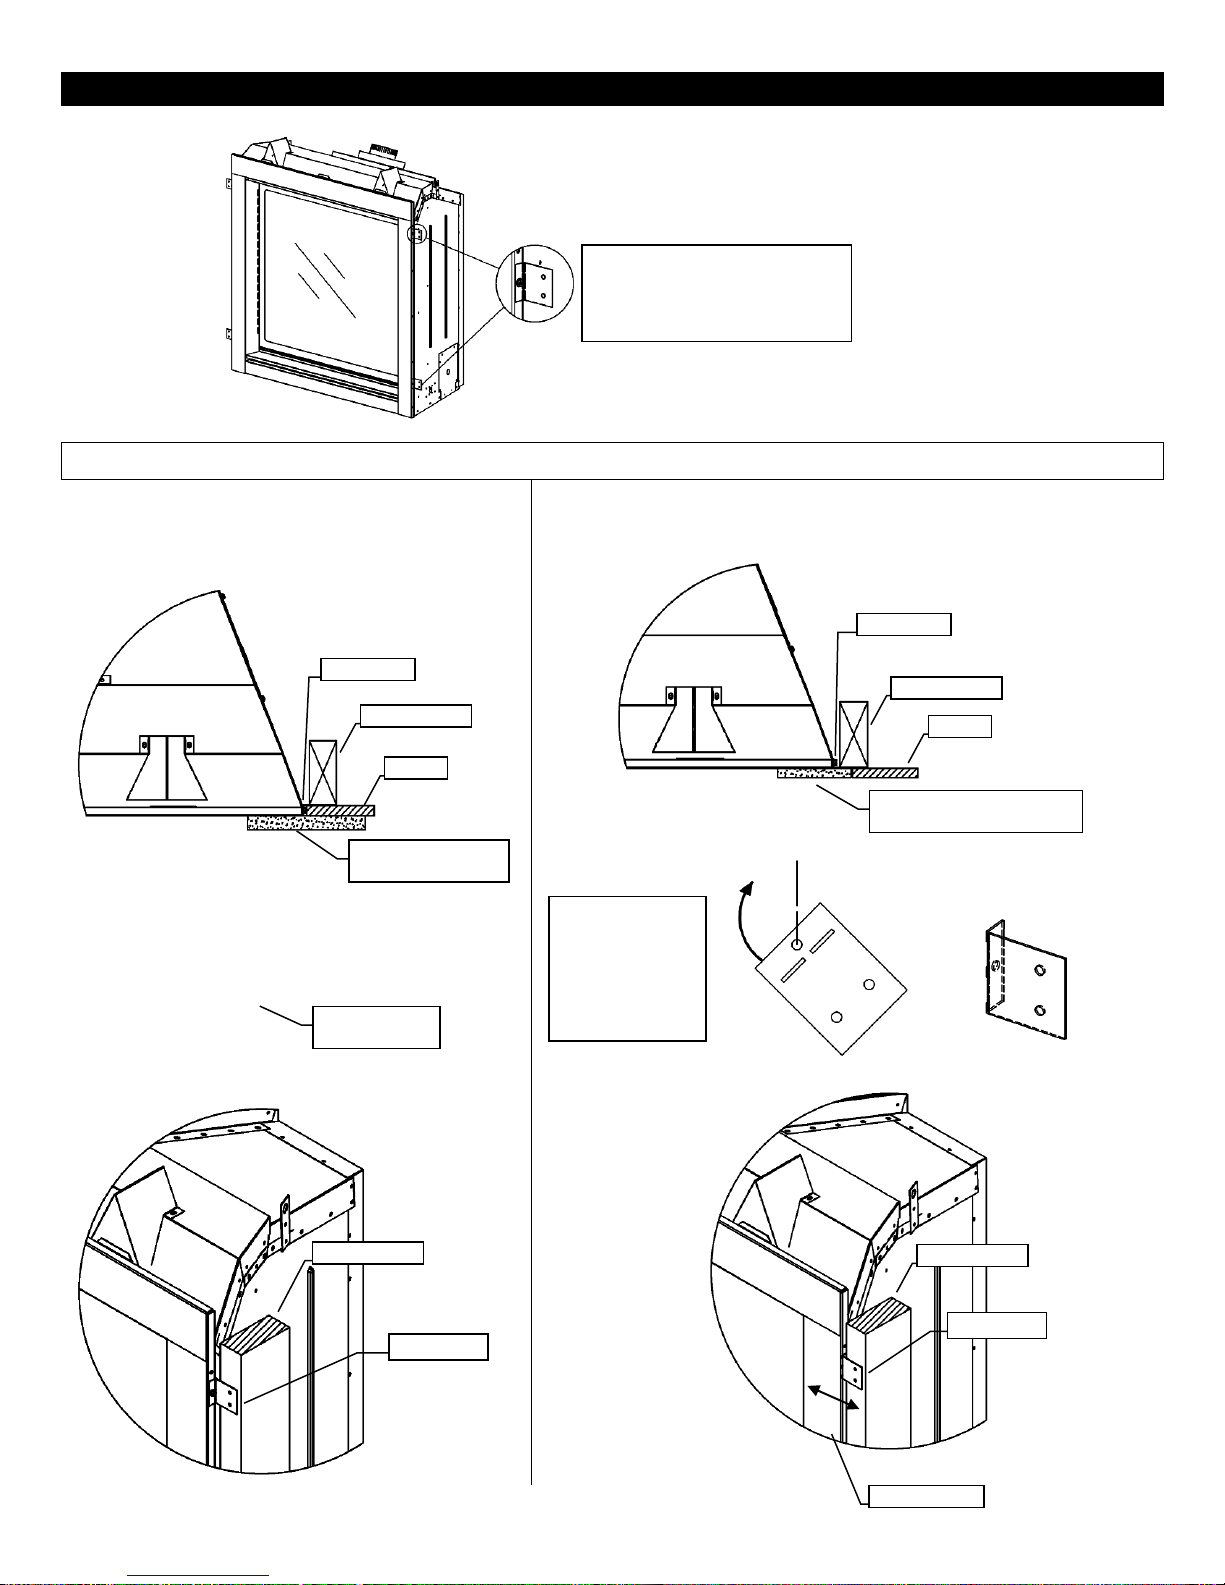
ZCV39 / ZCV42 Framing- Nailing Tab Guide
These Nailing Tabs can be used in two ways:
1/2” Drywall Flush with Face of Fireplace –
Fireplace and Combustible Wall to be covered
with a surround or Non-Combustible Materials
(e.g. Stone around Fireplace).
Framing Flush with Face of Fireplace -Fireplace to be covered
with Non-Combustibles (e.g. Concrete Board) for Flat Wall
appearance.
[Qty]2 Nailing Tabs are
located on each side of the
front frame.
Nailing Tab
Framing Stud
Drywall
Non-Combustible
Material (eg. Stone)
Nailing Tab
Framing Mount
Nailing Tab
Nailing Tab
Framing Stud
Drywall
Non-Combustible Material
(eg. Concrete Board)
Nailing Tabs
Must Be
Rotated 180°
And Folded
Back Onto
Framing Stud.
Nailing Tab
Framing Stud
Framing Stud
Flush Surface
10
39 / 42 / 47 ZVFCV Fireplace Framing
Rough Opening Dimensions
Width
Height
Depth*
39ZVFCV
39-1/2”
37-5/16”
20-5/16”
42ZVFCV
42-1/2”
40-3/8”
20-5/16”
47ZVFCV
48-1/2”
45-7/16”
22-5/8”
*Depth may vary depending upon how fireplace will be
finished. Refer to Nailing Tab Guide section.
⚠ CAUTION
If appliance is installed directly on carpeting
or other combustible material other than
wood flooring, a metal or wood panel
extending the full width and depth of the
appliance must be used. Carpet may extend
1 inch above the floor of the appliance.
⚠ CAUTION
Log heaters installed in this firebox create
warm air currents. These currents move heat
to wall surfaces next to firebox. Installing
firebox next to vinyl or cloth wall coverings or
operating firebox where impurities in the air
(such as tobacco smoke) exist, may discolor
walls.
⚠ WARNING
Do not allow any combustible materials to
overlap the firebox front facing.
⚠ WARNING
Non-combustible materials such as brick, tile,
etc. may overlap the front facing, but should
never cover any necessary openings such as
the access panel area.
⚠ WARNING
Use only non-combustible mortar or
adhesives when overlapping the front facing
with non-combustible facing material.
⚠ WARNING
Never modify or cover the front opening of
the firebox.
⚠ WARNING
Do NOT fill space around firebox with
insulation or other materials.
⚠ WARNING
Do not notch framing or alter standoffs.
11
Fireplace Framing
Built-in installation of this firebox involves installing
firebox into a framed-in enclosure. Optional
surrounds are available. Some Surrounds (i.e. S1,
S1PF) will extend past sides of firebox.
This will cover the rough edges of the wall opening.
If installing a mantel above the firebox, you must
follow the clearances shown in the Mantel
Clearances section. Follow the instructions below
to install the firebox.
1. Decide how your fireplace will be finished (i.e.
with surround or tile, etc.) before framing
fireplace. Refer to Nailing Tab Guide and
Fireplace and Framing Dimensions sections.
The firebox framing should be constructed of 2 x
4 wood or metal.
The table below lists the rough opening dimensions
for each model.
2. Install gas piping to firebox location. See
Installing Gas Line section and
Connecting to Gas Supply in log set
owner’s manual. IMPORTANT: If installing
blower accessory see Fan Installation
section.
3. Carefully insert firebox into rough opening.
4. Attach firebox to wall studs using nails or
wood screws through holes in nailing flange.
5. If using optional surround, install surround
after final finishing and/or painting of wall.
See appropriate Surround Installation
instructions.
6. Install and properly test gas log heater.
Follow installation instructions included with
the vent-free gas log heater that is being
installed.
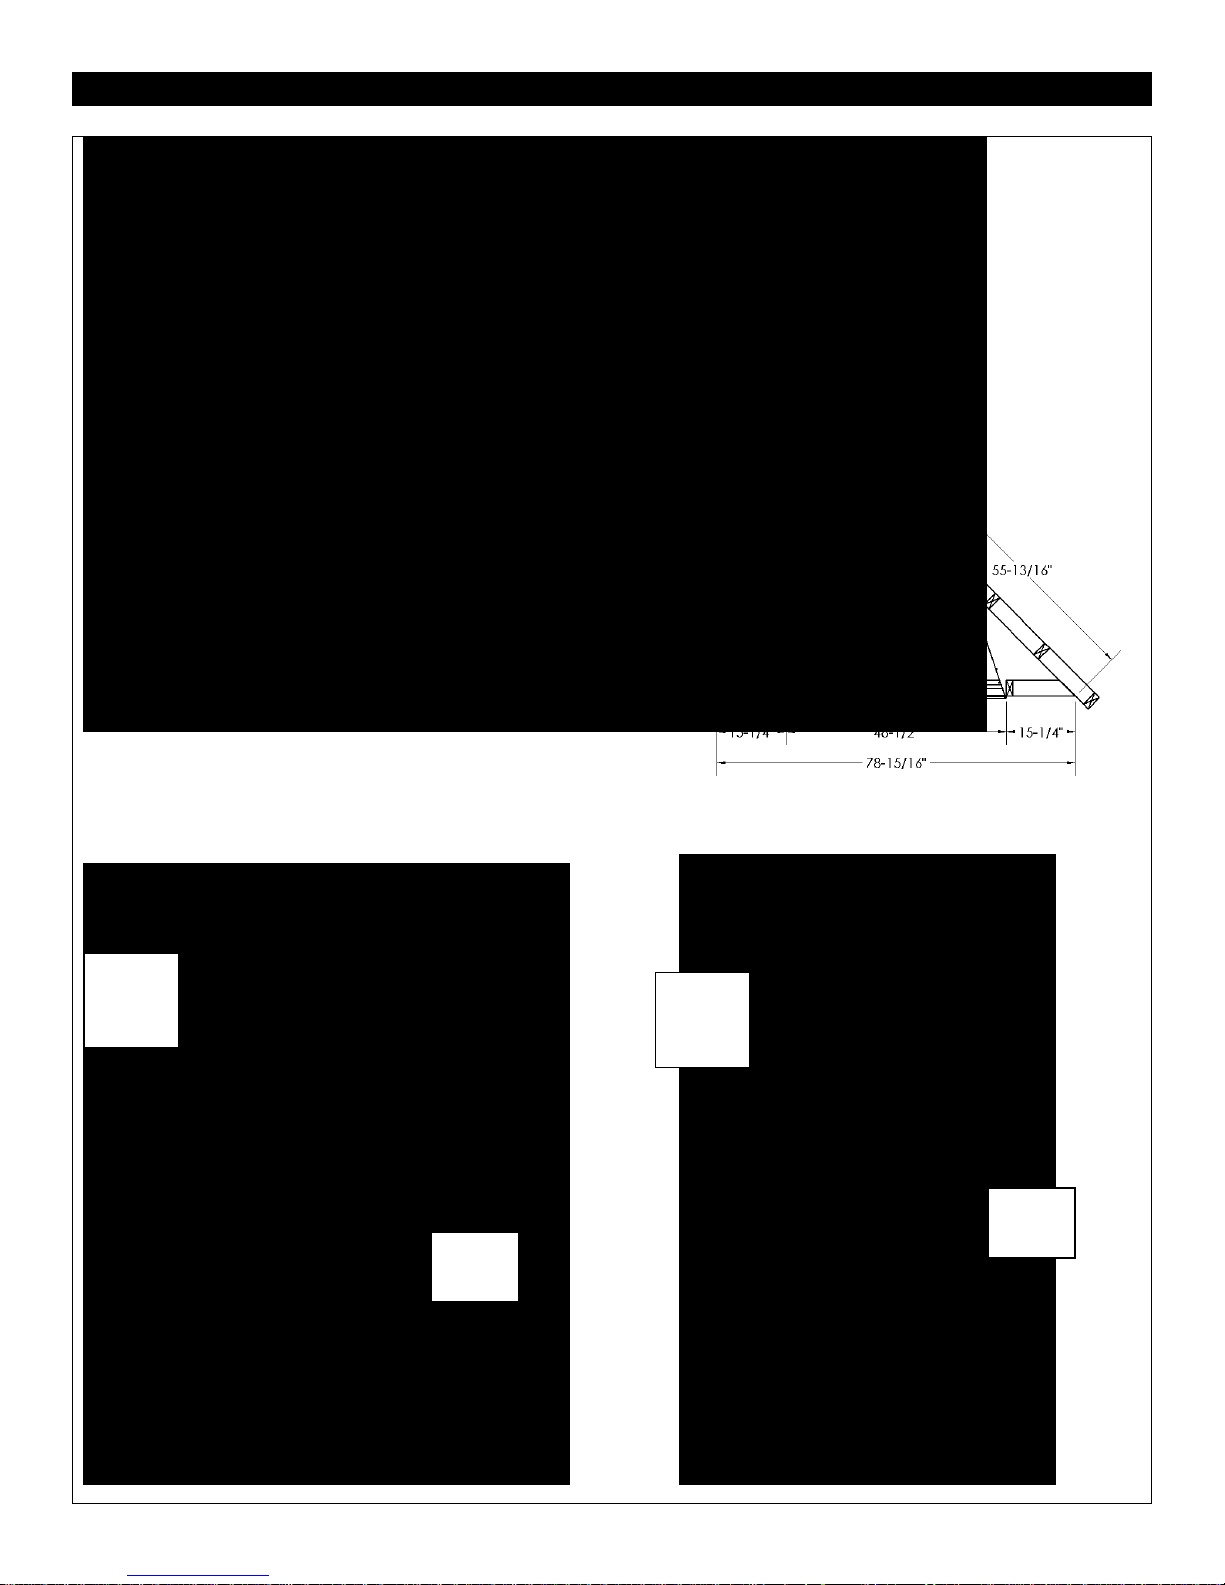
39ZVFCV Fireplace and Framing Dimensions
Determine whether face of fireplace will be:
Flush with finished wall (e.g., for surround, cultured stone or other non-combustible covering).
Flush with framing (to be covered with concrete board for a Flat Wall appearance).
Refer to Nailing Tab Guide section also.
83”
Minimum
Clearance
to Ceiling
83” Minimum
Clearance to
Ceiling
41-1/8”
Minimum
Enclosure
41-1/8”
Minimum
Enclosure
12
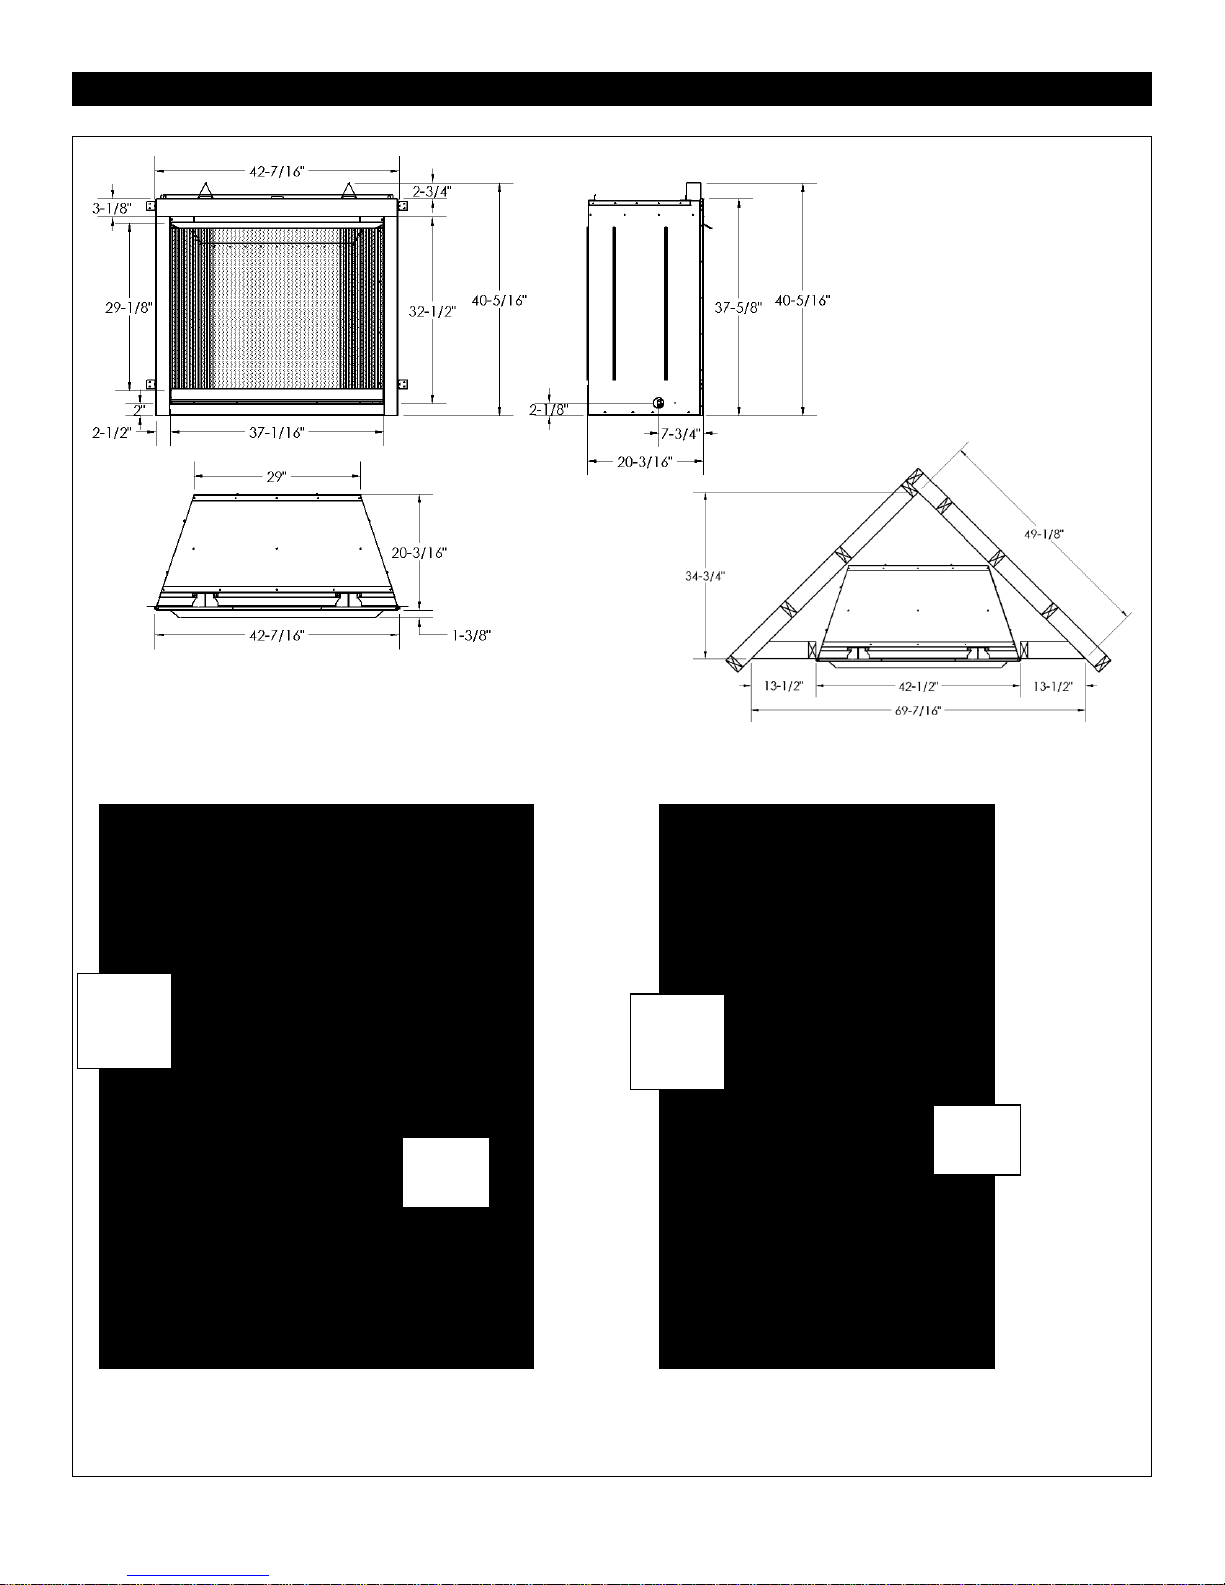
42ZVFCV Fireplace and Framing Dimensions
Determine whether face of fireplace will be:
Flush with finished wall (e.g., for surround, cultured stone or other non-combustible covering).
Flush with framing (to be covered with concrete board for a Flat Wall appearance).
Refer to Nailing Tab Guide section also.
83”
Minimum
Clearance
to Ceiling
44-1/4”
Minimum
Enclosure
83”
Minimum
Clearance
to Ceiling
44-1/4”
Minimum
Enclosure
13
47ZVFCV Fireplace and Framing Dimensions
Determine whether face of fireplace will be:
Flush with finished wall (e.g., for surround, cultured stone or other non-combustible covering).
Flush with framing (to be covered with concrete board for a Flat Wall appearance).
Refer to Nailing Tab Guide section also.
83”
Minimum
Clearance
to Ceiling
49-5/16”
Minimum
Enclosure
83”
Minimum
Clearance
to Ceiling
49-5/16”
Minimum
Enclosure
14
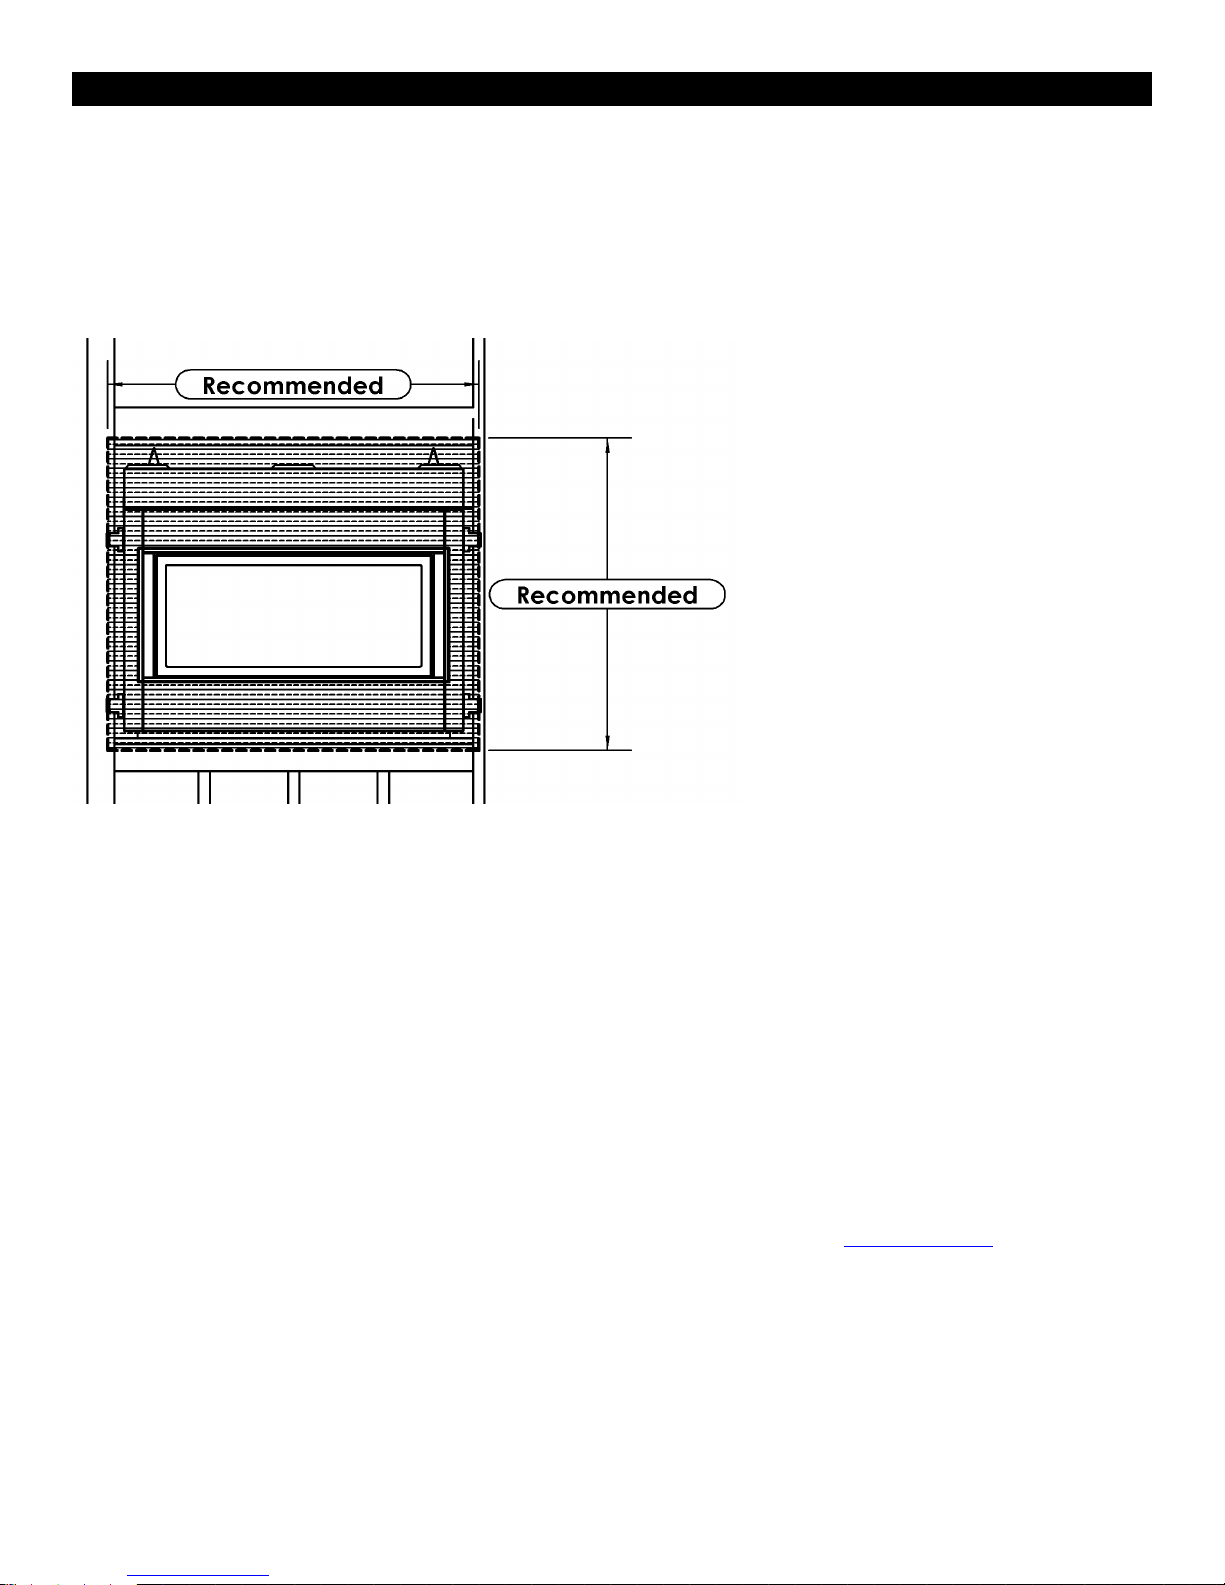
Installation Clearances – 39 / 42 / 47 ZVFCV
Carefully follow the instructions below. This will ensure safe installation.
Clearance To Combustibles
39ZVFCV
42ZVFCV
47ZVFCV
A
Front of Fireplace
36”
36”
36”
B
Back (From Stand-offs)
0”
0”
0”
C
Side (From Stand-offs)
0”
0”
0”
D
Floor*
0”
0”
0”
E
Bottom of Fireplace to Ceiling
83”
83”
83”
F
Top (From Stand-offs)
0”
0”
0”
G
Top of Fireplace to Minimum Enclosure
7”
7”
7”
*Note: If appliance is installed directly on carpeting or other combustible material other than wood flooring, a metal or
wood panel extending the full width and depth of the appliance must be used. Carpet may extend 1 inch above the floor
of the appliance.
⚠WARNING
Never install the firebox:
• in a bedroom or bathroom
• in a recreational vehicle
• where curtains, furniture, clothing, or other flammable
objects are less than 36 inches from the front, top, or sides
of the firebox
• in high traffic areas
• in windy or drafty areas
NOTICE
A qualified service person
must install firebox. Follow all
local codes.
⚠ WARNING
Ensure the minimum
clearances are
maintained. Left and
right clearances are
determined when
facing the front of the
heater.
⚠ WARNING
Maintain the
minimum
clearances.
If you can, provide
greater clearances
from floor, ceiling,
and adjoining wall.
15
IMPORTANT: Vent-free gas log heaters add
moisture to the air. Although this is beneficial,
installing firebox in rooms without enough
ventilation air may cause mildew to form from
too much moisture. See Air for Combustion
and Ventilation section in this manual.
IMPORTANT: Make sure the firebox is level. If firebox is not level, log set will not work properly.
39 / 42 / 47 ZVFCV Facing Requirements Required Non-Combustible Areas
If materials will be covering the face of the fireplace they must be non-combustible (i.e. brick
This area can have
a combustible
surface (i.e. hearth)
Note: Do not drive
excessively long
screws into the
face of the unit as
internal parts may
be damaged.
See Basic Finishing sections 1-5 also.
-Combustible Mantel Line-
Refer to Mantel Clearances
section for more detailed
information.
Any materials covering the
face of the fireplace MUST be
non-combustible (i.e. brick
stone, tile, concrete board).
ANY MATERIALS
COVERING FACE
OF FIREPLACE
MUST BE NON
COMBUSTIBLE.
This area can have a
combustible surface
(i.e. drywall)
FRONT VIEW
SIDE VIEW
Minimum Height for
Top Enclosure.
Increase dimension
as required.
16
stone, tile, concrete board).
 Loading...