

KingShield ASIM VST-IS598IH Installation & Operating Instructions Manual
SAFETY INFORMATION
SMOKE ALARM PLACEMENT
Thank you for purchasing a KingShield
Smoke Alarm from GreenBrook
Electrical. This product should be
installed by a competent person and in
accordance with the current IEE Wiring
Regulations. If in doubt, consult a
qualified electrician.
KEEP THESE
INSTRUCTIONS SAFE
FOR FUTURE REFERENCE
ALARM FEATURES
Ionization smoke alarms are generally more
effective at detecting flaming fires which
consume combustible materials
rapidly and spread quickly. Sources of these
fires may include paper burning in a waste
paper or rubbish bin or a grease fire in the
kitchen.
• AC/DC operated Ionization type smoke
alarm
• Ionization sensor for fast flaming fires
• Low battery warning indicator
• High and stable sensitivity sensor
• Quick fix mounting bracket and simple
AC connector for simple installation.
• Fitting and battery tamper-resist feature
• Inter-connectable with up to 40 units
• Self test button
• Alarm and AC power-on LED indicators
• Smoke alarm will automatically re-set
when smoke clears.
1. This smoke alarm requires constant
220-240V AC 50Hz mains power
supply to operate properly. Backup 9V
DC battery will offer additional protection
in the event of a power failure. DO
NOT use any other kind of battery
except as specified.
2. The push-to-test button accurately
tests all smoke alarm functions. DO
NOT use any other test method. Test
the alarm weekly to ensure proper
operation.
3. This alarm should be installed by
a
qualified electrician in accordance
with the current wiring regulations.
4. This alarm is designed to be used
inside a single family building only. In
multi-family buildings, each individual
living unit should have its own alarm.
D
O NOT install in non-residential
buildings or places which house many
people like hotels, motels, dormitories,
h
ospitals, nursing homes or group
homes. This alarm is not a substitute
for a complete alarm system.
5. Install an alarm in every room and on
every level of the home. Smoke may
not reach the smoke alarm for many
reasons. For example, if a fire starts in
a remote part of the home, on another
level, in a chimney, wall, roof or on the
other side of a closed door, smoke
may not reach the smoke alarm in
time to alert household members. A
smoke alarm will not promptly detect
a fire except in the area in which it is
installed.
6. Smoke alarms may not alert every
household member every time. The
alarm sound of the alarm is loud in
order to alert individuals of a potential
danger. However, there may be limiting
circumstances where a household
member may not hear the alarm (i.e.
outdoor or indoor noise, sound sleepers,
the hard of hearing, etc.)
7. Household members must hear the
alarm’s warning sound and quickly
respond to it, to reduce the risk of
damage, injury or death that may
result from a fire. If a household
member is hard of hearing, install
special smoke alarms with lights or
vibrating devices to alert occupants.
8. Smoke alarms can only sound their
alarms when they detect smoke.
Smoke alarms detect combustion
particles in the air. They do not sense
heat, flames or gas. This smoke alarm
is designed to give audible warning of
a developing fire. However many fires
are fast-burning, explosive or intentional.
Others are caused by carelessness or
safety hazards. Smoke may not reach
the smoke alarm QUICKLY ENOUGH
to ensure safe escape.
9. Smoke alarms have limitations. This
smoke alarm is not foolproof and is
not warranted to protect lives or
property from fire. Smoke alarms are
not suitable for insurance. Home
owners and renters should ensure
their lives and property. In addition it
is possible for the smoke alarm to fail
at any time. For this reason, you must
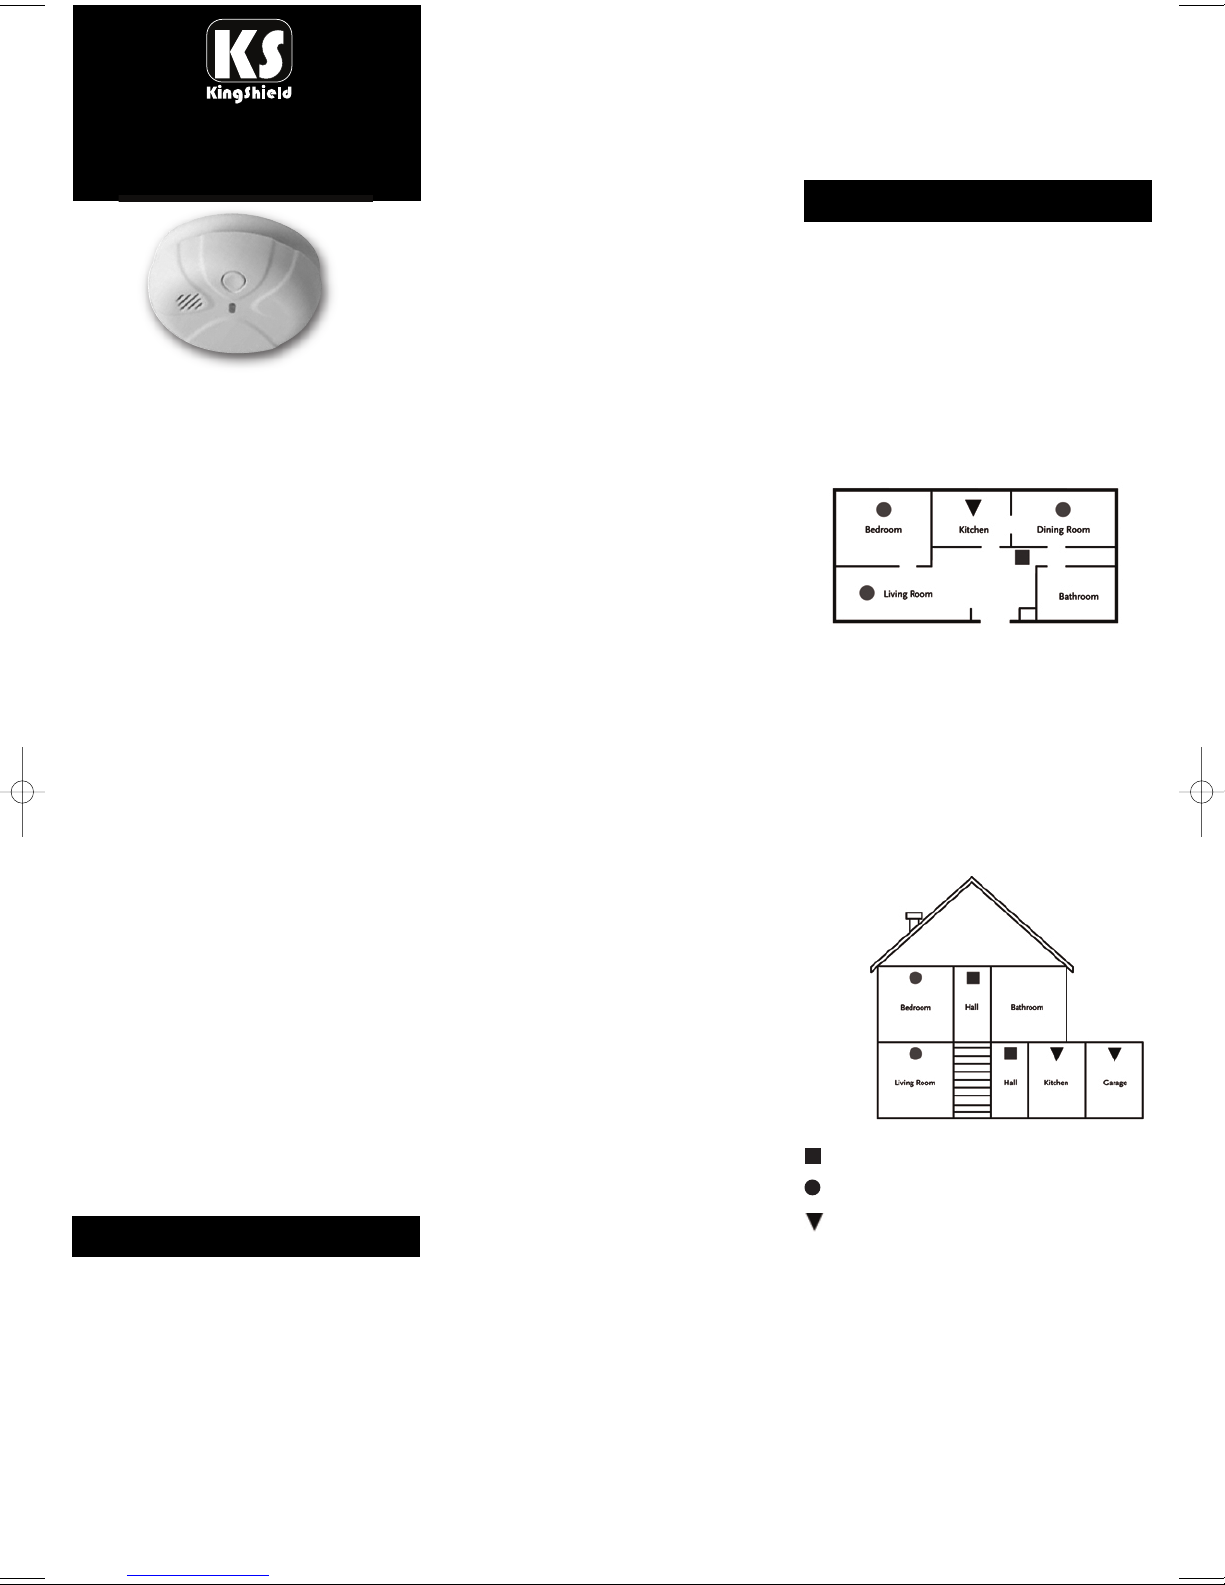
Minimum required smoke alarm locations
Recommendedadditional smoke alarm locations
Smokealarmsrecommendedfor additional
protection
Two-Story
Residence
Single-Story Residence
t
est the smoke alarm weekly and re
place every 5 years.
N
ote: For best protection, we recommend
that you install a smoke alarm in every
room.
Typical Single-Story Home
Install a smoke alarm on the ceiling or
w
all insideeach bedroom andin the hallway
outside each separate sleeping area. If a
bedroom area hallway is more than 30
feet long, install a smoke alarm at each
end. If there is a basement, install a
smoke alarm on the basement ceiling at
the bottom of the stairwell.
Typical Multi-Story or Split Level Home
Install a smoke alarm on the ceiling or
wall inside each bedroom and in the
hallway outside each separate sleeping
area. If a bedroom area hallway is more
than 30 feet long, install a smoke alarm
at each end. Also, install a smoke alarm
on the top of a first to second floor stairwell.
IMPORTANT SMOKE ALARM PLACEMENT
ANDEXCEPTION INFORMATION
1. Install a smoke alarm as close to the
center of the ceiling as possible. If this
is not practical, mount no closer than
4 inches from a wall or corner. Also, if
local codes allow, install smoke
alarms on the wall between 4 and 12
inches from the ceiling/wall
intersections.
Installation/Operating
instructions For Smoke Alarm
Model Ref: ASIM (VST-IS598IH)
INTER-CONNECTING
YOUR SMOKE ALARMS
2. Install a minimum of two smoke
alarms in every home, no matter how
s
mall the home.
3. Install a smoke alarm in each room
that is divided by a partial wall either
c
oming down from the ceiling at least
8 inches, or coming up from the floor.
4. Install a smoke alarm in lived-in attics
o
r attics which house electrical
equipment like fires, air conditioners or
heaters.
DO NOT INSTALL SMOKE ALARMS -
1. Near appliances or areas where
normal combustion regularly occurs
such as kitchens, near fires or hot
water heaters.
2. In areas with high humidity, like
bathrooms or areas near dishwashers
or washing machines. Install at least
10 feet away from these areas.
3. Near air returns or heating and
cooling supply vents. Install at least 3
feet away from these areas. The air
could blow smoke away from the
detector, interrupting its alarm.
4. Do not install smoke alarms in rooms
where temperatures may fall below
4°C or rise above 38°C.
5. In extremely dusty, dirty areas or
insect-infested areas where loose
particles could interfere with the
smoke alarms operation.
WARNING: This alarm is mains powered
and requires wiring in accordance with
the current IEE Regulations for Electrical
Installations (BS7671).
The circuit used to power the smoke
alarm must be a dedicated permanent
supply that cannot be switched off
accidentally by the normal user. Before
installing ensure the electrical supply is
isolated.
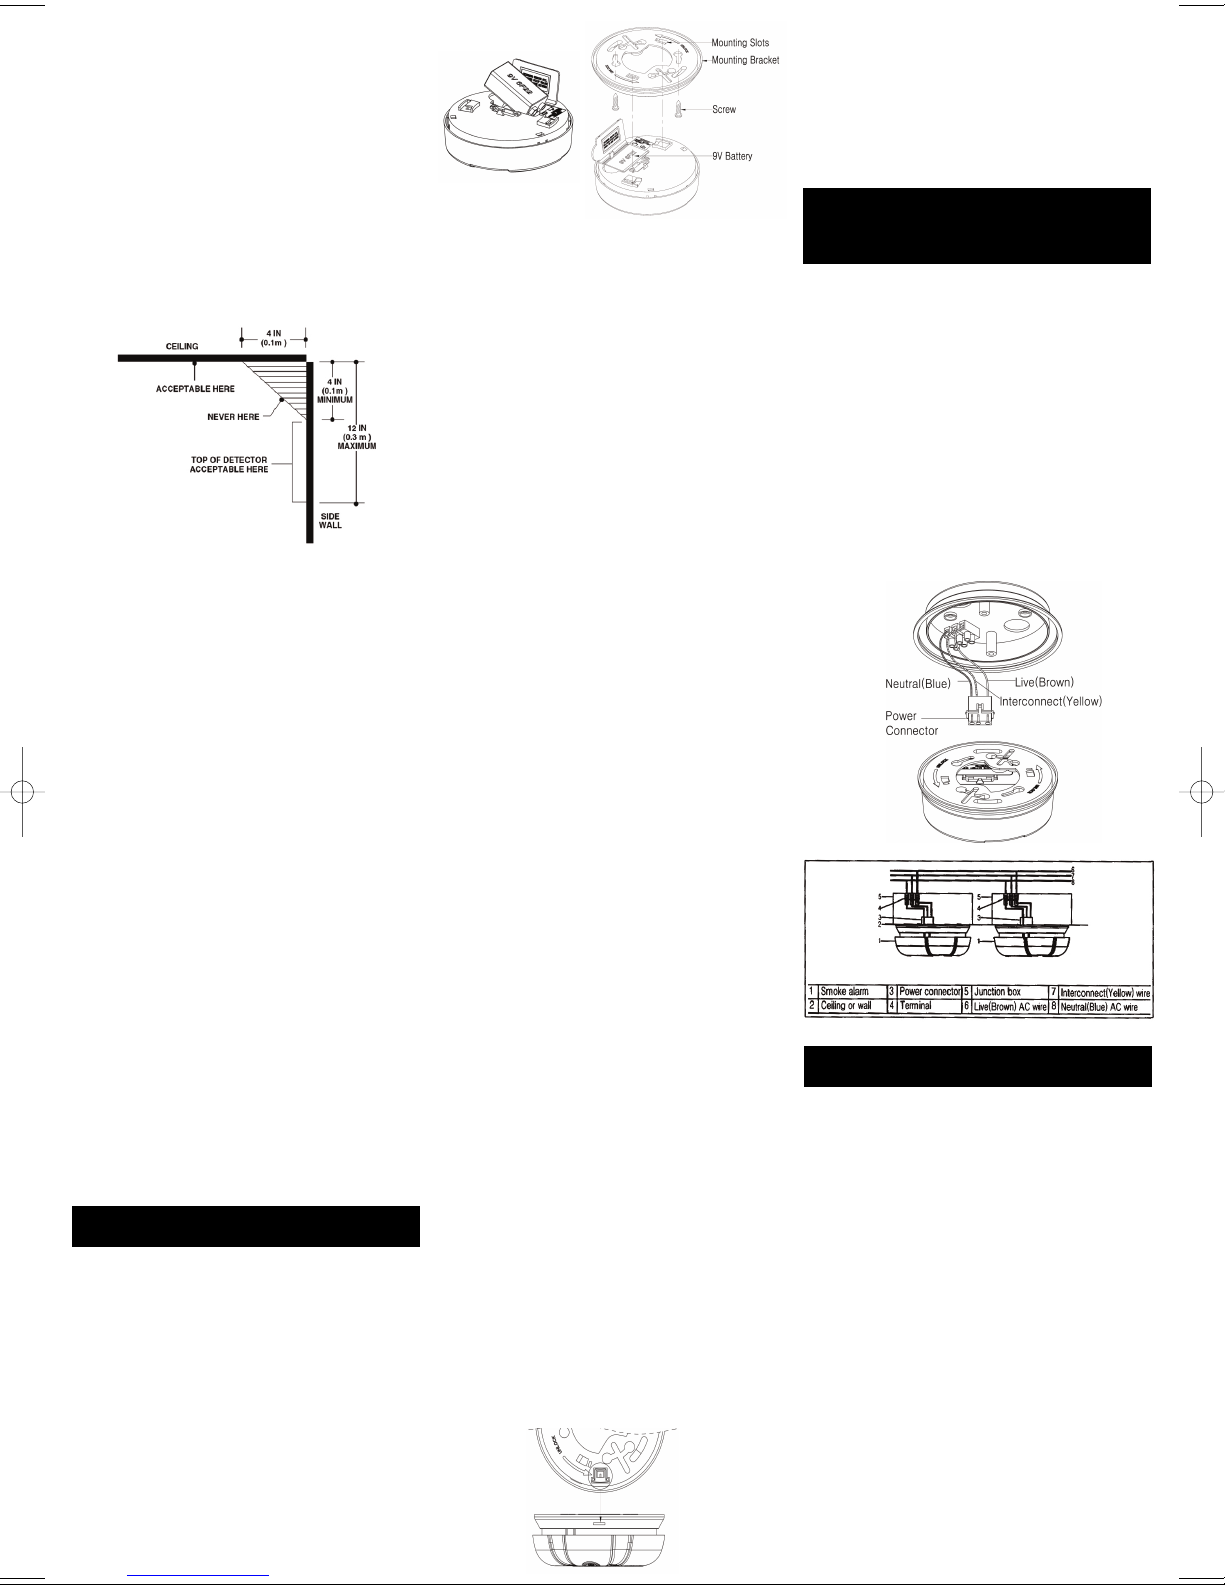
1. Isolate the power supply by switching
off at the mains.
P
LEASE NOTE: The alarm will not
mount to the plate if the battery is not
installed. You must install the battery.
1
4.You can now turn the mains power
supply back on and test your alarm.
See the ‘Testing’ section.
F
or inter-connecting line, use only
1.0mm
2
to 1.5mm2solid or stranded
wire. When inter-connecting, the maximum wire length can be up to 1500 feet
between any two alarms using 1.0mm
2
or
4000 feet for 1.5mm
2
. (20 Ohms loop
resistance).
This alarm can be inter-connected with
as many as 40 KingShield smoke or heat
alarms. Do not try to connect to any
other type or model of alarm other than
KingShield models.
Once the alarm has been installed a
small green LED indicator light should
be visible through the alarm grill, indicating
that it is receiving AC supply. A red LED
indicator light should also flash once a
minute to indicate the battery is healthy
and the unit is operating properly.
If smoke is detected, the unit will emit a
loud pulsating alarm and a red indicator
light will flash quickly and will continue
to do so until the air is clear.
The ‘HUSH’ feature can mute the detector
if it has been advertently triggered by
holding down the ‘TEST/HUSH’ button
for a few seconds. The alarm will be
muted for 10 minutes and then will reset
into normal mode.
2. Remove the mounting plate from the
back of the alarm by turning the plate
c
ounter clockwise.
3. Gently pull the wires through the
centre hole of the plate.
4. Secure the plate to the ceiling or wall
with mounting screws.
5. With a three way connector block,
connect the brown wire from the
connector plug to the brown/red
household wire.
6. Connect the blue wire from the
connector plug to the blue/black
household wire.
7. If you want to inter-connect more
alarms, connect the yellow wire from
the connector to the inter-connection
wire between the smoke alarms. See
‘Inter-Connecting Your Smoke Alarms’
section.
If it is a single alarm you are installing,
simply cover the yellow wire with
electrical tape and tuck it into the
junction box.
8. Lift open the battery pocket door.
9. Connect the new 9V battery to the
battery connector inside the battery
pocket. Be sure that the battery is
securely connected. The alarm may
beep briefly when the battery is
installed.
10.Close the battery pocket door,
snapping it into place.
11.Attach the connector plug to the pins
on the back of the alarm. The plug will
only fit one way and will snap into
place.
12.Gently tug the connector to be sure it
is attached securely.
13.Position the alarm on the mounting
plate and turn clockwise to lock into
place. To engage the tamper resist
feature, insert the pin into the notch
on the edge of the alarm when the
alarm is properly positioned on the
mounting plate.
OPERATING THE ALARM
HOW TO INSTALL
 Loading...